FlipCast - Microphone HYPERX - Free user manual and instructions
Find the device manual for free FlipCast HYPERX in PDF.

| Brand | HyperX |
| Model | FlipCast |
| Product Type | Dynamic front-address microphone |
| Polar Pattern | Cardioid |
| Low-Cut Filter | 150 Hz (switchable, 12 dB/octave) |
| Presence Boost | Switchable (enhances upper mid frequencies) |
| Connectivity | USB-C and balanced XLR |
| Headphone Jack | Yes (3.5 mm) |
| Power | Via USB (no phantom power required) |
| Configuration Software | HyperX NGENUITY |
| Multi-Function Control | Knob with LED indicator (gain, headphone volume, mix) |
| Touch Mute Sensor | Yes (white/red LED indicator) |
| Mounting | 3/8" and 5/8" threading (3/8" adapter included) |
| Windscreen | Removable |
| Filter Switches | 2-position (low-cut and presence) |
| Maintenance | External cleaning with soft cloth and mild cleaner; avoid openings; do not use compressed air |
| Included Cables | USB-C to USB-C and USB-C to USB-A adapter |
| Included Accessories | Windscreen, 3/8" threading adapter, USB-C to USB-A adapter, USB-C to USB-C cable |
| XLR Output | Balanced (no phantom power) |
| Compatible Operating Systems | Windows, macOS (via NGENUITY) |
Frequently Asked Questions - FlipCast HYPERX
User questions about FlipCast HYPERX
0 question about this device. Answer the ones you know or ask your own.
Ask a new question about this device
Download the instructions for your Microphone in PDF format for free! Find your manual FlipCast - HYPERX and take your electronic device back in hand. On this page are published all the documents necessary for the use of your device. FlipCast by HYPERX.
USER MANUAL FlipCast HYPERX
Streaming XLR/USB Dynamic Microphone
Quick Start Guide
Overview
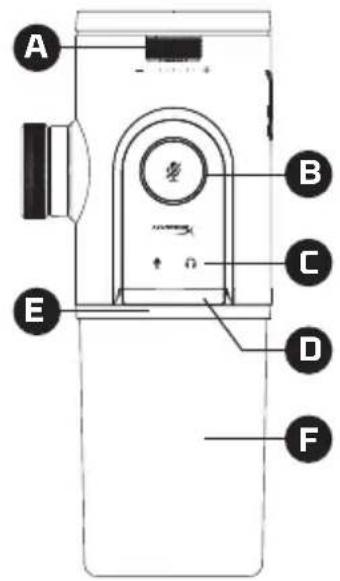
A Multifunction control
- ap-to-mute sensor
CED microphone and headphone indicators
DED bar
E RGB LED ring
F etachable windscreen
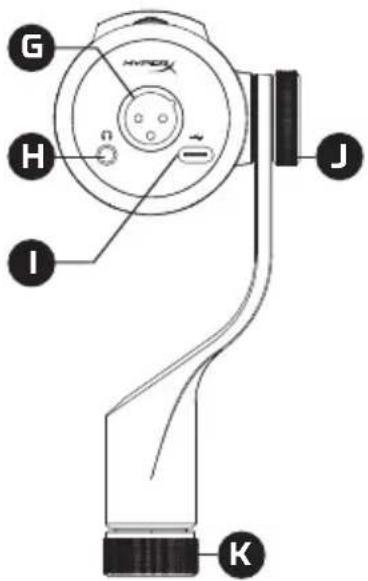
GLR output
H5mm headphone jack
SB-C port
Jilt adjustment nut
Ktand mount nut
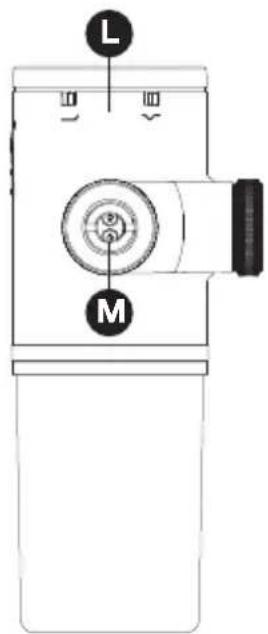
Liter switches
M/8" thread adapter
NUSB-C to USB-A adapter
USB-C to USB-C cable

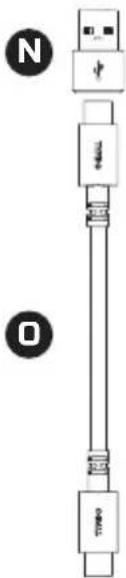
Setup Instructions
The HyperX FlipCast can be used with microphone stand or arm with either 3/8" or 5/8" threads. To use with 5/8" threads, use a coin to remove the preinstalled 3/8" thread adapter. Rotate the stand mount nut clockwise to attach the microphone. Adjust to the desired position before tightening the nuts, as rotation is locked once secured.
*HyperX Caster Not Included
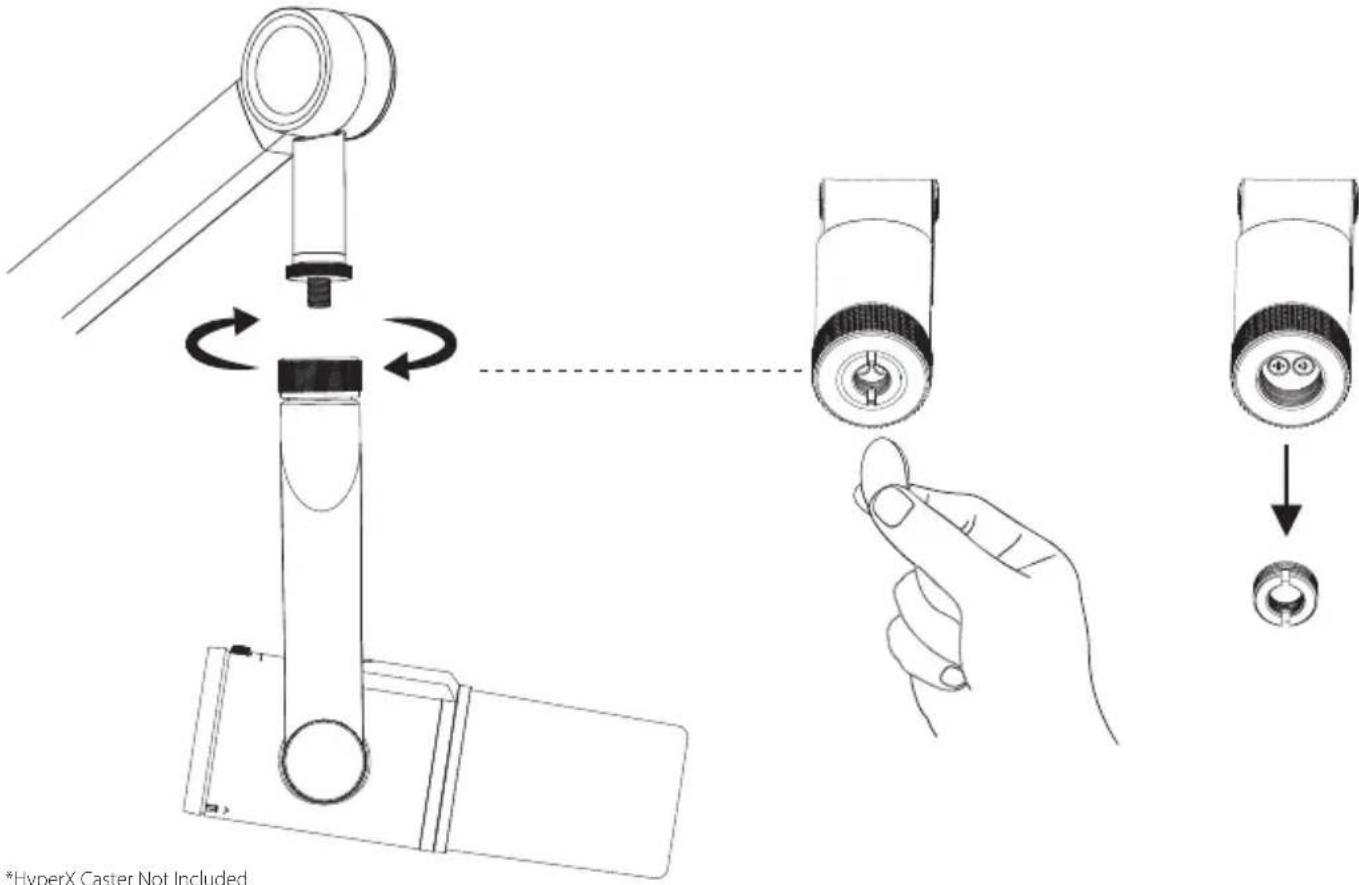
Microphone Position
The HyperX FlipCast features a cardioid pickup pattern, with the front being most sensitive to sound. This is useful for reducing the pickup of background or other unwanted sounds.

natural_image
Diagram of a mechanical device with concentric circular layers and directional arrows, no text or symbols present.FlipCast is an end-address dynamic microphone. For optimal vocal performance, speak directly into the front of the microphone, facing the sound source and position no more than 6 inches away.
XLR Connection
Use an XLR cable to connect the microphone's output to a balanced XLR microphone input. *
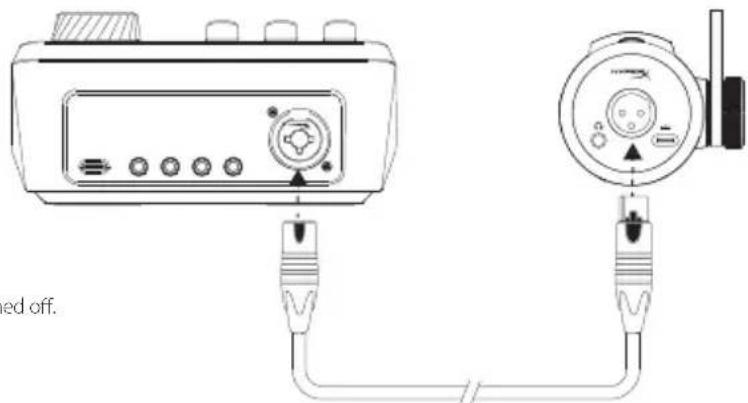
natural_image
Diagram of a device with two connected cables, one showing a control panel and the other a dial indicator (no text or symbols present)Phantom power not required and should be left switched off.
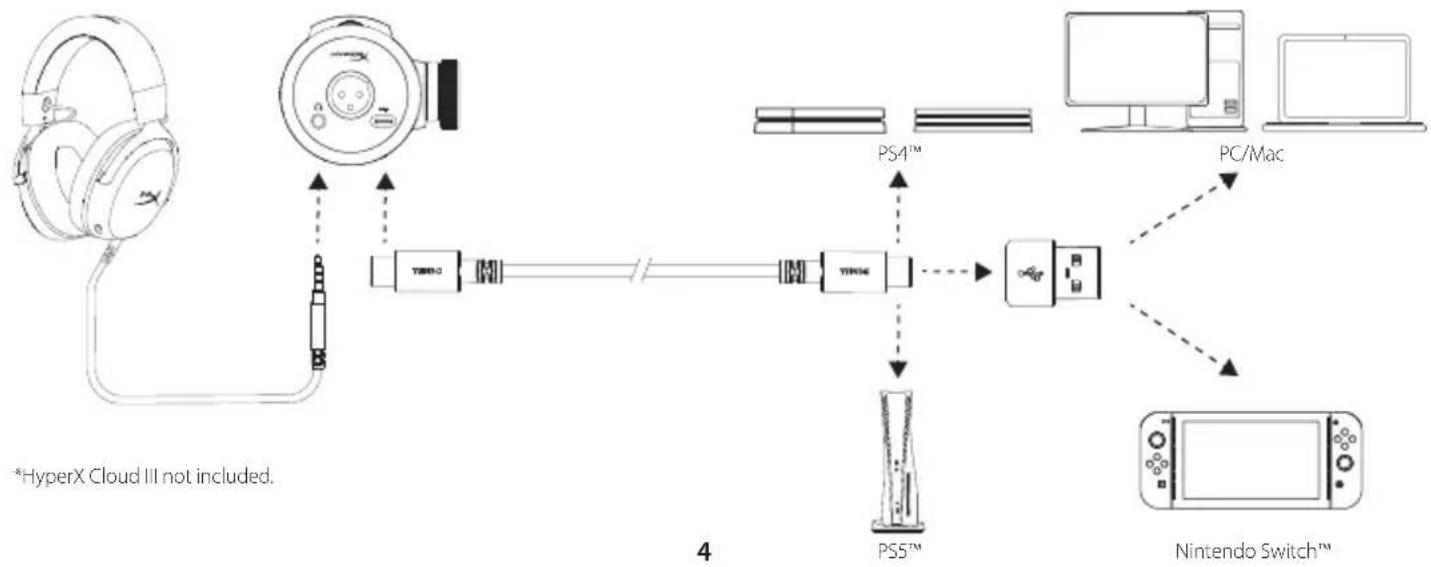
USB Connection
flowchart
graph TD
    A["Headphones"] --> B["USB"]
    B --> C["PS4™"]
    C --> D["PC/Mac"]
    D --> E["Nintendo Switch™"]
    F["PS5™"] --> C
    G["*HyperX Cloud III not included."] --> B
    style A fill:#f9f,stroke:#333
    style B fill:#ccf,stroke:#333
    style C fill:#cfc,stroke:#333
    style D fill:#fcc,stroke:#333
    style E fill:#cff,stroke:#333
    style F fill:#ffc,stroke:#333
    style G fill:#cfc,stroke:#333
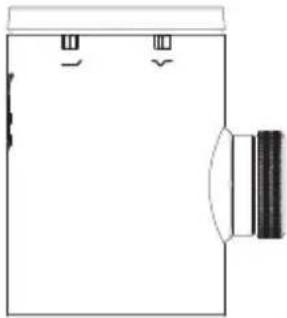
Filter Switches
natural_image
Simple line drawing of a rectangular container with two side handles and a curved side element (no text or symbols)| 150HZ HIGH-PASS FILTER OFF ON | ||
| — | - Green | |
Switching on the high-pass filter reduces out rumble or other unwanted low frequencies. The high-pass filter has a cutoff frequency of 150Hz and a roll-off of 12 dB/octave.
| PRESENCE BOOST OFF ON | ||
| √ | - Green | |
Switching on the presence boost enhances upper-mid frequencies, resulting in a brighter sound that improves vocal clarity.
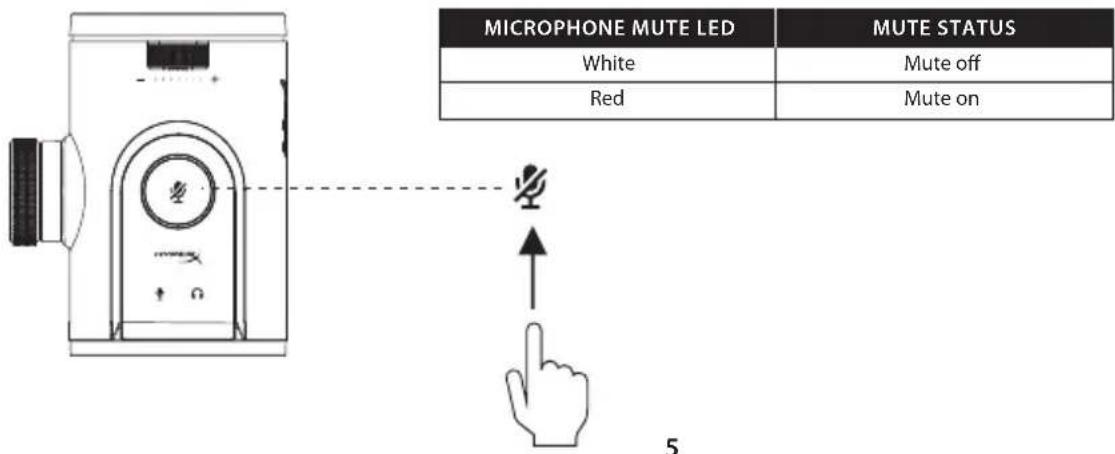
Tap-to-Mute Sensor
to mute/unmute the microphone. The microphone mute LED will indicate the current mute status.
NOTE: The mute control requires a USB connection and mutes both USB and XLR outputs. When using only XLR, the mute control will not be active, and only the filter switches will function.
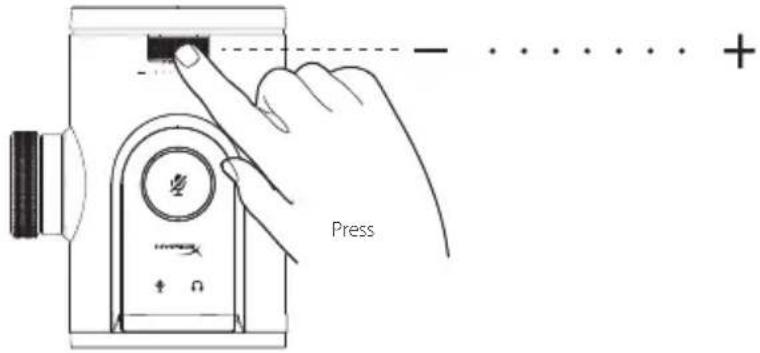
Multifunction Control and LED Indicators
When the microphone is not muted and no level adjustments are being made, the LED bar will show the microphone's level meter.

Press the multifunction wheel to cycle between adjustment modes, shown by the [ ] and [ ] LED's. The LED bar will indicate the setting of the currently selected mode.


natural_image
Grid of dark gray squares and white squares with no text or symbolsMicrophone Gain*


Headphone Volume*


Monitor/Playback Mix*
*USB connection only. 3.5mm connection required for Headphone Volume and Monitor/Playback Mix controls.
HyperX NGENUITY Questions or Setup Issues?

natural_image
Illustration of a computer monitor displaying three icons: a speech bubble with a question mark, a person silhouette, and a document (no text or symbols present)Maintenance
Cleaning the microphone
- Completely remove windscreen and unplug all cables from the microphone before cleaning.
- Put a very small amount of mild all-purpose cleaner on a soft cloth.
- Wipe down the external surface of the microphone. Avoid getting any moisture in the microphone holes.
- Let the surface of the microphone dry completely before use.
- Do not use harsh cleaners such as products containing bleach.
- Do not use compressed air and spray into the microphone.
- While detached gently hand wash windscreen with warm water, mild soap and air dry completely.
ENGLISH
Présentation
A - Multifunction control
B - Tap-to-mute sensor
C - LED microphone and headphone indicators
D - LED bar
E - aRGB LED ring
F - Detachable windscreen
G - XLR output
Setup Instructions
The HyperX FlipCast can be used with microphone stand or arm with either 3/8" or 5/8" threads. To use with 5/8" threads, use a coin to remove the preinstalled 3/8" thread adapter. Rotate the stand mount nut clockwise to attach the microphone. Adjust to the desired position before tightening the nuts, as rotation is locked once secured.
*HyperX Caster Not Included
Microphone Position
The HyperX FlipCast features a cardioid pickup pattern, with the front being most sensitive to sound. This is useful for reducing the pickup of background or other unwanted sounds.
FlipCast is an end-address dynamic microphone. For optimal vocal performance, speak directly into the front of the microphone, facing the sound source and position no more than 6 inches away.
XLR Connection
Use an XLR cable to connect the microphone's output to a balanced XLR microphone input. *
Phantom power not required and should be left switched off.
USB Connection
*HyperX Cloud III not included.
Filter Switches
| 150HZ HIGH-PASS FILTER OFF ON | ||
| — | - Green | |
Switching on the high-pass filter reduces out rumble or other unwanted low frequencies. The high-pass filter has a cutoff frequency of 150Hz and a roll-off of 12 dB/octave.
| PRESENCE BOOST OFF ON | ||
| ~ | - Green | |
Switching on the presence boost enhances upper-mid frequencies, resulting in a brighter sound that improves vocal clarity.
Tap-to-Mute Sensor
[ ] to mute/unmute the microphone. The microphone mute LED will indicate the current mute status.
NOTE: The mute control requires a USB connection and mutes both USB and XLR outputs. When using only XLR, the mute control will not be active, and only the filter switches will function.
| MICROPHONE MUTE LED | MUTE STATUS |
| White | Mute off |
| Red | Mute on |
Multifunction Control and LED Indicators
When the microphone is not muted and no level adjustments are being made, the LED bar will show the microphone's level meter.
Press the multifunction wheel to cycle between adjustment modes, shown by the [ ] and [ ] LED's. The LED bar will indicate the setting of the currently selected mode.
Level Meter / Press / Microphone Gain* / Headphone Volume* / Monitor/Playback Mix*
*USB connection only. 3.5mm connection required for Headphone Volume and Monitor/Playback Mix controls.
HyperX NGENUITY Software
Questions or Setup Issues
Maintenance
Cleaning the microphone
- Completely remove windscreen and unplug all cables from the microphone before cleaning.
- Put a very small amount of mild all-purpose cleaner on a soft cloth.
- Wipe down the external surface of the microphone. Avoid getting any moisture in the microphone holes.
- Let the surface of the microphone dry completely before use.
- Do not use harsh cleaners such as products containing bleach.
- Do not use compressed air and spray into the microphone.
- While detached gently hand wash windscreen with warm water, mild soap and air dry completely.
FRANÇAIS
Présentation
O - Cable USB-C a USB-C
Product Specification
Microphone
Power consumption: 5 V, 350 mA (all lights on)
Sample/bit rate: Recording: 44.1 kHz, 48 kHz, 96 kHz, 192 kHz; Playback:
44.1 kHz, 48 kHz, 96 kHz / Recording: 16-bit, 24-bit, 32-bit ; Playback: 16-bit, 24-bit
Element: Dynamic capsule
Polar patterns: Cardioid
Frequency response: 20 Hz - 20 kHz
Sensitivity: XLR: -10 dB (1V/Pa at 1kHz); USB (default level): -10 dBFS±4dB
(94 dBSPL at 1kHz); USB (max level): -8.5 dBFS±4dB (94 dBSPL at 1kHz)
Cable length: 3 m USB-C to USB-C with USB-A adapter
Weight: • Microphone: 575 g
• Total with USB cable: 650 g
Lighting: RGB
Light effects: Addressable RGB, input level meter, clip warning
Connection type: USB-C, 3.5 mm headphone output
*1 zone RGB lighting customizable with HyperX NGENUITY software
Headphone Output
Impedance: 1 Ω
Frequency response: 20 Hz - 20 kHz
Maximum power output: ≥ 20 mW (at 32 Ω)
THD: THD+N: ≤ 0.05% (1kHz/0dBFS)
SNR: ≥ 110 dB (at 1kHz/0dBFS, A-weighted)
Spesifikasi Produk
Mikrofon
Konsumsi daya: 5 V, 350 mA (all lights on)
Laju sampel/bit: Recording: 44.1 kHz, 48 kHz, 96 kHz, 192 kHz; Playback: 44.1 kHz,
48 kHz, 96 kHz / Recording: 16-bit, 24-bit, 32-bit ; Playback: 16-bit, 24-bit
Elemen: Dynamic capsule
Pola polar: Cardioid
Respons frekuensi: 20 Hz - 20 kHz
Sensitivitas: XLR: -10 dB (1V/Pa at 1kHz); USB (default level): -10 dBFS±4dB (94
dBSPL at 1kHz); USB (max level): -8.5 dBFS±4dB (94 dBSPL at 1kHz)
Panjang kabel: 3 m USB-C to USB-C with USB-A adapter
Berat: • Mikrofon: 575 g
Distorsi Harmonik Total: THD+N: ≤ 0.05% (1kHz/0dBFS)