SX3292C - Oven Atag - Free user manual and instructions
Find the device manual for free SX3292C Atag in PDF.

User questions about SX3292C Atag
0 question about this device. Answer the ones you know or ask your own.
Ask a new question about this device
Download the instructions for your Oven in PDF format for free! Find your manual SX3292C - Atag and take your electronic device back in hand. On this page are published all the documents necessary for the use of your device. SX3292C by Atag.
USER MANUAL SX3292C Atag
instructions for use
steam oven
natural_image
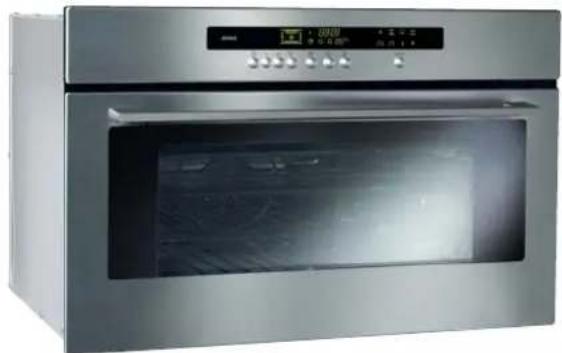
Exterior view of a stainless steel oven with digital display (no visible text or symbols)SX3211C
SX3292C
natural_image
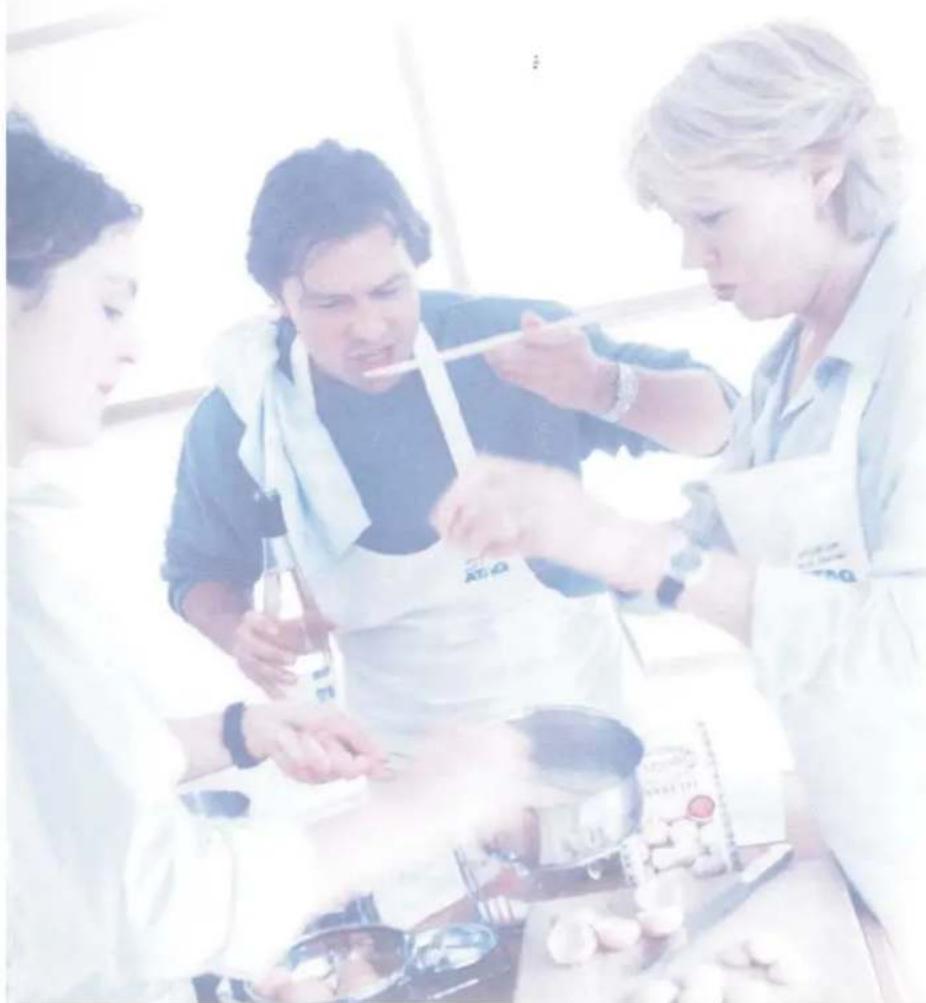
Three people in lab coats preparing food, one eating with chopsticks (no visible text or symbols)Geachte klant,
natural_image
Isometric diagram of a multi-tiered storage or cooling unit structure with no visible text or symbolsKITVAPIX (Optioneel accessoire)
natural_image
Line drawing of a rectangular mechanical component with internal channels and a curved top (no text or symbols)natural_image
Pure technical line drawing of a mechanical component without any text, numbers, or symbolsnatural_image
Technical line drawing of a microwave oven with two arrows indicating internal components (no text or symbols)natural_image
Illustration of a microwave oven with a thermometer and cup stack (no text or symbols)De deurpakking is defect.
WAT MOET U DOEN?
natural_image
Line drawing of a mechanical component with a knob and side grooves (no text or symbols)natural_image
Pure technical line drawing of a mechanical component without any text, numbers, or symbolsnatural_image
Diagram of a microwave oven with two upward arrows indicating airflow or movement (no text or symbols)natural_image
Illustration of a microwave oven with a thermometer and a separate collection cup (no text or symbols)natural_image
Isometric diagram of a multi-tiered electronic device with no visible text or symbolsKITVAPIX (Optionales Zubehör)
natural_image
Line drawing of a mechanical component with a curved handle and internal grooves (no text or symbols)natural_image
Simple line drawing of a U-shaped object with two protruding lines, no text or symbols presentnatural_image
Diagram of a microwave oven with two arrows indicating airflow or movement (no text or symbols)natural_image
Illustration of a kitchen appliance with a thermometer and cup (no text or symbols)You have just acquired a ATAG oven and we would like to thank you.
Our research teams have designed for you a new generation of appliances, whose quality, design and technological innovations make them products of exception and reveal our unique know-how.
With pure lines and modern aesthetics, your new ATAG oven blends harmoniously into your kitchen and perfectly combines technological mastery, cooking performance and aesthetic luxury.
In the line of ATAG products, you will also find a wide range of hobs, ventilation hoods, dishwashers, microwave ovens and refrigerators, all of which can be built in and all of which can be coordinated with your new ATAG oven.
Of course, in an ongoing effort to best satisfy your demands with regard to our products, our after-sales service department is at your disposal and ready to listen in order to respond to all of your questions and suggestions.
Thanks to these "New Items of Value" that serve as guideposts in our everyday lives, ATAG, the reference of excellence, is truly an invitation to a new art of living.
The ATAG Brand
steam cooking P3
overview
what does your oven look like? P4
accessories P5
how do you install your oven? P.6-7
electrical connection
build-in
how do you use your oven? P.8-9
setting the clock
locking display
how do you program for immediate cooking? P.10-12
water management
how do you set a cooking programme with delayed start? P.13
how do you use the timer? P.14
setting description P.15
cooking chart P.16-17
how do you care for your oven? P.18
how do you change the bulb? P.18
what to do in case of malfunctions? P.19
Steam cooking presents nothing but advantages if you follow the instructions for use. Healthy and natural, steam cooking preserves the full flavour of foods. A delicate sauce or aromatic herb seasonings add that something extra that makes the difference.
This kind of cooking releases no odours. There is no need to season the cooking water with herbs or spices; however, you can flavour a fish by placing it on a bed of seaweed or make a savoury poultry dish by adding a bunch of rosemary or tarragon.
You can simultaneously cook meat, fish and vegetables.
Steam cooking gently reheats pasta, rice and mashed potatoes with no risk of food sticking or drying out.
It makes it easier to cook puddings, flans, rice pudding, etc. covered with aluminium foil, the condensation water does not add moisture to the preparations.
There is no need to season before cooking--not even the steam water.
To make meat look more appetising, quickly brown it on all sides with hot butter in a pan.
Compared to boiling, steam offers nothing but advantages:
It is quick: cooking starts immediately, whereas for food in a water-filled dish, the cooking time only begins counting down once the water returns to a full boil.
It is healthy: vitamins (those that are water soluble) and minerals are well preserved because they scarcely dissolve in the condensation water that touches the food.
Moreover, no fats are used for this type of cooking.
The steam maintains the taste of food. It does not add odours, nor the taste of the grill or the pan. Furthermore, it takes nothing away because the food is not diluted in the water.
Words of advice: there is no point in using this cooking method to prepare fish that is not fresh or vegetables left in the refrigerator for a week--the results are catastrophic!
The steam does not transfer flavours or aromas; therefore do not hesitate to save both time and money by cooking items side by side, but without touching. For example, you can cook a fish next to a dessert.
Steam is also appropriate for blanching, defrosting and reheating or even holding warm, especially sauces.
First use a very small amount of fat to heat meats like poultry, veal and pork so that they take on an appetizing browned appearance. Then finish cooking them using the steam method.
Cut into pieces, food cooks faster and more evenly than if left whole.
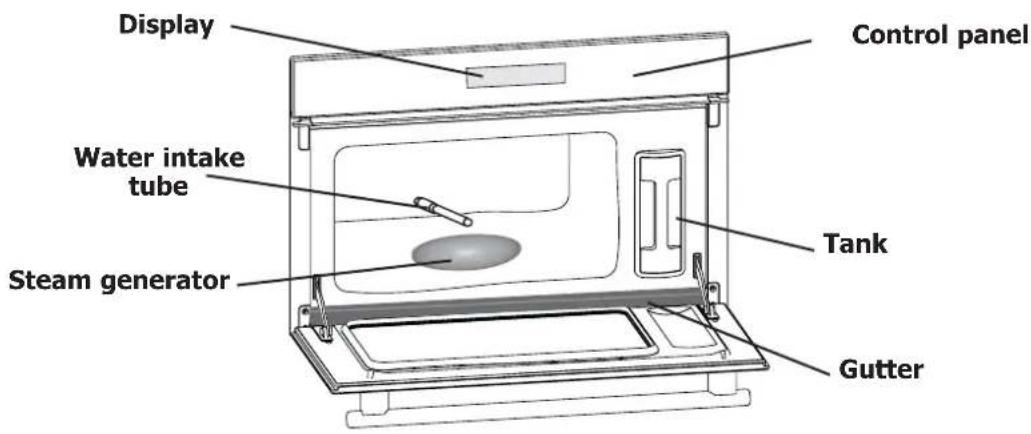
what does your oven look like?
close-up of control panel
text_image
Display Control panel Water intake tube Steam generator Tank Gutter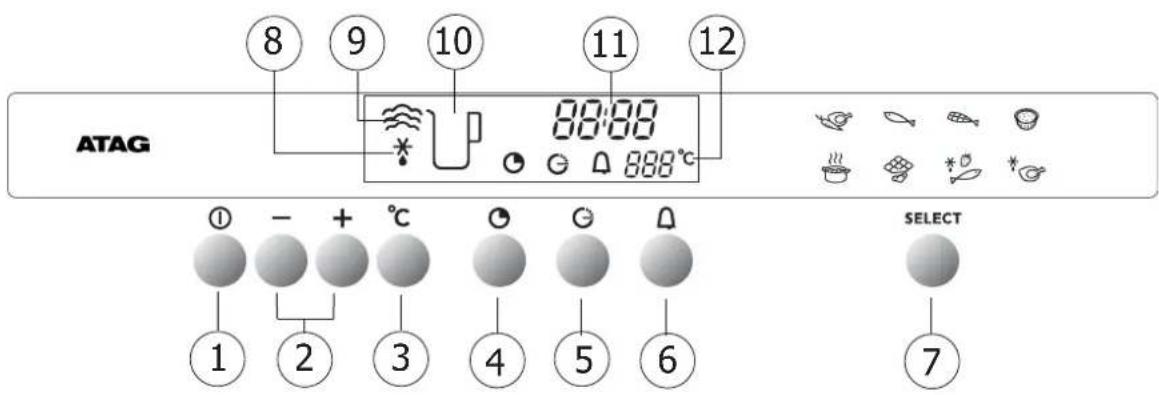
text_image
ATAG ⑧ ⑨ ⑩ ⑪ ⑫ 88:00 888°C ① - + °C ② ③ ④ ⑤ ⑥ SELECT ⑦1 Button: Stop/Start
7 Function selector
2 Changing time and temperature
8 Defrost indicator
3 Temperature setting
9 Cooking indicator
4 Cooking duration/time
10 Lack of water indicator
5 End cooking
11 Clock and time display
6 Independent timer
12 Temperature indicator
text_image
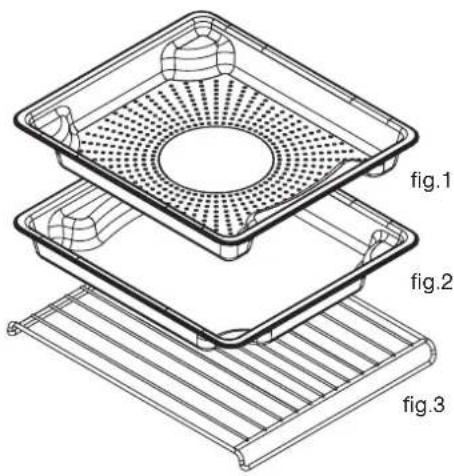
fig.1 fig.2 fig.3Food dish (fig.1)
Pierced stainless steel cooking dish to prevent contact between food and condensation water.
Condensate dish (fig.2)
Dish to recover the condensation water.

When cooking place the fig.1 dish on the fig.2 dish in reverse order so that they do not fit into each other (see diagram).
When storing place the fig.1 dish on the fig.2 dish in the same order so that they fit into each other.
Grid (fig.3)
Stainless steel removable support grid: it must be placed in the oven.

The cookware may be cleaned in the dishwasher.
natural_image
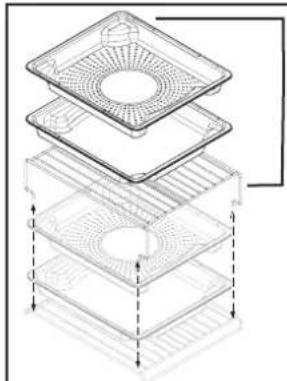
Isometric diagram of a multi-tiered storage or cooling unit structure with no text or symbolsKITVAPIX (Optional Accessory)
Steam oven double dish kit including :
1 x high level support grid
1 x food, dish
1 x condensate dish
accessories
removable tank
natural_image
Simple line drawing of a rectangular mechanical component with a curved side and internal grooves (no text or symbols)The water tank allows for independent water supply to the oven. Its capacity is approximately one litre (maximum level).

Tap water can sometimes be too hard. Lightly mineralised, still, bottled water will be more effective in cleaning your oven.

Using demineralised water is prohibited (not for human consumption).
For permanent installation, be mindful to add a standardised, compliant cut-off device in the electrical conduit. Otherwise the appliance must be positioned so that the electrical outlet is accessible after the unit has been built-in.
You must use an electrical receptacle that contains a ground wire and is connected in compliance with applicable safety standards.
Your electrical installation must be equipped with 10 ampere thermal-sensitive protection.
Do not operate the oven if the power cable or its plug are damaged. In this case, they must be replaced by the manufacturer, its After Sales Service department or a person of similar qualifications so as to avoid any danger.
Operating voltage 220-240 V \~ 50 Hz
Total oven power 1.77 kW
Energy consumption
- heating up to and holding at 100°C for one hour .... 0.71 kWh
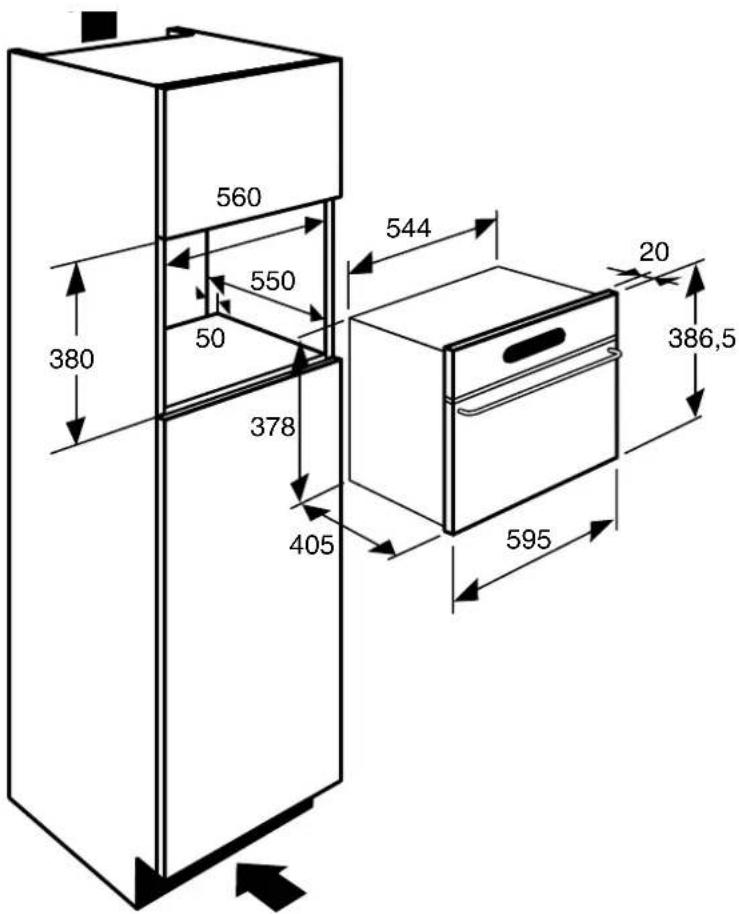
Useful dimensions of your oven
Width 38.5 cm
Height 18.2 cm
Depth 33.5 cm
Net capacity 23.5 litres
text_image
560 550 380 50 378 405 544 20 386,5 595- Place the appliance in the nook.
The appliance must be horizontal. Check the position.
-
For greater stability, attach the oven in the cabinet with two screws through the holes provided for this purpose on either side of the front inner panels.
-
Make the electrical connection.

Ensure that the plug will be accessible after installation.
how do you use your oven?
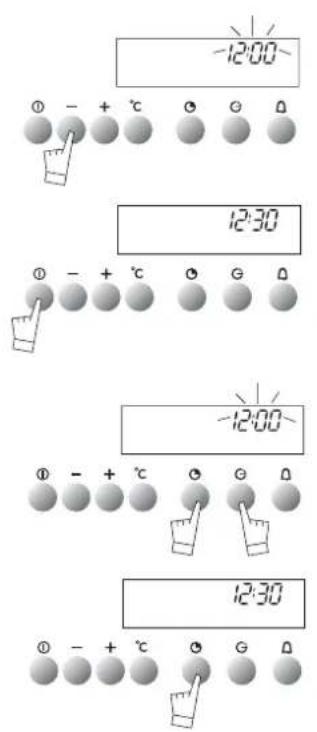
setting the time
text_image
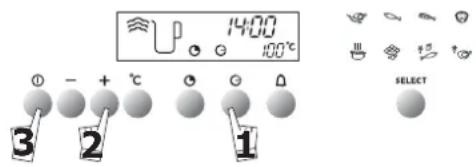
-12:00 0 - + °C 0 0 0 12:30 0 - + °C 0 G 0 -12:00 0 - + °C 0 G 0 12:30 0 - + °C 0 G 0Setting the clock
When supplied with electricity.
Set the time.
The display flashes 12:00. Press the + or - buttons to set the time.
Validate by pressing ①
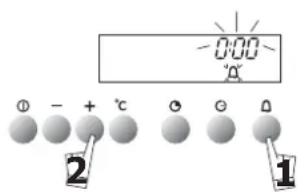
Resetting the clock
The set time is displayed.
Press the and buttons at the same time until the time flashes.
Set the clock with the + or - buttons.
Validate by pressing

If the time is not validated using the button, it is automatically saved after one minute.
how do you use your oven?
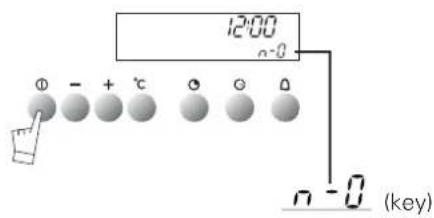
locking display
text_image
12:00 n-0 Φ - + °C Θ Θ Θ n - 0 (key)It is possible to lock the display. This feature cannot be used during timed cooking programmes.
Press the touch control for a few seconds.
A beep is sounded and a "key" ( ) appears on the screen. From this moment on, no touch control is active.
To unlock the display, press the touch control for a few seconds: a beep is sounded and the "key" disappears.
how do you program for immediate cooking?
operating principle
The water contained in the tank arrives in the cavity via a pipe. This water is transformed into steam when it comes into contact with a hot surface located in the lower part of the cavity: this is the steam generator.
There is no need to add water to the cooking dish. To guarantee REAL STEAM COOKING, your oven is furnished with specially designed cookware that will allow for perfect cooking.

You ABSOLUTELY MUST fill the water tank to the Max. level before cooking. Return the tank to its housing by firmly pushing ALL THE WAY until you feel the tank LOCK INTO POSITION.

When in use, the appliance becomes hot. Hot steam will escape when you open the door of the appliance. Keep children away.
A cooking time is pre-programmed for the various settings.
| Cooking temperature °C | Pre-programmed time | Min. setting time | Max. setting time |
| 100 | 25 min | 5 min | 1 hour |
| 85 | 15 min | 5 min | 1 hour |
| 75 | 15 min | 5 min | 1 hour |
| 90 | 20 min | 5 min | 1 hour |
| 95 | 30 min | 5 min | 1 hour |
| 80 | 15 min | 5 min | 1 hour |
| 55 | 30 min | 5 min | 1 hour |
| 60 | 30 min | 5 min | 1 hour |
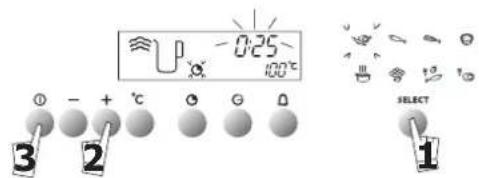
how do you program for immediate cooking?
steam cooking
text_image
U -0.25~ 100°C ① - + °C G G D SELECT ② ③-
Press the button and scroll down to select cooking function, for example the function The preset temperature 100^ is displayed and 25 minutes cooking time is suggested. The Symbol flashes.
-
Set the desired length of time (minimum is 5 minutes and maximum is 60 minutes) by pressing the + and - touch controls.
-
Press ① to begin cooking; the preset time and symbols are fixed, the cooking indicator comes up. When the oven reaches the set temperature, 100^ C is fixed and the oven beeps.

To avoid compromising the cooking results, do not open the appliance door during cooking.
how do you program for immediate cooking?
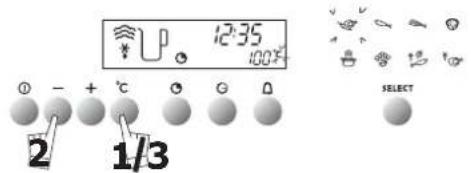
changing cooking temperature
It is only possible to adjust the cooking temperature in the position.
text_image
12:35 100% ① - + °C ② G ③ 2 1/3 SELECT-
Press the °C button. The °C symbol flashes.
-
Adjust the temperature by pressing the + or - buttons.
-
Save your choice by pressing the °C button.

If your choice is not validated using the °C button, the temperature is automatically saved after a few seconds.
how do you program for immediate cooking?
changing the cooking time
During cooking, you can adjust the cooking time by pressing and the + or - touch controls.

how do you program for immediate cooking?
cancelling cooking in progress
You can stop the cooking at any time by pressing the touch control (press and hold for approximately one second).
If steam generation has not yet begun (approximately one minute), the oven stops immediately and the time disappears.
If steam generation has already begun, the time converts to three minutes; a countdown begins and the steam escapes before the door is opened.
how do you program for immediate cooking?
at the end of a cooking programme
0m00s is displayed. The display animation ceases. Discontinuous beeps are emitted for three minutes.
To silence the beeps, press the touch control or open the door.

You ABSOLUTELY MUST empty the tank.

In order guarantee good oven reliability, the fan continues to function for a short period after cooking is complete.
how do you program for immediate cooking?
water management

natural_image
Simple line drawing of a U-shaped object with two protruding lines, no text or symbols presentIn the event of a water circuit-related problem during cooking, the "no water" indicator appears and a beep is emitted.
This error is specifically associated with:
- An empty tank.
- A poorly seated tank.
After checking these two items, cooking automatically restarts as soon as the door is closed.
Does not apply for 'defrost' functions
Set the selected cooking mode, the time, and the temperature if necessary, (see CHAPTER "How do you program for immediate cooking?" Paragraphs 1 and 2)
Example: position Temperature 100°C.
text_image
1400 100°C 3 - + °C 0 0 0 SELECT- Press the "end of cooking" touch control Ⓗ. The end of cooking time appears and flashes, as well as the Symbol, to indicate that it is now possible to set the time.
Example: It is 12:30.
You programmed a cooking time of 30 minutes. The displayed end of cooking time is 13:00.
After 30 seconds the display turns off and the cooking indicator flashes.
The display can be seen again by pressing a button
- Adjust the end of cooking time by pressing the + or - touch controls.
Example: End of cooking 14:00.
- Validate by pressing Ⓙ
Once the cooking end time has been programmed, the time comes back on the display.
After these steps, the oven heating is delayed so that cooking ends at 14:00.
When cooking is over, the oven will beep for several minutes and the
- symbol flashes. You can stop the beeps by pressing for one second.
how do you program for immediate cooking?
changing cooking time and cooking end time
You can consult the cooking end time at any time during cooking by pressing the Button.
To cancel the programme, press Ⓐ
how do you use the timer?
timer
Your oven is equipped with an electronic timer that is independent of the oven functions, making it possible to measure times.
This function is independent of the oven. It cannot be used to automatically stop a cooking programme.
This function can however be used while the oven is working. In this case, the timer display has priority over the clock display.
text_image
0:00 - °C + - - - - - - - - - - - - - - - - - - - - - - - - - - - - - - - - - - - - - - - - - - - - - - - - - - - - - - - - - - - - - - - - - - - - - - - - - - - - - - - - - - - - - - - - - - - -- Press the button.
0m00s and the timer symbol flash.
- Set the desired length of time (max. 59 min 50 seconds) by pressing the + or - buttons.
After a few seconds, the timer starts working.
When the cooking time is finished, the timer beeps. The symbol flashes.
Stop beeping by pressing or. ①
how do you use the timer?
changing or cancelling the timer programme
Stop beeping by pressing or. ①
Once the timer starts working, you can change the remaining time by pressing then the + or - buttons.
To cancel the timer, press then set time at 0m00s.
| SETTING Temperature °C | COOKING MODE | COOKING EXAMPLES | |
 | 100 | Vapour cooking mode most often used | Vegetables and meats |
 | 85 | For cooking delicate food | Delicate whole fish (trout) |
 | 75 | The meat remains iridescent, the collagen does not appear | Cooking delicate fish (sardine filets, red mullet) |
 | 90 | For cooking delicate food, fruits, compotes | Boiled eggs; stuffed tomatoes that maintain their shape. Puddings, etc. |
 | 95 | Terrines, pâtés. Reheating cooked dishes | |
 | 80 | Low heat | Melting chocolate, butter. Slightly warm fruit for immediate serving |
 | 55 | Slow defrosting without cooking | Defrosting fish filets before breading. Berries that must remain cool (for pies and sauces) |
 | 60 | Defrosting meats before grilling (eg: sausages) | |
| FOODWhatever the quantity | TIMES | °C | PREPARATIONS | NOTES | |
| VEGETABLES | Artichokes (small) | 40 to 45 min. | 100 | Placed upside down in the dish | • These times are a function of the type, size and freshness of the vegetables.Follow the indications that appear in the "Preparations" column. |
| Asparagus | 35 to 40 min. | 100 | For tips decrease cooking time | ||
| Broccoli | 18 min. | 100 | in small bunches | ||
| Carrots | 20 to 22 min. | 100 | in thin, round slices | ||
| Celery root | 25 to 30 min. | 100 | in thin slices | ||
| Pumpkin | 15 to 20 min. | 100 | in cubes | ||
| Mushrooms | 15 min. | 100 | in thin strips | ||
| Cauliflower | 30 to 35 min. | 100 | Brussels sproutscauliflower in small bunches chopped green cabbage | • The cooking time remains the same regardless of the quantity to be cooked.Example:1 or 4 artichokes require the same cooking time. | |
| 22 min. | |||||
| 30 to 35 min. | |||||
| Courgettes Chinese artichokes | 10 to 15 min. | 100 | in round slices | ||
| 20 min. | 100 | ||||
| Spinach | 20 min. | 100 | (fresh) stir while cooking (frozen) " " | ||
| 35 min | |||||
| Endives | 30 min. | 100 | core removed,cut in half lengthwise | ||
| Fennel | 22 min. | 100 | cut in half | • To check doneness, stick the tip of a knife into the thickest part of the vegetable; there will be no resistance if the food is cooked. | |
| Green beans | 30 to 35 min. | 100 | |||
| Turnips | 15 to 20 min. | 100 | in cubes | ||
| Fresh peas | 20 to 25 min. | 100 | / | ||
| Leeks | 25 min. | 100 | cut in half | ||
| Potatoes | 25 min. | 100 | cut in round slices | ||
| SHELLFISH CRUSTACEANS | Sea scallops | 10 to 12 min. | 90 | with seasoning | • Place the scallops on the grid of the glass dish, add aromatic herbs.• Place the crustaceans on a bed of seaweed. |
| Mussels/periwinkles | 20 to 25 min. | 95 | with seasoning | ||
| Crabs | 25 min. | 95 | / | ||
| Lobsters | 30 to 35 min. | 95 | depending on weight | ||
| Langoustines | 12 to 15 min. | 90 | / | ||
| FRUITS PUDDINGS | Apples/pears/peaches | 10 to 15 min. | 90 | whole, peeled | • Times depend on ripeness. |
| Compote | 25 min. | 95 | fruit in strips | ||
| Puddings | 10 min. | 90 | in ramekins | ||
| FISH | Northern pikeCodSea breamHaddockHerringPollack/black codMonkfishMackerelAtlantic codSkateRed mulletRed mullet/SoleSpotted dogfishSalmonTunaTrout,whole (1 kg) | 25 to 30 min.13 to 15 min.20 to 25 min.15 min.20 min.15 to 20 min.15 min.20 min.15 min.25 to 30 min.15 min.10 min.20 min.15 to 20 min.20 to 25 min.20 to 25 min. | 8585857585858085758080758585100100 | whole (1 kg)steaks (180 g)*whole (1kg)filetswhole (200 g)steaks (180 g)depending on thicknesswhole (250 g)filetswhole (200 g)filetsthick steaks(6 to 10 cm in length)steaks (180/200 g)steaks (180/200 g)whole (200 g)13 to 15 min. | *Steaks:Round slices of fish of 2 to 3 cm in thickness(180/200g) per person.*Insist on very fresh products.Place whole fish in the dish as is or on bay leaves, fennel or other aromatic herbs.As soon as cooking is complete, remove the skin, which will detach easily. |
| MEATS | BeefPork (filet mignon)Poultry (breasts, filets)(stuffed)SausagesBoudins | 15 to 30 min.25 min.20 to 25 min.25 min.20 min.10 to 15 min. | 100100100959090 | Roast 800 g: 55 to 60 min.Chicken thighs: 35 to 40 min.Roast turkey: 50 to 60 min.400 g piece | Then brown under the grill in another dish.* |
| EGGS | Start with very fresh eggskept at room temperature | 7 min.8 min.10 to 12 min.5 to 6 min. | 10010010010090 | Soft-boiled: placed directly on the grid.Medium-boiled: placed directly on the grid.Hard-boiledFried: broken in an individual dish placed on the grid and covered with cooking wrap.Poached: See detailed recipes. | |
| RICE, PASTA, FARINA | Place directly in a dish then cover with water or milk. The steam is not enough to saturate these inflating foods. Place a sheet of aluminium foil on the dish to prevent water droplets from falling in. | ||||
| Rice puddingFarina | 30 min.20 min. | 100100 | 100 g rinsed rice - 20 cl milk - 2 T. sugar200 g (1/4 litre water) | Fluff with a fork when cooking is complete. | |
how do you care for your oven?
maintenance
Cavity (after each use)
Wipe the cavity with a dry cloth after the steam generator has cooled or let the cavity air-dry by leaving the door open.
Water intake tube (once a month)
Remove the water intake tube by pulling it toward you.
Remove any hard-water deposits that may be inside (using a thin, pointed object such as a thick skewer or a knitting needle).
Steam generator (once a month)
Pour 1/2 cup of white alcohol vinegar on the generator.
Let sit for a few minutes, then clean and rinse with water. Do not use sponges or abrasive powders, nor coffee maker cleaning agents.
how do you care for your oven?
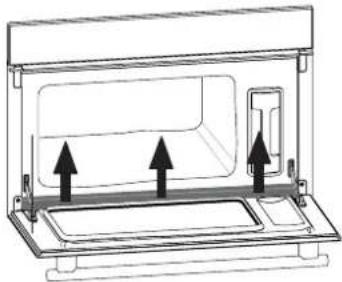
cleaning the gutter
natural_image
Technical line drawing of a microwave oven with two upward arrows indicating airflow or movement (no text or symbols)Remove this gutter by pulling it upward. Wipe it off and return it to its position using the three notches provided.

The oven should not be cleaned with a steam cleaner.
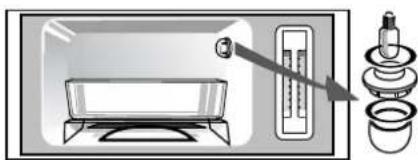
how do you change the bulb?
natural_image
Illustration of a microwave oven with a thermometer and a stack of cups (no text or symbols)The bulb is located at the back right of your oven's cavity.
Disconnect your oven before performing any task on the bulb to avoid the risk of electric shock.
- Turn the view port a quarter turn to the left.
- Unscrew the bulb in the same direction.
Bulb characteristics:
- 15 W - 220-240 V
- 300°C - E 14 socket
- Replace the bulb then reposition the view port, making sure the joints are correctly positioned.
- Reconnect your oven.
YOU OBSERVE THAT...
Your display does not light up.
The bulb doesn't work anymore.
Water or steam leak around the door during cooking.
POSSIBLE CAUSES
Oven is not connected to power source. Electronic board is not functioning.
The bulb is out of order. The oven is not connected. Your fuse is out of order.
The door is not properly closed. The door seal is defective.
WHAT SHOULD YOU DO?
- Check that the appliance is receiving electricity (good fuse). - Call the After-Sales Service Department.
- Change the bulb. - Connect the oven. - Change the fuse.
- Call the After-Sales Service Department.
In all circumstances, if your efforts are not sufficient, contact the After-Sales Service Department without delay.