
OX16611B - Oven Atag - Free user manual and instructions
Find the device manual for free OX16611B Atag in PDF.

User questions about OX16611B Atag
0 question about this device. Answer the ones you know or ask your own.
Ask a new question about this device
Download the instructions for your Oven in PDF format for free! Find your manual OX16611B - Atag and take your electronic device back in hand. On this page are published all the documents necessary for the use of your device. OX16611B by Atag.
USER MANUAL OX16611B Atag
natural_image
Simple circular diagram with a white center and curved lines above it, no text or symbols present.Selectieknop

Start/stop-toets

Timer-toets
natural_image
Technical diagram of a mechanical component with internal channels and mounting holes (no text or symbols)text_image
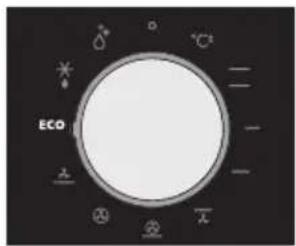
ECO ± ± ± ± ± ± ± ± ± ± ± ± ± ± ± ± ± ± ± ± ± ± ± ± ± ± ± ± ± ± ± ± ± ± ± ± ± ± ± ± ± ± ± ± ± ± ± ± ± ± +/-Kleine grill
Kleine grill
natural_image
Technical line drawing of a mechanical housing or enclosure with internal components and directional arrows indicating flow or movement (no text or symbols present)4
2
natural_image
Technical line drawing of a mechanical housing or enclosure with internal components and directional arrows indicating flow or movement (no text or symbols)4
2
natural_image
Diagram of a multi-layered air duct system with directional arrows indicating flow or circulation (no text or labels)4
2
natural_image
Diagram of a mechanical or fluidic component with curved flow arrows indicating direction (no text or symbols)2
natural_image
Diagram of a rectangular appliance with internal airflow arrows indicating circulation or movement (no text or symbols)natural_image
Diagram of a multi-layered air duct system with directional arrows indicating flow or circulation (no text or labels)natural_image
Diagram of a four-way pipe system inside a rectangular chamber, showing directional flow arrows (no text or labels)text_image
200°C 00:38natural_image
Technical line drawing of a mechanical device with a lever mechanism (no text or symbols)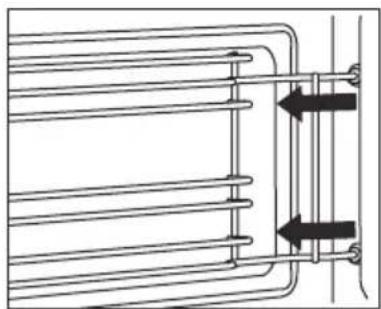
natural_image
Pure technical diagram of a heat exchanger or cooling unit with no text, numbers, or symbolstext_image
Technical diagram showing a door oven with labeled parts A, B, and C, illustrating the assembly and mounting mechanism.Ovendeur installeren
natural_image
Architectural diagram of a roof structure with diagonal bracing and support beams (no text or labels)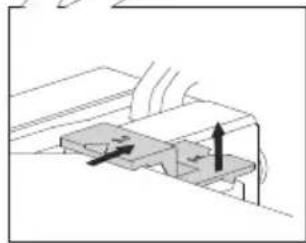
natural_image
Diagram of a mechanical or electrical component with directional arrows indicating movement (no text or symbols)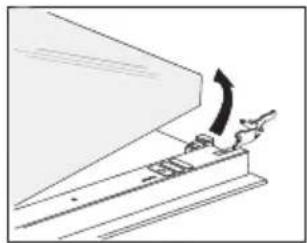
natural_image
Diagram of a mechanical device with an arrow indicating motion or force direction (no text or symbols present)
natural_image
Technical line drawing of a mechanical assembly with an arrow indicating direction (no text or symbols)text_image
Technical diagram showing a door opening process with labeled components and directional arrows indicating assembly steps.Algemeen
natural_image
Symbol of a trash bin with crossed lines indicating no waste or discharge (no text or numbers present)natural_image
Warning symbol with exclamation mark inside a triangle (no text or numbers)natural_image
Simple circular diagram with a pointer and curved line above it, no text or symbols present.Bouton de sélection
text_image
°C ECO ± ± ±Préchauffage rapide
natural_image
Technical diagram of a mechanical or electrical component with internal channels and mounting features (no text or symbols)text_image
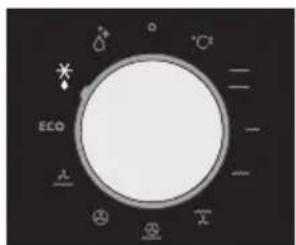
ECO ± ± ± ± ± ± ± ± ± ± ± ± ± ± ± ± ± ± ± ± ± ± ± ± ± ± ± ± ± ± ± ± ± ± ± ± ± ± ± ± ± ± ± ± ± ± ± ± ± ± ± ± ± ± ± ± ± ± ± ± ± ± ± ± ± ± ± ± ± ± ± ± ± ± ± ± ± ± ± ± ± ± ± ± ± ± ± ± ± ± ± ± ± ± ± ± ± ± ± ± ECOPetit gril
Petit gril
natural_image
Technical line drawing of a mechanical component with internal channels and mounting brackets (no text or symbols)4
2
natural_image
Technical line drawing of a mechanical housing or enclosure with internal components and directional arrows indicating flow or movement (no text or symbols present)4
2
natural_image
Diagram of a multi-compartment air duct system with directional arrows indicating flow or circulation (no text or labels)natural_image
Diagram of a rectangular appliance with internal airflow arrows indicating circulation or movement (no text or symbols)natural_image
Diagram of a mechanical or electrical component with curved arrows indicating flow or movement, no text or symbols present.text_image
200°C 00:38text_image
Technical diagram showing a door opening process with labeled parts A, B, and C, including a close-up of the mechanism.natural_image
Architectural diagram of a roof structure with diagonal bracing and support beams (no text or labels)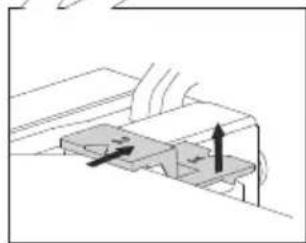
natural_image
Diagram of a mechanical component with directional arrows indicating movement or force (no text or symbols)
natural_image
Diagram of a mechanical device with an arrow indicating motion or force direction (no text or symbols present)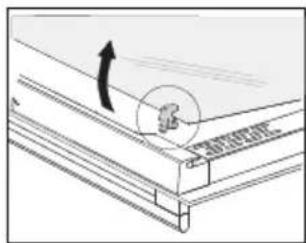
text_image
Technical diagram showing a mechanical assembly with an arrow indicating direction and a circular annotation labeled '基座' (base) pointing to a component.text_image
Technical diagram showing a door frame installation with a hand inserting a component, and a close-up of the internal switch.Généralités
natural_image
Symbol of a trash bin crossed with no text or numbers, representing waste sorting or disposal (no text present)natural_image
Warning symbol with exclamation mark inside a triangle (no text or numbers)natural_image
Simple circular diagram with a pointer and curved line above it, no text or symbols present.natural_image
Technical diagram of a rectangular enclosure with internal components and directional arrows indicating flow or movement (no text or symbols)2
natural_image
Technical line drawing of a mechanical housing or enclosure with internal components and directional arrows indicating flow or movement (no text or symbols present)4
2
natural_image
Technical line drawing of a mechanical housing or enclosure with internal components and directional arrows indicating flow or movement (no text or symbols present)4
2
flowchart
graph TD
    A["Top Block"] --> B["Left Block"]
    B --> C["Center Circle"]
    C --> D["Right Block"]
    D --> E["Bottom Block"]
    E --> F["Left Block"]
    F --> G["Right Block"]
    G --> H["Bottom Block"]
    H --> I["Left Block"]
    I --> J["Right Block"]
    J --> K["Bottom Block"]
    K --> L["Left Block"]
    L --> M["Right Block"]
    M --> N["Bottom Block"]
4
2
natural_image
Diagram of a mechanical or fluidic system with curved arrows indicating flow or movement around a central circular component (no text or symbols present)2
natural_image
Diagram of a rectangular appliance with internal airflow arrows indicating circulation or movement (no text or symbols)natural_image
Diagram of a multi-layered air duct system with directional arrows indicating flow or circulation (no text or labels)natural_image
Diagram of a four-way pipe system inside a rectangular chamber, showing directional flow arrows (no text or labels)text_image
200°C 00:38natural_image
Technical line drawing of a mechanical device with a lever and housing (no text or symbols)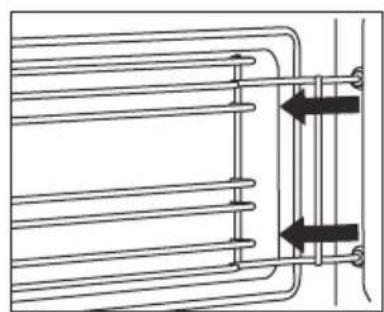
natural_image
Pure technical line drawing of a heat exchanger or cooling unit with no text, numbers, or symbolstext_image
Technical diagram showing a door oven with labeled parts A and B, including hand positioning instructions.natural_image
Architectural diagram of a roof structure with diagonal bracing and support beams (no text or labels)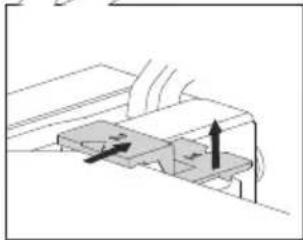
natural_image
Diagram of a mechanical or electrical component with directional arrows indicating movement (no text or symbols)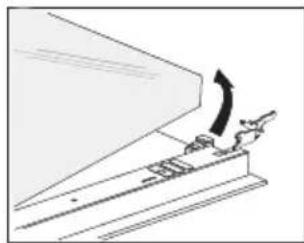
natural_image
Diagram of a mechanical device with an arrow indicating motion or force direction (no text or symbols present)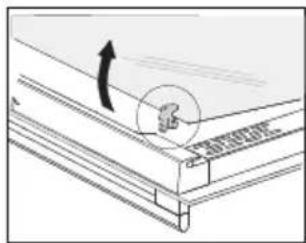
natural_image
Technical line drawing of a roof structure with an arrow indicating direction (no text or symbols)text_image
Technical diagram showing a door frame installation with a hand interacting with a device, and a close-up of the internal components.Allgemeines
natural_image
Symbol of a trash bin crossed with no visible text or labelsnatural_image
Warning symbol with exclamation mark inside a triangle (no text or numbers)Instructions for use
Oven
ATAG
OX16611B
EN Instructions for use EN 3 - EN 26

Pictograms used
Important information

Tip
Your oven
| Introduction | 4 | |
| Control panel 5 | ||
| Description | 6 | |
| Guide rails/Telescopic guide rails | 6 | |
| Accessories | 6 | |
| Door | 7 | |
| Cooling fan | 7 |
Use
| Initial use 8 | |
| Oven settings 9 | |
| Oven functions 11 | |
| Timer 15 | |
| Selecting additional functions 17 |
Cleaning
| Cleaning the oven 20Removing and cleaning the guide rails 20Removal and installation of the oven door 21Removing the oven window 22Aqua clean function 22Replacing the oven lamp 23 |
Solving problems
| General | 24 |
Your oven and the environment
| Disposal of the appliance and packaging 26 |
Introduction
Congratulations on the purchase of this oven. This product is designed to offer optimum user-friendliness. The oven has a wide range of settings enabling you to select the correct cooking method every time.
This manual shows how you can best use this oven.
In addition to information about operating the oven, you will also find background information that may be useful when using the appliance.

Please read the separate safety instructions carefully before using the appliance!
Read this manual before using the appliance and keep it in a safe place for future use.
Installation instructions are supplied separately.
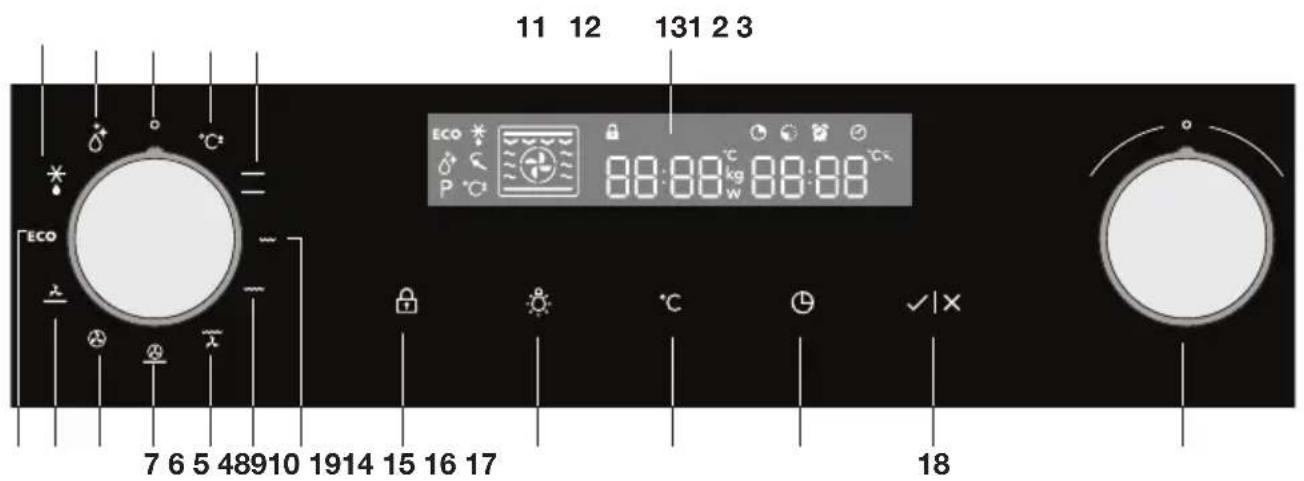
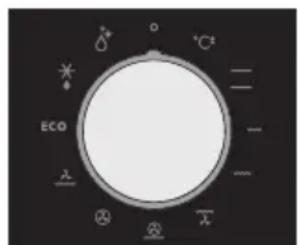
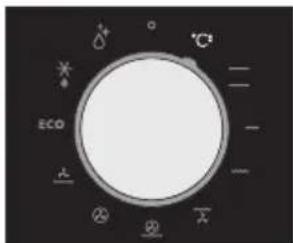
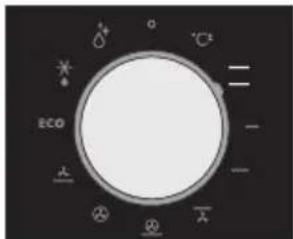
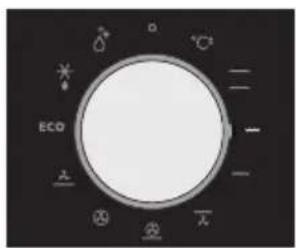
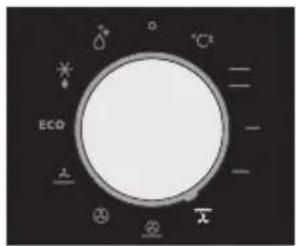
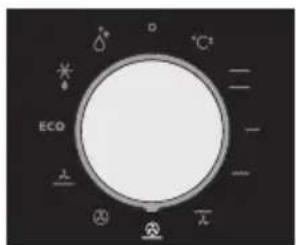
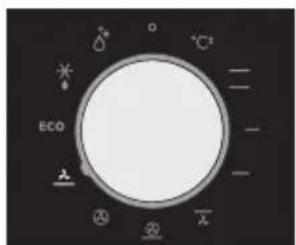
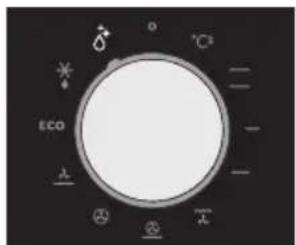
Control panel
text_image
11 12 131 2 3 ECO 88:88 kg 88:88 P °C 7 6 5 48910 1914 15 16 17 18- Off
- Quick preheat
- Top heat + bottom heat
- Small grill
- Large grill
- Grill with fan
- Hot air + bottom heat
- Hot air
- Bottom heat with fan
- ECO cooking
- Defrosting
- Aqua Clean
- Display (cooking information and timer)
- Child lock
- Oven lamp
- Temperature
- Timer
- Start/Stop
- Selection dial

Note:
For the best touch response, touch the keys with the main part of your fingertip. Every time you press a key during use, a short signal will sound.
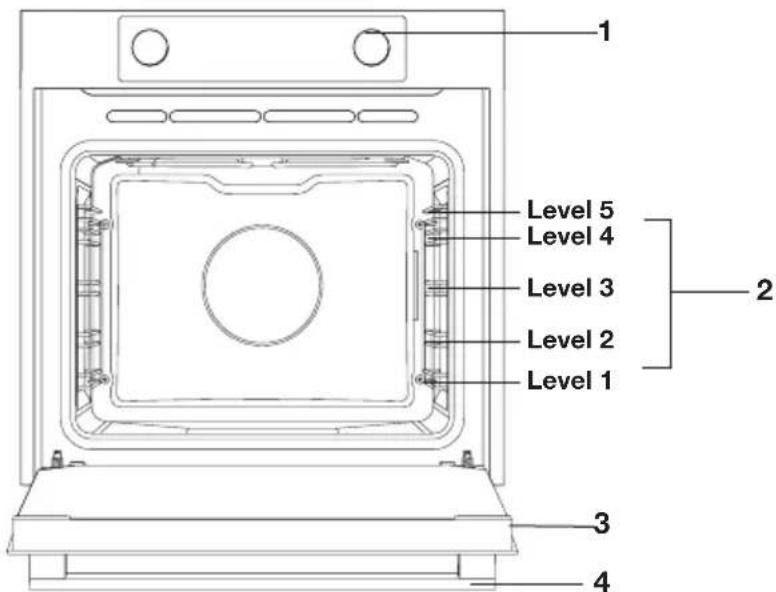
Description
text_image
Level 1 Level 2 Level 3 Level 4 Level 5 Level 1 Level 2 Level 3 Level 4- Control panel
- Rack levels
- Oven door
- Handle
Guide rails/Telescopic guide rails
- The oven has four or five guide rails (Level 1 to 4/5), depending on the model. Level 1 is mainly used in combination with bottom heat. The two upper levels are mainly used for the grill function.
- Place the oven rack, baking tray or steam dish in the gap between the guide rail sliders.
- A number of shelf levels can have fully-retractable telescopic guide rails, depending on the model.
▶ Pull the telescopic guide rails out of the oven cavity completely and place the oven rack / baking tray / steam dish on them. Then slide the oven rack / baking tray / steam dish on the telescopic guide rails, back into the oven cavity.
▶Only close the oven door when the telescopic guide rails have been returned completely back into the oven cavity.
Accessories
Your appliance is accompanied by a range of accessories, depending on the model. Only use original accessories; they are specially suited to your appliance. Be sure that all the accessories that are being used
are able to withstand the temperature settings of the chosen oven function.
Note: not all accessories are suitable/available for every appliance (it may also differ by country). When purchasing, always provide the exact identification number of your appliance. Please see the sales brochures or check online for more details about optional accessories.
Note: never place an accessory on the bottom of the oven!
| Accessories that can be supplied with your appliance (depending on the model) | |
 | Enamelled baking tray; to be used for pastries and cakes.Do not use the enamelled baking tray for microwave functions!Suitable for pyrolysis cleaning. |
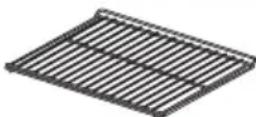 | Oven rack; mainly used for grilling. A steam dish or pan with food can also be placed on the oven rack.The oven rack is equipped with a safety peg. Lift the rack slightly at the front to slide it out of the oven.Do not use the oven rack for microwave functions! |
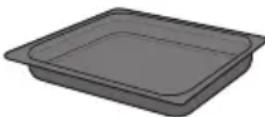 | Deep enamelled baking tray; to be used for roasting meat and baking moist pastry.Do not place the deep baking tray on the lowest level during a cooking process, except when using it as a drip tray during grilling, roasting or roasting with a spit roast (when available).Do not use the deep enamelled baking tray for microwave functions!Suitable for pyrolysis cleaning. |
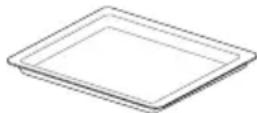 | Glass baking tray; for microwave and oven use.NOT suitable for pyrolysis cleaning. |
Door
- The door switches interrupt the operation of the oven when the door is opened during use. The oven continues operating when the door is closed.
Cooling fan
- The appliance is equipped with a cooling fan that cools the casing and control panel.
Initial use
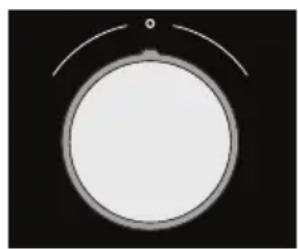
natural_image
Simple circular diagram with a pointer and curved line above it, no text or symbols present.Selection dial

Start/stop key

Timer key
Set the current time
When you connect the appliance to the mains electricity for the first time, the display lights up. After three seconds the clock symbol and '12:00' will flash on the display.
- Turn the 'selection dial' to set the current time.
You can set the values in the display faster by turning the selection dial further to the left or right. - Confirm the settings by pressing 'start/stop'.
If you do not press anything, the settings will be saved automatically after three seconds.
You can always set the current time by pressing the 'timer key' twice. Then turn the 'selection dial' to set the current time. Confirm the settings by pressing 'start/stop'.
If nothing is pressed, the settings are stored automatically after three seconds.
text_image
ECO + - - - - + - + - + - + - + - + - + - + - + - + - + - + - + - + - + - + - + - + - + - + - + - + - + - + - + - + - + - + - + - + - + - + - + - + - + - + - + - + - + - + - + - + - + - + - + - + - + - + - + - + - - + - + - + - + - + - + - + - + - + - + - + - + - + - + - + - + - + - + - + - + - + - + - + - + - + - + - + - + - + - + - + - + - + - + - + - + - + - + - + - + - + - + - + - + - + - + - + - + - + 20000000000000000000000000000000000000000000000000000000000000000000000000000000000000000000000000000Oven function dial

Temperature key
Using your oven
The oven has 10 oven functions and 1 cleaning function. Consult the table to select the correct oven function for the dish.
- Place the dish in the oven.
For most dishes you should first preheat the oven. -
Turn the 'oven function dial' to the desired setting. The selected pictogram will appear on the display.
-
Press the 'temperature key'.
-
Set the oven to the desired temperature using the 'selection dial'.
-
If desired, set a cooking time by pressing the 'timer key' and use the 'selection dial' to set the desired time.
-
Press the 'start/stop' key.
The set oven function will be started and the oven will be heated to the selected temperature. The temperature symbol in the display will flash. When the oven has reached the selected temperature, the temperature symbol in the display will stay lit.
Notes
- The temperature can be changed during cooking.
- Cooking times are rough estimates and can vary depending on a number of conditions.
- For certain dishes, the oven should be preheated.
- If you use baking paper, this should be able to withstand high temperatures.
- A lot of steam is released when cooking larger pieces of meat or dishes using dough, such as pies. This can cause condensation on the oven door. This is a normal occurrence and does not influence the functioning of the appliance. When the cooking process has ended, dry the door and the glass.
- Prevent condensation from forming and do not allow hot food to cool in a closed oven.
- Any glass dishes you use must be able to withstand temperatures of 275 °C.
Oven settings
Use the table to select the right oven function. Also consult the cooking instructions on the food packaging.
| Function | Description Recommended | temp. °C |
 | Quick preheatUse this function to heat the oven quickly to the desired temperature. This function is not suitable for cooking food!The preheat process is complete once the oven has been preheated to the desired temperature. | 160 |
 | Top heat + bottom heatHeat is generated by the heating elements at the top and bottom of the appliance. This setting is suitable for baking and roasting. | 200 |
 | Small grillFood is heated by the top grill heating element. | 240 |
 | Large grillFood is heated by the top grill heating element. The top heating element is activated simultaneously to increase the effect of the elements. | 240 |
 | Grill + fanThe fan distributes the heat generated from the top heating element. You can use this function for grilling meat and fish. | 170 |
| [YCVT] | Hot air + bottom heatThe combination of hot air and bottom heat provides a crispy and browned result. | 200 |
 | Hot airFood is heated by hot air supplied from the back of the oven.This setting uses even heating and is ideal for baking. | 180 |
| [3CB2] | Bottom heat + fanThe bottom element heats the dish and the heat is distributed by the fan. | 180 |
 | ECO cookingIn this mode, power consumption during the cooking process is optimized. This mode is used for roasting meat and baking pastry.By making use of the residual heat this setting gives a low energy consumption (energy class in accordance with EN 60350-1). On this setting the oven does not display the actual temperature in the oven. | 180 |
 | DefrostingThe air circulates with no heaters activated. Only the fan will be activated. This is used to slowly thaw frozen food. | |
| [DSY7] | Aqua CleanThe hot steam dampens the interior of the oven, so you can clean the oven easily. The Aqua Clean programme takes just 30 minutes. | 70 |
Each oven function has a number of basic or standard settings that you can adjust.

You adjust the settings by pressing the relevant key (before pressing the 'start/stop' key). Certain settings are not available for all programmes; if this is the case you will be alerted by a sound signal.
Oven functions
text_image
°C ECO - - - - - - - - - - - - - - - - - - - - - - - - - - - - - - - - - - - - - - - - - - - - - - - - - - - - - - - - - - - - - - - - - - - - - - - - - - - - - - - - - - -Quick preheat
text_image
CO²⁻ CO²⁻ ECO ± ± ± ±Top and bottom heat
Adjusting the cooking temperature
- Turn the 'oven function dial' to the desired oven function.
The selected pictogram will appear on the display and the prior set temperature will flash.
- Press the 'temperature key'. Set the oven to the desired
temperature using the 'selection dial'.
Quick preheat
Use this function to heat the oven quickly to the desired temperature.
This function is not suitable for cooking food!
- Turn the ‘oven function dial’ to the ‘quick preheat’ position.
The prior set temperature will be displayed. You can alter this temperature.
Note:
Preheat will begin after you have started the oven using the 'start/stop' key.
Preheat is complete when the set temperature is reached and a signal sounds.
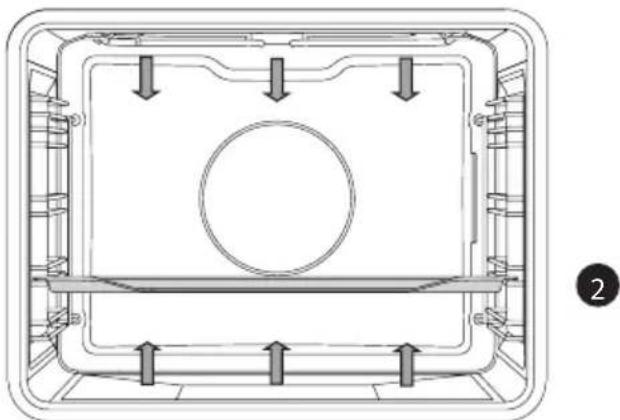
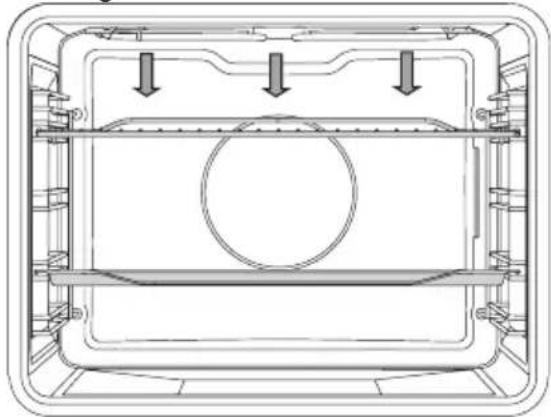
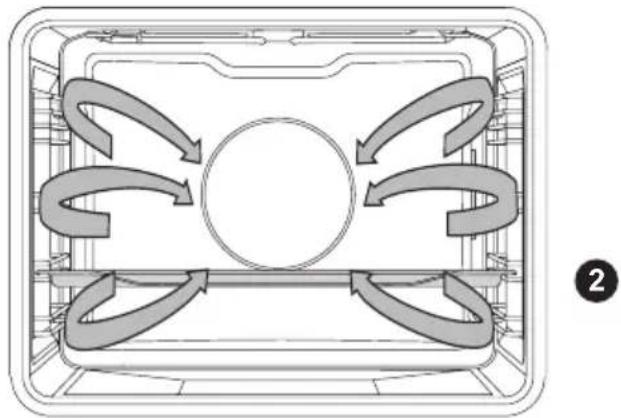
Top heat + bottom heat
Heat is generated by the heating elements at the top and bottom of the appliance. This setting is suitable for traditional baking and roasting.
natural_image
Technical diagram of a mechanical component with internal channels and mounting holes (no text or symbols)- Place the baking tray or oven rack in the middle of the oven.
• Preheating is recommended
text_image
ECO -Smal grill
Small Grill
Food is heated by the grill element.

natural_image
Technical line drawing of a mechanical housing or enclosure with internal components and mounting brackets (no text or symbols)4
2
- Place the oven rack in the upper part of the oven and the baking tray in the middle of the oven.
- Keep an eye on the cooking process. At high temperatures, meat can burn quickly
• Preheat the oven for 5 minutes

text_image
ECO D +/-Large grill
Large grill
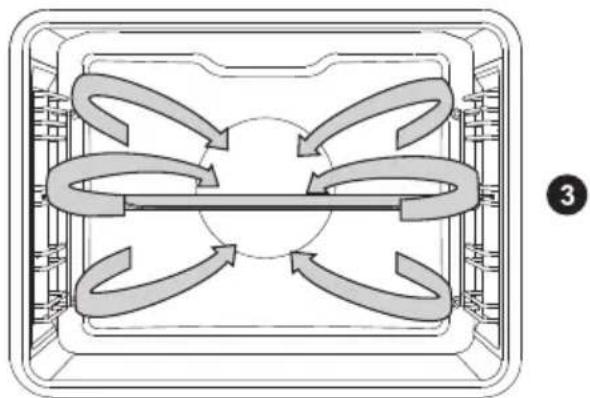
The heat comes from the top element and the grill element. This setting is particularly useful for dishes and baked food that require a real bottom crust or browning. Use this just before the end of the baking or roasting time.
natural_image
Technical line drawing of a mechanical housing or enclosure with internal components and mounting brackets (no text or symbols)4
2
- Place the oven rack in the upper part of the oven and the baking tray in the middle of the oven.
text_image
ECO × ② ③ × -Grill and fanr
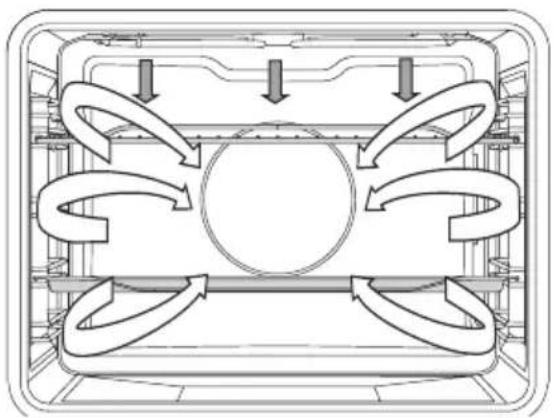
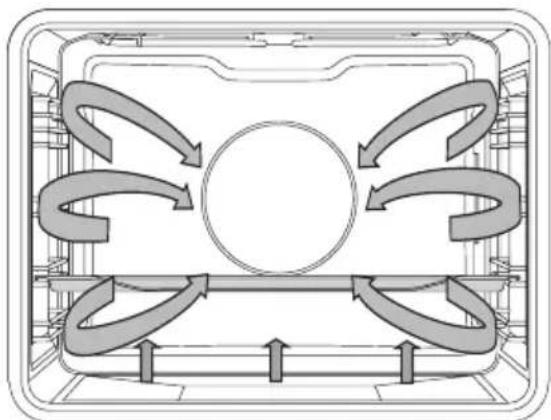
Grill + fan
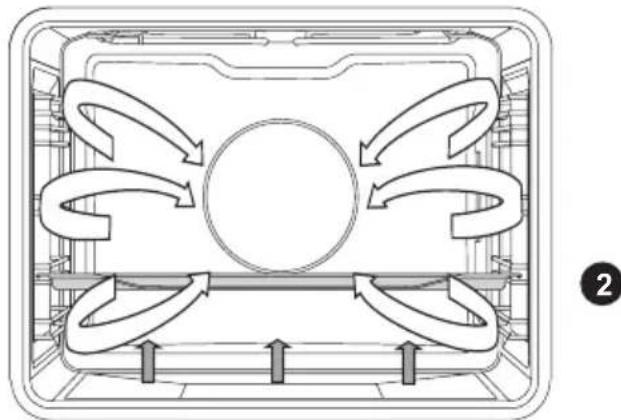
The fan distributes the heat generated from the top heating element. You can use this function for grilling meat, fish, poultry and vegetables. It gives food a crispy texture without it needing to be turned over.
natural_image
Diagram of a multi-layered air duct system with directional arrows indicating flow or circulation (no text or labels)4
2
- Place the oven rack in the upper part of the oven and the baking tray in the middle of the oven.
- Keep an eye on the cooking process. At high temperatures, meat can burn quickly
• Preheat the oven for 5 minutes
text_image
ECO +/-Hot air and bottom heat
Hot air + bottom heat
Food is heated using a combination of hot air and bottom heat. This setting is used for a crispy and browned result.
natural_image
Diagram of a mechanical or fluidic system with curved arrows indicating flow or movement around a central circular component (no text or symbols present)2
- Place the baking tray or oven rack in the middle of the oven.
• Preheating is recommended.

text_image
ECO + - - - + - + -Hot air
Hot air
Food is heated by hot air from a fan and the heating element at the back of the oven. This setting uses even heating and is ideal for baking.
natural_image
Diagram of a rectangular appliance with internal airflow arrows indicating circulation or movement (no text or symbols)- Place the baking tray or oven rack in the middle of the oven.
• Preheating is recommended
text_image
ECO +/-Bottom heat and fan
Bottom heat + fan
The bottom element heats the dish and the heat is distributed by the fan. This setting is used for baking yeasted pastry and preserving fruit and vegetables.
natural_image
Diagram of a refrigerated appliance with airflow arrows indicating circulation (no text or symbols)- Place a not too high baking tray in the lower part of the oven, so that hot air can also circulate over the upper surface of the food.
• Preheating is recommended
text_image
ECOECO heating
ECO cooking
In this mode, power consumption during the cooking process is optimized. This mode is used for roasting meat and baking pastry. By making use of the residual heat this setting gives a low energy consumption (energy class in accordance with EN 60350-1). On this setting the oven does not display the actual temperature in the oven.
natural_image
Diagram of a four-way pipe system inside a rectangular container, showing directional flow arrows (no text or labels)- Place the baking tray or oven rack in the middle of the oven.
text_image
ECO + - - - - - - - - - - - - - - - - - - - - - - - - - - - - - - - - - - - - - - - - - - - - - - - - - - - - - - - - - - - - - - - - - - - -Defrosting
Defrosting
In the defrost function the fan circulates the air. No heat elements are switched on. Use this function for slow defrosting of frozen dishes (cakes, biscuits, cookies, bread, bread rolls and frozen fruit).
- If desired, set a different defrost time by pressing the ‘timer key’ and setting the time using the ‘selection dial’.
- Turn the food over after half the defrosting time has elapsed; stir the food or break up large pieces if these are frozen together.
Timer
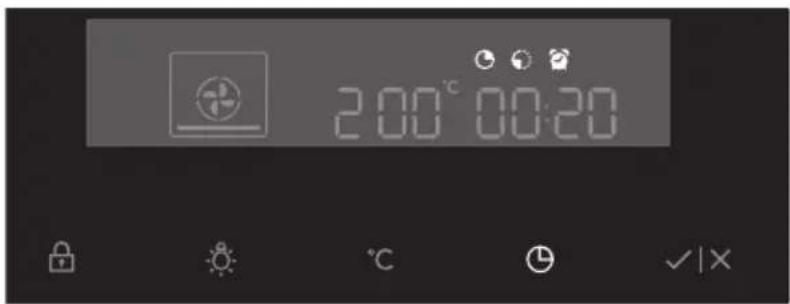
text_image
20:00'00:20Setting the timer
- Press the 'timer key' twice.
- To set the time, turn the ‘selection dial’ to the current time.
Timer function
- Select an oven function using the ‘oven function dial’ and set the temperature.
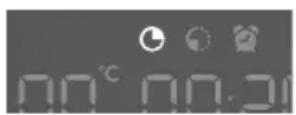
- Press the ‘timer key’ several times to select a timer function. The pictogram for the selected timer function lights up on the display and the adjustable start/end time will flash. The other pictograms are dimmed.
- Press the 'start/stop key' to start the cooking process. The elapsed cooking time will be displayed.
'Setting the 'cooking time'
- In this setting you can set how long the oven needs to operate (cooking time).

'Setting the 'end time'
- In this setting you can set the time the oven should switch off. A cooking time first needs to be set. Ensure that the clock is set precisely to the current time.

Example:
- Current time: 12:00
• Cooking time: 2 hours
• End of cooking: 18:00 hours

- First set the cooking time, for example 2 hours. The sum of the current time and the cooking time is displayed automatically (14:00 hours). Press the ‘timer key’ again to select the ‘end time’ pictogram and set the time when the cooking should be ended (18:00 hours).
- Press the 'start/stop key' to start the cooking process.
The timer will delay the cooking process until the appropriate time. The pictogram will now light up. The oven will switch on automatically (16:00 hours) and switch off at the selected time (18:00 hours).
'Timer alarm' function
- The ‘timer alarm’ function can be used independently of the oven. The highest possible setting is 23:59 hours.
The last minute of the run time is displayed in seconds.
The oven will switch off automatically once the set time has elapsed (end of cooking). A signal will sound that you can switch off by pressing the ‘start/stop’ or ‘timer’ key. The sound signal will stop automatically after one minute.

You can cancel all timer functions by setting the time to '0'.
If the appliance has been inactive for a few minutes, it will switch to standby. The current time appears and the selected timer function will light up.
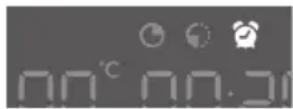
Selecting additional functions
text_image
200°C 00:38Certain settings are not available for all programmes; if this is the case you will be alerted by a sound signal.

natural_image
Simple white padlock icon on dark background (no text or symbols)Child lock key
Child lock
With the oven's childproof lock you can lock the control panel to prevent unintended use of the oven.
- You can activate the child lock by pressing the ‘child lock key’ for a few seconds.
A pictogram in the form of a lock appears in the display.
This indicates that all functions are locked. - To deactivate the child lock, press the key again for a few seconds. The lock pictogram disappears from the display, indicating that all functions are unlocked.
Note:
Once the child lock is activated and no timer function has been set (only the clock is displayed), the oven will not work. If the child lock is activated after a timer function has been set, the oven will work; however, the settings cannot be changed.
When the child lock is activated, oven functions or additional functions cannot be changed. The cooking process can only be ended by turning the ‘oven function dial’ to ‘0’.
The child lock remains activated even after the oven has been switched off. The child lock needs to be deactivated before you can select a new programme.
Lamp key
Oven lamp
- The oven lamp will light automatically if the oven door is opened or if the oven is switched on.
- After the end of the cooking process, the lamp stays lit for another minute.
- You can switch off the oven lamp by pressing the 'lamp key'.

Temperature key
Sound signal
The volume of the sound signal can be set if no timer function has been activated (only the time is displayed).
- The ‘Oven function dial’ must be in the ‘0’ position.
- Press and hold the 'temperature key'.
Bars appear on the display that are (partly) fully lit. - Turn the ‘selection dial’ to select one of three volume levels (one, two or three bars lit) or no sound (no bar lit).
- Press the 'start/stop' key to confirm.

natural_image
Simple white light bulb icon on black background (no text or symbols)Lamp key
Reduce display contrast
- The ‘oven function dial’ must be in the ‘0’ position.
- Press and hold the 'lamp key' for 5 seconds.
Bars appear on the display that are (partly) fully lit. - Turn the ‘selection dial’ to adjust the dimming level of the display (one, two or three bars).


Child lock key + Timer key
Standby
If you do not wish to use the display lighting, this can be disabled.
- Press the ‘child lock key + timer key’ to disable the display. ‘Off’ and the ‘timer’ pictogram will appear on the display.
- Press the ‘child lock key + timer key’ again to reactivate the display. ‘On’ and the ‘timer’ pictogram will appear on the display.

Following a power failure the additional function settings will only be saved for a few minutes. All settings, except the sound signal and child lock, will then revert to factory settings.
Cleaning the oven
Clean the oven regularly to prevent fat and leftover food from accumulating, especially on interior and exterior surfaces, the door and seal.
- Clean exterior surfaces with a soft cloth and soapy warm water. Wipe afterwards with a clean, damp cloth and dry the surfaces.
- Remove splashes and stains on the interior surfaces with a soapy cloth. Wipe afterwards with a clean, damp cloth and dry the surfaces.
- Clean the interior of the oven

Important
• Take care that NO water enters the vents.
- NEVER use abrasive cleaning materials or chemical solvents.
• ALWAYS ensure that the door seal stays clean.
This prevents accumulation of dirt and allows you to close the door properly.
Removing and cleaning the guide rails
Only use conventional cleaners to clean the guides.
- Remove the screws using a screwdriver.
- Remove the guides from the holes in the back wall.
natural_image
Technical line drawing of a mechanical device with a lever and housing (no text or symbols)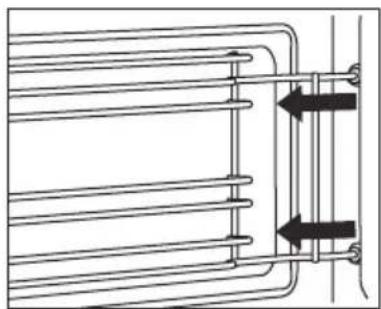
natural_image
Pure technical diagram of a heat exchanger or cooling system with no text, numbers, or symbolsRemoval and installation of the oven door
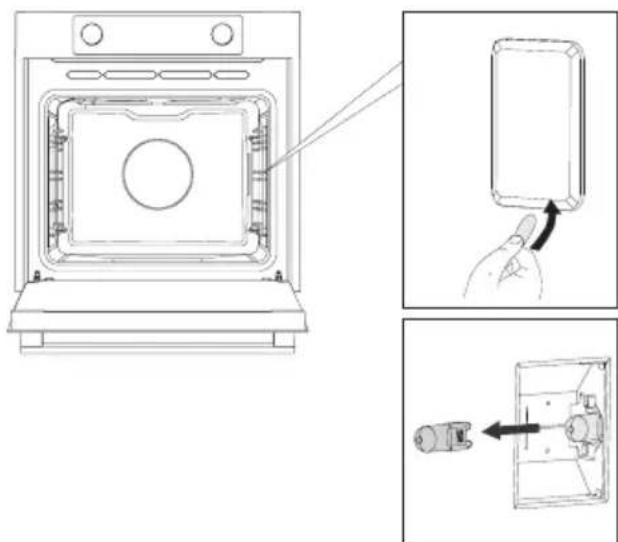
Keep your fingers away from the hinges of the oven door. The hinges are spring loaded and can cause injury if they spring back.
Make sure that the hinge latches are applied correctly to lock the hinges.
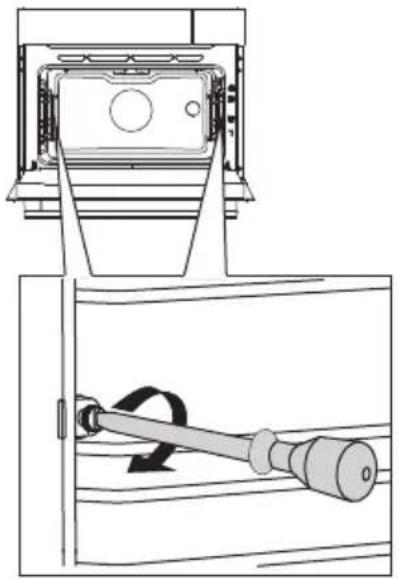
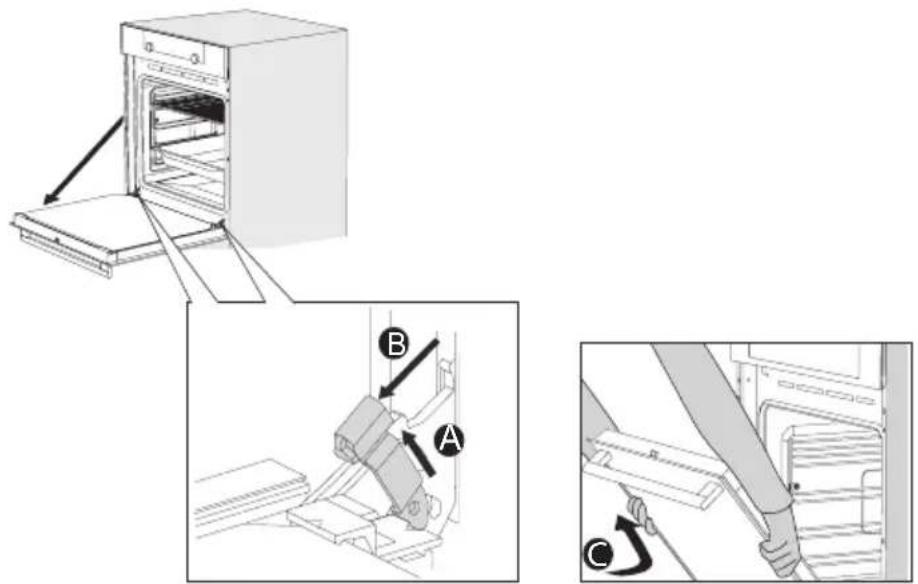
Remove the oven door
- Open the door to the fully open position.
- Lift both hinge latches (A) and pull them towards the oven door (B). The hinges will be locked in the 45^ position.
- Gently close the door until it reaches a 45^ angle.
- Remove the door by lifting and tilting it towards the oven (C). The hinges need to come out of the slots in the oven.
text_image
Technical diagram showing three steps of a door opening process: opening, lifting a seat, and closing the door.Install the oven door
- Hold the door at an angle of approximately 45^ in front of the oven.
- Insert the hinges into the slots and make sure they are both positioned correctly.
- Open the door to the fully open position.
- Lift both hinge latches and move them towards the oven.
- Gently close the oven door and make sure that it closes correctly. If the door does not open or close correctly, then make sure that the hinges are positioned correctly in their slots.
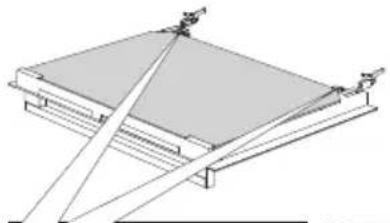
Removing the oven window
The glass in the oven door can be cleaned from the inside, but you do need to remove the glass from the door to do this. First remove the oven door (see chapter ‘Removing the oven door’).
- Lift the brackets on the left and right side of the door upwards slightly (to marker 1 on the bracket) and pull this away from the glass slightly (to marker 2 on the bracket).
- Grasp the glass at the bottom and gently lift this upwards to remove it from the support.
- The inner third glass (depending on the model) can be removed by lifting this carefully and removing it. Also remove the rubber seals around the glass.
natural_image
Architectural diagram of a roof structure with diagonal bracing and support beams (no text or labels)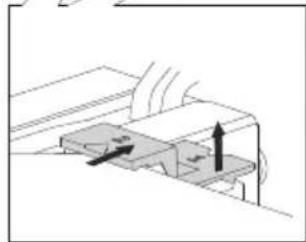
natural_image
Diagram of a mechanical component with directional arrows indicating motion or force (no text or symbols)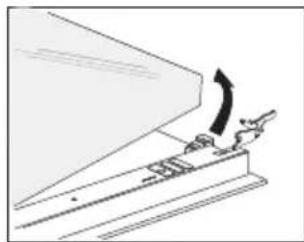
natural_image
Diagram of a mechanical device with an arrow indicating motion or force direction (no text or symbols present)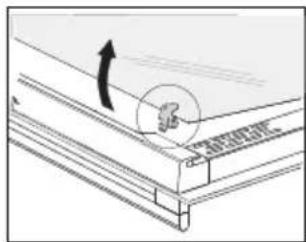
text_image
Technical diagram showing a mechanical assembly with an arrow indicating direction and a circular annotation highlighting a specific component.To replace the glass pane, observe the reverse order. The markings (semicircle) on the door and the glass pane should overlap.
Aqua Clean function
text_image
°C2 ECO λ ⊗ -Aqua clean function
With aqua clean and a damp cloth, you can easily remove grease and dirt from the oven walls.
Using aqua clean
Only use aqua clean when the oven has cooled down fully. It is more difficult to remove dirt and grease if the oven is hot.

The program takes 30 minutes.
Food remains on the enamel walls will be sufficiently soaked after 30 minutes so that they can be removed with a damp cloth.
- Remove all accessories from the oven.
- Pour 0.15 litres of water into the bottom of the oven.
- Select 'Aqua clean' with the function knob.
- Press on the confirm key to start aqua clean.
Please note: Do not open the door during the cleaning program.
Replacing the oven lamp

The lamp in this household appliance is only suitable for illumination of this appliance. The lamp is not suitable for household room illumination.
The bulb (halogen G9, 230 V, 25 W) is a consumable and therefore not covered by warranty. Before changing the bulb, remove the trays, the grid, and the guides.

- Cut the power to the appliance by removing the plug from the socket or switching off the fuse in the fuse box!
-
Please note: the lamp can be very hot! Use protection to remove the lamp.
-
Use a flat screwdriver to loosen the bulb cover, and remove it. NOTE: Be careful not to scratch the enamel.
-
Pull the halogen bulb out.
natural_image
Technical line drawing of an oven with internal components and a close-up view showing a hand interacting with a component (no text or symbols present)General
Try the solutions below if you have problems with your oven. You could save yourself the time and effort of an unnecessary phone call to customer services.
The food is not cooked
- Check whether the timer has been set and you have pressed the 'start key'.
- Close the door properly.
- Check whether a fuse has blown and whether a circuit breaker has been activated.
Food is overcooked or undercooked
- Check whether the correct cooking time has been set.
- Check whether the temperature has been set.
The display will be reset following power failure
- Remove the plug from the socket and put it back in again.
- Set the time again.
There is condensation on the interior of the oven
- This is normal. Wipe the oven clean after use.
The fan keeps working after the oven is switched off
- This is normal. Once the oven has been switched off, the cooling fan may continue to run for a little while.
Air flow can be felt at the door and the exterior of the appliance
- This is normal.
Light reflects on the door and the exterior of the appliance
- This is normal.
Steam escapes from the door or the vents
- This is normal.
Clicking sounds can be heard when the oven is working, particularly in the defrost setting
- This is normal.
Storing and repairing the oven
Repairs may only be performed by a qualified service technician. If maintenance is required, remove the plug from the socket and contact ATAG customer services.
Have the following information to hand when you call:
- The model number and serial number (stated on the inside of the oven door)
- Guarantee details
• A clear description of the problem
Choose a clean, dry place if you have to store the oven temporarily, as dust and moisture can damage the appliance.
Disposal of the appliance and packaging
This product is manufactured from sustainable materials. However, the appliance must be disposed of responsibly at the end of its useful life. The government can provide you with information about this.
The appliance packaging is recyclable. The following materials have been used:
- cardboard
• polyethylene wrapping (PE)
• CFC-free polystyrene (hard PS foam)
Dispose of these materials responsibly in accordance with legal provisions.
natural_image
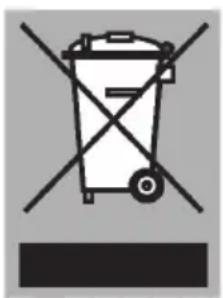
Symbol of a trash bin crossed with no visible text or labelsThe product has a pictogram of a rubbish bin with a cross through it. This indicates that household appliances must be disposed of separately. This means that the appliance may not be processed via the regular waste flow at the end of its useful life. You should take it to a special municipal waste depot or a sales outlet that offers to do this for you.
Collecting household equipment separately prevents harm to the environment and public health. The materials used in manufacturing this appliance can be recycled, which provides considerable savings in energy and raw materials.
CE
Declaration of conformity
We hereby declare that our products comply with the relevant European directives, standards and regulations as well as all requirements referred to in the standards.

natural_image
Warning symbol with exclamation mark inside a triangle (no text or numbers)The appliance rating label is located on the inside of the appliance.
When contacting the service department, have the complete type number to hand.
You will find the addresses and phone numbers of the service organisation on the guarantee card.
ATAG