
OX6771B - Oven Atag - Free user manual and instructions
Find the device manual for free OX6771B Atag in PDF.


User questions about OX6771B Atag
0 question about this device. Answer the ones you know or ask your own.
Ask a new question about this device
Download the instructions for your Oven in PDF format for free! Find your manual OX6771B - Atag and take your electronic device back in hand. On this page are published all the documents necessary for the use of your device. OX6771B by Atag.
USER MANUAL OX6771B Atag
natural_image
Simple line drawing of a document or paper holder with a rectangular top and horizontal bars at the bottom (no text or symbols)GEBRUIKSAANWIJZING
VANEENINBOUWOVEN
NL
OX6771B
Anderebelangrijke
text_image
Technical diagram of an oven with numbered components for identificationnatural_image
Technical line drawing of a mechanical assembly with cross-sectional views (no text or symbols)natural_image
Simple line drawing of a rectangular tray or container with no text or symbolsnatural_image
Simple line drawing of a rectangular container with a flat top and side edges (no text or symbols)text_image
C 00:10 200°Cnatural_image
Diagram of a mechanical component with an inset showing a hand interacting with a curved tool (no text or symbols present)text_image
A C E 00:10 ADD STEAM 200°CAbak-/braadsysteem
Cprogrammaduur
Etemperatuur

INFORMATIE!
natural_image
Diagram showing a hand holding a metal beam with a force applied, alongside a magnified view of a device inside a container (no text or symbols)text_image
C D E 00:30 80 °CCbereidingstijd
Dprogramma
text_image
Technical diagram showing three steps of a door opening process with Chinese annotations indicating component placement.1Plaatsdeondiepebakplaatinheteerste geleideniveauengieter0,4literheetwaterin.
text_image
Technical diagram showing a device interior with labeled components A and B, including directional arrows indicating movement or assembly.flowchart
graph TD
    A["Step 1: Initial setup with horizontal panel and vertical connectors"] --> B["Step 2: Rotation of component"]
    B --> C["Step 3: Insert a wall-mounted device"]
    C --> D["Step 4: Insert a flat-panel door"]
    D --> E["Step 5: Final installation with tool and bracket"]
    style A fill:#f9f,stroke:#333
    style B fill:#ccf,stroke:#333
    style C fill:#cfc,stroke:#333
    style D fill:#fcc,stroke:#333
    style E fill:#ffc,stroke:#333
1Doedeovendeureersthelemaalopen.
text_image
Technical diagram showing a device assembly with labeled components A and B, including a rotating component and directional arrows indicating motion.natural_image
Simple line drawing of a rectangular object with a circular element above it, no text or symbols present.MODED'EMPLOI
D'UNFOURENCASTRABLE
FR
OX6771B
Tablesdesmatières
text_image
Technical diagram of an oven with numbered components for identificationnatural_image
Technical line drawing of a front panel assembly with internal components and close-up views (no text or symbols)Interrupteursurlaportedufour
(selonlemodèle)
natural_image
Simple line drawing of a rectangular tray or container with rounded edges (no text or symbols)natural_image
Simple line drawing of a rectangular container or basin (no text or symbols)text_image
C 00:10 200°Cnatural_image
Diagram showing a hand holding a metal sheet with an inset close-up of the handle (no text or symbols)text_image
A C E 00:10 ADD STEAM 200°Cnatural_image
Diagram showing a mechanical assembly with a bracket and a magnified inset of a device (no text or symbols)text_image
C D E 00:30 80 °CCduréedecuisson
Dprogramme
Verrouillagedestouches
text_image
SE nS 50 °C 200 HOT MOUNT °Ctext_image
Technical diagram showing three steps of a door opening process with Chinese annotations indicating component placement.text_image
Technical diagram showing a device interior with labeled components A and B, including directional arrows indicating movement or assembly.flowchart
graph TD
    A["Step 1: Initial setup with horizontal panel and vertical connectors"] --> B["Step 2: Rotation of component"]
    B --> C["Step 3: Insert a wall-mounted device"]
    C --> D["Step 4: Insert a flat-panel door"]
    D --> E["Step 5: Final installation with tool and component"]
    style A fill:#f9f,stroke:#333
    style B fill:#ccf,stroke:#333
    style C fill:#cfc,stroke:#333
    style D fill:#fcc,stroke:#333
    style E fill:#ffc,stroke:#333
text_image
Technical diagram showing a device assembly with labeled components A and B, including a rotating component and directional arrows indicating motion.natural_image
Simple line drawing of a document or paper holder with a rectangular top and horizontal bars at the bottom (no text or symbols)GEBRAUCHSANWEISUNG
FÜREINENEINGEBAUTENBACKOFEN
DE
OX6771B
The deviation of the daily timed display on the screendoes not affect the functionality of the appliance and may be due to fluctuations in the frequency of the electrical network.

WARNUNG!
text_image
Technical diagram of an oven with numbered components for identificationnatural_image
Technical line drawing of a front panel assembly with internal components and mounting brackets (no text or symbols)natural_image
Simple line drawing of a rectangular tray or container with no text, numbers, or symbolsnatural_image
Simple line drawing of a rectangular container or basin (no text or symbols)text_image
C 00:10 200°Cnatural_image
Diagram of a hand holding a metal sheet with an arrow indicating force or movement (no text or symbols present)1.Funktionsauswahl
text_image
A C E 00:10 ADD STEAM 200 °Cnatural_image
Diagram showing a hand holding a metal frame with a pull-up arrow, alongside a zoomed-in view of the interior (no text or symbols)text_image
C D E 00:30 80 °CCGarzeit
DProgramm
text_image
Technical diagram showing three steps of a door opening process with Chinese annotations indicating component placement and cleaning.text_image
Technical diagram showing a device interior with labeled components A and B, including directional arrows indicating movement or assembly.flowchart
graph TD
    A["Step 1: Initial setup with horizontal panel and vertical connectors"] --> B["Step 2: Rotation of component"]
    B --> C["Step 3: Insert a wall-mounted device"]
    C --> D["Step 4: Insert a flat-panel door"]
    D --> E["Step 5: Final assembly with tool and component"]
    style A fill:#f9f,stroke:#333
    style B fill:#ccf,stroke:#333
    style C fill:#cfc,stroke:#333
    style D fill:#fcc,stroke:#333
    style E fill:#ffc,stroke:#333
text_image
Technical diagram showing a device with labeled components A and B, including a rotating component and directional arrows indicating movement.natural_image
Simple line drawing of a document or paper holder with a rectangular top and horizontal bars at the bottom (no text or symbols)INSTRUCTIONSFORUSE
OFABUILT-INOVEN
EN
OX6771B
Contents
3Introduction.... 27Startingtl
4Safetyprecautions.... 28Endofco
6Otherimportantsafetywarnings...... 29Generals
7Appliancedescription.... 31Generalti
7Ratingplate-productinformation......
8Controlunit......
9Appliance equivalentness levels for different
9Controlightseat
9Guides....
9OversdrogtheAlphaCleanprogramtocleanthe
9Coolingfan.... 41
10Overreenvigentaeadfixedsporlesut.(extendible)
11 Before first use 42
12SwRhehionogforthefiasttigbeavendoorand
13Chosingthesettings.... 43
13PROFESSIONALMODE(probake)......
22AUTOMATICMODE(autobake)......
CHOOSINGEXTRAFUNCTIONS(extra bake)....
25
25Lockingkeys......
27Startingtl
28Endofcoc
29Generals
31Generalti
32Cookingt
37Cooking
39
40Cleaning
41
42
43
45Replacing
46Troubles
46Specialwa
47Disposal
48Cookingt
Wethankyouforyourtrustandthepurchaseofourappliance.
This detailed instruction manual is supplied to make the use of this product easier. The instructions should allow you to learn about your new appliance as quickly as possible.
Makesureyouhavereceivedanundamagedappliance. If youdofindtransportdamage, please contactthesellerfromwhichyoupurchasedtheappliance,ortheregionalwarehousefromwhich itwassupplied. Thetelephonenumbercanbefoundontheinvoiceoronthedeliverynote.
Instructions for installation and connection a resupplied on a separate sheet.
The following symbols are used throughout the manual and they have the following meanings:

INFORMATION!
Information, advice, tip, or recommendation

WARNING!
Warning-general danger
It is important that you carefully read the instructions.
IMPORTANTSAFETYPRECAUTIONS-CAREFULLYREADTHE INSTRUCTION SANDSAVETHEMFORFUTUREREFERENCE.
The appliancemayonlybeconnectedtothepowermainsbyan authorizedservicetechnicianorexpert. Tamperingwiththeappliance ornonprofessionalrepairthereofmayresultinriskofsevereinjury ordamagetotheproduct.
Appliancemustbeconnectedtofixedwiringwhichhasincorporated meansofdisconnection.Fixedwiringmustbemadeinaccordance withthewiringrules.
The appliancemustnotbeinstalledbehindadecorativedoorin ordertoavoidoverheating.
If the supply cord is damaged, it must be replaced by the manufacturer, its service agent or similarly qualified persons in order to avoid a hazard (only for appliance supplied with connection cord).
This appliance can be used by children aged 8 years and above, and by persons with reduced physical, sensory or mental capabilities or lack of experience and knowledge, if they have been given supervision or instruction concerning the use of the appliance in a safeway, and if they understand the hazards involved. Children shall not play with the appliance. Cleaning and user maintenance shall not be done by children without supervision.
WARNING: Accessible parts may become hot during use. Young children should be kept away.
WARNING: The appliance and some of its accessible parts may become every hot during use. Careshould be takento avoid touching heating elements. Children less than 8 years of ages shall be kept away unless continuously supervised.
The appliance is not intended to be controlled by external trimers or separateremote control system.
Onlyusethetemperatureproberecommendedforuseinthisoven.
Donotuseharshabrasivecleanersorsharpmetalscraperstoclean theovendoorglass/theglassofhingedlidsofthehob(as appropriate),sincetheycanscratchthesurface,whichmayresult inshatteringoftheglass.
Donotusesteamcleanersorhigh-pressurecleanerstocleanthe applianceasthismayresultinanelectricshock.
WARNING: Before replacing the light bulb, makes sure the appliance has been disconnected from themains power, in order to prevent the hazard of an electric shock.
Neverpourwaterdirectlyonthebottomoftheovencavity. Temperaturedifferencescouldresultindamagetotheenamel coating.
Otherimportantsafetywarnings
The appliance is intended for household use. Donot use it for any other purpose, such as room heating, drying of pets or other animals, paper, fabrics, herbsetc. Asthism may lead to injury or fire hazard.
The appliance may only be connected to the power mains by an authorized servicetechnician or expert. Tampering with the appliance on nonprofessional repair thereof may result in risk of severe injury or damage to the product.
Werecommendthat(duetoapplianceweight)atleasttwopersonscarryandinstalltheappliance.
Donotlifttheappliancebyholdingitbythedoorhandle.
Ovendoorhingesmaybedamagedwhenunderexcessiveload.Donotstandorsitontheopenovendoor,anddonotleanagainstit.Also,donotplaceanyheavyobjectsontotheovendoor.
If the power cord so of other appliances placed near this appliance get entangled in the ovendoor, they can be damaged, which in turn can result in a short circuit. Therefore, makes sure the power cord so of other appliances are always at as a fast distance.
Makesuretheventsarenevercoveredorobstructedinanyotherway.
Donotlinetheovencavitywithaluminiumfoil, and donotplaceanybakingtraysorothercookware ontheovenbottom. This would obstruct and reduce air circulation in the oven, slowdown the baking process, and destroy the enamel coating.
Werecommendyouavoidopeningtheovendoorduringbaking,asthisincreasespowerconsumption andincreasescondensateaccumulation.
Attheendofthebakingprocess, and during baking, be careful when opening the ovendoor, as there is dangerofscalding.
Topreventlimescaleaccumulation,leavetheovendooropenafterbakingorusingtheoven,to allowtheovencavitytocooldowntoroomtemperature.
Cleantheovenwhenithascompletelycooleddown.
Eventualmismatchesincolourshadesbetweendifferentappliancesorcomponentswithinasingledesignlinemayoccurduetovariousfactors,suchasdifferentanglesunderwhichtheappliancesareobserved,differentcolouredbackgrounds,materials,androomillumination.

WARNING!
Carefullyreadtheinstructionsforusebeforeconnectingtheappliance.Repairorany warrantyclaimresultingfromincorrectconnectionoruseoftheapplianceshallnotbe coveredbythewarranty.

INFORMATION!
Appliancefunctionsandequipmentdependonthemodel.
Basicequipmentofyourapplianceincludeswireguides,shallowbakingtray,andawirerack.
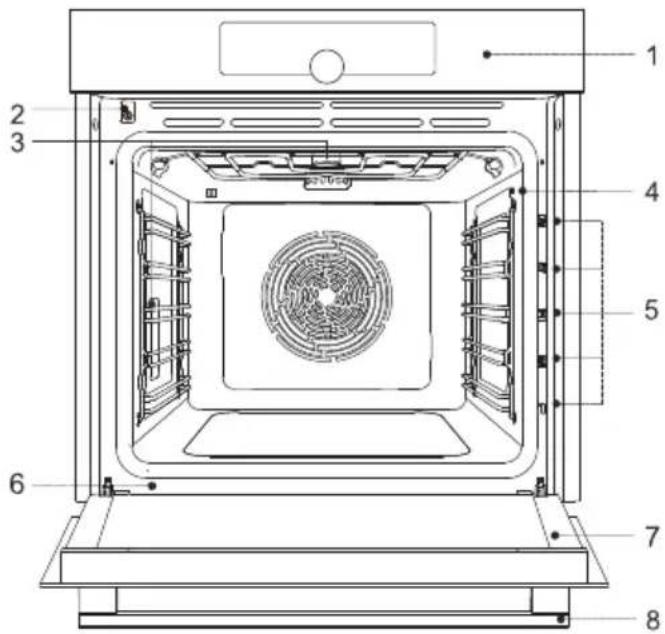
text_image
Technical diagram of an oven with numbered components for identification- Guides-cooking levels 1. Control unit
6.Ratingplate2.Doorswitch
7.Ovendoor3.Lighting - Doorhandle4. Temperatureprobesocket
Ratingplate-productinformation
Aratingplatewithbasicinformationabouttheapplianceisattachedtotheedgeoftheoven.

text_image
XXXXXX XXXXXX XXXXXX XXXXXX 1 2 3 4 5 6 7 85.ID/code1.Serialnumber
6.QRcode(dependingonthemodel)2.Model
7. Technical information3. Type
8.Compliancelabels/symbols4.Brand
Appliancedescription
Controlunit
(dependingonthemodel)
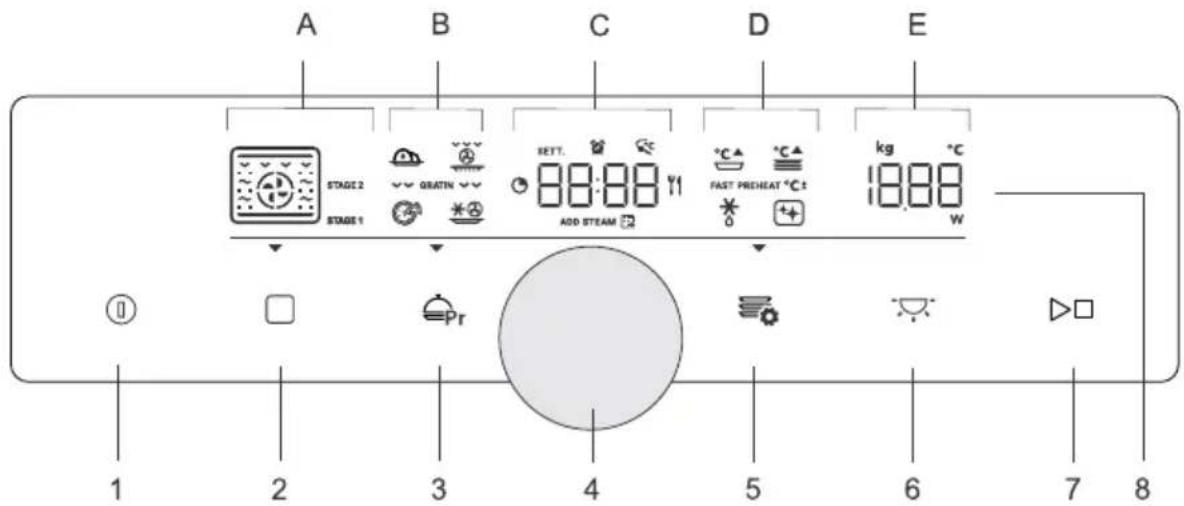
text_image
A B C D E STAGE 2 STAGE 1 GRATIN SETT. ADD STEAM FAST PREHEAT °C kg W Pr 1 2 3 4 5 6 7 81.onloffkey
2.(probake)professionalmodekey
3.(autobake)automaticmodekey
4. Settingsselectionandconfirmationknob
-rotatetheknobtochooseasetting
-presstheknobtoconfirmthesetting
5.(extrabake)keyforextrafunctionsandgeneralappliancesettings
6.(light)keyforswitchingtheovenlightingonandoff
7. start1stopkeyforstartingorpausing, and confirmingsettings
8. Displayunit:
A. bakingsystems, stepmode(STEP)
B.specialbakingsystems, automaticprograms, gratins
C.clock,timerfunctions,temperatureprobe,bakingtime
D.specialprograms,preheating
E.temperature,weight
Illuminated part of the theline - display the currently selected field from AtoE.

Arrow-displaystheselectedbasicsetting(probake),(autobake),(extrabake).

INFORMATION!
Forbetterkeyresponse,touchthekeyswithalargeareaofyourfingertip.Eachtimeyoupress akey,thiswillbeacknowledgedbyashortacousticsignal(ifthefunctionisavailable).
Controllights
Ovenlight: ovenlightisswitchedonwhenyouopenorclosetheovendoor,whenyouswitchon theoven,attheendofthebakingprocess,andwhenyoutouchtheovenlightkeyonthecontrol unit.
Guides
•Theguidesallowcookingorbakingon5racklevels.
- The height level so of guides in which the rack scan be inserted shall be counted from bottom up.
•Guidelevels4and5areintendedforgrilling/broiling.
- Wheninsertingequipment, it should be correctly rotated.
•Alwayspushtheequipmentallthewayintotheappliance.
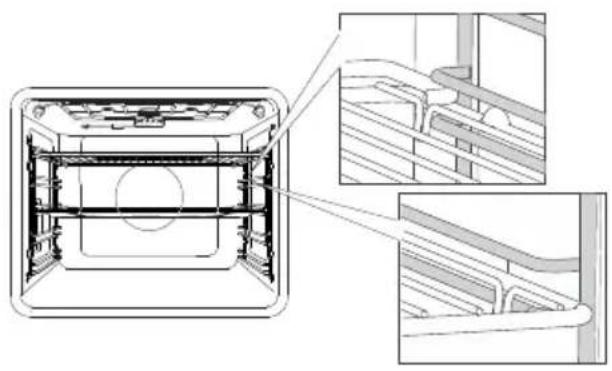
Wireguides
natural_image
Technical line drawing of a front panel assembly with internal components and mounting brackets (no text or symbols)Incaseofwireguides, alwaysinsertthewire rackandthebakingtrayintotheslotbetween theupperandlowerpartofeachguidelevel.
Ovendoorswitch
(dependingonthemodel)
Iftheovendoorisopenedduringovenoperation,theswitchturnsofftheheaterandfanintheoven cavity. Whenthedoorisclosed,theswitchturnstheapplianceoperationbackon.

WARNING!
Usingtheovenwiththedooropenandthedorswitchengaged(closed)isnotallowed.
Theovenwillsignalanerror, anditwillhavetobereset.
Coolingfan
The appliance is fitted with a cooling fan that cool the housing, the door, and the appliance control unit. After the oven is switched off, the cooling fan continues to operate for a short while in order to cooldown the oven.
Applianceequipment
Ovenequipmentandaccessories
(dependingonthemodel)

The WIRERACK is used for grilling/broiling or support forapan, baking tray or baking dish with the foody you are baking.

INFORMATION!
Thereisasafetylatchonthewirerack. Therefore, the wirerack hastobelifted slightly at the front when pulling it out from the oven.

natural_image
Simple line drawing of a rectangular tray or container with no text or symbolsSHALLOWBAKINGTRAYisusedforflatand
smallpastry.Itcanalsobeusedasadriptray.

WARNING!
Theshallowbakingtraymaydeformas itheatsupintheoven.Onceitcools down,itreturnstotheinitialshape.Such deformationdoesnotaffectitsfunction.
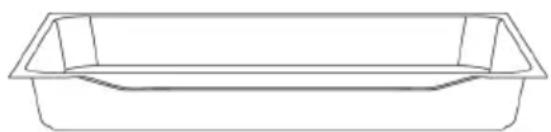
natural_image
Simple line drawing of a rectangular container with a side recess (no text or symbols)TheALL-AROUNDDEEPBAKINGTRAYis
usedforroastingvegetablesandbakingmoist pastry.ltcanalsobeusedasadriptray.

INFORMATION!
Neverinserttheall-purpose(oruniversal) deepbakingtrayintothefirstguideduring baking.

WARNING!
The appliance and some of the accessible part tend to heat up during cooking.
- Removeovenaccessoriesandanypackaging(cardboard,polystyrenefoam)fromtheoven.
- Wipetheovenaccessoriesandinteriorwithadampcloth.Donotuseabrasiveoraggressive clothsorcleaners.
- Heatanemptyovenforapproximatelyonehourwiththetopandbottomheatersystemata temperatureof250°C.Thecharacteristic"newovenscent"willbereleased;therefore,ventilate theroomthoroughlyduringthisprocess.
Switchingonforthefirsttime
Afterconnectingyourapplianceorafteranextendedpoweroutage,12:00willflashonthedisplay.
First, choose and confirm the following basic settings.

INFORMATION!
Change them by rotating the KNOB. To confirm the desired setting, press the KNOB or touch the key.
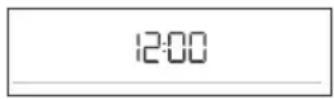
1.CLOCKSETTING
Settheclock/timeofday.First,setandconfirmtheminutes;thenset and confirmthehours.

INFORMATION!
Tosetoradjusttheclocklateron,seechapterExtrafunctions.

2.ACOUSTICSIGNALVOLUME
Mediumvolumeisthedefaultsetting.ThesignVoLandthecurrently setvaluefortheacousticsignalvolumewillappearonthedisplayunit. RotatetheKNOBtoincreaseordecreasethekeyvolume.

3.DISPLAYDIMMER
Mediumlightintensityisthedefaultsetting.Thesignbrhtandthe currentlysetvalueforthedisplaylightintensitywillappearonthedisplay unit.RotatetheKNOBtoincreaseordecreaselightingintensity.
Afteryouconfirmtheselectedsettings, theclockwillappearonthedisplayunit. The appliance is instandbymode.
The interface allows choosing several operating modes:
•Professionalmode(probake)
•Automaticmode(autobake)
•Extrafunctions(extrabake)
•Stepprogram(STAGE)intheprofessionalmode(probake)
•Automaticprogramsinautomaticmode(autobake)

INFORMATION!
- RotatetheKNOBtoscrollthroughthesettings.
- First, confirmtheselectedsettingbypressingtheKNOB; then, changethesetting.
- ConfirmeachsettingbypassingtheKNOB.
- Alineandanarrowindicatethelocationoftheparameterthatyouarelookingtoset.
• Pressthekeytostarttheprogram.
• Operationofthekey:
-brieftouch:switchtheovenonoroff,stopthebakingprocessorfunction.
-longtouch:theovenswitchestolowpowerconsumption(powersaving)mode.
NokeyorKNOBareactive, exceptforthekey. Toswitchontheoven, long-touch this key.

PROFESSIONALMODE(probake)
This function allows setting the baking parameters – baking system, temperature, fast preheating, and baking time–freely, at the user's discretion.
Touchthekeyandsetthefollowing:
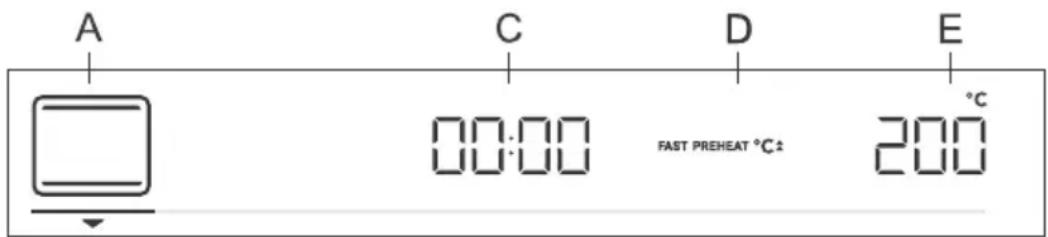
text_image
A C D E 00:00 FAST PREHEAT °C± 200 °CAbakingsystem
Cprogramduration
Dpreheating
Etemperature
Additionally, the following can be set:
-timerfunctions(seechapterTimerfunctions)
-stepbakingmode(STAGE)(seechapterstepprogram)
-gratin(GRATIN)(seechapterStartingthecookingprocess)
Fastpreheat
Usethefastpreheatingfunctionifyouwishtoheattheoventothedesiredtemperatureasquickly aspossible.
Choosingthesettings
Toactivatefastpreheating, rotatetheKNOBtothesetting(seeimage, labelD)C
Confirmtheselection. RotatetheKNOBtoselectthefullylitsignandconfirmit. Thefunctionisnow activated.
When these selected temperature is reached, the preheating process stops and can be acoustics signals emitted. door will appear on the display unit. Open the door and insert the food. The program will automatically continue baking with selected settings.

INFORMATION!
When the quick preheating function is activated, delayed start function cannot be used.
Appliancefunctionsandequipmentdependonthemodel.
| UseSymbol | |
 STEAM + STEAM + | HOTAIRHotairallowsbetterflowofhotairaroundthefood. Thisway, itdriesoutthesurface and createsathickercrust. Usethissystemtocookmeat, pastryandvegetables, andtodryfoodonasinglerackormultiplerackssimultaneously.Steaminjectionresultsinbetterbrowningandmorecrunchinessofthesurface. |
 | PIZZASYSTEMThissystemisoptimalforbakinghomemadepizzaandpastrywithhigherwater content. Useittobakeonasinglerack, whenyouwantthefoodtobedonefaster andtobecrunchy. |
 STEAM + STEAM + | EXTRACRISP(INTENSIVEBAKING)1)Thiscookingmethodresultsinacrunchycrustwithoutaddedfat. Thisahealthy versionoffast-foodpreparing, resultinginlowercaloriecontent. Suitableforsmaller cutsofmeat,fish,vegetables,andfrozenproductsreadyforextracrispiness (Frenchfries,chickennuggets).Steaminjectionresultsinbetterbrowningandmorecrunchinessofthesurface. |
 | GRILLWITHHOTAIRHotairallowsbetterflowofhotairaroundthefood. Thiswilldryoutthesurface. In combinationwiththegrillheater/broiler, thiswillalsoresultinamoreintensive colour.Forfasterbakingofmeatandvegetables. |
 | TURBOBAKEFordisheswhereevencrispinessfromallsidesidesirable. Thesystemisalso suitableasthefirststepinthestepbakingmode, asitallowsquickbrowningof thesurfaceinthefirststageandslowbakinginthesecondstage. Themeatwill bejuicywithanicelybrownedcrust. |
Tablecontinuedfromlastpage
| UseSymbol | |
 | LARGEGRILLUsethissystemtogrillargeamountsofflat-shapedfoodliketoast,opensandwiches,grillsausages,steaks,fish,skewersetc.,aswellasforcookingaugratinandforbrowningthecrust.Theheatersmountedonthetopoftheovencavityevenlyheattheentiresurface.Maximumallowedtemperature:240°C |
 | TOPANDBOTTOMHEATER1)Usethissystemforconventionalbakingonasinglerack,makingsoufflés,andbakingatlowtemperatures(slowcooking).Steaminjectionresultsinbetterbrowningandacrunchiercrust. |
| STEAM+ | |
 | GENTLEBAKINGForgentleandcontrolledslowcookingofdelicatefood(softcutsofmeat)andbakingpastrywithacrunchybottom. |
 | TOPANDBOTTOMHEATERWITHFANForevenbakingoffoodonasinglerack,andformakingsoufflés. |
 | LARGEGRILLWITHFANForroastingpoultryandlargercutsofmeatunderabroiler. |
 | LARGEGRILLANDBOTTOMHEATERForfasterbakingonasinglerackandforcrisplybrowningthetopofyourpastry. |
 | GRILLWITHBOTTOMHEATERANDFANForoptimumbakingofyeast-leaveneddough,alltypesofbread,andforpreservation. |
1) Thesystemsalsoallowsteaminjectionduringbaking(seechapterStartingthecookingprocess).

INFORMATION!
Inthesesystems,itispossibletousethegratinfunction(seechapterStartingthecookingprocess).
Touchthekey@startthecookingprocess.Selectedsettingswillappearondisplayunit.
TIMERFUNCTIONS
RotatetheKNOBtoselectthetimerfunctions.
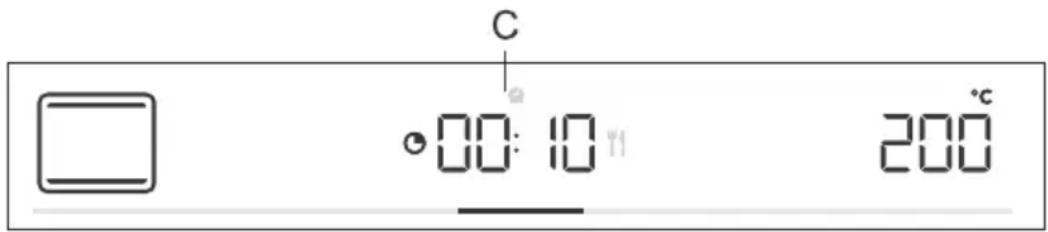
text_image
C 00:10 200°C| UseDescriptionSymbol | ||
 | Bakingtime | Inthismode,youcanspecifythedurationofoperationforthe oven. |
 | Eggtimer | Theindependentalarmoperatesindependentlyoftheoven operation.Afterthesetimehasexpired,theappliancedoesnot turnonoroffautomatically. |
 | Delayedend | Usethismodewhenyouwantthefoodintheoventostartcooking withatimedelay.Enterthedurationanddesiredendtimeof cooking.Theappliancestartsautomaticallyandendsitsoperation atthedesiredtime. |

Settingthecookingtime
In this mode, you can specify the duration of oven operation (cooking time).
Thedisplayshowsforthedurationofoperation.RotatetheKNOB tosetthedesiredoperatingtime.Confirmthesettingbypassingthe KNOB.
Touchthekeytostartbaking.

Minutemindersetting
Theminutemindercanbeusedindependentlyofovenoperation. The longestpossiblesettingis24hours. Duringthelastminute, the minute minderisdisplayedinseconds.
RotatetheKNOBtoselectthesymbolandconfirmyoursetting. RotatetheKNOBandsettheminuteminderduration.Confirmthesetting bypassingontheKNOB.

Settingdelayedend

INFORMATION!
Delayedstartisnotpossiblewhenthepreheatingfunctionis activated.
Usethisfunctionwhenyouwishtostartcookingthefoodintheoven afteracertainperiodoftime.Placethefoodintotheoven,thensetthe systemandtemperature.Then,settheprogramdurationandthetime whenyouwishyourfooddone.
Example:
Currenttime:12:00(noon)
Cookingtime:2hours
Endofcooking:at18:00(6p.m.)
The cooking durations symbol will appear on the display unit. Choose the setting and confirm it by pressing the KNOB (in our case, 2:00).
PresstheKNOBagainandrotateittoselectthesymbol.Confirm andsetthetimewhenyouwishyourfoodtobedone(inourcase,this is18:00,or6p.m.).Desiredcookingendtimewillappearonthedisplay unit(18:00).ConfirmthesettingbypassingontheKNOB.
Touchthekeytostartbaking.
Whilewaitingtobeactivated, theovenswitchestoapartialstand-by (thedisplayunitgoesdark). Theovenwillswitchonwiththeselected settingsautomatically(inourcaseat16:00,or4p.m.). Theovenwill switchoffatthesetime(inourcase,thisis18:00,or6p.m.).

INFORMATION!
Cookingendtimeandtheclockwillalternateonthedisplayunit.
Afterthesetimehasexpired, theovenstopsworkingautomatically. ThedisplaywillshowEnd.Anacousticsignalwillbeheardwhichyou mayturnoffbytouchinganykey.Afteroneminute,theacousticsignal willbeswitchedoffautomatically.

WARNING!
Thisfunctionisnotsuitableforfoodrequiringfastpreheating.
Perishablefoodshouldnotbekeptintheovenforalongtime. Beforeusingthismode, checkwhethertheclockonthe applianceisaccuratelyset.

INFORMATION!
Theselecttimerfunctioncanberesetto00:00bylong-pressingtheKNOB.
STEPPROGRAM
This function allows baking into most steps or stages (two consecutive baking steps are combined in asingle cooking process).
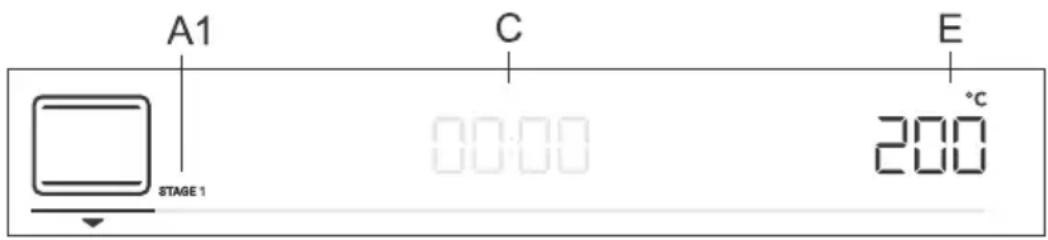
text_image
A1 C E STAGE 1 00:00 200 °CA1firstcookingstepSTAGE1,(STAGE2)
Cprogramduration/endofprogram(seechapter"TimerFunctions")
Etemperature/power
Step:STAGE1
Choosingthesettings
Inthemode, setthebakingsystemandtemperature. You can also choose the fast preheating function. Then, setthebakingdurationforSTAGE1(seechapterTimerFunctions). Confirm the setting by pressing on the KNOB.

INFORMATION!
InSTAGE1, you can set the delayed start; however, if you doso, you cannot activate fast preheating.
Step:STAGE2
Pressandholdthekey.STAGE2(secondcookingstep)willappearonthedisplayunit(thefirst onehasalreadybeenset).Setthebakingsystem,temperature,andduration.Confirmthesetting bypassingontheKNOB.
If you wish, you can also modify STAGE1 or STAGE2 before starting them.
TouchthekeyandselectSTAGE1.Nowyoucanchangethesettings.Then,dothesamefor STAGE2.
Todeletethestepmode, pressandholdthekey.

keytostartbaking.TheovenfirststartstooperatewiththesettingsselectedforSTAGE1.Whenthe STAGE1isdone,STAGE2isactivated.
STEAMINJECTION DURINGBAKING
Steaminjection results in better browning and acrunchier crust.
Waterfromthetankdripsinacontrolledmannerintoatraynexttoupperheaters. Thisway, just the rightamountofsteamisgenerated, resultinginbetterbrowningandcrunchiercrust, whilethecrumb orcoreremainsspringyandfluffy. Werecommendusingsteaminjectionwhenbakingbread, fresh rolls, spongerolls, cakes, aswellassmallercutsofpoultryandvegetables.
Steaminjection during cooking can be used with the following systems: , . In addition to the system, the display also shows ADD STEAM
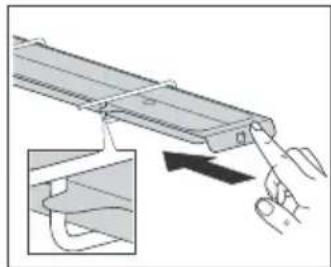
natural_image
Diagram of a mechanical component with an inset showing a hand interacting with a curved tool (no text or symbols present)1. Selecting the function
Inserttheevaporatingdishontherightside,underthetopoftheoven cavity.
text_image
A C E 00:10 ADD STEAM 200°CAcookingsystem
Cprogrammeduration
Etemperature

INFORMATION!
This function operates in atemperaturerange between 150-250°C.
Preheatinginsystemswithsteaminjectioncannotbeset. The correspondingsteameffectisachievedifthefunctionisswitched onwhiletheovenisstillcold.
F1 LL
2.Switchingonthefunctionandfillingthewatertank
Startcookingbypassing.

ThedisplaywillshowFill.Fillthewatertank(seechapterFillingthe watertankbelow),thenpresstheKNOBtoconfirm.

INFORMATION!
While this function is active, you may hear the sound of the pump, which is part of normal appliance operation.
UnF1
YES
3. Switchingoffthefunction, finishing the cooking process and cleaning the watertank
If there is left over water in the tank after cooking, the display will show UnFiL when the ovencools down, meaning that you should empty the watertank.
Choosingthesettings
natural_image
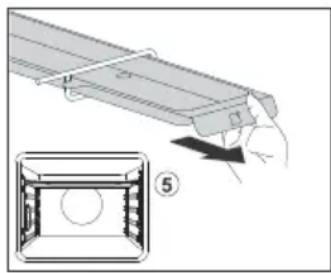
Diagram showing a hand holding a metal frame with a pull-up arrow, alongside a zoomed-in view of the interior (no text or symbols)Removefoodfromtheoven.
Todrainthewaterfromthetankimmediately,removetheevaporating dishandinsertanall-purposedeepbakingtrayonthe5thlevel.Turn theKNOBandselectYES.Theprocessofemptyingthewaterfromthe tankbegins.Whentheprocessiscomplete,removethebakingtray withwaterfromtheovenandwipetheovendry.
If you want to empty the watertank later, select No (see chapter Selecting general settings).

INFORMATION!
If,whenthedisplayshowsUnFiL,youdonotselectYES,thewarning willbedisplayedagainthenexttimeyouusetheoven.
Duringovenheating, the evaporating tray may deform, but this does not affect its function.
Fillingthewatertank
Thewatertankallowsforindependentwatersupplytothesteamoven.Watertankcapacityis approximately1.3dl.
Alwaysfillthetankwithcleantapwaterorbottledwaterwithoutadditives.Waterpouredintothe watertankshouldbeatroomtemperature,i.e.approximately20°C(+/-10°C).
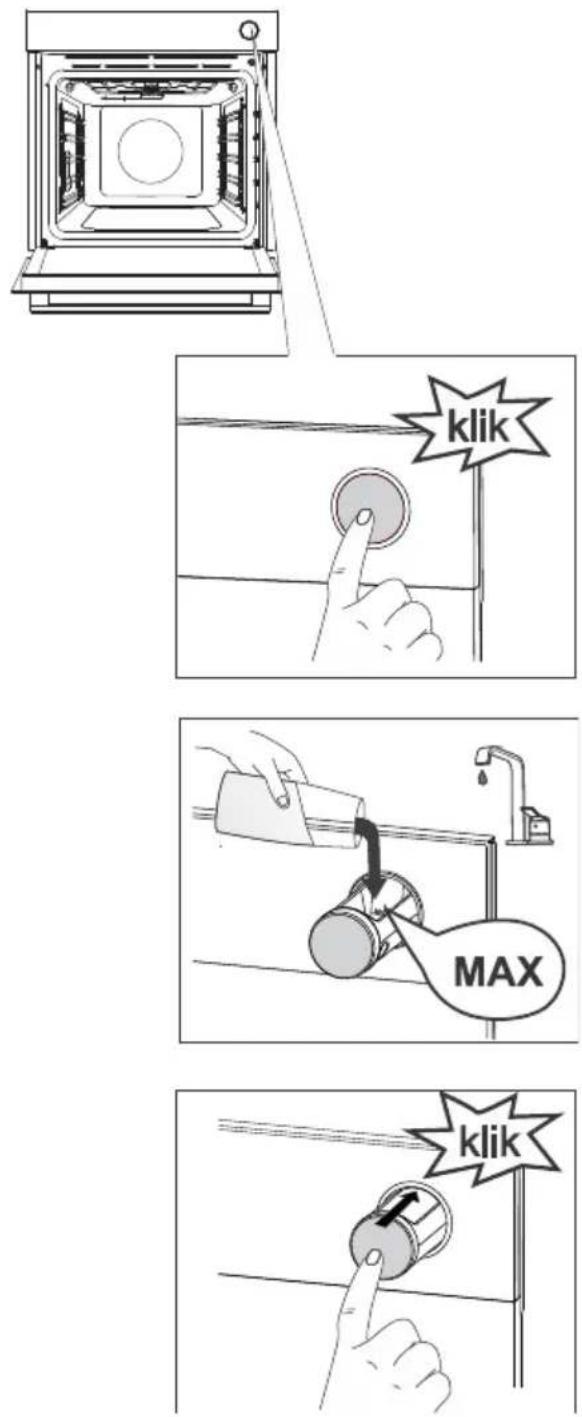
1Removethewatertankfromthehousingby pressingtheknob.Whenyoupresstheknob, thetankjumpsout.

INFORMATION!
Thewatertankcannotberemovedfrom theappliance.
2PourwateruptotheMAXmarkonthewater tank(sufficientfortheentirecookingprocess).
3Pressthewatertankbackintothehousing asfarasitwillgo(itwillclickintoplace).

WARNING!
If you fail to observ the MAX mark on the watertank and add to much water, the excessive water may flow out through a slot between the watertank lid and the watertank, and dripto the floor.
Donotusedistilledwater,tapwaterwith highchlorinecontent,orthersimilar liquids.Useonlyfreshtapwater, softenedwaterornon-carbonated mineralwater.

AUTOMATICMODE(autobake)
In this mode, you may choose between special bakings systems or automatic programs (preset programs for particular types of food).
Specialbakingsystems
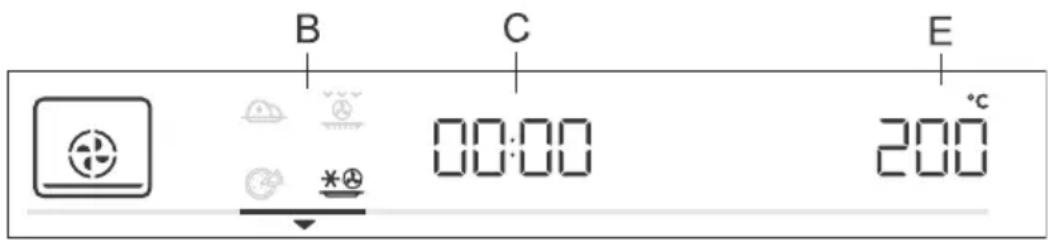
Touchthekeyandsetthefollowing:
text_image
B C E 00:00 200°CBspecialbakingsystems
Cprogramduration(seechapterTimerfunctions)
Etemperature
RotatetheKNOBandchooseyoursettings.Presetvalueswillbedisplayed:Youcanchangethe temperatureandprogramduration.
| UseSymbol | |
 | BAKINGFROZENFOOD1)Thismethodallowsbakingfrozenfoodinashorterperiodoftimewithout pre-heating.Optimumforpre-bakedfrozenproducts(bakeryproducts,croissants, lasagne,Frenchfries,chickennuggets),meatandvegetables. |
 | PIZZASYSTEM1)Thissystemisoptimalforbakinghomemadepizzaandpastrywithhigherwater content.Useittobakeonasinglerack,whenyouwantthefoodtobedonefaster andtobecrunchy. |
 | SLOWBAKING2)Forgentle,slowandevencookingofmeat,fishandpastryonasinglerack.This cookingmethodwillleavethemeatwithahigherwatercontent,makingitjuicier andmoretender,whilepastrywillbeevenlybrowned/baked.Thissystemisused inthetemperaturerangebetween 140^ and 220^ . |
 | EXTRACRISP(INTENSIVEBAKING)1)Thiscookingmethodresultsinacrunchycrustwithoutaddedfat.Thisisahealthy versionoffast-foodpreparing,withfewercaloriesinthecookedfood.Suitablefor smallercutsofmeat,fish,vegetables,andfrozenproductsreadyforextracrispiness (Frenchfries,chickennuggets). |
1) Inthesesystems, itispossibletousethegratinfunction(seechapterStartingthecookingprocess).
2) ThisfunctionisusedfordeterminingtheenergyefficiencyclasspursuanttotheEN60350-1standard.
Fastpreheat
Cookingproceduresforsomedishesintheautobakemodealsoincludethefastpreheatingfunction.
Thesignwillbefullylit. Whentheselectedtemperatureisreached, thepreheatingprocessstops and an acoustic signal is emitted. door will appear on the display unit. Open the door and insert the food. Theprogramwillautomaticallycontinuebakingwithselectedsettings.

INFORMATION!
Whenthefastpreheatfunctionisactivated, delayedstartfunctioncannotbeused.
Automaticprograms
In the automatic mode, you may choose between numerous automatic programs (the appliance will recommend the optimum cooking method, temperature, and cooking duration depending on the type of food specified).
Pressandholdthekeytedisplaytheautomaticprogramsonthedisplayunit(seetable).
Wherepossible,youcanalsosettheweightofthefood.
ConfirmyoursettingbypassingtheKNOB.Touchthekeytostartbaking.Presetvalueswill appearonthedisplayunit.
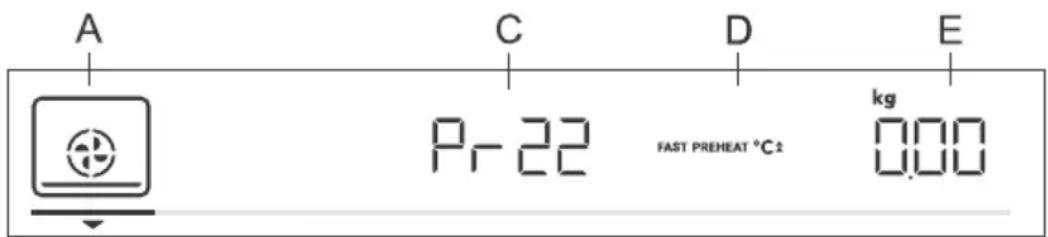
text_image
A C D E Pr-22 FAST PREHEAT °C2 kg 0.00Abakingsystem
Cautomaticprogramindication/programduration
Dfastpreheating
Eselectedamount
| TurningPreheating | |||||
| noyes3shallowba | |||||
| noyes3shallowba | |||||
| Pr03 | spongecake | rack | noyes2bakingpan, | ||
| Pr04 | smallpastry | noyes2shallowba | |||
| noyes2shallowba | |||||
| Pr06 | applepie | rack | 2bakingpan/dishonwire | no | |
| Pr07 | apple strudel | shallow baking tray | 2 | no | no |
| Pr08 | chocolatesoufflé | rack | noyes3bakingpan, | ||
| Pr09 | rising and proofing | shallow baking tray | 2 | no | no |
| Pr10 | bread | shallow baking tray | 2 | no | no |
| Pr11 | porkroast | wirerack | 2smallbakingdishon | no |
Choosing the settings
Tablecontinuedfromlastpage
| TurningPreheatingL | |||||
| roastedbeefPr12 | wirerack | nono2smallbaking | |||
| poultry-wholePr13 | tray | no2wirerafterw12/adrip cookingtime | |||
| Pr14 | poultry-smaller pieces | tray | no3wirerafterw12/adrip cookingtime | ||
| meatloafPr15 | rack | nono2bakingpan/c | |||
| Pr16 | oven-bakedbeef steak | tray | no4wirerafterw12/adrip cookingtime | ||
| meat-slowcookingPr17 | wirerack | noyes2smallbakin | |||
| Pr18 | baked/grilledfish | tray | no4wirerafterw12/adrip cookingtime | ||
| Pr19 | wedges | bakedpotatoes- nono3shallowbaki | |||
| Pr20 | Vegetablesoufflé | rack | nono2bakingpan/c | ||
| Pr21 | lasagne | rack | nono2bakingpan/c | ||
| homemadepizzaPr22 | shallowbak |

INFORMATION!
Gratinfunctioncanbeusedwithsomeautomaticprograms(seechapterStartingthecooking process).

CHOOSINGEXTRAFUNCTIONS(extrabake)
Touchthekeytodisplayextrafunctionswiththeirrespectivepresetvaluesonthedisplayunit.
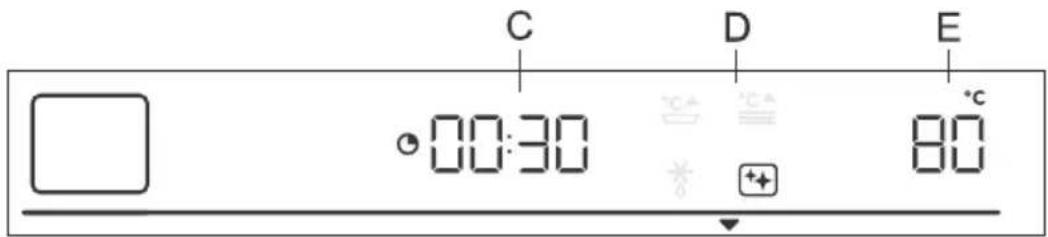
text_image
C D E 00:30 80 °CCcookingduration
Dprogram
Epresettemperature
RotatetheKNOBandselecttheprogram.Presetvalueswillbedisplayed:Someprogramsallow settingthetemperatureandcookingtime.

INFORMATION!
RotatetheKNOBtoscrollthroughtheprograms.ConfirmeachsettingbypassingtheKNOB.

Aquaclean
Thisprogramallowseasyremovalofstainsfromtheoven(seechapterCleaningandMaintenance.)

Defrosting
Usethisfunctiontoslowlydefrostfrozenfood(cakes,pastry,bread,rolls,anddeep-frozenfruit).
Halfwaythroughthedefrosttime,thepiecesshouldbeturnedover, stirredandseparatediftheywerefrozentogether.

Reheating
Thisisusedtokeepwarmthefoodthathasalreadybeencooked.You maysetthetemperatureandreheatingstartandendtime.

Platewarming
Usethisfunctiontoreheatyourdinnerware(plates,cups)beforeserving foodinittokeepthefoodwarmlonger.Youmaysetthetemperature andreheatingstartandendtime.
Lockingkeys
Toactivatethechildlock,pressandhold(for5seconds)thelightkey.Locwillappearon thedisplayunit.Whenyoulong-pressthelightkeyagain,thechildlockisdeactivated.
- If the lock is activated with no timer function engaged (only clock is displayed), then the oven will not operate.
Choosingthesettings
- If the child lock is activated after a timer function has been set, then the oven will operate normally; however, it will not be possible to change the settings.
- Whenthechildlockisactivated, cookingorbakingsystems(modes)oradditionalfunctions cannotbechanged. Thecooking/baking/roastingprocesscanonlybestoppedorswitchedoff.
- Child lock will remain active after the oven is switched off. To select a new system, the child lock mustfirstbedeactivated.
Startingthecookingprocess

Startthecookingprocessbypassingthekey. ▷□ Untilthesettemperatureisreachedforthefirsttime,thecurrentand thesettemperaturewillalternateonthedisplayunit.Thetemperature symbolflashesatfirst.Whenthedesiredtemperatureisreached,it goesoff.

INFORMATION!
If notimer function is selected, cooking timewill appear on the display unit. A short acoustic signal is emitted when the oven reaches these selected temperature.

Extragratin
You may only activate this function 10 minutes after the start of the cooking process (thesymbol will appear on the display unit).
PresstheKNOBtoopensettings.RotatetheKNOBtothesign
GRATIN and confirm your selection. RotatetheKNOBagain and select the fully litsign. Confirm your selection. The function is now activated. Cooking time of 10 minutes (10:00) will appear on the display unit.
Tochangetheduration, pressontheKNOBtwiceandrotateittoadjust thetime(max.30min). Confirmyourselection.
The function is used in the last stage of the cooking process when you add sauce/wetrubordryrubonto the food, or when you wish to additionally brown the crust. A golden-brown crust will form the dish during thegratin process, which protect the food from drying out, while also imparting amorepleasant appearance and better flavour.

INFORMATION!
The function can also be switched off while it is in progress. Rotate the KNOB to these setting and press on the KNOB to confirm. Choose the dimmed sign and confirm by pressing on the KNOB.
Endofcookingbytouching
Stopthecookingprocessbytouchingthekey.Endappearsondisplayunitandanacoustic signalisemitted.

INFORMATION!
After the operation is completed, all timersettings are also stopped and deleted, except for the eggtimer. Time of day (clock) will be displayed. The cooling fan will continue to operate for a while.
Aftertheuseoftheoven, somewhat may be left in the condensate channel (underneath the door). Wipethechannel with as spongeoracloth.
Press and hold the ⚪ key. SEtt will appear on the display unit for a few seconds. Then, the general settingsmenuwillappear.

INFORMATION!
RotatetheKNOBtoscrollthroughthesettings.ConfirmeachsettingbypassingtheKNOBor thekey
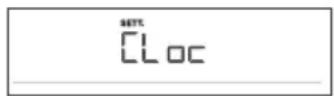
Clockdisplay
RotatetheKNOBtosettheclock.CLocwillappearonthedisplayunit. Afterconfirming,youcanchoosebetweenthe12hand24hclock display.Confirm,thensettheclock/timeofday.First,settheminutes. Confirm,andthensetthehoursandconfirmagain.

Acousticsignalvolume
Choosebetweenthreeacousticsignalvolumelevels.RotatetheKNOB tochoosetheVoLsetting.Confirmthesettingandsetthevolume.There arefouravailablevolumelevels(zerobars-OFF,one,twoorthree bars).
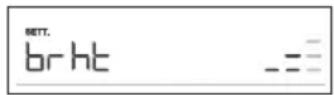
Displayillumination
Choosebetweenthreelevelsofdisplaylightintensity.RotatetheKNOB toselectthebrhtsetting.Confirmyourselectionandchooseloweror higherintensity.Therearethreeavailableilluminationlevels(one,two orthreebars).

Displayunit-nightmode
Thisfunctionwillautomaticallydimthedisplay(switchfromhightolow displayilluminationlevel)duringnighttime(8:00p.m.to6:00a.m.). ChoosethenGhtsetting RotatetheKNOBtoswitchOnorOFF.
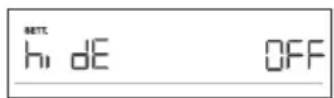
Standby
Thisfunctionswitchestheclockdisplayonoroff.SelectthehidE setting.RotatetheKNOBtoswitchOnorOFF.
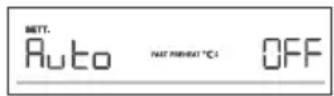
Automaticfastpreheating
Thisfunctionallowsautomaticadditionoffastpreheatingtothebaking systemsthatallowit. RotatetheKNOBtoselecttheAutosetting.ChooseOnorOFF.
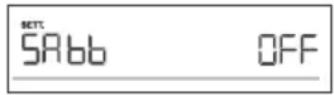
Sabbath
The Sabbathfunctionallowskeepingthefoodwarmintheovenwithout havingtoswitchtheovenonoroff.
RotatetheKNOBtoselectSAbb.ChooseOnorOFF.
Settheduration(between24and72hours)andtemperature. Confirm eachsettingbypassingtheKNOB.
If you wish the oven light to be on all the time, switch it on by touching the symbol.
Touchthekeytostartthecountdown.SAbbwillappearonthe displayunit.
Allsoundsandoperationwillbedeactivated,exceptforthekey.

INFORMATION!
In case of a power outage, the Sabbath modewill bedeactivated and the oven will return to the initial state.

Factorysettings
Thisfunctionallowsresettingtheappliancetofactorysettings.FAct willappearonthedisplayunit.RotatetheKNOBtoselectrES.Press thekeyuntiltheendoftheanimationtoconfirm.

WARNING!
Afterpoweroutageoraftertheapplianceisswitchedoff,additionalfunctionsettingswill remainstoredfornomorethanafewminutes.Then,allsettings,exceptfortheacoustic signalvolumeanddisplaydimmerwillberesettofactorydefaults.
Generaltipsandadviceforbaking
- Remove all unnecessary equipment from theovenduringbaking
- Use equipment made of heat-resistant non-reflective materials (supplied baking trays and dishes, enamel-coatedcookware, temperedglasscookware). Bright-coloured materials (stainlesssteel oraluminium) materials reflectheat. As a result, thermal processing of food in them is less effective.
- Alwaysinsertthebakingsheetsandtraystotheendoftheguides.Whenbakingonthewire rack, placethebakingdishesortraysinthemiddleoftherack.
- Foroptimumfoodpreparation, were recommend observing the guidelines specified in the cooking table. Choosethelowerspecifiedtemperatureandtheshortestspecifiedcookingtime. When thistimeexpires, check theresultsandthenadjustthesettingsasnecessary.
- Unlessitisabsolutelynecessary, donotopentheovendoorduringbaking.
- Donotplacethebakingtraysdirectlyontotheovencavitybottom.
- Donotcovertheovencavitybottomorthewirerackwithaluminiumfoil.
- Withlongercookingprograms,youcanswitchofftheovenapproximately10minutesbeforethe endofcookingtimetomakeuseoftheaccumulatedheat.
•Alwaysplacethebakingdishesontothewirerack. - When cooking according to recipes from older cookbooks, use the bottom and top heater system (asinconventionalovens)andsetthetemperature10°Clowerthanspecifiedintherecipe.
- If you are using parchment paper, make sure it is resistant to high-temperatures. Always trim it accordingly. Parchmentpaperpreventsthefoodfromstickingtothebakingtrayandmakesit easiertoremovethefoodfromthebakingtray.
- When cooking larger cut of meat or pastry with higher water content, alot of steam will be generated inside the oven, which in turn may condense on the oven. This is an normal phenomenon which will not affect the operation of the appliance. After the cooking process, wipethedoor and the doorglass dry.
- When baking directly on the wire rack, insert the all-purpose deep tray one level lower to serve asadriptray.
Fast preheating of the oven: Only preheat the oven if required by the recipe of in the tables in these instructions for use. If you are using the fast preheating function, donot insert the food into the oven until the oven is fully heated. Temperature has as substantial effect on the final result. Fast preheating is recommended for delicate cut sof meat (sirloin), and for yeast-leavened and sponge dough that require a shorter baking time. Heating an empty oven consumes alotofenergy. Therefore, if possible, were recommend cooking severaldishes in succession, or making severaldishes simultaneously.
GentleBake: Allows slow and controlled cooking at a low temperature. The meat juices are distributed evenly, and themeatremainsjuicyandtender. The Gentle Bakeslowcooking method dissuitable for delicate bonelessmeatcuts. Before slow cooking, searthemeatthoroughly from all sidesinafrying pan.
Cookingtable
NOTE: Dishesrequiringafullypre-heatedovenareindicatedwithasingleasterisk*inthetable. Dishesforwhicha5-minutepre-heatingcyclesufficesareindicatedwithtwoasterisks**. In this case, donotusetherapidpreheatmode.
| Dish | °C | min | ||
| PASTRYANDBAKERYPRODUCTS | ||||
| pastry/cakesinmoulds | ||||
| spongecake | 60-70200-2203 | |||
| piewithfilling | 60-701802 | |||
| marblecake | 50-60170-1802 | |||
| Gugelhupf(Bundtcake,pound cake) | 45-55170-1802cake | |||
| openpie,tart | 35-45170-1803 | |||
| brownies | 30-35170-1802 | |||
| pastryonbakingtraysanddishes | ||||
| 60-70180-1902struc | ||||
| 34-45200-2102struc | ||||
| 3spongeroll+bakingtraywith water | 13-18170-180* | |||
| 30-40180-1902buch | ||||
| biscuits,cookies | ||||
| 25-35160*3cupcake | ||||
| 30-40155-165*2,4cu | ||||
| 17-22180*2yeast-lea | ||||
| yeast-leavenedsmallpastry,2 levels | 18-25160* | |||
| 30-45200-2203puffp | ||||
| 25-30170* | ||||
| cookies/biscuits | ||||
Cooking table
Tablecontinuedfromlastpage
| Dish | °C | min | ||
| 30-40150*3pipedco | ||||
| 30-40150*2,4pipedc | ||||
| 40-50145*1,3,5pipe | ||||
| 40-50160-1803cook | ||||
| 20-25150-160*2,4bi | ||||
| 120-15080-100*3mer | ||||
| 120-15080-100*2,4m | ||||
| 15-20130-140*3mac | ||||
| 15-20130-140*2,4m | ||||
| bread | ||||
| 2risingandproofing | 40-45 | 30-45 | ||
| 2breadonabakingtray+ baking-tray withwater | 40-55190-200 | |||
| 40-55190-200*2,4br | ||||
| 30-45190-2003brea | ||||
| 2,4breadinatin,2levels | 30-45200-210 | |||
| 2flatbread(focaccia) | 270 | 15-25 | ||
| freshbreadrolls(Semmel/morning rolls) | 3 | + baking tray with water | 20-30180-200 | |
| freshbreadrolls(Semmel/morning rolls),2levels | 15-20200-210*2,4 | |||
| 5toast | 240 | 4-6 | ||
| 5opensandwiches | 240 | 3-5 | ||
Cookingtable
Tablecontinuedfromlastpage
| Dish | °C | min | ||
| 4-10300*1homema | ||||
| 25-30210-220*2,4hc | ||||
| 10-20200-2202froze | ||||
| 10-25200-2202,4fro. | ||||
| 50-60190-2002savo | ||||
| 40-50180-1902bure | ||||
| MEAT | ||||
| beefandveal | ||||
| 130-160160-1702bee | ||||
| 90-120200-2102brai | ||||
| 40-60170-190*2sirlc | ||||
| 250-300120-140*2be | ||||
| beefsteaks,welldone,thickness 4 cm | 25-30220-2304 | |||
| 25-35220-2304burg | ||||
| 120-150160-1702vea | ||||
| pork | ||||
| 100-200200-2203por | ||||
| 90-120180-1903pork | ||||
| 80-10080-100*2pork | ||||
| 200-230100-120*2po | ||||
| 210-240120-140*2po | ||||
| 20-25220-2304pork | ||||
| poultry | ||||
Cookingtable
Tablecontinuedfromlastpage
| Dish | °C | min | ||
 | 60-80200-2202poull | |||
 | 70-90170-1802poull | |||
 | 45-60170-1802poull | |||
 | 25-40210-2203chick | |||
 | 25-40210-2204chick | |||
 | 60-90100-120*3pou | |||
| meatdishes | ||||
 | 60-70170-1802meal | |||
 | 8-15230**4grillsaus | |||
| FISHANDSEAFOOD | ||||
 | 12-20230-2404whol | |||
 | 8-12220-2304fishfill | |||
 | 10-15220-2304fishs | |||
 | 5-10230*4scallops | |||
 | 3-10230*4shrimps | |||
| VEGETABLES | ||||
 | 30-40210-220*3bak | |||
 +Dakir+Dakir+Dakir+Dakir+Dakir+Dakir+Dakir+Dakir+Dakir+Dakir+Dakir+Dakir+Dakir+Dakir+Dakir+Dakir+Dakir+Dakir+Dakir+Dakir+Dakir+Dakir+Dakir+Dakir+Dakir+Dakir +Dakir+Dakir+Dakir+Dakir+Dakir+Dakir+Dakir+Dakir+Dakir+Dakir+Dakir+Dakir+Dakir+Dakir+Dakir+Dakir+Dakir+Dakir+Dakir+Dakir+Dakir+Dakir+Dakir+Dakir+Dakir+Dakir |  | 40-50200-210* | ||
 | 30-40190-2003stuff | |||
 | 20-30210-220*4Frer | |||
 +Dakingtraywith water +Dakingtraywith water | 30-40190-200 | |||
Cooking table
Tablecontinuedfromlastpage
| Dish | °C | min | ||
| 30-40190-2003stuffe | ||||
| CONVENTIONALPRODUCTS-FROZEN | ||||
| 20-25210-2203Fren | ||||
| 30-40190-2102,4fre | ||||
| 12-17210-220*4chic | ||||
| 15-20210-2202fishfi | ||||
| 30-40200-2102lasag | ||||
| 20-30190-2002dice | ||||
| 18-23170-1803crois | ||||
| BAKEDPUDDINGS,SOUFFLÉSANDDISHESAUGRATIN | ||||
| 35-45180-1902pota | ||||
| 35-45180-1902lasag | ||||
| 40-60160-1802swe | ||||
| 35-45160-180*2swe | ||||
| 30-45170-1903dishe | ||||
| 20-35180-2002stuffe | ||||
| 6-9240**4grillingch | ||||
| OTHER | ||||
| 301802preservatic | ||||
| 301253sterilization | ||||
| cookinginabain-marie(double boiler) | /150-170*2 | |||
| /60-953reheating | ||||
| 15752platewarmin | ||||
CookingwithaTemperatureProbe(BAKESENSOR)
(dependingonthemodel)
Thetemperatureprobeallowsforaccuratemonitoringofthecoretemperatureofthefoodduring cooking.

WARNING!
Thetemperatureprobeshouldnotbeindirectvicinityoftheheatingelements.
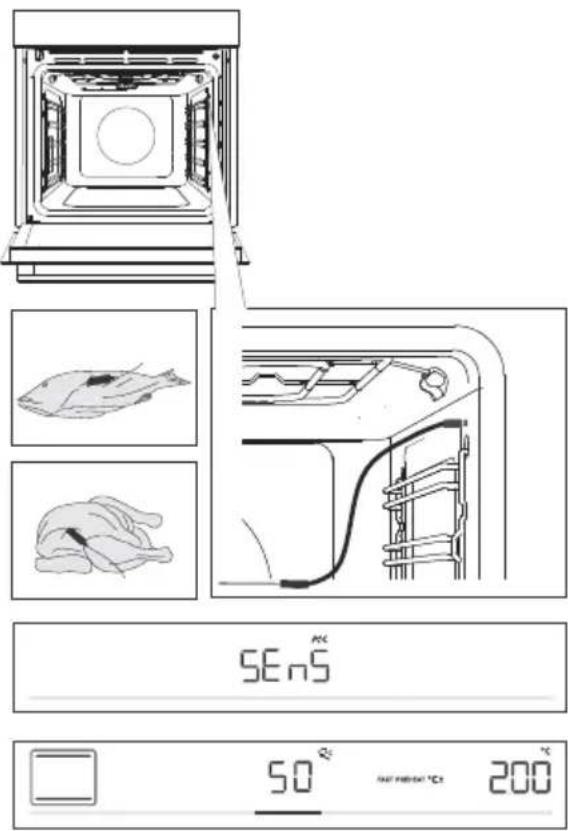
text_image
SE nS 50 °C 200 HAT MATHLET 1°C1Stickthemetalendoftheprobeintothe thickestpartofthefood.
2Plugtheprobeplugintothesocketlocated intheupper-rightcorneratthefrontoftheoven cavity(seefigure).SEnSwillappearonthe displayunit.Toactivatethefunction,rotatethe KNOBtopositionOn.Followthesame proceduretodeactivatethefunction.Select OFFonthedisplayunit.
NOTE: To enter the SEnS menu, stop the current cooking process and connect the betothesocket. When you insert the probe into the socket, the previously selected or preset functions on the oven are deleted.
3Selectthedesiredsystemandcooking temperature(inthetemperaturerangeupto 210°C)Theprobeoperationsymbolandthe presettemperaturewillappearonthedisplay unit,whichcanbechangedbyturningthe KNOB.Determinethedesiredfinalcore temperatureofyourfood(between30and99°C).
NOTE: When using the probe, setting the cooking time is not possible.
4Confirmthesettingbypassingthekey. ▷□
5Whenthesetcoretemperatureisreached, theovenwillstopoperating.Endwillappear onthedisplayunit.Anacousticsignalwillbe heardwhichyoumayturnoffbytouchingany key.Afteroneminute,theacousticsignalwill beswitchedoffautomatically.

INFORMATION!
During the cooking process, set and current food core temperature alternate on the display unit. You may change the cooking temperature or the target food core temperature during the cooking process.
CookingwithaTemperatureProbe(BAKESENSOR)
Correctuseoftheprobe,bytypeoffood:
- poultry:sticktheprobeinthethickestpartofthebreast;
- redmeat:sticktheprobeintoaleanpartthatisnotmarbledwithfat;
- smallerchunkswithbone:stickthemintoanareaalongthebone;
- fish:sticktheprobebehindthehead,towardsthespine.

WARNING!
Afteruse, carefullyremovetheprobefromthefood, unplugfromthesocketintheoven cavity, andcleanit.
IfSEnSappearsonthedisplayunitwhenthetemperatureprobeisnotconnected,clean thesocket.Tryconnectinganddisconnectingthetemperatureprobeseveraltimesina row.

INFORMATION!
If you donot us the probe, remove it from the oven.
Cooking with a Temperature Probe (BAKESENSOR)
Recommendeddonenesslevelsfordifferenttypesofmeat
| blue(raw) | medium, type of food rare | welldonemediumwe | |||
| BEEF | |||||
| 68-7359-6553-5848 | |||||
| 63-6658-6254-5749 | |||||
| 63-6658-6254-5749 | |||||
| 71-7466-6860-6354 | |||||
| VEAL | |||||
| 63-6658-6254-5749 | |||||
| 63-6658-6254-5749 | |||||
| PORK | |||||
| 75-8565-70///roast,/60-69///pork,loir | |||||
| ///meatload-85/ | |||||
| LAMB | |||||
| 77-8072-7066-7160 | |||||
| MUTTON | |||||
| 77-8072-7066-7160 | |||||
| GOATMEAT | |||||
| 77-8072-7066-7160 | |||||
| POULTRY | |||||
| ///poultry,82-80/ | |||||
| ///poultry,82-85/t | |||||
| FISHANDSEAFOOD | |||||
| /62-65///trout | |||||
| /55-60///tuna | |||||
| /52-55///salmon | |||||

WARNING!
Beforecleaning, unplugtheappliancefromthepowermainsandwaitfortheapplianceto cooldown.
Childrenshouldnotcleantheapplianceorperformmaintenancetaskswithoutproper supervision.
Foreasiercleaning, ovencavity and baking tray are coated with special enamelforasmooth and resistant surface.
Regularlycleantheapplianceandusewarmwaterandhanddishwashingliquidtoremovelarger impuritiesandlimescale.Useacleansoftclothorspongecloth.
Appliance exterior: use hot soapsuds and a soft cloth to remove impurities, then wipe the surfaces dry.
Appliance interior: for stubborn dirt and grime, use conventional oven cleaners. When using such cleaners, thoroughly wipe the appliance with awet cloth to remove all cleaner residues.
Accessoriesandguides:cleanwithhotsoapsudsandadampcloth.Forstubborndirtandgrime, werecommendpriorsoakinganduseofabrush.
If the cleaning results are not satisfactory, repeat the cleaning process.

INFORMATION!
Neveruseaggressiveorabrasivecleanersandaccessories(abrasivespongesanddetergents, stainandrustremovers, scrapersforglassceramicplates).
Ovenequipmentisdishwasher-safe.
Foodresidue(fat,sugar,protein)canigniteduringtheuseoftheappliance.Therefore,remove largerchunksofdirtfromtheoveninteriorandaccessoriesbeforeeachuse.
UsingtheAquaCleanprogramtocleantheoven
Thisprogrammakesiteasiertoremoveanystainsfrominsidetheoven.
The functionisthemosteffectiveifusedregularly,aftereachuse.
Before running the cleaning program, remove all large visible chunk of dirt and food residues from the ovencavity.
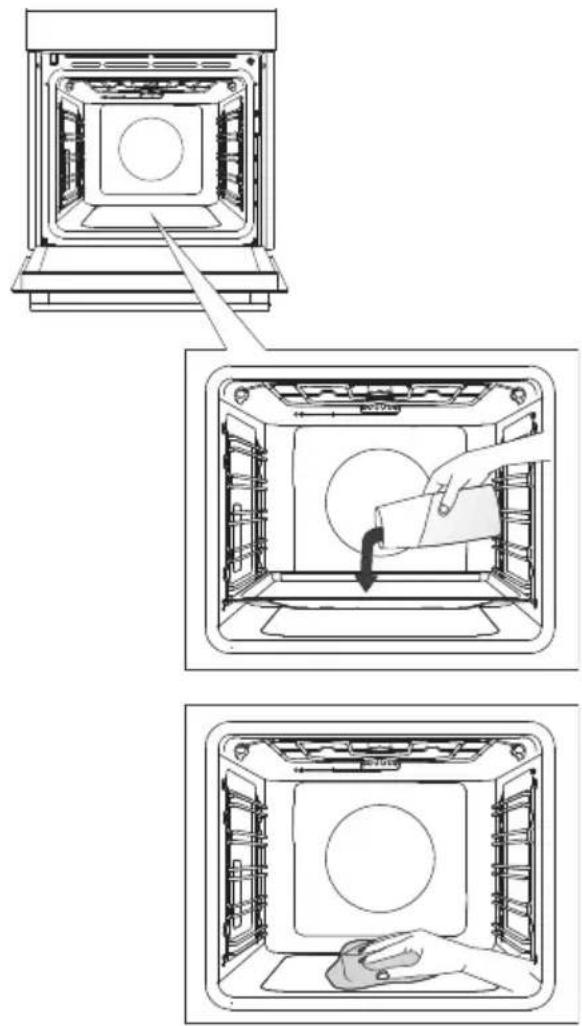
text_image
Technical diagram showing three steps of a door opening process with Chinese annotations1 Insert the shallow baking tray into the first guide level and pour 0.4 litres of hot water into it.
2Touchthekeytodisplayextra functionsonthedisplayunit.RotatetheKNOB tothesymbol.Presetvalueswillappear onthedisplayunit.
3Theprogramwilloperatefor30minutes. Whentheprogramiscomplete, Endwill appearonthedisplayunit.
4Whentheprogramiscompleted, carefully removethebakingtray, usingovenmitts (there canstillbesomewateronthebakingtray). Wipedownthestainswithdampclothand soapsuds. Thoroughlywipetheappliancewith awetclothtoremoveallcleanerresidue.

INFORMATION!
If the cleaning process is not successful (incase of particularly stubborndirt), repeatit.

WARNING!
UsetheAquaCleansystemwhentheovenhasfullycooleddown.
Cleaningandmaintenance
Removingwireandfixedpull-out(extendible)guides
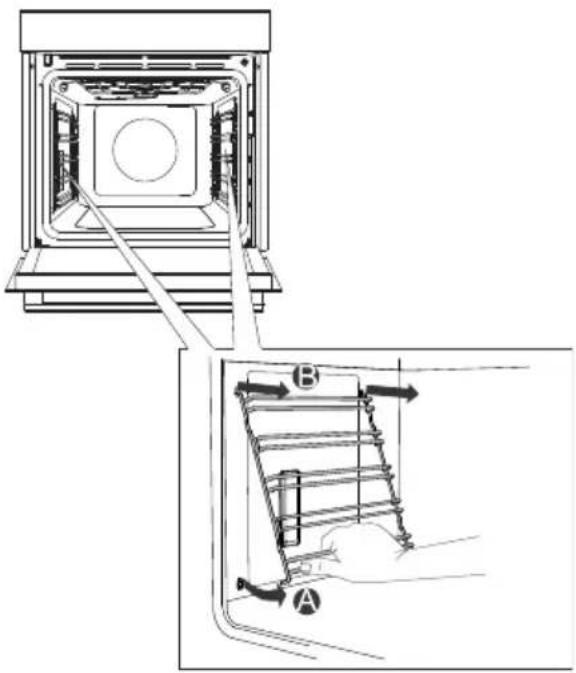
text_image
Technical diagram showing a mechanical assembly with labeled parts A and B, including a tool interacting with a component.AHoldtheguidesbythebottomsideandpull themtowardsthecenteroftheovencavity.
BRemovethemfromtheopeningsatthetop.

INFORMATION!
Whenremovingtheguides, takecarenot todamagetheenamelcoating.
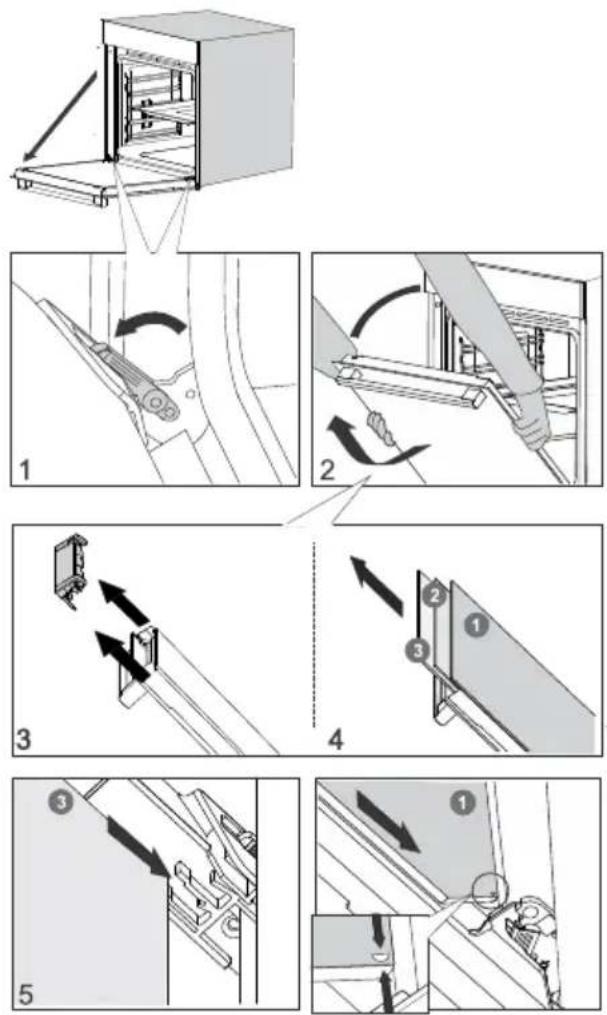
Removing andreplacingtheovendoorandglasspanes
flowchart
graph TD
    A["Step 1: Initial setup with horizontal panel and vertical connectors"] --> B["Step 2: Rotation of panel and vertical connectors"]
    B --> C["Step 3: Insert a component with arrows indicating motion"]
    C --> D["Step 4: Insert a component with arrows indicating motion"]
    D --> E["Step 5: Final assembly with tool and bracket"]
    style A fill:#f9f,stroke:#333
    style B fill:#ccf,stroke:#333
    style C fill:#cfc,stroke:#333
    style D fill:#fcc,stroke:#333
    style E fill:#ffc,stroke:#333
1First,fullyopenthedoor(asfarasitwillgo).
2Ovendoorisattachedtothehingeswith specialsupportsthatalsoincludesafety levers. Rotatethesafetyleverstowardsthe doorby90°. Slowlyclosethedoortoa45° angle(relativetothepositionofthefullyclosed door); then, liftthedoorandpullitout.
Ovendoorglasspanecanbecleanedfrom theinside,butithastoberemovedfromthe appliancedoorfirst.First,proceedas describedunderitem2,butdonotremoveit.
3Removetheairguide.Holditontheleft-andright-handsideofthedoorwithyour hands.Removeitbyslightlypullingittowards you.
4Holdthedoorglassattheupperedgeand removeit.Tothesameforthesecondandthird glasspane(dependingonthemodel).
5Toreplacetheglasspanes, observethe reverseorder.

INFORMATION!
Toreplacethedoor, followthereverseorder. If the doordoes not open or close properly, make sure thenotches on the hinges are aligned with the hinge beds.

WARNING!
Theovendoorhingecanclosewithconsiderableforce.Therefore,alwaysrotatebothsafety leverstothesupportwhenfittingorremovingtheappliancedoor.
Softdoorclosingandopening
(dependingonthemodel)
Ovendoorisfittedwithasystemthatdampensthedoorclosingforce,startingatthea75°angle.It allowssimple,quiet,andgentleopeningandclosingofthedoor.Agentlepush(toa15°angle relativetothecloseddoorposition)isenoughforthedoortocloseautomaticallyandsoftly.
Cleaningandmaintenance
WARNING!
If the force applied to closeted indoor or too strong, the effect of the system is reduced and the safety mechanism effect is decreased.
Cleaningandmaintenance
Replacingthebulb
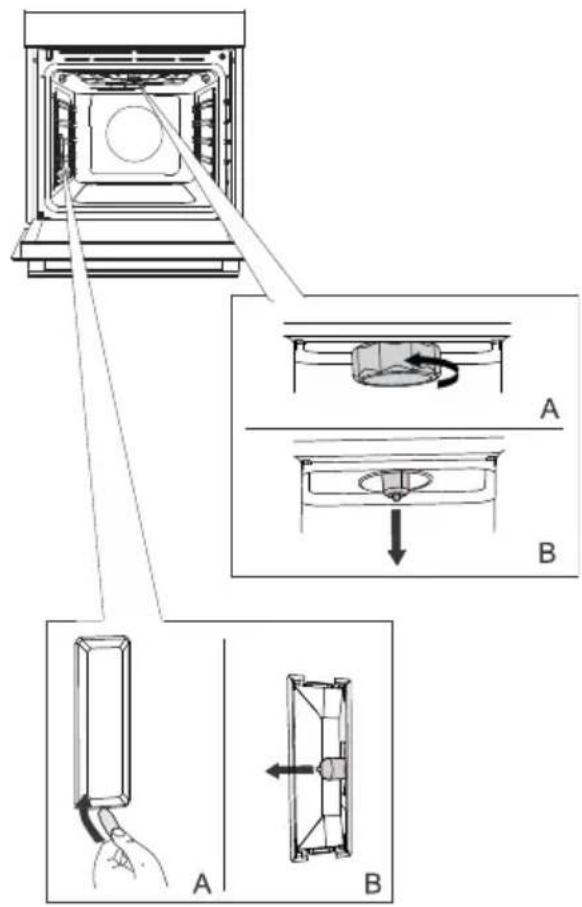
Thebulbisaconsumableandthereforenotcoveredbywarranty.Beforereplacingthebulb,remove allaccessoriesfromtheoven.
Halogenlamp:G9,230V,25W
text_image
Technical diagram showing a device assembly with labeled components A and B, including a rotating component and directional arrows indicating motion.1 Unscrewandremovethecover(in anti-clockwisedirection).Removethehalogen bulb.
2Useaflatplastictooltoremovethecover. Removethehalogenbulb.

INFORMATION!
Takecarenottodamagetheenamel coating. Useprotectiontoavoidburningyourself.

WARNING!
Onlyreplacethelightbulbwhentheapplianceisdisconnectedfrompowersupply.
Specialwarningsandfaultreporting
Duringthewarrantyperiod,onlyaservicecenterauthorizedbythemanufacturermaycarry outanyrepairs.
Beforemakinganyrepairs, makesuretheapplianceisdisconnectedfromthepowermainseither byremovingthefuseorbydisconnectingthepowerplugfromthewalloutlet.
Anyunauthorizedrepairsoftheappliancemayresultinelectricshockandshortcircuithazard; therefore, donotperformthem. Leavesuchworktoanexpertoraservicetechnician.
In caseofminorproblemswithapplianceoperation, check this manual to see if you can fix the problemyourself.
If the appliance is not operating properly or at all duetoin appropriate operation or handling, a visit from as servicetechnicians shall not be free of charge, even during the warranty period.
Savetheinstructionsforfuturereferenceandpassthemontoanysubsequentownersorusersof theappliance.
Followingissomeadviceonrectifyingsomecommonproblems.
| CauseProblem/error | |
| Callaservicetechnician.Themainfuseinyourhometripsoften. | |
| Theovenlightingdoesnotwork. | Theprocessofchangingthelightbulbintheovenis describedinthechapterReplacingthebulb. |
| Controlunitisnotresponding,thescreen isfrozen. | Disconnectttheappliancefromthepowermainsforafewminutes(undothefuseorswitchchoffthemainswitch);then,reconnecttheapplianceandswitchiton. |
| ErrorcodeErrXisdisplayed.Incaseofadouble-digiterrorcode,ErXX willbedisplayed. | Thereisanerrorintheelectronicmoduleoperation.Disconnectttheappliancefromthepowermainsforafewminutes.Iftheerrorisstillindicated,callaservicetechnician. |
| ThedisplaywillshowSEnSwhenthe temperatureprobeisnotconnected. | Cleanthesocket.Trytoconnectanddisconnectthetemperatureprobe severaltimesinsuccession. |
If the problem persists despite observing the above advice, call an authorized servicetechnician. Repair or any warranty claim resulting from incorrect connection or use of the appliances shall not be covered by the warranty. In this case, the user will cover the cost of repair.
Ourproductpackagingismadeofenvironmentallyfriendlymaterials thatcanberecycled, disposedof, ordestroyedwithoutanyhazardto theenvironment. Tothisend, packagingmaterialsarelabelled appropriately.
Thesymbolontheproductoritspackagingindicatesthattheproduct shouldnotbetratedasnormalhouseholdwaste. Taketheproductto anauthorizedcollectioncentreforwasteelectricandelectronic equipmentprocessing.
Correctdisposaloftheproductwillhelppreventanynegativeeffects ontheenvironmentandhealthofpeople,whichcouldoccurincaseof incorrectproductremoval.Fordetailedinformationonremovaland processingoftheproduct,pleasecontacttherelevantmunicipalbody inchargeofwastemanagement,yourwastedisposalservice,orthe storewhereyouboughttheproduct.
Wereservetherighttoanychansanderrorsintheinstructionsforuse.
EN60350-1: Only usee equipments supplied by the manufacturer.
Alwaysinsertthebakingtrayallthewaytotheendpositiononthewireguide.Placepastryorcakes bakedinmouldsasshownintheimage.
*Preheattheappliancetodesiredtemperature.Donotusetherapidpreheatmode.
**Preheattheappliancefor10minutes.Donotusetherapidpreheatmode.
***Turnafter2/3ofcookingtime.
BAKING
| EquipmentDish | mould placement | °C | min | |||
| shortbread-single rack | 25-401503 | shallowbaking | ||||
| shortbread-single rack | 35-50135**3 | shallowbaki | ||||
| shortbread-two racks/levels | 25-40140**2,4 | shallowba | ||||
| shortbread-three racks/levels | 45-6013514,5 | shallowba | ||||
| smallcakes-single rack | 20-30160-170**3 | shallow | ||||
| smallcakes-single rack | 20-30155**3 | shallowbaki | ||||
| smallcakes-two racks/levels | 30-45140**4,5 | shallowba | ||||
| smallcakes-three racks/levels | 1,3,530-50140 at 50g | tray | ||||
| spongecake | roundmetalmould,diameter26cm/wire rack | 45-551502 | ||||
| spongecake | roundmetalmould,diameter26cm/wire rack | 45-551602 | ||||
| spongecake-two racks/levels | 2×roundmetal mould,diameter26cm/wirerack | ○○ | 2,4 | 170* | 45-55 | |
| applepie | 2×roundmetal mould,diameter20cm/wirerack | ○○ | 160**2 | 70-120 | ||
| applepie | 2×roundmetal mould,diameter20cm/wirerack | ○○ | 1602 | 70-120 |
BROILING
Tablecontinuedfromlastpage
| BAKING | |||||
| 4-7max5wireracktoast | |||||
| beefburgers | wirerack+shallowbakingsheetasdrip tray | 25-40***2305** | |||