
WS9011ECR - Basket Atag - Free user manual and instructions
Find the device manual for free WS9011ECR Atag in PDF.

User questions about WS9011ECR Atag
0 question about this device. Answer the ones you know or ask your own.
Ask a new question about this device
Download the instructions for your Basket in PDF format for free! Find your manual WS9011ECR - Atag and take your electronic device back in hand. On this page are published all the documents necessary for the use of your device. WS9011ECR by Atag.
USER MANUAL WS9011ECR Atag
Instructions for use cooker hood
WS6011ECR
WS9011ECR
natural_image
Warning symbol with light bulb and triangular warning triangle (no text or numbers)natural_image
Illustration of a kitchen appliance with a door, drawer, and cabinet (no text or symbols)Verlichting
natural_image
Symbol of a trash bin with crossed lines indicating no waste or discharge, and a black rectangular block below (no text or labels)text_image
A B C D i 8.8 I E F G Hnatural_image
Illustration of a microwave oven with a hand inserting a clip into it (no text or symbols)Éclairage
natural_image
Symbol of a trash bin with crossed lines indicating no waste or discharge (no text or numbers present)text_image
A B C D I E F G H i 8.8natural_image
Illustration of a kitchen appliance with a hand inserting a component into it (no text or symbols visible)Lampen
natural_image
Symbol of a trash bin with crossed lines indicating no waste or discharge (no text or numbers present)| Cleaning | 7 | ||||
| Removing the grease filters | 8 | ||||
| Changing | the | light | bulbs |
Appendice
| Disposal of appliance and packaging | 9 |
Introduction

This user manual gives you a quick overview of all the possibilities offered by the appliance. You will find information on safety measures and maintaining the appliance.
Please retain this user manual and the installation guide.
They may be of use to future users of the appliance.
Declaration of conformity
We declare that our products meet the applicable European Directives, Decisions and Regulations and the requirements listed in the standards referenced.
Read the separate safety instructions before using the device!
The lamp in this household appliance is only suitable for illumination of this appliance. The lamp is not suitable for household room illumination.
Description

text_image
A B C D i 8.8. I E F G HA Switch fan on/off
B Reduce extractor capacity
C Increase extractor capacity
D Engage maximum extraction mode
E Clean Air function/filter indication
F Timer function
G Switch lighting on/off
H Dim lighting
I Display
Controls

text_image
A B C D i 8.8. I E F G HSwitching the fan on and off
- Switch the fan on with the on/off button (A) and select the desired extractor setting with buttons 'B' and 'C'.
The 'I' display indicates which setting has been selected.
- Use button 'D' to switch on the maximum setting.
"3" appears in the 'I' display.
After 6 minutes the maximum extraction mode is automatically reduced to the setting previously selected.
Switching the lighting on and off
- Use the 'G' button to switch the lighting on and off.
Dimming the lighting
- Dim the lighting with button 'H'.
The strength of the lighting varies between maximum and minimum, and vice-versa.
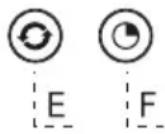
Clean Air function:
With the Clean Air function you can refresh the air in the kitchen over maximum 24 hours.
• Make sure the extractor cap has been switched off.
- Press on the Clean Air button 'E'.
Every hour, the extractor cap will switch on for 10 minutes automatically, at extraction setting 2. The display reads "24" and an indicator flashes at the bottom right.
Switching on the timer
- Switch on the extractor cap with button 'A'.
- Set the extraction strength with buttons 'B' and 'C'.
- Press the Timer button 'F'.
The extractor cap switches off automatically after 30 minutes.
Switch off the Timer function by pressing button 'F' again, or by switching off the extractor cap with button 'A'. The display shows the selected speed and the remaining time.
Grease filter indicator
After 100 hours of use the "F6" indicator is shown in the display.
- Clean the grease filters.
Reset the filter indicator alarm
- Turn the Lights and the motor off.
- Press button 'E' for 3 seconds.
Cleaning
Attention! Before performing any maintenance operation, isolate the hood from the electrical supply by switching off at the connector and removing the connector fuse. Or if the appliance has been connected through a plug and socket, then the plug must be removed from the socket.
The cooker hood should be cleaned regularly (at least with the same frequency with which you carry out maintenance of the fat filters) internally and externally. Do not use abrasive products. Do not use alcohol!
Attention! Failure to carry out the basic cleaning recommendations of the cooker hood and replacement of the filters may cause fire risks. Therefore, we recommend oserving these instructions.
The manufacturer declines all responsibility for any damage to the motor or any fire damage linked to inappropriate maintenance or failure to observe the above safety recommendations.
Cooker hood
Clean the cooker hood with soapy water and a soft cloth. Then wipe with clean water to rinse. Do not use aggressive cleaning agents such as soda. The cooker hood paintwork will stay looking nice if you wax it occasionally.

Stainless steel canopy hoods
Do not use any sort of scourer. Treat with a stainless steel care product and polish with the structure of the stainless steel.
Metal grease filters
These must be cleaned once a month (or when the filter saturation indication system – if envisaged on the model in possession – indicates this necessity) using non aggressive detergents, either by hand or in the dishwasher, which must be set to a low temperature and a short cycle. The openings must be placed downwards to let the water run out of the filters. The cleaning agents will make the aluminium filter turn dull, this is normal.
Grease filters
natural_image
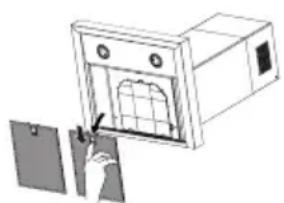
Illustration of a kitchen oven with a hand inserting a clip into it (no text or symbols)Removing the grease filters
Switch off the electricity! Remove the plug from the socket or switch the electricity off at the mains. Open the panel and pull the special handle to remove the filter.
Lighting
- The cooker hood is fitted with LED lighting.
- LEDs guarantee you optimum lighting, a service life of up to 10 times longer than conventional lamps and energy savings of as much as 90%.
- Contact the technical department when LED lighting needs to be replaced.
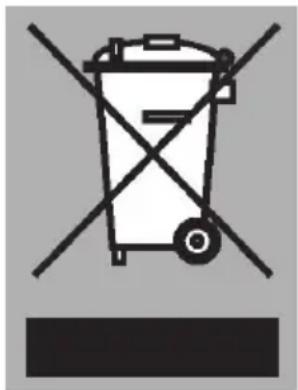
Disposal
Disposal of appliance and packaging
By ensuring this product is disposed of correctly, you will help prevent potential negative consequences for the environment and human health, which could otherwise be caused by inappropriate waste handling of this product. The local authorities can provide you with the relevant information.
The packaging of this appliance is recyclable. It could have been made from:
- cardboard;
- polythene foil (PE);
- CFK-free polystyrene (PS-hard foam).
natural_image
Symbol of a trash bin with crossed lines indicating no waste or discharge, and a black rectangular block below (no text or labels)You need to dispose of these materials responsibly in accordance with official regulations.
To draw attention to the fact that the segregated processing of electric household appliances is compulsory, this appliance carries the symbol of a crossed-out dustbin. This means that at the end of its working life, you may not dispose of the appliance as household refuse. Instead, you should hand it in at a special refuse collection centre run by the local authority or at a dealer's providing this service.
Segregated processing of household appliances avoids any negative effects on the environment and public health that might otherwise occur.
It enables the recovery of the materials used in the production of this appliance, thus realising considerable savings in terms of raw materials and energy.
CE
Declaration of conformity
We hereby declare that our products satisfy the applicable European directives, orders and regulations, as well as the requirements stated in the referenced standards.
ATAG

text_image
Barcode image containing encoded digital information805008