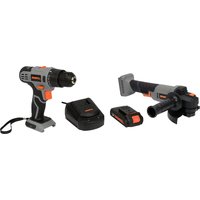
78097 - Drill Sthor - Free user manual and instructions
Find the device manual for free 78097 Sthor in PDF.


| Product Type | Cordless drill driver |
| Brand | Sthor |
| Model | 78097 |
| Rated voltage | 20 V DC |
| No-load speed (2 speeds) | 0-350 min⁻¹ / 0-1,300 min⁻¹ |
| Maximum torque | 26 Nm |
| Battery capacity | Li-Ion 2 Ah |
| Charging time | 1 h |
| Weight | 1.07 kg |
| Max drilling diameter (wood) | 20 mm |
| Max drilling diameter (concrete) | 10 mm |
| Max drilling diameter (steel) | 10 mm |
| Tool holder | Chuck 0.8-10 mm |
| Sound pressure level | 70.3 dB(A) ± 5.0 |
| Sound power level | 81.3 dB(A) ± 5.0 |
| Vibration level | 2.368 m/s² ± 1.5 |
| Protection rating | IPX0 |
| Insulation class | III |
| Charger power supply | 100-240 V~, 50/60 Hz |
| Main functions | Drilling, screwdriving, hammer drilling |
| Maintenance | Clean ventilation openings with a dry cloth; do not use chemicals. |
| Safety | Wear safety glasses and ear protection; use the auxiliary handle. |
| Repairability | Have all repairs carried out by an authorized service center; use original parts. |
Frequently Asked Questions - 78097 Sthor
User questions about 78097 Sthor
0 question about this device. Answer the ones you know or ask your own.
Ask a new question about this device
Download the instructions for your Drill in PDF format for free! Find your manual 78097 - Sthor and take your electronic device back in hand. On this page are published all the documents necessary for the use of your device. 78097 by Sthor.
USER MANUAL 78097 Sthor
natural_image
Two-panel image showing a hand holding a device with labeled parts (8 and 7), no readable text or symbols present.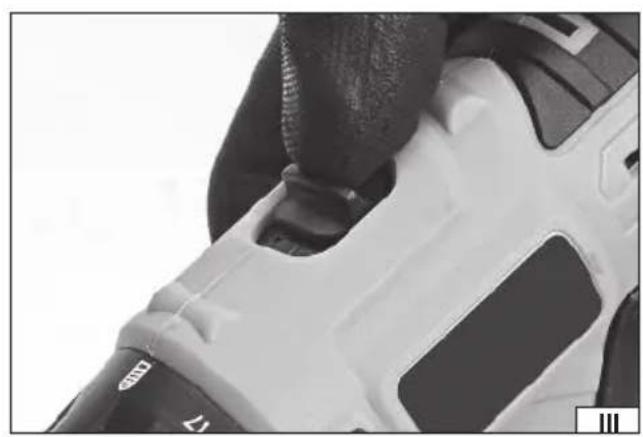
natural_image
Close-up of a white and black mechanical component with a hand adjusting a textured surface (no visible text or symbols)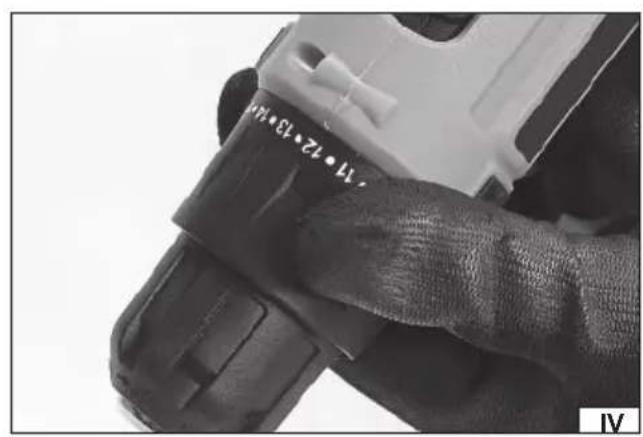
natural_image
Close-up of a mechanical component with textured grip and black band (no visible text or symbols)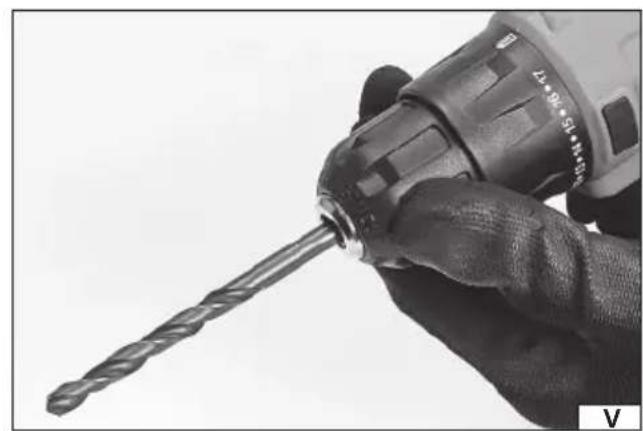
natural_image
Close-up of a hand holding a drill bit with a screwdriver, no visible text or symbols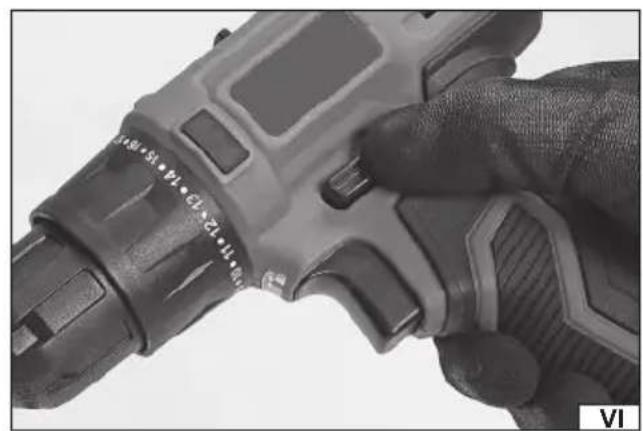
natural_image
Close-up of a hand holding a handheld electric drill bit, showing grip and adjustment knobs (no text or symbols visible)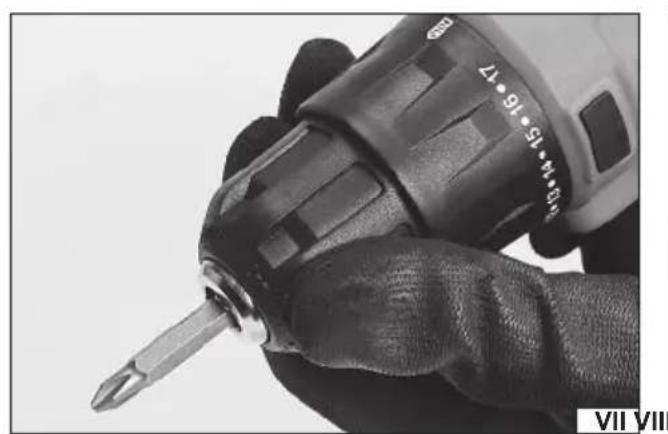
natural_image
Close-up of a hand holding a screwdriver, showing the tip and screw (no text or symbols visible)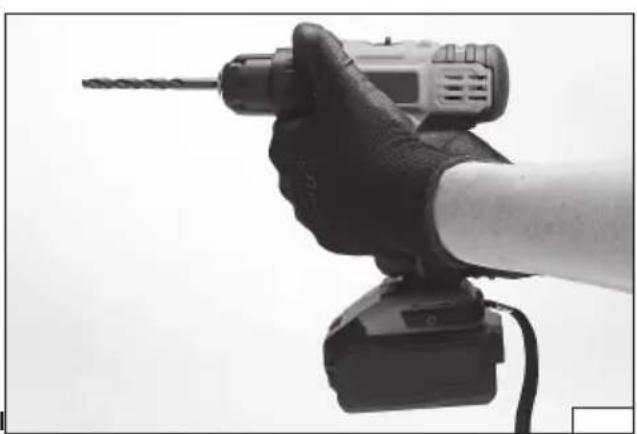
natural_image
Close-up of a hand holding a handheld electric drill press, with no visible text or symbolsPL
- drill driver
- battery
- power switch
- rotation direction switch
- drill chuck
- torque switch
- battery charger
- battery charge indicator
- battery clamp
DE
natural_image
Pure technical diagram showing two circular components with cross-sectional views and dimension lines (no text or symbols)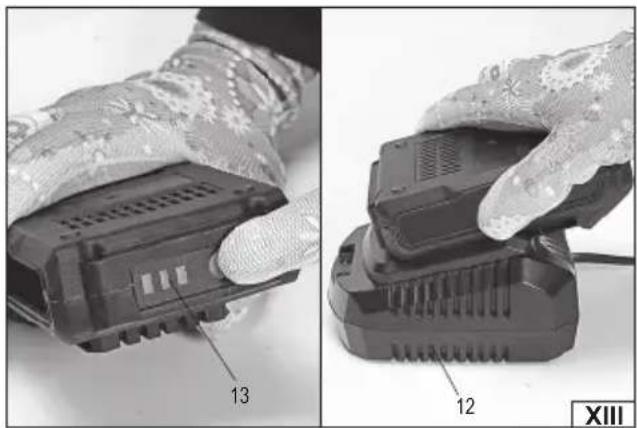
natural_image
Two black-and-white photos showing hands holding a battery pack, one with labeled component 13 and the other with component 12 (no text or symbols on main objects)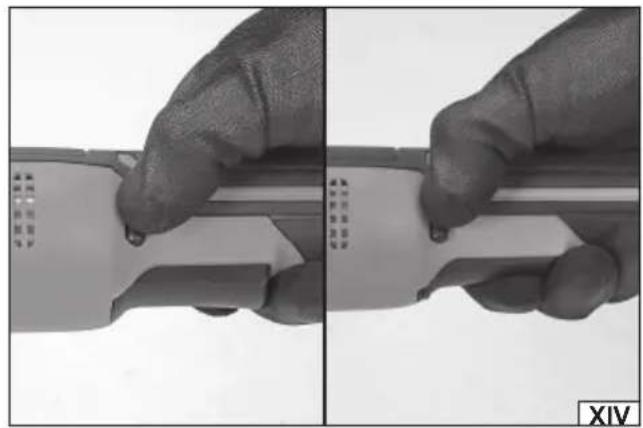
natural_image
Close-up of hands holding a device with a small object, showing a step and adjustment (no text or symbols visible)
natural_image
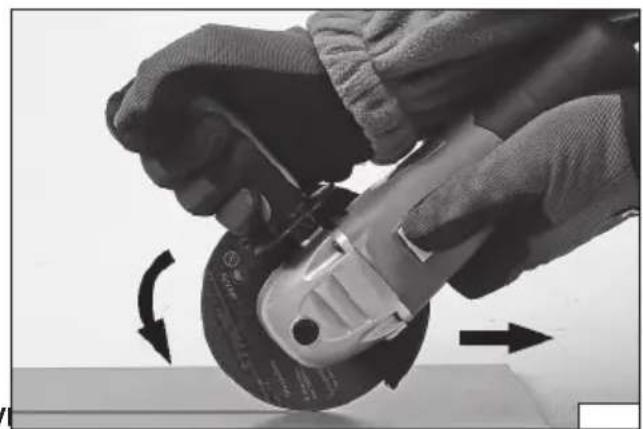
Close-up of hands using a power tool to cut a circular mechanical part, with rotation arrows indicating motion (no text or symbols visible)Read the operating instruction
Wear protective goggles
Wear hearing protectors
This symbol indicates that waste electrical and electronic equipment (including batteries and storage cells) cannot be disposed of with other types of waste. Waste equipment should be collected and handed over separately to a collection point for recycling and recovery, in order to reduce the amount of waste and the use of natural resources. Uncontrolled release of hazardous components contained in electrical and electronic equipment may pose a risk to human health and have adverse effects for the environment. The household plays an important role in contributing to reuse and recovery, including recycling of waste equipment. For more information about the appropriate recycling methods, contact your local authority or retailer.
The drill driver is a universal, portable tool which does not require an external power source, designed for DIY enthusiasts to drill holes in various materials (e.g. wood and wood-based materials, metals) as well as to drive and remove screws and bolts. Its specific advantages will be appreciated by DIY enthusiasts performing various assembly and finishing works.
The angular grinder is an electric tool designed for grinding and cutting metals as well as mineral construction materials, such as bricks, natural and artificial stone, concrete, glaze, etc. with abrasive disks and grinding wheels selected for the given material. The tool must not be used for processing other materials than those mentioned above, e.g. for grinding and cutting wood or polishing.
A correct, reliable and safe functioning of the grinder depends on its proper use, so:
Before you proceed to operate the grinder, read the manual thoroughly and keep it.
Always use protective goggles!
Do not use grinding wheels whose maximum acceptable tangential velocity is lower than 80 m/s!
Do not use grinding wheels whose maximum acceptable rotational speed is lower than the rotational speed of the grinder.
The supplier will not be held responsible for any damage resulting from the safety regulations and the recommendations indicated hereby not being observed.
EQUIPMENT
The product is supplied in a complete state but it requires some installation activities before starting its operation. The product is supplied with the battery and charging station (charger).
TECHNICAL PARAMETERS
| Parameter Unit Value | ||
| Catalogue No. 78080 | ||
| Operating voltage [V] 20 DC | ||
| Revolutions (idle speed) [min | -1] 0 - 350 / 0 - 1300 | |
| Max. torque [Nm] 26 | ||
| Noise level | ||
| - sound pressure [dB] 70,3 ± 5,0 | ||
| - power L_WA | [dB] 81,3 ± 5,0 | |
| Protection rating IPX0 | ||
| Insulation class III | ||
| Vibration level | [m/s2] | 2,368 ± 1,5 |
| Weight | [kg] | 1,07 |
| Tool chuck [mm] | 0,8 - 10 | |
| Max. drilling diameter | ||
| - in wood | [mm] | 20 |
| - in concrete | [mm] | 10 |
| - in steel | [mm] | 10 |
| Battery type | Li-Ion | |
| Battery capacity* [Ah] | 2 | |
| Charger* | ||
| Input voltage | [V~] | 100 - 240 |
| Mains frequency | [Hz] | 50 / 60 |
| Rated power | [W] | 47 |
| Output voltage | [V] | 21,5 DC |
| Output current | [A] | 2,2 |
| Charging time** | [h] | 1 |
| Parameter Unit Value | ||
| Catalog number | 78090 | |
| Mains voltage | [V] 20 DC | |
| Rated revs | [min-1] | 8 000 |
| Diameter of the abrasive disk | [mm] | 125 |
| Diameter of the abrasive disk hole | [mm] | 22,2 |
| Spindle tip | M14 |
EN
| Parameter Unit Value | ||
| Weight [kg] 1,26 | ||
| Noise level | ||
| - acoustic pressure LpA ± KpA [dB (A)] 85,5 ± 3,0 | ||
| - power L_wA ± K [dB (A)] 96,5 ± 3,0 | ||
| Vibration level _ab, kG ± K | [m/s2] 6,173 ± 1,5 / 5,741 ± 1,5 | |
| Insulation class III | ||
| Degree of protection IPX0 | ||
| Type of the battery Li-Ion | ||
| Capacity of the battery* [Ah] 2 | ||
| Charger* | ||
| Input voltage [V] 100 - 240 | ||
| Mains frequency | [Hz] | 50 / 60 |
| Output voltage | [V] | 21,5 DC |
| Input current | [A] | 2,2 |
| Rated power | [W] | 47 |
| Time of charging** | [h] | 1 |
* only for models equipped with battery and charger
** charging time applies only to the battery with a capacity listed in table
The declared noise emission value has been measured using the standard test method and can be used to compare one tool to another. The declared noise emission value can be used in the preliminary exposure assessment.
The declared total vibration value has been measured using the standard test method and can be used to compare one tool to another. The declared total vibration value can be used in the initial exposure assessment.
Caution! The vibration emission during tool operation may differ from the declared value, depending on the manner the tool is used. Caution! Safety measures to protect the operator, which are based on an assessment of exposure under actual conditions of use (including all parts of the work cycle, such as the time when the tool is switched off or idle and the activation time), must be specified.
GENERAL WARNINGS FOR THE SAFETY OF POWER TOOLS
Warning! Read all safety warnings, illustrations and specifications provided with this power tool. Failure to do so may result in electric shock, fire or serious injury.
Keep all warnings and instructions for future reference.
The term “power tool” used in warnings applies to all tools driven by power both wired and wireless.
Workplace safety
Keep the workplace well-lit and clean. Disorder and poor lighting can be causes of accidents.
Do not work with power tools in an environment with an increased risk of explosion, containing flammable liquids, gases or vapors. Power tools generate sparks that can ignite dust or fumes.
Children and third persons should not be allowed to enter the workplace. Loss of concentration can result in loss of control.
Electrical safety
The plug of the electric cable must match the power socket. You must not modify the plug in any way. Do not use any plug adapters with earthed power tools. An unmodified plug that fits the outlet reduces the risk of electric shock.
Avoid contact with earthed surfaces such as pipes, radiators and coolers. Grounding the body increases the risk of electric shock. Do not expose power tools to contact with atmospheric precipitation or moisture. Water and moisture that gets inside the power tool increases the risk of electric shock.
Do not overload the power cable. Do not use the power cord to carry, pull or unplug the power plug from the power outlet.
Avoid contact of the power cable with heat, oils, sharp edges and moving parts. Damage or entanglement of the power cord increases the risk of electric shock.
In the case of working outside closed rooms, use extension cords intended for work outside closed rooms. The use of an extension cord adapted for outdoor use reduces the risk of electric shock.
When using a power tool in a humid environment is unavoidable as a protection against supply voltage use a residual current device (RCD). The use of RCD reduces the risk of electric shock.
Personal safety
Stay alert, pay attention to what you do and keep common sense while working with the power tool. Do not use a power tool when you are tired or under the influence of alcohol or medication. Even a moment of inattention while working can lead to serious personal injury.
EN
Use personal protective equipment. Always wear eye protection. The use of personal protective equipment such as dust masks, anti-slip safety shoes, helmets and hearing protection reduce the risk of serious personal injury.
Prevent accidental operation. Make sure that the electric switch is in the “off” position before connecting to the power supply and / or battery, lifting or moving the power tool. Moving the power tool with the finger on the switch or powering the power tool, when the switch is in the “on” position can lead to serious injuries.
Before turning on the power tool remove any keys and other tools that were used to adjust it. The key left on the rotating parts of the power tool can lead to serious injuries.
Do not reach and do not lean too far. Keep the right attitude and balance all the time. This will allow easier control over the power tool in case of unexpected work situations.
Dress accordingly. Do not wear loose clothing or jewelry. Keep your hair and clothing away from moving parts of the power tool. Loose clothing, jewelry or long hair can be caught by moving parts.
If the devices are fitted for the connection of dust extraction or dust collection, make sure that they are connected and used properly. The use of dust extraction reduces the risk of dust hazards.
Do not let the experience acquired from frequent use of the tool resulted in carelessness and ignoring safety rules.
Carefree action can cause serious injuries in a fraction of a second.
Use and care of the power tool
Do not overload the power tool. Use the power tool appropriate for the selected application. The right power tool will provide a better and safer job if used according to the designed load.
Do not use the power tool, if the electric switch does not allow switching on and off. Power tool, which cannot be controlled by means of a power switch is dangerous and must be returned for repair.
Disconnect the plug from the power socket and / or remove the battery if it is detachable from the power tool before adjusting, changing accessories or storing the tool. Such preventive measures will allow you to avoid accidentally turning on the power tool.
Keep the tool out of the reach of children, do not let people who do not know how to operate the power tool or these instructions use a power tool. Power tools are dangerous in the hands of untrained users.
Maintain power tools and accessories. Check the tool for mismatches or jams of moving parts, damage to parts and any other conditions that may affect the operation of the power tool. Damage must be repaired before using the power tool. Many accidents are caused by incorrectly maintained tools.
Keep cutting tools sharp and clean. Properly maintained cutting tools with sharp edges are less prone to jamming and are easier to control when working.
Use power tools, accessories and inserted tools etc. in accordance with these instructions, taking into account the type and conditions of work. The use of tools for work other than designed is likely to result in a dangerous situation.
Handles and gripping surfaces must be dry, clean and free from oil and grease. Slippery handles and gripping surfaces do not allow for safe operation and control of the tool in dangerous situations.
Repairs
Repair the power tool only in authorized facilities using only original spare parts. This ensures proper operation safety of the power tool.
SAFETY WARNINGS FOR DRILLS
Safety instructions for all activities
Use hearing protectors when hammer drilling. Exposure to noise can cause hearing loss.
Use the additional handle(s). Loss of control can cause personal injury.
Grasp the tool properly before use. This tool generates high torque and when it is not properly held during operation, loss of control can cause personal injury.
Hold the tool by the insulated handles when working where the cutting accessory may come into contact with the hidden cord or supply cable. Cutting accessory coming into contact with a live wire can cause the metal parts of the tool to become “live” and cause an electric shock to the operator.
Safety instructions when using long drill bits
Never operate at a higher rotational speed than the maximum drill bit rotational speed. At higher speeds, the drill bit will probably bend and cause personal injury if it is allowed to rotate freely without contact with the workpiece.
Always start working at low speed and when the end of the drill bit is in contact with the workpiece. At higher speeds, the drill bit will probably bend and cause personal injury if it is allowed to rotate freely without contact with the workpiece.
Apply pressure only in the direction of the drill bit axis. Do not apply excessive pressure. The drill bit can bend, causing breakage or loss of control which will result in personal injury.
ADDITIONAL SAFETY GUIDELINES FOR DISC GRINDERS AND POLISHING MACHINES
The tool has been designed exclusively for grinding, grinding with abrasive paper, grinding with wire brushes and cut-
EN
ting. Get acquainted with all the warnings, instructions, illustrations and specifications supplied along with the electric tool. If the instructions below are not observed, there is a risk of electric shock, fire and / or serious injuries.
It is prohibited to use the tool as a polishing machine or in a way which does not comply with the manual. Using the tool for jobs it is not designed for implies a risk and may cause injuries.
Do not use accessories which have not been designed and are not recommended by the manufacturer. The fact that accessories may be installed in the tool does not mean work with them is safe.
The maximum rotational speed of the accessories must be higher than or equal to the maximum rotational speed of the tool. Accessories of a lower rotational speed than the speed of the tool may break during work.
The outer diameter and the thickness of accessories must fall within the range of dimensions indicated for the tool.
Accessories of incorrect dimensions cannot be properly protected and operated.
Threaded mounting of accessories must match the grinder spindle thread. The dimensions of the hole in which wheels, disks, flanges and other accessories are installed must comply with the dimensions of the spindle of the tool. Accessories in which the dimensions of the fixing hole do not comply with the dimensions of the spindle of the tool, will vibrate after start, which may preclude a proper control of the tool.
Do not use damaged accessories. Before each use, make sure the accessories are not splintered, broken or excessively worn. If accessories are dropped make sure they are not damaged or install new accessories. Once accessories have been inspected and installed, all persons must remain away from the plane of rotation of the accessories, and start the tool for a minute with the maximum rotational speed. During the test damaged accessories will be destroyed.
Use individual protection means. Depending on the job, wear face protections or safety goggles. If it is required use dust masks, hearing protectors, gloves and aprons protecting from small fragments of the accessories or materials generated during work. Eye protection must stop flying pieces generated during work. The dust mask must filter dust generated during work.
Excessive exposition to noise may lead to hearing impairment.
While realising tasks during which the disc may come into contact with a hidden live electric wire or a power supply cable hold the grinder by insulated handles. If the disc touches a live wire, the metal elements of the tool may cause electric shock to the operator of the tool.
Maintain a safe distance between the place of work and third persons. Persons who approach the place of work must use individual protection means. Chips generated during work or fragments of damaged accessories may be ejected beyond the direct vicinity of the place of work.
Place the power supply cord away from the rotating wheels. In case the operator loses the control over the tool, the cord may be cut or caught, and the hand or arm of the operator may be drawn into the rotating elements of the machine.
Never put down the tool until the rotating elements have stopped completely. The rotating elements may „catch“ the ground and impede the control of the tool.
Do not start the tool while carrying it. Accidental contact with the rotating elements may cause drawing clothes and contact of the tool with the body of the operator.
Clean the ventilating holes of the tool regularly. The ventilator of the motor pulls the dust generated during work into the tool. Excessive accumulation of metal particles contained in the dust increase the risk of electric shock.
Do not operate the tool in the vicinity of inflammable materials. The sparks generated during work may cause a fire.
Do not use accessories which require cooling with liquids. Water or cooling liquid may cause an electric shock.
Warnings related to the possibility of the tool rebounding towards the operator
Rebounding of the tool towards the operator is caused by a sudden reaction to blocked or seized discs or polishing belts or another accessory, which causes a sudden stop of the rotating accessory and a turn of the electric tool opposite to the direction of rotation.
For example, if the grinding disc is seized by the object being processed, the edge of the disc, which is at the point of seizure may get deeper into the surface of the material, and thus get ejected.
The disc may also move towards or away from the operator, depending on the direction of movement of the grinding wheel at the place of seizure. Grinding wheels may also break.
Rebounding of the tool towards the operator is caused by incorrect operation and / or inobservance of the indications contained in the operating manual. It may be prevented if the following recommendations are followed.
Hold the tool firmly and adopt an adequate position of the body and the hands, which will permit you resist the force generated when the tool rebounds. Always use the additional handle, if it has been supplied with the tool, which will ensure a maximum control when the tool rebounds or turns inadvertently during start. The operator is able to control the turning or rebound of the tool, if adequate safety measures have been taken.
Do not ever place hands close to the rotating elements of the tool. The rotating elements may, in case the machine rebounds, get into contact with the hand.
Do not remain within the area into which the tool will move in case of rebound. A rebound will propel the tool in the direction opposite to the rotation of the grinding disk, where it is seized.
Be particularly careful during work close to corners, sharp edges, etc. Avoid flicking up and seizure of the grinding disk. During work on corners or edges there is an increased risk of seizure of the grinding disk, which may imply a loss of control over the tool or rebound of the tool.
Do not use disks with cutting chains or disk saws. The edges cause frequent rebounds, which may lead to a loss of control over the tool.
EN
Warnings related to grinding and cutting with abrasive disks
Use only disks which are adequate for the tool and guards designed for the given type of disk. Disks which are not compatible with the tool cannot be properly protected and are not safe.
The grinding surface of centre depressed wheels must be mounted below the plane of the guard lip. An improperly mounted wheel that projects through the plane of the guard lip cannot be adequately protected.
The guard must be secured to the tool and placed in a position which ensures maximum safety, so that the smallest possible area of the disk is unprotected towards the operator. The guard helps to protect the operator from broken fragments of the disk and prevents accidental contact with the disk.
The disk must be used as intended. For example: do not grind with disks designed for cutting. Abrasive disks for cutting are designed for circumferential load, and the lateral forces applied to such a disk may destroy it.
Always use undamaged fixing disks, whose dimensions must be compatible with the grinding disk. Adequate fixing disks for the abrasive disk reduce the risk of damaging the grinding disk. The fixing disks for cutting disks may differ from the fixing disks designed for grinding disks.
Do not use worn abrasive disks from bigger tools. An abrasive disk of a bigger diameter is not adapted to a bigger rotational speed of smaller tools and may break.
Warnings related to grinding with abrasive paper
Do not use discs with abrasive papers of an excessive size. While selecting the grinding wheel, follow the guidelines of the manufacturer. Abrasive paper which significantly exceeds the size of the disc may cause injuries and increases the risk of seizure, tearing or rebounding towards the operator.
Warnings related to work with wire brushes
Be careful, since fragments of wires are ejected from the brush also during normal work. Do not overload the wires exerting excessive force on the brush. The wires may easily perforate light clothes and/or the skin.
If it is recommended to use guards while working with wire brushes, preclude any contact of the brush with the guard. The diameter of the wire brush may increase due to the load and the centrifugal force.
PREPARATION FOR WORK
ATTENTION! All the operations mentioned in this point must be realised with the power supply off.
- the battery must be disconnected from the tool!
Safety recommendations for battery loading
Attention! Before loading may start make sure the body of the charger, the cable and the plug are not broken or damaged. It is prohibited to use a damaged loading dock and charger! For the purpose of loading batteries only the charging dock and the charger provided may be used. Using another charger may be a cause of fire or damage the tool. Batteries may be charged only in a dry room, protected from unauthorised persons, particularly children. Do not use the charging dock and the charger without permanent supervision of an adult! If it is necessary to leave the room where loading is taking place, it is required to disconnect the charger from the mains, removing the charger from the mains socket. In case when smoke comes out of the charger, or a strange smell is emitted, etc., it is required to immediately remove the plug of the charger from the mains socket!
The tool and automatic return screwdriver is provided with an unloaded battery, so before work may commence, it is required to charge it following the procedure below, using the charger and charging dock provided. Li-ION batteries do not show the so called “memory effect”, so it is allowed to charge them at any moment. However, it is recommended to discharge them during normal work, and then load them to their full capacity. If due to the nature of the task it is not possible to do so each time, then it is required to do it at least from time to time. Under no circumstances is it allowed to discharge the batteries short-circuiting the electrodes, since this would cause irreversible damage! It is also prohibited to check the load of the batteries, short-circuiting the electrodes for sparking.
Storage of the battery
In order to prolong the life of the battery, it is required to provide adequate storage conditions. The batteries can go through approximately 500 „loading - discharging” cycles. The battery must be stored between 0 and 30°C, at the relative humidity of 50%. In order to store the battery for a prolonged period, it is required to charge it to approximately 70% of its capacity. In case of prolonged storage, it is required to recharge the battery once a year. Do not permit excessive discharging of the battery, since this would reduce its life and may cause irreversible damage.
During storage, the battery will be gradually unloading due to leakage conductance. The process of automatic unloading depends on the temperature of storage, since the higher the temperature, the fastest the process. In case of incorrect storage of batteries, there is a danger of electrolyte leakage. In case of leakage, it is required to protect the leakage with neutralizing agent. In case of contact of electrolyte with the eyes, it is required to rinse the eyes abundantly, and then immediately seek medical assistance. It is prohibited to use a tool with a damaged battery.
In case the battery is completely worn out, it is required to deposit it at a special point dedicated to disposal of such waste.
EN
Transport of the batteries
Lithium-ion batteries are in accordance with legal regulations treated as dangerous waste. The user of the tool may transport the tool with the battery or only batteries by land. Then no additional conditions must be complied with. In transport is realised by third parties (for example dispatch through courier service), then it is required to proceed in accordance with regulations for transport of dangerous materials. Before shipment, contact an authorised person.
It is prohibited to transport damaged batteries. During transport the battery must be removed from the tool, and the exposed contacts protected, e.g. with insulating tape. Protect the batteries so that they do not move inside the package during transport. It is also required comply with the national regulations for transport of dangerous materials.
Charging the battery
Attention! Before charging you should disconnect the charger from the mains by unplugging the power supply plug from the mains. In addition, you should clean the battery and its terminals of dirt and dust with a soft, dry cloth.
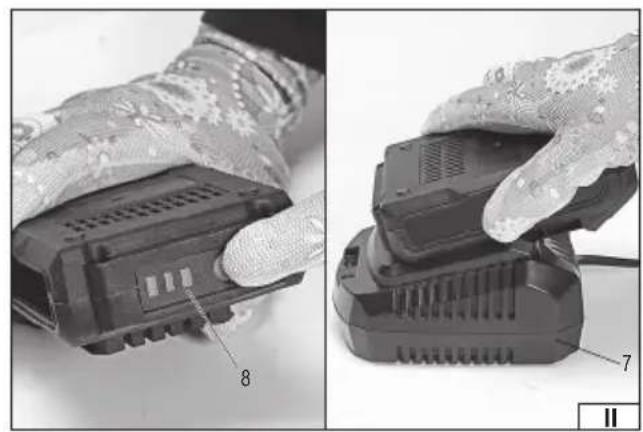
The battery has a built-in charge indicator. When you press the button, LEDs will light up (II), the more LEDs will light up, the more fully the battery pack is charged. If the button is pressed and the LEDs are off it means that the battery is discharged.
Disconnect the battery from the tool.
Push the battery in the charger socket (II).
Plug the charger into a mains socket.
When the red LED lights up, it means the loading process.
When charging is complete, the red LED goes off, and green LED lights up, indicating a full charge of the battery.
Unplug the charger from the mains outlet.
Remove the battery from the charging station, by pressing the battery latch button.
Attention! If, when the charger is connected to the power supply, the green LED is on, this indicates a fully charged battery. In this case, the charger does not start charging.
DRILL OPERATION
Setting rotational speed and selecting the torque
The cordless screwdriver has two mechanically-switched gears (III). Depending on the selected maximum rotational speed, select one of them. A gear that is characterised by a lower rotational speed is recommended for driving and removing the screws, while a gear that is characterised by a higher speed is recommended for drilling.
The torque is set with the ring located behind the chuck (IV). The higher the setting number the higher is torque offered by the screwdriver. Do not set a higher torque than it is necessary in order to work properly. Otherwise, this may lead to the destruction of threads. In the case of screwing the screws directly into the material, you should experimentally choose the correct torque, by carrying out a test on waste material. If you do not know which the maximum torque is safe for a given connection, you should set the smallest value and then increase it, until you achieve a suitable value for your work. If the screwdriver reaches the maximum set torque, the overload clutch will start its operation, then you should stop tightening.
If the product has been equipped with a drilling function with stroke, has the hammer symbol is visible on the setting ring. If you adjust the ring on hammer symbol this will start the hammer mechanism. Drilling with stroke should be used for drilling in concrete, and it should not be used for drilling in wood or plastic.
In the case when you use of the tool for drilling holes, you should adjust the ring to the symbol of a drill or a hammer. This will disconnect the overload clutch, and the maximum torque will be transferred to the drill bit.
Attention! You should not use the settings which are marked with numbers for drilling. Operation of the overload clutch during drilling may cause the destruction of material or damage the drill bit, this would also increase the risk of injury.
Installing drill bits in the drill chuck
Select the drill bit with a cylindrical holder suitable for the work.
Insert the drill bit into the chuck. Tighten the drill chuck by hand until the drill bit is securely attached (V).
Set the maximum torque. Set the torque ring to the drill bit or hammer symbol.
Setting the rotation direction
Set the rotation direction switch to the desired position. The direction of rotation is indicated by an arrow (VI). The arrowhead shows the movement direction of the drill bit and right-hand screws.
Caution! The direction of rotation must only be changed when the supply voltage is disconnected! Do not change the rotation direction during the operation of the drill driver!
Installing the screwdriver bits in the drill chuck
Insert the chuck for bits into the hole of the drill chuck, and then insert the bit suitable for work or install the bit directly into the chuck (VII).
EN
Preparatory actions for operation
Before starting work:
Attach the workpiece in a vice or using G clamps.
Use working tools appropriate for the work to be carried out. Make sure that they are sharpened and in good condition.
Wear work clothing and eye and hearing protection equipment.
Grasp the tool with both hands (VIII).
Adopt a firm and stable posture.
Turn on the tool by pressing the electric power switch with your finger.
Caution! If you notice any suspicious noises, cracks, odour, etc. during operation, immediately turn off the tool and remove the battery from the tool.
USING THE DRILL
Caution! Use hearing protectors when using the tool!
Using the right-hand or left-hand rotation direction
Use right-hand rotation when drilling with commonly used right-hand drill bits.
Apply left-hand rotation in case of jamming of the right-hand drill bit in the material and when removing screws. When removing the screws, use a minimum rotational speed.
Drilling in wood
Before drilling a hole, it is recommended to fix the workpiece with G clamps or place it in a vice, and then use a punch or a nail to determine the place of drilling. Insert the correct drill bit in the drill chuck, set the torque, connect the tool to the battery and start drilling.
When making through holes, it is recommended to place a wooden pad under the material, so that the edge of the hole at the outlet will not be torn.
In the case of drilling holes with large diameters, it is recommended to drill a smaller guide hole beforehand.
Drilling in metals
Always fasten the workpiece securely. In the case of thin sheet metal, it is recommended to place a piece of wood under it to avoid unwanted bends, etc. Then mark the locations of holes with a punch and start drilling.
Use drill bits intended for steel. It is recommended to use sintered carbide drill bits when drilling in white cast iron. When drilling larger holes, it is recommended to make a smaller guide hole beforehand.
When drilling in steel, use general purpose lubricating oil to cool the drill bit.
For aluminium, use turpentine or paraffin as a coolant.
Do not use cooling agents when drilling in brass, copper or cast iron. For cooling, remove the drill bit from the material frequently to allow it to cool down.
Drilling in hard, compact ceramic materials (concrete, hard brick, stone, marble, etc.)
Before drilling the correct hole, drill a smaller hole. Do not use the hammer drilling function for this operation. The correct hole should be drilled with the hammer drilling activated. Use sintered carbide hammer drill bits in good condition.
Drilling in glazed tiling, soft brick, plaster, etc.
Use hammer drill bits. Do not activate the hammer drilling function. During drilling, press the tool firmly with constant force. Remove the drill bit from the drilled hole from time to time to remove dust and waste.
Using the tool for driving or removing the screws
For this purpose, it is recommended to use the lowest possible rotational speed and use appropriate bits.
The bits can be installed directly in the drill chuck, or with a special magnetic chuck.
To remove the screw, change the rotation direction with the switch to the left-hand rotation.
Using attachments
The tool must not be used to drive work attachments.
Additional notes
When working, do not exert too much pressure on the workpiece and do not make sudden movements in order not to damage the drill bit and the drill.
Take regular breaks during work.
Do not overload the tool, the temperature of the external surfaces must never exceed 60^ C.
After finishing work, turn off the drill, disconnect the battery and perform maintenance and visual inspection.
EN
ASSEMBLY OF ANGLE GRINDER ACCESSORIES
Assembly of the abrasive wheel guard
For this purpose, you should put on the wheel cover on the cylindrical body part around the spindle and with a screw or clip of cover ring clamp, immobilize it, so the cover will be mounted straight ahead, firmly and tightly. Set the guard of the grinding wheel, so the unsheltered part of the grinding wheel will be as far as possible from the hand of a grinder user. Never work with the grinder without correctly mounted grinding wheel guard!
With the grinder there is supplied the guard, which provides the adequate protection only when grinding with abrasive wheels and wheels using sandpaper and some wire brushes. After installing the wheel on the spindle, the accessory must not protrude beyond the side guard. In the case of performance of any other type of allowed work, you should contact the manufacturer to acquire the guard intended for this kind of work.
Installation of auxiliary handle
Mount the handle by its firm screwing to the tool heading.
OPERATION OF THE GRINDING WHEELS
ATTENTION! Mounting of the abrasive wheels may be done only with disconnected power supply. Remove the battery pack from the power tool socket!
Installing the wheels
Disconnect power supply voltage from the tool. Remove the battery pack from the power tool socket!
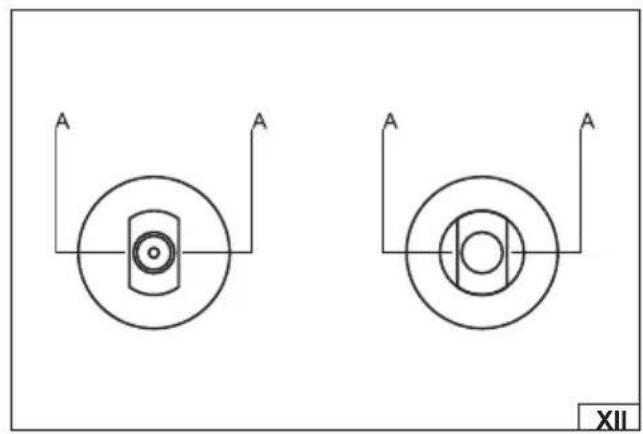
During the assembly please pay attention, that the edges A (X) at the bottom of the spindle shaft and of the mounting flanges exactly overlap.
Install the top mounting fl ange on spindle,
Mount the grinding wheel on the spindle and on the upper mounting flange.
Screw the bottom mounting fl ange on the spindle.
Press the spindle lock and tighten the lower mounting flange with a key and then release the lock button.
Mount the battery to the power tool, turn on the grinder and watch its work without any load by the time of about 1 minute.
Remove the battery and inspect the wheels mounting.
The location of the mounting fl anges
Please pay attention, that grinding wheels, in the point of mounting to the spindle, can vary in their thickness.
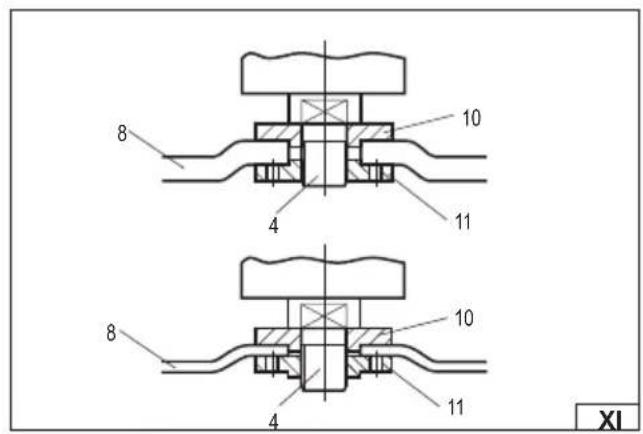
Depending on the applied grinding wheels, which are thin (thickness up to 3.2 mm), or thick (thickness above 3.2 mm) the positioning of mounting flanges (XI) is different. Do not use wheels thicker than 6 mm.
Removing the grinding wheels
Turn off the grinder and remove the battery.
Press the spindle lock and loosen the lower mounting flange with the wrench for mounting, and then remove the abrasive wheel from the spindle. Clean the spindle and clamping flanges of dust and other pollutants arising in the course of work.
Types of abrasive wheels
You can use for grinder all grinding wheels designed for use with angle grinders with a permissible peripheral speed of at least 80 m/s and fixing and external diameters specified in the technical data table.
If the grinding wheel is equipped with an unthreaded hole, for its mounting you should use the mounting flanges.
It is also possible to mount the grinding wheels with an outside diameter specified in the technical data table, equipped with a threaded hole M14. In this case, you should not use the mounting flanges, and the grinding wheel should be screwed directly to the spindle, by blocking it with a button, and by tightening the blade firmly and securely with a flat wrench (the grinder is not equipped with it).
In the case of wheels, which allow for mounting the sandpaper wheel by using Velcro, you should only use the sandpaper wheels, which are specified in the table of technical data. The wheels should be placed concentrically on the grinding wheel. The edge of the wheel should not protrude beyond the wheel edge.
It is also possible to use diamond grinding wheels with dimensions specified in the technical data table, intended for cutting and dry grinding. Installation should be carried out in the same way as for grinding wheels.
For metal treatment it is recommended to use grinding wheels made of materials intended for the processing of a given type of metal. Refer to the documentation that is attached to the grinding wheel.
For the processing of ceramic materials you can use the grinding wheel or diamond grinding wheels, designed for a dry work.
Wire brushes and sanding wheels are recommend for removing old paint coatings from metal parts.
It is prohibited to modify the mounting hole, spindle or use reduction rings in order to align the mounting hole diameter to the diameter of spindle. It is prohibited to use grinding wheels with a mounting diameter other than the diameter specified in the technical data table. It is forbidden to use wheels with the cutting chain or disk saws. because that increases the risk of tool rebound toward the operator.
EN
Attention! It is forbidden to use other grinding wheels than those, which are approved for use in this manual. Even if they can be mounted on the grinder spindle. Inappropriate grinding wheels may not withstand the loads generated during the operation of the angle grinder. Damaged, crumbling grinding wheels create a threat of serious injury or death.
USE OF THE GRINDER
Remove the battery from the power tool socket!
Before working with the tool, you should check whether the enclosure, cover and battery are not damaged.
If there are any visible damages it is prohibited to operate the grinder!
Attach the cover of grinding wheel and the handle.
Never work with the grinder without correctly mounted grinding wheel guard!
Choose the type of grinding wheel, which is appropriate for the type of work, and mount the grinding wheel on the grinder spindle.
Workpiece should be mounted in an appropriate way, so it does not move during its machining, for example, by clamps or clips.
The wheel of grinder spins at high speed and improper mounting of the workpiece can cause its uncontrolled movement during operation, which increases the risk of injury.
In the case of cutting you should support the cut material on both sides of the cut line, but in such a way, that during cutting it would not cause the grinding wheel jam. Supports should be positioned near the edges of cut material, and near the cut line.
Wear eye protection, hearing protectors and working gloves.
Check that the switch is in the "off - 0" position, the switch is depressed. Then connect the battery pack to the power tool.
Assume an appropriate position to ensure balance and turn the tool on with the switch.
The on/off switch has a safety lock to prevent the tool from being started accidentally. Move the lock to the left or right, hold it in this position and then press the switch (XIV). Once the tool has started, the pressure on the lock can be released. The switch does not have the option of locking the on position, it must be held at all times during operation. Releasing pressure on the switch turns the tool off. The wheel may still rotate for some time after releasing the pressure on the switch.
Proceed to work by applying the proper surface of the grinding wheel to workpiece:
- in the case of grinding wheels for grinding you should grind by the side and/or front surface,
- in the case of flap grinding wheels you should grind by the surface side so that the sandpaper leaves would move parallel to the workpiece,
- in the case of wheels with Velcro, which allow for fixing the abrasive paper, grinding must be carried out by side surface,
- in the case of wire brushes the treatment should be done by wires endings, not by their side surface,
- in the case of grinding wheels for cutting, you should cut by their front surface, do not grind by the front surface of grinding wheels, which are designed for cutting.
When grinding with a side surface you should keep the grinder at an angle of no more than 30 degrees with respect to the treated surface (XV). Move the grinder forward and back by smooth moves.
During cutting, the grinding wheel should be at a right angle relative to the cut surface. Do not make the cut at a different angle. It is forbidden to change an angle of the cutting grinding wheel in relation to the workpiece during the cutting operation. The cut should be made only in a straight line. Failure to follow these guidelines increases the risk of grinding wheel jam in workpiece, which can cause rebound of tool toward the operator, rupture of the grinding wheel or its disintegration
uring cutting, drive the grinder in the direction of rotation of the wheel (XVI).
During grinder operation, do not exert too much pressure on the treated material, and do not make sudden movements, to not cause jamming, or cracks and bursts of grinding wheel.
Do not allow to overload the grinder, its external surfaces temperature should never exceed 60°C.
The grinder is stopped after releasing the pressure on the switch.
At the end of work you should turn off the grinder, remove the battery and make an examination.
Attention! The grinding wheel can rotate even for some time after the machine is switched off. You should wait until a complete stop of grinding wheel movement before putting away the grinder. Prior to the inspection you should wait for cooling of the grinding wheel. During the work, both, grinding wheel and workpiece material, can warm up to a high temperature.
Remember! When operating the angle grinder:
Always use eye protection.
Do not use grinding wheels of a maximum allowable peripheral speed of less than 80 m/s.
Do not use grinding wheels of a maximum allowable rotational speed less than the rotational speed of the grinder.
MAINTENANCE AND OVERHAUL
ATTENTION! Before any adjustment, technical service or maintenance operations unplug the tool. Once the operations have been finished, the technical conditions of the tool must be assessed by means of external evaluation and inspection of the following elements: body and handle, conductor with a plug and deflection, functioning of the electric switch, patency of ventilation slots, sparking of brushes, noise level of functioning of bearings and gears, start-up and smoothness of operation. During the guarantee period, the user cannot dismantle the electric tools or change any sub-assemblies or elements, since it will cancel any guarantee
EN
rights. All irregularities detected at overhaul or during functioning of the tools are a signal to have the tool repaired at a service shop. Once the functioning has been concluded, the casing, ventilation slots, switches, additional handle and protections must be cleansed with a stream of air (at a pressure not exceeding 0.3 MPa), with a brush or a cloth without any chemical substances or cleaning liquids. Tools and handles must be cleansed with a clean cloth.
CHARAKTERISTIK DES WERKZEUGES
VEILIGHEIDSWAARSCHUWINGEN VOOR BOREN
DEKLARACJA ZGODNOŚCI | DECLARATION OF CONFORMITY | DECLARAȚIE DE CONFORMITATE
0825/78097/EC/2025
We declare and guarantee with full responsibility that the following products:
meet requirements of the following European Standards / Technical Specifications:
The person authorized to compile the technical file:
Serial number: concern all serials numbers of item(s) mentioned in this declaration
DEKLARACJA ZGODNOŚCI | DECLARATION OF CONFORMITY | DECLARAȚIE DE CONFORMITATE
0825/78097/EC/2025
We declare and guarantee with full responsibility that the following products:
meet requirements of the following European Standards / Technical Specifications:
The person authorized to compile the technical file:
Serial number: concern all serials numbers of item(s) mentioned in this declaration





- PL
- DE
- EQUIPMENT
- GENERAL WARNINGS FOR THE SAFETY OF POWER TOOLS
- Workplace safety
- Electrical safety
- Personal safety
- EN
- Use and care of the power tool
- Repairs
- SAFETY WARNINGS FOR DRILLS
- Safety instructions for all activities
- Safety instructions when using long drill bits
- ADDITIONAL SAFETY GUIDELINES FOR DISC GRINDERS AND POLISHING MACHINES
- Warnings related to the possibility of the tool rebounding towards the operator
- PREPARATION FOR WORK
- Transport of the batteries
- Charging the battery
- DRILL OPERATION
- Setting rotational speed and selecting the torque
- Installing drill bits in the drill chuck
- Setting the rotation direction
- Installing the screwdriver bits in the drill chuck
- USING THE DRILL
- ASSEMBLY OF ANGLE GRINDER ACCESSORIES
- Assembly of the abrasive wheel guard
- OPERATION OF THE GRINDING WHEELS
- USE OF THE GRINDER
- Remember! When operating the angle grinder:
- MAINTENANCE AND OVERHAUL
- CHARAKTERISTIK DES WERKZEUGES
- VEILIGHEIDSWAARSCHUWINGEN VOOR BOREN
- DEKLARACJA ZGODNOŚCI | DECLARATION OF CONFORMITY | DECLARAȚIE DE CONFORMITATE
Brand : Sthor
Model : 78097
Category : Drill