
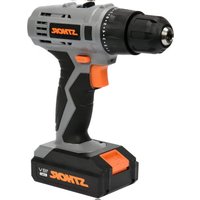
78974 - Drill Sthor - Free user manual and instructions
Find the device manual for free 78974 Sthor in PDF.


| Product Type | Cordless drill/driver |
| Model Number | 78974 |
| Brand | Sthor |
| Operating Voltage | 18 V DC |
| No-Load Speed | 0 - 350 / 0 - 1300 min⁻¹ |
| Maximum Torque | 24 Nm |
| Weight | 0.83 kg |
| Chuck Capacity | 0.8 - 10 mm |
| Max Drilling Diameter (Wood) | 10 mm |
| Max Drilling Diameter (Concrete) | 10 mm |
| Max Drilling Diameter (Steel) | 10 mm |
| Battery Type | Li-Ion |
| Battery Capacity | 1.3 Ah |
| Charger Input | ~230 V, 50 Hz |
| Charger Output | 15 V, 400 mA |
| Charging Time | 3 - 5 hours |
| Noise Level (Sound Pressure) | 89.0 dB(A) ± 3.0 |
| Sound Power Level | 100.0 dB(A) ± 3.0 |
| Vibration Level (ah) | 15.25 m/s² ± 1.5 |
| Degree of Protection | IPX0 |
| Insulation Class | III |
| Drilling Functions | Hammer drilling for concrete, standard drilling for wood and metal |
| Rotation Direction | Right (forward) and left (reverse) |
| Torque Adjustment | 16-step clutch with drill/hammer mode |
| Speed Gears | 2 mechanical gears (low for screwing, high for drilling) |
| Included Accessories | Rechargeable battery, charger |
Frequently Asked Questions - 78974 Sthor
User questions about 78974 Sthor
0 question about this device. Answer the ones you know or ask your own.
Ask a new question about this device
Download the instructions for your Drill in PDF format for free! Find your manual 78974 - Sthor and take your electronic device back in hand. On this page are published all the documents necessary for the use of your device. 78974 by Sthor.
USER MANUAL 78974 Sthor
D AKKUSCHRAUBER-UND-BOHRER
RUS АККУМУЛЯТОРНАЯ ДРЕЛЬ С ШУРУПОВЕРТОМ
natural_image
Black and white photo of a STHOR 18V power tool with black handle and base (no visible text or symbols on the device body)CE
PL GB D RUS UA LT LV CZ SK H RO E


natural_image
Close-up of hands using a tool to adjust or install a battery pack, labeled with parts 8 and 9 (no text or symbols beyond labels)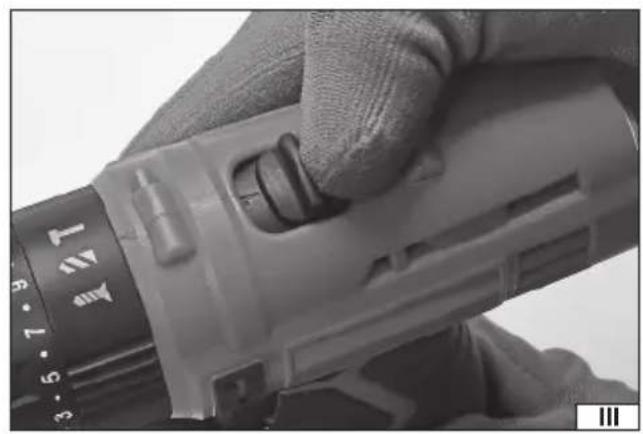
natural_image
Close-up of a hand holding a drill bit with a 1.5V indicator (no text or symbols on the tool itself)
natural_image
Close-up of hands holding a mechanical component with multiple rotary dial indicators (no text or symbols visible)
natural_image
Close-up of a hand holding a drill bit with a caliper (no visible text or symbols)
natural_image
Close-up of a hand holding a 3D-printed electric drill bit with a numbered label (1) on the blade, no visible text or symbols beyond the number.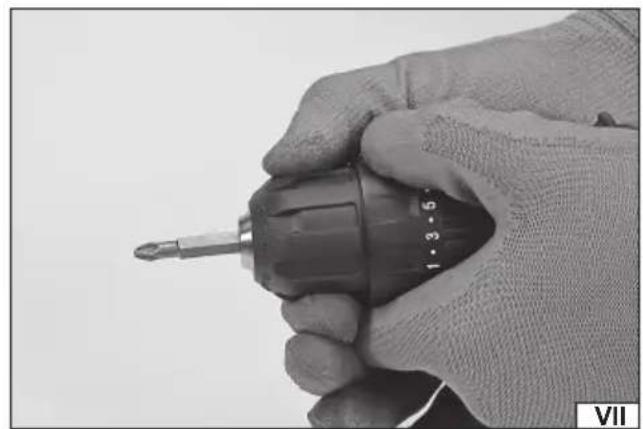
natural_image
Close-up of a hand holding a screwdriver with a head dial, no visible text or symbols
natural_image
Hand holding a handheld electric drill, no visible text or symbols2018
Read the operating instruction
Wear protective goggles
Wear hearing protectors
Rotation direction switch
Correct disposal of this product: This marking shown on the product and its literature indicates this kind of product mustn't be disposed with household wastes at the end of its working life in order to prevent possible harm to the environment or human health. Therefore the customers is invited to supply to the correct disposal, differentiating this product from other types of refusals and recycle it in responsible way, in order to re - use this components. The customer therefore is invited to contact the local supplier office for the relative information to the differentiated collection and the recycling of this type of product.
UMWELTSCHUTZ
CHARAKTERYSTYKA WYROBU
The drill and screwer is a universal portable tool which does not require external power supply for do-it-yourself enthusiasts designed to drill holes in distinct materials (e.g. wood and wood-derived materials, metals) and to screw and unscrew bolts. Its special advantages will be appreciated by DIY enthusiasts realising assembly and finishing jobs. The tool has been designed solely for domestic work and must not be used professionally, i.e. in workshops and for remunerable jobs. A correct, reliable and safe functioning of the electric tool depends on its proper use, so:
Before you proceed to operate the device, read the manual thoroughly and keep it.
The supplier will not be held responsible for any damage resulting from the safety regulations and the recommendations indicated hereby not being observed.
EQUIPMENT
The product is supplied in a complete state and requires no assembly. Together with the product there are provided: the rechargeable battery and charging station (charger).
TECHNICAL PARAMETERS
| Parameter Unit Value | ||
| Catalog number 78974 | ||
| Operating voltage [V] 18 DC | ||
| Speed (idle) [min | -1] 0 - 350 / 0 - 1300 | |
| Maximum torque [Nm] 24 | ||
| Noise level | ||
| - acoustic pressure L_pA ± K_pA | [dB] 89,0 ± 3,0 | |
| - acoustic power L_wA ± K_wA | [dB] | 100,0 ± 3,0 |
| Degree of protection | IPX0 | |
| Insulation class | III | |
| Level of vibrations a_h ± K | [m/s] | 15,25 ± 1,5 |
| Weight | [kg] | 0,83 |
| Tool handle | [mm] | 0,8 - 10 |
| Maximum diameter of drilling | ||
| - in wood | [mm] | 10 |
| - in concrete | [mm] | 10 |
| - in steel | [mm] | 10 |
| Type of the battery | Li-Ion | |
| Capacity of the battery | [Ah] 1,3 | |
| Charger | ||
| Input voltage | [V~] ~230 | |
| Mains frequency | [Hz] | 50 |
| Rated power | [W] | 21 DC |
| Output voltage | [V] | 15 |
| Input current | [A] | 400 |
| Time of charging | [h] | 3 - 5 |
GENERAL SAFETY CONDITIONS
NOTE! Get acquainted with all the instructions below. Failure to observe them may lead to an electric shock, fire or injuries. The notion of electric tool used in the instructions applies to all the tools which are powered with electric current, both wire tools and wireless ones.
OBSERVE THE FOLLOWING INSTRUCTIONS
Place of work
The place of work must be properly illuminated and clean. Disorder and poor illumination may be a cause of accidents. Do not work with electric tools in explosive environments, or those which contain inflammable liquids, gases or vapours. Electric tools generate sparks, which may cause a fire in case of contact with inflammable gases or vapours. Do not allow children and outsiders to the place of work. A lack of concentration may result in a loss of control over the tool.
Electric safety
The plug of the power supply cable must fit the mains socket. Do not modify the plug. Do not use any adapters whatsoever in order to adapt the plug to the socket. Unmodified plug which fits the socket reduces the risk of an electric shock. Avoid contact with grounded surfaces, such as pipes, heaters and refrigerators. Grounding of the body increases the risk of an electric shock. Do not expose electric tools to precipitation or humidity. Water and humidity which gets into the electric tool increases the risk of an electric shock. Do not overload the power supply cable. Do not use the power supply cable in order to carry the tool or to connect and disconnect the plug from the mains socket. Avoid contact of the power supply cable with heat, oils, sharp tools and moving elements. Damage to the power supply cable increases the risk of an electric shock. In case work is realised outside closed areas, it is necessary to use extension cords designed for applications outside closed areas. Using a correct extension cord permits to reduce the risk of an electric shock.
Personal safety
Commence work in good physical and psychological conditions. Pay attention to what you do. Do not work if you are tired or under effects of medicines or alcohol. Even a moment's inattention during work may lead to serious injuries. Always use individual means of protection. Always wear goggles. Using individual means of protection, such as dust-masks, protective shoes, helmets and hearing protections permits to reduce the risk of serious injuries. Avoid accidental activation of the tool. Make sure the switch is in the OFF position, before you connect the tool to the mains. Holding the tool with a finger on the switch or connecting an electric tool when the switch is in the ON position may lead to serious injuries. Before you turn an electric tool on remove all the spanners and other tools, which have been used for adjustments. A spanner left on rotating elements of the tool may lead to serious injuries. Keep your balance. Maintain an appropriate position. It will permit to control the electric tool in case of unpredicted situations during its operation. Use protective clothes. Do not wear loose clothes or jewellery. Keep your hair, clothes and gloves away from moving elements of the electric tool. Loose clothes, jewellery or long hair may get caught on moving elements of the tool. Use dust extractors or dust containers, if the tool is equipped with any. Make sure they are properly connected. Using of dust extractors permits to reduce the risk of serious injuries.
Safety precautions while using the electric tool
Before the battery is installed, make sure the switch is off. Installation of the battery when the switch is on may lead to accidents. Use solely the charger recommended by the manufacturer. Using a charger designed for another type of battery may be a cause of fire.
The electric tool must be operated exclusively with the battery indicated by the manufacturer. Using another battery may be a cause of fire or injuries.
When the battery is not used, it must be stored away from such metal objects as paper clips, coins, nails, screws or other small metal elements, which might short-circuit the terminals. Short-circuited terminals of the battery may cause burns or fire.
Under adverse circumstances liquid may leak from the battery; avoid any contact. In case of accidental contact with the liquid, rinse it with water. In case of eye contact, seek medical. The liquid leaking from the battery may cause irritation or burns.
During work when the tool may touch a hidden live conductor, the electric tool must be held by insulated handles. The installed bit in case of contact with a live conductor may conduct electricity to the metal elements of the tool, which may cause electric shock to the operator.
Repairs
Have the tool repaired solely by authorised workshops, where original spare parts are used. This will ensure the adequate safety of operation of the electric tool.
PREPARATION FOR WORK
ATTENTION! All the operations mentioned in this point must be realised with the power supply off.
- the battery must be disconnected from the tool!
Safety recommendations for battery loading
Attention! Before loading may start make sure the body of the charger, the cable and the plug are not broken or damaged. It is prohibited to use a damaged loading dock and charger! For the purpose of loading batteries only the charging dock and the charger provided may be used. Using another charger may be a cause of fire or damage the tool. Batteries may be charged only in a dry room, protected from unauthorised persons, particularly children. Do not use the charging dock and the charger without permanent supervision of an adult! If it is necessary to leave the room where loading is taking place, it is required to disconnect the charger from the mains, removing the charger from the mains socket. In case when smoke comes out of the charger, or a strange smell is emitted, etc., it is required to immediately remove the plug of the charger from the mains socket!
The drill and automatic return screwdriver is provided with an unloaded battery, so before work may commence, it is required to charge it following the procedure below, using the charger and charging dock provided. Li-ION batteries do not show the so called “memory effect”, so it is allowed to charge them at any moment. However, it is recommended to discharge them during normal work, and then load them to their full capacity. If due to the nature of the task it is not possible to do so each time, then it is required to do it at least from time to time. Under no circumstances is it allowed to discharge the batteries short-circuiting the
GB
electrodes, since this would cause irreversible damage! It is also prohibited to check the load of the batteries, short-circuiting the electrodes for sparking.
Storage of the battery
In order to prolong the life of the battery, it is required to provide adequate storage conditions. The batteries can go through approximately 500 "loading - discharging" cycles. The battery must be stored between 0 and 30^ , at the relative humidity of 50% . In order to store the battery for a prolonged period, it is required to charge it to approximately 70% of its capacity. In case of prolonged storage, it is required to recharge the battery once a year. Do not permit excessive discharging of the battery, since this would reduce its life and may cause irreversible damage.
During storage, the battery will be gradually unloading due to leakage conductance. The process of automatic unloading depends on the temperature of storage, since the higher the temperature, the fastest the process. In case of incorrect storage of batteries, there is a danger of electrolyte leakage. In case of leakage, it is required to protect the leakage with neutralizing agent. In case of contact of electrolyte with the eyes, it is required to rinse the eyes abundantly, and then immediately seek medical assistance. It is prohibited to use a tool with a damaged battery.
In case the battery is completely worn out, it is required to deposit it at a special point dedicated to disposal of such waste.
Transport of the batteries
Lithium-ion batteries are in accordance with legal regulations treated as dangerous waste. The user of the tool may transport the tool with the battery or only batteries by land. Then no additional conditions must be complied with. In transport is realised by third parties (for example dispatch through courier service), then it is required to proceed in accordance with regulations for transport of dangerous materials. Before shipment, contact an authorised person.
It is prohibited to transport damaged batteries. During transport the battery must be removed from the tool, and the exposed contacts protected, e.g. with insulating tape. Protect the batteries so that they do not move inside the package during transport. It is also required comply with the national regulations for transport of dangerous materials.
Charging the battery
Attention! Before charging you should disconnect the charger from the mains by unplugging the power supply plug from the mains. In addition, you should clean the battery and its terminals of dirt and dust with a soft, dry cloth.
The battery has a built-in charge indicator. When you press the button, LEDs will light up (II), the more LEDs will light up, the more fully the battery pack is charged. If the button is pressed and the LEDs are off it means that the battery is discharged.
Disconnect the battery from the tool.
Connect the plug of the charger to the battery socket (II).
Plug the charger into a mains socket.
When the red LED lights up, it means the loading process.
When charging is complete, the red LED goes off, and green LED lights up, indicating a full charge of the battery.
Unplug the charger from the mains outlet.
It is required to remove the plug of the charger from the mains socket, and disconnect the plug of the charger from the battery.
Attention! If, when the charger is connected to the power supply, the green LED is on, this indicates a fully charged battery. In this case, the charger does not start charging.
Setting the rotational speed and selection of torque
Screwdriver has two mechanically switched gears (III). Depending on the maximum rotational speed you should choose one of them. The gear which is characterized by a lower rotational speed is recommended for tightening and loosening screws, while running the gear with a higher speed is recommended for drilling.
The torque is set with the ring located behind the chuck (IV). The higher the setting number the higher is torque offered by the screwdriver. Do not set a higher torque than it is necessary in order to work properly. Otherwise, this may lead to the destruction of threads. In the case of screwing the screws directly into the material, you should experimentally choose the correct torque, by carrying out a test on waste material. If you do not know which the maximum torque is safe for a given connection, you should set the smallest value and then increase it, until you achieve a suitable value for your work. If the screwdriver reaches the maximum set torque, the overload clutch will start its operation, then you should stop tightening.
If the product has been equipped with a drilling function with stroke, has the hammer symbol is visible on the setting ring. If you adjust the ring on hammer symbol this will start the hammer mechanism. Drilling with stroke should be used for drilling in concrete, and it should not be used for drilling in wood or plastic.
In the case when you use of the tool for drilling holes, you should adjust the ring to the symbol of a drill or a hammer. This will disconnect the overload clutch, and the maximum torque will be transferred to the drill bit.
Attention! You should not use the settings which are marked with numbers for drilling. Operation of the overload clutch during drilling may cause the destruction of material or damage the drill bit, this would also increase the risk of injury.
GB
Mounting the drill bits in the self-locking chuck
You should select the drill which is appropriate for your work with roll drill bit chuck.
Insert the drill bit to the chuck. Hand tighten the chuck, till the drill bit will be fi rm fi xed (V).
Set the maximum torque. The torque knob you should set to the symbol of a drill or hammer.
Adjustment of the direction of rotation
Place the selector of rotation to R - right rotation or L - left rotation (VI).
Attention! The direction of rotation may be changed only if the power supply is off! It is prohibited to change the direction of rotation during operation of the drill and screwer!
Installation of screwdriver bits in the drill chuck
Place a bit holder in the drill chuck and install an adequate bit. (VII)
Preparation for work
Before work:
Secure the material to be processed in an anvil or using woodwork clamps.
Use tools which are adequate for the job to be done. Make sure they are sharp and in good conditions.
Wear protective clothes as well as eye and hearing protectors.
Hold the tool with both hands (VIII).
Adopt a stable and secure position.
Turn the tool on pressing the switch with a finger.
Attention! In case suspicious noise, cracks and smell are detected during operation, the tool must be immediately turned off and the battery removed.
USING OF THE TOOL
Attention! Use hearing protection while using the tool!
Using right or left rotation
The right rotation should be used while drilling with common dextrorotatory drill bits.
The left rotation should be used if the dextrorotatory drill bit is seized in the material and to remove bolts. In case of removing bolts, use the lowest rotation.
Drilling in wood
Before making a hole it is recommended to secure the material with clamps or in an anvil, and then to mark the point to be drilled with a centre punch or a nail. Secure an adequate drill bit in the drill chuck, adjust the torque, connect the tool to the battery and start drilling.
In case of making holes through the material, it is recommended to place a wooden pad under the material, so as to avoid fraying of the edge of the hole.
In case of making holes of large diameters it is recommended to drill first a smaller guiding hole.
Drilling in metals
Always secure the material to be processed. In case of thin sheet it is recommended to place it on a wooden pad so as to avoid undesired bends, etc. Then mark the points to be drilled with a centre punch and start drilling.
Use drill bits for steel. In case drilling is done in white cast iron, it is recommended to use sintered carbide drill bits.
In case of making holes of large diameters it is recommended to drill first a smaller guiding hole.
In case of drilling in steel, cool the drill bit with machine oil.
In case of drilling in aluminium, cool the drill bit with turpentine or paraffi n.
In case of drilling in brass, copper or cast iron, do not use cooling agents. In order to cool the drill bit, it should be often removed from the material.
Drilling in ceramic materials
Drilling in hard, compact materials (concrete, hard bricks, stone, marble, etc.)
Applies only to hammer tools.
Before the desired hole is made, drill a smaller hole with the hammer function off. Drill the proper hole with the hammer function on. Use hammer sintered carbide drill bits in good conditions.
Drilling in glaze, soft bricks, plaster, etc.
Use hammer drill bits. Do not turn the hammer function on (if applicable). During drilling press the tool hard with constant force.
Remove the drill bit from the hole being drilled from time to time, in order to remove dust and waste.
GB
Using the tool to screw bolts in and out
It is recommended to use the lowest rotation and adequate bits.
Bits may be installed directly in the drill chuck or with a special magnetic holder.
In order to unscrew a bolt select the left rotation (L).
Using attachments
The tool must not be used to power working attachments.
Additional information
During work do not exert excessive pressure on the processed material and do not make violent moves, so as to avoid any damage to the working tool and the drill.
Make regular breaks during work.
Do not overstress the tool. The temperature of the external surfaces must not exceed 60^ C.
Once the work has been concluded, turn the drill off, remove the battery and carry out maintenance tasks and inspection.
MAINTENANCE AND OVERHAUL
ATTENTION! Before any adjustment, technical service or maintenance operations unplug the tool. Once the operations have been finished, the technical conditions of the tool must be assessed by means of external evaluation and inspection of the following elements: body and handle, conductor with a plug and deflection, functioning of the electric switch, patency of ventilation slots, sparking of brushes, noise level of functioning of bearings and gears, start-up and smoothness of operation. During the guarantee period, the user cannot dismantle the electric tools or change any sub-assemblies or elements, since it will cancel any guarantee rights. All irregularities detected at overhaul or during functioning of the tools are a signal to have the tool repaired at a service shop. Once the functioning has been concluded, the casing, ventilation slots, switches, additional handle and protections must be cleansed with a stream of air (at a pressure not exceeding 0.3 MPa), with a brush or a cloth without any chemical substances or cleaning liquids. Tools and handles must be cleansed with a clean cloth.
CHARAKTERISTIK DES ERZEUGNISSES
Bohren in Keramikmaterial
DECLARATION OF CONFORMITY
0618/78974/EC/2018
We declare and guarantee with full responsibility that the following products:
Cordless drill / driver 18 V d.c., ∅10 mm, 0 - 350 / 0-1350 min ^-1 ; item no. 78974
meet requirements of the following European Standards / Technical Specifications:
EN 60745-1:2009 + A11:2010
EN 60745-2-1:2010
EN 60745-2-1:2010
EN 55014-1:2006 + A1:2009 + A2:2011
EN 55014-2:1997 + A1:2001 + A2:2008
and fulfill requirements of the following European Directives:
2006/42/EC Machinery and safety elements
2014/30/EU Electromagnetic compatibility (EMC) Directive
2011/65/EU Restriction of the Use of Certain Hazardous Substances
Serial number: concern all serials numbers of item(s) mentioned in this declaration
The last two digits of the year in which the CE marking was affixed: 17
Year of production: 2018
The person authorized to compile the technical file:
Tomasz Zych
(Place and date of issue)

DYREKTORDS.
DARIUSZ HAYEK
(Name and signature of authorized person)
TOYA S.A.


- UMWELTSCHUTZ
- CHARAKTERYSTYKA WYROBU
- EQUIPMENT
- GENERAL SAFETY CONDITIONS
- Place of work
- Electric safety
- Personal safety
- Safety precautions while using the electric tool
- Repairs
- PREPARATION FOR WORK
- Safety recommendations for battery loading
- GB
- Storage of the battery
- Transport of the batteries
- Charging the battery
- Setting the rotational speed and selection of torque
- USING OF THE TOOL
- MAINTENANCE AND OVERHAUL
- CHARAKTERISTIK DES ERZEUGNISSES
- Bohren in Keramikmaterial
- DECLARATION OF CONFORMITY
Brand : Sthor
Model : 78974
Category : Drill