
MD 15442 - Battery charger MEDION - Free user manual and instructions
Find the device manual for free MD 15442 MEDION in PDF.

| Product Type | Car/Motorcycle Battery Charger with LCD Screen |
| Brand | Medion |
| Model | MD 15442 |
| Category | Battery Charger |
| Input Voltage | 220-240 V ~ 50 Hz, 0.6 A |
| Output Voltage | 6 V or 12 V (automatic detection) |
| Charging Current | 1 A or 4 A (depending on mode) |
| Compatible Battery Capacity | 1.2 Ah to 120 Ah |
| Compatible Battery Types | Lead-acid, Gel, AGM (6 V/12 V) |
| Charging Modes | Normal, Fast, Winter, Reactivation (deep discharge) |
| Protection Functions | Reverse polarity protection, overheat, short-circuit, faulty battery |
| Display | LCD screen with LED status and mode indicators |
| Included Accessories | Charger, red/black clamps, user manual and warranty documents |
| Warranty | 24 months (commercial warranty) |
| Power Supply | 220-240 V ~ 50 Hz, 0.6 A |
Frequently Asked Questions - MD 15442 MEDION
User questions about MD 15442 MEDION
0 question about this device. Answer the ones you know or ask your own.
Ask a new question about this device
Download the instructions for your Battery charger in PDF format for free! Find your manual MD 15442 - MEDION and take your electronic device back in hand. On this page are published all the documents necessary for the use of your device. MD 15442 by MEDION.
USER MANUAL MD 15442 MEDION
natural_image
Red and black electric vehicle charging station with red clamp and power cord, displaying 0.0V digital display (no text or symbols on device body)Car-battery charger with LCD-display
- About these instructions.... 28
1.1. Symbols and key words used in these instructions ....28
EN
-
Package contents
-
Proper use
-
Safety information NL
4.1. Faults 31
4.2. Risk of explosion! 31
4.3. Risk of explosion and fire! 31
4.4. Protect yourself from electric shock! 31
4.5. Handling rechargeable batteries ....32
-
About this device.... 34
-
Operation 3!
6.1. Status displays 35
6.2. Description of charging cycle....36
6.3. Connect charger to battery 38
6.4. Select charging mode 39
6.5. Adjust charging current manually ....39
6.6. Regenerate/recharge fully discharged 12 V batteries (regeneration mode)....42
6.7. Device protection function 42
6.8. Removing the battery 42
6.9. Switch off 42
- End of operation 43
- Cleaning and care 43
- Disposal 4
- Technical data 44
- Legal notice 44
- General Warranty Conditions 45
- Service Address...... 47
1. About these instructions

Read the safety instructions carefully before using the device for the first time. Note the warnings on the device and in the operating instructions. Always keep the operating instructions close to hand. If you sell the device or give it away, make sure you also hand over these instructions and the warranty card.
1.1. Symbols and key words used in these instructions

DANGER!
Warning of immediate mortal danger!
WARNING!
Warning of possible risk of fatal injury and/or serious irreversible injuries!
WARNING!
Warning about the risk of electric shock!

CAUTION!
Please follow the instructions to prevent injuries and property damage!
ATTENTION!
Please follow the instructions to avoid property damage!

NOTICE!
Additional information on using the device.

NOTICE!
Please follow the guidelines in the operating instructions!
Bullet point/information on operating steps and results
▶ Tasks to be performed
2. Package contents
Remove all packaging materials.

ATTENTION!
Do not let children or babies play with the plastic wrapping. There is a risk of suffocation!
When you have unpacked everything, check that the parts below have been included:
- Charger with 2 quick contact connection terminals (1 red, 1 black)
- Operating instructions and warranty documents
3. Proper use
This device is a primary-side switched charging device with pulse trickle charging. It is suitable for charging and maintaining the charge of the following rechargeable 6 V or 12 V lead batteries with an electrolyte solution, gel and AGM batteries:
-6 V/ 12 V: Capacity of 1.2 Ah to 120 Ah;
It can also regenerate fully discharged 12 V batteries (regeneration mode).
The device is not designed for commercial use.
Only use the charger to charge the battery types stated in these instructions. No other batteries may be charged with the charger. When using other types of batteries there is a risk of injury and the charger could be damaged.
The charger charges batteries automatically in several stages and can therefore recharge them up to 100% of their capacity.
You can also connect a battery that has not been used for a long time to the charger in order to recharge it.
The device is only designed for private and not industrial/commercial use.
Please note that we shall not be liable in cases of improper use:
- Do not modify the device without our agreement and do not use any additional appliances not approved or supplied by us.
-
Use only spare parts and accessories that we have supplied or approved.
-
Heed all the information in these operating instructions, especially the safety information. Any other use is deemed improper and can cause personal injury or property damage.
- Do not use the device under extreme environmental conditions.
4. Safety information
Read the safety instructions carefully before using the device for the first time.
Note the warnings on the device and in the operating instructions.
Always keep the operating instructions close to hand. If you sell the device or give it away, please ensure that you also pass on these instructions.
- Keep the device and its accessories out of the reach of children.
- This device may be used by children over the age of 8 and by persons with reduced physical, sensory or mental abilities or by those without experience and/or knowledge, if they are supervised or have been instructed in the safe use of the device and have understood the dangers that result from it. Children must not be allowed to play with the device. Cleaning and user maintenance may not be carried out by children unless they are over the age of 8 and are supervised;
- Children younger than 8 should be kept away from the device and the mains cable.
- Never expose your charger to rain or moisture! Do not use the device outside!
- The device may not come into contact with drops or sprayed water.
- Only connect the charger to an easily reachable 220-240 V \~ 50 Hz socket.
- Do not cover the charger otherwise overheating and thus damage may occur.
-
To avoid the risk of tripping, please avoid using extension cables.
-
Only use the device in environmental temperatures of -10^ - 40^ .
- The device may not be exposed to prolonged direct sunlight.
4.1. Faults
- If damage occurs to the mains cable, charger or connection cable, immediately pull the mains plug from the socket.
- Never try to open and/or repair the device yourself. Contact our service centre or qualified personnel.
- Ensure that defective appliances or damaged mains cables are repaired immediately by a specialist workshop or contact your service centre to reduce risks.
4.2. Risk of explosion!
- Ensure that ventilation is adequate. Charge and discharge the device in a well ventilated room that is protected from the weather.
- In addition ensure that there is no open flame (fire, embers or sparks) when charging or discharging the device! Gaseous hydrogen may flow out of the battery when charging and discharging. If there is contact with an open flame a highly explosive gas detonation may occur!
4.3. Risk of explosion and fire!
- Ensure that no explosive or flammable substances, e.g. petrol or solvent, can be ignited when using the charger!
- Connect the line at a distance from the battery and petrol line.
4.4. Protect yourself from electric shock!
- Only use the charger for 6 V or 12 V rechargeable lead batteries (batteries) with an electrolyte solution, gel or AGM batteries.
- For a battery that is firmly fixed in the vehicle ensure that the vehicle is out of use and is at a protected standstill! Switch the
ignition off and put the vehicle into park, e.g. with the hand-brake applied (car) or with a fixed rope (boat)!
- Avoid electrical short circuits when connecting the charger to the battery. Only connect the minus pole connection cable to the battery's minus pole! Only connect the plus pole connection cable to the battery's plus pole!
- Before connecting to the mains ensure that the mains power is 220-240 V\~50 Hz as per the regulations!
- When inserting the mains cable into the socket, only touch the insulated area on the mains plug!
- Only touch the connection terminals (plus pole and minus pole) in the insulated area!
- Detach the charger from the mains before assembly, maintenance or cleaning work!
- Do not expose the charger to fire, heat or long lasting temperature effects above 45°C! The charger's output power falls automatically at higher temperatures.
- Before using the battery connection terminals disconnect the device from the power.
4.5. Handling rechargeable batteries
- Do not use the charging and trickle charging process on batteries that cannot be recharged.
- Do not use frozen rechargeable batteries!
- Do not use damaged or corroded rechargeable batteries.
- Never open or cut up rechargeable cells or batteries.
- Never expose cells or batteries to great heat or fire. Avoid storage in direct sunlight.
- Never short circuit cells or batteries.
- Please note that when charging batteries a highly explosive gas detonation mixture can occur. There is a risk of explosion for improper use. Please also note:
Fire, sparks, naked light and smoking are prohibited.
When using cables and electrical appliances ensure that
sparks do not form and there is no electrostatic discharge. Avoid short circuits.
- Caution risk of chemical burns! Battery acid can cause strong chemical burns. Use protective gloves, clothes and eye protection that withstand acids. Do not turn batteries over as acid can leak from the gas release openings.
- If a cell has become unsealed the liquid must not touch the skin or eyes. If it does come into contact the affected location must be washed with a large quantity of water. Contact a doctor immediately.
- Remove the leaking battery liquid with a dry, absorbent cloth and avoid contact with skin by, for example, using protective gloves that withstand acid.
- At all times observe the plus (+) and minus (-) signs on the cells, batteries and appliances. Ensure proper use.
- Store cells and batteries out of the reach of children.
- Only use the charger for 6 V or 12 V rechargeable lead batteries with an electrolyte solution, gel and AGM batteries.
- Store the technical documentation on battery charging together with this manual for future reference.
5. About this device
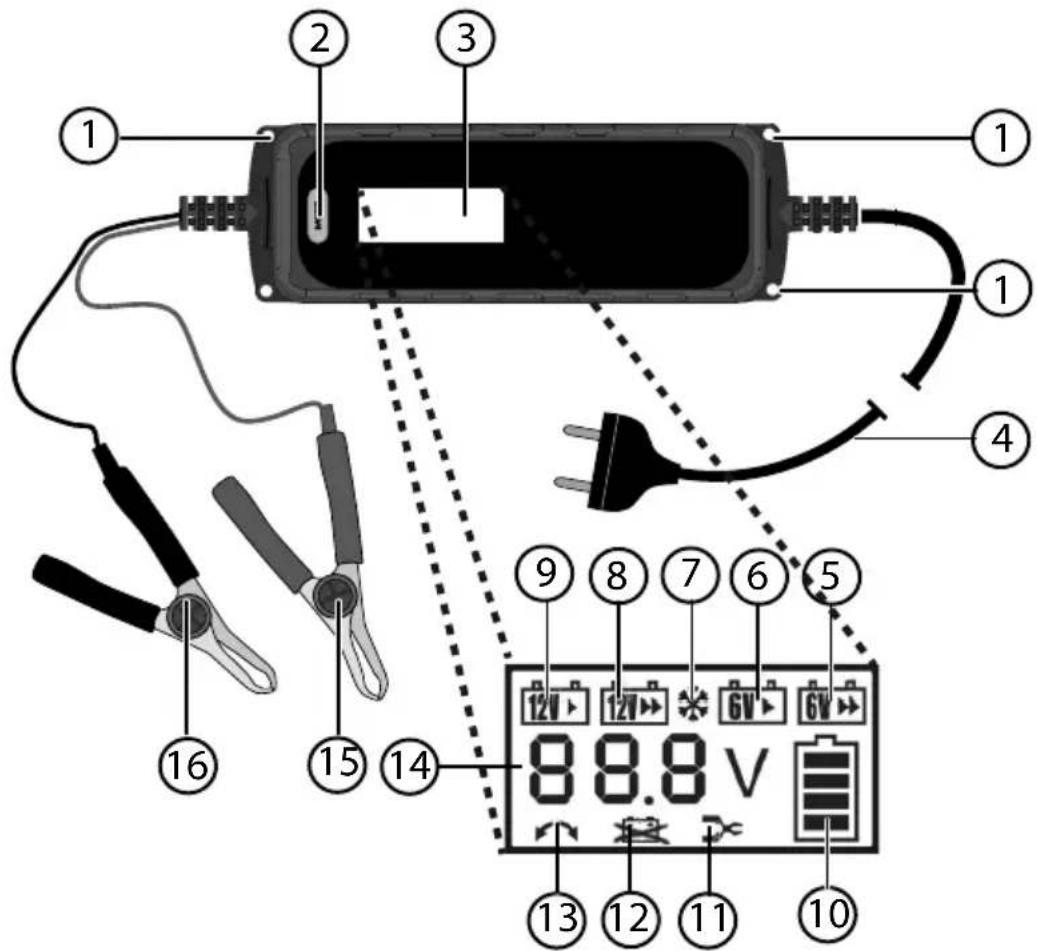
1) Fixing holes
2) Button MODE
3) Display
4) Network cable with plug
5) Charging indicator (6 V/4 A quick charge)
6) Charging indicator (6 V/1A normal charge)
7) Charging indicator (winter mode for 12 V 1 A/4 A; 6 V 1 A/4 A)
8) Charging indicator (12 V/4 A quick charge)
9) Charging indicator (12 V/1 A normal charge)
10) The battery is being charged when the battery icon is flashing. If the battery icon is permanently lit, the battery is fully charged and the device switches to trickle charging.
11) No battery attached
12) Battery defective
13) Terminals incorrectly connected
14) Indicator for current battery charge
15) Plus pole terminal (red), with connection cable
16) Minus pole terminal (black), with connection cable
6. Operation
6.1. Status displays
The following LEDS may light up during operation:
| LED Mode | |
| Mode 1:Charging process for 6 V battery1 A charging current | |
| Mode 2:Quick charging process for 6 V battery4 A charging current | |
| Mode 3:Charging process for 12 V motorbike battery or 12 V car battery1 A charging current | |
| Mode 4:Quick charge process 12 V car battery4 A charging current | |
| Mode 5:Charging process at low environmental temperature for 6/12V battery1 A/4 A charging current | |
| Charging process active | |
| Trickle charging for fully charged battery.Before the charger switches to trickle charging when the battery is fully charged, the frame of the battery icon flashes for around 1 minute. | |
| Error: battery defective | |
| Error: e.g. incorrect connection terminal poles | |
6.2. Description of charging cycle
| Mode 1. Battery volt-age check | 2.4 A constant power charging-ing | 3.3 A constant power charging-ing | 4.2 A constant power charging-ing | 6.0.5 A constant power charging-ing | 7. Checking the batteries | 8. Trickle charge | |||||
| 12V A. if voltage of more than 7.5V detected nizes battery as 12V. | - | - | |||||||||
| 12V B. if voltage between 7.5-10.5V is found, maintenance charge is acti- as rated (1) Pulse charging for 0.3 seconds, then stop for Winter | A constant current charging, un- till 13.8V,stop charging for 6 seconds, then to 3. | 3A constant current charging, un- till 14.4V,stop charging for 6 seconds, then to 4. | 2A constant current charging, un- till 14.4V,stop charging for 6 seconds, then to 5. | 1A constant current charging, un- till 14.4V,stop charging for 6 seconds, then to 6. | 1A pulse charging, ing for 0.5 sec and oads, stop for 12V, bad battery incl. coated. B. Ex-exceeds 12V, less than or equal to 13.2V, go until volt angle less than or equal to 13.2V, then will back to trickle charging. C. If exceeds 13.2V, wait until volt to 13.2V, then will back to trickle charging. After that it will voltage exceeds 10.5V. After that it will voltage could not over 10.5V, unless, bad bat- they will be -in- directed. C. If voltage ex- ceeds 10.5V, go to 2. | 4A constant current charging, un- till 13.8V,stop charging for 6 seconds, then to 3. | 3A constant current charging, un- till 14.8V,stop charging for 6 seconds, then to 4. | 2A constant current charging, un- till 14.8V,stop charging for 6 seconds, then to 5. | 1A constant current charging, un- till 14.8V, stop charging for 6 seconds, then to 6. | if condition be- tween B and C, after 1min, battery symbol or 4 grids will be long lighting. | If condition be- tween B and C, after 1min, battery symbol or 4 grids will be long lighting. |
| 12V A. if voltage of more than 7.5V detected charger recog- nizes battery well | - | ||||||||||
| 12V B. if voltage between 7.5-10.5V is found, maintenance charge is acti- atied (1) Pulse charging for 0.3 seconds, then stop for Winter | A constant current charging, un- till 13.8V,stop charging for 6 seconds, then to 3. | 3A constant current charging, un- till 14.4V,stop charging for 6 seconds, then to 4. | 2A constant current charging, un- till 14.4V,stop charging for 6 seconds, then to5. | 1A constant current charging, un- till 14.4V, stop charging for 6 seconds, then to 6. | 1A pulse charging, ing for 0.5 sec and oads, stop for 12V, bad battery incl. coated. B. Ex-exceeds 13.2V, less than or equal to 13.2V, go until volt to 13.2V, then will back to trickle charging. C. If exceeds 13.2V, wait until volt to 13.2V, then will back to trickle charging. After that it will voltage exceeds 10.5V. After that it will voltage could not over 10.5V, unless, bad bat- they will be -in- directed. C. If voltage ex- ceeds 10.8V, go to 2. | 4A constant current charging, un- till 13.8V,stop charging for 6 seconds, then to 3. | 3A constant current charging, un- till 14.8V,stop charging for 6 seconds, then to 4. | 2A constant current charging, un- till 14.8V,stop charging for 6 seconds, then to 5. | 1A constant current charged, un- till 14.8V, stop charging for 6 seconds, then to 6. | if condition be- tween B and C, after 1min, battery symbol or 4 grids will be long lighting. | C. If voltage ex- ceeds 10.8V, go to 2. |
| Mode 1. Battery voltage check | 2.4 A constant power charging | 3.3 A constant power charging | 4.2 A constant power charging | 5.1 A constant power charging | 6.0.5 A constant power charging | 7. Checking the batteries | 8. Trickle charge | |
| 6 V | A. if voltage of less than 7.5V detected, charger recognizes battery as 6V.B. if voltage of 2.5-5.2V is found, maintenance charge is activated(1A pulse charging for 0.3 seconds, then stop for 0.7 seconds, until voltage exceeds 5V. After that it will go to step 2. If voltage could not over 5.2V within 60 minutes, bad battery will be indicated.C. if voltage exceeds 10.5V, go to 2.. | -- 1A constant | current charging, until 7.3V, stop charging for 6 seconds, then go to 6 | 1A pulse charging for 0.5 seconds, stop for 0.5 seconds, until voltage go to 7.3V, stop for 6 seconds, go to 7 | Stop charging, after 1min, the voltage:D. less than or equal to 6V, bad battery indicated.E. Exceeds 6V, less than or equal to 6.6V, go the 8F. If exceeds 6.6V, wait until voltage less than or equal to 6.6V, then will back to trickle charging. This is the cycle. | 1A pulse charging for 0.2 seconds, stop for 0.8 seconds. But voltage cannot exceed 6.9V, if voltage more than or equal to 6.9V, stop trickle charging, until voltage less than or equal to 6.6V, then will back to trickle charging. | ||
| 6 V Sch-nell | 4A constant current Charging, until 6.9V, stop charging for 6 seconds, then go to 3. | 3A constant current Charging, until 7.3V, stop charging for 6 seconds, then go to 4.. | 2A constant current Charging, until 7.3V, stop charging for 6 seconds, then go to 5 | |||||
| 6 V Winter | --- 1A constant | current charging, until 7.5V, stop charging for 6 seconds, then go to 6 | 1A pulse charging for 0.5 seconds, stop for 0.5 seconds, until voltage go to 7.5V, stop for 6 seconds, go to s7 | |||||
| 6 V Winter Sch-nell | 4A constant current Charging, until 6.9V, stop charging for 6 seconds, then go to 3. | 3A constant current Charging, until 7.5V, stop charging for 6 seconds, then go to 4. | 2A constant current Charging, until 7.5V, stop charging for 6 seconds, then go to step 5 | If condition between B and C, after 1min, battery symbol of 4 grids will be long lighting. | ||||
6.3. Connect charger to battery

ATTENTION!
Live components
There is a risk of an electric shock.
Before assembly and maintenance work and before cleaning the device always detach it from the mains power supply!
Always unplug the mains plug before attaching or detaching the battery to the connection terminals.

NOTE
Before disconnecting a car or motorcycle battery, refer to the vehicle instruction manual on the potential consequences of disconnecting the battery.
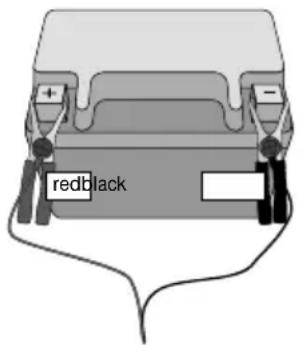
If the battery that you wish to charge is connected to the vehicle, first disconnect the vehicle's minus pole connection cable (black) from the battery's minus pole before the charging or trickle charging process. The battery's minus pole is usually connected to the vehicle's bodywork.
▶ Then disconnect the vehicle's plus pole connection cable (red) from the battery's plus pole.
Then attach the charger's plus pole terminal (red) to the battery's plus pole and then the minus pole terminal (black) to the battery's minus pole.
Connect the battery charger's mains cable to a mains socket.
6.4. Select charging mode
Select a charging mode depending on the battery type and environmental temperature. You can also recharge a completely discharged battery ("regeneration").
The charger's electronics automatically recognise the battery type (6 V/ 12 V) and automatically start the charging process after around three seconds. This avoids sparks that often occur during the connection process.
In order to select a charging mode press the MODE button several times. The icon for the relevant mode is displayed on the screen.
The charger recognises the modes suitable for the battery type. Therefore not every mode can be selected for every battery.
▶ After selecting a mode the charger implements it. If a battery remains attached to the charger after complete charging, the charger automatically switches to trickle charging. The battery is also charged with trickle charging if another mode is selected.
6.5. Adjust charging current manually
If as a result of battery voltage being too low the correct battery tap is not detected, you can also adjust the charging mode manually.
▶ Hold down the MODE button for about 3 seconds.
▶ Then select the right charging mode with the MODE button.
6.5.1. Mode 1 (Charging process for 6 V battery, receiver battery capacity 1.2–120 Ah, 1 A charging current)
Set this mode to charge 6 V lead acid batteries with a capacity under 120 Ah.
The charger normally recognises the mode suitable for the battery type. If the battery is still not detected, do the following:

NOTE
Refer to the nameplate on your battery for the battery type.
▶ Press the MODE button several times to select Mode 1.
Charging mode 1 shown on the screen.
If you then do not set another mode the electronics automatically start the charging process with a charging current of around 1 A.
When the battery is fully charged, all bars on the battery display are permanently lit. Trickle charging takes place in this status.
6.5.2. Mode 2 (Charging process for 6 V battery, receiver battery capacity 1.2–120 Ah, 4 A charging current)
Set this mode to quickly charge 6 V lead acid batteries with a capacity under 120 Ah.
The charger normally recognises the mode suitable for the battery type. If the battery is still not detected, do the following:

NOTE
Refer to the nameplate on your battery for the battery type.
▶ Press the MODE button several times to select Mode 2.
Charging mode 2 is shown on the screen.
If you then do not set another mode the electronics automatically start the charging process with a charging current of around 4 A.
When the battery is fully charged, all bars on the battery display are permanently lit.
Trickle charging takes place in this status.
6.5.3. Mode 3 (Charging process for 12 V motorcycle battery or 12 V car battery, receiver battery capacity 1.2–120 Ah, 1 A charging current)
Set this mode to charge batteries with a capacity under 120 Ah.
The charger normally recognises the mode suitable for the battery type. If the battery is still not detected, do the following:

NOTE
Refer to the nameplate on your battery for the battery type.
▶ Press the MODE button several times to select Mode 3.
Charging mode 3 is shown on the screen.
If you then do not set another mode the electronics automatically start the charging process with a charging current of around 1 A.
When the battery is fully charged, all bars on the battery display are permanently lit.
Trickle charging takes place in this status.
6.5.4. Mode 4 (Quick charging process for 12 V car battery, receiver battery capacity 1.2–120 Ah, 4 A charging current)
Set this mode to quickly charge batteries with a capacity under 120 Ah.
The charger normally recognises the mode suitable for the battery type. If the battery is still not detected, do the following:

NOTE
Refer to the nameplate on your battery for the battery type.
▶ Press the MODE button several times to select Mode 4.
Charging mode 4 is shown on the screen.
If you then do not set another mode the electronics automatically start the charging process with a charging current of around 4 A.
When the battery is fully charged, all bars on the battery display are permanently lit. Trickle charging takes place in this status.
6.5.5. Winter mode
Set this mode to charge batteries with a capacity over 1.2 Ah and lower environmental temperatures. Set this mode also to load AGM (Absorbent Glass Mat) batteries and a capacity of over 1.2 Ah.
The charger normally recognises the mode suitable for the battery type. If the battery is still not detected, do the following:

NOTE
Refer to the nameplate on your battery for the battery type.
▶ Press the MODE button several times to select Mode 4.
Charging mode 4 is shown on the screen.
If you then do not set another mode the electronics automatically start the charging process with a charging current of around 3.8 A.
When the battery is fully charged the frame on the battery icon stops flashing and the whole battery lights up permanently. Trickle charging takes place in this status.
6.6. Regenerate/recharge fully discharged 12 V batteries (regeneration mode)
▶ Attach the fully discharged battery into the charger and start the charging process.
In this regeneration mode the battery is charged until the charger measures a terminal voltage that is high enough for a regular charging mode. The device then switches automatically to an appropriate charging mode and continues the charging.
6.7. Device protection function
The device is protected against improper use. If there is a short circuit between the terminals with the result that the power circuit is not closed (the terminals are not fixed correctly) or the battery voltage falls below 7.5 V the device remains in standby mode. You cannot operate the device.
If the terminals have incorrect polarity (are connected incorrectly) the error indicator also lights up ↗
If the battery itself is defective, lights up on the screen.
6.7.1. Overheating cut-out
If the device overheats during charging the charging current is reduced to a lower output. This protects the device from damage.

NOTE
A low charging current can significantly extend the charging time.
6.8. Removing the battery
Remove the battery from the charger in the following sequence:
▶ After charging disconnect the device from the mains power.
▶ Detach the minus pole terminal (black) from the battery's minus pole.
▶ Detach the plus pole terminal (red) from the battery's plus pole.
▶ Reconnect the vehicle's plus pole connection cable to the battery's plus pole.
▶ Reconnect the vehicle's minus pole connection cable to the battery's minus pole.
6.9. Switch off
▶ Switch the charger off by removing the mains plug.
7. End of operation
▶ If you no longer use the device pull the plug out of the socket.
▶ Store the device in a dry location.
8. Cleaning and care
Before cleaning, pull the plug out of the mains socket. Use a dry, soft cloth for cleaning. Avoid the use of chemical solutions and cleaning products because these may damage the device surface and/or markings.
▶ After longer periods of use also clean the connection terminals with a dry cloth to achieve ideal contact to the poles.
9. Disposal

Packaging
The product has been packaged to protect it from damage in transit. The packaging is made of materials that can be recycled in an environmentally friendly manner.

natural_image
Symbol of a waste bin with no text or labels, crossed by two diagonal lines and a black rectangle below (no readable text or symbols)Device
Old devices should not be disposed of with the normal household rubbish.
In accordance with Directive 2012/19/EU, the device must be properly disposed of at the end of its service life.
This involves separating the materials in the device for the purpose of recycling and avoiding any impact on the environment.
Take old appliances to a collection point for electrical scrap or a recycling centre.
Contact your local waste disposal company or your local authority for more information on this subject.
Batteries
Batteries must be properly disposed of. Retailers who stock batteries and local authority collection points have appropriate disposal containers for this purpose. You can contact your local waste disposal company or municipal authorities for further information.
10. Technical data
Model: MD 15442
Input: 220 - 240 V \~ 50/60 Hz; 0.6 A
Output for batteries
with measurement voltages: 6 V or 12 V
Charging current approx. 0.8 A/3.8 A (12 V)
approx. 0.8 A (6 V)
Subject to technical modifications!

11. Legal notice
Copyright © 2015
All rights reserved.
This operating manual is protected by copyright.
Mechanical, electronic and any other form of reproduction is prohibited without the written permission of the manufacturer
Copyright is owned by the company:
Medion AG
Am Zehnthof 77
45307 Essen
Germany
The operating manual can be reordered via the service hotline and is available for download via the service portal at www.medion.com/gb/service/start/.
You can also scan the QR code above and download the operating manual onto your mobile device via the service portal.

12. General Warranty Conditions
12.1. General information
The warranty period is 24 months and begins on the day the product is purchased. The warranty covers all types of material and product damage that could occur during normal use.
Please keep your original proof of purchase in a safe place. The warranty provider reserves the right to refuse to confirm the status of the warranty or to carry out a repair under warranty if a valid proof of purchase cannot be produced.
If it is necessary to return your device for repair, please ensure that it is suitably packaged for transportation. Unless otherwise specified, you shall bear the costs for sending the device and the transport risk. The warranty provider does not assume any liability for additional materials sent with the product that do not belong to the original package contents supplied with the product.
Please enclose as much information as possible about the fault when sending the device to the warranty provider. In order to make a valid claim under warranty and before returning the device, please contact the Service Hotline operated by the warranty provider or the Service Portal. They will provide you with information on how to proceed further.
This warranty has no effect on your statutory warranty rights and is subject to the laws of the country in which the first purchase of the product was made by the end customer.
12.1.1. Scope
In the event of a fault on your product that is covered by this warranty, the warranty provider guarantees to repair or replace the product. The decision about whether to repair or replace the device is taken by the warranty provider. Therefore, the warranty provider can at its own discretion decide to replace a device submitted for repair under warranty with a refurbished device of the same quality.
No warranty is provided for batteries or rechargeable batteries or for consumable materials i.e. parts which have to be replaced at regular intervals during the normal use of the product e.g. video projector lamps.
A pixel error (permanently coloured, light or dark point in an image) is not generally considered a fault. Please refer to the information provided in the manual for this product for the precise number of permissible defects in the image.
The warranty provider gives no warranty for burnt-in images on plasma or LCD devices that result from the improper use of the device. Please refer to the information provided in the manual for this product for precise instructions on operating your plasma or LCD device.
The warranty does not cover errors relating to the playback of data media that have been created in an incompatible format or as a result of using unsuitable software. If it is discovered during the repair that the fault concerned is not covered under warranty, the warranty provider reserves the right to invoice the customer for the
costs already incurred in the form of a flat-rate handling charge, as well as to charge the customer for the materials and labour required for the repair after submitting a cost estimate. You will be informed in advance as the customer about these repair charges; you are responsible for accepting or rejecting the repair process.
12.1.2. Exclusions
Malfunctions and damage to the device caused by external influences, accidental damage, improper use, changes made to the product, modifications, upgrades, the use of third-party parts, neglect, viruses or software faults, improper transport, improper packaging or loss during the return of the product are not covered by the warranty issued by the warranty provider.
The warranty will be invalidated if the fault to the device is caused by maintenance or repair carried out by someone other than a service partner authorized by the warranty provider. The warranty will also be invalidated if labels or serial numbers on the device or a component of the device have been modified or made illegible.
12.1.3. Service Hotline
Before sending the device to the warranty provider, you must contact us via the Service Hotline or the Service Portal. This ensures that you receive further information on how to make a valid claim under warranty.
The use of the hotline may be subject to a charge.
The Service Hotline should under no circumstances be considered a substitute for user training for software and hardware or reading the manual, nor does it provide support for third-party products.
12.2. Special warranty conditions for PC, notebook, pocket PC (PDA), devices with navigation functions (PNA), telephone devices, mobile telephones and devices with a memory function
Should any of the supplied options (e.g. memory cards, etc.) have a fault, you are entitled to a repair or replacement. The warranty covers material and labour costs for restoring the functionality of the product concerned.
The warranty can be invalidated if any damage to the product itself or the supplied options results from the addition of any hardware to your product that is not produced or distributed by the warranty provider.
A limited warranty is provided for supplied software. This applies to a pre-installed operating system and also to supplied programs. For software supplied with the device by the warranty provider, a warranty is issued that any data media, e.g. discs and CD-ROMs on which the software is supplied, shall be free from faults in terms of their materials and workmanship for a period of 90 days following purchase. In the event of a faulty data medium being supplied, the warranty provider shall replace the faulty data medium free of charge; any further claims are excluded. Excluding the warranty for data media, all software is supplied without warranty. Furthermore,
it is not warranted that this software shall function without interruption or errors or that it will meet your requirements. In the case of map material supplied for a device with navigation functions, no warranty is provided for its completeness.
It may be necessary to delete all data from the device in order to repair it. Please ensure that you have a backup copy for all of the data on the device before sending back the device. We expressly point out that the factory settings will be restored in the event of a repair. The warranty provider assumes no liability for the cost of a software configuration, lost revenue, loss of data or software, or other consequential damages.
12.3. Special warranty conditions for repair on site or replacement on site
If there is an entitlement to on-site repair or replacement, the specific warranty terms and conditions for on-site repair or replacement shall apply to your product. The following provisions must be ensured by you for carrying out repairs or replacements on site:
- Personnel from the warranty provider who arrive at your premises for the above-mentioned purpose must have unrestricted, safe and immediate access to the devices.
- Telecommunication facilities required by these personnel for the proper execution of your order, for testing and diagnostic purposes or for remedying faults must be provided by you at your own expense.
- You shall be personally responsible for restoring your own application software after completion of the service by the warranty provider.
- You shall be personally responsible for configuring and connecting any existing external devices after completion of the service by the warranty provider.
- The free cancellation period for repairs or replacements on site is at least 48 hours, thereafter we shall invoice you for any costs resulting from a late or missing cancellation.
13. Service Address

0333
3213106

01793
715716
(costs:
local)
Mo - Fr: 08:00 - 20:00
Sa - Su: 10:00 - 16:00

www.medion.co.uk
@ Please use the contact form at www.medion.com/contact
Sommaire
natural_image
Symbol of a trash bin with crossed lines indicating no waste or restriction (no text or labels)Apparaat
Pull out the warning sticker of your language from the enclosed sheet and stick it onto the marked area on the rear side of the charger.
- Car-battery charger with LCD-display
- About these instructions
- Symbols and key words used in these instructions
- Package contents
- ATTENTION!
- Proper use
- Safety information
- Faults
- Risk of explosion!
- Risk of explosion and fire!
- Protect yourself from electric shock!
- Handling rechargeable batteries
- About this device
- Operation
- Status displays
- Connect charger to battery
- NOTE
- Select charging mode
- Adjust charging current manually
- Mode 1 (Charging process for 6 V battery, receiver battery capacity 1.2–120 Ah, 1 A charging current)
- Mode 2 (Charging process for 6 V battery, receiver battery capacity 1.2–120 Ah, 4 A charging current)
- Mode 3 (Charging process for 12 V motorcycle battery or 12 V car battery, receiver battery capacity 1.2–120 Ah, 1 A charging current)
- Mode 4 (Quick charging process for 12 V car battery, receiver battery capacity 1.2–120 Ah, 4 A charging current)
- Winter mode
- Regenerate/recharge fully discharged 12 V batteries (regeneration mode)
- Device protection function
- Overheating cut-out
- Removing the battery
- Switch off
- End of operation
- Cleaning and care
- Disposal
- Packaging
- Device
- Batteries
- Technical data
- Subject to technical modifications!
- Legal notice
- Germany
- General Warranty Conditions
- General information
- Scope
- Exclusions
- Service Hotline
- Special warranty conditions for PC, notebook, pocket PC (PDA), devices with navigation functions (PNA), telephone devices, mobile telephones and devices with a memory function
- Special warranty conditions for repair on site or replacement on site
- Service Address
- Sommaire
- Apparaat
Brand : MEDION
Model : MD 15442
Category : Battery charger