USER MANUAL YT-82131 Yato
natural_image
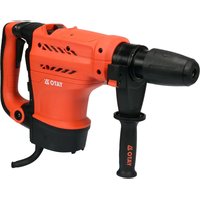
YATO 11 electric drill put tool with black handle and gray body (no visible text or symbols on the device body)
CE
natural_image
Close-up of a hand holding a drill bit with visible grip and blade (no text or symbols)
natural_image
Technical diagram showing a drill bit assembly with a 3D model and a close-up view of a mechanical component (no text or symbols present)
natural_image
Two-step illustration showing hands using a drill bit to adjust the spiral drill bit (no text or symbols present)

natural_image
Close-up of a hand pressing a button on a mechanical component (no visible text or symbols)
natural_image
Close-up of a gloved hand holding a small metallic object with a circular base and screw, next to a mechanical component (no visible text or symbols)
natural_image
Close-up of a hand holding a drill bit with a coiled drill, no visible text or symbols
PL
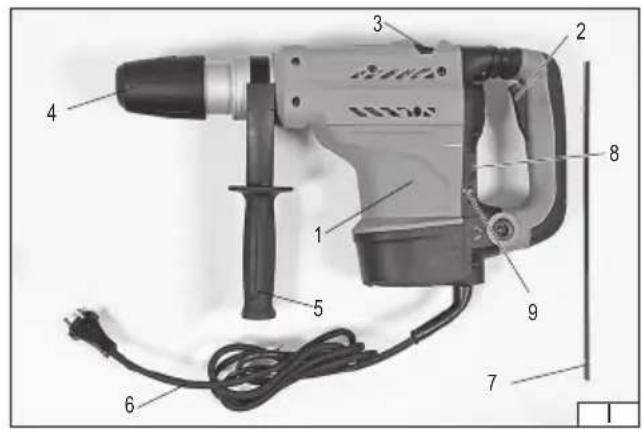
- body with the main handle
- electric ON/OFF switch
- operating mode switch
- drill chuck
- additional handle
- power cord
- depth gauge
- LED lamps
- rpm speed control
DE
Read the operating instruction
Wear hearing protectors
Wear protective goggles
Second class of insulation
This symbol indicates that waste electrical and electronic equipment (including batteries and storage cells) cannot be disposed of with other types of waste. Waste equipment should be collected and handed over separately to a collection point for recycling and recovery, in order to reduce the amount of waste and the use of natural resources. Uncontrolled release of hazardous components contained in electrical and electronic equipment may pose a risk to human health and have adverse effects for the environment. The household plays an important role in contributing to reuse and recovery, including recycling of waste equipment. For more information about the appropriate recycling methods, contact your local authority or retailer.
The manual hammer drill is an ordinary electric tool, insulation Class II, which has been designed for drilling and hammering in concrete, natural and artificial stone, marble, etc., using working tools with an SDS maxchuck system. The hammer drill permits continuous adjustments of rotation of the spindle and by deactivation of the hammering action it permits drilling in such materials as: wood, metal or plastics. A correct, reliable and safe operation of the tool depends on its correct use, so:
Read the operating manual thoroughly before work and keep it for future reference.
The supplier shall not be held responsible for any damage occurred as a result of failure to observe safety regulations and indications contained in this manual.
ACCESSORIES
The package provided by the manufacturer should contain:
- hammer drill
- additional handle
- drilling depth limiting device
TECHNICAL PARAMETERS
| Parameter Unit Value | | |
| Catalogue No. YT-82131 | | |
| Rated voltage [V~] 220 - 240 | | |
| Rated frequency [Hz] 50 | | |
| Rated power [W] 1300 | | |
| Rated speed [min] | ^-1 300 - 540 | |
| Max drilling diameter in concrete using a twist drill [mm] 50 | | |
| Max drilling diameter in concrete using a crown drill | [mm] | 150 |
| Impact energy | [J] | 20 |
| Impact frequency | [min ^-1 ] | 2900 |
| Weight | [kg] | 9.7 |
| Noise level | | |
| - sound pressure L_pA ± K | [dB(A)] | 95 ± 3 |
| - power L_wA ± K | [dB(A)] | 106 ± 3 |
| Vibration level ah _HD ± K /ah _CHeq ± K (impact drilling / forging) | [m/s ^2 ] | 20.93 ± 1.5 / 23.19 ± 1.5 |
| Insulation class | | II |
| Protection rating | | IP20 |
Warning! Read all safety warnings, illustrations and specifications provided with this power tool. Failure to do so may result in electric shock, fire or serious injury.
Keep all warnings and instructions for future reference.
The term "power tool" used in warnings applies to all tools driven by power both wired and wireless.
Workplace safety
Keep the workplace well-lit and clean. Disorder and poor lighting can be causes of accidents.
Do not work with power tools in an environment with an increased risk of explosion, containing flammable liquids, gases or vapors. Power tools generate sparks that can ignite dust or fumes.
Children and third persons should not be allowed to enter the workplace. Loss of concentration can result in loss of control.
Electrical safety
The plug of the electric cable must match the power socket. You must not modify the plug in any way. Do not use any plug adapters with earthed power tools. An unmodified plug that fits the outlet reduces the risk of electric shock.
Avoid contact with earthed surfaces such as pipes, radiators and coolers. Grounding the body increases the risk of electric shock.
Do not expose power tools to contact with atmospheric precipitation or moisture. Water and moisture that gets inside the power tool increases the risk of electric shock.
Do not overload the power cable. Do not use the power cord to carry, pull or unplug the power plug from the power outlet.
Avoid contact of the power cable with heat, oils, sharp edges and moving parts. Damage or entanglement of the power cord
EN
increases the risk of electric shock.
In the case of working outside closed rooms, use extension cords intended for work outside closed rooms. The use of an extension cord adapted for outdoor use reduces the risk of electric shock.
When using a power tool in a humid environment is unavoidable as a protection against supply voltage use a residual current device (RCD). The use of RCD reduces the risk of electric shock.
Personal safety
Stay alert, pay attention to what you do and keep common sense while working with the power tool. Do not use a power tool when you are tired or under the influence of alcohol or medication. Even a moment of inattention while working can lead to serious personal injury.
Use personal protective equipment. Always wear eye protection. The use of personal protective equipment such as dust masks, anti-slip safety shoes, helmets and hearing protection reduce the risk of serious personal injury.
Prevent accidental operation. Make sure that the electric switch is in the “off” position before connecting to the power supply and / or battery, lifting or moving the power tool. Moving the power tool with the finger on the switch or powering the power tool, when the switch is in the “on” position can lead to serious injuries.
Before turning on the power tool remove any keys and other tools that were used to adjust it. The key left on the rotating parts of the power tool can lead to serious injuries.
Do not reach and do not lean too far. Keep the right attitude and balance all the time. This will allow easier control over the power tool in case of unexpected work situations.
Dress accordingly. Do not wear loose clothing or jewelry. Keep your hair and clothing away from moving parts of the power tool. Loose clothing, jewelry or long hair can be caught by moving parts.
If the devices are fitted for the connection of dust extraction or dust collection, make sure that they are connected and used properly. The use of dust extraction reduces the risk of dust hazards.
Do not let the experience acquired from frequent use of the tool resulted in carelessness and ignoring safety rules.
Carefree action can cause serious injuries in a fraction of a second.
Do not overload the power tool. Use the power tool appropriate for the selected application. The right power tool will provide a better and safer job if used according to the designed load.
Do not use the power tool, if the electric switch does not allow switching on and off. Power tool, which cannot be controlled by means of a power switch is dangerous and must be returned for repair.
Disconnect the plug from the power socket and / or remove the battery if it is detachable from the power tool before adjusting, changing accessories or storing the tool. Such preventive measures will allow you to avoid accidentally turning on the power tool.
Keep the tool out of the reach of children, do not let people who do not know how to operate the power tool or these instructions use a power tool. Power tools are dangerous in the hands of untrained users.
Maintain power tools and accessories. Check the tool for mismatches or jams of moving parts, damage to parts and any other conditions that may affect the operation of the power tool. Damage must be repaired before using the power tool. Many accidents are caused by incorrectly maintained tools.
Keep cutting tools sharp and clean. Properly maintained cutting tools with sharp edges are less prone to jamming and are easier to control when working.
Use power tools, accessories and inserted tools etc. in accordance with these instructions, taking into account the type and conditions of work. The use of tools for work other than designed is likely to result in a dangerous situation.
Handles and gripping surfaces must be dry, clean and free from oil and grease. Slippery handles and gripping surfaces do not allow for safe operation and control of the tool in dangerous situations.
Repairs
Repair the power tool only in authorized facilities using only original spare parts. This ensures proper operation safety of the power tool.
ADDITIONAL SAFETY CONDITIONS
Wear hearing protection. Exposure to sound may come from the auditory pathway.
Tools from molding and workmanship with handles from the assembly. Losing control can be the boss of the place.
Use dust masks. The use of dust masses reduces the risk of layer breakage.
While doing your job, for security advice, you may come across a hidden security feature that prevents you from monitoring or reviewing information about the security of an electronic device with technology. Restricting access to a tool that could be guided through the handling process could make the tool handling tools operable.
It is always checked whether an equal limit is set to double check or check the date. At higher speed, the drill is likely to bend, if allowed to freely contact the rotary tool, it will accumulate trauma.
EN
Apply only in-line with a drill and do not apply to the application. The drill bit may bend, causing it to break and lose control, resulting in injury.
INSTALLATION OF EQUIPMENT
CAUTION! Only install the equipment, if supply voltage is disconnected. Pull the power cord plug out of the mains socket!
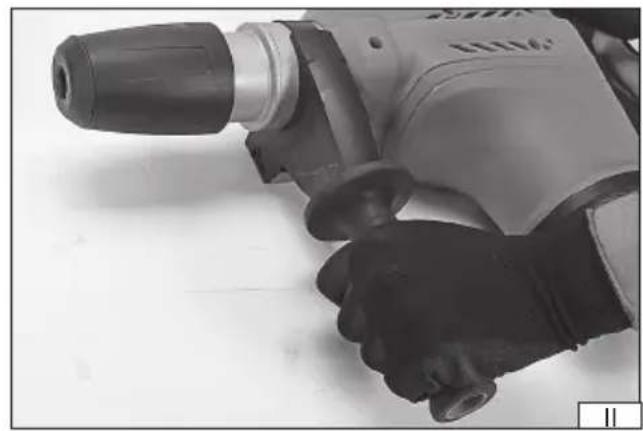
Installing the additional handle (II)
The tool is equipped with an additional handle. Place the handle clamp on the body of the tool, and then fix it by tightening the handle. The position of the additional handle should be selected depending on the available workplace and the operator's preferences. During work, periodically check the degree of tightening, due to vibrations generated during work, the attachment of the auxiliary handle may loosen.
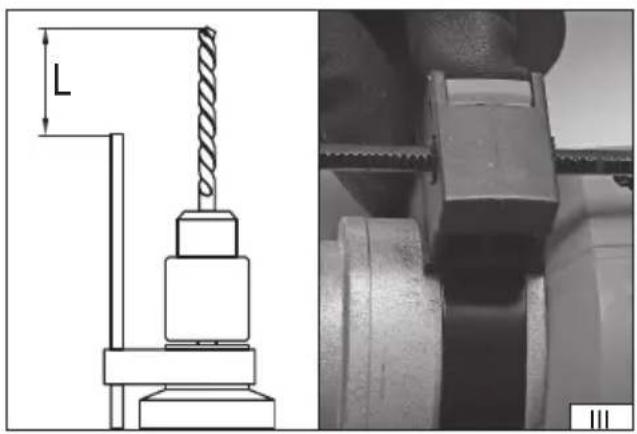
Installing the drilling depth stop (III)
Press and hold the depth stop locking button, and then slide the stop into the opening under the button. Move the stop to the desired position and release the locking button. The stop can only move in relation to the opening, if the locking button is pressed and held. If the stop does not remain still in the opening, slide it out and set in a position in which the ratchet mechanism locks on the corrugated surface of the stop.
PREPARING FOR OPERATION
Before starting work, make sure that the housing and the connecting cable with a plug are not damaged. In case of damage, do not proceed any further!
Caution! All activities related to changing tools (drills and chisels with the SDS MAX holder), installing covers and guides, adjusting, etc. should be carried out with the tool disconnected from supply voltage. For this reason, before proceeding with such activities:
Pull the power cord plug out of the mains socket!
Clean the selected tool from dirt and rust, and lubricate the holder with a thin layer of grease.
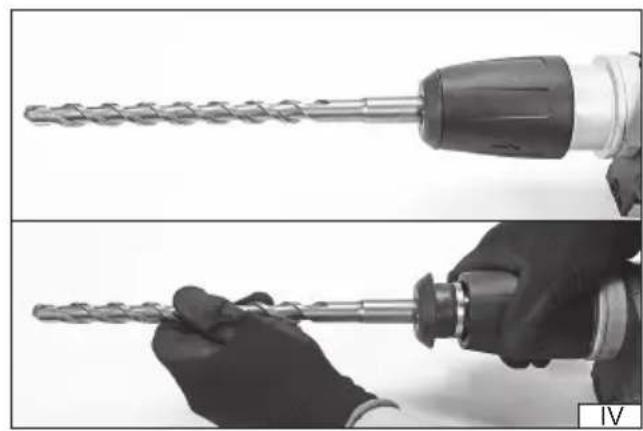
Insert the cleaned tool into the opening. If necessary, rotate the tool to make sure it enters the holder without any resistance.
Release the holder. The tool should automatically lock inside the holder with the help of the ratchet mechanism.
Make sure the tool has been seated firmly. To this end, simply try pulling the tool out of the holder. Repeat all installation steps, if the drill or chisel comes out of the holder.
Pull the tool holder towards you and hold it in this position (IV), and then pull the tool out of the holder.
Setting the operating mode (V)
The impact function makes it easy to drill holes in concrete, masonry, and hard ceramic materials (hard bricks, stones, or marble). For this purpose, set the impact switch to impact work (the drill and hammer symbol).
When drilling holes in other materials, disable the impact drilling function by setting the switch to impact-free operation (the drill symbol).
It is also possible to set the forging function. In this mode, rotational speed is disconnected, while the impact force remains active. To this end, set the operating mode switch to the forging position (the hammer symbol).
The position marked with the symbol of a hammer and an arrow is used to adjust the position of the chisel to ensure safe and ergonomic operation. Press the power switch and the chisel will start rotating. Release the power switch to stop its rotations. Then, move the switch to the forging position.
Caution! Do not use this setting to perform any forging or drilling.
Preparatory Activities
Select the right tool and install it in the tool holder.
Set the operating mode switch to the correct position: the hammer symbol - forging; the hammer and drill symbol - impact drilling; the drill symbol - drilling without impact; the hammer symbol with an arrow - setting the chisel position.
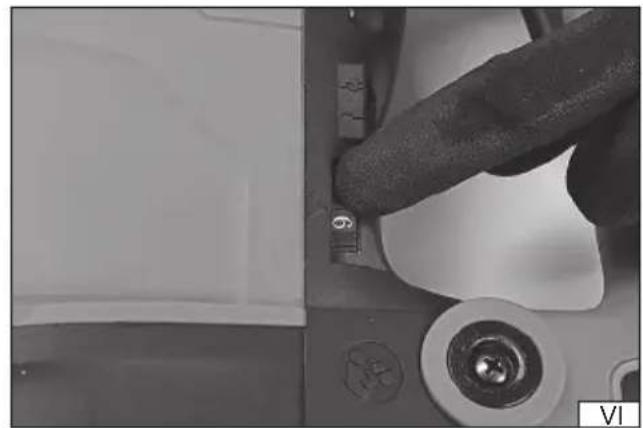
Set the rotational speed using the knob (VI). The higher the setting, the higher the rotational speed.
Wear hearing protectors, eye protection, work gloves, and respiratory protection.
Insert the plug of the power cord into mains socket.
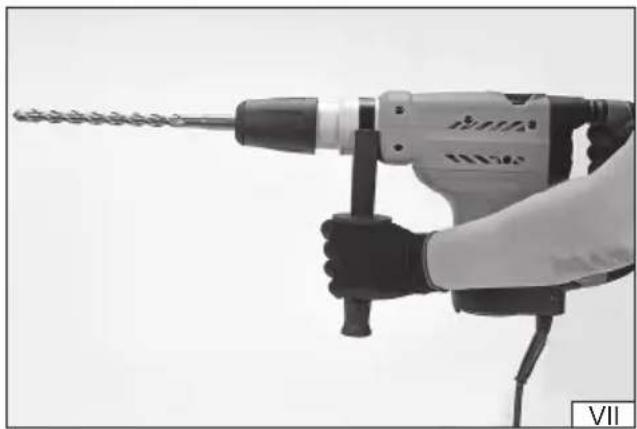
Stand in a well-balanced position, grab the rotary hammer with both hands and start it by pressing the electrical switch (VII) with your finger.
Keep the tool working for a few minutes, until the lubricant has reached all components of the drive mechanism.
Switch the rotary hammer off by releasing the switch.
Caution! When hearing any suspicious grinding or cracking sounds, immediately disconnect the rotary hammer from the power
EN
network and have it inspected by an authorised service centre.
LEDs
The tool has LEDs signalling the condition of the carbon brushes in the motor and assisting in detecting any damage to the power cord. The LED marked with the plug symbol lights up immediately after plugging the plug into the mains socket. If the LED does not light up, after connecting the plug to the mains, it may indicate lack of power supply in the socket or a faulty power cord. Do not attempt to repair a damaged power cord, but change it to a new one. Have the power cord changed at an authorised service centre.
If the LED marked with the carbon brush symbol lights up, the carbon brushes in the motor must be changed. Have them changed at an authorised service centre. Working with worn-out carbon brushes can damage the motor and cause electrical shorts leading to a fire and/or electric shock.
Attention! While operating the hammer drill, it is required to use hearing protection!
Drilling in ceramic materials
Drilling in hard and compact materials: concrete, hard bricks, stone, marble etc.
While the hammer drill is disconnected from the mains, install a drill in the chuck.
If necessary, install the drilling depth-limiting device.
Set the operating mode selector to drilling with hammer action, or if it is available, to drilling without hammer action.
Plug the tool to the mains, turn the hammer drill on with the switch and start work.
During work make regular breaks – avoid overheating of the hammer drill and the tool.
Drilling with hammer action is recommended only in case of compact ceramic materials: concrete, hard bricks, stone etc. In case of drilling holes of large diameter, it is recommended to drill first a smaller guide hole, and then use a drill of the final diameter. Use drills designed for hammer action drilling.
It is not recommended to use the hammer action function in case of ceramic materials of loose structure, such as: glaze, soft bricks, plaster, etc. Hammer action drilling in such materials may damage the material.
The hammer drill is equipped with a clutch that prevents overloading of the electric motor in case when the tool is jammed during work, for example as a result of hitting a reinforcement wire. In such cases the drill will stop rotating, although the electric motor is still working.
Also excessive pressure exerted on the tool during work may cause activation of the clutch.
In such cases remove the tool from the hole, make sure the hammer drill is functioning correctly and then resume work, applying only the pressure which is necessary for proper operation. In case a reinforcement rod or another hidden metal obstacle is hit, drill it using the hammer action function and a drill for metal of the same diameter as the hammer action drill, and then continue drilling in the ceramic material.
Hammering
While the tool is disconnected from the mains install the required tool in the chuck: cutter or punch.
Set the operating mode selector to the hammering position. Plug the drill to the mains, turn the hammer drill on with the switch, wait until it has reached the full speed and start work.
During hammering, do not drive the tool too much into the material to be processed. Hack the material off in thin layers, not exerting excessive pressure on the hammer drill.
Using attachments
Drills with adjustable direction of rotation should not be used with attachments.
Protection of the drilling chuck
If the hammer drill is equipped with a rubber protection of the chuck, then it is recommended to use it in case of drilling with the drill pointing up, e.g. for drilling in ceilings. Once the drill has been installed in the chuck, place the protection on it. Dust and debris generated during drilling will accumulate in the protection, which permits to keep the chuck clean. Once work has ended, remove the protection from the drill, remove dust and debris from the protection, and then rinse it under lukewarm water.
During work do not exert excessive pressure on the material to be processed and do not make abrupt movements, so as not to damage the tool and the drill. Make regular breaks during work. Avoid overloading the tool. The temperature of the external surfaces must not exceed 60^ C. Once work has been finished, turn the drill off, unplug it from the mains and proceed to maintenance and inspection.
The declared total value of vibrations has been determined by means of a standard method and it may be used for comparative purposes. The declared total value of vibrations may be applied in the preliminary assessment of exposure.
Attention! The emission of vibrations during work with the tool may differ from the declared value, depending on the use of the tool.
EN
Attention! It is required to determine safety means to protect the operator, which are based on assessment of exposure under real operating conditions (including the whole working cycle, as for example the time when the tool is of or idling, and the time of activation).
Lubrication
Before each use of drills or cutters they must be thoroughly cleaned and the SDS maxchuck must be lubricated with a thin layer of grease. It is recommended to use grease designed for the SDS maxchucks. In case of incorrect operation of the hammer action mechanism, one of the reasons may be incorrect lubrication of the gear and the crank assembly of the hammer action piston. It is recommended to use grease designed for toothed and crank gears. It is recommended to have grease refilled in an authorised service point.
MAINTENANCE AND OVERHAUL
ATTENTION! Before any adjustment, technical service or maintenance operations unplug the tool. Once the operations have been finished, the technical conditions of the tool must be assessed by means of external evaluation and inspection of the following elements: body and handle, conductor with a plug and deflection, functioning of the electric switch, patency of ventilation slots, sparking of brushes, noise level of functioning of bearings and gears, start-up and smoothness of operation. During the guarantee period, the user cannot dismantle the electric tools or change any sub-assemblies or elements, since it will cancel any guarantee rights. All irregularities detected at overhaul or during functioning of the tools are a signal to have the tool repaired at a service shop. Once the functioning has been concluded, the casing, ventilation slots, switches, additional handle and protections must be cleansed with a stream of air (at a pressure not exceeding 0.3 MPa), with a brush or a cloth without any chemical substances or cleaning liquids. Tools and handles must be cleansed with a clean cloth.
CHARAKTERISTIK DES WERKZEUGES
Bohren in Keramikmaterial
EN IEC 62841-2-6:2020 + A11:2020
EN IEC 55014-1:2021
EN IEC 55014-2:2021
EN IEC 61000-3-2:2019 + A1:2021
EN 61000-3-3:2013 + A1:2019 + A2:2021
0625/YT-82131/EC/2025
We declare and guarantee with full responsibility that the following products:
Rotary hammer 220 - 240 V\~; 50 Hz; 1300 W, 50 mm; item no. YT-82131
meet requirements of the following European Standards / Technical Specifications:
EN 62841-1:2015 + A11:2022
EN IEC 62841-2-6:2020 + A11:2020
EN IEC 55014-1:2021
EN IEC 55014-2:2021
EN IEC 61000-3-2:2019 + A1:2021
EN 61000-3-3:2013 + A1:2019 + A2:2021
and fulfill requirements of the following European Directives:
2006/42/EC Machinery and safety elements
2014/30/EU Electromagnetic compatibility (EMC) Directive
2011/65/EU Restriction of the Use of Certain Hazardous Substances
Serial number: concern all serials numbers of item(s) mentioned in this declaration
The person authorized to compile the technical file:
Agnieszka Rędziak
(Place and date of issue)
V-CE PREZES ZARZADU
JAN SZMIDT
(Name and signature of authorized person)
TOYA S.A.
EN IEC 62841-2-6:2020 + A11:2020
EN IEC 55014-1:2021
EN IEC 55014-2:2021
EN IEC 61000-3-2:2019 + A1:2021
EN 61000-3-3:2013 + A1:2019 + A2:2021