
YT-82125 - Drill Yato - Free user manual and instructions
Find the device manual for free YT-82125 Yato in PDF.


| Product Type | Electric Drill |
| Model | YT-82125 |
| Brand | Yato |
| Power Source | AC 220-240V, 50/60Hz |
| Power Input | 650 W |
| No-Load Speed | 0-2800 RPM (variable) |
| Impact Rate | 0-44800 BPM (hammer mode) |
| Chuck Type | Keyless, 1.5-13 mm capacity |
| Maximum Drilling Capacity (Steel) | 13 mm |
| Maximum Drilling Capacity (Wood) | 35 mm |
| Maximum Drilling Capacity (Concrete) | 16 mm |
| Torque Settings | 20+1 torque settings |
| Reversible | Yes |
| Speed Control | Variable speed trigger |
| Lock-On Button | Yes |
| Auxiliary Handle | Included |
| Depth Stop | Included |
| Weight | 1.5 kg |
| Dimensions (L x W x H) | 280 x 70 x 200 mm |
| Cable Length | 2.5 m |
| Safety Features | Double insulation, safety switch |
| Maintenance | Regular cleaning, carbon brush replacement |
| Spare Parts Availability | Chuck, carbon brushes, switch, cord |
| Certifications | CE, RoHS |
| Warranty | 2 years |
Frequently Asked Questions - YT-82125 Yato
User questions about YT-82125 Yato
0 question about this device. Answer the ones you know or ask your own.
Ask a new question about this device
Download the instructions for your Drill in PDF format for free! Find your manual YT-82125 - Yato and take your electronic device back in hand. On this page are published all the documents necessary for the use of your device. YT-82125 by Yato.
USER MANUAL YT-82125 Yato
natural_image
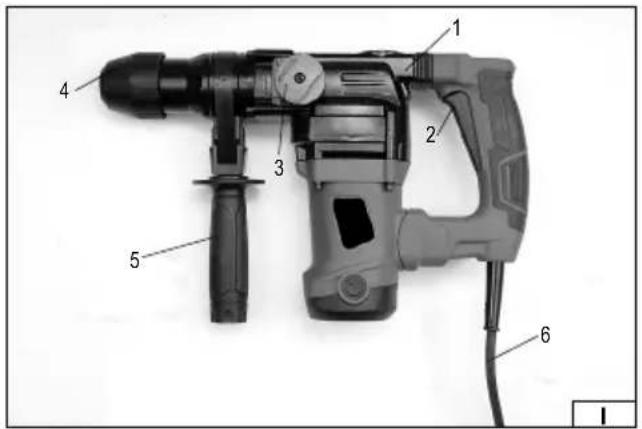
Black YATO 3D drill press tool with handle and control knob (no visible text or symbols)CE
PL GB D RUS UA LT LV CZ SK H RO E
natural_image
Close-up of a hand holding a black tool, next to a mechanical device (no visible text or symbols)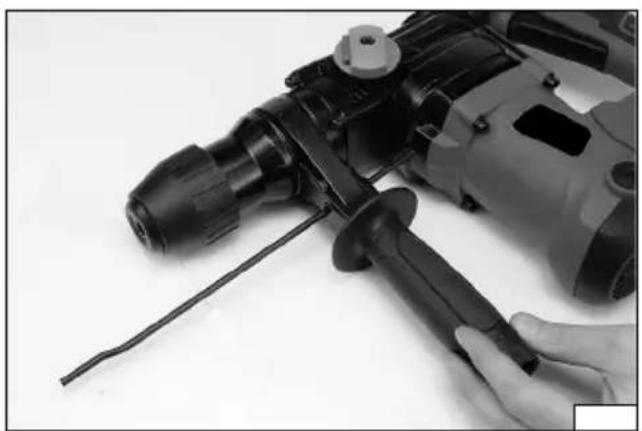
natural_image
Close-up of a hand using a drill bit on a power tool, no visible text or symbols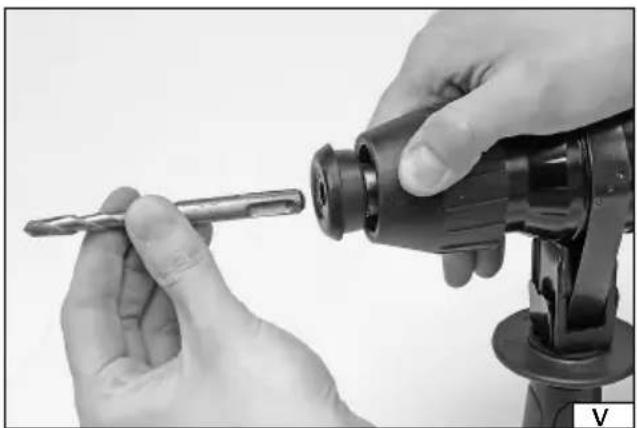
natural_image
Close-up of hands using a tool to adjust a mechanical component (no visible text or symbols)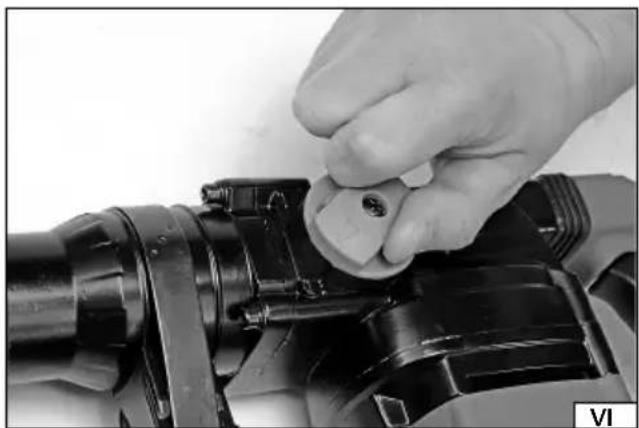
natural_image
Close-up of a hand adjusting a mechanical component with a circular tool (no visible text or symbols)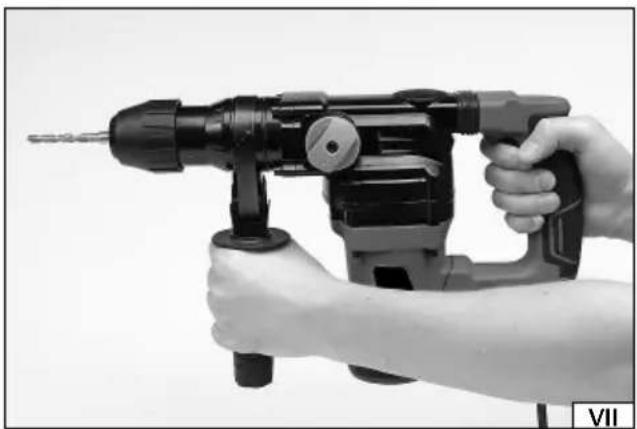
natural_image
Close-up of hands holding a black-and-white photo of a hand operating a drill bit, no visible text or symbols2015
Rok produkcji:
Production year:
Produktionsjahr:
Год выпуска:
Рік випуску:
Pagaminimo metai:
Ražošanas gads:
Rok výroby:
Rok výroby:
Gyártási év:
Read the operating instruction
Wear protective goggles
Wear hearing protectors
Rating voltage and frequency
Maximum drilling diameter in concrete
Second class of insulation
Correct disposal of this product: This marking shown on the product and its literature indicates this kind of product mustn't be disposed with household wastes at the end of its working life in order to prevent possible harm to the environment or human health. Therefore the customers is invited to supply to the correct disposal, differentiating this product from other types of refusals and recycle it in responsible way, in order to re - use this components. The customer therefore is invited to contact the local supplier office for the relative information to the differentiated collection and the recycling of this type of product.
UMWELTSCHUTZ
The manual hammer drill is an ordinary electric tool, insulation Class II, which has been designed for drilling and hammering in concrete, natural and artificial stone, marble, etc., using working tools with an SDS Plus chuck system. A correct, reliable and safe operation of the tool depends on its correct use, so:
Read the operating manual thoroughly before work and keep it for future reference.
The supplier shall not be held responsible for any damage occurred as a result of failure to observe safety regulations and indications contained in this manual.
ACCESSORIES
The package provided by the manufacturer should contain:
- hammer drill
- additional handle
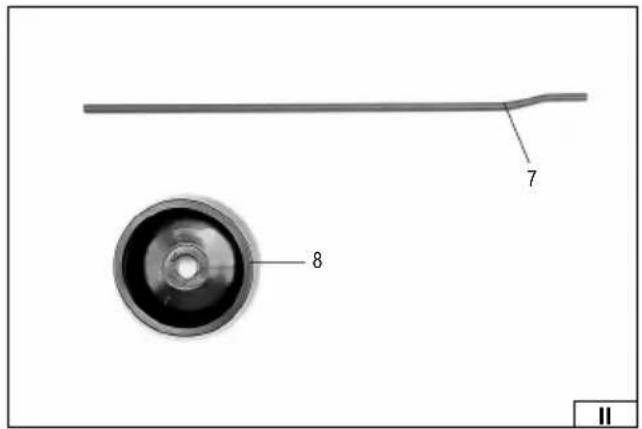
- drilling depth limiting device
- protection of the drilling chuck
TECHNICAL PARAMETERS
| Parameter Unit of measurements Value | ||
| Catalogue number YT-82125 | ||
| Nominal voltage [V] ~230 | ||
| Nominal frequency [Hz] 50 | ||
| Nominal power [W] 1250 | ||
| Nominal rotation [min] | -1] 800 | |
| Maximum hole diameter (concrete) [mm] 30 | ||
| Hammering energy [J] | 4,0 | |
| Hammering frequency | [min-1] | 3900 |
| Mass | [kg] | 5,1 |
| Level of noise | ||
| - acoustic pressure L_pA ± K | [dB(A)] | 86,25 ± 3 / 92,4 ± 3 |
| - power L_vA ± K | [dB(A)] | 97,25 ± 3 / 103,4 ± 3 |
| Level of vibration (main handle / additional handle) | [m/s2] | 15,105 ± 1,5 / 14,641 ± 1,5 |
| Class of insulation | II | |
| Grade of protection | IP20 |
GENERAL SAFETY CONDITIONS
NOTE! Get acquainted with all the instructions below. Failure to observe them may lead to an electric shock, fire or injuries. The notion of electric tool used in the instructions applies to all the tools which are powered with electric current, both wire tools and wireless ones.
OBSERVE THE FOLLOWING INSTRUCTIONS
Place of work
The place of work must be properly illuminated and clean. Disorder and poor illumination may be a cause of accidents.
Do not work with electric tools in explosive environments, or those which contain inflammable liquids, gases or vapours. Electric tools generate sparks, which may cause a fire in case of contact with inflammable gases or vapours.
Do not allow children and outsiders to the place of work. A lack of concentration may result in a loss of control over the tool.
Electric safety
The plug of the power supply cable must fit the mains socket. Do not modify the plug. Do not use any adapters whatsoever in order to adapt the plug to the socket. Unmodified plug which fits the socket reduces the risk of an electric shock.
Avoid contact with grounded surfaces, such as pipes, heaters and refrigerators. Grounding of the body increases the risk of an electric shock.
Do not expose electric tools to precipitation or humidity. Water and humidity which gets into the electric tool increases the risk of an electric shock.
Do not overload the power supply cable. Do not use the power supply cable in order to carry the tool or to connect and disconnect the plug from the mains socket. Avoid contact of the power supply cable with heat, oils, sharp tools and moving elements. Damage to the power supply cable increases the risk of an electric shock.
GB
In case work is realised outside closed areas, it is necessary to use extension cords designed for applications outside closed areas. Using a correct extension cord permits to reduce the risk of an electric shock.
If operating a power tool in a damp location is unavoidable, use a residual current device (RDC) protected supply. Use of an RCD reduces the risk of electric shock.
Personal safety
Commence work in good physical and psychological conditions. Pay attention to what you do. Do not work if you are tired or under effects of medicines or alcohol. Even a moment's inattention during work may lead to serious injuries.
Always use individual means of protection. Always wear goggles. Using individual means of protection, such as dust-masks, protective shoes, helmets and hearing protections permits to reduce the risk of serious injuries.
Avoid accidental activation of the tool. Make sure the switch is in the OFF position, before you connect the tool to the mains. Holding the tool with a finger on the switch or connecting an electric tool when the switch is in the ON position may lead to serious injuries.
Before you turn an electric tool on remove all the spanners and other tools, which have been used for adjustments. A spanner left on rotating elements of the tool may lead to serious injuries.
Keep your balance. Maintain an appropriate position. It will permit to control the electric tool in case of unpredicted situations during its operation.
Use protective clothes. Do not wear loose clothes or jewellery. Keep your hair, clothes and gloves away from moving elements of the electric tool. Loose clothes, jewellery or long hair may get caught on moving elements of the tool.
Use dust extractors or dust containers, if the tool is equipped with any. Make sure they are properly connected. Using of dust extractors permits to reduce the risk of serious injuries.
Operation of the electric tool
Do not overload the electric tool. Use a proper tool for the given purpose. A correct selection of the tool for the given work will result in a more efficient and safer work.
Do not use the electric tool if the switch is not functioning properly. A tool which may not be controlled by means of a switch is dangerous and must be repaired.
Disconnect the plug from the mains socket before any adjustment, replacement of accessories or storage of the tool. It will permit to avoid accidental activation of the electric tool.
Store the tool away from children. Do not allow untrained persons to operate the tool. An electric tool may be dangerous in hands of an untrained person.
Make sure the tool is properly maintained. Check the tool in order to detects any unfitting or loose moving elements. Check whether the elements of the tool are not damaged. In case any damaged elements of the tool are detected, they must be repaired before the electric tool is operated. Many accidents are caused by improper maintenance of tools.
Cutting tools must be sharp and clean. Properly maintained cutting tools are easier to control during work.
Use electric tools and accessories in accordance with the aforementioned instructions. Use the tool in accordance with its purpose, taking into account the kind and conditions of work. Should the tool be used for other applications than the ones it has been designed for, the risk of a dangerous situation increases.
Repairs
The tool may be repaired only by authorised service centres, which must use solely original spare parts. It will guarantee a proper level of safety of operation of the electric tool.
ADDITIONAL SAFETY CONDITIONS
Wear ear protectors. Exposure to noise can cause hearing loss.
Use auxiliary handles supplied with the tool. Loss of control can cause personal injury.
Use anti-dust mask. Use of the anti-dust mask reduces the risk of the personal injury.
During the work, hold power tool by insulated gripping surface, because inserted tool may contact with hidden “live” wire. Cutting a “live” wire may make exposed metal parts of the power tool “live” and could give the operator an electric shock.
INSTALLATION OF THE ACCESSORIES
ATTENTION! Installation of the accessories must be carried out when the power supply voltage is disconnected. Remove the plug of the cord of the tool from the mains socket!
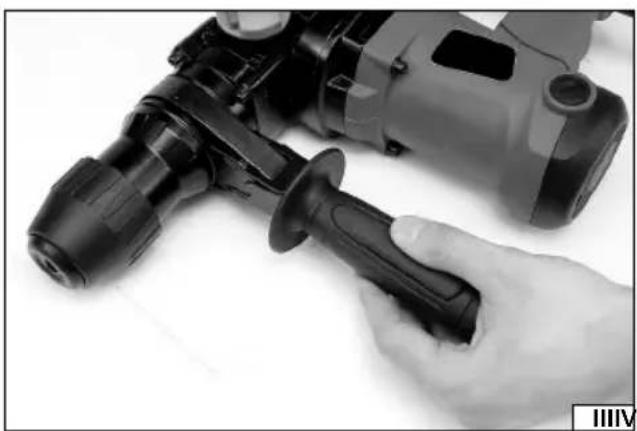
Installation of the additional handle (III)
Install the additional handle in the desired position and tighten it, turning the grip of the handle.
Installation of the drilling depth-limiting device (IV)
If the hammer drill is equipped with a drilling depth-limiting device, it may be installed on the additional handle.
GB
Depending on the installation system the limiting device should be inserted into the hole in the additional handle, and once the right position has been determined, it should be fastened with a button, handwheel or turning the additional handle.
PREPARATION FOR WORK
Before work may commence, it is necessary to make sure the enclosure and the cord with plug are not damaged. In case any damage is detected, it is prohibited to continue working!
Attention! All actions consisting in replacement of the working tools (drill and cutter with the SDS Plus chuck system), installation of guards and guides, adjustments etc. must be carried out when the power supply voltage is disconnected: Remove the plug of the cord of the tool from the mains socket!
Installation of SDS Plus working tools in the tool chuck
Clean the selected tool of dirt and rust and lubricate The SDS Plus chuck with a thin layer of grease.
Tool the tool chuck towards you and maintain it in this position (V).
Insert a clean tool in the opening. If necessary, turn the tool, so that it enters the chuck without resistance.
Release the chuck; the tool should lock automatically in the chuck.
Make sure the tool is securely installed, trying to remove it from the SDS-Plus chuck. If the drill or the cutter can be removed from the chuck, the installation procedure must be repeated.
Selection of kind of operation (VI)
The hammer action operation facilitates drilling in concrete, walls and hard ceramic materials (hard bricks, stones, marble). The hammer action selector must be set to hammer action indicated with a symbol of a drill and a hammer.
In order to do so, set the operating mode selector to the hammer symbol.
Preparation
Select adequate tools and install them in the chuck.
Set the operating mode selector to the adequate position: hammer symbol – hammering; hammer and drill symbol – drilling with hammer action; drill symbol – drilling without hammer action; hammer with an arrow – setting the position of the position of the chisel.
Wear hearing and eyes protection, and protective gloves.
Plug the cord to the mains.
Adapt a position that guarantees equilibrium, grab the hammer drill with both hands and start it pressing the electric switch (VII).
Hold the tool for a couple of minutes, so that the lubricant reaches all the elements of the drive mechanism.
Turn the hammer drill off, releasing the switch.
Attention! In case any suspicious sounds are detected the hammer drill must be immediately disconnected from the mains. Have it inspected by an authorised service point.
USING THE TOOL
Attention! While operating the hammer drill, it is required to use hearing protection!
Drilling in ceramic materials
Drilling in hard and compact materials: concrete, hard bricks, stone, marble etc.
While the hammer drill is disconnected from the mains, install a drill in the chuck.
If necessary, install the drilling depth-limiting device.
Set the operating mode selector to drilling with hammer action, or if it is available, to drilling without hammer action.
Plug the tool to the mains, turn the hammer drill on with the switch and start work.
During work make regular breaks – avoid overheating of the hammer drill and the tool.
Drilling with hammer action is recommended only in case of compact ceramic materials: concrete, hard bricks, stone etc. In case of drilling holes of large diameter, it is recommended to drill first a smaller guide hole, and then use a drill of the final diameter. Use drills designed for hammer action drilling.
It is not recommended to use the hammer action function in case of ceramic materials of loose structure, such as: glaze, soft bricks, plaster, etc. Hammer action drilling in such materials may damage the material.
The hammer drill is equipped with a clutch that prevents overloading of the electric motor in case when the tool is jammed during work, for example as a result of hitting a reinforcement wire. In such cases the drill will stop rotating, although the electric motor is still working.
Also excessive pressure exerted on the tool during work may cause activation of the clutch.
In such cases remove the tool from the hole, make sure the hammer drill is functioning correctly and then resume work, applying
GB
only the pressure which is necessary for proper operation. In case a reinforcement rod or another hidden metal obstacle is hit, drill it using the hammer action function and a drill for metal of the same diameter as the hammer action drill, and then continue drilling in the ceramic material.
Hammering
While the tool is disconnected from the mains install the required tool in the chuck: cutter or punch.
Set the operating mode selector to the hammering position. Plug the drill to the mains, turn the hammer drill on with the switch, wait until it has reached the full speed and start work.
During hammering, do not drive the tool too much into the material to be processed. Hack the material off in thin layers, not exerting excessive pressure on the hammer drill.
Protection of the drilling chuck
If the hammer drill is equipped with a rubber protection of the chuck, then it is recommended to use it in case of drilling with the drill pointing up, e.g. for drilling in ceilings. Once the drill has been installed in the chuck, place the protection on it. Dust and debris generated during drilling will accumulate in the protection, which permits to keep the chuck clean. Once work has ended, remove the protection from the drill, remove dust and debris from the protection, and then rinse it under lukewarm water.
Additional remarks
During work do not exert excessive pressure on the material to be processed and do not make abrupt movements, so as not to damage the tool and the drill. Make regular breaks during work. Avoid overloading the tool. The temperature of the external surfaces must not exceed 60^ C. Once work has been finished, turn the drill off, unplug it from the mains and proceed to maintenance and inspection.
The declared total value of vibrations has been determined by means of a standard method and it may be used for comparative purposes. The declared total value of vibrations may be applied in the preliminary assessment of exposure.
Attention! The emission of vibrations during work with the tool may differ from the declared value, depending on the use of the tool.
Attention! It is required to determine safety means to protect the operator, which are based on assessment of exposure under real operating conditions (including the whole working cycle, as for example the time when the tool is of or idling, and the time of activation).
Lubrication
Before each use of drills or cutters they must be thoroughly cleaned and the SDS Plus chuck must be lubricated with a thin layer of grease. It is recommended to use grease designed for the SDS Plus chucks. In case of incorrect operation of the hammer action mechanism, one of the reasons may be incorrect lubrication of the gear and the crank assembly of the hammer action piston. It is recommended to use grease designed for toothed and crank gears. It is recommended to have grease refilled in an authorised service point.
MAINTENANCE AND OVERHAUL
ATTENTION! Before any adjustment, technical service or maintenance operations unplug the tool. Once the operations have been finished, the technical conditions of the tool must be assessed by means of external evaluation and inspection of the following elements: body and handle, conductor with a plug and deflection, functioning of the electric switch, patency of ventilation slots, sparking of brushes, noise level of functioning of bearings and gears, start-up and smoothness of operation. During the guarantee period, the user cannot dismantle the electric tools or change any sub-assemblies or elements, since it will cancel any guarantee rights. All irregularities detected at overhaul or during functioning of the tools are a signal to have the tool repaired at a service shop. Once the functioning has been concluded, the casing, ventilation slots, switches, additional handle and protections must be cleansed with a stream of air (at a pressure not exceeding 0.3 MPa), with a brush or a cloth without any chemical substances or cleaning liquids. Tools and handles must be cleansed with a clean cloth.
CHARAKTERISTIK DES WERKZEUGES
Bohren in Keramikmaterial


- UMWELTSCHUTZ
- ACCESSORIES
- TECHNICAL PARAMETERS
- GENERAL SAFETY CONDITIONS
- Place of work
- Electric safety
- GB
- Personal safety
- Operation of the electric tool
- Repairs
- ADDITIONAL SAFETY CONDITIONS
- INSTALLATION OF THE ACCESSORIES
- PREPARATION FOR WORK
- USING THE TOOL
- Hammering
- Protection of the drilling chuck
- Additional remarks
- Lubrication
- MAINTENANCE AND OVERHAUL
- CHARAKTERISTIK DES WERKZEUGES
Brand : Yato
Model : YT-82125
Category : Drill