
NDV8791CZ - Basket AEG - Free user manual and instructions
Find the device manual for free NDV8791CZ AEG in PDF.

| Brand | AEG |
| Model | NDV8791CZ |
| Product type | Built-in or decorative kitchen hood |
| Dimensions (W x D x H) | 80 cm x 50 cm x 40 cm (estimated) |
| Weight | Approximately 15 kg |
| Power supply | 220-240 V ~ 50/60 Hz |
| Motor power | 200 W |
| Speed levels | 5 (1, 2, 3, Boost, Max) |
| Special features | Hob2Hood, Breeze, WiFi, AuroraTech (adaptive lighting), connected filters |
| Lighting | LED, adjustable color temperature (neutral, warm, cool) |
| Grease filter | Dishwasher safe, cleaning recommended every 2 months |
| Charcoal filter | Replacement or cleaning depending on type, alarm after 160 h |
| Minimum safety distance (hob) | 65 cm |
| Exhaust type | Recirculation or external extraction |
| Connectivity | Wi-Fi 2.4 GHz (802.11 bgn), mobile app |
| Noise level | 40-70 dB depending on speed (estimated) |
| Maximum extraction capacity | 800 m³/h (estimated) |
| Protection class | Class II (double insulation) |
| Spare parts | Grease filters, charcoal filters, LED bulb |
| Warranty | 2 years (standard) |
| Certifications | CE, RoHS |
| Intended use | Domestic, indoor |
Frequently Asked Questions - NDV8791CZ AEG
User questions about NDV8791CZ AEG
0 question about this device. Answer the ones you know or ask your own.
Ask a new question about this device
Download the instructions for your Basket in PDF format for free! Find your manual NDV8791CZ - AEG and take your electronic device back in hand. On this page are published all the documents necessary for the use of your device. NDV8791CZ by AEG.
USER MANUAL NDV8791CZ AEG
natural_image
Simple line drawing of a wireless router with signal waves (no text or symbols)NDV8791CB NDV8791CT
natural_image
Simple line drawing of a rectangular box with a label and an arrow indicating rotation (no text or symbols)natural_image
Diagram of a solar panel with a grid pattern and a curved arrow indicating rotation (no text or symbols)natural_image
Simple line drawing of a rectangular object with a curved arrow labeled '1' pointing to its base, no text or symbols present.natural_image
Diagram of a solar panel with a grid pattern and a curved arrow indicating rotation (no text or symbols)natural_image
Simple line drawing of a rectangular object with a label '1' and an arrow, no text or symbols present.natural_image
Diagram of a solar panel with a grid pattern and an arrow indicating rotation (no text or symbols)natural_image
Simple line drawing of a rectangular object with a label '1' and an arrow, no text or symbols present.natural_image
Diagram of a solar panel with a curved arrow indicating rotation or movement, no text or symbols presentnatural_image
Simple line drawing of a rectangular object with a label '1' and an arrow, no text or symbols present.natural_image
Diagram of a solar panel with a grid pattern and an arrow indicating rotation (no text or symbols)natural_image
Symbol of a trash bin crossed with a diagonal line, representing no waste or discharge (no text or labels)natural_image
Recycling symbol with three arrows forming a triangle (no text or labels)natural_image
Simple line drawing of a rectangular object with a curved arrow labeled '1' and circular holes at the base (no text or symbols beyond the label)natural_image
Diagram of a solar panel with a curved arrow indicating rotation or movement, no text or symbols presentWelcome to AEG! Thank you for choosing our appliance.

Get usage advice, brochures, troubleshooting, service and repair information:
www.aeg.com/support
Subject to change without notice.
CONTENTS
- SAFETY INFORMATION....76
- SAFETY INSTRUCTIONS.... 78
- INSTALLATION....80
- PRODUCT DESCRIPTION....80
- DAILY USE....81
- CARE AND CLEANING....84
- TROUBLESHOOTING....85
- ENVIRONMENTAL CONCERNS....86
1. ⚠SAFETY INFORMATION
Before the installation and use of the appliance, carefully read the supplied instructions. The manufacturer is not responsible for any injuries or damage that are the result of incorrect installation or usage. Always keep the instructions in a safe and accessible location for future reference.
1.1 Children and vulnerable people safety
- This appliance can be used by children aged from 8 years and above and persons with reduced physical, sensory or mental capabilities or lack of experience and knowledge if they have been given supervision or instruction concerning the use of the appliance in a safe way and understand the hazards involved. Children of less than 8 years of age and persons with very extensive and complex disabilities shall be kept away from the appliance unless continuously supervised.
- Children should be supervised to ensure that they do not play with the appliance.
- Keep all packaging away from children and dispose of it appropriately.
- Keep children and pets away from the appliance when it operates.
- Children shall not carry out cleaning and user maintenance of the appliance without supervision.
1.2 General Safety
- This appliance is intended for domestic use above hobs, cookers and similar cooking devices.
- This appliance is designed for single household domestic use in an indoor environment.
- This appliance may be used in offices, hotel guest rooms, bed & breakfast guest rooms, farm guest houses and other similar accommodation where such use does not exceed (average) domestic usage levels.
- Before carrying out any maintenance, disconnect the appliance from the power supply.
- CAUTION: Accessible parts may become hot during use with cooking appliances.
- Use only the fixing screws supplied with the appliance if not supplied, use the screws recommended in the installation instructions. Install the appliance in a safe and suitable place that meets installation requirements.
- WARNING: Failure to install the screws or fixing device in accordance with these instructions may result in electrical hazards.
- Do not use adhesives to fix the appliance.
- The minimum distance between the hob surface on which the pans stand and the lower part of the appliance shall be at least 65 cm, unless otherwise specified in the installation instructions for the appliance or hob.
- The discharge of air must comply with local authorities regulations.
-
Ensure good air ventilation in the room where the appliance is installed to avoid the backflow of gases into the room from appliances burning gas or other fuels, including open fires.
-
Make sure that the ventilation openings are not blocked and the air collected by the appliance is not conveyed into a duct used to exhaust smoke and steam from other appliances (central heating systems, thermosiphons, water-heaters, etc.).
- When the appliance operates with other appliances the maximum vacuum generated in the room should not exceed 0.04 mbar.
- If the supply cord is damaged, it must be replaced by the manufacturer, its Authorised Service Centre or similarly qualified persons to avoid an electrical hazard.
- If the cord set is damaged, it must be replaced by a special cord set available from the manufacturer or its Authorised Service Centre.
- If the appliance is connected directly to the power supply, the electrical installation must be equipped with an isolating device that allows to disconnect the appliance from the mains at all poles. Complete disconnection must comply with conditions specified in the overvoltage category III. The means for disconnection must be incorporated in the fixed wiring in accordance with the wiring rules.
- Do not flambé under the appliance.
- Do not use to exhaust hazardous or explosive materials and vapours.
- Clean the appliance regularly with a soft cloth to prevent the deterioration of the surface material.
- Do not use a steam cleaner, water spray, harsh abrasive cleaners or sharp metal scrapers to clean the surface of the appliance. Use only neutral detergents.
- Clean grease filters regularly (at least every 2 months) and remove grease deposits from the appliance to prevent the risk of fire.
- Use a cloth to clean the interior of the appliance.
2. SAFETY INSTRUCTIONS
2.1 Installation

WARNING!
Risk of injury, electric shock, fire, burns or damage to the appliance.
- Only a qualified person must install this appliance.
- Do not install or use a damaged appliance.
- Follow the installation instructions supplied with the appliance.
• Always take care when moving the appliance as it is heavy. Always use safety gloves and enclosed footwear. - Before installing the appliance remove all the packaging, the labelling and the protective film.
- Do not install the exhaust air into a wall cavity, unless the cavity is designed for that purpose.
2.2 Electrical connection

WARNING!
Risk of fire and electric shock.
- All electrical connections should be made by a qualified electrician.
- Make sure that the parameters on the rating plate are compatible with the electrical ratings of the mains power supply.
- If the symbol ( ) is not printed on the rating plate, the appliance must be earthed.
• Always use a correctly installed shockproof socket. - Do not let the electricity mains cable tangle.
- Do not use multi-plug adapters and extension cables.
- If the mains socket is loose, do not connect the mains plug.
- Do not pull the mains cable to disconnect the appliance. Always pull the mains plug.
- The shock protection of live and insulated parts must be fastened in such a way that it cannot be removed without tools.
- Make sure the appliance is installed correctly. Loose and incorrect electricity
mains cable can make the terminal become too hot.
- Connect the appliance at the end of the installation. Make sure that there is access to the mains after the installation.
2.3 Use

WARNING!
Risk of injury, burns and electric shock.
- This appliance is for cooking purpose only. Do not use the appliance for other purpose.
- Do not change the specification of this appliance.
- Do not operate the appliance with wet hands or when it has contact with water.
- Use only the accessories supplied with the appliance.
- Keep flames or heated objects away from fats and oils during cooking and frying.
- Do not use uncovered electric grills.
- Do not use the appliance as a storage surface.
- Do not use magnifying glasses, binoculars or similar optical devices to look directly at the lighting of the appliance.
- If the appliance works with other devices, the maximum developed pressure must not exceed 4 Pa (4x10⁻⁵ bar).
2.4 Service
• To repair the appliance contact the Authorised Service Centre. Use original spare parts only.
- Concerning the lamp(s) inside this product and spare part lamps sold separately: These lamps are intended to withstand extreme physical conditions in household appliances, such as temperature, vibration, humidity, or are intended to signal information about the operational status of the appliance. They are not intended to be used in other applications and are not suitable for household room illumination.
2.5 Disposal

WARNING!
Risk of injury or suffocation.
- Contact your municipal authority for information on how to dispose of the appliance.
- Disconnect the appliance from the mains supply.
- Cut off the mains electrical cable close to the appliance and dispose of it.
3. INSTALLATION

WARNING!
Refer to Safety chapters.
3.1 Installation instructions

For complete information about the installation of the appliance refer to a separate installation booklet.
4. PRODUCT DESCRIPTION
4.1 Control panel overview

Function Description
| 1 | On / Off Turns the hood on and off. | |
| 2 | First speed The motor switches to first speed level. | |
| 3 | Second speed The motor switches to second speed level. | |
| 4 | Third speed The motor switches to third speed level. | |
| 5 | Speed boost The motor switches to higher speed level. After 8 minutes the appli-ance returns to previous setting. | |
| 6 | Maximum speed The motor switches to maximum speed level. After 5 minutes the ap-pliance returns to previous setting. | |
| 7 | Breeze The motor operates on the lowest speed. After 60 minutes the appli-ance turns off. | |
| 8 | Hob2Hood® Indicator of the function to control hood from hob. | |
| 9 | Filter notification | Reminds to change or clean the charcoal filter and clean the grease filter. |
Function Description
10 WiFi Indicates WiFi connection status.
11 Light colour temperature Changes the light colour temperature.
12 Lamp Turns the lights on and off. Changes the light intensity.
5. DAILY USE
5.1 Using the hood
Check the recommended speed according to the table below.
1 While heating up food, cooking with covered pots.
2 While cooking with covered pots on multiple cooking zones or burners, gentle frying.
3 While boiling and frying big quantities of food without a lid, cooking on multiple cooking zones or burners.

While boiling and frying big quantities of food without a lid, big humidity.

Refreshes the air in kitchen after cooking at a very low noise level. It can be activated and de-activated by touching the symbol. The function turns off automatically after 60 minutes. Use after cooking only.

It is recommended to leave the hood operating for approximately 15 minutes before and after cooking.
Activating the appliance

The control Panel is a sensor field. To operate the hood touch the symbol exactly in the middle for at least 1 second.
To operate the hood:
- Turn on the appliance by pressing the symbol.
You can now activate the functions.
- To activate the function touch the symbol.
Deactivating the appliance
To turn off the appliance press the ⏻ symbol again.
Perfect Illumination - Lighting

The hood lighting works independently to other hood functions.
Activating and deactivating the lighting
To illuminate the cooking surface touch the
☀ symbol. Touch the symbol again to change the light intensity in the following order: Maximum, Medium, Low, Off.
To switch off the lights, touch and hold the symbol for 3 seconds.
Setting the light colour temperature

The hood remembers the last setting of the light colour temperature.
There are two ways to set the light colour temperature:
-
Touch the symbol to change the colour temperature from neutral, through warm to cold.
-
Touch and hold the symbol to move smoothly between light colour temperatures. Release it once you reach the desired setting.
AuroraTech®
It is a function that automatically adjusts the illumination colour and intensity based on the time of day, creating an optimal ambiance. Use the app to activate this function.

After activating from the app, the function will operate each time the lighting is switched on. You can still manually adjust the lighting settings using the
and 📋buttons. However, the AuroraTech® function will be deactivated.
5.2 Hob2Hood®
It is a function that connects the hob to a hood. Both the hob and the hood are equipped with an infrared signal communicator. The fan speed is determined based on the mode setting and the temperature of the hottest cookware on the hob. Alternatively, you can manually control the fan using the hob. This function can be activated from the hob's control panel.

For more information how to use the function, refer to the hob user manual.
5.3 Filter notification
The filter alarm serves as a reminder to clean the grease filter and either replace or clean the charcoal filter, depending on its type. The
symbol blinks regularly for 30 seconds if
the grease filter must be cleaned. The symbol blinks twice per every second for 30 seconds if the charcoal filter must be replaced or cleaned.

This function activates independently after 40 hours of operation for grease filter and 160 hours of operation for charcoal filter.

Refer to Cleaning the grease filter in the Care and cleaning chapter.

Refer to cleaning the charcoal filter or replacing the charcoal filter in Care and cleaning chapter.
To reset the function counter in the notification period, touch the ⚙ symbol for 3 seconds. The symbol stops blinking for the correct reset.

The function counter for charcoal filter is disabled by default. For recirculation mode, it must be activated.
To activate or deactivate the counter for charcoal filter:
- Switch on the control panel.
- Make sure the fan and the light are turned off.
- Touch the 2 symbol for 3 seconds.
The function is activated if symbols 2 and blink once. The function is deactivated if symbols 2 and blink twice.
5.4 WiFi connectivity setup
This feature enables you to connect your appliance to a WiFi network and pair it with your mobile device. Using this feature, you can access additional functions, control and monitor your appliance from your mobile device, and receive notifications.
To connect the appliance you need:
- Wireless network with the Internet connection,
- Mobile device connected to your wireless network.
Frequency/Protocol WiFi: 2.4 GHz / 802.11 bgn
Power WiFi 2.4 GHz: <20 dBm
Encryption WPA-PSK, WPA2-PSK, WPA3-SAE
Installing the app
Take the following steps to connect the appliance to WiFi :
- Make sure that the appliance is plugged into a power socket and turned on.
- Make sure that your mobile device is connected to the same wireless network you want to add your appliance to.
-
To download the app, use your mobile device's camera to scan the QR code located on the back cover of the user manual. You can also download the app directly from Google Play (Android) or App Store (iOS).
-
Open the app and register to create an account.
Configuring the appliance wireless connection
i
The onboarding is possible only for 20 seconds after activating the control panel. If the symbol turns off, deactivate and activate the control panel again.
Follow the instructions in the app to complete the onboarding process:
- Make sure the fan and the lighting are turned off.
- Touch and hold the symbol on your appliance for 3 seconds, the symbol starts to flash continuously. The onboarding process is ongoing.
- Continue to follow the instructions in the app to complete the onboarding process.
i
To stop the onboarding process, touch the ⏻ or any of the speed level symbols.
After the successful onboarding, the appliance emits a single beep, and the indicator stops flashing.
If the onboarding process is unsuccessful, the indicator flashes rapidly for 6 seconds and then turns off. Repeat the procedure.
i
If the onboarding process exceeds 1 minute, the control panel enters standby mode, the indicator turns off, and the app provides feedback on the onboarding status.
i
After onboarding, the symbol is visible once the control panel is activated and a connection to the internet is established.
i
Each time the action is performed using the app, the indicator blinks 3 times.
Disabling / Enabling the appliance wireless connection
To temporarily disable the WiFi connection:
- Make sure the fan and the lighting are turned off.
- Touch and hold the symbol for 3 seconds until you hear a beep.
The 1 symbol blinks twice and the symbol turns off.

To enable the WiFi connection again:
- Make sure the fan and the lighting are turned off.
- Touch and hold the symbol for 3 seconds until you hear a beep.
The 1 symbol blinks once and the symbol turns on when the connection is established.
Resetting the appliance wireless connection
To offboard the WiFi network:
- Make sure the fan and the lighting are turned off.
- Touch and hold the symbol for 3 seconds.
The appliance emits a single beep, and the symbol blinks until the successful reset. In some cases the symbol can blink only once.
This action results in the removal of the appliance from the WiFi network. To re-establish the connection, repeat all the steps
described in the 'Configuring the appliance wireless connection' section.
6. CARE AND CLEANING
6.1 Notes on cleaning
Cleaning Agents
Do not use abrasive detergents and brushes.
Clean the surface of the appliance with a soft cloth with warm water and a mild detergent.
After cooking some parts of appliance can get hot. To avoid stains appliance must be cooled down and dried with clean cloth or paper towels.
Clean stains with a mild detergent.
Keep the hood clean
Clean the appliance each month to prevent the deterioration of the surface material.
Clean the interior and grease filters carefully from fat. Fat accumulation or other residue may cause fire.
Follow the instructions to clean the filters when the filter notification is on. Refer to the Daily Use chapter.
Charcoal filter
The time of saturation of the charcoal filter varies depending on the type of cooking and the regularity of cleaning the grease filter. Refer to leaflet included in the accessory.

Before carrying out any maintenance, make sure there is no cookware on the hob and that the hood and the hob are disconnected from the power supply.
6.2 Cleaning the grease filter
There are two grease filters. One situated underneath and the other at the front side of the appliance.
Filters are mounted with the use of clips and pins on the opposite side.
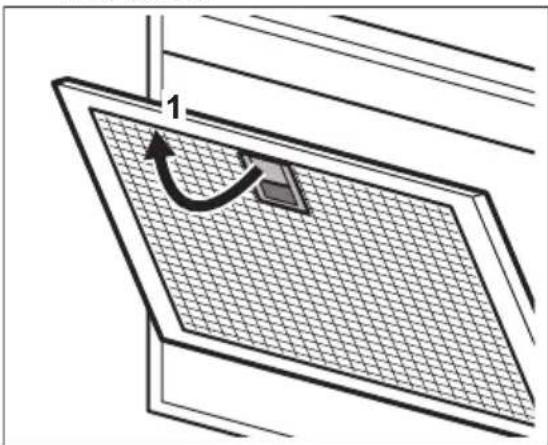
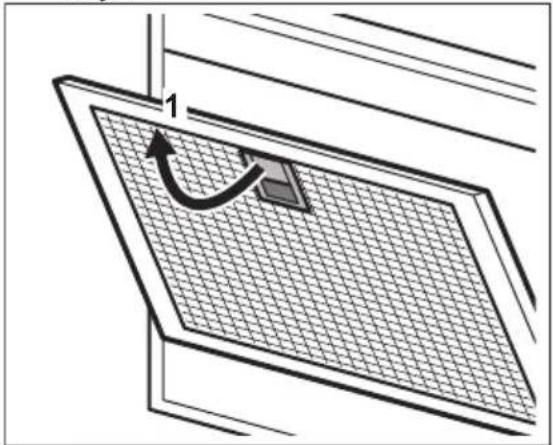
To clean the filter:
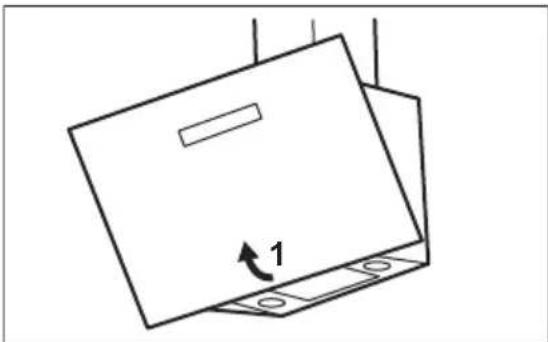
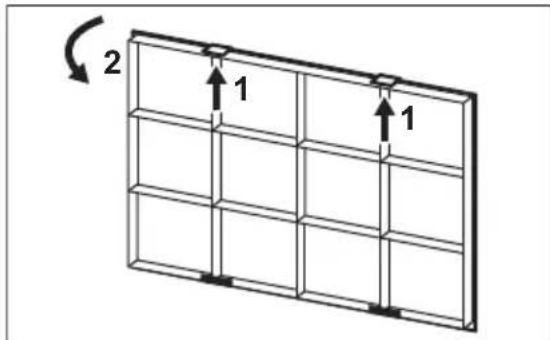
- Pull the cover to open it.
natural_image
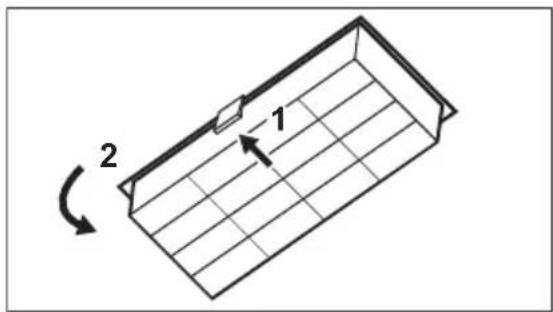
Simple line drawing of a rectangular object with a label '1' and an arrow, no text or symbols present.- Pull the handle on the filter underneath the hood and slightly tilt the front of the filter down.
natural_image
Diagram of a solar panel with a grid pattern and a curved arrow indicating rotation (no text or symbols)- Clean the grease filters by hand using a sponge with non-abrasive detergents, or clean them in a dishwasher. We recommend cleaning the grease filters by hand.

The dishwasher must be set to a low temperature and a short cycle. The grease filter may discolour, it has no influence on the performance of the appliance.
- To mount the filters back follow the first two steps in reverse order. Repeat the steps for all filters if applicable.
6.3 Replacing the charcoal filter - optional

Depending on type, filter can be or cannot be regenerated. Refer to the leaflet provided with the filter.
To replace the filter:
- Remove the grease filters from the appliance.
Refer to "Cleaning the grease filter" in this chapter.
- press the tab (1) and slightly tilt the front of the filter. There are two charcoal filters. One situated underneath (A) and the other at the front side (B) of the appliance.
A.


- To install a filter, perform the same steps in reverse order.
6.4 Replacing the lamp
This appliance is supplied with a LED lamp and separate control gear (LED driver). These parts can be replaced by a technician only. In case of any malfunction refer to "Service" in the "Safety Instructions" chapter.
7. TROUBLESHOOTING

WARNING!
Refer to Safety chapters.
7.1 What to do if...
| Problem Possible cause Remedy | |
| You cannot activate the appliance. The appliance is not connected to a power supply or it is connected incorrectly. | Check if the appliance is correctly connected to the electrical supply. |
| You cannot activate the appliance. Lack of electrical power supply. | Check the fuse or the main switch. If the fuse or the switch continue to break the circuit, contact a qualified electrician. |
The lamp does not operate. The lamp is defective. Contact an Authorised Service Centre.
| Problem Possible cause Remedy | ||
| The brightness level or light colour temperature is not as described in the instructions. | Incorrect Perfect illumination setting. | Touch the symbol to check if you are able to change all three colour temperatures. |
| The lamp is defective. Contact an Authorised Service Centre. | ||
| The appliance does not absorb enough vapours. | The motor speed is not adequate to the appearing vapours. | Increase the speed of the motor. |
| The App cannot connect to the appliance. | Connectivity issues. | Check the wireless signal. |
| Make sure that the wireless connection is on. Refer to "WiFi connectivity setup" chapter. | ||
| Check if your mobile device is connected to the wireless network. | ||
| Check your home network and router. | ||
| Restart the router. | ||
| Contact your wireless service provider if there are further problems with the wireless network. | ||
| The appliance, the mobile device, or both need to be configured again because a new router has been installed or the router configuration has been changed. Refer to "WiFi connectivity setup" chapter. | ||
| The App cannot frequently connect to the appliance. | Connectivity issues. | Make sure that the wireless signal reaches the appliance. Try to move the home router as near the appliance as possible or consider purchasing a wireless range extender. |
| Make sure the wireless signal is not disrupted by a microwave. Turn the microwave off. Avoid using the microwave and the remote control of the appliance at the same time. | ||
8. ENVIRONMENTAL CONCERNS
Recycle materials with the symbol .Put the packaging in relevant containers to recycle it. Help protect the environment and human health by recycling waste of electrical and electronic appliances. Do not dispose of
appliances marked with the symbol with the household waste. Return the product to your local recycling facility or contact your municipal office.
natural_image
Simple line drawing of a rectangular object with a label '1' and an arrow, no text or symbols present.natural_image
Diagram of a solar panel with a curved arrow indicating rotation or movement, no text or symbols presentnatural_image
Simple line drawing of a rectangular object with a label '1' and an arrow, no text or symbols present.natural_image
Diagram of a solar panel with a grid pattern and a curved arrow indicating rotation (no text or symbols)1. ⚠TURVALLISUUSTIEDOT
natural_image
Simple line drawing of a rectangular object with a label '1' and an arrow, no text or symbols present.natural_image
Diagram of a solar panel with a grid pattern and a curved arrow indicating rotation (no text or symbols)natural_image
Simple line drawing of a rectangular object with a label '1' and an arrow, no text or symbols present.natural_image
Diagram of a solar panel with a curved arrow indicating rotation or movement, no text or symbols present5. SVAKODNEVNA UPORABA
5.1 Uporaba nape
natural_image
Simple line drawing of a rectangular object with a label '1' and an arrow, resting on a base (no text or symbols beyond the label)- Povucite ručicu na filtru ispod nape i lagano nagnite prednji dio filtra prema dolje.
natural_image
Diagram of a solar panel with a curved arrow indicating rotation or movement, no text or symbols present- Filtar za masnoću očistite ručno koristeći spužvu s neabrazivnim deterdžentima ili ga očistite u perilici posuđa. Preporučujemo ručno čišćenje filtera za masnoću.
i
natural_image
Simple line drawing of a rectangular object with a curved arrow labeled '1' on its side, resting on a base (no text or symbols beyond the label)natural_image
Diagram of a solar panel with a curved arrow indicating rotation or movement, no text or symbols presentnatural_image
Simple line drawing of a rectangular object with a label '1' and an arrow, no text or symbols present.natural_image
Diagram of a solar panel with a grid pattern and a curved arrow indicating rotation (no text or symbols)• გამორთეთ მოწყობილობა დენის
მიავარი წყაროდან.
• Assays form designations and designations of the system design, designations of the system design, designations of the system design, designations of the system design, designations of the system design, designations of the system design, designations of the system design, designations of the system design, designations of the system design, designations of the system design, designations of the system design, designations of the system design, designations of the system design, designations of the system design, designations of the system design, designation
3. მონტაცი

zsngzmbngd5!
natural_image
Simple line drawing of a rectangular object with a label '1' and an arrow, no text or symbols present.natural_image
Diagram of a solar panel with a grid pattern and a curved arrow indicating rotation (no text or symbols)g0m0m0n0 g0m0m0B3m0m0s0:
- მონსენით მოწყობილობას ცნიმის დვილერები.
^a ^b ^c ^d ^e ^f ^g ^h ^i ^j ^k ^l ^m ^n ^o ^p ^q ^r ^s ^t ^u ^v ^w ^x ^y ^z . - ζυσχόμησος (1) ḥδαθεύμος χος προβες ωσκυσμος ζυσχόμησος Ḥυδα δυσκυ. αυδασελυγδυμος δυδασκυ μπο φυσκυξιος. γίσσον δυσκυξιο αυδασελυγδυμος δυγμοδομμοδού Ḥυδα (A), ευμμα τρυσκυξιος δυσκυξιος - Ḥυδα αυδασκυξιος (B).
A.
B.
- grades of the house, the property of the government, the government of the state, the government of the state, the government of the state, the government of the state, the government of the state, the government of the state, the government of the state, the government of the state, the government of the state, the government of the state, the government of the state, the government of the state, the government of the state, the government of the state, the government of the state, the government of the state, the government of the state, the government and the government of the state, the government of the state, the government of the state, the government of the state, the government of the state, the government of the state, the government of the state, the government of the state, the government of the state, the government of the state, the government of the state, the government of the state, the government of the state, the government of the state, the government of the state, the government of the state, the government of
6.4 ཕുുെണുെ 350000
natural_image
Simple line drawing of a rectangular object with a label '1' and an arrow, placed on a base (no text or symbols beyond the label)natural_image
Diagram of a solar panel with a curved arrow indicating rotation or movement, no text or symbols presentnatural_image
Simple line drawing of a rectangular object with a label '1' and an arrow, no text or symbols present.natural_image
Diagram of a solar panel with a grid pattern and a curved arrow indicating rotation (no text or symbols)natural_image
Simple line drawing of a rectangular object with a label '1' and an arrow, no text or symbols present.natural_image
Diagram of a solar panel with a grid pattern and a curved arrow indicating rotation (no text or symbols)natural_image
Simple line drawing of a rectangular object with a label '1' and an arrow, no text or symbols present.natural_image
Diagram of a solar panel with a grid pattern and a curved arrow indicating rotation (no text or symbols)natural_image
Simple line drawing of a rectangular object with a label '1' and an arrow, no text or symbols present.natural_image
Diagram of a solar panel with a curved arrow indicating rotation or movement, no text or symbols present7. PROBLEEMOPLOSSING

WAARSCHUWING!
WiFi Indikerer status for WiFi-tilkobling.
11
Lys fargetemperatur Endrer lysfargetemperaturen.
12
natural_image
Simple line drawing of a rectangular object with a label '1' and an arrow, no text or symbols present.natural_image
Diagram of a solar panel with a grid pattern and a curved arrow indicating rotation (no text or symbols)natural_image
Simple line drawing of a rectangular object with a label '1' and an arrow, no text or symbols present.natural_image
Diagram of a solar panel with a curved arrow indicating rotation or movement, no text or symbols presentEncriptação WPA-PSK, WPA2-PSK, WPA3-SAE
natural_image
Simple line drawing of a rectangular object with a label '1' and an arrow, no text or symbols present.natural_image
Diagram of a solar panel with a grid pattern and a curved arrow indicating rotation (no text or symbols)natural_image
Simple line drawing of a rectangular object with a label '1' and an arrow, no text or symbols present.natural_image
Diagram of a solar panel with a grid pattern and a curved arrow indicating rotation (no text or symbols)natural_image
Simple line drawing of a rectangular object with a label '1' and an arrow, no text or symbols present.natural_image
Diagram of a solar panel with a grid pattern and a curved arrow indicating rotation (no text or symbols)natural_image
Simple line drawing of a rectangular object with a label '1' and an arrow, no text or symbols present.natural_image
Diagram of a solar panel with a curved arrow indicating rotation or movement, no text or symbols present- Tukové filtre čistite ručne pomocou špongie s neabrazivnymi čistiacimi prostriedkami alebo ich čistite v
natural_image
Simple line drawing of a rectangular object with a curved arrow labeled '1' on its side, resting on a base (no text or symbols beyond the label)natural_image
Diagram of a solar panel with a curved arrow indicating rotation or movement, no text or symbols present4. PËRSHKRIM I PRODUKTIT
natural_image
Simple line drawing of a rectangular object with a label '1' and an arrow, no text or symbols present.natural_image
Diagram of a solar panel with a curved arrow indicating rotation or movement, no text or symbols presentnatural_image
Simple line drawing of a rectangular object with a label '1' and an arrow, no text or symbols present.natural_image
Diagram of a solar panel with a curved arrow indicating rotation or movement, no text or symbols presentnatural_image
Simple line drawing of a rectangular object with a label '1' and an arrow, no text or symbols present.natural_image
Diagram of a solar panel with a grid pattern and a curved arrow indicating rotation (no text or symbols)Şifreleme WPA-PSK, WPA2-PSK, WPA3-SAE
Uygulamayı yükleme
natural_image
Simple line drawing of a rectangular object with a label '1' and an arrow, no text or symbols present.natural_image
Diagram of a solar panel with a grid pattern and a curved arrow indicating rotation (no text or symbols)ELECTROLUX APPLIANCES AB
BUSINESS SECTOR EMA-EMEA (SEE)
ST GÖRANSGATAN 143
SE-105 45 STOCKHOLM
SWEDEN
TEL: +46 (8) 738 60 00
FAX: +46 (8) 738 63 35
www.electrolux.com
natural_image
Simple line drawing of a rectangular object with a label '1' and an arrow, no text or symbols present.natural_image
Diagram of a solar panel with a grid pattern and a curved arrow indicating rotation (no text or symbols)| الإصلح | السب المحتمل | المشكة |
| تأكد مما إذا كان الجهاز متصلاً بشكل صحيع بمصدر الكهرباء | الجهاز غير متصل بمصدر الكهرباء أو أنه متصل بشكل غير صحيع. | tensor تفعيل الجهاز. |
| تحفق من المن importer أو المفتاح الرئيسية، إذا استمر المن importer أو المفتاح في كسر الدائرة، فاتصل بكهرباني مؤقل. | عدم وجود مصر للTYار الكهرباني. | tensor تفعيل الجهاز. |
| اتصل يمركز خدمة معتمد. | المClosing معيب. | المClosing لا يعمل. |
| لمس الرمز للتحفق مما إذا كنت قادراً على تغير درجات الحرارة الثالثة للألوان. | Perfect illumination إعداد ∅pgir ∅pgir ∅pgir ∅pgir ∅pgir ∅pgir ∅pgir ∅pgir ∅pgir ∅pgir ∅pgir ∅pgir ∅pgir ∅pgir ∅pgir ∅pgir ∅pgir ∅pgir ∅pgir ∅pgir ∅pgir ∅pgir ∅pgir ∅pgir ∅pgir ∅pgIR ∅pgir ∅pgir ∅pgir ∅pgir ∅pgir ∅pgir ∅pgir ∅pgir ∅pgir ∅pgir ∅pgir ∅pgir ∅pgir ∅pgir ∅pgir ∅pgir ∅pgir ∅pgir ∅pgir ∅pgir ∅pgir ∅pgir ∅pgir ∅pgir ∅pgin ∅pgir ∅pgir ∅pgir ∅pgir ∅pgir ∅pgir ∅pgir ∅pgir ∅pgir ∅pgir ∅pgir ∅pgir ∅pgir ∅pgir ∅pgir ∅pgir ∅pgir ∅pgir ∅pgir ∅pgir ∅pgir ∅pgir ∅pgir ∅pgir ∅pgi ∅pgir ∅pgir ∅pgir ∅pgir ∅pgir ∅pgir ∅pgir ∅pgir ∅pgir ∅pgir ∅pgir ∅pgir ∅pgir ∅pgir ∅pgir ∅pgir ∅pgir ∅pgir ∅pgir ∅pgir ∅pgir ∅pgir ∅pgir ∅pgir ∅pgit ∅pgir ∅pgir ∅pgir ∅pgir ∅pgir ∅pgir ∅pgir ∅pgir ∅pgir ∅pgir ∅pgir ∅pgir ∅pgir ∅pgir ∅pgir ∅pgir ∅pgir ∅pgir ∅pgir ∅pgir ∅pgir ∅pgir ∅pgir ∅pgir ∅pgire ∅pgir ∅pgir ∅pgir ∅pgir ∅pgir ∅pgir ∅pgir ∅pgir ∅pgir ∅pgir ∅pgir ∅pgir ∅pgir ∅pgir ∅pgir ∅pgir ∅pgir ∅pgir ∅pgir ∅pgir ∅pgir ∅pgir ∅pgir ∅pgir ∅pgim ∅pgir ∅pgir ∅pgir ∅pgir ∅pgir ∅pgir ∅pgir ∅pgir ∅pgir ∅pgir ∅pgir ∅pgir ∅pgir ∅pgir ∅pgir ∅pgir ∅pgir ∅pgir ∅pgir ∅pgir ∅pgir ∅pgir ∅pgir ∅pgir ∅pgih ∅pgir ∅pgir ∅pgir ∅pgir ∅pgir ∅pgir ∅pgir ∅pgir ∅pgir ∅pgir ∅pgir ∅pgir ∅pgir ∅pgir ∅pgir ∅pgir ∅pgir ∅pgir ∅pgir ∅pgir ∅pgir ∅pgir ∅pgir ∅pgir ∅pgiri ∅pgir ∅pgir ∅pgir ∅pgir ∅pgir ∅pgir ∅pgir ∅pgir ∅pgir ∅pgir ∅pgir ∅pgir ∅pgir ∅pgir ∅pgir ∅pgir ∅pgir ∅pgir ∅pgir ∅pgir ∅pgir ∅pgir ∅pgir ∅pgir ∅pgirus ∅pgir ∅pgir ∅pgir ∅pgir ∅pgir ∅pgir ∅pgir ∅pgir ∅pgir ∅pgir ∅pgir ∅pgir ∅pgir ∅pgir ∅pgir ∅pgir ∅pgir ∅pgir ∅pgir ∅pgir ∅pgir ∅pgir ∅pgir ∅pgir ∅pgirm ∅pgir ∅pgir ∅pgir ∅pgir ∅pgir ∅pgir ∅pgir ∅pgir ∅pgir ∅pgir ∅pgir ∅pgir ∅pgir ∅pgir ∅pgir ∅pgir ∅pgir ∅pgir ∅pgir ∅pgir ∅pgir ∅pgir ∅pgir ∅pgir ∅pgirim ∅pgir ∅pgir ∅pgir ∅pgir ∅pgir ∅pgir ∅pgir ∅pgir ∅pgir ∅pgir ∅pgir ∅pgir ∅pgir ∅pgir ∅pgir ∅pgir ∅pgir ∅pgir ∅pgir ∅pgir ∅pgir ∅pgir ∅pgir ∅pgir ∅pgiram ∅pgir ∅pgir ∅pgir ∅pgir ∅pgir ∅pgir ∅pgir ∅pgir ∅pgir ∅pgir ∅pgir ∅pgir ∅pgir ∅pgir ∅pgir ∅pgir ∅pgir ∅pgir ∅pgir ∅pgir ∅pgir ∅pgir ∅pgir ∅pgir ∅pgirk ∅pgir ∅pgir ∅pgir ∅pgir ∅pgir ∅pgir ∅pgir ∅pgir ∅pgir ∅pgir ∅pgir ∅pgir ∅pgir ∅pgir ∅pgir ∅pgir ∅pgir ∅pgir ∅pgir ∅pgir ∅pgir ∅pgir ∅pgir ∅pgir ∅pgirt ∅pgir ∅pgir ∅pgir ∅pgir ∅pgir ∅pgir ∅pgir ∅pgir ∅pgir ∅pgir ∅pgir ∅pgir ∅pgir ∅pgir ∅pgir ∅pgir ∅pgir ∅pgir ∅pgir ∅pgir ∅pgir ∅pgir ∅pgir ∅pgir ∅pgirs ∅pgir ∅pgir ∅pgir ∅pgir ∅pgir ∅pgir ∅pgir ∅pgir ∅pgir ∅pgir ∅pgir ∅pgir ∅pgir ∅pgir ∅pgir ∅pgir ∅pgir ∅pgir ∅pgir ∅pgir ∅pgir ∅pgir ∅pgir ∅pgir ∅pgira ∅pgir ∅pgir ∅pgir ∅pgir ∅pgir ∅pgir ∅pgir ∅pgir ∅pgir ∅pgir ∅pgir ∅pgir ∅pgir ∅pgir ∅pgir ∅pgir ∅pgir ∅pgir ∅pgir ∅pgir ∅pgir ∅pgir ∅pgir ∅pgir ∅pgirc ∅pgir ∅pgir ∅pgir ∅pgir ∅pgir ∅pgir ∅pgir ∅pgir ∅pgir ∅pgir ∅pgir ∅pgir ∅pgir ∅pgir ∅pgir ∅pgir ∅pgir ∅pgir ∅pgir ∅pgir ∅pgir ∅pgir ∅pgir ∅pgir ∅pgiro ∅pgir ∅pgir ∅pgir ∅pgir ∅pgir ∅pgir ∅pgir ∅pgir ∅pgir ∅pgir ∅pgir ∅pgir ∅pgir ∅pgir ∅pgir ∅pgir ∅pgir ∅pgir ∅pgir ∅pgir ∅pgir ∅pgir ∅pgir ∅pgir ∅pgAir ∅pgir ∅pgir ∅pgir ∅pgir ∅pgir ∅pgir ∅pgir ∅pgir ∅pgir ∅pgir ∅pgir ∅pgir ∅pgir ∅pgir ∅pgir ∅pgir ∅pgir ∅pgir ∅pgir ∅pgir ∅pgir ∅pgir ∅pgir ∅pgir ∅pgar ∅pgir ∅pgir ∅pgir ∅pgir ∅pgir ∅pgir ∅pgir ∅pgir ∅pgir ∅pgir ∅pgir ∅pgir ∅pgir ∅pgir ∅pgir ∅pgir ∅pgir ∅pgir ∅pgir ∅pgir ∅pgir ∅pgir ∅pgir ∅pgir ∅pgur ∅pgir ∅pgir ∅pgir ∅pgir ∅pgir ∅pgir ∅pgir ∅pgir ∅pgir ∅pgir ∅pgir ∅pgir ∅pgir ∅pgir ∅pgir ∅pgir ∅pgir ∅pgir ∅pgir ∅pgir ∅pgir ∅pgir ∅pgir ∅pgir ∅pging ∅pgir ∅pgir ∅pgir ∅pgir ∅pgir ∅pgir ∅pgir ∅pgir ∅pgir ∅pgir ∅pgir ∅pgir ∅pgir ∅pgir ∅pgir ∅pgir ∅pgir ∅pgir ∅pgir ∅pgir ∅pgir ∅pgir ∅pgir ∅pgir ∅pgiring ∅pgir ∅pgir ∅pgir ∅pgir ∅pgir ∅pgir ∅pgir ∅pgir ∅pgir ∅pgir ∅pgir ∅pgir ∅pgir ∅pgir ∅pgir ∅pgir ∅pgir ∅pgir ∅pgir ∅pgir ∅pgir ∅pgir ∅pgir ∅pgir ∅pgirie ∅pgir ∅pgir ∅pgir ∅pgir ∅pgir ∅pgir ∅pgir ∅pgir ∅pgir ∅pgir ∅pgir ∅pgir ∅pgir ∅pgir ∅pgir ∅pgir ∅pgir ∅pgir ∅pgir ∅pgir ∅pgir ∅pgir ∅pgir ∅pgir ∅pgiris ∅pgir ∅pgir ∅pgir ∅pgir ∅pgir ∅pgir ∅pgir ∅pgir ∅pgir ∅pgir ∅pgir ∅pgir ∅pgir ∅pgir ∅pgir ∅pgir ∅pgir ∅pgir ∅pgir ∅pgir ∅pgir ∅pgir ∅pgir ∅pgir ∅pgrir ∅pgir ∅pgir ∅pgir ∅pgir ∅pgir ∅pgir ∅pgir ∅pgir ∅pgir ∅pgir ∅pgir ∅pgir ∅pgir ∅pgir ∅pgir ∅pgir ∅pgir ∅pgir ∅pgir ∅pgir ∅pgir ∅pgir ∅pgir ∅pgir ∅pgiry ∅pgir ∅pgir ∅pgir ∅pgir ∅pgir ∅pgir ∅pgir ∅pgir ∅pgir ∅pgir ∅pgir ∅pgir ∅pgir ∅pgir ∅pgir ∅pgir ∅pgir ∅pgir ∅pgir ∅pgir ∅pgir ∅pgir ∅pgir ∅pgir ∅pgiv ∅pgir ∅pgir ∅pgir ∅pgir ∅pgir ∅pgir ∅pgir ∅pgir ∅pgir ∅pgir ∅pgir ∅pgir ∅pgir ∅pgir ∅pgir ∅pgir ∅pgir ∅pgir ∅pgir ∅pgir ∅pgir ∅pgir ∅pgir ∅pgir ∅pg IR ∅pgir ∅pgir ∅pgir ∅pgir ∅pgir ∅pgir ∅pgir ∅pgir ∅pgir ∅pgir ∅pgir ∅pgir ∅pgir ∅pgir ∅pgir ∅pgir ∅pgir ∅pgir ∅pgir ∅pgir ∅pgir ∅pgir ∅pgir ∅pgir ∅pg bir ∅pgir ∅pgir ∅pgir ∅pgir ∅pgir ∅pgir ∅pgir ∅pgir ∅pgir ∅pgir ∅pgir ∅pgir ∅pgir ∅pgir ∅pgir ∅pgir ∅pgir ∅pgir ∅pgir ∅pgir ∅pgir ∅pgir ∅pgir ∅pgir ∅pg Bir ∅pgir ∅pgir ∅pgir ∅pgir ∅pgir ∅pgir ∅pgir ∅pgir ∅pgir ∅pgir ∅pgir ∅pgir ∅pgir ∅pgir ∅pgir ∅pgir ∅pgir ∅pgir ∅pgir ∅pgir ∅pgir ∅pgir ∅pgir ∅pgir ∅pg ir ∅pgir ∅pgir ∅pgir ∅pgir ∅pgir ∅pgir ∅pgir ∅pgir ∅pgir ∅pgir ∅pgir ∅pgir ∅pgir ∅pgir ∅pgir ∅pgir ∅pgir ∅pgir ∅pgir ∅pgir ∅pgir ∅pgir ∅pgir ∅pgir ∅pg. ∆ngrm ∆ngrm ∆ngrm ∆ngrm ∆ngrm ∆ngrm ∆ngrm ∆ngrm ∆ngrm ∆ngrm ∆ngrm ∆ngrm ∆ngrm ∆ngrm ∆ngrm ∆ngrm ∆ngrm ∆ngrm ∆ngrm ∆ngrm ∆ngrm ∆ngrm ∆ngrm ∆ngrm ∆ngrm ∆ngRM ∆ngRM ∆ngRM ∆ngRM ∆ngRM ∆ngRM ∆ngRM ∆ngRM ∆ngRM ∆ngRM ∆ngRM ∆ngRM ∆ngRM ∆ngRM ∆ngRM ∆ngRM ∆ngRM ∆ngRM ∆ngRM ∆ngRM ∆ngRM ∆ngRM ∆ngRM ∆ngRM ∆ngRM ∆ngBM ∆ngBM ∆ngBM ∆ngBM ∆ngBM ∆ngBM ∆ngBM ∆ngBM ∆ngBM ∆ngBM ∆ngBM ∆ngBM ∆ngBM ∆ngBM ∆ngBM ∆ngBM ∆ngBM ∆ngBM ∆ngBM ∆ngBM ∆ngBM ∆ngBM ∆ngBM ∆ngBM ∆ngBM ∆ngBm√ |
natural_image
Diagram of a solar panel with a curved arrow indicating rotation or movement, no text or symbols presentnatural_image
Simple line drawing of a rectangular object with a label '1' and an arrow, resting on a base plate (no text or symbols beyond the label)i
هذا小微企业 Muslims Concentrated Markets Markets Markets Markets Markets Markets Markets Markets Markets Markets Markets Markets Markets Markets Markets Markets Markets Markets Markets Markets Markets Markets Markets Markets Markets Markets Markets Markets Markets Markets Markets Markets Markets Markets Markets Markets Markets Markets Markets Markets Markets Markets Markets Markets Markets Markets Markets Markets Markets Markets Markets Markets Markets Markets Markets Markets Markets Markets Markets Markets Markets Markets Markets Markets Markets Markets Markets Markets Markets Markets Markets Markets Markets Markets Markets Markets Markets Markets Markets Markets Markets Markets Markets Markets Markets Markets Markets Markets Markets Markets Markets Markets Markets Markets Markets Markets Markets Markets Markets Markets Market Markets Markets Markets Markets Markets Markets Markets Markets Markets Markets Markets Markets Markets Markets Markets Markets Markets Markets Markets Markets Markets Markets Markets Markets Markets Markets Markets Markets Markets Markets Markets Markets Markets Markets Markets Markets Markets Markets Markets Markets Markets Markets Markets Markets Markets Markets Markets Markets Markets Markets Markets Markets Markets Markets Markets Markets Markets Markets Markets Markets Markets Markets Markets Markets Markets Markets Markets Markets Markets Markets Markets Markets Markets Markets Markets Markets Markets Markets Markets Markets Markets Markets Markets Markets Markets Markets Markets Markets Markets Markets Markets Markets Markets Markets Markets Markets Markets Markets Markets Communities Market Market Market Market Market Market Market Market Market Market Market Market Market Market Market Market Market Market Market Market Market Market Market Market Market Market Market Market Market Market Market Market Market Market Market Market Market Market Market Market Market Market Market Market Market Market Market Market Market Market Market Market Market Market Market Market Market Market Market Market Market Market Market Market Market Market Market Market Market Market Market Market Market Market Market Market Market Market Market Market Market Market Market Market Market Market Market Market Market Market Market Market Market Market Market Market Market Market Market Market市场
The software in this product contains components that are based on free and open source software. AEG gratefully acknowledges the contributions of the open software and robotics communities to the development project.
To access the source code of these free and open source software components whose license conditions require publishing, and to see their full copyright information and applicable license terms, please visit: http://aeg.opensoftwarerepository.com (folder NIUS)
- Welcome to AEG! Thank you for choosing our appliance.
- CONTENTS
- ⚠SAFETY INFORMATION
- Children and vulnerable people safety
- General Safety
- SAFETY INSTRUCTIONS
- Installation
- WARNING!
- Electrical connection
- Use
- Service
- Disposal
- INSTALLATION
- Installation instructions
- PRODUCT DESCRIPTION
- Control panel overview
- Function Description
- DAILY USE
- Using the hood
- Activating the appliance
- To operate the hood:
- Deactivating the appliance
- Perfect Illumination - Lighting
- Activating and deactivating the lighting
- Setting the light colour temperature
- AuroraTech®
- Hob2Hood®
- Filter notification
- To activate or deactivate the counter for charcoal filter:
- WiFi connectivity setup
- Installing the app
- Configuring the appliance wireless connection
- i
- Disabling / Enabling the appliance wireless connection
- Resetting the appliance wireless connection
- CARE AND CLEANING
- Notes on cleaning
- Cleaning Agents
- Keep the hood clean
- Charcoal filter
- Cleaning the grease filter
- To clean the filter:
- Replacing the charcoal filter - optional
- Replacing the lamp
- TROUBLESHOOTING
- What to do if...
- ENVIRONMENTAL CONCERNS
- ⚠TURVALLISUUSTIEDOT
- SVAKODNEVNA UPORABA
- Uporaba nape
- მონტაცი
- ཕുുെണുെ 350000
- PROBLEEMOPLOSSING
- WAARSCHUWING!
- PËRSHKRIM I PRODUKTIT
- Uygulamayı yükleme
Brand : AEG
Model : NDV8791CZ
Category : Basket