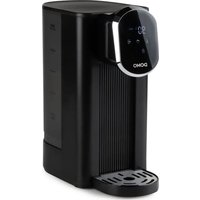
DO524WK - Heating DOMO - Free user manual and instructions
Find the device manual for free DO524WK DOMO in PDF.


| Product type | Hot water dispenser / Instant water heater |
| Brand | DOMO |
| Model | DO524WK |
| Voltage | 220-240 V ~ 50/60 Hz |
| Power | 2200-2600 W |
| Standby consumption | 0.54 W (after <1 minute) |
| Tank capacity | Approximately 1.5 L (between MIN and MAX) |
| Adjustable temperatures | 40 °C, 50 °C, 60 °C, 70 °C, 80 °C, 90 °C, 100 °C |
| Adjustable water volumes | 150 ml, 250 ml, 350 ml, 500 ml, or continuous flow |
| Main functions | Hot water dispensing, automatic shut-off, memory of settings, lock, standby mode |
| Descaling program | Automatic with indicator light |
| Safety | Overheat safety thermostat, dry run protection, child lock |
| Display | LCD screen with indicators for temperature, volume, lock, descaling and water shortage |
| Drip tray | Removable for easy cleaning |
| Drainage opening | At the bottom of the appliance to drain waste water |
| Cleaning and maintenance | Wipe with a damp cloth; descale every 10 hours of use; do not immerse |
| Spare parts and accessories | Available on the DOMO online shop (authentic accessories and parts) |
| Warranty | 2 years from the date of purchase |
| General information | Domestic and similar use; do not use outdoors; read the manual before use |
Frequently Asked Questions - DO524WK DOMO
User questions about DO524WK DOMO
0 question about this device. Answer the ones you know or ask your own.
Ask a new question about this device
Download the instructions for your Heating in PDF format for free! Find your manual DO524WK - DOMO and take your electronic device back in hand. On this page are published all the documents necessary for the use of your device. DO524WK by DOMO.
USER MANUAL DO524WK DOMO
natural_image
Modern black and white digital water heater with glass of mint and mint leaf garnish (no visible text or symbols)NL Handleiding Waterkoker - Heetwaterdispenser
FR Mode d'emploi Bouilloire - Distributeur d'eau chaude
DE Gebrauchsanleitung Wasserkocher - Heißwasserspender
EN Instruction booklet Water kettle - Hot water dispenser
ES Manual de instrucciones Hervidor - Dispensador de agua caliente
IT Istruzioni per l'uso Bollitore - Erogatore di acqua calda
CZ Návod k použití Rychlovarná konvice s dávkovačem
SK Návod na použitie Rychlovarná kanvica s dávkovačom
www.domo-elektro.be

Read all instructions carefully.
Save this instruction manual for future reference.
⚠PRODUCTSPECIFIEKE WAARSCHUWINGEN
BEDIENINGSPANEEEL
natural_image
Close-up of a black door with a circular opening and a red arrow pointing to the button (no text or symbols visible)natural_image
Symbol of a trash bin with crossed lines indicating no waste or discharge (no text or labels)⚠AVERTISSEMENTS SPÉCIFIQUES AU PRODUIT
PANNEAU DE COMMANDE
natural_image
Close-up of a black door with a circular button and a red arrow pointing to the left side (no text or symbols visible)TEMPÉRATURES RECOMMANDÉES & TYPES DE THÉ
natural_image
Symbol of a trash bin with crossed lines indicating no waste or discharge, and a solid black rectangle below (no text or labels)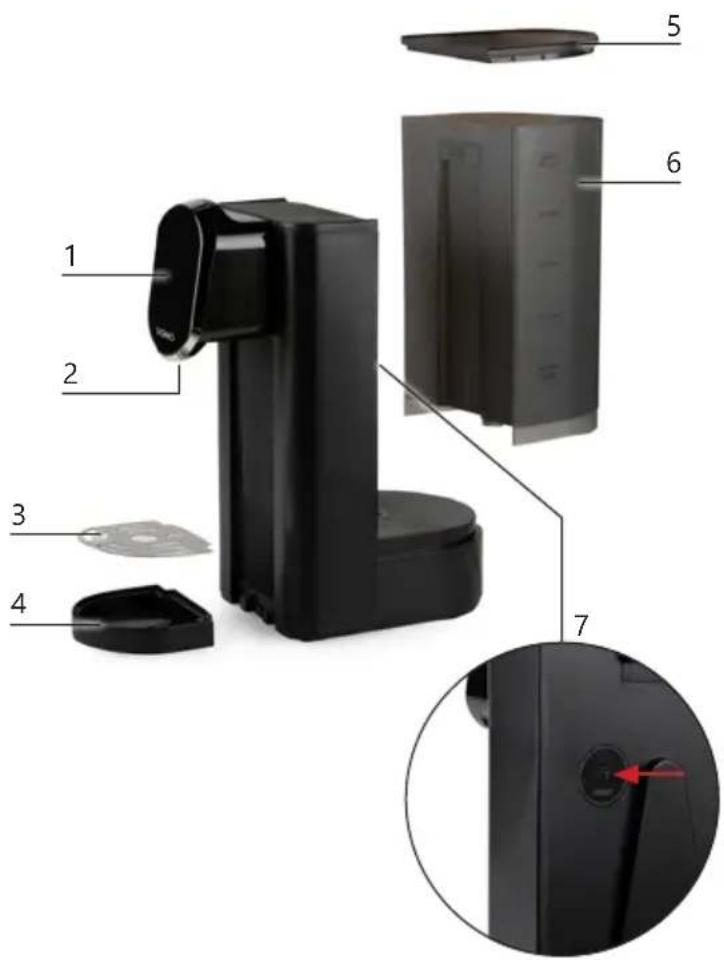
BEDIENFELD
natural_image
Close-up of a black door handle with a red arrow pointing to the circular button (no text or symbols visible)EMPFOHLENE TEMPERATUREN & TEESORTEN
natural_image
Symbol of a trash bin with crossed lines indicating no waste or discharge (no text or labels)Thank you very much for placing your trust in DOMO. We hope you enjoy your new purchase.
All our products undergo strict quality control before reaching you. If you still experience any problems with your device, we sincerely regret that. We have collected the most frequently asked questions about our devices on our webshop. Scan the QR code and have a look!
If you cannot find a solution to your problem there, do not hesitate to contact our customer service via info@linea2000.be. Our staff will do everything they can to assist you!
This device has a warranty period of 2 years from the date of purchase. During this warranty period, the distributor will assume responsibility for any defects that can be shown to be the result of material, construction or manufacturing errors. Such defects will be remedied by repair or replacement of the device. The 2-year warranty period will be suspended during the repair period and will continue after the repair has taken place for the remaining duration of the warranty period. The warranty will be honoured if proof of purchase clearly showing the date of purchase is provided. If your device becomes defective within the 2-year warranty period, please return it with your proof of purchase to the store you purchased it from or follow the procedure of the relevant webshop if you bought it online.
The warranty does not cover damage to the device, accessories or parts caused by:
• normal wear and tear from use;
• non-compliance with the instructions for use, maintenance and cleaning in the manual;
- incorrect connection, e.g. electrical voltage too high;
- incorrect, heavy-handed or abnormal use;
• repairs or alterations carried out by the consumer or unauthorised third parties;
- use of parts or accessories not recommended nor supplied by the distributor.
SAFETY INSTRUCTIONS
When using electrical appliances, basic safety precautions should always be taken, including the following. Any injury or damage caused by failure to comply with these rules are at your own risk. Neither the manufacturer, importer, or the supplier may be held liable.
- Read all instructions carefully.
- Make sure all packaging materials and promotional stickers have been removed before using the appliance for the first time. Make sure children cannot play with the packaging materials.
-
This appliance is only suitable for use in domestic and similar environments, such as:
-
staff kitchen areas in shops, offices and other working environments;
- farm houses;
- by clients in hotels, motels and other residential type environments;
- bed and breakfast type environments.
- Children should be supervised to ensure that they do not play with the appliance.
- This appliance can be used by children aged from 16 years and above and persons with reduced physical, sensory or mental capabilities or lack of experience and knowledge if they have been given supervision or instruction concerning use of the appliance in a safe way and understand the hazards involved.
• Children shall not play with the appliance.
- Cleaning and user maintenance shall not be made by children unless they are older than 16 or supervised.
- Keep the appliance and its cord out of reach of children younger than 16 years.
- All repairs should be carried out by the manufacturer or its aftersales service.
▲ELECTRICAL WARNINGS
- In order to avoid a hazard this appliance must not be supplied through an external switching device, such as a timer or a
separate remote control, or connected to a circuit that is regularly switched on and off by the utility.
- The appliance must be disconnected from its power source when not in use, during service and when replacing parts. If present, first turn all the buttons to the 'off' position, then pull the plug out of the socket by grasping the plug itself. Never pull the cord or appliance to remove the plug from the socket.
- Before use, check carefully that the electric tension and frequency of the power net at your home match the indications on the rating label of the appliance.
- The appliance must be plugged into an appropriate outlet that is installed and grounded in accordance with local installation regulations.
- Do not let the power supply cord hang over the edge of a counter, or touch hot surfaces.
- Keep the power cord away from hot parts and don't cover the appliance.
- Unwrap the cord completely to prevent overheating of the cord. Do not allow the power cord supply to run underneath or around the unit.
- For safety reasons, never use the appliance if the cord, plug, or appliance itself is damaged, or after a malfunction of the appliance. Return the appliance to the DOMO Service Department or its service agent for examination, repair, or electrical or mechanical adjustment. Do not try to repair the appliance yourself.
⚠️INSTALLATION
- Do not place near flammable materials, gases or explosives.
- Do not use or store this appliance outdoors.
• Always use the appliance on a steady, dry and level surface.
- Never place this appliance near a gas stove or electrical stove or in a place where it may come into contact with a warm appliance.
⚠ USE
- Do not use this appliance for other than intended use.
- Never leave the appliance unattended while it is functioning.
- Do not operate the appliance with wet hands.
- The use of accessories that are not recommended or sold by the manufacturer can cause fire, electrical shock or injuries. Only use the utensils delivered with the appliance.
⚠ CLEANING AND MAINTENANCE
- To protect against electrical shock or burns, do not immerse unit, cord, or plug in water or other liquid.
- Failure to maintain this appliance in a clean condition could adversely affect the life of the appliance and possibly result in a hazardous situation.
⚠PRODUCTSPECIFIC WARNINGS
- Keep your hands away from the appliance while it is operating. Boiling water and hot steam can cause burns.
- Always fill the water tank above the MIN mark and below the MAX mark as indicated on the appliance.
- Be careful not to spill any liquid on the power cord.
- Never open the lid while the water is boiling.
- Never move the appliance while it is still in use.
- Never switch on the appliance when the water tank is empty.
- Make sure a cup is placed under the appliance before pressing the on/off button.
SAVE THESE INSTRUCTIONS FOR FUTURE REFERENCE
All images and descriptions in this manual are purely indicative and may differ slightly from the actual device.
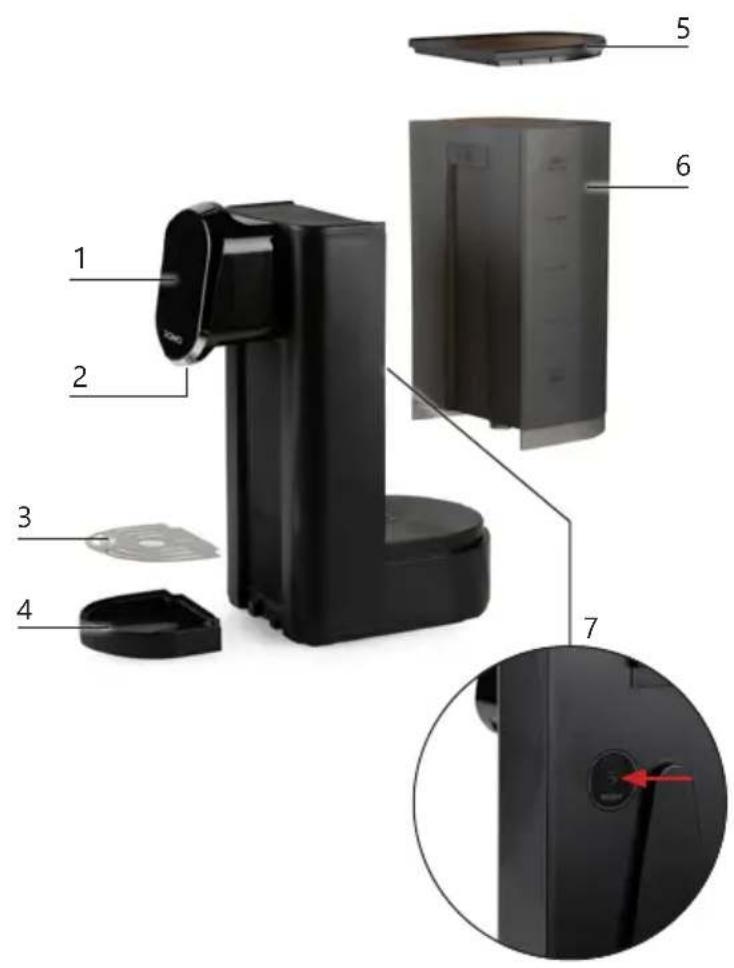
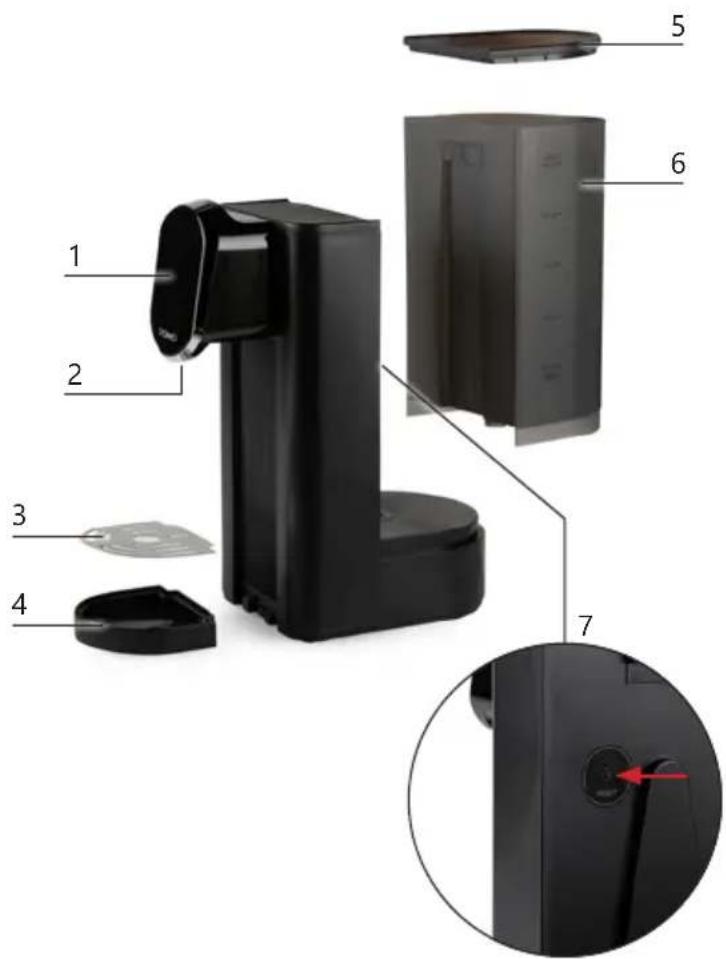
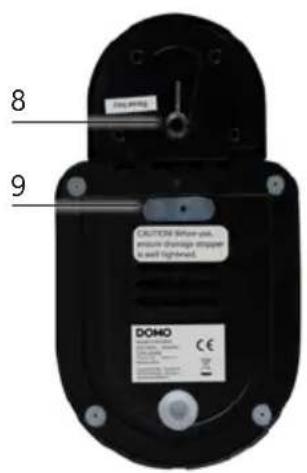
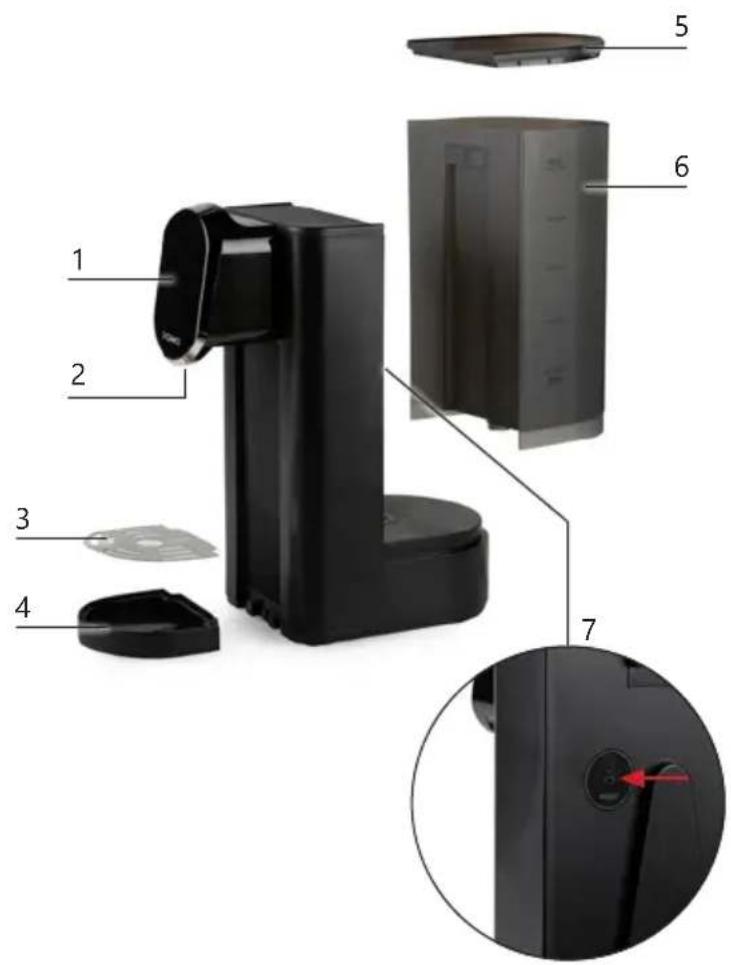
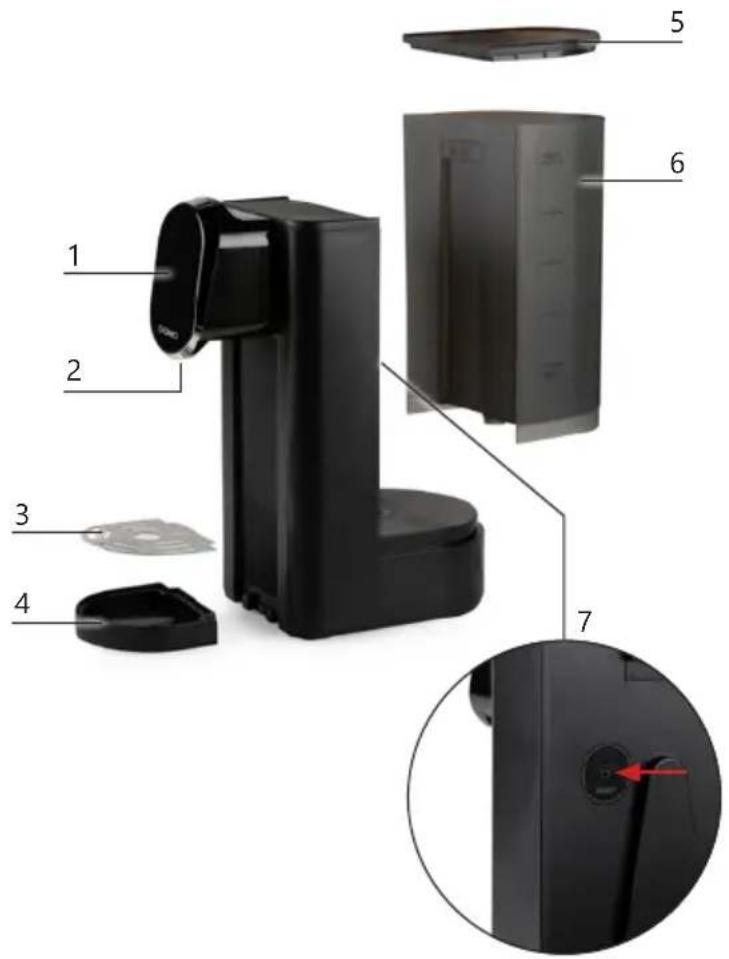
PARTS
- Control panel
- Water spout
- Drip tray plate
- Drip tray
- Water tank lid
- Water tank
- Reset button
- Reset key
- Drain opening with stopper
CONTROL PANEL
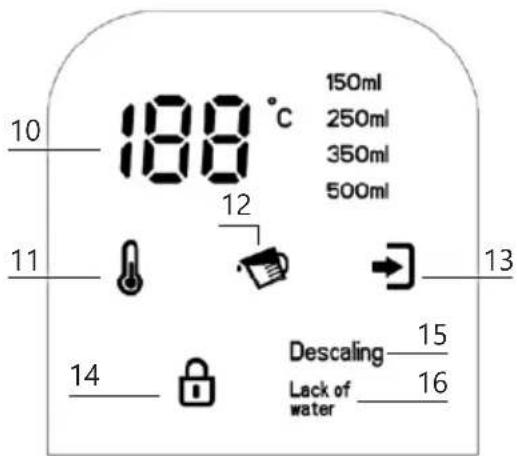
- Display
- Button "Set temperature"
- Button "Set volume"
- Button "Start-stop"
- Button "Lock"
- "Descaling" indicator: descaling
- "Lack of water" indicator: water tank empty
BEFORE THE FIRST USE
- Remove all packaging materials and any promotional stickers.
- Place the hot water dispenser on a flat, stable surface. Attach the drip tray.
- Rinse the appliance before use. Fill the water tank to the MAX mark with water and let the full amount run through at 100^ as described under "Use".
USE
-
Fill the water tank. See "Filling the water tank".
-
Place a cup on the drip tray under the water spout.
⚠️Make sure the cup matches the desired amount of water.
- Plug the appliance into the socket. To unlock the appliance, press the "Lock" button seconds.

-
Press the "Set temperature" button to select the desired temperature. Each press increases the value. You can choose from: 00, 40°C, 50°C, 60°C, 70°C, 80°C, 90°C and 100°C. The selected temperature will light up. If you choose 00, the water will be at room temperature.
-
Press the "Set volume" button to select the desired amount of water. Each press increases the value. You can choose from: 150 ml, 250 ml, 350 ml, 500 ml. The selected volume will light up. You can also let the water run continuously until you press stop. To do this, hold the volume button for 3 seconds. All volume indicators will light up on the display.
-
Press the "Start-stop" button to start the kettle. Press this button again if you want to stop the appliance before the set amount has run through.
-
After about 5 to 10 seconds, the water will boil and one cup of water will automatically flow from the spout. You will hear a signal and the appliance will stop automatically.
⚠️ Wait until the water has completely run through before removing the cup.
⚠ The water flowing from the spout is hot. Never touch the water or steam with your hands to avoid burns.
SLEEP MODE
- After 15 seconds of inactivity, the appliance will enter sleep mode. The "Lock" button will light up on the display.
- To unlock the appliance, press the "Lock" button for 5 seconds. The appliance is ready for use again.
FILLING THE WATER TANK
If the "Lack of water" indicator flashes and the display shows code E7, you need to fill the water tank.
-
Remove the water tank from the appliance and open the lid.
-
Fill the tank between the MIN and MAX marks and close the lid.
-
Place the tank back on the appliance.
⚠️ Never use warm, hot or sparkling water or any other liquid in the water tank.
⚠️ Always remove the water tank from the appliance when filling it to prevent overflow and damage.
NOTES
- The kettle will remember the previous settings. However, if you unplug it, the default settings will be restored.
- The selected water volume may fluctuate by ± 15% due to external factors such as ambient temperature.
- The appliance is equipped with a safety thermostat. In case of overheating or abnormal operation, the appliance will stop to prevent damage. If this happens, unplug the appliance. Let it cool down for 30 minutes. Use the reset key on the bottom of the appliance. Insert this key

natural_image
Close-up of a black door with a red arrow pointing to a circular button (no text or symbols visible)into the reset button hole located behind the water tank. Plug the appliance back in. It can now be used again.
RECOMMENDED TEMPERATURES & TEA TYPES
- Black tea: made by fully oxidising the tea leaves. Recommended temperature: 90°C. Steep for 3–5 minutes.
- Green tea: considered the healthiest type. Leaves are heated and dried after harvesting. Recommended temperature: 60–80°C. Steep for 3 minutes.
- Oolong tea: also called blue tea, between green and black tea. Best steeped for 6–8 minutes in water at 80–90°C.
- White tea: rare type made from young buds of the tea plant. Recommended temperature: 70–80°C. Steep for about 5 minutes.
- Herbal tea: not technically tea, made from herbs and/or spices. Best steeped at 90–100°C for 5–7 minutes.
- Instant coffee: recommended temperature is 80^ . Boiling water can make it taste bitter. At 80^ , the aromas are better preserved.
- Instant soup: 100^ . Boiling water is needed to dissolve and cook the ingredients properly.
- Cocoa powder: 70–80°C is hot enough to mix the powder well without boiling, so the chocolate milk doesn't curdle and the taste remains smooth.
CLEANING AND MAINTENANCE
• Always unplug the appliance before cleaning.
- Wipe the outside of the appliance with a slightly damp cloth. You may use a mild detergent, but do not use abrasive products.
- If you do not use the appliance for a longer period, unplug it and empty the water tank.
CLEANING
Empty the drip tray and rinse it with warm water and a mild detergent.
At the bottom of the kettle is a drainage opening. After cleaning, hold the appliance over a container and open the stopper to remove waste water. Close the stopper again.
DESCALING
After 10 hours of use, the appliance needs to be descaled. The "Descaling" light will flash as a reminder to perform the descaling programme timely.
- Put the device above a sink or place an empty container of 2.5L under the spout.
- Fill the water reservoir till the maximum level with water and a liquid descaler. Follow the instructions on the product packaging.
- Power on the device, and press and hold the "Set temperature" button for 3 seconds.
- The device enters into the descaling programme. On the display "01" appears and the "start-stop" button and "Descaling" light is on. Hot water is dispensed, until the reservoir is empty.
- When the reservoir is empty "Lack of water" is displayed, and the "Descaling" light is off.
- Take out the reservoir and rinse a few times with clean water. Fill the reservoir till maximum with clean water.
-
Press and hold the button "Set volume" for 3 seconds, so all different volumes illuminate on the display. Press "start-stop" button to rinse the appliance with clean water.
-
When the reservoir is empty "Lack of water" is displayed, and the descaling programme is finished.
Remark: you can stop the descaling process by pressing the "Start-stop" button during the descaling programme.
⚠️Do not immerse unit, cord, or plug in water or other liquid.
⚠️ Never use aggressive or abrasive cleaning agents.
PROBLEMS AND SOLUTIONS
| PROBLEMS SOLUTIONS | |
| Water has leaked under the appliance. • The drainage opening is not properly closed. Ensure the stopper at the bottom is securely sealed. | |
| The appliance no longer works. • The overheating protection has likely been triggered. Unplug the appliance, let it cool for 30 minutes, and use the reset key located at the bottom. | |
| The water is not hot enough. • If you use hot water right after plugging in, it may be cooler than when simply unlocking the appliance. This is because the appliance waits a few seconds before heating to prevent overheating. It is recommended to keep the appliance plugged in unless not in use for a long time. In sleep mode, the appliance does not heat. | |
| The display shows error code E7. • The water tank is empty. Refill the tank. | |
| The display shows error code E4. • The temperature sensor is faulty. Contact the retailer or DOMO customer service. | |
| The display shows error code E5. • Short circuit in the temperature sensor. Contact the retailer or DOMO customer service. | |
| The display shows error code E8. • The water pump is faulty. Contact the retailer or DOMO customer service. | |
SPECIFICATIONS
| Model DO524WK | |
| Voltage 220-240V~ 50/60Hz | |
| Power 2200-2600W | |
| Energy consumption in standby mode after <1 minute | 0.54W |
GUIDELINES
natural_image
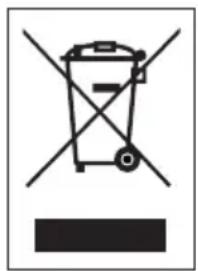
Symbol of a trash bin crossed with two crossed lines and a solid black rectangle below (no text or labels)This symbol on the product or on its packaging indicates that this product may not be treated as household waste. Instead it must be brought to the applicable collection point for recycling of electrical and electronic equipment. By ensuring this product is disposed of correctly, you will help prevent potential negative consequences for the environment and human health, which could otherwise be caused by inappropriate waste handling of this product. For more detailed information about recycling of this product, please contact your local city office, your household waste disposal service or the shop where you purchased the product.

The packaging is recyclable. Please treat the packaging ecologically.

This appliance conforms to all European requirements in the areas of safety, health, and environmental protection.
The EU declaration concerning this appliance can be requested at any time from info@linea2000.be
GARANTIA
Estimado cliente,
PANEL DE CONTROL
natural_image
Close-up of a black door with a red arrow pointing to a circular button (no text or symbols visible)natural_image
Symbol of a trash bin crossed with two crossed lines, no text or numbers present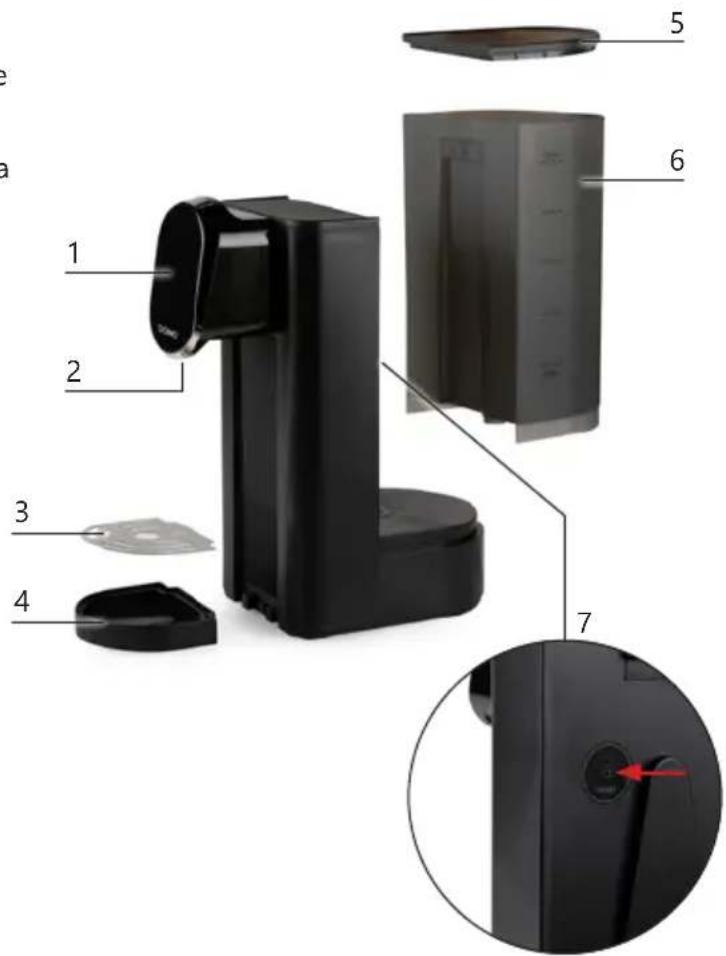
PANNELLO DI CONTROLLO
PRIMA DELL'USO
natural_image
Close-up of a black door with a red arrow pointing to a circular button (no text or symbols visible)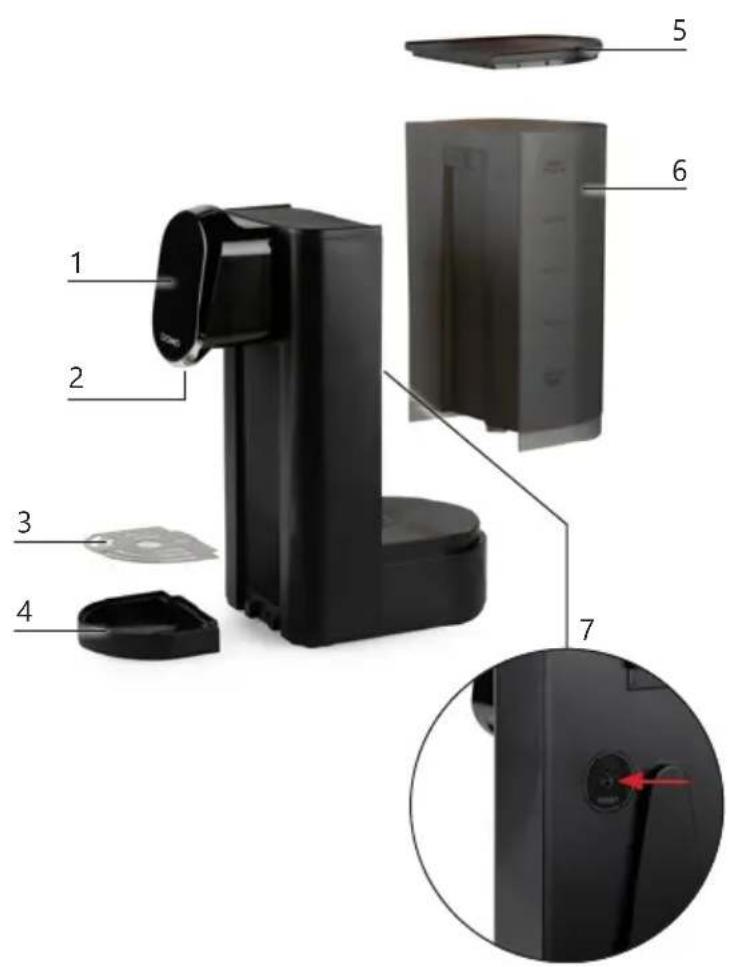
OVLÁDACÍ PANEL
natural_image
Close-up of a black electronic device with a red arrow pointing to a circular button (no text or symbols visible)DOPORUČENÉ TEPLOTY A DRUHY ČAJE
natural_image
Symbol of a trash bin crossed with no text or numbers, representing waste sorting or disposal (no text present)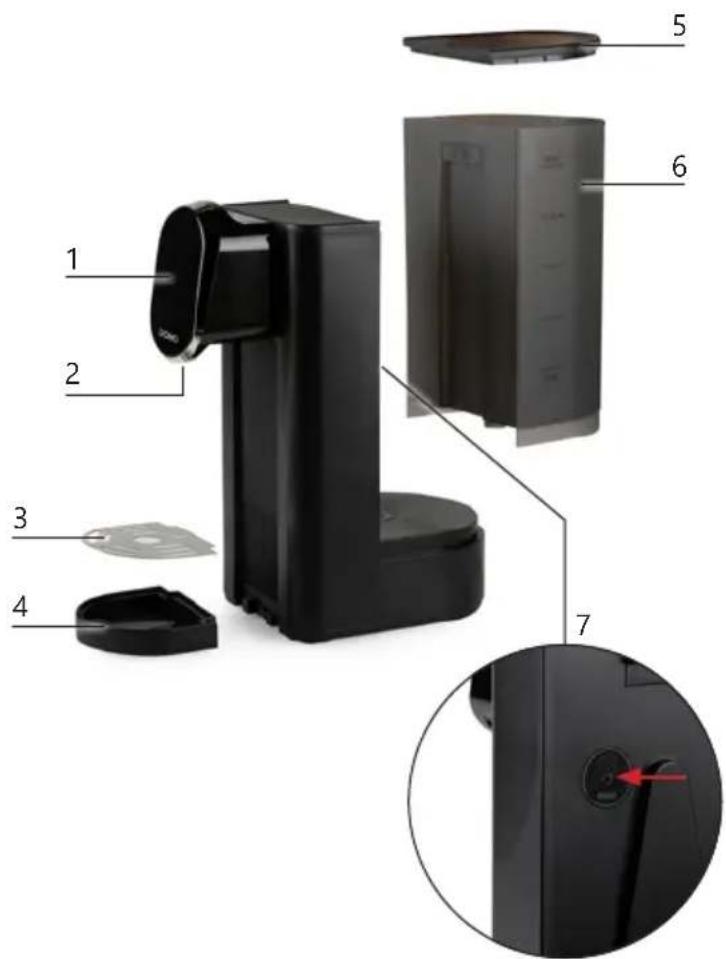
OVLÁDACÍ PANEL
natural_image
Close-up of a black door handle with a red arrow pointing to a circular button (no text or symbols visible)ODPORÚČANÉ TEPLOTY A DRUHY ČAJU
natural_image
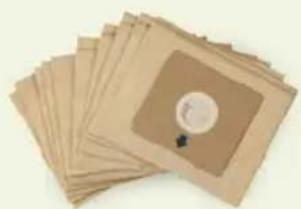
Symbol of a trash bin with crossed lines indicating no waste or discharge, and a solid black rectangle below (no text or labels)Looking for extra accessories or you have a broken piece?
ORDER the original DOMO accessories and parts on our webshop.
Webshop

natural_image
Stack of sheets of paper with a circular inset showing a small object, no visible text or symbols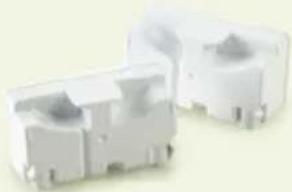
natural_image
Two white plastic electrical connectors with mounting holes (no text or symbols visible)
natural_image
White cylindrical container with black interior, no visible text or symbols
natural_image
Clear glass coffee maker with black handle and lid (no text or symbols visible)
- ⚠PRODUCTSPECIFIEKE WAARSCHUWINGEN
- BEDIENINGSPANEEEL
- ⚠AVERTISSEMENTS SPÉCIFIQUES AU PRODUIT
- PANNEAU DE COMMANDE
- TEMPÉRATURES RECOMMANDÉES & TYPES DE THÉ
- BEDIENFELD
- EMPFOHLENE TEMPERATUREN & TEESORTEN
- SAFETY INSTRUCTIONS
- ▲ELECTRICAL WARNINGS
- ⚠️INSTALLATION
- ⚠ USE
- ⚠ CLEANING AND MAINTENANCE
- ⚠PRODUCTSPECIFIC WARNINGS
- SAVE THESE INSTRUCTIONS FOR FUTURE REFERENCE
- PARTS
- CONTROL PANEL
- BEFORE THE FIRST USE
- USE
- SLEEP MODE
- FILLING THE WATER TANK
- NOTES
- RECOMMENDED TEMPERATURES & TEA TYPES
- CLEANING AND MAINTENANCE
- CLEANING
- DESCALING
- GUIDELINES
- GARANTIA
- PANEL DE CONTROL
- PANNELLO DI CONTROLLO
- PRIMA DELL'USO
- OVLÁDACÍ PANEL
- DOPORUČENÉ TEPLOTY A DRUHY ČAJE
- ODPORÚČANÉ TEPLOTY A DRUHY ČAJU
Brand : DOMO
Model : DO524WK
Category : Heating