
AGS0993F - Freezer AEG - Free user manual and instructions
Find the device manual for free AGS0993F AEG in PDF.

| Product Type | Freezer |
| Brand | AEG |
| Model | AGS0993F |
| Dimensions (H x W x D) | 850 x 550 x 612 mm |
| Power supply | 230-240 V ~ 50 Hz |
| Operating autonomy | 20 hours |
| Freezing capacity | Up to the quantity indicated on the rating plate (per 24 h) |
| Climate class | SN, N, ST, T (from +10°C to +43°C) |
| Refrigerant | R600a (isobutane, flammable) |
| Main functions | Adjustable thermostat, Half-load mode, Full-load mode, temperature indicator |
| Maintenance and cleaning | Clean the interior with warm soapy water, manual defrost when the frost layer reaches 3-5 mm, clean the condenser and compressor |
| Safety | Child lock (not specified), refrigerating circuit protected, instructions to avoid fire and electrocution |
| Spare parts and repairability | Original parts recommended, maintenance and recharging of the refrigeration circuit by qualified professional |
| Weight | Not specified in the manual |
| General information | Installation by professional, wait 4 hours before connecting, 2-year warranty (conditions in manual) |
Frequently Asked Questions - AGS0993F AEG
User questions about AGS0993F AEG
0 question about this device. Answer the ones you know or ask your own.
Ask a new question about this device
Download the instructions for your Freezer in PDF format for free! Find your manual AGS0993F - AEG and take your electronic device back in hand. On this page are published all the documents necessary for the use of your device. AGS0993F by AEG.
USER MANUAL AGS0993F AEG
www.aeg.com/webselfservice
www.aeg.com/webselfservice

Thank you for choosing this AEG product. We have created it to give you impeccable performance for many years, with innovative technologies that help make life simpler features you might not find on ordinary appliances. Please spend a few minutes reading to get the very best from it.
Visit our website for:

Get usage advice, brochures, trouble shooter, service information:
www.aeg.com/webselfservice

Register your product for better service:
www.registeraeg.com

Buy Accessories, Consumables and Original spare parts for your appliance:
www.aeg.com/shop
CUSTOMER CARE AND SERVICE
Always use original spare parts.
When contacting our Authorised Service Centre, ensure that you have the following data available: Model, PNC, Serial Number.
The information can be found on the rating plate.
Warning / Caution-Safety information
1 General information and tips
Environmental information
Subject to change without notice.
1. SAFETY INFORMATION
Before the installation and use of the appliance, carefully read the supplied instructions. The manufacturer is not responsible for any injuries or damages that are the result of incorrect installation or
usage. Always keep the instructions in a safe and accessible location for future reference.
1.1 Children and vulnerable people safety
- This appliance can be used by children aged from 8 years and above and persons with reduced physical, sensory or mental capabilities or lack of experience and knowledge if they have been given supervision or instruction concerning the use of the appliance in a safe way and understand the hazards involved.
- Do not let children play with the appliance.
Children shall not carry out cleaning and user maintenance of the appliance without supervision. - Keep all packaging away from children and dispose of it appropriately.
1.2 General Safety
-Farm houses; staff kitchen areas in shops, offices and other working environments
- By clients in hotels, motels, bed and breakfast and other residential type environments
- This appliance is intended to be used in household and similar applications such as:
- Keep ventilation openings, in the appliance enclosure or in the built-in structure, clear of obstruction.
- Do not use mechanical devices or other means to accelerate the defrosting process, other than those recommended by the manufacturer.
- Do not damage the refrigerant circuit.
- Do not use electrical appliances inside the food storage compartments of the appliance, unless they are of the type recommended by the manufacturer.
- Do not use water spray and steam to clean the appliance.
-
Clean the appliance with a moist soft cloth. Only use neutral detergents. Do not use abrasive products, abrasive cleaning pads, solvents or metal objects.
-
Do not store explosive substances such as aerosol cans with a flammable propellant in this appliance.
- If the supply cord is damaged, it must be replaced by the manufacturer, its Authorised Service Centre or similarly qualified persons in order to avoid a hazard.
2. SAFETY INSTRUCTIONS
2.1 Installation

WARNING!
Only a qualified person must install this appliance.
- Remove all the packaging and the transit bolts.
- Do not install or use a damaged appliance.
- Follow the installation instructions supplied with the appliance.
Always take care when moving the appliance as it is heavy. Always use safety gloves and enclosed footwear. - Make sure the air can circulate around the appliance.
- At first installation or after reversing the door wait at least 4 hours before connecting the appliance to the power supply. This is to allow the oil to flow back in the compressor.
- Before carrying out any operations on the appliance (e.g. reversing the door), remove the plug from the power socket.
- Do not install the appliance close to radiators or cookers, ovens or hobs.
- Do not install the appliance where there is direct sunlight.
- Do not install this appliance in areas that are too humid or too cold, such as the construction appendices, garages or wine cellars.
- When you move the appliance, lift it by the front edge to avoid scratching the floor.
2.2 Electrical connection

WARNING!
Risk of fire and electric shock.
-
The appliance must be earthed.
-
Make sure that the parameters on the rating plate are compatible with the electrical ratings of the mains power supply.
Always use a correctly installed shockproof socket. - Do not use multi-plug adapters and extension cables.
- Make sure not to cause damage to the electrical components (e.g. mains plug, mains cable, compressor). Contact the Authorised Service Centre or an electrician to change the electrical components.
- The mains cable must stay below the level of the mains plug.
- Connect the mains plug to the mains socket only at the end of the installation. Make sure that there is access to the mains plug after the installation.
- Do not pull the mains cable to disconnect the appliance. Always pull the mains plug.
2.3 Use

WARNING!
Risk of injury, burns, electric shock or fire.
- Do not change the specification of this appliance.
- Do not put electrical appliances (e.g. ice cream makers) in the appliance unless they are stated applicable by the manufacturer.
- Be careful not to cause damage to the refrigerant circuit. It contains isobutane (R600a), a natural gas with a high level of environmental compatibility. This gas is flammable.
- If damage occurs to the refrigerant circuit, make sure that there are no
flames and sources of ignition in the room. Ventilate the room.
- Do not let hot items to touch the plastic parts of the appliance.
- Do not put soft drinks in the freezer compartment. This will create pressure on the drink container.
- Do not store flammable gas and liquid in the appliance.
- Do not put flammable products or items that are wet with flammable products in, near or on the appliance.
- Do not touch the compressor or the condenser. They are hot.
- Do not remove or touch items from the freezer compartment if your hands are wet or damp.
- Do not freeze again food that has been thawed.
- Obey the storage instructions on the packaging of frozen food.
2.4 Care and cleaning

WARNING!
Risk of injury or damage to the appliance.
- Before maintenance, deactivate the appliance and disconnect the mains plug from the mains socket.
-
This appliance contains hydrocarbons in the cooling unit. Only a qualified person must do the maintenance and the recharging of the unit.
-
Regularly examine the drain of the appliance and if necessary, clean it. If the drain is blocked, defrosted water collects in the bottom of the appliance.
2.5 Service
- To repair the appliance contact and Authorised Service Centre.
- Use original spare parts only.
2.6 Disposal

WARNING!
Risk of injury or suffocation.
- Disconnect the appliance from the mains supply.
- Cut off the mains cable and discard it.
- Remove the door to prevent children and pets to be closed inside of the appliance.
- The refrigerant circuit and the insulation materials of this appliance are ozone-friendly.
- The insulation foam contains flammable gas. Contact your municipal authority for information on how to discard the appliance correctly.
- Do not cause damage to the part of the cooling unit that is near the heat exchanger.
3. OPERATION
3.1 Control panel
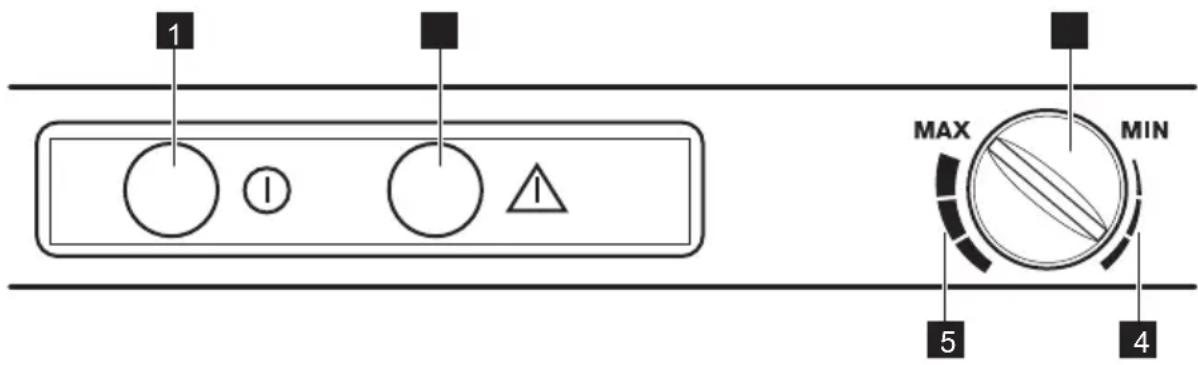
1 Green Indicator Light
2 Red Indicator Light
3 Temperature Regulator
4 Half Loaded position
5 Full Loaded position
3.2 Switching on
Leave the appliance to stand upright for 4 hours after installation.
Insert the plug into the wall socket.
- Turn the Temperature Regulator clockwise to a medium setting.
The Green Indicator Light will light up and remain lit until the appliance is switched off. - Leave to run for 8 hours to allow the correct temperature to be reached before placing food inside.
The Red Indicator Light will stay on until the correct temperature is reached. - When the appliance has reached the set temperature (the Red Indicator Light has gone out) adjust the Temperature Regulator according to the quantity of the stored foods.

A few hours after starting up the Red Indicator Light will go out to show that the correct temperature has been reached for the setting chosen and will stay out to indicate that everything is in order. It will come on if the freezer temperature rises unduly for instance, after opening the freezer door or placing food inside the cabinet, but the light should go out again when the temperature returns to the correct storage level.
4. DAILY USE

WARNING!
Refer to Safety chapters.
4.1 Freezing fresh food
The freezing (top) area is suitable for freezing fresh food and storing frozen and deep-frozen food for a long time.
3.3 Switching off
To turn off the appliance, disconnect the mains plug from the wall socket.
3.4 Temperature regulation
The temperature within the appliance is controlled by the Temperature Regulator situated on the control panel.
To operate the appliance, proceed as follows:
- turn the Temperature Regulator toward MIN to obtain the minimum coldness.
- turn the Temperature Regulator toward MAX to obtain the maximum coldness.

In case of freezing less food volumes, the Half Loaded setting is the most suitable.
In case of freezing large food volumes, the Full Loaded setting is the most suitable.

CAUTION!
Do not place heavy nor hot objects on top of the appliance to avoid any damage.
To freeze fresh food, place it in the freezing (top) compartment and leave it there for 24 hours.
Move frozen food in the storing (lower) compartments to make room for another freezing.
The maximum amount of food that can be frozen in 24 hours is specified on the
rating plate, a label located on the inside of the appliance.
The freezing process lasts 24 hours: during this period do not add other food to be frozen.
4.2 Storage of frozen food
When first starting-up or after a period out of use, before putting the products in the compartment let the appliance run at least 8 hours on the higher settings.

In the event of accidental defrosting, for example due to a power failure, if the power has been off for longer than the value shown in the technical characteristics chart under "rising time", the defrosted food must be consumed quickly or cooked immediately and then refrozen (after cooling).
5. HINTS AND TIPS
5.1 Normal operating sounds
The following sounds are normal during operation:
- A faint gurgling and bubbling sound from coils sound when refrigerant is pumped.
- A whirring and pulsating sound from the compressor when refrigerant is pumped.
- A sudden cracking noise from inside appliance caused by thermic dilatation (a natural and not dangerous physical phenomenon).
- A faint click noise from the temperature regulator when the compressor switches on or off.
5.2 Hints for energy saving
- Do not open the door frequently or leave it open longer than absolutely necessary.
4.3 Thawing
Deep-frozen or frozen food, prior to being used, can be thawed in the refrigerator compartment or at room temperature, depending on the time available for this operation.
Small pieces may even be cooked still frozen, directly from the freezer: in this case, cooking will take longer.
5.3 Hints for freezing
To help you make the most of the freezing process, here are some important hints:
- the maximum quantity of food which can be frozen in 24 hours is shown on the rating plate;
- the freezing process takes 24 hours no further food to be frozen should be added during this period;
- freeze only top quality, fresh and thoroughly cleaned, foodstuffs;
- prepare food in small portions to enable it to be rapidly and completely frozen and to make it possible subsequently to thaw only the quantity required;
- wrap up the food in aluminium foil or polythene and make sure that the packages are airtight;
-
do not allow fresh, unfrozen food to touch food which is already frozen, thus avoiding a rise in temperature of the latter;
-
lean foods store better and longer than fatty ones; salt reduces the storage life of food;
- water ices, if consumed immediately after removal from the freezer compartment, can possibly cause the skin to be freeze burnt;
- it is advisable to show the freezing in date on each individual pack to enable you to keep tab of the storage time.
5.4 Hints for storage of frozen food
To obtain the best performance from this appliance, you should:
- make sure that the commercially frozen foodstuffs were adequately stored by the retailer;
- be sure that frozen foodstuffs are transferred from the foodstore to the freezer in the shortest possible time;
not open the door frequently or leave it open longer than absolutely necessary; - once defrosted, food deteriorates rapidly and cannot be refrozen;
- do not exceed the storage period indicated by the food manufacturer.
6. CARE AND CLEANING

WARNING!
Refer to Safety chapters.
6.1 General warnings

CAUTION!
Unplug the appliance before carrying out any maintenance operation.

This appliance contains hydrocarbons in its cooling unit; maintenance and recharging must therefore only be carried out by authorized technicians.

The accessories and parts of the appliance are not suitable for washing in a dishwasher.
6.2 Cleaning the interior
Before using the appliance for the first time, the interior and all internal accessories should be washed with lukewarm water and some neutral soap to remove the typical smell of a brand-new product, then dried thoroughly.

CAUTION!
Do not use detergents, abrasive powders, chlorine or oil-based cleaners as they will damage the finish.
6.3 Periodic cleaning

CAUTION!
Do not pull, move or damage any pipes and/or cables inside the cabinet.

CAUTION!
Take care of not to damage the cooling system.

CAUTION!
When moving the cabinet, lift it by the front edge to avoid scratching the floor.
The equipment has to be cleaned regularly:
- Clean the inside and accessories with lukewarm water and some neutral soap.
- Regularly check the door seals and wipe clean to ensure they are clean and free from debris.
- Rinse and dry thoroughly.
- If accessible, clean the condenser and the compressor at the back of the appliance with a brush.
This operation will improve the performance of the appliance and save electricity consumption.
6.4 Defrosting the freezer

CAUTION!
Never use sharp metal tools to scrape off frost from the evaporator as you could damage it. Do not use a mechanical device or any artificial means to speed up the thawing process other than those recommended by the manufacturer. A temperature rise of the frozen food packs, during defrosting, may shorten their safe storage life.

About 12 hours prior to defrosting, set a lower temperature, in order to build up sufficient chill reserve for the interruption in operation.
A certain amount of frost will always form on the freezer shelves and around the top compartment.
Defrost the freezer when the frost layer reaches a thickness of about 3 - 5mm
-
Switch off the appliance, or pull out electrical plug from the wall socket.
-
Remove any stored food, wrap it in several layers of newspaper and put it in a cool place.

WARNING!
Do not touch frozen goods with wet hands. Hands can freeze to the goods.
- Leave the door open and insert the plastic scraper in the appropriate seating at the bottom centre, placing a basin underneath to collect the defrost water.
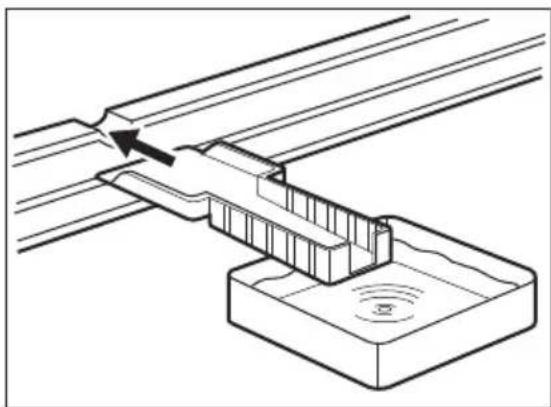
In order to speed up the defrosting process, place a pot of warm water in the freezer compartment. In addition, remove pieces of ice that break away before defrosting is complete.
- When defrosting is completed, dry the interior thoroughly and keep the scraper for future use.
- Switch on the appliance.
- Turn the Temperature Regulator to the Full Loaded position and leave to run for at least 8 hours.
- After the Red Indicator Light has gone out, reload the previously removed food into the compartments.
- Adjust the Temperature Regulator according to the quantity of the stored foods.
6.5 Periods of non-operation
When the appliance is not in use for long periods, take the following precautions:
- Disconnect the appliance from electricity supply.
- Remove all food.
- Defrost (if necessary) and clean the appliance and all accessories.
- Leave the door/doors open to prevent unpleasant smells.

WARNING!
If you want to keep the appliance switched on, ask somebody to check it once in a while to prevent the food inside from spoiling in case of a power failure.
7. TROUBLESHOOTING

WARNING!
Refer to Safety chapters.
7.1 What to do if...
| Problem Possible cause Solution | ||
| The appliance does not operate. | The appliance is switched off. | Switch on the appliance. |
| The mains plug is not connected to the mains socket correctly. | Connect the mains plug to the mains socket correctly. | |
| There is no voltage in the mains socket. | Connect a different electrical appliance to the mains socket. Contact a qualified electrician. | |
| The appliance is noisy. The appliance is not supported properly. | Check if the appliance stands stable. | |
| The compressor operates continually. | Temperature is set incorrectly. | Refer to "Operation" chapter. |
| Many food products to be frozen were put in at the same time. | Wait a few hours and then check the temperature again. | |
| The room temperature is too high. | Refer to climate class chart on the rating plate. | |
| Food products placed in the appliance were too warm. | Allow food products to cool to room temperature before storing. | |
| The door is not closed correctly. | Refer to "Closing the door". | |
| There is too much frost and ice. | The door is not closed correctly or the gasket is deformed/dirty. | Refer to "Closing the door". |
| The water drainage plug is not correctly positioned. | Position the water drainage plug in the correct way. | |
| Food products are not wrapped properly. | Wrap the food products better. | |
| Temperature is set incorrectly. | Refer to "Operation" chapter. | |
| Door is misaligned or interferes with ventilation grill. | The appliance is not levelled. | Refer to "Levelling". |
| The temperature in the appliance is too low/too high. | The temperature regulator is not set correctly. | Set a higher/ lower tempera-ture. |
| The door is not closed cor-rectly. | Refer to "Closing the door". | |
| The food products' tempera-ture is too high. | Let the food products tem- perature decrease to room temperature before storage. | |
| Many food products are stored at the same time. | Store less food products at the same time. | |
| The thickness of the frost is greater than 4-5 mm. | Defrost the appliance. | |
| The door has been opened often. | Open the door only if neces-sary. | |
| There is no cold air circula-tion in the appliance. | Make sure that there is cold air circulation in the appli- ance. | |
| Door does not open easily. You attempted to re-open the door immediately after closing. | Wait a few seconds between closing and re-opening of the door. | |

If the advice does not lead to the desired result, call the nearest Authorized Service Centre.
- If necessary, adjust the door. Refer to "Installation".
- If necessary, replace the defective door gaskets. Contact the Authorised Service Centre.
7.2 Closing the door
- Clean the door gaskets.
8. INSTALLATION

WARNING!
Refer to Safety chapters.
8.1 Positioning
Install the appliance in a dry, well ventilated indoors where the ambient temperature corresponds to the climate class indicated on the rating plate of the appliance.
| Climate Ambient temperature class |
| SN +10°C to + 32°C |
| N +16°C to + 32°C |
| ST +16°C to + 38°C |
| T +16°C to + 43°C |

Some functional problems might occur for some types of models when operating outside of that range. The correct operation can only be guaranteed within the specified temperature range. If you have any doubts regarding where to install the appliance, please turn to the vendor, to our customer service or to the nearest Authorised Service Centre.
8.2 Levelling
When placing the appliance ensure that it stands level. This can be achieved by two adjustable feet at the bottom in front.
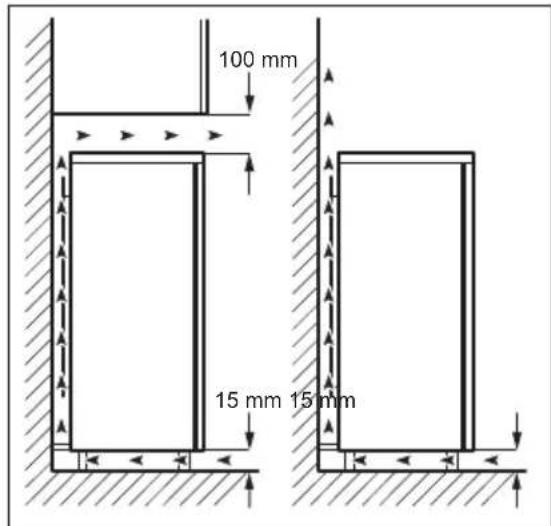
8.3 Location

It must be possible to disconnect the appliance from the mains power supply; the plug must therefore be easily accessible after installation.
The appliance should be installed well away from sources of heat such as radiators, boilers, direct sunlight etc. Ensure that air can circulate freely around the back of the cabinet. To ensure best performance, if the appliance is positioned below an overhanging wall unit, the minimum distance between the top of the cabinet and the wall unit must be at least 100mm . Ideally, however, the appliance should not be positioned below overhanging wall units. Accurate levelling is ensured by one or more
adjustable feet at the base of the cabinet.
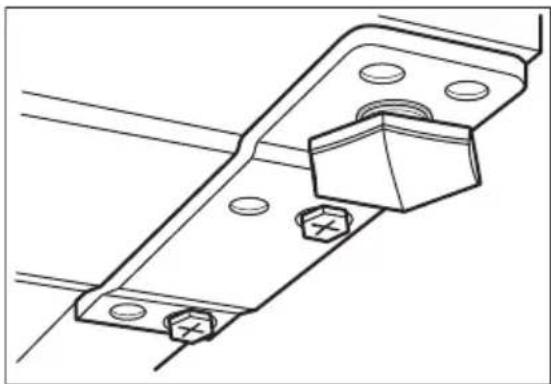
8.4 Rear spacers
In the bag with the documentation, there are two spacers which must be fitted as shown in the figure.
- Fit the spacers into the holes. Make sure that the arrow (A) is positioned as shown in the picture.

- Turn counter-clockwise the spacers through 45^ until they lock into place.
8.5 Door reversibility

WARNING!
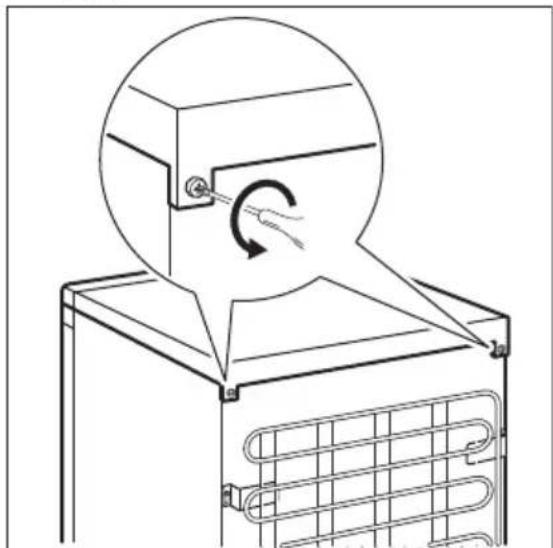
Before carrying out any operations, remove the plug from the power socket.

CAUTION!
To carry out the following operations, we suggest that this be made with another person that will keep a firm hold on the doors of the appliance during the operations.
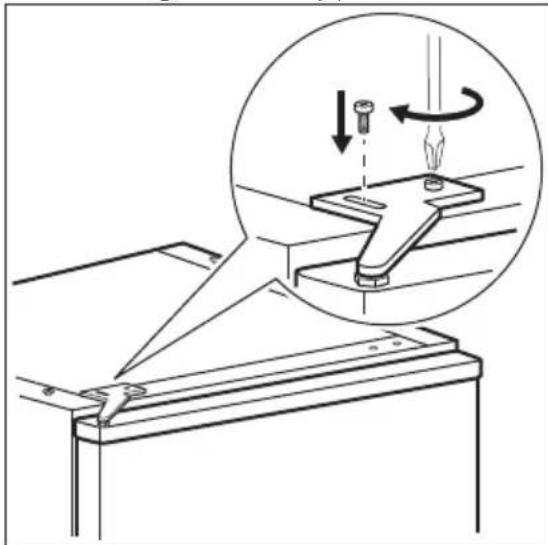
- Unscrew both screws on the rear side.
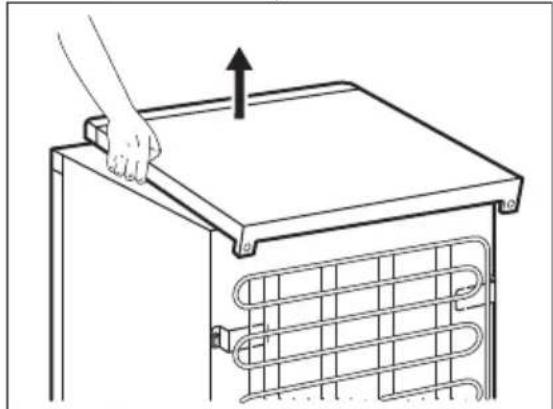
- Push back the top and lift it.
-
Unscrew the left foot.
-
Unscrew the screws of the door bottom hinge. Remove the hinge. Put over the pin in the direction of the arrow.
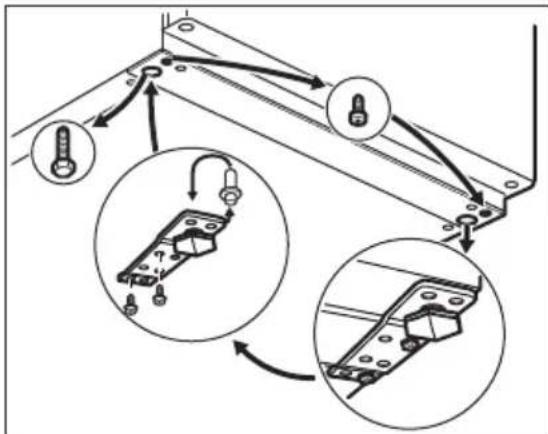
- Unscrew and install the screw on the opposite side.
- Install the hinge on the opposite side.
- Screw the right foot.
- Unscrew the screws of the door top hinge.
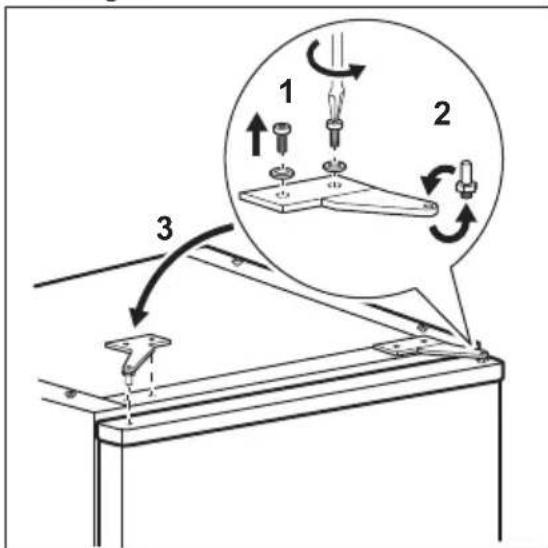
- Remove the hinge. Put over the pin in the direction of the arrow. Install the hinge on the opposite side.
-
Tighten the hinge.
-
Put the top in position.
- Push front the top.
- Screw both screws on the rear side.
- Remove and install the handle on the opposite side.


CAUTION!
Reposition, level the appliance, wait for at least four hours and then connect it to the power socket.

Do a final check to make sure that:
- All screws are tightened.
The magnetic seal adheres to the cabinet. - The door opens and closes correctly. If the ambient temperature is cold (i.e. in Winter), the gasket may not fit perfectly to the cabinet. In that case, wait for the natural fitting of the gasket.
In case you do not want to carry out the above mentioned operations, contact the nearest Authorised Service Centre. The Authorised Service specialist will carry out the reversibility of the doors at your cost.
9. TECHNICAL DATA
9.1 Technical data
8.6 Electrical connection
- Before plugging in, ensure that the voltage and frequency shown on the rating plate correspond to your domestic power supply.
- The appliance must be earthed. The power supply cable plug is provided with a contact for this purpose. If the domestic power supply socket is not earthed, connect the appliance to a separate earth in compliance with current regulations, consulting a qualified electrician.
The manufacturer declines all responsibility if the above safety precautions are not observed. - This appliance complies with the E.E.C. Directives.
| Width mm 550 |
| Depth mm 612 |
| Rising time Hours 20 |
| Voltage Volts 230 - 240 |
| Frequency Hz 50 |
The technical information is situated in the rating plate, on the external or
internal side of the appliance and in the energy label.
10. CH GUARANTEE
Customer Service Centres
| Point of Service | ||
| Industriestrasse 105506 Mägenwil | Le Trési 61028 Préverenges | Via Violino 116928 Manno |
| Morgenstrasse 1313018 Bern | ||
| Zürcherstrasse 204E9000 St. Gallen | ||
| Seetalstrasse 116020 Emmenbrücken | ||
| Schlossstrasse 14133 Pratteln | ||
| Comercialstrasse 197000 Chur | ||
Spare parts service Industriestrasse 10, 5506 Magenwil, Tel. 0848 848 111
Specialist advice/Sale Badenerstrasse 587,8048 Zurich,Tel.0444058111
Warranty For each product we provide a two-year guarantee from the date of purchase or delivery to the consumer (with a guarantee certificate, invoice or sales receipt serving as proof). The
guarantee covers the costs of materials, labour and travel. The guarantee will lapse if the operating instructions and conditions of use are not adhered to, if the product is incorrectly installed, or in the event of damage caused by external influences, force majeure, intervention by third parties or the use of non-genuine components.
11. ENVIRONMENTAL CONCERNS
Recycle materials with the symbol Put the packaging in relevant containers to recycle it. Help protect the environment and human health by recycling waste of electrical and electronic appliances. Do not dispose of
appliances marked with the symbol with the household waste. Return the product to your local recycling facility or contact your municipal office.

For Switzerland:
Where should you take your old equipment?
Anywhere that sells new equipment or hand it in to official SENS collection points or official SENS recycling firms.
The list of official SENS collection points can be found at www.erecycling.ch
C