
Aero Ring Smart - Air Conditioning Klarstein - Free user manual and instructions
Find the device manual for free Aero Ring Smart Klarstein in PDF.

| Product type | Mobile air conditioner |
| Brand | Klarstein |
| Model | Aero Ring Smart |
| Article numbers | 10045095, 10046096, 10045097, 10045098 |
| Cooling capacity | 7000 BTU / 9000 BTU depending on model |
| Power supply | 220-240 V~, 50-60 Hz |
| Refrigerant | R290 (flammable) |
| Operating temperature range | 16 °C to 35 °C |
| Operating modes | Auto, Cooling, Dehumidification, Fan |
| Fan speeds | Auto, High, Low |
| Remote control | Included |
| Smartphone control | Yes (Klarstein app) |
| WiFi connectivity | 2.4 GHz |
| Timer | Yes (adjustable via remote control) |
| Auto restart | Yes (in case of power failure) |
| Air filter | Washable, regular cleaning recommended |
| Drainage | Manual drain in dehumidification mode (hose included) |
| Safety | Grounding mandatory, child protection (8 years+) |
| Installation instructions | Requires exhaust duct for Cool and Dry modes |
| Included accessories | Exhaust duct, adapters (flat and round), remote control, window kit |
Frequently Asked Questions - Aero Ring Smart Klarstein
User questions about Aero Ring Smart Klarstein
0 question about this device. Answer the ones you know or ask your own.
Ask a new question about this device
Download the instructions for your Air Conditioning in PDF format for free! Find your manual Aero Ring Smart - Klarstein and take your electronic device back in hand. On this page are published all the documents necessary for the use of your device. Aero Ring Smart by Klarstein.
USER MANUAL Aero Ring Smart Klarstein
bar
| Category | Value | |---|---| | Category 1 | 100 | | Category 2 | 100 | | Category 3 | 100 | | Category 4 | 100 | | Category 5 | 100 | | Category 6 | 100 | | Category 7 | 100 | | Category 8 | 100 | | Category 9 | 100 | | Category 10 | 100 | | Category 11 | 100 | | Category 12 | 100 | | Category 13 | 100 | | Category 14 | 100 | | Category 15 | 100 | | Category 16 | 100 | | Category 17 | 100 | | Category 18 | 100 | | Category 19 | 100 | | Category 20 | 100 | | Category 21 | 100 | | Category 22 | 100 | | Category 23 | 100 | | Category 24 | 100 | | Category 25 | 100 | | Category 26 | 100 | | Category 27 | 100 | | Category 28 | 100 | | Category 29 | 100 | | Category 30 | 100 | | Category 31 | 100 | | Category 32 | 100 | | Category 33 | 100 | | Category 34 | 100 | | Category 35 | 100 | | Category 36 | 100 | | Category 37 | 100 | | Category 38 | 100 | | Category 39 | 100 | | Category 40 | 100 | | Category 41 | 100 | | Category 42 | 100 | | Category 43 | 100 | | Category 44 | 100 | | Category 45 | 100 | | Category 46 | 100 | | Category 47 | 100 | | Category 48 | 100 | | Category 49 | 100 | | Category 50 | 100 | | Category 51 | 100 | | Category 52 | 100 | | Category 53 | 100 | | Category 54 | 100 | | Category 55 | 100 | | Category 56 | 100 | | Category 57 | 100 | | Category 58 | 100 | | Category 59 | 100 | | Category 60 | 100 | | Category 61 | 100 | | Category 62 | 100 | | Category 63 | 100 | | Category 64 | 100 | | Category 65 | 100 | | Category 66 | 100 | | Category 67 | 100 | | Category 68 | 100 | | Category 69 | 100 | | Category 70 | 100 | | Category 71 | 100 | | Category 72 | 100 | | Category 73 | 100 | | Category 74 | 100 | | Category 75 | 100 | | Category 76 | 100 | | Category 77 | 100 | | Category 78 | 100 | | Category 79 | 100 | | Category 80 | 100 | | Category 81 | 100 | | Category 82 | 100 | | Category 83 | 100 | | Category 84 | 100 | | Category 85 | 100 | | Category 86 | 100 | | Category 87 | 100 | | Category 88 | 100 | | Category 89 | 100 | | Category 90 | 100 | | Category 91 | 100 | | Category 92 | 100 | | Category 93 | 100 | | Category 94 | 100 | | Category 95 | 100 | | Category 96 | 100 | | Category 97 | 100 | | Category 98 | 100 | | Category 99 | 100 | | Total (Total) = [sum of bars] / [values] * (sum of bars + bars) * (sum of bars + bars) * (sum of bars + bars) * (sum of bars + bars) * (sum of bars + bars) * (sum of bars + bars) * (sum of bars + bars) * (sum of bars + bars) * (sum of bars + bars) * (sum of bars + bars) * (sum of bars + bars) * (sum of bars + bars) * (sum of bars + bars) * (sum in brackets) * (sum in brackets) * (sum in brackets) * (sum in brackets) * (sum in brackets) * (sum in brackets) * (sum in brackets) * (sum in brackets) * (sum in brackets) * (sum in brackets) * (sum in brackets) * (sum in brackets) * (sum in brackets) * (sum in brackets) * (sum in brackets) * (sum in brackets) * (sum in brackets) * (total).* (sum in brackets) * (sum in brackets) * (sum in brackets) * (sum in brackets) * (sum in brackets) * (sum in brackets) * (sum in brackets) * (sum in brackets) * (sum in brackets) * (sum in brackets) * (sum in brackets) * (sum in brackets) * (total).* (sum in brackets) * (sum in brackets) * (sum in brackets) * (sum in brackets)INHALTSVERZEICHNIS
Technische Daten 3
Warnhinweise 4
Hinweise:
natural_image
Technical line drawings of two industrial air purifiers with internal pipes and heat sinks (no text or symbols)natural_image
Diagram of a portable air purifier connected to a coiled hose with a diagonal line crossing through it (no text or symbols present)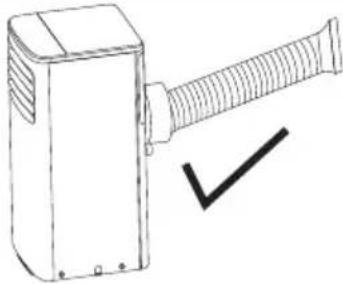
natural_image
Line drawing of a mechanical device with a threaded shaft and a checkmark (no text or symbols)Ohne Installation
natural_image
Line drawing of a cylindrical mechanical component with mounting feet (no text or symbols)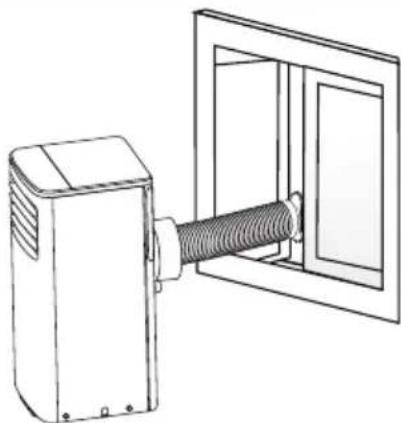
natural_image
Line drawing of a device with a coiled cable inside a transparent enclosure (no text or symbols)H
I
WASSERAUSLASS
natural_image
Technical line drawing of two views of a portable air conditioner unit, showing internal components and airflow direction (no text or symbols)- Filterreinigung
natural_image
Technical line drawing of a mechanical component with internal grating and mounting feet (no text or symbols)natural_image
Symbol of a trash bin crossed with a diagonal line, no text or labels presentBerlin Brands Group UK Limited
PO Box 42
272 Kensington High Street
London, W8 6ND
United Kingdom
Congratulations on purchasing this equipment. Please read this manual carefully and take care of the following hints on installation and use to avoid technical damages. Any failure caused by ignoring the items and cautions mentioned in the operation and installation instructions are not covered by our warranty and any liability. Scan the QR code to get access to the latest user manual and more product information.

CONTENTS
Technical Data 33
Warnings 34
Safety INstructions 35
Product Overview 37
Controls 38
Operation 40
Accessories 41
Installation 41
Water Drainage 46
Cleaning 47
Troubleshooting 48
Maintenance 49
Scrap and Recovery 53
Device Control by Smartphone 55
Disposal Considerations 57
Manufacturer & Importer (UK) 57
TECHNICAL DATA
| Article number 10045095, 10046096 | 10045097, 10045098 | |
| Cooling power 7000 BTU 9000 BTU | ||
| Power supply 220-240 V~ 50-60 Hz | ||
| Working range temperature 16-35 °C (60-96 °F) | ||
WARNINGS
WARNING: This air conditioner uses the flammable refrigerant R290. The air conditioner with R290 refrigerant may cause serious damage to the human body or surrounding objects if handled roughly.
The space required for the installation, use, repair and storage of this air conditioner must be in accordance with the following table:
| Refrigerant Content | Room Area Refrigerant Content | Room Area | |
| m ≤ 152g ≥ 4m | ^2 | 185 < m ≤ 250g ≥ 12m | ^2 |
| 152 < m ≤ 185g ≥ 9m | ^2 | 250m^2m ≤ 304g ≥ 15m | ^2 |
- Do not use any methods to speed up defrosting or to clean frozen parts, except as specifically recommended by the manufacturer.
- Do not puncture or burn the air conditioner and check the refrigerant line for damage.
- The air conditioner should be stored in a room without a permanent source of fire, such as an open flame, a burning gas appliance, a working electric heater, etc.
• Note that refrigerants can be odourless. - The air conditioner should be stored in a way that prevents mechanical damage caused by accidents.
- Maintenance or repair of air conditioners using R290 refrigerant must be carried out after a safety check to minimise the risk of incidents.
- Please read the instructions carefully before installation, use and maintenance.
| Symbol Note | Explanation | |
 | WARNING | This symbol indicates that this appliance uses a flammable refrigerant. If the refrigerant leaks and is exposed to an external ignition source, there is a risk of fire. |
 | CAUTION | This symbol indicates that this manual should be read carefully. |
 | CAUTION | This symbol indicates that the equipment should be handled by service personnel with reference to the installation manual. |
 | CAUTION | This symbol shows that information is available such as the operating manual or installation manual. |
SAFETY INSTRUCTIONS
- This appliance can be used by children aged from 8 years and above and persons with reduced physical, sensory or mental capabilities or lack of experience and knowledge if they have been given supervision or instruction concerning use of the appliance in a safe way and understand the hazards involved. Children shall not play with the appliance. Cleaning and user maintenance shall not be made by children without supervision
- This appliance is not intended for use by persons (including children) with reduced physical, sensory or mental capabilities, or lack of experience and knowledge, unless they have been given supervision or instruction concerning
- use of the appliance by a person responsible for their safety.
- Children should be supervised to ensure that they do not play with the appliance.
- This unit is designed for indoor use only.
- The air conditioner must be grounded. Incomplete grounding may result in electric shocks.
- Do not connect the ground wire to the gas pipe, water pipe, lightning rod or telephone ground wire.
- After installation, the earth leakage test must be continued by means of electrification.
- An earth leakage breaker with rated capacity must be installed to avoid possible electric shocks.
- Don't install the air conditioner in a place where flammable gases or liquids are present. Failure to do so may result in fire or explosion.
- If the power supply cord is damaged, it must be replaced by the manufacture or its service agent or a similar qualified person.
- The specification of the fuse are printed on the circuit bord, such as: AC 250 V/5 A.
- Don't put your hands or any other objects into the air inlets or outlets. Doing so may result in personal injury or damage to the unit.
- Do not touch the swinging blades as this may wet your fingers and damage the driving parts of the blades.
- Don't try to repair the air conditioner yourself. You may be injured or cause further malfunction.
- During thunderstorms, please turn off the main power switch to prevent damage to the unit.
- Do not use liquid or corrosive detergent to clean the product, and do not spill water or other liquids on the product, as it may damage the plastic parts or even cause an electric shock.
-
Do not use the unit in a wet room such as a bathroom or laundry room.
-
Don't touch the unit with wet or damp hands or barefoot.
- Don't pull on the cord.
- Don't remove any part of the unit unless instructed to do so by an authorized technician.
- Do not move the unit unless the power has been disconnected and the power cord is attached to the bending and winding column.
- Don't use the unit with a damaged plug or a loose socket.
- Ducts connected to an appliance must not contain an ignition source.
WARNING
Failure to observe the following precautions may result in electric shock, fire or personal injury.
-
The plug must be connected to a properly installed and grounded outlet.
-
Do not use an extension cord or plug adaptor with this unit.
CAUTION
- Don't expose your body to cold air for a long time, as this will worsen your physical condition and cause health problems.
- Don't block the air inlet or outlet, otherwise the cooling capacity will be weakened, even causing the system to stop working.
- Close the windows and doors, otherwise, the cooling capacity will be weakened.
- If the air filter is very dirty, the cooling capacity will be weakened. Please clean the air filter regularly.
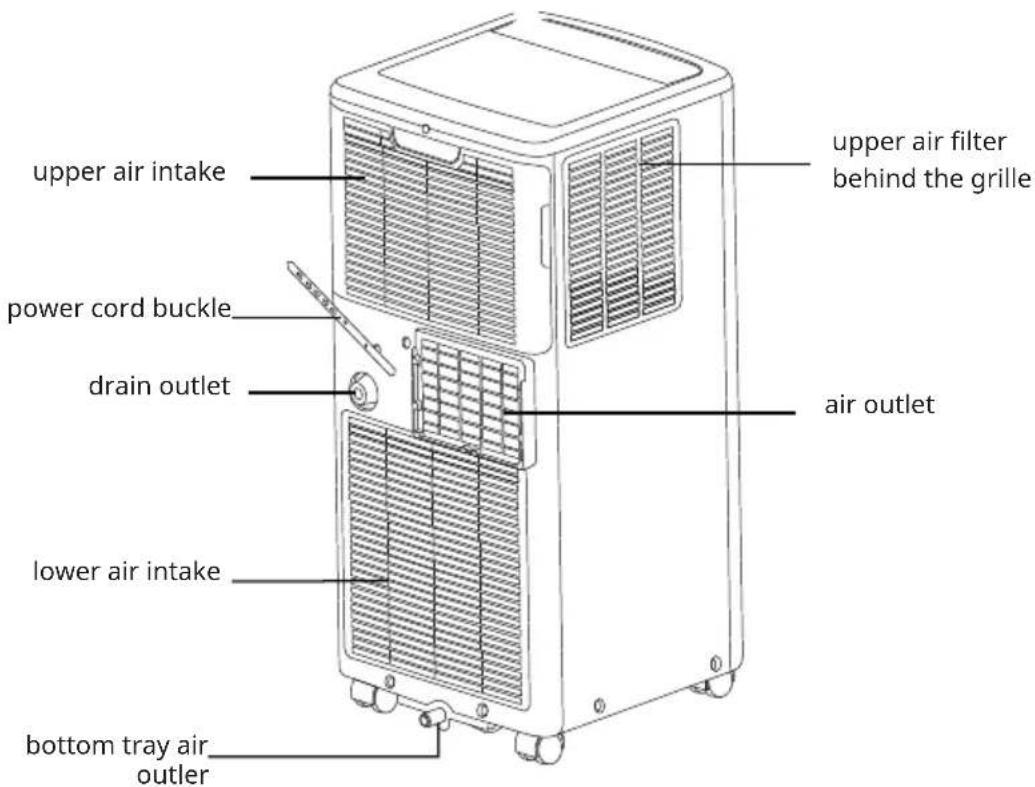
PRODUCT OVERVIEW
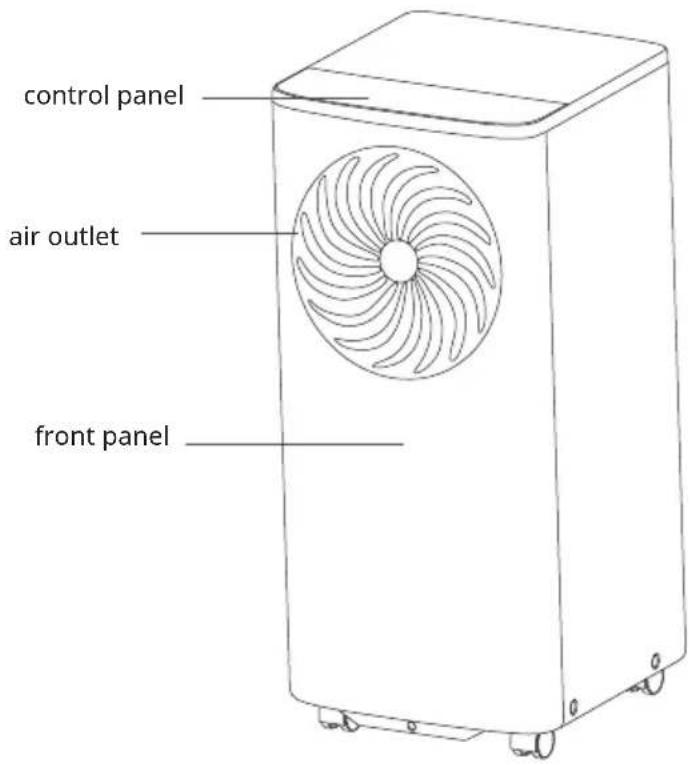
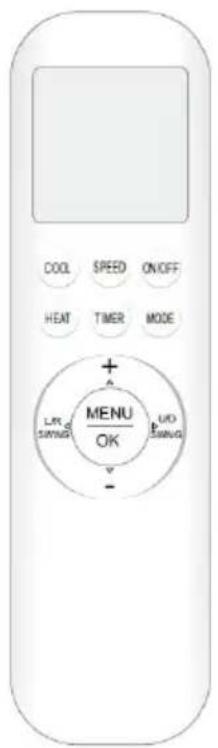
CONTROLS
Control panel
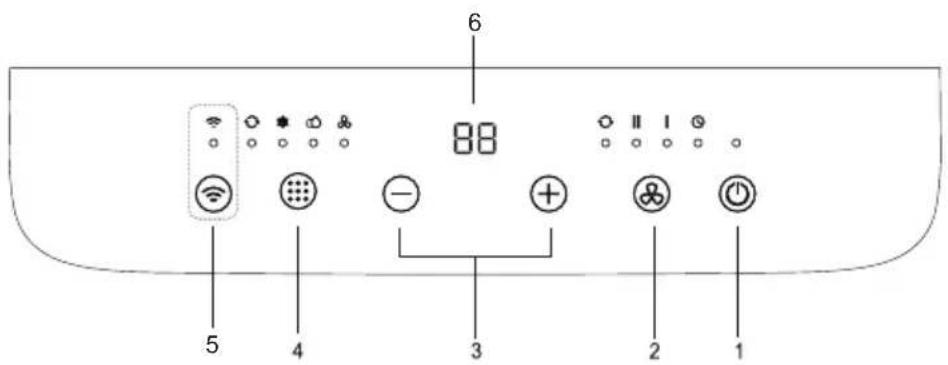
1 ON/OFF button
2 Fan speed button
3 Increase/decrease temperature
Switch between Fahrenheit/Celsius display
4 Mode
5 Wifi button
6 Temp. indicator
Remote control
Use
Temperature indication
- In cooling mode, when ⊕ or ⊖ button is pressed, the setting temperature is displayed and be adjusted.
- In auto and cooling mode, temp. indicator display is setting temperature.
- In drying and fanning mode, temp. indicator display is room temperature.
Function buttons
1 Pre  | button to make the unit run or stop. |
| 2 | Press this button, you can select the fan speed between the modes AUTO --> HIGH --> LOW . The fan speed indicator light illuminates under the different fan speed.Note: In fanning mode, auto fan speed is non-effective. |
| 3 | a. Each time then for button is pressed the setting temperature will increase or decrease by 1°C(1°F).The temperature setting range is16 °C(60 °F)-32 °C(90 °F).b. By pressing both buttons at the same time(≥3s) the display will toggle between Celsius and Fahrenheit. |
| 4 | Press this button, you can select the running mode as follows:AUTO -->COOL -->DRY -->FANThe mode indicator light illuminates under the different mode. |
| 5 | Press and hold the button for 5 seconds. The WLAN turns on for matching.After the wifi connection is successful, the indicator lights up and the previous display status is restored. |
Note: Please use the remote controller to set the sleep/timer function.
OPERATION

WARNING
Failure to observe the following precautions may result in electric shock, fire or personal injury.
- The plug must be connected to a properly installed and grounded outlet.
- Do not use an extension cord or plug adaptor with this unit.
Before starting the unit
- Select a suitable location, making sure the unit is near an electrical outlet.
- Fit the flexible exhaust hose and the adjustable window slider kit.
- Plug the unit into a mains socket
Cooling operation mode
- Press the MODE button repeatedly until the Cooling indicator lights up.
- Set the desired temperature by pressing the "+" or "-" button.
- Press the FAN button to select the fan speed.
Drying operation mode
- Press the MODE button repeatedly until the Dry indicator lights up.
- The fan runs at a fixed speed in this mode.
- Press the FAN button to select the fan speed.
Note: The setting temperature and fan speed can not be adjusted. The setting temperature is 25°C (77°F) and the fan speed is low.
Fan operation mode
- Press the MODE button repeatedly until the fan indicator lights up.
- Press the FAN button to select the fan speed.
Note: The set temperature cannot be adjusted.
Auto-restart function
If the power supply to the unit is interrupted, the unit restarts in the mode/settings last used when the power is restored. The compressor restarts after 4 minutes.
- Set: Press the sleep button 10 times within 5 seconds, the buzzer will sound 4 times.
- Cancel: Press the Sleep timer key 10 times within 5 seconds, the buzzer will sound twice.
ACCESSORIES
| Parts Parts name Quantity | ||||
 |  |  | Exhaust pipeAdaptor AAdaptor B (flat mouth) | 1 set |
 | 1 pc | |||
 | Remote control | 1 pc | ||
Unpacking inspection
- Open the box and check unit in area with good ventilation (open the door and window) and without ignition source.
Note: Operators are required to wear anti-static clothing.
- Before opening the box, it is necessary to check for refrigerant leakage by a specialist; if a leak is found, the installation of the air conditioner must be stopped.
- Fire protection and antistatic precautions must be prepared before the check. Then check the refrigerant line for collision marks and make sure it is in good condition.
INSTALLATION
Safety principles for installing air conditioner
- Fire protection equipment must be prepared before installation.
- Ensure that the installation site is well ventilated (open doors and windows).
- No ignition source, smoking and telephone calls are allowed in the area where R290 refrigerant is located.
- Antistatic precautions are necessary when installing the air conditioner, e.g. wear pure cotton clothing and gloves.
- Keep the leak detector operational during installation.
- If a leak of R290 refrigerant occurs during installation, the concentration in the indoor environment must be controlled immediately until it reaches a safe level. If a leak of refrigerant affects the performance of the unit, stop operation immediately. The unit must first be evacuated and returned to be serviced.
-
Keep electrical appliances, power switches, plugs, sockets, high temperature heat sources and high static electricity away from the area under the sides of the appliance.
-
The unit must be installed in an accessible location for installation and maintenance, without obstacles that could block air inlets or outlets.
- The unit must be kept away from heat sources, flammable or explosive conditions at all times.
Requirements for installation position
- Avoid areas where flammable, explosive or corrosive gases are present.
- Avoid places with strong artificial electric/magnetic fields.
- Avoid places with high noise and resonance levels.
- Avoid severe natural conditions (e.g. heavy lampblack, strong sandy wind, direct sunlight or high temperature heat sources).
- Avoid locations within reach of children.
- Select a location with good ventilation and easy access to the unit for service and repair.
Installation environment inspection
- Check the nameplate on the unit to make sure the refrigerant is R290.
- Check the floor area of the room. The room must not be smaller than the specified floor space of 12m^2 . The unit must be installed in a well-ventilated location.
- Check the surroundings of the installation site: R290 must not be installed in the closed, reserved space of a building.
Customerguide
- The customer must have a qualified power supply that matches the one printed on the air conditioner's label.
- They must use a dedicated and efficient grounding outlet that matches the plug of the air conditioner.
- The appliance must be installed in accordance with national regulations.
Select the best location
- Install the mobile air conditioner in a flat and spacious location where the air
outlets will not be obstructed.
- A minimum clearance from walls or other obstacles should be kept,
- The gradient can't be more than 10 degrees with the horizontal plane, while placing and using the unit. Uneven ground may cause additional noise or vibration, or lead to damage to the unit.
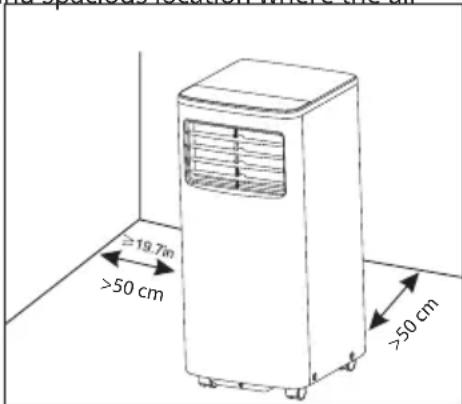
Notes:
• The air conditioner shall not be used in the laundry.
• The plug shall be accessible after the unit is positioned
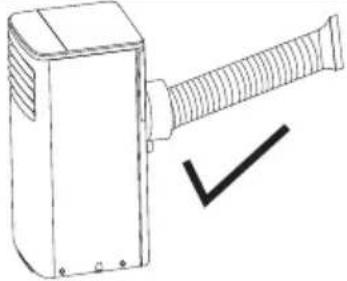
Duct mount instruction
- In cooling and drying mode, the exhaust duct needs to be installed while in fan mode, the exhaust duct is not needed.
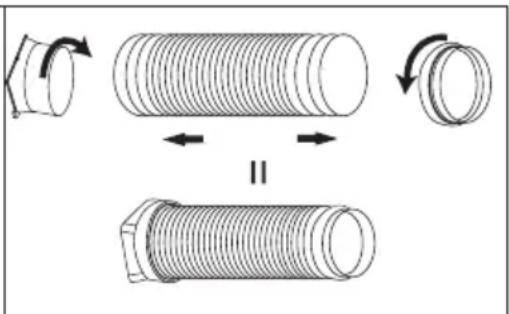
- According to the actual needs, the exhaust duct can be moderately compressed and tensed, but cannot be arbitrarily stretched and bent.
- The exhaust duct can be connected with Windows or installed into the wall.
-
With the actual needs, you can make the installation with accessories of the unit.
-
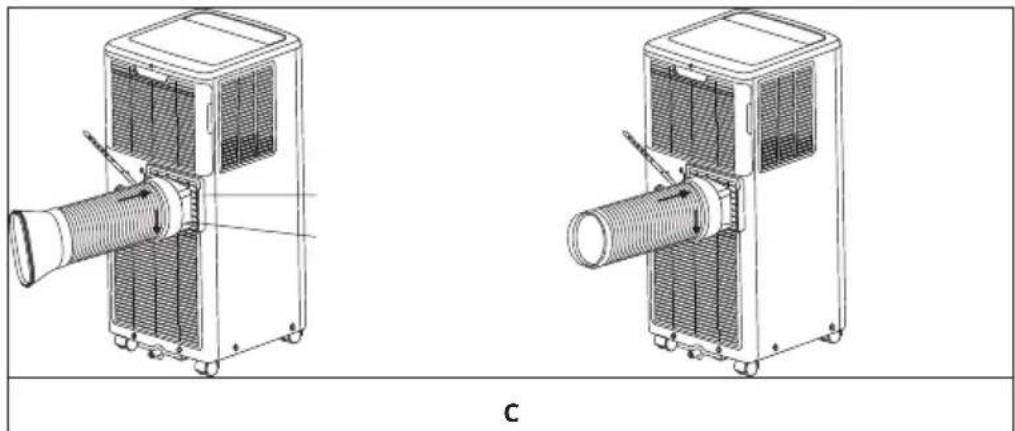
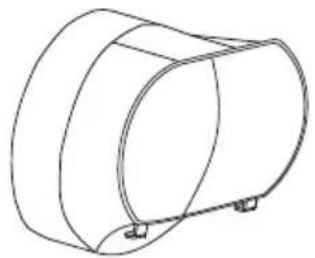
Install the adaptor A and adaptor B( flat mouth or round mouth) onto the exhaust duct as shown in Fig.A or Fig.B.
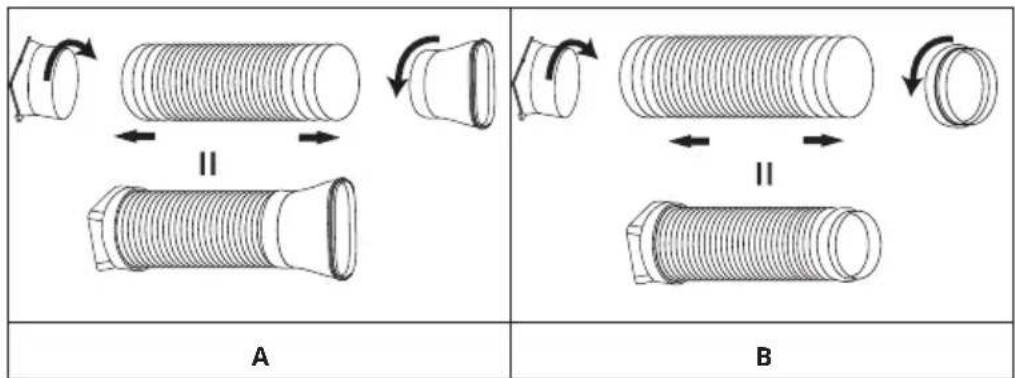
Connect the exhaust duct to the Air outlet connector on back of the unit. Slide-in the adaptor A downwards until it is locked in place. (Fig.C).
natural_image
Technical line drawings of two industrial air purifiers with heat exchangers and cooling fins (no text or symbols)Install the exhaust duct into the window
| Remove the unit with the packed exhaust duct next to the window, and then connect the adaptor B (flat mouth) of the exhaust duct with the window. (Fig.E) | 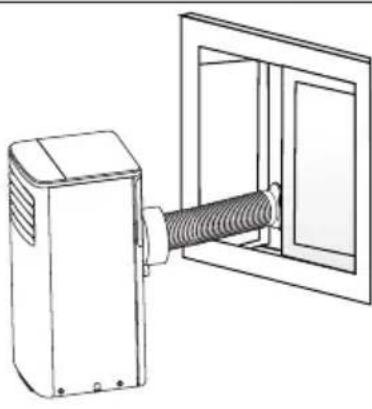 |
| E |
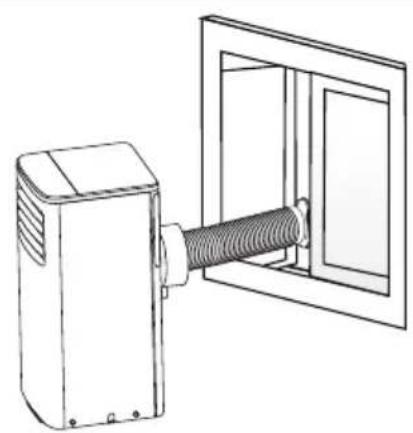
Install the exhaust duct into the wall
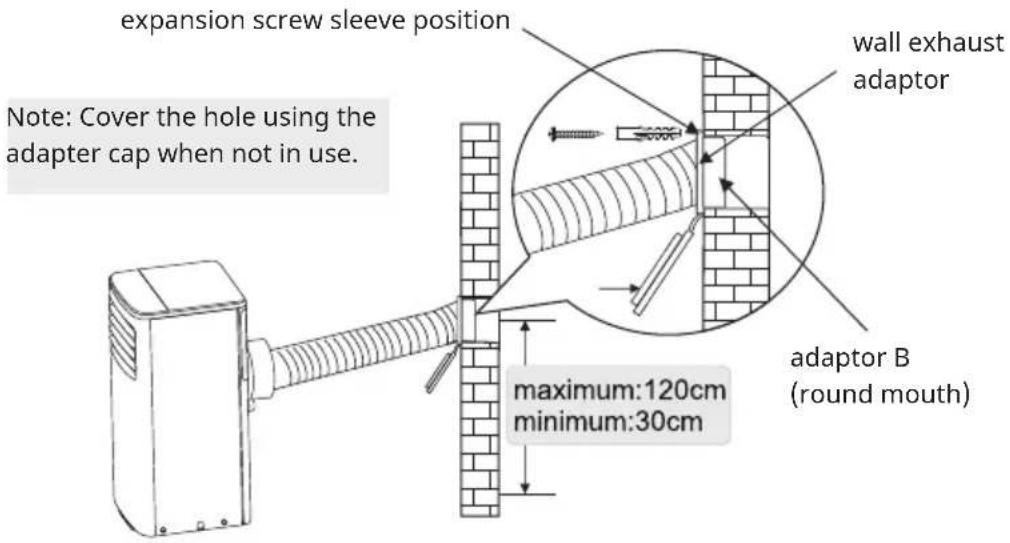
- Prepare a hole in the wall. Install the wall exhaust adaptor onto the wall by using 4 expansion screw sleeve and type C screws, be sure to fix thoroughly.
- Connect the exhaust duct to wall exhaust adaptor. (Fig.G)
G
The duct can be compressed to 270 mm minimum and extended to 1500 mm maximum. It is better to keep the duct length to a minimum length.
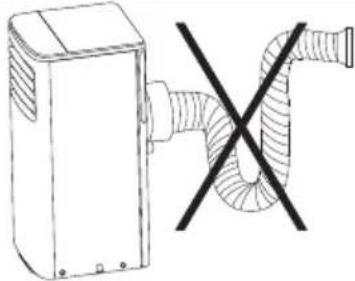
Stretching or bending the duct excessively will affect the cooling efficiency. (As the following fig. shows)
| Do not! Yes! | |
 |  |
Without installation
If the unit does not have the window slider kit and wall exhaust, and the Adaptor B is like this, as shown in Fig H. You can open the window slightly and position as shown in Fig I.
 |  |
| H | I |
WATER DRAINAGE
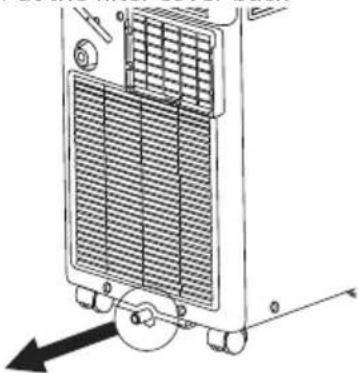
During dehumidifying mode, remove the upper drain plug from the back of the unit. Attach the drain hose to the hole. Place the other end of the hose in the drainage way or other drain areas.
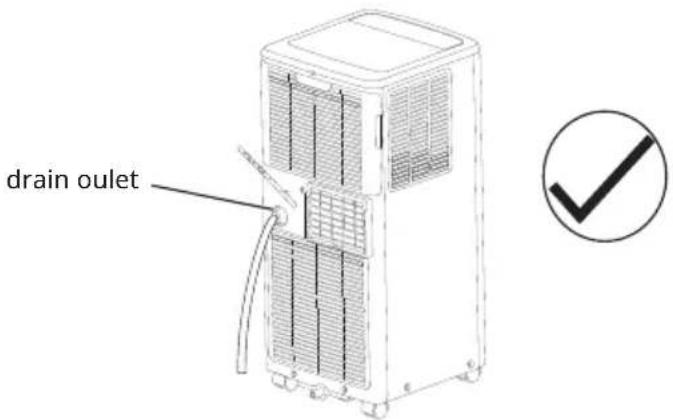
Make sure the hose is secure and there are no leaks. Direct the hose toward the drain, making sure that there are no kinks that will stop the water flowing. Place the end of the hose into the drain and make sure the end of the hose is down to let the water flow smoothly. Do never let the end of the hose show upwards.
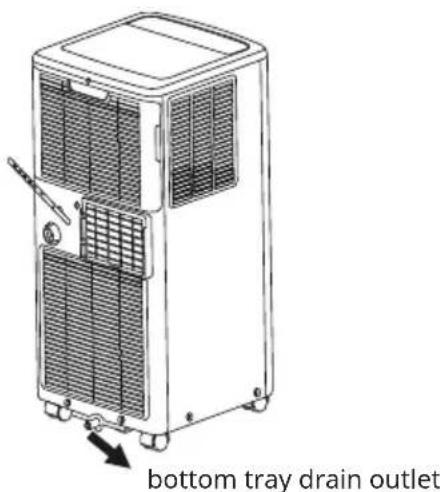
When the water level of the bottom tray reaches the maximum level, the digital display area shows "P1" and the WATER FULL indicator light illuminates. Carefully move the unit to a drain location, remove the bottom drain plug and let the water drain away. Reinstall the bottom drain plug and restart the machine until the P1 symbol disappears. If the error repeats, call for service.
NOTE: Be sure to reinstall the bottom drain plug before using the unit.
CLEANING
- Before cleaning the air conditioner, switch it off and disconnect the power supply for at least 5 minutes, otherwise there is a risk of electric shock.
- Do not use petrol, benzene, thinner or other chemicals or liquid insecticides on the air conditioner, as these substances may cause the paint to peel, crack or deform plastic parts.
- Never attempt to clean the unit by pouring water directly on any of the surface areas as this will cause deterioration of the electrical components and wiring insulation.
Clean the unit
When the unit is contaminated, clean it gently with a wrung towel using tepid water below 40 °C (104 °F).
Clean the air filter
- Remove the grid and take out the upper air filter.

natural_image
Technical line drawing of two views of a portable air conditioner unit with cooling fins and ventilation slots (no text or symbols)- Clean the air filter
Use a vacuum cleaner or water to rinse filter, and if the filter is very dirty (for example, with greasy dirt), clean it with warm water (below 40^ C{104"F}) with mild detergent dissolved in, and then put the filter in the shade to dry in the air.
- Reinstall the dried filter in reverse order of removal. Put the filter cover back to its place.
Note: if you don't use the unit for a long time, please pull out the rubber plug to drain the inside water out referring to right figure.
natural_image
Technical line drawing of a mechanical component with no visible text or symbolsTROUBLESHOOTING
To save the cost of a service call, please try the suggestions below to see if you can solve your problem without outside help.
| Problem Causes Solutions | ||
| Air condition will not operate | The power switch is released.Power supply failure.The fuse is burnt.It doesn't reach the setting time for starting up. | Switch on the power.Wait for the recovery of power supply.Replace the fuse by professional .Wait or reset the original setting. |
| Unit doesn't start when pressing on/off button | It is not four minutes after switch off.Room temperature is lower than the setting temperature under cooling mode. | Wait four minutes.Reset the setting temperature. Set a proper temperature, setting temperature should be lower than ambient temperature. |
| The wind blowing out, but the cooling effect is bad | The air filter is blocked by dust.The air inlet or outlet of machine blocked.Turn the air conditioner on in very hot room.Cooling capacity is insufficient.The doors or windows are open. | Clean the air filter.Remove the obstruction.Allow additional time to remove stored heat from walls, ceiling, floor and furniture.Reconfirm the required cooling capacity with your dealer.Close the doors and windows. |
| Noise or vibration The | ground is not level or not flat enough | Place the unit on a flat, level ground if possible. |
MAINTENANCE
Maintenance notice
For maintenance or scrap, please contact authorized service centers.
Maintenance by unqualified person may cause dangers.
Feed air conditioner with R290 refrigerant, and maintain the air conditioner in strictly accordance with manufacturer's requirements. The chapter is mainly focused on special maintenance requirements for appliance with R290 refrigerant. Ask repairer to read after-sales technical service handbook for detailed information.
Qualification requirements of maintenance personnel
- Special training additional to usual refrigerating equipment repair procedures is required when equipment with flammable refrigerants is affected. In many countries, this training is carried out by national training organisations that are accredited to teach the relevant national competency standards that may be set in legislation. The achieved competence should be documented by a certificate.
- The maintenance and repair of the air conditioner must be conducted according to the method recommended by the manufacturer. If other professionals are needed to help maintain and repair the equipment, it should be conducted under the supervision of individuals who have the qualification to repair AC equipped with flammable refrigerant.
Inspection of the site
Safety inspection must be taken before maintaining equipment with R290 refrigerant to make sure the risk of fire is minimized. Check whether the place is well ventilated, whether anti-static and fire prevention equipment is perfect. While maintaining the refrigeration system, observe the following precautions before operating the system.
Operating procedures
1. General work area:
All maintenance staff and others working in the local area shall be instructed on the nature of work being carried out. Work in confined spaces shall be avoided. The area around the workspace shall be sectioned off. Ensure that the conditions within the area have been made safe by control of flammable material.
2. Checking for presence of refrigerant:
The area shall be checked with an appropriate refrigerant detector prior to and during work, to ensure the technician is aware of potentially toxic or flammable atmospheres. Ensure that the leak detection equipment being used is suitable for use with all applicable refrigerants, Le.non-sparking, adequately sealed or
intrinsically safe.
3. Presence of fire extinguisher:
If any hot work is to be conducted on the refrigeration equipment or any associated parts, appropriate fire extinguishing equipment shall be available to hand. Have a dry powder or CO2 fire extinguisher adjacent to the charging area.
4. No ignition sources:
No person carrying out work in relation to a refrigeration system which involves exposing any pipe work shall use any sources of ignition in such a manner that it may lead to the risk of fire or explosion. All possible ignition sources, including cigarette smoking, should be kept sufficiently far away from the site of installation, repairing, removing and disposal, during which refrigerant can possibly be released to the surrounding space.
Prior to work taking place, the area around the equipment is to be surveyed to make sure that there are no flammable hazards or ignition risks. 'No Smoking' signs shall be displayed.
5. Ventilated Area(open the door and window):
Ensure that the area is in the open or that it is adequately ventilated before breaking into the system or conducting any hot work. A degree of ventilation shall continue during the period that the work is carried out. The ventilation should safely disperse any released refrigerant and preferably expel it externally into the atmosphere.
6. Checks to the refrigeration equipment:
Where electrical components are being changed, they shall be fit for the purpose and to the correct specification. At all times the manufacturer's maintenance and service guidelines shall be followed. If in doubt, consult the manufacturer's technical department for assistance. The following checks shall be applied to installations using flammable refrigerants:
- The charge size is in accordance with the room size within which the refrigerant containing parts are installed.
- The ventilation machinery and outlets are operating adequately and are not obstructed.
- If an indirect refrigerating circuit is being used, the secondary circuit shall be checked for the presence of refrigerant.
- Refrigeration pipe or components are installed in a position where they are unlikely to be exposed to any substance which may corrode refrigerant containing components, unless the components are constructed of materials which are inherently resistant to being corroded or are suitably protected against being so corroded.
7. Checks to electrical devices:
Repair and maintenance to electrical components shall include initial safety checks and component inspection procedures. If a fault exists that could compromise safety, then no electrical supply shall be connected to the circuit until it is
satisfactorily dealt with. If the fault cannot be corrected immediately but it is necessary to continue operation, an adequate temporary solution shall be used. This shall be reported to the owner of the equipment so all parties are advised.
Initial safety checks shall include:
- That capacitors are discharged: this shall be done in a safe manner to avoid possibility of sparking.
- That no live electrical components and wiring are exposed while charging, recovering or purging the system.
- Keep continuity of earthing.
Inspection of cable
Check the cable for wear, corrosion, overvoltage, vibration and check if there are sharp edges and other adverse effects in the surrounding environment. During the inspection, the impact of aging or the continuous vibration of the compressor and the fan on it should be taken into consideration.
Leakage check of R290 refrigerant
Note: Check the leakage of the refrigerant in an environment where there is no potential ignition source. No halogen probe (or any other detector that uses an open flame) should be used.
For systems with refrigerant R290, electronic leak detection instrument is available to detect and leak detection should not be conducted in environment with refrigerant. Make sure the leak detector will not become a potential source of ignition, and is applicable to the measured refrigerant. Leak detector shall be set for the minimum ignitable fuel concentration (percentage) of the refrigerant. Calibrate and adjust to proper gas concentration (no more than 25%) with the used refrigerant.
The fluid used in leak detection is applicable to most refrigerants. But do not use chloride solvents to prevent the reaction between chlorine and refrigerants and the corrosion of copper pipeline.
If you suspect a leak, then remove all the fire from the scene or put out the fire. If the location of the leak needs to be welded, then all refrigerants need to be recovered, or, isolate all refrigerants away from the leak site (using cut-off valve). Before and during the welding, use OFN to purify the entire system.
Removal and vacuum pumping
- Make sure there is no ignited fire source near the outlet of the vacuum pump and the ventilation is well.
- Allow the maintenance and other operations of the refrigeration circuit should be carried out according to the general procedure, but the following best
operations that the flammability is already taken into consideration are the key. You should follow the following procedures:
- Remove the refrigerant.
- Decontaminate the pipeline by inert gases.
- Evacuation.
- Decontaminate the pipeline by inert gases again.
-
Cut or weld the pipeline.
-
The refrigerant should be returned to the appropriate storage tank. The system should be blown with oxygen free nitrogen to ensure safety. This process may need to be repeated for several times. This operation shall not be carried out using compressed air or oxygen.
By blowing, the system is charged with anaerobic nitrogen to reach working pressure under vacuum, then the oxygen-free nitrogen is released into the atmosphere, and finally the system is evacuated. This process is repeated until all the refrigerant in the system has been purged. After the final charging of the anaerobic nitrogen, the gas is released to atmospheric pressure and the system can be welded. This operation is necessary to weld the pipework.
Procedures of charging refrigerants
As a supplement to the general procedure, the following requirements need to be added:
- Make sure that there is no contamination among different refrigerants when using a refrigerant charging device. The pipeline for charging refrigerants should be as short as possible to reduce the residual of refrigerants in it.
• Storage tanks should remain vertically up. - Make sure the grounding solutions are already taken before the refrigeration system is charged with refrigerants.
- After finishing the charging (or when it is not yet finished), label the mark on the system.
- Be careful not to overcharge refrigerants.
SCRAP AND RECOVERY
Scrap
Before this procedure, the technical personnel shall be thoroughly familiar with the equipment and all its features, and make a recommended practice for refrigerant safe recovery. For recycling the refrigerant, shall analyze the refrigerant and oil samples before operation. Ensure the required power before the test.
- Be familiar with the equipment and operation.
- Disconnect power supply.
- Before carrying out this process, you have to make sure:
- If necessary, mechanical equipment operation should facilitate the operation of the refrigerant tank.
- If personal protective equipment is effective and can be used correctly.
- The whole recovery process should be carried out under the guidance of qualified personnel.
-
The recovering of equipment and storage tank should comply with the relevant national standards.
-
If possible, the refrigerating system should be vacuumized.
- If the vacuum state can't be reached, you should extract the refrigerant in each part of the system from many places.
- Before the start of the recovery, you should ensure that the capacity of the storage tank is sufficient.
- Start and operate the recovery equipment according to the manufacturer's instructions.
- Don't fill the tank to its full capacity (the liquid injection volume does not exceed 80% of the tank volume).
- Even the duration is short, it must not exceed the maximum working pressure of the tank.
- After the completion of the tank filling and the end of the operation process, you should make sure that the tanks and equipment should be removed quickly and all closing valves in the equipment are closed.
- The recovered refrigerants are not allowed to be injected into another system before being purified and tested.
Note: The identification should be made after the appliance is scrapped and refrigerants are evacuated. The identification should contain the date and endorsement. Make sure the identification on the appliance can reflect the flammable refrigerants contained in this appliance.
Recovery:
- The clearance of refrigerants in the system is required when repairing or scrapping the appliance. It is recommended to completely remove the refrigerant.
- Only a special refrigerant tank can be used when loading the refrigerant into the storage tank. Make sure the capacity of the tank is appropriate to the refrigerant injection quantity in the entire system. All tanks intended to be used for the recovery of refrigerants should have a refrigerant identification (i.e. refrigerant recovery tank). Storage tanks should be equipped with pressure relief valves and globe valves and they should be in a good condition. If possible, empty tanks should be evacuated and maintained at room temperature before use.
- The recovery equipment should be kept in a good working condition and equipped with equipment operating instructions for easy access. The equipment should be suitable for the recovery of R290 refrigerants. Besides, there should be a qualified weighting apparatus which can be normally used. The hose should be linked with detachable connection joint of zero leakage rate and be kept in a good condition. Before using the recovery equipment, check if it is in a good condition and if it gets perfect maintenance. Check if II electrical components are sealed to prevent the leakage of the refrigerant and the fire caused by it. If you have any question, please consult the manufacturer.
- The recovered refrigerant shall be loaded in the appropriate storage tanks, attached with a transporting instruction, and returned to the refrigerant manufacturer. Don't mix refrigerant in recovery equipment, especially a storage tank.
- The space loading R290 refrigeration can't be enclosed in the process of transportation. Take anti electrostatic measures if necessary in transportation. In the process of transport, loading and unloading, necessary protective measures must be taken to protect the air conditioner to ensure that the air conditioner is not damaged.
- When removing the compressor or clearing the compressor oil, make sure the compressor is pumped to an appropriate level to ensure that there is no residual R290 refrigerants in the lubricating oil. The vacuum pumping should be carried out before the compressor is returned to the supplier. Ensure the safety when discharging oil from the system.
DEVICE CONTROL BY SMARTPHONE
If you integrate the device into your home WiFi, you can conveniently operate it via the associated Klarstein app. The app not only allows you to remotely control the device via your smartphone, but also gives you access to recipes and additional information.
Follow these steps to connect your smartphone to your Klarstein device:
1 Download the Klarstein app first by scanning the QR code with your smartphone (see below), or download it directly from App Store or Google Play.
2 Make sure your smartphone is connected to the same WiFi network that your Klarstein device is to be connected to.
3 Open the Klarstein app.
4 Sign in to your account. If you do not have an account, sign up in the Klarstein app.
5 Follow the instructions from the app.
App Download
Use the scan function of your smartphone to scan the QR code and save the app on your smartphone.
Note: The app provides further information on how to use the app and help on how to connect to your device as soon as you open it for the first time.
| iOS Android | |
 |  |
Troubleshooting connection problems
If your Klarstein device cannot be found in the WLAN, check the following:
1 The device is not plugged in. Make sure that your device is plugged into an electric socket.
2 The device is not in pairing mode. Make sure that the WiFi indicator (LED) on the smart device control panel is blinking as described in the 'Reset WiFi settings' instruction of your smart device (instructions are usually available on device connection process).
3 The WiFi access point does not operate on 2.4 GHz. Make sure that your access point operates on 2.4 GHz band and you have a separate SSID on 2.4 GHz band. If you are not sure about the operating band of your access point, please contact your internet provider company.
Important: please note that if your WiFi router is dual band - operating on both 2.4 GHz and 5 GHz band - you need to separate the SSIDs for each band and use the 2.4 GHz SSID for connection.
4 Firewall settings of your WiFi network; the firewall setting of your WiFi network may not allow the Klarstein app to configure the WiFi settings on your smart device. Please make sure that you are not using a public WiFi network, e.g. airports, dormitories, companies, etc.
5 Different credentials used in smartphone and the app. Make sure that the WiFi credentials entered in the Klarstein app are the same as the ones that your smartphone is connected to.
Following the above mentioned points, if your smart device still fails to connect to the app, please contact us via email for support: appsupport@go-bbg.com
DISPOSAL CONSIDERATIONS
natural_image
Symbol of a trash bin with crossed lines and a horizontal bar below (no text or labels)If there is a legal regulation for the disposal of electrical and electronic devices in your country, this symbol on the product or on the packaging indicates that this product must not be disposed of with household waste. Instead, it must be taken to a collection point for the recycling of electrical and electronic equipment. By disposing of it in accordance with the rules, you are protecting the environment and the health of your fellow human beings from negative consequences. For information about the recycling and disposal of this product, please contact your local authority or your household waste disposal service.
This product contains batteries. If there is a legal regulation for the disposal of batteries in your country, the batteries must not be disposed of with household waste. Find out about local regulations for disposing of batteries. By disposing of them in accordance with the rules, you are protecting the environment and the health of your fellow human beings from negative consequences.
MANUFACTURER & IMPORTER (UK)
Manufacturer:
Chal-Tec GmbH, Wallstrasse 16, 10179 Berlin, Germany.
Importer for Great Britain:
Berlin Brands Group UK Limited
PO Box 42
272 Kensington High Street
London, W8 6ND
United Kingdom
Cher client, chère cliente,
SOMMAIRE
Fiche technique 59
Mises en garde 60
Guide du client
natural_image
Technical line drawing of two household air purifiers with heat sinks and ventilation grilles (no text or symbols)natural_image
Technical line drawing of a mechanical component with internal grating and mounting holes (no text or symbols)DÉPANNAGE
natural_image
Symbol of a trash bin crossed with a diagonal line, no text or numbers presentDÉCLARATION DE CONFORMITÉ

Fabricant :
Chal-Tec GmbH, Wallstraße 16, 10179 Berlin, Allemagne.
Berlin Brands Group UK Limited PO Box 42
272 Kensington High Street London, W8 6ND United Kingdom
AVVERTIMENTO
natural_image
Diagram showing three types of pipe fittings with directional arrows indicating movement (no text or symbols)A
natural_image
Diagram showing three types of threaded fasteners with rotation arrows, no text or symbols presentB
natural_image
Line drawing of a portable air conditioner unit with cooling fins and a screwdriver, showing no text or symbolsnatural_image
Technical line drawing of two views of a portable air conditioner unit with cooling fins and ventilation slots (no text or symbols)natural_image
Technical line drawing of a mechanical component with no visible text or symbolsnatural_image
Symbol of a trash bin crossed with a diagonal line, no text or labels presentBerlin Brands Group UK Limited
PO Box 42
272 Kensington High Street
London, W8 6ND
United Kingdom
ÍNDICE
Datos técnicos 111
Advertencias 112
natural_image
Line drawing of a portable air conditioner unit with control panel and indicator lights (no text or symbols)natural_image
Technical line drawing of two views of a portable air conditioner unit with cooling fins and ventilation slots (no text or symbols)natural_image
Technical line drawing of a mechanical component with internal grating and mounting base (no text or symbols)natural_image
Symbol of a trash bin crossed with a diagonal line, no text or labels presentBerlin Brands Group UK Limited
PO Box 42
272 Kensington High Street
London, W8 6ND
United Kingdom

- INHALTSVERZEICHNIS
- Hinweise:
- Ohne Installation
- WASSERAUSLASS
- CONTENTS
- TECHNICAL DATA
- WARNINGS
- SAFETY INSTRUCTIONS
- WARNING
- Failure to observe the following precautions may result in electric shock, fire or personal injury.
- CAUTION
- PRODUCT OVERVIEW
- CONTROLS
- Use
- Temperature indication
- Function buttons
- OPERATION
- Before starting the unit
- Cooling operation mode
- Drying operation mode
- Fan operation mode
- Auto-restart function
- ACCESSORIES
- Unpacking inspection
- INSTALLATION
- Safety principles for installing air conditioner
- Requirements for installation position
- Installation environment inspection
- Customerguide
- Select the best location
- Notes:
- Duct mount instruction
- Install the exhaust duct into the window
- Install the exhaust duct into the wall
- Without installation
- WATER DRAINAGE
- CLEANING
- Clean the unit
- Clean the air filter
- TROUBLESHOOTING
- MAINTENANCE
- Maintenance notice
- Qualification requirements of maintenance personnel
- Inspection of the site
- Operating procedures
- General work area:
- Checking for presence of refrigerant:
- Presence of fire extinguisher:
- No ignition sources:
- Ventilated Area(open the door and window):
- Checks to the refrigeration equipment:
- Checks to electrical devices:
- Inspection of cable
- Leakage check of R290 refrigerant
- Removal and vacuum pumping
- Procedures of charging refrigerants
- SCRAP AND RECOVERY
- Scrap
- Recovery:
- DEVICE CONTROL BY SMARTPHONE
- App Download
- Troubleshooting connection problems
- DISPOSAL CONSIDERATIONS
- MANUFACTURER & IMPORTER (UK)
- Manufacturer:
- Importer for Great Britain:
- Cher client, chère cliente,
- SOMMAIRE
- Guide du client
- DÉPANNAGE
- DÉCLARATION DE CONFORMITÉ
- Fabricant :
- AVVERTIMENTO
- ÍNDICE
Brand : Klarstein
Model : Aero Ring Smart
Category : Air Conditioning