
H-4564 - Forklift Uline - Free user manual and instructions
Find the device manual for free H-4564 Uline in PDF.

User questions about H-4564 Uline
0 question about this device. Answer the ones you know or ask your own.
Ask a new question about this device
Download the instructions for your Forklift in PDF format for free! Find your manual H-4564 - Uline and take your electronic device back in hand. On this page are published all the documents necessary for the use of your device. H-4564 by Uline.
USER MANUAL H-4564 Uline
Avoid conditions that may affect accuracy.
- Temperature extremes: Do not place in direct sunlight or near air conditioning vents.
- Keep scale dry: Do not place in high humidity, damp or wet locations.
- Keep away from air movers like fans or open doors and windows.
- Keep scale clean.
- Do not stack items on the scale when not in use.
STOP
WARNING! Scale is not waterproof. Avoid direct contact with water, high humidity and condensation. Do not spray or immerse scale in water. Data may become unstable or scale may malfunction. Turn power off and allow scale to dry before reuse.
For safe operation of the truck, read all warnings and instructions in this guide and on the truck before use.
- Do not operate the pallet truck unless you are familiar with it and have been trained or authorized to do so.
- Do not operate the truck unless you have checked its condition. Pay special attention to wheels, handle assembly, forks and controller lever.
- Do not use the truck on sloping ground.
-
Never place any part of your body in the lifting mechanism or under the forks or load. Do not carry passengers.
-
It is recommended that operator wears gloves and protective shoes while operating the truck.
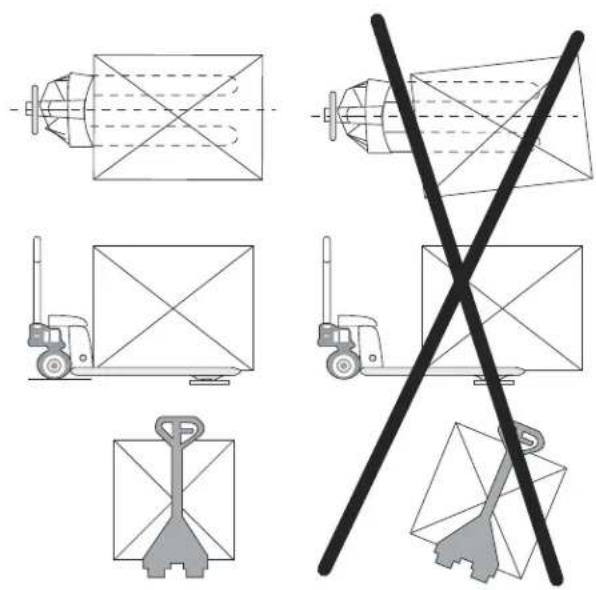
- Do not handle unstable or loosely stacked loads.
- Do not overload the truck.
- The capacity of the truck assumes an evenly distributed load with the center of the load being at the halfway point of the length of the forks.
- Ensure length of forks matches length of the pallet.
- Lower forks to lowest height when truck is not in use.
TECHNICAL DATA
| MODEL H-4564 | |
| Max. Lifting Weight 5,000 lbs. | |
| Min. Fork Height 3½" | |
| Max. Fork Height | 7½" |
| Fork Length | 48" |
| Fork Overall Width 27" | |
| Individual Fork Width 7" | |
| Capacity 5,000 lbs. | |
| Division 1 lb. | |
| External Resolution 1/5,000 | |
| Internal Resolution 1/600,000 | |
| Stabilization Time 1 Second (Typical) | |
| Operating Temperature 32-104°F (0-40°C) | |
| Power Supply | External AC adapter, 12V 500mA, built-in rechargeable battery (lead acid, 6V/10Ah) |
| Display | 5½ digits LCD digital display with 2" High digits (white color LED backlight) |
| Load Cells | 4 Load Cells |
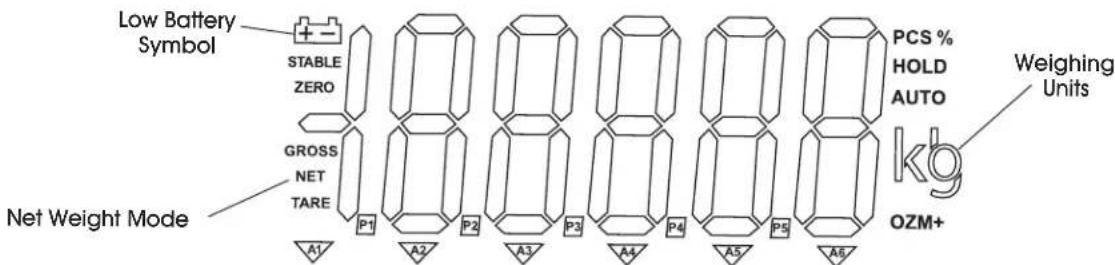
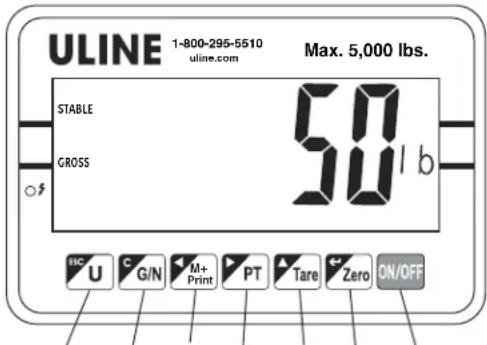
LCD DISPLAY
DISPLAY
DISPLAYCHARACTERS
| CHARACTER | DISPLAY |
| 0 | 0 |
| 1 | 1 |
| 2 | 2 |
| 3 | 3 |
| 4 | 4 |
| 5 | 5 |
| 6 | 6 |
| 7 | 7 |
| 8 | 8 |
| 9 | 9 |
| A | A |
| B | b |
| CHARACTER | DISPLAY |
| C | [ |
| D | d |
| E | E |
| F | F |
| G | G |
| H | H |
| I | I |
| J | J |
| K | F |
| L | L |
| M | n |
| N | n |
| CHARACTER | DISPLAY |
| O | o |
| P | p |
| Q | q |
| R | r |
| S | s |
| T | t |
| U | u |
| V | u |
| W | w |
| X | x |
| Y | y |
| Z | z |
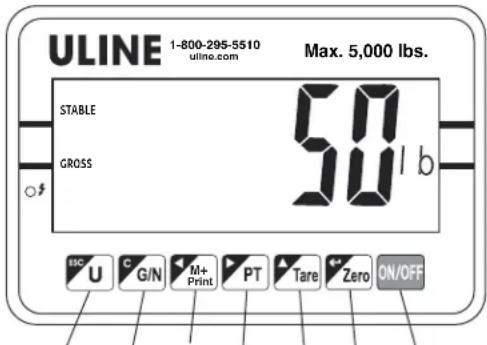
OVERVIEW OF CONTROLS
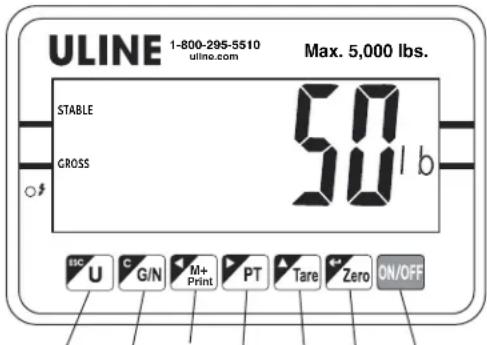
CONTROL PANEL
1234567
CONTROL PANEL BUTTONS
| # DESCRIPTION |
| 1 Unit Button |
| 2 Gross/Net Weight Button |
| 3 Accumulate Button |
| 4 Prepare Button |
| 5 Tore Button |
| 6 Zero Button |
| 7 ON/OFF Button |
CONTROL FUNCTIONS
| BUTTON PRIMARY FUNCTION SECONDARY FUNCTION | ||
| ESC U | UNIT (U) Selects weighing units: pounds or kilograms. | ESC Acts as an escape key to return the scale to normal operating mode. |
| C G/N | GROSS/NET WEIGHT Toggles between gross weight and net weight. Display shift is only available after using hare/pretare functions. | CLEAR Acts as a clear key to reset parameters or other functions. |
| M+ Print | ACCUMULATE (M+) Adds the value to the accumulation memory. Zero display and press this key to show current total value. PRINT Prints prints weight data on piece of paper. | SPACES LEFT Spaces left to change different numbers on the display. Also used to set parameters or other functions. |
| PT | PRETARE Allows user to manually key in TARE value. | SPACES RIGHT Spaces right to change different numbers on the display. Also used to set parameters of other functions. |
| Tare | TARE Deducts the container weight from pieces weight. | CHANGE NUMBER Changes number to set parameters and other functions. |
| Zero | ZERO Zeros display for next weight. | ENTER Enter key to set parameters and other functions. |
| ON/OFF | ON/OFF Turns the power on/off. | |
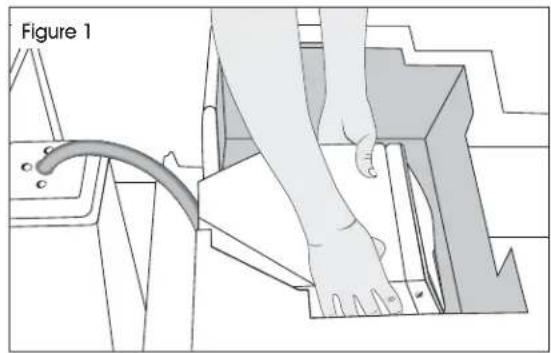
ASSEMBLY
Remove control panel from packing foam. (See Figure 1)
ATTACH CONTROL PANEL
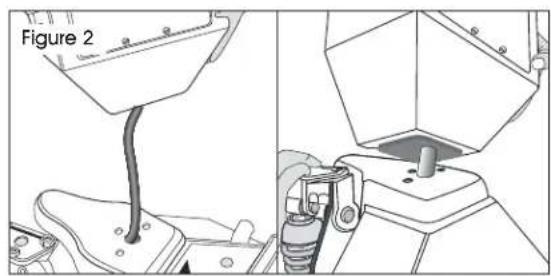
- Feed excess cable into the control panel head. Align three holes in control panel with three holes on pallet truck base. (See Figure 2)
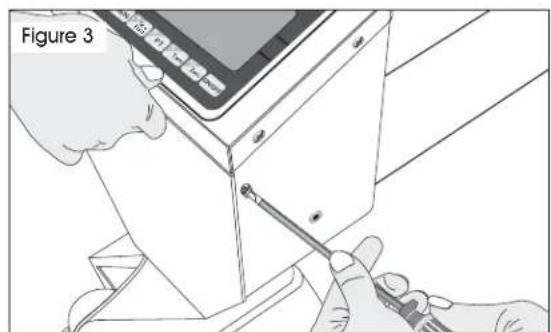
- Remove the two screws (one on each side) to release the front panel. Carefully open the front panel. (See Figure 3)
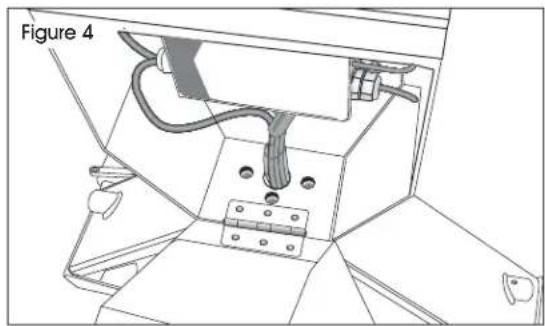
- Align mounting holes on pallet truck with mounting holes on control panel. (See Figure 4)
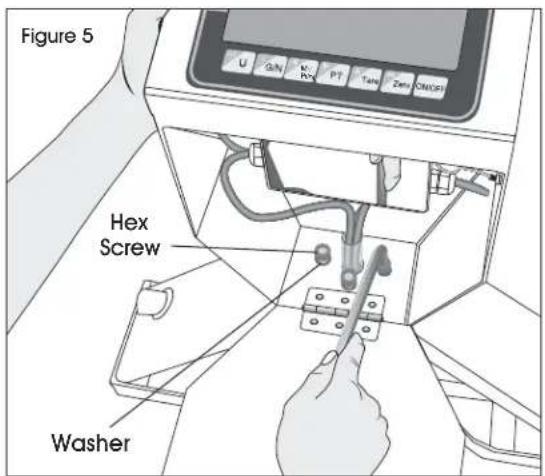
- Insert and tighten three hex screws with spring washers through base of control panel with hex wrench provided. (See Figure 5)
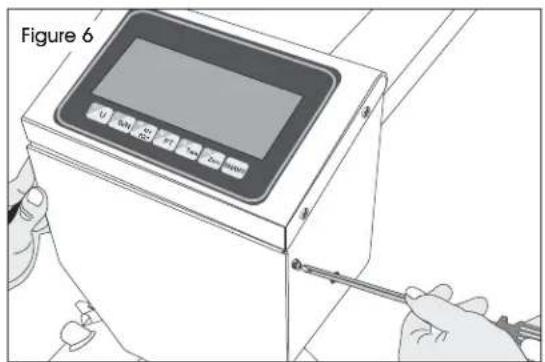
- Close front panel and secure with two screws. (See Figure 6)
ASSEMBLY CONTINUED
HANDLE INSTALLATION
- Remove handle from protective wrapping.
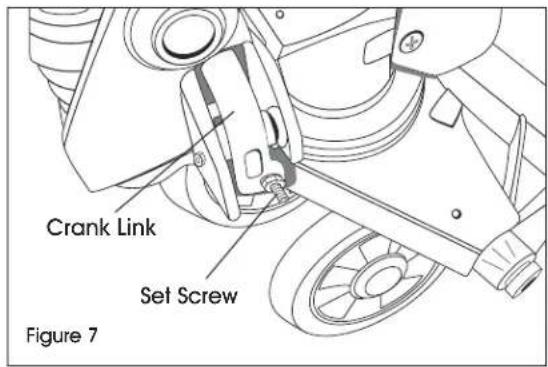
- Loosen set screw on crank link. (See Figure 7)
- Remove three hex screws and three spring washers from bottom of handle.
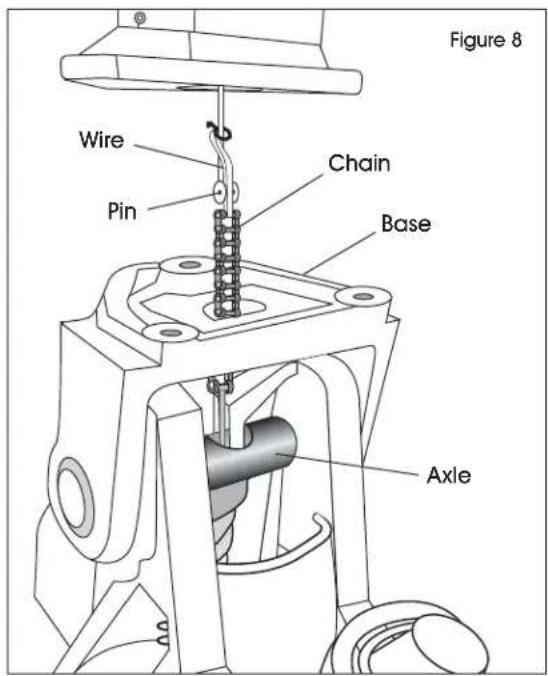
- Feed wire, chain and pin on bottom of handle through center of base and axle. (See Figure 8)
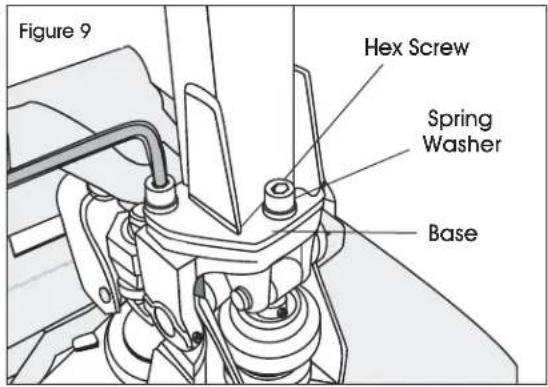
- Attach handle to base using three hex screws and three spring washers and tighten with hex wrench provided. (See Figure 9)
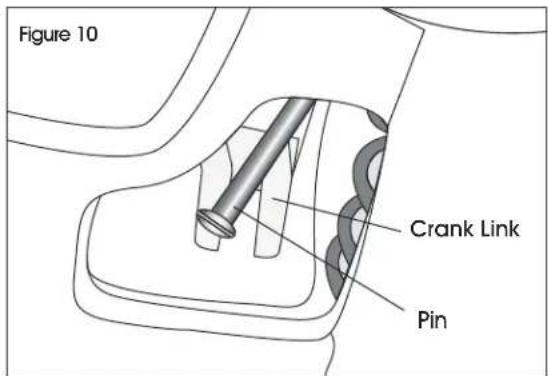
- While raising crank link, slide pin of rod and chain into crank link groove. (See Figure 10)
OPERATION
RAISING/Lowering FORKS
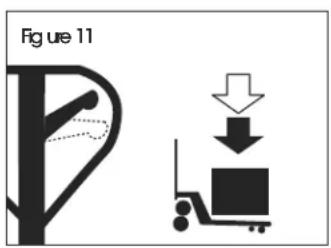
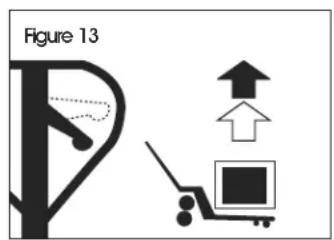
Control lever is located on pallet truck handle and can be set to three positions: lower, neutral and ascent. (See Figures 11-13)
- Tighten set screw on crank link until lower position on control lever functions properly. (See step 2 of Handle Installation on page 5).
- If forks elevate while pumping with control lever in neutral position, turn set screw clockwise until pumping the handle no longer elevates forks and neutral position functions properly.
- If forks descend while pumping with control lever in neutral position, turn set screw counter-clockwise until forks no longer descend.
- If forks do not descend when control lever is in lower position, turn set screw clockwise until forks lower while in lower position.
- If forks do not elevate while pumping with control lever in ascent position, turn set screw counterclockwise until the forks elevate while pumping in the ascent position. Re-check neutral and lower positions to ensure proper functioning.
CONTROL LEVER
The control lever can be set in three positions:
Lower:
Push lever up to lower. the forks
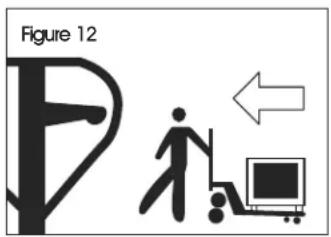
Netral:
To move the load.
Ascent:
Push lever down and pump handle to raise the forks.
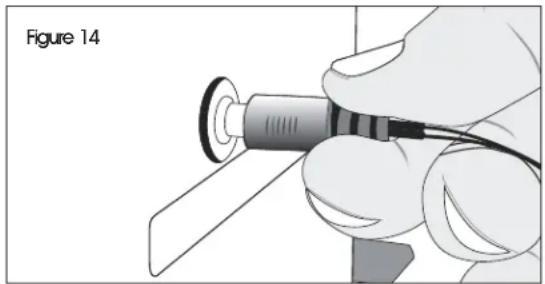
CHARGING THE BATTERY
Connect AC adapter into the plug on the side of the control panel. Plug cord into 110/120V AC outlet. (See Figure 14)

NOTE: Charging time is approximately 15 hours.
BATTERY STATUS (LED INDICATOR)
- Green - Battery is fully charged.
Red - Battery is charging.
ZEROING THE DISPLAY
Press the ZERO key at any time to zero the scale. This will usually only be necessary when the pallet is empty. When the zero point is obtained, the display will show "0" (zero).
The scale has an automatic rezeroing function to account for minor drifting or accumulation of material on the pallet. However, you may need to press the ZERO key to rezero the scale if small amounts of weight are shown when the pallet is empty.
OPERATION CONTINUED
TARING
Zero the scale by pressing the ZERO key if necessary. The "ZERO" indicator will be on.
Place a container on the pallet, display shows weight.
Press the TARE key to tare the scale. The weight that was displayed is stored as the tare value and that value is subtracted from the display. "0" (zero) shows on display. The "GROSS" indicator will be off and "NET" indicator on. As product is added, only the weight of the product will be shown. The scale could be tared a second time if another type of product was to be added to the first one. Again, only the weight that is added after taring will be displayed.
When the container is removed, a negative value will be shown. If the scale was tared just before removing the container, this value is the gross weight of the container plus all product that was removed. The "ZERO" indicator will be on because the pallet is back to the same condition it was when the ZERO key was last pressed. Press TARE key again to escape "NET" mode.
WEIGHING
Put the control lever in the LOWER position and lower the truck to lowest position.
Press the ON/OFF key to turn the scale on. After the indicator counts down, the display will zero. Place the forks under the pallet. While balancing load as evenly as possible, put lever in ASCENT position and pump handle to raise load. Once "STABLE" indicator shows, the accurate weight of the load is displayed. (Total weight of pallet and the goods.)
GROSS/NET FUNCTION
This function is only available after TARE function has been used. Pressing the G/N button will toggle between total weight (gross) on skid and weight after TARE function was used (NET).
SELECTING WEIGHING UNITS
Press U key to select desired weighing units (LBS or KG).
ACCUMULATION

NOTE: Before using Accumulation function, remove all weight from forks and zero the scale.
- Weigh item on scale. Once "STABLE" indicator shows, press M+ key to store weight in memory.
- The display will show "RC D" and then the total in memory for two seconds before returning to normal.
- The "M+ indicator is on. Remove the weight, allow the scale to return to zero and put a second weight on the scale.
- Press M+ key, the display shows "RC 02" and then the new total.
- Continue until all weights have been added. The scale can accumulate up to 99 items.

NOTE: Changing weighing units during Accumulation function will clear memory.
MEMORY RECALL
To view totals in memory, press the M+ key while display reads "0" (zero), and display will show "RC n" ('n' is current accumulation times) and then the total in memory for two seconds. The scale then returns to normal.
TO CLEAR MEMORY
To clear the accumulated data in memory, press the M+ key and the G/N key when total weight value is displayed.
PRETARE
- To set, press and hold PT key for three seconds to display current fare value.
- To manually key in a hare value, use TARE key to select value and M+ and PT keys to toggle between active digits.
- Enter Prefare value and press ZERO key.
- Display now shows "P≤5 0". Press TARE key to select desired prefare item. (0-9 preset items are available.)
- Once pretare item is selected, press ZERO key to store pretare value in memory.

NOTE: Pretare value is displayed while "NET" indicator is shown on display.
SELECT PRETARE
- Press G / N key to ensure scale is in net mode.
- Press PT key. "PEI D" is shown on display. Press TARE key to select desired stored item (0-9). Press ZERO key to display pretare value.
CLEAR PRETAREVALUE
- Press PT. Display will show "PE/ D".
- Use M+ and PT buttons to select prepare item (0-9).
- Press ZERO key to display pretare weight.
- Press and hold PT for three seconds and follow steps to set prepare value to zero.
THERMAL PRINTER

NOTE: Thermal printer is located at the bottom of the control panel. Reorder Uline model # S-16160.
- Open the paper roll cover by pulling down the cover. (See Figure 15)
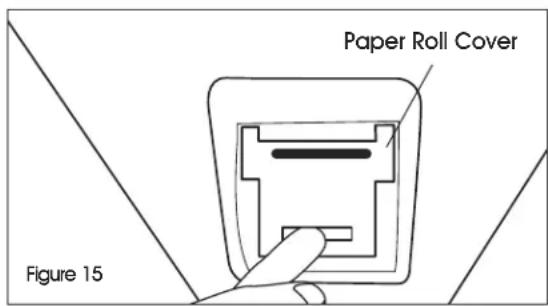
- Insert paper roll. Feed the paper roll end through the cover. (See Figure 16)

- Close the cover tightly.
- Press the M + / Print key to print.
PRINTOUT FOMRATS
PARAMETERS
Format 1
(NO. N.W) 1 6.96kg
Format 2
NO. 3
G.W. 20.50kg
N.W. 18.30kg
Format 3
NO. 3
N.W. 18.30kg
The scale has parameters that can be set by the user.
- To set parameters, press the ZERO key and TARE key at the same time.
- The display will show the first function, "FUnlE".
- Pressing the TARE key will cycle through the other functions.
- Pressing ZERO key will allow you to set the function.
- It may be necessary to either use TARE key set a value or use the M+ and PT keys to move the active digit and then using the TARE key to increment a digit, followed by the ZERO key to enter the value.
- Use the U key to leave a parameter unchanged.
- For example when the display shows "F1 u n t", press the ZERO key to begin.
- The display will show "on /b". Press the TARE key to set the weighing unit to ON/OFF status.
- Press ZERO key to enter value, and the scale will show the next weighing unit. Use TARE key to set and ZERO key to enter. When finished, press U key to exit.
FUNCTION SETTING TABLE
| FUNCTION SUB-FUNCTION DESCRIPTION DEFAULT VALUE | |||
| Fl u nt | -------- | Sets the displayed weight unit. Select kg/lb. | kg/lb |
| F3 oFF | Bk Set the backlight. On: Always on. Auto: Press a key and weight is more than 20d, backlight comes on automatically. Off: Always off. | Auto | |
| Off Set auto power off. 0: Don't use auto power off function. 3: Auto power off after standby 3 minutes. 5: Auto power off after standby 5 minutes. 15: Auto power off after standby 15 minutes. 30: Auto power off after standby 30 minutes. | of 0 | ||
| F4 Prt | 0 Continues | mode-------- | |
| 1 | Print Format | -------- | |
| 2 | |||
| 3 | |||
BATTERY OPERATION
BATTERY LIFE
The weighing indicator is battery operated. The battery life is approximately 60 hours.
LOW BATTERY INDICATOR
When the battery needs charging, the battery symbol on the display turns on. The battery should be charged. The scale will operate for about 30 minutes then automatically switch off to protect the battery.
CHARGING THE BATTERY
Plug in the AC adapter. Scale does not need to be turned on. Battery should be charged for 15 hours for full capacity.
BATTERY CHARGING STATUS
On the left side of display window, an LED indicates battery charging status. When the scale is plugged in, the internal battery will charge. Colors in the LED window indicate battery status:
- Green - Battery is fully charged.
- Red - Battery needs recharging.
Over time, the battery may fail to hold a full charge and eventually will need replacing.

WARNING! Never use any damaged charger or battery. Do not short circuit the battery across the + and - terminals. Do not dispose of batteries in a fire or in household waste. Check local regulations for proper disposal.
BATTERY OPERATION CONTINUED
BATTERY PERFORMANCE
Always use original batteries and AC adapter. Scale is not intended for use with non-original batteries and/or battery chargers.
- AC adapter rating is 12V.
- New batteries or batteries stored for long periods of time may require longer charging times.
-
Keep battery at or near room temperature when charging.
-
Do not expose batteries to temperatures below 14^(-10^) or above 113^(45^) .
Fully charge battery before first use. - Batteries should be charged once every three months at minimum.
- As the battery is used it may fail to hold a full charge. If the battery life becomes unacceptable, contact Uline Customer Service at 1-800-295-5510.
MAINTENANCE
EXPEL AIR FROM THE PUMP UNIT
Air may get into the hydraulics due to transportation or pump disturbances. It can prevent forks from elevating while pumping in ASCENT position. To expel air: Put the control lever to the LOWER position, then move the handle up and down several times.
DAILY CHECK AND MAINTENANCE
A daily check of the pallet truck can help prevent accidents. Give special attention to the wheels, the axles, the handle, the forks and control lever. The forks should be unloaded and lowered in the lowest position when the job is completed.
LUBRICATION
Use motor oil or grease to lubricate all moveable parts.
CALIBRATION
ENTER TECHNICAL PARAMETER MODE

NOTE: Must use 10% of capacity to calibrate.
- Press ZERO and TARE keys at the same time. The display shows "F1 UnE".
- Press TARE key until display shows "Pra" and press ZERO key to show "Pn" on the display.
- Press in order M + ,U and TARE keys to enter technical parameter setting mode.
- Press TARE key to select parameter, press ZERO key to enter value and U key to exit.
- It may be necessary to use TARE key to set a value or use M+ and PT keys to move the active digit.
CALIBRATION
- Enter Technical Parameter Setting mode (see steps 1-3 above) until display shows "PI rEF".
- Press the TARE key until display shows "P2 CRL". Press ZERO key to enter and press TARE key until display shows "CRL".
- Press ZERO key twice and display shows "UnLd". Remove all weight from the forks. After "STABLE" indicator is visible, press the ZERO key.
- The display shows the calibration weight value. Use the M+ , PT and TARE keys to set the weight value.

NOTE: Use M+ and PT keys to move active digit, use TARE key to change value. You can also press G/N to make value zero.
CALIBRATION CONTINUED
- After weight is keyed, press ZERO key to enter. Display will show "LOrd".

NOTE: If the problem persists, contact Uline Customer Service at 1-800-295-5510.
-
Add calibration weight onto forks. After "STABLE" indicator is visible, press ZERO key to enter.
-
Display returns to normal once calibration is successful. If an error message is shown, try the calibration steps again; a disturbance may have prevented a successful calibration.
ERROR CODES
| ERROR CODE | DESCRIPTION RESOLUTION | |
| ----- Overload Remove weight from the scale. | If the problem persists contact Uline Customer Service at 1-800-295-5510. | |
| Err 1 | Date Setting Error Enter date using correct format. Format: yy:mm:dd | |
| Err 2 | Time Setting Error Enter time using correct format. Format: hh:mm:ss | |
| Err 4 | Zero Setting Error The scale was outside the normal zero setting range either when it was turned on or when the ZERO key was pressed. Remove weight from the scale and try again.Use the TARE key to set the display to zero value.If the problem persists contact Uline Customer Service at 1-800-295-5510. | |
| Err 6 | A/D out of range The values from the A/D converter are outside the normal range. Remove weight from the scale if overloaded, make sure fork cover plate is attached. Indicates the load cell or the electronics may be faulty.If the problem persists contact Uline Customer Service at 1-800-295-5510. | |
SEGURIDAD
| CARACTER | PANTALLA |
| C | C |
| D | d |
| E | E |
| F | F |
| G | G |
| H | H |
| I | I |
| J | J |
| K | K |
| L | L |
| M | m |
| N | n |
| CARÁCTER | PANTALLA |
| O | o |
| P | p |
| Q | ð |
| R | r |
| S | s |
| T | t |
| U | u |
| V | v |
| W | w |
| X | x |
| Y | y |
| Z | z |
REVISION DE LOS CONTROLES
PANEL DE CONTROL
1234567
TECLAS DEL PANEL DE CONTROL
| CHARACTERE AFFICHAGE | |
| C | [ |
| D | d |
| E | E |
| F | F |
| G | G |
| H | H |
| I | I |
| J | J |
| K | \( \vdash \) |
| L | L |
| M | \( \bar{n} \) |
| N | n |
| CARACTÈRE AFFICHAGE | |
| O | O |
| P | P |
| Q | à |
| R | r |
| S | S |
| T | t |
| U | U |
| V | U |
| W | ü |
| X | - |
| Y | y |
| Z | 乙 |
PANNEAU DE CONTROLLE
1234567
BOUTONS DU PANNEAU DE COMMANDE


