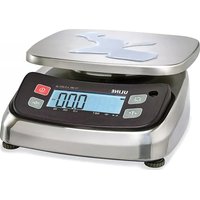
H-11925 - Scale Uline - Free user manual and instructions
Find the device manual for free H-11925 Uline in PDF.


User questions about H-11925 Uline
0 question about this device. Answer the ones you know or ask your own.
Ask a new question about this device
Download the instructions for your Scale in PDF format for free! Find your manual H-11925 - Uline and take your electronic device back in hand. On this page are published all the documents necessary for the use of your device. H-11925 by Uline.
USER MANUAL H-11925 Uline
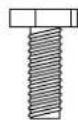
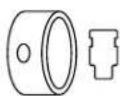
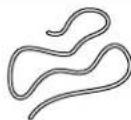
Sealing Hardware (See "Legal For Trade" on page 8)
SAFETY
STOP
WARNING! Disconnect all power to this unit before installing, cleaning or servicing. Failure to do so could result in bodily harm or damage to the unit.
- Only qualified persons should service this scale.
- Do not place the scale in direct sunlight.
- Verify voltage and receptacle type are correct for the scale.
-
Do not use any other type of power adaptor than the one designed for this scale.
-
Pluggable equipment must be installed near an easily accessible socket outlet.
- Avoid unstable power sources. Do not use near large users of electricity, such as welding equipment or large motors.
- Avoid sudden temperature changes, vibration, wind and water.
- Avoid heavy radio frequency noise.
- Keep the scale clean.
SETUP
PAN INSTALLATION
- Remove stainless steel pan and plastic pan support from carton.
- Pull wrench (1) out from plastic pan support (4). (See Figure 1)
- Place fixed washer (2) on the center of plastic pan support (4).
- Secure fixed washer (2) with two screws (3).
- Put the plastic pan support on the scale base.
- Use the wrench (1) to tighten the screws (3).
- Replace wrench (1) into slot in plastic pan support (4).
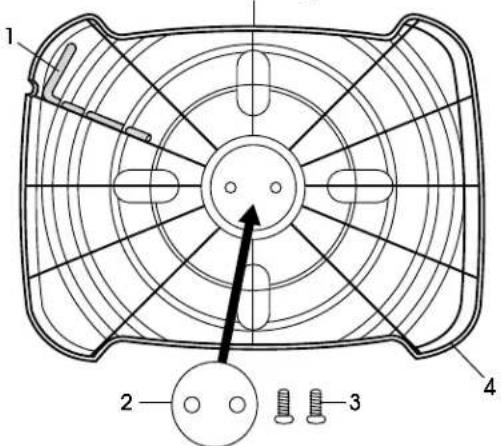
Figure 1
Plastic Pan Support
SETUP CONTINUED
POWER
BATTERY POWER
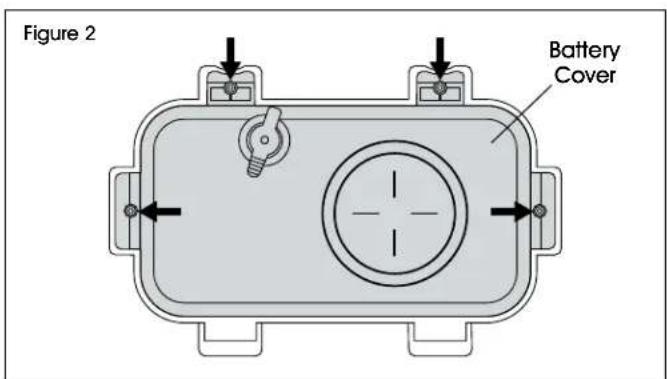
- Remove four screws with included wrench and open battery cover at the bottom side of the scale. (See Figure 2)
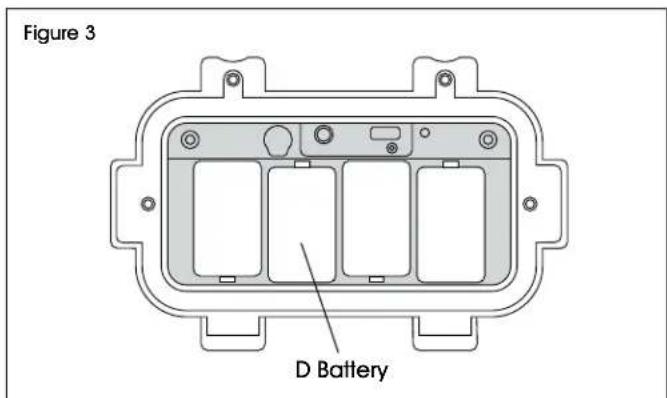
- Insert four D alkaline batteries into battery compartment. (See Figure 3)
- Replace battery cover and secure with previously removed screws and provided wrench.
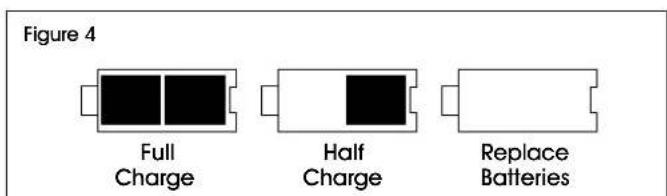
- When operating on battery power, the display will show charge status. (See Figure 4)
AC ADAPTOR (SOLD SEPARATELY)
Adaptor connects into AC power socket. Verify that the AC power socket outlet is properly protected.

IMPORTANT! Pluggable equipment must be installed near an easily accessible socket outlet with a protective ground/earth contact.
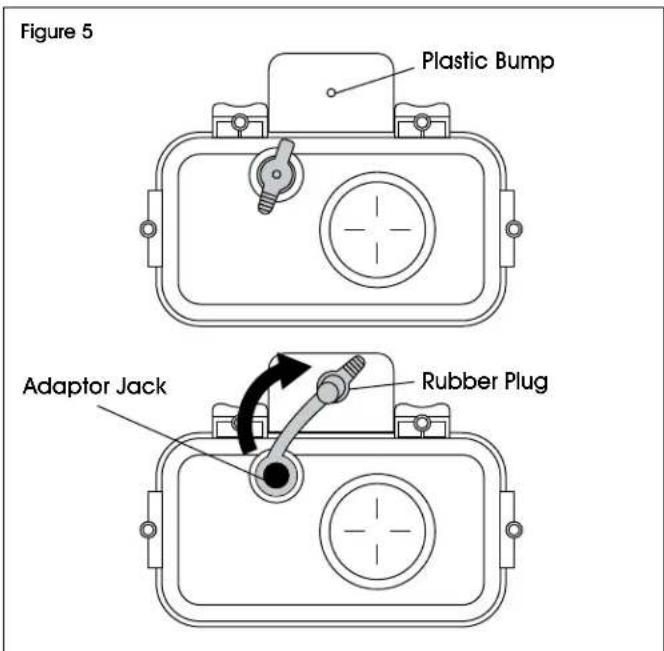
- Pull out the rubber plug of adaptor jack and insert it into the plastic bump. (See Figure 5)

NOTE: The adaptor jack is located on the underside of the scale.
- Connect the adaptor pin into the adaptor jack. (See Figure 5)

NOTE: When the adaptor is plugged in, display will show constant full charge.

IMPORTANT! Disconnect AC adaptor and insert rubber plug before cleaning.

NOTE: No IP rating when rubber plug is open and scale is plugged into outlet with AC adaptor.
SETUP CONTINUED
LEVELING DEVICE
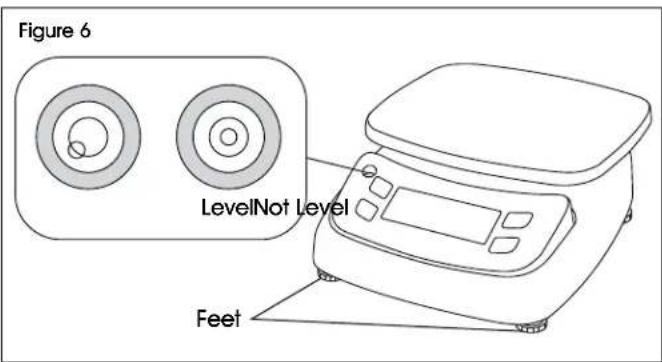
The level bubble is used to level the scale. It is located left of the display. (See Figure 6)
Adjust feet on underside of scale until bubble is centered. (See Figure 6)

NOTE: Bubble must be in the center of the water level.

IMPORTANT! Check bubble regularly to ensure a correct level reading. Correct if necessary.
OVERVIEW OF CONTROLS
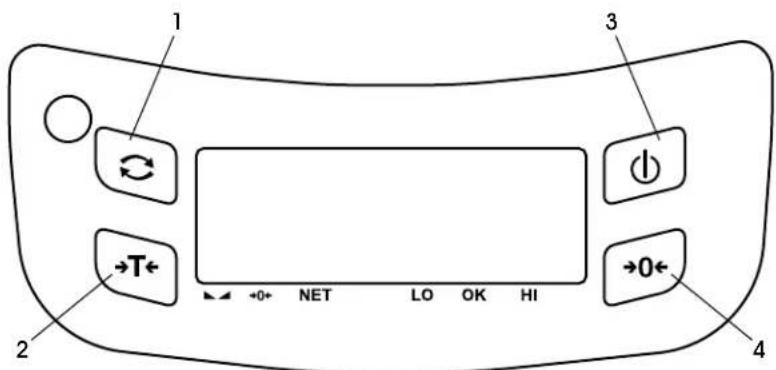
CONTROL PANEL
CONTROL PANEL PARTS
| # DESCRIPTION |
| 1 Next Button |
| 2 Topo Button |
| 3 Power Button |
| 4 Zero Button |
BUTTON FUNCTIONS
| BUTTON | ←→ | →T← | ← | →0← |
| FUNCTION | NEXTUsed to change weighing units (kg./lb./oz./g).Used to scroll menu down in setting mode.Long press to exit the menu. | TARESubtracts the fare values.Long press to enter parts counting mode.Use to scroll menu up in setting mode. | POWERPress to turn scale on.Long press to turn scale off.Use as exit button in setting mode. | ZERONexts display to zero.Long press to enter limits setting mode.Use as enter button in setting mode. |
INDICATORS
| →0← | NET | LO/OK/HI | kg/lb/oz/g | |
| Zeroing Stable Net weight | Indication for check weighing | Low battery (Appears on display) | Current weight unit (Appears on display) |
OPERATION
INITIAL STARTUP
Warm-up time of 15 minutes stabilizes the measured values after switching on.
TURNING THE SCALE ON/OFF
Press POWER button to turn scale on. On power-up, display shows the application software version. Press TARE button to display the legal software version. The display is switched on. To switch off, long press POWER button again.
ZEROING
Environmental conditions can lead to a balance of exactly zero despite the pan not taking any strain. However, you can set the display of your balance to zero any time by pressing ZERO button to ensure weighing starts at zero.
TARING
Tare any container to ensure subsequent weighing will display the net weight of the object being weighed.
- Load weight on the pan.
- Press TARE button. Zero is displayed, and tare is subtracted.
- Remove weight from the platform. Tared weight is displayed. Only one tare value can be set. It is displayed with a negative value.
- Press TARE button. Zero is displayed, fare weight is cleared.
PARTS COUNTING
In weighing mode, parts counting mode can be enabled.
- Place the parts (pieces) on the pan. Items must be placed according to parts options.
- Long press the TARE button. Display shows P / 0 . Select the parts options by pressing TARE button. Parts options are: P / 0, P / 20, P / 50, P / 100, P / 200 .
- Press ZERO button when the displayed number matches the number of items used in the sample.
- Scale will store the pieces according to the items.
- Add more pieces to the pan, and the display will show the pieces according to the stored items.
- Long press the NEXT button to exit parts counting mode.
POWER AUTO OFF
Scale can be set to turn off automatically after a set period of inactivity.
- Press NEXT button during startup.
- Press TARE button until display shows F3 ROF.
- Press ZERO button to enter.
- Press TARE button to select the sub menu options.
- Press ZERO button to confirm.
- Long press NEXT button to go back to normal weighing mode.
| DISPLAY DESCRIPTION | |
| OFF*(default) | Set to turn off the auto off function. |
| OF 3 | Set to turn off after three minutes of inactivity. |
| OF10 | Set to turn off after 10 minutes of inactivity. |
| OF15 | Set to turn off after 15 minutes of inactivity. |
| OF30 | Set to turn off after 30 minutes of inactivity. |
BACKLIGHT SETTING
Backlight can be set to off, low, medium or high. Backlight is active when scale is in use or when weight is not zero.
- Press NEXT button during startup.
- Press TARE button until display shows F2 BL.
- Press ZERO button to enter.
- Press TARE button to select the sub menu options.
- Press ZERO button to confirm.
- Long press NEXT button to go back to normal weighing mode.
| DISPLAY DESCRIPTION | |
| BI OF | Backlight function set to turned off. |
| BI RUI | Backlight set to low light. |
| BI RU2 | Backlight set to medium light. |
| BI RU3 | Backlight set to high light. |
OPERATION CONTINUED
LIMITS SETTING
- Long press ZERO button. Display will show 000.000 (High limits set) and the triangle symbol above the HI indicator appears.
- Press TARE button to change the value. Press NEXT button to shift location.
- When shifted to last digit, press ZERO button to confirm value.
- Display will show 000.000 (Low limits set) and the triangle symbol above the LO indicator appears.
- Press TARE button to change the value. Press NEXT button to shift location.
- Press ZERO button to confirm and come back to the weighing mode.
LIMITS INDICATORS
- When the weight is below the low limits, the triangle symbol above the LO indicator appears.
- When the weight is between the limits, the triangle symbol above the OK indicator appears.
- When the weight exceeds the high limits, the triangle symbol above the HI indicator appears.
PARAMETERS
KEYS IN MENU
ENTER MENU
- Press the POWER button to turn on scale.
- Press the NEXT button during the startup, or long press the NEXT button in the normal weighing mode.
ENTER SELECTED MENU
Press the ZERO button to enter display menu.
SELECT MENU
Press TARE button to scroll up and NEXT button to scroll down.
| MENU DESCRIPTION | ||
| F0 CAL | CAL Normal calibration. | |
| L-IN2 | Linear calibration.L-IN3 | |
| L-IN6 | ||
| F1 UNIT(LB, OZ, KG, G) | ON | Set weighing units. |
| OFF | ||
| F2 BL | BI OF Set backlight function off. | |
| BI AU1* Set backlight function on. | ||
| BI AU2 | Set the luminance of backlight. | |
| BI AU3 | ||
| F3 Aof | OFF* | Set automatic turn-off time. |
| Of 3 | ||
| Of 10 | ||
| Of 15 | ||
| Of 30 | ||
| F4 inp | To show the internal counts. | |
| F5 spd | LOW | Set the AD speed.MID |
| HIGH | ||
| F6 RES | 3,000 | To set resolution. |
| 6,000* | ||
| Dual-i | ||
| 15,000 | ||
| 30,000 | ||
| F7 Gra | 9.79640 | To set the local gravity. |
| F8 cap | 6 lb. | To set the capacity. |
| 12 lb. | ||
| 30 lb. | ||
| 60 lb. | ||
ESCAPE FROM MENU
Long press NEXT button or press POWER button to escape from current menu.
To access settings F0CAL, F6RES, F7Gra, F8cap, F9AP and FD unit. Press the calibration switch before operating.

NOTE: The calibration switch is located on the bottom of the scale.
| MENU DESCRIPTION | ||
| F9 AP | NO | Non-Approval |
| OIML OIML approval | ||
| NTEP* NTEP approval | ||
| FA TARE | OFF To disable the multi-tare operation. | |
| ON* To enable the multi-tare operation. | ||
| FB s-Uw | OFF* | Disable function to save unit weight in parts counting. |
| ON | Enable function to save unit weight in parts counting. | |
| FC slept | off* Disable sleep mode. | |
| OF 10 | Enter sleep mode after 10 minutes with no weight changes or key presses. | |
| OF 20 | Enter sleep mode after 20 minutes with no weight changes or key presses. | |
| OF 30 | Enter sleep mode after 30 minutes with no weight changes or key presses. | |
| FD UNIT | kg. | Select kg. unit. The menu definition is as follows: F0 CAL - Calibrate in kg mode. F1 UNIT - lb/oz/g can be set ON/OFF F8 CAP - The capacity can be selected from one of the capacities according to your scale. |
| lb. | Select kg. unit. The menu definition is as follows: F0 CAL - Calibrate in kg mode. F1 UNIT - lb/oz/g can be set ON/OFF F8 CAP - The capacity can be selected from one of the capacities according to your scale. | |
- Default setting
CALIBRATION
NORMAL CALIBRATION
- Turn on the scale. Press NEXT button during startup. Display will show F0 CRL.
- Remove screws on bottom of scale with provided wrench, and open the battery cover.
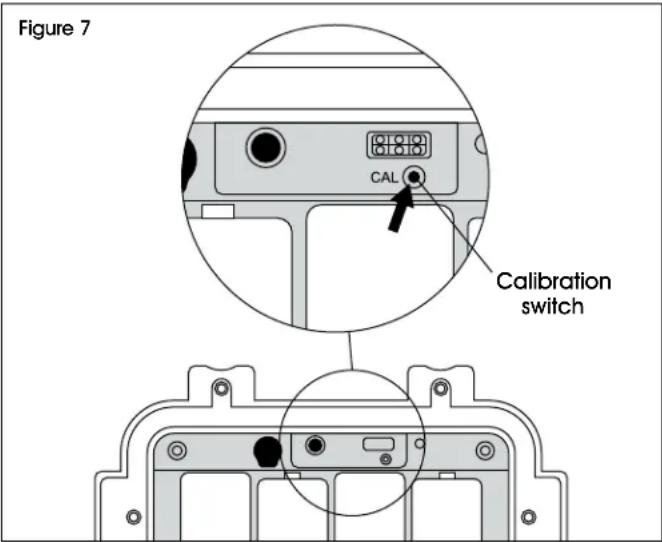
- Press the calibration switch with a long pin or similar object.
- Press ZERO button to confirm and display will show CRL.
- Press ZERO button to confirm and display will show UNLORO.
- Ensure the pan is empty when the "STABLE" indicator is on.
- Display will show full capacity calibration weight.
- Place the weight on the platter.
- Once the stable indicator is shown on the display, the display will show P_SS and return to setting mode. Press POWER button to return to weighing mode.

NOTE: If the display shows any error message or incorrect measurement, repeat the calibration.
- Turn off scale and place cover back onto scale.
| MODEL FULL | CAPACITY WEIGHT IN LB. MODE |
| H-11925 | 12 lbs |
| H-11926 | 30 lbs. |
| MODEL FULL | CAPACITY WEIGHT IN KG. MODE |
| H-11925 | 6 kg. |
| H-11926 | 12 kg. |
LINEAR CALIBRATION
- Turn on the scale. Press NEXT button during startup. Display will show F0 CAL.
- Remove screws on bottom of scale with provided wrench, and open the battery cover.
- Press the calibration switch with a long pin or similar object. (See Figure 7)
- Press ZERO button to confirm and display will show CRL.
- Press TARE button to select linear point l_-m2 .
- Press ZERO button to confirm and display will show UNLOBO.
- Ensure the pan is empty when the "STABLE" indicator is on.
- After six seconds, display will show 1/2 of the capacity.
- Place the first calibration weight (1/2 of the capacity) on the pan.
CALIBRATION CONTINUED
- After six seconds, display will show 1/2 of the capacity.
- Remove the first calibration weight (1/2 of the capacity) from the pan.
- Place the second calibration weight (full capacity) on the pan.
- After six seconds, display will show UNLORG.
- Place the second calibration weight (full capacity) on the pan.
- After six seconds, display will show 1/2 of the capacity.
- Remove the second calibration weight (full capacity) from the pan.
- Place the first calibration weight (1/2 capacity) on the pan.
- After six seconds, display will show UNLORD.
- Remove the first calibration weight (1/2 capacity) from the pan.
After three seconds, scale will show p_ass and return to setting mode.
| LINEAR CALIBRATION WEIGHT 2 POINTS | |
| RECOMMENDED RESOLUTION 1/6,000 | |
| LOAD 0 UNLOAD | |
| LOAD 1 1/2 MAX | |
| LOAD 2 FULL MAX | |
| LOAD 3 UNLOAD | |
| LOAD 4 FULL MAX | |
| LOAD 5 | 1/2 MAX |
| LOAD 6 UNLOAD | |
| Calibration Weight (kg.) | ||
| MODEL | H-11925 | H-11926 |
| RESOLUTION | 1/6,000 | 1/6,000 |
| LOAD 0 | UNLOAD | UNLOAD |
| LOAD 1 | 3 kg. | 6 kg. |
| LOAD 2 | 6 kg. | 12 kg. |
| LOAD 3 | UNLOAD | UNLOAD |
| LOAD 4 | 6 kg. | 12 kg. |
| LOAD 5 | 3 kg. | 6 kg. |
| LOAD 6 | UNLOAD | UNLOAD |
| Calibration Weight (lbs.) | ||
| MODEL | H-11925 | H-11926 |
| RESOLUTION | 1/6,000 | 1/6,000 |
| LOAD 0 | UNLOAD | UNLOAD |
| LOAD 1 | 6 lbs. | 15 lbs. |
| LOAD 2 | 12 lbs. | 30 lbs. |
| LOAD 3 | UNLOAD | UNLOAD |
| LOAD 4 | 12 lbs. | 30 lbs. |
| LOAD 5 | 6 lbs. | 15 lbs. |
| LOAD 6 | UNLOAD | UNLOAD |
LEGAL FOR TRADE
When the scale is used in trade or a legally controlled application, it must be set up, verified and sealed in accordance with local weights and measures regulations. It is the responsibility of the purchaser to ensure that all pertinent legal requirements are met.
"Sealing Hardware" is used for this application.
VERIFICATION
The local weights and measures official or authorized service agent must perform the verification procedure.
SEALING
The local weights and measures official or authorized service agent must apply the security seal to prevent tampering with the settings.
MAINTENANCE
PREVENTIVE MAINTENANCE
- Switch off and unplug the device before cleaning.
- Do not open the rubber plug during cleaning.
- Ensure that no fluids get inside the device.
- Do not use organic acid, alkaline solutions, scouring powders or plastic-dissolving cleaning agents for cleaning.
- Do not spray corrosive liquid directly on the device.
- Avoid strong pressure or scratching the surface with hard, sharp or pointed objects.
CLEANING HOUSING
- To clean device housing, use a soft, clean cloth dampened with a mild cleaner and water.
- After cleaning, plug the scale back in or install the dry batteries and turn it on.
BATTERY MAINTENANCE
- Do not use any other type of power adaptor than the one designed for this scale.
- If the scale is not used for an extended period, remove batteries from the battery compartment to avoid leakage.
- Store batteries in a dry, temperate environment.
TROUBLESHOOTING
ERROR CODES
| ERRORMESSAGE DESCRIPTION SOLUTION | ||
| Err 4 | Zero setting error. | Zero setting range exceeded due to switching on. (4% max)Ensure platform is empty. |
| Err 19 | Initialize zero error. Calibrate the scale. | |
| Err 20 | Limit setting error. Set lower limit less than upper limit. | |
| Err 21 | Serial number setting error. | Serial number should be programmed. |
| Err 22 | Unstable sampling. Sampling when stability is required. | |
| Err 23 | Unstable fare weight Tare the weight when stability is required. | |
| Err 24 | Gravity value out of range. | The gravity value should not be out of range. |
| -------- | Judging stability Wait until scale is stable. | |
| --o-- | Over range. | Remove the load. Recalibrate. |
TROUBLESHOOTING
| ERRORMESSAGE DESCRIPTION SOLUTION | ||
| --u1-- | Under-load. Remove weight, check the platform and restart or calibrate. | |
| F311 | Calibration failed. Check the test weights and recalibrate. | |
| Bat 10 | Low Battery. Replace with new battery. | |
| Cannot turn on power. | Main power is turned off. | Check that the power switch is turned on and power LED is working. |
| Power supply is not plugged in. | Verify the voltage going to the scale matches the power supply labels on the power module or scale. | |
| Power supply faulty. | Replace batteries. | |
| Display is turned off. | ||
| Dead batteries. | ||
| Display is unstable. Air variation. | Pan is in contact. | Verify the scale is in an acceptable location and on a good table/surface. |
| Sample is moving (animal weighing). | Verify the power supply is correct for the scale. | |
| Vibrations from table. | ||
| Dramatic temperature change. | ||
| Power supply/battery faulty. | ||
| Weight value incorrect. | Calibration error. | Recalibrate. Pay attention to the test weight used, the stability of the scale and the required weighing unit. |
| Linearity error, linearity calibrated with inaccurate weights. | If required, perform linear calibration. | |
| Balance not leveled. | Check that pan is installed correctly. | |
| Some materials between the sample and pan. | Verify scale is in an acceptable location. | |
| Wrong weighing unit displayed. | ||
TROUBLESHOOTING CONTINUED
| OPERATING ISSUE CAUSES RECOMMENDATIONS | ||
| Cannot use full capacity. | Overload stopper touching pan support or bottom of the load cell. | Check for objects under the pan or load cell. Confirm transportation lock is removed. Verify pan installation. Check the weighing units used. |
| Transportation lock not removed. | ||
| A/D circuit problem. | ||
| Parameters set incorrectly. | ||
| Load cell or mechanics damaged. | ||
| Not linear. Overload stopper | touching load cell or mechanics damaged. | Check for objects under the pan or load cell. Confirm transportation lock is removed. Verify pan installation. |
| A/D damaged. | ||
| Off center loading error. Adjust mechanism. | Overload stops not correct. | Check for objects under the pan or load cell. Confirm transportation lock is removed. Verify pan installation. |
| Load cell damaged. | Ensure load cell fixed correctly. | |
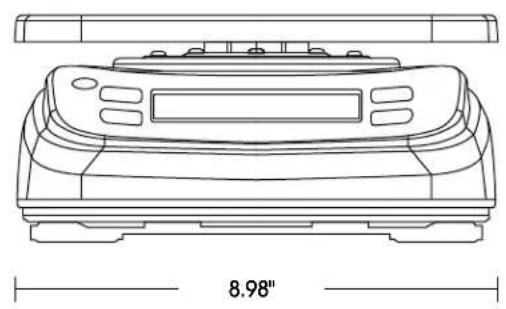
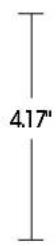
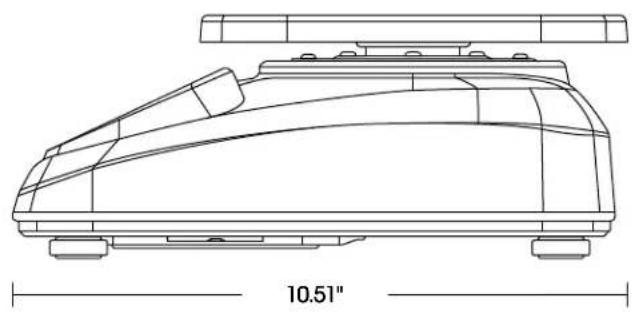
DIMENSIONS
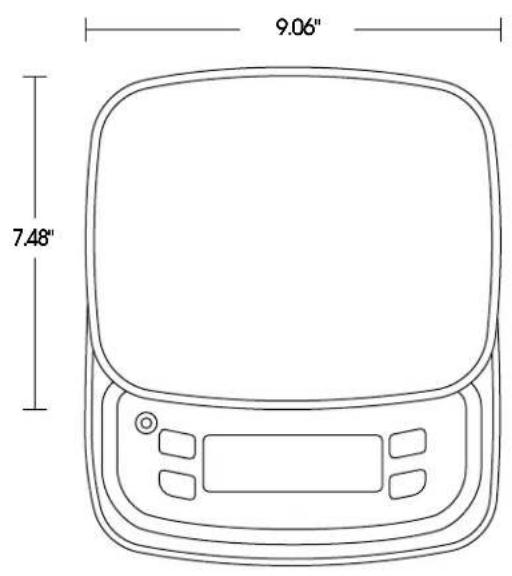
SPECIFICATIONS
| MODEL H-11925 H-11926 | ||
| Capacity 12 lb. 30 lb. | ||
| Readability 0.002 lb. 0.005 lb. | ||
| Minimum Capacity 0.04 lb. 0.1 lb. | ||
| Resolution 1/6,000 | ||
| Enclosure | 304 Stainless Steel | |
| Display | 6 Digits 0.98" Height LCD with White Color LED Backlight | |
| Operating Temperature | 14°F – 104°F | |
| Weighing Units | lb., oz, Kg, G | |
| Button Pad | 4 buttons – Mechanical Keyboard | |
| Pan Size | 304 Stainless Steel Pan 7.5 x 9.1" | |
| Power Supply | Four 1.5 V D-size Alkaline Batteries | |
| Dimension (W x D x H) | 9.0 x 10.5 x 4.2" | |
| Net Weight | 6.6 lb. | |
| Gross Weight | 8.8 lb. | |
ULINE H-11925, H-11926 BÁSCULA IMPERMEABLE PARA ALIMENTOS
| Peso de Calibración (Ib.) | ||
| MODELO | H-11925 | H-11926 |
| RESOLUCION | 1/6000 | 1/6000 |
| CARGA 0 | UNLOAD | UNLOAD |
| CARGA 1 | 6 lbs. | 15 lbs. |
| CARGA 2 | 12 lbs. | 30 lbs. |
| CARGA 3 | UNLOAD | UNLOAD |
| CARGA 4 | 12 lbs. | 30 lbs. |
| CARGA 5 | 6 lbs. | 15 lbs. |
| CARGA 6 | UNLOAD | UNLOAD |


