
HL-1040 - Laser printer BROTHER - Free user manual and instructions
Find the device manual for free HL-1040 BROTHER in PDF.

User questions about HL-1040 BROTHER
0 question about this device. Answer the ones you know or ask your own.
Ask a new question about this device
Download the instructions for your Laser printer in PDF format for free! Find your manual HL-1040 - BROTHER and take your electronic device back in hand. On this page are published all the documents necessary for the use of your device. HL-1040 by BROTHER.
USER MANUAL HL-1040 BROTHER
Brother Laser Printer
HL-800/1000 Series
User's Guide
natural_image
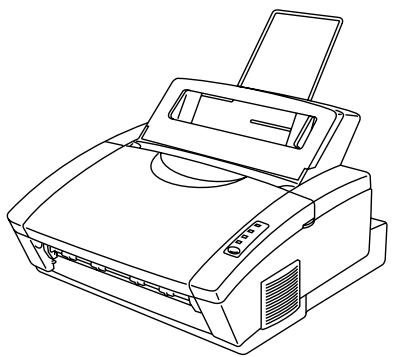
Line drawing of a printer with paper feed and paper clip (no text or symbols)Keep this manual in a convenient place for quick and easy reference at all times.
TABLE OF CONTENTS
CHAPTER 1 INTRODUCTION.... 1-1
ABOUT THE GUIDEBOOKS 1-1
Finding Out How to Use the Printer 1-1
ABOUT YOUR PRINTER.... 1-2
Printer Overview.... 1-2
System Requirements in Brother Printing Solution for Windows 1-3
Features.... 1-3
OPERATING AND STORAGE ENVIRONMENT 1–7
Power Supply.... 1–7
Environment 1-7
CHAPTER 2 PAPER HANDLING.... 2–1
PAPER SPECIFICATIONS 2–1
MULTI-PURPOSE SHEET FEEDER.... 2-5
Loading Paper into the Feeder 2-6
Two Side Printing (Manual Duplexing) 2-8
MANUAL FEED SLOT 2–9
OUTPUT TRAY AND PAPER SUPPORT WIRE 2–11
CHAPTER 3 CONTROL PANEL .... 3–1
LAMPS AND SWITCH 3-1
Ready (Paper) Lamp 3-1
Data (Toner) Lamp 3-2
Drum Lamp.... 3-2
Alarm Lamp.... 3-2
Switch 3-3
Other Control Features 3-3
Sleep Mode 3-3
Test Print Mode 3-4
CHAPTER 4 OPTIONS.... 4–1
SERIAL INTERFACE BOARD RS-100M (HL-1040/1050 Only)...... 4–1
Selecting the RS-422A (Apple) or RS-232C (IBM) Serial Interface 4–1
Setting the Serial Interface Parameters 4-2
Connecting the Serial Interface Cable 4-4
ADDITIONAL MEMORY (HL-1050 Only) 4–6
CHAPTER 5 MAINTENANCE .... 5–1
REPLACING THE TONER CARTRIDGE 5-1
REPLACING THE DRUM UNIT 5–7
CLEANING THE PRINTER....5-11
Cleaning the Printer Exterior 5-11
Cleaning the Printer Interior and Drum Unit 5-12
RE-PACKING THE PRINTER....5-15
CHAPTER 6 TROUBLESHOOTING....6-1
ALARM INDICATIONS AT A GLANCE 6–1
Operator Calls....6-1
Service Calls 6–4
PAPER JAMS....6-5
Q & A 6-8
Setting Up the Printer Hardware....6-8
Setting Up the Printer for Windows 6-8
Setting Up the Printer for DOS....6-10
Setting Up the Printer for Apple Macintosh Computers 6–11
Paper Handling 6–11
Printing 6-12
Print Quality 6-14
CHAPTER 7 APPENDIX...... A-1
PRINTER SPECIFICATIONS ...... A-1
Printing ...... A-1
Functions ...... A–2
Electrical and Mechanical....A-3
PARALLEL INTERFACE SPECIFICATIONS...... A-4
UNIVERSAL SERIAL BUS (USB) INTERFACE (HL-1050 Only)...... A–6
RESIDENT FONTS ...... A–7
SYMBOL SETS/CHARACTER SETS ...... A-9
INDEX ......Index-1
Definitions of Warnings, Cautions, and Notes
The following conventions are used in this User's Guide:

Warning
Indicates warnings that must be observed to prevent possible personal injury.

Caution
Indicates cautions that must be observed to use the printer properly or prevent damage to the printer.

Note
Indicates notes and useful tips to remember when using the printer.
To Use the Printer Safely

Warning
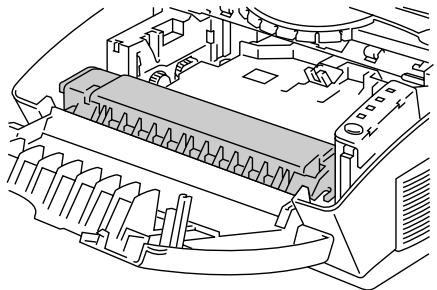
After you have just used the printer, some internal parts of the printer are extremely hot. When you open the top cover of the printer, never touch the shaded parts shown in the following illustration.
natural_image
Technical line drawing of an internal mechanical component (no text or symbols visible)
High Temperature
Inside the Printer

Warning
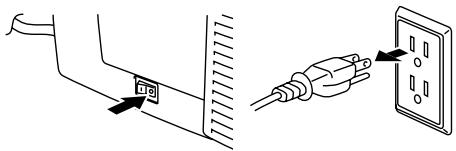
There are high voltage electrodes inside the printer. Before cleaning the printer, make sure to turn off the power switch and unplug the power cord from the power outlet.
natural_image
Diagram showing a cable connector with a plug inserted into an electrical outlet (no text or symbols present)Turning off the Switch and Unplugging the Printer
Shipment of the Printer
If for any reason you must ship your Printer, carefully package the Printer to avoid any damage during transit. It is recommended that you save and use the original packaging. The Printer should also be adequately insured with the carrier.
Warning
When shipping the Printer, the DRUM UNIT assembly including the TONER CARTRIDGE must be removed from the Printer and placed in the plastic bag. Failure to remove and place it in the plastic bag during shipping will cause severe damage to the Printer and will VOID THE WARRANTY.
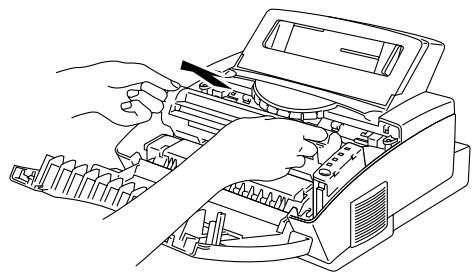
1 Remove the drum unit.
natural_image
Line drawing of hands operating a printer with a pen inserted (no text or symbols)2 Place it in the plastic bag and seal the bag completely.
natural_image
Technical line drawing of a mechanical component with no visible text or symbols3 Remove the AC cord and the extension wire of the paper tray from the printer. Re-pack the printer. See "REPACKING THE PRINTER" in Chapter 5.
natural_image
Technical line drawing of an open industrial device with internal components (no text or symbols)(For USA & CANADA Only)
For technical and operational assistance, please call:
| In USA | 1-800-276-7746 | (outside California) |
| 714-859-9700 Ext. 329 | (within California) | |
| In CANADA | 1-800-853-6660 | |
| 514-685-6464 | (within Montreal) |
If you have comments or suggestions, please write us at:
| In USA | Printer Customer SupportBrother International Corporation15 MusickIrvine, CA 92718 |
| In CANADA | Brother International Corporation (Canada), Ltd.- Marketing Dept.1, rue Hôtel de VilleDollard-des-Ormeaux, PQ, Canada H9B 3H6 |
BBS
For downloading drivers from our Bulletin Board Service, call:
In USA 1-888-298-3616
In CANADA 1-514-685-2040
Please log on to our BBS with your first name, last name and a four digit number for your password. Our BBS supports modem speeds up to 14,400, 8 bits no parity, 1 stop bit.
Fax-Back System
Brother Customer Service has installed an easy to use Fax-Back System so you can get instant answers to common technical questions and product information for all Brother products. This is available 24 hours a day, 7 days a week. You can use the system to send the information to any fax machine, not just the one you are calling from.
Please call 1-800-521-2846 (USA) or 1-800-681-9838 (Canada) and follow the voice prompts to receive faxed instructions on how to use the system and your index of Fax-Back subjects.
DEALERS/SERVICE CENTERS (USA only)
For the name of an authorized dealer or service center, call 1-800-284-4357.
SERVICE CENTERS (Canada only)
For service center addresses in Canada, call 1-800-853-6660
INTERNET ADDRESS
For technical questions and downloading drivers: http://www.brother.com
CHAPTER 1 INTRODUCTION
ABOUT THE GUIDEBOOKS
Finding Out How to Use the Printer
You have two guidebooks for this printer. Read each guidebook in the following order:
- Read the Quick Setup Guide to set up your printer and to ensure proper connection with your computer. It also contains information for installing the printer driver, fonts and Remote Printer Console Program. (HL-1040/1050 only)
-
Read this On-line User's Guide to get information about the following.
-
Features and operating environment requirements of your printer – Chapter 1
• Paper Handling – Chapter 2
• Control Panel – Chapter 3 - Options – Chapter 4
- Maintenance – Chapter 5
- Troubleshooting – Chapter 6
- Specifications – Appendices
- Index
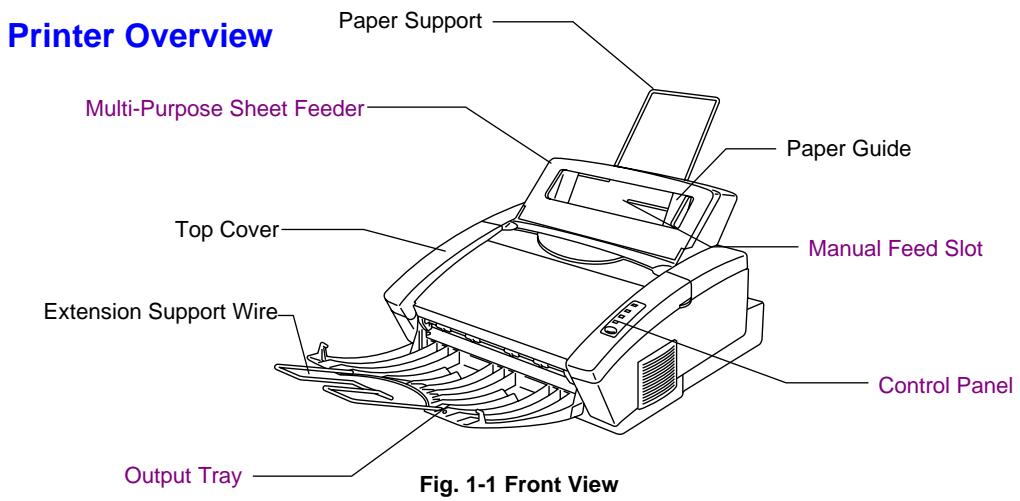
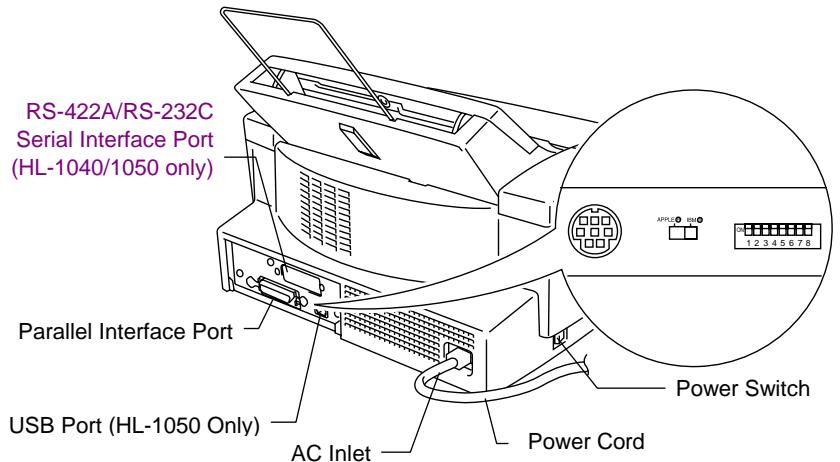
Fig. 1-2 Rear View
Note
An RS-422A/RS-232C Serial Interface Port, containing an RS-422A/RS-232C Slide Switch and DIP Switches for Serial setting is optionally available for the HL-1040/1050 series printers only. Some models may have this option pre-installed.
System Requirements in Brother Printing Solution for Windows
Check the following system requirements to setup and operate the printer in Brother Printing Solution for Windows:
- IBM PC or compatible with 80486 SX or higher microprocessor
- Parallel interface (or printer port)
- 4 MB or more of memory (8 MB recommended)
- 10 MB of space available on your hard disk for the printer driver and all fonts
- Microsoft Windows 95/98, 3.1/3.11 or Windows NT 4.0

Caution
The HL-820/1020 printer has been designed specifically for Windows 95/98, 3.1/3.11 and Windows NT 4.0. It cannot work in a DOS environment such as MS-DOS.
Features
This printer has the following features:
☐ High Resolution and Fast Printing Speed
HL-820 :
True 600 dots per inch (dpi) with microfine toner and up to 8 pages per minute (ppm) printing speed (A4 or Letter paper).
HL-1020 :
True 600 dots per inch (dpi) with microfine toner and up to 10 pages per minute (ppm) printing speed (A4 or Letter paper).
HL-1040 :
True 600 dots per inch (dpi) with microfine toner and up to 10 pages per minute (ppm) printing speed (A4 or Letter paper).
HL-1050 :
True 600 dots per inch (dpi) and 1200 x 600 dpi for graphics with microfine toner and up to 10 pages per minute (ppm) printing speed (A4 or Letter paper).
□ Versatile Paper Handling
The printer has a multi-purpose sheet feeder and straight paper path mechanism. Using this mechanism, you can load A4, letter, legal, B5, A5, A6 and executive sizes of paper, and various types of paper including envelopes, organizer paper, and your custom paper size. The multi-purpose sheet feeder also allows manual paper loading, so you can also use labels and transparencies.
□ Enhanced Printing Performance and User-Friendly Operation for Windows®
The dedicated printer driver and TrueType-compatible fonts for Microsoft® Windows 95/98 and Windows 3.1 are available on the floppy disk and CD-ROM supplied with your printer. You can easily install them into your Windows system using our installer program. The driver supports our unique compression mode to enhance printing speed in Windows applications and allows you to choose various printer settings including toner saving mode, custom paper size, sleep mode, gray scale adjustment, resolution and so forth. You can easily set these print options through the Printer Setup Menu within the Windows Control Panel.
☐ (For HL-1040/1050 Only) Remote Printer Console Program for DOS
The utility program, Remote Printer Console (RPC), is available on a floppy disk supplied with your printer. When you operate your computer in the DOS (Disk Operating System) environment, this program allows you to easily change the default settings of the printer such as fonts, page setup, emulations and so on.
This program also provides a status monitor program, which is a Terminate-and-Stay Resident (TSR) program. It can monitor the printer status while running in the background and report the current status or errors on your computer screen.
☐ (For HL-1040/1050 Only) Popular Printer Emulation Support
These printers support the following popular printer emulation modes. The HL-1040 supports HP LaserJet IIP, Epson FX-850, and IBM Proprinter XL.
The HL-1050 supports HP LaserJet 6P/6L, Epson FX-850 and IBM Proprinter XL. When you use DOS application software or Windows version 3.0 or earlier, you can use any of these emulations to operate the printer. The printer also supports auto-emulation switching between HP and Epson or HP and IBM. If you want to select the printer emulation, you can do it using the Remote Printer Console Program.
☐ Printer Status Monitor with Bi-directional Parallel Interface
The printer driver can monitor your printer's status using bi-directional parallel communications. A high quality bi-directional parallel printer cable is recommended.
The printer status monitor program can show the current status of your printer. When printing, the animated dialog box appears on your computer screen to show the current printing process. If an error occurs, a dialog box will appear to let you know what to correct. For example: when your printer is out of paper, the dialog box will display “Paper Empty” and instructions for the proper corrective action.
☐ (For HL-1050 Only)
USB Interface
The Universal Serial Bus Interface is an interface which allows the printer to connect to multiple peripheral devices.
☐ (For HL-1050 Only)
High Resolution Control & Advanced Photoscale Technology
High resolution control (HRC) technology provides clear and crisp printouts. Use this function to get smooth text print quality. Advanced Photoscale Technology enables the printer to print graphics in 256 grayscales, producing nearly photographic quality. Use this function when you want to print photographic images.
☐ (For HL-1040/1050 Only)
Optional Apple Macintosh ^® Interface
An optional Apple Macintosh serial interface is available, which allows your printer to be connected to Apple Macintosh computers. With this option, you can use your printer with both an IBM PC, or compatible, and an Apple Macintosh at the same time. This optional interface board can be used as an RS-422A interface for Macintosh or an RS-232C serial interface for an IBM PC or compatible.
□ Enhanced Memory Management
The printer provides its own data compression technology in the printer hardware and the supplied printer driver software, which can automatically compress graphic data and font data efficiently into the printer's memory. You can avoid memory errors and print most full page 600 dpi graphic and text data, including larger fonts, with the printer's standard memory.
Environment-Friendly
Economy Printing Mode
This feature will cut your printing cost by saving toner. It is useful to obtain draft copies for proof-reading. You can select from two economy modes—25% toner saving and 50% toner saving—through the Windows printer driver supplied with your printer.
Sleep Mode (Power Save Mode)
When the printer is not used for a certain amount of time, sleep mode automatically reduces power consumption. The printer consumes less than 13 W when in sleep mode.
Low Running Cost
Since the toner cartridge is separate from the drum unit, you need to replace only the toner cartridge after approximately 2,400 pages, which is cost effective and ecologically friendly. (Some models are supplied with a starter toner cartridge which must be replaced after 1,000 pages.)
The actual number of pages printed with each toner cartridge may vary depending on your average type of print job.
Please take note of the following before using the printer.
Power Supply
Use the printer within the specified power range.
AC power: ±10% of the rated power voltage in your country
Frequency: 50/60 Hz (220 V–240 V) or 50/60 Hz (110–120 V)
The power cord, including extensions, should not exceed 5 meters (16.5 feet).
Do not share the same power circuit with other high-power appliances, particularly an air conditioner, copier, shredder and so on. If it is unavoidable that you must use the printer with these appliances, it is recommended that you use an isolation transformer or a high-frequency noise filter.
Use a voltage regulator if the power source is not stable.
Environment
The printer should be installed near a power outlet, which is easily accessible.
Use the printer only within the following ranges of temperature and humidity.
Ambient temperature: 10^ C to 32.5^ C ( 50^ F to 90.5^ F)
Ambient humidity: 20% to 80% (without condensation)
The printer should be used in a well ventilation room.
Place the printer on a flat, horizontal surface.
Keep the printer clean. Do not place the printer in a dusty place.
Do not place the printer where the ventilation hole of the printer is blocked.
Do not place the printer where it is exposed to direct sunlight. Use a blind or a heavy curtain to protect the printer from direct sunlight when the printer is unavoidably set up near a window.
Do not place the printer near devices that contain magnets or generate magnetic fields.
Do not subject the printer to strong physical shocks or vibrations.
Do not expose the printer to open flames or salty or corrosive gasses.
Do not place objects on top of the printer.
Do not place the printer near an air conditioner.
Keep the printer horizontal when carrying.
Do not cover the slots in the top cover.
CHAPTER 2 PAPER HANDLING
PAPER SPECIFICATIONS
The printer can handle paper that has the following specifications.
| Paper Type | Paper Size |
| Cut sheet | A4, Letter, Legal, B5(JIS/ISO), A5, A6, Executive, Custom size (70-216 x 127-356 mm, 2.75-8.5 x 5-14 inches) |
| Envelopes | DL, C5, COM-10, Monarch, 9” x 12” |
| Organizer | Day-Timer ^ J, K, L(70-216 x 127-356 mm, 2.75-8.5 x 5-11 inches) |
| Labels and Transparencies | A4, Letter (70-216 x 127-356 mm, 2.75-8.5 x 5-14 inches) |
Paper Capacity in Feeder
Multi-purpose Sheet Feeder:
A4/Letter paper: Up to 22 mm (0.87 inch) in height (up to the mark) Approx. 200 sheets of 75 g/m^2 (20 lb.) 30 sheets of 157 g/m^2 (42 lb.) A4/Letter paper
Legal paper: 100 sheets
Envelopes, Organizer:10 sheets
Output Tray: Approx. 100 sheets of 75 g/m^2 (20 lb.) A4/Letter paper
| Cut Sheet | Envelope | |
| Basis Weight | 60 to 157 g/m2(16 to 42 lb.) | 75 to 90 g/m2(20 to 24 lb.)single thickness |
| Caliper | ±0.03 to ±0.08 in.(0.08 to 0.2 mm) | 0.0033 to 0.0058 in.(0.084 to 0.14 mm)single thickness |
| Moisture Content | 4% to 6% by weight | 4% to 6% by weight |
Recommended paper
Cut sheet: Xerox 4200
(in USA) / Xerox 80 Premier Paper (in Europe) or equivalent
Label: Avery laser label or equivalent
Transparency: 3M CG3300 or equivalent
Remarks
It is recommended that you test paper, especially special sizes and types of paper and heavy paper, on this printer before purchasing large quantities.
Avoid using coated paper, such as vinyl coated paper.
Avoid using preprinted or highly textured paper.
Use a recommended type of paper, especially plain paper and transparencies, for optimum printing. For more information on paper specifications, consult your nearest authorized sales representative or the place you purchased your printer.
If the paper has problems feeding from the multi-purpose sheet feeder, use the manual feed slot and try again.
Use neutral paper. Do not use acid paper to avoid any damage to the printer drum unit.
You can use recycled paper in this printer.
Make sure to select the appropriate media type in the printer driver for optimum printing.
The print quality might be degraded or the life of drum unit might be shortened with the following usage.
- Using paper with narrower width than A4/Letter continuously
- Using the printer for a special job (i.e. printing of name cards etc.)
Cut Sheet
We recommend you use long-grained paper for the best print quality. If you are using short-grained paper, it could be the cause of paper jams.
Labels / Transparencies
Avoid feeding labels with carrier sheets exposed, or your printer will be damaged.
We recommend you use label or transparencies which are designed for use in laser printers.
Special Paper
Before using paper with holes such as organizer sheets, you must fan the stack well to avoid paper jams and misfeeds.
Do not use organizer sheets that are stuck together. The paste used might cause damage to the printer.
Before using any paper, make sure that it is not curled. If it is, you should straighten the paper as much as possible. Feeding curled paper can cause paper jams and misfeeds.

natural_image
Line drawing of two hands folding a card into a stack of cards (no text or symbols)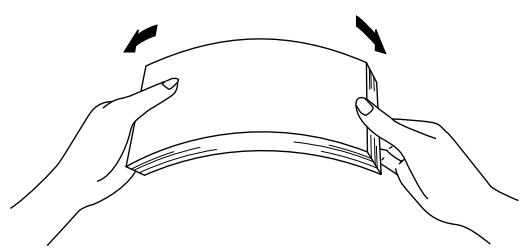
natural_image
Line drawing of two hands holding a folded paper or card, with arrows indicating fold direction (no text or symbols)Fig. 2-1 Fan the Paper and Straighten the Paper
The printer can handle 9" width paper. However, you may get stains on the paper outside 8.5" width or on the back of the paper.
If different types of paper are loaded at the same time in the feeder, it may cause paper jams or mis-feeds.
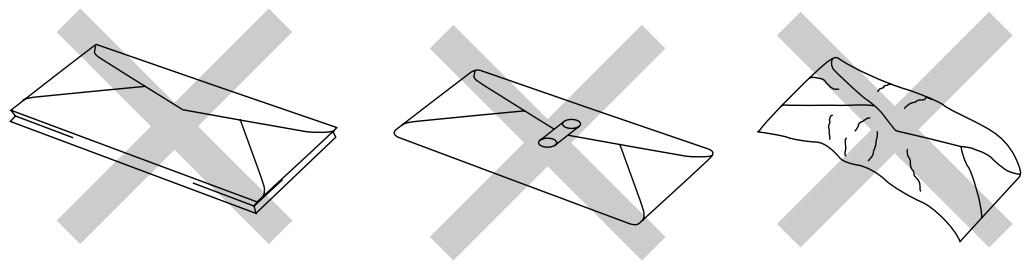
Envelopes
The following types of envelopes are not recommended for use.
- Damaged, curled, wrinkled, or irregularly shaped envelopes
- Extremely shiny or highly textured envelopes
- Envelopes with clasps
- Envelopes with self-adhesive closures
- Envelopes of baggy construction
- Envelopes not sharply creased
- Embossed envelopes
- Envelopes already printed by a laser printer
- Envelopes pre-printed on the inside
- Envelopes that cannot be arranged uniformly when placed in a pile
natural_image
Three technical line drawings of folded paper sheets with geometric cutouts and shading patterns (no text or symbols)Fig. 2-2 Envelopes
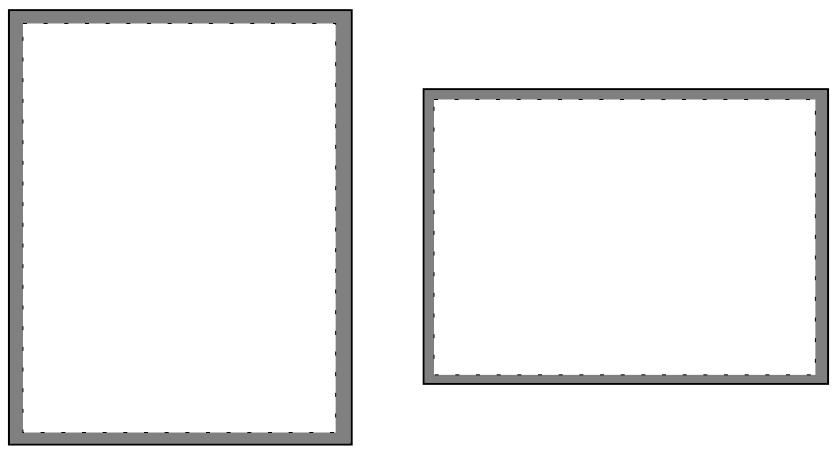
Printable Area The figure below shows the physically printable area. (Except 9"x12" envelope)
natural_image
Two empty rectangular frames with gray borders, no text or symbols presentUnprintable area
Approximately 4 mm(0.16 inch) for any sizes of paper
Fig. 2-3 Printable Area
MULTI-PURPOSE SHEET FEEDER
The printer has a multi-purpose sheet feeder that can feed plain paper, envelopes, transparencies and organizer paper.
To use the multi-purpose sheet feeder, follow these steps:
- Make sure that you have selected the proper paper source, paper size, media type and orientation.
Note
- You may select the proper paper source, paper size, and orientation in your application software.
-
If your application software does not support your custom paper size, select the next paper size up that is closest but larger than the custom size. Then adjust the print area by changing the right and left margins in your application software.
-
Make sure that the multi-purpose sheet feeder contains the selected size of paper in the selected orientation. If necessary, change the paper in the feeder.
- Send your file or document to the printer.
When the printer receives data, it begins the print process by loading paper from the multi-purpose sheet feeder. If the printer is in sleep mode when it receives data, it will wake up and start the printing process automatically.
Loading Paper into the Feeder
To load paper into the feeder, follow these steps.
- Open the multi-purpose sheet feeder by gently pulling the lid forward towards you. (①)
- Load paper into the multi-purpose sheet feeder with the printing surface face down. (②)

Caution
- The feeder can hold up to 200 sheets of plain paper (75 g/m ^2 , 20 lb.). If you load too many sheets, paper jams could occur.
• Make sure that the paper is stacked below the ▼ mark. - If there is still some paper in the feeder, you must first remove it, put it together with the new paper and then insert the stack in the feeder.
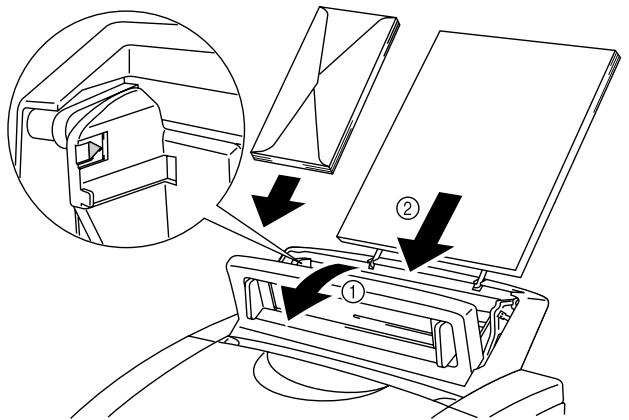
Fig. 2-4 Opening the Feeder and Loading Paper or Envelopes in the Feeder
Note
If you load envelopes in the feeder, make sure they are inserted in the direction shown above.
- Move the paper guide to the paper width. (①)

Caution
Failure to set the paper guide to the paper size may cause paper skew or jams.
- Close the multi-purpose sheet feeder. (②)
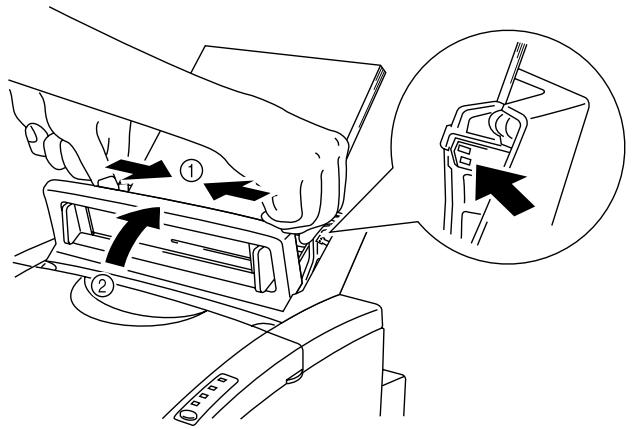
Fig. 2-5 Moving the Paper Guide and Closing the Feeder
Note
If the multi-purpose sheet feeder runs out of paper when you try to print, the Alarm and Paper lamps blink to alert you to a paper empty error.
You have to load paper in the feeder and push the panel switch to cancel the alarm and continue printing. If paper jams in the printer, the Alarm and Paper lamps also blink. If the error is a paper jam, clear it referring to “PAPER JAMS” in Chapter 6.
Two Side Printing (Manual Duplexing)
The supplied printer driver for Windows 95/98 or Windows 3.1 enables manual duplex printing. For more information about settings, see the help text in the printer driver.
The printer prints all the even numbered pages on one side of the paper first, and then prints all the odd pages on the reverse side of the paper.
When you have finished printing the even numbered sides of the paper, the driver instructs you to re-insert the paper by a pop-up message on the computer screen. Follow the instructions on how to reinsert the paper.
Note
- Before re-inserting the sheets, you have to straighten them, or you will get paper errors.
- The use of very thin or very thick paper is not recommended.
- If you encounter a double feeding error, we recommend that you hold all sheets of paper except the front sheet while the paper is feeding.
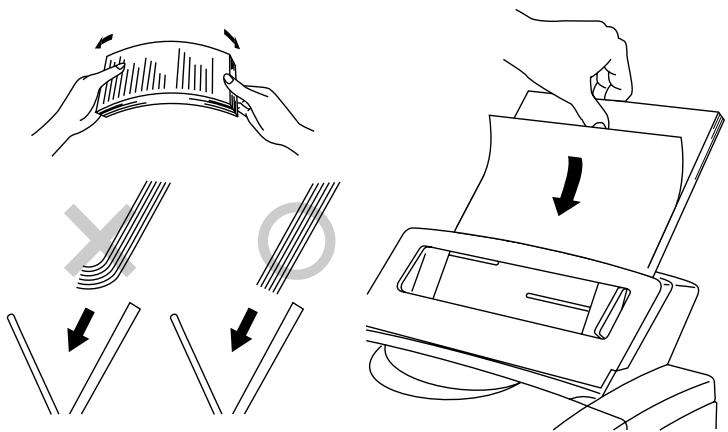
Fig. 2-6 Notes for Manual Duplexing
Note
When you use the Manual Duplex function, it is possible that paper jams may occur or print quality might not be satisfactory.
The multi-purpose sheet feeder also has a manual feed slot. You can manually load paper sheet by sheet from this slot. You do not need to remove paper from the multi-purpose sheet feeder when using the manual feed slot.
☐ When you load one sheet of paper manually:
You do not need to choose manual feed in the Setup dialog box of your printer driver. Holding the selected size of paper in the selected orientation (Portrait or Landscape), place the side of the paper you wish to print on face down into the manual feed slot. Align the paper at the center of the manual feed slot, and be sure to insert it all the way until the top edge of the paper (or envelope) strikes the bottom of the manual feed slot to avoid paper mis-feeding. (①) Move the paper guide of the manual feed slot to the paper width you are using. (②)
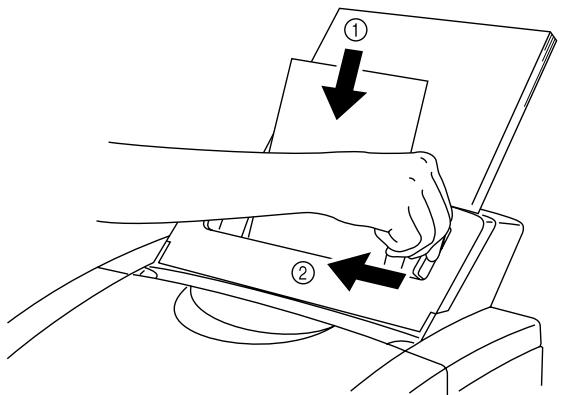
Fig. 2-7 Moving the Paper Guide
☐ When you load more than one sheet of paper manually:
Open the Setup dialog box of the supplied Windows printer driver and choose Manual Feed in the Paper Source section. Follow the above instructions to load the first page. The printer automatically starts printing. After the first page is printed, the dialog box appears and prompts you to load the next page. Load a sheet and choose OK to resume printing. Repeat these steps until you have finished printing all the pages.
Caution
If bi-directional communication is not operational between the printer and the computer, such as when the printer is shared on a network, the dialog box will not appear to load the next page. Manual paper feeding is not recommended when your printer is attached to a network.
Note
- Insert paper firmly into the manual feed slot.
- Be sure to load sheet by sheet when using the manual feed slot.
OUTPUT TRAY AND PAPER SUPPORT WIRE
The printer ejects paper with printed surfaces face down into the output tray at the front of the printer.
When the output tray is closed, the ejected paper comes out sheet by sheet through the slit at the front. When you open the tray, sheets can be stacked on the tray.
Follow these steps to open the output tray:
- Pull the top of the tray down (①).
- Extend the extension support wire (②).
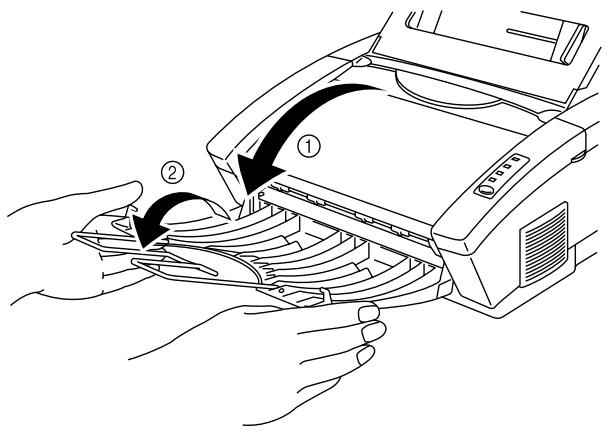
Fig. 2-8 Opening the Output Tray and Extending the Extension Support Wire
You can stack up to 100 sheets in the output tray.
Caution
- When you use transparencies, remove each sheet immediately after printing. Stacking sheets may cause paper curled or paper jam.
- Continuous printing with the output tray closed may cause condensation inside the output tray.
CHAPTER 3 CONTROL PANEL
LAMPS AND SWITCH
This section refers to the following lamps and switch on the printer control panel.
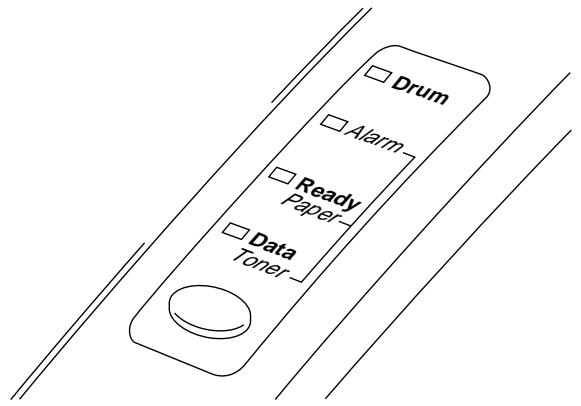
flowchart
graph TD
    A["Drum"] --> B["Alarm"]
    B --> C["Ready Paper"]
    C --> D["Data Toner"]
Fig. 3-1 Lamps and Switch on Control Panel
Note
When the power switch is off or the printer is in sleep mode, all lamps including the Ready lamp are off.
Ready (Paper) Lamp
The Ready lamp indicates the current status of the printer.
| Lamp | Printer status |
| Off | Thepowerswitch is off or the printer is in sleep mode. If the printer is in sleep mode, it will wake up automatically when it receives data or you press the control panel switch. |
| Blinking | The printer is warming up.(Blinking at 1 second intervals) |
| Blinking | The printer is cooling down and stops printing until the printers internal temperature lowers.(Blinking at 2 seconds intervals) |
| On | The printer is ready to print. |
This lamp also works as the Paper lamp with the Alarm lamp. They blink simultaneously to indicate a paper error. See “Operator Calls” Chapter 6.
Data (Toner) Lamp
The Data lamp indicates the current status of the print data process.
| Lamp | Printer status |
| Off | The printer has no print data. |
| ○ | |
| Blinking | The printer is receiving data from the computer or the printer is processing data in memory. |
| ○↔● | |
| On | Print data remains in the printer memory. If the Data lamp is on for a long period of time and nothing has printed, you need to press the switch to print the remaining data. |
This lamp also works as the Toner lamp with the Alarm lamp. They blink simultaneously to indicate a toner error. See “REPLACING THE TONER CARTRIDGE” in Chapter 5 and “Operator Calls” in Chapter 6.
Drum Lamp
The Drum lamp indicates the drum unit is nearly at the end of its life.
| Lamp | Printer status |
| Off | The drum unit can be used. |
| ○ | |
| On | The drum unit is nearly at the end of its life.Installing a new drum unit turns off this lamp. See “REPLACING THE DRUM UNIT” in Chapter 5. |
| ● |
Alarm Lamp
The Alarm lamp blinks to indicate a printer error status such as “COVER OPEN” and “MEMORY FULL.” If any other error occurs, the printer indicates the error by blinking the Alarm lamp with another lamp or by printing an error report.
Note
The Ready, Data and Drum lamps are used to indicate printer errors with the Alarm lamp. See “ALARM INDICATIONS AT A GLANCE” in Chapter 6 and take corrective action for the error.
Switch
This switch will be used for the following purpose depending on the situation.
Cancel printing
If you press the switch during printing, the printer immediately stops printing and ejects the paper.
Wake-up
If the printer is in sleep mode, pressing the switch wakes it up into the ready state.
Form Feed
If the Data lamp is on, press the switch. The printer prints any data remaining in the printer memory: this operation is called “Form Feed.”
Error Recovery
If an error occurs, the printer will recover from some errors automatically. If the error does not clear automatically, press the switch to clear the error and continue printer operation.
Other Control Features
The printer has the following useful features:
Sleep Mode
When the printer does not receive data for a certain period of time (timeout), it enters sleep mode. Sleep mode acts as though the printer was turned off. The default time-out is 5 minutes. While the printer is in sleep mode, all the lamps are off and it is as if it was turned off, but the printer can still receive data from the computer. Receiving a print file or document automatically wakes up the printer to start printing. Pressing the switch also wakes up the printer.
Note
- When the printer goes into sleep mode, the fan will not stop until the printer engine has cooled down.
- Sleep mode allows the print engine to cool, so the temperature of your room and how long the printer has been in sleep mode affects the warm-up time. This warm-up time can take up to 30 seconds. The Ready lamp blinks to indicate that the printer is warming up.
- You can change the time out for the sleep mode with the supplied printer driver (all models) or Remote Printer Console program (HL-1040/1050 only). Refer to the Help section in the printer driver or RPC program for more information about the sleep mode setting.
Test Print Mode
The printer has the following test print mode. Follow these steps:
-
Make sure that the top cover is closed.
-
Hold down the switch and turn on the power switch. Keep the switch depressed until the Drum lamp comes on.
The Drum lamp lights to indicate that the printer is in the test print mode.
- Press the switch again to execute the test print or hold down the switch to select another option and release the switch to execute the selected option.
The test print mode varies depending upon the printer model as follows:
| Lamp Lit | Choice | Function |
| Drum | Test sample page | The printer prints a test sample page.The printer returns to the ready status after printing. |
| Alarm | Print Config & Print Fonts I | The printer prints the current configuration of the printer and a list of the internal fonts.The printer returns to the ready status after printing. (HL-1040/1050 only) |
| Ready | Factory Reset | The printer is restored to the factory setting and permanent fonts and macros are cleared.The printer returns to the ready status after printing. (HL-1040/1050 only) |
| Data | Hex Dump Print | The printer can print data as hexadecimal values, so that you can check data errors and problems.To exit from this mode, you have to turn off the printer. (HL-1040/1050 only) |
CHAPTER 4 OPTIONS
SERIAL INTERFACE BOARD RS-100M (For HL-1040/1050 Only)
To connect the printer to a DOS computer with a serial interface or to an Apple Macintosh computer, you need to install the optional serial interface board. When you have installed the serial interface board, you can share the printer between two computers (two IBM compatible PCs or one IBM compatible PC and one Apple Macintosh) using the parallel and serial interfaces at the same time. Automatic interface selection is a standard feature.
Note
- The serial interface board for this printer is optional, but in some countries the serial interface board may have been installed by either the factory or dealer.
- The serial interface for Apple Macintosh (RS-422A) will only print at 300 dpi.
The serial interface board is installed onto the main controller board inside the printer. For the details about installation, see the instruction guide which was provided with the serial interface board.
Selecting the RS-422A (Apple) or RS-232C (IBM) Serial Interface
Note
This section is only for printer models which have had the serial interface installed.

Caution
Be sure to select the serial interface type to match your computer as follows:
- For Apple Macintosh computers: you should not have to change any settings because the Apple (RS-422A) setting is factory selected (default).
- For IBM compatible PCs you should move the switch to the IBM (RS-232C) setting.
- If you are using an Apple Macintosh on the RS-422A port and an IBM compatible PC on the parallel port, it is not necessary to make any changes to the switch setting.
If necessary, select the interface type as follows:
- Make sure that the printer is in the off-line state.
- Select the RS-422A(Apple) or RS-232C(IBM) interface by changing the serial interface slide switch to the right for IBM(RS-232C) or to the left side for Apple(RS-422A).
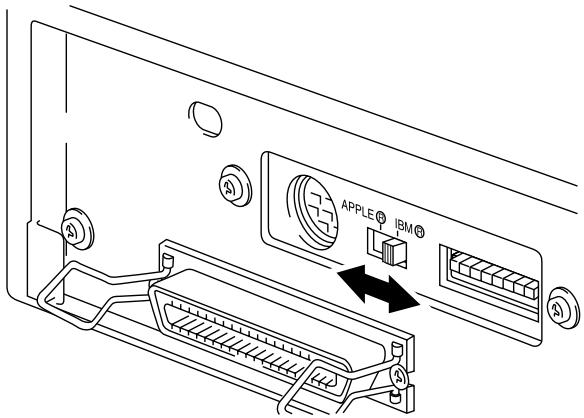
Fig. 4-1 Selecting the RS-422A (Apple) or RS-232C (IBM) Serial Interface
Setting the Serial Interface Parameters
Note
This section is only for printer models which have had the serial interface installed.

Caution
Be sure to set the parameters to match your computer as follows:
- Never change the RS-422A parameters for Apple Macintosh computers. Because the RS-422A parameters have been correctly set at the factory for Apple Macintosh computers, you do not need to change the settings. You may skip this section. If you change parameters for the RS-232C serial interface and you switch back to RS-422A for Apple Macintosh computers, be sure to restore the parameters to the factory settings.
- Set the RS-232C parameters to match your computer. You can set serial settings in several different places, within your DOS application, within the Windows Printer Icon (for Windows application software only), or within your AUTOEXEC.BAT file using MODE commands. For information on serial interface parameters, see the user's guide of your computer or software.
If necessary, set the serial interface parameters as follow:
- Make sure that the printer is in the off-line state.
- Set the serial interface parameters by moving up (on) or down (off) the selectors of the dual in-line package (DIP) switch.
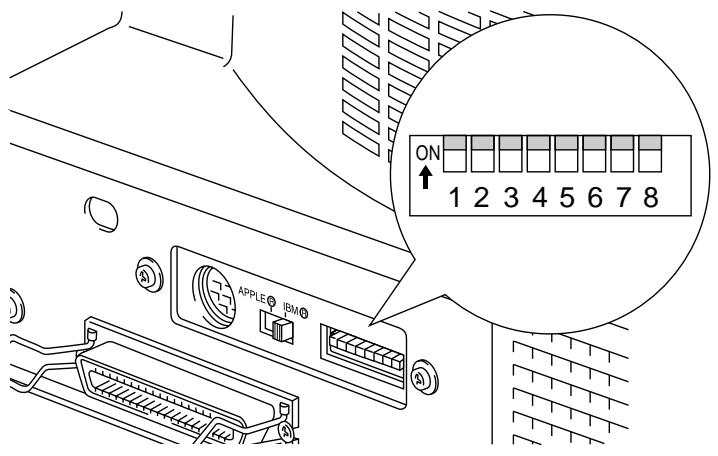
Fig. 4-2 Setting the Serial Interface Parameters
Table 1: Serial Interface Parameters Settings
| Selector | Parameters | On (up) | Off (down) |
| 1 | Baud Rate | — See Table 2. — | |
| 2 | Baud Rate | — See Table 2. — | |
| 3 | Data Length | 7 bits | 8 bits |
| 4 | Stop Bit | 2 bits | 1 bit |
| 5 | Parity | — See Table 3. — | |
| 6 | Parity | — See Table 3. — | |
| 7 | Protocol | Xon/Xoff + DTR | DTR only |
| 8 | Robust Xon | On | Off |
Table 2: Baud Rate Settings
| Selector 1 | Selector 2 | For RS-422A | For RS-232C |
| Off | Off | 57600 | 9600 |
| On | Off | 9600 | 4800 |
| Off | On | 1200 | 1200 |
| On | On | 19200 | 19200 |
Table 3: Parity Settings
| Selector 5 | Selector 6 | Parity |
| On | On | Odd |
| On | Off | Even |
| Off | — | None |
Note
- The factory settings are indicated in bold.
- If the robust Xon setting is turned on with selector 8, the printer sends Xon signals at one second intervals to the connected computer until it receives data. It is effective only if selector 7 is set to the On position for the Xon/Xoff plus DTR setting.
Connecting the Serial Interface Cable
Note
This section is only for printer models which have had the serial interface installed.
You need a serial interface cable with an 8-pin, DIN-type connector to connect your printer and computer.
Note
- Consult your dealer for a serial interface cable.
- If you are a Macintosh user, you can easily find the necessary cable at a local computer store. Look for Apple serial cables labeled as “Macintosh to ImageWriter II™ or “Macintosh to Personal LaserWriter™ 300” or the “Apple System Peripheral 8 Cable”. Do not purchase a serial cable labeled as “Straight-through” or “LocalTalk.”
- If you are a PC user, you need to purchase a special serial cable from your dealer. If you have a 9-pin connector on your computer, look for a cable labeled “IBM AT to ImageWriter II” cable. If you have a 25-pin connector, look for a cable labeled “DB25 to ImageWriter II.” These cables most likely would be found in the Apple Macintosh section at your computer dealer. For more information about the interface specification, consult your dealer.
You can connect a parallel and a serial interface cable at the same time. The auto interface selection function allows you to share the printer with two computers. To do this, connect the parallel interface cable and then connect the serial interface cable as follows:
- Make sure that the power switch is turned off.

Caution
Be sure to turn off the power switch before connecting or disconnecting the interface cables, or the printer may be damaged.
- Insert and secure the parallel interface connector into the parallel interface port of your printer.
- Insert and secure the serial interface connector into the serial interface port of your printer.
- Turn on the power switch.
ADDITIONAL MEMORY (HL-1050 Only)
The HL-820/1020/1040 printers have 2 Mbyte of standard memory and additional memory cannot be fitted.
The HL-1050 printer has 4 Mbyte of standard memory and a slot for optional additional memory. The memory can be expanded up to 36 Mbytes total by installing a commercially available single in-line memory module (SIMM).
Note
The HL-820/1020/1040 machine memory cannot be expanded.
Additional memory is useful and may be necessary if you are using the Page Protection function.
Minimum Memory Recommendation (including resident memory)
Page Protect = AUTO or Off
| 300 dpi | 600 dpi | |
| Letter/A4 | 2 MB | 2 MB |
| Legal | 2 MB | 2 MB |
Page Protect = Letter, A4, or Legal
| 300 dpi | 600 dpi | |
| Letter/A4 | 2 MB | 6 MB |
| Legal | 3 MB | 6 MB |
The following types of SIMM are recommended and can be installed:
• 1 Mbyte HITACHI HB56D25632B-6A, -7A
• 2 Mbytes HITACHI HB56D51232B-6A, -7A
• 4 Mbytes HITACHI HB56A132BV-7A, -7AL, -7B, -7BL
• 8 Mbytes HITACHI HB56A232BT-7A, -7AL, -7B, -7BL
• 16 Mbytes HITACHI HB56A432BR-6A, -7A
• 32 Mbytes HITACHI HB56A832BS-6A, -7A
This printer can accept memory SIMMS with the following specifications:
Speed 60 nsec - 80 nsec
Pin Type 72 pin
Height 35.00 mm (1.38") or less
Output 32 bit or 36 bit
Note
The HL-1050 can also support DIB graphics with a resolution of 1200 x 600 dpi under Windows 95/98/3.1 with the supplied printer driver. We recommend to expand the printer memory to avoid any memory full error.
Note
The printer has only one slot for a SIMM upgrade. If you want to increase your printer memory again after you have already installed a SIMM module into the slot, you will need to remove the previously installed SIMM first. For example if you had previously increased the printer memory from the standard 4MB to 12MB by adding an 8MB SIMM and you wish to increase your total memory to 36 MB, you need to remove the installed 8MB SIMM and install a new 32MB SIMM into the printer.
Installing the SIMM
To install the SIMM, follow these steps:
- Turn off the power switch and unplug the AC cord from the AC outlet. Disconnect the interface cable (printer cable) from the printer.
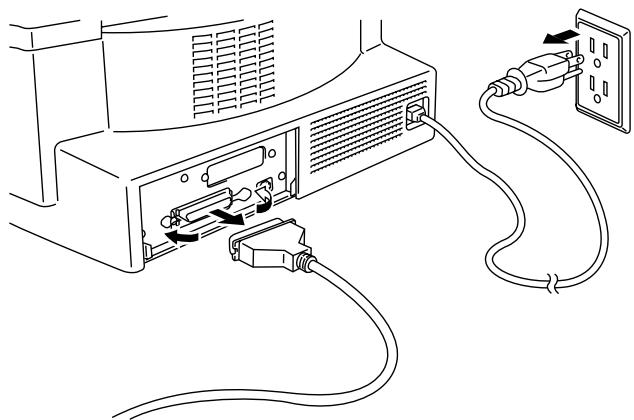
natural_image
Line drawing of an electronic device with cable and plug connections (no text or symbols)Fig. 4-3 Unplug the AC Cord and Disconnect the Interface Cable
Caution
Be sure to turn off the power switch and unplug the AC cord to the printer before installing or removing the SIMM to/from the main controller board.
- Unscrew the screws securing the rear plate of the main controller board to the printer and pull out the main controller board.
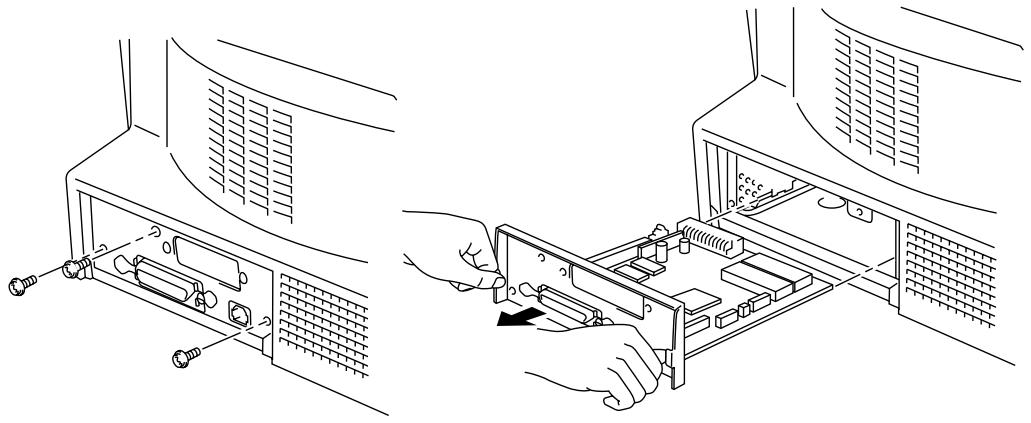
natural_image
Technical line drawing showing two views of a computer monitor with connectors and a cable connector (no text or symbols)Fig. 4-4 Removing the Main Controller Board
- Unpack the SIMM and hold it by its edge.
Caution
SIMM boards may be damaged by even a small amount of static electricity. Do not touch the memory chips or the board surface. When handling the board and before installing or removing it, wear an antistatic wrist strap, or frequently touch the surface of the antistatic package or bare metal on the printer.
- Install the SIMM into the slot and push it gently towares the vertical until it clicks into place.
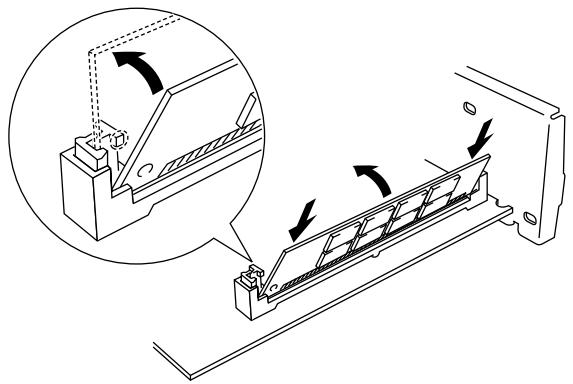
natural_image
Technical diagram of a mechanical assembly with an inset showing a close-up of a component being inserted (no text or symbols present)Fig. 4-5 Install the SIMM
- Install the main controller board into the printer by sliding it into the guide rails.
- Secure the main controller board with the four screws.
- Reconnect the interface cable (printer cable) from your computer. Plug the power cord into the AC outlet and turn on the power switch.
- To check that the SIMM is installed correctly, you may perform a Test Print "Print Configuration" which will print the current total memory size.
CHAPTER 5 MAINTENANCE
REPLACING THE TONER CARTRIDGE
The printer can print approximately 2,400 pages (5% coverage: A4/Letter) with one toner cartridge. When the toner cartridge is running low, the Alarm and Data (Toner) lamps blink once every 5 seconds to indicate toner low. Initially, some models are supplied with a starter toner cartridge which must be replaced after 1,000 pages.
Note
- Actual page count will vary depending on your average document type. (i.e.: standard letter, detailed graphics, etc.)
- It is recommended that you always keep a new toner cartridge ready for use for when you get the toner low warning.
- Discard the used toner cartridge according to local regulations. If you are not sure of them, consult your local dealer. Be sure to seal up the toner cartridge tightly so that toner powder does not spill out of the cartridge. Do not discard used toner cartridges together with domestic rubbish.
- It is recommended that you clean the printer when you replace the toner cartridge. See “CLEANING THE PRINTER” in this chapter.
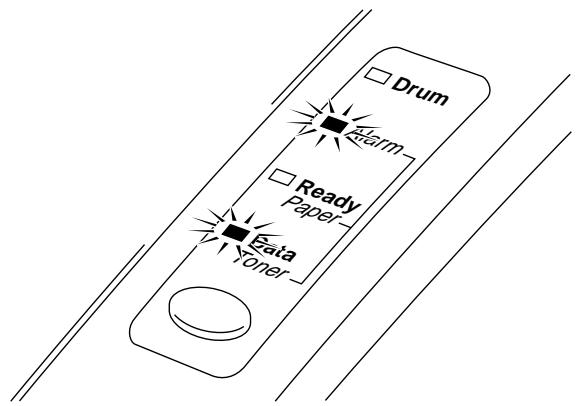
Fig. 5-1 Toner Low and Empty Indication
Caution
You may print approximately 100 pages after the first toner low indication. Both Alarm and Data (Toner) lamps will blink continuously to indicate that the toner is empty. Once this indication appears, your printer cannot resume printing until you have installed a new toner cartridge.

Caution
Keep the drum unit level after removing the toner cartridge, to avoid possible toner spill or scatter.
Follow these steps to replace the toner cartridge:
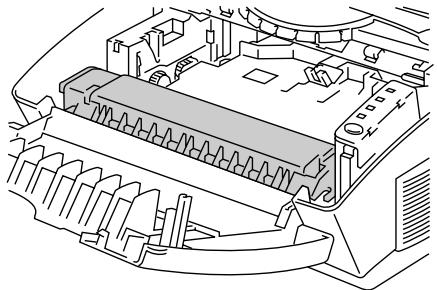
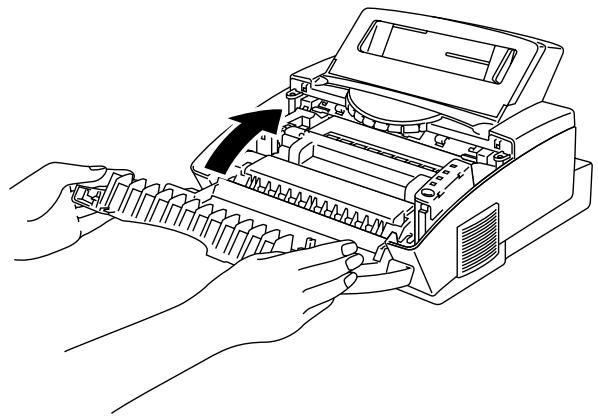
- Open the top cover towards you. Remove the drum unit by holding each side of the drum and gently lifting the drum forwards towards you.
natural_image
Line drawing of hands operating a printer with a magnified inset showing the internal components (no text or symbols)Fig. 5-2 Removing the Drum Unit
Note
It is recommended to put the drum unit on a piece of disposable paper or cloth in case of accidental toner spill or scatter.
Warning
After you have just used the printer, some internal parts of the printer are extremely hot. When you open the top cover of the printer, never touch the shaded parts shown in the following illustration.
natural_image
Technical line drawing of an internal mechanical component with no visible text or symbols
High Temperature
Fig. 5-3 Inside the Printer
- Gently turn the lever on the toner cartridge forward until it stops.
Note
The toner cartridge cannot be removed unless the shutter is completely closed by turning the lever fully to the front.
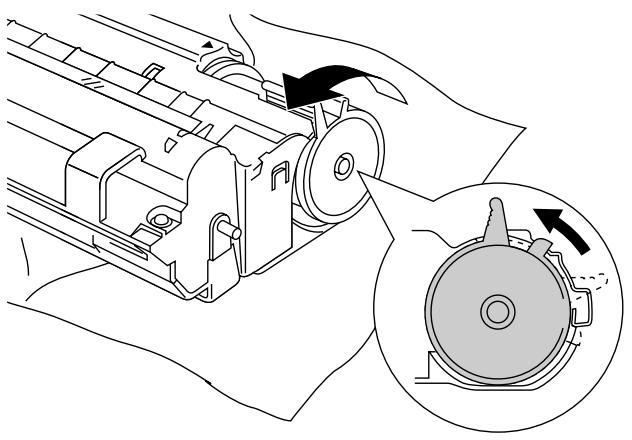
natural_image
Mechanical assembly diagram showing a motor and gear mechanism with directional arrows (no text or labels)Fig. 5-4 Turning the Lever to Close the Shutter
- Remove the old toner cartridge from the drum unit by pulling it out gently.

natural_image
Technical line drawing of a mechanical assembly with a hand operating a tool (no text or symbols present)Fig. 5-5 Removing the Old Toner Cartridge
Caution
Handle the toner cartridge carefully. If toner scatters on your hands or clothes, wipe or wash it off with cold water immediately.
- Unpack the new toner cartridge, gently shake it five or six times and then remove the protective part.
Caution
- Only unpack the toner cartridge immediately before installing it into the printer. If toner cartridges are left unpacked for a long period of time, the toner life is shortened.
- You can only use a Brother genuine toner cartridge (TN-300 series) which is specially formulated to ensure top print quality. Using another brand of toner cartridge could void your printer's warranty.
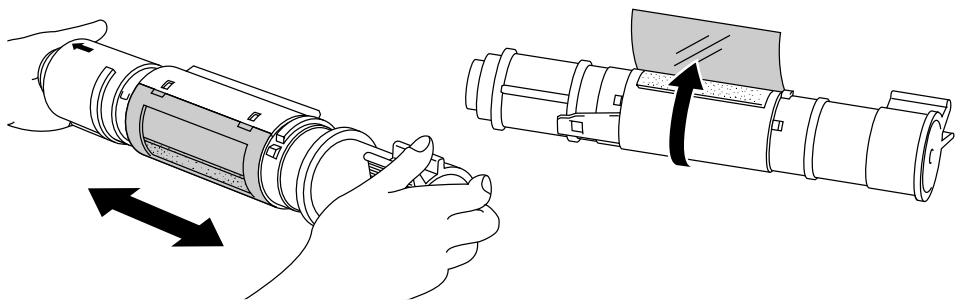
natural_image
Illustration of a hand holding a cylindrical device with an arrow indicating direction, next to a separate mechanical component (no text or symbols present)Fig. 5-6 Shaking the Toner Cartridge and Remove the Protective Part
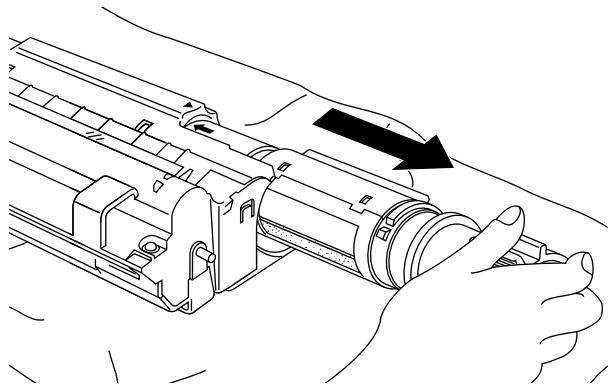
- Install the new toner cartridge into the right hand side of the drum unit. Make sure that the toner cartridge guide bar is exactly aligned with the guide slot in the drum unit and pushed fully home into the drum unit to ensure that the toner cartridge and the drum unit fit together correctly.

natural_image
Technical illustration of a mechanical assembly with hands operating a component, showing motion arrows and a magnified inset (no text or symbols)Fig. 5-7 Installing the Toner Cartridge into the Drum Unit
- Gently turn the lever on the toner cartridge backward until it stops.
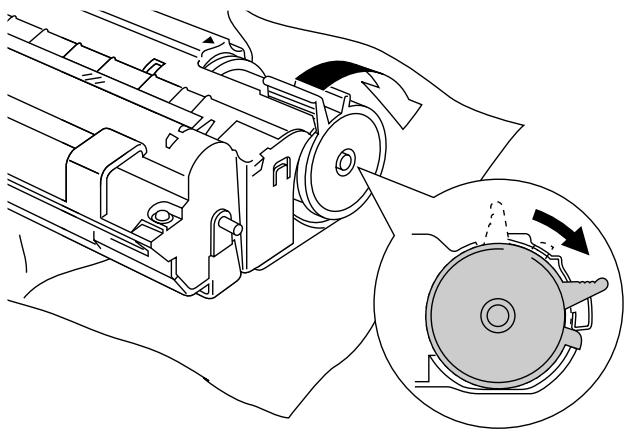
natural_image
Technical diagram of a mechanical assembly with an inset showing a circular component with directional arrows (no text or labels)Fig. 5-8 Turning the Lever to Open the Shutter
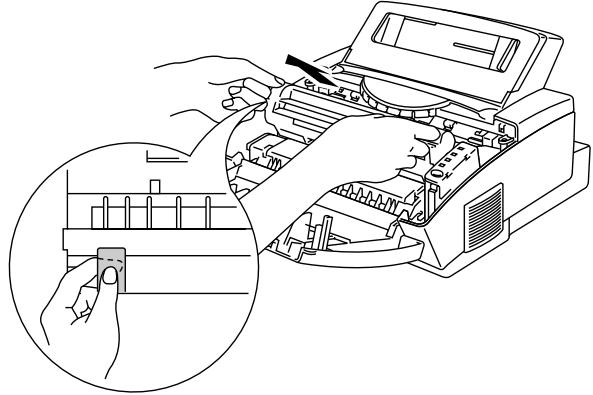
-
Turn the drum unit upside down gently.
-
Clean the primary corona wire inside the drum unit by gently sliding the blue tab to the right and left several times.

Fig. 5-9 Cleaning the Primary Corona Wire
- Re-install the drum unit into the printer and close the top cover.
natural_image
Line drawing of hands operating a printer with an arrow indicating the process (no text or symbols present)Fig. 5-10 Close the top cover
REPLACING THE DRUM UNIT
The printer uses a drum unit to create the print images on paper. If the Drum lamp is on, it indicates the drum unit is nearly at the end of its life. We recommend you prepare a new drum unit to replace the current one. Even if the Drum lamp is on, you may be able to continue to print without replacing the drum unit for a while. If there is a noticeable deterioration in the output print quality even before the Drum lamp lights, then the drum unit should be replaced.
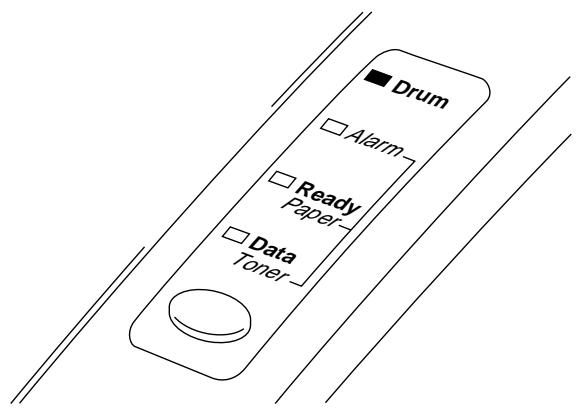
Fig. 5-11 Drum Unit Nearly at the End of its Life

Caution
- When removing the drum unit, handle it carefully as it may contain toner.
- You should clean the printer when you replace the drum unit. See “CLEANING THE PRINTER” in this chapter.
Note
The drum unit is a consumable, and it is necessary to replace it periodically.
There are many factors that determine the actual drum life, such as temperature, humidity, type of paper and toner that you use, the number of pages per print job, etc.. The drum life is estimated at approximately 20,000 pages at 20 pages per job and 8,000 pages at 1 page per job. The actual number of pages that your drum will print may be significantly less than these estimates. Because we have no control over the many factors that determine the actual drum life, we cannot guarantee a minimum number of pages that will be printed by your drum.
For best performance, use only genuine Brother toner, and the product should only be used in a clean, dust-free environment with adequate ventilation.
Follow these steps to replace the drum unit:
- Open the top cover towards you. Remove the old drum unit.
natural_image
Line drawing of hands operating a printer with a magnified inset showing the internal components (no text or symbols)Fig. 5-12 Removing the Drum Unit
Warning
After you have just used the printer, some internal parts of the printer are extremely hot. When you open the top cover of the printer, never touch the shaded parts shown in the following illustration.
natural_image
Technical line drawing of an internal mechanical component with no visible text or symbols
High Temperature
Fig. 5-13 Inside the Printer
- Remove the toner cartridge from the drum unit and keep it in a safe place. For more information, see “REPLACING THE TONER CARTRIDGE” in this chapter.
Note
- Discard the used drum unit according to local regulations. If you are not sure of them, consult your local dealer/retailer. Be sure to seal up the drum unit tightly so that toner powder does not spill out of the unit. Do not discard used drum units together with domestic rubbish.
- It is recommended to put the drum unit on a piece of disposable paper or cloth in case of accidental toner spill or scatter.
natural_image
Line drawing of a hand operating a mechanical component with an arrow indicating direction (no text or symbols present)Fig. 5-14 Removing the Toner Cartridge
- Unpack the drum unit and gently shake it five or six times horizontally.
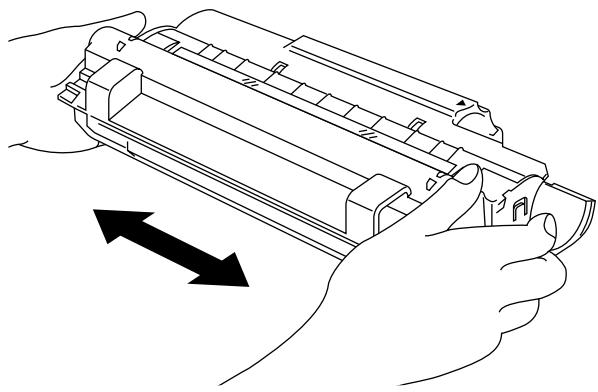
natural_image
Line drawing of hands holding a mechanical component with an arrow indicating direction (no text or symbols)Fig. 5-15 Shaking the Drum Unit
Caution
- Do not remove the starter sheet.
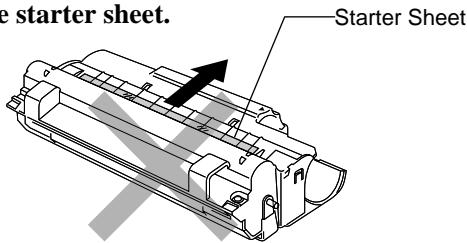
Fig. 5-16 Do Not Remove the Starter Sheet
- Only unpack a drum unit immediately before installing it into the printer. If an unpacked drum unit is subjected to excessive direct sunlight or room light, the unit may be damaged.
-
Handle the toner cartridge and the drum unit carefully as it contains toner. If toner scatters and your hands or clothes get dirty, wipe or wash it off with cold water immediately.
-
Install the toner cartridge into the new drum unit. For more information, see “REPLACING THE TONER CARTRIDGE” in this chapter.
- Install the new drum unit into the printer.
natural_image
Line drawing of a printer with hands operating the internal circuit, showing mechanical components and a magnified inset (no text or symbols)Fig. 5-17 Installing the Drum Unit
- Close the top cover.
- The printer automatically ejects the starter sheet. Ejecting this sheet resets the drum life alarm.
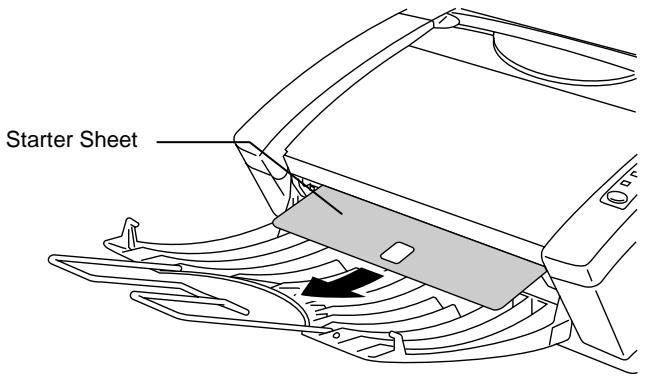
Fig. 5-18 Ejecting the Starter Sheet
Clean the printer exterior and interior periodically. If printed pages get stained with toner, clean the printer interior and drum unit.
Cleaning the Printer Exterior
Clean the printer exterior as follows:
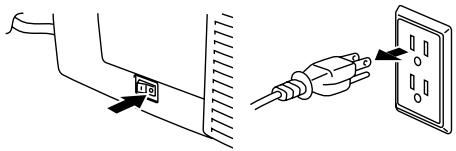
- Turn off the power switch and unplug the power cord.

Warning
There are high voltage electrodes inside the printer. Before cleaning the printer, make sure to turn off the power switch and unplug the power cord from the power outlet
natural_image
Diagram showing a cable connector inserted into a wall socket and connected to a plug (no text or symbols present)Fig. 5-19 Turning off the Switch and Unplugging
- Remove the paper in the multi-purpose sheet feeder.
- Use a damp cloth for cleaning.

Caution
Use water or neutral detergents for cleaning. Cleaning with volatile liquids such as thinners or benzene will damage the surface of the printer.
- Wipe dirt and dust away from the printer exterior and feeder with a cloth.
- Load paper into the multi-purpose sheet feeder, and plug in the power cord.
Cleaning the Printer Interior and Drum Unit
Clean the printer interior and the drum unit as follows:
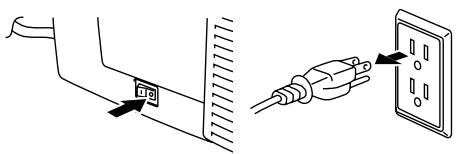
- Turn off the power switch and unplug the power cord.
Warning
There are high voltage electrodes inside the printer. Before cleaning the printer, make sure to turn off the power switch and unplug the power cord from the outlet.
natural_image
Diagram showing connection between a cable and a plug on an electrical outlet (no text or symbols present)Fig. 5-20 Turning off the Switch and Unplugging
- Open the top cover of the printer.
- Take the drum unit out of the printer and put it aside.
Warning
After you have just used the printer, some internal parts of the printer are extremely hot. When you open the top cover of the printer, never touch the shaded parts shown in the following illustration.
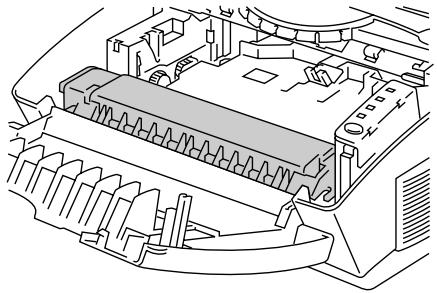
natural_image
Technical line drawing of an internal combustion engine component (no text or symbols)
High Temperature
Fig. 5-21 Inside the Printer
- Gently wipe the scanner window with a soft dry cloth.

Fig. 5-22 Cleaning the Scanner Window
Caution
- Do not touch the scanner window with your fingers.
-
Do not wipe the scanner window with cleaning alcohol (isopropyl).
-
Turn the drum unit upside down carefully.
Caution
Handle the drum unit carefully as it contains toner. If toner scatters and your hands or cloths get dirty, wipe or wash it off with cold water immediately.
Note
It is recommended to put the drum unit on a piece of disposable paper or cloth in case of accidental toner spill or scatter.
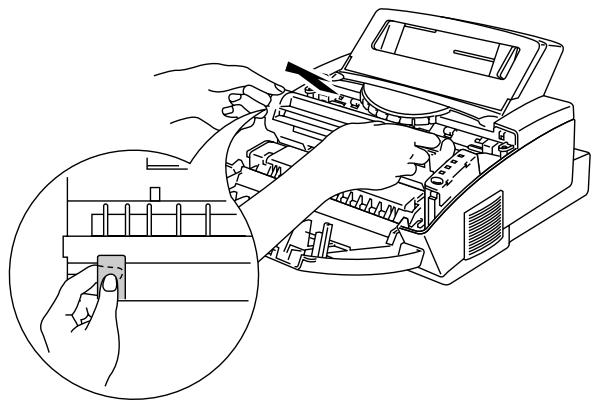
- Clean the primary corona wire inside the drum unit by gently sliding the tab to the right and left several times.
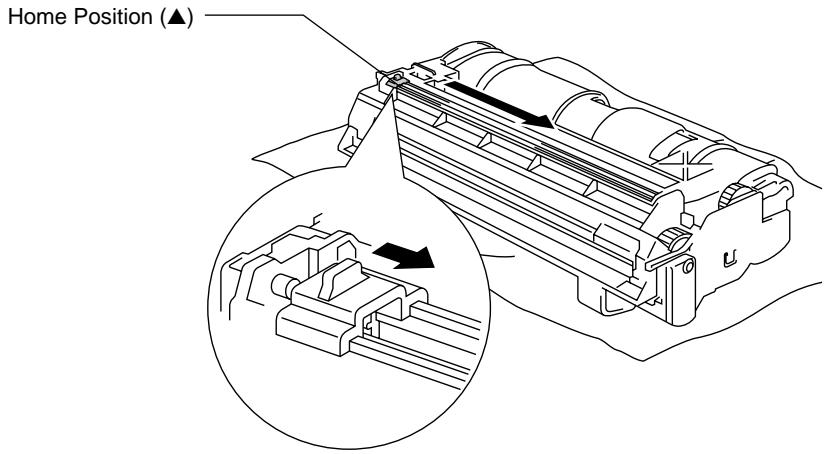
Fig. 5-23 Cleaning the Primary Corona Wire
- Return the tab to the home position (▲ mark position) before reinstalling the drum unit.
Caution
Be sure to position the tab at the home position, or printed pages may have vertical stripes.
- Install the drum unit into the printer.
See the section “REPLACING THE DRUM UNIT” in Chapter 5.
-
Close the top cover.
-
Plug in the power cord and turn on the power switch.
Caution
Whenever you transport the printer, use the packing materials which are provided with your printer. Also, follow the steps below to re-pack the printer, or the printer may be damaged which will void the printer's warranty.
- Turn off the power switch and unplug the printer from the AC outlet. Remove the AC cord and the extension wire of the paper tray from the printer.
- Open the top cover.
- Remove the drum unit assembly, referring to the previous section.
Note
Remove the drum unit assembly with the toner cartridge included.

natural_image
Line drawing of hands operating a printer with a magnified inset showing the internal components (no text or symbols)Fig. 5-24 Removing the Drum Unit Assembly
- Place the drum unit assembly in the plastic bag and seal the bag completely.
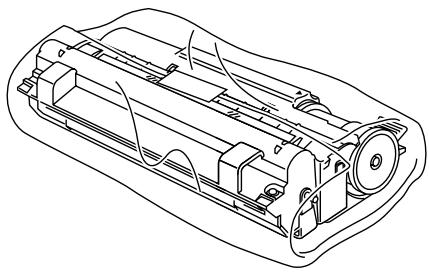
natural_image
Technical line drawing of a cylindrical mechanical device with internal components (no text or symbols)Fig. 5-25 Placing the Drum Unit in the Plastic Bag
- Close the top cover, the extension wire, and the output tray.
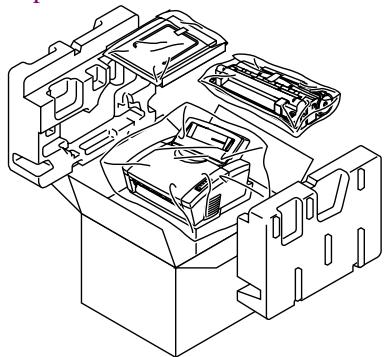
- Wrap the printer in the plastic bag and place it in the original carton box with the original Styrofoam packing material.
- Place any documents (manual and any documentation describing the reason for repacking the printer) and the drum unit assembly in the carton box as shown below.
- Close the carton box and tape it.
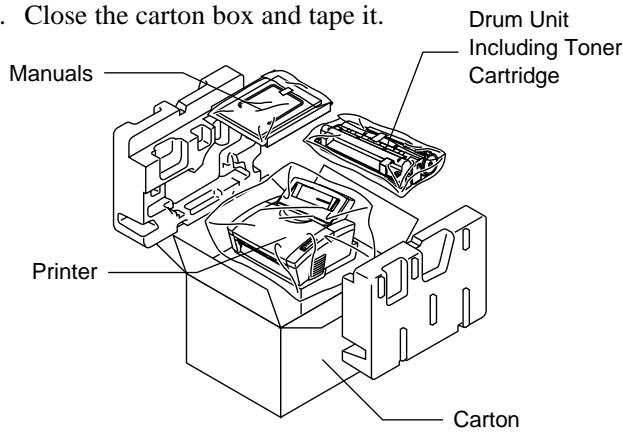
Fig. 5-26 Repacking the Printer
CHAPTER 6 TROUBLESHOOTING
ALARM INDICATIONS AT A GLANCE
Operator Calls
If a recoverable error occurs, the printer indicates an ‘operator call’ by blinking the Alarm lamp and any of the following lamps.
Find the error and take the proper action to correct it. The printer automatically recovers from most errors, but you may need to reset the printer with the panel switch as described below.
| Blinking Lamp | Error | Action |
| Paper Alarm | Paper jam | Clear the paper jam referring to the next section “PAPER JAMS” and press the panel switch if the printer does not automatically resume printing. |
| Paper empty | Load paper in the printer referring to Chapter 2 and press the panel switch. | |
| Misfeed | Reinstall the paper and press the panel switch. | |
| Toner Alarm (every 5 seconds) | Toner low | Indicates that the printer has approximately 100 pages of printing left before the toner cartridge is empty. Prepare a new toner cartridge. |
| Toner Alarm (Fast blinking) | Toner Empty | Replace the toner cartridge with a new one referring to Chapter 5. |
For errors shown below, the printer indicates an operator call by blinking the Alarm lamp. If you use the printer with the supplied Windows driver, the status monitor will appear to indicate the error on your computer screen. The HL-1040/1050 printer also prints some error messages on paper.
| Error | Action |
| COVER OPEN | Close the top cover of the printer. |
| PRINT OVERRUN | Press the panel switch to print the data remaining in the printer.If you use the supplied Windows driver, try again after turning on Error Recovery in the PRINT menu of your application software, (Refer to Help section in Windows printer driver for the details.)For HL-1050 onlyExpand the printer memory with an optional memory board and set page protection to ON by using the supplied Windows driver or RPC program.For HL-1050 onlyChange the following settings in the supplied Windows driver and try again. The best combination of the settings below will vary depending on your document.Graphics ModeTrueTypeTM modeUse Printer TrueTypeTM FontsIf this does not clear the error, reduce the complexity of your document or reduce the print resolution. |
| MEMORY FULL(For HL-1040/1050 Only)This error can occur only when using DOS or Macintosh. | Press the panel switch to print the data remaining in the printer.Reduce the print resolution or reduce the complexity of your document.For HL-1050 onlyExpand the printer memory.by adding a commercially available SIMM. |
| Parallel Interface Line Error | Press the panel switch to resume printing.Check that the connection between your computer and printer is secure and correct, and check the interface cable. |
| Serial Interface Framing Error(For HL-1040/1050 Only) | Press the panel switch to resume printing.Check the communication parameters such as baud rate and stop bit settingson both your computer and printer. |
| Serial Interface Parity Error(For HL-1040/1050 Only) | Press the panel switch to resume printing.Check the communication parameters such as bit length and parity settings on both your computer and printer. |
| Serial Interface Overrun Error(For HL-1040/1050 Only) | Press the panelswitchto resume printing.The interface hardware may be damaged. Consult your dealer. |
| Serial Interface Input Buffer Overflow(For HL-1040/1050 Only) | Press the panelswitchto resume printing.Check the communication parameters such as the handshake protocols on both your computer and printer.If the error occurs again, the interface hardware may be damaged. Consult your dealer. |
Note
If the printer does not operate as you expect it to, it is recommended that you turn off the power switch, wait a few seconds and then turn it on again. If you still have problems, consult your dealer or our authorized service representative.
Service Calls
If an unrecoverable error occurs, the printer indicates the need for a service call by lighting all the lamps and then the following combination of lamps alternately:
| Service Call | Fuser malfunction | Laser BD malfunction | Scanner malfunction | ROM error |
| Drum | ● | ○ | ● | ○ |
| Alarm | ○ | ● | ● | ○ |
| Ready | ○ | ○ | ○ | ● |
| Data | ○ | ○ | ○ | ○ |
| Service Call | D-RAM error | Service A | Service B | Service C |
| Drum | ● | ○ | ● | ○ |
| Alarm | ○ | ● | ● | ○ |
| Ready | ● | ● | ● | ○ |
| Data | ○ | ○ | ○ | ● |
| Service Call | Service D | Service E0 | Service E1 | Service P |
| Drum | ● | ○ | ● | ○ |
| Alarm | ○ | ● | ● | ○ |
| Ready | ○ | ○ | ○ | ● |
| Data | ● | ● | ● | ● |
| Service Call | NV-RAM error | CPU Runtime error |
| Drum | ● | ● |
| Alarm | ○ | ● |
| Ready | ● | ● |
| Data | ● | ● |
● ON
○ OFF
If you see any of these service call indications, turn off the power switch, wait a few seconds and then turn it on again and try to print again.
If you cannot clear the error and see the same service call indication after turning on the printer, consult your dealer or our authorized service representative. Report the error status and situation referring to the above table.
Note
Be sure that the top cover and the main controller board are firmly installed.
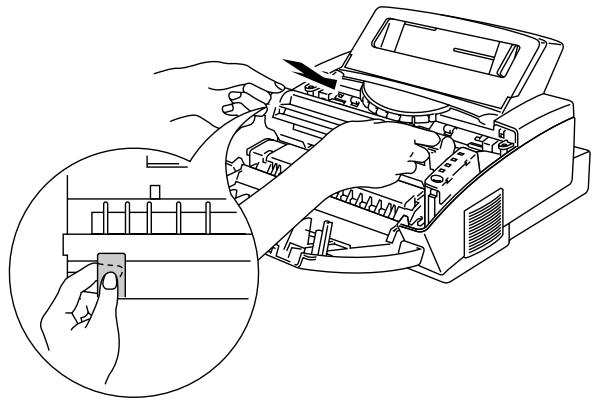
Before you can clear a paper jam error, you need to find the location of the paper jams. Locate the position referring to the following figure.
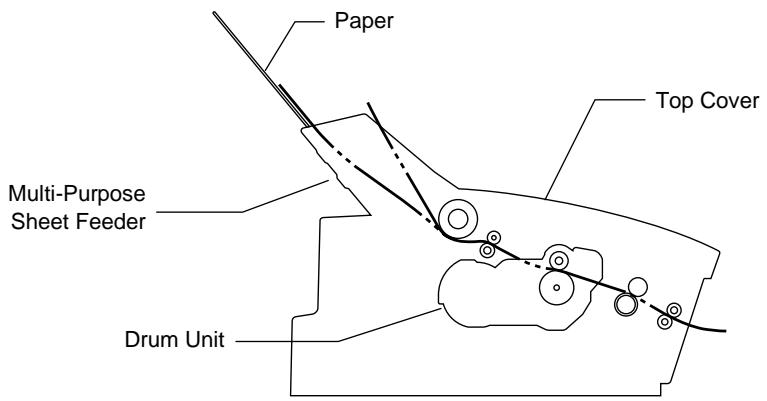
Fig. 6-1 Locating Paper Jam Position
After locating the position, clear the jammed paper referring to the following descriptions. If the jammed paper is removed completely and the top cover is closed, the printer may resume printing automatically. If the printer does not resume printing, press the control panel switch.

Warning
After you have just used the printer, some internal parts of the printer are extremely hot. When you open the top cover of the printer, never touch the shaded parts shown in the following diagram.
natural_image
Technical line drawing of an internal mechanical component (no text or symbols visible)
High Temperature
Fig. 6-2 Inside the Printer
Caution
Do not pull jammed paper from the output tray. Be sure to open the top cover to remove the jam, or the fuser may get dirty with toner powder and may result in toner scatter on the next printed page or pages.
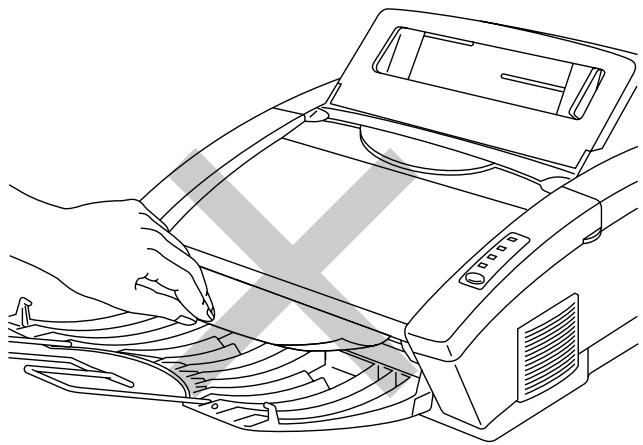
natural_image
Line drawing of a printer with hands operating it, showing internal components (no text or symbols)Fig. 6-3 Do Not Pull the Jammed Paper from the Output Tray
□ Paper Jam in the Multi-Purpose Sheet Feeder
If a paper jam has occurred inside the multi-purpose sheet feeder, open the multi-purpose sheet feeder to pull the jammed paper upward out of the feeder; then close the multi-purpose sheet feeder. Also, open the top cover and check that a torn piece of paper does not remain inside the printer referring to the next section.
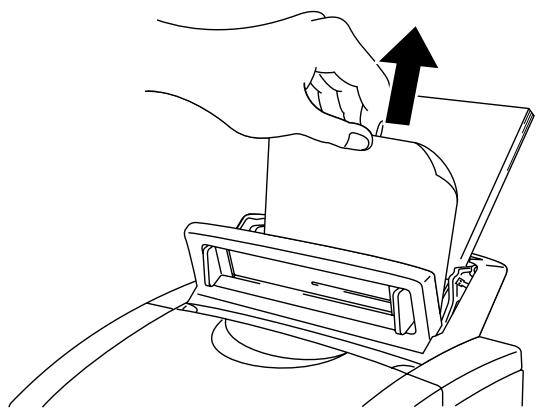
natural_image
Line drawing of a hand using a tool to press or install a document on a flat surface, with an upward arrow indicating the process (no text or symbols present)Fig. 6-4 Paper Jam in the Feeder
If the paper cannot be pulled up, see the next section “Paper Jam near the Drum Unit.”
☐ Paper Jam near the Drum Unit or at the Paper Output Tray
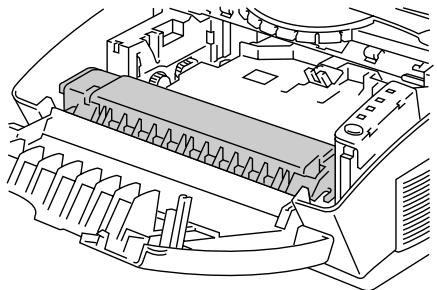
If a paper jam has occurred near the drum unit, open the top cover and remove the drum unit. Then, pull the jammed paper upwards and out of the printer. Install the drum unit and close the top cover.
natural_image
Line drawing of a printer internal structure with no visible text or symbolsFig. 6-5 Paper Jam near the Drum Unit
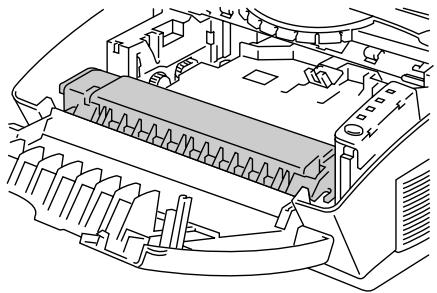
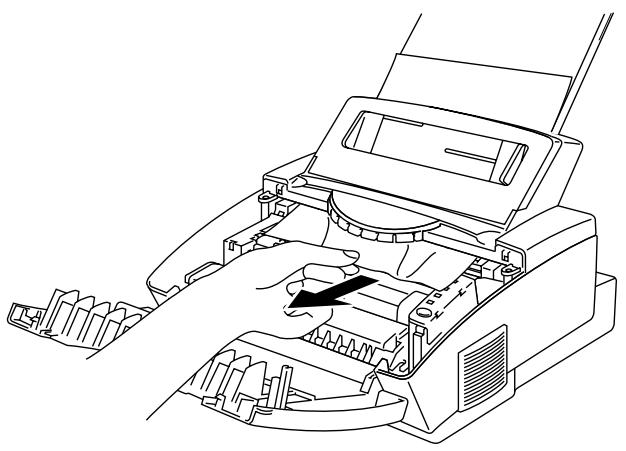
□ Paper Jam in the Fuser Unit
If a paper jam has occurred in the fuser unit, open the top cover and remove the drum unit. Then, pull the jammed paper out of the fuser. Install the drum unit and close the top cover.
natural_image
Line drawing of a printer with an arrow indicating the process (no text or symbols present)Fig. 6-6 Paper Jam Inside the Printer
This section contains questions and answers for using your printer. If you have encountered a problem, find the question relating to your problem and take the steps recommended to correct the problem.
Setting Up the Printer Hardware
| Question | Recommendation |
| The printer does not work. All lamps are off. | The printer may be in sleep mode. Press the panel switch to wake up the printer. Check to see if the printer is plugged into a live power source and the power switch is on. |
| The printer does not print. | Check the following:• The printer is turned on.• All of the protective parts have been removed.• The toner cartridge and drum unit are installed properly.• The interface cable is securely connected between the printer and computer.• Check to see if the Alarm lamp is blinking. If the lamp is blinking, refer to the Operator Call section of this manual.• Check to see if the Ready lamp is blinking. If the lamp is blinking fast, the printer might be cooling down to lower the printers internal temperature. Open the top cover of the printer to lower the temperature. |
Setting Up the Printer for Windows
| Question | Recommendation |
| I cannot print from my application software. | Make sure the supplied Windows printer driver is installed and selected with your application software.(For HL-1040/1050)If you use the serial interface, make sure that the serial slide switch of the serial interface is in the correct position and the interface settings are correctly set up with the DIP switches. |
| Sometimes I get the memory Full message. How can I correct this? | Reduce the print resolution or reduce the complexity of your document and try again.(For HL-1050)Expand the printer memory by adding a commercially available SIMM.(For HL-1050)Change the following settings in the supplied Windows driver and try again. The best combination of the following settings may vary depending on your document.Graphics ModeTrueType ModeUse Printer TrueType Fonts |
| Sometimes I get a Print Overrun error when printing certain documents from Windows. | If you are using the supplied Windows driver, turn error recovery on in the Setup dialog box and try again.Reduce the print resolution or reduce the complexity of your document and try again.(For HL-1050)Expand the printer memory by installing a commercially available SIMM and set the Page Protection ON in the supplied Windows driver.(For HL-1050)Change the following settings in the supplied Windows driver and try again. The best combination of the following settings may vary depending on your document.Graphics ModeTrueType ModeUse Printer TrueType Fonts |
Setting Up the Printer for DOS (For HL-1040/1050 Only)
| Question | Recommendation |
| I cannot print from my application software. | ·Check if the DOS application software interface settings match that of your printer: for example, if you are using a parallel printer cable, you would most likely set your DOS software printer port to LPT1. ·Check if the printer has any printer alarms active. ·Check if the appropriate printer is selected in your application software. ·The HL-820/1020 cannot print from DOS applications. ·If the serial interface is used, make sure that the RS-232C serial interface is selected with the slide switch. Make sure that the interface settings are correctly set up with the proper DIP switches. Make sure the serial parameters of baud rates, parity and stop bits match between your application software and the printer. |
| The printer prints, but it prints incorrect information. Sometimes it prints a couple of characters and then ejects the page, etc. | This is an indication that your application printer emulation setting and the printer's emulation do not match. Check in your application software which printer you have selected to make sure the printer is set up correctly. Remember the printer emulates three widely used printer selections: HL-1040 (HP LaserJet IIP, Epson FX-850, and IBM Proprinter XL) / HL-1050 (HP LaserJet 6L/6P, Epson FX-850 and IBM Proprinter XL). Try setting the printer into HP emulation and then select the HP LaserJet IIP (for HL-1040) or HP LaserJet 6P/6L (for HL-1050) printer in your application software. |
| The printer does not print when I press the Print Screen Key. (Data lamp On) | Press the panel switch. The data has been sent to the printer but the printer did not receive the Page Eject command: print screens do not send this command. |
| The printer prints the first part of my document but does not print the last page. (Data lamp On) | This was a common problem with database software and spreadsheet software when not correctly set up. The data has been sent to the printer but the printer did not receive the Page Eject command. Press the panel switch to eject the page. Then check with your software supplier on how to add a Page Eject (or Form Feed) command to the end of your print job. |
| How can I change the User settings or default settings of the printer? | Use the remote printer console (RPC) program. |
Setting Up the Printer for Apple Macintosh Computers When the Optional RS-100M Serial Interface Is Installed into Your Printer (For HL-1040/1050 Only)
| Question | Recommendation |
| I cannot print from my application software. | Make sure that the supplied Macintosh printer driver is installed in the System Folder and it is selected with Chooser.Check the PORT selection within the Chooser: it should match the port to which you physically attached the printer cable.The serial slide switch of the optional interface board should be in the Apple (RS-422A) position.Check the printer cable type: you cannot use a LocalTalk or straight-through cable. Refer to Chapter 4 for details on printer cable type. |
Paper Handling
| Question | Recommendation |
| The printer does not load paper. | Check to see if the “PAPER EMPTY” message appears on your computer screen or the Alarm and Paper lamps are blinking on the printer control panel. If so, the multi-purpose sheet feeder may be out of paper or not properly installed. If it is empty, load a new stack of paper into the feeder.If there is paper in the multi-purpose sheet feeder, make sure it is straight. If the paper is curled, you should straighten it before printing. Sometimes it is helpful to remove the paper, turn the stack over and put it back into the paper tray.Reduce the amount of paper in the multi-purpose sheet feeder, then try again. |
| The printer does not load paper from the manual feed slot. | Re-insert the paper firmly, one sheet at a time. |
| How can I load envelopes? | You can load envelopes from either the multi-purpose sheet feeder or the manual feed slot. Your application software must be set up correctly to print on the envelope size you are using. This is usually done in the page setup or document setup menu of your software. Refer to your application manual. |
| What paper can I use? | You can use plain paper, envelopes, transparencies, labels, and organizer paper. For information on loading paper, see “Paper Handling” in Chapter 2. |
| How can I clear paper jams? | See “PAPER JAMS” in this chapter. |
Printing
| Question | Recommendation |
| The printer prints unexpectedly or it prints garbage. | Turn the printer off and on again to reset the printer.Make sure your application software is correctly set up to use this printer by checking the printer settings in your application software.(For HL-1040/1050)Check the printer emulation settings. If you can use the supplied RPC program, use it to change the settings as required. Also, you can print the current setting list from the RPC program or Printer Control Panel.(For HL-1040/1050)Make sure that the correct interface type and settings are made to match your computer. Be sure to use the RS-422A serial interface for Macintosh computers and the RS-232C serial interface for PCs. Refer to “SERIAL INTERFACE BOARD RS100M” in Chapter 4. |
| The printer cannot print full pages of a document. An error message “PRINT OVERRUN” occurs. | The printer received a very complex print job and could not process part of the page. This may be solved by the following ways.If you are using Windows 95/98 or Windows 3.1 with the supplied printer driver, see the “Setting up the Printer for Windows” section.Try to reduce the complexity of your document or reduce the print resolution. |
| The printer prints the first couple of pages correctly, then some pages have text missing. (For HL-1040/1050 Only) | This is a problem usually relating to serial interface settings. Your computer is not recognizing the printer’s input buffer full signal. Causes could be incorrect serial cable (incorrectly wired or too long) or incorrect setting of your computer serial interface. |
| The printer cannot print full pages of a document. A "MEMORY FULL" error message occurs.(For HL-1040/1050 Only) | ·(For HL-1050)Change the following settings in the supplied Windows driver and try again. The best combination of the following settings may vary depending on your document.Graphics ModeTrueType ModeUse Printer TrueType FontsReduce the graphic quality or the number of font sizes within your application software.Reduce the printer resolution.Reduce the complexity of your document and try again.(For HL-1050)Expand the printer memory by adding a commercially available SIMM and set the Page Protection to ON by using the supplied Windows driver. |
| The printer cannot print full pages of a document. A "MEMORY FULL" error message occurs.(For HL-10-40/1050 Only) | ·(For HL-1050)Expand the printer memory by installing a commercially available memorySIMM.Reduce the printer resolution.Reduce the complexity of your document and try again.Reduce the graphic quality or the number of font sizes within your application software. |
| My headers or footers appear when I view my document on screen but do not show up when I print them. | Most laser printers have a restricted area that cannot be printed on. Usually the first two lines and last two lines of text cannot print (leaving 62 printable lines). Adjust the top and bottom margins in your document to allow for this. |
Print Quality

Caution
You will clear a print quality problem by replacing the drum unit with a new one if the Drum lamp is on. The drum unit is at the end of its life.
| Question | Recommendation |
Printed pages contain white stripes.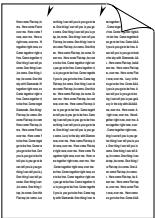 Fig. 6-7 White Stripes or Faint Images Fig. 6-7 White Stripes or Faint Images | You may clear the problem by wiping the scanner windows with a soft cloth. (See “Cleaning the printer interior and Drum unit.” in Chapter 5.)If the same problem occurs and theDrumlamp is still on after cleaning, replace the drum unit with a new one. |
Printed pages are stained with toner or have vertical stripes.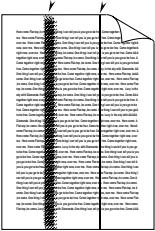 Fig. 6-8 Dark Stripes or Toner Stains Fig. 6-8 Dark Stripes or Toner Stains | Clean the printer interior and the primary corona wire of the toner cartridge.See “Cleaning the Printer Interior and Drum Unit” in Chapter 5.Make sure that the tab of the corona wire is at the home position.If the same print problem occurs and theDrumlamp is still on after cleaning, replace the drum unit with a new one. |
Printed pages have white spots in black text and graphics area.____ Fig. 6-9 White Spots Fig. 6-9 White Spots | Make sure that you use paper that meets the specifications. Rough surface or thick media can cause the problem.If you still have the same problem and theDrumlamp is on, replace the drum unit with a new one. |
Toner scatters and stains the printed page.  Fig. 6-10 Scattering Toner Fig. 6-10 Scattering Toner | Clean the printer interior. See “Cleaning the Printer Interior and Drum Unit” in Chapter 5.Make sure that you use paper that meets specifications.After the new toner cartridge is installed, the first 10 - 20 pages may be stained with toner. This problem will be cleared after the first 10-20 pages with the new toner cartridge.If you still have the same problem and theDrumlamp is on, replace the drum unit with a new one. |
The whole page is printed in black. Fig. 6-11 Black Page Fig. 6-11 Black Page | Wipe the electric terminalsreferring to “Cleaning the Printer Interior and Drum Unit” in Chapter 5. Never use heat-sensitive paper as it will cause this problem.If the same problem occurs and theDrumlamp is still on after cleaning, replace the drum unit with a new one. |
Nothing is printed on the page. Fig. 6-12 White Page Fig. 6-12 White Page | Make sure that the toner cartridge is not empty.Wipe the electric terminalsreferring to “Cleaning the Printer Interior and Drum Unit” in Chapter 5.Make sure that a torn piece of paper does not remain on the scanner window. |
Printed pages are marked at regular intervals.  Fig. 6-13 Example of Regular Marking Fig. 6-13 Example of Regular Marking | The problem may disappear by itself. Try printing multiple pages to clear this problem especially if the printer has not been used for a long time.If the surface of the drum has been scratched, replace the drum unit with a new one.If the problem does not disappear, it may be that the drum has been marked or damaged due to excessive exposure to light. In this case, replace the drum unit with a new one. |
Printed pages are blurred at the center or either edge. Fig. 6-14 Blurred Page Fig. 6-14 Blurred Page | Certain environmental conditions such as humidity, high temperatures, etc. may cause this situation to occur.Make sure that the printer is placed on a flat, horizontal surface.Remove the drum unit with the toner cartridge installed. Try shaking them from side to side.You may clear the problem by wiping the scanner windows with a soft cloth. (See “Cleaning the Printer Interior and Drum Unit.”)If the same problem occurs after cleaning andDrumlamp is still on, replace the drum unit with a new one. |
Ghost images show up on printed pages. Fig. 6-15 Ghost Images Fig. 6-15 Ghost Images | Make sure that you use paper that meets the specifications. Rough surface or thick media can cause the problem.Make sure that you select the appropriate media type in the pritner driver. |
Note
The drum unit is a consumable, and it is necessary to replace it periodically.
CHAPTER 7 APPENDIX
PRINTER SPECIFICATIONS
Printing
| Print Method | Electrophotography by semiconductor laser beam scanning | |
| Laser | Wavelength: | 780 nm |
| Output: | 5 mW max | |
| Resolution | HL-820/1020: | 600 dots/inch(under Brother Printing Solution for Windows) |
| HL-1040: | 600 dots/inch(under Brother Printing Solution for Windows / under Brother Software PCL5e for DOS box in Windows )300 dots/inch(under DOS, Apple Macintosh and other operating system) | |
| HL-1050: | 1200 (H) x 600 (V) dots/inch(for Windows DIB graphics)600 x 600 dots/inch(for Windows and DOS)300 x 300 dots/inch(using Apple Macintosh with the optional RS-100M) | |
| Print Quality | Normal printing modeEconomy printing mode (up to 25% and 50% toner saving) | |
| Print Speed | HL-820 : | Up to 8 pages/minutes |
| HL-1020/1040/1050: | Up to 10 pages/minute | |
| (when loading A4 or letter-size paper from the multi-purpose sheet feeder) | ||
| NOTE: Maximum print speed is obtained by printing several copies of the same page. Print speed may vary depending on interface type, emulation, processing power of the computer, memory allocated to the print job, paper size and graphic quality. | ||
| Warm-Up | Max. 30 seconds at 23°C (73.4°F)(The warm up time depends on the ambient temperature and humidity.) | |
USER'S GUIDE
| First Print | 15 seconds (when loading A4 or letter-size paper from the multi-purpose sheet feeder) |
| Print Media | Toner cartridge:Life Expectancy: 2,400 pages/new toner cartridge1,000 pages/starter toner cartridge(when printing A4- or letter-size paper at 5% print coverage)NOTE: Toner life expectancy will vary depending on the type of average print job printed.Drum Unit:Life Expectancy: 20,000 pages at 20 pages per job8,000 pages at 1 page per jobNOTE: There are many factors that determine the actual drum life, such as temperature, humidity, type of paper and toner than you use, the number of pages per print job, etc.. |
Functions
| TrueType Fonts on disks | TrueType-compatible soft-fonts for Windows on the supplied disk |
| Emulation | HL-820/1020:Brother Printing Solution for WindowsHL-1040: Brother Printing Solution for WindowsAutomatic emulation selection among HP LaserJet IIP (PCL level 4), EPSON FX-850, or IBM Proprinter XLHL-1050: Brother Printing Solution for WindowsAutomatic emulation selection among HP LaserJet 6P (PCL level 6), EPSON FX-850, or IBM Proprinter XL |
| Printer Driver | Windows 3.1/3.11, Windows 95/98 and Windows^TM NT 4.0 driver, supporting Brother Native Compression mode and bi-directional capabilityOptional Macintosh driver available for System 6.0.7 or higher (For HL-1040/1050 Only) |
| Interface | Bi-directional parallelUSB interface (HL-1050 only)RS-422A/RS-232C serial interface (RS-100M) is optionally available. (For HL-1040/1050 only) |
Memory
HL-820/1020/1040:2 MB
HL-1050: 4 MB
Expandable up to 36 MB by installing an industry standard SIMM
Diagnostics
Self-diagnostic program
Electrical and Mechanical
| Power Source | U.S.A. and Canada: Europe and Australia: | AC 110 to 120 V, 50 / 60 Hz AC 220 to 240 V, 50 /60 Hz |
| Power Consumption | Printing: Stand-by: Sleep: | 280 W or less 60 W or less 13 W or less |
| Noise | Printing: Sleep: | 49 dB A or less 33 dB A or less |
| Temperature | Operating: Storage: | 10 to 32.5°C (50 to 90.5°F) 0 to 40°C (38 to 104°F) |
| Humidity | Operating: Storage: | 20 to 80% (without condensation) 20 to 80% (without condensation) |
| Dimensions (W x H x D) | 390 x 245 x 365 mm (14.4 x 9.8 x 13.9 inches) (when the output tray is closed.) | |
| Weight | Approx. 7.2 kg (14.3 lb.) including the drum unit | |
PARALLEL INTERFACE SPECIFICATIONS

Note
To ensure best quality performance use an IEEE 1284 compliant parallel cable between the printer and your computer. Only IEEE 1284 cables support all of the advanced printing capabilities, like bi-directional communication. These cables will be clearly marked with “IEEE-1284”.
Interface Connector
Printer Side: Amphenol FCN-685J036-L/X or equivalent
A shielded cable should be used.
Pin Assignment
| Pin No. | Signal | Direction | Pin No. | Signal | Direction |
| 1 | DATA STROBE | Input | 19 | 0V (S.G.) | - |
| 2 | DATA 1 | Input | 20 | 0V (S.G.) | - |
| 3 | DATA 2 | Input | 21 | 0V (S.G.) | - |
| 4 | DATA 3 | Input | 22 | 0V (S.G.) | - |
| 5 | DATA 4 | Input | 23 | 0V (S.G.) | - |
| 6 | DATA 5 | Input | 24 | 0V (S.G.) | - |
| 7 | DATA 6 | Input | 25 | 0V (S.G.) | - |
| 8 | DATA 7 | Input | 26 | 0V (S.G.) | - |
| 9 | DATA 8 | Input | 27 | 0V (S.G.) | - |
| 10 | ACKNLG | Output | 28 | 0V (S.G.) | - |
| 11 | BUSY | Output | 29 | 0V (S.G.) | - |
| 12 | PE | Output | 30 | 0V (S.G.) | - |
| 13 | SLCT | Output | 31 | INPUT PRIME | Input |
| 14 | AUTO FEED | Input | 32 | FAULT | Output |
| 15 | N.C. | - | 33 | N.C. | - |
| 16 | 0V (S.G.) | - | 34 | N.C. | - |
| 17 | 0V (S.G.) | - | 35 | N.C. | - |
| 18 | +5V | - | 36 | SLCT IN | Input |
Note
To use bi-directional communication, an interface cable which has the pin connections above must be used.
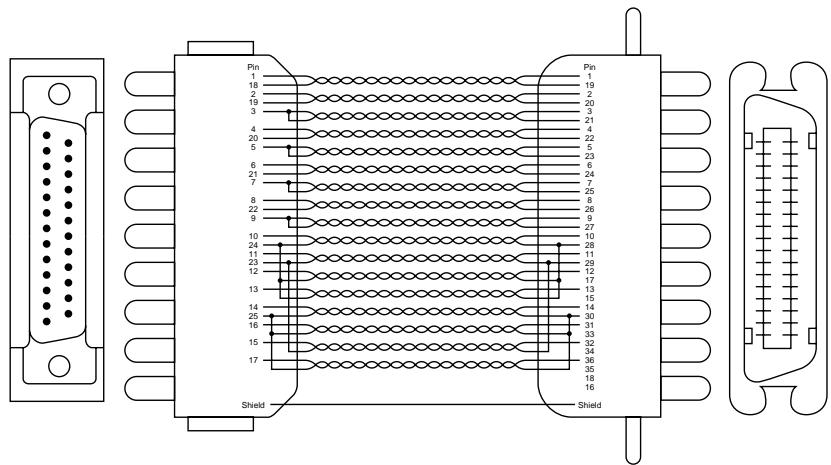
Fig. A-1 Parallel Interface Cable
UNIVERSAL SERIAL BUS (USB) INTERFACE (HL-1050 only)
Interface Connector
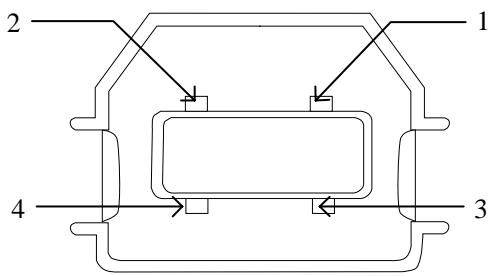
Pin Assignment
| Pin No. | Signal | |
| 1 | Vcc (+5V) | |
| 2 | - Data | Serial Data - |
| 3 | + Data | Serial Data + |
| 4 | Ground | |
RESIDENT FONTS
The following bitmapped fonts are resident in this printer.
Note
HL-820/1020 printer does not have resident fonts inside the printer.
HL-1040 :
Bitmapped Fonts
Brougham 10 (12 point) upright/normal
upright/bold
italic/normal
italic/bold
Brougham 12 (10 point) upright/normal
upright/bold
italic/normal
italic/bold
Letter Gothic 16.66 (8.5 point) upright/normal
upright/bold
italic/normal
italic/bold
(Portrait and Landscape are available for the above.)
HL-1050 :
Bitmapped Fonts
This printer has the following bitmapped fonts. They can be used in the HP LaserJet 6P, EPSON FX-850, and IBM Proprinter XL modes. They have the following characteristics.
- Letter Gothic 16.66 Normal, Italic, Bold, BoldItalic (Portrait & Landscape)
• OCR-A(Portrait & Landscape)
• OCR-B(Portrait & Landscape)
Scalable Fonts
The following scalable fonts can be used in the HP LaserJet 6P, EPSON FX-850, and IBM Proprinter XL modes.
Intellifont Compatible Fonts
- Alaska (Extrabold)
• Antique Oakland (Oblique, Bold)
• Brougham (Oblique, Bold, BoldOblique)
• Cleveland Condensed - Connecticut
• Guatemala Antique (Italic, Bold, BoldItalic)
• Letter Gothic (Oblique, Bold) - Maryland
• Oklahoma (Oblique, Bold, BoldOblique)
• PC Tennessee Roman (Italic, Bold, BoldItalic)
• PC Brussels Light (Italic, Demi, DemiItalic)
• Utah (Oblique, Bold, BoldOblique)
• Utah Condensed (Oblique, Bold, BoldOblique)
Microsoft Windows 3.1 TrueType Compatible Fonts
- BR Symbol
• Helsinki (Oblique, Bold, BoldOblique)
• Tennessee Roman (Italic, Bold, BoldItalic)
• W Dingbats
SYMBOL SETS/CHARACTER SETS
OCR Symbol Sets (HL-1050 Only)
When the OCR-A or OCR-B font is selected, the corresponding symbol set is always used.
OCR-A
OCR-B
HP LaserJet IIP Mode ( HL-1040 )
- ISO14 JIS ASCII
- ISO57 Chinese
- ISO11 Swedish
- HP Spanish
- ISO17 Spanish
- ISO10 Swedish
• ISO16 Portuguese - ISO84 Portuguese
-
ISO85 Spanish
• PC-8 -
PC-8 D/N
- PC-8 Turkish
- PC-850
- PC-852
- PC-860
- PC-863
- PC-865
- Roman 8
• ISO Latin 1 (ECMA-94) - ISO60 Norwegian 1
• ISO61 Norwegian 2
- ISO4 UK
- ISO25 French
- ISO69 French
- HP German
- ISO21 German
- ISO15 Italian
- ISO6 ASCII
- Legal
- ISO2 IRV
HP LaserJet 6P Mode ( HL-1050 )
-
Roman 8 (8U)
• ISO Latin1 (0N)
• ISO Latin2 (2N)
• ISO Latin5 (5N)
• ISO Latin6 (6N)
• PC-8 (10U)
• PC-8 D/N (11U)
• PC-850 (12U)
• PC-852 (17U)
• PC-775 (26U)
• PC-1004 (9J)
• PC-8 Turkish (9T)
• Windows Latin1 (19U)
• Windows Latin2 (9E)
• Windows Latin5 (5T)
• Windows Baltic (19L) -
Legal (1U)
• Ventura Math (6M) - Ventura Intl (13J)
- Ventura US (14J)
• PS Math (5M) - PS Text (10J)
- Math-8 (8M)
• Pi Font (15U)
• MS Publishing (6J) - Windows 3.0 (9U)
- Desktop (7J)
• MC Text (12J) - Symbol (19M)
• Windings (579L) - ISO2 IRV
-
ISO4 UK
-
ISO6 ASCII
- ISO10 Swedish
- ISO11 Swedish
• ISO14 JIS ASCII - ISO15 Italian
• ISO16 Portuguese - ISO17 Spanish
- ISO21 German
- ISO25 French
- ISO57 Chinese
• ISO60 Norwegian1
• ISO61 Norwegian2 - ISO69 French
• ISO84 Portuguese - ISO85 Spanish
- HP German
- HP Spanish
EPSON Mode ( HL-1040/1050 )
| US ASCIIPC-8PC-8 D/NPC-850PC-852PC-860PC-863PC-865 | PC-8 TurkishGermanUK ASCII IFrench IDanish IItalySpanishSwedish | JapaneseNorwegianDanish IITK ASCII IIFrench IIFrench IIDutchSouth African |
IBM Mode ( HL-1040/1050 )
| PC-8 | PC-852 | PC-865 |
| PC-8 D/N | PC-860 | PC-8 Turkish |
| PC-850 | PC-863 |
Note
If you want to know what characters are in each symbol/character set, print the CHARSETS.PRN file from the “Print form” option in the Direct Access Menu of the Remote Printer Console Program.
☐ HP LaserJet IIP / HP LaserJet 6P
| 0 | 1 | 2 | 3 | 4 | 5 | 6 | 7 | 8 | 9 | A | B | C | D | E | F | 0 | 1 | 2 | 3 | 4 | 5 | 6 | 7 | 8 | 9 | A | B | C | D | E | F | |||||||||||||||||||||||||||||||||||||||||||||||||||||||||||||||||||||||||
| 0 | 0 | @ | P | ` | p | - | 0 | 0 | @ | P | ` | p | ° | |||||||||||||||||||||||||||||||||||||||||||||||||||||||||||||||||||||||||||||||||||||||||||
| 1 | ! | 1 | A | Q | a | q | 1 | ! | 1 | A | Q | a | q | ± | ||||||||||||||||||||||||||||||||||||||||||||||||||||||||||||||||||||||||||||||||||||||||||
| 2 | " | 2 | B | R | b | r | . | 2 | " | 2 | B | R | b | r | ^2 | |||||||||||||||||||||||||||||||||||||||||||||||||||||||||||||||||||||||||||||||||||||||||
| 3 | # | 3 | C | S | c | s | ° | 3 | # | 3 | C | S | c | s | ^3 | |||||||||||||||||||||||||||||||||||||||||||||||||||||||||||||||||||||||||||||||||||||||||
| 4 | 4 | D | T | d | t | \hat{E} | \zeta | \acute{a} | \acute{a} | \breve{o} | \P | 4 | 4 | D | T | d | t | ` | ||||||||||||||||||||||||||||||||||||||||||||||||||||||||||||||||||||||||||||||||||||||
| 5 | % | 5 | E | U | e | u | 34 | 5 | % | 5 | E | U | e | u | ¥ | |||||||||||||||||||||||||||||||||||||||||||||||||||||||||||||||||||||||||||||||||||||||||
| 6 | & | 6 | F | V | f | v | - | 6 | & | 6 | F | V | f | v | | | |||||||||||||||||||||||||||||||||||||||||||||||||||||||||||||||||||||||||||||||||||||||||
| 7 | ' | 7 | G | W | g | w | 14 | 7 | ' | 7 | G | W | g | w | · | × | ÷ | |||||||||||||||||||||||||||||||||||||||||||||||||||||||||||||||||||||||||||||||||||||||
| 8 | ( | 8 | H | X | h | x | ` | ¡ | à | 12 | 8 | ( | 8 | H | X | h | x | .. | ` | |||||||||||||||||||||||||||||||||||||||||||||||||||||||||||||||||||||||||||||||||||||
| 9 | ) | 9 | I | Y | i | y | ` | ¿ | è | ì | ^a | 9 | ) | 9 | I | Y | i | y | ‘ | |||||||||||||||||||||||||||||||||||||||||||||||||||||||||||||||||||||||||||||||||||||
| A | * : | J | Z | j | z | ^ | ò | ° | A | * : | J | Z | j | z | ^a | ° | ||||||||||||||||||||||||||||||||||||||||||||||||||||||||||||||||||||||||||||||||||||||||
| B | + ; | K | [ | k | { | .. | £ | ù | « | B | + ; | K | [ | k | { | « » | » | |||||||||||||||||||||||||||||||||||||||||||||||||||||||||||||||||||||||||||||||||||||||
| C | , | < | L | \ | l | | | ~ | ¥ | ä | ■ | C | ,< | L | \ | l | | | ¬ | 14 | ì | |||||||||||||||||||||||||||||||||||||||||||||||||||||||||||||||||||||||||||||||||||||
| D | - = | M ] | ||||||||||||||||||||||||||||||||||||||||||||||||||||||||||||||||||||||||||||||||||||||||||||||||||||||
| E | . > | |||||||||||||||||||||||||||||||||||||||||||||||||||||||||||||||||||||||||||||||||||||||||||||||||||||||
| F | / ? | |||||||||||||||||||||||||||||||||||||||||||||||||||||||||||||||||||||||||||||||||||||||||||||||||||||||
The following table shows characters available only in the corresponding character set. The numbers at the top of the table are code values with which characters are to be replaced in the Roman 8 character set. For other characters, see the character set of Roman 8.
| SYMBOL | SET | 23 | 24 | 40 | 5B | 5C | 5D | 5E | 60 | 7B | 7C | 7D | 7E |
| ISO2 | IRV | # | $ | @ | [ | \ | ] | ^ | ` | | | - | ||
| ISO4 | UK | £ | @ | [ | \ | ] | ^ | ` | { | | | } | - | |
| ISO6 | ASCII | # | @ | [ | \ | ] | ^ | ` | | | ~ | |||
| ISO10 | Swedish | # | @ | Ä | Ö | Å | ^ | ` | ä | ö | å | - | |
| ISO11 | Swedish | # | É | Ä | Ö | Å | Ü | é | ä | ö | å | ü | |
| ISO14 | JIS ASCII | # | @ | [ | ¥ | ] | ^ | ` | { | | | } | - | |
| ISO15 | Italian | £ | § | ° | ç | é | ^ | ü | à | ö | è | i | |
| ISO16 | Portuguese | # | § | Ä | Ç | Ö | ^ | ` | ä | ç | ö | ° | |
| ISO17 | Spanish | £ | § | ¡ | Ñ | ¿ | ^ | ` | ° | ñ | ç | ` | |
| ISO21 | German | # | § | Ä | Ö | Ü | ^ | ` | ä | ö | ü | ß | |
| ISO25 | French | £ | à | ° | ç | § | ^ | ` | é | ü | è | ` | |
| ISO57 | Chinese | # | ¥ | @ | [ | \ | ] | ^ | ` | | | - | ||
| ISO60 | Norwegian1 | # | @ | € | ∅ | Å | ^ | ` | æ | ø | å | ||
| ISO61 | Norwegian2 | § | @ | € | ∅ | Å | ^ | ` | æ | ø | å | | | |
| ISO69 | French | £ | à | ° | ç | § | ^ | μ | é | ù | è | ` | |
| ISO84 | Portuguese | # | ` | Ä | Ç | Ö | ^ | ` | ä | ç | ō | ~ | |
| ISO85 | Spanish | # | ` | ¡ | Ñ | Ç | ¿ | ` | ` | ñ | ç | ` | |
| HP | German | £ | § | Ä | Ö | Ü | ^ | ` | ä | ö | ü | ß | |
| HP | Spanish | # | @ | ¡ | Ñ | ¿ | ° | ` | { | ñ | } | ~ |
☐ HP LaserJet IIP/6P, EPSON FX-850, IBM Propritner XL
| PC-8 | |||||||||||||||||||||||||||||||||||||||||||||||||||||||||||||||||||||||||||||||||||||||||||||||||||||||||||||||||||||||||||||||||||||||||||||||||||||||||||||||||||||||||||||||||||||||||||||||||||||||||||||||||||||||||||||||||||||||||||||||||||||||||||||||||||||||||||||||||||||||||||||||||||||||||||||||||||||||||||||||||||||||||||||||||||||||||||||||||||||||||||||||||||||||||||||||||||||||||||||||||||||||||||||||||||||||||||||||||||||||||||||||||||||||||||||||||||||||||||||||||||||||||||||||||||||||||||||||||||||||||||||||||||||||||||||||||||||||||||||||||||||||||||||||||||||||||||||||||||||||||||||||||||||||||||||||||||||||||||||||||||||||||||||||||||||||||||||||||||||||||||||||||||||||||||||||||||||||||||||||||||||||||
| 0 | 1 | 2 | 3 | 4 | 5 | 6 | 7 | 8 | 9 | A | B | C | D | E | F | ||||||||||||||||||||||||||||||||||||||||||||||||||||||||||||||||||||||||||||||||||||||||||||||||||||||||||||||||||||||||||||||||||||||||||||||||||||||||||||||||||||||||||||||||||||||||||||||||||||||||||||||||||||||||||||||||||||||||||||||||||||||||||||||||||||||||||||||||||||||||||||||||||||||||||||||||||||||||||||||||||||||||||||||||||||||||||||||||||||||||||||||||||||||||||||||||||||||||||||||||||||||||||||||||||||||||||||||||||||||||||||||||||||||||||||||||||||||||||||||||||||||||||||||||||||||||||||||||||||||||||||||||||||||||||||||||||||||||||||||||||||||||||||||||||||||||||||||||||||||||||||||||||||||||||||||||||||||||||||||||||||||||||||||||||||||||||||||||||||||||||||||||||||||||||||||||||||||||||
| 0 | 0 | @ | P | ` | p | Ç | É | á | ☒ | L | ⊥ | α | ≡ | PC-850 | 0 | 1 | 2 | 3 | 4 | 5 | 6 | 7 | 8 | 9 | A | B | C | D | E | F | |||||||||||||||||||||||||||||||||||||||||||||||||||||||||||||||||||||||||||||||||||||||||||||||||||||||||||||||||||||||||||||||||||||||||||||||||||||||||||||||||||||||||||||||||||||||||||||||||||||||||||||||||||||||||||||||||||||||||||||||||||||||||||||||||||||||||||||||||||||||||||||||||||||||||||||||||||||||||||||||||||||||||||||||||||||||||||||||||||||||||||||||||||||||||||||||||||||||||||||||||||||||||||||||||||||||||||||||||||||||||||||||||||||||||||||||||||||||||||||||||||||||||||||||||||||||||||||||||||||||||||||||||||||||||||||||||||||||||||||||||||||||||||||||||||||||||||||||||||||||||||||||||||||||||||||||||||||||||||||||||||||||||||||||||||||||||||||||||||||||||||||||||||||||||||
| 1 | ☉ | ◀ | ! | 1 | A | Q | a | q | ü | æ | í | ☒ | ⊥ | 〒 | β | ± | 1 | ☉ | ◀ | ! | 1 | A | Q | a | q | ü | æ | í | ☒ | ⊥ | D | β | ± | 2 | ☉ | ◀ | ! | 1 | A | Q | a | q | ü | æ | í | ☒ | ⊥ | D | β | ± | 3 | ♥ | !! | # | 3 | C | S | c | s | â | ô | ú | | | 〒 | ⊥ | π | ≤ | ||||||||||||||||||||||||||||||||||||||||||||||||||||||||||||||||||||||||||||||||||||||||||||||||||||||||||||||||||||||||||||||||||||||||||||||||||||||||||||||||||||||||||||||||||||||||||||||||||||||||||||||||||||||||||||||||||||||||||||||||||||||||||||||||||||||||||||||||||||||||||||||||||||||||||||||||||||||||||||||||||||||||||||||||||||||||||||||||||||||||||||||||||||||||||||||||||||||||||||||||||||||||||||||||||||||||||||||||||||||||||||||||||||||||||||||||||||||||||||||||||||||||||||||||||||||||||||||||||||||||||||||||||||||||||||||||||||||||||||||||||||||||||||||||||||||||||||||||||||||||||||||||||||||||||||||||||||||||||||||||||||||||||||||||||||||
| 4 | ♦ | ¶ | 4 | D | T | d | t | ä | ö | ñ | + | - | 〒 | Σ | ∫ | 4 | ♦ | ¶ | 4 | D | T | d | t | ä | ö | ñ | + | - | Ê | ö | ¶ | ||||||||||||||||||||||||||||||||||||||||||||||||||||||||||||||||||||||||||||||||||||||||||||||||||||||||||||||||||||||||||||||||||||||||||||||||||||||||||||||||||||||||||||||||||||||||||||||||||||||||||||||||||||||||||||||||||||||||||||||||||||||||||||||||||||||||||||||||||||||||||||||||||||||||||||||||||||||||||||||||||||||||||||||||||||||||||||||||||||||||||||||||||||||||||||||||||||||||||||||||||||||||||||||||||||||||||||||||||||||||||||||||||||||||||||||||||||||||||||||||||||||||||||||||||||||||||||||||||||||||||||||||||||||||||||||||||||||||||||||||||||||||||||||||||||||||||||||||||||||||||||||||||||||||||||||||||||||||||||||||||||||||||||||||||||||||||||||||||||||||||||||||||||||||||
| 5 | ♣ | § | % | 5 | E | U | e | u | à | ò | Ñ | + | + | 〒 | σ | 」 | |||||||||||||||||||||||||||||||||||||||||||||||||||||||||||||||||||||||||||||||||||||||||||||||||||||||||||||||||||||||||||||||||||||||||||||||||||||||||||||||||||||||||||||||||||||||||||||||||||||||||||||||||||||||||||||||||||||||||||||||||||||||||||||||||||||||||||||||||||||||||||||||||||||||||||||||||||||||||||||||||||||||||||||||||||||||||||||||||||||||||||||||||||||||||||||||||||||||||||||||||||||||||||||||||||||||||||||||||||||||||||||||||||||||||||||||||||||||||||||||||||||||||||||||||||||||||||||||||||||||||||||||||||||||||||||||||||||||||||||||||||||||||||||||||||||||||||||||||||||||||||||||||||||||||||||||||||||||||||||||||||||||||||||||||||||||||||||||||||||||||||||||||||||||||||||||||||||||||
□ EPSON FX-850
US ASCII
| 0 | 1 | 2 | 3 | 4 | 5 | 6 | 7 | 8 | 9 | A | B | C | D | E | F | |
| 0 | 0 | @ | P | ` | p | 0 | @ | P | ` | p | ||||||
| 1 | ! | 1 | A | Q | a | q | ! | 1 | A | Q | a | q | ||||
| 2 | " | 2 | B | R | b | r | " | 2 | B | R | b | r | ||||
| 3 | # | 3 | C | S | c | s | # | 3 | C | S | c | s | ||||
| 4 | 4 | D | T | d | t | 4 | D | T | d | t | ||||||
| 5 | % | 5 | E | U | e | u | % | 5 | E | U | e | u | ||||
| 6 | & | 6 | F | V | f | v | & | 6 | F | V | f | v | ||||
| 7 | ' | 7 | G | W | g | w | ' | 7 | G | W | g | w | ||||
| 8 | ( | 8 | H | X | h | x | ( | 8 | H | X | h | x | ||||
| 9 | ) | 9 | I | Y | i | y | ) | 9 | I | Y | i | y | ||||
| A | * : | J | Z | j | z | * : | J | Z | j | z | ||||||
| B | + ; | K | [ | k | { | + ; | K | [ | k | { | ||||||
| C | , | < | L | \ | l | | | , | < | L | \ | l | / | ||||
| D | - = | M ] | m | } | - = | M ] | m | } | ||||||||
| E | . > | N | ^ | n | ~ | . > | N | ^ | n | ~ | ||||||
| F | / ? | O _ o | / ? | O _ o | ||||||||||||
The following table shows characters available only in the corresponding character set. The numbers at the top of the table are code values with which characters are to be replaced in the US ASCII character set. For other characters, see the character set of US ASCII.
| SYMBOL | SET | 23 | 24 | 40 | 5B | 5C | 5D | 5E | 60 | 7B | 7C | 7D | 7E |
| German | # | S | Ä | Ö | Ü | ^ | ` | ä | ö | ü | ß | ||
| UK ASCII I | £ | @ | [ | \ | ] | ^ | ` | { | | | } | ~ | ||
| French I | # | à | ° | ç | S | ^ | ` | é | ù | è | .. | ||
| Danish I | # | @ | € | ∅ | Å | ^ | ` | æ | ø | å | ~ | ||
| Italy | # | @ | ° | \ | é | ^ | ù | à | ò | è | ì | ||
| Spanish | Pt | @ | ¡ | Ñ | ¿ | ^ | ` | .. | ñ | } | ~ | ||
| Swedish | # | ¤ | É | Ä | Ö | Å | Ü | é | ä | ö | å | ü | |
| Japanese | # | @ | [ | ¥ | ] | ^ | ` | | | ~ | ||||
| Norwegian | # | ¤ | É | € | ∅ | Å | Ü | é | æ | ø | å | ü | |
| Danish II | # | É | € | ∅ | Å | Ü | é | æ | ø | å | ü | ||
| UK ASCII II | # | £ | @ | [ | \ | ] | ^ | ` | { | | | } | ~ | |
| French II | # | â | à | î | ç | ê | û | ô | é | ú | è | ï | |
| Dutch | # | $ | @ | [ | ] | f | ^ | ` | é | ij | è | .. | |
| South African | # | ê | É | Ê | Ö | è | Ü | é | ë | ö | ô | ü |
Trademarks
The Brother logo is a registered trademark of Brother Industries, Ltd.
Apple, the Apple Logo, and Macintosh are trademarks, registered in the United States and other countries, and TrueType is a trademark of Apple Computer, Inc.
Epson is a registered trademark and FX-80 and FX-850 are trademarks of Seiko Epson Corporation.
Hewlett Packard is a registered trademark and PCL, HP LaserJet 6P, 6L, 5P, 5L, 4, 4L 4P, III, IIIP, II, and IIP are trademarks of Hewlett-Packard Company.
IBM, IBM PC, and Proprinter are registered trademarks of International Business Machines Corporation.
Microsoft and MS-DOS are registered trademarks of Microsoft Corporation. Windows is a registered trademark of Microsoft Corporation in the U.S. and other countries.
All other brand and product names mentioned in this User's Guide are registered trademarks of their respective companies.
Compilation and Publication Notice
Under the supervision of Brother Industries Ltd., this manual has been compiled and published, covering the latest product's descriptions and specifications.
The contents of this manual and the specifications of this product are subject to change without notice.
Brother reserves the right to make changes without notice in the specifications and materials contained herein and shall not be responsible for any damages (including consequential) caused by reliance on the materials presented, including but not limited to typographical and other errors relating to the publication.
©1998 Brother Industries Ltd.
This product is designed for use in a professional environment.
Federal Communications Commission(FCC) Declaration of Conformity (For USA Only)
Responsible Party : Brother International Corporation 100 Somerset Corporate Boulevard Bridgewater, NJ 08807-0911, USA TEL : (908) 704-1700
declares, that the products
Product Name : Brother Laser Printer HL-820, HL-1020, HL-1040, HL-1040DX, HL-1050, HL-1050DX
Model Numbers : HL-8L, HL-8h
Product Options : ALL
complies with Part 15 of the FCC Rules. Operation is subject to the following two conditions: (1) This device may not cause harmful interference, and (2) this device must accept any interference received, including interference that may cause undesired operation.
This equipment has been tested and found to comply with the limits for a Class B digital device, pursuant to Part 15 of the FCC Rules. These limits are designed to provide reasonable protection against harmful interference in a residential installation. This equipment generates, uses, and can radiate radio frequency energy and, if not installed and used in accordance with the instructions, may cause harmful interference to radio communications. However, there is no guarantee that interference will not occur in a particular installation. If this equipment does cause harmful interference to radio or television reception, which can be determined by turning the equipment off and on, the user is encouraged to try to correct the interference by one or more of the following measures:
- Reorient or relocate the receiving antenna.
- Increase the separation between the equipment and receiver.
- Connect the equipment into an outlet on a circuit different from that to which the receiver is connected.
- Consult the dealer or an experienced radio/TV technician for help.
Important
A shielded interface cable should be used in order to ensure compliance with the limits for a Class B digital device.
Changes or modifications not expressly approved by Brother Industries, Ltd. could void the user's authority to operate the equipment.
Industry Canada Compliance Statement (For Canada Only)
This Class B digital apparatus meets all requirements of the Canadian Interference-Causing Equipment Regulations.
International Energy Star Compliance Statement
The purpose of the International Energy Star Program is to promote the development and popularization of energy-efficient office equipments, which includes computers, monitors, printers, facsimile receivers and copy machines world-wide.
As an International Energy Star partner, Brother Industries, Ltd. has decided that this product meets the guideline of the program.

Radio Interference (220-240 V Model Only)
This printer complies with EN55022(CISPR Publication 22)/Class B.
Before this product is used, ensure that you use a double-shielded interface cable with twisted-pair conductors and that it is marked “IEEE 1284 compliant”. The cable must not exceed 1.8 metres in length.
Laser Safety (For 110–120 V Model Only)
This printer is certified as a Class I laser product under the U.S. Department of Health and Human Services (DHHS) Radiation Performance Standard according to the Radiation Control for Health and Safety Act of 1968. This means that the printer does not produce hazardous laser radiation.
Since radiation emitted inside the printer is completely confined within protective housings and external covers, the laser beam cannot escape from the machine during any phase of user operation.
FDA Regulations (For 110-120 V Model Only)
U.S. Food and Drug Administration (FDA) has implemented regulations for laser products manufactured on and after August 2, 1976. Compliance is mandatory for products marketed in the United States. One of the following labels on the back of the printer indicates compliance with the FDA regulations and must be attached to laser products marketed in the United States.
MANUFACTURED:
Brother Corporation (Asia) Ltd. Brother Buji Nan Ling Factory
Gold Garden Ind., Nan Ling Village, Buji, Rong Gang, Shenzhen, CHINA
This product complies with FDA radiation performance standards, 21 CFR Subchapter J
MANUFACTURED:
BROTHER INDUSTRIES (USA) INC.
2950 Brother Blvd., Bartlett, TN 38133, U.S.A.
This product complies with FDA radiation performance standards, 21 CFR Subchapter J
MANUFACTURED:
BROTHER INDUSTRIES LTD.
15-1 Naeshiro-cho Mizuho-ku Nagoya, 467 Japan
This product complies with FDA radiation performance standards, 21 CFR Subchapter J
Caution
Use of controls, adjustments or performance of procedures other than those specified in this manual may result in hazardous radiation exposure.
Declaration of Conformity (For Europe)
We, Brother International Europe Ltd.,
Brother House 1 Tame Street, Guide Bridge, Audenshaw, Manchester M34 5JE, UK.
declare that this product is in conformity with the following normative documents.
Safety: EN 60950,
EN 60825
EMC: EN 55022 Class B,
EN 50082-1
following the provisions of the Low Voltage Directive 73/23/EEC and the Electromagnetic Compatibility Directive 89/336/EEC (as amended by 91/263/EEC and 92/31/EEC).
Issued by:
Brother International Europe Ltd.
European Technical Services Division
IEC 825 Specification (For 220–240 V Model Only)
This printer is a Class 1 laser product as defined in IEC 825 specifications. The label shown below is attached in countries where required.

This printer has a Class 3B Laser Diode which emits invisible laser radiation in the Scanner Unit. The Scanner Unit should not be opened under any circumstances.
Caution
Use of controls, adjustments or performance of procedures other than those specified in this manual may result in hazardous radiation exposure.
The following caution label is attached near the scanner unit.
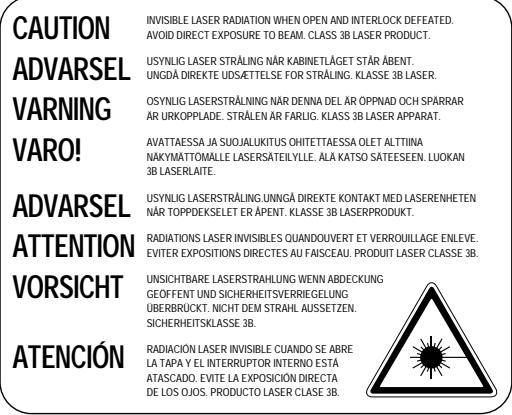
For Finland and Sweden
LUOKAN 1 LASERLAITE
KLASS 1 LASER APPARAT
IMPORTANT - For Your Safety
To ensure safe operation the three-pin electrical plug supplied must be inserted only into a standard three-pin power point which is properly grounded through normal household wiring.
Extension cords used with the equipment must be three-pin plug type and correctly wired to provide proper grounding. Incorrectly wired extension cords may cause personal injury and equipment damage.
The fact that the equipment operates satisfactorily does not imply that the power is grounded and that the installation is completely safe. For your safety, if in any doubt about the effective grounding of the power, consult a qualified electrician.
Disconnect device
This printer must be installed near a power outlet, which is easily accessible. In case of emergencies, you must disconnect the power cord from the power outlet in order to shut off power completely.
Geräuschemission / Acoustic Noise Emission (For Germany Only)
Lpa < 70 dB (A) DIN 45635-19-01-KL2
IMPORTANT - Wiring Information (For U.K. only)
If the power cord supplied with this printer is not suitable for your electrical outlet, remove the plug from the mains cord and fit an appropriate three pin plug. If the replacement plug is intended to take a fuse then fit the same fuse as the original.
If a moulded plug is severed from the power cord then it should be destroyed because a plug with cut wires is dangerous if plugged into a live socket outlet. Do not leave it where a child might find it.
In the event of replacing the plug fuse, fit a fuse approved by ASTA to BS1362 with the same rating as the original fuse.
Always replace the fuse cover. Never use a plug with the cover omitted.
WARNING - THIS PRINTER MUST BE PROPERLY EARTHED.
The wires in the mains cord are coloured in accordance with the following code:
Green and yellow: Ground
Blue: Neutral
Brown: Live
The colours of the wiring in the power lead of this printer may not correspond with the markings which identify the terminals in your plug. If you need to fit a different plug, proceed as follows.
Remove a length of the cord outer sheath, taking care not to damage the coloured insulation of the wires inside.
Cut each of the three wires to the appropriate length. If the construction of the plug permits, leave the green and yellow wire longer than the others so that, in the event that the cord is pulled out of the plug, the green and yellow wire will be the last to disconnect.
Remove a short section of the coloured insulation to expose the wires.
The wire which is coloured green and yellow must be connected to the terminal in the plug which is marked with the letter “E” or by the earth symbol or coloured green or green and yellow.
The wire which is coloured blue must be connected to the terminal which is marked with the letter “N” or coloured black or blue.
The wire which is coloured brown must be connected to the terminal which is marked with the letter “L” or coloured red or brown.
The outer sheath of the cord must be secured inside the plug. The coloured wires should not hang out of the plug.
INDEX
A
Alarm lamp 3–2, 6–1
auto-emulation switching....1-4
B
baud rate 4–3
bitmapped font..... A-7
C
character set..... A-9
control panel....1–2, 3–1
cover open....6-2
cut sheet....2-1
D
data compression technology......1–5
Data lamp 3-2
data length....4-3
DIP switch 1-2, 4-3
DOS....6-10
dpi....1-3
Drum lamp 3-2
drum unit 5-7
life 5-7, A-2
duplex printing 2–8
E
economy mode....1–6
emulation.... 1–4, A–2
envelope....2-1, 2-4
error
message 6-2
recoverable 6–1
unrecoverable 6–4
extension wire 1-2
F
Factory Reset....3-4
H
hex dump print....3-4
/
interface ......A-2, A-4\~6
error....6-2
J
jammed paper 6–5
L
label....2-1
M
Macintosh....1–5, 6–11
manual feed slot.... 1–2, 2–9
memory 4-6, A-3
full 6-2
misfeed....6-1
multi-purpose sheet feeder .. 1–2, 2–5
capacity 2-1
o
operator call 6-1\~3
organizer 2-1
output tray 1–2, 2–11
capacity 2-1
P
paper
capacity 2-1
empty 6-1
jam....6-1, 6-5
recommended....2-1
size 2-1
type....2-1
paper guide 1-2
Paper lamp....3-1, 6-1
paper support....1-2
parallel interface
pin assignment ......A-4
port 1-2
power cord 1-2
power switch 1-2
ppm 1-3
primary corona wire....5–14
method...... A-1
overrun....6-2
quality ...... A-1
speed A-1
Print Config....3-4
Print Fonts I....3-4
printable area 2-4
printer driver ...... A-2
printer status monitor.... 1–5
R
Ready lamp 3-1
Remote Printer Console 1-4
resident font..... A-7
resolution.... 1–3, A–1
RPC 1-4
RS-232C....4-2
RS-422A....4-2
s
scanner window....5–13
serial interface 4-1
cable 4-4
parameter 4-3
RS-422A/RS-232C port 1–2
service call....6-4
sleep mode....1–6, 3–3
slide switch....1-2, 4-2
starter sheet 5–9
switch 3-3
symbol set ...... A–9
T
test print mode....3-4
time-out 3-3
toner
empty 6-1
low 6-1
toner cartridge 5–1
life A-2
Toner lamp 3-2, 6-1
top cover....1-2
transparency....2-1
W
warm-up ...... A-1
Windows....6-8
- Brother Laser Printer
- HL-800/1000 Series
- User's Guide
- TABLE OF CONTENTS
- CHAPTER 1 INTRODUCTION.... 1-1
- CHAPTER 2 PAPER HANDLING.... 2–1
- CHAPTER 3 CONTROL PANEL .... 3–1
- CHAPTER 4 OPTIONS.... 4–1
- CHAPTER 5 MAINTENANCE .... 5–1
- CHAPTER 6 TROUBLESHOOTING....6-1
- CHAPTER 7 APPENDIX...... A-1
- Definitions of Warnings, Cautions, and Notes
- Warning
- Caution
- Note
- To Use the Printer Safely
- High Temperature
- Shipment of the Printer
- (For USA & CANADA Only)
- BBS
- Fax-Back System
- DEALERS/SERVICE CENTERS (USA only)
- SERVICE CENTERS (Canada only)
- INTERNET ADDRESS
- CHAPTER 1 INTRODUCTION
- ABOUT THE GUIDEBOOKS
- Finding Out How to Use the Printer
- System Requirements in Brother Printing Solution for Windows
- Features
- ☐ High Resolution and Fast Printing Speed
- □ Versatile Paper Handling
- □ Enhanced Printing Performance and User-Friendly Operation for Windows®
- ☐ (For HL-1040/1050 Only) Remote Printer Console Program for DOS
- ☐ (For HL-1040/1050 Only) Popular Printer Emulation Support
- ☐ Printer Status Monitor with Bi-directional Parallel Interface
- ☐ (For HL-1050 Only)
- USB Interface
- High Resolution Control & Advanced Photoscale Technology
- ☐ (For HL-1040/1050 Only)
- Optional Apple Macintosh ® Interface
- □ Enhanced Memory Management
- Environment-Friendly
- Economy Printing Mode
- Sleep Mode (Power Save Mode)
- Low Running Cost
- Power Supply
- Environment
- CHAPTER 2 PAPER HANDLING
- PAPER SPECIFICATIONS
- Paper Capacity in Feeder
- Recommended paper
- Remarks
- Cut Sheet
- Labels / Transparencies
- Special Paper
- Envelopes
- MULTI-PURPOSE SHEET FEEDER
- Loading Paper into the Feeder
- Two Side Printing (Manual Duplexing)
- ☐ When you load one sheet of paper manually:
- ☐ When you load more than one sheet of paper manually:
- OUTPUT TRAY AND PAPER SUPPORT WIRE
- CHAPTER 3 CONTROL PANEL
- LAMPS AND SWITCH
- Ready (Paper) Lamp
- Data (Toner) Lamp
- Drum Lamp
- Alarm Lamp
- Switch
- Cancel printing
- Wake-up
- Form Feed
- Error Recovery
- Other Control Features
- Sleep Mode
- Test Print Mode
- CHAPTER 4 OPTIONS
- SERIAL INTERFACE BOARD RS-100M (For HL-1040/1050 Only)
- Selecting the RS-422A (Apple) or RS-232C (IBM) Serial Interface
- Setting the Serial Interface Parameters
- Connecting the Serial Interface Cable
- ADDITIONAL MEMORY (HL-1050 Only)
- Minimum Memory Recommendation (including resident memory)
- Installing the SIMM
- CHAPTER 5 MAINTENANCE
- REPLACING THE TONER CARTRIDGE
- REPLACING THE DRUM UNIT
- Cleaning the Printer Exterior
- Cleaning the Printer Interior and Drum Unit
- CHAPTER 6 TROUBLESHOOTING
- ALARM INDICATIONS AT A GLANCE
- Operator Calls
- Service Calls
- □ Paper Jam in the Multi-Purpose Sheet Feeder
- ☐ Paper Jam near the Drum Unit or at the Paper Output Tray
- □ Paper Jam in the Fuser Unit
- Setting Up the Printer for Apple Macintosh Computers When the Optional RS-100M Serial Interface Is Installed into Your Printer (For HL-1040/1050 Only)
- Print Quality
- CHAPTER 7 APPENDIX
- PRINTER SPECIFICATIONS
- PARALLEL INTERFACE SPECIFICATIONS
- UNIVERSAL SERIAL BUS (USB) INTERFACE (HL-1050 only)
- RESIDENT FONTS
- HL-1040 :
- Bitmapped Fonts
- HL-1050 :
- Scalable Fonts
- Intellifont Compatible Fonts
- Microsoft Windows 3.1 TrueType Compatible Fonts
- SYMBOL SETS/CHARACTER SETS
- OCR Symbol Sets (HL-1050 Only)
- HP LaserJet IIP Mode ( HL-1040 )
- HP LaserJet 6P Mode ( HL-1050 )
- Trademarks
- Compilation and Publication Notice
- Federal Communications Commission(FCC) Declaration of Conformity (For USA Only)
- Important
- Industry Canada Compliance Statement (For Canada Only)
- International Energy Star Compliance Statement
- Radio Interference (220-240 V Model Only)
- Laser Safety (For 110–120 V Model Only)
- FDA Regulations (For 110-120 V Model Only)
- MANUFACTURED:
- Declaration of Conformity (For Europe)
- IEC 825 Specification (For 220–240 V Model Only)
- For Finland and Sweden
- LUOKAN 1 LASERLAITE
- KLASS 1 LASER APPARAT
- IMPORTANT - For Your Safety
- Disconnect device
- Geräuschemission / Acoustic Noise Emission (For Germany Only)
- IMPORTANT - Wiring Information (For U.K. only)
- INDEX
- A
- B
- C
- D
- E
- F
- H
- /
- J
- L
- M
- o
- P
- R
- s
- T
- W
Brand : BROTHER
Model : HL-1040
Category : Laser printer