
HL-B2080DW - Laser printer BROTHER - Free user manual and instructions
Find the device manual for free HL-B2080DW BROTHER in PDF.
| Product type | Monochrome laser printer |
| Dimensions (W x D x H) | 356 x 183 x 360 mm |
| Weight | 7.4 kg |
| Power supply | 220-240 V AC, 50/60 Hz |
| Power consumption (printing) | Approx. 510 W |
| Power consumption (standby) | Approx. 48 W |
| Power consumption (sleep) | Approx. 6 W |
| Power consumption (off) | Approx. 0.03 W |
| RAM | 64 MB |
| Print speed (A4, one-sided) | Up to 34 pages/min |
| Print speed (A4, double-sided) | Up to 16 images/min (8 sheets/min) |
| Maximum print resolution | 1200 x 1200 dpi |
| First page out (A4, at 23°C) | Less than 8.5 seconds |
| Standard input tray capacity | 250 sheets (80 g/m²) |
| Output tray capacity (face down) | 150 sheets (80 g/m²) |
| Supported paper sizes (tray) | A4, Letter, A5, A5 (Long Edge), A6, Executive |
| Supported paper weight (tray) | 60 to 163 g/m² |
| Connectivity | USB 2.0, Ethernet 10/100, Wi-Fi 802.11b/g/n, Wi-Fi Direct |
| Automatic duplex printing | Yes (A4) |
| Toner cartridge | TN-B023, approx. 2000 pages |
| Drum unit | DR-B023, approx. 12000 pages |
| Noise level (printing) | 49 dB(A) |
| Supported operating systems | Windows 7/8/10, Windows Server, macOS 10.10.5+ |
Frequently Asked Questions - HL-B2080DW BROTHER
User questions about HL-B2080DW BROTHER
0 question about this device. Answer the ones you know or ask your own.
Ask a new question about this device
Download the instructions for your Laser printer in PDF format for free! Find your manual HL-B2080DW - BROTHER and take your electronic device back in hand. On this page are published all the documents necessary for the use of your device. HL-B2080DW by BROTHER.
USER MANUAL HL-B2080DW BROTHER
Definitions of Notes 2
Trademarks 3
Important Note 4
Introduction to Your Brother Machine.... 5
Control Panel Overview 6
Access Brother Utilities (Windows) 8
Uninstall the Brother Software and Drivers (Windows) 10
Paper Handling....11
Load Paper....12
Load and Print Using the Paper Tray 13
Load and Print Paper in the Manual Feed Slot 16
Paper Settings....22
Change the Paper Size and Paper Type....23
Change the Check Paper Size Setting....24
Unprintable Area 25
Recommended Print Media....26
Using Special Paper....27
Print 28
Print from Your Computer (Windows)....29
Print a Document (Windows)....30
Print Settings (Windows) 32
Change the Default Print Settings (Windows) 36
Monitor the Status of the Machine from Your Computer (Windows) 37
Print from Your Computer (Mac) 38
Print a Document (Mac) 39
Print Options (Mac) 40
Monitor the Status of the Machine from Your Computer (Mac) 45
Cancel a Print Job....46
Test Print 47
Network 48
Supported Basic Network Features 49
Network Management Software and Utilities 50
Learn about Network Management Software and Utilities 51
Additional Methods of Configuring Your Brother Machine for a Wireless Network 52
Before Configuring Your Brother Machine for a Wireless Network....53
Configure Your Machine for a Wireless Network....54
Configure Your Machine for a Wireless Network Using the One Push Method of Wi-Fi Protected Setup ^™ (WPS)....55
Configure Your Machine for a Wireless Network Using the PIN Method of Wi-Fi Protected Setup ^™ (WPS)....56
Configure Your Machine for a Wireless Network Using the Machine's Control Panel Setup Wizard . 59
Configure Your Machine for a Wireless Network When the SSID Is Not Broadcast 61
Use Wi-Fi Direct ^® 63
Advanced Network Features....72
Home > Table of Contents
Print the Network Configuration Report....73
Print the WLAN Report....74
Technical Information for Advanced Users....77
Reset the Network Settings to the Factory Settings....78
Security 79
Lock the Machine Settings 80
Setting Lock Overview....81
Network Security Features....85
Before Using Network Security Features 86
Manage Your Network Machine Securely Using SSL/TLS 87
Send an Email Securely 120
Mobile....125
Google Cloud Print....126
Google Cloud Print Overview 127
Before Using Google Cloud Print 128
Print from Google Chrome ^TM or Chrome OS ^TM 132
Print from Google Drive ^™ for Mobile 133
Print from Gmail™ Webmail Service for Mobile 134
AirPrint 135
AirPrint Overview....136
Before Using AirPrint....137
Print Using AirPrint 140
Mobile Printing for Windows....144
Mopria ^® Print Service....145
Brother iPrint&Scan for Mobile Devices 146
Brother iPrint&Scan for Windows and Mac 147
Brother iPrint&Scan Overview....148
Troubleshooting 149
Error and Maintenance Messages 150
Paper Jams 153
Paper is Jammed in the Paper Tray 154
Paper is Jammed in the Back of the Machine 155
Paper is Jammed inside the Machine 157
Paper is Jammed in the 2-sided Tray....158
Printing Problems....160
Improve the Print Quality....163
Network Problems....168
Error Messages....169
Where Can I Find My Brother Machine's Network Settings? 170
I Cannot Complete the Wireless Network Setup Configuration.... 171
Use the Network Connection Repair Tool (Windows) 173
My Brother Machine Cannot Print over the Network 174
I Want to Check that My Network Devices are Working Correctly 176
Google Cloud Print Problems....177
AirPrint Problems 178
Other Problems 179
Home > Table of Contents
Machine Information....180
Check the Serial Number 181
Check the Firmware Version 182
Reset Functions Overview 183
Reset Your Brother Machine 184
Routine Maintenance 185
Replace Supplies 186
Replace the Toner Cartridge 188
Replace the Drum Unit 191
Clean the Machine 193
Clean the Corona Wire....194
Clean the Drum Unit Using Drum Dot Print.... 195
Clean the Paper Pick-up Rollers 198
Check the Remaining Part Life 199
Pack and Ship Your Brother Machine 200
Machine Settings.... 202
Change Machine Settings from the Control Panel 203
General Settings....204
Menu Table (for LCD Models) 211
Print a List of Printer Settings....217
Change Machine Settings from Your Computer....218
Change Machine Settings Using Web Based Management 219
Appendix 223
Specifications 224
How to Enter Text on Your Brother Machine 228
Supplies 229
Information Regarding Recycled Paper 230
Brother Numbers....231
Before You Use Your Brother Machine
- Definitions of Notes
- Trademarks
- Important Note
Definitions of Notes
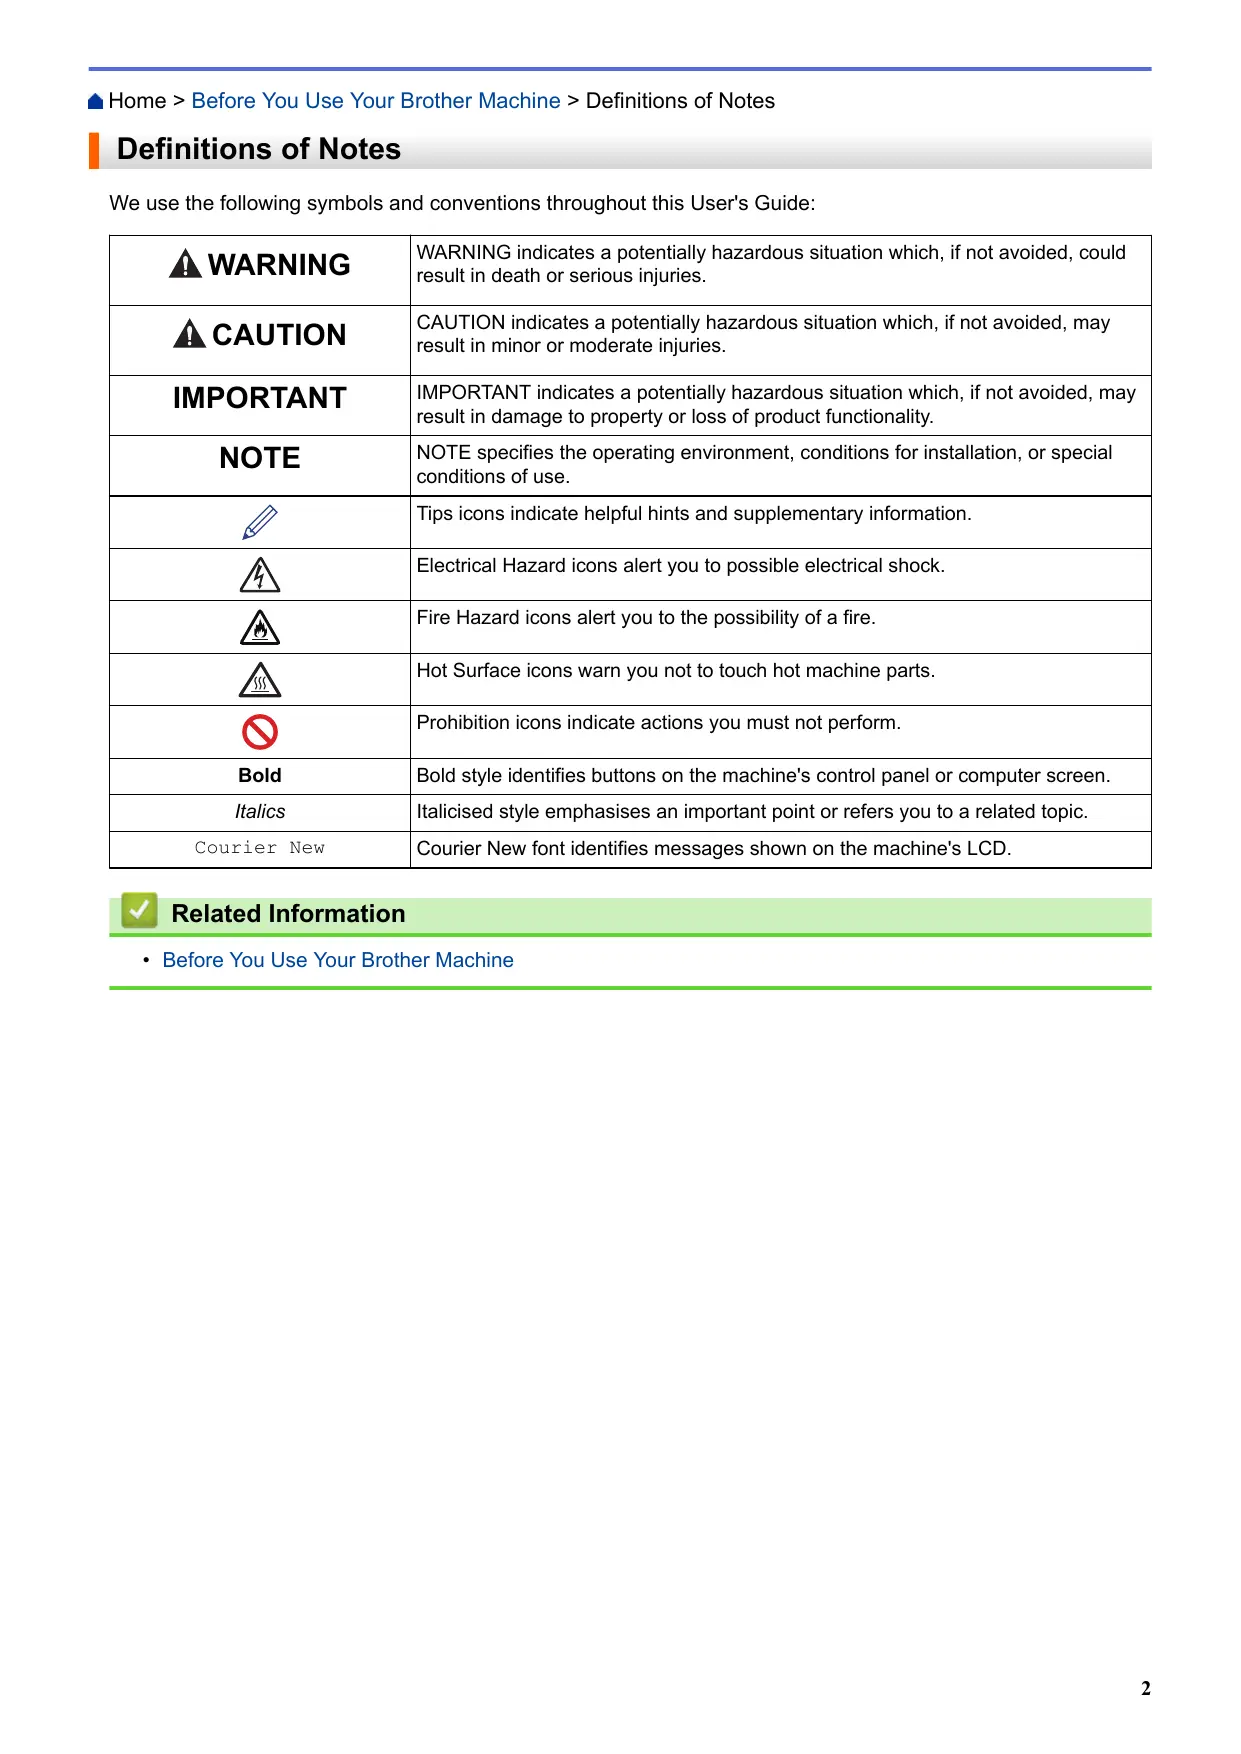
We use the following symbols and conventions throughout this User's Guide:
| WARNING | WARNING indicates a potentially hazardous situation which, if not avoided, could result in death or serious injuries. |
| CAUTION | CAUTION indicates a potentially hazardous situation which, if not avoided, may result in minor or moderate injuries. |
| IMPORTANT | IMPORTANT indicates a potentially hazardous situation which, if not avoided, may result in damage to property or loss of product functionality. |
| NOTE | NOTE specifies the operating environment, conditions for installation, or special conditions of use. |
 | Tips icons indicate helpful hints and supplementary information. |
 | Electrical Hazard icons alert you to possible electrical shock. |
 | Fire Hazard icons alert you to the possibility of a fire. |
 | Hot Surface icons warn you not to touch hot machine parts. |
 | Prohibition icons indicate actions you must not perform. |
| Bold | Bold style identifies buttons on the machine's control panel or computer screen. |
| Italics | Italicised style emphasises an important point or refers you to a related topic. |
| Courier New | Courier New font identifies messages shown on the machine's LCD. |

Related Information
• Before You Use Your Brother Machine
Trademarks
BROTHER is either a trademark or a registered trademark of Brother Industries, Ltd.
Microsoft, Windows, Windows Server and Internet Explorer are either registered trademarks or trademarks of Microsoft Corporation in the United States and/or other countries.
Apple, Mac, Safari, AirPrint, the AirPrint logo, iPad, iPhone and iPod touch are trademarks of Apple Inc., registered in the United States and other countries.
macOS is a trademark of Apple Inc.
App Store is a service mark of Apple Inc.
PostScript and PostScript 3 are either registered trademarks or trademarks of Adobe Systems Incorporated in the United States and/or other countries.
Wi-Fi, Wi-Fi Alliance and Wi-Fi Direct are registered trademarks of Wi-Fi Alliance ^® .
WPA, WPA2, Wi-Fi CERTIFIED, Wi-Fi Protected Setup and Wi-Fi Protected Setup logo are trademarks of Wi-Fi Alliance®.
Android, Gmail, Google Cloud Print, Google Drive, Google Chrome, Chrome OS and Google Play are trademarks of Google Inc. Use of these trademarks is subject to Google Permissions.
Mopria ^® and the Mopria ^® Logo are registered trademarks and service marks of Mopria Alliance, Inc. in the United States and other countries. Unauthorised use is strictly prohibited.
Mozilla and Firefox are registered trademarks of the Mozilla Foundation.
Intel is a trademark of Intel Corporation in the U.S. and/or other countries.
The Bluetooth ^® word mark is a registered trademark owned by the Bluetooth SIG, Inc. and any use of such marks by Brother Industries, Ltd. is under license.
Each company whose software title is mentioned in this manual has a Software License Agreement specific to its proprietary programs.
Any trade names and product names of companies appearing on Brother products, related documents and any other materials are all trademarks or registered trademarks of those respective companies.

Related Information
• Before You Use Your Brother Machine
Important Note
- Do not use this product outside the country of purchase as it may violate the wireless telecommunication and power regulations of that country.
- Windows 10 in this document represents Windows 10 Home, Windows 10 Pro, Windows 10 Education and Windows 10 Enterprise.
• Windows Server 2008 in this document represents Windows Server 2008 and Windows Server 2008 R2. - The screens in this User's Guide are for illustration purposes only and may differ from the actual screens.
- Unless otherwise specified, the screens in this manual are from Windows 7 and macOS v10.10.5. Screens on your computer may vary depending on your operating system.
- The contents of this guide and the specifications of this product are subject to change without notice.
• Not all features are available in countries subject to applicable export restrictions.

Related Information
• Before You Use Your Brother Machine
Home > Introduction to Your Brother Machine
Introduction to Your Brother Machine
• Control Panel Overview
• Access Brother Utilities (Windows)
Control Panel Overview
The control panel will vary depending on your model.
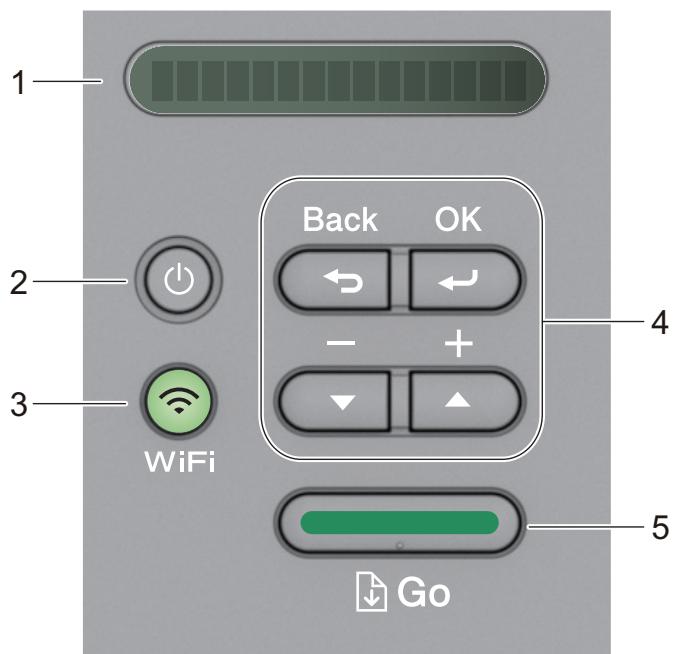
1. LCD (Liquid Crystal Display)
Displays messages to help you set up and use your machine.
Wireless Models:
A four-level indicator shows the wireless signal strength if you are using a wireless connection.

2. Power On/Off Button
- Turn on the machine by pressing ⏻.
- Turn off the machine by pressing and holding ⏻. The LCD displays [Shutting Down] for a few seconds before going off.
3. Network Buttons
- Wired Models:
Network
Press Network to set up wired network settings.
• Models with Wireless Function:
WiFi
Press the WiFi button and launch the wireless installer on your computer. Follow the on-screen instructions to set up a wireless connection between your machine and your network.
When the WiFi light is on, your Brother machine is connected to a wireless access point. When the WiFi light blinks, the wireless connection is down, or your machine is in the process of connecting to a wireless access point.
4. Menu Buttons
OK
Press to store your machine settings. After you change a setting, the machine returns to the previous menu level.
Back
- Press to go back one level in the menu.
- Press to select the previous digit when setting numbers.
▲ or ▼ (+ or -)
- Press to scroll through menus and options.
- Press to enter a number or to increase or decrease the number. Press and hold down ▲ or ▼ to scroll faster. When you see the number you want, press OK.
5. Go Button
- Press to clear certain error messages. To clear all other errors, follow the control panel instructions.
- Press to print any data remaining in the machine's memory.
- Press to select the displayed option. After you change a setting, the machine returns to Ready mode.
- Press and hold Go for about two seconds to cancel a print job.

Related Information
• Introduction to Your Brother Machine
Access Brother Utilities (Windows)
Brother Utilities is an application launcher that offers convenient access to all Brother applications installed on your computer.
- Do one of the following:
• (Windows 7, Windows Server 2008 and Windows Server 2008 R2)
Click (Start) > All Programs > Brother > Brother Utilities.
• (Windows 8 and Windows Server 2012)
Tap or click (Brother Utilities) either on the Start screen or the desktop.
• (Windows 8.1 and Windows Server 2012 R2)
Move your mouse to the lower left corner of the Start screen and click (if you are using a touch-based device, swipe up from the bottom of the Start screen to bring up the Apps screen).
When the Apps screen appears, tap or click (Brother Utilities).
• (Windows 10 and Windows Server 2016)
Click > Brother > Brother Utilities.
- Select your machine (where XXXX is the name of your model).
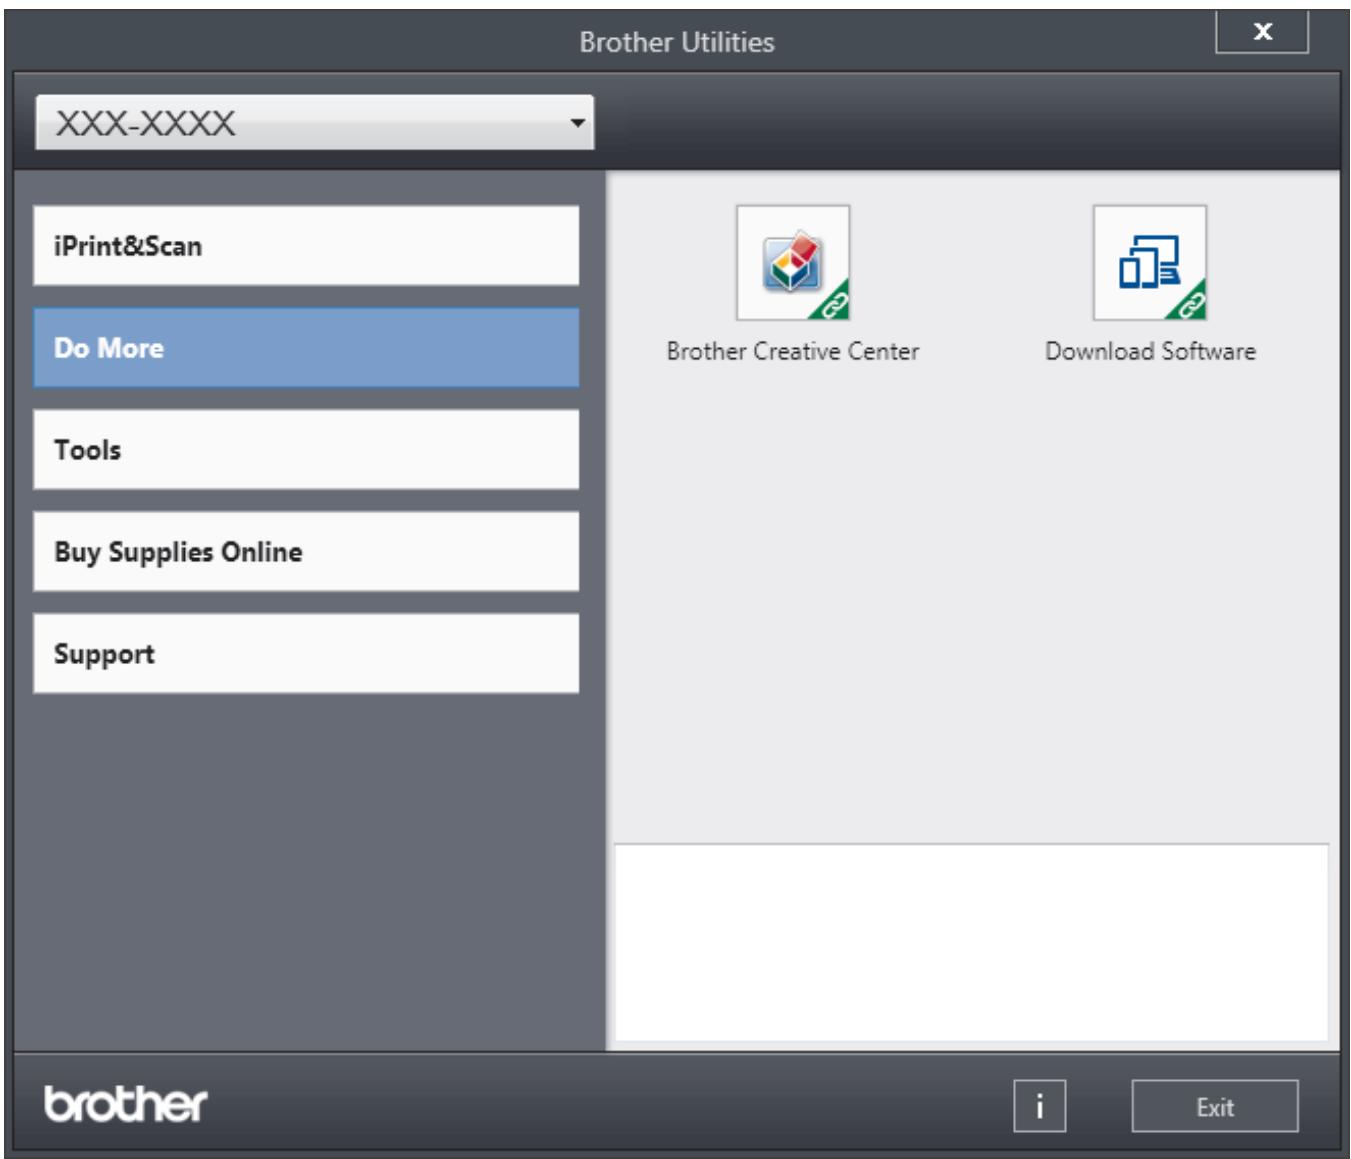
- Choose the operation you want to use.

Related Information
• Introduction to Your Brother Machine
- Uninstall the Brother Software and Drivers (Windows)
Home > Introduction to Your Brother Machine > Access Brother Utilities (Windows) > Uninstall the Brother Software and Drivers (Windows)
Uninstall the Brother Software and Drivers (Windows)
1. Do one of the following:
• (Windows 7, Windows Server 2008 and Windows Server 2008 R2)
Click (Start) > All Programs > Brother > Brother Utilities.
• (Windows 8 and Windows Server 2012)
Tap or click (Brother Utilities) either on the Start screen or the desktop.
• (Windows 8.1 and Windows Server 2012 R2)
Move your mouse to the lower left corner of the Start screen and click ↓ (if you are using a touch-based device, swipe up from the bottom of the Start screen to bring up the Apps screen).
When the Apps screen appears, tap or click (Brother Utilities).
• (Windows 10 and Windows Server 2016)
Click □ > Brother > Brother Utilities.
- Select your model from the drop-down list (if it is not already selected).
- Click Tools in the left navigation bar.
- If the Software Update Notification icon is visible, select it, and then click Check now > Check for Software Updates > Update. Follow the on-screen instructions.
• If the Software Update Notification icon is not visible, go to the next step.
- Click Uninstall in the Tools section of Brother Utilities.
Follow the instructions in the dialog box to uninstall the software and drivers.

Related Information
- Access Brother Utilities (Windows)
Paper Handling
- Load Paper
- Paper Settings
- Unprintable Area
• Recommended Print Media
• Using Special Paper
▲ Home > Paper Handling > Load Paper
Load Paper
- Load and Print Using the Paper Tray
- Load and Print Paper in the Manual Feed Slot
▲ Home > Paper Handling > Load Paper > Load and Print Using the Paper Tray
Load and Print Using the Paper Tray
- Load Paper in the Paper Tray
Home > Paper Handling > Load Paper > Load and Print Using the Paper Tray > Load Paper in the Paper Tray
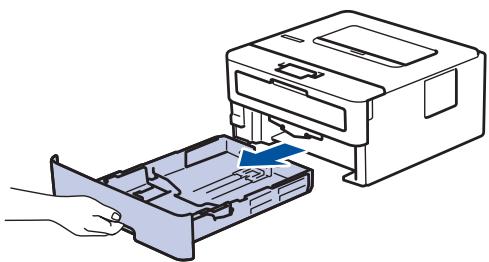
Load Paper in the Paper Tray
- If the Check Size setting is set to On and you pull the paper tray out of the machine, a message appears on the LCD asking if you want to change the paper size and paper type. Change the paper size and paper type settings if needed, following the LCD instructions.
-
When you load a different size and type of paper in the tray, you must also change the Paper Size and Paper Type settings in the machine, or on your computer.
-
Pull the paper tray completely out of the machine.
natural_image
Illustration of a printer being inserted into a plastic case, with no visible text or symbols- Press and slide the paper guides to fit the paper.
Press the green release levers to slide the paper guides.
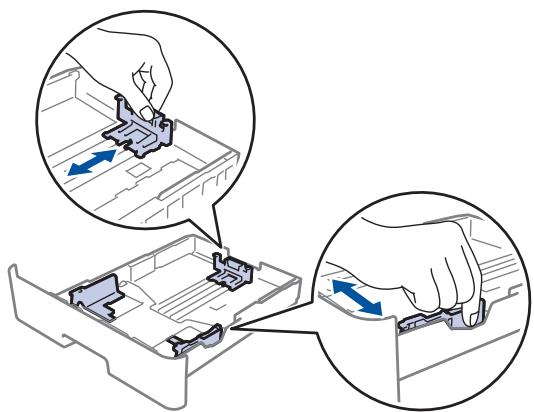
- Fan the stack of paper well.
- Load paper in the paper tray with the printing surface face down.
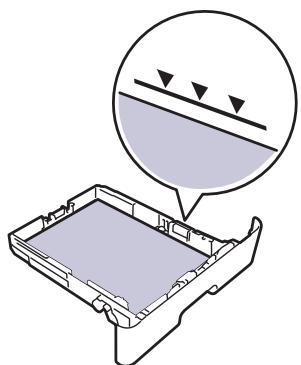
- Make sure the paper is below the maximum paper mark (▼▼▼).
Overfilling the paper tray will cause paper jams.
natural_image
Diagram of a mechanical component with a magnified view showing a surface and three downward-pointing arrows (no text or symbols)- Slowly push the paper tray completely into the machine.
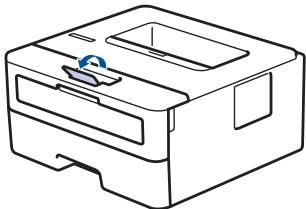
- Lift the support flap to prevent paper from sliding off the output tray.

natural_image
Line drawing of a printer with a blue circular button on the cover (no text or symbols)
Related Information
- Load and Print Using the Paper Tray
Load and Print Paper in the Manual Feed Slot
- Load and Print Plain Paper, Thin Paper, Recycled Paper and Bond Paper in the Manual Feed Slot
- Load and Print on Thick Paper and Labels in the Manual Feed Slot
- Load and Print on Envelopes in the Manual Feed Slot
Home > Paper Handling > Load Paper > Load and Print Paper in the Manual Feed Slot > Load and Print Plain Paper, Thin Paper, Recycled Paper and Bond Paper in the Manual Feed Slot
Load and Print Plain Paper, Thin Paper, Recycled Paper and Bond Paper in the Manual Feed Slot
When you load a different paper size in the tray, you must change the Paper Size setting in the machine or on your computer at the same time.
- Lift the support flap to prevent paper from sliding off the face down output tray.
natural_image
Line drawing of a rectangular electronic device with ports and a blue circular button (no text or symbols)- Open the manual feed slot cover.
natural_image
Line drawing of a printer with a paper feed insert (no text or symbols)- Use both hands to slide the manual feed slot paper guides to fit the width of the paper you are using.
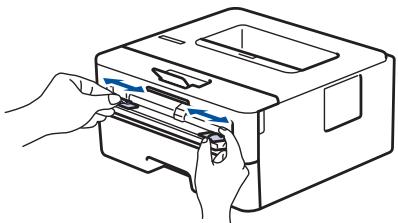
natural_image
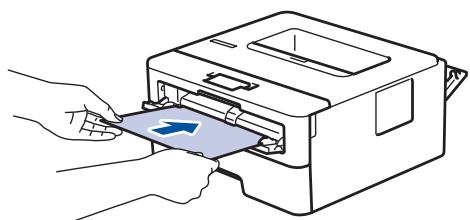
Line drawing of hands inserting a printer into a paper holder (no text or symbols)- Using both hands, put one full sheet of paper in the manual feed slot until the front edge touches the paper feed roller. When you feel the machine pull it in, let go.
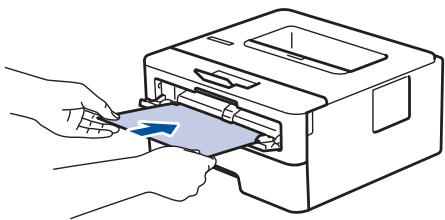
natural_image
Illustration of hands inserting a printer into a machine (no text or symbols visible)
- Load paper into the manual feed slot with the printing surface facing up.
-
Make sure the paper is straight and in the correct position in the manual feed slot. If it is not, the paper may not be fed correctly, resulting in a skewed printout or a paper jam.
-
Send your print job to the machine.

Change your print preferences in the Print screen before sending the print job from your computer.
- After the printed page comes out from the machine, load the next sheet of paper in the manual feed slot. Repeat for each page that you want to print.

Related Information
- Load and Print Paper in the Manual Feed Slot
Home > Paper Handling > Load Paper > Load and Print Paper in the Manual Feed Slot > Load and Print on Thick Paper and Labels in the Manual Feed Slot
Load and Print on Thick Paper and Labels in the Manual Feed Slot
When you load a different paper size in the tray, you must change the Paper Size setting in the machine or on your computer at the same time.
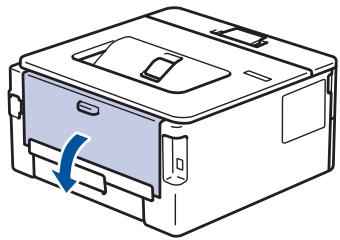
- Open the machine's back cover (the face up output tray).
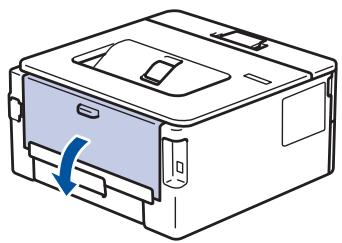
natural_image
Line drawing of a mechanical device with a blue arrow indicating rotation or movement (no text or symbols)
The machine automatically turns on Manual Feed mode when you load paper in the manual feed slot.
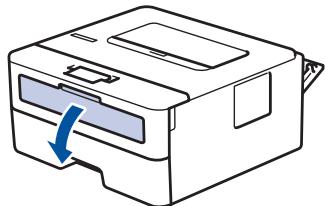
- On the front of the machine, open the manual feed slot cover.
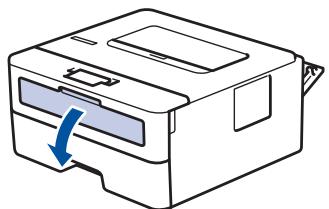
natural_image
Line drawing of a printer with a blue arrow indicating rotation (no text or symbols)- Use both hands to slide the manual feed slot paper guides to fit the width of the paper that you are using.

natural_image
Line drawing of hands operating a printer with blue directional arrows indicating motion (no text or symbols)- Using both hands, put one full sheet of paper in the manual feed slot until the front edge touches the paper feed roller. When you feel the machine pull it in, let go.
natural_image
Illustration of hands inserting a printer into a machine (no text or symbols visible)
- Load paper into the manual feed slot with the printing surface facing up.
• Pull the paper out completely if you must reload the paper into the manual feed slot. - Do not put more than one sheet of paper in the manual feed slot at one time, as it may cause a jam.
-
Make sure the paper is straight and in the correct position in the manual feed slot. If it is not, the paper may not be fed correctly, resulting in a skewed printout or a paper jam.
-
Send your print job to the machine.

Change your print preferences in the Print screen before sending the print job from your computer.
- After the printed page comes out from the back of the machine, load the next sheet of paper in the manual feed slot. Repeat for each page that you want to print.
- Close the back cover (the face up output tray) until it locks in the closed position.
- Load and Print Paper in the Manual Feed Slot
Home > Paper Handling > Load Paper > Load and Print Paper in the Manual Feed Slot > Load and Print on Envelopes in the Manual Feed Slot
Load and Print on Envelopes in the Manual Feed Slot
When you load a different paper size in the tray, you must change the Paper Size setting in the machine or on your computer at the same time.
- Open the machine's back cover (the face up output tray).
natural_image
Line drawing of a printer with a blue arrow indicating compression or disassembly (no text or symbols)
The machine automatically turns on Manual Feed mode when you load paper in the manual feed slot.
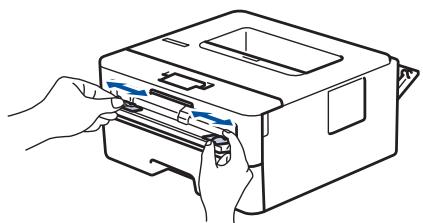
- Pull down the two green levers, one on the left side and one on the right side, as shown in the illustration.
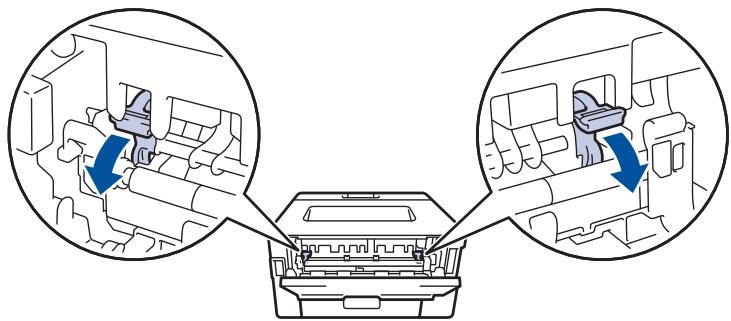
natural_image
Diagram showing car interior compartments with directional arrows indicating movement or force (no text or symbols present)- On the front of the machine, open the manual feed slot cover.
natural_image
Illustration of a printer with a blue arrow indicating compression or disassembly (no text or symbols present)- Use both hands to slide the manual feed slot paper guides to fit the width of the paper that you are using.
natural_image
Line drawing of hands operating a printer with blue scroll arrows indicating motion (no text or symbols)- Using both hands, put one envelope in the manual feed slot until the front edge touches the paper feed roller. When you feel the machine pull it in, let go.

natural_image
Line drawing of hands inserting a printer into a machine (no text or symbols)
- Load the envelope into the manual feed slot with the printing surface facing up.
• Pull the envelope out completely when you reload the envelope into the manual feed slot. - Do not put more than one envelope in the manual feed slot at one time, as it may cause a jam.
-
Make sure the envelope is straight and in the correct position on the manual feed slot. If it is not, the envelope may not be fed correctly, resulting in a skewed printout or a paper jam.
-
Send your print job to the machine.

Change your print preferences in the Print dialog box before sending the print job from your computer.
| Settings | Options for Envelopes |
| Paper Size | Com-10DLC5Monarch |
| Media Type | EnvelopesEnv. ThickEnv. Thin |
- After the printed envelope comes out of the machine, put in the next envelope. Repeat for each envelope that you want to print.
- When you have finished printing, return the two green levers you adjusted in the earlier step back to their original positions.
- Close the back cover (the face up output tray) until it locks in the closed position.

Related Information
- Load and Print Paper in the Manual Feed Slot
▲ Home > Paper Handling > Paper Settings
Paper Settings
• Change the Paper Size and Paper Type
- Change the Check Paper Size Setting
▲ Home > Paper Handling > Paper Settings > Change the Paper Size and Paper Type
Change the Paper Size and Paper Type
When you change the size and type of the paper you load in the tray, you must change the Paper Size and Paper Type settings on the LCD at the same time.
- Press ▲ or ▼ to display the [General Setup] option, and then press OK.
- Press ▲ or ▼ to display the [Tray Setting] option, and then press OK.
- Press ▲ or ▼ to display the [Paper Type] option, and then press OK.
- Press ▲ or ▼ to display the paper type you want, and then press OK.
- Press ▲ or ▼ to display the [Paper Size] option, and then press OK.
- Press ▲ or ▼ to display the paper size you want, and then press Go.

Related Information
- Paper Settings
▲ Home > Paper Handling > Paper Settings > Change the Check Paper Size Setting
Change the Check Paper Size Setting
When you turn on your machine's Check Size setting, the machine displays a message when you remove a paper tray, asking if you changed the paper size and paper type.
The default setting is On.
- Press ▲ or ▼ to display the [General Setup] option, and then press OK.
- Press ▲ or ▼ to select the [Tray Setting] option, and then press OK.
- Press ▲ or ▼ to select the [Check Size] option, and then press OK.
- Press ▲ or ▼ to select the [On] or [Off] option, and then press Go.

Related Information
- Paper Settings
Unprintable Area
The measurements in the table below show maximum unprintable areas from the edges of the most commonly-used paper sizes. The measurements may vary depending on the paper size or settings in the application you are using.
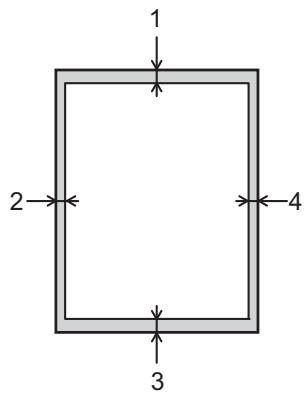

Do not attempt to print into these areas; your output will not reflect anything in these areas.
| Usage | Document Size | Top (1)Bottom (3) | Left (2)Right (4) |
| Letter | 4.23 mm | 4.23 mm | |
| A4 | 4.23 mm | 4.23 mm | |
| Legal | 4.23 mm | 4.23 mm |

Related Information
- Paper Handling
Recommended Print Media
To get the best print quality, we recommend using the paper listed in the table.
| Paper Type | Item |
| Plain Paper | Xerox Premier TCF 80 g/m2 |
| Xerox Business 80 g/m2 | |
| Recycled Paper | Steinbeis Evolution White 80 g/m2 |
| Labels | Avery laser label L7163 |
| Envelopes | Antalis River series (DL) |

Related Information
- Paper Handling
Using Special Paper
Always test paper samples before purchasing them to ensure desirable performance.
• DO NOT use inkjet paper; it may cause a paper jam or damage your machine.
- If you use bond paper, paper with a rough surface, or paper that is wrinkled or creased, the paper may exhibit degraded performance.
Store paper in its original packaging and keep it sealed. Keep the paper flat and away from moisture, direct sunlight and heat.
IMPORTANT
Some types of paper may not perform well or may cause damage to your machine.
DO NOT use paper:
• that is highly textured
• that is extremely smooth or shiny
• that is curled or warped
• that is coated or has a chemical finish
• that is damaged, creased or folded
• that exceeds the recommended weight specification in this guide
• with tabs and staples
• with letterheads using low temperature dyes or thermography
• that is multipart or carbonless
• that is designed for inkjet printing
If you use any of the types of paper listed above, they may damage your machine. This damage is not covered under any Brother warranty or service agreement.

Related Information
- Paper Handling
• Print from Your Computer (Windows)
• Print from Your Computer (Mac)
- Cancel a Print Job
- Test Print
Print from Your Computer (Windows)
• Print a Document (Windows)
• Print Settings (Windows)
- Change the Default Print Settings (Windows)
• Monitor the Status of the Machine from Your Computer (Windows)
Print a Document (Windows)
- Select the print command in your application.
- Select Brother XXX-XXXX (where XXXX is the name of your model), and then click the printing properties or preferences button.
The printer driver window appears.
- Make sure you have loaded the correct size paper in the paper tray.
- Click the Paper Size drop-down list, and then select your paper size.
- In the Orientation field, select the Portrait or Landscape option to set the orientation of your printout.

If your application contains a similar setting, we recommend that you set the orientation using the application.
- Type the number of copies (1-999) you want in the Copies field.
- Click the Media Type drop-down list, and then select the type of paper you are using.
- To print multiple pages on a single sheet of paper or print one page of your document on multiple sheets, click the Multiple Page drop-down list, and then select your options.
- Change other printer settings, if needed.
- Click OK.
- Complete your print operation.

Related Information
• Print from Your Computer (Windows)
• Print Settings (Windows)
Related Topics:
Print Settings (Windows)
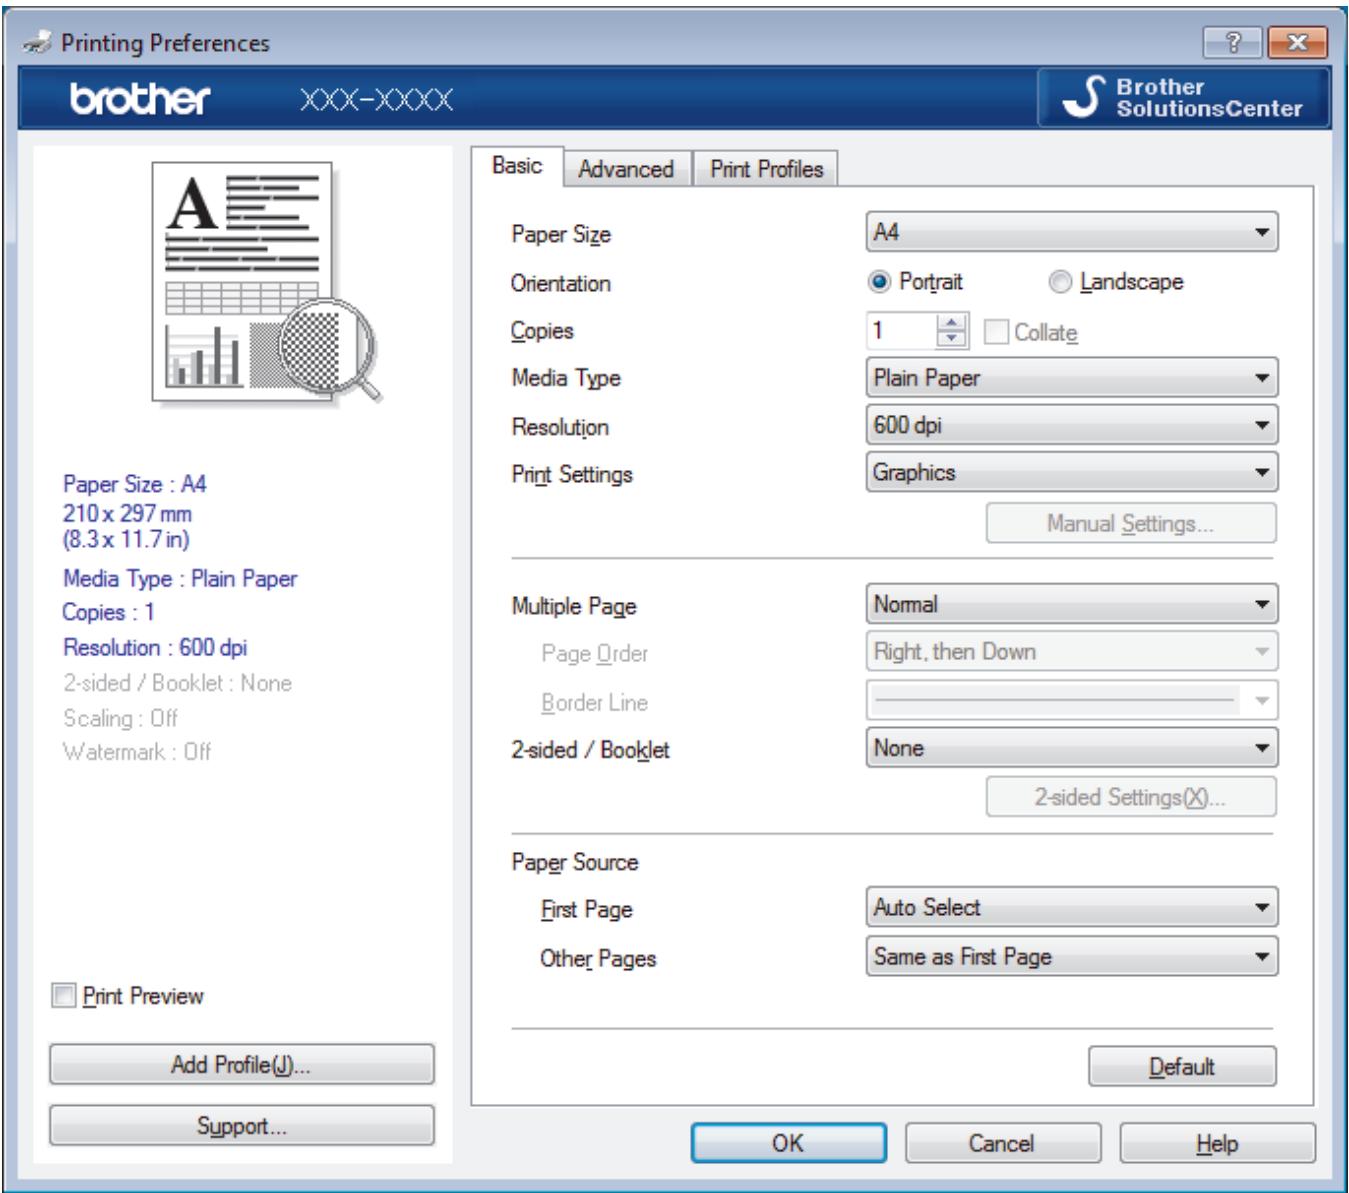
Basic Tab
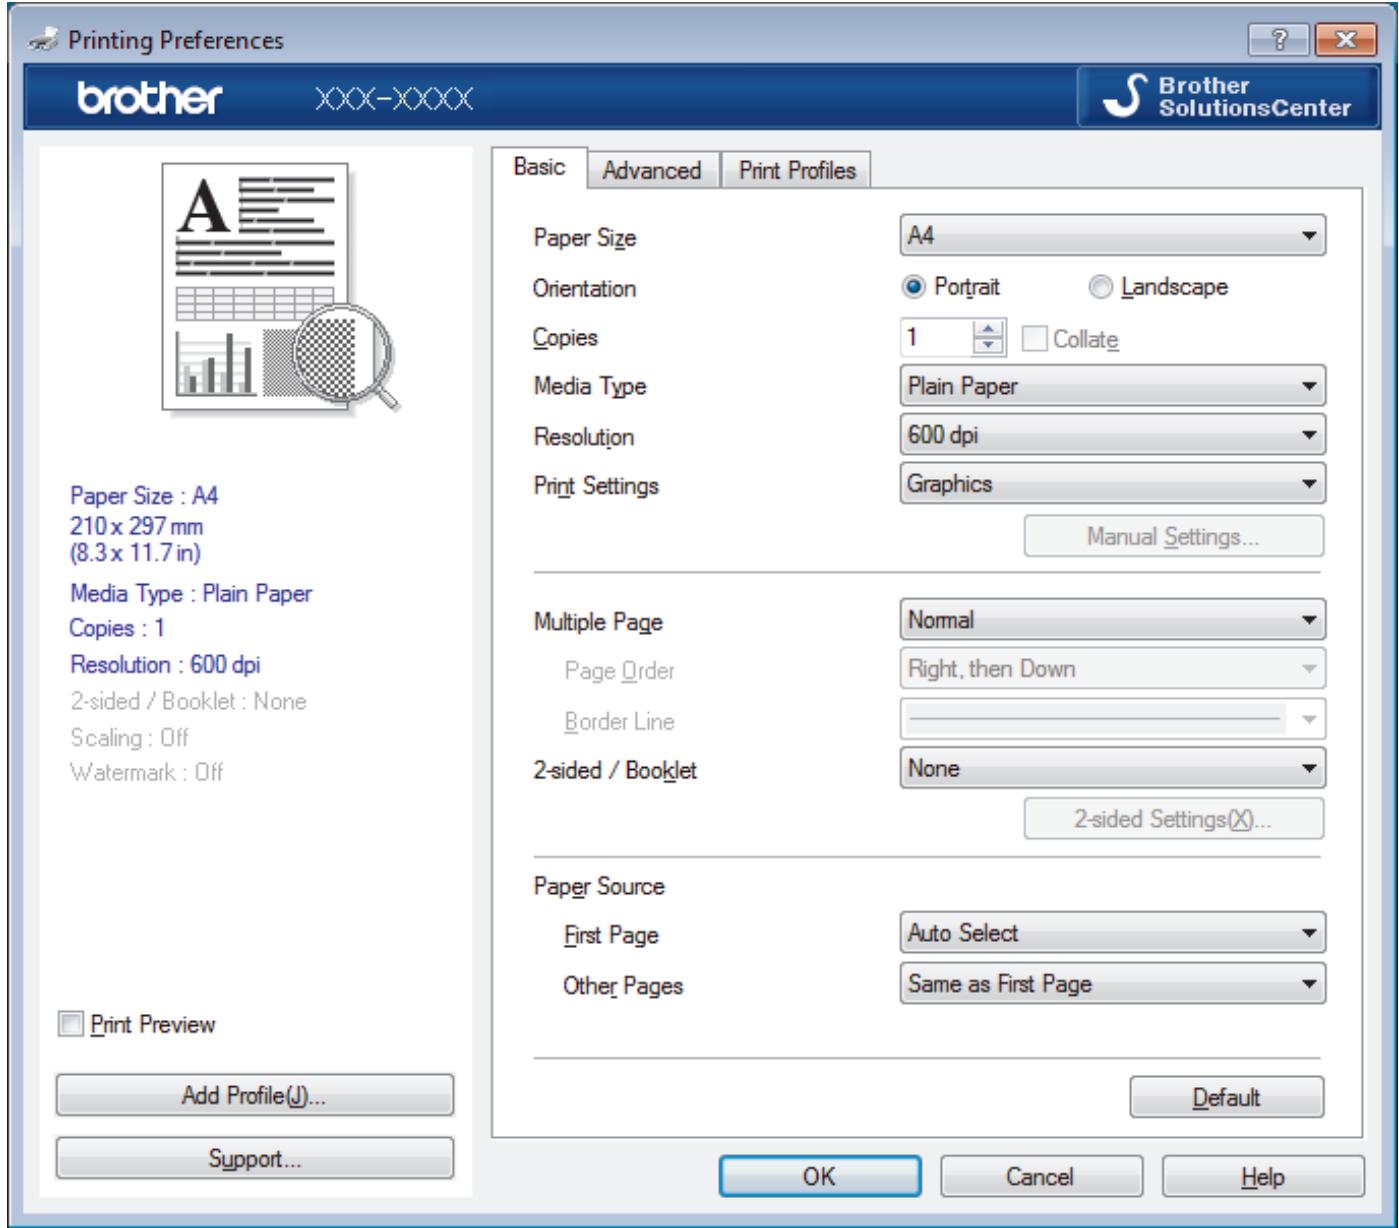
1. Paper Size
Select the size of the paper you want to use. You can either choose from standard paper sizes or create a custom paper size.
2. Orientation
Select the orientation (portrait or landscape) of your printout.
If your application contains a similar setting, we recommend that you set the orientation using the application.
3. Copies
Type the number of copies (1-999) that you want to print in this field.
Collate
Select this option to print sets of multi-page documents in the original page order. When this option is selected, one complete copy of your document will print, and then reprint according to the number of copies you choose. If this option is not selected, then each page will print according to the number of copies chosen before the next page of the document is printed.
4. Media Type
Select the type of media you want to use. To achieve the best print results, the machine automatically adjusts its print settings according to the selected media type.
5. Resolution
Select the print resolution. As print resolution and speed are related, the higher the resolution, the longer it will take to print the document.
6. Print Settings
Select the type of document you want to print.
Manual Settings...
Specify advanced settings such as brightness, contrast, and other settings.
Graphics
Use Printer Halftone
Select this option to use the printer driver to express halftones.
Brightness
Specify the brightness.
Contrast
Specify the contrast.
Graphics Quality
Select either Graphics or Text for the best print quality, based on the type of document you are printing.
Improve Grey Printing
Select this option to improve the image quality of shaded areas.
Improve Pattern Printing
Select this option to improve the pattern printing if printed fills and patterns are different from the fills and patterns you see on your computer screen.
Improve Thin Line
Select this option to improve the image quality of thin lines.
Use System Halftone
Select this option to use Windows to express halftones.
TrueType Mode (Available only for certain models)
Mode
Select how the fonts are processed for printing.
Use Printer TrueType Fonts
Select whether to use built-in fonts for the font processing.
7. Multiple Page
Select this option to print multiple pages on a single sheet of paper, or print one page of your document on multiple sheets.
Page Order
Select the page order when printing multiple pages on a single sheet of paper.
Border Line
Select the type of border to use when printing multiple pages on a single sheet of paper.
8. 2-sided / Booklet
Select this option to print on both sides of the paper, or print a document in booklet format using 2-sided printing.
2-sided Settings button
Click this button to select the type of 2-sided binding. Four types of 2-sided bindings are available for each orientation.
9. Paper Source
Select the paper source setting according to your print conditions or purpose.
First Page
Select the paper source to use for printing the first page.
Other Pages
Select the paper source to use for printing the second and subsequent pages.
Advanced Tab
![Brother XXX-XXXX Printing Preferences brother XXX-XXXX Brother SolutionsCenter Basic Advanced Print Profiles Paper Size : A4 210 x 297 mm (8.3 x 11.7 in) Media Type : Plain Paper Copies : 1 Resolution : 600 dpi 2-sided / Booklet : None Scaling : Off Watermark : Off Print Preview Add Profile(J)... Support... Scaling Off Fit to Paper Size A4 Free [ 25 - 400 % ] 100 Reverse Print Use Watermark Settings... Header-Footer Print Settings(B)... Toner Save Mode Administrator Settings... Other Print Options(Y)... Default OK Cancel Apply Help](/content/2024/11/223887/images/90dbaf10d02025cfe04e330b2101df46dc1229d03cc5cb8959ed0b0540501742.jpg)
1. Scaling
Select these options to enlarge or reduce the size of the pages in your document.
Fit to Paper Size
Select this option to enlarge or reduce the document pages to fit a specified paper size. When you select this option, select the paper size you want from the drop-down list.
Free [25 - 400%]
Select this option to enlarge or reduce the document pages manually. When you select this option, type a value into the field.
2. Reverse Print
Select this option to rotate the printed image 180 degrees.
3. Use Watermark
Select this option to print a logo or text on your document as a watermark. Select one of the preset watermarks, add a new watermark, or use an image file you have created.
4. Header-Footer Print
Select this option to print the date, time and PC login user name on the document.
5. Toner Save Mode
Select this feature to conserve toner by using less toner to print documents; printouts appear lighter, but are still legible.
6. Administrator
This feature allows you to change the administrator password and restrict various printing functions.
7. User Authentication (Available only for certain models)
This feature allows you to confirm the restrictions for each user.
8. Other Print Options button
Sleep Time
Select this option to set the machine to enter sleep mode immediately after printing.
Macro (Available only for certain models)
Select this feature to print an electronic form (macro), which you have stored in your machine's memory, as an overlay on the print job.
Density Adjustment
Specify the print density.
Improve Print Output
Select this option to reduce the amount of paper curling and improve the toner fixing.
Skip Blank Page
Select this option to allow the printer driver to automatically detect blank pages and exclude them from printing.
Print Text in Black
Select this option when you want to print colour text in black.
Print Archive
Select this option to save the print data as a PDF file to your computer.
Eco settings
Select this option to reduce printing noise.

Related Information
• Print from Your Computer (Windows)
Related Topics:
• Print a Document (Windows)
Change the Default Print Settings (Windows)
When you change an application's print settings, the changes only apply to documents printed with that application. To change print settings for all Windows applications, you must configure the printer driver properties.
- Do one of the following:
• For Windows Server 2008
Click (Start) > Control Panel > Hardware and Sound > Printers.
• For Windows 7 and Windows Server 2008 R2
Click (Start) > Devices and Printers.
- For Windows 8
Move your mouse to the lower right corner of your desktop. When the menu bar appears, click Settings, and then click Control Panel. In the Hardware and Sound group, click View devices and printers.
• For Windows 10 and Windows Server 2016
Click > Windows System > Control Panel. In the Hardware and Sound group, click View devices and printers.
• For Windows Server 2012
Move your mouse to the lower right corner of your desktop. When the menu bar appears, click Settings, and then click Control Panel. In the Hardware group, click View devices and printers.
• For Windows Server 2012 R2
Click Control Panel on the Start screen. In the Hardware group, click View devices and printers.
-
Right-click the Brother XXX-XXXX icon (where XXXX is your model name), and then select Printer properties. If printer driver options appear, select your printer driver.
-
Click the General tab, and then click the Printing Preferences... or Preferences... button.
The printer driver dialog box appears.

• To configure the tray settings, click the Device Settings tab(Available only for certain models).
• To change the printer port, click the Ports tab.
- Select the print settings you want to use as defaults for all of your Windows programs.
- Click OK.
- Close the printer properties dialog box.

Related Information
• Print from Your Computer (Windows)
Home > Print > Print from Your Computer (Windows) > Monitor the Status of the Machine from Your Computer (Windows)
Monitor the Status of the Machine from Your Computer (Windows)
The Status Monitor utility is a configurable software tool for monitoring the status of one or more devices, allowing you to get immediate notification of errors.
• Do one of the following:
- Double-click the √ icon in the task tray.
- (Windows 7, Windows Server 2008 and Windows Server 2008 R2)
Click (Start) > All Programs > Brother > Brother Utilities.
Click the drop-down list and select your model name (if not already selected). Click Tools in the left navigation bar, and then click Status Monitor.
- (Windows 8 and Windows Server 2012)
Click 📋 (Brother Utilities), and then click the drop-down list and select your model name (if not already selected). Click Tools in the left navigation bar, and then click Status Monitor.
- (Windows 8.1 and Windows Server 2012 R2)
Move your mouse to the lower left corner of the Start screen and click (if you are using a touch-based device, swipe up from bottom of the Start screen to bring up the Apps screen). When the Apps screen appears, tap or click (Brother Utilities), and then click the drop-down list and select your model name (if not already selected). Click Tools in the left navigation bar, and then click Status Monitor.
- (Windows 10 and Windows Server 2016)
Click > Brother > Brother Utilities.
Click the drop-down list and select your model name (if not already selected). Click Tools in the left navigation bar, and then click Status Monitor.
Troubleshooting
Click the Troubleshooting button to access the troubleshooting website.
Looking for replacement supplies?
Click the Looking for replacement supplies? button for more information on Brother genuine supplies.

Related Information
• Print from Your Computer (Windows)
- Printing Problems
Related Topics:
▲ Home > Print > Print from Your Computer (Mac)
Print from Your Computer (Mac)
• Print a Document (Mac)
- Print Options (Mac)
• Monitor the Status of the Machine from Your Computer (Mac)
Print a Document (Mac)
- Make sure you have loaded the correct size paper in the paper tray.
- From an application, such as Apple TextEdit, click the File menu, and then select Print.
- Select Brother XXX-XXXX (where XXXX is your model name).
- Type the number of copies you want in the Copies field.
- Click the Paper Size pop-up menu, and then select your paper size.
- Select the Orientation option that matches the way you want the document to print.
- Click the application pop-up menu, and then select Print Settings.
The Print Settings options appear. - Click the Media Type pop-up menu, and then select the type of paper you are using.
- Change other printer settings, if needed.
- Click Print.

Related Information
• Print from Your Computer (Mac)
Related Topics:
- Print Options (Mac)
Print Options (Mac)
Page Setup
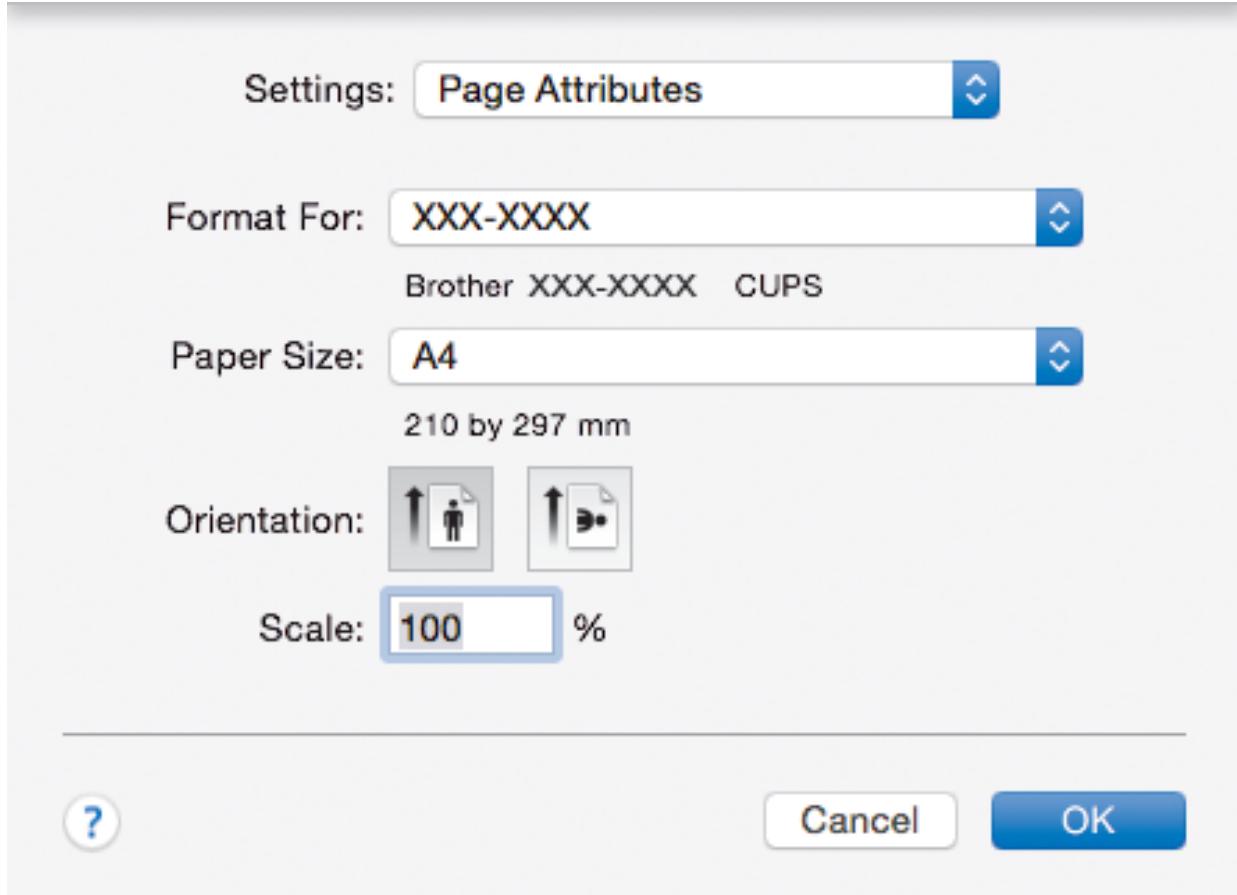
1. Paper Size
Select the size of the paper you want to use. You can either choose from standard paper sizes or create a custom paper size.
2. Orientation
Select the orientation (portrait or landscape) of your printout.
If your application contains a similar setting, we recommend that you set the orientation using the application.
3. Scale
Type a value into the field to enlarge or reduce the pages in your document to fit the selected paper size.
Layout
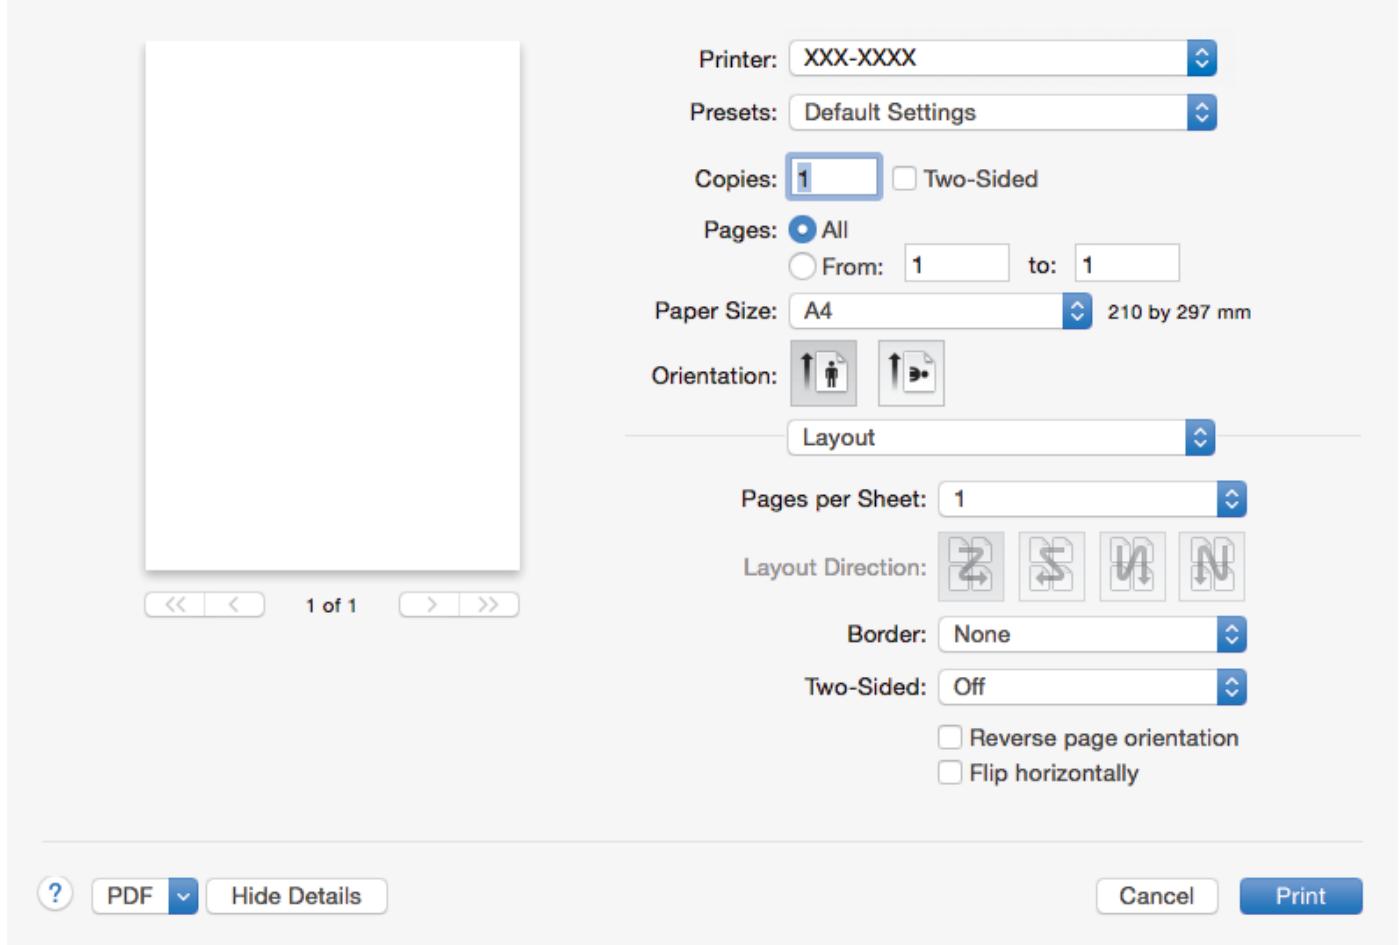
- Pages per Sheet
Select the number of pages to print on a single sheet of paper.
- Layout Direction
Select the page order when printing multiple pages on a single sheet of paper.
- Border
Select the type of border to use when printing multiple pages on a single sheet of paper.
- Two-Sided
Select whether to print on both sides of the paper.
- Reverse page orientation
Select this option to rotate the printed image 180 degrees.
- Flip horizontally
Select this option to reverse the printed image on the page horizontally from left to right.
Paper Handling
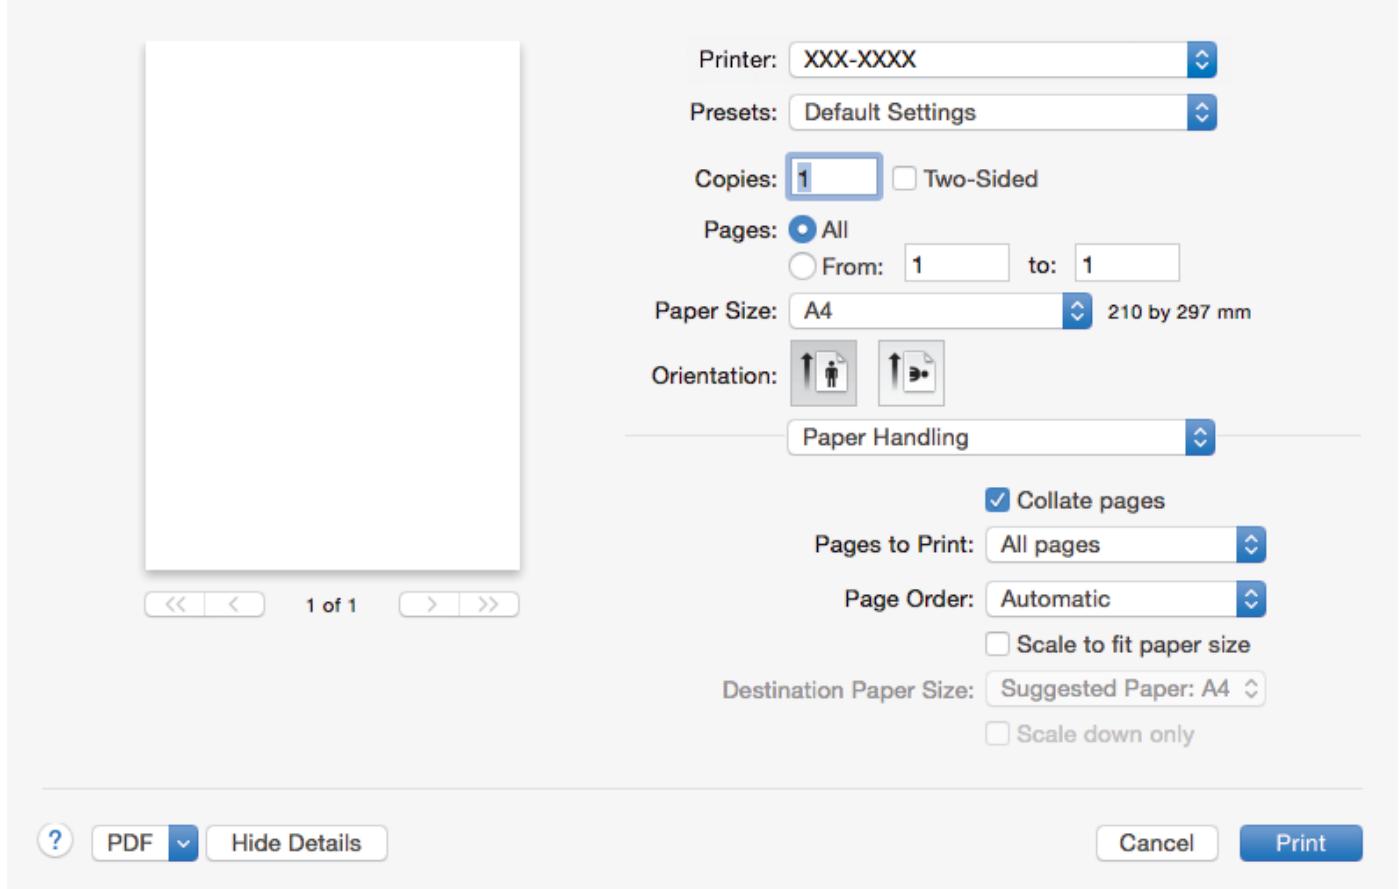
1. Collate pages
Select this option to print sets of multi-page documents in the original page order. When this option is selected, one complete copy of your document will print, and then reprint according to the number of copies you choose. If this option is not selected, then each page will print according to the number of copies chosen before the next page of the document is printed.
2. Pages to Print
Select which pages you want to print (even pages or odd pages).
3. Page Order
Select the page order.
4. Scale to fit paper size
Select this option to enlarge or reduce the pages in your document to fit the selected paper size.
5. Destination Paper Size
Select the paper size to print on.
6. Scale down only
Select this option if you want to reduce the pages in your document when they are too large for the selected paper size. If this option is selected and the document is formatted for a paper size that is smaller than the paper size you are using, the document will be printed at its original size.
Print Settings
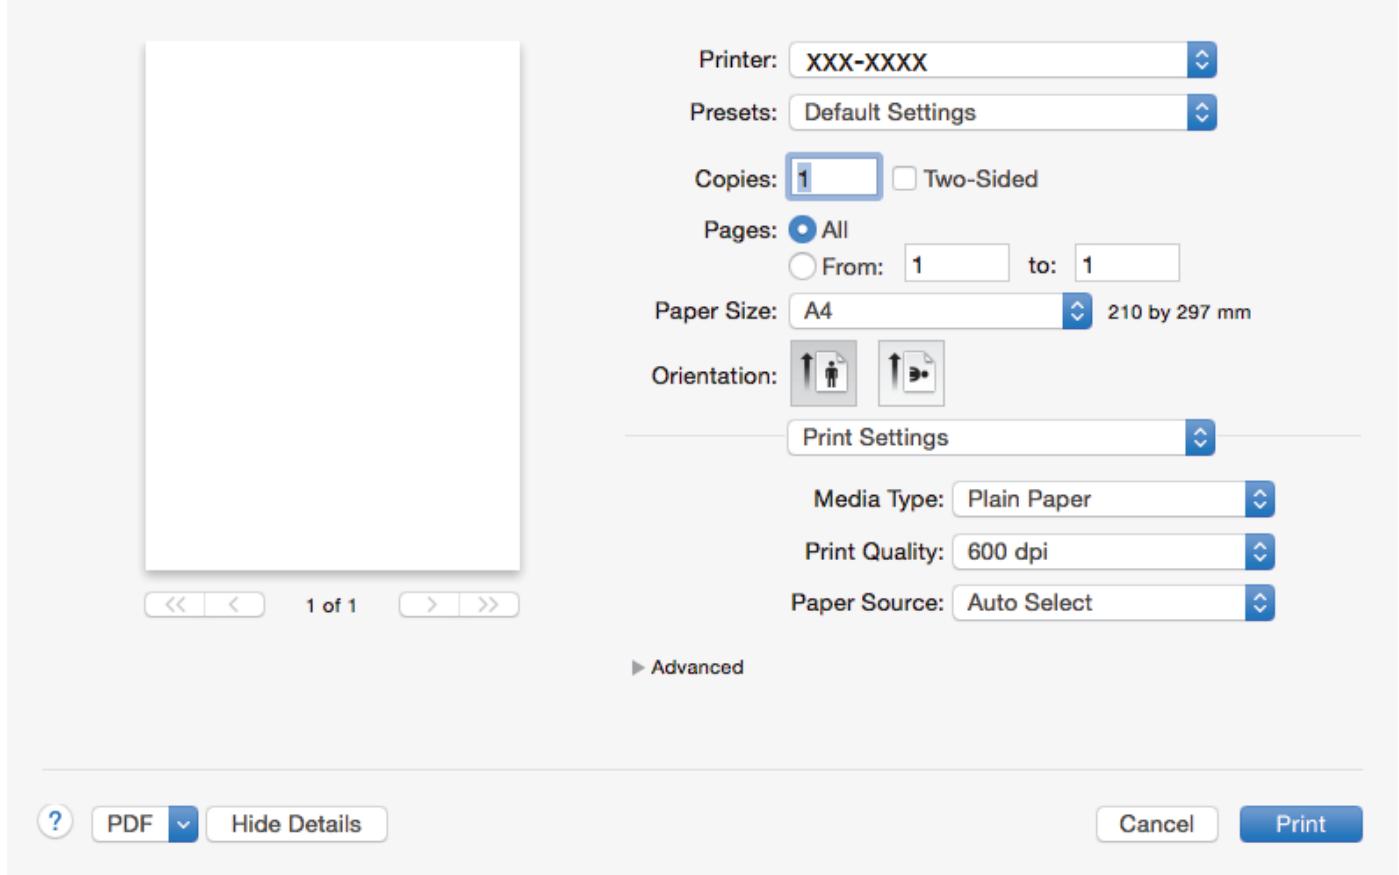
1. Media Type
Select the type of media you want to use. To achieve the best print results, the machine automatically adjusts its print settings according to the selected media type.
2. Print Quality
Select the print resolution you want. Because print quality and speed are related, the higher the quality, the longer it will take to print the document.
3. Paper Source
Select the paper source setting according to your print conditions or purpose.
4. Advanced
Toner Save Mode
Select this feature to conserve toner by using less toner to print documents; printouts appear lighter, but are still legible.
Graphics Quality
Select either Graphics or Text for the best print quality, based on the type of document you are printing.
Improve Print Output
Select this option to reduce the amount of paper curling and improve the toner fixing.
Density Adjustment
Specify the print density.
Sleep Time
Specify the amount of time that passes before the machine enters Sleep Mode.
Quiet Mode
Select this option to reduce printing noise.
Other Print Options
Skip Blank Page
Select this option to allow the printer driver to automatically detect blank pages and exclude them from printing.

Related Information
• Print from Your Computer (Mac)
• Print a Document (Mac)
Related Topics:
Home > Print > Print from Your Computer (Mac) > Monitor the Status of the Machine from Your Computer (Mac)
Monitor the Status of the Machine from Your Computer (Mac)
The Status Monitor utility is a configurable software tool for monitoring the status of a device, allowing you to get immediate notification of error messages, such as paper empty or paper jam, at preset update intervals. You can also access Web Based Management.
- Click the System Preferences menu, select Print & Scan or Printers & Scanners, and then select your machine.
- Click the Options & Supplies button.
- Click the Utility tab, and then click the Open Printer Utility button.
Status Monitor starts.

Troubleshooting
Click the Troubleshooting button to access the troubleshooting website.
Visit the Genuine Supplies website
Click the Visit the Genuine Supplies website button for more information on Brother genuine supplies.
Updating the machine's status
To view the latest machine status while the Status Monitor window is open, click the 📄 icon. You can set the interval at which the software updates machine status information. Click Brother Status Monitor in the menu bar, and then select Preferences.
Web Based Management (Network Connection Only)
Access the Web Based Management System by clicking the machine icon on the Status Monitor screen. You can use a standard Web Browser to manage your machine using HTTP (Hyper Text Transfer Protocol).

Related Information
• Print from Your Computer (Mac)
Related Topics:
- Printing Problems
Cancel a Print Job
- On the machine's control panel, press and hold Go for about two seconds to cancel the current print job.

To cancel multiple print jobs, press and hold Go for six seconds.

Related Information
- Print
Related Topics: - Printing Problems
Test Print
If there are problems with print quality, follow these instructions to do a test print:
- Press ▲ or ▼ to display the [Printer] option, and then press OK.
- (HL-B2080DW)
Press ▲ or ▼ to display the [Print Options] option, and then press OK. - Press ▲ or ▼ to display the [Test Print] option, and then press Go.
The machine prints the test page.

Related Information
- Improve the Print Quality
Related Topics:
Network
• Supported Basic Network Features
• Network Management Software and Utilities
• Additional Methods of Configuring Your Brother Machine for a Wireless Network
• Advanced Network Features
• Technical Information for Advanced Users
Supported Basic Network Features
The print server supports various features depending on the operating system. Use this table to see which network features and connections are supported by each operating system.
| Operating Systems | Windows 7Windows 8Windows 10 | Windows Server2008/2008 R2/2012/2012R2/2016 | macOS v10.10.5macOS v10.11.xmacOS v10.12.x |
| Printing | Yes | Yes | Yes |
| BRAdmin Light | Yes | Yes | |
| BRAdmin Professional | Yes | Yes | |
| Web Based Management | Yes | Yes | Yes |
| Status Monitor | Yes | Yes | |
| Driver Deployment Wizard | Yes | Yes | |
| Vertical Pairing | Yes |

- Go to your model's Downloads page on the Brother Solutions Center at support.brother.com to download the latest version of Brother's BRAadmin Light.
- Go to your model's Downloads page on the Brother Solutions Center at support.brother.com to download the latest version of Brother's BRAadmin Professional utility.

Related Information
- Network
Network Management Software and Utilities
Configure and change your Brother machine's network settings using a management utility.
- Learn about Network Management Software and Utilities
- Change Machine Settings from Your Computer
- Change Machine Settings Using Web Based Management
Home > Network > Network Management Software and Utilities > Learn about Network Management Software and Utilities
Learn about Network Management Software and Utilities
Web Based Management
Web Based Management is a utility that uses a standard web browser to manage your machine using the Hyper Text Transfer Protocol (HTTP) or Hyper Text Transfer Protocol over Secure Socket Layer (HTTPS). Type your machine's IP address into your web browser to access and change your print server settings.
BRAdmin Light (Windows)
BRAdmin Light is a utility for the initial setup of Brother network-connected devices. This utility can search for Brother products on your network, view the status and configure the basic network settings, such as IP address.
Go to your model's Downloads page on the Brother Solutions Center at support.brother.com to download BRAdmin Light.

- If using Windows Firewall, or the firewall function of an anti-spyware or antivirus application, temporarily disable them. When you are sure you can print, configure the software settings following the instructions.
BRAdmin Professional (Windows)
BRAdmin Professional is a utility for more advanced management of network-connected Brother devices. This utility can search for Brother products on your network and view the device status from an easy-to-read Windows Explorer-style screen that changes colour to identify the status of each device. You can configure network and device settings, and update device firmware from a Windows computer on your LAN. BRAdmin Professional can also log activity of Brother devices on your network and export the log data. For users who want to monitor locally-connected machines, install the Print Auditor Client software on the client computer. This utility allows you to use BRAdmin Professional to monitor machines that are connected to a client computer via the USB interface.

- Go to your model's Downloads page on the Brother Solutions Center at support.brother.com to download the latest version of Brother's BRAmin Professional utility.
- Node name: The node name appears in the current BRAdmin Professional window. The default node name is "BRNxxxxxxxxxxxx" for a wired network or "BRWxxxxxxxxxxxxx" for a wireless network (where "xxxxxxxxxxxxx" is your machine's MAC Address / Ethernet address).
- If using Windows Firewall, or the firewall function of an anti-spyware or antivirus application, temporarily disable them. When you are sure you can print, configure the software settings following the instructions.

Related Information
• Network Management Software and Utilities
Additional Methods of Configuring Your Brother Machine for a Wireless Network
To connect your machine to your wireless network, we recommend using the Brother installation disc.
• Before Configuring Your Brother Machine for a Wireless Network
- Configure Your Machine for a Wireless Network
- Configure Your Machine for a Wireless Network Using the One Push Method of Wi-Fi Protected Setup™ (WPS)
- Configure Your Machine for a Wireless Network Using the PIN Method of Wi-Fi Protected Setup™ (WPS)
- Configure Your Machine for a Wireless Network Using the Machine's Control Panel Setup Wizard
- Configure Your Machine for a Wireless Network When the SSID Is Not Broadcast
- Use Wi-Fi Direct®
Before Configuring Your Brother Machine for a Wireless Network
Before attempting to configure a wireless network, confirm the following:
- To achieve optimum results with normal everyday document printing, place the Brother machine as close to the wireless LAN access point/router as possible with minimal obstructions. Large objects and walls between the two devices and interference from other electronic devices can affect the data transfer speed of your documents.
Due to these factors, wireless may not be the best method of connection for all types of documents and applications. If you are printing large files, such as multi-page documents with mixed text and large graphics, you may want to consider selecting wired Ethernet for faster data transfer (supported models only), or USB for the fastest throughput speed. - Although the Brother machine can be used in both a wired and wireless network (supported models only), only one connection method can be used at a time. However, a wireless network connection and Wi-Fi Direct connection, or a wired network connection (supported models only) and Wi-Fi Direct connection can be used at the same time.

If you do not know the security information, please consult the router manufacturer, your system administrator, or your Internet provider.

Related Information
• Additional Methods of Configuring Your Brother Machine for a Wireless Network
Configure Your Machine for a Wireless Network
- Turn on your computer and insert the Brother installation disc into your computer.
• For Windows, follow these instructions:
- For Mac, click Driver Download to go to the Brother Solutions Center. Follow the on-screen instructions to install printer drivers.
- The opening screen appears automatically.
Choose your language, and then follow the on-screen instructions.

If the Brother screen does not appear, do the following:
- (Windows 7)
Go to Computer. Double-click the CD/DVD icon, and then double-click start.exe.
• (Windows 8 and Windows 10)
Click the (File Explorer) icon on the taskbar, and then go to Computer (This PC). Double-click the CD/DVD icon, and then double-click start.exe.
• If the User Account Control screen appears, click Yes.
- Choose Wireless Network Connection (Wi-Fi), and then click Next.
- Follow the on-screen instructions.
You have completed the wireless network setup. To install Full Driver & Software Package necessary for operating your device, insert the Brother installation disc into your computer or go to your model's Downloads page on the Brother Solutions Center at support.brother.com.

Related Information
• Additional Methods of Configuring Your Brother Machine for a Wireless Network
▲ Home > Network > Additional Methods of Configuring Your Brother Machine for a Wireless
Network > Configure Your Machine for a Wireless Network Using the One Push Method of Wi-Fi Protected Setup ^™ (WPS)
Configure Your Machine for a Wireless Network Using the One Push Method of Wi-Fi Protected Setup ^TM (WPS)
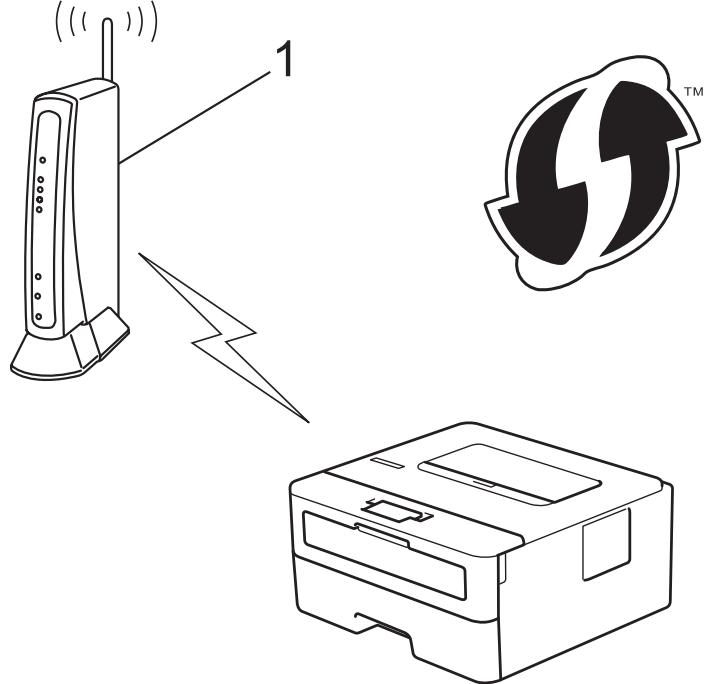
If your wireless access point/router supports WPS (PBC: Push Button Configuration), you can use WPS from your machine's control panel menu to configure your wireless network settings.

Routers or access points that support WPS are marked with this symbol:

natural_image
Abstract black and white geometric logo design with arrow-like shapes (no text or symbols)- Press ▲ or ▼ to select the [Network] option, and then press OK.
- Press ▲ or ▼ to select the [WLAN] option, and then press OK.
- Press ▲ or ▼ to select the [WPS] option, and then press OK.
- When [WLAN Enable?] appears, press ▼ to select On.
This will start the wireless setup wizard. To cancel, press ▲.
- When the LCD displays [Press Key on rtr], press the WPS button on your wireless access point/router.
Press ▲ on the machine's control panel. Your machine will automatically detect your wireless access point/router and try to connect to your wireless network.
If your wireless device is connected successfully, the machine's LCD displays [Connected].
You have completed the wireless network setup. To install Full Driver & Software Package necessary for operating your device, insert the Brother installation disc into your computer or go to your model's Downloads page on the Brother Solutions Center at support.brother.com.

Related Information
• Additional Methods of Configuring Your Brother Machine for a Wireless Network
Related Topics:
• Wireless LAN Report Error Codes
▲ Home > Network > Additional Methods of Configuring Your Brother Machine for a Wireless
Network > Configure Your Machine for a Wireless Network Using the PIN Method of Wi-Fi Protected Setup ^™ (WPS)
Configure Your Machine for a Wireless Network Using the PIN Method of Wi-Fi Protected Setup ^™ (WPS)
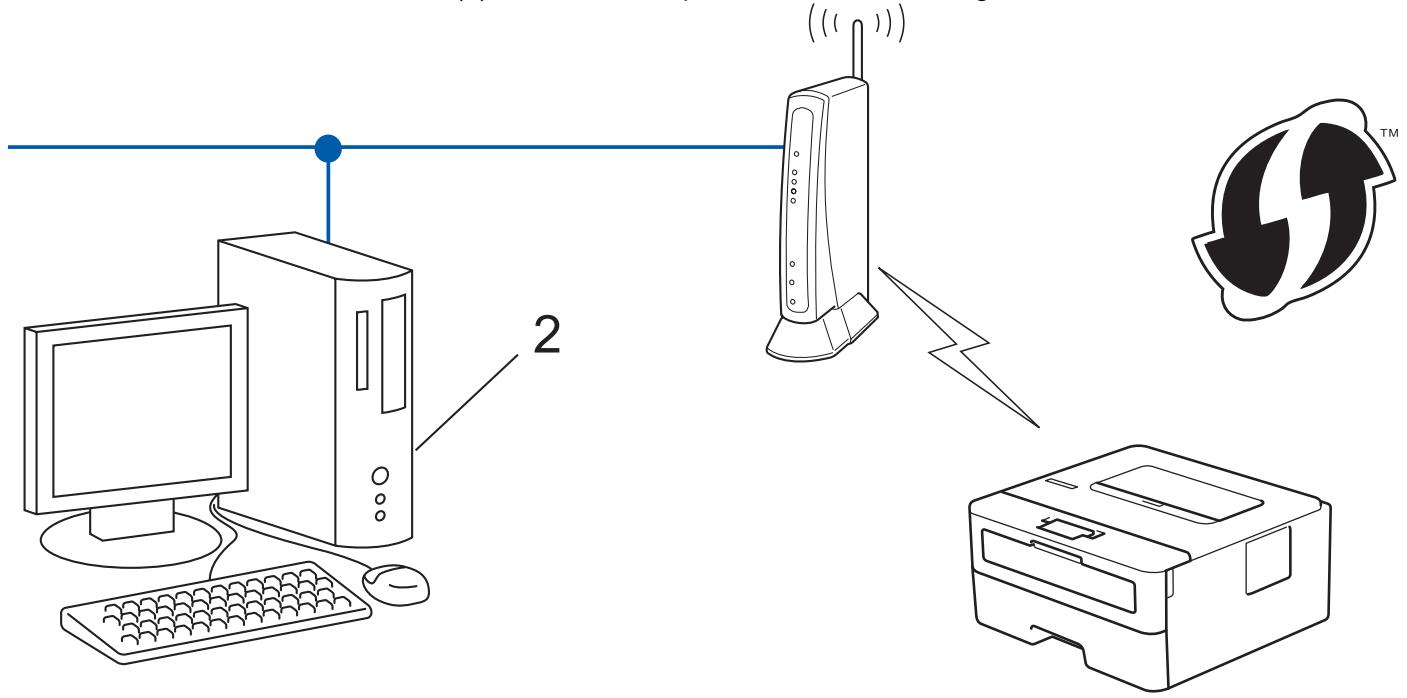
If your wireless LAN access point/router supports WPS, you can use the Personal Identification Number (PIN) Method to configure your wireless network settings.
The PIN Method is one of the connection methods developed by the Wi-Fi Alliance®. By submitting a PIN created by an Enrollee (your machine) to the Registrar (a device that manages the wireless LAN), you can set up the wireless network and security settings. For more information on how to access WPS mode, see the instructions provided with your wireless access point/router.
Type A
Connection when the wireless LAN access point/router (1) doubles as the Registrar:
Type B
Connection when another device (2), such as a computer, is used as the Registrar:

natural_image
Abstract black arrow symbol inside a white circular outline, no text or labels present- Press ▲ or ▼ to select the [Network] option, and then press OK.
- Press ▲ or ▼ to select the [WLAN] option, and then press OK.
- Press ▲ or ▼ to select the [WPS w/PIN Code] option, and then press OK.
- When [WLAN Enable?] appears, press ▼ to select On.
This will start the wireless setup wizard. To cancel, press ▲.
- The LCD displays an eight-digit PIN and the machine starts searching for a wireless LAN access point/router.
- Using a computer connected to the network, in your browser's address bar, type the IP address of the device you are using as the Registrar. (For example: http://192.168.1.2)
- Go to the WPS settings page and type the PIN, and then follow the on-screen instructions.

- The Registrar is usually the wireless LAN access point/router.
- The settings page will differ depending on the brand of wireless LAN access point/router. For more information, see the instructions supplied with your wireless LAN access point/router.
If you are using a Windows 7, Windows 8, or Windows 10 computer as a Registrar, complete the following steps:
- Do one of the following:
- Windows 7
Click (Start) > Devices and Printers > Add a device.
- Windows 8
Move your mouse to the lower right corner of your desktop. When the menu bar appears, click Settings > Control Panel > Hardware and Sound > View devices and printers > Add a device.
- Windows 10
Click 📋 > Windows System > Control Panel. In the Hardware and Sound group, click Add a device.

- To use a Windows 7, Windows 8, or Windows 10 computer as a Registrar, you must register it to your network in advance. For more information, see the instructions supplied with your wireless LAN access point/router.
-
If you use Windows 7, Windows 8, or Windows 10 as a Registrar, you can install the printer driver after the wireless configuration by following the on-screen instructions. To install the full driver and software package, use the Brother installation disc.
-
Select your machine and click Next.
-
Type the PIN displayed on the machine's LCD, and then click Next.
- (Windows 7) Select your network, and then click Next.
- Click Close.
If your wireless device is connected successfully, the machine's LCD displays [Connected].
You have completed the wireless network setup. To install Full Driver & Software Package necessary for operating your device, insert the Brother installation disc into your computer or go to your model's Downloads page on the Brother Solutions Center at support.brother.com.

Related Information
• Additional Methods of Configuring Your Brother Machine for a Wireless Network
• Wireless LAN Report Error Codes
Related Topics:
Configure Your Machine for a Wireless Network Using the Machine's Control Panel Setup Wizard
Before configuring your machine, we recommend writing down your wireless network settings. You will need this information before you continue with the configuration.
- Check and record the current wireless network settings of the computer to which you are connecting.
Network Name (SSID)
Network Key
For example:
Network Name (SSID)
HELLO
Network Key
12345

- Your access point/router may support the use of multiple WEP keys, however your Brother machine supports the use of the first WEP key only.
- If you need assistance during setup and want to contact Brother customer service, make sure you have your SSID (Network Name) and Network Key ready. We cannot assist you in locating this information.
• If you do not know this information (SSID and Network Key), you cannot continue the wireless setup.
How can I find this information?
- Check the documentation provided with your wireless access point/router.
- The initial SSID could be the manufacturer's name or the model name.
-
If you do not know the security information, please consult the router manufacturer, your system administrator, or your Internet provider.
-
Press ▲ or ▼ to select the [Network] option, and then press OK.
- Press ▲ or ▼ to select the [WLAN] option, and then press OK.
- Press ▲ or ▼ to select the [Setup Wizard] option, and then press OK.
- When [WLAN Enable?] appears, press ▼ to select On.
This will start the wireless setup wizard. To cancel, press ▲.
- The machine will search for your network and display a list of available SSIDs. When a list of SSIDs appears, press ▲ or ▼ to select the SSID you want.
- Press OK.
- Do one of the following:
- If you are using an authentication and encryption method that requires a Network Key, enter the Network Key you wrote down in the first step.
Enter the key, and then press OK to apply your settings.
To apply the settings, press ▼. To cancel, press ▲.
• If your authentication method is Open System and your encryption mode is None, go to the next step.
- The machine attempts to connect to the wireless device you have selected.
If your wireless device is connected successfully, the machine's LCD displays [Connected].
You have completed the wireless network setup. To install Full Driver & Software Package necessary for operating your device, insert the Brother installation disc into your computer or go to your model's Downloads page on the Brother Solutions Center at support.brother.com.

Related Information
• Additional Methods of Configuring Your Brother Machine for a Wireless Network
• How to Enter Text on Your Brother Machine
• Wireless LAN Report Error Codes
Related Topics:
Configure Your Machine for a Wireless Network When the SSID Is Not Broadcast
Before configuring your machine, we recommend writing down your wireless network settings. You will need this information before you continue with the configuration.
- Check and write down the current wireless network settings.
| Network Name (SSID) |
| Communication Mode | Authentication Method | Encryption Mode | Network Key |
| Infrastructure | Open System | NONE | - |
| WEP | |||
| Shared Key | WEP | ||
| WPA/WPA2-PSK | AES | ||
| TKIP |
For example:
| Network Name (SSID) |
| HELLO |
| Communication Mode | Authentication Method | Encryption Mode | Network Key |
| Infrastructure | WPA2-PSK | AES | 12345678 |

If your router uses WEP encryption, enter the key used as the first WEP key. Your Brother machine supports the use of the first WEP key only.
- Press ▲ or ▼ to select the [Network] option, and then press OK.
- Press ▲ or ▼ to select the [WLAN] option, and then press OK.
- Press ▲ or ▼ to select the [Setup Wizard] option, and then press OK.
- When [WLAN Enable?] appears, press ▼ to select On.
This will start the wireless setup wizard. To cancel, press ▲.
6. The machine will search for your network and display a list of available SSIDs. Press ▲ or ▼ to select the [
7. Enter the SSID name, and then press OK.
8. Select the [Infrastructure] option, and then press OK.
9. Press ▲ or ▼ to select the Authentication Method you want, and then press OK.
10. Do one of the following:
- If you selected the [Open System] option, press ▲ or ▼ to select the Encryption Type [None] or [WEP], and then press OK.
If you selected the [WEP] option for Encryption Type, enter the WEP key, and then press OK.
• If you selected the [Shared Key] option, enter the WEP key, and then press OK.
- If you selected the [WPA/WPA2-PSK] option, press ▲ or ▼ to select the Encryption Type [TKIP+AES] or [AES], and then press OK.
Enter the WPA ^TM key, and then press OK.

Your Brother machine supports the use of the first WEP key only.
- To apply the settings, press ▼. To cancel, press ▲.
- The machine will attempt to connect to the wireless device you have selected.
If your wireless device is connected successfully, the machine's LCD displays [Connected].
You have completed the wireless network setup. To install Full Driver & Software Package necessary for operating your device, insert the Brother installation disc into your computer or go to your model's Downloads page on the Brother Solutions Center at support.brother.com.

Related Information
• Additional Methods of Configuring Your Brother Machine for a Wireless Network
- I Cannot Complete the Wireless Network Setup Configuration
• How to Enter Text on Your Brother Machine
• Wireless LAN Report Error Codes
Related Topics:
Home > Network > Additional Methods of Configuring Your Brother Machine for a Wireless Network > Use Wi-Fi Direct®
Use Wi-Fi Direct®
• Print from Your Mobile Device Using Wi-Fi Direct
- Configure Your Wi-Fi Direct Network
• I Cannot Complete the Wireless Network Setup Configuration
Home > Network > Additional Methods of Configuring Your Brother Machine for a Wireless Network > Use Wi-Fi Direct® > Print from Your Mobile Device Using Wi-Fi Direct
Print from Your Mobile Device Using Wi-Fi Direct
Wi-Fi Direct is one of the wireless configuration methods developed by the Wi-Fi Alliance®. It allows you to configure a secured wireless network between your Brother machine and a mobile device, such as an Android™ device, Windows device, iPhone, iPod touch, or iPad, without using an access point. Wi-Fi Direct supports wireless network configuration using the one-push or PIN Method of Wi-Fi Protected Setup™ (WPS). You can also configure a wireless network by manually setting an SSID and password. Your Brother machine's Wi-Fi Direct feature supports WPA2™ security with AES encryption.
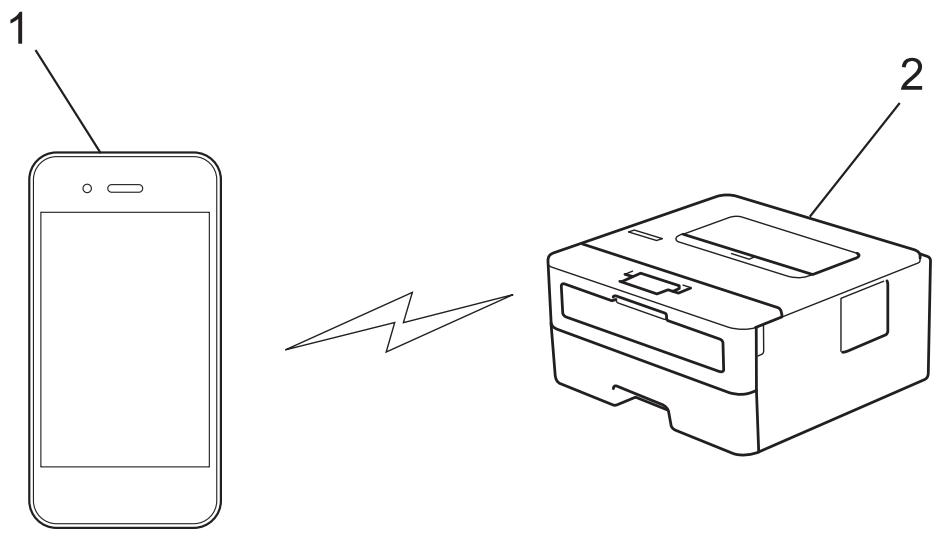
- Mobile device
- Your Brother machine

- Although the Brother machine can be used in both a wired and wireless network, only one connection method can be used at a time. However, a wireless network connection and Wi-Fi Direct connection, or a wired network connection (supported models only) and Wi-Fi Direct connection can be used at the same time.
- The Wi-Fi Direct-supported device can become a Group Owner (G/O). When configuring the Wi-Fi Direct network, the G/O serves as an access point.

Related Information
- Use Wi-Fi Direct®
Home > Network > Additional Methods of Configuring Your Brother Machine for a Wireless Network > Use Wi-Fi Direct® > Configure Your Wi-Fi Direct Network
Configure Your Wi-Fi Direct Network
Configure your Wi-Fi Direct network settings from your machine's control panel.
• Wi-Fi Direct Network Configuration Overview
- Configure Your Wi-Fi Direct Network Using the One-Push Method
- Configure Your Wi-Fi Direct Network Using the One-Push Method of Wi-Fi Protected Setup™ (WPS)
- Configure Your Wi-Fi Direct Network Using the PIN Method
- Configure Your Wi-Fi Direct Network Using the PIN Method of Wi-Fi Protected Setup™ (WPS)
- Configure Your Wi-Fi Direct Network Manually
Wi-Fi Direct Network Configuration Overview
The following instructions offer five methods for configuring your Brother machine in a wireless network environment. Select the method you prefer for your environment:
Check your mobile device for configuration.
- Does your mobile device support Wi-Fi Direct?
| Option | Description |
| Yes | Go to Step 2 |
| No | Go to Step 3 |
- Does your mobile device support one-push configuration for Wi-Fi Direct?
| Option | Description |
| Yes | See Related Information: Configure Your Wi-Fi Direct Network Using the One-Push Method. |
| No | See Related Information: Configure Your Wi-Fi Direct Network Using the PIN Method. |
- Does your mobile device support Wi-Fi Protected Setup ^™ (WPS)?
| Option | Description |
| Yes | Go to Step 4 |
| No | See Related Information: Configure Your Wi-Fi Direct Network Manually. |
- Does your mobile device support one-push configuration for Wi-Fi Protected Setup ^™ (WPS)?
| Option | Description |
| Yes | See Related Information: Configure Your Wi-Fi Direct Network Using the One-Push Method of Wi-Fi Protected SetupTM (WPS). |
| No | See Related Information: Configure Your Wi-Fi Direct Network Using the PIN Method of Wi-Fi Protected SetupTM (WPS). |
To use Brother iPrint&Scan functionality in a Wi-Fi Direct network configured by one-push configuration using Wi-Fi Direct or by PIN Method configuration using Wi-Fi Direct, the device you use to configure Wi-Fi Direct must be running Android ^™ 4.0 or greater.

Related Information
- Configure Your Wi-Fi Direct Network
Related Topics:
- Configure Your Wi-Fi Direct Network Using the One-Push Method
- Configure Your Wi-Fi Direct Network Using the One-Push Method of Wi-Fi Protected Setup™ (WPS)
- Configure Your Wi-Fi Direct Network Using the PIN Method
- Configure Your Wi-Fi Direct Network Using the PIN Method of Wi-Fi Protected Setup™ (WPS)
- Configure Your Wi-Fi Direct Network Manually
Home > Network > Additional Methods of Configuring Your Brother Machine for a Wireless Network > Use Wi-Fi Direct® > Configure Your Wi-Fi Direct Network > Configure Your Wi-Fi Direct Network Using the One-Push Method
Configure Your Wi-Fi Direct Network Using the One-Push Method
If your mobile device supports Wi-Fi Direct, follow these steps to configure a Wi-Fi Direct network:
- Press ▲ or ▼ to select the [Network] option, and then press OK.
- Press ▲ or ▼ to select the [Wi-Fi Direct] option, and then press OK.
- Press ▲ or ▼ to select the [Push Button] option, and then press OK.
- When [Wi-Fi Direct On?] appears, press ▼ to accept. To cancel, press ▲.
- Activate Wi-Fi Direct on your mobile device (see your mobile device's user's guide for instructions) when [Activate Wi-Fi Direct on other device and press OK.] appears on the machine's LCD. Press OK on your machine.
This will start the Wi-Fi Direct setup. To cancel, press Back.
-
Do one of the following:
-
When your Brother machine is the Group Owner (G/O), connect your mobile device to the machine directly.
-
When your Brother machine is not the G/O, it will display available device names with which to configure a Wi-Fi Direct network. Press ▲ or ▼ to select the mobile device you want to connect to and press OK. To search for available devices again, press [
], and then press OK. -
If your mobile device connects successfully, the machine's LCD displays [Connected]. You have completed the Wi-Fi Direct network setup. The Mobile Print/Scan Guide for Brother iPrint&Scan contains information on printing from your mobile device. Go to your model's Manuals page on the Brother Solutions Center at support.brother.com to see the guide.

Related Information
- Configure Your Wi-Fi Direct Network
Related Topics:
• Wi-Fi Direct Network Configuration Overview
Home > Network > Additional Methods of Configuring Your Brother Machine for a Wireless Network > Use Wi-Fi Direct® > Configure Your Wi-Fi Direct Network > Configure Your Wi-Fi Direct Network Using the One-Push Method of Wi-Fi Protected Setup™ (WPS)
Configure Your Wi-Fi Direct Network Using the One-Push Method of Wi-Fi Protected Setup™ (WPS)
If your mobile device supports WPS (PBC: Push Button Configuration), follow these steps to configure a Wi-Fi Direct network:
- Press ▲ or ▼ to select the [Network] option, and then press OK.
- Press ▲ or ▼ to select the [Wi-Fi Direct] option, and then press OK.
- Press ▲ or ▼ to select the [Group Owner] option, and then press OK.
-
Press ▲ or ▼ to select the [On] option, and then press OK.
-
Press ▲ or ▼ to select the [Push Button] option, and then press OK.
-
When [Wi-Fi Direct On?] appears, press ▼ to accept. To cancel, press ▲.
-
Activate your mobile device's WPS one-push configuration method (see your mobile device's user's guide for instructions) when [Activate Wi-Fi Direct on other device and press OK.] appears on the machine's LCD. Press OK on your machine.
This will start the Wi-Fi Direct setup. To cancel, press Back.
- If your mobile device connects successfully, the machine's LCD displays [Connected]. You have completed the Wi-Fi Direct network setup. The Mobile Print/Scan Guide for Brother iPrint&Scan contains information on printing from your mobile device. Go to your model's Manuals page on the Brother Solutions Center at support.brother.com to see the guide.

Related Information
- Configure Your Wi-Fi Direct Network
Related Topics:
• Wi-Fi Direct Network Configuration Overview
Home > Network > Additional Methods of Configuring Your Brother Machine for a Wireless Network > Use Wi-Fi Direct® > Configure Your Wi-Fi Direct Network > Configure Your Wi-Fi Direct Network Using the PIN Method
Configure Your Wi-Fi Direct Network Using the PIN Method
If your mobile device supports the PIN Method of Wi-Fi Direct, follow these steps to configure a Wi-Fi Direct network:
- Press ▲ or ▼ to select the [Network] option, and then press OK.
- Press ▲ or ▼ to select the [Wi-Fi Direct] option, and then press OK.
- Press ▲ or ▼ to select the [PIN Code] option, and then press OK.
-
When [Wi-Fi Direct On?] appears, press ▼ to accept. To cancel, press ▲.
-
Activate Wi-Fi Direct on your mobile device (see your mobile device's user's guide for instructions) when [Activate Wi-Fi Direct on other device and press OK.] appears on the machine's LCD. Press OK on your machine.
This will start the Wi-Fi Direct setup. To cancel, press Back.
- Do one of the following:
- When your Brother machine is the Group Owner (G/O), it will wait for a connection request from your mobile device. When [Input PIN Code] appears, enter the PIN displayed on your mobile device in your Brother machine. Press OK to complete the setup. If the PIN is displayed on your Brother machine, enter the PIN in your mobile device.
- When your Brother machine is not the G/O, it will display available device names with which to configure a Wi-Fi Direct network. Press ▲ or ▼ to select the mobile device you want to connect to and press OK. To search for available devices again, press [
-
Do one of the following:
-
Press ▼ to display the PIN on your Brother machine, enter the PIN in your mobile device, and then go to the next step.
-
Press ▲ to enter the PIN displayed by your mobile device in your Brother machine. Press OK, and then go to the next step.
If your mobile device does not display a PIN, press Back on your Brother machine. Go back to the first step and try again. -
If your mobile device connects successfully, the machine's LCD displays [Connected]. You have completed the Wi-Fi Direct network setup. The Mobile Print/Scan Guide for Brother iPrint&Scan contains information on printing from your mobile device. Go to your model's Manuals page on the Brother Solutions Center at support.brother.com to see the guide.

Related Information
- Configure Your Wi-Fi Direct Network
Related Topics:
• Wi-Fi Direct Network Configuration Overview
Home > Network > Additional Methods of Configuring Your Brother Machine for a Wireless Network > Use Wi-Fi Direct® > Configure Your Wi-Fi Direct Network > Configure Your Wi-Fi Direct Network Using the PIN Method of Wi-Fi Protected Setup™ (WPS)
Configure Your Wi-Fi Direct Network Using the PIN Method of Wi-Fi Protected Setup™ (WPS)
If your mobile device supports the PIN Method of Wi-Fi Protected Setup ^™ (WPS), follow these steps to configure a Wi-Fi Direct network:
- Press ▲ or ▼ to select the [Network] option, and then press OK.
- Press ▲ or ▼ to select the [Wi-Fi Direct] option, and then press OK.
- Press ▲ or ▼ to select the [Group Owner] option, and then press OK.
-
Press ▲ or ▼ to select the [On] option, and then press OK.
-
Press ▲ or ▼ to select the [PIN Code] option, and then press OK.
-
When [Wi-Fi Direct On?] appears, press ▼ to accept. To cancel, press ▲.
-
Activate your mobile device's WPS PIN configuration method (see your mobile device's user's guide for instructions) when [Activate Wi-Fi Direct on other device and press OK.] appears on the machine's LCD. Press OK on your machine.
This will start the Wi-Fi Direct setup. To cancel, press Back.
-
The machine will wait for a connection request from your mobile device. When [Input PIN Code] appears, enter the PIN displayed on your mobile device in the machine.
-
Press OK.
-
If your mobile device connects successfully, the machine's LCD displays [Connected]. You have completed the Wi-Fi Direct network setup. The Mobile Print/Scan Guide for Brother iPrint&Scan contains information on printing from your mobile device. Go to your model's Manuals page on the Brother Solutions Center at support.brother.com to see the guide.

Related Information
- Configure Your Wi-Fi Direct Network
Related Topics:
• Wi-Fi Direct Network Configuration Overview
Home > Network > Additional Methods of Configuring Your Brother Machine for a Wireless Network > Use Wi-Fi Direct® > Configure Your Wi-Fi Direct Network > Configure Your Wi-Fi Direct Network Manually
Configure Your Wi-Fi Direct Network Manually
If your mobile device does not support Wi-Fi Direct or WPS, you must configure a Wi-Fi Direct network manually.
- Press ▲ or ▼ to select the [Network] option, and then press OK.
- Press ▲ or ▼ to select the [Wi-Fi Direct] option, and then press OK.
-
Press ▲ or ▼ to select the [Manual] option, and then press OK.
-
When [Wi-Fi Direct On?] appears, press ▼ to accept. To cancel, press ▲.
-
The machine will display the SSID name and Password for five minutes. Go to your mobile device's wireless network settings screen, select the SSID name, and then enter the password.
-
If your mobile device connects successfully, the machine's LCD displays [Connected]. You have completed the Wi-Fi Direct network setup. For information on printing from your mobile device, go to your model's Manuals page on the Brother Solutions Center at support.brother.com to see the Mobile Print/Scan Guide for Brother iPrint&Scan.

Related Information
- Configure Your Wi-Fi Direct Network
• Wi-Fi Direct Network Configuration Overview
Related Topics:
Advanced Network Features
• Print the Network Configuration Report
• Print the WLAN Report
Print the Network Configuration Report
The Network Configuration Report lists the network configuration, including the network print server settings.

- Node Name: The Node Name appears on the current Network Configuration Report. The default Node Name is "BRNxxxxxxxxxxxx" for a wired network or "BRWxxxxxxxxxxxxx" for a wireless network (where "xxxxxxxxxxxxx" is your machine's MAC Address / Ethernet Address.)
- If the [IP Address] on the Network Configuration Report shows 0.0.0.0, wait for one minute and try printing it again.
- You can find your machine's settings, such as the IP address, subnet mask, node name, and MAC Address on the report, for example:
- IP address: 192.168.0.5
- Subnet mask: 255.255.255.0
- Node name: BRN000ca0000499
-
MAC Address: 00-0c-a0-00-04-99
-
Press ▲ or ▼ to select the [Print Reports] option, and then press OK.
- Press ▲ or ▼ to select [Network Config].
- Press OK.
- Press Go.

Related Information
• Advanced Network Features
• Where Can I Find My Brother Machine's Network Settings?
- Use the Network Connection Repair Tool (Windows)
• I Want to Check that My Network Devices are Working Correctly
- Access Web Based Management
Related Topics:
Home > Network > Advanced Network Features > Print the WLAN Report
Print the WLAN Report
The WLAN Report reflects your machine's wireless status. If the wireless connection fails, check the error code on the printed report.
- Press ▲ or ▼ to select the [Print Reports] option, and then press OK.
- Press ▲ or ▼ to select the [WLAN Report] option, and then press OK.
- Press Go.
The machine will print the WLAN Report.

Related Information
• Advanced Network Features
• Wireless LAN Report Error Codes
Related Topics:
• My Brother Machine Cannot Print over the Network
• I Want to Check that My Network Devices are Working Correctly
Wireless LAN Report Error Codes
If the Wireless LAN Report shows that the connection failed, check the error code on the printed report and see the corresponding instructions in the table:
| Error Code | Problem and Recommended Solutions |
| TS-01 | The wireless setting is not activated, change the wireless setting to ON.If a network cable is connected to your machine, disconnect it and change the wireless setting of your machine to ON. |
| TS-02 | The wireless access point/router cannot be detected.1. Check the following two points:Unplug the power to your wireless access point/router, wait for 10 seconds, and then plug it back in.If your WLAN access point/router is using MAC address filtering, confirm that the MAC address of the Brother machine is allowed in the filter.If you manually entered the SSID and security information (SSID/authentication method/encryption method/Network Key), the information may be incorrect.Reconfirm the SSID and security information and re-enter the correct information as necessary.This device does not support a 5 GHz SSID/ESSID and you must select a 2.4 GHz SSID/ ESSID. Make sure the access point/router is set to 2.4 GHz or 2.4 GHz/5 GHz mixed mode. |
| TS-04 | The Authentication/Encryption methods used by the selected wireless access point/router are not supported by your machine.Change the authentication and encryption method of the wireless access point/router. Your machine supports the following authentication methods:WPA-PersonalTKIP or AESWPA2-PersonalTKIP or AESOpenWEP or None (without encryption)Shared keyWEPIf your problem is not solved, the SSID or network settings you entered may be incorrect. Confirm the wireless network settings. |
| TS-05 | The security information (SSID/Network Key) is incorrect.Confirm the wireless security information (Authentication method/Encryption method/Network Key). |
| TS-06 | The machine cannot detect a WLAN access point/router that has WPS enabled.Confirm the wireless security information (Authentication method/Encryption method/Network Key). |
| TS-07 | The machine cannot detect a WLAN access point/router that has WPS enabled.If you want to connect with WPS, you must operate both your machine and the WLAN access point/router. Confirm the connection method for WPS on WLAN access point/router and try starting again.If you do not know how to operate your WLAN access point/router using WPS, see the documentation provided with your WLAN access point/router, ask the manufacturer of your WLAN access point/router or ask your network administrator. |
| TS-08 | Two or more WLAN access points that have WPS enabled are detected. Confirm that only one WLAN access point/router within range has the WPS method active and try again.Try starting again after few minutes in order to avoid effects from other access points. |

Related Information
• Print the WLAN Report
Related Topics:
• My Brother Machine Cannot Print over the Network
• I Want to Check that My Network Devices are Working Correctly
- Configure Your Machine for a Wireless Network Using the One Push Method of Wi-Fi Protected Setup™ (WPS)
- Configure Your Machine for a Wireless Network Using the PIN Method of Wi-Fi Protected Setup™ (WPS)
- Configure Your Machine for a Wireless Network Using the Machine's Control Panel Setup Wizard
- Configure Your Machine for a Wireless Network When the SSID Is Not Broadcast
Home > Network > Technical Information for Advanced Users
Technical Information for Advanced Users
- Reset the Network Settings to the Factory Settings
▲ Home > Network > Technical Information for Advanced Users > Reset the Network Settings to the Factory Settings
Reset the Network Settings to the Factory Settings
You can use your machine's control panel to reset the print server to its default factory settings. This resets all information, such as the password and IP address.

- This feature restores all wired (supported models only) and wireless network settings to the factory settings.
-
You can also reset the print server to its factory settings using BRAadmin Light, BRAadmin Professional, or Web Based Management.
-
Press ▲ or ▼ to select the [Network] option, and then press OK.
- Press ▲ or ▼ to select the [Network Reset] option, and then press OK.
- Press ▼ for [Yes].
The machine will restart.

Related Information
• Technical Information for Advanced Users
Security
- Lock the Machine Settings
• Network Security Features
Home > Security > Lock the Machine Settings
Lock the Machine Settings
Before turning on the machine's Access Lock, make a careful note of your password. If you forget the password, you must reset all passwords stored in the machine by contacting your administrator or Brother customer service.
- Setting Lock Overview
Setting Lock Overview
Use the Setting Lock feature to block unauthorised access to machine settings.
When Setting Lock is set to On, you cannot access the machine settings without entering the password.
- Set the Setting Lock Password
- Change the Setting Lock Password
- Turn Setting Lock On
▲ Home > Security > Lock the Machine Settings > Setting Lock Overview > Set the Setting Lock Password
Set the Setting Lock Password
- Press ▲ or ▼ to display the [General Setup] option, and then press OK.
- Press ▲ or ▼ to display the [Setting Lock] option, and then press OK.
- Enter a four-digit number for the password.
To enter each digit, press ▲ or ▼ to select a number, and then press OK. - When the LCD displays [Verify:], re-enter the new password.

Related Information
- Setting Lock Overview
Home > Security > Lock the Machine Settings > Setting Lock Overview > Change the Setting Lock Password
Change the Setting Lock Password
- Press ▲ or ▼ to display the [General Setup] option, and then press OK.
- Press ▲ or ▼ to display the [Setting Lock] option, and then press OK.
- Press ▲ or ▼ to select the [Set Password] option, and then press OK.
- Enter the current four-digit password.
To enter each digit, press ▲ or ▼ to select a number, and then press OK. - Enter a new four-digit password.
To enter each digit, press ▲ or ▼ to select a number, and then press OK. - When the LCD displays [Verify:], re-enter the new password.

Related Information
- Setting Lock Overview
▲ Home > Security > Lock the Machine Settings > Setting Lock Overview > Turn Setting Lock On
Turn Setting Lock On
- Press ▲ or ▼ to display the [General Setup] option, and then press OK.
- Press ▲ or ▼ to display the [Setting Lock] option, and then press OK.
- Press OK when the LCD displays [On].
- Enter the current four-digit password.
To enter each digit, press ▲ or ▼ to select a number, and then press OK.

To turn Setting Lock off, press OK. Press ▼ to select [Yes] when the LCD displays [Unlock?], enter the current four-digit password.

Related Information
- Setting Lock Overview
Network Security Features
• Before Using Network Security Features
- Manage Your Network Machine Securely Using SSL/TLS
- Send an Email Securely
▲ Home > Security > Network Security Features > Before Using Network Security Features
Before Using Network Security Features
Your Brother machine employs some of the latest network security and encryption protocols available today. These network features can be integrated into your overall network security plan to help protect your data and prevent unauthorised access to the machine.

We recommend disabling the FTP server and TFTP protocols. Accessing the machine using these protocols is not secure.

Related Information
• Network Security Features
Manage Your Network Machine Securely Using SSL/TLS
• Introduction to SSL/TLS
• Certificates and Web Based Management
- Manage Your Network Machine Securely Using Web Based Management
- Manage Your Network Machine Securely Using BRAdmin Professional (Windows)
• Print Documents Securely Using SSL/TLS
Home > Security > Network Security Features > Manage Your Network Machine Securely Using SSL/TLS > Introduction to SSL/TLS
Introduction to SSL/TLS
Secure Socket Layer (SSL) or Transport Layer Security (TLS) is an effective method of protecting data sent over a local or wide area network (LAN or WAN). It works by encrypting data, such as a print job, sent over a network, so anyone trying to capture it will not be able to read it.
SSL/TLS can be configured on both wired and wireless networks and will work with other forms of security such as WPA keys and firewalls.

Related Information
- Manage Your Network Machine Securely Using SSL/TLS
- Brief History of SSL/TLS
• Benefits of Using SSL/TLS
Home > Security > Network Security Features > Manage Your Network Machine Securely Using SSL/TLS > Introduction to SSL/TLS > Brief History of SSL/TLS
Brief History of SSL/TLS
SSL/TLS was originally created to secure web traffic information, particularly data sent between web browsers and servers. For example, when you use Internet Explorer for Internet Banking and you see https:// and the little padlock icon in the web browser, you are using SSL. SSL grew to work with additional applications, such as Telnet, printer, and FTP software, in order to become a universal solution for online security. Its original design intentions are still being used today by many online retailers and banks to secure sensitive data, such as credit card numbers, customer records, etc.
SSL/TLS uses extremely high levels of encryption and is trusted by banks all over the world.

Related Information
• Introduction to SSL/TLS
Home > Security > Network Security Features > Manage Your Network Machine Securely Using SSL/TLS > Introduction to SSL/TLS > Benefits of Using SSL/TLS
Benefits of Using SSL/TLS
The primary benefit of using SSL/TLS on Brother machines is to guarantee secure printing over an IP network by restricting unauthorised users from reading data sent to the machine. SSL's key selling point is that it can be used to print confidential data securely. For example, an HR department in a large company may be printing wage slips on a regular basis. Without encryption, the data contained on these wages slips can be read by other network users. However, with SSL/TLS, anyone trying to capture the data will see a confusing page of code and not the actual wage slip.

Related Information
• Introduction to SSL/TLS
Home > Security > Network Security Features > Manage Your Network Machine Securely Using SSL/TLS > Certificates and Web Based Management
Certificates and Web Based Management
You must configure a certificate to manage your networked Brother machine securely using SSL/TLS. You must use Web Based Management to configure a certificate.
• Supported Security Certificate Features
• Create and Install a Certificate
- Manage Multiple Certificates
Supported Security Certificate Features
Your Brother machine supports the use of multiple security certificates, which allows secure management, authentication, and communication with the machine. The following security certificate features can be used with the machine:
- SSL/TLS communication
• SSL communication for SMTP
The Brother machine supports the following:
• Pre-installed certificate
Your machine has a pre-installed self-signed certificate. This certificate enables you to use SSL/TLS communication without creating or installing a different certificate.

The pre-installed self-signed certificate cannot protect your communication from being compromised. We recommend using a certificate that is issued by a trusted organisation for better security.
• Self-signed certificate
This print server issues its own certificate. Using this certificate, you can easily use the SSL/TLS communication without creating or installing a different certificate from a CA.
• Certificate from a Certificate Authority (CA)
There are two methods for installing a certificate from a CA. If you already have a certificate from a CA or if you want to use a certificate from an external trusted CA:
- When using a Certificate Signing Request (CSR) from this print server.
- When importing a certificate and a private key.
• Certificate Authority (CA) Certificate
To use a CA certificate that identifies the CA and owns its private key, you must import that CA certificate from the CA before configuring the security features of the Network.

- If you are going to use SSL/TLS communication, we recommend contacting your system administrator first.
- When you reset the print server back to its default factory settings, the certificate and the private key that are installed will be deleted. If you want to keep the same certificate and the private key after resetting the print server, export them before resetting, and then reinstall them.

Related Information
• Certificates and Web Based Management
Home > Security > Network Security Features > Manage Your Network Machine Securely Using SSL/TLS > Certificates and Web Based Management > Create and Install a Certificate
Create and Install a Certificate
- Step by Step Guide for Creating and Installing a Certificate
• Create and Install a Self-signed Certificate
• Create and Install a Certificate from a Certificate Authority (CA) - Import and Export a CA Certificate
Home > Security > Network Security Features > Manage Your Network Machine Securely Using SSL/TLS > Certificates and Web Based Management > Create and Install a Certificate > Step by Step Guide for Creating and Installing a Certificate
Step by Step Guide for Creating and Installing a Certificate
There are two options when choosing a security certificate: use a self-signed certificate or use a certificate from a Certificate Authority (CA).
These are a brief summary of the actions required, based on the option you choose.
Option 1
Self-Signed Certificate
- Create a self-signed certificate using Web Based Management.
- Install the self-signed certificate on your computer.
Option 2
Certificate from a CA
- Create a Certificate Signing Request (CSR) using Web Based Management.
- Install the certificate issued by the CA on your Brother machine using Web Based Management.
- Install the certificate on your computer.

Related Information
• Create and Install a Certificate
Home > Security > Network Security Features > Manage Your Network Machine Securely Using SSL/TLS > Certificates and Web Based Management > Create and Install a Certificate > Create and Install a Self-signed Certificate
Create and Install a Self-signed Certificate
• Create a Self-signed Certificate
• Install the Self-signed Certificate for Windows users with Administrator Rights
- Import and Export the Self-signed Certificate on your Brother Machine
Create a Self-signed Certificate
- Start your web browser.
- Type "http://machine's IP address" in your browser's address bar (where "machine's IP address" is the machine's IP address).
For example:
http://192.168.1.2

- If you are using a Domain Name System or enable a NetBIOS name, you can type another name, such as "SharedPrinter" instead of the IP address.
- For example: http://SharedPrinter If you enable a NetBIOS name, you can also use the node name.
- For example: http://brnxxxxxxxxxxxxx
The NetBIOS name can be found in the Network Configuration Report.
- For Mac, access Web Based Management by clicking the machine's icon on the Status Monitor screen.

- No password is required by default. Type a password if you have set one, and then click
- Click the Network tab.
- Click the Security tab.
- Click Certificate.
- Click Create Self-Signed Certificate.
-
Enter a Common Name and a Valid Date.
-
The length of the Common Name is less than 64 bytes. Enter an identifier, such as an IP address, node name, or domain name to use when accessing this machine through SSL/TLS communication. The node name is displayed by default.
-
A warning will appear if you use the IPPS or HTTPS protocol and enter a different name in the URL than the Common Name that was used for the self-signed certificate.
-
Select your setting from the Public Key Algorithm drop-down list. The default setting is RSA(2048bit).
-
Select your setting from the Digest Algorithm drop-down list. The default setting is SHA256.
- Click Submit.
- Click Network.
- Click Protocol.
- Click HTTP Server Settings.
- Select the certificate you want to configure from the Select the Certificate drop-down list.
- Click Submit.
The following screen appears.
HTTP Server Settings
The setting for high security in communication was done.
To activate your new settings, this Device needs to restart.
Note: Any jobs in progress will be aborted.
To activate other protocols that have secure settings after restarting, check the box below.
☑ Activate other protocols that have secure settings.
Would you like to restart immediately?

- Click Yes to restart your print server.
The self-signed certificate is created and saved in your machine's memory.
To use SSL/TLS communication, the self-signed certificate must be installed on your computer.

Related Information
- Create and Install a Self-signed Certificate
Home > Security > Network Security Features > Manage Your Network Machine Securely Using SSL/TLS > Certificates and Web Based Management > Create and Install a Certificate > Create and Install a Self-signed Certificate > Install the Self-signed Certificate for Windows users with Administrator Rights
Install the Self-signed Certificate for Windows users with Administrator Rights
The following steps are for Microsoft Internet Explorer. If you use another web browser, consult the documentation for your web browser to get help with installing certificates.
1. Do one of the following:
• (Windows 7 and Windows Server 2008)
Click (Start) > All Programs.
- (Windows 8)
Right-click the (Internet Explorer) icon on the taskbar.
• (Windows 10 and Windows Server 2016)
Click > Windows Accessories.
• (Windows Server 2012 and Windows Server 2012 R2)
Click 📄 (Internet Explorer), and then right-click the 📄 (Internet Explorer) icon that appears on the taskbar.
2. Right-click Internet Explorer, and then click Run as administrator.

If the More option appears, click More.
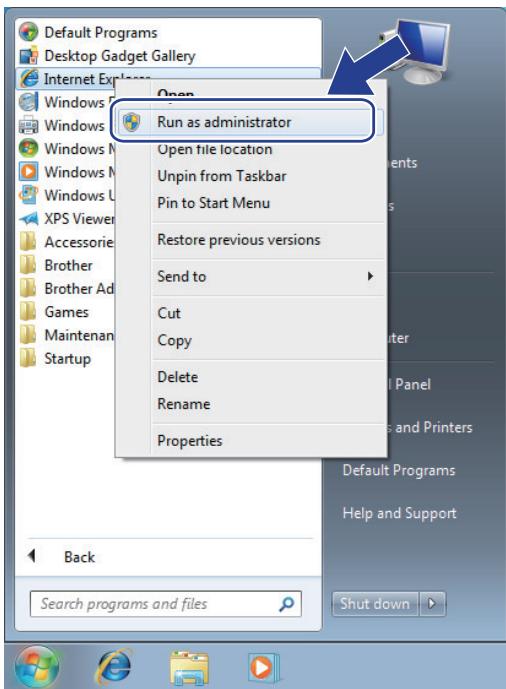
If the User Account Control screen appears, click Yes.
- Type "https://machine's IP address" in your browser's address bar to access your machine (where "machine's IP address" is the machine's IP address or the node name that you assigned for the certificate).
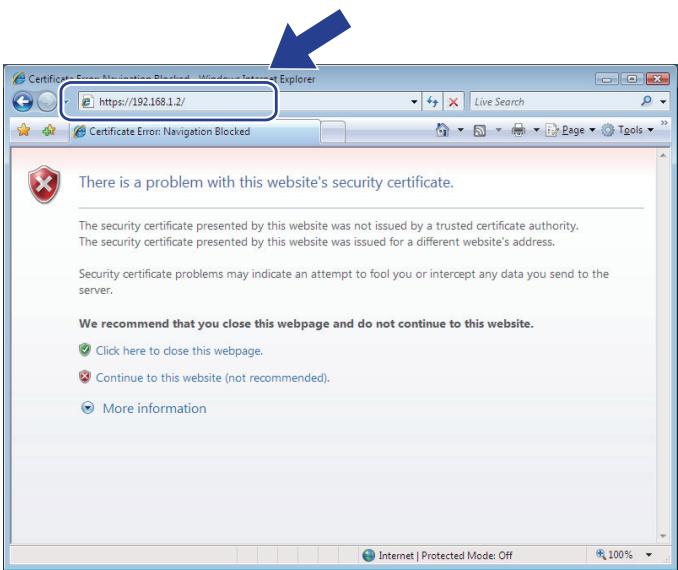
4. Click Continue to this website (not recommended).
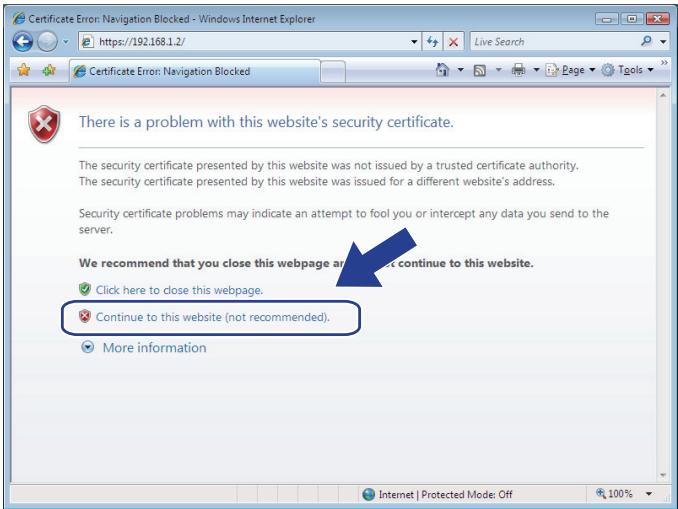
5. Click Certificate error, and then click View certificates.
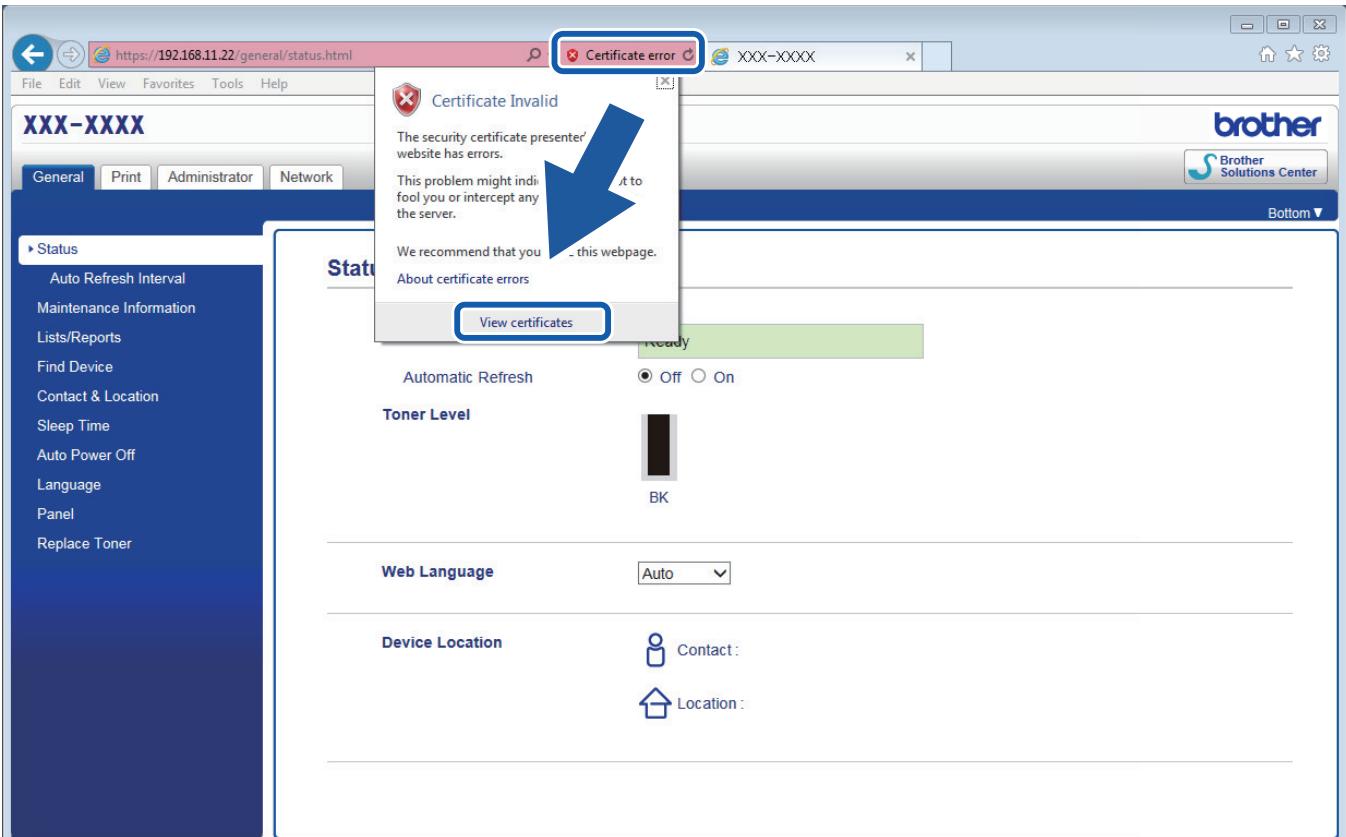
6. Click Install Certificate....
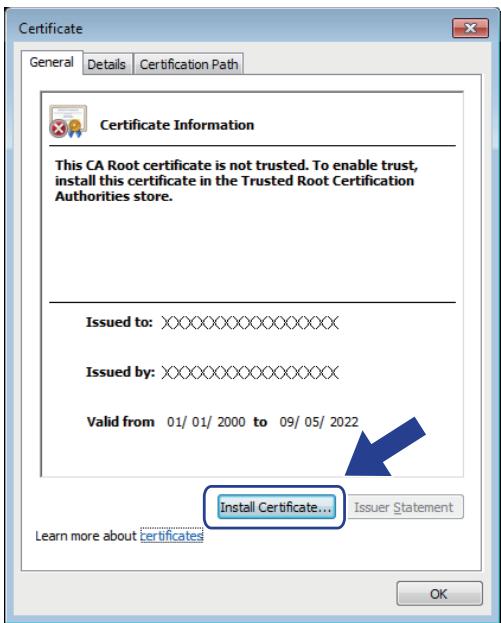
- When the Certificate Import Wizard appears, click Next.
- Select Place all certificates in the following store, and then click Browse....
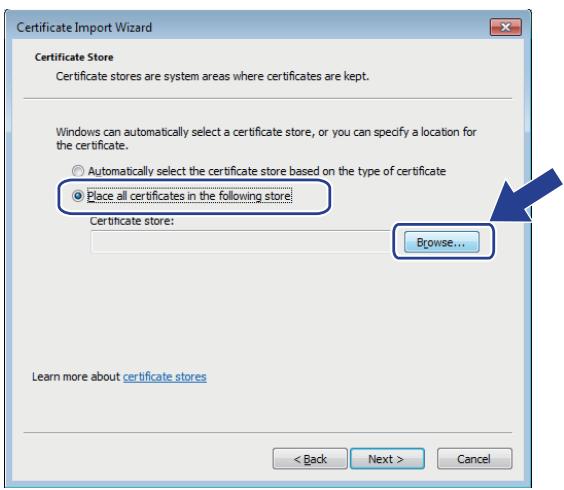
- Select Trusted Root Certification Authorities, and then click OK.
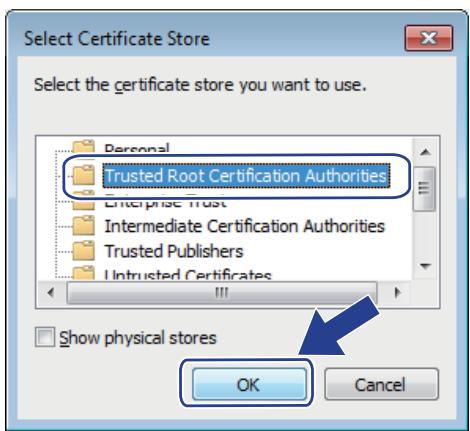
- Click Next.
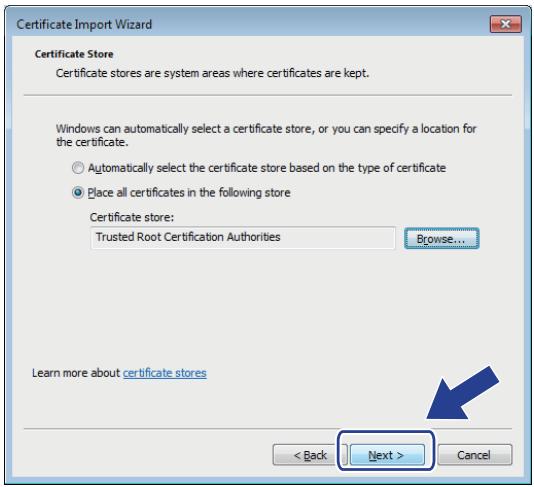
- Click Finish.
- Click Yes, if the fingerprint (thumbprint) is correct.
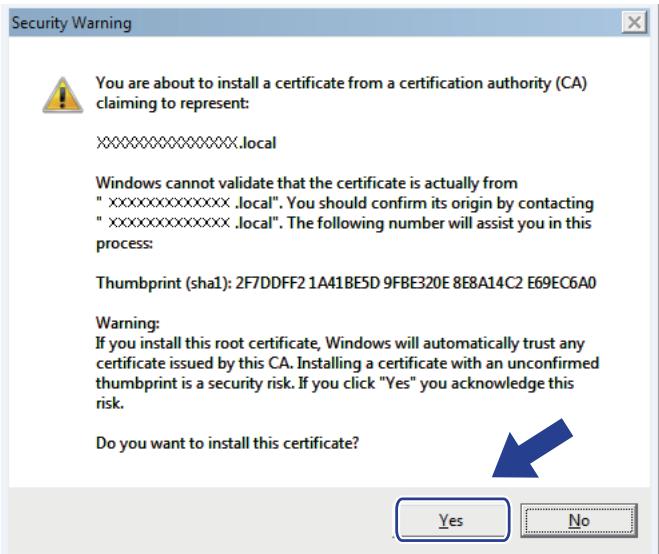

The fingerprint (thumbprint) is printed on the Network Configuration Report.
- Click OK.
The self-signed certificate is now installed on your computer, and SSL/TLS communication is available.

Related Information
• Create and Install a Self-signed Certificate
▲ Home > Security > Network Security Features > Manage Your Network Machine Securely Using SSL/TLS > Certificates and Web Based Management > Create and Install a Certificate > Create and Install a Self-signed Certificate > Import and Export the Self-signed Certificate on your Brother Machine
Import and Export the Self-signed Certificate on your Brother Machine
You can store the self-signed certificates on your Brother machine and manage them by importing and exporting.
- Import the Self-signed Certificate
• Export the Self-signed Certificate
▲ Home > Security > Network Security Features > Manage Your Network Machine Securely Using SSL/TLS > Certificates and Web Based Management > Create and Install a Certificate > Create and Install a Self-signed Certificate > Import and Export the Self-signed Certificate on your Brother Machine > Import the Self-signed Certificate
Import the Self-signed Certificate
- Start your web browser.
- Type "http://machine's IP address" in your browser's address bar (where "machine's IP address" is the machine's IP address).
For example:
http://192.168.1.2

- If you are using a Domain Name System or enable a NetBIOS name, you can type another name, such as "SharedPrinter" instead of the IP address.
- For example: http://SharedPrinter If you enable a NetBIOS name, you can also use the node name.
- For example: http://brnxxxxxxxxxxxxx
The NetBIOS name can be found in the Network Configuration Report.
- For Mac, access Web Based Management by clicking the machine's icon on the Status Monitor screen.
- No password is required by default. Type a password if you have set one, and then click →.
- Click the Network tab.
- Click the Security tab.
- Click Certificate.
- Click Import Certificate and Private Key.
- Browse to the file you want to import.
- Type the password if the file is encrypted, and then click Submit.
The self-signed certificate is imported to your machine.
To use SSL/TLS communication, the self-signed certificate must also be installed on your computer. Contact your network administrator.

Related Information
- Import and Export the Self-signed Certificate on your Brother Machine
▲ Home > Security > Network Security Features > Manage Your Network Machine Securely Using SSL/TLS > Certificates and Web Based Management > Create and Install a Certificate > Create and Install a Self-signed Certificate > Import and Export the Self-signed Certificate on your Brother Machine > Export the Self-signed Certificate
Export the Self-signed Certificate
- Start your web browser.
- Type "http://machine's IP address" in your browser's address bar (where "machine's IP address" is the machine's IP address).
For example:
http://192.168.1.2

- If you are using a Domain Name System or enable a NetBIOS name, you can type another name, such as "SharedPrinter" instead of the IP address.
- For example:
http://SharedPrinter
If you enable a NetBIOS name, you can also use the node name. - For example:
http://brnxxxxxxxxxxxxx
The NetBIOS name can be found in the Network Configuration Report.
- For Mac, access Web Based Management by clicking the machine's icon on the Status Monitor screen.

- No password is required by default. Type a password if you have set one, and then click
- Click the Network tab.
- Click the Security tab.
- Click Certificate.
- Click Export shown with Certificate List.
- If you want to encrypt the file, type a password in the Enter password field. If the Enter password field is blank, your output file will not be encrypted.
- Type the password again in the Retype password field, and then click Submit.
- Click Save.
- Specify the location where you want to save the file.
The self-signed certificate is exported to your computer.
You can also import the self-signed certificate to your computer.

Related Information
- Import and Export the Self-signed Certificate on your Brother Machine
Home > Security > Network Security Features > Manage Your Network Machine Securely Using SSL/TLS > Certificates and Web Based Management > Create and Install a Certificate > Create and Install a Certificate from a Certificate Authority (CA)
Create and Install a Certificate from a Certificate Authority (CA)
If you already have a certificate from an external trusted CA, you can store the certificate and private key on the machine and manage them by importing and exporting. If you do not have a certificate from an external trusted CA, create a Certificate Signing Request (CSR), send it to a CA for authentication, and install the returned certificate on your machine.
• Create a Certificate Signing Request (CSR)
• Install a Certificate on Your Brother Machine
- Import and Export the Certificate and Private Key
Create a Certificate Signing Request (CSR)
A Certificate Signing Request (CSR) is a request sent to a Certificate Authority (CA) to authenticate the credentials contained within the certificate.
We recommend installing a Root Certificate from the CA on your computer before creating the CSR.
- Start your web browser.
- Type "http://machine's IP address" in your browser's address bar (where "machine's IP address" is the machine's IP address).
For example:
http://192.168.1.2

- If you are using a Domain Name System or enable a NetBIOS name, you can type another name, such as "SharedPrinter" instead of the IP address.
- For example: http://SharedPrinter
If you enable a NetBIOS name, you can also use the node name.
- For example: http://brnxxxxxxxxxxxxx
The NetBIOS name can be found in the Network Configuration Report.
- For Mac, access Web Based Management by clicking the machine's icon on the Status Monitor screen.
- No password is required by default. Type a password if you have set one, and then click →.
- Click the Network tab.
- Click the Security tab.
- Click Certificate.
- Click Create CSR.
- Type a Common Name (required) and add other information about your Organization (optional).

- Your company details are required so that a CA can confirm your identity and verify it to the outside world.
- The length of the Common Name must be less than 64 bytes. Enter an identifier, such as an IP address, node name, or domain name to use when accessing this printer through SSL/TLS communication. The node name is displayed by default. The Common Name is required.
- A warning will appear if you type a different name in the URL than the Common Name that was used for the certificate.
- The length of the Organization, the Organization Unit, the City/Locality and the State/Province must be less than 64 bytes.
• The Country/Region should be a two character ISO 3166 country code. -
If you are configuring an X.509v3 certificate extension, select the Configure extended partition check box, and then select Auto (Register IPv4) or Manual.
-
Select your setting from the Public Key Algorithm drop-down list. The default setting is RSA(2048bit).
- Select your setting from the Digest Algorithm drop-down list. The default setting is SHA256.
- Click Submit.
The CSR appears on your screen. Save the CSR as a file or copy and paste it into an online CSR form offered by a Certificate Authority.
12. Click Save.

- Follow your CA's policy regarding the method to send a CSR to your CA.
- If you are using the Enterprise root CA of Windows Server 2008/2012/2012 R2/2016, we recommend using the Web Server for the certificate template to securely create the Client Certificate. For more information, go to your model's page on the Brother Solutions Center at support.brother.com.

Related Information
- Create and Install a Certificate from a Certificate Authority (CA)
Install a Certificate on Your Brother Machine
When you receive a certificate from a CA, follow the steps below to install it into the print server:
Only a certificate issued with your machine's CSR can be installed onto the machine. When you want to create another CSR, make sure that the certificate is installed before creating another CSR. Create another CSR only after installing the certificate on the machine. If you do not, the CSR you create before installing will be invalid.
- Start your web browser.
- Type "http://machine's IP address" in your browser's address bar (where "machine's IP address" is the machine's IP address).
For example:
http://192.168.1.2

- If you are using a Domain Name System or enable a NetBIOS name, you can type another name, such as "SharedPrinter" instead of the IP address.
- For example: http://SharedPrinter
If you enable a NetBIOS name, you can also use the node name.
- For example: http://brnxxxxxxxxxxxxx
The NetBIOS name can be found in the Network Configuration Report.
- For Mac, access Web Based Management by clicking the machine's icon on the Status Monitor screen.
- No password is required by default. Type a password if you have set one, and then click →.
- Click the Network tab.
- Click the Security tab.
- Click Certificate.
- Click Install Certificate.
- Browse to the file that contains the certificate issued by the CA, and then click Submit. The certificate has been created successfully and saved in your machine's memory successfully.
To use SSL/TLS communication, the Root Certificate from the CA must be installed on your computer. Contact your network administrator.

Related Information
- Create and Install a Certificate from a Certificate Authority (CA)
Home > Security > Network Security Features > Manage Your Network Machine Securely Using SSL/TLS > Certificates and Web Based Management > Create and Install a Certificate > Create and Install a Certificate from a Certificate Authority (CA) > Import and Export the Certificate and Private Key
Import and Export the Certificate and Private Key
Store the certificate and private key on your machine and manage them by importing and exporting them.
- Import a Certificate and Private Key
• Export the Certificate and Private Key
Home > Security > Network Security Features > Manage Your Network Machine Securely Using SSL/TLS > Certificates and Web Based Management > Create and Install a Certificate > Create and Install a Certificate from a Certificate Authority (CA) > Import and Export the Certificate and Private Key > Import a Certificate and Private Key
Import a Certificate and Private Key
- Start your web browser.
- Type "http://machine's IP address" in your browser's address bar (where "machine's IP address" is the machine's IP address).
For example:
http://192.168.1.2

- If you are using a Domain Name System or enable a NetBIOS name, you can type another name, such as "SharedPrinter" instead of the IP address.
- For example: http://SharedPrinter If you enable a NetBIOS name, you can also use the node name.
- For example: http://brnxxxxxxxxxxxxx
The NetBIOS name can be found in the Network Configuration Report.
- For Mac, access Web Based Management by clicking the machine's icon on the Status Monitor screen.
- No password is required by default. Type a password if you have set one, and then click →.
- Click the Network tab.
- Click the Security tab.
- Click Certificate.
- Click Import Certificate and Private Key.
- Browse to the file you want to import.
- Type the password if the file is encrypted, and then click Submit.
The certificate and private key are imported to your machine.
To use SSL/TLS communication, the Root Certificate from the CA must also be installed on your computer. Contact your network administrator.

Related Information
- Import and Export the Certificate and Private Key
Home > Security > Network Security Features > Manage Your Network Machine Securely Using SSL/TLS > Certificates and Web Based Management > Create and Install a Certificate > Create and Install a Certificate from a Certificate Authority (CA) > Import and Export the Certificate and Private Key > Export the Certificate and Private Key
Export the Certificate and Private Key
- Start your web browser.
- Type "http://machine's IP address" in your browser's address bar (where "machine's IP address" is the machine's IP address).
For example:
http://192.168.1.2

- If you are using a Domain Name System or enable a NetBIOS name, you can type another name, such as "SharedPrinter" instead of the IP address.
- For example:
http://SharedPrinter
If you enable a NetBIOS name, you can also use the node name. - For example:
http://brnxxxxxxxxxxxxx
The NetBIOS name can be found in the Network Configuration Report.
- For Mac, access Web Based Management by clicking the machine's icon on the Status Monitor screen.
- No password is required by default. Type a password if you have set one, and then click →.
- Click the Network tab.
- Click the Security tab.
- Click Certificate.
- Click Export shown with Certificate List.
- Enter the password if you want to encrypt the file. If a blank password is used, the output is not encrypted.
- Enter the password again for confirmation, and then click Submit.
- Click Save.
- Specify the location where you want to save the file.
The certificate and private key are exported to your computer.
You can also import the certificate to your computer.

Related Information
- Import and Export the Certificate and Private Key
Home > Security > Network Security Features > Manage Your Network Machine Securely Using SSL/TLS > Certificates and Web Based Management > Create and Install a Certificate > Import and Export a CA Certificate
Import and Export a CA Certificate
You can import, export and store CA certificates on your Brother machine.
- Import a CA Certificate
- Export a CA Certificate
Home > Security > Network Security Features > Manage Your Network Machine Securely Using SSL/TLS > Certificates and Web Based Management > Create and Install a Certificate > Import and Export a CA Certificate > Import a CA Certificate
Import a CA Certificate
- Start your web browser.
- Type "http://machine's IP address" in your browser's address bar (where "machine's IP address" is the machine's IP address).
For example:
http://192.168.1.2

- If you are using a Domain Name System or enable a NetBIOS name, you can type another name, such as "SharedPrinter" instead of the IP address.
- For example: http://SharedPrinter If you enable a NetBIOS name, you can also use the node name.
- For example: http://brnxxxxxxxxxxxxx
The NetBIOS name can be found in the Network Configuration Report.
- For Mac, access Web Based Management by clicking the machine's icon on the Status Monitor screen.
- No password is required by default. Type a password if you have set one, and then click →.
- Click the Network tab.
- Click the Security tab.
- Click CA Certificate.
- Click Import CA Certificate.
- Browse to the file you want to import.
- Click Submit.

Related Information
- Import and Export a CA Certificate
Export a CA Certificate
- Start your web browser.
- Type "http://machine's IP address" in your browser's address bar (where "machine's IP address" is the machine's IP address).
For example:
http://192.168.1.2

- If you are using a Domain Name System or enable a NetBIOS name, you can type another name, such as "SharedPrinter" instead of the IP address.
- For example: http://SharedPrinter If you enable a NetBIOS name, you can also use the node name.
- For example: http://brnxxxxxxxxxxxxx
The NetBIOS name can be found in the Network Configuration Report.
- For Mac, access Web Based Management by clicking the machine's icon on the Status Monitor screen.

- No password is required by default. Type a password if you have set one, and then click
- Click the Network tab.
- Click the Security tab.
- Click CA Certificate.
- Select the certificate you want to export and click Export.
- Click Submit.
- Click Save.
- Specify where on your computer you want to save the exported certificate, and save it.

Related Information
- Import and Export a CA Certificate
Home > Security > Network Security Features > Manage Your Network Machine Securely Using SSL/TLS > Certificates and Web Based Management > Manage Multiple Certificates
Manage Multiple Certificates
The multiple certificate feature allows you to use Web Based Management to manage each certificate installed on your machine. In Web Based Management, navigate to the Certificate or CA Certificate screen to view certificate content, delete, or export your certificates.
| Maximum Number of Certificates Stored UP on Brother Machine | |
| Self-signed Certificate or Certificate Issued by a CA | 3 |
| CA Certificate | 3 |
You can store up to 3 Certificate Authority (CA) certificates using SMTP over SSL (only available for certain models).
We recommend storing one less certificate than allowed, reserving an empty spot in case of certificate expiration. When a certificate expires, import a new certificate into the reserved spot, and then delete the expired certificate. This ensures that you avoid configuration failure.

- When you use SSL for SMTP communications, you do not have to choose the certificate. The necessary certificate will be chosen automatically.

Related Information
• Certificates and Web Based Management
Manage Your Network Machine Securely Using Web Based Management
To manage your network machine securely, you must use management utilities with security protocols.
We recommend using the HTTPS protocol for secure management. To use this protocol, HTTPS must be enabled on your machine.

• The HTTPS protocol is enabled by default.
- You can change the HTTPS protocol settings using the Web Based Management screen.
- Start your web browser.
- Type "https://Common Name" in your browser's address bar (where "Common Name" is the Common Name that you assigned to the certificate; this could be your IP address, node name, or domain name).
- No password is required by default. Type a password if you have set one, and then click →.
- You can now access the machine using HTTPS.

• If you use the SNMPv3 protocol, follow the steps below.
• You can also change the SNMP settings by using BRAdmin Professional.
- Click the Network tab.
- Click Protocol.
- Make sure the SNMP setting is enabled, and then click Advanced Settings.
- Configure the SNMP settings.
SNMP

Status
Enabled
SNMP Mode of Operation
SNMP v1/v2c read-write access
- SNMPv3 read-write access and v1/v2c read-only access
© SNMPv3 read-write access
Cancel
Submit
There are three options for SNMP Mode of Operation.
• SNMP v1/v2c read-write access
In this mode, the print server uses version 1 and version 2c of the SNMP protocol. You can use all Brother applications in this mode. However, it is not secure since it will not authenticate the user, and data will not be encrypted.
• SNMPv3 read-write access and v1/v2c read-only access
In this mode, the print server uses the read-write access of version 3 and the read-only access of version 1 and version 2c of the SNMP protocol.

When you use SNMPv3 read-write access and v1/v2c read-only access mode, some Brother applications (such as BRAdmin Light) that access the print server do not work correctly since they authorize the read-only access of version 1 and version 2c. If you want to use all applications, we recommend using SNMP v1/v2c read-write access mode.
• SNMPv3 read-write access
In this mode, the print server uses version 3 of the SNMP protocol. If you want to manage the print server securely, use this mode.

When you use SNMPv3 read-write access mode, note the following:
- You can use only BRAmin Professional or Web Based Management to manage the print server.
- Except for BRAdmin Professional, all applications that use SNMPv1/v2c will be restricted. To allow the use of SNMPv1/v2c applications, use SNMPv3 read-write access and v1/v2c read-only access or SNMP v1/v2c read-write access mode.
9. Click Submit.

Related Information
- Manage Your Network Machine Securely Using SSL/TLS
Home > Security > Network Security Features > Manage Your Network Machine Securely Using SSL/TLS > Manage Your Network Machine Securely Using BRAdmin Professional (Windows)
Manage Your Network Machine Securely Using BRAadmin Professional (Windows)
To use BRAdmin Professional utility, you must:
- Use the latest version of BRAadmin Professional. Go to your model's Downloads page on the Brother Solutions Center at support.brother.com.
- Use Web Based Management with the HTTPS protocol if you use BRAmin Professional and Web Based Management together.
- Use a different password in each group if you are managing a mixed group of older and newer print servers with BRAdmin Professional. This will ensure security is maintained on the newer print servers.

- "Older versions of BRAadmin" refer to BRAadmin Professional older than Ver. 2.80 and BRAadmin Light for Mac older than Ver.1.10.
- "Older print servers" refer to NC-2000 series, NC-2100p, NC-3100h, NC-3100s, NC-4100h, NC-5100h, NC-5200h, NC-6100h, NC-6200h, NC-6300h, NC-6400h, NC-8000, NC-100h, NC-110h, NC-120w, NC-130h, NC-140w, NC-8100h, NC-9100h, NC-7100w, NC-7200w and NC-2200w.

Related Information
- Manage Your Network Machine Securely Using SSL/TLS
Print Documents Securely Using SSL/TLS
To print documents securely with IPP protocol, use the IPPS protocol.
- Start your web browser.
- Type "http://machine's IP address" in your browser's address bar (where "machine's IP address" is the machine's IP address).
For example:
http://192.168.1.2

- If you are using a Domain Name System or enable a NetBIOS name, you can type another name, such as "SharedPrinter" instead of the IP address.
- For example: http://SharedPrinter If you enable a NetBIOS name, you can also use the node name.
- For example: http://brnxxxxxxxxxxxxx
The NetBIOS name can be found in the Network Configuration Report.
- For Mac, access Web Based Management by clicking the machine's icon on the Status Monitor screen.
- No password is required by default. Type a password if you have set one, and then click →.
- Click the Network tab.
- Click Protocol. Make sure the IPP check box is selected.

If the IPP check box is not selected, select the IPP check box, and then click Submit.
Restart your machine to activate the configuration.
After the machine restarts, return to the machine's web page, click the Network tab, and then click Protocol.
- Click HTTP Server Settings.
- Select the HTTPS(Port 443) check box in the IPP, and then click Submit.
- Restart your machine to activate the configuration.
Communication using IPPS cannot prevent unauthorised access to the print server.

Related Information
- Manage Your Network Machine Securely Using SSL/TLS
Send an Email Securely
- Configure Email Sending Using Web Based Management
- Send an Email with User Authentication
- Send an Email Securely Using SSL/TLS
Home > Security > Network Security Features > Send an Email Securely > Configure Email Sending Using Web Based Management
Configure Email Sending Using Web Based Management
We recommend using Web Based Management to configure secured email sending with user authentication, or email sending using SSL/TLS.
- Start your web browser.
-
Type "http://machine's IP address" in your browser's address bar (where "machine's IP address" is the machine's IP address).
For example:
http://192.168.1.2 -
No password is required by default. Type a password if you have set one, and then click →.
-
Click the Network tab.
-
Click the Protocol menu in the left navigation bar.
-
In the SMTP field, click Advanced Settings and make sure the status of SMTP is Enabled.
-
Configure the SMTP settings.
-
Confirm that the email settings are correct after configuration by sending a test email.
-
If you do not know the SMTP server settings, contact your network administrator or Internet Service Provider (ISP).
-
When finished, click Submit.
The Test Send E-mail Configuration dialog box appears.
- Follow the instructions in the dialog box to test the current settings.

Related Information
- Send an Email Securely
Home > Security > Network Security Features > Send an Email Securely > Send an Email with User Authentication
Send an Email with User Authentication
Your Brother machine supports the SMTP-AUTH method to send email via an email server that requires user authentication. This method prevents unauthorised users from accessing the email server.
You can use the SMTP-AUTH method for email notification and email reports.

We recommend using Web Based Management to configure the SMTP authentication.
Email Server Settings
You must configure your machine's SMTP authentication method to match the method used by your email server. For details about your email server settings, contact your network administrator or Internet Service Provider (ISP).

To enable SMTP server authentication, in the Web Based Management SMTP screen, under Server Authentication Method, you must select SMTP-AUTH.

Related Information
- Send an Email Securely
Home > Security > Network Security Features > Send an Email Securely > Send an Email Securely Using SSL/TLS
Send an Email Securely Using SSL/TLS
Your Brother machine supports SSL/TLS methods to send an email via an email server that requires secure SSL/TLS communication. To send email via an email server that is using SSL/TLS communication, you must configure SMTP over SSL/TLS.

We recommend using Web Based Management to configure SSL/TLS.
Verify Server Certificate
Under SSL/TLS, if you choose SSL or TLS, the Verify Server Certificate check box will be selected automatically.
SMTP

Status
Enabled
Send E-mail Settings(SMTP)
Server Address
0.0.0.0
Port
25
Server Authentication Method
None
SMTP-AUTH
SMTP-AUTH Account Name
SMTP-AUTH Account Password
Enter password
Retype password
SSL/TLS
None
SSL
TLS
□ Verify Server Certificate
Device E-mail Address
brnxxxxxxxxxxxx@example.com
CA Certificate>>
E-mail report>>
Notification>>
Cancel
Submit

- Before you verify the server certificate, you must import the CA certificate issued by the CA that signed the server certificate. Contact your network administrator or your Internet Service Provider (ISP) to confirm if importing a CA certificate is necessary.
- If you do not need to verify the server certificate, clear the Verify Server Certificate check box.
Port Number
If you select SSL, the Port value will be changed to match the protocol. To change the port number manually, type the port number after you choose SSL/TLS.
You must configure your machine's SMTP communication method to match the method used by your email server. For details about your email server settings, contact your network administrator or your ISP.
In most cases, the secured webmail services require the following settings:
| SMTP | Port | 25 |
| Server Authentication Method | SMTP-AUTH | |
| SSL/TLS | TLS |

Related Information
- Send an Email Securely
Mobile
- Google Cloud Print
- AirPrint
• Mobile Printing for Windows
• Mopria® Print Service
• Brother iPrint&Scan for Mobile Devices
Google Cloud Print
• Google Cloud Print Overview
• Before Using Google Cloud Print
• Print from Google Chrome ^TM or Chrome OS ^TM
• Print from Google Drive™ for Mobile
• Print from Gmail™ Webmail Service for Mobile
Google Cloud Print Overview
Google Cloud Print ^™ is a Google service that allows you to print to a printer registered to your Google account using a network-compatible device (such as a mobile phone or computer) without installing the printer driver on the device.
Printing from Android ^™ apps requires installing the Google Cloud Print ^™ app from the Google Play ^™ Store.
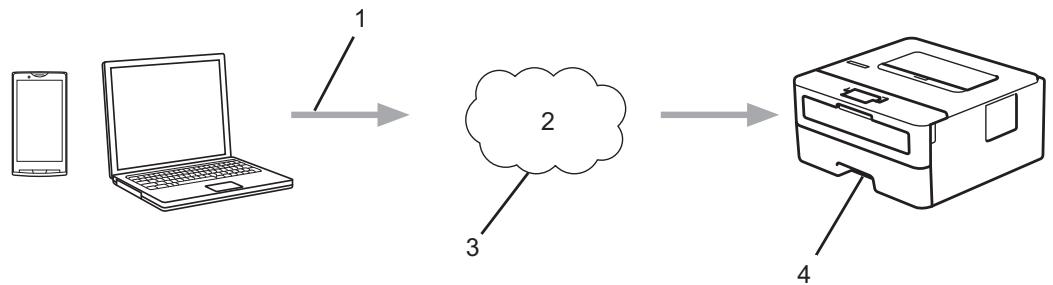
flowchart
graph LR
    A["Smartphone"] -->|1| B["Laptop"]
    B --> C["Cloud Cloud"]
    C --> D["Printer"]
    D -->|4| E["Printer"]
- Print request
- Internet
- Google Cloud Print ^TM
- Printing

Related Information
- Google Cloud Print
Before Using Google Cloud Print
• Network Settings for Using Google Cloud Print
- Register Your Machine with Google Cloud Print Using Google Chrome ^TM
- Register Your Machine with Google Cloud Print Using Web Based Management
Home > Mobile > Google Cloud Print > Before Using Google Cloud Print > Network Settings for Using Google Cloud Print
Network Settings for Using Google Cloud Print
In order to use Google Cloud Print ^™ , your Brother machine must be connected to a network that has access to the Internet, either through a wired or wireless connection. To connect and configure your machine correctly, see the Quick Setup Guide or related topics in this guide.

Related Information
• Before Using Google Cloud Print
• Google Cloud Print Problems
Related Topics:
Home > Mobile > Google Cloud Print > Before Using Google Cloud Print > Register Your Machine with Google Cloud Print Using Google Chrome™
Register Your Machine with Google Cloud Print Using Google Chrome™
Make sure you have already created a Google Account. If you do not have an account, use a computer or mobile device to access the Google website (https://accounts.google.com/signup) and create an account. Make sure your Brother machine is idle before starting the registration process.

The steps in this section are examples for Windows users.
Screens on your computer may vary depending on your operating system and environment.
- Open Google Chrome ^TM on your computer.
- Sign in to your Google Account.
- Click the Google Chrome ^™ menu icon, and then Settings > Show advanced settings....
- In the Google Cloud Print section, click Manage.
- Follow the on-screen instructions to register your machine.
- When a confirmation message appears on your machine, press the [OK] button.

If the confirmation message does not appear on your machine's LCD, repeat these steps.
- When your Brother machine is successfully registered, it will appear in the My devices field.

Related Information
• Before Using Google Cloud Print
Home > Mobile > Google Cloud Print > Before Using Google Cloud Print > Register Your Machine with Google Cloud Print Using Web Based Management
Register Your Machine with Google Cloud Print Using Web Based Management
Make sure you have already created a Google Account. If you do not have an account, use a computer or mobile device to access the Google website (https://accounts.google.com/signup) and create an account. Make sure your Brother machine is idle before starting the registration process. Before you begin to register your machine, confirm that the correct date and time are set on the machine.
- Confirm that your Brother machine is connected to the same network as your computer or mobile device.
- Start your web browser.
- Type "http://machine's IP address" in your browser's address bar (where "machine's IP address" is the machine's IP address).
For example: http://192.168.1.2 - No password is required by default. Type a password if you have set one, and then click →.
- Click the Network tab.
- Click the Protocol menu in the left navigation bar.
- Make sure that Google Cloud Print is selected, and then click Advanced Settings.
- Make sure that Status is set to Enabled. Click Register.
- Follow the on-screen instructions to register your machine.
- When a confirmation message appears on your machine, press the OK button.

If the confirmation message does not appear on your machine's LCD, repeat these steps.
-
Click Google.
-
The sign-in screen for Google Cloud Print ^™ appears. Sign in with your Google Account and follow the on-screen instructions to register your machine.
-
When you have finished registering your machine, return to the Web Based Management screen and make sure that Registration Status is set to Registered.

Related Information
• Before Using Google Cloud Print
Home > Mobile > Google Cloud Print > Print from Google Chrome™ or Chrome OS™
Print from Google Chrome ^TM or Chrome OS ^TM
- Make sure your Brother machine is turned on.
- Open the web page that you want to print.
- Click the Google Chrome ^TM menu icon.
- Click Print.
- Select your machine from the printer list.
- Change print options, if needed.
- Click Print.

Related Information
- Google Cloud Print
Home > Mobile > Google Cloud Print > Print from Google Drive™ for Mobile
Print from Google Drive™ for Mobile
- Make sure your Brother machine is turned on.
- Access Google Drive ^™ from your Android ^™ or iOS device's web browser.
- Open the document that you want to print.
- Tap the menu icon.
- Tap Print.
- Select your machine from the printer list.
- Change print options, if needed.
- Tap or Print.

Related Information
- Google Cloud Print
Print from Gmail™ Webmail Service for Mobile
- Make sure your Brother machine is turned on.
- Access the Gmail™ webmail service from your Android™ or iOS device's web browser.
- Open the email that you want to print.
- Tap the menu icon.

If Print appears beside the attachment name, you can also print the attachment. Tap Print, and then follow the instructions on your mobile device.
- Tap Print.
- Select your machine from the printer list.
- Change print options, if needed.
- Tap or Print.

Related Information
- Google Cloud Print
AirPrint
• AirPrint Overview
• Before Using AirPrint
- Print Using AirPrint
AirPrint Overview
AirPrint is a printing solution for Apple operating systems that allows you to wirelessly print photos, email, web pages and documents from your iPad, iPhone, iPod touch and Mac computer without the need to install a driver.
For more information, visit Apple's website.
Use of the "Works with Apple badge" means that an accessory has been designed to work specifically with the technology identified in the badge and has been certified by the developer to meet Apple performance standards.

Works with
Apple AirPrint

Related Information
- AirPrint
Related Topics: - AirPrint Problems
Before Using AirPrint
• Network Settings for Using AirPrint
- Disable and Enable AirPrint Using Web Based Management (Web Browser)
Network Settings for Using AirPrint
In order to use AirPrint, your mobile device must connect to the wireless network to which your Brother machine is connected. AirPrint supports wireless connections that use infrastructure mode or Wi-Fi Direct®.
To configure your mobile device for a wireless network, refer to your mobile device's user's guide. A link to your mobile device's user's guide on Apple's website can be found by tapping in Safari.
To configure your Brother machine for a wireless network, see the Quick Setup Guide or related topics in this guide. If your Brother machine supports a wired network, you can use a network cable to connect to the wireless access point/router.
If your Brother machine supports Wi-Fi Direct and you want to configure your Brother machine for a Wi-Fi Direct network, see related topics in this Online Guide.

Related Information
- Before Using AirPrint
Home > Mobile > AirPrint > Before Using AirPrint > Disable and Enable AirPrint Using Web Based Management (Web Browser)
Disable and Enable AirPrint Using Web Based Management (Web Browser)
Confirm that your Brother machine is connected to the same network as your computer.
- Start your web browser.
- Type "http://machine's IP address" in your browser's address bar (where "machine's IP address" is the machine's IP address).
For example:
http://192.168.1.2 - No password is required by default. Type a password if you have set one, and then click →.
- Click the Network tab.
- Click the Protocol menu in the left navigation bar.
- To disable AirPrint, clear the AirPrint check box. To enable AirPrint, select the AirPrint check box.

By default, AirPrint is enabled.
-
Click Submit.
-
Restart your machine to activate the configuration.

Related Information
- Before Using AirPrint
Print Using AirPrint
• Print from iPad, iPhone, or iPod Touch
• Before Using AirPrint (macOS)
• Print Using AirPrint (macOS)
Print from iPad, iPhone, or iPod Touch
The procedure used to print may vary by application. Safari is used in the example below.
- Make sure your Brother machine is turned on.
- Use Safari to open the page that you want to print.
-
Tap or
-
Tap Print.
-
Make sure your Brother machine is selected.
-
If a different machine (or no printer) is selected, tap Printer.
A list of available machines appears.
-
Tap your machine's name in the list.
-
Select the desired options, such as the number of pages to print and 2-sided printing (if supported by your machine).
-
Tap Print.

Related Information
- Print Using AirPrint
Before Using AirPrint (macOS)
Before printing using macOS, add your Brother machine to the printer list on your Mac computer.
- Select System Preferences from the Apple Menu.
- Click Printers & Scanners.
- Click the + icon below the Printers pane on the left.
- Click Add Printer or Scanner.... The Add screen appears.
- Select your Brother machine, and then select AirPrint from the Use pop-up menu.
- Click Add.

Related Information
- Print Using AirPrint
Print Using AirPrint (macOS)
The procedure used to print may vary by application. Safari is used in the example below. Before printing, make sure your Brother machine is in the printer list on your Mac computer.
- Make sure your Brother machine is turned on.
- On your Mac computer, use Safari to open the page that you want to print.
- Click the File menu, and then select Print.
- Make sure your Brother machine is selected. If a different machine (or no printer) is selected, click the Printer pop-up menu, and then select your Brother machine.
- Select the desired options, such as the number of pages to print and 2-sided printing (if supported by your machine).
- Click Print.

Related Information
- Print Using AirPrint
Home > Mobile > Mobile Printing for Windows
Mobile Printing for Windows
Mobile printing for Windows is a function to print wirelessly from your Windows mobile device. You can connect to the same network that your Brother machine is connected to and print without installing the printer driver on the device. Many Windows apps support this function.
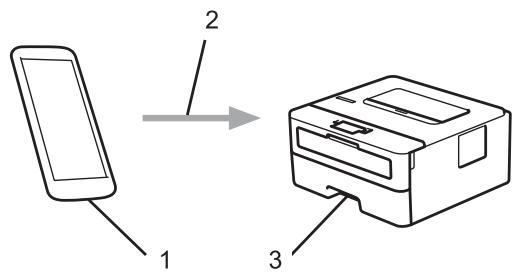
- Windows mobile device (Windows 10 Mobile or later)
- Wi-Fi ^® connection
- Your Brother machine

Related Information
- Mobile
Mopria® Print Service
Mopria® Print Service is a print feature on Android™ mobile devices (Android™ version 4.4 or later) developed by the Mopria® Alliance. With this service, you can connect to the same network as your machine and print without additional setup. Many native Android™ apps support printing.

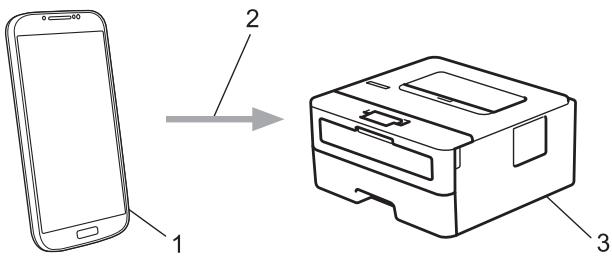
- Android ^TM 4.4 or later
- Wi-Fi ^® Connection
- Your Brother Machine
You must download the Mopria® Print Service from the Google Play™ Store and install it on your Android™ device. Before using this service, you must turn it on.

Related Information
- Mobile
Brother iPrint&Scan for Mobile Devices
Use Brother iPrint&Scan to print from various mobile devices.
• For Android ^TM Devices
Brother iPrint&Scan allows you to use features of your Brother machine directly from your Android ^™ device, without using a computer.
Download and install Brother iPrint&Scan from the Google Play™ Store app.
• For all iOS supported devices including iPhone, iPad and iPod touch
Brother iPrint&Scan allows you to use features of your Brother machine directly from your iOS device.
Download and install Brother iPrint&Scan from the App Store.
- For Windows Devices
Brother iPrint&Scan allows you to use features of your Brother machine directly from your Windows device, without using a computer.
Download and install Brother iPrint&Scan from the Microsoft Store.
For more detailed information, visit support.brother.com/ips.

Related Information
- Mobile
Related Topics:
• Brother iPrint&Scan Overview
Home > Brother iPrint&Scan for Windows and Mac
Brother iPrint&Scan for Windows and Mac
• Brother iPrint&Scan Overview
Brother iPrint&Scan Overview
Use Brother iPrint&Scan for Windows and Mac to print from your computer.
The following screen shows an example of Brother iPrint&Scan for Windows. The actual screen may differ depending on the version of the application.
- For Windows
Go to your model's Downloads page on the Brother Solutions Center at support.brother.com to download the latest application.
- For Mac
Download and install Brother iPrint&Scan from the App Store.
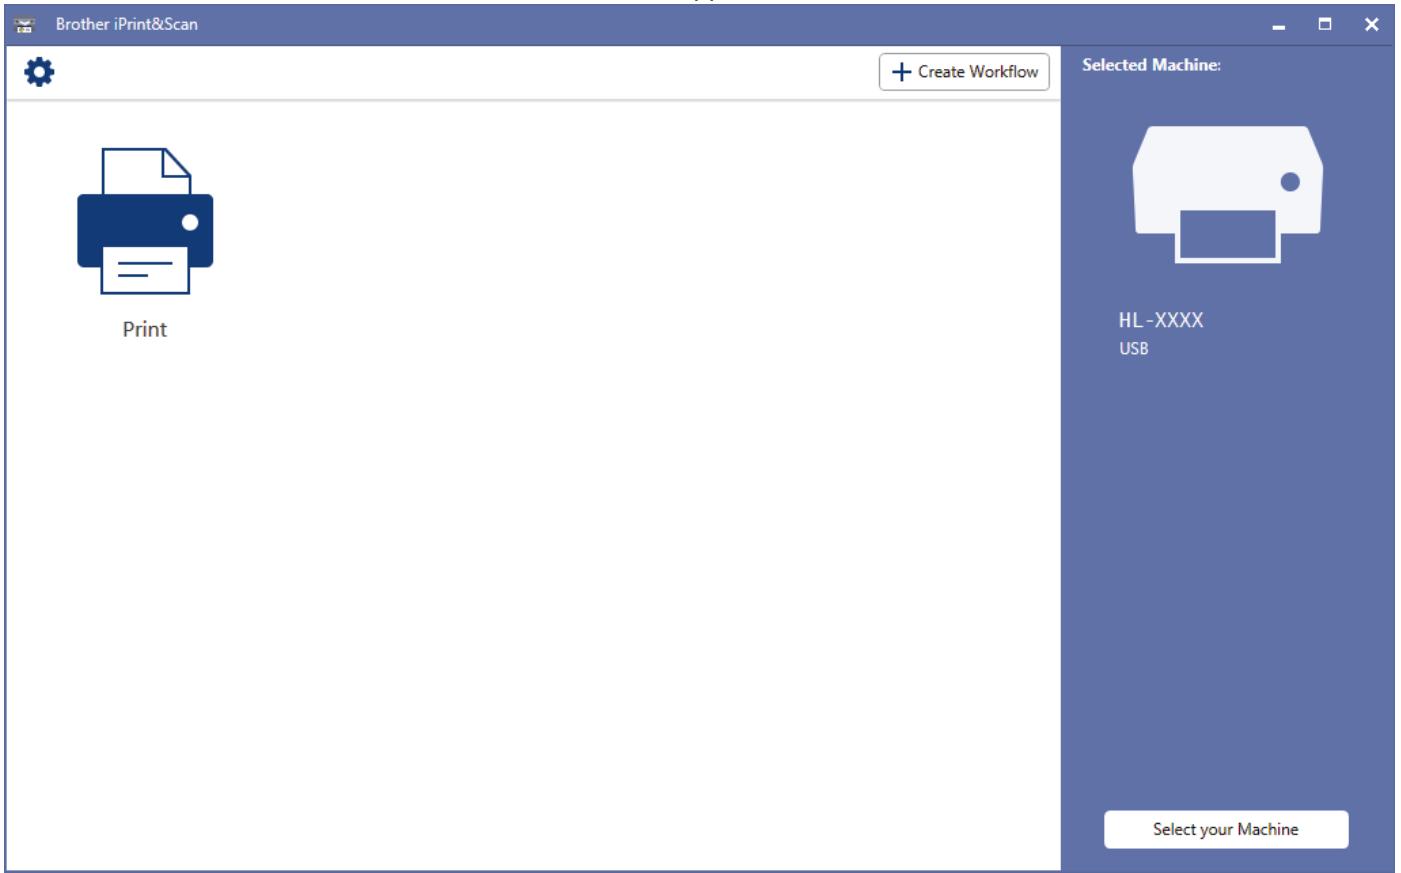

Related Information
• Brother iPrint&Scan for Windows and Mac
Related Topics:
• Brother iPrint&Scan for Mobile Devices
Troubleshooting
Use this section to resolve typical problems you may encounter when using your Brother machine. You can correct most problems yourself.
IMPORTANT
For technical help, you must call Brother customer service or your local Brother dealer.
Using non-Brother supplies may affect the print quality, hardware performance, and machine reliability.

If you need additional help, go to the Brother Solutions Center at support.brother.com.
First, check the following:
- The machine's power cord is connected correctly and the machine's power is on. See the Quick Setup Guide.
- All of the protective materials have been removed. See the Quick Setup Guide.
• Paper is loaded correctly in the paper tray. - The interface cables are securely connected to the machine and the computer, or the wireless connection is set up on both the machine and your computer.
• Error and maintenance messages
If you did not solve the problem with the checks, identify the problem and then see Related Information.

Related Information
- Error and Maintenance Messages
- Paper Jams
- Printing Problems
- Improve the Print Quality
• Network Problems
• Google Cloud Print Problems - AirPrint Problems
- Other Problems
• Machine Information
Error and Maintenance Messages
As with any sophisticated office product, errors may occur and supply items may have to be replaced. If this happens, your machine identifies the error or required routine maintenance and shows the appropriate message. The most common error and maintenance messages are shown in the table.
Follow the instructions in the Action column to solve the error and remove the message.
You can correct most errors and perform routine maintenance by yourself. If you need more tips: Visit support.brother.com, and click the FAQs & Troubleshooting page.
| Error Message | Cause | Action |
| 2-sided Disabled | The back cover of the machine is not closed completely. | Close the back cover of the machine until it locks in the closed position. |
| The 2-sided tray is not installed completely. | Install the 2-sided tray firmly in the machine. | |
| Cartridge Error | The toner cartridge is not installed correctly. | Remove the toner cartridge and drum unit assembly. Take out the toner cartridge, and put it back in the drum unit again. Reinstall the toner cartridge and drum unit assembly in the machine.If the problem continues, contact Brother customer service or your local Brother dealer. |
| Cooling Down | The temperature of the inside of the machine is too hot. The machine pauses its current print job and goes into cooling down mode. | Wait until the machine has finished cooling down. Make sure all vents on the machine are clear of obstructions.When the machine has cooled down, the machine will resume printing.If the fan is not spinning, disconnect the machine from the power for several minutes, then reconnect it. |
| Cover is Open | The front cover is not completely closed. | Open and then firmly close the front cover of the machine. |
| Cover is Open | The fuser cover is not completely closed. | Close the fuser cover located inside the back cover of the machine. |
| Drum ! | The corona wire on the drum unit must be cleaned. | Clean the corona wire on the drum unit.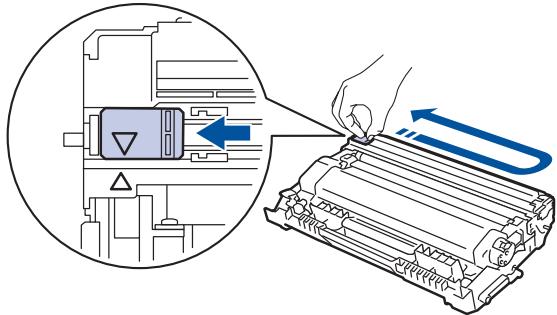 See Related Information: Clean the Corona Wire.If the problem continues, replace the drum unit with a new one. See Related Information: Clean the Corona Wire.If the problem continues, replace the drum unit with a new one. |
| The drum unit or the toner cartridge and drum unit assembly is not installed correctly. | Remove the drum unit, remove the toner cartridge from the drum unit, and put the toner cartridge back into the drum unit. Reinstall the drum unit in the machine. | |
| Drum End Soon | The drum unit is near the end of its life. | Order a new drum unit before the LCD displays Replace Drum. |
| Jam 2-sided | The paper is jammed in the 2-sided tray or inside the back cover. | Remove the 2-sided tray and open the back cover to pull out all jammed paper. |
| Jam Inside | The paper is jammed inside the machine. | Open the front cover, remove the toner cartridge and drum unit assembly, and pull out all jammed paper. Close the front cover. |
| Jam Rear | The paper is jammed in the back of the machine. | Open the fuser cover and remove all jammed paper. Close the fuser cover. |
| Jam Tray 1 | The paper is jammed in the indicated paper tray. | Pull out the paper tray indicated on the LCD and remove all jammed paper. |
| Manual Feed | Manual was selected as the paper source in the printer driver, but there is no paper in the manual feed slot. | Place paper in the manual feed slot. |
| Media Mismatch | The media type specified in the printer driver differs from the paper type specified in the machine's menu. | Load the correct type of paper in the tray indicated on the LCD, and then select the correct media type in the Paper Type setting on the machine. |
| No Drum Unit | The drum unit is not installed correctly. | Reinstall the toner cartridge and drum unit assembly. |
| No Paper | The machine is out of paper, or paper is not loaded correctly in the paper tray. | • Refill paper in the paper tray. Make sure the paper guides are set to the correct size.• If paper is in the tray, remove it and load it again. Make sure the paper guides are set to the correct size.• Do not overfill the paper tray. |
| No Paper T1 | The machine failed to feed paper from the indicated paper tray. | Do one of the following:• Refill paper in the paper tray indicated on the LCD. Make sure the paper guides are set to the correct size.• If paper is in the tray, remove it and load it again. Make sure the paper guides are set to the correct size.• Do not overfill the paper tray. |
| No Toner | The toner cartridge or the toner cartridge and drum unit assembly is not installed correctly. | Remove the toner cartridge and drum unit assembly. Remove the toner cartridge from the drum unit, and reinstall the toner cartridge back in the drum unit. Reinstall the toner cartridge and drum unit assembly back in the machine. If the problem continues, replace the toner cartridge with a new one. |
| Out of Memory | The machine's memory is full. | Press and hold Go for about two seconds and reduce the print resolution. |
| Print Data Full | The machine's memory is full. | Press and hold Go for about two seconds and delete the previously stored print data. |
| Print Unable ## | The machine has a mechanical problem. | • Press and hold ⏻ to turn the machine off, wait a few minutes, and then turn it on again.• If the problem continues, contact Brother customer service. |
| Replace Drum | It is time to replace the drum unit. | Replace the drum unit with a new one.See Related Information: Replace the Drum Unit. |
| The drum unit counter was not reset when a new drum was installed. | Reset the drum unit counter.See the instructions included with the new drum unit. | |
| Replace Toner | The toner cartridge is at the end of its life. The machine stops all print operations. | Replace the toner cartridge with a new one. |
| Self-Diagnostic | The temperature of the fuser unit does not rise to a specified temperature within the specified time. | Press and hold ⏻ to turn the machine off, wait a few seconds, and then turn it on again.Leave the machine idle for 15 minutes with the power on. |
| The fuser unit is too hot. | ||
| Size Error | The paper size defined in the printer driver is not supported by the defined tray. | Choose a paper size supported by the defined tray. |
| Size Error DX | The paper size specified in the machine's paper size setting is not available for automatic 2-sided printing. | Press and hold Go for about two seconds (if required).Load the correct size of paper in the tray and set the tray for that paper size.Choose a paper size supported by 2-sided printing.Paper size available for automatic 2-sided printing is A4. |
| The paper in the tray is not the correct size and is not available for automatic 2-sided printing. | ||
| Size Mismatch | The paper in the tray is not the correct size. | Load the correct size of paper in the tray indicated on the LCD and set the size of paper for the tray. Press Go. |
| Toner Low | If the LCD displays this message, you can still print. The toner cartridge is near the end of its life. | Order a new toner cartridge now so you have it ready when the LCD displays Replace Toner. |

Related Information
- Troubleshooting
Related Topics:
- Replace Supplies
- Replace the Drum Unit
- Clean the Corona Wire
Paper Jams
Always remove the remaining paper from the paper tray and straighten the stack when you are adding new paper. This helps prevent multiple sheets of paper from feeding through the machine at one time and prevents paper jams.
• Paper is Jammed in the Paper Tray
• Paper is Jammed in the Back of the Machine
• Paper is Jammed inside the Machine
• Paper is Jammed in the 2-sided Tray
Home > Troubleshooting > Paper Jams > Paper is Jammed in the Paper Tray
Paper is Jammed in the Paper Tray
If the machine's control panel or the Status Monitor indicates that there is a jam in the paper tray, follow these steps:
- Pull the paper tray completely out of the machine.
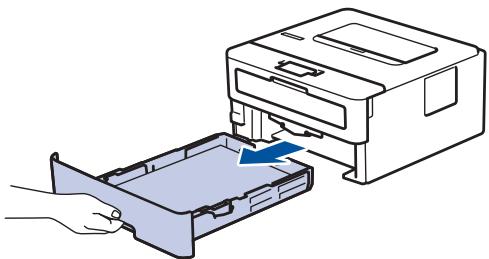
natural_image
Illustration of a printer being inserted into a plastic case, showing the printer's internal structure and the paper holder (no text or symbols present)- Slowly pull out the jammed paper.
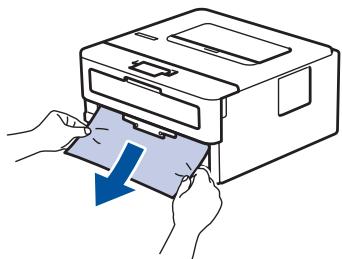
natural_image
Illustration of hands inserting a printer into a paper airplane with a blue arrow indicating the download (no text or symbols present)
Pulling the jammed paper downward using both hands allows you to remove the paper more easily.
- Fan the stack of paper to prevent further jams, and slide the paper guides to fit the paper size.

- Make sure the paper is below the maximum paper mark (▼▼▼).

natural_image
Diagram of a rectangular device with internal components and a magnified view showing three downward-pointing arrows (no text or symbols)- Put the paper tray firmly back in the machine.

Related Information
- Paper Jams
Paper is Jammed in the Back of the Machine
If the machine's control panel or the Status Monitor indicates that there is a jam in the back (Rear) of the machine, follow these steps:
- Leave the machine turned on for 10 minutes for the internal fan to cool the extremely hot parts inside the machine.
- Open the back cover.
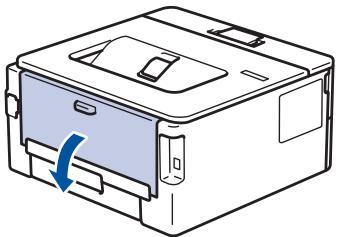
natural_image
Line drawing of a printer with a blue arrow indicating the paper cut or change (no text or symbols present)- Pull the blue tabs at the left and right sides toward you to release the fuser cover.
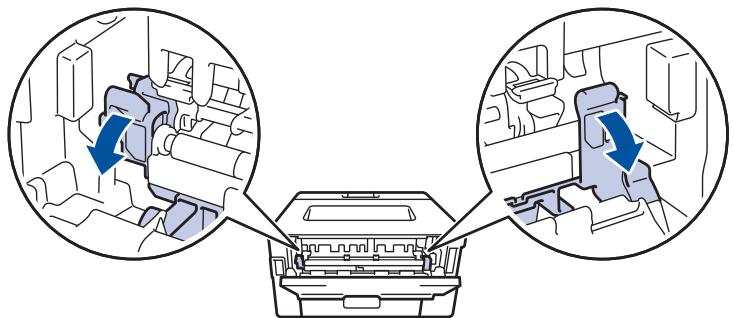
natural_image
Diagram showing engine compartment with two circular insets highlighting internal components (no text or symbols)
WARNING
HOT SURFACE
The machine's internal parts will be extremely hot. Wait for the machine to cool down before touching them.
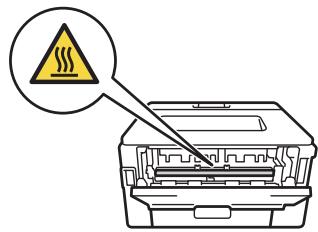

If the green envelope levers inside the back cover are pulled down to the envelope position, lift these levers to the original position before pulling the green tabs down.
- Use both hands to gently pull the jammed paper out of the fuser unit.
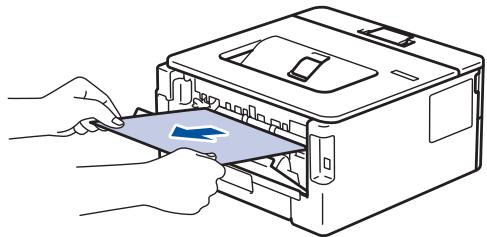
natural_image
Line drawing of hands inserting a card into a printer (no text or symbols)- Close the fuser cover.

natural_image
Diagram showing engine compartment with internal components and directional arrows indicating flow or movement (no text or symbols present)
If you print on envelopes, pull down the green envelope levers to the envelope position again before closing the back cover.
- Close the back cover until it locks in the closed position.

Related Information
- Paper Jams
Paper is Jammed inside the Machine
If the machine's control panel or the Status Monitor indicates that there is a jam inside the machine, follow these steps:
- Leave the machine turned on for 10 minutes for the internal fan to cool the extremely hot parts inside the machine.
- Open the front cover.
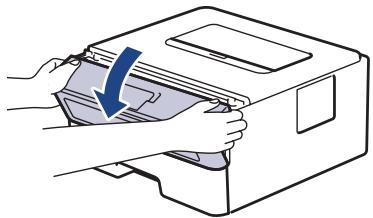
natural_image
Illustration of hands inserting a file into a paper airplane (no text or symbols)- Remove the toner cartridge and drum unit assembly.
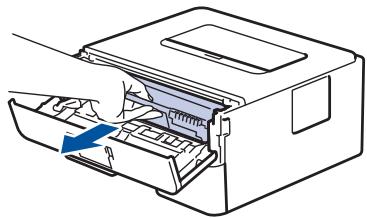
natural_image
Diagram of a printer's internal structure showing paper feeding into a paper holder (no text or symbols present)
WARNING
HOT SURFACE
The machine's internal parts will be extremely hot. Wait for the machine to cool down before touching them.
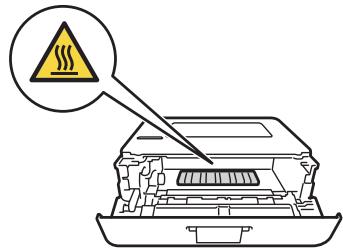
- Pull out the jammed paper slowly.
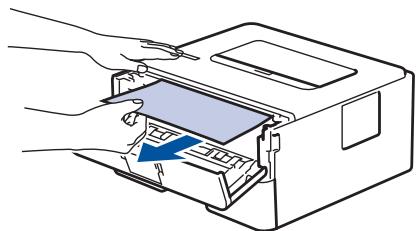
natural_image
Line drawing of a printer with hands inserting a card into the case (no text or symbols)- Install the toner cartridge and drum unit assembly into the machine.

natural_image
Diagram of a printer's internal structure showing paper feeding into a paper airplane (no text or labels)- Close the front cover.

Related Information
- Paper Jams
▲ Home > Troubleshooting > Paper Jams > Paper is Jammed in the 2-sided Tray
Paper is Jammed in the 2-sided Tray
If the machine's control panel or the Status Monitor indicates that there is a jam in the 2-sided paper tray, follow these steps:
- Leave the machine turned on for 10 minutes for the internal fan to cool the extremely hot parts inside the machine.
- Pull the paper tray completely out of the machine.

natural_image
Illustration of a printer being inserted into a plastic case, with a hand holding the case (no text or symbols present)- At the back of the machine, pull the 2-sided tray completely out of the machine.
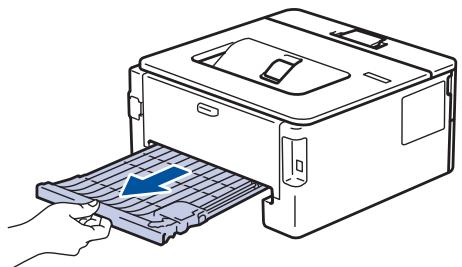
natural_image
Illustration of a hand inserting a device into a machine (no text or symbols visible)- Pull the jammed paper out of the machine or out of the 2-sided tray.
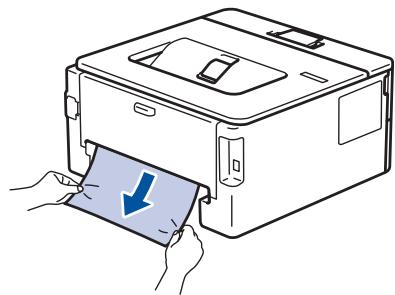
natural_image
Line drawing of a printer with a paper being inserted, showing hand placement and blue arrow indicating print direction (no text or symbols)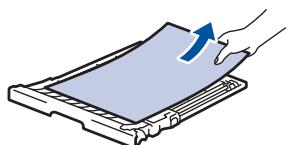
natural_image
Illustration of a hand pressing down on a sheet of paper with an upward arrow (no text or symbols)- Remove paper that may have jammed under the machine due to static electricity.
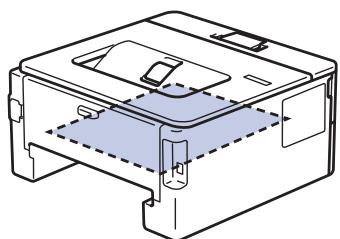
natural_image
Technical line drawing of a mechanical device housing with internal components and mounting brackets (no text or symbols)- If paper is not caught inside the 2-sided tray, open the back cover.
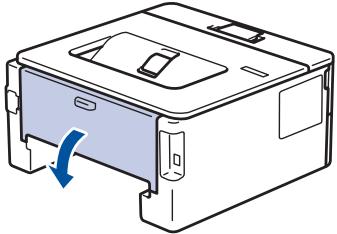
natural_image
Diagram of a printer or printer casing with a blue arrow indicating rotation (no text or symbols present)
WARNING
HOT SURFACE
The machine's internal parts will be extremely hot. Wait for the machine to cool down before touching them.
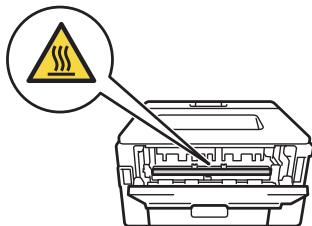
- Use both hands to gently pull the jammed paper out of the back of the machine.
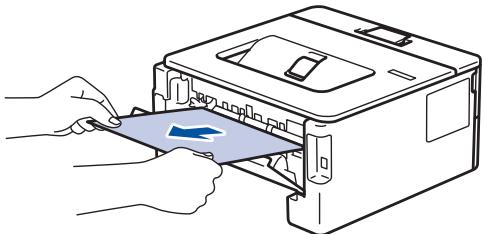
natural_image
Illustration of hands inserting a card into a printer case (no text or symbols visible)- Close the back cover until it locks in the closed position.
- Put the 2-sided tray firmly back in the rear of the machine.
- Put the paper tray firmly back in the front of the machine.

Related Information
- Paper Jams
Printing Problems
| Difficulties | Suggestions |
| No printout | Check the machine is not in Power Off mode.If the machine is in Power Off mode, press ⏻ on the control panel, and then send the print data again. |
| Check that the correct printer driver has been installed and selected. | |
| Check to see if the Status Monitor or the machine's control panel displays an error status. | |
| Check that the machine is online:Windows7 and Windows Server 2008 R2Click (Start) >Devices and Printers. Right-clickBrother XXX-XXXX and click See what's printing.Click Printer in the menu bar. Make sure Use Printer Offline is not selected.Windows Server 2008Click (Start) >Control Panel > Hardware and Sound > Printers. Right-click Brother XXX-XXXX.Make sure Use Printer Online is not listed. If it is listed, click this option to set the driver Online.Windows 8 and Windows Server 2012Move your mouse to the lower right corner of your desktop. When the menu bar appears, click Settings > Control Panel > Hardware and Sound > View devices and printers. Right-click the Brother XXX-XXXX. Click See what's printing. If printer driver options appear, select your printer driver. Click Printer in the menu bar and make sure that Use Printer Offline is not selected.Windows 10 and Windows Server 2016Click > Windows System > Control Panel. In the Hardware and Sound group, click View devices and printers. Right-click the Brother XXX-XXXX.Click See what's printing. If printer driver options appear, select your printer driver. Click Printer in the menu bar and make sure that Use Printer Offline is not selected.Windows Server 2012 R2Click Control Panel on the Start screen. In the Hardware group, click View devices and printers.Right-click the Brother XXX-XXXX. Click See what's printing. If printer driver options appear, select your printer driver. Click Printer in the menu bar and make sure Use Printer Offline is not selected. | |
| MacClick the System Preferences menu, and then select the Printers & Scanners option. When the machine is offline, delete it using the button, and then add it using the + button. | |
| The machine is not printing or has stopped printing. | Cancel the print job and clear it from the machine's memory. The printout may be incomplete. Send the print data again.See Related Information: Cancel a Print Job. |
| The headers or footers appear when the document displays on the screen but they do not show up when it is printed. | There is an unprintable area on the top and bottom of the page. Adjust the top and bottom margins in your document to allow for this. |
| The machine prints unexpectedly or it prints garbage. | Cancel the print job and clear it from the machine's memory. The printout may be incomplete. Send the print data again.See Related Information: Cancel a Print Job. |
| Check the settings in your application to make sure they are set up to work with your machine. | |
| Confirm that the Brother printer driver is selected in your application's Print window. | |
| The machine prints the first couple of pages correctly, then some pages have missing text. | Check the settings in your application to make sure they are set up to work with your machine. |
| Your machine is not receiving all of the data sent from the computer. Make sure you connected the interface cable correctly. | |
| The machine does not print on both sides of the paper even though the printer driver setting is 2-sided and the machine supports automatic 2-sided printing. | Check the paper size setting in the printer driver. You must select A4 paper that is 60 to 105 g/m^2 . |
| Print speed is too slow. | Try changing the printer driver setting. The highest resolution needs longer data processing, sending and printing time. |
| If you have enabled the Quiet Mode, disable the Quiet Mode on the printer driver or the machine's menu setting. | |
| The machine does not feed paper. | If there is paper in the paper tray, make sure it is straight. If the paper is curled, straighten it. Sometimes it is helpful to remove the paper, turn the stack over and place it back in the paper tray. |
| Reduce the amount of paper in the paper tray, and then try again. | |
| (For models with Manual Feed Slot)Make sureManualis not selected forPaper Sourcein the printer driver. | |
| Clean the paper pick-up rollers. | |
| The machine does not feed paper from the Manual feed slot.(For models with Manual Feed Slot) | Use both hands to push one sheet of paper firmly into the manual feed slot until the top edge of the paper presses against the paper feed rollers. Continue pressing the paper against the rollers until the machine grabs the paper and pulls it in further. |
| Put only one sheet of paper in the manual feed slot. | |
| Make sureManualis selected asPaper Sourcein the printer driver. | |
| The machine does not feed envelopes. | (For models with Manual Feed Slot)Load one envelope at a time in the manual feed slot. Your application must be set to print the envelope size you are using. This is usually done in the Page Setup or Document Setup menu of your application. |

Related Information
- Troubleshooting
Related Topics:
• Monitor the Status of the Machine from Your Computer (Windows)
• Monitor the Status of the Machine from Your Computer (Mac)
- Cancel a Print Job
• Clean the Paper Pick-up Rollers
Improve the Print Quality
If you have a print quality problem, print a test page first. If the printout looks good, the problem is probably not the machine. Check the interface cable connections and try printing a different document. If the printout or test page printed from the machine has a quality problem, check the examples of poor print quality and follow the recommendations in the table.
IMPORTANT
Using non-genuine supplies may affect the print quality, hardware performance, and machine reliability.
- To get the best print quality, we suggest using recommended print media. Make sure you use paper that meets our specifications.
- Check that the toner cartridge and drum unit are installed correctly.
| Examples of poor print quality | Recommendation | |
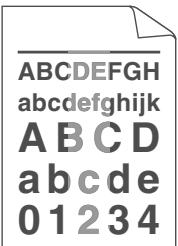 Faint Faint | If the machine indicates Replace Toner status, install a new toner cartridge.Check the machine's environment. Conditions such as humidity, high temperatures, and so on, may cause this print fault.If the whole page is too light, Toner Save may be turned on. Turn off Toner Save mode in the machine's menu settings or the printer driver.Clean the drum unit.Clean the corona wire on the drum unit.Replace the toner cartridge with a new toner cartridge.Replace the drum unit with a new drum unit. | |
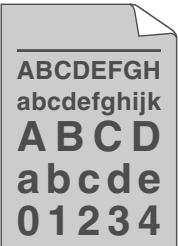 Grey background Grey background | Check the machine's environment. Conditions such as high temperatures and high humidity can increase the amount of background shading.Clean the drum unit.Replace the drum unit with a new drum unit. | |
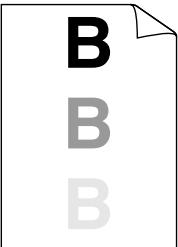 Ghosting imagesExamples of poor print quality Ghosting imagesExamples of poor print quality | Check the machine's environment. Conditions such as low humidity and low temperatures may cause this print quality problem.Select the appropriate media type in the printer driver.Select the appropriate media type in the menu setting.Make sure the two green levers inside the back cover are in the up position. Pull up the two green levers until they stop. | |
| Recommendation | ||
 Clean the drum unit.Replace the drum unit with a new drum unit.Replace the toner cartridge with a new toner cartridge.The fuser unit may be contaminated.Contact Brother customer service. Clean the drum unit.Replace the drum unit with a new drum unit.Replace the toner cartridge with a new toner cartridge.The fuser unit may be contaminated.Contact Brother customer service. | ||
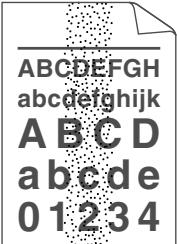 Toner specks Toner specks | Make sure the media type setting in the driver matches the type of paper you are using.Clean the drum unit.The toner cartridge may be damaged.Replace the toner cartridge with a new toner cartridge.The drum unit may be damaged.Replace the drum unit with a new drum unit.The fuser unit may be contaminated.Contact Brother customer service. | |
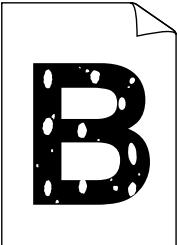 Hollow print Hollow print | SelectThick Papermode in the printer driver or use thinner paper than you are currently using.Select the appropriate media type in the menu setting.Check the machine's environment. Conditions such as high humidity can cause hollow print.The drum unit may be damaged.Replace the drum unit with a new drum unit. | |
 All black All black | Clean the corona wire inside the drum unit.The drum unit may be damaged.Replace the drum unit with a new drum unit. | |
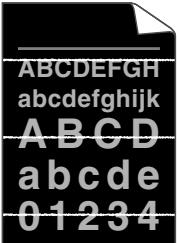 White lines across the page White lines across the page | Select the appropriate media type in the printer driver.Select the appropriate media type in the menu setting.The problem may disappear by itself. Print multiple blank pages to clear this problem, especially if the machine has not been used for a long time.Clean the drum unit.The drum unit may be damaged.Replace the drum unit with a new drum unit. | |
| Examples of poor print quality | Recommendation | |
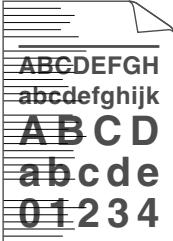 Lines across the page Lines across the page | Clean the drum unit.The drum unit may be damaged.Replace the drum unit with a new drum unit. | |
 White lines, bands or ribbing across the page White lines, bands or ribbing across the page | Check the machine's environment. Conditions such as high humidity and high temperatures may cause this print quality problem.Clean the drum unit.If the problem is not solved after printing a few pages, replace the drum unit with a new drum unit. | |
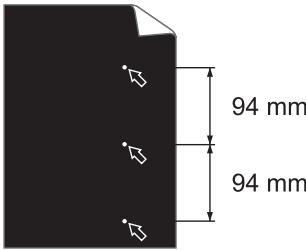 White Spots on black text and graphics at 94 mm intervals White Spots on black text and graphics at 94 mm intervals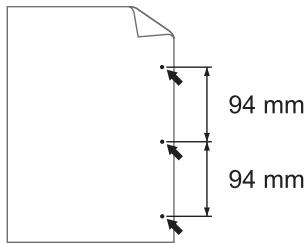 Black spots at 94 mm intervals Black spots at 94 mm intervals | If the problem is not solved after printing a few pages, the drum unit may have foreign material, such as glue from a label, stuck on the drum. Clean the drum unit.See Related Information:Clean the Drum Unit Using Drum Dot Print.The drum unit may be damaged.Replace the drum unit with a new drum unit. | |
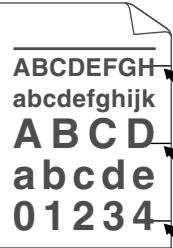 Black toner marks across the page Black toner marks across the page | If you use label sheets for laser printers, the glue from the sheets may sometimes stick to the drum surface. Clean the drum unit.See Related Information:Clean the Drum Unit Using Drum Dot Print.If you used paper that has clips or staples, the drum unit may be damaged.If the unpacked drum unit is in direct sunlight (or room light for long periods of time), the unit may be damaged.Clean the drum unit.The drum unit may be damaged.Replace the drum unit with a new drum unit. | |
 Black lines down the pagePrinted pages have toner stains down the page Black lines down the pagePrinted pages have toner stains down the page | Clean the corona wire inside the drum unit by sliding the green tab.Make sure that the green tab on the drum unit is in the Home position.The drum unit may be damaged.Replace the drum unit with a new drum unit.The fuser unit may be contaminated.Contact Brother customer service. | |
| Examples of poor print quality | Recommendation |
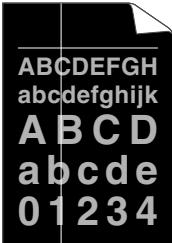 White lines down the page White lines down the page | Make sure foreign material such as a torn piece of paper, sticky notes or dust is not inside the machine and around the toner cartridge and drum unit.The drum unit may be damaged.Replace the drum unit with a new drum unit. |
 Image skewed Image skewed | Make sure the paper or other print media is loaded correctly in the paper tray and the guides are not too tight or too loose against the paper stack.Set the paper guides correctly.The paper tray may be too full.Check the paper type and quality.Check for loose objects such as torn paper inside the machine.If the problem only occurs during automatic 2-sided printing, check for torn paper in the 2-sided tray. Verify the 2-sided tray is inserted completely and the back cover is closed completely. |
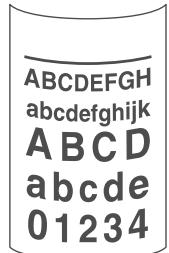 Curled or wavy image Curled or wavy image | Check the paper type and quality. High temperatures and high humidity will cause paper to curl.If you do not use the machine often, the paper may have been in the paper tray too long. Turn over the stack of paper in the paper tray. Also, fan the paper stack, and then rotate the paper 180^ in the paper tray.Open the back cover (face up output tray) to let the printed paper exit onto the face up output tray.Choose Reduce Paper Curl mode in the printer driver when you do not use our recommended print media. |
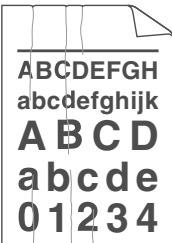 Wrinkles or creases Wrinkles or creases | Make sure paper is loaded correctly.Check the paper type and quality.Turn over the stack of paper in the tray or rotate the paper 180^ in the input tray. |
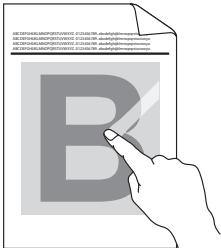 Poor fixing Poor fixing | Make sure the two green levers inside the back cover are in the up position. Pull up the two green levers until they stop.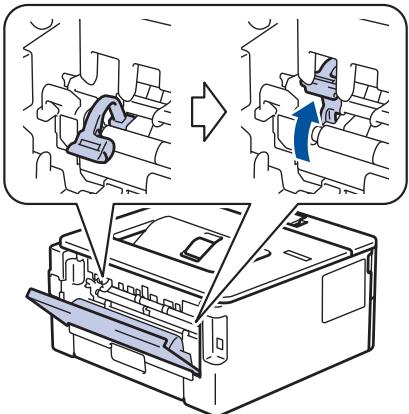 Make sure the media type setting in the printer driver matches the type of paper you are using.Choose Improve Toner Fixing mode in the printer driver.If this selection does not provide enough improvement, change the printer driver setting in Media Type to a thick setting. If you are printing an envelope, choose Env. Thick in the media type setting. Make sure the media type setting in the printer driver matches the type of paper you are using.Choose Improve Toner Fixing mode in the printer driver.If this selection does not provide enough improvement, change the printer driver setting in Media Type to a thick setting. If you are printing an envelope, choose Env. Thick in the media type setting. |
 Envelope creases Envelope creases | Make sure the two green levers inside the back cover are pulled down to the envelope position when you print envelopes. After you have finished printing, reset the levers back to their original position. Pull up the levers until they stop. Make sure envelopes are printed with the back cover (face up output tray) opened.(For models with Manual Feed Slot)Make sure envelopes are fed only from the manual feed slot. Make sure envelopes are printed with the back cover (face up output tray) opened.(For models with Manual Feed Slot)Make sure envelopes are fed only from the manual feed slot. |

Related Information
- Troubleshooting
Related Topics:
- Test Print
- Clean the Drum Unit Using Drum Dot Print
- Reduce Toner Consumption
- Replace the Toner Cartridge
- Replace the Drum Unit
Network Problems
- Error Messages
• Where Can I Find My Brother Machine's Network Settings?
• I Cannot Complete the Wireless Network Setup Configuration
• Use the Network Connection Repair Tool (Windows)
• My Brother Machine Cannot Print over the Network
• I Want to Check that My Network Devices are Working Correctly
Error Messages
Your Brother machine will display an error message if an error occurs. The most common error messages are shown in the table.
| Error Messages | Cause | Action |
| Connection Error | Other devices are trying to connect to the Wi-Fi Direct network at the same time. | Make sure there are no other devices trying to connect to the Wi-Fi Direct network, and then try to configure the Wi-Fi Direct settings again. |
| Connection Fail | The Brother machine and your mobile device cannot communicate during the Wi-Fi Direct network configuration. | Move the mobile device closer to your Brother machine.Move your Brother machine and the mobile device to an obstruction-free area.If you are using the PIN Method of WPS, make sure you have entered the correct PIN. |
| No Device | When configuring the Wi-Fi Direct network, the Brother machine cannot find your mobile device. | Make sure your machine and mobile device are in the Wi-Fi Direct mode.Move the mobile device closer to your Brother machine.Move your Brother machine and the mobile device to an obstruction-free area.If you are manually configuring the Wi-Fi Direct network, make sure you have entered the correct password.If your mobile device has a configuration page for how to obtain an IP address, make sure the IP address of your mobile device has been configured via DHCP. |

Related Information
• Network Problems
▲ Home > Troubleshooting > Network Problems > Where Can I Find My Brother Machine's Network Settings?
Where Can I Find My Brother Machine's Network Settings?
• Print the Network Configuration Report
- Change Machine Settings from Your Computer
I Cannot Complete the Wireless Network Setup Configuration
Turn your wireless router off and back on. Then, try to configure the wireless settings again. If you are unable to resolve the problem, follow the instructions below:
Investigate the problem using the WLAN Report.
| Cause | Action | Interface |
| Your security settings (SSID/ Network Key) are not correct. | Confirm the security settings using the Wireless Setup Helper utility. For more information and to download the utility, go to your model's Downloads page on the Brother Solutions Center at support.brother.com.Select and confirm that you are using the correct security settings.- See the instructions supplied with your wireless LAN access point/router for information on how to find the security settings.- The manufacturer's name or model number of the wireless LAN access point/router may be used as the default security settings.- Consult with the access point/router manufacturer, your Internet provider, or network administrator. | Wireless |
| Your Brother machine's MAC address is not allowed. | Confirm that the Brother machine's MAC Address is allowed in the filter. You can find the MAC Address on your Brother machine's control panel. | Wireless |
| Your wireless LAN access point/router is in stealth mode (not broadcasting the SSID). | Enter the correct SSID name or Network Key manually.Check the SSID name or the Network Key in the instructions supplied with your wireless LAN access point/router and reconfigure the wireless network setup. | Wireless |
| Your security settings (SSID/ password) are not correct. | Confirm the SSID and password.- When you are configuring the network manually, the SSID and password are displayed on your Brother machine. If your mobile device supports the manual configuration, the SSID and password will be displayed on your mobile device's screen. | Wi-Fi Direct |
| You are using Android^TM 4.0. | If your mobile device disconnects (approximately six minutes after using Wi-Fi Direct), try the one-push configuration using WPS (recommended) and set the Brother machine as a G/O. | Wi-Fi Direct |
| Your Brother machine is placed too far from your mobile device. | Move your Brother machine within about 3.3 feet (1 metre) of the mobile device when you configure the Wi-Fi Direct network settings. | Wi-Fi Direct |
| There are some obstructions (walls or furniture, for example) between your machine and the mobile device. | Move your Brother machine to an obstruction-free area. | Wi-Fi Direct |
| There is a wireless computer, Bluetooth®-supported device, microwave oven, or digital cordless phone near the Brother machine or the mobile device. | Move other devices away from the Brother machine or the mobile device. | Wi-Fi Direct |
| If you have checked and tried all of the above, but still cannot complete the Wi-Fi | Turn your Brother machine off and back on. Then, try to configure the Wi-Fi Direct settings again. | Wi-Fi Direct |
| Direct configuration, do the following: | If you are using your Brother machine as a client, confirm how many devices are allowed in the current Wi-Fi Direct network, and then check how many devices are connected. |
For Windows
If your wireless connection has been interrupted, and you have checked and tried all of the above, we recommend using the Network Connection Repair Tool.

Related Information
• Network Problems
Related Topics:
- Configure Your Machine for a Wireless Network When the SSID Is Not Broadcast
- Use Wi-Fi Direct®
Use the Network Connection Repair Tool (Windows)
Use the Network Connection Repair Tool to fix the Brother machine's network settings. It will assign the correct IP address and Subnet Mask.
• Windows 7/Windows 8/Windows 10
You must log on with Administrator rights.
• Make sure the Brother machine is turned on and is connected to the same network as your computer.
- Do one of the following:
| Option | Description |
| Windows Server 2008 | Click (Start) > All Programs > Brother > Brother Utilities.Click the drop-down list and select your model name (if not already selected). Click Tools in the left navigation bar, and then click Network Connection Repair Tool. |
| Windows 7 | Click (Start) > All Programs > Brother > Brother Utilities.Click the drop-down list and select your model name (if not already selected). Click Tools in the left navigation bar, and then click Network Connection Repair Tool. |
| Windows 8/Windows 10 | Launch (Brother Utilities), and then click the drop-down list and select your model name (if not already selected). Click Tools in the left navigation bar, and then click Network Connection Repair Tool. |
| Windows Server 2012 / 2012 R2 / 2016 | Launch (Brother Utilities), and then click the drop-down list and select your model name (if not already selected). Click Tools in the left navigation bar, and then click Network Connection Repair Tool. |

• If the User Account Control screen appears, click Yes.
- Follow the on-screen instructions.
- Check the diagnosis by printing the Network Configuration Report or the Printer Settings page.

The Network Connection Repair Tool will start automatically if you select the Enable Connection Repair Tool option in the Status Monitor. Right-click the Status Monitor screen, and then click Other Settings > Enable Connection Repair Tool. This is not recommended when your network administrator has set the IP address to Static, since it will automatically change the IP address.
If the correct IP address and the Subnet Mask are still not assigned even after using the Network Connection Repair Tool, ask your network administrator for this information.

Related Information
• Network Problems
• Print the Network Configuration Report
• My Brother Machine Cannot Print over the Network
• I Want to Check that My Network Devices are Working Correctly
Related Topics:
My Brother Machine Cannot Print over the Network
| Cause | Action | Interface |
| Your security software blocks your machine's access to the network. | Some security software might block access without showing a security alert dialog box even after successful installation.To allow access, see the instructions for your security software or ask the software manufacturer. | Wired/Wireless |
| Your Brother machine was not assigned an available IP address. | Confirm the IP address and the Subnet Mask.Verify that both the IP addresses and Subnet Masks of your computer and the Brother machine are correct and located on the same network.For more information about how to verify the IP address and the Subnet Mask, ask your network administrator.WindowsConfirm the IP address and the Subnet Mask using the Network Connection Repair Tool. | Wired/Wireless |
| The failed print job is still in your computer's print queue. | If the failed print job is still in your computer's print queue, delete it.Otherwise, double-click the printer icon in the following folder and cancel all documents:- Windows 7Click(Start) > Devices and Printers > Printers and Faxes.- Windows 8Move your mouse to the lower right corner of your desktop.When the menu bar appears, clickSettings > Control Panel.In theHardware and Soundgroup, clickView devices and printers> Printers.- Windows 10 and Windows Server 2016Click>Windows System > Control Panel. In theHardware and Soundgroup, clickView devices and printers> Printers.- Windows Server 2008ClickStart > Control Panel> Printers.- Windows Server 2012Move your mouse to the lower right corner of your desktop.When the menu bar appears, clickSettings > Control Panel.In theHardware group, clickView devices and printers> Printers.- Windows Server 2012 R2ClickControl Panelon theStartscreen. In theHardware group, clickView devices and printers.- macOS v10.10.5, v10.11.x, v10.12.xClickSystem Preferences> Printers & Scanners. | Wired/Wireless |
| Your Brother machine is not connected to the wireless network. | Print the WLAN Report to check the error code on the printed report. | Wireless |
If you have checked and tried all of the above, but your Brother machine still cannot print, uninstall the printer driver and reinstall it.

Related Information
• Network Problems
Related Topics:
• Print the WLAN Report
• Wireless LAN Report Error Codes
- Use the Network Connection Repair Tool (Windows)
• I Want to Check that My Network Devices are Working Correctly
Home > Troubleshooting > Network Problems > I Want to Check that My Network Devices are Working Correctly
I Want to Check that My Network Devices are Working Correctly
| Check | Action | Interface |
| Check that your Brother machine, access point/ router, or network hub is turned on. | Check the following:The power cord is connected correctly and the Brother machine is turned on.The access point/router or hub is turned on and its link button is blinking.All protective packaging has been removed from the machine.The toner cartridge and drum unit are installed correctly.The front and back covers are fully closed.Paper is inserted correctly in the paper tray.(For wired networks) A network cable is securely connected to the Brother machine and to the router or hub. | Wired/Wireless |
| Check the Link Status in the Network Configuration Report or the Printer Settings page. | Print the Network Configuration Report and check that Ethernet Link Status or Wireless Link Status is Link OK. | Wired/Wireless |
| Check that you can "ping" the Brother machine from your computer. | Ping the Brother machine from your computer using the IP address or the node name in the Windows command prompt or Mac Terminal application:pingor. Successful: Your Brother machine is working correctly and connected to the same network as your computer.Unsuccessful: Your Brother machine is not connected to the same network as your computer.(Windows)Ask the network administrator and use the Network Connection Repair Tool to fix the IP address and the subnet mask.(Mac)Confirm that the IP address and the Subnet Mask are set correctly. | Wired/Wireless |
| Check that your Brother machine is connected to the wireless network. | Print the WLAN Report to check the error code on the printed report. | Wireless |
If you have checked and tried all of the above but you are still having problems, see the instructions supplied with your wireless LAN access point/router to find the SSID and the Network Key information and set them correctly.

Related Information
• Network Problems
• Print the Network Configuration Report
• Print the WLAN Report
• Wireless LAN Report Error Codes
• Use the Network Connection Repair Tool (Windows)
• My Brother Machine Cannot Print over the Network
Related Topics:
Google Cloud Print Problems
| Difficulty | Suggestions |
| My Brother machine is not displayed in the printer list. | Make sure your machine is turned on. |
| Confirm that Google Cloud PrintTM is enabled. | |
| Confirm that your machine is registered with Google Cloud PrintTM. If it is not registered, try to register again. | |
| I cannot print. | Make sure your machine is turned on. |
| Confirm your network settings. See Related Information. | |
| Certain files may not be printable, or may not appear exactly as they are displayed. | |
| I cannot register my Brother machine with Google Cloud PrintTM. | Make sure your machine is connected to a network with Internet access. |
| Verify that the date and time are set correctly on your machine. | |
| I do not see a confirmation message on my Brother machine when I try to register with Google Cloud PrintTM, even after repeating the registration steps. | Make sure your Brother machine is idle while you are registering with Google Cloud PrintTM. |

Related Information
- Troubleshooting
Related Topics:
• Network Settings for Using Google Cloud Print
AirPrint Problems
| Difficulty | Suggestions |
| My Brother machine is not displayed in the printer list. | Make sure your Brother machine is turned on. |
| Confirm the network settings. See Related Information. | |
| Move the mobile device closer to the wireless access point/router, or to your Brother machine. | |
| I cannot print. | Make sure your Brother machine is turned on. |
| Confirm the network settings. See Related Information. | |
| I am trying to print a multiple-page document from an iOS device, but ONLY the first page is printing. | Make sure you are running the latest OS version.Refer to the following Apple support article for more information about AirPrint:support.apple.com/kb/HT4356. |

Related Information
- Troubleshooting
Related Topics:
- AirPrint Overview
Other Problems
| Difficulties | Suggestions |
| The machine will not turn on. | Adverse conditions on the power connection (such as lightning or a power surge) may have triggered the machine's internal safety mechanisms. Unplug the power cord. Wait for ten minutes, then plug in the power cord and press ⏻ to turn on the machine.If the problem is not solved and you are using a power breaker, disconnect it to make sure it is not the problem. Plug the machine's power cord directly into a different known working wall electrical socket. If there is still no power, try a different power cable. |
| The Brother software cannot be installed. | (Windows)If the Security Software warning appears on the computer screen during the installation, change the Security Software settings to permit the Brother product setup program or other program to run.(Mac)If you are using a firewall function of anti-spyware or antivirus security software, temporarily disable it and then install the Brother software. |

Related Information
- Troubleshooting
Machine Information
- Check the Serial Number
- Check the Firmware Version
- Reset Functions Overview
- Reset Your Brother Machine
Home > Troubleshooting > Machine Information > Check the Serial Number
Check the Serial Number
- Press ▲ or ▼ to select the [Machine Info.] option, and then press OK.
- Press ▲ or ▼ to select the [Serial No.] option, and then press OK.
The machine displays the serial number on the LCD.

Related Information
• Machine Information
Home > Troubleshooting > Machine Information > Check the Firmware Version
Check the Firmware Version
- Press ▲ or ▼ to display the [Machine Info.] option, and then press OK.
- Press ▲ or ▼ to display the [Firmware Version] option, and then press OK.
The machine displays the firmware version on the LCD.

Related Information
• Machine Information
Reset Functions Overview
The following reset functions are available:

Unplug the interface cable before you choose Network Settings Reset function or Factory Reset function.

Subdivided reset functions are not available for some models.
- Machine Reset
This function resets the following settings:
-
Setting Lock
• Language Setting -
Network Settings Reset (For Network Models)
Reset the print server back to its default factory settings (includes Password and IP Address information).
- Factory Reset
Brother strongly recommends you perform this operation when you dispose of the machine.

Related Information
• Machine Information
▲ Home > Troubleshooting > Machine Information > Reset Your Brother Machine
Reset Your Brother Machine
- Press ▲ or ▼ to display the [Initial Setup] option, and then press OK.
- Press ▲ or ▼ to display the [Reset] option, and then press OK.
- Press ▲ or ▼ to choose the type of reset you want to perform, and then press OK.
- Press ▼.
- Press ▼ for [Yes].
The machine will restart.

Related Information
• Machine Information
Routine Maintenance
- Replace Supplies
- Clean the Machine
• Check the Remaining Part Life
• Pack and Ship Your Brother Machine
Replace Supplies
You must replace supplies when the machine indicates that the life of the supply is over.
Using non-Brother supplies may affect the print quality, hardware performance, and machine reliability. The toner cartridge and drum unit are two separate supplies. Make sure both are installed as an assembly. The model name of supplies may vary depending on the country.
NOTE
- Be sure to seal up the used supplies tightly in a bag so that toner powder does not spill out of the cartridge.
- Visit www.brother.com/original/index.html for instructions on how to return your used supplies to the Brother collection and recycling program. If you choose not to return your used supply, discard the used supply according to local regulations, keeping it separate from domestic waste. If you have questions, contact your local waste disposal office.
- We recommend placing used and new supplies on a piece of paper to prevent accidentally spilling or scattering the material inside.
- If you use paper that is not a direct equivalent for the recommended print media, the life of supplies and machine parts may be reduced.
- The projected life for each of the toner cartridges is based on ISO/IEC 19752. Frequency of replacement will vary depending on the print volume, percentage of coverage, types of media used, and powering on/off the machine.
- Frequency of replacing supplies except toner cartridges will vary depending on the print volume, types of media used, and powering on/off the machine.
- Handle the toner cartridge carefully. If toner scatters on your hands or clothes, immediately wipe or wash it off with cold water.
IMPORTANT
• To avoid print quality problems, DO NOT touch the shaded parts shown in the illustrations.
Drum unit
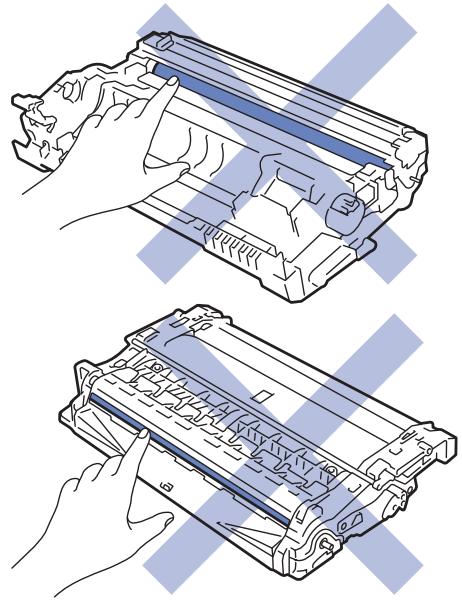
natural_image
Illustration of two hands installing or adjusting a mechanical component, showing internal structure and assembly (no text or symbols)
Related Information
- Routine Maintenance
- Replace the Toner Cartridge
- Replace the Drum Unit
Related Topics:
- Error and Maintenance Messages
- Supplies
Replace the Toner Cartridge
- Make sure the machine is turned on.
- Open the front cover.

natural_image
Illustration of hands inserting a folder into a printer case, with a blue arrow indicating the direction (no text or symbols present)- Remove the toner cartridge and drum unit assembly from the machine.

natural_image
Diagram of a printer internal structure showing paper feeding into a paper holder (no text or symbols present)- Push down the green lock lever, and then take the toner cartridge out of the drum unit as shown in the illustration.
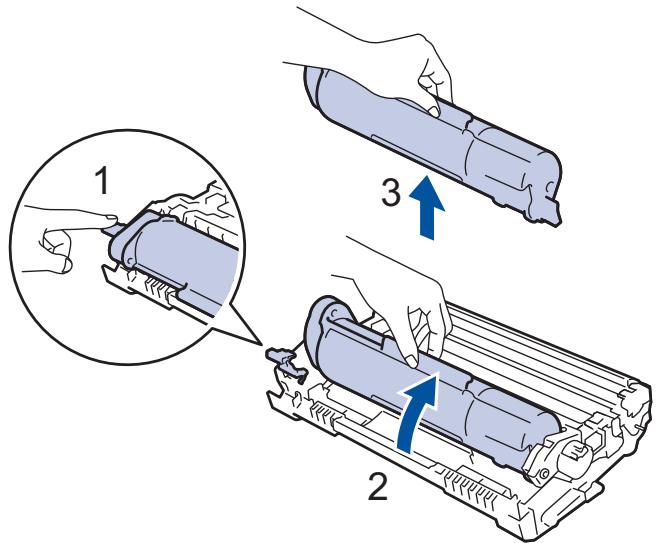

To avoid staining toner on your hands or clothes, DO NOT touch the shaded parts shown in the illustrations.

natural_image
Technical line drawing of a mechanical component with an inset magnified view showing internal components (no text or symbols)- Unpack the new toner cartridge.
- Push the new toner cartridge firmly into the drum unit until you hear it lock into place.
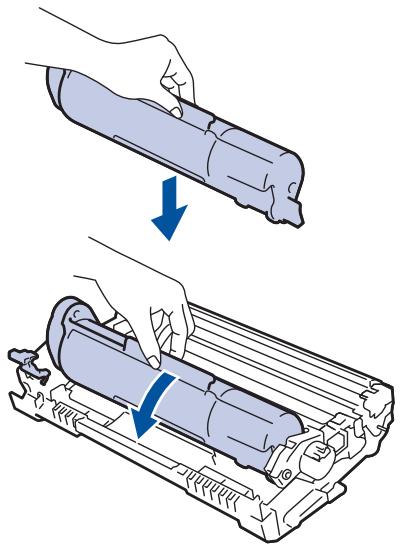
natural_image
Illustration showing a hand holding a cylindrical device being inserted into a tray, with no visible text or symbols.
Make sure you put the toner cartridge in correctly or it may separate from the drum unit.
- Clean the corona wire inside the drum unit by gently sliding the green tab from left to right and right to left several times.

natural_image
Illustration of a hand inserting a component into a cylindrical device, showing internal components and a blue arrow indicating direction (no text or symbols present)
Be sure to return the tab to the Home position (▲). The arrow on the tab must be aligned with the arrow on the drum unit. If it is not, printed pages may have a vertical stripe.
- Install the toner cartridge and drum unit assembly back into the machine.

natural_image
Illustration of a printer's internal structure with a blue arrow indicating the paper feed (no text or symbols present)- Close the front cover of the machine.

- Do not turn off the machine or open the front cover until the machine returns to Ready Mode.
- The toner cartridge that comes with your Brother machine is a Inbox toner cartridge.
- It is a good idea to keep a new toner cartridge ready for use when you see the Toner Low warning.
- To ensure high quality printing, we recommend using only Brother Original toner cartridges. When you want to buy toner cartridges, contact your Brother Dealer.
• DO NOT unpack the new toner cartridge until you are ready to install it. - If a toner cartridge is left unpacked for a long time, the toner life will be shortened.
- Brother strongly recommends you DO NOT refill the toner cartridge provided with your machine. We also strongly recommend you continue to use only Brother Original replacement toner cartridges. Use or attempted use of third party toner and/or cartridges in the Brother machine may cause damage to the machine and/or may result in unsatisfactory print quality. Our limited warranty coverage does not apply to any problem that is caused by the use of third party toner and/or cartridges. To protect your investment and obtain premium performance from the Brother machine, we strongly recommend the use of Brother Original Supplies.

Related Information
- Replace Supplies
- Improve the Print Quality
Related Topics:
Replace the Drum Unit
- Make sure the machine is turned on.
- Open the front cover.

natural_image
Illustration of hands inserting a folder into a printer case, with a blue arrow indicating the direction (no text or symbols present)- Remove the toner cartridge and drum unit assembly from the machine.
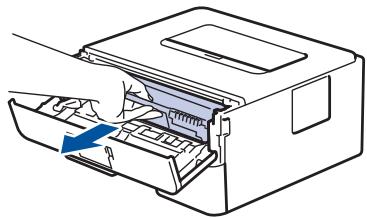
natural_image
Diagram of a printer internal structure showing paper feeding into a paper holder (no text or symbols)- Push down the green lock lever, and then take the toner cartridge out of the drum unit as shown in the illustration.


To avoid staining toner on your hands or clothes, DO NOT touch the shaded parts shown in the illustrations.
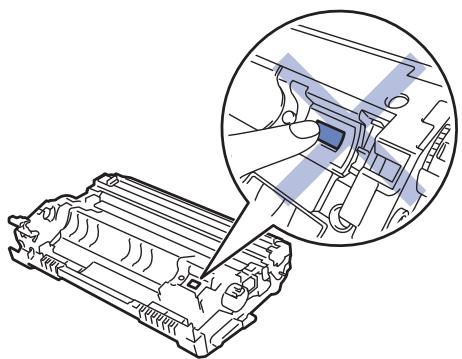
natural_image
Technical line drawing of a mechanical component with an inset magnified view showing internal components (no text or symbols)- Unpack the new drum unit.
- Push the toner cartridge firmly into the new drum unit until you hear it lock into place.

natural_image
Illustration showing a hand holding a cylindrical device being inserted into a tray, with no text or symbols present.
Make sure you put the toner cartridge in correctly or it may separate from the drum unit.
- Install the toner cartridge and drum unit assembly back into the machine.

natural_image
Diagram of a printer's internal structure showing paper feed and paper tray (no text or labels)- Close the front cover of the machine.
NOTE
- Drum wear and tear occurs due to use and rotation of the drum and interaction with paper, toner and other materials in the paper path. In designing this product, Brother decided to use the number of rotations of the drum as a reasonable determinant of the drum life. When a drum reaches the factory-established rotation limit corresponding to the rated page yield, the product's LCD will advise you to replace the drum. The product will continue to function; however, print quality may not be optimal.
- If an unpacked drum unit is placed in direct sunlight (or room light for long periods of time), the unit may be damaged.
- There are many factors that determine the actual drum life, such as the temperature, humidity, type of paper, type of toner used and so on. Under ideal conditions, the average drum life is estimated at approximately 12,000 pages (based on 1 page per job [A4/Letter single-sided pages]). The number of pages may be affected due to a variety of factors including but not limited to media type and media size.
Because we have no control over the many factors that determine the actual drum life, we cannot guarantee a minimum number of pages that will be printed by your drum.
• For best performance, use only Brother Original toner. - The machine should be used only in a clean, dust-free environment with adequate ventilation.
- Printing with a non-Brother drum unit may reduce not only the print quality but also the quality and life of the machine itself. Warranty coverage does not apply to problems caused by the use of a non-Brother drum unit.

Related Information
- Replace Supplies
Related Topics:
- Error and Maintenance Messages
- Improve the Print Quality
Clean the Machine
Clean the outside and inside of the machine regularly with a dry, lint-free cloth.
When you replace the toner cartridge or the drum unit, make sure you clean the inside of the machine. If printed pages are stained with toner, clean the inside of the machine with a dry, lint-free cloth.

WARNING
- DO NOT use flammable substances, any type of spray, or an organic solvent/liquid containing alcohol or ammonia to clean the inside or outside of the product. Doing so could cause a fire. Instead, use only a dry, lint-free cloth.


IMPORTANT
• DO NOT use isopropyl alcohol to remove dirt from the control panel. It may crack the panel.
• To avoid print quality problems, DO NOT touch the shaded parts shown in the illustrations.
Drum unit
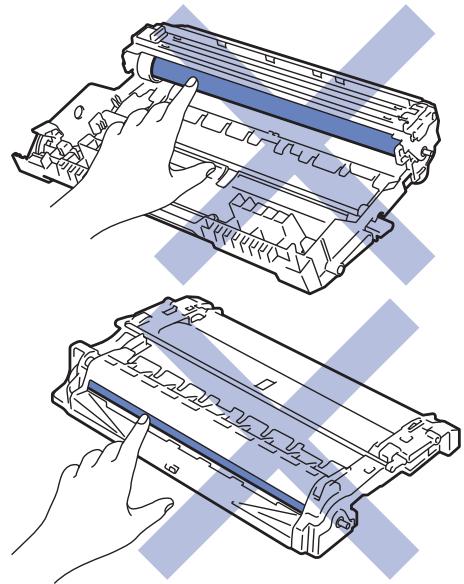
natural_image
Illustration of two hands installing or adjusting a mechanical component, showing internal structure and assembly (no text or symbols)
Related Information
- Routine Maintenance
- Clean the Corona Wire
- Clean the Drum Unit Using Drum Dot Print
- Clean the Paper Pick-up Rollers
Clean the Corona Wire
If you have print quality problems or the control panel displays [Drum !] status, clean the corona wire.
- Open the front cover.
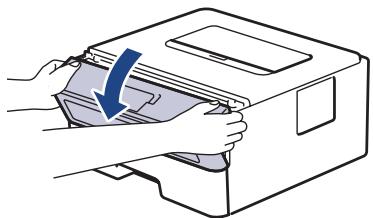
natural_image
Illustration of hands inserting a file into a paper airplane (no text or symbols)- Remove the toner cartridge and drum unit assembly from the machine.

natural_image
Diagram of a printer with internal components and a blue arrow indicating a loading or movement (no text or symbols present)- Clean the corona wire inside the drum unit by gently sliding the green tab from left to right and right to left several times.
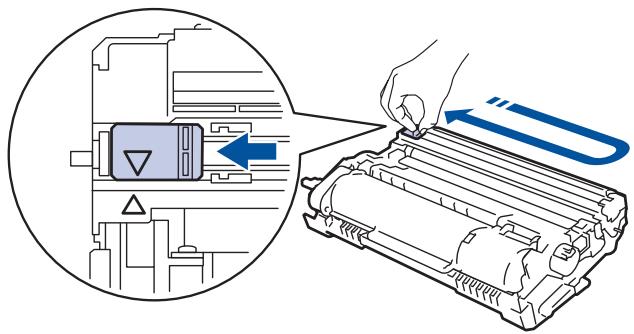
natural_image
Illustration of a printer's internal structure being inserted into a physical device, with no visible text or symbols.
Be sure to return the tab to the Home position (▲). The arrow on the tab must be aligned with the arrow on the drum unit. If it is not, printed pages may have a vertical stripe.
- Install the toner cartridge and drum unit assembly back into the machine.
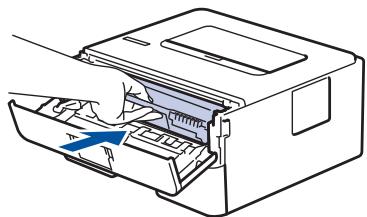
natural_image
Diagram of a printer internal structure showing paper feed and paper tray (no text or symbols)- Close the front cover of the machine.

Related Information
- Clean the Machine
Related Topics:
- Error and Maintenance Messages
Clean the Drum Unit Using Drum Dot Print
If your printout has dots or other repeating marks at 94 mm intervals, the drum may have foreign material, such as glue from a label, stuck on the drum surface.
- Make sure the machine is in Ready mode.
- Press ▲ or ▼ to display the [Print Reports] option, and then press OK.
-
Press ▲ or ▼ to select the [Drum Dot Print] option.
-
Press Go.
The machine prints the Drum Dot Check Sheet.
-
Press and hold ⏻ to turn the machine off.
-
Open the front cover.

natural_image
Illustration of hands inserting a paper into a filing cabinet (no text or symbols)- Remove the toner cartridge and drum unit assembly from the machine.
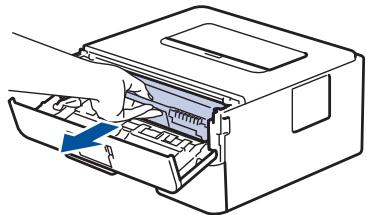
natural_image
Diagram of a printer internal structure showing paper feed and paper tray (no text or symbols)- Turn the drum unit as shown in the illustration. Make sure that the drum unit gear is on the left side.
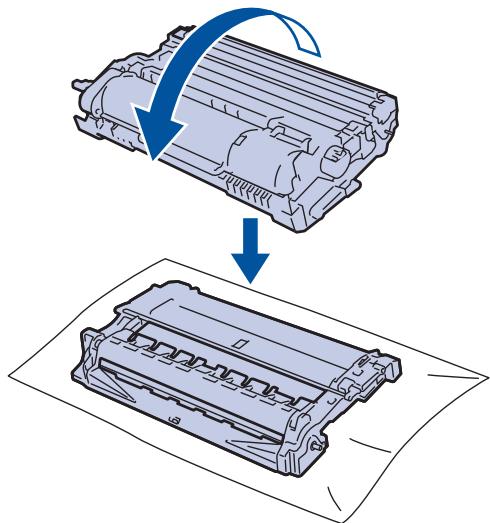
natural_image
Diagram showing a mechanical component being processed into a plastic housing, with no visible text or symbols.- Use the numbered markers next to the drum roller to find the mark on the drum. For example, a dot in column 2 on the check sheet means that there is a mark in drum region "2".
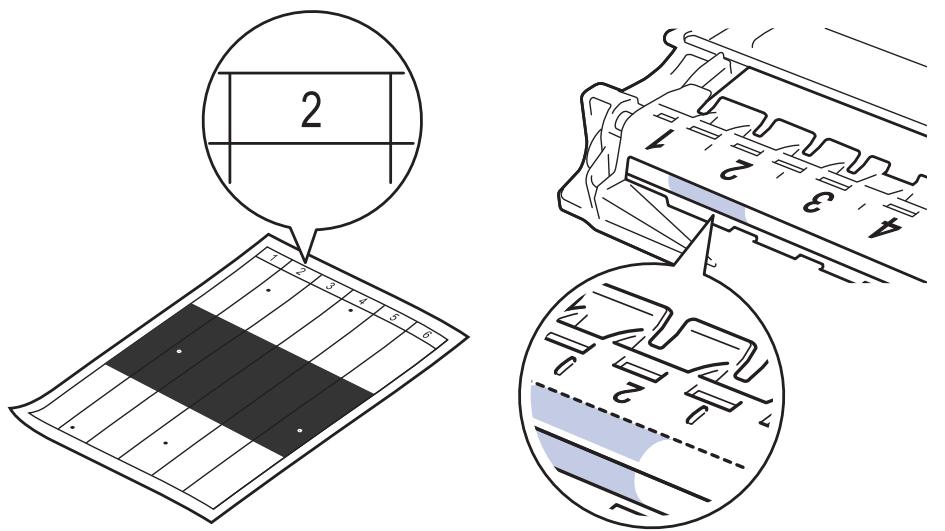
- Rotate the wheel at the end of the drum unit while pushing the shaded part, as shown in the illustration, to find the mark or foreign material.
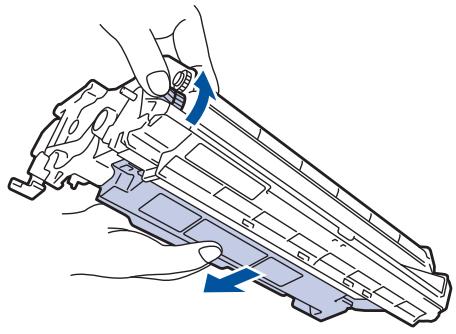
natural_image
Diagram of a hand holding a mechanical component with blue arrows indicating direction (no text or symbols present)IMPORTANT
- To avoid print quality problems, DO NOT touch the surface of the drum unit, only the wheel on the end.
- Wipe the surface of the drum gently with a dry cotton swab until the mark or foreign material on the surface comes off.
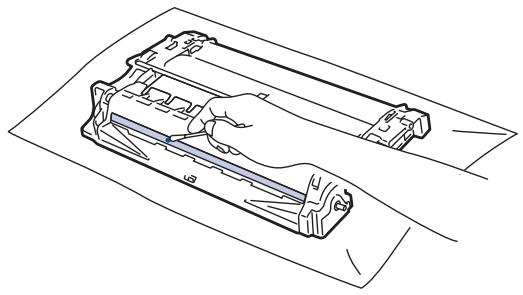
natural_image
Line drawing of a hand holding a mechanical component, no text or symbols presentNOTE
DO NOT clean the surface of the photosensitive drum with a sharp object or any liquids.
- Install the toner cartridge and drum unit assembly back into the machine.

natural_image
Diagram of a printer's internal structure showing paper feeding into a paper airplane (no text or symbols present)- Close the front cover of the machine.
- Press ⏻ to turn the machine on.

Related Information
- Clean the Machine
- Improve the Print Quality
Related Topics:
Clean the Paper Pick-up Rollers
Cleaning the paper pick-up rollers periodically may prevent paper jams by ensuring that paper feeds properly.
If you have paper feed problems, clean the pick-up rollers as follows:
-
Press and hold ⏻ to turn the machine off.
-
Pull the paper tray completely out of the machine.
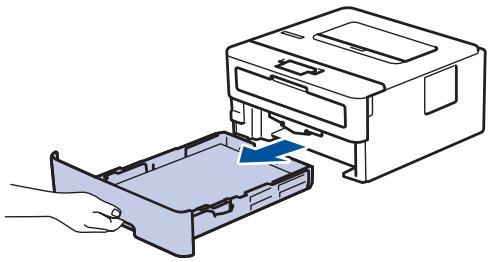
natural_image
Illustration of a printer being inserted into a plastic case, with a hand holding the case (no text or symbols present)-
If paper is loaded or something is stuck inside in the paper tray, remove it.
-
Tightly wring out a lint-free cloth soaked in lukewarm water, and then wipe the separator pad on the paper tray to remove dust.
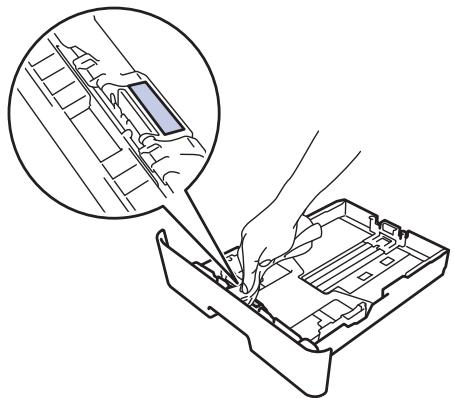
natural_image
Illustration of hands installing or adjusting a mechanical component into a plastic housing (no text or symbols visible)- Wipe the two pick-up rollers inside the machine to remove dust.
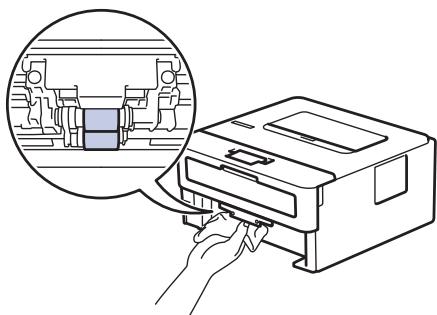
natural_image
Illustration of a hand inserting a printer into a machine, with an inset showing a printer inside (no text or symbols present)-
Reload the paper and put the paper tray firmly back in the machine.
-
Press ⏻ to turn the machine on.

Related Information
- Clean the Machine
Related Topics:
- Printing Problems
Home > Routine Maintenance > Check the Remaining Part Life
Check the Remaining Part Life
- Press ▲ or ▼ to display the [Machine Info.] option, and then press OK.
- Press ▲ or ▼ to select the [Parts Life] option, and then press OK.
- Press ▲ or ▼ to select the machine part you want to check, and then press OK.
The LCD displays the approximate remaining part life.

Related Information
• Routine Maintenance
Pack and Ship Your Brother Machine

- If for any reason you must ship your machine, carefully repack the machine in the original packaging to avoid any damage during transit. The machine should be adequately insured with the carrier.
- Press and hold ⏻ to turn the machine off. Leave the machine off for at least 10 minutes to cool down.
- Disconnect all the cables, and then unplug the power cord from the electrical socket.

Some models are equipped with a non-detachable AC power cord. If your cord is not detachable, fold it loosely and rest it on top of the machine so it packs easily.
- Put the machine into the bag it originally came in.
- Pack the machine, the printed materials, and the AC power cord (if applicable) in the original carton with the original packing material as shown. The illustrations may differ from the actual packing materials. The materials vary depending on your model.
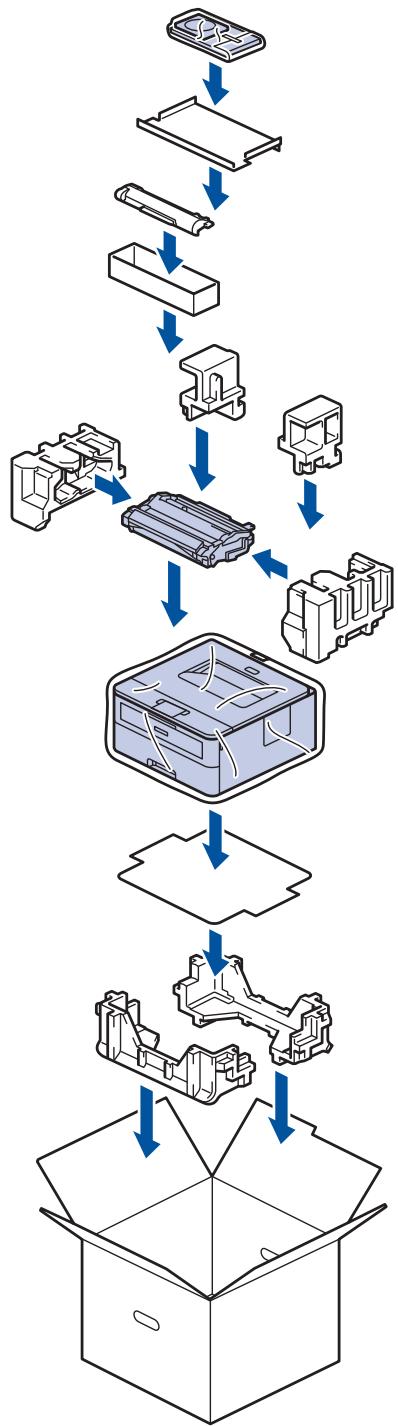
flowchart
graph TD
    A["Raw Material Inspection"] --> B["Packaging"]
    B --> C{Material Inspection}
    C -->|Blue Arrow Down| D["Assembly"]
    C -->|Blue Arrow Up| E["Product Packaging"]
    E --> F["Final Box with Packaging"]
    F --> G["Final Box with Component"]
    G --> H["Final Box with Component"]
    H --> I["Final Box with Component"]
- Close the carton and tape it shut.

Related Information
• Routine Maintenance
Machine Settings
Customise settings and features, create shortcuts, and work with options displayed on the machine's LCD to make your Brother machine a more efficient work tool.
- Change Machine Settings from the Control Panel
• Print a List of Printer Settings
• Change Machine Settings from Your Computer
Change Machine Settings from the Control Panel
- General Settings
- Menu Table (for LCD Models)
General Settings
- Set Sleep Mode Countdown
• About Deep Sleep Mode - Set Auto Power Off Mode
- Reduce Toner Consumption
- Reduce Printing Noise
• Change the Language on the LCD
Home > Machine Settings > Change Machine Settings from the Control Panel > General Settings > Set Sleep Mode Countdown
Set Sleep Mode Countdown
The Sleep Mode (or Power Save Mode) setting can reduce power consumption. Select how long the machine must be idle before it goes into Sleep Mode. The Sleep Mode timer is reset when the machine receives a print job.
When the machine is in Sleep Mode, it acts as if it is turned off. The machine will wake up and start printing when it receives a print job. Use these instructions to set a time delay (countdown) before the machine enters Sleep Mode.
- Press ▲ or ▼ to select the [General Setup] option, and then press OK.
- Press ▲ or ▼ to select the [Ecology] option, and then press OK.
- Press ▲ or ▼ to select the [Sleep Time] option, and then press OK.
- Press ▲ or ▼ to enter the length of time, in minutes, that the machine should remain idle before entering Sleep Mode.
Press Go.

Related Information
- General Settings
▲ Home > Machine Settings > Change Machine Settings from the Control Panel > General Settings > About Deep Sleep Mode
About Deep Sleep Mode
If the machine is in Sleep mode and does not receive any jobs for certain length of time, the machine will automatically enter Deep Sleep mode. The length of time is based on your specific model and settings.
Deep Sleep mode uses less power than Sleep mode.
| Applicable Models | Machine's Control Panel in Deep Sleep Mode | Conditions That Will Wake the Machine |
| HL-B2080DW | The LCD displays Deep Sleep. | The machine receives a job.Someone presses a button on the control panel. |

Related Information
- General Settings
Home > Machine Settings > Change Machine Settings from the Control Panel > General Settings > Set Auto Power Off Mode
Set Auto Power Off Mode
If the machine is in Deep Sleep Mode for certain length of time, based on your model and settings, the machine will go into Power Off Mode automatically. The machine does not go into Power Off Mode when the machine is connected to a network.
• To start printing, press ⏻ on the control panel and then send a print job.

Select how long the machine must be in Deep Sleep Mode before it goes into Auto Power Off Mode.
- Press ▲ or ▼ to display the [General Setup] option, and then press OK.
- Press ▲ or ▼ to display the [Ecology] option, and then press OK.
- Press ▲ or ▼ to select the [Auto Power Off] option, and then press OK.
- Press ▲ or ▼ to select the option you want, and then press Go.

Related Information
- General Settings
Home > Machine Settings > Change Machine Settings from the Control Panel > General Settings > Reduce Toner Consumption
Reduce Toner Consumption
Using the Toner Save feature may reduce toner consumption. When Toner Save is set to on, the print on your documents appears lighter.
We DO NOT recommend using the Toner Save feature for printing photo or greyscale images.
- Press ▲ or ▼ to display the [General Setup] option, and then press OK.
- Press ▲ or ▼ to display the [Ecology] option, and then press OK.
- Press ▲ or ▼ to display the [Toner Save] option, and then press OK.
- Press ▲ or ▼ to display [On], and then press Go.

Related Information
- General Settings
- Improve the Print Quality
Related Topics:
Home > Machine Settings > Change Machine Settings from the Control Panel > General Settings > Reduce Printing Noise
Reduce Printing Noise
The Quiet Mode setting can reduce printing noise. When Quiet Mode is turned on, the print speed becomes slower. The factory setting is off.
- Press ▲ or ▼ to display the [General Setup] option, and then press OK.
- Press ▲ or ▼ to display the [Ecology] option, and then press OK.
- Press ▲ or ▼ to select the [Quiet Mode] option, and then press OK.
- Press ▲ or ▼ to display the [On] or [Off] option, and then press Go.

Related Information
- General Settings
Home > Machine Settings > Change Machine Settings from the Control Panel > General Settings > Change the Language on the LCD
Change the Language on the LCD
Change the LCD language if needed.
This feature is not available in some countries.
- Press ▲ or ▼ to display the [Initial Setup] option, and then press OK.
- Press ▲ or ▼ to display the [Local Language] option, and then press OK.
- Press ▲ or ▼ to display your language, and then press Go.

Related Information
- General Settings
Home > Machine Settings > Change Machine Settings from the Control Panel > Menu Table (for LCD Models)
Menu Table (for LCD Models)
- Settings Tables
Settings Tables
Use these tables to understand the various menus and options that you will use to set your preferences on the machine.
[General Setup]
| Level 1 | Level 2 | Level 3 | Description |
| Tray Setting | Paper Type | - | Set the type of paper in the paper tray. |
| Paper Size | - | Set the size of paper. | |
| Check Size | - | Select whether to display a message telling you to check that the size of the paper in the machine and the machine's Paper Size setting match. | |
| Manual Feed | - | Select whether to print from the Manual Feed Slot. | |
| Resolution | - | - | Choose a print resolution. |
| Density | - | - | Increase or decrease the print density. |
| Ecology | Eco Mode | - | Turn the following machine settings on at the same time.2-sided Print: Long Edge(Available only for certain models)Sleep Time:0Min |
| Toner Save | - | Increase the page yield of the toner cartridge. | |
| Sleep Time | - | Set how much time will pass before the machine enters Power Saving mode. | |
| Quiet Mode | - | Decrease printing noise. | |
| Auto Power Off | - | Set the number of hours that the machine will remain in Deep Sleep mode before going into Power Off mode. | |
| Panel Control | Button Repeat | - | Set the time for the LCD message to change when holding ▲ or ▼ at intervals. |
| Message Scroll | - | Set the time in seconds that an LCD message will scroll across the LCD. From Level 1=0.2 sec to Level 10=2.0 sec. | |
| LCD Contrast | - | Adjust the contrast of the LCD. | |
| Auto Online | - | Set the machine to return to Ready mode after it has been idle for 30 seconds. | |
| Setting Lock | - | - | Lock your machine's settings using the Setting Lock password. |
| Interface | Select | - | Select the interface to use.If you select Auto, the machine changes the interface to USB or Network depending on which interface is receiving data. |
| Auto IF Time | - | Set the time-out period for the auto interface selection. | |
| Input Buffer | - | Increase or decrease the input buffer capacity. |
[Printer]
For Printer Emulation Supported models
| Level 1 | Level 2 | Description |
| Print Options | Font List | Print the font list and samples. |
| Test Print | Print a test page. | |
| 2-sided | 2-sided Print | Turn 2-sided printing off or on and select flip on long edge or short edge. |
| Level 1 | Level 2 | Description |
| (For automatic 2-sided printing models) | Single Image | For a print job where the last page is a 1-sided image, select the 1-sided Feed option to reduce printing time. |
| Auto Continue | - | Select if you want the machine to clear paper size errors or media type errors automatically. |
| Paper Type | - | Set the type of paper. |
| Paper Size | - | Set the size of paper. |
| Copies | - | Set the number of printed pages. |
| Orientation | - | Set pages to print in either portrait or landscape orientation. |
| Print Position | X Offset | Move the print start position (at the top-left corner of pages) horizontally up to -500 (left) to +500 (right) dots in 300 dpi. |
| Y Offset | Move the print start position (at the top-left corner of pages) vertically up to -500 (up) to +500 (down) dots in 300 dpi. | |
| Auto FF | - | Allow the machine to print any remaining data automatically. |
| HP LaserJet | Font No. | Set the font number. |
| Font Pitch | Set the font pitch.The Font Pitch menu appears when you choose I012 to I018, I031 to I037 or I097 to I109 in Font No. setting. | |
| Font Point | Set the font size.The Font Point menu appears when you choose I000 to I011, I019 to I030 or I038 to I096 in Font No. setting. | |
| Symbol Set | Select the symbol or character set. | |
| Table Print | Print the code table. | |
| Auto LF | ON: CR -> CR+LF, OFF: CR -> CR | |
| Auto CR | ON: LF -> LF+CR, FF -> FF+CR, or VT -> VT+CROFF: LF -> LF, FF -> FF, or VT -> VT | |
| Auto WRAP | Choose whether a line feed and carriage return will happen when the machine reaches the right margin. | |
| Auto SKIP | Choose whether a line feed and carriage return will happen when the carriage position reaches the bottom margin. | |
| Left Margin | Set the left margin at column 0 to 70 columns at 1 cpi. | |
| Right Margin | Set the right margin at column 10 to 80 columns at 1 cpi. | |
| Top Margin | Set the top margin distance from the top edge of the paper. | |
| Bottom Margin | Set the bottom margin distance from the bottom edge of the paper. | |
| Lines | Set the number of lines on each page. | |
| Tray Command | Select this setting if a tray mismatch appears when you use the HP drivers. |
All other models
| Level 1 | Level 2 | Description |
| Test Print | - | Print a test page. |
| 2-sided(For automatic 2-sided printing models) | 2-sided Print | Turn 2-sided printing off or on and select flip on long edge or short edge. |
| Single Image | For a print job where the last page is a 1-sided image, select the 1-sided Feed option to reduce printing time. | |
| Auto Continue | - | Select if you want the machine to clear paper size errors or media type errors automatically. |
| Print Position | X Offset | Move the print start position (at the top-left corner of pages) horizontally up to -500 (left) to +500 (right) dots in 300 dpi. |
| Y Offset | Move the print start position (at the top-left corner of pages) vertically up to -500 (up) to +500 (down) dots in 300 dpi. |
[Network] (HL-B2080DW)
1 On connection to the network, if the machine's 'Boot Method' is 'Auto' the machine will attempt to set the IP address and Subnet Mask from a boot server such as DHCP. If a boot server cannot be found, an APIPA IP address will be allocated, such as 169. 254. [001-254]. [000-255]. If the 'Boot Method' of the machine is set to 'Static' you must manually enter an IP address from the machine's control panel.
| Level 1 | Level 2 | Level 3 | Level 4 | Descriptions |
| Wired LAN | TCP/IP | Boot Method | - | Choose the IP method that best suits your needs. |
| IP Address | - | Enter the IP address. | ||
| Subnet Mask | - | Enter the Subnet mask. | ||
| Gateway | - | Enter the Gateway address. | ||
| Node Name | - | Enter the Node name. | ||
| WINS Config | - | Select the WINS configuration mode. | ||
| WINS Server | Primary | Specify the IP address of the primary WINS server. | ||
| Secondary | Specify the IP address of the secondary WINS server. | |||
| DNS Server | Primary | Specify the IP address of the primary DNS server. | ||
| Secondary | Specify the IP address of the secondary DNS server. | |||
| APIPA | - | Allocate the IP address from the link-local address range automatically ^1 . | ||
| IPv6 | - | Enable or disable the IPv6 protocol. | ||
| Ethernet | - | - | Choose the Ethernet link mode. | |
| Wired Status | - | - | Display the Ethernet link status. | |
| MAC Address | - | - | Display the MAC address of the machine. | |
| Set to Default | - | - | Restore wired network settings of your machine to the factory settings. | |
| Wired Enable | - | - | Turn the wired interface on or off. | |
| WLAN | TCP/IP | Boot Method | - | Choose the IP method that best suits your needs. |
| IP Address | - | Enter the IP address. | ||
| Subnet Mask | - | Enter the Subnet mask. | ||
| Gateway | - | Enter the Gateway address. | ||
| Node Name | - | Enter the Node name. | ||
| WINS Config | - | Select the WINS configuration mode. | ||
| WINS Server | Primary | Specify the IP address of the primary WINS server. | ||
| Secondary | Specify the IP address of the secondary WINS server. | |||
| DNS Server | Primary | Specify the IP address of the primary DNS server. | ||
| Secondary | Specify the IP address of the secondary DNS server. | |||
| WLAN | TCP/IP | APIPA | - | Allocate the IP address from the link-local address range automatically ^1 . |
| IPv6 | - | Enable or disable the IPv6 protocol. | ||
| Setup Wizard | - | - | Configure the wireless network settings using the setup wizard. | |
| WLAN Assistant | - | - | Configure your wireless network settings using the Brother installation disc. | |
| WPS | - | - | Configure your wireless network settings using the one-button push method. | |
| WPS w/PIN Code | - | - | Configure the wireless network settings using WPS with a PIN code. | |
| WLAN Status | Status | - | Display the wireless Ethernet link status. | |
| Signal | - | Display the signal condition. | ||
| Channel | - | Display the channel in use when Status is Active. | ||
| Speed | - | Display the connection speed when Status is Active. | ||
| SSID | - | Display SSID. | ||
| Comm. Mode | - | Display the current Communication mode. | ||
| MAC Address | - | - | Display the MAC address of the machine. | |
| Set to Default | - | - | Restore wireless network settings of your machine to the factory settings. | |
| WLAN Enable | - | - | Turn the wireless interface on or off. | |
| Wi-Fi Direct | Push Button | - | - | Configure your Wi-Fi Direct network settings using the one-button push method quickly. |
| PIN Code | - | - | Configure your Wi-Fi Direct network settings using WPS with a PIN code quickly. | |
| Manual | - | - | Configure your Wi-Fi Direct network settings manually. | |
| Group Owner | - | - | Set your machine as the Group Owner. | |
| Device Info. | Device Name | - | View your machine's device name. | |
| SSID | - | Display the Group Owner's SSID. | ||
| IP Address | - | Display your machine's IP Address. | ||
| Status Info. | Status | - | Display the Wi-Fi Direct network status. | |
| Signal | - | Display the current Wi-Fi Direct network signal strength.When your machine acts as Group Owner, the LCD always displays Strong. | ||
| Channel | - | Display the channel in use when the Status is G/O Active or Client Active. | ||
| Speed | - | Display the connection speed when the Status is G/O Active or Client Active. | ||
| I/F Enable | - | - | Enable or disable the Wi-Fi Direct connection. | |
| Network Reset | - | - | - | Restore all network settings of your machine to the factory settings. |
[Print Reports]
| Level 1 | Level 2 | Description |
| Printer Settings | - | Print the Printer Settings page. |
| Network Config(For network models) | - | Print the Network Configuration Report. |
| Print File List(Available only for certain models) | - | Print a list of data saved in the memory. |
| Drum Dot Print | - | Print the Drum Dot Check Sheet. |
| WLAN Report(For wireless models) | - | Print the wireless LAN connectivity diagnosis result. |
[Machine Info.]
| Level 1 | Level 2 | Description |
| Serial No. | - | Display the machine's serial number. |
| Firmware Version | - | Check your machine's firmware version. |
| Page Counter | - | Display the total printed pages. |
| Parts Life^1 | Toner Life | Display the remaining life of the toner cartridge. |
| Drum Life | Display the remaining life of the drum unit. |
1 Life is approximate and may vary by type of use.
[Initial Setup]
| Level 1 | Level 2 | Description |
| Reset | Machine Reset | Restore all the machine settings that you have changed. |
| Network Reset | Restore all network settings back to the factory settings. | |
| Factory Reset | Restores all the machine's settings to the factory defaults. Perform this operation when you dispose of your machine. | |
| Local Language | - | Select the LCD language for your country. |
![BROTHER HL-B2080DW - [Printer] - 1](/content/2024/11/223887/images/4f5651cdee7615a142970265ab088bf87f8f2f47ec58e6ec8803651546d9faed.jpg)
Related Information
- Menu Table (for LCD Models)
Home > Machine Settings > Print a List of Printer Settings
Print a List of Printer Settings
- Press ▲ or ▼ to display the [Print Reports] option, and then press OK.
- Press ▲ or ▼ to display the [Printer Settings] option, and then press OK.
- Press Go.
The machine prints the Printer Settings.

Related Information
- Machine Settings
Change Machine Settings from Your Computer
- Change Machine Settings Using Web Based Management
• Where Can I Find My Brother Machine's Network Settings?
• Network Management Software and Utilities
Home > Machine Settings > Change Machine Settings from Your Computer > Change Machine Settings Using Web Based Management
Change Machine Settings Using Web Based Management
Web Based Management is a utility that uses a standard web browser to manage your machine using the Hyper Text Transfer Protocol (HTTP) or Hyper Text Transfer Protocol over Secure Socket Layer (HTTPS).
• What is Web Based Management?
- Access Web Based Management
- Set a Login Password for Web Based Management
• Network Management Software and Utilities
Home > Machine Settings > Change Machine Settings from Your Computer > Change Machine Settings Using Web Based Management > What is Web Based Management?
What is Web Based Management?
Web Based Management is a utility that uses a standard web browser to manage your machine using the Hyper Text Transfer Protocol (HTTP) or Hyper Text Transfer Protocol over Secure Socket Layer (HTTPS). Type your machine's IP address into your web browser to access and change your print server settings.

• We recommend Microsoft Internet Explorer 11/Edge for Windows and Safari 9/10 for Mac. Make sure that JavaScript and Cookies are always enabled in whichever browser you use.
- You must use the TCP/IP protocol on your network and have a valid IP address programmed into the print server and your computer.
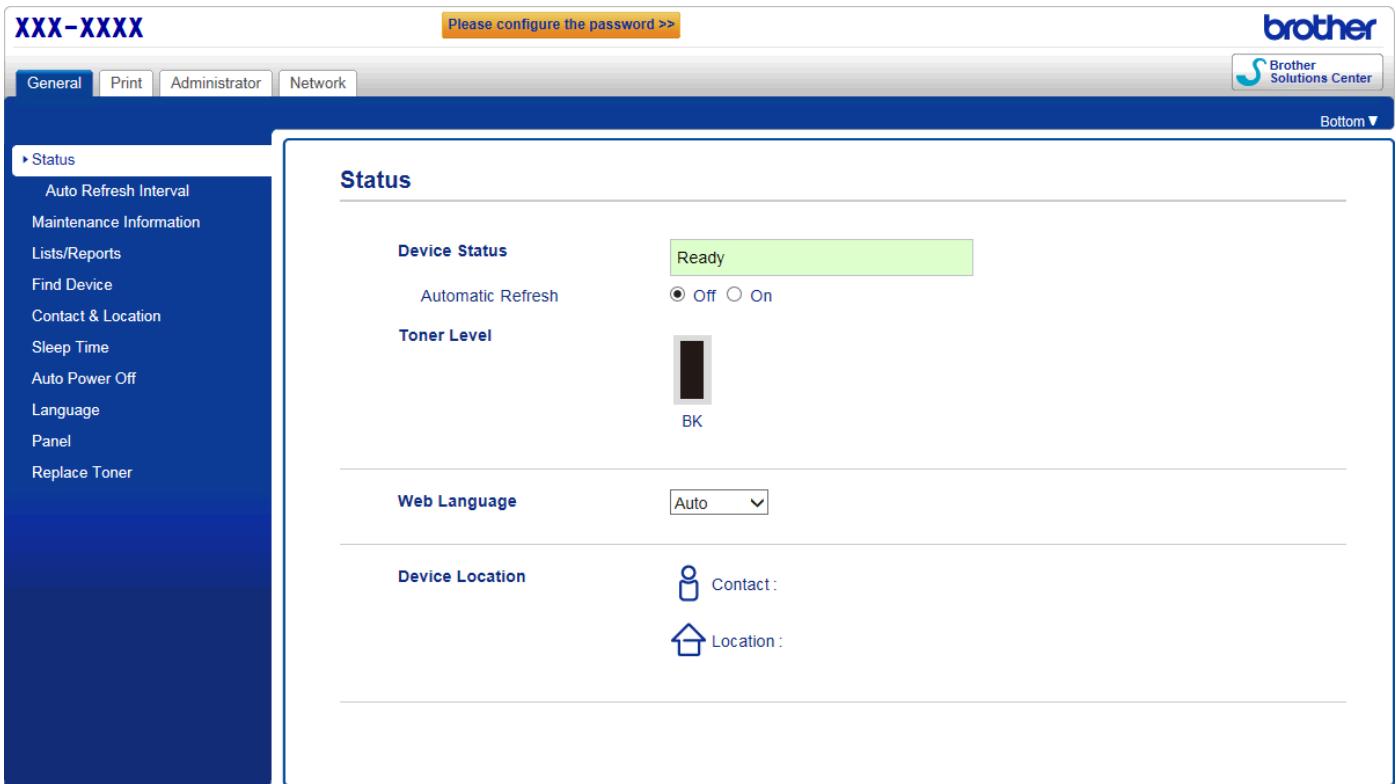
- The actual screen may differ from the screen shown above.

Related Information
- Change Machine Settings Using Web Based Management
Access Web Based Management
- We recommend using the HTTPS security protocol when configuring settings using Web Based Management.
-
When you use HTTPS for Web Based Management configuration, your browser will display a warning dialog box.
-
Start your web browser.
-
Type "http://machine's IP address" in your browser's address bar (where "machine's IP address" is the machine's IP address).
For example:
http://192.168.1.2

- If you are using a Domain Name System or enable a NetBIOS name, you can type another name, such as "SharedPrinter" instead of the IP address.
- For example: http://SharedPrinter
If you enable a NetBIOS name, you can also use the node name.
- For example: http://brnxxxxxxxxxxxxx
The NetBIOS name can be found in the Network Configuration Report.
- For Mac, access Web Based Management by clicking the machine's icon on the Status Monitor screen.
- No password is required by default. Type a password if you have set one, and then click

You can now change the print server settings.
If you change the protocol settings, you must restart the machine after clicking Submit to activate the configuration.

Related Information
- Change Machine Settings Using Web Based Management
Related Topics:
• Print the Network Configuration Report
Set a Login Password for Web Based Management
We recommend setting a login password to prevent unauthorised access to Web Based Management.
- Start your web browser.
- Type "http://machine's IP address" in your browser's address bar (where "machine's IP address" is the machine's IP address).
For example:
http://192.168.1.2

- If you are using a Domain Name System or enable a NetBIOS name, you can type another name, such as "SharedPrinter" instead of the IP address.
- For example: http://SharedPrinter If you enable a NetBIOS name, you can also use the node name.
- For example: http://brnxxxxxxxxxxxxx
The NetBIOS name can be found in the Network Configuration Report.
- For Mac, access Web Based Management by clicking the machine's icon on the Status Monitor screen.
- No password is required by default. Type a password if you have set one, and then click →.
- Click Administrator.
- Type the password you want to use in the Enter New Password field (8 to 32 characters).
- Retype the password in the Confirm New Password field.
- Click Submit.
In the future, every time you access Web Based Management, type the password in the Login field, and then click →.
After configuring the settings, log off by clicking →.

If you have not previously set a login password, you can also set a password by clicking the Please configure the password button on the machine's web page.

Related Information
- Change Machine Settings Using Web Based Management
Appendix
- Specifications
• How to Enter Text on Your Brother Machine - Supplies
• Information Regarding Recycled Paper - Brother Numbers
Specifications
General Specifications
Print Media Specifications
Printer Specifications
Interface Specifications
Supported Protocols and Security Features
Computer Requirements Specifications
General Specifications
| Printer Type | • Laser | ||
| Print Method | • Electrophotographic Laser Printer | ||
| Memory Capacity | Standard | • 64 MB | |
| LCD (Liquid Crystal Display) | • 16 characters x 1 line | ||
| Power Source | • 220 to 240 V AC 50/60 Hz | ||
| Power Consumption(Average) | Peak | • Approximately 1104 W | |
| Printing ^1 | • Approximately 510 W at 25 °C | ||
| Printing(Quiet Mode)^1 | • Approximately 265 W at 25 °C | ||
| Ready ^1 | • Approximately 48 W at 25 °C | ||
| Sleep ^1 | • Approximately 6 W | ||
| Deep Sleep ^1 | • Approximately 0.6 W | ||
| Power Off ^23 | • Approximately 0.03 W | ||
Dimensions(Typical outline view)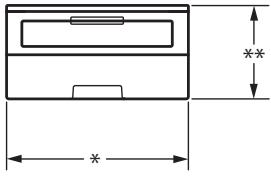 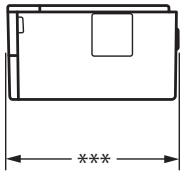 | Unit: mm* : 356** : 183*** : 360 | ||
| Weights (with supplies) | • 7.4 kg | ||
| Noise Level | Sound Pressure | Printing | • LpAm = 49 dB (A) |
| Printing(Quiet Mode) | • LpAm = 44 dB (A) | ||
| Ready | • LpAm = 30.0 dB (A) | ||
| Sound Power | Printing ^4 | • LWAd = 6.66 B (A) | |
| Printing(Quiet Mode) | • LWAd = 6.14 B (A) | ||
| Ready ^4 | • LWAd = Inaudible | ||
| Temperature | Operating | • 10 to 32 °C | |
| Temperature | Storage | 0 to 40 °C | |
| Humidity | Operating | 20 to 80% (without condensation) | |
| Storage | 35 to 85% (without condensation) | ||
Print Media Specifications
| Paper Input | Paper Tray(Standard) | Paper Type | Plain Paper, Thin Paper, Recycled Paper, Thick Paper |
| Paper Size | A4, Letter, A5, A5 (Long Edge), A6, Executive | ||
| Paper Weight | 60 to 163 g/m2 | ||
| Maximum Paper Capacity | Up to 250 sheets of 80 g/m2 Plain Paper | ||
| Manual Feed Slot | Paper Type | Plain Paper, Thin Paper, Thick Paper, Thicker Paper, Recycled Paper, Bond, Label, Envelope, Env. Thin, Env.Thick | |
| Paper Size | Width:76.2 to 215.9 mmLength:127 to 355.6 mmEnvelope:COM-10, DL, C5, Monarch | ||
| Paper Weight | 60 to 230 g/m2 | ||
| Maximum Paper Capacity | One sheet at a time | ||
| Paper Output ^1 | Face Down Output Tray | Up to 150 Sheets of 80 g/m2 Plain Paper (face down delivery to the face down output paper tray) ^2 | |
| Face Up Output Tray | One sheet (face up delivery to the face up output tray) | ||
| 2-sided | Automatic 2-sided Printing | Paper Type | Plain Paper, Thin Paper, Recycled Paper |
| Paper Size | A4 | ||
| Paper Weight | 60 to 105 g/m2 | ||
1 For labels, we recommend removing the printed sheets from the output paper tray immediately after they exit the machine to avoid the possibility of smudging.
2 Calculated with 80 g/m2 in a temperate, non humid environment.
Printer Specifications
| Automatic 2-sided Print | Yes | |
| Emulation | PCL6 | |
| Resolution | 600 x 600 dpi, HQ1200 (2400 x 600 dpi) quality, 1200 x 1200 dpi | |
| Print Speed56 | 1-sided print | Up to 34 pages/minute (A4 size)Up to 36 pages/minute (Letter size) |
| 2-sided Print | Up to 16 sides/minute (Up to 8 sheets/minute) (A4 size)Up to 17 sides/minute (Up to 8.5 sheets/minute) (Letter size) | |
| First Print Time7 | • Less than 8.5 seconds at 23 °C / 230 V | |
Interface Specifications
| USB12 | Hi-Speed USB 2.0Use a USB 2.0 interface cable that is no more than 2.0 metres long. |
| LAN | (HL-B2080DW)10Base-T/100Base-TX3 |
| Wireless LAN | IEEE 802.11b/g/n (Infrastructure Mode)IEEE 802.11g/n (Wi-Fi Direct®) |
1 Your machine has a USB 2.0 Hi-Speed interface. The machine can also be connected to a computer that has a USB 1.1 interface.
2 Third party USB ports are not supported.
3 Use a straight-through Category 5 (or greater) twisted-pair cable.
Supported Protocols and Security Features
Ethernet
10Base-T/100Base-TX
Wireless LAN
IEEE 802.11b/g/n (Infrastructure Mode), IEEE 802.11g/n (Wi-Fi Direct)
Protocols (IPv4)
ARP, RARP, BOOTP, DHCP, APIPA(Auto IP), WINS/NetBIOS name resolution, DNS Resolver, mDNS, LLMNR responder, LPR/LPD, Custom Raw Port/Port9100, SMTP Client, IPP/IPPS, FTP Server, SNMPv1/v2c/v3, HTTP/HTTPS server, TFTP client and server, ICMP, Web Services (Print)
Protocols (IPv6)
NDP, RA, DNS resolver, mDNS, LLMNR responder, LPR/LPD, Custom Raw Port/Port9100, IPP/IPPS, SMTP Client, FTP Server, SNMPv1/v2c/v3, HTTP/HTTPS server, TFTP client and server, ICMPv6, Web Services (Print)
Network Security (Wired)
SMTP-AUTH, SNMP v3, SSL/TLS (SMTP, HTTP, IPP)
Network Security (Wireless)
SMTP-AUTH, SNMP v3, SSL/TLS (SMTP, HTTP, IPP)
Wireless Network Security
WEP 64/128 bit, WPA-PSK (TKIP/AES), WPA2-PSK (TKIP/AES)(Wi-Fi Direct supports WPA2-PSK (AES) only)
Wireless Certification
Wi-Fi Certification Mark License (WPA ^™ /WPA2 ^™ - Personal), Wi-Fi Protected Setup (WPS) Identifier Mark License, Wi-Fi CERTIFIED ^™ Wi-Fi Direct
Computer Requirements Specifications
Supported Operating Systems And Software Functions
| Computer Platform & Operating System Version | PC Interface | Processor | Hard Disk Space to Install | |||
| Parallel (IEEE1284) | USB 1 | 10BASE-T/100BASE-TX (Ethernet) | Wireless 2802.11b/g/n | |||
| Windows Operating System | Windows 7 SP1 / 8 / 8.1 | N/A | Printing | 32 bit (x86) or 64 bit (x64) processor | 80 MB |
| Windows 10 Home / 10 Pro / 10 Education / 10 Enterprise | |||||
| Windows Server 2008 | Printing | ||||
| Windows Server 2008 R2 | 64 bit (x64) processor | ||||
| Windows Server 2012 | |||||
| Windows Server 2012 R2 | |||||
| Windows Server 2016 | |||||
| Mac Operating System | macOS v10.10.5 | Printing | Intel® Processor | 80 MB | |
| macOS v10.11.x | |||||
| macOS v10.12.x |
1 Third party USB ports are not supported.
2 HL-B2080DW
For the latest driver updates, go to your model's Downloads page on the Brother Solutions Center at support.brother.com.
All trademarks, brand and product names are the property of their respective companies.

Related Information
- Appendix
Home > Appendix > How to Enter Text on Your Brother Machine
How to Enter Text on Your Brother Machine
When text is required, enter characters on the machine. The characters that are available may differ depending on the operation you perform.
- Hold down or repeatedly press ▲ or ▼ to select a character from this list:
0123456789abcdefghijklmnopqrstuvwxyzABCDEFGHIJKLMNOPQRSTUVWXYZ(space)!"#\$%&'()*+,-./:;<=>?@[]^_ - Press OK when the character or symbol you want is displayed, and then enter the next character.
- Press Back to delete characters entered incorrectly.

Related Information
- Appendix
- Configure Your Machine for a Wireless Network Using the Machine's Control Panel Setup Wizard
- Configure Your Machine for a Wireless Network When the SSID Is Not Broadcast
Related Topics:
Supplies
When the time comes to replace supplies, such as the toner or drum, an error message will appear on your machine's control panel or in the Status Monitor. For more information about the supplies for your machine, visit www.brother.com/original/index.html or contact your local Brother dealer.

- The Supply Model Name will vary depending on your country and region.
Toner Cartridge
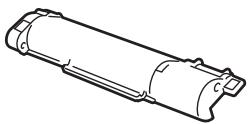
| Supply Model Name | Approximate Life (Page Yield) | Applicable Models |
| TN-B023 | Approximately 2,000 pages12 | HL-B2080DW |
1 Approximate cartridge yield is declared in accordance with ISO/IEC 19752.
2 A4/Letter single-sided pages
The average inbox toner life is estimated at approximately 2,000 pages based on 1 page per job [A4 or Letter size single-sided pages].
Drum Unit
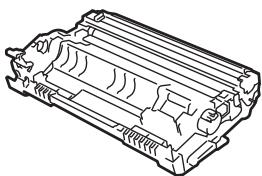
natural_image
Technical line drawing of a mechanical component with internal channels and mounting holes (no text or symbols)| Supply Model Name | Approximate Life (Page Yield) | Applicable Models |
| DR-B023 | Approximately 12,000 pages ^1 | HL-B2080DW |
1 Approximately 12,000 pages based on 1 page per job [A4/Letter single-sided pages]. The number of pages may be affected due to a variety of factors including but not limited to media type and media size.

Related Information
- Appendix
Related Topics:
- Replace Supplies
Information Regarding Recycled Paper
- Recycled paper is of the same quality as paper made from original forest sources. Standards governing modern recycled paper ensure that it meets the highest quality requirements for different printing processes. The imaging equipment supplied by the VA signatories is suitable for using with recycled paper meeting the EN 12281:2002 standard.
- Purchasing recycled paper saves natural resources and promotes the circular economy. Paper is made using cellulose fibres from wood. Collecting and recycling paper extends the life of fibres over multiple life cycles, making the best use of the resources.
- The recycled paper production process is shorter. The fibres have already been processed, so less water and energy, and fewer chemicals are used.
- Paper recycling has the benefit of saving carbon by diverting paper products from alternative disposal routes such as landfill and incineration. Landfill waste emits methane gas, which has a powerful greenhouse effect.

Related Information
- Appendix
Brother Numbers
IMPORTANT
For technical help, you must contact Brother customer service or your local Brother Dealer.
FAQs (Frequently Asked Questions)
Customer Service
FAQs (Frequently Asked Questions)
The Brother Solutions Center is our one-stop resource for all your machine needs. Download the latest software and utilities and read FAQs and Troubleshooting tips to learn how to get the most from your Brother product. Check here for Brother driver updates, too.
support.brother.com
Customer Service
Visit global.brother/gw for contact information on your local Brother office.
Service Centre locations
For service centres in Europe, contact your local Brother Office. Contact information for European offices can be found by going to global.brother/gw, and selecting your region and country.
Internet Addresses
Brother Global Web Site: global.brother/gw
For Frequently Asked Questions (FAQs), Product Support and Technical Questions, and Driver Updates and Utilities:
support.brother.com

Related Information
- Appendix
brother
Visit us on the World Wide Web global.brother/gw