
HL-8050 - Laser printer BROTHER - Free user manual and instructions
Find the device manual for free HL-8050 BROTHER in PDF.

| Brand | Brother |
| Model | HL-8050 |
| Product Type | Monochrome laser printer |
| Print Resolution | 600 x 600 dpi |
| Print Speed | Up to 8 pages per minute (A4) |
| Supported Paper Sizes | A4, Letter, Legal, Envelopes |
| Input Tray Capacity | 250 sheets |
| Memory | 2 MB (expandable) |
| Printer Languages | PCL6, PCL5e, BR-Script 3 (PostScript Level 3), Epson FX-850, IBM Proprinter XL |
| Monthly Duty Cycle | Up to 15,000 pages |
| Toner Cartridge | TN-650 (black) |
| Drum | DR-600 (approx. 20,000 pages) |
| Dimensions (W x D x H) | 370 x 370 x 280 mm |
| Weight | 7.5 kg |
| Power Supply | 220-240 V AC, 50/60 Hz |
| Power Consumption | Printing: 280 W, Standby: 15 W |
| Connectivity | IEEE 1284 Parallel Port, USB 1.1 Port |
| Key Features | Manual duplex printing, toner saving, multi-page printing |
| Maintenance & Cleaning | Clean the transfer roller, drum and sensors. Use a lint-free cloth. |
| Safety | Auto power-off after inactivity, overheat protection |
| Spare Parts & Repairability | Drum, fuser, pickup rollers available separately. Repair level: accessible. |
Frequently Asked Questions - HL-8050 BROTHER
User questions about HL-8050 BROTHER
0 question about this device. Answer the ones you know or ask your own.
Ask a new question about this device
Download the instructions for your Laser printer in PDF format for free! Find your manual HL-8050 - BROTHER and take your electronic device back in hand. On this page are published all the documents necessary for the use of your device. HL-8050 by BROTHER.
USER MANUAL HL-8050 BROTHER
Brother Laser Printer
For visually-impaired users :
This User's Guide can be read by Screen Reader 'text-to-speech' software.
You must set up the hardware and install the driver before you can use the printer.
Please read the Quick Setup Guide to set up the printer. You can find a printed copy in the box or view it on the CD-ROM we have supplied.
Please read this User's Guide thoroughly before you use the printer.
Keep the CD-ROM in a convenient place so you can use it quickly if you need to.
Please visit our web site at http://solutions.brother.com where you can get answers to Frequently Asked Questions (FAQs), Product Support and Technical Questions, and the latest Driver Updates and Utilities.
Table of Contents
Table of Contents
Trademarks -VI
Compilation and Publication -VI
For US and Canada -VII
Brother Numbers -VII
VIII
Regulations -VIII
International ENERGY STAR® Compliance Statement . -IX
Laser Notices -IX
Internal laser radiation -IX
Safety Information -X
For Europe and Other Countries -XI
Brother Numbers -XI
Regulations -XII
International ENERGY STAR® Compliance Statement -XII
Laser Notices -XII
Internal laser radiation -XIII
Safety Information -XIII
Introduction -XVI
How to Use This Guide -XVII
Conventions -XVII
Conventions and Symbols used in this User's Guide -XVII
Special Features of This Printer -XVIII
Safety Precautions -XIX
Installing and Relocating your Printer . -XIX
Operating Environment -XXI
Precautions for Power and Grounded/Earthed Connections -XXII
Radio Interference -XXIV
Operating Precautions -XXIV
Other Difficulties -XXV
Notes on Handling Consumables -XXVI
-XXVI
1 Basic Printer Operation 1-1
Printer Part Names and Functions 1-1
Front View 1-1
Back View 1-2
Inside View 1-3
Connecting the AC Power Cord 1-4
Turning the Printer On and Off 1-5
Turn the Printer On 1-5
Turn the Printer Off 1-5
2 Usable Paper Types and Printing Method 2-1
Suitable and Unsuitable Paper Types 2-1
Suitable Paper Types 2-1
Suitable Basis Weight 2-1
Paper Trays, Types and Sizes 2-2
Recommended Paper 2-3
Special paper 2-4
Printable area 2-5
Unsuitable Paper Types 2-7
Storing Paper 2-8
Loading Paper and Printing 2-9
Load A4/Letter Paper in the Paper Tray 2-9
Printing on A4/Letter Paper from the Paper Tray 2-11
Load Paper Larger than A4/Letter Size in the Paper Tray 2-12
Load Envelopes in the Paper Tray 2-15
Printing on Envelopes from the Paper Tray 2-19
Load Labels, Transparencies and Other Special Paper in the Paper Tray 2-20
Printing on Transparencies from the Paper Tray 2-23
Printing to the Face-up Output Tray 2-25
Changing the Configuration for Options 2-26
Memory expansion 2-26
In Windows 2-28
On a Macintosh Computer 2-28
For Mac OS® 8-6 - 9.2 2-28
For Mac OS X 10.2 or greater 2-28
Duplex Printing 2-29
Types of Duplex Printing 2-29
3 Printer Driver and Software 3-1
Printer Driver (Windows®) 3-1
Installing the Printer Driver 3-1
Upgrading the Printer Driver 3-1
Features in the PCL Printer Driver 3-2
Basic tab 3-2
Advanced tab 3-3
Device Options 3-5
Destination 3-7
Accessories tab 3-7
Support tab 3-8
Features in the PS Printer Driver 3-9
Ports tab 3-9
Device Settings tab 3-9
Layout tab 3-10
Paper/Quality tab 3-10
Advanced Options 3-11
Software (Windows®) 3-12
Software for Networks 3-12
Printer Driver (Macintosh®) 3-13
Installing the Printer Driver 3-13
Upgrading the Printer Driver 3-13
Features in the PS Printer Driver (For Mac OS® 8.6 to 9.2 / Mac OS® X 10.1/10.2 or greater) 3-14
Page setup 3-14
Layout 3-14
Specific options 3-15
Web Browser Management for Network Users 3-15
Automatic Emulation Selection 3-16
Automatic Interface Selection 3-17
Printer Settings 3-18
Factory Settings 3-18
Network Factory Default Setting 3-18
4 Control Panel 4-1
Control Panel Overview 4-1
4-2
Job Cancel Button 4-2
Go Button 4-2
Secure Print Button 4-3
+or-Button 4-3
To move through menus on the LCD 4-3
To enter numbers 4-3
Set Button 4-3
Back Button 4-4
How to Set the RAMDISK size 4-4
Reprint Button 4-4
Reprinting the last job 4-5
Printing PROOF data 4-6
Printing PUBLIC data 4-6
Printing SECURE data 4-6
Menu Button 4-8
LED Indicators 4-8
AlarmLED-Red 4-8
Ready LED - Green 4-8
Liquid Crystal Display (LCD) 4-9
LCD Message 4-9
Printer status messages 4-9
How to Use the Control Panel 4-10
Control Panel LCD Menu 4-12
INFORMATION 4-13
PAPER 4-13
QUALITY 4-14
SETUP 4-14
PRINT MENU 4-16
NETWORK 4-19
INTERFACE 4-20
RESET MENU 4-20
About emulation modes 4-22
List of factory settings 4-23
Buzzer Indications 4-26
5 Troubleshooting 5-1
If you are unable to fix the problem 5-1
Power Problems 5-2
Printing Problems 5-3
Indicators are On, Flashing or Off 5-3
Cannot Print in Windows 5-4
Cannot Print from a Macintosh Computer 5-5
Print Quality Problems 5-6
Blank or Completely Black Pages are Output 5-6
Faded or Dirty Printouts, White Areas (drop-outs), Creases, Blurs 5-7
Unsatisfactory Printing 5-10
Paper Handling Problems 5-11
Solving Print Problems 5-12
Others Problems 5-13
Network Problems 5-13
DOS Problems 5-14
BR-Script 3 Problems 5-14
What to Do When an Error Message Appears 5-15
Error Messages 5-15
Maintenance Messages 5-16
Call Service Messages 5-16
Clearing Paper Jams 5-17
Paper Jams in the Paper Tray 5-19
Paper Jams Around the Fuser Unit 5-22
Paper Jams Around the Toner Cartridge 5-25
Paper Jams in the Duplex Unit 5-27
Paper Jams in the Offset Catch Tray 5-29
Transporting the Printer 5-32
6 Routine Maintenance and Consumable Items Replacement 6-1
Replacing the Toner Cartridge (TN-1700) 6-1
Toner Cartridge Handling Precautions 6-1
Handling Precautions 6-1
Replacing the Toner Cartridge 6-2
Replacing the Fuser Unit & Transfer Roll Cartridge (FP-8000) 6-5
Fuser Unit & Transfer Roll Cartridge Handling Precautions 6-5
Handling Precautions 6-5
Replacing the Fuser Unit & Transfer Roll Cartridge 6-5
Replacing the Feed Roller 6-10
Feed Roller Handling Precautions 6-10
Replacing the Feed Roller 6-11
Cleaning the Printer 6-15
Cleaning Precautions 6-15
Cleaning the Outside of the Printer 6-15
Cleaning the Interior 6-16
Cleaning the Feeder Roller 6-17
If the Printer Will Not Be Used for a Long Time 6-18
7 Appendixes A-1
Introduction to the Optional and Consumable Items A-1
Options A-1
CompactFlash Memory A-1
DIMM Memory A-1
Optional Lower Tray Unit (A4/Letter - 550 sheets) (LT-8000)
Duplex Unit (DX-8000) A-2
Offset Catch Tray (CT-8000) A-2
Consumable Items A-3
Toner Cartridge (TN-1700) A-3
Fuser Unit & Transfer Roll Cartridge (FP-8000) A-3
CompactFlash Card .A-4
Installing the CompactFlash Card A-4
IM Memory A-6
Installing the DIMM Memory .A-6
Optional Lower Tray Unit (LT-8000) A-8
Installing the Lower Tray Unit .A-9
Uninstalling the Lower Tray Unit .A-12
Duplex Unit (DX-8000) A-16
Installing the Duplex Unit . . . . . . . . . . . . . . . . . . . . . . . . . . . . . . . . . . . . . . . . . . . . . . . . . . . . . . . . . .
Uninstalling the Duplex Unit A-17
Offset Catch Tray (CT-8000) A-20
Installing the Offset Catch Tray .A-20
Uninstalling the Offset Catch Tray .A-22
Getting Product Support Information .A-24
Printer Specifications . A-25
Printing A-25
Functions A-25
Options A-26
Electrical and Mechanical A-26
Paper Specifications A-27
Recommended Paper A-28
Special paper A-29
Printable Area A-30
Life Span of Consumable Items A-31
Fonts A-32
66 Scalable and 12 Bitmapped Fonts A-32
HP LaserJet, EPSON FX-850 and IBM Proprinter XL Modes .A-32
66 Scalable Fonts A-33
BR-Script 3 Mode A-33
Symbol and Character Sets A-34
OCR Symbol Sets A-34
HP LaserJet Mode A-35
EPSON Mode .A-43
IBM Mode A-45
HP-GL Mode A-46
Symbol sets supported by the printer's intelligent compatible typefaces A-48
Symbol sets supported by the printer's TrueType™ and Type 1 Font Compatible, and original typefaces
Quick Reference for Commands A-50
Bar Code Control A-50
Print bar codes or expanded characters A-50
8 Index 1-1
Trademarks
Brother is a registered trademark of Brother Industries, Ltd.
Apple, Macintosh and LaserWriter are registered trademarks, and TrueType is trademark of Apple Computer, Inc.
Centronics is a trademark of Genicom Corporation.
Hewlett-Packard, HP, PCL 5e, PCL 6 and PCL are registered trademarks of Hewlett-Packard Company.
Adobe, Adobe logo, Acrobat and PostScript are a registered trademark of Adobe Systems Incorporated.
This printer contains UFST and Micro Type from Agfa Division.
ENERGY STAR® is a U.S. registered mark.
All other brand and product names mentioned in this user's guide are registered trademarks or trademarks of respective companies.
Compilation and Publication
Under the supervision of Brother Industries Ltd., this manual has been compiled and published, covering the latest product descriptions and specifications.
The contents of this manual and the specifications of this product are subject to change without notice.
Brother reserves the right to make changes without notice in the specifications and materials contained herein and shall not be responsible for any damages (including consequential) caused by reliance on the materials presented, including but not limited to typographical and other errors relating to the publication.
©2003 Brother Industries Ltd.
Shipment of the Printer
If for any reason you must ship your Printer, carefully package the Printer to avoid any damage during transit. It is recommended that you save and use the original packaging. The Printer should also be adequately insured with the carrier.
IMPORTANT: For technical and operational help, you must call the country where you bought the printer. Calls must be made from within that country.
Register your product
By registering your product with Brother, you will be recorded as the original owner of the product.
Your registration with Brother:
may serve as a confirmation of the purchase date of your product should you lose your receipt;
may support an insurance claim by you in the event of product loss covered by insurance; and,
will help us notify you of enhancements to your product and special offers.
Please complete the Brother Warranty Registration or, for your convenience and most efficient way to register your new product, register on-line at
http://www.brother.com/registration/
Frequently asked questions (FAQs)
The Brother Solutions Center is our one-stop resource for all your Printer needs. You can download the latest software and utilities, read FAQs and troubleshooting tips, and go to the 'Solutions' section to learn how to get the most from your Brother product.
http://solutions.brother.com
You can check here for the Brother driver updates.
Customer Service
In USA: 1-800-276-7746
In Canada: 1-877-BROTHER
If you have comments or suggestions, please write us at:
In USA: Printer Customer Support
Brother International Corporation
15 Musick
Irvine, CA 92618
In Canada: Brother International Corporation (Canada), Ltd.
- Marketing Dept.
Service center locator (USA only)
For the location of a Brother authorized service center, call 1-800-284-4357.
Service center locations (Canada only)
For the location of a Brother authorized service center, call 1-877-BROTHER
Brother fax back system (USA only)
Brother has installed an easy to use fax back system so you can get instant answers to common technical questions and product information. This is available 24 hours a day, 7 days a week. You can use the system to send the information to any fax machine.
Call the number below and follow the recorded instructions to receive a fax about how to use the system and an index of fax back subjects.
In USA: 1-800-521-2846
Internet Addresses
Brother Global Web Site: http://www.brother.com
For Frequently Asked Questions (FAQs), Product Support and Technical Questions, and Driver Updates and Utilities: http://solutions.brother.com
(In USA only) For Brother Accessories & Supplies: http://www.brothermall.com
Regulations
Electronic Emission Notices
Federal Communications Commission (FCC) Declaration of Conformity (For U.S.A. Only)
Responsible Party: Brother International Corporation
100 Somerset Corporate Boulevard
Bridgewater, NJ 08807-0911, USA
TEL: (908) 704-1700
declares, that the products
Product Name: Brother Laser Printer HL-8050N
Model Number: HL-8050N
Product Options: ALL
complies with Part 15 of the FCC Rules. Operation is subject to the following two conditions: (1) This device may not cause harmful interference, and (2) this device must accept any interference received, including interference that may cause undesired operation.
This equipment has been tested and found to comply with the limits for a Class B digital device, pursuant to Part 15 of the FCC Rules. These limits are designed to provide reasonable protection against harmful interference in a residential installation. This equipment generates, uses, and can radiate radio frequency energy and, if not installed and used in accordance with the instructions, may cause harmful interference to radio communications. However, there is no guarantee that interference will not occur in a particular installation. If this equipment does cause harmful interference to radio or television reception, which can be determined by turning the equipment off and on, the user is encouraged to try to correct the interference by one or more of the following measures:
Adjust or relocate the receiving antenna.
Increase the distance between the equipment and the receiver.
- Connect the equipment to an AC power outlet/rod on a circuit different from that which the receiver is already connected.
Call the dealer or an experienced radio/TV technician for help.
Important
A shielded interface cable should be used in order to ensure compliance with the limits for a Class B digital device. Changes or modifications not expressly approved by Brother Industries, Ltd. could void the user's authority to operate the equipment.
Industry Canada Compliance Statement (For Canada Only)
This Class B digital apparatus complies with Canadian ICES-003.
The purpose of the International ENERGY STAR® Program is to promote the development and popularization of energy-efficient office equipment.
As an ENERGY STAR® Partner, Brother Industries, Ltd. has determined that this product meets the ENERGY STAR® guidelines for energy efficiency.

Laser Notices
Laser Safety (100 - 127 V Model Only)
This printer is certified as a Class I laser product under the U.S. Department of Health and Human Services (DHHS) Radiation Performance Standard according to the Radiation Control for Health and Safety Act of 1968. This means that the printer does not produce hazardous laser radiation.
Since radiation emitted inside the printer is completely confined within protective housings and external covers, the laser beam cannot escape from the machine during any phase of user operation.
FDA Regulations (100 - 127 V Model Only)
U.S. Food and Drug Administration (FDA) has implemented regulations for laser products manufactured on and after August 2, 1976. Compliance is mandatory for products marketed in the United States. The label shown on the back of the printer indicates compliance with the FDA regulations and must be attached to laser products marketed in the United States.
MANUFACTURED:
BROTHER INDUSTRIES, LTD.
15-1 Naeshiro-cho, Mizuho-ku, Nagoya, 467-8561 Japan
This product complies with FDA radiation performance standards, 21 CFR Subchapter J.
Caution: Use of controls, adjustments or the performance of procedures other than those specified in this manual may result in hazardous radiation exposure.
Internal laser radiation
Max. Radiation Power 5 mW
Wave Length 770 nm-800 nm
Laser Class Class I/1b (Accordance with 21 CFR Part 1040.10)
IMPORTANT - For Your Safety
To ensure safe operation the three-pin plug supplied must be inserted only into a standard three-pin power outlet/Socket which is properly grounded/earthed through the normal standard wiring.
Extension cords should not be used with the equipment. If it is essential that an extension cord has to be used, it must be a three-pin plug type and correctly wired to provide proper grounding/earthing. Incorrectly wired extension cords may cause personal injury and equipment damage.
The fact that the equipment operates satisfactorily does not imply that the power is grounded/earthed and that the installation is completely safe. For your safety, if in any doubt about the effective grounding/earthing of the power, call a qualified electrician.
Disconnect device
This printer must be installed near an AC power outlet/rod that is easily accessible. In case of emergencies, you must disconnect the power cord from the power outlet/rod to shut off the power completely.
Caution for batteries
Do not replace the battery. There is a danger of explosion if the battery is incorrectly replaced. Do not disassemble, recharge or dispose of in a fire. Used batteries should be disposed of according to local regulations.
LAN Connection
Caution: Connect this production to a LAN connection which is not subjected to over-voltages.
For Europe and Other Countries
Brother Numbers
IMPORTANT: For technical and operational help, you must call the country where you bought the printer. Calls must be made from within that country.
Register your product
By registering your product with Brother, you will be recorded as the original owner of the product.
Your registration with Brother:
may serve as a confirmation of the purchase date of your product should you lose your receipt;
may support an insurance claim by you in the event of product loss covered by insurance; and,
will help us notify you of enhancements to your product and special offers.
Please complete the Brother Warranty Registration or, for your convenience and most efficient way to register your new product, register on-line at
http://www.brother.com/registration/
Frequently asked questions (FAQs)
The Brother Solutions Center is our one-stop resource for all your Printer needs. You can download the latest software and utilities, read FAQs and troubleshooting tips, and go to the 'Solutions' section to learn how to get the most from your Brother product.
http://solutions.brother.com
You can check here for the Brother driver updates.
Customer Service
In Europe: Visit www.brother.com for contact information on your local Brother office.
Service center locations (Europe)
For service center in Europe, contact your local Brother office. Address and telephone contact information or European offices can be found at www.brother.com and selecting your country from the pull down list.
Internet Addresses
Brother Global Web Site: http://www.brother.com
For Frequently Asked Questions (FAQs), Product Support and Technical Questions, and Driver Updates and Utilities: http://solutions.brother.com
(In USA only) For Brother Accessories & Supplies: http://www.brothermall.com
International ENERGY STAR® Compliance Statement
The purpose of the International ENERGY STAR® Program is to promote the development and popularization of energy-efficient office equipment.
As an ENERGY STAR® Partner, Brother Industries, Ltd. has determined that this product meets the ENERGY STAR® guidelines for energy efficiency.

Laser Notices
Laser Safety (100 - 127 V Model Only)
This printer is certified as a Class I laser product under the U.S. Department of Health and Human Services (DHHS) Radiation Performance Standard according to the Radiation Control for Health and Safety Act of 1968. This means that the printer does not produce hazardous laser radiation.
Since radiation emitted inside the printer is completely confined within protective housings and external covers, the laser beam cannot escape from the machine during any phase of user operation.
FDA Regulations (100 - 127 V Model Only)
U.S. Food and Drug Administration (FDA) has implemented regulations for laser products manufactured on and after August 2, 1976. Compliance is mandatory for products marketed in the United States. The label shown on the back of the printer indicates compliance with the FDA regulations and must be attached to laser products marketed in the United States.
MANUFACTURED:
BROTHER INDUSTRIES, LTD.
15-1 Naeshiro-cho, Mizuho-ku, Nagoya, 467-8561 Japan
This product complies with FDA radiation performance standards, 21 CFR Subchapter J.
Caution: Use of controls, adjustments or the performance of procedures other than those specified in this manual may result in hazardous radiation exposure.
IEC 60825 Specification (220 - 240 V Model Only)
This printer is a Class 1 laser product as defined in IEC 60825 specifications. The label shown below is attached in countries where required.
This printer has a Class 3B Laser Diode that emits invisible laser radiation in the Scanner Unit. The Scanner Unit should not be opened under any circumstances.
Caution: Use of controls, adjustments or the performance of procedures other than those specified in this manual may result in hazardous radiation exposure.
For Finland and Sweden
LUOKAN 1 LASERLAITE
KCLASS 1 LASER APPARAT
Internal laser radiation
Max. Radiation Power 5 mW
Wave Length 770 nm-800 nm
Laser Class Class IIlb (Accordance with 21 CFR Part 1040.10)
Safety Information
IMPORTANT - For Your Safety
To ensure safe operation the three-pin plug supplied must be inserted only into a standard three-pin power outlet/Socket which is properly grounded/earthed through the normal standard wiring.
Extension cords should not be used with the equipment. If it is essential that an extension cord has to be used, it must be a three-pin plug type and correctly wired to provide proper grounding/earthing. Incorrectly wired extension cords may cause personal injury and equipment damage.
The fact that the equipment operates satisfactorily does not imply that the power is grounded/earthy and that the installation is completely safe. For your safety, if in any doubt about the effective grounding/earthing of the power, call a qualified electrician.
Disconnect device
This printer must be installed near an AC power outlet/rod that is easily accessible. In case of emergencies, you must disconnect the power cord from the power outlet/rod to shut off the power completely.
Caution for batteries
Do not replace the battery. There is a danger of explosion if the battery is incorrectly replaced. Do not disassemble, recharge or dispose of in a fire. Used batteries should be disposed of according to local regulations.
Opmerking / Oplaadbare Batterij Recycle Informatie (For Netherlands Only)
Gerauschemission / Acoustic Noise Emission (For Germany Only)
Lpa < 70 dB (A) DIN 45635-19-01-KL2

Radio Interference (220 - 240 V Model Only)
This printer complies with EN55022 (CISPR Publication 22)/Class B.
IT power system (For Norway Only)
This product is also designed for IT power system with Phase to phase voltage 230V.
LAN Connection
Caution: Connect this production to a LAN connection which is not subjected to over-voltages.
Wiring Information (For U.K. only)
Important
If you need to replace the plug fuse, fit a fuse that is approved by ASTA to BS1362 with the same rating as the original fuse.
Always replace the fuse cover. Never use a plug with the cover removed.
WARNING - THIS PRINTER MUST BE PROPERLY EARTHED.
The wires in the mains cord are colored in accordance with the following code:
Green and yellow: Earth
Blue: Neutral
Brown: Live
If in any doubt, contact a qualified electrician.
"EC" Declaration of Conformity under the R & TTE Directive
Manufacturer
Brother Industries Ltd.,
15-1, Naeshiro-cho, Mizuho-ku,
Nagoya 467-8561, Japan
Herewith declare that:
Product description
: Laser Printer
Product Name
: HL-8050N
is in conformity with provisions of the R & TTE Directive (1999/5/EEC 2002) and we declare compliance with the following standards:
R&TTE: EN300330-2 V1.1.1
EN301489-3 V1.3.1
CE0682 ①
Safety: EN60950:2000
EMC: EN55022:1998 A1:2000 Class B
EN55024:1998
EN61000-3-2:1995 + A14:2000
EN61000-3-3:1995
Year in which CE marking was First affixed: 2003
Issued by
:Brother Industries, Ltd.
Date
:7 July,2003
Place
: Nagoya, Japan
Signature
:
Jokashi Paeuda
Takashi Maeda
Manager
Quality Management Group
Quality Management Dept.
Information & Document Company
Introduction
Thank you for purchasing the HL-8050N. This guide contains important information about the printer operation and precautions to be followed. To help you use it efficiently, please read this guide before using your new printer.
Furthermore, after you read the guide, store it in a safe place. It will be useful in case you forget how to perform operations or if a problem occurs with the printer.
This guide is written for users who are familiar with the personal computers, operating systems, and software compatible with this printer. For operational procedures and information regarding these items, refer to the documentation provided with the various hardware and software that you are using.
Brother Industries Ltd.
How to Use This Guide
Conventions
The following conventions and symbols are used in this User's Guide:
Conventions and Symbols used in this User's Guide
| Example | Meaning |
| Alerts you to an important operating procedure that should be performed with care. Make sure that you read these items. | |
| Notes provide you with useful information. | |
| See Control Panel Overview on page 4-1. | A cross reference to another section in this User's Guide. If you are reading the Adobe Acrobat PDF file on screen, you can click on the italicized text to jump to the other location. |
| Indicates that the item referred to is in another guide (such as the Quick Setup Guide). | |
| Key | Indicates a key on the keyboard of your computer. Example: Press the Enter key |
| bold | Indicates a window, dialog box, or tab element or button displayed on the computer screen. Also indicates a menu or value displayed on the printer's control panel. Example: Click OK in the Properties dialog box. Set Enabled on the control panel. |
| LCD display font | Indicates a message displayed on the printer's control panel. This may also emphasize a part name or important information to be entered. Example: READY appears. ENTER "0.0.0.0" |
| Press the Set or + button once. | Indicates a control panel button. Example: Press the + button. Press the Set button. |
| + | Indicates that you need to press 2 keys or control panel buttons at the same time. Example: Press the ++ - buttons. |
Special Features of This Printer
This printer has the following special features:
■ With its up to 1,200 x 1,200 dpi resolution, it can print high quality documents and images.
Attains high-speed printing of up to 34/35 pages per minute (ppm) when printing the same A4/Letter-sized document.
- You can load envelopes, labels, transparencies and paper of various sizes, from A6 to Legal, in all the paper trays including the two optional lower tray units. Paper tray 1 holds up to 150 sheets and paper tray 2 holds up to 550 sheets.
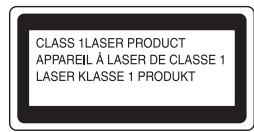
- Two optional lower tray units (two LT-8000) are available (A4/Letter - 550 sheets each). By adding both optional lower tray units, you can expand the total paper tray input capacity to up to 1,800 sheets.
By adding the optional duplex unit (DX-8000), you can have automatic 2 sided printing.
- By adding the optional offset catch tray (CT-8000) you can print up to 500 sheets offset., which expands the total output capacity to up to 1,000 sheets.
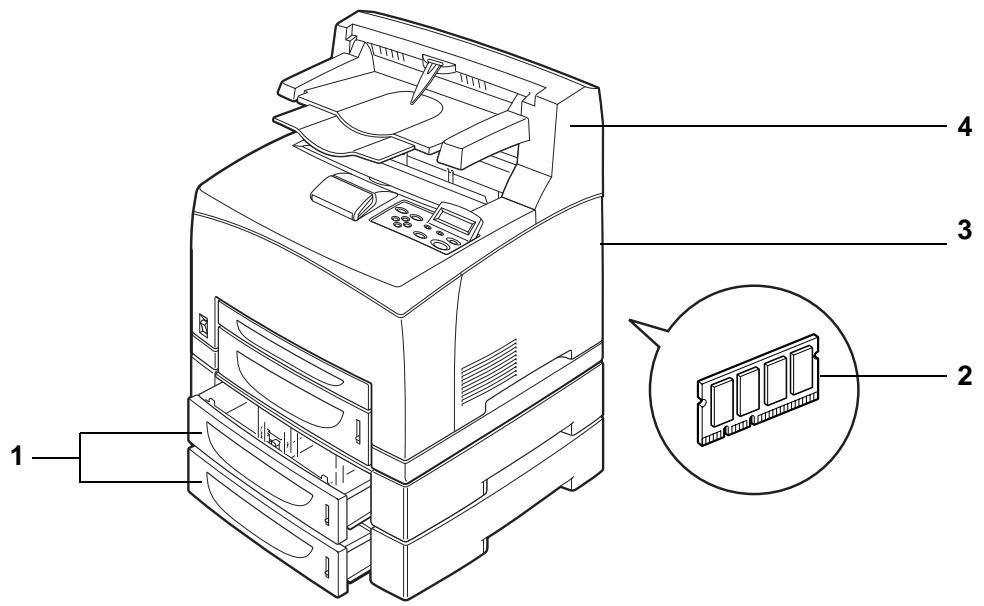
The following illustration shows the printer with the optional offset catch tray (CT-8000) and the two optional lower tray units (two LT-8000) installed.
Safety Precautions
To ensure the safe operation of your printer, make sure that you read this section thoroughly before use. This section describes the conventions used in the guide.

WARNING

CAUTION
Indicates warning that must be observed to prevent possible personal injury.
Indicates caution that must be observed to use the printer properly or prevent damage to the printer.
This symbol alerts you to procedures that require close attention. Make sure that you read and follow the instructions carefully.

High temperature

Flammable

Electrical shock

Finger injure
This symbol alerts you to prohibited procedures.
Make sure that you read the instructions carefully.

Prohibited

No naked/ open flame

Do not dismantle

Do not touch
This symbol alerts you to procedures that need to be performed. Make sure that you perform the procedure after reading the instructions carefully.

Hint

Remove the plug

Ground/Earth
Installing and Relocating your Printer

CAUTION

Do not place the printer in a hot, humid, dusty, or poorly ventilated environment. Prolonged exposure to such adverse conditions can cause fire or electric shocks.

Do not place the printer near heaters or volatile, flammable, or combustible materials, such as curtains.

Place the printer on a level, sturdy surface that can withstand the printer's weight. Failure to do so could cause the printer to fall, resulting in injuries.

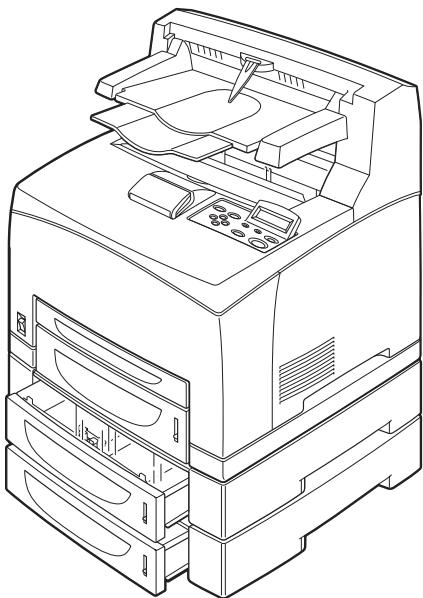
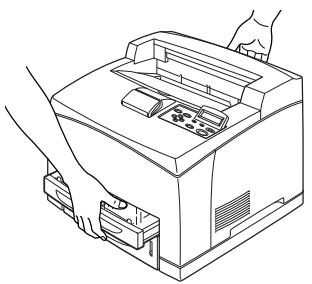
To prevent injuries, use two people when you lift this printer.

To lift the printer, face the front of the printer and grip the recessed areas at the bottom left and right with both hands. Never try to lift the printer by gripping any other areas. Lifting the printer by gripping other areas can cause the printer to fall, resulting in injuries.

When lifting the printer, get a firm footing and bend your knees to avoid possible injuries to your back.

Do not move the printer by lifting it by the front and back edges (positions shown in the following illustration) when the paper tray is extended (loaded with Legal 14 paper). The printer may fall and result in injuries or the paper tray may be damaged.

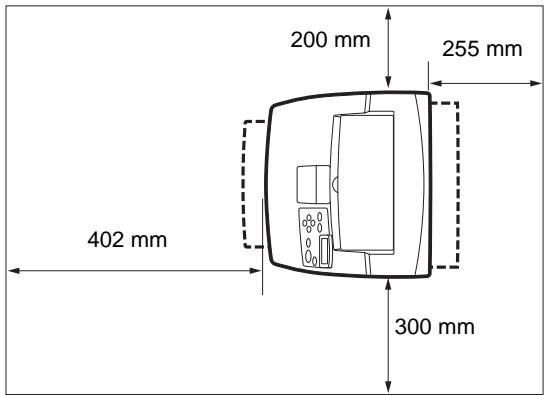
The printer has ventilation grilles on the side and at the back of the machine. Ensure that the printer is installed no less than 300mm (11.7 in.) from the wall on the right, 200mm (7.8 in.) from the wall on the left, and 255mm (9.9 in.) from the wall at the back. A poorly ventilated printer can cause excessive internal heat to build up and result in fire. The illustration below shows the minimum clearances required for normal operation, consumables replacement, and maintenance ensuring that your printer operates at peak performance.

When moving the printer, be sure to unplug the power cord from the AC power outlet/socket. Moving the printer with the power cord connected can damage the power cord, which could result in a fire or an electric shock.
Operating Environment
Use the printer in a place that meets the following requirements:
Ambient temperature range of 10 to 32^ (50.0 to 89.6^ ), relative humidity of 15 to 85% (no condensation)
When using the printer at an ambient temperature of 32^ ( 89.6^ ), the relative humidity should not exceed 65% . When the relative humidity reaches 85% , the ambient temperature should not exceed 28^ ( 82.4^ ).

■Do not place the printer in a room where there are sudden fluctuations in temperature and do not move the printer from a cold place to a warm humid place. If you do, condensation may occur inside the printer and deteriorate print quality.
■Do not place the printer in direct sunlight, as this may damage the printer.
■When moving the printer, remove the toner cartridge.
■Do not place the printer directly next to an air conditioner or heater, as this affects the temperature inside the printer and can cause damage.
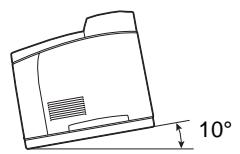
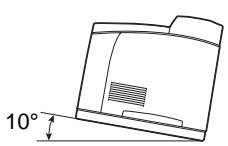
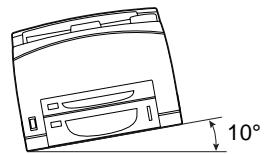
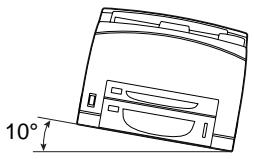
■Do not use the printer when it is tilted at an angle of more than 5 degrees, as this may result in damage.

WARNING

Use the printer within the specified power range.
AC power:100-127 V AC ± 10% (90 V-140 V) or 220-240 V AC ± 10% (198 V-264 V)
Frequency: 50 ± 3 ~Hz / 60 ± 3 ~Hz

Ensure that the AC power cord connector and AC power outlet/rod are free of dust. In a damp environment, a contaminated connector can, over time, draw non-negligible amounts of current that can generate heat and eventually cause fire.

Do not attempt to modify, pull, bend, chafe, or otherwise damage the AC power cord. Do not place objects on the AC power cord. A damaged AC power cord can cause fire or electric shock.

Never touch the AC power cord with wet hands. This constitutes an electric shock hazard.

In the following situations, stop using the printer immediately, turn it off, and disconnect the AC power cord from the AC power outlet/socket. After that, call your dealer or Brother Customer Service immediately. Continued use of the printer in such situations could result in fire:
There is smoke emanating from the printer or the outside of the printer is excessively hot.
Unusual noises are coming from the printer.
There is water inside the printer.

To prevent fire or electric shocks, connect the AC power cord to a grounded/earthed AC power outlet/socket. For your safety, if in any doubt about the effective grounding/earthing of the power, call a qualified electrician.

If the power cord is broken or insulated wires are exposed, stop using the printer immediately, turn it off, and disconnect the AC power cord from the AC power outlet/rod. After that, call your dealer or Brother Customer Service. Using a damaged cord can cause fire or an electric shock.
CAUTION

Do not plug or unplug the printer when it is on. Unplugging a live connector can deform the plug and cause fire.

When unplugging the printer, grasp the plug instead of the power cord. Forcibly pulling the AC power cord can damage it and cause a fire or an electric shock.

Be sure to turn off and unplug the printer before accessing the interior of the printer for cleaning, maintenance, or troubleshooting. Accessing the interior of a live printer can result in electric shock.

Do not use conductive paper, e.g. carbonic paper and coated paper. When paper jam occurs, they can cause a short circuit and fire.

Once a month, turn off the printer and check the AC power cord for the following.
The AC power cord is plugged firmly into the AC power outlet.
The plug is not excessively heated, rusted, or bent.
The plug and outlet are dust free.
The cord is not cracked or frayed.
■If you notice any unusual conditions, call your dealer or Brother Customer Service for assistance.

When the printer is not used over an extended period of time, it is advisable to unplug the printer.

Switch off the printer before connecting the interface cable or options. Connecting the interface cable or options to a live printer can cause electric shocks.
Radio Interference
This printer may interfere with radio or television reception, causing flickering or distortion. This can be determined by turning the printer off and on. To correct interference, perform one or a combination of the following procedures:
Move the printer away from a TV and/or radio.
■ Reposition the printer, TV and/or radio.
If the printer, TV and/or radio are plugged to the same AC power outlet/shipment, unplug them, then plug them into different AC power outlets/sockets.
- Reposition the TV and/or radio antennas and cables until the interference stops. For external antennas, call your local electrician.
Use coaxial cables with radio and television antennas.
Operating Precautions
WARNING

Do not place any liquid containers such as vases or coffee cups on the printer. Liquids spilt on the printer can cause a fire or electric shock.

Do not place any metal parts such as staples or clips on the printer. If metal or flammable materials get into the printer, they can short circuit internal components and cause a fire or electric shocks.

If debris (metal or liquid) gets into the printer, turn off and unplug the printer. After that, call your dealer or Brother Customer Service immediately. Operating a debris-contaminated printer can cause a fire or electric shocks.

Never open or remove printer covers that are secured with screws unless specifically instructed to do so in the this guide. High-voltage components can cause electric shocks.

Do not try to alter the printer's structure or modify any parts. Unauthorized modifications can cause fire.

This printer complies with the IEC60825 (Class 1) international laser standard. This means that the printer does not present any risk of injury to individuals from laser radiation. Various covers confine the laser radiation to the inside of the printer; hence, users cannot incur injury from the laser under normal operating conditions. Removing covers, unless instructed to do so in this guide, can cause injury from laser radiation.

CAUTION

Never touch an area indicated by a high-temperature warning label (on or near the fuser unit). Touching these areas may result in burns.
If a sheet of paper is wrapped around the fuser or rollers, do not use excessive force to remove it so as to avoid injuries or burns. Turn off the printer immediately and call your dealer or Brother Customer Service.

Do not place any heavy objects on the printer. An off-balance printer can fall over or the heavy object can fall, resulting in injuries.

Do not use highly flammable sprays or solvents in or around the printer, as this can result in fire.

When removing paper jams, make sure that no pieces of paper are left inside the printer, as this can cause fire.
If the paper is wrapped around the fuser or roller, or you cannot see the jam that you are trying to clear, do not attempt to remove the paper by yourself, as this may result in injuries or burns. Turn off the printer immediately and call your dealer or Brother Customer Service.

Do not place magnetic objects near the safety switch of the printer. Magnets can activate the printer accidentally, resulting in injuries.
Other Difficulties
Refer to this guide for procedures on clearing paper jams and how to resolve any other problems that may occur.

WARNING

Never put a toner cartridge into a naked/open flame. It can explode, resulting in injuries.

Never put a transfer roll cartridge into a naked/open flame. It can explode, resulting in injuries.

Never heat the drum or scratch its surface. A heated or scratched drum can be hazardous to your health.

Do not use a vacuum cleaner for cleaning any spilled toner. Use a cloth soaked with soapy water to wipe it out. The vacuumed toner may cause a fire in the cleaner due to its electrical sparks.

CAUTION
- Do not open consumables until you are ready to use them. Do not store consumables in the following conditions:
Hot or humid areas
Near a naked/open flame
Exposed to direct sunlight
Dusty areas
Before using consumables, read the instructions and precautions provided with the consumables.
■ Administer emergency first aid as follows:
Eye Contact: Flush eyes with plenty of water for a minimum of 15 minutes, and seek medical advice.
Skin contact: Wash material off skin with plenty of soap and water.
Inhalation: remove person to fresh air, and seek medical attention.
Ingestion: If toner is swallowed, get immediate medical attention or advice.
- When you remove the transfer roll cartridge from the printer because the waste toner collection box is full, do not attempt to empty the waste toner box and reuse the cartridge, as toner may spill inside the printer and cause damage. Loose toner can spill inside the printer and deteriorate print quality.
1 Basic Printer Operation
Printer Part Names and Functions
The names and functions of the various parts of the printer are as follows:
Front View
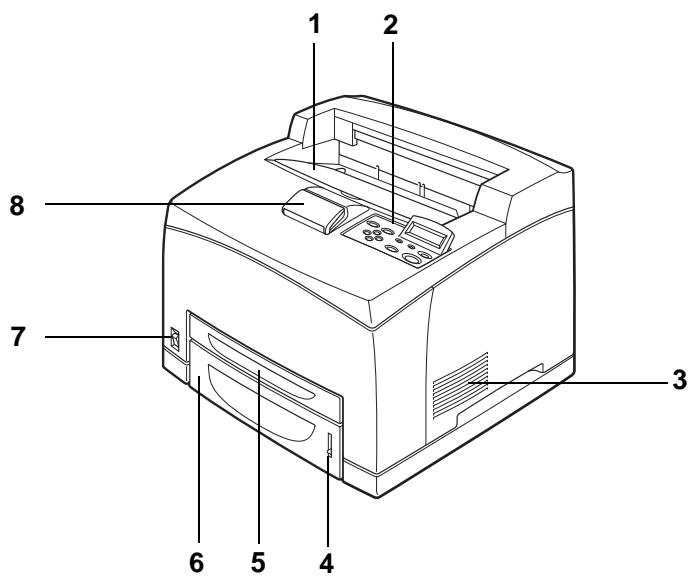
| No. | Name | Description |
| 1 | Center output tray | Print jobs are output with the printed side facing down. |
| 2 | Control panel | Use the buttons and display to control the printer. |
| 3 | Ventilation grille | Releases heat to prevent the interior of the printer from overheating. |
| 4 | Paper meter | Use the meter as a guide to refill the paper tray. |
| 5 | Paper tray 1(A4/Letter - 150 sheets) | Load paper here. |
| 6 | Paper tray 2(A4/Letter - 550 sheets) | Load paper here. |
| 7 | Power switch | The printer's power switch. Press I to turn on the printer and O to turn it off. |
| 8 | Paper stopper | Raise this when printing on paper larger than A4 or Letter size. |
| No. | Name | Description |
| 9 | Ventilation grille | Releases heat to prevent the interior of the printer from heating up. |
| 10 | Duplex unit connector | Connect the optional duplex unit here. |
| 11 | AC power connector | Connect the power cord here. |
| 12 | Option slot (for the CompactFlash card) | Install the CompactFlash card here. |
| 13 | Ethernet interface connector | To use the printer through a network, connect the Ethernet cable here. |
| 14 | USB interface connector | To use the printer locally, connect the USB cable here. |
| 15 | Parallel interface connector | To use the printer locally, connect the parallel cable here. |
| 16 | Back lever | Lift the lever when you open the back cover. |
| 17 | Back cover | Open the back cover when replacing the fuser unit and removing jammed paper. |
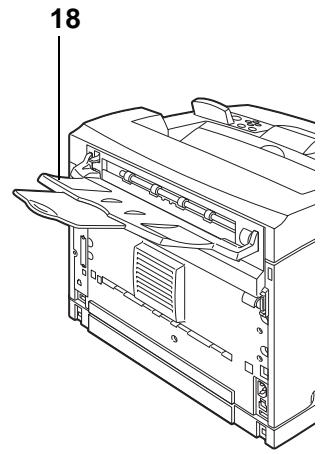
| 18 | Face-up output tray | Use the face-up output tray when you want to print out to it. |
| 19 | Paper stopper | Raise this when printing on paper larger than A4/Letter size. |
| 20 | Toner cartridge | Contains the toner and the photosensitive drum. |
| 21 | Top cover | Open this when replacing the toner cartridge and removing jammed paper. |
| 22 | Transfer roll cartridge | Transfers the image created on the drum surface to the paper, collects used toner. |
| 23 | Fuser unit | Uses heat to fuse the toner to the paper. A WARNING The fuser unit gets very hot during printing. Do not touch it. Touching the fuser unit can cause burns. |
Connecting the AC Power Cord

WARNING
Three power specifications are listed below. The specifications that apply to your printer depend on its configuration. Connect the power plug only to a properly rated power outlet. Otherwise, it can cause fire or electric shocks. If in doubt, contact your dealer or Brother Customer Service.
Rated voltage: 100V
Rated frequency: 50 / 60Hz
Rated voltage: 110 V
Rated frequency: 60 Hz
Rated voltage: 220 - 240 V
Rated frequency: 50 / 60Hz
To prevent fire or electric shock, connect the AC power cord to a grounded/earthed AC power outlet/socket. For your safety, if in any doubt about the effective grounding/earthing of the power, call a qualified electrician.
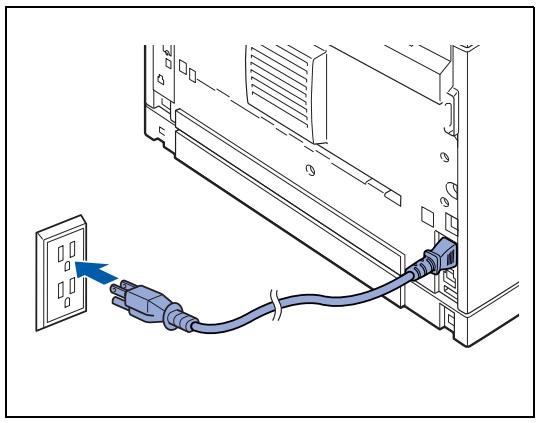
1 Connect the AC power cord to the back of the printer.
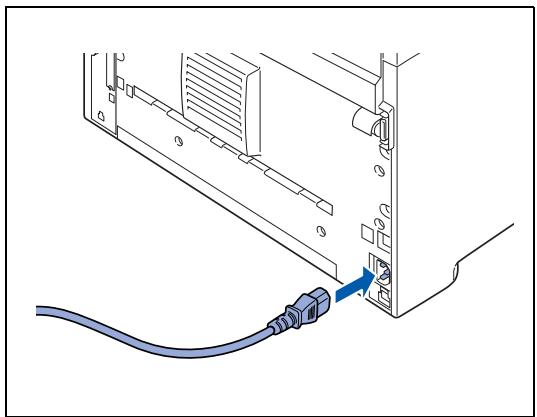
2 Make sure that the power switch has been firmly pushed to the O position and then insert the other end of the AC power cord in the power outlet. If the AC power cord has a ground/earth wire, connect it as well.
Turning the Printer On and Off
Turn the Printer On
Turn the power on before operating the printer. When you have finished using the printer for the day or you do not intend to use it for a long period of time, turn the power off.
Once the power is switched off, information such as print data saved in the printer will be deleted.
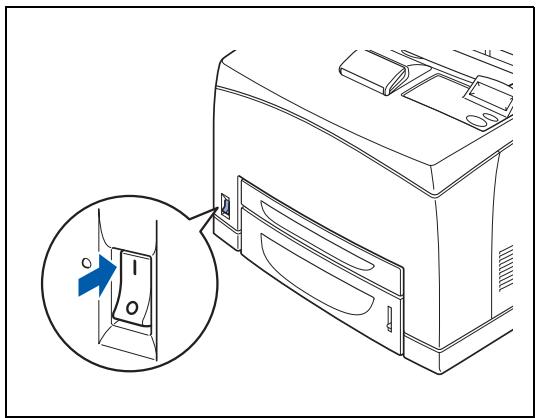
1 Press the power switch to the I position to turn the power on.
Turn the Printer Off
1 Make sure that the printer is not processing any data.
2 Press the power switch to the O position to turn the power off.

2 Usable Paper Types and Printing Method
Suitable and Unsuitable Paper Types
Using paper that is unsuitable for printing can cause paper jams and deteriorate print quality. We recommend that you use the types of paper listed below to get the best results from your printer.
Suitable Paper Types
Suitable Basis Weight
Make sure the paper you use complies with the following specifications.
| Feeding Method | Specifications |
| Standard paper tray (Tray 1 and Tray 2) | Basis weight: 60 to 216 g/m2(16 to 57 lb) |
| Optional paper tray (Tray 3 and Tray 4) |
Paper Trays, Types and Sizes
The paper types, sizes, and the maximum number of sheets that you can load in the different trays are shown in the table below. Load all paper into the printer in the portrait orientation (lengthwise). The names for the paper trays in the printer driver and this guide are as follows:
| Standard paper tray (A4/Letter - 150 sheets) | Tray 1 |
| Standard paper tray (A4/Letter - 550 sheets) | Tray 2 |
| 2 Optional paper trays (A4/Letter - 550 sheets per tray) (up to two LT-8000) | Tray 3 / Tray 4 |
| Optional Duplex Unit for Duplex Printing (DX-8000) | DX |
| Optional Offset Catch Tray (CT-8000) | CT |
| Paper size | Number of sheets | |
| Tray 1 | A4, Letter, Legal, B5 (JIS), B5 (ISO), Executive, A5, A6, B6 Envelopes: Com-10, Monarch, DL, C5 User-defined size: width: 76.2 to 215.9 mm (3.0 to 8.5 in.), length: 127.0 to 355.6 mm (5.0 to 14.0 in.) | 150 sheets (80 g/m2or 20 lb) |
| Tray 2 | A4, Letter, Legal, B5 (JIS), B5 (ISO), Executive, A5, A6, B6 Envelopes: Com-10, Monarch, DL, C5 User-defined size: width: 98.4 to 215.9 mm (3.9 to 8.5 in.), length: 148.0 to 355.6 mm (5.8 to 14.0 in.) | 550 sheets (80 g/m2or 20 lb) |
| (Option) Tray 3 / Tray 4 | A4, Letter, Legal, B5 (JIS), B5 (ISO), Executive, A5, A6, B6 Envelopes: Com-10, Monarch, DL, C5 User-defined size: width: 98.4 to 215.9 mm (3.9 to 8.5 in.), length: 148.0 to 355.6 mm (5.8 5 to 14.0 in.) | 550 sheets (80 g/m2or 20 lb) |
| DX | A4, Letter, Legal, B5 (JIS), B5 (ISO), Executive, A5, A6, B6 User-defined size: width: 88.9 to 215.9 mm (3.5 to 8.5 in.), length: 139.7 to 355.6 mm (5.5 to 14.0 in.) | - |
| CT | A4, Letter, Legal, B5 (JIS), B5 (ISO), Executive, A5, A6, B6 Envelopes: Com-10, Monarch, DL, C5 User-defined size: width: 88.9 to 215.9 mm (3.5 to 8.5 in.), length: 139.7 to 355.6 mm (5.5 to 14.0 in.) | 500 sheets (80 g/m2or 20 lb) |
| Plain paper 60 g/m2to 110 g/m2(16 to 29 lb) | Thick paper 111 g/m2to 159 g/m2(30 to 42 lb) | Thicker paper 160 g/m2to 216 g/m2(43 to 57 lb) | Transparencies | Labels | Envelopes | |
| Tray 1 | i | i | i | i | i | i |
| Tray 2 | i | i | i | i | i | i |
| Tray 3 / Tray 4 | i | i | i | i | i | i |
| DX | i | i | i | - | - | - |
| CT | i | i | i | i | - | i |
| Select the Media type from the printer driver | Plain paper | Thick paper | Thicker paper | Transparency | Plain paper Thick paper | Thick paper Thicker paper |

Using low-quality paper can cause creasing and deteriorate print quality.
The number of sheets that you can load varies according to the paper thickness.
Recommended Paper
We recommend the following paper types for this printer:
| Paper Type | Europe | USA |
| Plain paper | Xerox Premier 80 g/m2(21.4 lb) | Xerox 4200DP 20 lb |
Before you buy a lot of paper, please test some to make sure that the paper is suitable.
Use paper that is made for plain-paper copying.
Use neutral paper. Do not use acidic or alkaline paper.
Use long-grain paper.
Use paper with a moisture content of approximately 5% .

This printer can use recycled paper that meets the DIN 19309 specification.
Special paper
You can print the following types of 'speciality paper' from all of the paper trays.
| Paper size | Paper type | |
| Transparencies* | Letter (215.9 x 279.4 mm (8.5 x 10.9 in.)) A4 (210 x 297 mm (8.2 x 11.6 in.)) | 3M P/N CG3300 |
| Labels* | Letter (215.9 x 279.4 mm (8.5 x 10.9 in.)) A4 (210 x 297 mm (8.2 x 11.6 in.)) | Avery Laser Labels P/N 5160 (US) XEROX P/N 3R96178 (Europe) |
| G21 Envelopes | Com#10 (104.8 x 241.3 mm (4.1 x 9.4 in.)) C5 (162 x 229 mm (6.3 x 8.9 in.)) DL (110 x 220 mm (4.3 x 8.6 in.)) Monarch (98.4 x 190.5 mm (3.8 x 7.4 in.)) |
- Use only transparencies and labels that are designed for use in laser printers and for black and white printing.

The illustration below shows the 'width' and 'length' mentioned in the table on page 2-2.

- Length
- Portrait orientation
- Feed direction
- Width
Printable area
When using PCL emulation, the edges of the paper that cannot be printed on are shown below. Portrait

| A4 | Letter | Legal | B5 (JIS) | B5 (ISO) | Executive | A5 | |
| 1 | 4.2 mm (0.17 in) | 4.2 mm (0.17 in) | 4.2 mm (0.17 in) | 4.2 mm (0.17 in) | 4.2 mm (0.17 in) | 4.2 mm (0.17 in) | 4.2 mm (0.17 in) |
| 2 | 6.01 mm (0.24 in) | 6.35 mm (0.25 in) | 6.35 mm (0.25 in) | 5.84 mm (0.23 in) | 6.01 mm (0.24 in) | 6.35 mm (0.25 in) | 6.01 mm (0.24 in) |
| 3 | 4.2 mm (0.17 in) | 4.2 mm (0.17 in) | 4.2 mm (0.17 in) | 4.2 mm (0.17 in) | 4.2 mm (0.17 in) | 4.2 mm (0.17 in) | 4.2 mm (0.17 in) |
| 4 | 6.01 mm (0.24 in) | 6.35 mm (0.25 in) | 6.35 mm (0.25 in) | 5.84 mm (0.23 in) | 6.01 mm (0.24 in) | 6.35 mm (0.25 in) | 6.01 mm (0.24 in) |
| A6 | B6 | COM-10 | Monarch | C5 | DL | |
| 1 | 4.2 mm (0.17 in) | 4.2 mm (0.17 in) | 4.2 mm (0.17 in) | 4.2 mm (0.17 in) | 4.2 mm (0.17 in) | 4.2 mm (0.17 in) |
| 2 | 6.01 mm (0.24 in) | 6.01 mm (0.24 in) | 6.35 mm (0.25 in) | 6.35 mm (0.25 in) | 6.01 mm (0.24 in) | 6.01 mm (0.24 in) |
| 3 | 4.2 mm (0.17 in) | 4.2 mm (0.17 in) | 4.2 mm (0.17 in) | 4.2 mm (0.17 in) | 4.2 mm (0.17 in) | 4.2 mm (0.17 in) |
| 4 | 6.01 mm (0.24 in) | 6.01 mm (0.24 in) | 6.35 mm (0.25 in) | 6.35 mm (0.25 in) | 6.01 mm (0.24 in) | 6.01 mm (0.24 in) |
Portrait
| A4 | Letter | Legal | B5 (JIS) | B5 (ISO) | Executive | A5 | |
| 1 | 4.2 mm (0.17 in) | 4.2 mm (0.17 in) | 4.2 mm (0.17 in) | 4.2 mm (0.17 in) | 4.2 mm (0.17 in) | 4.2 mm (0.17 in) | 4.2 mm (0.17 in) |
| 2 | 5.0 mm (0.19 in) | 5.08 mm (0.2 in) | 5.08 mm (0.2 in) | 5.08 mm (0.2 in) | 5.0 mm (0.19 in) | 5.08 mm (0.2 in) | 5.0 mm (0.19 in) |
| 3 | 4.2 mm (0.17 in) | 4.2 mm (0.17 in) | 4.2 mm (0.17 in) | 4.2 mm (0.17 in) | 4.2 mm (0.17 in) | 4.2 mm (0.17 in) | 4.2 mm (0.17 in) |
| 4 | 5.0 mm (0.19 in) | 5.08 mm (0.2 in) | 5.08 mm (0.2 in) | 5.08 mm (0.2 in) | 5.0 mm (0.19 in) | 5.08 mm (0.2 in) | 5.0 mm (0.19 in) |
| A6 | B6 | COM-10 | Monarch | C5 | DL | |
| 1 | 4.2 mm (0.17 in) | 4.2 mm (0.17 in) | 4.2 mm (0.17 in) | 4.2 mm (0.17 in) | 4.2 mm (0.17 in) | 4.2 mm (0.17 in) |
| 2 | 5.0 mm (0.19 in) | 5.0 mm (0.19 in) | 5.08 mm (0.2 in) | 5.08 mm (0.2 in) | 5.0 mm (0.19 in) | 5.0 mm (0.19 in) |
| 3 | 4.2 mm (0.17 in) | 4.2 mm (0.17 in) | 4.2 mm (0.17 in) | 4.2 mm (0.17 in) | 4.2 mm (0.17 in) | 4.2 mm (0.17 in) |
| 4 | 5.0 mm (0.19 in) | 5.0 mm (0.19 in) | 5.08 mm (0.2 in) | 5.08 mm (0.2 in) | 5.0 mm (0.19 in) | 5.0 mm (0.19 in) |
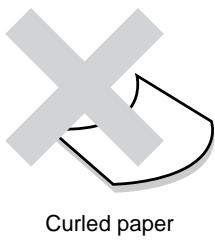
Avoid using the following paper types as they can cause paper jams or damage the printer.
Transparencies other than those recommended.
■ Inkjet paper
Paper that is too thick or too thin
Paper with a face preprinted with another printer or copier, or paper preprinted with ink
Ided, creased, or torn paper
Damp or wet paper
Curled or warped paper
Sheets affected by static electricity
Layered or adhesive paper
Specially coated paper
Colored paper with a treated surface
■ Paper printed with ink that cannot withstand temperatures of 155^ C ( 311^ F ).
Heat-sensitive paper
Carbon paper
■ Paper with a rough surface such as textured or fiber form paper
Acidic paper that can cause the characters to fade over time. Use neutral paper.
Envelopes with a rough surface or clips attached
■ Paper with staples, paper clips, tape, or ribbons attached
Envelopes with sticky adhesive
Label sheets where the backing is visible or is precut.
Shiny backing paper visible
Precut label sheets
T-shirt transfer paper (using Heat press)
Transfer paper (using cold water)
Digital coated glossy paper
Label film (transparent, colorless)
Perforated paper
Full color transparencies

Inkjet paper
Paper with tape attached
Storing Paper
Failure to properly store paper can cause paper jams, deteriorate print quality, or damage the printer. Store paper under the following conditions:
Between 10^ and 30^ (50 to 86^ )
Between 30% and 65% relative humidity
In a dry place
After opening the package, wrap unused sheets in their original package and store in a cabinet or other dry place.
Store paper on a flat surface. Do not lean paper against other objects or place it in an upright position.
Avoid storing paper in a way that may cause creasing, folding, or curling.
Store paper away from direct sunlight.
Loading Paper and Printing
See the appropriate section below to load or change paper.
For more information about suitable paper types, see Suitable and Unsuitable Paper Types on page 2-1.
Load A4/Letter Paper in the Paper Tray
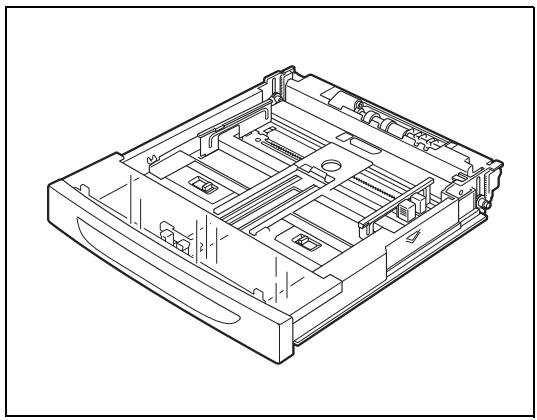
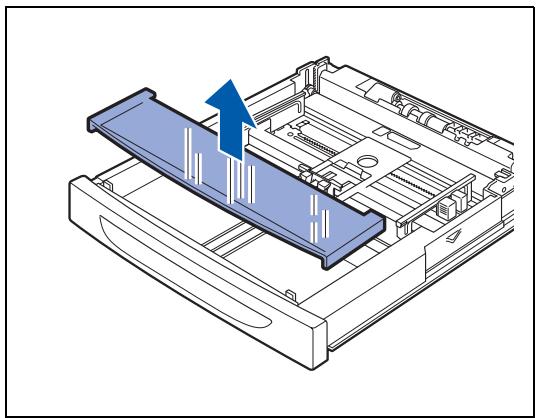
Follow the steps below to load A4 or Letter paper into any of paper trays.
(Paper tray 1 is shown in the illustrations.)
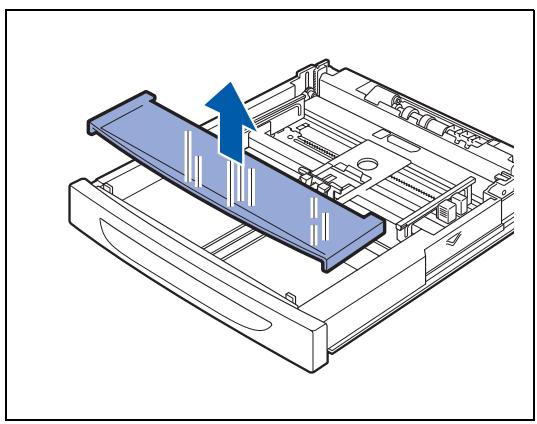
1 Place the paper tray on a flat surface.

2 Remove the lid of the tray.

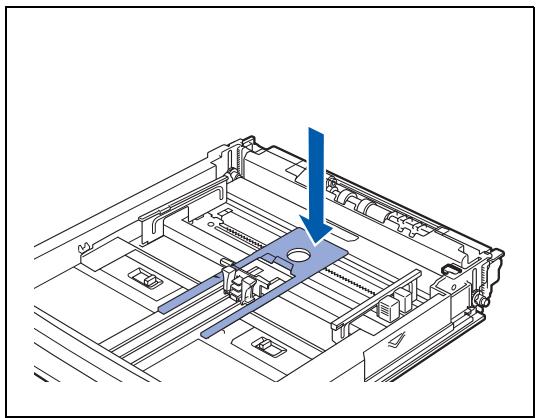
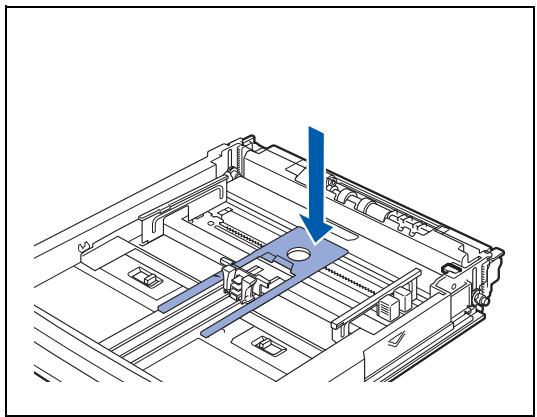
3 If the base plate of the paper tray is raised, push it down.

4 Squeeze the length guide and slide it to fit the paper size.
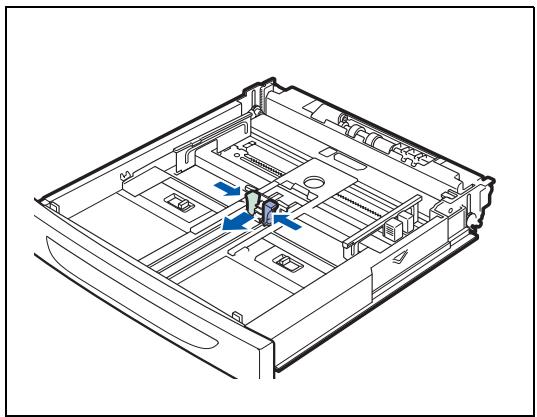
5 Squeeze the right width guide and slide it to fit the paper size.
6 Load the paper with the side to be printed facing up and with all 4 corners aligned.

- Do not load paper exceeding the maximum fill line or the maximum capacity allowed.
Align the right width guide with the paper width correctly. If the right width guide is not in place, the paper will not be properly fed and may cause a paper jam.
We do not recommend the use of pre-printed papers. Using pre-printed paper may cause the toner to smudge.
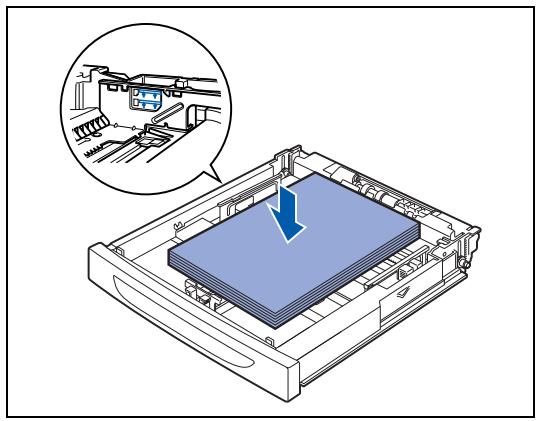
7 Replace the lid of the paper tray.

The lid of the tray must be firmly seated. If not, the paper might be misaligned.

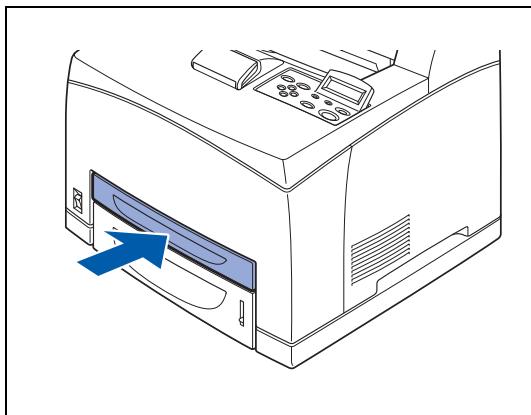
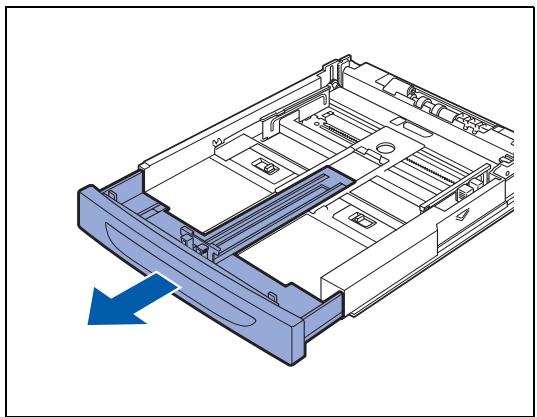
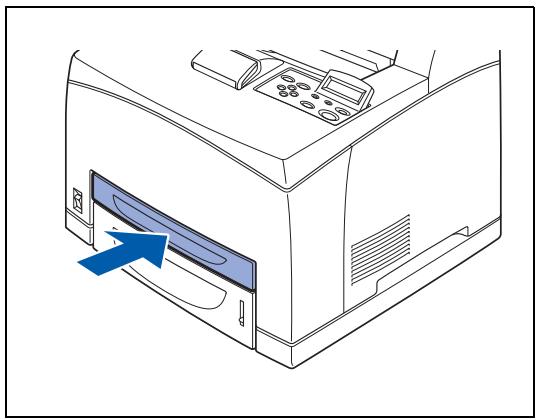
8 Push the paper tray completely into the printer.
Printing on A4/Letter Paper from the Paper Tray
1 Start printing from your program after loading A4 or letter paper in the printer.

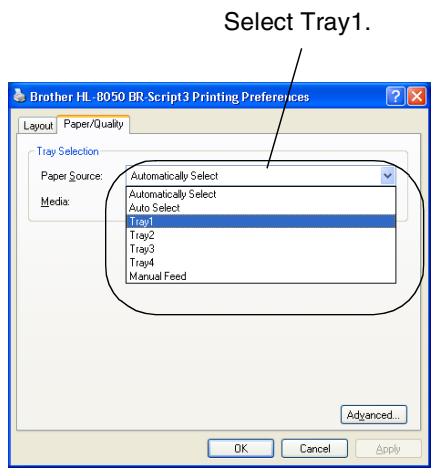
Select Tray1.
Select the Paper Size.
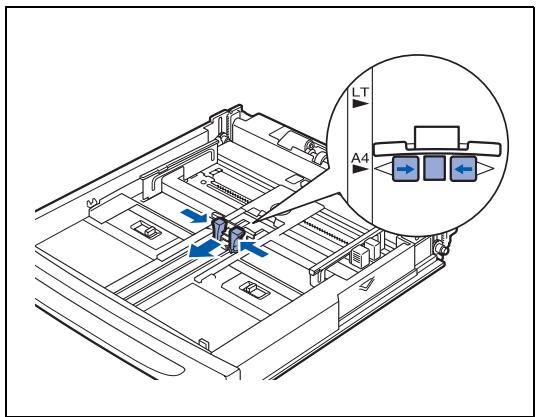
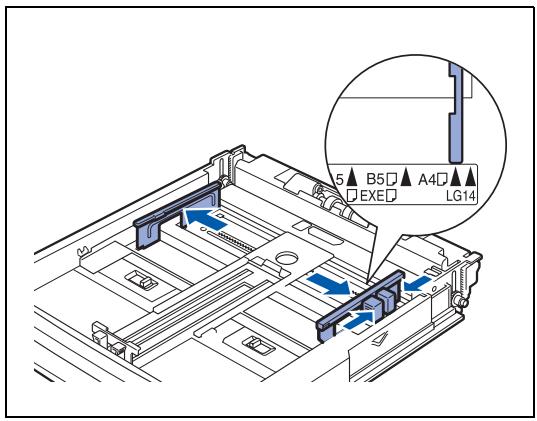
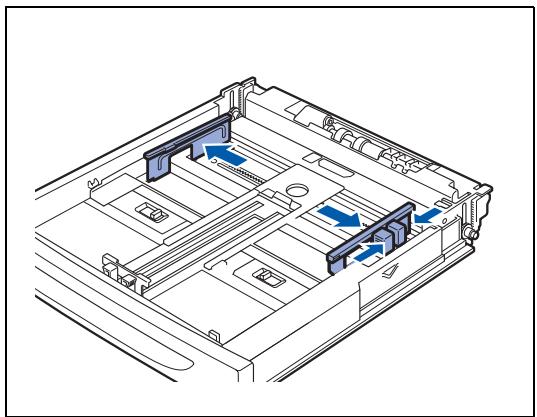
Follow the steps below to load paper larger than A4 or Letter size into any of the paper trays. (Paper tray 1 is shown in the illustrations.)
1 Place the paper tray on a flat surface.
2 Remove the lid of the tray.
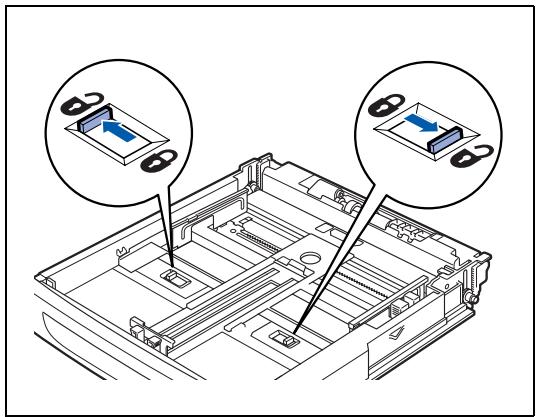
3 Slide the right and left lock tabs in the paper tray outwards to unlock them.
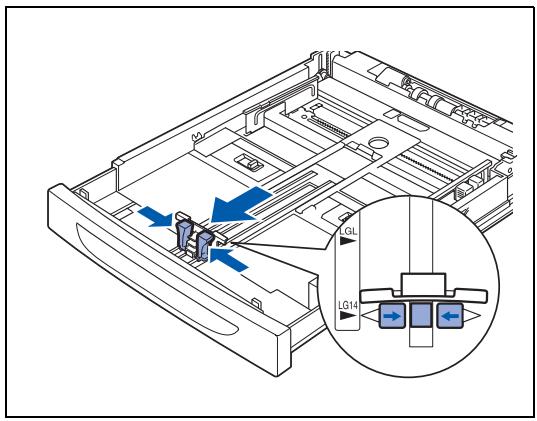
4 Hold the grip of the paper tray and pull its extendable part to the front until the centerpiece touches the marker for the paper size you are using.

The right and left lock tabs in the paper tray move inwards and lock automatically.
5 Squeeze the length guide and slide it to fit the paper size.
6 Squeeze the right width guide and slide it to fit the paper size.
7 Load the paper with the side to be printed on facing up and with all 4 corners aligned.

- Do not load paper exceeding the maximum fill line or the maximum capacity allowed.
Align the right width guide with the paper width correctly. If the right width guide is not in place, the paper will not be properly fed and may cause a paper jam.
8 Replace the lid of the paper tray.

The lid of the tray must be firmly seated. If not, the paper might be misaligned.
9 Push the paper tray completely into the printer.
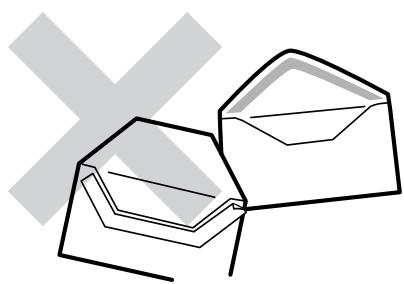
Types of envelopes to avoid
Do not use envelopes:
that are damaged, curled, wrinkled, or an unusual shape
that are extremely shiny or textured
with clasps, snaps or tie strings
with self-adhesive closures
that are of baggy construction
that are not sharply creased
that are embossed (have raised writing on them)
that were previously printed by a laser printer
that are pre-printed on the inside
that cannot be arranged when put in a pile
that are made of paper that weighs more than the paper weight specifications for the printer
that have been badly made, with edges that are not straight or consistently square or
with windows, holes, cutouts or perforations.

IF YOU USE ANY OF THE TYPES OF ENVELOPES LISTED ABOVE, THEY MAY DAMAGE YOUR PRINTER. THIS DAMAGE IS NOT COVERED UNDER ANY BROTHER WARRANTY OR SERVICE AGREEMENT.

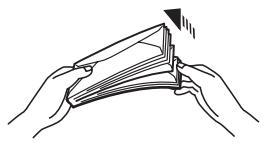
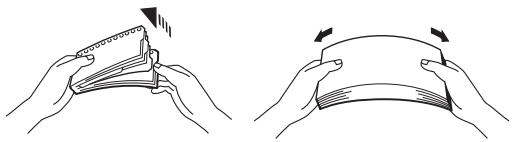
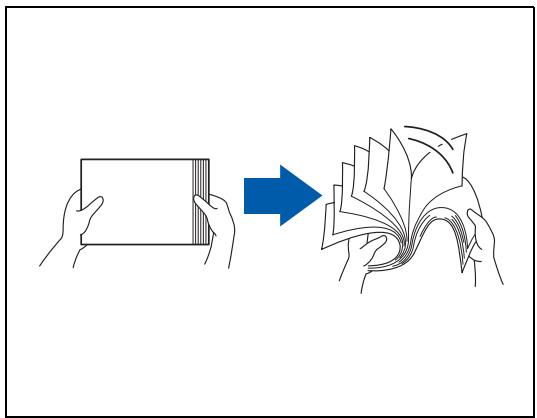
Before you print envelopes, you must 'fan' the stack to avoid paper jams and misfeeds.
- Do not load different types of envelope at the same time in the paper tray because it may cause paper jams or misfeeds.
- Do not print envelopes using duplex printing.
For proper printing, you must choose the same paper size from your software application as the paper in the tray.
Take care when selecting the settings for envelopes, because choosing them incorrectly may result in printing on the wrong side or in the wrong direction.
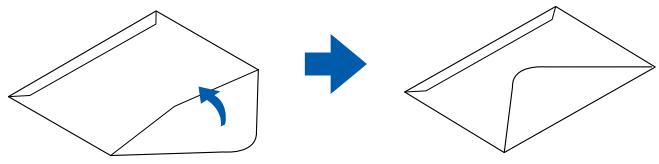
Open the envelope flaps before feeding and load as illustrated below. You can use Com-10, Monarch, C5 and DL envelopes.

- Do not use envelopes with tape seals. Printing on some types of pre-glued envelopes may not be possible, depending on the condition of the adhesive. We recommend using envelopes designed for laser printers.
- Do not use paper larger than 215.9 ~mm (8.5 in.) wide and 355.6 ~mm (14.0 in.) long.

Using poor-quality envelopes can cause creasing and deteriorate print quality.
The following is an example of how to print the address on an envelope.
Example

printed like this.
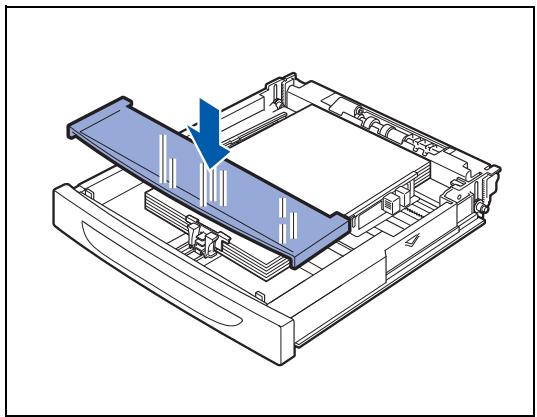
Follow the steps below to load envelopes into any of the paper trays. (Paper tray 1 is shown in the illustrations.)
1 Place the paper tray on a flat surface.

2 Remove the lid of the tray.

3 If the base plate of the paper tray is raised, push it down.
4 Squeeze the length guide and slide it to fit the envelopes.
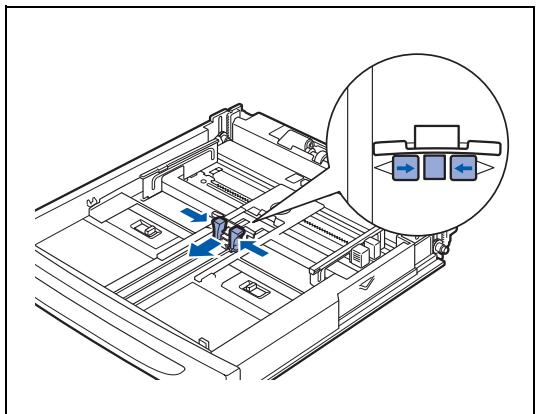
5 Squeeze the right width guide and slide it to fit the envelopes.
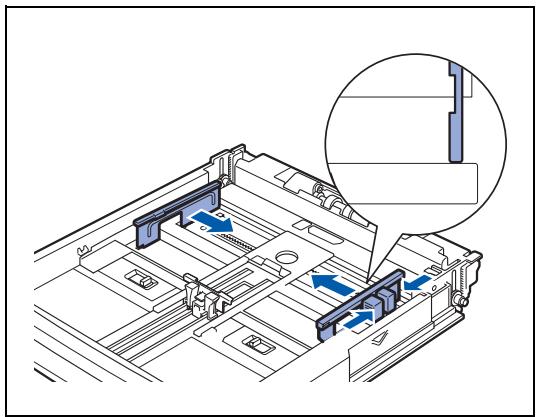
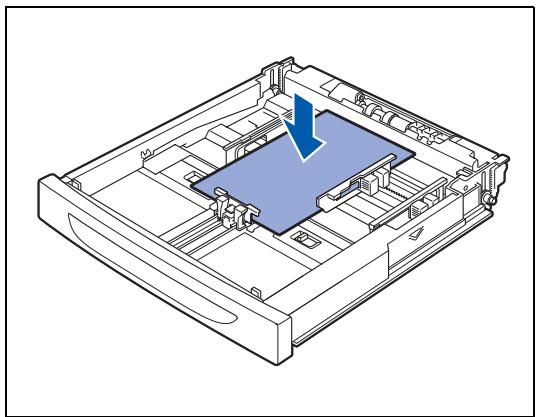
6 Load the envelopes with the side to be printed facing up and with all 4 corners aligned.

- Do not load envelopes exceeding the maximum capacity allowed.
Align the right width guide with the envelope width correctly. If the right width guide is not in place, the envelope will not be properly fed and may cause a paper jam.
The flap must be placed face down with the flap on the right side edge.
7 Replace the lid of the paper tray.

The lid of the tray must be firmly seated. If not, the paper might be misaligned.
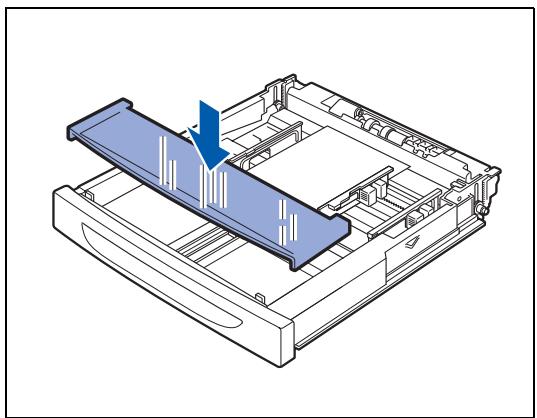
8 Push the paper tray completely into the printer.

1 Start printing from your program after loading the envelopes in the printer.
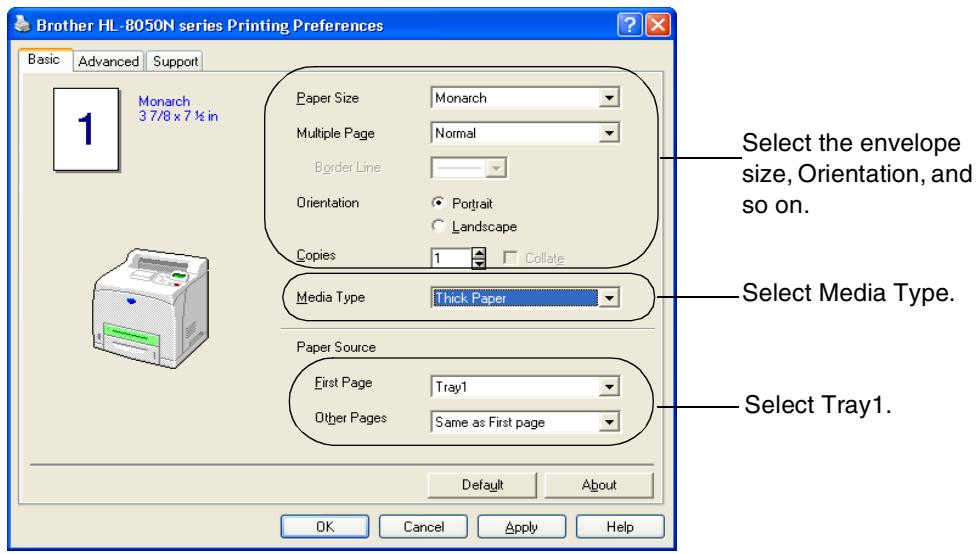
2 Follow the steps below to select the paper size from the control panel:
(1) Press any of the Menu buttons (+, -, Set or Back) to take the printer off line.
(2) Press + or - until PAPER appears on the LCD display.
(3) Press Set, and then press + or - until TRAY1 SIZE appears.
(4) Press Set.
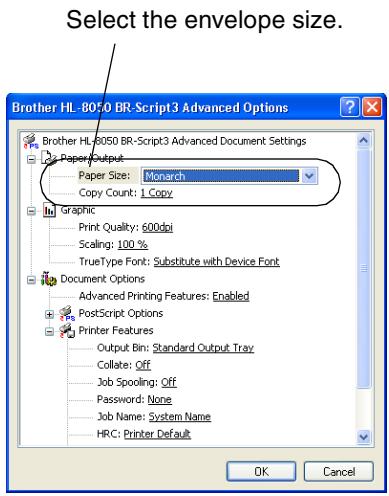
(5) Press + or - to select the envelope size, and then press the Set button.
Load Labels, Transparency and Other Special Paper in the Paper Tray
Types of special paper to avoid
Do not use paper that is damaged, curled, wrinkled or an unusual shape.


Before using paper that has holes in it, such as organizer sheets, you must 'fan' the stack to avoid paper jams and misfeeds.
- Do not use paper with perforations (holes) at the edges.
- Do not put the punched holes near the actuator (paper sensor).
- Do not use organizer sheets that are stuck together. The glue that is used might damage the printer.
- Do not load different types of paper at the same time in the paper tray because it may cause paper jams or misfeeds (except for transparencies) (See Printing on Transparencies from the Paper Tray on page 2-23).
For proper printing, you must choose the same paper size from your software application as the paper in the tray.
If your application software does not allow you to select the paper size in its PRINT menu, you can use the control panel Menu buttons to go to the PAPER menu to change the paper size. For more information, see PAPER on page 4-13.
Use transparencies that are designed for use in laser printers and for black and white printing only.

Transparencies for full-color printing cannot be loaded. Using unsuitable transparencies may lead to a printer malfunction.
If the output transparencies are allowed to stack up in the center output tray, paper jams may occur due to static electricity. Remove the transparencies from the tray as soon as they exit the printer.
Follow the steps below to load transparencies into any of the paper trays.
(Paper tray 1 is shown in the illustrations.)
1 Place the paper tray on a flat surface.

2 Remove the lid of the tray.
3 If the base plate of the paper tray is raised, push it down.
4 Squeeze the length guide and slide it to fit the paper size.
5 Squeeze the right width guide and slide it to fit the paper size.
6 Fan the paper well in small amounts.
7 Load the paper with the side to be printed on facing up and with all 4 corners aligned.

Transparencies for color printing may cause jams or fuser malfunctions. Do not use them.
- Do not load paper exceeding the maximum capacity allowed.

8 Replace the lid of the paper tray.

The lid of the tray must be firmly seated. If not, the paper might be misaligned.
9 Push the paper tray completely into the printer.
Printing on Transparency from the Paper Tray
When printing on transparencies or specialty paper, make sure that you select the type of paper and image quality before sending the print command.

Use only transparencies that are designed for use with laser printers and for black and white printing.
Use only the recommended type of transparencies (See Special paper on page 2-4). Do not use any other type, such as color transparencies (bordered with a white frame).
Using unsuitable transparencies can cause damage to the printer.
- Do not use transparencies bordered with a white frame.
- Remove each transparency sheet from the face down output tray as soon as it is printed. When transparencies are allowed to accumulate in the face down output tray, static electricity can build up and cause jams.

Transparencies can be fed from trays 1, 2, 3 and 4. When feeding transparencies from trays 1, 2, 3 and 4, load plain paper to about 30mm (about 1.2 in.) in height in the tray first, and then load transparencies on top of the plain paper up to the maximum fill line. In this case, up to 100 sheets of transparencies can be loaded.
1 Start printing from your program after loading the transparencies in the printer.
Select a paper tray.
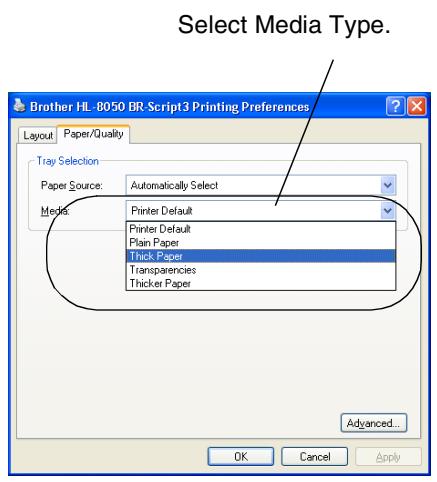
Select the Transparency.
Select the Paper Size.
1 Push the back lever up.
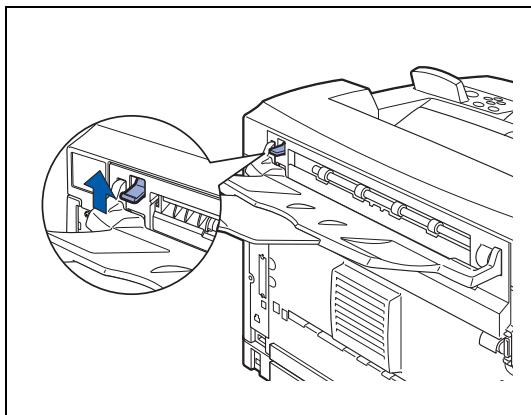
2 Put the paper in paper tray.

When you have completed printing to the face-up output tray, push the back lever down.
Changing the Configuration for Options
Once you set the initial configuration of the printer, you must reconfigure the printer driver when you install the following options:
- Lower tray units (up to two LT-8000)
- Memory expansion
- Duplex unit (DX-8000)
- Offset Catch Tray (CT-8000)
For details about how to install options, see the instructions provided with the options. In the following section, it is assumed that the options are already installed.
Memory expansion
In general, DIMM must have the following specifications:
Type: 100 pin and 32 bit output
CAS latency: 2 or 3
Clock frequency: 66 MHz or more
Capacity: 16, 32, 64, 128 or 256 MB
Height: 46 mm (1.8 in.) or less
Parity: NONE
Dram Type: SDRAM 4 Bank
SDRAM can be used.

For more information, call the dealer you bought the printer from.
For the latest information and drivers, visit the Brother Solutions Center at http://solutions.brother.com
The following DIMM size can be installed:
16MB TECHWORKS 12456-0001
32MB TECHWORKS 12457-0001
64 MB TECHWORKS 12458-0001
128 MB TECHWORKS 12459-0001
256 MB TECHWORKS 12530-0001
16MB Buffalo Technology 12323-0001
32MB Buffalo Technology 12324-0001
64 MB Buffalo Technology 12325-0001
128 MB Buffalo Technology 12326-0001
Follow the steps below. The following example is for Windows® XP.
1 On the Start menu, click Printers and Faxes. The Printers window opens.
2 Click the appropriate printer and on the File menu, click Properties. The Properties dialog box opens.
3 Click the Accessories tab. Select the options added to the printer and click OK or Apply.
On a Macintosh® Computer
Follow the steps below:
For Mac OS® 8-6 - 9.2
1 Select the Printer icon on your Desktop.
2 Select Change Setup... on Printing menu.
3 Select the options added to the printer and click OK.
For Mac OS® X 10.2 or greater

This is not available in Mac OS® X 10.1.
1 Open Print Center.
2 Select the printer from printer list.
3 Select Show Infor from Printer menu.
4 Select Installable Options.
5 Select the options added to the printer and click OK.
6 Close the Printer Center
Duplex Printing
To use duplex printing, you need to install the optional Duplex unit onto your printer. You can perform automatic duplex printing with the printer when using the optional duplex unit (DX-8000).
For details about the types of paper suitable for duplex printing, see Suitable and Unsuitable Paper Types on page 2-1.
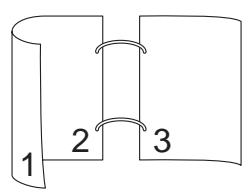
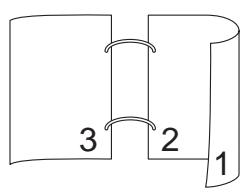
Types of Duplex Printing
There are six types of duplex printing. The results of printing with the six types are shown below:
3 Printer Driver and Software
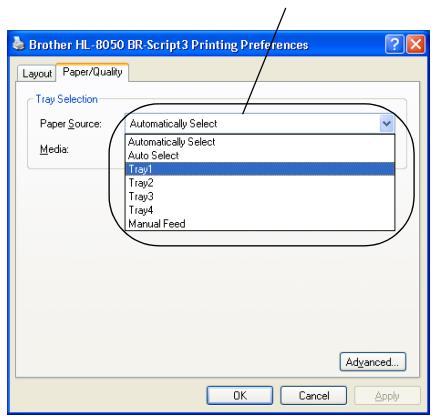
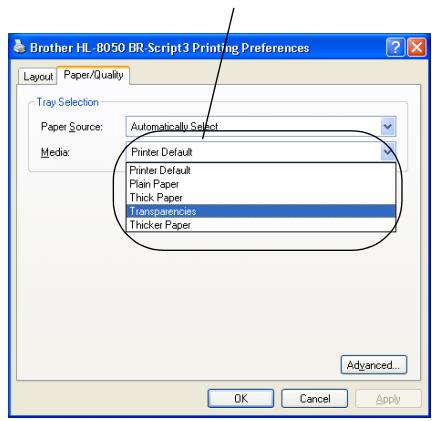
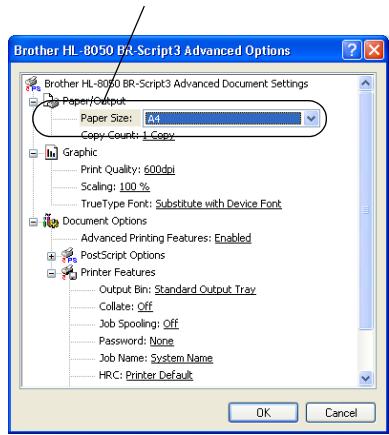
Printer Driver (Windows®)
A printer driver is software that translates data from the format used by a computer to the format that a particular printer needs. Typically, this format is a printer command language (PCL) or page description language.
The printer drivers for the following operating systems are on the CD-ROM that we have supplied. You can also download the latest printer driver from the Brother Solutions Center at http://solutions.brother.com
| PCL Driver (Hewlett-Packard LaserJet compatible laser printer) | BR-Script Driver (Postscript® 3 language emulation) | |
| Windows® 95/98/Me | ① | ① |
| Windows® 2000 | ① | ① |
| Windows NT® 4.0 | ① | ① |
| Windows® XP | ① | ① |
When using the printer locally, install the printer driver on the computer connected to it. To share a printer through a network, install the printer driver on every computer connected to the network.
Installing the Printer Driver

To install the Windows® printer driver, see the Quick Setup Guide.
Upgrading the Printer Driver
Printer driver upgrades are available on the Brother Solutions Center. To use the software, download it. Any connection charges incurred while downloading the software are entirely the customer's responsibility.
The address of the Brother Solutions Center is:
http://solutions.brother.com
You can download the latest driver or get other product information by accessing the Brother Solutions Center at http://solutions.brother.com

The screens in this section are from Windows XP.
The screens on your PC will vary depending on your Operating System.
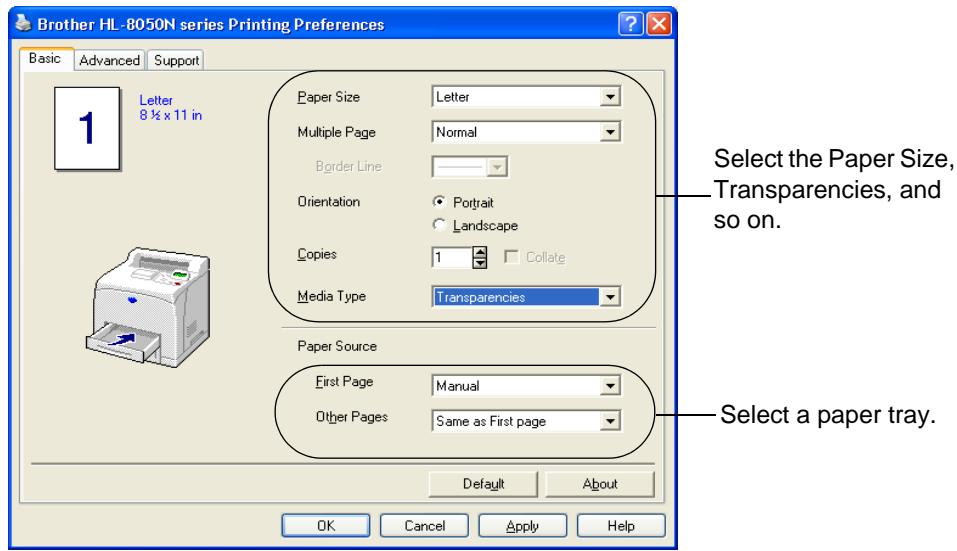
Basic tab

If you are using Windows NT® 4.0, Windows® 2000 or XP, you can access the Basic tab by clicking Printing Preferences... in the General tab of the Brother HL-8050N series Properties screen.
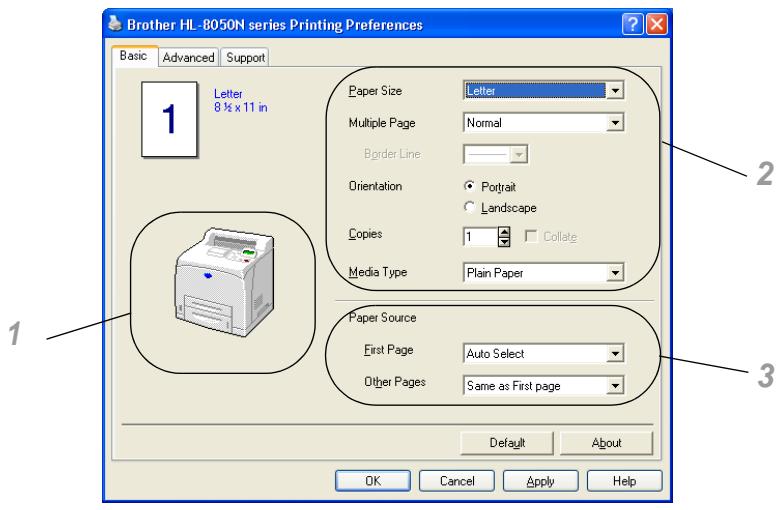
Change the settings for Paper Size, Multiple Page, Orientation and so on.
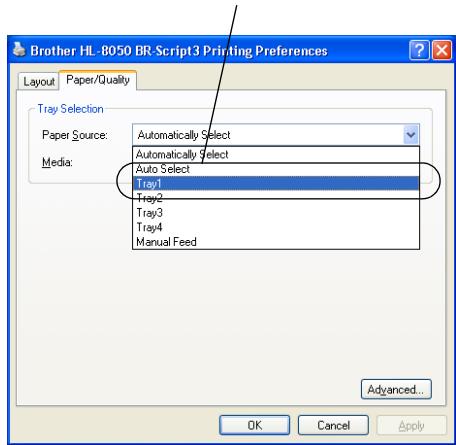
1 Select the Paper Source or set the Duplex setting by clicking the Paper Source or Duplex unit.
2 Select Paper Size, Multiple Page, Orientation (Portrait or Landscape), Copies and Media Type.
3 Select the Paper Source and so on.
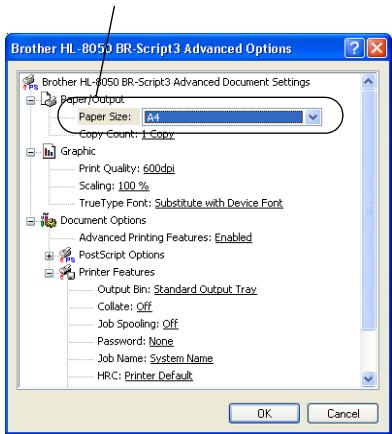
Advanced tab

If you are using Windows NT® 4.0, Windows® 2000 or XP, you can access the Advanced tab by clicking Printing Preferences... in the General tab of the Brother HL-8050N series Properties screen.
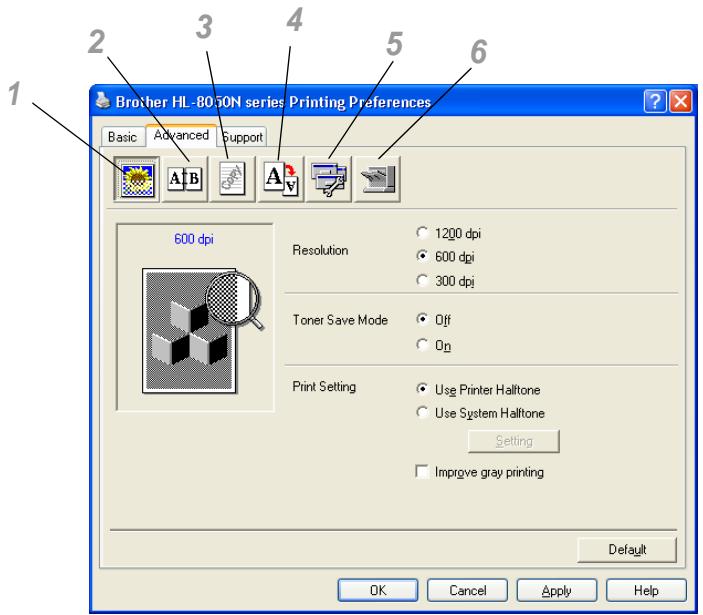
Change the tab settings by clicking the following icons:
1 Print Quality
2 Duplex Printing
3 Watermark
4 Page Setting
5 Device Options
6 Destination
Print Quality
Select the Resolution, Toner Save Mode and Print Setting.
You can change the Resolution in the printer driver as follows:
1200 dpi
600 dpi
300 dpi
Toner Save Mode
You can save running costs by turning on the Toner Save Mode, which reduces the print density.
Print Setting
You can manually change the brightness, contrast and other settings.
For Windows® 95/98/Me users only:
Auto
You can automatically print with the most suitable print setting by selecting the Auto button.
Manual
You can change the settings manually by selecting the manual button and clicking the setting button.
For Windows NT® 4.0, Windows® 2000/XP users only:
Use Printer Halftone
You can print, using the printer setting by selecting the User printer Halftone button.
Use System Halftone
You can manually change the brightness, contrast and other settings by selecting the Use system Halftone button and clicking the setting button.
Improve gray printing
You can improve the image quality of shaded areas by clicking the Improve gray printing check box. (Printing speed will be shower depending on data type.)
Duplex Printing
To use duplex printing, you need to install the optional duplex unit (DX-8000) onto your printer. If you click the Duplex icon, the dialog box for duplex settings will appear. There are six types of duplex print options available.
Booklet Printing (For PCL driver Only)
A Booklet Printing function can be used when the optional duplex unit is installed. If you select the Duplex icon, the dialog box for duplex settings will appear so you can select from 2 types of booklet options.
Watermark
Select Use Watermark to put a watermark logo or text into your documents:
When you use a bitmap file as a watermark, you can change the size of the watermark and put it anywhere you like on the page.
When you use text as a watermark, you can change the font, darkness and angle settings.
Page Setting
You can change the Scaling of the print image and select Mirror Print and Reverse Print options.
Device Options

You can set the following Printer Function modes in this tab:
Jump to the page for each Printer Function by clicking the function name.
Job Spooling
Quick Print Setup
Sleep Time
Status Monitor
Macro
■ Administrator (Windows® 95/98/Me users only)
Insert Command / File (Windows® 95/98/Me users only)
Page Protection
Print Date & Time
Density adjustment
HRC (Windows NT® 4.0, Windows® 2000/XP users only)
TrueType Mode (Windows NT® 4.0, Windows® 2000/XP users only)
Job Spooling
The printer saves data that you want reprinted.
You can reprint a document without sending the data again from your PC (except for Secure Printing).
Last Job Reprint: Reprint the last job
■ Secure Print: Print the data with a password
Public: Save the data without a password
Proof: Save the data and print it
For more information about the reprint function, see Reprint Button on page 4-4.

If you want to prevent other people from printing your data using the Reprint function, clear the Use Reprint check box in the job spooling settings.
Quick Print Setup
You can turn the Quick Print Setup function ON or OFF. A small selection window appears on your computer, this will then let you make changes to the settings of the following functions:
Multiple Page
Duplex
Toner Save Mode
Paper Source
Media Type
Sleep Time
When the printer does not receive data for a certain period of time (timeout), it enters sleep mode. Sleep mode acts as though the printer was turned off. The default timeout is 5 minutes and it is automatically adjusted to the most suitable time-out setting depending on the frequency of your printer use (Intelligent Sleep Mode). While the printer is in sleep mode, the light on the display is off, but the printer can still receive data from the computer. Receiving a print file or document automatically wakes up the printer to start printing. Pressing one of the buttons will also wake up the printer.
Status Monitor
This reports the page number and printer status (any errors that occur on the printer) during printing. If you do not need the Printer Status and would like to speed up your job, set the printer status to OFF.
Macro
You can save a page of a document as a macro to printer memory or optional device. Moreover, you can execute the saved macro - in other words, you can use the saved macro as an overlay on any documents. This will save time and increase printing speed for often used information such as forms, company logos, letter head formats or invoices.
Administrator (Windows® 95/98/Me users only)
Administrators have the authority to limit the Number of copies, Scaling settings and Watermark settings.
Insert Command / File (Windows® 95/98/Me users only)
This option allows data to be inserted into a print job.
Page Protection
'Page Protection' refers to a setting that reserves additional memory for the creation of full page images. Selections are AUTO, OFF, LTR (Letter-size paper), A4 or LGL (legal-size-paper).
The page protection feature allows the printer to create the full page image to be printed in memory before physically moving the paper through the printer. When the image is very complicated and the printer has to wait to process the image before printing, use this function.
Print Date & Time
Date: Specifies the format of the date.
Time: Specifies the format of the time.
Density adjustment
Increase or decrease the print density.
HRC (Windows NT® 4.0, Windows® 2000/XP users only)
This option allows you to change the HRC (High Resolution Control) setting on your Brother HL-8050N series printer. HRC is a special function that offers improved print quality of characters and graphics that conventional laser printers cannot attain with resolutions of 300 or 600 dpi.
Printer Default
Light
Medium
Dark
Off
TrueType Mode (Windows NT® 4.0, Windows® 2000/XP users only)
TrueType fonts may be sent to your printer in one of the following ways:
Download as TrueType
Download as Bit Image
■ Print as Graphics
Destination
You can select the output bin when you have installed the optional Offset Catch Tray (CT-8000) onto the printer.
Accessories tab
When you install the optional units, you can add those options and select their settings in the Accessories tab as follows.

1 You can manually add and remove the options for any optional unit device or RAMDISK that are installed on the printer. Tray settings will match the installed options.
2 Auto detection of printer options
The Auto Detect function finds the currently installed optional unit devices and shows the available settings in the printer driver.
When you click the Auto Detect button, options that are installed on the printer will be listed. You can manually add or remove options. Tray and other settings will match the installed options.

Auto Detect function is not available under certain printer conditions.
3 Paper Source Setting
This feature automatically knows the size of paper in each paper tray.
Support tab

If you are using Windows NT® 4.0, Windows® 2000 or XP, you can access the Support tab by clicking Printing Preferences... in the General tab of the Brother HL-8050N series Properties screen.
You can download the latest driver by accessing the Brother Solutions Center at http://solutions.brother.com
You can see the printer driver version.
You can check the current driver settings.
You can print the Printer Settings page and the internal fonts list.
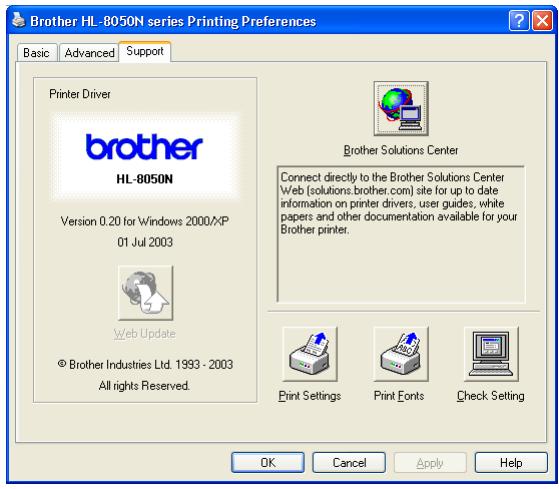
You can download the latest driver by accessing the Brother Solutions Center at http://solutions.brother.com
For more information, please see the online Help in the printer driver.

The screens in this section are from Windows® XP.
The screens on your PC will vary depending on your Operating System.
Ports tab
Select the port where your printer is connected or the path to the network printer you are using.
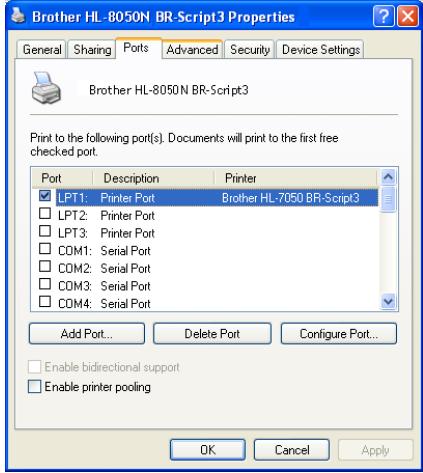
Device Settings tab
Select the options you installed.
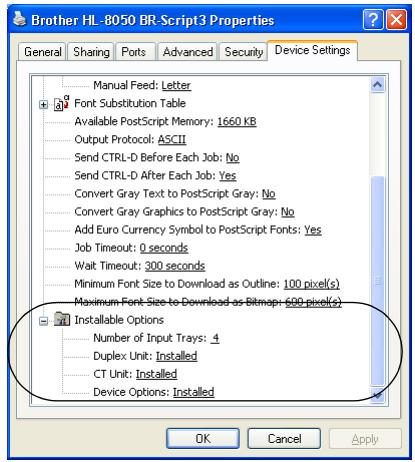
Layout tab

If you are using Windows NT® 4.0, Windows® 2000 or XP, you can access the Layout tab by clicking Printing Preferences... in the General tab of the Brother HL-8050N BR-Script3 Properties screen.
You can change the Layout setting by selecting the setting in the Orientation, Print on Both Sides, Page Order and Page Per Sheet.
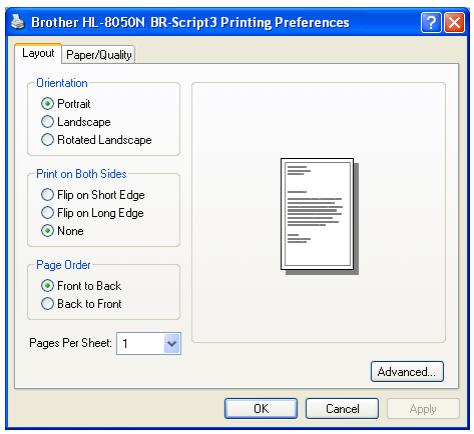
Paper/Quality tab
Select the paper source and media type.
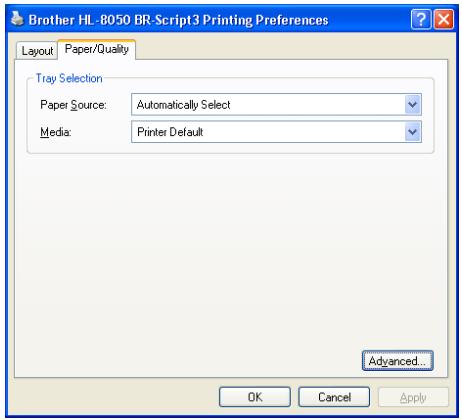
Advanced Options

If you are using Windows NT® 4.0, Windows® 2000 or XP, you can access the Brother HL-8050N BR-Script3 Advanced Options tab by clicking Advanced... button in the Layout tab or the Paper/Quality tab.
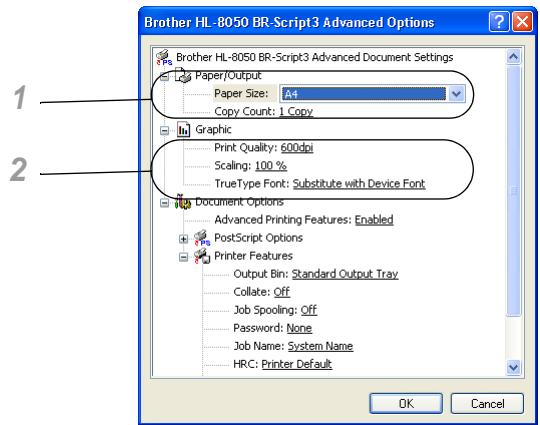
1 Select the Paper Size and Copy Count.
2 Set the Print Quality, Scaling and TrueType Font setting.
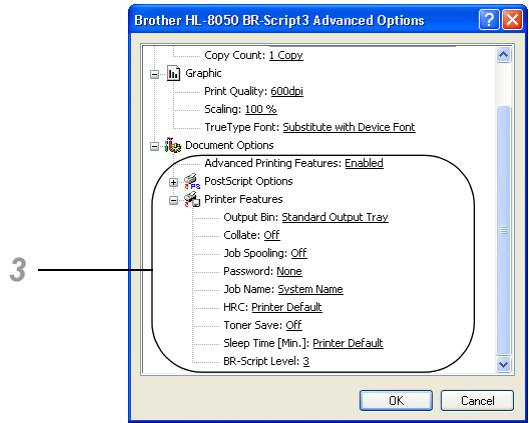
3 You can change settings by selecting the setting in the Printer Features list:
Output Bin
Collate
Job Spooling (You will need to set the RAM disk size first.) (See Accessories tab on page 3-7 and How to Set the RAMDISK size on page 4-4.)
■ Password
HRC
Toner Save
Sleep Time
BR-Script Level
Web Browser Management
Many Brother printers support Embedded Web Server (EWS) technology. This means that you can use a standard web browser to manage many aspects of the printer; for example, you can view consumable life, configure network parameters, view serial number information, printer usage, and so on. Start your web browser and enter the NetBIOS name, DNS name or IP address of the printer.
BRAdmin Professional
The BRAdmin Professional utility is designed to manage your Brother network connected devices, such as our network ready printers and multifunction centers. BRAdmin Professional can also manage other manufacturers' products that support SNMP (Simple Network Management Protocol).
Driver Deployment Wizard
This installer includes the Windows® PCL driver and Brother network port driver (LPR and NetBIOS). The administrator should set up the IP address, Gateway and Subnet with BRAdmin Professional before using this software.
If the administrator then installs the printer driver and port driver using this software, he can save the file to the File server or send the file in E-mail to users. Then, each user just clicks that file to have the printer driver, port driver, IP address, and so on, automatically copied to their PC.
Web BRAdmin
The Web BRAdmin software is designed to manage all LAN/WAN Brother network connected devices. By installing the Web BRAdmin server software on a computer running IIS*, Administrators with a Web browser can connect to the Web BRAdmin server, which then communicates with the device itself. Unlike the BRAdmin Professional utility - which is designed for Windows® systems only - the Web BRAdmin server software can be accessed from any client computer with a web browser that supports Java 2. You can download the Web BRAdmin software from our web site at http://solutions.brother.com/webbradmin.
IIS^* = InternetInformationServer4.0 or Internet Information Services 5.0/5.1
Web BRAdmin and Internet Information Server 4.0 is supported on the following operating systems: Windows NT® 4.0 Server
Web BRAdmin and Internet Information Services 5.X is supported on the following operating systems:
Windows® 2000 Professional
Windows® 2000 Server
Windows® 2000 Advanced Server
Windows® XP Professional
Printer Driver (Macintosh®)
A printer driver is software that translates data from the format used by a computer to the format that a particular printer needs. Typically, this format is a printer command language (PCL) or page description language.
The printer drivers for the following operating systems are on the CD-ROM that we have supplied. You can also download the latest printer driver from the Brother Solutions Center at http://solutions.brother.com
| BR-Script Driver (Postscript® 3 language emulation) | |
| Mac OS® 8.6-9.2 *Use the LaserWriter 8 Driver that we have supplied for your OS | ① |
| Mac OS® X 10.1/10.2 or greater *Use the PostScript® Driver that we have supplied for your OS | ① |
Printer drivers for both USB and network connections are provided with your Brother printer.
You can install the printer driver on Macintosh computers that meet the following requirements:
The printer is connected with a USB cable and the computer runs Mac OS® 8.6 to Mac OS® X 10.2 or greater with a standard USB interface.
The printer is connected to a network and computers that are running Mac OS® 8.6 to Mac OS® X.
- The printer is configured as an AppleTalk client. For details about how to set up an AppleTalk client, see the literature that came with your Macintosh computer.
Mac OS® X 10.2.4 Network users can connect using the Simple Network Configuration capabilities.
Installing the Printer Driver

To install the Macintosh printer driver, see the Quick Setup Guide.
Upgrading the Printer Driver
Printer driver upgrades are available on the Brother Solutions Center. To use the software, download it. Any connection charges incurred while downloading the software are entirely the customer's responsibility.
The address of the Brother Solutions Center is:
http://solutions.brother.com
You can download the latest driver by accessing the Brother Solutions Center at http://solutions.brother.com

The screens in this section are from Laser Writer 8 of Mac OS® 9.0.
The screens on your Macintosh® will vary depending on your Operating System.
Page setup
You can set the Paper size, Orientation and Scale.
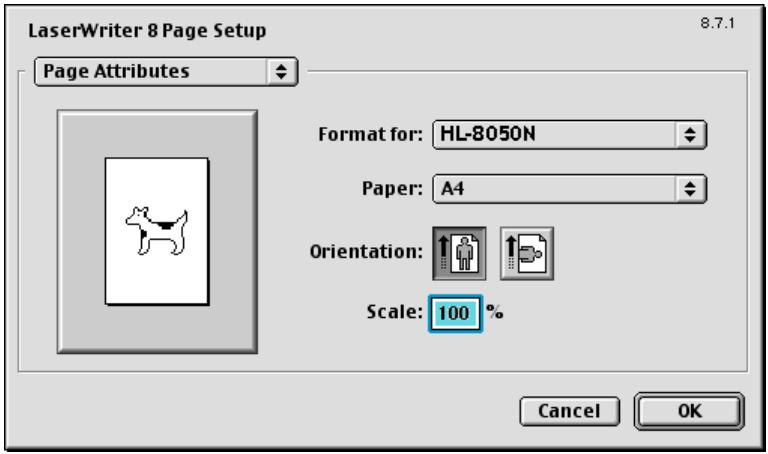
Layout
Set the Pages per sheet, Layout direction, Border and Print on Both Sides.
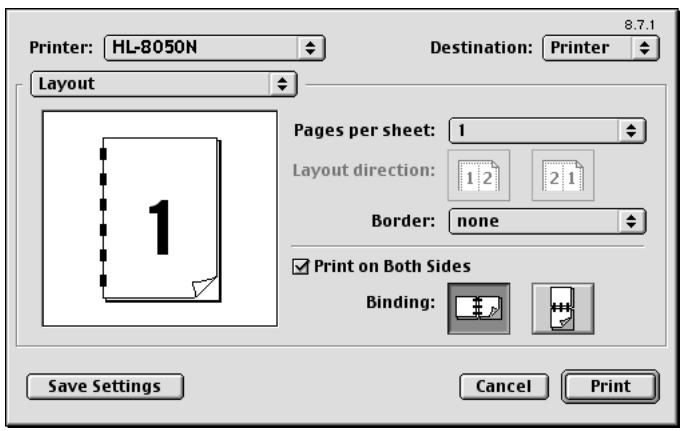
Pages per sheet: Select how many pages will appear on each side of the paper.
Layout direction: When you specify the Pages per sheet, you can also specify the direction of the layout.
Border: If you want to add a border, use this function.
Print on Both Sides: When you want to print on both sides of the paper, use this function.
Specific options
Set the Media Type, Output Bin, Collate, Resolution, Job Spooling and secure printing.
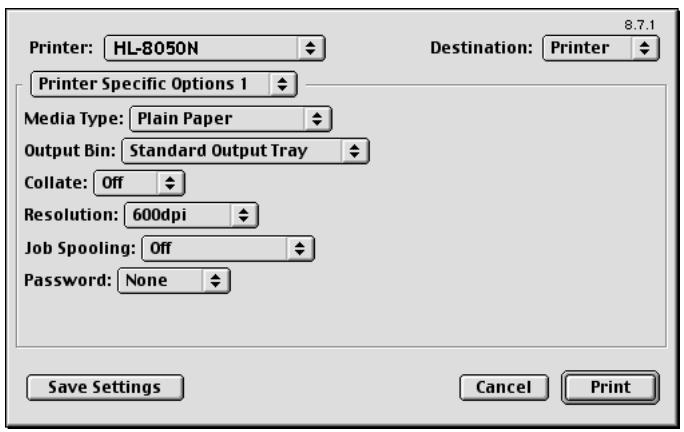
Media Type: You can use several types of media in your printer. To get the best printing quality, be sure you choose the type of media that you are using.
Output Bin: Choose one of the trays for printing.
Collate: When using Layout directions for multiple page jobs, all the pages of the job are printed followed by another complete set of pages, and so on.
Resolution: You can set the resolution (dpi) according to your printer requirement.
Job Spooling: When you want to Reprint. select ON.
Password: The password will be displayed as numbers and must be set from the printer.
Web Browser Management for Network Users
The HL-8050N supports Embedded Web Server (EWS) technology. This means that you can use a standard web browser to manage many aspects of the printer; for example, you can view consumable life, configure network parameters, view serial number information, printer usage, and so on. Start your web browser and enter the NetBIOS name, DNS name or IP address of the printer.
Automatic Emulation Selection
This printer has an Automatic Emulation Selection feature. When the printer receives data from the computer, it automatically chooses the emulation mode. This feature has been set at the factory to ON.
The printer can choose from the following combinations:
| EPSON (default) | IBM |
| HP LaserJet | HP LaserJet |
| BR-Script 3 | BR-Script 3 |
| HP-GL | HP-GL |
| EPSON FX-850 | IBM Proprinter XL |
You can select the emulation mode manually by using the control panel to access EMULATION in the SETUP menu. See SETUP on page 4-14.

When you use the Automatic Emulation Selection, note the following:
The EPSON or IBM emulation mode priority must be selected, because the printer cannot distinguish between them. Since the factory setting is EPSON emulation mode, you might need to select the IBM emulation mode by using the control panel to access EMULATION in the SETUP menu.
Try Automatic Emulation Selection with your application software or network server. If it does not work properly, select the emulation mode manually by using either the printer control panel buttons or the emulation selection commands from your software.
Automatic Interface Selection
This printer has an Automatic Interface Selection feature. When the printer receives data from the computer, it automatically selects the IEEE 1284 Parallel or the USB interface, whichever is appropriate.
When you use the parallel interface, you can turn the high-speed and bi-directional parallel communications on or off by using the control panel buttons to access PARALLEL in the INTERFACE menu. See INTERFACE on page 4-20. Since the Automatic Interface Selection mode has been factory set to ON, simply connect the interface cable to the printer. (Note: Always turn off both your computer and printer when connecting or disconnecting the cable.)
When necessary, select the interface or the serial communications parameters manually by using the control panel buttons to access the INTERFACE menu. See INTERFACE on page 4-20. For the settings on your computer, please see your user's manual for you computer or application software.

When you use the Automatic Interface Selection, note the following:
This function takes a few seconds to work. If you want to speed up printing, select the required interface manually by using the control panel to access SELECT in the INTERFACE menu.
If you typically use only one interface, we recommend that you select that interface in the INTERFACE menu. If only one interface is selected, the printer will allocate the entire input buffer to that interface.
Printer Settings
Factory Settings
The printer settings have been set at the factory before shipment. They are called factory settings. Although you can operate the printer with these factory settings unchanged, you can tailor the printer with user settings. See List of factory settings on page 4-23.

Changing the user settings does not affect the factory settings. You cannot modify the present factory settings.
The changed user settings can be restored to the default factory settings with the RESET MENU menu. See RESET MENU on page 4-20.
Network Factory Default Setting
If you wish to reset the network setting to its default factory settings (resetting all information such as the password and IP address information), please follow these steps:
1 Turn off the printer.
2 Hold down the + button as you turn on the power switch. Keep the button pressed down until the LCD display shows READY.
3 The print server has been reset to its default factory settings.

For more information on APIA, see the Network User's Guide or visit http://solutions.brother.com
Control Panel Overview
The control panel consists of LED indicators, a Liquid Crystal Display (LCD) and several buttons. This section describes the names and functions of the control panel's parts.
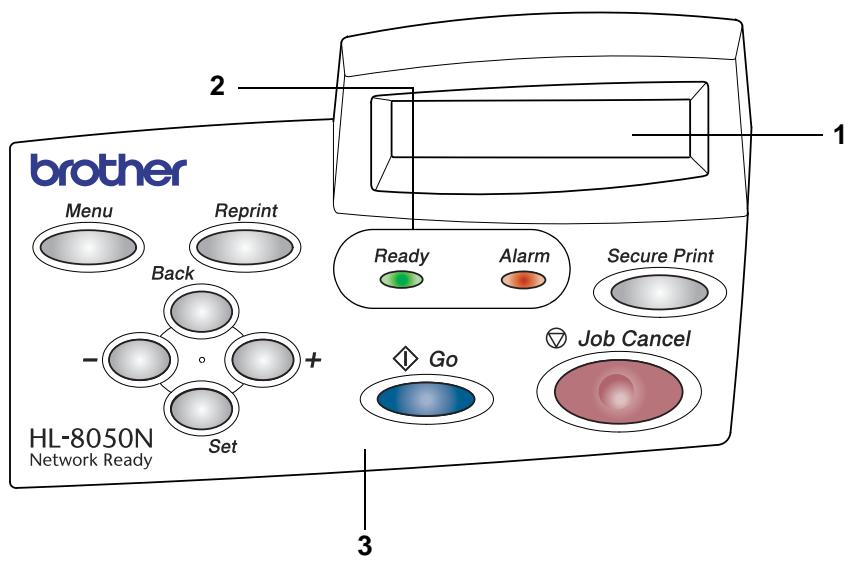
- Liquid Crystal Display (LCD)
- LED indicators (Light Emitting Diode indicators)
- Buttons
Buttons
You can control the basic printer operations and change various printer settings with nine buttons (Job Cancel, Go, Secure Print, +, -, Set, Back, Reprint, Menu).
| Name | Menu Screen |
| Job Cancel | Stop and cancel the printing job in progress. |
| Go | Exit from the control panel menu, reprint settings and error messages.Pause and continue printing. |
| Secure Print | Reprint the secure data. |
| + | Move forward through menus.Move forward through the options you can choose. |
| - | Move backward through menus.Move backward through the options you can choose. |
| Set | Select the control panel menu.Set the selected menus and settings. |
| Back | Go back one level in the menu. |
| Reprint | Reprint the last job received. |
| Menu | Go to the top menu (INFORMATION mode). |
Job Cancel Button
You can cancel the processing or printing of data with the Job Cancel button. The display shows JOB CANCELLING until the job is cancelled. After cancelling the job, the printer returns to the READY state. When the printer is not receiving data or printing, the display shows NO DATA!! and you cannot cancel the job.
Go Button
You can change the panel indications from the current status (Menu, Error and Reprint settings) by pressing the Go button once. For ERROR indications, the control panel only changes when the error is cleared.
You can pause printing with the Go button. Pressing the Go button again restarts the print job and clears the pause. During a pause, the printer is off-line.

If the printer is in PAUSE mode and you do not want to print the remaining data, you can cancel the job by pressing the Job Cancel button. Once the job has been cancelled the printer will return to the READY state.
Secure Print Button
You can use the Secure Print button to reprint saved secure data in job units.
This function is available only when a CompactFlash card that contains secure data is installed or when secure data is stored in RAM. (See Accessories tab on page 3-7 and How to Set the RAMDISK size on page 4-4.)
Basically, the Secure Print button is enabled only while the printer is in the READY or MENU state. It is disabled during the PRINT state and PAUSE (printing paused) state.
Pressing the Secure Print button while it is enabled displays a screen for selecting the secure data user name. Using the same steps as those for selecting the secure data job for the REPRINT operation, specify the user name, job name, password, and then number of copies. Next, press the Set or Secure Print button to start printing.
You can use the + or - buttons to change the number of copies to a value up to 999. After printing is complete, the secure data is deleted and the printer enters the READY state. If you press the Secure Print button when there is no storage media installed, the message NO DATA STORED! appears in the top line of the LCD for about one second.
+ or - Button
If you press the + or - button when the printer is on-line (READY), it goes off-line and the LCD displays the menu.
To move through menus on the LCD
If you press the + or - button when the printer is on-line (READY), it goes off-line and the LCD displays the current mode.
You can go to other menus by pressing the + or - button. Pressing the + or - button allows you to move forward or backward through the menus and settings on the display. Press or keep pressing the button until you see the setting you want.
To enter numbers
You can enter numbers in two ways. You can press the + or - button to move up or down one number at a time, or you can hold down the + or - button to move faster. When you see the number you want, press the Set button.
Set Button
If you press the Set button when the printer is on-line (READY), it goes off-line and the LCD goes to the menu.
Pressing the Set button allows you to choose the displayed menu or option. After changing a setting, an asterisk (*) appears briefly on the right-hand side of the message.
Back Button
If you press the Back button when the printer is on-line (READY), it goes off-line and the LCD goes to the menu.
Pressing the Back button allows you to return to the previous level from the current menu level.
The Back button also allows you to choose the previous digit while setting numbers.
When you select a setting and it does not have and asterisk (Set button was not pressed), the Back button allows you to return to the previous menu level with the original setting unchanged.

When you press the Set button to choose a setting, an asterisk appears briefly at the end of the display. Since the asterisk shows what you have chosen, you can easily see the current settings as you look through the display.
How to Set the RAMDISK size
1 Press the + or - button until SETUP mode appears.
2 Press the Set button, and then press the + or - button until RAMDISK SIZE appears.
3 Press the Set button, and then press the + or - button to set RAMDISK size.
4 Press the Set button.
Reprint Button
If you want to reprint a document that has just been printed, you can reprint it by pressing the Reprint button. Also, if you have created a document that you wish to share with co-workers, simply spool the document to a non-secure area of the printer. This document can then be reprinted by anyone who is on the network or at the printer control panel.
You can use the Reprint button when the printer is in READY or PAUSE state.
If you want to print PROOF, PUBLIC or SECURE data, we recommend that you install the CompactFlash card.
If you do not install CompactFlash card (see Installing the CompactFlash Card on page A-4), you can reprint from random access memory (RAM). The reprint data in RAM will be deleted when the printer is turned off.
When you use RAM to reprint:
1 Press the Set button on the control panel to exit from the READY state and select RAMDISK SIZE in the SETUP menu.
2 The default RAM disk is 0MB. Press the + button to increase the reprint RAM size in increments of 1MB.

- When you increase the RAM size for Secure Printing, the work area of the printer is decreased and the printer performance will be reduced. Make sure that you reset the RAMDISK size to 0MB after you finish using Secure Printing.
When you store data in RAM, the data will be deleted when the printer is turned off.
We recommend that you add more RAM if you want to be able to print a lot of secure data. (See Memory expansion on page 2-26.)
Reprinting the last job
You can reprint the data from the last print job without sending it from the computer again.

If REPRINT function is set to OFF on the control panel and you press the Reprint button, the LCD shows NO DATA STORED for a short time.
If you want to cancel reprinting, press the Job Cancel button.
If the printer does not have enough memory to spool the print job data, it will only print the last page.
- Pressing the - or + button makes the number of reprint copies decrease or increase. You can select between 1 and 999 copies.
For more information about the settings in the printer driver, see Job Spooling on page 3-5.
Reprint the last job three times
1 Turn the REPRINT function ON by using the control panel buttons to go to the SETUP menu.

If you print using the driver we have supplied with the printer, the settings for Job Spooling in the printer driver will take priority over the settings made on the control panel. For more information, see Job Spooling on page 3-5.
2 Press the Reprint button.
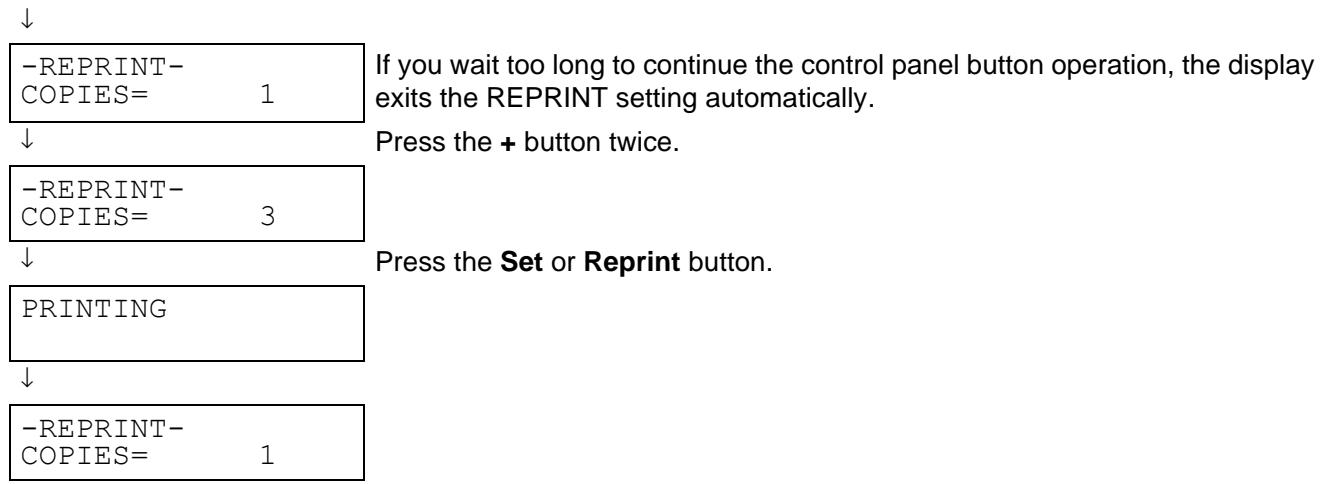

If you press the Go button twice, the printer will exit the REPRINT setting.
If you want to reprint the data and have pressed the Go button, the display shows PRESS SET TO PRINT. Press the Set or Reprint button to start reprinting, or press Go again to cancel the reprint job.
Printing PROOF data
You can use this function to reprint PROOF data that has just been printed and has no security settings. Documents that are placed in the PROOF area are available to anyone. You might use this function for a document that will be moved to a public folder at a later date.
When the area to spool data is full, the earliest data is automatically deleted first. The order of deleting data is not connected to the order of reprinting.
When you reprint PROOF data, please see How to print SECURE data on page 4-7.

If you have not installed the CompactFlash, the reprint data will be deleted when the printer is turned off.
If there is data in the job information that cannot be displayed on the LCD, the display shows '?'
For more information about the settings in the printer driver, see Job Spooling on page 3-5.
Printing PUBLIC data
You can use this function to reprint documents that are stored in a PUBLIC area of the printer memory. Documents here will not be protected by a password and anyone can access them using the front panel or a web browser. The printer will not print a PUBLIC document when you send it to the printer. You must use the control panel of the printer or connect to the printer through a web browser.
PUBLIC data can be deleted using the control panel of the printer or from the web-based management software.

If there is data in the job information that cannot be displayed on the LCD, the display shows '?'
For more information about the settings in the printer driver, see Job Spooling on page 3-5.
Printing SECURE data
SECURE documents are protected by a password and only those people who know the password will be able to print the document. The printer will not print the document when you send it for printing. To print the document you must use the control panel of the printer (with the password) or connect to the printer using a web browser.
If you want to delete the spooled data, you can carry out this operation using the control panel or the web-based management software.

If there is data in the job information that cannot be displayed on the LCD, the display shows '?'
For more information about the settings in the printer driver, see Job Spooling on page 3-5
How to print SECURE data
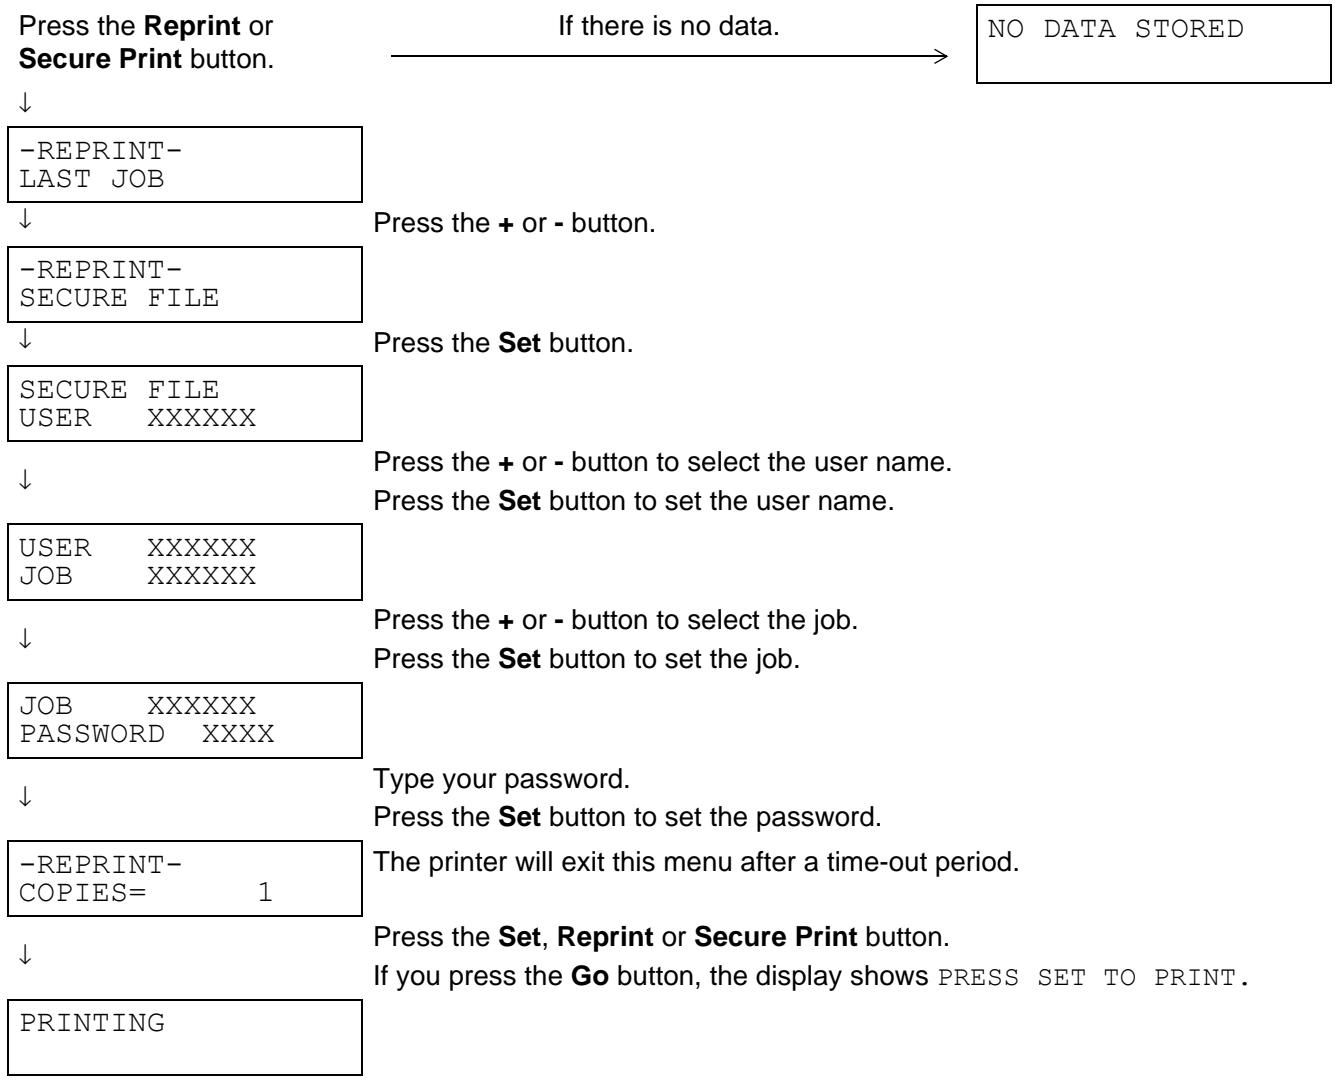
When there is no reprint data in memory
If the printer does not have reprint data in the memory and you press the Reprint or Secure Print button, the LCD shows NO DATA STORED.
To cancel the reprint job
Pressing the Job Cancel button allows you to cancel the current reprint job. The Job Cancel button also allows you to cancel a paused reprint job.
Menu Button
Pressing the Menu button while in a non-menu setting mode puts the printer off-line and displays the Top Menu. The Menu button is provided only for the purpose of displaying the Top Menu. It does not perform any other operation. The printer automatically exits the menu if no operation is performed for 30 seconds.
LED Indicators
The LED indicators are lights that show the printer's status.
Alarm LED - Red
This LED lights to indicate that the printer has detected some type of problem (operator call, error, service error).
| LED Status | Meaning |
| On | Alarm state (error) |
| Off | Normal state (no error) |
Ready LED - Green
| LED Status | Meaning |
| Off | Printer is turned off. Printer is off-line. ■ Menu selection being performed ■ Number of reprint copies being set ■ PAUSE state ■ Alarm state |
| Blinking | Printer is receiving data from computer or processing data. |
| On | Printer is on-line and ready for printing. ■ READY/WARMING UP state ■ SLEEP state ■ PRINTING state (including reprint) ■ JOB CANCEL state Incomplete data* is present. In this case, Data exists is displayed in the top line of the LCD. * Data that is in the process of being created exists, and no data is being received. |

If the printer goes off-line while data is being received or processed (such as when the menu is displayed or an error occurs), data display is still given priority.
Liquid Crystal Display (LCD)
The display shows the current printer status. When you use the control panel buttons, the display will change.
If you take the printer off-line, the display changes to show the emulation you have chosen.
If there are any problems, the display shows the appropriate error message, maintenance message or call service message so you will know that you need to take action. For more information about these messages, see What to Do When an Error Message Appears on page 5-15.
LCD Message
Printer status messages
The following table shows the printer status messages that are displayed during normal operation:
| Messages | Meaning |
| READY | Ready to print. |
| PRINTING | Printing. |
| RESOLUTION ADAPT | Printing with reduced resolution. |
| PROCESSING | Busy processing data. |
| JOB CANCELLING | Cancelling the job. |
| PAUSE | The printer has suspended its functions. Pressing the Go button starts the printer again. |
| WARMING UP | The printer is warming up. |
| SLEEP | In Sleep state |
| PRESS SET TO PRINT | Press the Set button to start printing. |
| RESET TO FACTORY SETTING | The printer setting returns to the factory settings. |
| SELF TEST | Performing self-diagnostics. |
| RAM SIZE=XX MB | This printer has XX MB memory. |
| NOW INITIALIZING | The printer is setting up. |
| PROGRAMING-WAIT | Accessing CompactFlash card. |
| IGNORE DATA | PS data is being read and disregarded. |
| DATA EXISTS (*) | Incomplete data exists. |
| COOLING DOWN | Wait for a few seconds until inside of the printer has cooled down. |
- Data that is being created exists, and no data is being received. Pressing the Go button performs FORM FEED and changes the display message to PRINTING.
When you operate the Menu buttons (+, -, Set, Back or Menu), remember the following basic steps:
If no control panel operations are performed for 30 seconds, the LCD automatically returns to READY.
- When you press the Set button to choose a setting, an asterisk appears at the end of the display for a short time. After that, the display returns to the previous menu level.
After changing the status or a setting, pressing the Back button before you press the Set button will cause the display to return to the previous menu level with the original settings unchanged.
There are two ways to input numbers. You can press + or - to scroll up or down one number at a time, or you can hold down + or - to scroll faster. The blinking number is the one that you can change.
When you want to turn the MANUAL FEED setting ON
The default setting is OFF. Turn this setting ON if you want to.
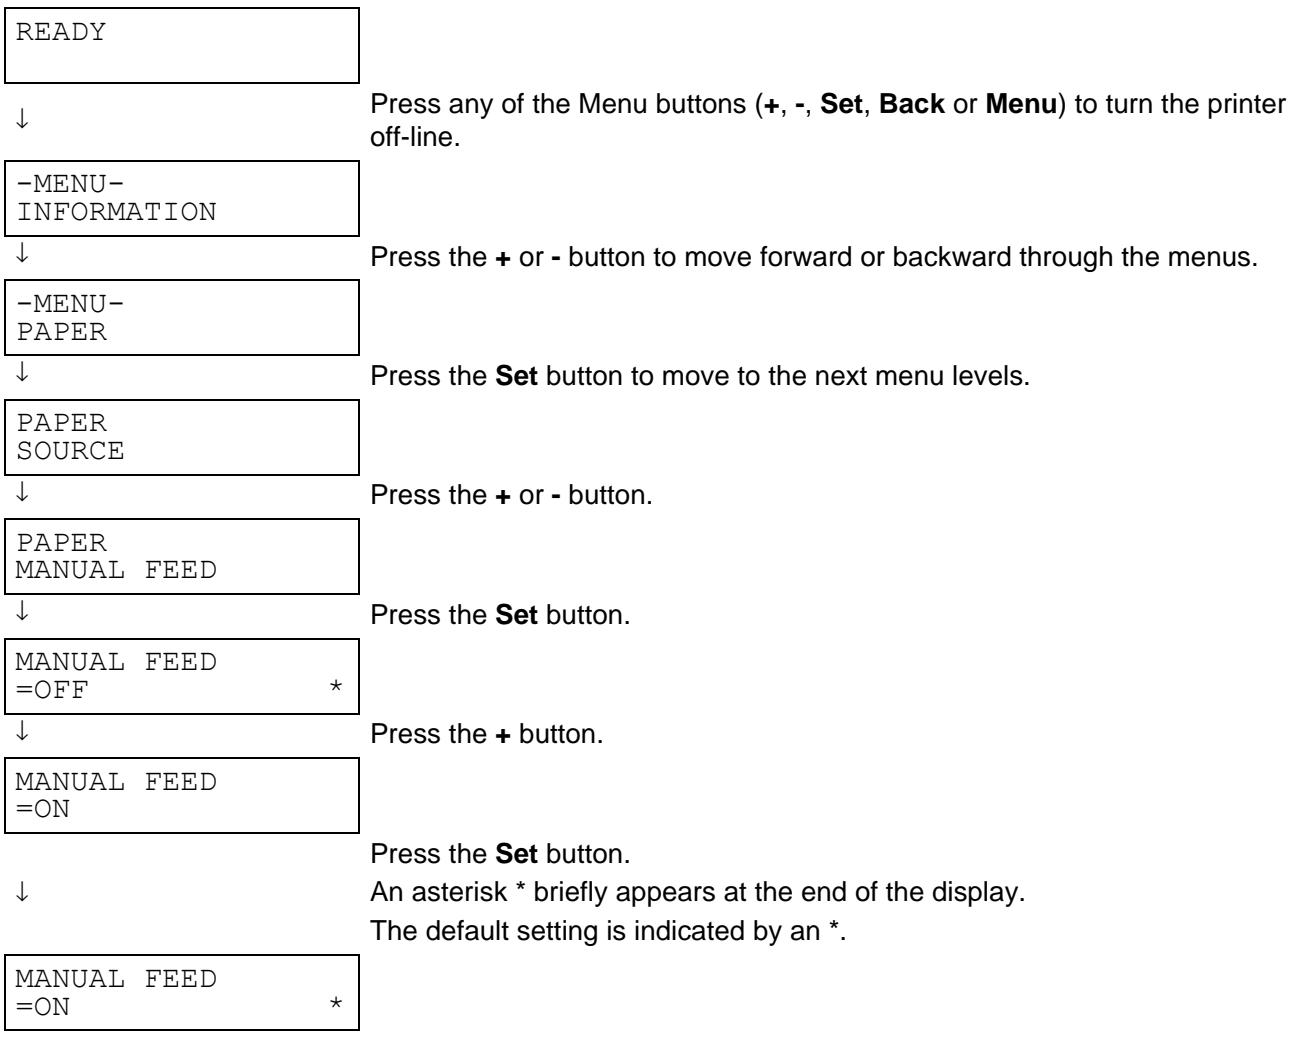

The control panel LCD names for the paper trays are as follows.
| Standard paper tray | TRAY 1 and TRAY 2 |
| Optional paper tray | TRAY 3 and TRAY 4 |
| Optional duplex unit for Duplex printing | DX |
| Offset catch tray | CT |
There are eight menus. For more information about the selections available in each menu, please see the pages listed below.
■ INFORMATION For more information, see page 4-13.
PAPER For more information, see page 4-13.
QUALITY For more information, see page 4-14.
■ SETUP For more information, see page 4-14.
■ PRINT MENU For more information, see page 4-16.
■ NETWORK For more information, see page 4-19.
■ INTERFACE For more information, see page 4-20.
RESET MENU For more information, see page 4-20.
INFORMATION
PAPER
| Menu | Description | ||
| PRINT SETTINGS | Prints the print settings page. | ||
| PRINT TEST | Prints the test page. | ||
| PRINT DEMO | Prints the demonstration sheet. | ||
| PRINT FILE LIST | Prints the card list. | ||
| PRINT FONTS | Prints the font list and samples. | ||
| VERSION | SER.NO | ##### | Shows Printer serial number. |
| ROM VER | ##### | Shows ROM version. | |
| ROM DATE | ##/##/# | Shows ROM date. | |
| NET VER | ##### | Shows Network version (only Network users). | |
| NET DATE | ##/##/# | Shows Network build date (only Network users). | |
| ENG VER | ##### | Shows Engine ROM version. | |
| RAM SIZE | #####MB | Shows the size of memory in this printer. | |
| MAINTENANCE | PAGE COUNTER | ##### | Shows the current total printed pages. |
| REMAIN FUSER | ##### | Shows the pages left to print with fuser unit. | |
| Menu | Description | |
| SOURCE | AUTO/TRAY1/TRAY2/TRAY3/TRAY4 | Select which paper tray the paper will be fed from. |
| PRIORITY | T1>T2>T3>T4T4>T3>T2>T1 | When SOURCE is selected as AUTO:Selects the order in which the printer uses the paper trays that contains paper of the same size. |
| MANUAL FEED | OFF/ON | Select whether or not you want to feed paper manually. |
| TRAY1 SIZE | DETECT SENSOR/B5/B6/A6/COM-10/DL/MONARCH/C5/USER DEFINED | Select the size of paper you loaded in the paper tray, for example, A4/Letter/Legal/.... |
| TRAY2 SIZE | DETECT SENSOR/B5/B6/A6/COM-10/DL/MONARCH/C5/USER DEFINED | Select the size of paper you loaded in the paper tray, for example, A4/Letter/Legal/.... |
| TRAY3 SIZE | DETECT SENSOR/B5/B6/A6/COM-10/DL/MONARCH/C5/USER DEFINED | Select the size of paper you loaded in the paper tray, for example, A4/Letter/Legal/.... |
| TRAY4 SIZE | DETECT SENSOR/B5/B6/A6/COM-10/DL/MONARCH/C5/USER DEFINED | Select the size of paper you loaded in the paper tray, for example, A4/Letter/Legal/.... |
| DUPLEX | OFF/ON (LONG BIND)/ON (SHORT BIND) | Select whether you want to automatically print on both sides of the paper. |
| OUTPUT | STANDARD/CT/CT STACK | Select where you want the printed pages to go. |
| JOB OFFSET | ON/OFF | Select whether or not you want to offset the job. |
QUALITY
| Menu | Description | |
| RESOLUTION | 300/600/1200 | You can select a print resolution of 300, 600 or 1200 dpi (dots per inch). |
| HRC | MEDIUM/DARK/OFF/LIGHT | HRC: High Resolution Control (HRC) offers improved print quality of letters, numbers and graphics that conventional laser printers cannot achieve, with a resolution of 300 or 600 dpi. |
| TONER SAVE | OFF/ON | Reduce costs by turning this on. |
| DENSITY | -2 to 2 | Increase or decrease the print density. |
SETUP
| Menu | Description | ||
| LANGUAGE | ENGLISH/FRANÇAIS/... | Select the language you want the display of the LCD to show. | |
| PANEL CONTROL | LOWER LCD | NONE/PAGE COUNTER/JOB NAME | Select what you want to appear on the second line of your LCD display. |
| AUTO ONLINE | ON/OFF | The printer will automatically go online after a print job if you set this to ON. | |
| BUTTON REPEAT | Set the time for the display message to change when holding the + or - button at intervals of: 0.1, 0.2, 0.3, 0.4, 0.5, 1.0, 1.5 or 2.0 seconds. The factory setting is 0.1. | ||
| MESSAGE SCROLL | Set the time in seconds that an LCD message will scroll across the display. From Level 1=0.2 to Level 10=2.0. The factory setting is Level 1. | ||
| ERROR BUZZER | OFF | Select this if you do not want the buzzer to activate when there is an error at the printer. | |
| NORMAL | There will be three sets of five Buzzes when an error occurs. | ||
| SPECIAL | Buzzes five times consecutively until the error is cleared. | ||
| PANEL BUZZER | OFF | Disables buzz function when you press the button. | |
| ON | Enables buzz function when you press the button. | ||
| POWER SAVE TIME | 1:30:60MIN. | Select the length of time the printer will wait until it goes into Power Save mode. | |
| AUTO CONTINUE | OFF/ON | ||
| TONER LOW | CONTINUE/STOP | CONTINUE: Continue printing even if there is a TONER LOW error. STOP: Stop printing if there is a TONER LOW error. | |
| LOCK PANEL | OFF/ON | Turn the lock panel setting on or off. | |
| PASS NO.=##### | Enter a 3-digit password for unlocking the control panel when it is locked. | ||
| REPRINT | ON/OFF | Select whether you want the Reprint feature on or off. If Reprint is set to ON the printer will reprint the last print job when the Reprint button is pressed. | |
| PAGE PROTECTION | AUTO/OFF/LETTER/A4/LEGAL | PROTECT=AUTO | |
| EMULATION | AUTO (EPSON) / AUTO (IBM) / HP LASERJET/... | Choose the emulation mode that you want the printer to use. | |
| KEEP PCL | OFF/ON | ||
| RAMDISK SIZE | 0/1/2/...MB | RESTART? | |
| DELETE STORAGE | Delete the data in CompactFlash card. | ||
| SECURE FILE | Select the user name, job name and password. | ||
| PUBLIC FILE | Select the user name and job name. | ||
| PROOF FILE | Select the user name and job name. | ||
| DATA ID(CF) | ##### | Enter the image data ID that is stored on the compact flash card. | |
| MACRO ID(CF) | ##### | Enter the image macro ID that is stored on the CompactFlash card. | |
| FONT ID(CF) | ##### | Enter the Font ID that is stored on the CompactFlash card. | |
| FORMAT (CF) | ##### | Format the CompactFlash Card | |
| TIME STYLE | YY/MM/DD hh:mmMM/DD/YY hh:mmDD/MM/YY hh:mm | Choose the way you want the printer to display the date. | |
| DATE & TIME | DISPLAY | YYYY/MM/DDhh:mm | Select whether you want the date or the time displayed. |
| YEAR | ##### | Enter the year i.e. 2003. | |
| MONTH | ## | Enter the month i.e. 07. | |
| DAY | ## | Enter the day i.e. 01. | |
| HOUR | ## | Enter the hour (24hour format) i.e 14. | |
| MINUTE | ## | Enter the minutes i.e. 30. | |
PRINT MENU
| Menu | Description | ||
| MEDIA TYPE | PLAIN PAPER/THICK PAPER/TRANSPARENCIES/THICKER PAPER | Choose the type of media that is in the paper tray. | |
| PAPER | LETTER/LEGAL/A4/EXECUTIVE/COM-10/DL/JIS B5/B5/A5/B6/A6/MONARCH/C5 | Choose the size of paper that is in the paper tray. | |
| COPIES | ■ You can check the total number of printed pages.■ Shows the number of printed pages (1 to 999). | ||
| ORIENTATION | PORTRAIT/LANDSCAPE | This printer can print pages in portrait or landscape orientation. | |
| PRINT POSITION | This printer can be adjusted to align the page format. | ||
| X OFFSET | -500:0:500 | Move the print start position (at the top-left corner of pages) horizontally up to -500 (left) to +500 (right) dots in 300 dpi. | |
| Y OFFSET | -500:0:500 | Move the print start position (at the top-left corner of pages) vertically up to -500 (up) to +500 (down) dots in 300 dpi. | |
| AUTO FF TIME | OFF/1:5:99 (sec) | Allows you to print the remaining data without pressing the Go button. | |
| FF SUPPRESS | OFF/ON | Turns the feed suppress (PAUSE) setting on or off. | |
| HP LASERJET | FONT NO. | I000:## | Enter the code for the HP font that you want. |
| FONT PITCH/POINT | ##.## | Enter the size you want the font to be printed. | |
| SYMBOL SET | PC-8/.. | Set the symbol set or the character set. | |
| TABLE PRINT | Print code table. | ||
| AUTO LF | OFF/ON | ON: CR-CR+LF, OFF: CR-CR | |
| AUTO CR | OFF/ON | ON: LF LF+CR, FF+CR, or VT-VT+CR OFF: LF-LF, FF-FF, or VT-VT | |
| AUTO WRAP | OFF/ON | Select whether a line feed and carriage return will happen when the printer reaches the right margin. | |
| AUTO SKIP | ON/OFF | Select whether a line feed and carriage return will happen when the printer position reaches the bottom margin. | |
| LEFT MARGIN | ## | Set the left margin at column 0 to 70 columns at 10 cpi. | |
| RIGHT MARGIN | ## | Set the right margin at column 10 to 80 columns at 10 cpi. | |
| HP LASERJET(continue) | TOP MARGIN | #.## | Set the top margin at a distance from the top edge of the paper: 0, 0.33, 0.5, 1.0, 1.5 or 2.0. The factory setting is 0.5. |
| BOTTOM MARGIN | #.## | Set the bottom margin at a distance from the bottom edge of the paper: 0, 0.33, 0.5, 1.0, 1.5 or 2.0. The factory setting is 0.33(None-HP), 0.5(HP). | |
| LINES | ## | Set the number of lines on each page from 5 to 128 lines. | |
| EPSON FX-850 | FONT NO. | I000:## | Enter the code for the font that you want. |
| FONT PITCH/POINT | ##.## | Enter the size you want the font to be printed. | |
| CHARACTER SET | PC-8/.. | Set the symbol set or the character set. | |
| TABLE PRINT | Print code table. | ||
| AUTO LF | OFF/ON | ON: CR-CR+LF, OFF: CR-CR | |
| AUTO MASK | OFF/ON | ||
| LEFT MARGIN | ## | Set the left margin at column 0 to 70 columns at 10 spi. | |
| RIGHT MARGIN | ## | Set the right margin at column 10 to 80 columns at 10 spi. | |
| TOP MARGIN | #.## | Set the top margin at a distance from the top edge of the paper: 0, 0.33, 0.5, 1.0, 1.5 or 2.0. The factory setting is 0.33. | |
| BOTTOM MARGIN | #.## | Set the bottom margin at a distance from the bottom edge of the paper: 0, 0.33, 0.5, 1.0, 1.5 or 2.0. The factory setting is 0.33. | |
| LINES | ## | Set the number of lines on each page from 5 to 128 lines. | |
| IBM PROPRINTER | FONT NO. | I000:## | Enter the code for the font that you want. |
| FONT PITCH/POINT | ##.## | Enter the size you want the font to be printed. | |
| CHARACTER SET | PC-8/.. | Set the symbol set or the character set. | |
| TABLE PRINT | Print code table. | ||
| AUTO LF | OFF/ON | ON: CR-CR+lf, OFF: CR-CRSelect whether you want the printer to auto Line Feed. | |
| AUTO CR | OFF/ON | Select whether you want the printer to auto Carriage Return. | |
| AUTO MASK | OFF/ON | ||
| LEFT MARGIN | ## | Set the left margin at column 0 to 70 columns at 10 spi. | |
| RIGHT MARGIN | ## | Set the right margin at column 10 to 80 columns at 10 spi. | |
| IBM PROPRINTER (continue) | TOP MARGIN | #.## | Set the top margin at a distance from the top edge of the paper: 0, 0.33, 0.5, 1.0, 1.5 or 2.0. The factory setting is 0.33. |
| BOTTOM MARGIN | #.## | Set the bottom margin at a distance from the bottom edge of the paper: 0, 0.33, 0.5, 1.0, 1.5 or 2.0. The factory setting is 0.33. | |
| LINES | ## | Set the number of lines on each page from 5 to 128 lines. | |
| HP-GL | CHAR SET (STD) | ## | Enter the code for the Standard Character you want. |
| CHAR SET (ALT) | ## | Enter the code for the Alternative Character you want. | |
| PEN # SIZE | PEN1 to 6 | Set size and gray percentage for the selected pen. | |
| PEN # GRAY | PEN1 to 6 | 15, 30, 45, 75, 90 or 100 % (# is the selected pen number) | |
| BR-SCRIPT | ERROR PRINT | OFF/ON | Choose whether or not the printer prints an error if a postscript error occurs. |
NETWORK
| Menu | Description | ||
| TCP/IP | TCP/IP ENABLE | ON/OFF | |
| IP ADDRESS= | #####.#####.#####.##### | Enter the IP address. | |
| SUBNET MASK= | #####.#####.#####.##### | Enter the Subnet mask. | |
| GATEWAY= | #####.#####.#####.##### | Enter the Gateway address. | |
| IP BOOT TRIES | # | Enter the number of times the print server attempts to automatically obtain a TCP/IP address. | |
| IP METHOD | AUTO/STATIC/RARP/BOOTP/DHCP | You can choose the BOOT method that best suits your needs. | |
| APIPA | ON/OFF | Automatically allocates the IP address from the link-local address range. | |
| NETWARE | NETWARE ENABLE | ON/OFF | Select ON to use the printer on a Netware network. |
| NET FRAME | AUTO/8023/ENET/8022/SNAP | Lets you specify the frame type. | |
| APPLETALK | ON/OFF | Select ON to use the printer on a Macintosh®network. | |
| NETBEUI | ON/OFF | Select ON to use the NETBEUI protocol on your network. | |
| DLC/LLC | ON/OFF | Select ON to use the printer on a DCL/LLC network. | |
| NETBIOS/IP | ON/OFF | Select ON to use the printer on a Net BIOS/IP network. | |
| ENET | AUTO/100B-FD/10B-FD | Selects Ethernet link mode. | |
INTERFACE
| Menu | Description | ||
| SELECT | AUTO/PARALLEL/USB/Network | ||
| AUTO IF TIME | 1:5:99 (sec) | You need to set the time-out period for the auto interface selection. | |
| INPUT BUFFER | LEVEL 1:3:15 | Increase or decrease the input buffer capacity. | |
| PARALLEL | When using the parallel interface | ||
| HIGH SPEED | ON/OFF | Turns high-speed parallel communications on or off. | |
| BI-DIR | ON/OFF | Turns bi-directional parallel communications on or off. | |
RESET MENU
| Menu | Description | |
| RESET PRINTER | Resetsethe printer and restores all printer settings (including command settings) to settings you have previously made with the control panel buttons. | |
| FACTORY RESET | Resetsethe printer and restores all printer settings (including command settings) to the factory settings. See List of factory settings on page 4-23. | |
| PARTS LIFE | FUSER UNIT | Resetsethe fuser unit. See Replacing the Fuser Unit & Transfer Roll Cartridge (FP-8000) on page 6-5. |
Set date and time
-MENU- INFORMATION
↓
Press the + or - button until the SETUP mode appears (and to display each setting shown below).
-MENU-SETUP
↓
Press the Set button, and then press the + or - button until DATE & TIME appears.
SETUP DATE & TIME
↓
Press the Set button, and then press the + or - button until YEAR appears.
DATE & TIME YEAR
↓
Press the Set button.
YEAR = 2000
↓
Press the + button until 2004 appears.
YEAR = 2004
↓
Press the Set button.
YEAR = 2004
↓
Press the Set button.
DATE & TIME YEAR
↓
Press the Set button.
DATE & TIME MONTH
↓
DATE & TIME
2004/01/01 12:00
About emulation modes
This printer has the following emulation modes.
HP LaserJet Mode
The HP LaserJet mode (or HP mode) is the emulation mode in which this printer supports the PCL6 language of the Hewlett-Packard LaserJet laser printer. Many software applications support this type of laser printer. Using this mode will allow your printer to operate at its best with those applications.
BR-Script 3 Mode
BR-Script is an original Brother page description language and a PostScript® language emulation interpreter. This printer supports level 3. The BR-Script interpreter of this printer allows you to control text and graphics on pages.
For technical information about PostScript commands, see the following manuals:
Adobe Systems Incorporated. PostScript Language Reference Manual, 3rd Edition. Menlo Park: Addison-Wesley Publishing Company, Inc., 1999.
Adobe Systems Incorporated. PostScript Language Program Design. Menlo Park: Addison-Wesley Publishing Company, Inc., 1988.
Adobe Systems Incorporated. PostScript Language Reference Manual. Menlo Park: Addison-Wesley Publishing Company, Inc., 1985.
Adobe Systems Incorporated. PostScript Language Tutorial and Cookbook. Menlo Park: Addison-Wesley Publishing Company, Inc., 1985.
Adobe Systems Incorporated. PostScript Language Reference Manual, third Edition. Addison-Wesley Longman, Inc., 1999.
HP-GL Mode
The HP-GL mode is the emulation mode in which this printer supports the HP-GL language of the Hewlett-Packard plotter model HP-7475A. Many graphics and CAD applications support this type of plotter. Use this mode so your printer will work when printing from those types of applications.
EPSON FX-850 and IBM Proprinter XL Mode
The EPSON FX-850 and IBM Proprinter XL modes are the emulation modes that this printer supports to meet the industry-standard for dot matrix printers. Some applications support these dot matrix printer emulations. Use these emulation modes so your printer will work well when printing from those types of applications.
List of factory settings
The following table shows the factory settings. To reset the printer's network settings, see Network Factory Default Setting on page 3-18.

The emulation mode affects the setting. Effective modes are shown in brackets in the following table.
The following settings can not be restored to the factory settings with the reset menu in the factory settings mode interface mode, HRC setting, page protection, scalable font, lock panel, page counter and local language for display messages.
The copy setting is always restored to the factory setting when the printer is turned off and on again.
| Menu | Factory Setting | ||
| PAPER | SOURCE | AUTO | |
| PRIORITY | T1>T2>T3>T4 | ||
| MANUAL FEED | OFF | ||
| TRAY1 SIZE | DETECT SENSOR | ||
| TRAY2 SIZE | DETECT SENSOR | ||
| TRAY3 SIZE | DETECT SENSOR | ||
| TRAY4 SIZE | DETECT SENSOR | ||
| DUPLEX | OFF | ||
| OUTPUT | STANDARD | ||
| JOB OFFSET | ON | ||
| QUALITY | RESOLUTION | 600 | |
| HRC | MEDIUM | ||
| TONER SAVE | OFF | ||
| DENSITY | 0 | ||
| SETUP | LANGUAGE | ENGLISH | |
| PANEL CONTROL | LOWER LCD | NONE | |
| AUTO ONLINE | ON | ||
| BUTTON REPEAT | 0.1 SEC | ||
| MESSAGE SCROLL | LEVEL 1 | ||
| POWER SAVE TIME | 30MIN | ||
| AUTO CONTINUE | OFF | ||
| TONER LOW | CONTINUE | ||
| SETUP(continue) | LOCK PANEL | OFF | |
| REPRINT | ON | ||
| PAGE PROTECTION | AUTO | ||
| EMULATION | AUTO (EPSON) | ||
| KEEP PCL | OFF | ||
| RAMDISK SIZE | 0MB | ||
| TIME STYLE | YY/MM/DD hh:mm | ||
| PRINT MENU | MEDIA TYPE | PLAIN PAPER | |
| PAPER | A4/LETTER | ||
| COPIES | 1 | ||
| ORIENTATION | PORTRAIT | ||
| PRINT POSITON | X OFFSET | 0 | |
| Y OFFSET | 0 | ||
| AUTO FF TIME | 5 | ||
| FF SUPPRESS | OFF | ||
| HP LASERJET | FONT NO. | 59 | |
| FONT PITCH/POINT | 10.00/12.00 | ||
| SYMBOL SET | PC8 | ||
| AUTO LF | OFF | ||
| AUTO CR | OFF | ||
| AUTO WRAP | OFF | ||
| AUTO SKIP | ON | ||
| LEFT MARGIN | 0 | ||
| RIGHT MARGIN | 78 | ||
| TOP MARGIN | 0.50 | ||
| BOTTOM MARGIN | 0.50 | ||
| LINES | 64 | ||
| EPSON FX-850 | FONT NO. | 59 | |
| FONT PITCH/POINT | 10.00/12.00 | ||
| CHARACTER SET | PC8 | ||
| AUTO LF | OFF | ||
| AUTO MASK | OFF | ||
| LEFT MARGIN | 0 | ||
| RIGHT MARGIN | 80 | ||
| TOP MARGIN | 0.33 | ||
| BOTTOM MARGIN | 0.33 | ||
| LINES | 66 | ||
| PRINT MENU (continue) | IBM PROPRINTER | FONT NO. | 59 |
| FONT PITCH/POINT | 10.00/12.00 | ||
| CHARACTER SET | PC8 | ||
| AUTO LF | OFF | ||
| AUTO CR | OFF | ||
| AUTO MASK | OFF | ||
| LEFT MARGIN | 0 | ||
| RIGHT MARGIN | 80 | ||
| TOP MARGIN | 0.33 | ||
| BOTTOM MARGIN | 0.33 | ||
| LINES | 66 | ||
| HP-GL | CHAR SET (STD) | ANSI ASCII | |
| CHAR SET (ALT) | ANSI ASCII | ||
| PEN # SIZE | 3DOTS | ||
| PEN # GRAY | 100% | ||
| BR-SCRIPT | ERROR PRINT | OFF | |
| NETWORK | TCP/IP | TCP/IP ENABLE | ON |
| IP ADDRESS | 169.254.1.0 to 169.254.254.255*1 | ||
| SUBNET MASK | 255.255.0.0*1 | ||
| GATEWAY | 0.0.0.0 | ||
| IP BOOT TRIES | 3 | ||
| IP METHOD | AUTO | ||
| APIPA | ON | ||
| NETWARE | NETWARE ENABLE | ON | |
| NET FRAME | AUTO | ||
| APPLETALK | ON | ||
| NETBEUI | ON | ||
| DLC/LLC | ON | ||
| NETBIOS/IP | ON | ||
| ENET | AUTO | ||
| INTERFACE | SELECT | AUTO | |
| AUTO IF TIME | 5 | ||
| INPUT BUFFER | LEVEL 3 | ||
| PARALLEL | HIGH SPEED | ON | |
| BI-DIR | ON | ||
*1 These settings depend on APIA function.
Buzzer Indications
The control panel has a buzzer. The buzzer will sound when one of the control panel buttons is pressed, or the status of the printer changes. See the table for a description of the buzzer meanings.
| Buzzer Indications | Conditions |
| A short buzz | When you enter any information using the button. |
| Two short buzzes | ■ When you come back to the top menu option after you move forward or backward through the menus. ■ When you move to another menu level. |
| Five short buzzes | When an error occur. |
| A long buzz | When you set any optional menu setting. |
| Two long buzzes | When the printer becomes online. When the printer becomes READY status after a warming up condition. |
| A short and a long buzz | When you enter wrong information. |
You can change the settings of the buzzer by using the buttons on the control panel.
To change the setting of the buzzer, press the + (plus) button until SETUP is displayed, then press the Set button. Press the + (plus) button until ERROR BUZZER or PANEL BUZZER is displayed and press the Set button.
See SETUP in this chapter for a description of the buzzer settings (see SETUP on page 4-14).
5 Troubleshooting
Read this chapter to learn how to correct printer problems.
If you are unable to fix the problem
Turn the printer off, disconnect the power cord from the AC outlet/shipment, and contact your dealer or Brother Customer Service for assistance.

WARNING
Do not make any changes or modifications to the equipment, as this may cause a fire or an electric shock.

CAUTION
Turn the printer off and disconnect the power cord from the AC outlet/rod before performing maintenance on the printer. Failure to turn the printer off and disconnect the power cord may result in an electric shock.
Power Problems
| Symptom | Possible Cause | Action |
| No power | Is the printer off? | Press the I on the power switch to turn the printer on. See Turning the Printer On and Off on page 1-5. |
| Is the power cord loose or disconnected? | Turn the printer off and connect the power cord properly. Turn the printer on again. | |
| Is the printer connected to a correctly rated outlet/socket? | Connect the printer to an AC power outlet/socket that you know works. Do not connect any other equipment to the outlet/socket. Do not connect the printer to an auxiliary power outlet on the back of a computer. | |
| The printer frequently turns off | Is the power cord loose or disconnected? | Turn the printer off and connect the power cord correctly. Turn the printer on again. |
| The printer is defective. | Turn the printer off immediately, disconnect the power cord from the AC power outlet/socket, and contact your dealer or Brother Customer Service. |
Printing Problems
Indicators are On, Flashing or Off
| Symptom | Possible Cause | Action |
| The Alarm LED is on | Is there an error message on the control panel display? | Check the message and rectify the error accordingly. See What to Do When an Error Message Appears on page 5-15. |
| The Ready LED is off | Is the control panel display on the menu screen? | Press the Menu buttons on the control panel to go back to the READY state. See Buttons on page 4-2. |
| The Ready LED is not on or is not flashing after executing the print command | Is the parallel, USB, or Ethernet interface cable loose or disconnected? | Turn the printer off and check the interface cable. If necessary, reconnect. |
| Does the parallel, USB, or Ethernet interface cable meet the required printer specifications? | Use only the recommended parallel or USB interface cables for the printer. 10Base-T and 100Base-TX Ethernet interface cables are compatible with the printer. Use twisted pair cables suitable for network connections. A Category 5 100Base-TX is required. | |
| Is the computer configured correctly? | Check the following settings on your computer and reconfigure any that are not correct. • Make sure that the appropriate printer driver for your operating system is installed. • Make sure that the port is set correctly in the printer driver. | |
| Is the printer IP address correct? (When using TCP/IP.) | Call your system administrator to obtain a valid IP address. Use the printer configuration list to confirm the IP address. | |
| The Ready LED is not on or is not flashing after executing the print command | Is the printer properly configured for use through a network? (When on a network.) | Print the printer configuration list to check the network settings. Correct any in appropriate settings. See the Network User's Guide on the CD-ROM. |
| The network has a problem. (When on a network). | Check that the printer is on and execute the print command from the computer one more time. If the problem persists, call your system administrator. | |
| Is the printer off? | Press the I on the power switch to turn the printer on. See Turning the Printer On and Off on page 1-5. | |
| Printouts are not output from the Printer even though the Ready LED is on or flashing | There may be data remaining in the printer. | Cancel printing or force the remaining data to be printed out. See Job Cancel Button on page 4-2 |
| The printer does not print | Example for Windows® XPDoes "Pause Printing" appear in the printer window? | When printing stops because of an error, the printer sometimes switches to the "Pause Printing" state. Follow the steps below to release the printer from the "Pause Printing" state. 1. On the Start menu, click Printers and Faxes. 2. Double-click the appropriate printer. 3. In the printer window, click the Printer menu. 4. On the Printer menu, if Pause Printing is selected, click it to release. |
| Is the printer off? | Press the I on the power switch to turn the printer on. See Turning the Printer On and Off on page 1-5. | |
| Is the parallel, USB, or Ethernet interface cable loose or disconnected? | Turn the printer off and check the interface cable. If necessary, reconnect it, then turn the printer back on. | |
| Cannot print with TCP/IP | Is the printer IP address set correctly? (When using TCP/IP.) | The IP address might be different. Call your system administrator and set the correct IP address. Use the printer configuration list to confirm the current IP address. |
| Is there a reception filter? | Call your system administrator to find out if there is a reception filter set. | |
| An error message appears on the computer screen | A printer error has occurred. | Check the message and rectify the error accordingly. |
| The printer does not appear in the Chooser window | Is the printer off? | Press the I on the power switch to turn the printer on. See Turning the Printer On and Off on page 1-5. |
| Is the USB or Ethernet interface cable loose or disconnected? | Turn the printer off and check the interface cable. If necessary, reconnect it, then turn the printer back on. | |
| Is the network expansion card loose or disconnected? | Turn the printer off and reinstall the network expansion card into the printer, then turn the printer back on. | |
| Are the zone and printer names correctly specified? | The zone or printer names might be incorrect. Ask your system administrator for the correct settings. Use the printer configuration list to confirm the current printer settings. | |
| An error message appears on the computer screen | Are you using the appropriate Mac OS®? | Print from a computer with an operating system compatible with the printer. This printer supports Mac OS® 8.6 to Mac OS® X. |
| A print error has occurred. | Check the message and rectify the error accordingly. |
Print Quality Problems
Blank or Completely Black Pages are Output
| Symptom | Possible Cause | Action |
| Nothing is printed | The seal of the toner cartridge is not pulled out. | Pull out the seal. See Replacing the Toner Cartridge (TN-1700) on page 6-1. |
| Two or more sheets may be feeding at once. | Remove the paper stack from the tray, fan it, and put it back in the tray. | |
| The toner cartridge is old or damaged. | Replace the toner cartridge. See Replacing the Toner Cartridge (TN-1700) on page 6-1. | |
| The toner cartridge is not correctly set. | Reset the toner cartridge correctly. See Replacing the Toner Cartridge (TN-1700) on page 6-1. | |
| The power supply is defective. | Contact your dealer or Brother Customer Service. | |
| Output sheets are completely black | The toner cartridge is old or damaged. | Replace the toner cartridge. See Replacing the Toner Cartridge (TN-1700) on page 6-1. |
| The power supply is defective. | Contact your dealer or Brother Customer Service. | |
| Faded printouts Printer | Is the media suitable? | Replace the media with a recommended size and type, and confirm that your printer driver settings are correct. See Suitable and Unsuitable Paper Types on page 2-1. |
| Is the paper damp? | Replace the paper. See Loading Paper and Printing on page 2-9. | |
| The toner cartridge is old or damaged. | Replace the toner cartridge. See Replacing the Toner Cartridge (TN-1700) on page 6-1. | |
| Is the printer driver Toner Save Mode active? | In the printer driver, deactivate the Toner Save Mode in the Print Quality setting of Advanced tab (Windows®), or the General dialog box (Macintosh®). | |
| The power supply is defective. | Contact your dealer or Brother Customer Service. | |
| Dirty spots are printed Printer | Is the media suitable? Are you using preprinted or inkjet paper? | Replace the media with a recommended size and type, and confirm that your printer driver settings are correct. See Suitable and Unsuitable Paper Types on page 2-1. |
| The toner cartridge is old or damaged. | Replace the toner cartridge. See Replacing the Toner Cartridge (TN-1700) on page 6-1. | |
| Vertical black lines Printer | The toner cartridge, fuser unit or transfer roll cartridge is old or damaged. | Check the toner cartridge, fuser unit and transfer roll cartridge and replace them as necessary. See Replacing the Toner Cartridge (TN-1700) on page 6-1. See Replacing the Fuser Unit & Transfer Roll Cartridge (FP-8000) on page 6-5. |
| Recurring smudges Printer | Dirt in the paper path. | Print several blank sheets. |
| The toner cartridge, fuser unit or transfer roll cartridge is old or damaged. | Check the toner cartridge, fuser unit and transfer roll cartridge and replace them as necessary. See Replacing the Toner Cartridge (TN-1700) on page 6-1. See Replacing the Fuser Unit & Transfer Roll Cartridge (FP-8000) on page 6-5. | |
| Ink smears when rubbed. | Is the paper damp? | Replace the paper. See Loading Paper and Printing on page 2-9. |
| Is the media suitable? | Replace the media with a recommended size and type, and confirm that your printer driver settings are correct. See Suitable and Unsuitable Paper Types on page 2-1. | |
| Shadows appear around areas of dense black printing. | Is the media suitable? | Replace the media with a recommended size and type, and confirm that your printer driver settings are correct. See Suitable and Unsuitable Paper Types on page 2-1. |
| Ghost image | Is the media suitable? | Replace the media with a recommended size and type, and confirm that your printer driver settings are correct. See Suitable and Unsuitable Paper Types on page 2-1. |
| White spots appear in areas of dense black printing. | Is the media suitable? Is the media folded or creased? | Replace the media with a recommended size and type, and confirm that your printer driver settings are correct. See Suitable and Unsuitable Paper Types on page 2-1. |
| The toner cartridge is old or damaged. | Replace the toner cartridge. See Replacing the Toner Cartridge (TN-1700) on page 6-1. | |
| Partial blanks | Is the paper damp? | Replace the paper. See Loading Paper and Printing on page 2-9. |
| Is the media suitable? | Replace the media with a recommended size and type, and confirm that your printer driver settings are correct. See Suitable and Unsuitable Paper Types on page 2-1. | |
| Vertical stripes P1 int x P2 int x P3 int x P4 int x | Is the toner cartridge properly installed in the printer? | Make sure that the toner cartridge is properly installed. See Replacing the Toner Cartridge (TN-1700) on page 6-1. |
| Dirt may be on the laser window. | Clean the laser window. | |
| The toner cartridge, transfer roll cartridge, or fuser unit is old or damaged. | Check the toner cartridge, transfer roll cartridge and fuser unit and replace them as necessary. See Replacing the Toner Cartridge (TN-1700) on page 6-1. See Replacing the Fuser Unit & Transfer Roll Cartridge (FP-8000) on page 6-5. | |
| Creased paper | Is the paper damp? | Replace the paper. See Loading Paper and Printing on page 2-9. |
| Is the media suitable? Are you using warped paper? | Replace the media with a recommended size and type, and confirm that your printer driver settings are correct. See Suitable and Unsuitable Paper Types on page 2-1. | |
| Is the paper tray properly inserted into the printer? | Push the paper tray completely back into the printer. | |
| Is there paper or a foreign object jammed in the printer? | Turn the power off and remove the jammed paper or foreign object. If you cannot remove the obstruction, turn the printer off and contact your dealer or Brother Customer Service. Do not attempt to disassemble the printer. | |
| Is the fuser unit or transfer roll cartridge properly installed in the printer? | Make sure that the transfer roll cartridge and fuser unit are properly installed. See Replacing the Fuser Unit & Transfer Roll Cartridge (FP-8000) on page 6-5. | |
| Slanted printing, Incorrectly positioned printing | Are the paper guides in the paper tray set correctly? | In the paper tray, set the side and end guides to their correct positions. See Load A4/Letter Paper in the Paper Tray on page 2-9. See Load Envelopes in the Paper Tray on page 2-15. |
| Text is blurred. | Is the paper damp? | Replace the paper. See Loading Paper and Printing on page 2-9. |
| Printer Printer Printer | Is the media suitable? | Replace the media with a recommended size and type, and confirm that your printer driver settings are correct. See Suitable and Unsuitable Paper Types on page 2-1. |
Unsatisfactory Printing
| Symptom | Possible Cause | Action |
| Unsatisfactory transparencies | Is the transparency sheet suitable? | Use transparencies suitable for use with this printer. |
| Is the printer driver configured to print transparencies? | Make sure that the transparencies is selected on paper tab on the printer driver (in Windows®) or Page Setup dialog box (with Macintosh®) | |
| Unsatisfactory envelopes | Are the envelopes of a suitable type? | Use envelopes suitable for use with this printer.See Suitable and Unsuitable Paper Types on page 2-1. |
| Is the printer driver configured to print envelopes? | Make sure that the envelopes is selected on paper tab on the printer driver (in Windows®) or Page Setup dialog box (with Macintosh®) | |
| Unsatisfactory printing | Are the printer driver toner save or low-resolution functions active? | Change the printer driver settings on the Print Quality setting of Advanced tab. |
Paper Handling Problems
First, make sure that you are using paper that meets our recommended paper specifications. See Suitable and Unsuitable Paper Types on page 2-1.
| Symptom | Action |
| The printer does not load paper. | ■ If paper is in the paper tray, make sure it is straight. If the paper is curled, you should straighten it before printing. Sometimes it is helpful to remove the paper, turn the stack over, and then put it back in the paper tray.■ Reduce the amount of paper in the paper tray, and then try again.■ Make sure that manual feed mode is not set in the printer driver.■ Fan the paper well and put it back in firmly.■ Wipe the rubber parts of the feed roller with a damp, soft cloth. (See Cleaning the Feeder Roller on page 6-17.) If this does not correct the problem, the feed roller needs to be replaced. Please call your dealer or Brother Customer Service for a replacement. |
| There is a paper jam. | ■ Clear the jammed paper (see Clearing Paper Jams on page 5-17).■ Wipe the rubber parts of the feed roller with a damp, soft cloth. (See Cleaning the Feeder Roller on page 6-17.) If this does not correct the problem, the feed roller needs to be replaced. Please call your dealer or Brother Customer Service for a replacement. |
| The printed pages are curled, so the face-down output tray cannot hold the maximum number of sheets. | ■ Turn over the paper in the paper tray.■ Change the printer driver setting in Media Type to a thicker setting. |
| The printer does not print. | ■ Make sure that the cable is connected to the printer.■ Make sure that you have chosen the appropriate printer driver. |
| When printing on normal paper, it creases. | ■ Change the printer driver setting in Media to the Thin paper setting. |
Solving Print Problems
| Symptom | Action |
| The printer prints unexpectedly or it prints garbage data. | Make sure the printer cable is not too long. We recommend that you use a parallel cable that is less than 2 metres (6 feet) long. Make sure that the printer cable is not damaged or broken. If you are using an interface-switching device, remove it. Connect your computer directly to your printer, and then try again. Check that you have chosen the appropriate printer driver with 'Set as default'. Make sure that the printer is not connected to the same port that is also connected to a storage device or scanner. Take away all other devices and connect the port only to the printer. Turn off Printer Status reporting in the Device Options tab in the printer driver. |
| The printer cannot print full pages of a document. | Press the Go button to print the data that is left in the printer. If the Go button does not clear the error, reduce the complexity of your document or reduce the print resolution. Change the following settings in the supplied Windows® driver, and then try again. The best combination of the settings below will vary depending on your document. ■ Graphics mode ■ TrueType™ mode ■ Use printer TrueType™ fonts |
| The printer cannot print full pages of a document. An error message MEMORY FULL appears. | Press the Go button to print the data that is left in the printer. Reduce the print resolution or reduce the complexity of your document. Expand the printer memory by adding a DIMM. See Memory expansion on page 2-26. |
| The headers or footers appear when I view my document on the screen but they do not show up when I print it. | Most laser printers have a restricted area that cannot be printed on. This 'unprintable area' is usually the first two lines and the last two lines of a page (leaving 62 printable lines). Adjust the top and bottom margins of your document to allow for this. |
Others Problems
| Symptom | Action |
| The printer cannot print at all. Your PC shows the following error message: ‘There was an error writing to LPT1: (or BRUSB) for the printer.’ | ■ Check that the printer cable is not damaged or broken. ■ If you are using an interface-switching device, remove it. Connect your computer directly to your printer, and then try again. Check that you have chosen the appropriate printer driver and ‘Set as default’. |
Network Problems
| Symptom | Possible Cause | Action |
| The IP address changes when turning on the printer | Is the printer set to acquire an IP address through a DHCP server? | Set the IP address acquisition method to "Panel". See Quick Setup Guide. |
| Cannot use a web browser to manage the printer. | Is the printer off? | Press the I on the power switch to turn the printer on. See Turn the Printer On on page 1-5. |
| Is the Ethernet cable loose or disconnected? | Turn the printer off and check the Ethernet cable. If necessary, reconnect, then turn the printer back on. | |
| Is the printer's Internet address correct? | Confirm that the printer Internet address is correct. If the problem persists, use an IP address to connect to the printer instead. | |
| Is the printer's IP address correct? | The IP address might be set incorrectly. Ask your system administrator for the correct settings. Use the printer configuration list to confirm the current IP address. | |
| Are you using a proxy server? | Certain proxy servers block access to the printer. Configure your Web browser so that it does not use the proxy server or set the address you want to access so that it does not go through the proxy server. | |
| Is the port number correct? | The default port number is "80". Specify the correct port number. | |
| Symptom | Action | |
| Cannot print from application software | ■ Check that the DOS application software interface settings match those of your printer. For example, if you are using a parallel printer cable, you would most likely set your DOS software printer port to LPT1.■ Check if the printer has any printer alarms.■ Check that you have chosen the appropriate printer in your application software. |
BR-Script 3 Problems
| Symptom | Action |
| The printer cannot print. | If UNUSED DATA appears on the LCD, please do the following:1. Reset the printer. [Press the - button twice, then press the Set button twice and finally press the Go button.]2. Turn off ERROR PRINT in BR-SCRIPT3 mode. Press the + button five times, then press the Set button and then the - button, now press the Set button twice, select ERROR PRINT=OFF and press the Set button and finally press the Go button.]3. If the printer prints out the error message page which says "ERROR NAME; limitcheck", add more memory. See Installing the DIMM Memory on page A-6. |
| The print speed slows down. | Add optional memory. See Installing the DIMM Memory on page A-6. |
| The printer cannot print EPS data. | You need the following settings to print EPS data:1. In the Printer folder, select the printer you use.2. Press the Advanced button on the PostScript tab.3. Select 'Tagged binary communication protocol' in data format. |
What to Do When an Error Message Appears
LCD messages
Error Messages
| Standard paper tray | TRAY 1 and TRAY 2 |
| Optional paper tray | TRAY 3 and TRAY 4 |
| Optional duplex unit for Duplex printing | DX |
| Offset catch tray | CT |
| Message | Meaning and Action |
| NO TONER | Install the toner cartridge correctly.See Replacing the Toner Cartridge (TN-1700) on page 6-1. |
| ILLEGAL TONER | Use only a Brother genuine toner cartridge. |
| NO PAPER XXX | Put paper in the empty tray. |
| NO TRAY XXX | Put the paper tray in the printer. |
| COVER OPEN | Close the top cover of the printer.Close the back cover of the printer.Ensure that the cover of the DX is closed.Close the CT cover of the printer. |
| BACK LEVER ERROR | Lower the Back lever. |
| JAM XXX | Carefully pull out the jammed paper from the indicated area. See Clearing Paper Jams on page 5-17. |
| STACKER FULL | Take some paper out of the output tray. |
| SIZE MISMATCH | Put the same size paper in the paper tray that is selected in the printer driver, and then press the Go button. |
| MEDIATYPE ERROR | Specify the correct type of media. |
| MANUAL FEED | Put the same size of paper in the paper tray as is shown on the LCD. If the printer is 'paused', press the Go button. |
| SIZE ERROR TX | Put the same size paper in the paper tray that is selected in the printer driver. See Suitable and Unsuitable Paper Types on page 2-1. |
| SIZE ERROR DX | You can only print in the sizes specified for Duplex printing. Check printer driver setting and paper size in the tray. See Suitable and Unsuitable Paper Types on page 2-1. |
| SIZE ERROR CT | The CT does not accept the paper size specified. Select the corrected paper size in the printer driver. See Suitable and Unsuitable Paper Types on page 2-1. |
| LT-8000 FAIL | Optional Lower Tray is removed. Turn off the printer, and then turn it on again. |
| DX-8000 FAIL | Optional Duplex unit is removed. Turn off the printer, and then turn it on again. |
| CT-8000 FAIL | Optional Offset Catch Tray is removed. Turn off the printer, and then turn it on again. |
| DIMM ERROR | Re-install the DIMM correctly.Turn off the printer. Wait a few seconds, and then turn it on again. If this error message appears again, replace the DIMM with a new one. |
| CARD ERROR | Make sure of the following:■ The CompactFlash card is installed properly.■ The installed CompactFlash card is formatted properly.Turn off the printer. Wait a few seconds, then turn it on again. If this error message appears again, replace the CompactFlash card with a new one. |
| CARD REMOVAL | Turn off the printer. Wait a few seconds, then turn it on again. If this error message appears again, replace the CompactFlash card with a new one. |
| BUFFER ERROR | Check the Interface settings. |
| STORAGE FULL | Delete data from RAM or CompactFlash or add more memory. See Installing the DIMM Memory on page A-6 or See Installing the CompactFlash Card on page A-4. |
| DOWNLOAD FULL | Delete data from RAM or add more memory. See Installing the DIMM Memory on page A-6. |
| FONT FULL | Delete data from RAM or CompactFlash or add more memory. See Installing the DIMM Memory on page A-6 or See Installing the CompactFlash Card on page A-4. |
| MEMORY FULL | Delete data from RAM or add more memory. See Installing the DIMM Memory on page A-6. |
| PRINT OVERRIDE | Select a lower resolution or set the page protect option in the driver to the correct size. |
Maintenance Messages
| Message | Meaning and Action |
| TONER LOW | Purchase a new toner cartridge and have it ready. When the print result is faded printouts, replace the new toner cartridge. To replace the toner cartridge, see Replacing the Toner Cartridge (TN-1700) on page 6-1. |
| REPLACE FUSER | Replace the new fuser unit and transfer roll cartridge. To replace the fuser unit and transfer roll cartridge, see Replacing the Fuser Unit & Transfer Roll Cartridge (FP-8000) on page 6-5. |
| REPLACE PF KIT1 | Call your dealer for a replacement paper feeding kit. |
| REPLACE PF KIT2 | Call your dealer for a replacement paper feeding kit. |
| REPLACE PF KIT3 | Call your dealer for a replacement paper feeding kit. |
| REPLACE PF KIT4 | Call your dealer for a replacement paper feeding kit. |
Call Service Messages
| Message | Meaning and Action |
| ERROR ### | Turn off the printer. Wait a few seconds, then turn it on again. If this does not clear the problem, call your dealer or Brother Customer Service. |
Clearing Paper Jams
If a paper jam occurs, printing stops and an error message appears on the control panel informing you of the location of the paper jam.
To clear the paper jam, read the error message, refer to the appropriate section below, and follow the procedure.
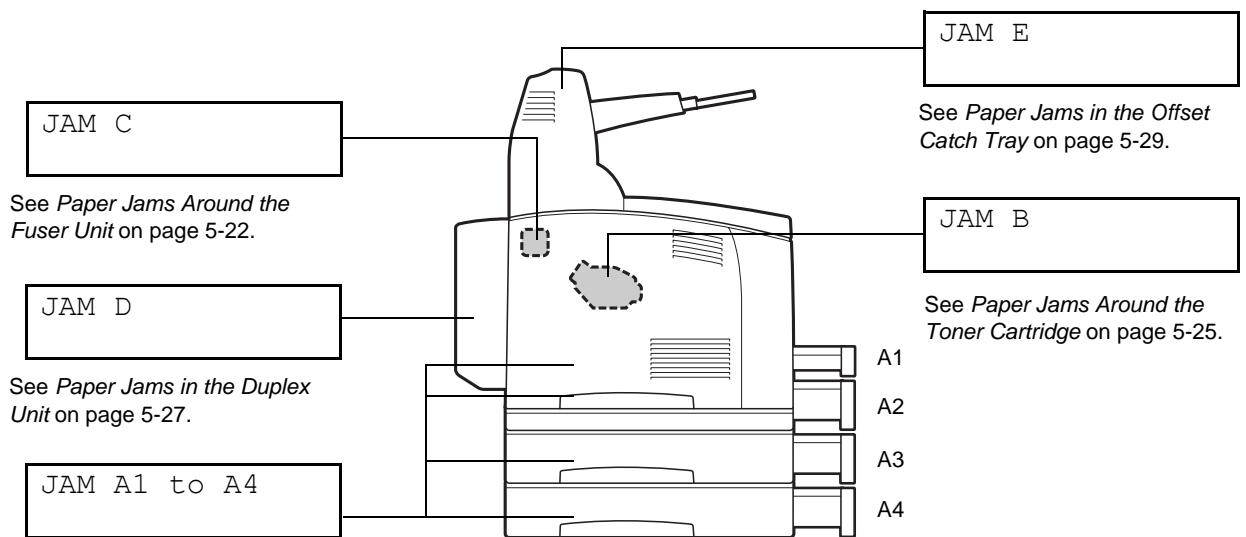
See Paper Jams in the Paper Tray on page 5-19.
See Paper Jams Around the Toner Cartridge on page 5-25.
Attempting to print while there is paper jammed in the printer may damage the printer. Remove jammed paper immediately.

The illustration above shows the printer with the two optional lower trays, duplex unit, and offset catch tray installed.
If the jammed paper is removed without opening the top cover, you still need to open and close the top cover. Doing this will remove the error message.
- Paper jams could be due to the printer installation environment and type of paper used. For details on selecting the appropriate location to install the printer, see Safety Precautions on page -XIX. For details on selecting the correct type of paper, see Suitable and Unsuitable Paper Types on page 2-1.

CAUTION
■ When removing paper jams, make sure that no pieces of paper are left inside the printer, as this can cause a fire. If the paper is wrapped around the fuser or roller, or you cannot see the jam you are trying to clear, do not attempt to remove the paper by yourself, as this may cause injuries or burns. Turn the printer off immediately and contact your dealer or Brother Customer Service.
- Never touch an area indicated by a high-temperature warning label (on or near the fuser unit). Touching these areas may result in burns.
If smoke comes out of the printer when a paper jam occurs, do not open the printer covers. Turn the printer off, remove the power cord from the AC outlet/rodet, and contact your dealer or Brother Customer Service for assistance.
Remove jammed paper slowly and carefully to avoid tearing it.

Paper jams can be caused by incorrect printer installation, or using unsuitable or low-quality paper. For details about the types of paper suitable for printing, see Suitable and Unsuitable Paper Types on page 2-1.
1 Open the top cover.

Do not touch any parts inside the printer.

2 Hold the toner cartridge by the grip and pull it out slowly. Then place it on a flat surface.
To prevent the toner from dirtying the surface, lay a piece of paper on the surface before putting the toner cartridge down.

3 Close the top cover securely.

4 Pull the paper tray out of the printer.

The paper tray must be pulled out completely. If the paper tray is pulled out halfway and pushed in again, the paper may be damaged.

If the paper is jammed inside the printer and behind paper tray 1, pull out both paper tray 1 and paper tray 2.
If the paper is jammed inside the printer and behind paper tray 2, pull out only paper tray 2.
5 Remove any wrinkled paper in the paper tray.
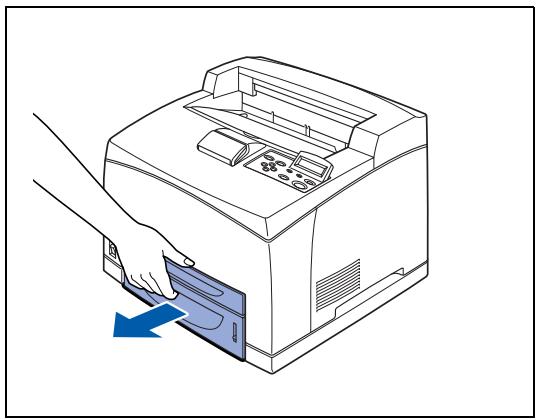
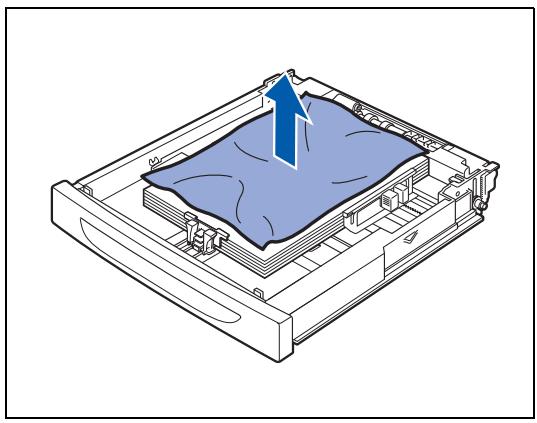
6 Remove any paper jammed inside the printer.

If the printer is installed with the two optional lower trays, examine the interior of all the lower trays.
If the printer is installed with the two optional lower trays and the A5-sized paper (length 148.5 mm (5.8 in.)) of the short edge feed is jammed inside the feeder, use both hands to grip the both ends of the paper to pull it out to the front.
7 Push the paper tray completely into the printer.
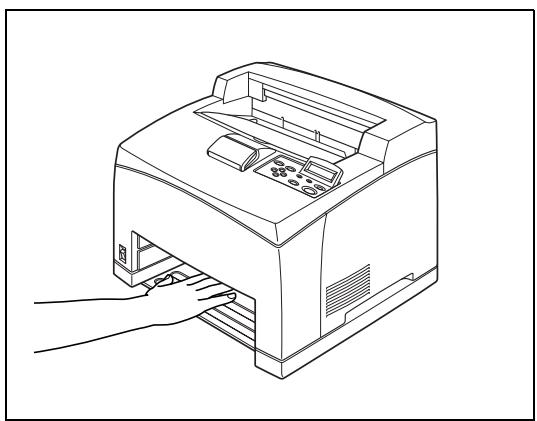
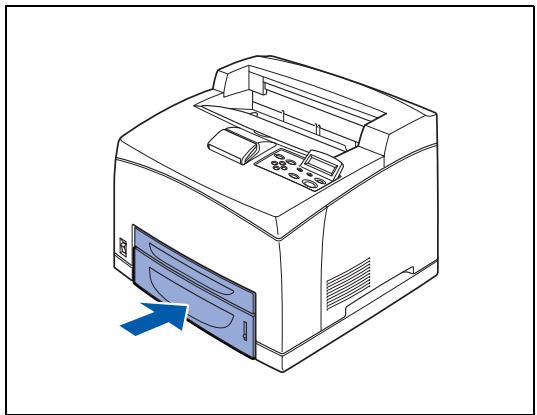
8 Open the top cover.

Do not touch any parts inside the printer.
9 Hold the toner cartridge by the grip and insert it into the slot inside the printer.

- Do not touch any parts inside the printer.
Ensure that the toner cartridge is firmly set.
10 Close the top cover securely.


1 Remove any paper from the center output tray.

If the duplex unit is installed, open the cover of the duplex unit first. See Paper Jams in the Duplex Unit on page 5-27.

2 Open the top cover.

Do not touch any parts inside the printer.

3 Hold the toner cartridge by the grip and pull it out slowly. Then place it on a flat surface.
To prevent the toner from dirtying the surface, lay a piece of paper on the surface before putting the toner cartridge down.

4 Close the top cover securely.

5 Open the back cover by lifting the lower gray lever at the top left corner of the back of the printer.

Do not touch any parts inside the printer.
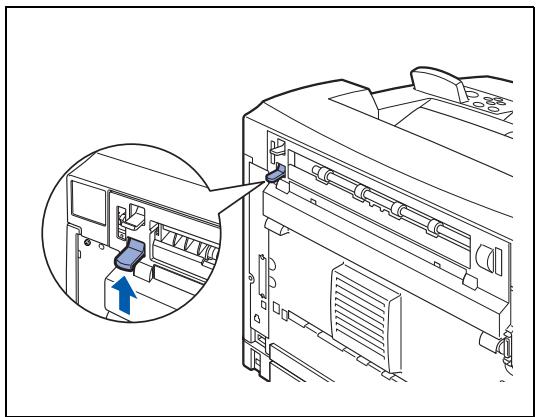
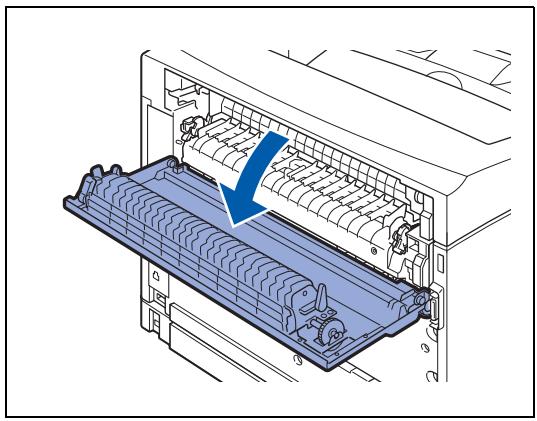
6 Remove any jammed paper. If paper is torn, check for any remaining torn pieces of paper.

The fuser unit is hot. Be careful not to touch it as you can get burnt.
Make sure that the levers at both ends of the fuser unit are returned to the positions they were in before clearing the jam.

If you let go of the cover of the fuser unit, it will return to its original position.
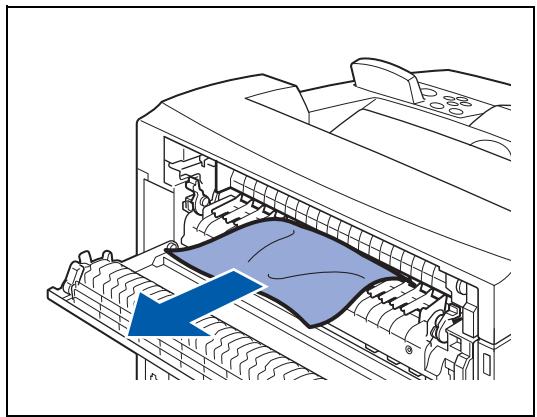
7 Close the back cover.


Make sure that the levers at the back of the printer, as shown in the illustration, are returned to the positions they were in before clearing the jam.
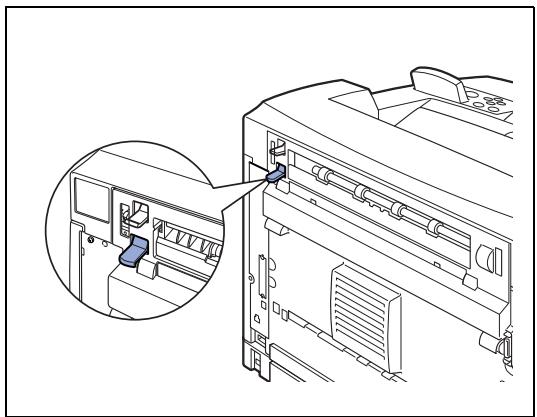
8 Open the top cover.

Do not touch any parts inside the printer.

9 Hold the toner cartridge by the grip and insert it into the slot inside the printer.

Do not touch any parts inside the printer.
Ensure that the toner cartridge is firmly set.

10 Close the top cover securely.

1 Remove any paper from the center output tray.
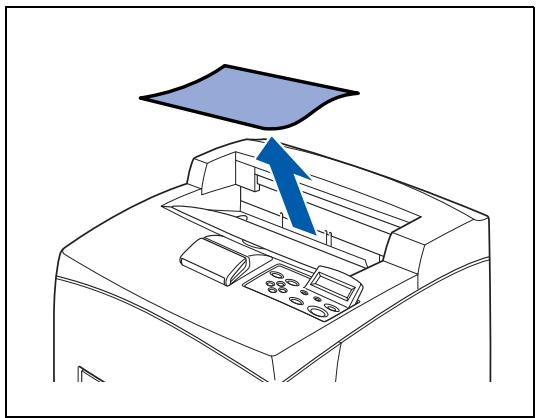
2 Open the top cover.

Do not touch any parts inside the printer.

3 Hold the toner cartridge by the grip and pull it out slowly. Then place it on a flat surface.

To prevent the toner from dirtying the surface, lay a piece of paper on the surface before putting the toner cartridge down.

4 Examine the interior from which the toner cartridge has been taken out and remove any jammed paper. By rotating the rollers as shown in the illustration, the paper will be loosened and can be removed easily. If paper is torn, check for any remaining torn pieces of paper.

5 Hold the toner cartridge by the grip and insert it into the slot inside the printer.

- Do not touch any parts inside the printer.
Ensure that the toner cartridge is firmly set.

6 Close the top cover securely.

1 Open the top cover.

Do not touch any parts inside the printer.

2 Hold the toner cartridge by the grip and pull it out slowly. Then place it on a flat surface.
To prevent the toner from dirtying the surface, lay a piece of paper on the surface before putting the toner cartridge down.
3 Lift the lever at the top left hand side of the duplex unit to unlock it and open the cover of the duplex unit.
4 Examine the interior of the duplex unit and remove any jammed paper.
If paper is torn, check for any remaining torn pieces of paper.


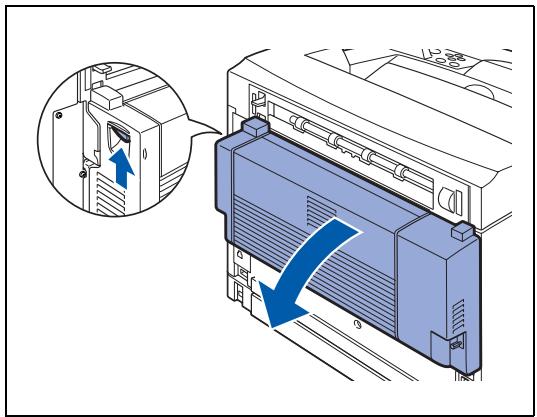
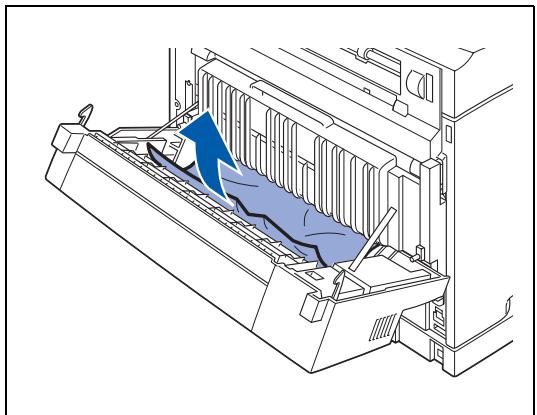
5 Close the cover of the duplex unit.
6 Hold the toner cartridge by the grip and insert it into the slot inside the printer.

Do not touch any parts inside the printer.
Ensure that the toner cartridge is firmly set.
7 Close the top cover securely.

1 Open the top cover.

Do not touch any parts inside the printer.

2 Hold the toner cartridge by the grip and pull it out slowly. Then place it on a flat surface.
To prevent the toner from dirtying the surface, lay a piece of paper on the surface before putting the toner cartridge down.
3 Open the offset catch tray cover by pulling the tab at the top left of the cover.
4 Remove any jammed paper.
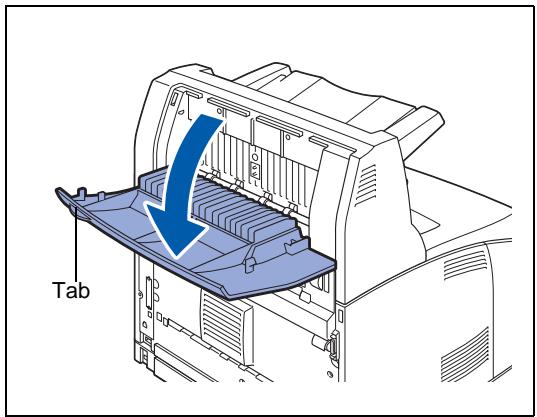
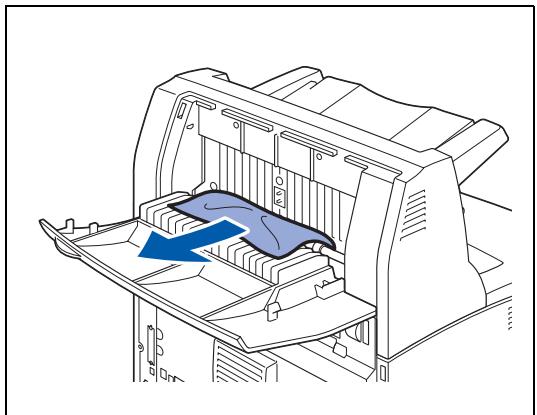
5 Close the offset catch tray cover.
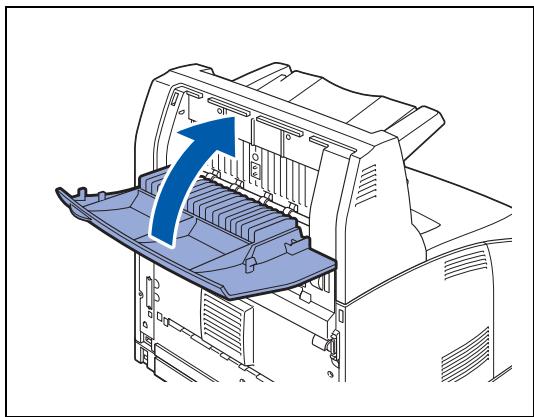
6 Open the back cover by lifting up the lower gray lever at the top left corner of the back of the printer.
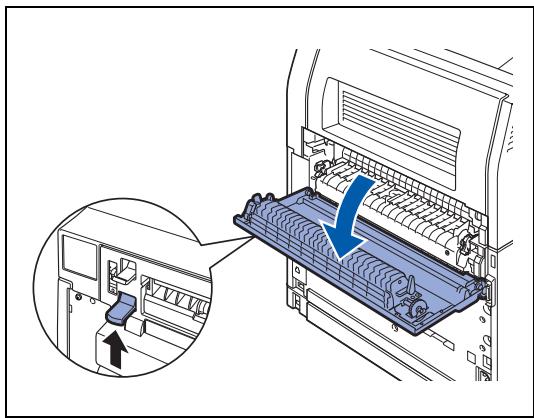
7 Remove any jammed paper. If paper is torn, check for any remaining torn pieces of paper.

The fuser unit is hot. Be careful not to touch it as you can get burnt.
Make sure that the levers at both ends of the fuser unit are returned to the positions they were in before clearing the jam.

If you let go of the cover of the fuser unit, it will return to its original position.
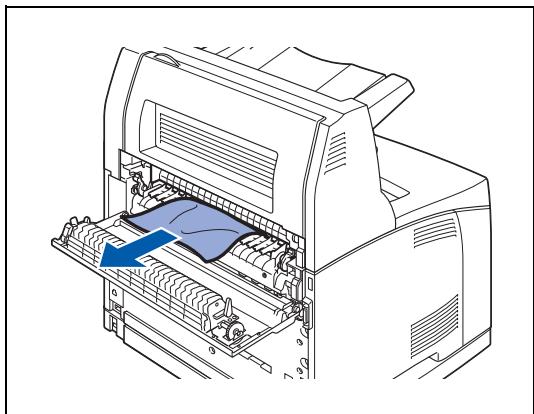
8 Close the back cover.

Make sure that the levers at the back of the printer, as shown in the illustration, are returned to the positions they were in before clearing the jam.
9 Hold the toner cartridge by the grip and insert it into the slot inside the printer.

- Do not touch any parts inside the printer.
Ensure that the toner cartridge is firmly set.
10 Close the top cover securely.
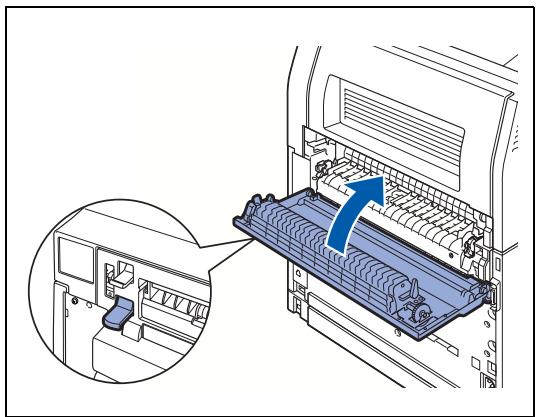
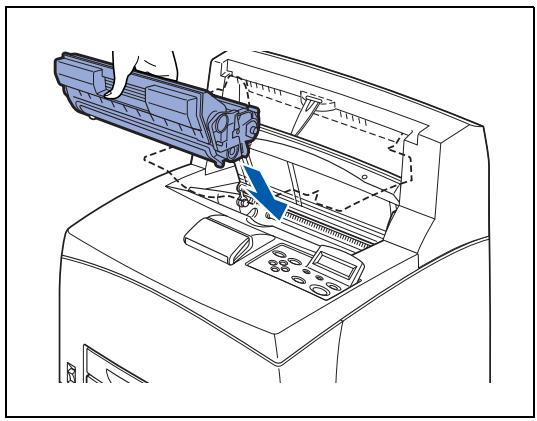
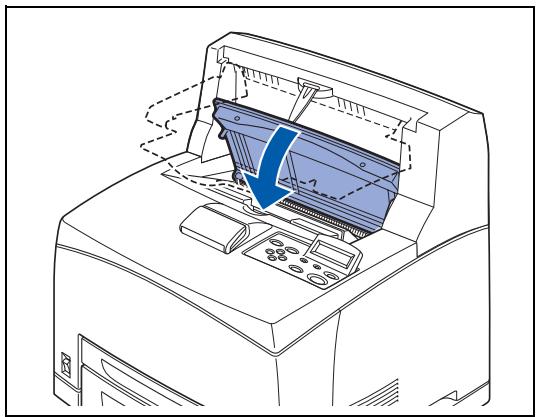
Transporting the Printer
Whenever you transport the printer, use the packing materials that came with the printer. If you do not pack the printer properly, you may void your warranty.
To prevent injuries, this printer should be lifted by two people.
To lift the printer, face the front of the printer and grip the recessed areas at the bottom left and right with both hands.
Never try to lift the printer by gripping any other areas. Lifting the printer by gripping other areas can cause the printer to fall, resulting in injuries.
- When lifting the printer, get a firm footing and bend your knees to avoid possible injuries to your back.

- When carrying the printer, keep it level to prevent trays or consumables from falling out. Do not tilt it more than 10 degrees in any direction.
- When the optional 2 lower trays are installed, remove them before transporting the printer. If the lower trays are not removed, they may fall, resulting in damage or injuries. Remove the 2 lower trays. Please refer to the literature we provided with them or see Uninstalling the Lower Tray Unit on page A-12.
Before transporting the printer, follow the procedure below:
1 Press the power switch to the O position to turn the power off.

2 Remove all connection cords, such as the power cord and interface cables.
WARNING
- Never touch a power cord with wet hands. Danger of electric shock exists.
- When unplugging the machine, grasp the plug instead of the cord. Forcibly pulling on a cord can damage it and cause fire or electric shock.

3 Remove any paper from the center output tray (1) and return the paper stopper to its original position, if it is extended (2).

4 Pull out the paper tray from the printer and remove any paper in the tray. Keep the paper wrapped and away from humidity and dirt.
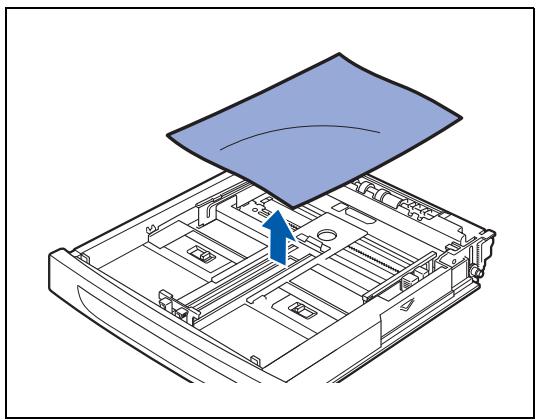
5 Open the top cover.

Do not touch any parts inside the printer.

6 Hold the toner cartridge by the glip and pull it out slowly.

It is necessary to remove the toner cartridge. If you move the printer with the toner cartridge installed, the toner may spill in the interior of the printer.
- Do not shake the toner cartridge after it has been removed from the printer. The toner will spill.
After removing the toner cartridge, put it into its original aluminum bag or wrap it with a thick cloth to prevent it from being exposed to strong light.

7 Close the top cover securely.
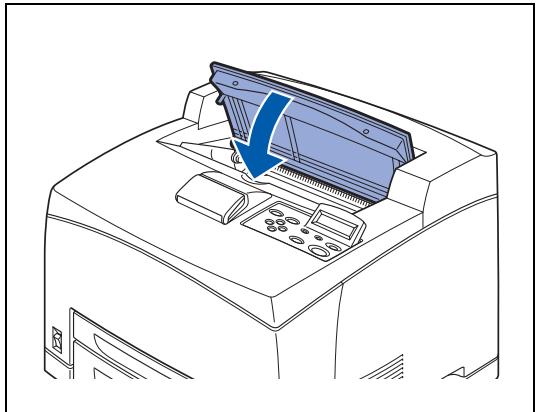
8 While holding up the face-up output tray, remove the right and left tabs from the holes at the back of the printer. Push the lever down.
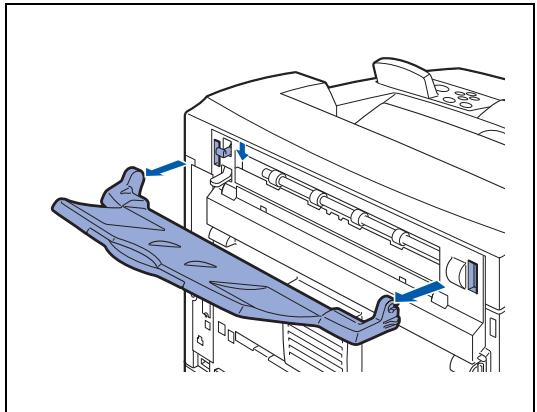
9 Lift the printer and move it gently. If the printer is to be moved over a long distance, pack it inside the original carton.
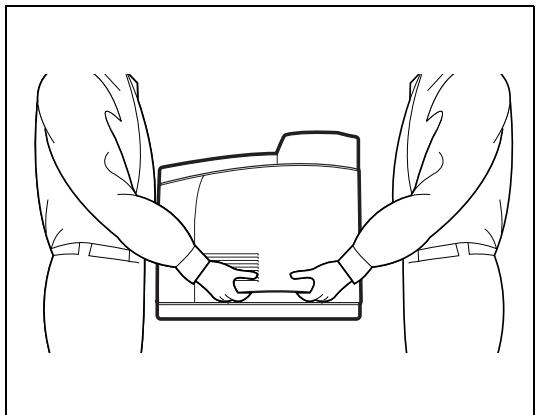
6 Routine Maintenance and Consumable Items Replacement
Replacing the Toner Cartridge (TN-1700)
The toner cartridge is a consumable. A new replacement toner cartridge contains enough toner to print up to 17,000 A4 or Letter-size single-sided pages at about 5 % coverage. For more information about consumables, see Introduction to the Optional and Consumable Items on page A-1.
For details about when to change consumables, see Life Span of Consumable Items on page A-31.
Toner Cartridge Handling Precautions

WARNING
Never throw a toner cartridge into an open flame. It can cause an explosion and you can get burnt.
Handling Precautions
- Do not subject it to direct sunlight or strong light.
- When installing the toner cartridge, select a location not subject to strong light and try to finish the installation within 5 minutes.
- Do not touch the surface of the photosensitive drum. Do not let the toner cartridge stand or place it upside down. The drum might get damaged.
A drum shutter protects the photosensitive drum from light. Do not open the drum shutter.
Although the toner is not harmful to the body, wash it off immediately if your hands or clothes are stained with it.
We recommend that you use up the toner cartridge within 1 year after opening it.
Toner consumption varies according to the image coverage on the page and the print density setting.
The greater the image coverage, the greater the toner consumption.
If you change the print density setting for lighter or darker printing, toner consumption varies accordingly.
Wait to unpack the toner cartridge until immediately before you install it in the printer.
■ Brother strongly recommends that you do not refill the toner cartridge provided with your printer. We also strongly recommend that you continue to use only Genuine Brother Brand replacement toner cartridges. Using or attempting to use potentially incompatible toner and/or toner cartridges in your printer may cause damage to the printer itself and/or it may result in unsatisfactory print quality. Our warranty coverage does not apply to any problem that was caused by the use of unauthorized third party toner and toner cartridges. To protect your investment and guarantee your print quality please continue to replace consumed toner cartridges with only Genuine Brother Branded Supplies.
■ Printing with a third-party toner or third-party toner cartridge may reduce not only the print quality but also the quality and life of the printer itself. It may also cause serious damage to the performance. Warranty coverage does not apply to problems caused by the use of third-party toner or third-party toner cartridges.
Replacing the Toner Cartridge
1 Turn off the printer power switch.

2 Remove any paper from the center output tray.

3 Open the top cover.

Do not touch any parts inside the printer.

4 Hold the toner cartridge by the grip and pull it out slowly.

To prevent the toner from dirtying the surface, lay a piece of paper on the surface first before putting the toner cartridge down.

5 Take the new toner cartridge out of the box and shake it 7 to 8 times in the manner shown.
If the toner is not evenly spread out, the print quality may drop. Also, if you do not shake the toner cartridge well, there may be operating noise or the interior of the toner cartridge may be damaged during operation.
- Do not touch the surface of the photosensitive drum.
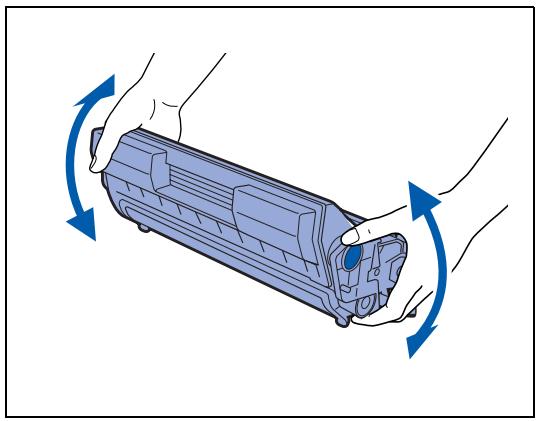
6 Place the toner cartridge on a flat surface and pull the seal on the right hand side out horizontally.

When pulling out the seal, pull it out horizontally. The tape might break if it is pulled out diagonally.
After the seal has been pulled out, do not shake or bump the toner cartridge.
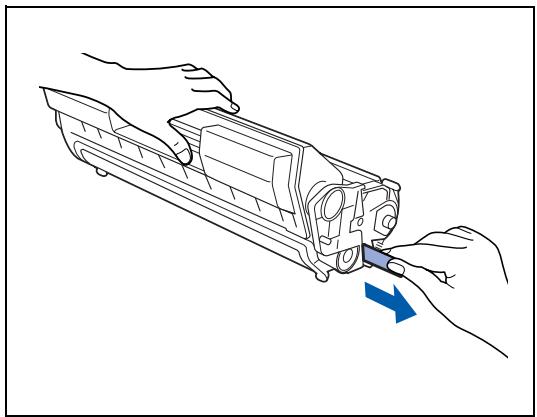
7 Hold the toner cartridge by the grip and insert it into the slot inside the printer.

Ensure that the toner cartridge is firmly set.
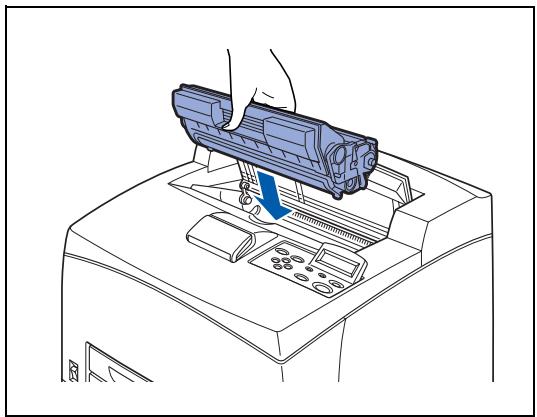
8 Close the top cover securely. Turn the printer switch back on.
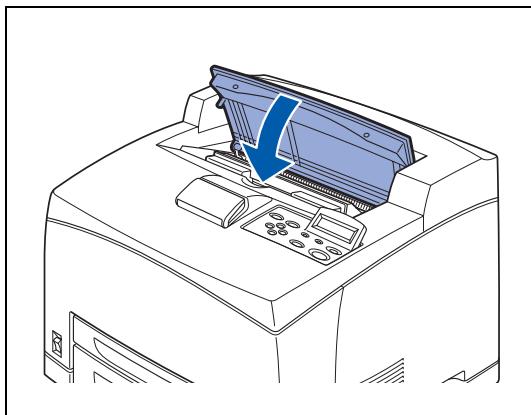
Replacing the Fuser Unit & Transfer Roll Cartridge (FP-8000)
The fuser unit and transfer roll cartridge are consumables. For more information about consumables, see Introduction to the Optional and Consumable Items on page A-1.
For details about when to change consumables, see Life Span of Consumable Items on page A-31.
Fuser Unit & Transfer Roll Cartridge Handling Precautions
WARNING
Never touch the labeled area found on or near the heat roller. You can get burnt. To avoid injuries or burns, if a sheet of paper is wrapped around the heat roller, do not try to remove it by yourself. Switch off the printer immediately, and contact Brother Customer Service.
■ Be sure to switch off and unplug the printer before accessing the interior of the printer for cleaning, maintenance, or fault clearance. Access to a live printer's interior can cause electric shock.
- Never throw a transfer roll cartridge into a naked/open flame. It can cause an explosion and you can get burnt.
Handling Precautions
Do not replace the fuser unit immediately after using the printer. You may get burnt.
- Do not remove and reinsert the transfer roll cartridge in use.
- When the message to replace the transfer roll cartridge appears, replace the transfer roll cartridge immediately. Otherwise, the printer will stop printing.
Replacing the Fuser Unit & Transfer Roll Cartridge
1 Turn off the printer power switch and leave it for 30 minutes until the fuser unit cools down.

2 Remove any paper from the center output tray.

3 Open the back cover by lifting the lower gray lever at the top left corner of the back of the printer.

Do not touch any parts inside the printer.

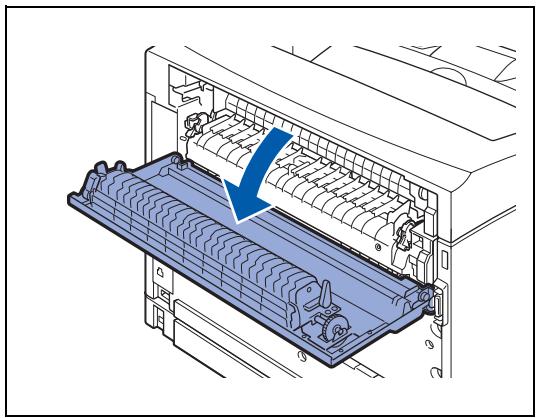
4 Push down the 2 beige levers at the bottom of the used fuser unit.
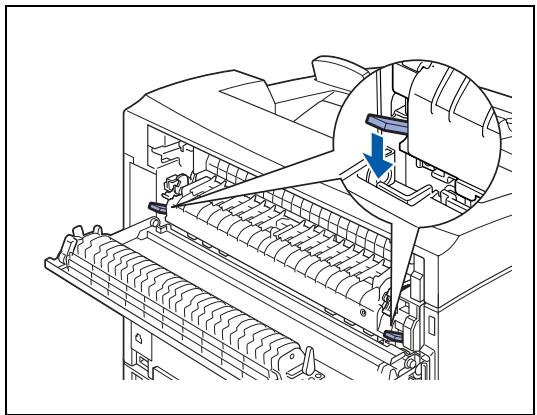
5 Remove the used fuser unit slowly.
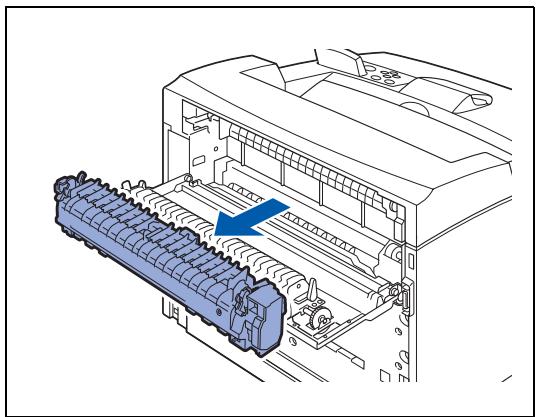
6 Install the new fuser unit slowly.
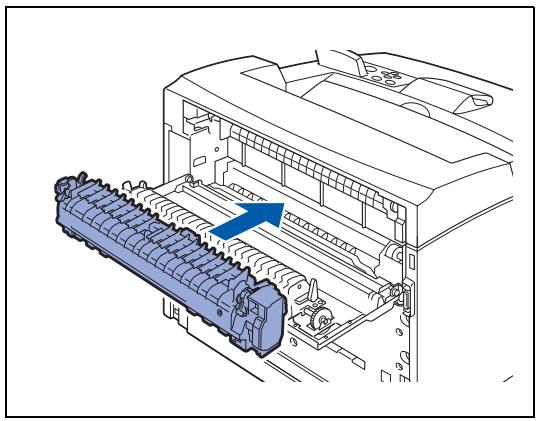
7 Lift up the 2 beige levers at the bottom of the fuser unit to lock it.
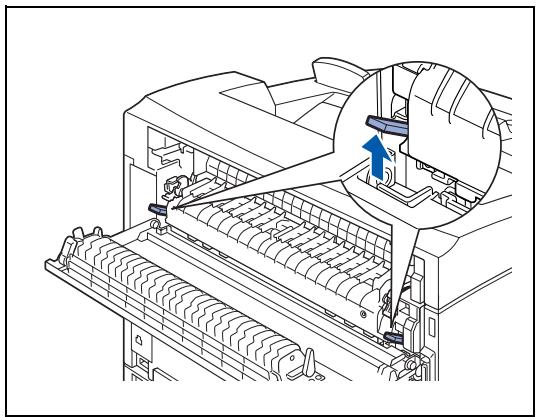
8 Close the back cover.

Do not close the back cover if the fuser unit is not installed. Forcibly closing it may damage the lever or the cover.
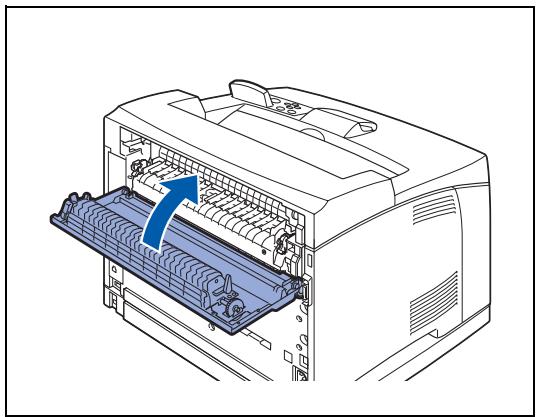
9 Open the top cover.

Do not touch any parts inside the printer.

10 Hold the toner cartridge by the grip and pull it out slowly.

To prevent the toner from dirtying the surface, lay a piece of paper on the surface first before putting the toner cartridge down.
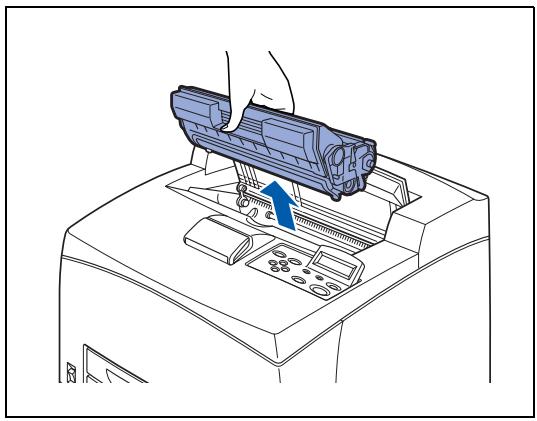
11 Pull the 2 levers on the upper part of the transfer roll cartridge, then squeeze the 2 beige levers on the bottom of the used transfer roll cartridge and pull it out slowly towards you.
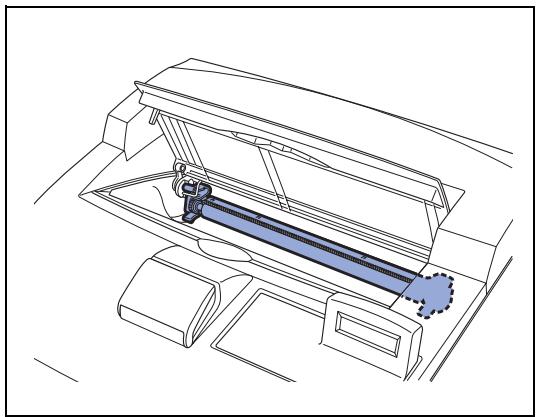
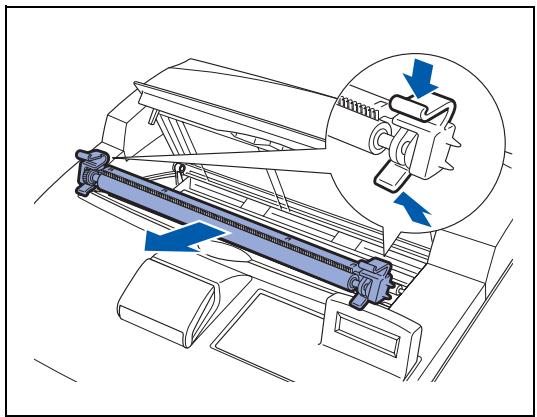
12 Pick up the new transfer roll cartridge by the levers at both ends and slowly push it into the slot.
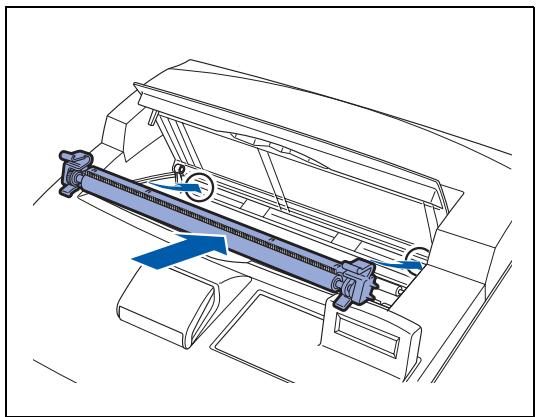
13 Hold the toner cartridge by the grip and insert it into the slot inside the printer.

Ensure that the toner cartridge is firmly set.

14 Close the top cover securely.
Turn the printer switch back on.

Replacing the Feed Roller
To purchase the replacement Feed Roller, call your dealer or Brother Customer Service.
Feed Roller Handling Precautions

WARNING
- To prevent electric shock, always turn the printer off and disconnect the power cord from the AC outlet/Socket before cleaning the printer or performing maintenance.
Before you replace the feed roller, turn the power switch off, unplug the AC power cord and allow the printer to cool for at least 30 minutes before replace the feed roller.
There are feed rollers inside the interior of the printer (2 in 2 locations, 4 in total), lower tray unit (1 location) and paper tray (1 location).
Those rollers are periodic replacement parts. We recommend that you call your dealer or Brother Customer Service if you need assistance replacing the Feed Roller.
Inside the printer (2 locations)
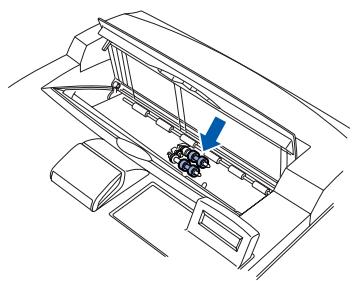
Lower tray unit (1 location)
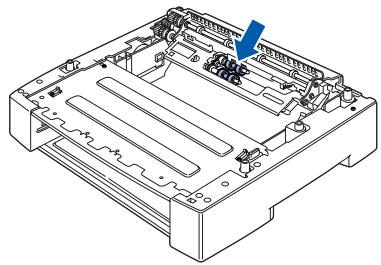
Paper tray (1 location)
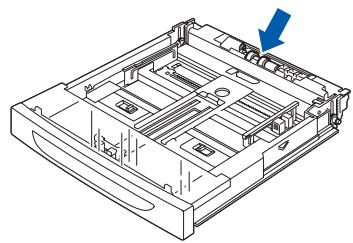

The following procedure explains how to replace the feed roller of the paper tray. Follow this procedure for replacing the feed roller of the optional lower tray unit as well.
Paper tray feed roller
1 Pull the paper tray out of the printer.

If replacing the feed roller of tray 2, pull out both tray 1 and tray 2.

2 While pushing down on the shaft of the feed roller as shown in the illustration (1), widen the tab of the feed roller to loosen it (2) and then slowly remove the feed roller from the shaft of the paper tray (3).
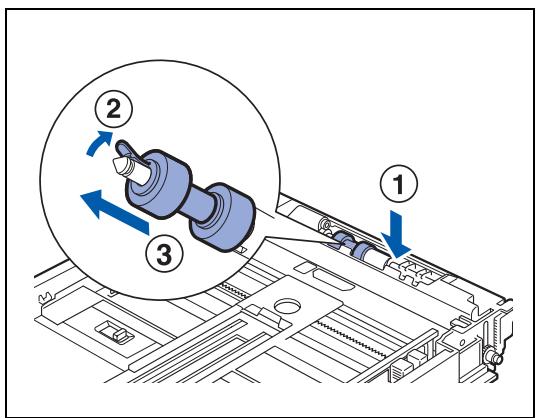
3 Hold the new feed roller with the tab as shown in the illustration and slowly push it on to the shaft of the paper tray.
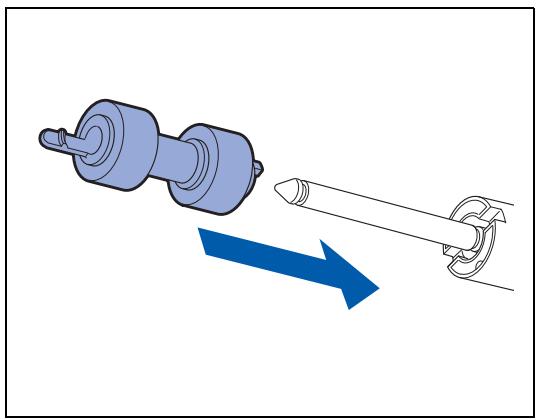
4 Align the small tab on the feed roller with the slot of the shaft, and then push the feed roller completely in so that the tab fits into the slot.
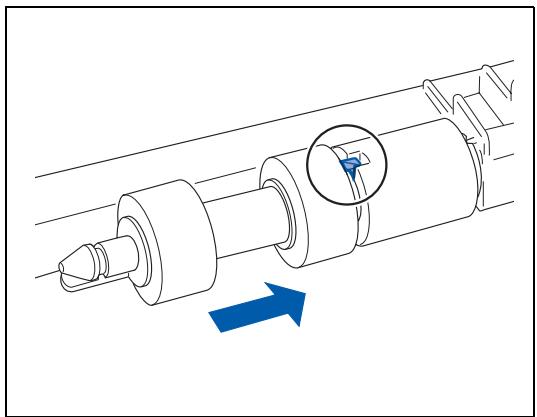
5 Push the paper tray completely into the printer.

Feed roller inside the printers
1 Remove any paper from the center output tray.
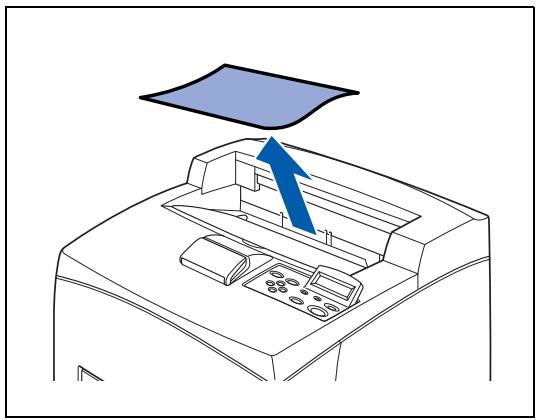
2 Open the top cover.

3 Hold the toner cartridge by the grip and pull it out slowly.

To prevent the toner from dirtying the surface, lay a piece of paper on the surface first before putting the toner cartridge down.

4 While pushing down on the shaft of the feed roller as shown in the illustration, widen the tab of the feed roller to loosen it (1) and then slowly remove the feed roller from the shaft.
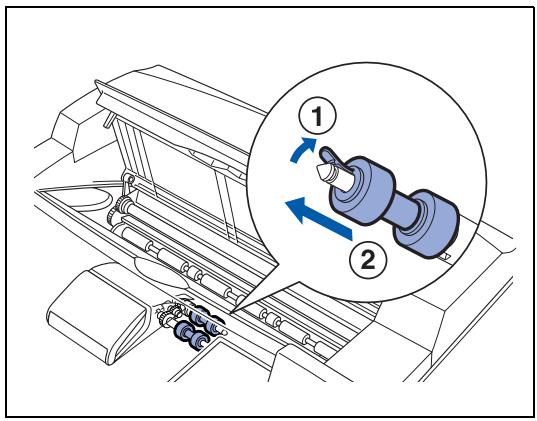
5 Hold the new feed roller with the tab as shown in the illustration and slowly push it on to the shaft of the paper tray.

6 Align the small tab on the feed roller with the slot of the shaft, and then push the feed roller completely in so that the tab fits into the slot.
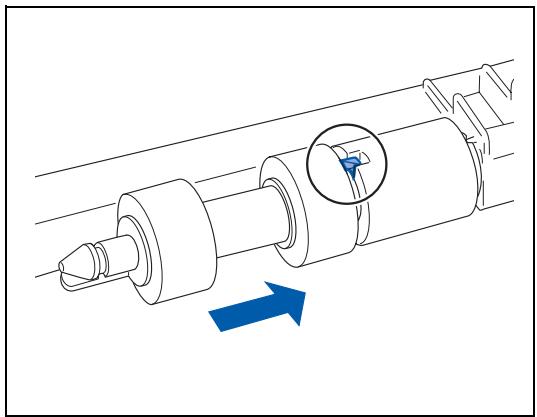
7 Hold the toner cartridge by the grip and insert it into the slot inside the printer.

Make sure that the toner cartridge is firmly set.
8 Close the top cover securely.

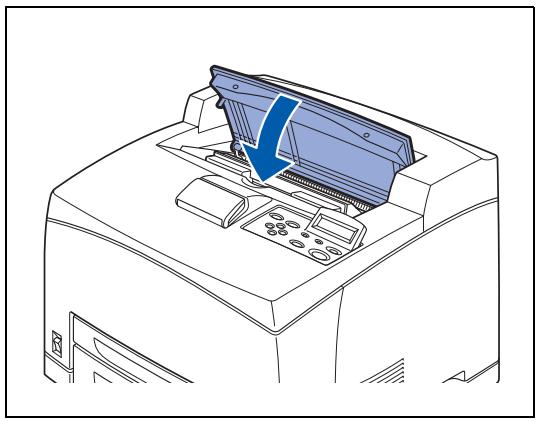
Cleaning the Printer
We recommend that you clean the printer at least once a month to keep it in good working condition and to maintain print quality.

CAUTION
Turn the printer off and disconnect the power cord from the AC outlet/rod before cleaning the printer. Failure to turn the printer off and disconnect the power cord may result in an electric shock.
Cleaning Precautions
- Never spray anything directly onto the printer. Droplets can enter the printer and cause malfunctions. Never use detergents other than neutral detergents.
Never lubricate the printer with oil. The printer does not require lubrication.
Never use a vacuum cleaner to clean the printer.
Cleaning the Outside of the Printer
1 Press the power switch to the O position to turn the power off.

2 Use a soft, damp cloth to clean the outside of the printer. If some stains prove difficult to remove, use a cloth lightly moistened with neutral detergent.
3 Wipe any remaining water with a soft, dry cloth.
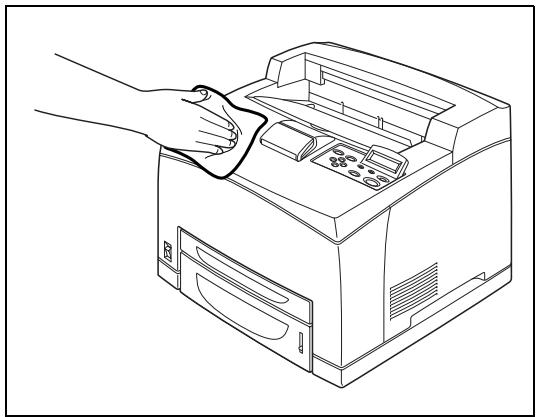
1 Press the power switch to the O position to turn the power off.

Remove any remaining pieces of paper.
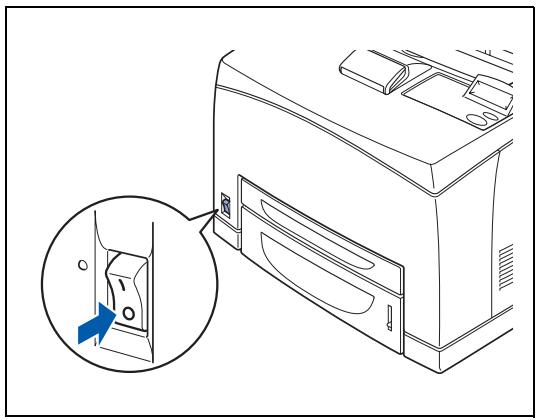
2 Use a soft, damp cloth to clean the interior. If some stains prove difficult to remove, use a cloth lightly moistened with neutral detergent.
3 Wipe any remaining water with a soft, dry cloth.
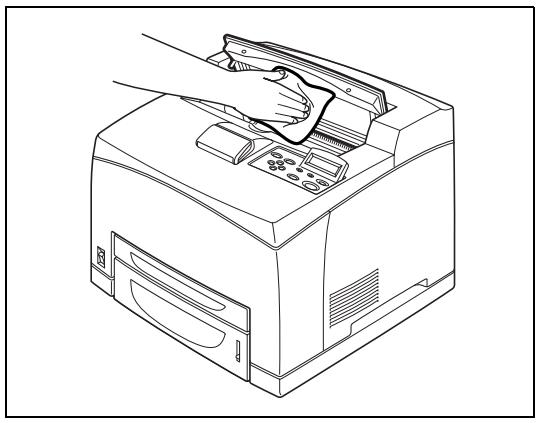
1 Pull out the paper tray from the printer.
2 Wipe the rubber parts with a damp, soft cloth.
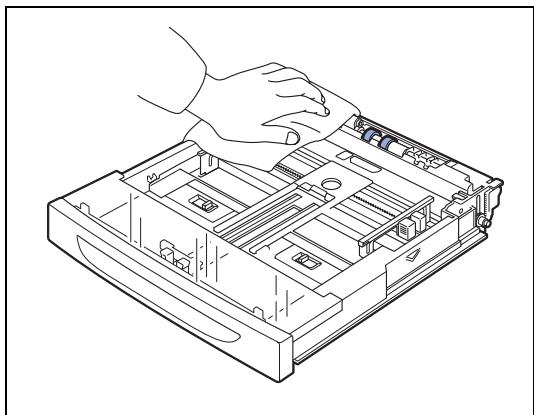
3 Push the paper tray completely into the printer.
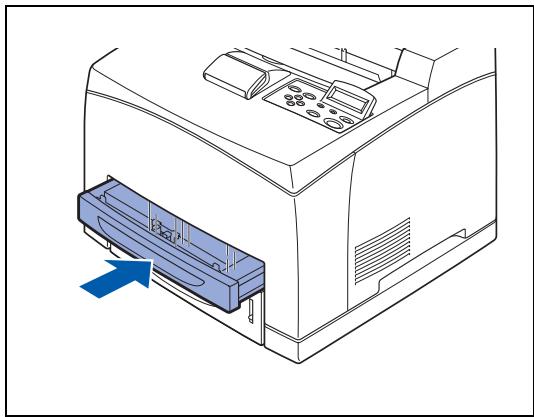
Carry out the following procedure if you are not going to use the printer for a long period of time.
1 Press the power switch to the O position to turn the power off.
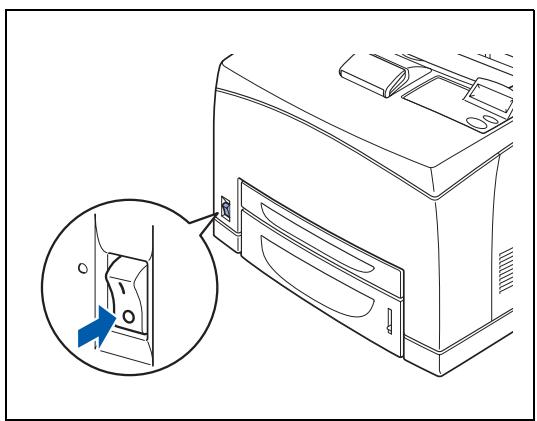
2 Remove all connection cords, such as the power cord and interface cables.

WARNING
- Never touch a power cord with wet hands. Danger of electric shock exists.
- When unplugging the machine, grasp the plug instead of the cord. Forcibly pulling on a cord can damage it and cause fire or electric shock.

3 Remove the paper from the paper tray and store it in a location free of humidity and dust.
For details on storing the paper, see Suitable and
Unsuitable Paper Types on page 2-1.
Introduction to the Optional and Consumable Items
The following options are available for this printer. To order any of these options, contact your dealer or Brother Customer Service.
Options
CompactFlash Memory
If you install an optional CompactFlash memory card, you can save macros, the print log and fonts on it. This card lets you select the Reprint functions through the network.
For the installation procedure, see Installing the CompactFlash Card on page A-4.

DIMM Memory
If you want to print documents containing complex graphic layouts or large amount of image data, it may be necessary to expand the memory of your printer.
For the installation procedure, see DIMM Memory on page A-6.
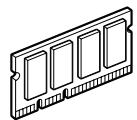
Optional Lower Tray Unit (A4/Letter - 550 sheets) (LT-8000)
You can attach up to 2 additional trays to the printer. Each tray of the module holds up to 550 sheets of paper. When installed, the trays become the printer's tray 3 and tray 4.
For the installation procedure, see Installing the Lower Tray Unit on page A-9.
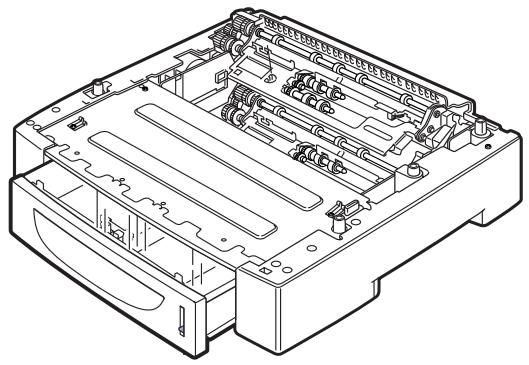
Duplex Unit (DX-8000)
Install this unit on the printer to enable 2 sided printing. For the installation procedure, see Installing the Duplex on page A-16.
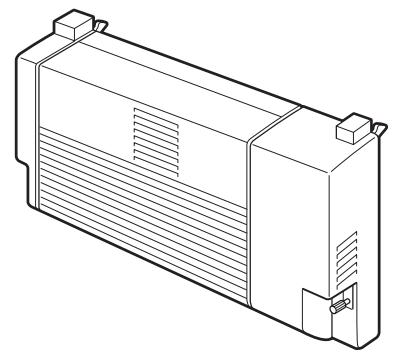
Offset Catch Tray (CT-8000)
Install this tray on the printer to enable offset of print jobs to be output. Maximum capacity is 500 sheets of the standard paper.
For the installation procedure, see Installing the Offset Catch Tray on page A-20.
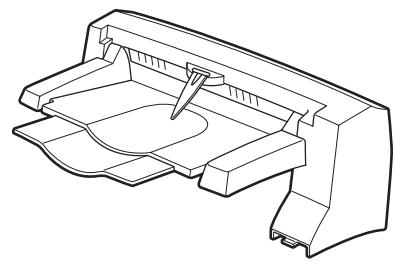
Toner Cartridge (TN-1700)
The replacement toner cartridge includes the toner and the photosensitive drum. If the toner in the toner cartridge is insufficient, the printout will become light and blurred.
The following replacement toner cartridge is available:
TN-1700: can print up to 17,000 pages


The possible number of pages that can be printed is based on A4/Letter size paper with a print ratio of 5% and the default density setting using one toner cartridge. The number of pages that can be actually printed varies according to the conditions of use.

Use of toner cartridges not recommended by Brother may impair print quality or printer performance. Use only toner cartridges recommended by Brother in this printer.
For the installation procedure, see Replacing the Toner Cartridge (TN-1700) on page 6-1.
Fuser Unit & Transfer Roll Cartridge (FP-8000)
For the installation procedure, see Replacing the Fuser Unit & Transfer Roll Cartridge (FP-8000) on page 6-5.
The following fuser unit & transfer roll cartridge is available:
FP-8000: can print up to 200,000 pages

The actual number of printed pages will vary depending on the average type of print job and paper.
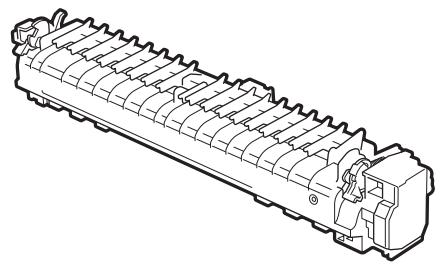
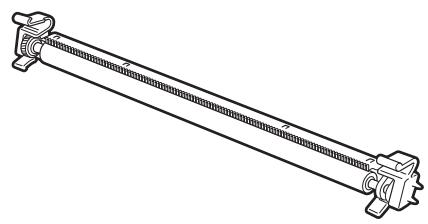
CompactFlash Card
You can install the following types of CompactFlash memory card.
Type I
16 MB SDCFB-16-801
32 MB SDCFB-32-801
64 MB SDCFB-64-801
128 MB SDCFB-128-801
256 MB SDCFB-256-801

Make sure the printer power is OFF before you install or remove a card so you don't seriously damage it or lose all its data.
For more information about the cards, call your dealer or Brother Customer Service.
Installing the CompactFlash Card
1 Turn off the printer power switch.

2 Pull out the power cord from the power outlet and then from the printer.

3 Insert a CompactFlash card into the slot with the label facing to the left.
Make sure you put it in properly.

Before you remove the card, turn the power switch OFF. To remove the card, pull it out of the printer.
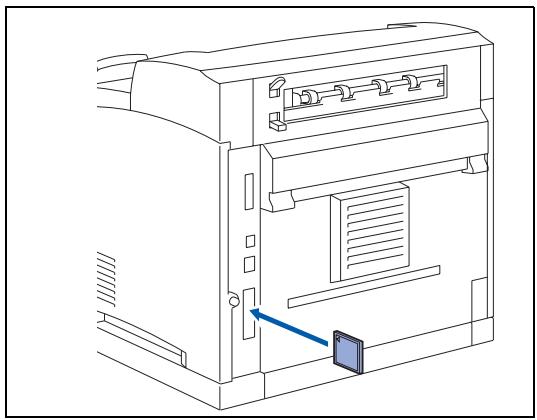
DIMM Memory
Installing the DIMM Memory
1 Turn off the printer power switch.
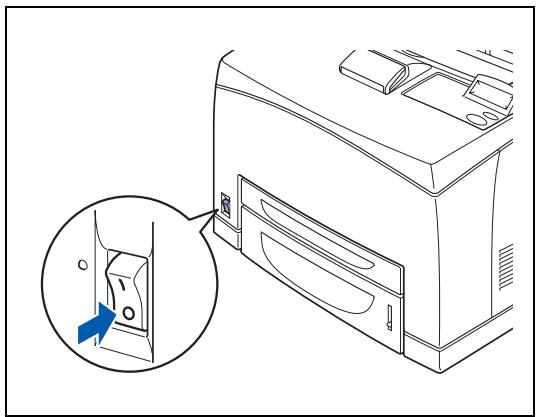
2 Pull out the AC power cord from the AC power outlet/socket and then the printer.

Make sure you turn the power to the printer off before you install or remove the DIMM.

3 Loosen the screw on left side of the back of the printer, and then remove the side cover.
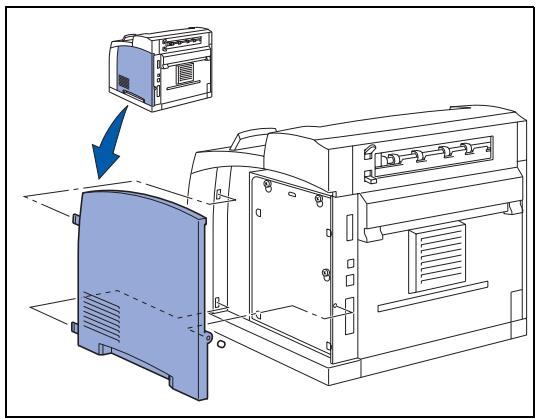
4 Loosen the two screws, and then remove the metal plate by lifting it up slightly.
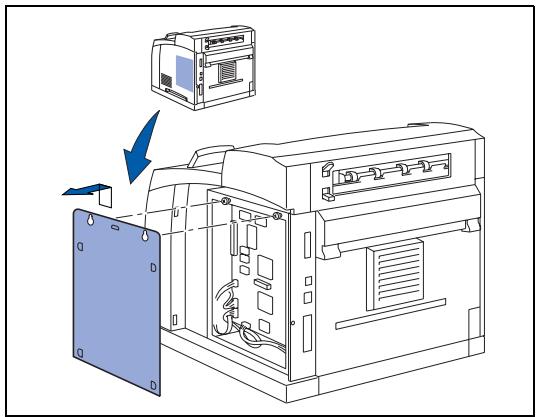
5 Unpack the DIMM and hold it by its edges.
6 Hold the DIMM with your fingers on the side edges and your thumb on the back edge. Line up the notches on the DIMM with the DIMM slot. (Check that the locks on each side of the DIMM slot are open or facing outwards.)
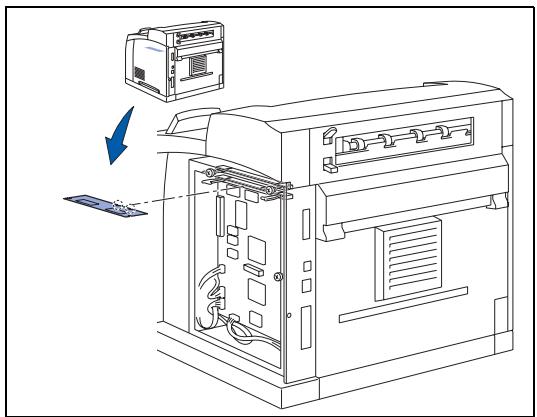
7 Press the DIMM straight into the slot (press firmly). Make sure the locks on each side of the DIMM click into place. (To remove a DIMM, you must release the locks.)
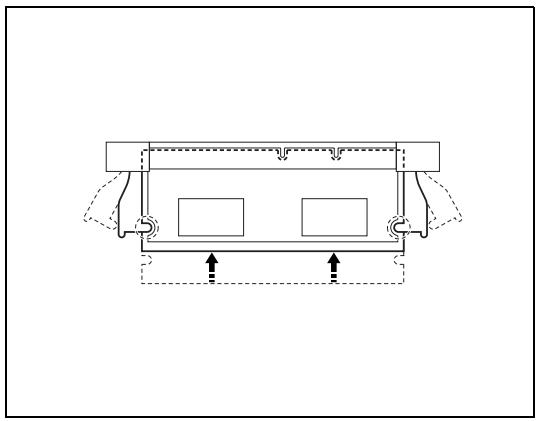
8 Secure the metal plate with the two screws.
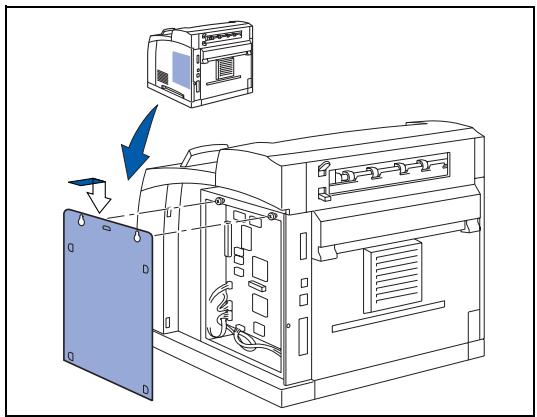
9 Put the side cover back on.
10 Reconnect the interface cable to your printer. Plug the printer back in, and then turn on the printer power switch.
11 To check whether the DIMM has been installed properly, you can print the Print Settings listing that shows the current memory size.

To set the memory size, see How to Set the RAMDISK size on page 4-4.
Optional Lower Tray Unit (LT-8000)
1 The optional lower tray (A4/Letter - 550 sheets) is available for this printer.

You can add up to two lower trays.

WARNING
- Be sure to switch off the power and unplug the power cord from the outlet before carrying out the operations.
If not, you might get an electric shock. - When lifting the machine, get a firm footing and bend your knees to avoid possible injuries to your back.

The weight of this printer, without the optional accessories, paper trays, consumable and paper, is 18.0 ~kg . Before moving the printer, you must uninstall the optional accessories first.
- When lifting the printer, there should be two people, one in front and one behind the printer, to firmly grip the recessed areas provided on both sides of the printer. Never try to lift the printer by gripping any other areas. Lifting the printer by gripping any other areas can cause the printer to fall and result in injuries.
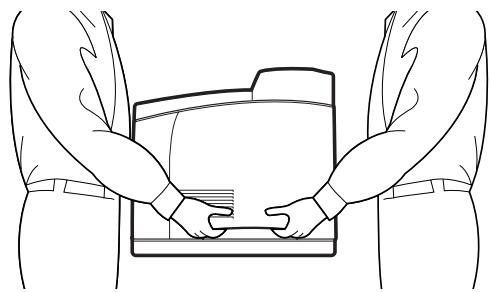
Checking the contents of the lower tray package
Before installing the lower tray unit to the printer, make sure that you have all of the following items.
Lower tray unit (A4/Letter - 550 sheets)
Fasteners (four pieces)
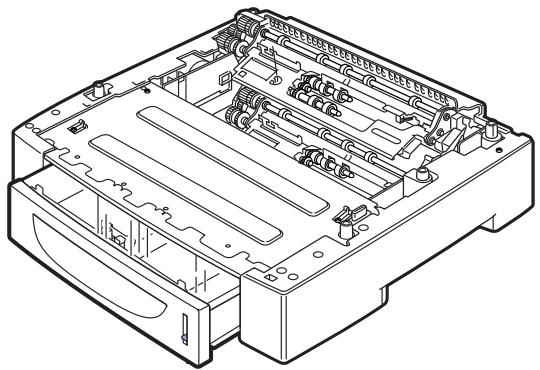
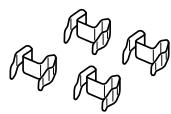
1 Place the lower tray to be installed at the lowest level on a flat location.

Proceed to Step 5 if you are installing only one lower tray.
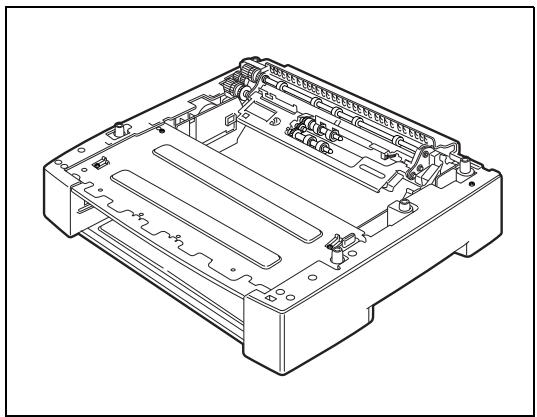
2 Lift up the lower tray to be installed at the top level by holding the parts as shown in the illustration.
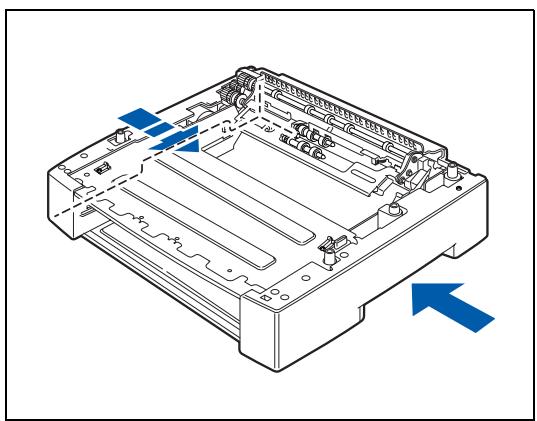
3 Align the front and back corners of the top and bottom lower trays, and slowly lower the top module so that the guide pins at the 4 corners of the bottom module fit into the holes at the base plate of the top module.
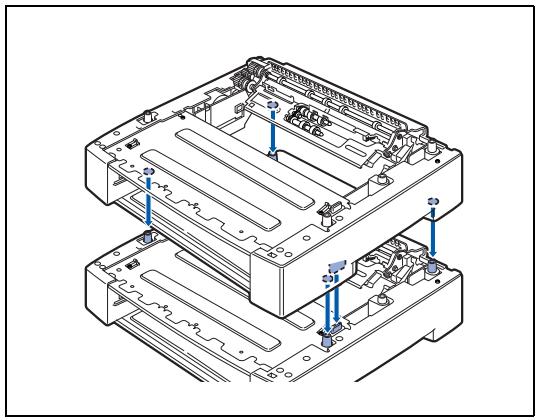

The lower tray must be lowered gently. Otherwise, the interior parts may be damaged.
4 Insert the fasteners provided into the 2 locations inside of the lower tray and 2 locations at the back of the lower tray. Insert the fasteners securely.
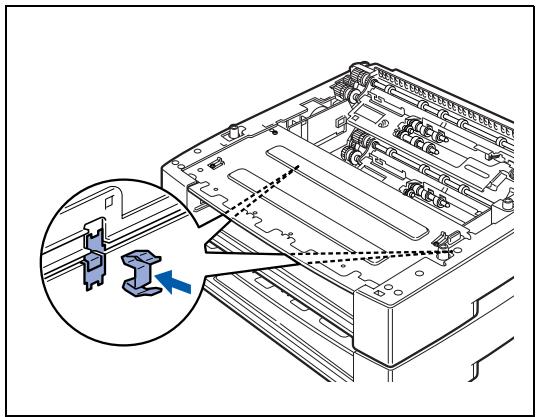
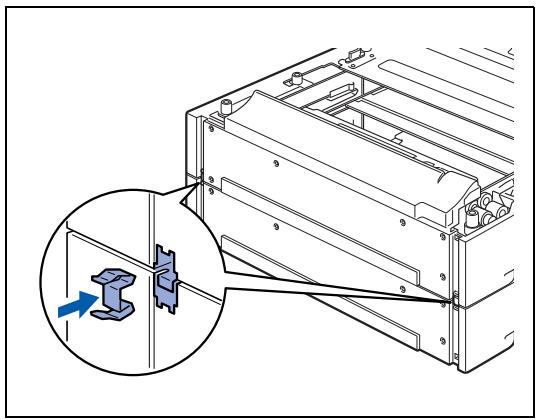
5 Turn off the printer power switch.

6 Pull out the power cord from the power outlet and then the printer.

7 Remove any paper from the center output tray (1) and return the paper stopper to its original position if it is raised (2).
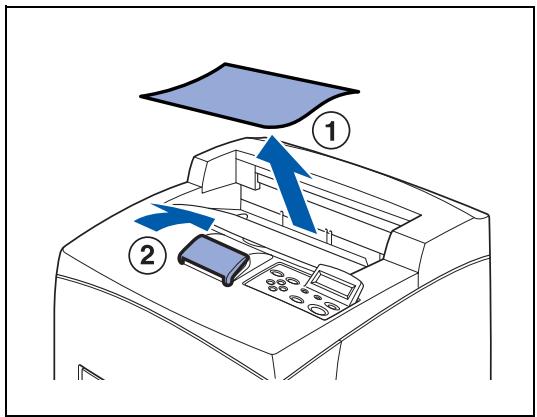
8 Pull the paper trays out of the printer.
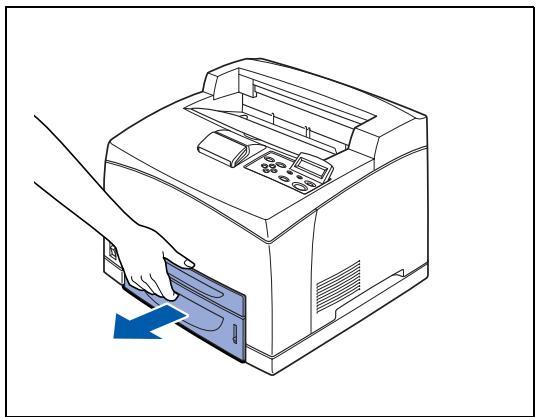
9 Lift up the printer by holding the recessed areas as shown in the illustration.
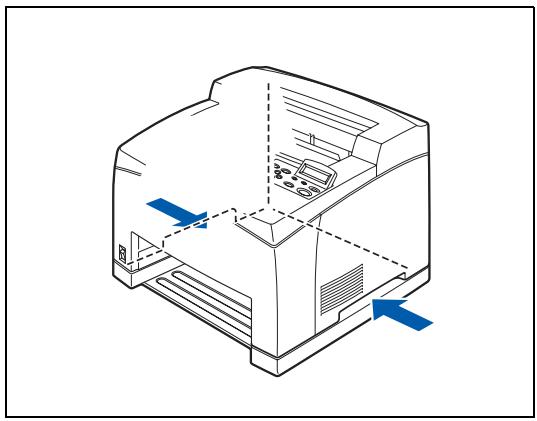
10 Align the corners of the printer and the lower trays, and lower the printer gently so that the guide pins at the 4 corners of the lower trays fit into the holes at the base plate of the printer.
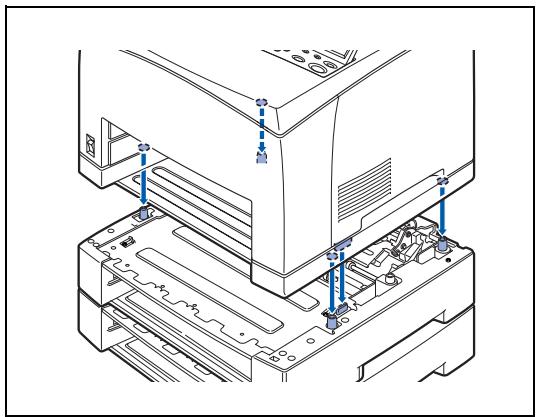

The printer must be lowered gently.
Otherwise, the interior parts may be damaged.
11 Insert the fasteners provided into the 2 locations inside the printer and 2 locations at the back of the printer. Insert the fasteners securely.
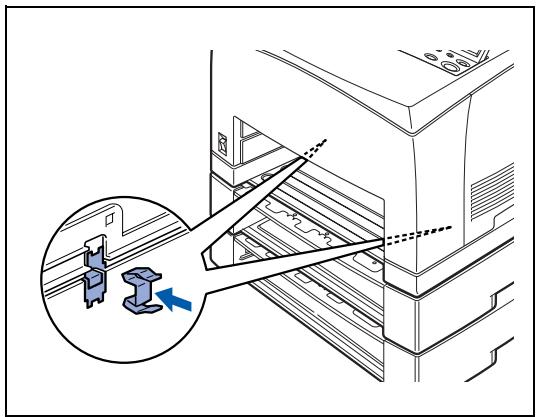
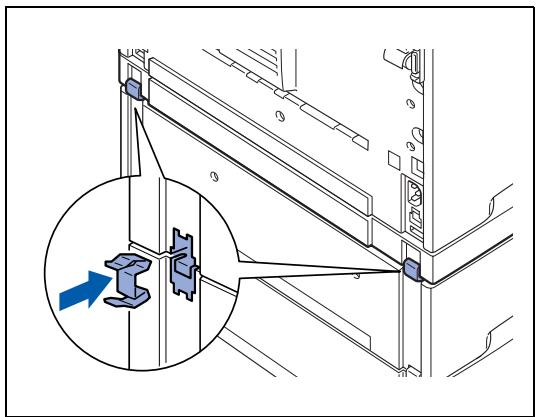
12 Push the paper trays completely into the printer. Turn the printer switch back on.

To configure the printer driver, see Accessories tab on page 3-7.
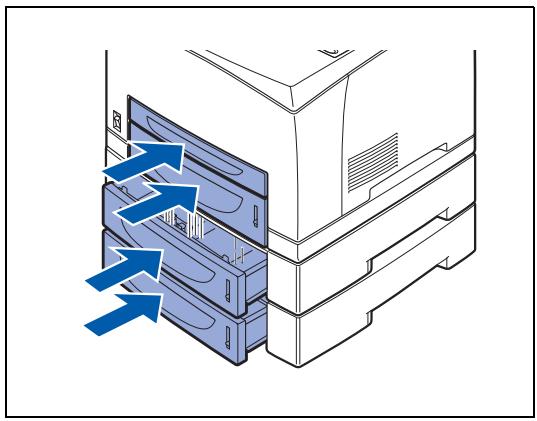
Uninstalling the Lower Tray Unit

The procedure here explains the uninstallation of two lower trays as an example. You can use the same procedure for uninstalling one lower tray.
1 Turn off the printer power switch.

2 Pull out the power cord from the AC power outlet/Socket and then the printer.
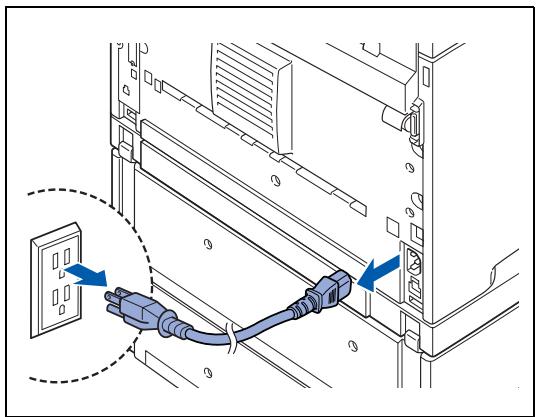
3 Remove any paper from the center output tray (1) and return the paper stopper to its original position if it is raised (2).
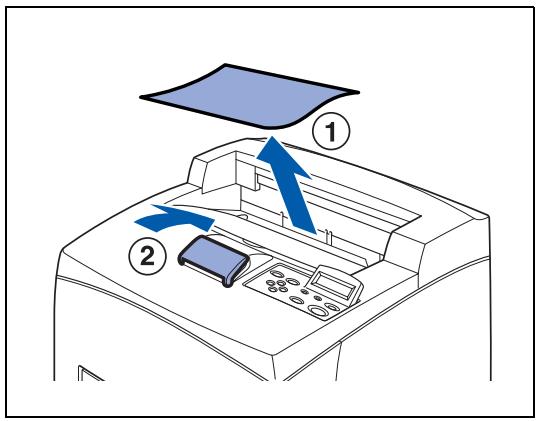
4 Pull all the paper trays out of the printer.

5 Remove the fasteners found at the 2 locations inside the printer and at the 2 locations at the back of the printer.
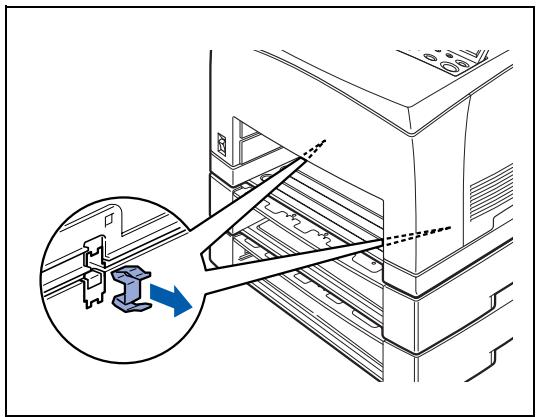
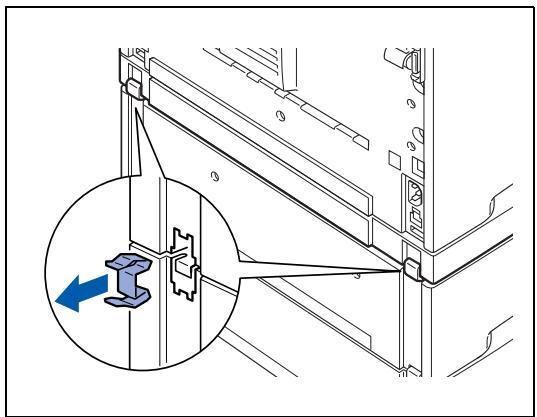
6 Lift up the printer by holding the recessed areas as shown in the illustration and then remove it from the lower trays.
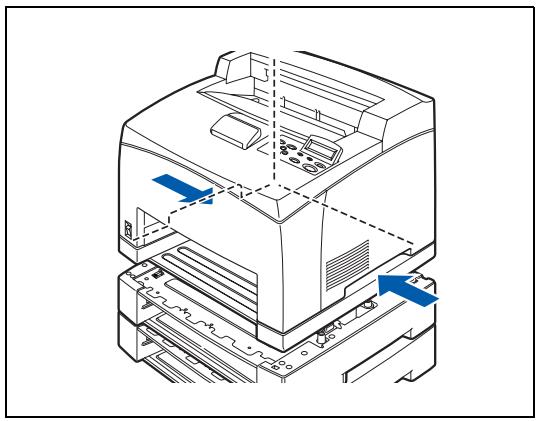
7 Remove the fasteners found at the 2 locations inside the lower trays and at the 2 locations at the back of the lower trays.
8 Lift up the top lower tray by holding the recessed areas as shown in the illustration and then remove it from the bottom lower tray.
Turn the printer switch back on.

Duplex Unit (DX-8000)
You can install an optional duplex unit to this printer.

WARNING
Be sure to switch off the power and unplug the power cord from the outlet before carrying out the operations. If not, you might get an electrical shock.
Installing the Duplex Unit
1 Turn off the printer power switch.

2 Pull out the power cord from the AC power outlet/rod and then the printer.
3 Remove the packing that protects the DX connector.
4 Push in the packing cover from the printer by pushing the two tabs as shown in the illustration.
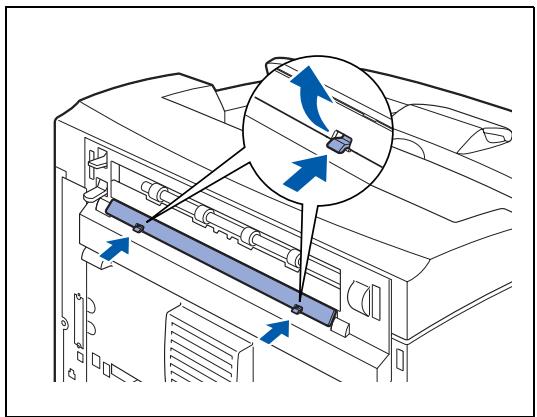
5 Insert the right and left tabs at the bottom of the duplex unit into the holes at the back of the printer and then align the top part of the duplex unit with the printer. Ensure that the connector of the duplex unit is connected to the connector of the printer.
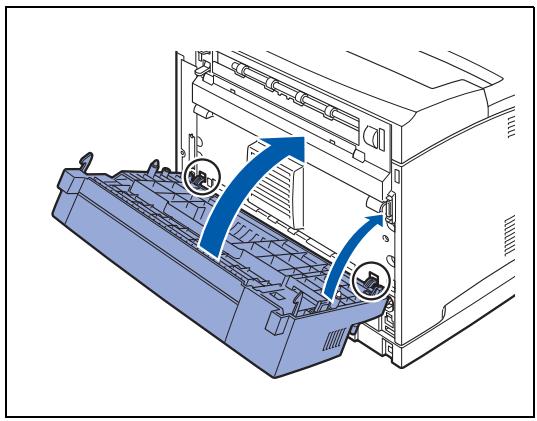
6 Tighten the screws at both ends of the bottom of the duplex unit.
Turn the printer switch back on.

To configure the printer driver, see Accessories tab on page 3-7.
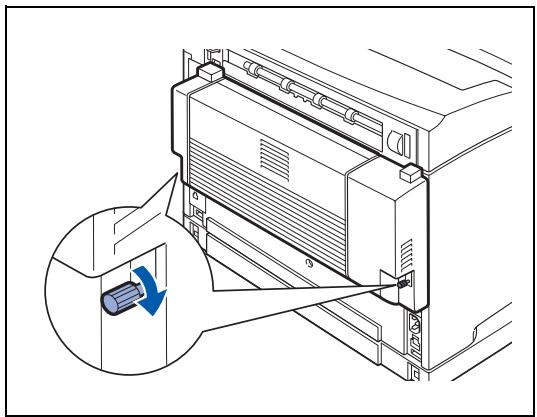
Uninstalling the Duplex Unit
1 Turn off the printer power switch.
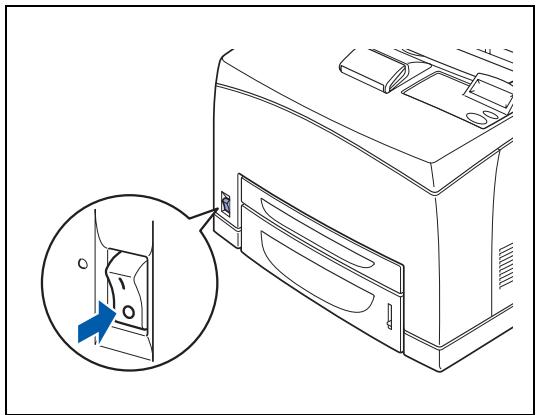
2 Pull out the power cord from the AC power outlet/Socket and then the printer.
3 Loosen the screws at both ends of the bottom of the duplex unit.
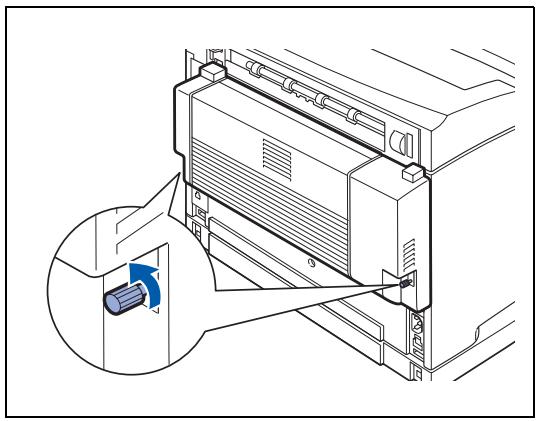
4 While supporting the duplex unit with your hand, lift the lever at the top left hand side of the duplex unit to unlock it and then tilt the top part of the duplex unit away from the printer.
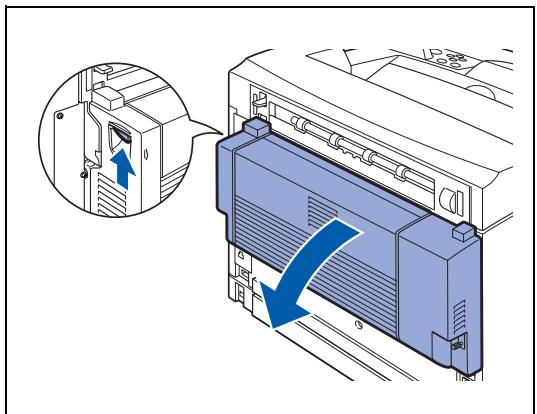

You must support the duplex unit with your hand, when it is unlocked. If you do not, it may fall.
5 While holding up the duplex unit, remove the right and left tabs of the duplex unit from the holes at the back of the printer.
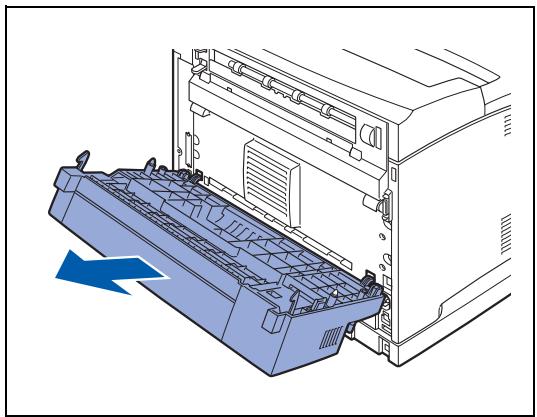
6 Push in the protective cover and protective part, which was removed during installation of the duplex unit, until it clicks into the back of the printer. Turn the printer switch back on.
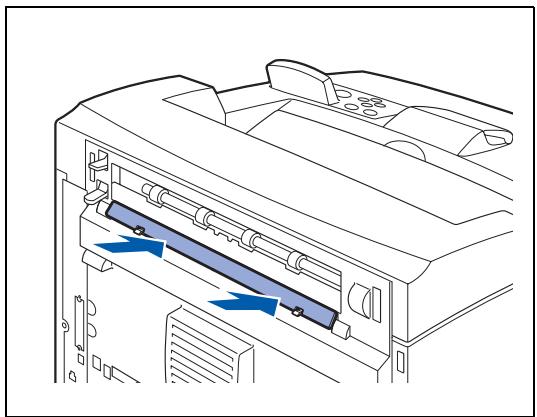
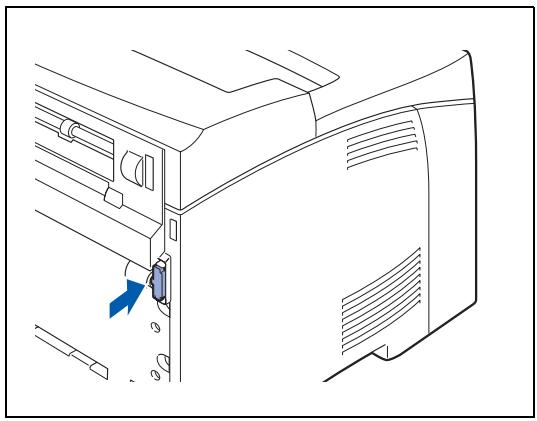
Offset Catch Tray (CT-8000)
You can install an optional offset catch tray to this printer.

WARNING
Be sure to switch off the power and unplug the power cord from the AC power outlet/rod before carrying out the operations. If you do not, you might get an electrical shock.
Installing the Offset Catch Tray
1 Turn off the printer power switch.
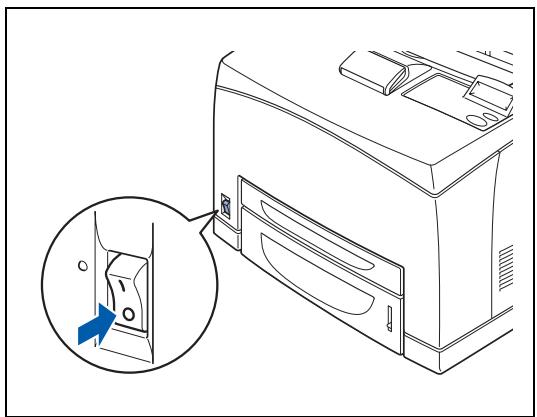
2 Pull out the power cord from the AC power outlet/rod and then the printer.

3 Open the back cover by lifting the lower gray lever at the top left corner of the back of the printer.

Do not touch any parts inside the printer.
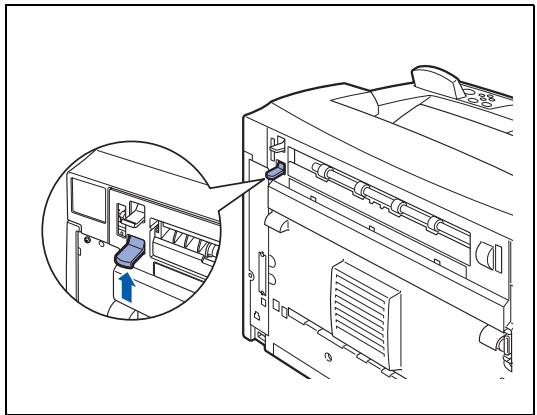
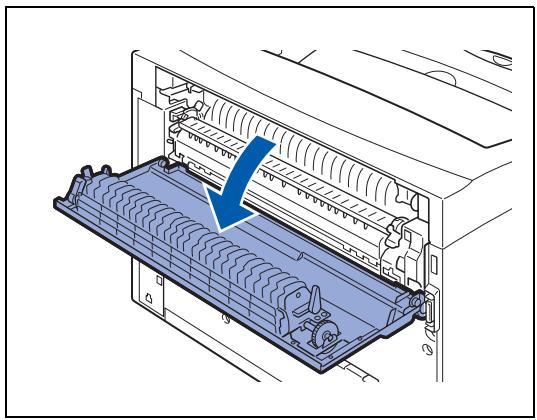
4 Loosen the right and left screws as shown in the illustration to uninstall the top cover of the paper exit.

5 Insert the right and left tabs of the offset catch tray into the holes at the top of the printer (1), and then slowly lower it down on the top of the printer (2).
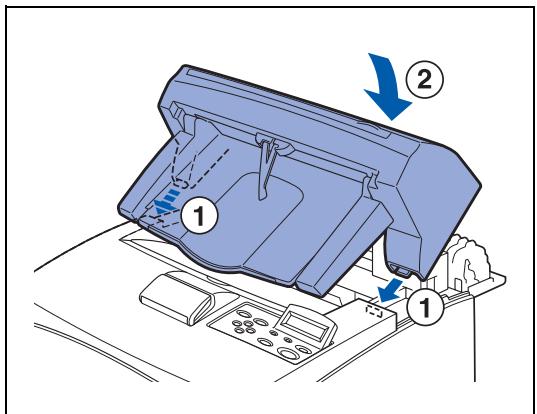
6 Secure the screws at both ends of the bottom of the offset catch tray.
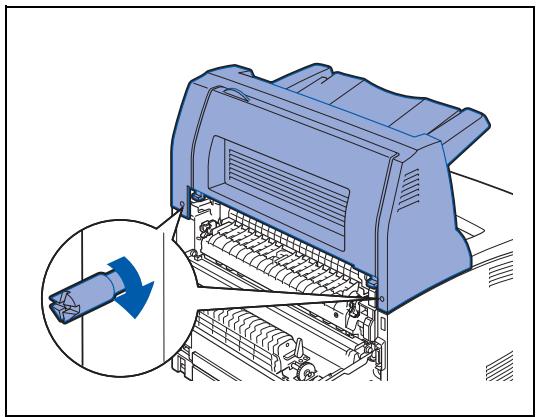
7 Pull out the tray's extension.
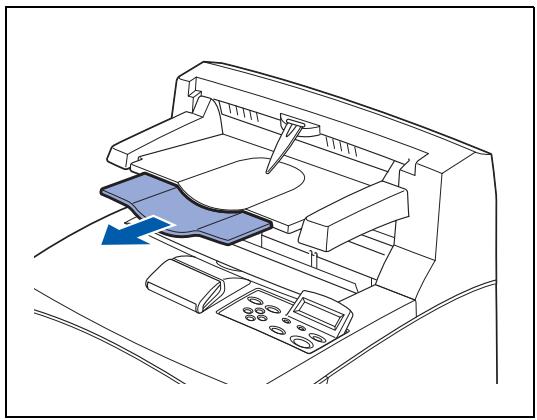
8 Close the back cover. Reconnect the AC power cord to the printer. and then the AC power outlet/socket, Turn the printer switch back on.

To configure the printer driver, see Accessories tab on page 3-7.
Uninstalling the Offset Catch Tray
1 Turn off the printer power switch.

2 Pull out the power cord from the AC power outlet/rod and then the printer.
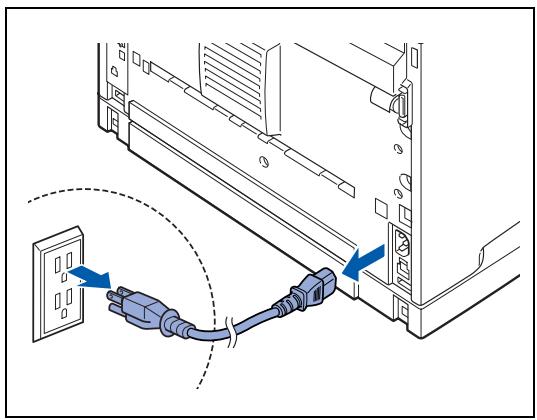
3 Push in the offset catch tray's extension.

4 Lift up the lower gray lever (1) at the top left corner of the back of the printer to open the back cover (2).
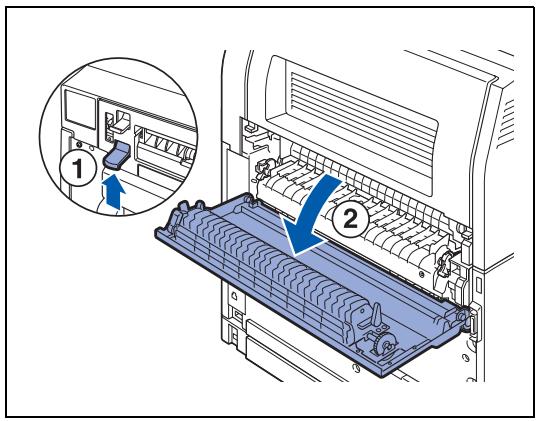
5 Loosen the screws on both sides of the offset catch tray (1), and then while holding up the offset catch tray, tilt it forwards to remove the right and left tabs from the holes at the top of the printer (2) so you can lift the tray off the printer.
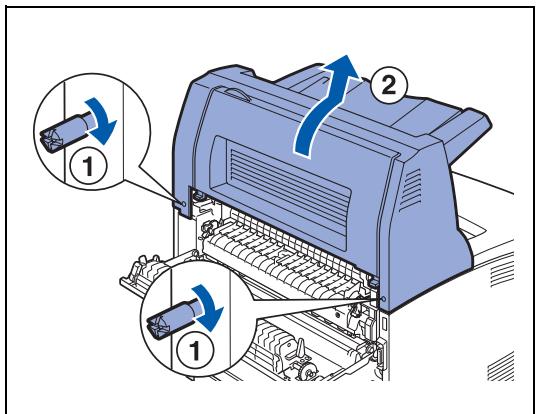
6 Insert the right and left tabs of the top cover of the paper exit, which were removed during installation of the offset catch tray, into the holes at the top of the printer. Reconnect the AC power cord to the printer, and then the AC power outlet/socket. Turn the printer switch back on.
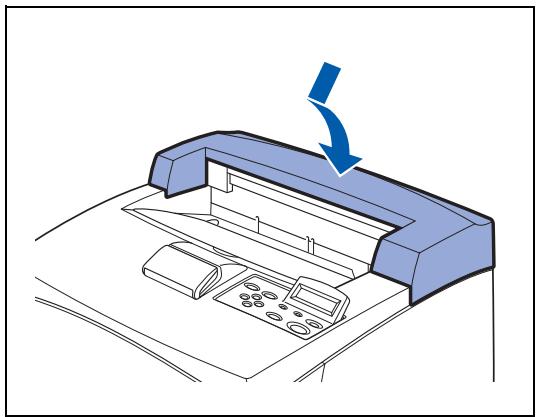
Getting Product Support Information
Access our user support web site for the latest drivers and information about your printer.
http://solutions.brother.com
Printer Specifications
Printing

When the printer does not receive data for a certain period of time (time-out), it enters sleep mode. Sleep mode acts as though the printer is turned off. The default time-out is 30 minutes. You can change the setting at the control panel.
Functions
| CPU | Toshiba TMPR 4955 300 MHz |
| Emulation | Automatic emulation selection ■ HP LaserJet 5 (PCL 6) (Hewlett-Packard laser printer-LaserJet) ■ BR-Script® 3 (PostScript® 3 language emulation) ■ HP-GL ■ EPSON FX-850 ■ IBM Proprinter XL |
| Interface | Bi-directional parallel (IEEE1284 compliant) USB 1.1 10/100Base TX Ethernet |
| Memory | 64 MB (expandable to 576 MB with two DIMMs) |
| Control panel | Nine buttons, two LED, and one LCD that is a two-line, 16 column display |
| Paper handling | Lower tray unit (LT-8000) Maximum 550 sheets x 2 trays |
| Duplex unit for duplex printing (DX-8000) | |
| Offset catch tray for output source (CT-8000) | |
| Network connectivity | Ethernet 10BaseT/100BaseTX Print server |
| Storage device | DIMM |
| CompactFlash Card |
Electrical and Mechanical
| Power supply | USA and Canada: AC 98 to 132 V, 50/60 Hz±3Hz Europe and Australia: AC 198 to 264V, 50/60 Hz±3Hz | |
| Power consumption | 100 to 120V | |
| Printing: 985 W | ||
| Stand-by: 105 W | ||
| Stand-by in sleep mode: 12 W | ||
| OFF: 1 W or less*1 | ||
| 200 to 240 V | ||
| Printing: 985 W | ||
| Stand-by: 83 W | ||
| Stand-by in sleep mode: 14 W | ||
| OFF: 1 W or less*1 | ||
| *1 The only way to achieve 0 W power is to unplug the printer from the power source. | ||
| Noise Level | Sound Pressure Printing: Less than 53.6dBA Stand-by: Less than 27.0dBA | |
| Sound Power Printing: 6.7B Stand-by: 4.0B | ||
| Temperature | Operating: 10 to 32 °C (50 to 90 °F) | |
| Humidity | Operating: 15 to 85 % (without condensation) | |
| Dimensions | 421.8 (W) x 465.4 (D) x 404.3 (H) mm (16.6 (W) x 18.3 (D) x 15.9 (H) in.) | |
| Weight | Approximately 20.5 kg (45.4 lb) | |
Paper Specifications
The names for the paper trays in the printer driver and this guide are as follows:
| Standard paper tray (A4/Letter - 150 sheets) | Tray 1 |
| Standard paper tray (A4/Letter - 550 sheets) | Tray 2 |
| 2 Optional paper trays (A4/Letter - 550 sheets per tray) (up to two LT-8000) | Tray 3 / Tray 4 |
| Optional Duplex Unit for Duplex Printing (DX-8000) | DX |
| Optional Offset Catch Tray (CT-8000) | CT |
| Paper size | Number of sheets | |
| Tray 1 | A4, Letter, Legal, B5 (JIS), B5 (ISO), Executive, A5, A6, B6 Envelopes: Com-10, Monarch, DL, C5 User-defined size: width: 76.2 to 215.9 mm (3.0 to 8.5 in.), length: 127.0 to 355.6 mm (5.0 to 14.0 in.) | 150 sheets (80 g/m2or 20 lb) |
| Tray 2 | A4, Letter, Legal, B5 (JIS), B5 (ISO), Executive, A5, A6, B6 Envelopes: Com-10, Monarch, DL, C5 User-defined size: width: 98.4 to 215.9 mm (3.9 to 8.5 in.), length: 148.0 to 355.6 mm (5.8 to 14.0 in.) | 550 sheets (80 g/m2or 20 lb) |
| (Option) Tray 3 / Tray 4 | A4, Letter, Legal, B5 (JIS), B5 (ISO), Executive, A5, A6, B6 Envelopes: Com-10, Monarch, DL, C5 User-defined size: width: 98.4 to 215.9 mm (3.9 to 8.5 in.), length: 148.0 to 355.6 mm (5.8 5 to 14.0 in.) | 550 sheets (80 g/m2or 20 lb) |
| DX | A4, Letter, Legal, B5 (JIS), B5 (ISO), Executive, A5, A6, B6 User-defined size: width: 88.9 to 215.9 mm (3.5 to 8.5 in.), length: 139.7 to 355.6 mm (5.5 to 14.0 in.) | - |
| CT | A4, Letter, Legal, B5 (JIS), B5 (ISO), Executive, A5, A6, B6 Envelopes: Com-10, Monarch, DL, C5 User-defined size: width: 88.9 to 215.9 mm (3.5 to 8.5 in.), length: 139.7 to 355.6 mm (5.5 to 14.0 in.) | 500 sheets (80 g/m2or 20 lb) |
| Plain paper 60 g/m2to 110 g/m2(16 to 29 lb) | Thick paper 111 g/m2to 159 g/m2(30 to 42 lb) | Thicker paper 160 g/m2to 216 g/m2(43 to 57 lb) | Transparencies | Labels | Envelopes | |
| Tray 1 | i | i | i | i | i | i |
| Tray 2 | i | i | i | i | i | i |
| Tray 3 / Tray 4 | i | i | i | i | i | i |
| DX | i | i | i | - | - | - |
| CT | i | i | i | i | - | i |
| Select the Media type from the printer driver | Plain paper | Thick paper | Thicker paper | Transparency | Plain paper Thick paper | Thick paper Thicker paper |

Using low-quality paper can cause creasing and deteriorate print quality.
The number of sheets that you can load varies according to the paper thickness.
Recommended Paper
We recommend the following paper types for this printer:
| Paper Type | Europe | USA |
| Plain paper | Xerox Premier 80 g/m2(21.4 lb) | Xerox 4200DP 20 lb |
Before you buy a lot of paper, please test some to make sure that the paper is suitable.
Use paper that is made for plain-paper copying.
Use neutral paper. Do not use acidic or alkaline paper.
Use long-grain paper.
Use paper with a moisture content of approximately 5% .

This printer can use recycled paper that meets the DIN 19309 specification.
Special paper
You can print the following types of 'speciality paper' from all of the paper trays.
| Paper size | Paper type | |
| Transparencies* | Letter (215.9 x 279.4 mm (8.5 x 10.9 in.)) A4 (210 x 297 mm (8.2 x 11.6 in.)) | 3M P/N CG3300 |
| Labels* | Letter (215.9 x 279.4 mm (8.5 x 10.9 in.)) A4 (210 x 297 mm (8.2 x 11.6 in.)) | Avery Laser Labels P/N 5160 (US) XEROX P/N 3R96178 (Europe) |
| G21 Envelopes | Com#10 (104.8 x 241.3 mm (4.1 x 9.4 in.)) C5 (162 x 229 mm (6.3 x 8.9 in.)) DL (110 x 220 mm (4.3 x 8.6 in.)) Monarch (98.4 x 190.5 mm (3.8 x 7.4 in.)) |
- Use only transparencies and labels that are designed for use in laser printers and for black and white printing.
Printable Area
When using A4/Letter, 8.5'' × 14'' (Legal) or smaller.
■Printable area" refers to the area on a page where printing is possible.
■"Non-printable area" refers to the area (the edges) on the page where printing is not possible.
- Printable area
- Non printable area
Life Span of Consumable Items
Replacement toner cartridge
| Toner cartridge | Yield |
| TN-1700 | Up to 17,000 pages |

The replacement toner cartridge yield is based on A4/Letter size paper with 5% coverage and the default resolution. The number of pages that actually can be printed varies according to the conditions of use.
| Paper size | A4/Letter size |
| Paper feeding direction | Short edge feed |
| Paper | Standard paper |
| Print coverage | 5% |
| Print resolution | Default setting values |
Fuser unit and transfer roll cartridge
| Regular replacement parts | Yield |
| Fuser unit / Transfer roll cartridge (FP-8000) | Up to 200,000 sheets |

The fuser unit and transfer roll cartridge yield is based on A4/Letter size paper with 5% coverage and the default resolution. The number of pages that actually can be printed varies according to the conditions of use.
Fonts
66 Scalable and 12 Bitmapped Fonts
This printer has the following scalable fonts and bitmapped fonts. The fonts that can be used will vary according to your emulation mode.
HP LaserJet, EPSON FX-850 and IBM Proprinter XL Modes
Scalable fonts:
Intellifont Compatible Fonts
Alaska, Extrabold
Antique Oakland, Oblique, Bold
Brougham, Oblique, Bold, BoldOblique
Cleveland Condensed
Connecticut
Guatemala Antique, Italic, Bold, BoldItalic
Letter Gothic, Oblique, Bold
Maryland
Oklahoma, Oblique, Bold, BoldOblique
PC Brussels Light, LightItalic, Demi, Demiltalic
PC Tennessee Roman, Italic, Bold, BoldItalic
Utah, Oblique, Bold, BoldOblique
Utah Condensed, Oblique, Bold, BoldOblique
Microsoft® Windows® 95/98/Me, Windows® 2000 and Windows NT® TrueType compatible fonts:
BR Symbol
Helsinki, Oblique, Bold, BoldOblique
Tennessee Roman, Italic, Bold, BoldItalic
Dingbats
Type 1 Font compatible fonts:
■ Atlanta Book, BookOblique, Demi, DemiOblique
Calgary Mediumltalic
Copenhagen Roman, Italic, Bold, BoldItalic
Portugal Roman, Italic, Bold, BoldItalic
Brother Original Fonts:
Bermuda Script
Germany
San Diego
US Roman
Bitmapped fonts (portrait and landscape):
LetterGothic16.66 Medium, Italic, Bold, BoldItalic
OCR-A
OCR-B
66 Scalable Fonts
BR-Script 3 Mode
Scalable fonts
■ Atlanta Book, BookOblique, Demi, DemiOblique
Alaska, Extrabold
Antique Oakland, Oblique, Bold
Bermuda Script
BR Dingbats
BR Symbol
Brougham,Oblique,Bold,BoldOblique
Brussels Light, LightItalic, Demi, Demiltalic
Calgary MediumItalic
Cleveland Condensed
Connecticut
Copenhagen Roman, Italic, Bold, BoldItalic
Germany
Guatemala Antique, Italic, Bold, BoldItalic
Helsinki, Oblique, Bold, BoldOblique
Helsinki Narrow, Oblique, Bold, BoldOblique
Letter Gothic, Oblique, Bold
Maryland
Oklahoma, Oblique, Bold, Bold Oblique
Portugal Roman, Italic, Bold, BoldItalic
San Diego
Tennessee Roman, Italic, Bold, BoldItalic
US Roman
Utah, Oblique, Bold, BoldOblique
Utah Condensed, Oblique, Bold, BoldOblique
Symbol and Character Sets
For the HP LaserJet, EPSON FX-850, and IBM Proprinter XL emulation modes, you can select the symbol and character sets in the PRINT MENU. See About emulation modes on page 4-22.
If you have chosen the HP-GL emulation menu, you can choose the standard or alternate character set in the PRINT MENU. See PRINT MENU on page 4-16.
OCR Symbol Sets
When you choose the OCR-A or OCR-B font, the matching symbol set is always used.
OCR-A
| 0 1 2 3 4 5 6 7 8 9 A B C D E F | |
| 0 | 0 a P r p |
| 1 | ! 1 A Q a q |
| 2 | " 2 B R b r |
| 3 | # 3 C S C S |
| 4 | $ 4 D T d t |
| 5 | ? 5 E U e u |
| 6 | & 6 F V f v |
| 7 | ' 7 G w g u |
| 8 | ( & H X n x |
| 9 | ) 9 I Y i y |
| A | * : J Z j z |
| B | + ; K [ k k |
| C | , < L \\ 1 | |
| D | - = M ] m ] |
| E | . > N ^ n ^ n |
| F | / ? 0 ^ 0 ^ ■ |
OCR-B
| 0 1 2 3 4 5 6 7 8 9 A B C D E F | |
| 0 | 0 @ P p R |
| 1 | ! 1 A Q a q |
| 2 | " 2 B R b r ∅ |
| 3 | # 3 C S C S ∅ |
| 4 | $ 4 D T d t ∅ |
| 5 | % 5 E U e u |
| 6 | & 6 F V f v ∇ ∅ |
| 7 | ' 7 G W g w ∅ |
| 8 | (8 H X h x ) ' ∅ |
| 9 | ) 9 I Y i y ∇ ∅ ∪ ij |
| A | * : J Z j z ∇ ∅ ∪ o |
| B | + ; K [ k c ] ∇ ∅ ∪ i |
| C | , < L \ l | ∇ ∅ |
| D | - = M ] m ) , S |
| E | > N ^ n ∇ ∅ ∪ β |
| / ? 0 _ o ▪ |
Roman 8 (8U)
| 0 | 1 | 2 | 3 | 4 | 5 | 6 | 7 | 8 | 9 | A | B | C | D | E | |
| 0 | - | a | A | A | D | ||||||||||
| 1 | A | y | e | I | A | p | |||||||||
| 2 | A | y | o | a | . | ||||||||||
| 3 | # | 3 | C | S | C | S | E | ° | U | R | D | u | |||
| 4 | 4 | DT | d | L | E | c | a | a | q | ||||||
| 5 | 5 | E | U | e | U | E | c | e | I | i | q | ||||
| 6 | & | 6 | F | V | f | V | I | N | o | o | I | - | |||
| 7 | 7 | 7 | G | W | g | W | Y | n | u | o | o | q | |||
| 8 | ( | 8 | H | X | h | X | i | a | K | O | o | ||||
| 9 | ) | 9 | I | Y | i | Y | i | Y | c | e | I | o | |||
| A | * | : | J | Z | j | Z | Z | Z | a | o | o | o | o | ||
| B | + | ; | K | [ | k | [ | k | ] | " | e | U | U | s | ||
| C | , | < | L | \ | L | | | | | | | " | y | a | E | s | ||
| D | = | M | ] | m | ] | } | } | } | } | U | s | e | I | U | » |
| E | . | > | N | ^ | n | - | - | - | - | U | f | o | B | Y | ± |
| F | / | ? | O | _ | o | & | & | & | E | φ | O | O | y |
ISO Latin1 (ON)
| 0 | 1 | 2 | 3 | 4 | 5 | 6 | 7 | 8 | 9 | A | B | C | D | E | F |
| 0 | a | b | d | e | f | g | |||||||||
| 1 | i | j | k | l | m | n | |||||||||
| 2 | o | p | q | r | s | t | |||||||||
| 3 | # | 3 | C | S | E | 3 | A | O | a | o | p | q | |||
| 4 | $ | 4 | D | T | d | t | u | v | A | O | s | o | |||
| 5 | % | 5 | E | U | u | v | v | μ | A | O | a | o | |||
| 6 | & | 6 | F | V | f | v | | | q | E | O | e | o | |||
| 7 | ' | 7 | G | W | g | w | S | C | x | c | + | ||||
| 8 | ( | 8 | H | X | h | x | E | E | e | o | |||||
| 9 | ) | 9 | I | Y | i | y | ∅ | E | O | e | u | ||||
| A | * | * | J | Z | j | z | ∅ | E | O | e | u | ||||
| B | + | K | [ | k | [ | k | ] | » | E | E | e | u | |||
| C | , | < | L | \ | 1 | | | | | | | - | 1/2 | I | U | I | u | |
| D | - | = | M | ] | m | } | - | 1/2 | I | f | f | f | |||
| E | . | > | N | ^n | ~ | ∅ | 4/2 | I | P | P | p | ||||
| F | / | ? | O | _o | _ | _ | _ | _ | - | c | I | β | i | y |
ISO Latin2 (2N)
| 0 | 1 | 2 | 3 | 4 | 5 | 6 | 7 | 8 | 9 | A | B | C | D | E |
| 0 | ||||||||||||||
| 1 | ||||||||||||||
| 2 | ||||||||||||||
| 3 | # | 3 | C | S | C | S | L | A | O | A | G | |||
| 4 | 4 | D | T | d | T | n | A | O | A | G | ||||
| 5 | 5 | E | U | e | U | I | L | O | I | S | ||||
| 6 | & | 6 | F | V | f | V | S | S | C | C | G | |||
| 7 | ' | 7 | G | W | g | W | S | C | C | C | C | + | ||
| 8 | ( | 8 | H | X | h | X | C | K | C | F | ||||
| 9 | ) | 9 | I | Y | i | y | S | S | E | ü | e | |||
| A | * | : | J | Z | j | z | S | S | E | ü | e | ü | ||
| B | + | ; | K | [ | k | [ | k | T | T | ü | ü | ü | ü | |
| C | , | < | L | \ | l | | | Z | Z | Ü | ü | ü | ü | ||
| D | = | - | M | ] | m | ] | - | - | I | Y | i | Y | - | |
| E | . | > | N | ^n | - | - | Z | Z | T | T | T | T | - | |
| F | / | ? | O | _ | o | 8 | - | Z | Z | D | β | d | - |
ISO Latin5 (5N)
| 0 | 1 | 2 | 3 | 4 | 5 | 6 | 7 | 8 | 9 | A | B | C | D | E | F |
| 0 | 0 | @ | P | ` | p | ° | A | G | ä | g | |||||
| 1 | ! | 1 | A | Q | a | q | i | ± | A | N | à | n | |||
| 2 | " | 2 | B | R | b | r | c | ° | A | O | à | o | |||
| 3 | # | 3 | C | S | c | s | E | ' | A | O | á | o | |||
| 4 | $ | 4 | D | T | d | t | π | A | O | á | o | ||||
| 5 | % | 5 | E | U | e | u | μ | A | O | à | o | o | |||
| 6 | & | 6 | F | V | f | v | | | E | O | ae | e | o | |||
| 7 | ' | 7 | G | W | g | w | S | C | x | c | + | ||||
| 8 | { | 8 | H | X | h | x | ° | E | O | e | ø | ||||
| 9 | } | 9 | I | Y | i | y | ° | E | O | e | u | ||||
| A | * | * | J | Z | j | z | a | ° | E | O | ü | ü | |||
| B | + | ; | K | f | k | f | « | » | E | O | ü | ü | |||
| C | , | < | L | \ | l | l | - | 1/2 | I | U | i | ü | |||
| D | - | = | M | ] | m | m | - | 1/2 | I | I | i | i | |||
| E | . | > | N | ^ | n | ^ | - | 4/5 | I | S | S | S | |||
| F | / | ? | O | _ | ò | ò | - | ü | T | B | y | y |
ISO Latin6 (6N)
| 0 | 1 | 2 | 3 | 4 | 5 | 6 | 7 | 8 | 9 | A | B | C | D | E | F | |
| 0 | 0 | @ | p | ` | p | ° | A | D | ä | ã | ||||||
| 1 | ! | 1 | AQ | a | q | A | a | Ä | N | á | n | |||||
| 2 | " | 2 | B | R | br | E | é | A | ö | á | ó | |||||
| 3 | # | 3 | C | S | cs | G | g | A | ó | á | o | |||||
| 4 | $ | 4 | DT | dt | I | i | X | ö | ã | ö | ||||||
| 5 | % | 5 | EU | ue | u | I | I | A | ö | á | o | |||||
| 6 | & | 6 | FV | fv | K | k | E | ö | æ | e | ||||||
| 7 | ' | 7 | GW | gw | S | . | I | ü | ji | ü | ||||||
| 8 | ( | 8 | HX | hx | L | L | C | ø | ø | ø | ||||||
| 9 | ) | 9 | IY | iy | D | d | EU | éu | qu | |||||||
| A | * | : | JZ | jz | S | S | EU | éu | qu | |||||||
| B | + | ; | K | [k | c | T | t | E | ü | éu | ||||||
| C | , | < | L | \l | Z | Z | EU | éu | üu | |||||||
| D | - | = | M | ] | m} | - | f | f | í | y | f | |||||
| E | . | > | N | ^n | . | Ü | ü | T | ü | p | ü | |||||
| F | / | ? | O | -o | . | N | n | ü | β | i | k |
PC-8 (10U)
| 0 | 1 | 2 | 3 | 4 | 5 | 6 | 7 | 8 | 9 | A | B | C | D | E | F | |
| 0 | ||||||||||||||||
| 1 | ||||||||||||||||
| 2 | ||||||||||||||||
| 3 | ||||||||||||||||
| 4 | ||||||||||||||||
| 5 | ||||||||||||||||
| 6 | ||||||||||||||||
| 7 | ||||||||||||||||
| 8 | ||||||||||||||||
| 9 | ||||||||||||||||
| A | ||||||||||||||||
| B | ||||||||||||||||
| C | ||||||||||||||||
| D | ||||||||||||||||
| E |
PC-8 D/N (11U)
| 0 | 1 | 2 | 3 | 4 | 5 | 6 | 7 | 8 | 9 | A | B | C | D | E | F | |
| 0 | ||||||||||||||||
| 1 | ||||||||||||||||
| 2 | ||||||||||||||||
| 3 | ||||||||||||||||
| 4 | ||||||||||||||||
| 5 | ||||||||||||||||
| 6 | ||||||||||||||||
| 7 | ||||||||||||||||
| 8 | ||||||||||||||||
| 9 | ||||||||||||||||
| A | ||||||||||||||||
| B | ||||||||||||||||
| C | ||||||||||||||||
| D |
PC-850 (12U)
| 0 | 1 | 2 | 3 | 4 | 5 | 6 | 7 | 8 | 9 | A | B | C | D | E | F |
| 0 | |||||||||||||||
| 1 | |||||||||||||||
| 2 | |||||||||||||||
| 3 | |||||||||||||||
| 4 | |||||||||||||||
| 5 | |||||||||||||||
| 6 | |||||||||||||||
| 7 | |||||||||||||||
| 8 | |||||||||||||||
| 9 | |||||||||||||||
| A | |||||||||||||||
| B | |||||||||||||||
| C | |||||||||||||||
| D |
PC-852 (17U)
| 0 | 1 | 2 | 3 | 4 | 5 | 6 | 7 | 8 | 9 | A | B | C | D | E | F | |
| 0 | ||||||||||||||||
| 1 | ||||||||||||||||
| 2 | ||||||||||||||||
| 3 | ||||||||||||||||
| 4 | ||||||||||||||||
| 5 | ||||||||||||||||
| 6 | ||||||||||||||||
| 7 | ||||||||||||||||
| 8 | ||||||||||||||||
| 9 | ||||||||||||||||
| 10 | ||||||||||||||||
| 11 | ||||||||||||||||
| 12 | ||||||||||||||||
| 13 | ||||||||||||||||
| 14 | ||||||||||||||||
| 15 | ||||||||||||||||
| 16 | ||||||||||||||||
| 17 |
PC-775 (26U)
| 0 | 1 | 2 | 3 | 4 | 5 | 6 | 7 | 8 | 9 | A | B | C | D | E | F | |
| 0 | ||||||||||||||||
| 1 | ||||||||||||||||
| 2 | ||||||||||||||||
| 3 | ||||||||||||||||
| 4 | ||||||||||||||||
| 5 | ||||||||||||||||
| 6 | ||||||||||||||||
| 7 | ||||||||||||||||
| 8 | ||||||||||||||||
| 9 | ||||||||||||||||
| A | ||||||||||||||||
| B | ||||||||||||||||
| C | ||||||||||||||||
| D | ||||||||||||||||
| E |
PC-1004 (9J)
| 0 | 1 | 2 | 3 | 4 | 5 | 6 | 7 | 8 | 9 | A | B | C | D | E | F | |
| 0 | ||||||||||||||||
| 1 | ||||||||||||||||
| 2 | ||||||||||||||||
| 3 | ||||||||||||||||
| 4 | ||||||||||||||||
| 5 | ||||||||||||||||
| 6 | ||||||||||||||||
| 7 | ||||||||||||||||
| 8 | ||||||||||||||||
| 9 | ||||||||||||||||
| A | ||||||||||||||||
| B | ||||||||||||||||
| C | ||||||||||||||||
| D | ||||||||||||||||
| E |
PC-8 Turkish (9T)
| 0 | 1 | 2 | 3 | 4 | 5 | 6 | 7 | 8 | 9 | A | B | C | D | E | F | |
| 0 | 0 | @ | P | ^ | p | C | E | A | L | α | = | |||||
| 1 | 1 | A | Q | a | qu | e | i | T | β | ± | ||||||
| 2 | 2 | B | R | b | r | e | o | G | T | Γ | > | |||||
| 3 | # | # | 3 | C | S | c | s | a | o | U | T | π | < | |||
| 4 | # | 4 | D | T | d | t | a | o | n | - | b | E | ||||
| 5 | % | 5 | E | U | e | u | a | o | N | + | + | σ | J | |||
| 6 | * | & | 6 | F | V | f | v | a | U | C | + | μ | ± | |||
| 7 | * | i | 7 | G | W | g | w | c | U | O | H | t | = | |||
| 8 | # | ↑ | (8 | H | X | h | x | e | i | c | + | Φ | ° | |||
| 9 | O | ↓ | ) | 9 | I | Y | i | y | e | O | F | Θ | . | |||
| A | # | → | * | : | J | Z | j | z | e | U | - | || | || | Ω | . | |
| B | # | ← | + | ; | K | [ | k | { | i | C | | | δ | √ | |||
| C | 9 | , | < | L | \ | 1 | | | i | f | 1 | B | ■ | n | |||
| D | # | ← | - | = | M | l | m | } | 1 | ¥ | i | B | = | φ | 2 | |
| E | # | ▲ | . | > | N | ^n | . | A | S | < | J | | | c | . | ||
| F | # | / | ? | O | _ | ○ | O | A | S | × | J | ± |
Windows Latin1 (19U)
| 0 | 1 | 2 | 3 | 4 | 5 | 6 | 7 | 8 | 9 | A | B | C | D | E | F |
| 0 | |||||||||||||||
| 1 | |||||||||||||||
| 2 | |||||||||||||||
| 3 | |||||||||||||||
| 4 | |||||||||||||||
| 5 | |||||||||||||||
| 6 | |||||||||||||||
| 7 | |||||||||||||||
| 8 | |||||||||||||||
| 9 | |||||||||||||||
| A | |||||||||||||||
| B | |||||||||||||||
| C | |||||||||||||||
| D | |||||||||||||||
| E | |||||||||||||||
| F |
Windows Latin2 (9E)
| 0 | 1 | 2 | 3 | 4 | 5 | 6 | 7 | 8 | 9 | A | B | C | D | E | F | |
| 0 | 0 | @ | P | p | ° | R | D | f | d | |||||||
| 1 | ! | 1 | AQ | a | q | ' | ± | A | N | á | n | |||||
| 2 | " | 2 | BR | br | , | , | A | N | à | n | ||||||
| 3 | # | 3 | C | S | c | L | T | A | C | ó | o | |||||
| 4 | $ | 4 | DT | dt | " | M | , | A | C | ó | o | |||||
| 5 | % | 5 | EUE | u | u | • | A | U | I | O | i | |||||
| 6 | & | 6 | FV | f | v | + | - | I | C | O | ó | o | ||||
| 7 | ' | 7 | Gw | g | wt | - | S | , | C | x | c | + | ||||
| 8 | ( | 8 | H | h | x | , | C | K | ó | r | ||||||
| 9 | ) | 9 | I | y | i | y | e | e | a | E | ó | ü | ||||
| A | * | : | J | Z | j | z | S | S | e | O | ü | q | ||||
| B | + | ; | K | [ | k | < | × | > | E | E | ü | ü | ||||
| C | , | < | L | \ | l | | | é | - | E | E | ü | ü | ||||
| DE | - | = | M | ] | m | } | t | t | - | f | Y | i | y | |||
| F | . | > | N | ^ | n | . | Z | Z | ? | Y | I | t | t | |||
| / | ? | O | . | o | ? | Z | Z | Z | D | β | d |
Windows Latin5 (5T)
| 0 | 1 | 2 | 3 | 4 | 5 | 6 | 7 | 8 | 9 | A | B | C | D | E |
| 0 | 0 | @ | p | p | ° | A | G | a | g | |||||
| 1 | ! | 1 | A | Q | a | q | i | ± | A | N | a | |||
| 2 | " | 2 | B | R | br | r | , | ° | A | O | a | |||
| 3 | # | 3 | C | S | c | f | " | E | A | ó | ó | |||
| 4 | $ | 4 | D | T | d | t | " | H | A | ó | ó | |||
| 5 | % | 5 | E | U | e | u | ... | μ | A | o | o | |||
| 6 | & | 6 | F | V | f | v | + | - | E | E | ó | |||
| 7 | ' | 7 | G | W | g | w | - | S | C | x | c | |||
| 8 | (8 | 8 | H | X | h | x | ~ | E | O | e | ||||
| 9 | ) | 9 | I | Y | i | y | " | ° | E | O | ó | |||
| A | * | ; | J | Z | j | z | S | a | E | O | e | |||
| B | + | ; | K | [ | k | { | < | × | " | E | ó | |||
| C | , | < | L | \ | l | | | α | - | 1 | ü | ü | |||
| D | - | = | M | ] | m | } | - | ½ | I | I | ||||
| E | > | N | ^ | n | ~ | * | Ey | S | is | s | ||||
| / | ? | O | ~ | ò | yy | - | y | β | ü | ü |
Windows Baltic (19L)
| 0 | 1 | 2 | 3 | 4 | 5 | 6 | 7 | 8 | 9 | A | B | C | D | E | F | |
| 0 | 0 | @ | p | p | ° | A | S | q | q | |||||||
| 1 | ! | 1 | A | Q | a | q | , | ± | + | N | # | n | ||||
| 2 | " | 2 | B | R | b | r | , | € | 2 | A | n | a | ||||
| 3 | # | 3 | C | S | c | s | , | E | 3 | C | O | o | ||||
| 4 | $ | 4 | D | T | d | t | , | π | , | A | O | a | ||||
| 5 | % | 5 | E | U | e | u | ... | μ | E | A | O | a | ||||
| 6 | & | 6 | F | V | f | v | + | - | ¶ | E | O | e | ||||
| 7 | ' | 7 | G | W | g | w | ‡ | - | S | · | E | e | ‡ | |||
| 8 | ( | 8 | H | X | h | x | ∅ | ∅ | CU | U | q | |||||
| 9 | ) | 9 | I | Y | i | y | # | * | E | L | E | £ | ||||
| A | * | : | J | Z | j | z | R | Z | S | Z | s | |||||
| B | + | K | [ | k | k | { | < | × | » | E | U | ü | ü | |||
| C | , | < | L | \ | l | | | - | ½ | C | U | ü | ü | ||||
| D | - | = | M | ] | m | } | ... | - | ½ | K | Z | k | ||||
| E | . | > | N | ^ | n | . | . | * | ½ | I | Z | i | z | |||
| F | / | ? | O | . | ∞ | . | R | æ | L | β | † |
Legal (1U)
| 0 1 2 3 4 5 6 7 8 9 A B C D E F | |
| 0 | 0 @ P ^ p |
| 1 | ! 1 A Q a q |
| 2 | " 2 B R b r |
| 3 | # 3 C S C S |
| 4 | $ 4 D T d t |
| 5 | % 5 E U e u |
| 6 | & 6 F V f v |
| 7 | ' 7 G W g w |
| 8 | ( 8 H X h x |
| 9 | ) 9 I Y i y |
| A | * : J Z j z |
| B | + ; K [ k S |
| C | , _ L * l # |
| D | - = M ] m † |
| E | . ∅ N _ n * * |
| F | / ? O _ o * * |
Ventura Math (6M)
| 0 | 1 | 2 | 3 | 4 | 5 | 6 | 7 | 8 | 9 | A | B | C | D | E | F | |
| 0 | ||||||||||||||||
| 1 | ||||||||||||||||
| 2 | ||||||||||||||||
| 3 | ||||||||||||||||
| 4 | ||||||||||||||||
| 5 | ||||||||||||||||
| 6 | ||||||||||||||||
| 7 | ||||||||||||||||
| 8 | ||||||||||||||||
| 9 | ||||||||||||||||
| A | ||||||||||||||||
| B | ||||||||||||||||
| C | ||||||||||||||||
| D | ||||||||||||||||
| E | ||||||||||||||||
| F |
Ventura Intl (13J)
| 0 | 1 | 2 | 3 | 4 | 5 | 6 | 7 | 8 | 9 | A | B | C | D | E | F |
| 0 | 0 | @ | P | ' | p | " | a | A | A | a | # | ||||
| 1 | ! | 1 | A | Q | a | q | A | " | E | I | A | # | |||
| 2 | " | 2 | B | R | b | r | A | " | O | a | a | # | |||
| 3 | # | 3 | C | S | c | s | E | ° | U | E | t | ||||
| 4 | $ | 4 | D | T | d | t | E | C | a | a | # | ||||
| 5 | % | 5 | E | U | e | u | E | C | i | i | - | ||||
| 6 | & | 6 | F | V | f | v | I | N | o | o | - | ||||
| 7 | ' | 7 | G | W | g | w | I | N | u | m | o | ||||
| 8 | ( | 8 | H | X | h | x | e | ; | A | O | |||||
| 9 | ) | 9 | I | Y | i | y | e | ; | E | i | O | # | |||
| A | * | : | J | Z | j | z | u | U | O | O | o | 2 | |||
| B | + | ; | K | [ | k | { | } | < | f | U | U | E | # | * | |
| C | , | < | L | \ | l | | | | | > | * | A | E | # | * | ||
| D | - | = | M | ] | m | } | } | U | S | E | i | O | # | ||
| E | . | > | N | ^ | n | - | - | U | f | O | β | Y | |||
| F | / | ? | O | _ | o | □ | F | U | O | y | ... |
Ventura US (14J)
| 0 1 2 3 4 5 6 7 8 9 A B C D E F | |
| 0 | |
| 1 | ! 1 A Q a q " |
| 2 | " 2 B R b r " " |
| 3 | # 3 C S C S " |
| 4 | 4 D T d t " |
| 5 | 5 E U e u " - |
| 6 | & 6 F V f v " - |
| 7 | ' 7 G W g w " |
| 8 | ( 8 H X h x ) " |
| 9 | ) 9 I Y i y " * |
| A | * : J Z j z " |
| B | + ; K [ k { ] |
| C | , < L \ l | " |
| D | - = M ] m } u S |
| E | . > N ^ n ~ " |
| F | / ? O _ o □ # ... |
PS Math (5M)
| 0 1 2 3 4 5 6 7 8 9 A B C D E F | |
| 0 | 0 ≈ Π - π |
| 1 | ! 1 A Θ α θ T ± ∅ ∇ ( ) |
| 2 | V 2 B P β ρ ' ' R # Χ # |
| 3 | # 3 X Σ x σ ≤ ≥ p # Ε # |
| 4 | 3 4 Δ T δ / × ∅ π ∞ |
| 5 | # 5 E Y ε ∅ ∞ ∪ ∑ |
| 6 & 6 Φ Σ φ Φ f ∅ ∅ √ | |
| 7 | 3 7 Γ Ω γ ω + * ∪ ∩ |
| 8 | (8 H E η ξ ♀ ♀ ∨ ∪ ∨ |
| 9 | 9 I Ψ i ψ ∨ ∅ ∨ ∩ ∧ |
| A: ∴ Ψ Z φ ζ ♀ ♀ ♀ ♀ = ∅ ∩ ∨ | |
| B: + ; K [ x { ↔ = ∅ ⇟} | |
| C | , < Λ ∴ λ ] ← ... C ⇔ |
| D | - = M ] μ ] ↑ | ≤ ∪ |
| E | . > N ⊥ ∅ → - ∈ ∃ |
| F | / ? O - O ↓ ←∉ ∅ |
PS Text (10J)
| 0 1 2 3 4 5 6 7 8 9 A B C D E F | ||
| 0 | ||
| 1 | ! 1 A Q a q i - # # | |
| 2 | " 2 B R b r # # " | |
| 3 | # 3 C S C S £ # " a | |
| 4 | $ 4 D T d t / - " | |
| 5 | % 5 E U e u ¥ - - - - - - - - - - - - - - - - - - - - - - - - - - - - - - - - - - - - - - - - - - - - - - - - - - - - - - - - - - - - - - - - - - - - - - - - - - - - - - - - - - - - - - - - - - - - - - - - - - - - | |
| 6 | & 6 F V f v f # " - - - - - - - - - - - - - - - - - - - - - - - - - - - - - - - - - - - - - - - - - - - - - - - - - - - - - - - - - - - - - - - - - - - - - - - - - - - - - - - - - - - - - - - - - - - - - - - - - - - - 7 | ' 7 G W g w S * ' |
| 8 | (8 H X h x n , " - - - - - - - - - - - - - - - - - - - - - - - - - - - - - - - - - - - - - - - - - - - - - - - - - - - - - - - - - - - - - - - - - - - - - - - - - - - - - - - - - - - - - - - - - - - - - - - - - - - 9 ) 9 I Y i y ' " ' ' ' ' ' ' ' ' ' ' ' ' ' ' ' ' ' ' ' ' ' ' ' ' ' ' ' ' ' ' ' ' ' ' ' ' ' ' ' ' ' ' ' ' ' ' ' ' ' ' ' ' ' ' ' ' ' ' ' ' ' ' ' ' ' ' ' ' ' ' ' ' ' ' ' ' ' ' ' ' ' ' ' ' ' ' ' ' ' ' ' ' ' ' ' ' ' ' ' ' | |
| A | * : J Z j z " " " " " " " " " " " " " " " " " " " " " " " " " " " " " " " " " " " " " " " " " " " " " " " " " " " " " " " " " " " " " " " " " " " " " " " " " " " " " " " " " " " " " " " " " " " " " " " " " " " " | |
| B | + ; K [ k { « » , " " " " " " " " " " " " " " " " " " " " " " " " " " " " " " " " " " " " " " " " " " " " " " " " " " " " " " " " " " " " " " " " " " " " " " " " " " " " " " " " " " " " " " " " " " " " " " " " " " " C | , < L \ l | < ... |
| D | - = M ] m ] > % " " " " " " " " " " " " " " " " " " " " " " " " " " " " " " " " " " " " " " " " " " " " " " " " " " " " " " " " " " " " " " " " " " " " " " " " " " " " " " " " " " " " " " " " " " " " " " " " " " " “ | |
| E | . > N ^ n ^ fi . | |
| F | / ? O _ o fl . |
Math-8 (8M)
| 0 | 1 | 2 | 3 | 4 | 5 | 6 | 7 | 8 | 9 | A | B | C | D | E | F | |
| 0 | 0 | . | II | . | π | - | @ | A | ||||||||
| 1 | √ | 1 | A | P | α | ρ | ↑ | V | O | - | [ | |||||
| 2 | " | 2 | B | E | β | σ | ↑ | E | Θ | - | [ | |||||
| 3 | ° | 3 | Γ | T | γ | τ | ↓ | T | Θ | L | { | |||||
| 4 | . | 4 | Δ | I | δ | v | ← | ⊥ | Θ | θ | [ | |||||
| 5 | + | 5 | E | Φ | ε | φ | Θ | U | Λ | f | [ | |||||
| 6 | × | 6 | Z | X | ζ | χ | ⇒ | O | V | Φ | ∅ | |||||
| 7 | , | 7 | H | Ψ | η | ψ | ∅ | ∈ | √ | L | √ | |||||
| 8 | (8 | θ | Ω | θ | ω | ← | → | ∅ | { | |||||||
| 9 | ) | 9 | I | ∇ | U | θ | ; | ∈ | Ω | K | } | |||||
| A | × | e | K | ∂ | κ | φ | ∪ | C | - | J | / | |||||
| B | + | ε | Λ | C | λ | ω | ○ | • | * | / | √ | |||||
| C | , | < | M | ≤ | μ | = | ↔ | C | • | C | - | |||||
| D | - | = | N | ≠ | ν | ≡ | # | D | O | J | = | |||||
| E | . | > | E | ≥ | ξ | = | ∑ | G | ↑ | R | * | ± | ||||
| F | / | = | O | - | O | ⊗ | - | ∑ | S | B | = |
Pi Font(15U)
| 0 | 1 | 2 | 3 | 4 | 5 | 6 | 7 | 8 | 9 | A | B | C | D | E | F | |
| 0 | ||||||||||||||||
| 1 | ||||||||||||||||
| 2 | ||||||||||||||||
| 3 | ||||||||||||||||
| 4 | ||||||||||||||||
| 5 | ||||||||||||||||
| 6 | ||||||||||||||||
| 7 | ||||||||||||||||
| 8 | ||||||||||||||||
| 9 | ||||||||||||||||
| A | ||||||||||||||||
| B | ||||||||||||||||
| C | ||||||||||||||||
| D | ||||||||||||||||
| E |
MS Publishing (6J)
| 0 | 1 | 2 | 3 | 4 | 5 | 6 | 7 | 8 | 9 | A | B | C | D | E | F | |
| 0 | 2 | 、 | 。 | Ω | ||||||||||||
| 1 | 1 | , | · | 、 | ||||||||||||
| 2 | " | R | " | · | - | |||||||||||
| 3 | 3 | S | % | % | ^ | ● | ^ | |||||||||
| 4 | 4 | T | ~ | 。 | ~ | |||||||||||
| 5 | 5 | 0 | - | - | 1 | |||||||||||
| 6 | 7 | O | - | U | ij | |||||||||||
| 7 | 1 | . | . | L | L | |||||||||||
| 8 | 9 | ■ | ** | ■ | L | L | ||||||||||
| 9 | 0 | Y | fi | ■ | ||||||||||||
| A | 8 | Z | Z | fl | . | . | ||||||||||
| B | † | ff | ☐ | . | ||||||||||||
| C | , | " | U | e | fi | ☐ | ||||||||||
| D | - | + | - | ff | % | ~ | ||||||||||
| E | ... | - | 6 | " | Pt | < | ◆ | . | . | |||||||
| F | / | 0 | - | ∞ | f | > | ◇ | . | n |
Windows 3.0 (9U)
| 0 | 1 | 2 | 3 | 4 | 5 | 6 | 7 | 8 | 9 | A | B | C | D | E | F | ||
| 0 | 0 | @ | P | p | ° | A | D | a | o | ||||||||
| 1 | ! | 1 | A | Q | a | q | i | ± | A | N | á | n | |||||
| 2 | " | 2 | B | r | b | r | ' | Φ | 2 | A | ó | a | o | ||||
| 3 | # | 3 | C | s | c | s | £ | 3 | A | ó | a | o | |||||
| 4 | 4 | D | T | d | t | m | ' | A | O | a | o | ||||||
| 5 | 5 | E | U | e | u | ¥ | μ | A | O | a | o | ||||||
| 6 | & | 6 | F | V | f | v | | | ¶ | E | O | a | o | |||||
| 7 | ' | 7 | G | W | g | w | S | C | C | × | c | ÷ | |||||
| 8 | ( | 8 | H | X | h | x | , | E | O | e | o | ||||||
| 9 | 9 | I | Y | i | y | ° | E | U | é | ü | |||||||
| A | * | ; | J | Z | j | z | a | ° | E | U | ú | ||||||
| B | + | ; | K | [ | k | { | « | » | E | U | è | ü | |||||
| C | , | < | L | \ | l | | | - | ½ | I | ü | ü | ||||||
| D | - | = | M | ] | m | } | - | ½ | I | y | í | y | |||||
| E | . | > | N | ~ | n | ~ | * | ¼ | I | p | i | p | |||||
| F | / | ? | O | _ | o | ö | - | ü | I | β | i | y |
Desktop (7J)
| 0 1 | 2 3 | 4 5 | 6 7 | 8 9 | A | B | C | D | E | F | ||
| 0 | 0 | @ | P | p | " | - | < | a | ||||
| 1 | ! | 1 | A | Q | a | q | " | + | > | g | ||
| 2 | " | 2 | B | B | r | S | μ | × | « | æ | ||
| 3 | # | 3 | C | S | c | s | t | % | > | E | ||
| 4 | 4 | D | T | d | t | # | . | 0 | δ | |||
| 5 | 5 | E | U | e | u | o | . | ", | D | |||
| 6 | & | 6 | F | V | f | v | o | . | " | ij | ||
| 7 | ' | 7 | G | W | g | w | m | i | I | J | ||
| 8 | ( | 8 | H | X | h | x | % | = | 2 | £ | ||
| 9 | ) | 9 | I | Y | i | y | c | # | R | L | ||
| A | * | ; | J | Z | j | z | - | ° | Ω | ε | ||
| B | + | ; | K | [ | k | { | - | ☐ | 2 | E | ||
| C | , | < | L | \ | l | | | , | 3 | ¥ | ∅ | ||
| D | - | = | M | ] | m | } | fi | - | / | ∅ | ||
| E | . | > | N | ^ | n | ~ | fl | | | f | b | ||
| F | / | ? | O | _ | o | ⊗ | - | β | p |
MC Text (12J)
| 0 | 1 | 2 | 3 | 4 | 5 | 6 | 7 | 8 | 9 | A | B | C | D | E | F |
| 0 | |||||||||||||||
| 1 | |||||||||||||||
| 2 | |||||||||||||||
| 3 | |||||||||||||||
| 4 | |||||||||||||||
| 5 | |||||||||||||||
| 6 | |||||||||||||||
| 7 | |||||||||||||||
| 8 | |||||||||||||||
| 9 | |||||||||||||||
| A | |||||||||||||||
| B | |||||||||||||||
| C | |||||||||||||||
| D | |||||||||||||||
| E | |||||||||||||||
| F |
Symbol (19M)
| 0 | 1 | 2 | 3 | 4 | 5 | 6 | 7 | 8 | 9 | A | B | C | D | E | ||
| 0 | 0 | \( \equiv \) | \( \Pi \) | \( \pi \) | \( ^\circ \) | \( \& \) | \( \angle \) | \( \diamond \) | ||||||||
| 1 | ! | 1 | A | \( Θ \) | \( \alpha \) | \( \theta \) | \( T \pm \) | \( \exists \) | \( \nabla \) | \( \langle \rangle \) | ||||||
| 2 | \( \forall \) | 2 | B | P | β | \( \varrho \) | \( ^\prime \) | \( \& \) | \( \& \) | \( \otimes \) | \( \int \) | |||||
| 3 | # | 3 | X | Σ | \( \chi \) | \( \sigma \) | \( \leq \) | \( \geq \) | \( \wp \) | \( \odot \) | \( \bigcirc \) | |||||
| 4 | \( \exists \) | 4 | Δ | T | δ | \( \tau \) | \( / \times \) | \( \otimes \) | \( TM \) | \( TM \) | ||||||
| 5 | % | 5 | E | Y | \( \varepsilon \) | \( v \) | \( \infty \) | \( \oplus \) | \( \prod \) | \( \sum \) | ||||||
| 6 | & | 6 | \( \Phi \) | \( \varsigma \) | \( \phi \) | \( \omega \) | \( \partial \) | \( \varnothing \) | \( √ \) | |||||||
| 7 | \( \exists \) | 7 | Γ | Ω | \( \gamma \) | \( ω \) | \( \clubsuit \) | \( \bullet \) | \( \cdot \) | |||||||
| 8 | ( | 8 | H | Ξ | \( \eta \) | \( \xi \) | \( ♦ \) | + | \( ∪ \) | \( \neg \) | ||||||
| 9 | ) | 9 | I | \( Ψ \) | \( i \) | \( ψ \) | \( ♀♦ \) | \( \supset \) | \( \wedge \) | |||||||
| A | *: | θ | Z | \( Φ \) | \( φ \) | \( ♣♦ \) | \( \supseteq \) | \( ∨ \) | ||||||||
| B | + ; | K | [ | \( x \) | { | \( ⇌ \) | \( ≡ \) | \( ⇌ \) | ||||||||
| C | , | < A | \( \therefore \) | \( λ \) | | | \( ← \) \( \ldots \) | \( C \) | \( ⇌ \) | | | |||||||
| D | - = | M | ] | \( μ \) | } | \( ↑ \) | \( \subseteq \) | \( \upharpoonleft \) | { | |||||||
| E | . | > N | ⊥ | \( v \) | . | \( → - ∈ \) | \( ⇒ \) | | | ||||||||
| F | / | ? | O | _ | O | \( ↓\downarrow \) | \( ⊥↓ \) | | | ||||||||
Wingdings (579L)
| 0 | 1 | 2 | 3 | 4 | 5 | 6 | 7 | 8 | 9 | A | B | C | D | E | F | |
| 0 | ||||||||||||||||
| 1 | ||||||||||||||||
| 2 | ||||||||||||||||
| 3 | ||||||||||||||||
| 4 | ||||||||||||||||
| 5 | ||||||||||||||||
| 6 | ||||||||||||||||
| 7 | ||||||||||||||||
| 8 | ||||||||||||||||
| 9 | ||||||||||||||||
| A | ||||||||||||||||
| B | ||||||||||||||||
| C | ||||||||||||||||
| D | ||||||||||||||||
| E | ||||||||||||||||
| F |
The following table shows characters that are only available in the matching character set. The numbers at the top of the table are hexadecimal code values so that characters will be replaced with the Roman 8 character set. For other characters, see the Roman 8 character set.
| SYMBOL SET | 23 | 24 | 40 | 5B | 5C | 5D | 5E | 60 | 7B | 7C | 7D | 7E | |
| ISO2 IRV | <ESC> (2U) | # | # | @ | [ \ ] | ^ | ` | { | } | - | |||
| ISO4 UK | <ESC> (1E) | € | @ | [ ] | ^ | ` | - | ||||||
| ISO6 ASCII | <ESC> (0U) | # | @ | [ \ ] | ^ | ` | { | } | - | ||||
| ISO10 Swedish | <ESC> (3S) | # | # | @ | A O A | ^ | ä | ö | a a | - | |||
| ISO11 Swedish | <ESC> (0S) | # | # | E A O A | ü | é | ä | o | a u | - | |||
| ISO14 JIS ASCII | <ESC> (OK) | # | @ | [ € ] | ^ | - | |||||||
| ISO15 Italian | <ESC> (OI) | € | S ° C é ^ | ü | à | ó | e i ° | - | - | ||||
| ISO16 Portuguese | <ESC> (4S) | # | S A C O | ^ | ä | c | o ° | - | - | ||||
| ISO17 Spanish | <ESC> (2S) | € | S A N C | ^ | ° | n | c y | - | - | ||||
| ISO21 German | <ESC> (1G) | # | S A O U ^ | ^ | ä | o | u B | - | - | ||||
| ISO25 French | <ESC> (OF) | € | a ° C S | ^ | é | u e | e ° | - | - | ||||
| ISO57 Chinese | <ESC> (2K) | # | ¥ | @ [ \ ] | ^ | { | | | } | - | - | |||
| ISO60 Norwegian1 | <ESC> (OD) | # | @ E O A | ^ | æ | ø | a ° | - | - | ||||
| ISO61 Norwegian2 | <ESC> (1D) | S | @ ° C S | ^ | æ | ø | a ° | - | - | ||||
| ISO69 French | <ESC> (1F) | € | a ° C O ^ | ^ | μ | é | u ù e | - | - | ||||
| ISO84 Portuguese | <ESC> (5S) | # | ^ A C O | ^ | a | c | o ° | - | - | ||||
| ISO85 Spanish | <ESC> (6S) | # | i N C C ^ | ^ | - | n | c c | - | - | ||||
| HP German | <ESC> (OG) | # | € | S A O U ° | ^ | - | a o | u B | - | - | |||
| HP Spanish | <ESC> (1S) | # | i N ° | ^ | - | { n } | - | - | - | ||||
ABICOMP Brazil / Portugal (13P)
PC-853 Latin3 (Turkish) (18U)
ABICOMP International (14P)
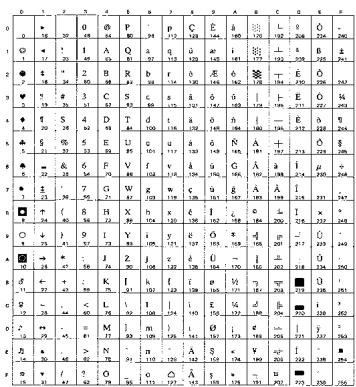
PC-857 Latin5 (Turkish) (16U)
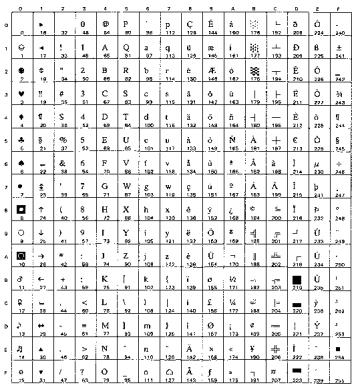
PC-858 Multilingual Euro (13U)
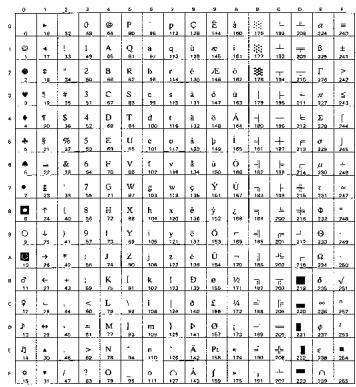
PC-861 Iceland (21U)
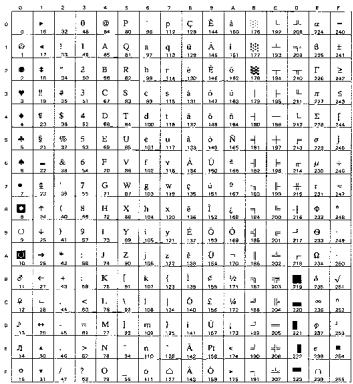
PC-860 Portugal (20U)
PC-863 Canadian French (23U)
PC-865 Nordic (25U)
PC8 PC Nova (27Q)
ISO8859/15 Latin9 (9N)
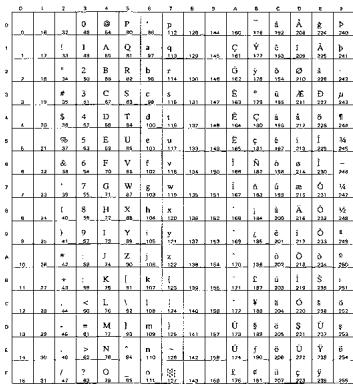
Turkish8 (8T)
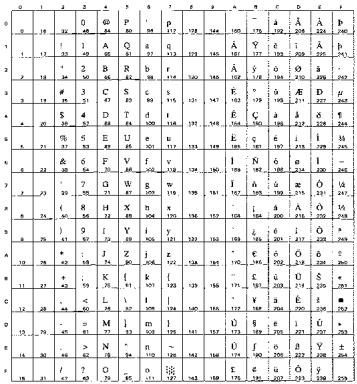
Roman9 (4U)
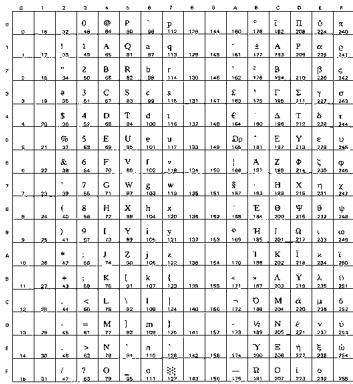
ISO8859/7 Latin/Greek (12N)
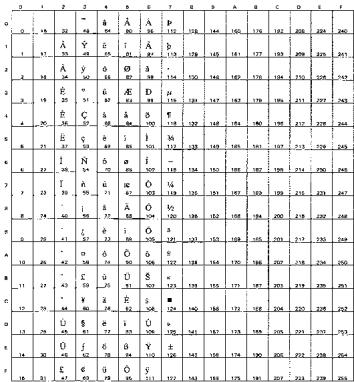
Roman Extension (OE)
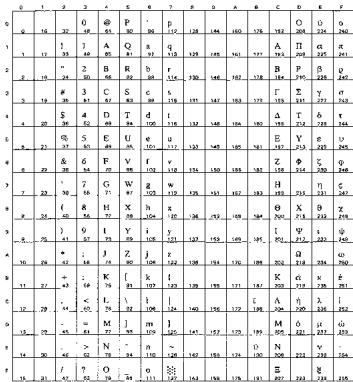
Greek8 (8G)
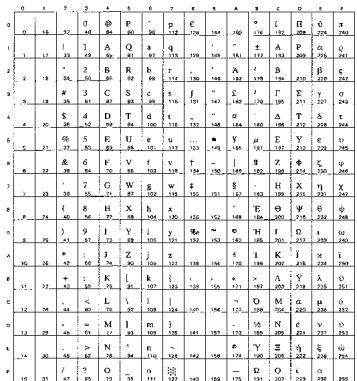
Windows Greek (9G)
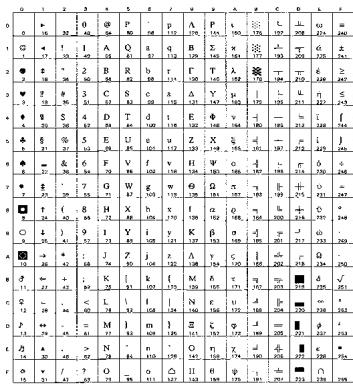
PC8 Latin / Greek (12G)
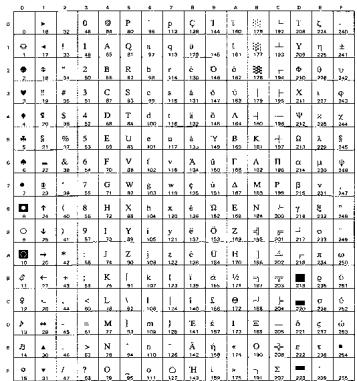
PC-851 Greece (10G)
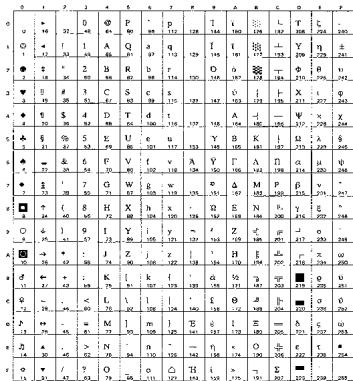
PC-869 Greece (11G)
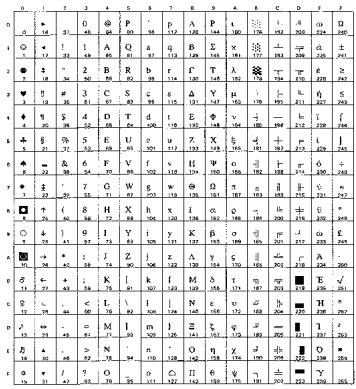
PC8 Greek Alternate (437G) (14G)
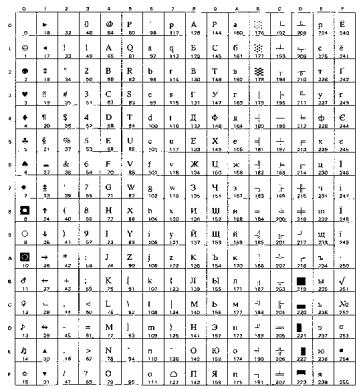
Ukrainian (14R)
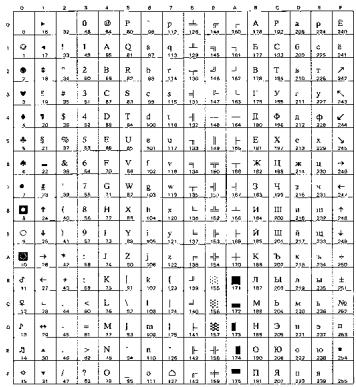
Russian-GOST (12R)
ISO8859 / 5 Latin / Cyrillic (10N)
PC-855 Cyrillic (10R)
PC8 Bulgarian (13R)
PC-866Cyrillic (3R)
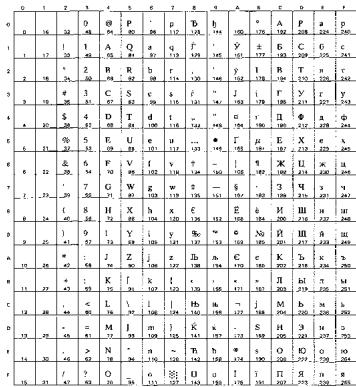
Windows Cyrillic (9R)
| US ASCII | ||||||||||||||||
| 0 | 1 | 2 | 3 | 4 | 5 | 6 | 7 | 8 | 9 | A | B | C | D | E | F | |
| 0 | ||||||||||||||||
| 1 | ||||||||||||||||
| 2 | ||||||||||||||||
| 3 | ||||||||||||||||
| 4 | ||||||||||||||||
| 5 | ||||||||||||||||
| 6 | ||||||||||||||||
| 7 | ||||||||||||||||
| 8 | ||||||||||||||||
| 9 | ||||||||||||||||
| A | ||||||||||||||||
| B | ||||||||||||||||
| C | ||||||||||||||||
| D | ||||||||||||||||
| E | ||||||||||||||||
| F | ||||||||||||||||
The following table shows characters that are only available in the matching character set. The numbers at the top of the table are hexadecimal code values so that characters will be replaced with the US ASCII character set. For other characters, see the US ASCII character set.
| SYMBOL SET | 23 | 24 | 40 | 5B | 5C | 5D | 5E | 60 | 7B | 7C | 7D | 7E |
| German | # | S | Ä | Ö | Ü | ^ | ^ | ä | ö | ü | β | |
| UK ASCII I | E | @ | [ | \ | ] | ^ | ^ | { | | | } | ^ | |
| French I | # | à | ° | c | S | ^ | ^ | é | ü | è | ^ | |
| Danish I | # | @ | € | Ø | Å | ^ | ^ | æ | ø | à | ^ | |
| Italy | # | @ | ° | \ | é | ^ | ü | à | ö | è | ü | |
| Spanish | Pt | @ | i | N | á | ^ | ^ | ^ | n | } | ^ | |
| Swedish | # | # | E | A | O | A | ü | é | ä | ö | ü | à |
| Japanese | # | @ | [ | ¥ | ] | ^ | ^ | | | ^ | |||
| Norwegian | # | # | E | € | Ø | A | ü | é | æ | ø | à | ü |
| Danish II | # | E | € | Ø | A | ü | é | æ | ø | ü | à | |
| UK ASCII II | # | £ | @ | [ | \ | ] | ^ | ^ | { | | | } | ^ |
| French II | # | à | à | i | c | é | ü | ó | ú | è | ü | i |
| Dutch | # | $ | @ | i | l | f | ^ | ^ | é | ij | è | ^ |
| South African | # | é | E | E | O | é | ü | é | é | ö | ö | ü |
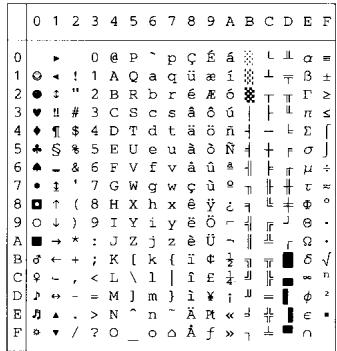
PC-8
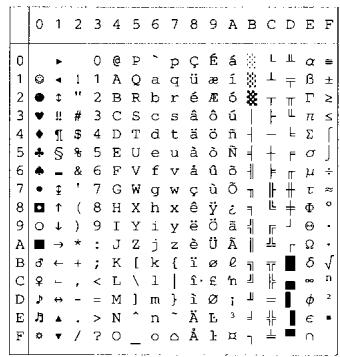
PC-8 D/N
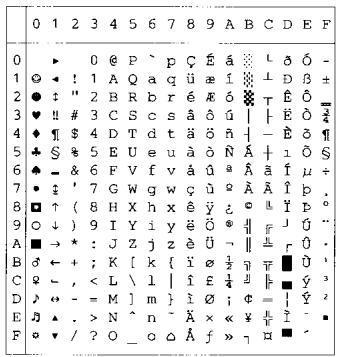
PC-850

PC-852

PC-860
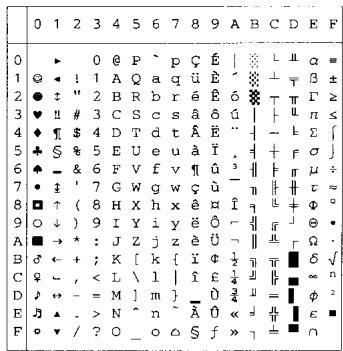
PC-863

PC-865
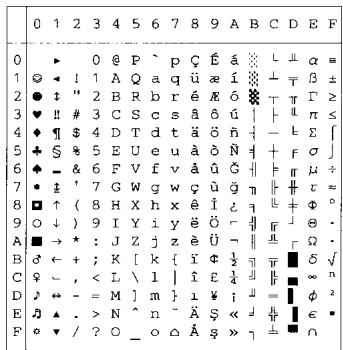
PC-8 Turkish
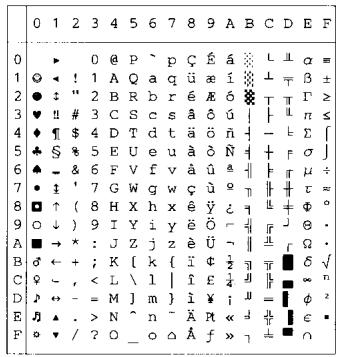
PC-8

PC-8 D/N
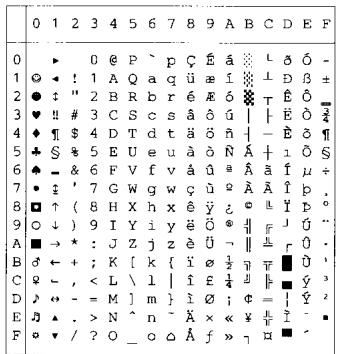
PC-850
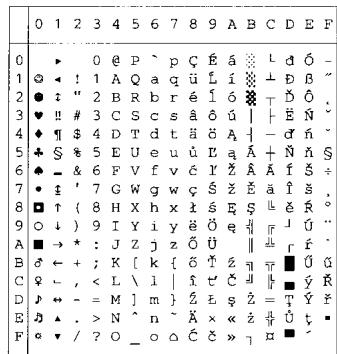
PC-852
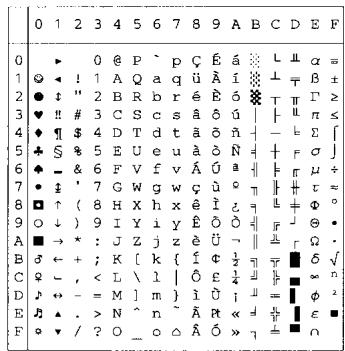
PC-860
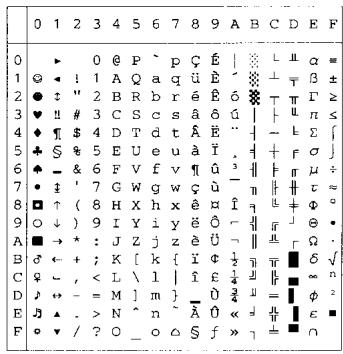
PC-863
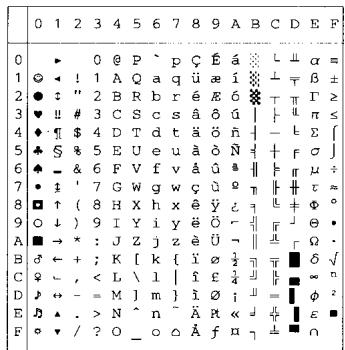
PC-865

PC-8 Turkish
ANSI ASCII (O)
| 0 | 1 | 2 | 3 | 4 | 5 | 6 | 7 |
| 0 | 0 | @ | P | . | p | ||
| 1 | ! | 1 | A | Q | a | q | |
| 2 | " | 2 | B | R | b | r | |
| 3 | # | 3 | C | S | c | s | |
| 4 | $ | 4 | D | T | d | t | |
| 5 | % | 5 | E | U | e | u | |
| 6 | & | 6 | F | V | f | v | |
| 7 | , | 7 | G | W | g | w | |
| 8 | ( | 8 | H | X | h | x | |
| 9 | ) | 9 | I | Y | i | y | j |
| A | * | ; | J | Z | j | z | |
| B | + | ; | K | [ | k | { | |
| C | , | < | L | \ | l | | | l |
| D | - | = | M | ] | m | } | } |
| E | , | > | N | ^ | n | ~ | } |
| F | / | ? | 0 | _ | 0 |
9825 CHR. SET(1)
| 0 | 1 | 2 | 3 | 4 | 5 | 6 | 7 |
| 0 | 0 | @ | P | . | p | ||
| 1 | ! | 1 | A | Q | a | q | |
| 2 | " | 2 | B | R | b | r | |
| 3 | # | 3 | C | S | c | s | |
| 4 | $ | 4 | D | T | d | t | |
| 5 | % | 5 | E | U | e | u | |
| 6 | & | 6 | F | V | f | v | |
| 7 | ' | 7 | G | W | g | w | |
| 8 | ( | 8 | H | X | h | x | |
| 9 | ) | 9 | I | Y | i | y | |
| A | * | : | J | Z | j | z | |
| B | + | ; | K | [ | k | π | |
| C | , | < | L | √ | l | - | |
| D | - | = | M | ] | m | → | |
| E | , | > | N | ↑ | n | ~ | |
| F | / | ? | 0 | _ | o |
FRENCH/GERMAN(2)
| 0 | 1 | 2 | 3 | 4 | 5 | 6 | 7 |
| 0 | 0 | @ | P | p | |||
| 1 | ! | 1 | A | Q | a | q | |
| 2 | " | 2 | B | R | b | r | |
| 3 | £ | 3 | C | S | c | s | |
| 4 | $ | 4 | D | T | d | t | |
| 5 | % | 5 | E | U | e | u | |
| 6 | & | 6 | F | V | f | v | |
| 7 | ' | 7 | G | W | g | w | |
| 8 | ( | 8 | H | X | h | x | |
| 9 | ) | 9 | I | Y | i | y | |
| A | * | : | J | Z | j | z | |
| B | + | ; | K | [ | k | " | |
| C | , | < | L | C | l | . | |
| D | - | = | M | ] | m | " | |
| E | . | > | N | ` | n | ' | |
| F | / | ? | 0 | _ | 0 |
SCANDINAVIAN (3)
| 0 | 1 | 2 | 3 | 4 | 5 | 6 | 7 |
| 0 | 0 | @ | P | . | p | ||
| 1 | ! | 1 | A | Q | a | q | |
| 2 | " | 2 | B | R | b | r | |
| 3 | £ | 3 | C | S | c | s | |
| 4 | $ | 4 | D | T | d | t | |
| 5 | % | 5 | E | U | e | u | |
| 6 | & | 6 | F | V | f | v | |
| 7 | ' | 7 | G | W | g | w | |
| 8 | ( | 8 | H | X | h | x | |
| 9 | ) | 9 | I | Y | i | y | |
| A | * | : | J | Z | j | z | |
| B | + | ; | K | Ø | k | " | |
| C | , | < | L | € | l | . | |
| D | - | = | M | ø | m | " | |
| E | , | > | N | æ | n | . | |
| F | / | ? | O | _ | o |
SPANISH/LATIN(4)
| 0 | 1 | 2 | 3 | 4 | 5 | 6 | 7 |
| 0 | 0 | @ | P | p | |||
| 1 | ! | 1 | A | Q | a | q | |
| 2 | " | 2 | B | R | b | r | |
| 3 | € | 3 | C | S | c | s | |
| 4 | $ | 4 | D | T | d | t | |
| 5 | % | 5 | E | U | e | u | |
| 6 | & | 6 | F | V | f | v | |
| 7 | ' | 7 | G | W | g | w | |
| 8 | ( | 8 | H | X | h | x | |
| 9 | ) | 9 | I | Y | I | y | y |
| A | * | : | J | Z | j | z | |
| B | + | ; | K | [ | k | ~ | |
| C | , | < | L | i | l | ~ | |
| D | - | = | M | ] | m | ~ | |
| E | . | > | N | ^ | n | ~ | |
| F | / | ? | O | _ | o |
JIS ASCII (6)
| 0 | 1 | 2 | 3 | 4 | 5 | 6 | 7 |
| 0 | 0 | @ | P | p | |||
| 1 | ! | 1 | A | Q | a | q | |
| 2 | " | 2 | B | R | b | r | |
| 3 | # | 3 | C | S | c | s | |
| 4 | $ | 4 | D | T | d | t | |
| 5 | % | 5 | E | U | e | u | |
| 6 | & | 6 | F | V | f | v | |
| 7 | , | 7 | G | W | g | w | |
| 8 | ( | 8 | H | X | h | x | |
| 9 | ) | 9 | I | Y | i | y | j |
| A | * | ; | J | Z | j | z | |
| B | + | ; | K | [ | k | { | |
| C | , | < | L | ¥ | 1 | l | | |
| D | - | = | M | ] | m | } | |
| E | , | > | N | ~ | n | ~ | |
| F | / | ? | 0 | _ | o |
ROMAN8EXT.(7)
| 0 | 1 | 2 | 3 | 4 | 5 | 6 | 7 |
| 0 | a | A | A | p | |||
| 1 | à | é | í | à | p | ||
| 2 | à | ó | ø | a | |||
| 3 | è | · | ú | æ | B | ||
| 4 | è | ç | á | á | ö | ||
| 5 | è | ç | é | í | I | ||
| 6 | I | N | ó | ø | I | - | |
| 7 | ɪ | n | ú | æ | ó | ¼ | |
| 8 | i | i | á | O | ½ | ||
| 9 | . | è | é | i | ð | a | |
| A | . | a | ó | ü | ö | a | |
| B | .” | £ | ú | ü | ş | « | |
| C | ~ | ¥ | æ | É | S | ☐ | |
| D | ù | S | ë | Y | ú | » | |
| E | Ü | f | ö | B | þ | ± | |
| F | £ | c | ü | Ü | þ |
ISO IRV (9)
| 0 | 1 | 2 | 3 | 4 | 5 | 6 | 7 |
| 0 | 0 | @ | P | p | |||
| 1 | ! | 1 | A | Q | a | q | |
| 2 | " | 2 | B | R | b | r | |
| 3 | # | 3 | C | S | c | s | |
| 4 | a | 4 | D | T | d | t | |
| 5 | % | 5 | E | U | e | u | |
| 6 | & | 6 | F | V | f | v | |
| 7 | , | 7 | G | W | g | ||
| 8 | ( | 8 | H | X | h | x | |
| 9 | ) | 9 | I | Y | i | y | |
| A | * | ; | J | Z | j | z | |
| B | + | ; | K | [ | k | { | |
| C | . | < | L | \ | l | | | |
| D | - | = | M | ] | m | } | |
| E | . | > | N | . | n | - | |
| F | / | ? | 0 | _ | 0 |
ISO FRENCH (34)
| 0 | 1 | 2 | 3 | 4 | 5 | 6 | 7 |
| 0 | 0 | à | P | p | |||
| 1 | ! | 1 | A | Q | a | q | |
| 2 | " | 2 | B | R | b | r | |
| 3 | £ | 3 | C | S | c | s | |
| 4 | $ | 4 | D | T | d | t | |
| 5 | % | 5 | E | U | e | u | |
| 6 | & | 6 | F | V | f | v | |
| 7 | ' | 7 | G | W | g | w | |
| 8 | ( | 8 | H | X | h | x | |
| 9 | ) | 9 | I | Y | i | y | |
| A | * | : | J | Z | j | z | |
| B | + | ; | K | • | k | é | |
| C | , | < | L | c | l | ü | |
| D | - | = | M | S | m | è | |
| E | . | > | N | . | n | . | . |
| F | / | ? | O | _ | O |
ISO U.K. (35)
| 0 | 1 | 2 | 3 | 4 | 5 | 6 | 7 |
| 0 | 0 | @ | P | p | |||
| 1 | ! | 1 | A | Q | a | q | |
| 2 | " | 2 | B | R | b | r | |
| 3 | £ | 3 | C | S | c | s | |
| 4 | $ | 4 | D | T | d | t | |
| 5 | % | 5 | E | U | e | u | |
| 6 | & | 6 | F | V | f | v | |
| 7 | ' | 7 | G | W | g | w | |
| 8 | ( | 8 | H | X | h | x | |
| 9 | ) | 9 | I | Y | I | y | |
| A | * | : | J | Z | j | z | |
| B | + | ; | K | [ | k | { | |
| C | , | < | L | \ | l | l | | |
| D | - | = | M | ] | m | } | } |
| E | , | > | N | , | n | , | - |
| F | / | ? | 0 | _ | o |
ISO ITALIAN (36)
| 0 | 1 | 2 | 3 | 4 | 5 | 6 | 7 | |
| 0 | 0 | S | P | u | p | |||
| 1 | ! | 1 | A | Q | a | q | ||
| 2 | " | 2 | B | R | b | r | ||
| 3 | £ | 3 | C | S | c | s | ||
| 4 | $ | 4 | D | T | d | t | ||
| 5 | % | 5 | E | U | e | u | ||
| 6 | & | 6 | F | V | f | v | ||
| 7 | ' | 7 | G | W | g | w | ||
| 8 | ( | 8 | H | X | h | x | ||
| 9 | ) | 9 | I | Y | i | y | ||
| A | * | : | J | Z | j | z | ||
| B | + | ; | K | . | k | à | ||
| C | , | < | L | c | l | ò | ||
| D | - | = | M | é | m | è | ||
| E | . | > | N | . | n | i | ||
| F | / | ? | O | _ | o |
ISO SPANISH (37)
| 0 | 1 | 2 | 3 | 4 | 5 | 6 | 7 |
| 0 | 0 | S | P | p | |||
| 1 | ! | 1 | A | Q | a | q | |
| 2 | " | 2 | B | R | b | r | |
| 3 | £ | 3 | C | S | c | s | |
| 4 | $ | 4 | D | T | d | t | |
| 5 | % | 5 | E | U | e | u | |
| 6 | & | 6 | F | V | f | v | |
| 7 | ' | 7 | G | W | g | w | |
| 8 | ( | 8 | H | X | h | x | |
| 9 | ) | 9 | I | Y | i | y | |
| A | * | : | J | Z | j | z | |
| B | + | ; | K | i | k | . | |
| C | , | < | L | N | l | n | |
| D | - | = | M | ♀ | m | ♀ | |
| E | . | > | N | . | n | . | |
| F | / | ? | O | _ | o | . |
| ISO SWEDISH (30) | ISO SWEDISH: N (31) | ISO NORWAY 1 (32) | ISO GERMAN (33) | ||||||||||||||||||||
| 0 | 1 | 2 | 3 | 4 | 5 | 6 | 7 | 0 | 1 | 2 | 3 | 4 | 5 | 6 | 7 | ||||||||
| 0 | 0 | @ | P | p | 0 | 0 | E | P | e | p | 0 | 0 | S | P | p | ||||||||
| 1 | ! | 1 | A | Q | a | q | 1 | ! | 1 | A | Q | a | q | 1 | ! | 1 | A | Q | a | q | |||
| 2 | " | 2 | B | R | b | r | 2 | " | 2 | B | R | b | r | 2 | " | 2 | B | R | b | r | |||
| 3 | # | 3 | C | S | c | s | 3 | # | 3 | C | S | c | s | 3 | # | 3 | C | S | c | s | |||
| 4 | a | 4 | D | T | d | t | 4 | a | 4 | D | T | d | t | 4 | $ | 4 | D | T | d | t | |||
| 5 | % | 5 | E | U | e | u | 5 | % | 5 | E | U | e | u | 5 | % | 5 | E | U | e | u | |||
| 6 | & | 6 | F | V | f | v | 6 | & | 6 | F | V | f | v | 6 | & | 6 | F | V | f | v | |||
| 7 | , | 7 | G | W | g | w | 7 | , | 7 | G | W | g | w | 7 | , | 7 | G | W | g | w | |||
| 8 | ( | 8 | H | X | h | x | 8 | ( | 8 | H | X | h | x | 8 | ( | 8 | H | X | h | x | |||
| 9 | ) | 9 | I | Y | i | y | 9 | ) | 9 | I | Y | i | y | 9 | ) | 9 | I | Y | i | y | |||
| A | * | ; | J | Z | j | z | A | * | ; | J | Z | j | z | A | * | ; | J | Z | j | z | |||
| B | + | ; | K | A | k | a | B | + | ; | K | A | k | a | B | + | ; | K | A | k | a | |||
| C | , | < | L | Ö | l | ö | C | , | < | L | Ö | l | ö | C | , | < | L | Ö | l | ö | |||
| D | - | = | M | Ä | m | ä | D | - | = | M | Ä | m | ä | D | - | = | M | Ü | m | ü | |||
| E | . | > | N | ^ | n | ^ | E | . | > | N | ^ | n | ^ | E | . | > | N | ^ | n | B | |||
| F | / | ? | O | _ | o | F | / | ? | O | _ | o | F | / | ? | O | _ | o | ||||||
| ISO PORTUGUESE (38) | ISO NORWAY 2 (39) | ||||||||||||||||
| 0 | 1 | 2 | 3 | 4 | 5 | 6 | 7 | 0 | 1 | 2 | 3 | 4 | 5 | 6 | 7 | ||
| 0 | 0 | S | P | , | p | 0 | 0 | @ | P | , | p | ||||||
| 1 | ! | 1 | A | Q | a | q | 1 | ! | 1 | A | Q | a | q | ||||
| 2 | " | 2 | B | R | b | r | 2 | " | 2 | B | R | b | r | ||||
| 3 | # | 3 | C | S | c | s | 3 | 3 | C | S | c | s | |||||
| 4 | 4 | D | T | d | t | 4 | $ | 4 | D | T | d | t | |||||
| 5 | % | 5 | E | U | e | u | 5 | % | 5 | E | U | e | u | ||||
| 6 | & | 6 | F | V | f | v | 6 | & | 6 | F | V | f | v | ||||
| 7 | , | 7 | G | W | g | w | 7 | , | 7 | G | W | g | w | ||||
| 8 | ( | 8 | H | X | h | x | 8 | ( | 8 | H | X | h | x | ||||
| 9 | ) | 9 | I | Y | i | y | 9 | ) | 9 | I | Y | i | y | ||||
| A | * | : | J | Z | j | z | A | * | : | J | Z | j | z | ||||
| B | + | ; | K | A | k | ä | B | + | ; | K | Ä | k | æ | ||||
| C | , | < | L | C | l | c | C | , | < | L | Ø | l | ø | ||||
| D | - | = | M | O | m | ö | D | - | = | M | Å | m | á | ||||
| E | . | > | N | . | n | E | . | > | N | . | n | | | |||||
| F | / | ? | O | _ | o | F | / | ? | O | _ | o | ||||||
Symbol sets supported by the printer's intellifont compatible typefaces
- The symbol sets marked with an * are variations of the Roman-8 symbol set.
** LetterGothic 16.66, OCR-A and OCR-B are bitmapped fonts.
Symbol sets supported by the printer's TrueType™ and Type 1 Font Compatible, and original typefaces
- The symbol sets marked with an * are variations of the Roman-8 symbol set.
Quick Reference for Commands
Bar Code Control
The printer can print bar codes in the HP LaserJet, EPSON
FX-850, and IBM Proprinter XL emulation modes.
Print bar codes or expanded characters
Code ESC i
Dec 27 105
Hex 1B69
Format: ESC i n ... n\
Creates bar codes or expanded characters according to the segment of parameters "n ... n". For more information about parameters, see the following Definition of Parameters. This command must end with the "\" code (5CH).
Definition of Parameters
This bar code command can have the following parameters in the parameter segment (n ... n). As parameters are effective within the single command syntax ESC i n ... n \, they don't apply in the bar code commands. If certain parameters are not given, they take the preset settings. The last parameter must be the bar code data start ('b' or 'B') or the expanded character data start ('l' or 'L'). Other parameters can be given in any sequence. Each parameter can start with a lower-case or upper-case character, for example, 't0' or 'T0', 's3' or 'S3' and so one.
Bar code mode
n = t0' or 'T0 CODE 39 (default)
n = 't1' or 'T1 Interleaved 2 of 5
n = 't3' or 'T3' FIM (US-Post Net)
n = 't4' or 'T4' Post Net (US-Post Net)
n = 't5' or 'T5 EAN 8, EAN 13, or UPC A
n = 't6' or 'T6' UPC E
n = 't9' or 'T9 Codabar
n = 't12' or 'T12 Code 128 set A
n = 't13' or 'T13 Code 128 set B
n = 't14' or 'T14 Code 128 set C
n = 't130' or 'T130 ISBN (EAN)
n = 't131' or 'T131 ISBN (UPC-E)
n = 't132' or 'T132 EAN 128 set A
n = 't133' or 'T133 EAN 128 set B
n = 't134' or 'T134 EAN 128 set C
This parameter selects the bar code mode as shown above. When n is 't5' or 'T5' the bar code mode (EAN 8, EAN 13, or UPC A) varies according to the number of characters in the data.
Bar Code, expanded character, line block drawing and box drawing
$$ n = ^ {\prime} s 0 ^ {\prime} \text {o r} ^ {\prime} S 0 \quad 3: 1 (d e f a u l t) $$
$$ n = ^ {\prime} s 1 ^ {\prime} \text {o r} ^ {\prime} S 1 \quad 2: 1 $$
$$ n = ^ {\prime} s 3 ^ {\prime} \text {o r} ^ {\prime} S 3 \quad 2. 5: 1 $$
This parameter selects the bar code style as above. When the EAN 8, EAN 13, UPC-A, Code 128 or EAN 128 bar code mode is selected, this bar code style parameter is ignored.
Expanded Character
'S'
0 = White
1 = Black
2 = Vertical stripes
3 = Horizontal stripes
4 = Cross hatch
For example 'S' n1 n2
n1 = Background fill pattern
n2 = Foreground fill pattern
If 'S' is followed by only one parameter, the parameter is a foreground fill pattern.
Line block drawing & box drawing
"S"
1 = Black
2 = Vertical stripes
3 = Horizontal stripes
4 = Cross hatch
Bar Code
$$ n = ^ {\prime} m n n n ^ {\prime} \text {o r} ^ {\prime} M n n n ^ {\prime} (n n n = 0 \sim 3 2 7 6 7) $$
This parameter shows the bar code width. The unit of 'nnn' is a percentage.
Bar code human readable line ON or OFF
$$ n = ^ {\prime} r 0 ^ {\prime} \text {o r} ^ {\prime} R 0 \quad H u m a n \text {r e a d a b l e l i n e O F F} $$
$$ n = ^ {\prime} r 1 ^ {\prime} \text {o r} ^ {\prime} R 1 \quad H u m a n \quad r e a d a b l e \quad l i n e \quad O N $$
Preset: Human readable line ON
(1) 'T5' or 't5'
(2) 'T6' or 't6'
(3) 'T130' or 't130'
(4) 'T131' or 't131'
Preset: Human readable line OFF All others
This parameter shows whether or not the printer prints the human readable line below the bar code. Human readable characters are always printed with OCR-B font of 10 pitch and all the current character style enhancements are masked. The factory setting is determined by the bar code mode selected by 't' or 'T'.
Quiet zone
$$ n = ^ {\prime} o n n n ^ {\prime} o r ^ {\prime} O n n n ^ {\prime} (n n n = 0 \sim 3 2 7 6 7) $$
Quiet zone is the space on both sides of the bar codes. Its width can be shown using the units that are set by the 'u' of 'U' parameter. (For the description of 'u' or 'U' parameter, see the next section.) The factory setting of the quiet-zone width is 1 inch.
Bar code, expanded character unit, line block drawing and box drawing
$$ n = ^ {\prime} u 0 ^ {\prime} \text {o r} ^ {\prime} U 0 m m (p r e s e t) $$
$$ n = ^ {\prime} u 1 ^ {\prime} \text {o r} ^ {\prime} U 1 \quad 1 / 1 0 $$
$$ n = ^ {\prime} u 2 ^ {\prime} \text {o r} ^ {\prime} U 2 \quad 1 / 1 0 0 $$
$$ n = ^ {\prime} u 3 ^ {\prime} \text {o r} ^ {\prime} U 3 \quad 1 / 1 2 $$
$$ n = ^ {\prime} u 4 ^ {\prime} \text {o r} ^ {\prime} U 4 \quad 1 / 1 2 0 $$
$$ n = ^ {\prime} u 5 ^ {\prime} \text {o r} ^ {\prime} U 5 \quad 1 / 1 0 m m $$
$$ n = ^ {\prime} u 6 ^ {\prime} \text {o r} ^ {\prime} U 6 \quad 1 / 3 0 0 $$
$$ n = ^ {\prime} u 7 ^ {\prime} \text {o r} ^ {\prime} U 7 \quad 1 / 7 2 0 $$
This parameter shows the measurement units of X-axis offset, Y-axis offset, and bar code height.
Bar code, expanded character, line block drawing and box drawing offset in X-axis
$$ n = ^ {\prime} x n n n ^ {\prime} \text {o r} ^ {\prime} X n n n ^ {\prime} $$
This parameter shows the offset from the left margin in the 'u'- or 'U'-specified unit.
Bar code & expanded character offset in Y-axis
$$ n = ^ {\prime} y n n n ^ {\prime} \text {o r} ^ {\prime} Y n n n ^ {\prime} $$
This parameter shows the downward offset from the current print position in the 'u'- or 'U'-specified unit.
Bar code, expanded character, line block drawing and box drawing height
n = 'hnnn', 'Hnnn', 'dnnn', or 'Dnnn'
(1) EAN13, EAN8, UPC-A, ISBN (EAN13, EAN8, UPC-A),
ISBN (UPC-E): 22 mm
(2) UPC-E: 18 mm
(3) Others: 12 mm
Expanded characters 2.2 mm (preset)
Line block drawing and box drawing 1 dot
This parameter shows the height of bar codes or expanded characters as shown above. It can start with 'h', 'H', 'd', or 'D'. The height of bar codes is shown in the 'u'- or 'U'-specified unit. The factory setting of the bar code height (12 mm, 18 mm or 22 mm) is determined by the bar code mode selected by 't' or 'T'.
Expanded character width, line block drawing and box drawing
n = 'wnnn' or 'Wnnn'
Expanded character 1.2 ~mm
Line block drawing and box drawing 1 dot
This parameter shows the width of expanded characters as shown above.
Expanded character rotation
n = 'a0' or 'A1' 'Upright (preset)
n = 'a1' or 'A1' 'Rotated 90 degrees
n = 'a2' or 'A2 'Upside down, rotated 180 degrees
n = 'a3' or 'A3' Rotated 270 degrees
Bar code data start
$$ n = ^ {\prime \prime} b ^ {\prime \prime} o r ^ {\prime \prime} B ^ {\prime \prime} $$
Data that follows 'b' or 'B' is read in as bar code data. Bar code data must end with the '\code (5CH), which also ends this command. The acceptable bar code data is determined by the bar code mode selected by 't' or 'T'.
When CODE 39 is selected with the parameter 't0' or 'T0'
Forty three characters '0' to '9', 'A' to 'Z', '-', '.', '(space)', '$', '/',+'', and '%' can be accepted as bar code data. Other characters will cause a data error. The number of characters for bar codes is not limited. The bar code data automatically starts and ends with an asterisk ''(start character and stop character). If the received data has an asterisk' at the beginning or end, the asterisk is regarded as a start character or stop character.
When Interleaved 2 of 5 is selected with the parameter 't1' or 'T1':
Ten numerical characters '0' to '9' can be accepted as bar code data. Other characters cause a data error. The number of characters for bar codes is not limited. Because this mode of bar codes needs even characters, if the bar code data has odd characters, '0' is automatically added to the end of the bar code data.
When FIM (US-Post Net) is selected with the parameter 't3' or 'T3'
Characters 'A' to 'D' are valid and one digit of data can be printed. Upper-case and lower-case alphabet characters can be accepted.
When Post Net (US-Post Net) is selected with the parameter 't4' or 'T4'
Numbers '0' to '9' can be data and it must end with a check digit. '?' can be used instead of the check digit.
When EAN 8, EAN 13, or UPC A is selected with the parameter 't5' or 'T5'
Ten numbers '0' to '9' can be accepted as bar code data. The number of characters for bar codes is limited as follows:
EAN 8: Total 8 digits (7 digits + 1 check digit)
EAN 13: Total 13 digits (12 digits + 1 check digit)
UPCA: Total 12 digits (11 digits + 1 check digit)
A number of characters other than above will cause data error that results in the bar code data being printed as normal print data. If the check digit is not correct, the printer calculates the correct check digit automatically so that the correct bar code data will be printed. When EAN13 is selected, adding +' and a two-digit or five-digit number after the data can create an add-on code.
When UPC-E is selected with the parameter "t6" or "T6":
The numbers '0' to '9' can be accepted as bar code data.
1 Eight digits (standard format) The first character must be '0' and the data must end with a check digit. Total eight digits = '0' plus 6 digits plus 1 check digit.
2 Six digits The first character and the last check digit are removed from the eight digit data.
1: For eight digits, '?' can be used instead of a check digit.
2: Adding "+" and two-digit or five-digit number after the data creates an add-on code for all six and eight digit formats.
When Codebar is chosen with the parameter 't9' or 'T9'
Characters '0' to '9', '-', '.', $$, '/',+'', ':' can be printed. Characters 'A' to 'D' can be printed as a start-stop code, which can be upper case or lower case. If there is no start-stop code, errors will happen. A check digit cannot be added and using?」 causes errors.
When Code 128 Set A, Set B, or Set C is selected with the parameter 't12' or 'T12,' 't13' or 'T13,' or 't14' or 'T14'
Code 128 sets A, B and C can be individually selected. Set A indicates characters Hex 00 to 5F. Set B includes characters Hex 20 to 7F. Set C includes the pairs 00 to 99. Switching is allowed between the code sets by sending %A, %B, or %C. FNC 1, 2, 3, and 4 are produced with %1, %2, %3, and %4. The SHIFT code, %S, allows temporary switching (for one character only) from set A to set B and vice versa. The '%' character can be encoded by sending it twice.
When ISBN (EAN) is selected with the parameter 't130' or 'T130'
The same rules apply as for 't5' or 'T5'.
When ISBN (UPC-E) is selected with the parameter 't131' or 'T131':
The same rules apply as for 't6' or 'T6'.
When EAN 128 set A, set B or set C is selected with the parameter 't132' or 'T132', 't133' or 'T133' or 't134' or 'T134'
The same rules apply as for 't12' or 'T12', 't13' or 'T13', or 't14' or 'T14'.
Box drawing
ESC i ... E (or e)
'E' or 'e' is a terminator.
Line block drawing
ESC i ... V (or v)
'V' or 'v' is a terminator.
Expanded character data start
n = 'I' or 'L'
Data that follows 'I' or 'L' is read as expanded character data (or labeling data). Expanded character data must end with the '\code(5CH)), which also ends this command.
Example Program Listings
WIDTH "LPT1:",255
'CODE 39
LPRINT CHR$ (27); "it0r1s0o0x00y00bCODE39?\";
'Interleaved 2 of 5
LPRINT CHR$ (27); "it1r1s0o0x00y20b123456?\";
'FIM
LPRINT CHR$ (27); "it3r1o0x00y40bA\";
'Post Net
LPRINT CHR$ (27); "it4r1o0x00y60b1234567890?\";
'EAN-8
LPRINT CHR$ (27); "it5r1o0x00y70b1234567?\";
'UPC-A
LPRINT CHR$ (27); "it5r1o0x50y70b12345678901?\";
'EAN-13
LPRINT CHR$ (27); "it5r1o0x100y70b123456789012?\";
'UPC-E
LPRINT CHR$ (27); "it6r1o0x150y70b0123456?\";
'Codabar
LPRINT CHR$ (27); "it9r1s0o0x00y100bA123456A\";
'Code 128 set A
LPRINT CHR$ (27); "it12r1o0x00y120bCODE128A12345?\";
'Code 128 set B
LPRINT CHR$ (27); "it13r1o0x00y140bCODE128B12345?\";
'Code 128 set C
LPRINT CHR(27); "it14r1o0x00y160b"; CHR (1); CHR$ (2);?"?\";
'ISBN (EAN)
LPRINT CHR$ (27); "it130r1o0x00y180b123456789012?+12345\";
'EAN 128 set A
LPRINT CHR$ (27); "it132r1o0x00y210b1234567890?\";
LPRINT CHR$ (12)
END
Index
Symbols
- or - button 4-3
A
Accessories and supplies (USA) -VIII, -XI
Alarm LED 4-8
Automatic emulation selection 3-16
Automatic interface selection 3-17
B
Back button 4-4
Back cover 1-2
Bar code control A-50
Bitmapped font A-32
Booklet 3-3, 3-4
BRAdmin professional 3-12
Brother Solutions Center -VII, -XI
BR-Script 3 3-1,4-22
Buttons 4-2
Buzzer 4-26
C
Center output tray 1-1
Cleaning the printer 6-15
CompactFlash card (option) A-4
Consumable items A-3
Control panel 1-1, 4-1
D
Date and time setting 4-21
Delete storage 4-15
Device options 3-5
DIMM memory (option) 2-26, A-6
DOS 5-14
Duplex printing 2-29
Duplex unit (option) A-2, A-16
Duplex unit connector 1-2
E
Emulation mode 3-16
Envelopes 2-4, 2-19, A-29
EPSON FX-850 mode 4-22
Error messages 5-15
Ethernet interface connector 1-2
F
Face-up Output Tray 2-25
Face-up output tray 1-2
Factory settings 3-18, 4-23
Faded printouts 5-7
Fuser parts 6-11
Fuser unit and transfer roll cartridge .... 6-5, A-3
G
Go button 4-2
H
HP LaserJet mode 4-22
HP-GL mode 4-22
HRC (High Resolution Control) 3-7
1
IBM Proprinter XL mode 4-17, 4-18, 4-22
INFORMATION menu 4-13
INTERFACE menu 4-20
J
Job Cancel button 4-2
L
Labels 2-4, A-29
LCD menu 4-12
LED 4-9
Lower tray unit (option) A-8
M
Macintosh® 2-28, 5-5
Menu button 4-2
Modes 4-22
N
Network 5-13
NETWORK menu 4-19
0
Offset catch tray (option) A-2, A-20
Options 2-26,A-1
P
Paper 2-1, 2-7
Paper jams 5-17
PAPER menu 4-13
Paper meter 1-1
Paper stopper 1-1
Paper tray 1-1, 2-9, 2-12, 2-15, 2-20
Parallel interface connector 1-2
PCL6 3-1
Power 5-2
Power cord and connector 1-2, 1-4
Power save mode 4-23
Power switch 1-1
PRINT MENU menu 4-16
Print quality 3-3,5-6
Printer driver (Macintosh®) 3-13, 3-14
Printer driver (Windows®) 3-1, 3-2, 3-9
PROOF data 4-6
PUBLIC data 4-6
Q
QUALITY menu 4-14
R
Ready LED 4-8
Register your printer (USA) -VII, -XI
Reprint button 4-4
RESET MENU menu 4-20
S
Scalablefont A-32
SECURE data 4-6
Secure Print button 4-3
Set button 4-3
SETUP menu 4-14
Software (Windows®) 3-12
Suitable paper types 2-1
T
Toner cartridge 6-1, A-3
Toner save mode 4-14
Transfer roll cartridge A-3
Transparencies 2-4, 2-23, A-29
U
Unsuitable paper types 2-7
USB interface 1-2
USB interface connector 1-2
V
Ventilation grille 1-1, 1-2
W
Watermark 3-4
Windows® 2-28, 5-4
- Brother Laser Printer
- For visually-impaired users :
- Table of Contents
- Routine Maintenance and Consumable Items Replacement 6-1
- Appendixes A-1
- Trademarks
- Compilation and Publication
- Shipment of the Printer
- Register your product
- Frequently asked questions (FAQs)
- Customer Service
- Service center locator (USA only)
- Service center locations (Canada only)
- Brother fax back system (USA only)
- Internet Addresses
- Regulations
- Electronic Emission Notices
- Federal Communications Commission (FCC) Declaration of Conformity (For U.S.A. Only)
- Important
- Industry Canada Compliance Statement (For Canada Only)
- Laser Notices
- Laser Safety (100 - 127 V Model Only)
- FDA Regulations (100 - 127 V Model Only)
- Internal laser radiation
- IMPORTANT - For Your Safety
- Disconnect device
- Caution for batteries
- LAN Connection
- For Europe and Other Countries
- Brother Numbers
- Service center locations (Europe)
- International ENERGY STAR® Compliance Statement
- MANUFACTURED:
- IEC 60825 Specification (220 - 240 V Model Only)
- For Finland and Sweden
- LUOKAN 1 LASERLAITE
- KCLASS 1 LASER APPARAT
- Safety Information
- Opmerking / Oplaadbare Batterij Recycle Informatie (For Netherlands Only)
- Gerauschemission / Acoustic Noise Emission (For Germany Only)
- Radio Interference (220 - 240 V Model Only)
- IT power system (For Norway Only)
- Wiring Information (For U.K. only)
- "EC" Declaration of Conformity under the R & TTE Directive
- Introduction
- How to Use This Guide
- Conventions
- Conventions and Symbols used in this User's Guide
- Special Features of This Printer
- Safety Precautions
- WARNING
- CAUTION
- Installing and Relocating your Printer
- Operating Environment
- Radio Interference
- Operating Precautions
- Other Difficulties
- Basic Printer Operation
- Printer Part Names and Functions
- Connecting the AC Power Cord
- Turning the Printer On and Off
- Turn the Printer On
- Turn the Printer Off
- Usable Paper Types and Printing Method
- Suitable and Unsuitable Paper Types
- Suitable Paper Types
- Suitable Basis Weight
- Paper Trays, Types and Sizes
- Recommended Paper
- Special paper
- Printable area
- Portrait
- Storing Paper
- Loading Paper and Printing
- Load A4/Letter Paper in the Paper Tray
- Printing on A4/Letter Paper from the Paper Tray
- Types of envelopes to avoid
- IF YOU USE ANY OF THE TYPES OF ENVELOPES LISTED ABOVE, THEY MAY DAMAGE YOUR PRINTER. THIS DAMAGE IS NOT COVERED UNDER ANY BROTHER WARRANTY OR SERVICE AGREEMENT.
- Example
- Load Labels, Transparency and Other Special Paper in the Paper Tray
- Types of special paper to avoid
- Printing on Transparency from the Paper Tray
- Changing the Configuration for Options
- Memory expansion
- On a Macintosh® Computer
- For Mac OS® 8-6 - 9.2
- For Mac OS® X 10.2 or greater
- Duplex Printing
- Types of Duplex Printing
- Printer Driver and Software
- Printer Driver (Windows®)
- Installing the Printer Driver
- Upgrading the Printer Driver
- Basic tab
- Advanced tab
- Print Quality
- Print Setting
- For Windows® 95/98/Me users only:
- Auto
- Manual
- For Windows NT® 4.0, Windows® 2000/XP users only:
- Use Printer Halftone
- Use System Halftone
- Improve gray printing
- Booklet Printing (For PCL driver Only)
- Watermark
- Page Setting
- Device Options
- Job Spooling
- Quick Print Setup
- Sleep Time
- Status Monitor
- Macro
- Page Protection
- Print Date & Time
- Density adjustment
- Destination
- Accessories tab
- Support tab
- Ports tab
- Device Settings tab
- Layout tab
- Paper/Quality tab
- Advanced Options
- Web Browser Management
- BRAdmin Professional
- Driver Deployment Wizard
- Web BRAdmin
- Printer Driver (Macintosh®)
- Page setup
- Layout
- Specific options
- Web Browser Management for Network Users
- Automatic Emulation Selection
- Automatic Interface Selection
- Printer Settings
- Factory Settings
- Network Factory Default Setting
- Control Panel Overview
- Buttons
- Job Cancel Button
- Go Button
- Secure Print Button
- + or - Button
- To move through menus on the LCD
- To enter numbers
- Set Button
- Back Button
- How to Set the RAMDISK size
- Reprint Button
- Reprinting the last job
- Reprint the last job three times
- Press the Reprint button.
- Printing PROOF data
- Printing PUBLIC data
- Printing SECURE data
- How to print SECURE data
- When there is no reprint data in memory
- To cancel the reprint job
- Menu Button
- LED Indicators
- Alarm LED - Red
- Ready LED - Green
- Liquid Crystal Display (LCD)
- LCD Message
- Printer status messages
- When you want to turn the MANUAL FEED setting ON
- QUALITY
- SETUP
- PRINT MENU
- INTERFACE
- RESET MENU
- Set date and time
- About emulation modes
- HP LaserJet Mode
- BR-Script 3 Mode
- HP-GL Mode
- EPSON FX-850 and IBM Proprinter XL Mode
- List of factory settings
- Buzzer Indications
- Troubleshooting
- If you are unable to fix the problem
- Power Problems
- Printing Problems
- Indicators are On, Flashing or Off
- Print Quality Problems
- Blank or Completely Black Pages are Output
- Unsatisfactory Printing
- Paper Handling Problems
- Solving Print Problems
- Others Problems
- Network Problems
- BR-Script 3 Problems
- What to Do When an Error Message Appears
- Maintenance Messages
- Call Service Messages
- Clearing Paper Jams
- Transporting the Printer
- Routine Maintenance and Consumable Items Replacement
- Replacing the Toner Cartridge (TN-1700)
- Toner Cartridge Handling Precautions
- Handling Precautions
- Replacing the Toner Cartridge
- Replacing the Fuser Unit & Transfer Roll Cartridge (FP-8000)
- Fuser Unit & Transfer Roll Cartridge Handling Precautions
- Replacing the Fuser Unit & Transfer Roll Cartridge
- Replacing the Feed Roller
- Feed Roller Handling Precautions
- Paper tray feed roller
- Feed roller inside the printers
- Cleaning the Printer
- Cleaning Precautions
- Cleaning the Outside of the Printer
- Introduction to the Optional and Consumable Items
- Options
- CompactFlash Memory
- DIMM Memory
- Optional Lower Tray Unit (A4/Letter - 550 sheets) (LT-8000)
- Duplex Unit (DX-8000)
- Offset Catch Tray (CT-8000)
- Toner Cartridge (TN-1700)
- Fuser Unit & Transfer Roll Cartridge (FP-8000)
- CompactFlash Card
- Type I
- Installing the CompactFlash Card
- Installing the DIMM Memory
- Optional Lower Tray Unit (LT-8000)
- Checking the contents of the lower tray package
- Uninstalling the Lower Tray Unit
- Installing the Duplex Unit
- Uninstalling the Duplex Unit
- Installing the Offset Catch Tray
- Uninstalling the Offset Catch Tray
- Getting Product Support Information
- Printer Specifications
- Printing
- Functions
- Electrical and Mechanical
- Paper Specifications
- Life Span of Consumable Items
- Replacement toner cartridge
- Fuser unit and transfer roll cartridge
- Fonts
- Scalable and 12 Bitmapped Fonts
- HP LaserJet, EPSON FX-850 and IBM Proprinter XL Modes
- Scalable fonts:
- Intellifont Compatible Fonts
- Microsoft® Windows® 95/98/Me, Windows® 2000 and Windows NT® TrueType compatible fonts:
- Type 1 Font compatible fonts:
- Brother Original Fonts:
- Bitmapped fonts (portrait and landscape):
- Scalable Fonts
- Scalable fonts
- Symbol and Character Sets
- OCR Symbol Sets
- Symbol sets supported by the printer's intellifont compatible typefaces
- Symbol sets supported by the printer's TrueType™ and Type 1 Font Compatible, and original typefaces
- Quick Reference for Commands
- Bar Code Control
- Print bar codes or expanded characters
- Definition of Parameters
- Bar code mode
- Bar Code, expanded character, line block drawing and box drawing
- Expanded Character
- Line block drawing & box drawing
- Bar Code
- Bar code human readable line ON or OFF
- Quiet zone
- Bar code, expanded character unit, line block drawing and box drawing
- Bar code, expanded character, line block drawing and box drawing offset in X-axis
- Bar code & expanded character offset in Y-axis
- Bar code, expanded character, line block drawing and box drawing height
- Expanded character width, line block drawing and box drawing
- Expanded character rotation
- Bar code data start
- Box drawing
- Line block drawing
- Expanded character data start
- Example Program Listings
- Index
- Symbols
- A
- B
- C
- D
- E
- F
- G
- H
- 1
- J
- L
- M
- N
- 0
- P
- Q
- R
- S
- T
- U
- V
- W
Brand : BROTHER
Model : HL-8050
Category : Laser printer