EAF5 Flex Megazone XXL 11L - Deep fryer Essentiel B - Free user manual and instructions
Find the device manual for free EAF5 Flex Megazone XXL 11L Essentiel B in PDF.

| Product type | Oil-free hot air fryer |
| Brand | Essentiel B |
| Model | EAF5 Flex Megazone XXL 11L |
| Power supply | 220-240 V ~ 50-60 Hz |
| Power | 2800 W |
| Total capacity | 11 L (2 x 5.5 L with divider) |
| Temperature range | 50 °C to 230 °C |
| Timer | 1 to 60 minutes (up to 24 h in dehydration mode) |
| Number of programs | 12 presets |
| Special functions | Keep warm, Reheat, Dehydrate, Sync cooking, End-of-cooking scheduling |
| Heating elements | 4 (one under the cooking pot for even cooking) |
| Cooking pot material | Steel with non-stick coating |
| Included accessories | 2 removable cooking grids, 1 removable divider |
| Dishwasher-safe parts | Cooking pot, grids, divider |
| Auto shut-off | After 20 min of inactivity |
| Standby power consumption | 0.4 W |
| Acoustic signal | At end of program |
| Cord storage | Yes |
| Maintenance | Clean the cooking pot, grids and divider with hot soapy water or in the dishwasher; wipe the exterior with a damp cloth; brush the heating element |
Frequently Asked Questions - EAF5 Flex Megazone XXL 11L Essentiel B
User questions about EAF5 Flex Megazone XXL 11L Essentiel B
0 question about this device. Answer the ones you know or ask your own.
Ask a new question about this device
Download the instructions for your Deep fryer in PDF format for free! Find your manual EAF5 Flex Megazone XXL 11L - Essentiel B and take your electronic device back in hand. On this page are published all the documents necessary for the use of your device. EAF5 Flex Megazone XXL 11L by Essentiel B.
USER MANUAL EAF5 Flex Megazone XXL 11L Essentiel B
natural_image
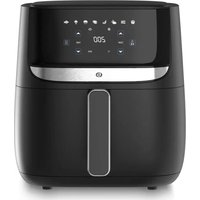
Front view of a modern electric air fryer with digital display and control buttons (no visible text or symbols on device body)Notice d'utilisation / User guide / Bedienungsanleitung / Gebruiksaanwijzing

| FR EN DE NL | ||||
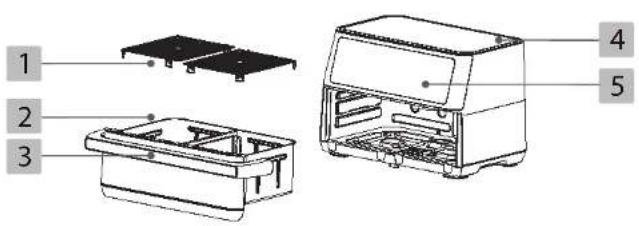
| 1 | Grilles de cuisson Cooking trays Grillroste Bakroosters | |||
| 2 | Cuve Pot Behälter Kuip | |||
| 3 | Poignée de la cuve Pot handle Griff des Behalters | Handgreep van de kuip | ||
| 4 | Corps de l'appareil Appliance body | Gehäuse des Goräts | Behuizing van het toostel | |
| 5 | Bandeau de commande | Control panel Bedienfeld Bedieningspaneel | ||
| 6 | Ouvertures de ventilation (sortie d'air) | Vent (air outlet) | Lüftungsöffnungen (Luftauslass) | Ventilatieopeningen (luchtuitgang) |
| 7 | Cordon d'alimentation | Power cable Stromkabel Voedingssnoer | ||
| 8 | Range-cordon Cord organiser Kabelfach Snoeropbergruimte | |||
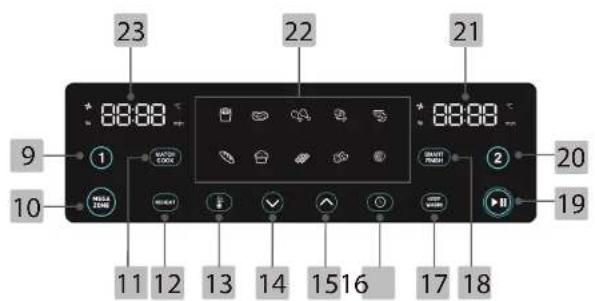
| 9 | Touche Zone 1 (zone gauche) | Zone 1 button (left-hand zone) | Taste Zone 1 (linke Zone) | Toets Zone 1 (linkerzone) |
| 10 | Touche Mega Zone (zone 1 et 2) | Mega Zone button (Zones 1 and 2) | Taste Mega Zone (Zone 1 und 2) | Toets Mega Zone (zone 1 en 2) |
| 11 | Touche Synchronisation des cuissons | Synchronise cooking button | Taste Garsynchronisation | Toets Synchroniseren van de bereidingstijden |
| 12 | Touche Réchauffer | Reheat button | Taste Aufwärmen | Toets Opwarmen |
| 13 | Touche Température | Temperature button | Taste Temperatur | Toets Temperatuur |
| 14 | Touche Diminuer | Decrease button | Taste Verringern | Toets Verlagen |
| 15 | Touche Augmenter | Increase button | Taste Erhöhen | Toets Verhogen |
| 16 | Touche Temps | Time button | Taste Zeit | Toets Tijd |
| 17 | Touche Maintlen au chaud | Keep warm button | Taste Warmhalten | Toets Warm houden |
| 18 | Touche Programmation de fin de cuisson | End of cooking programming button | Taste Programmierung Garzeilende | Toets Instellen einde bereidingstijd |
| 19 | Touche départ/pause | Start/pause key | Start/Pause-Taste | Toets start/pauze |
| 20 | Touche Zone 2 (zone droite) | Zone 2 button (right-hand zone) | Taste Zone 2 (rechte Zone) | Toots Zone 2 (rechterzone) |
| 21 | Écran d'affichage Zone 2 | Zone 2 display screen | Display Zone 2 | Weergavescherm Zone 2 |
| 22 | Témoins lumineux des programmes de cuisson | Cooking program indicator lights | Kontrolleuchten der Garprogramme | Controlelampjes bakprogramma |
| 23 | Écran d'affichage Zono 1 | Zone 1 display screen | Display Zone 1 | Weergavescherm Zone 1 |
votre produit
natural_image
Technical diagram showing a mechanical assembly with two plates above a rectangular housing (no text or symbols)natural_image
Hand inserting a plug into an electrical outlet (no text or symbols visible)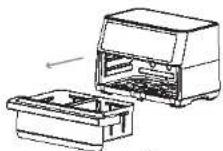
natural_image
Line drawing of a hand placing small objects into a tray (no text or symbols)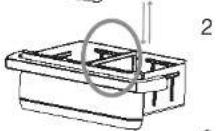

5
• 1 air fryer
- 1 basket
• 2 removable cooking racks
• 1 removable separator
- 1 user guide
Technical characteristics
- Power supply: 220-240 V\~ 50-60 Hz
- Power: 2,800 W
- 1 x 11-litre basket, divisible into 2 x 5.5-litre baskets, dishwasher-safe
• 2 removable dishwasher-safe racks
• 1 dishwasher-safe separator
• 12 programmes - Keep warm and Reheat functions
• Functions for synchronising cooking times and programming end of cooking times
• Temperature setting from 50°C to 230°C
• Timer from 1 to 60 minutes
• 4 heating elements
• Sound signal at end of programme
• Power cord holder
• Off mode power consumption: 0.4 W
- The period after which the equipment reaches automatically off mode: 20 minutes
intended use
Use this air fryer to cook meat, vegetables and crumbed foods (such as cheese or chicken). This appliance is designed for domestic use only and must not be used for commercial purposes. Any other use may cause damage to the appliance or cause injury.
Your appliance has a second heating element located underneath the drip tray, so cooking is more even. Choose from 12 programmes, including Keep warm and Reheat functions.
Use the separator to switch from a large 11 L zone to 2 x 5.5 L compartments.
unpacking
- Unpack the appliance and inspect it. Remove the packaging and all labels from the appliance, with the exception of the nameplate. Check that it is complete and in good condition. If the appliance is damaged or faulty, do not use it and return it to your retailer or customer service.
- Keep all packaging out of the reach of children. There is a risk of accidents if children play with the packaging materials.
before fi rst use
- Thoroughly wash the basket, the cooking racks and the separator with a soft sponge and hot, soapy water. Rinse with clean water, then dry carefully with a dishcloth. Alternatively, wash them in the dishwasher.
- Wipe the inside and outside of the appliance with a damp cloth.
set-up
-
Place the base of the appliance close to a mains socket, on a fl at, stable, heat-resistant surface. Make sure you leave enough ventilation space around the appliance, particularly at the rear, where the air outlet grille is located.
-
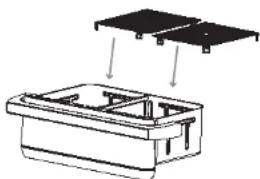
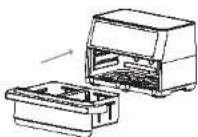
Insert the cooking racks into the basket.
natural_image
Technical diagram showing a mechanical assembly with two plates above a rectangular housing (no text or symbols)- This air fryer works with hot air and without oil. Do not fill the basket with oil or any other liquid.
- Do not place anything on top of the appliance as this will disturb the air circulation and affect the hot-air cooking results.
fi rst use
The first time you use it, you may experience a slight release of smoke and odours. This is completely normal and will quickly disappear.
use
- Connect the mains plug to an earthed wall socket.
- Gently pull the basket out of the air fryer.
- Remove or install the separator by sliding it upwards or downwards. The separator allows you to cook different foods simultaneously under identical conditions (same temperature, same time) or not, depending on your needs.
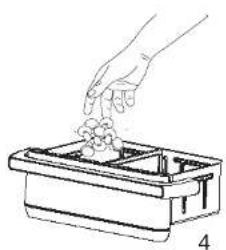
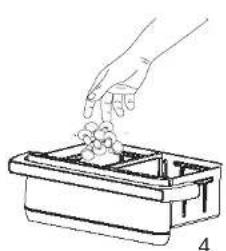
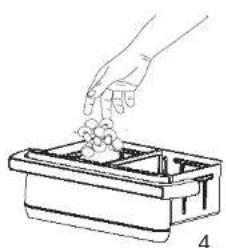
- Place the ingredients on the cooking racks.
- Slide the basket back into the air fryer.

natural_image
Hand inserting a plug into an electrical outlet (no text or symbols visible)
natural_image
Line drawing of a hand placing a small object into a tray with a container (no text or symbols)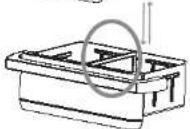
2

5
- Warning: do not touch the basket during use and for some time after use, as it becomes very hot. Hold the basket by the handle only.
- Determine the cooking time and temperature for the ingredients and select them on the control panel (see "Preparation tips" and "Programming").
- Some ingredients need to be shaken halfway through the cooking time (see the "Preparation tips" paragraph). To shake the ingredients, take the basket out of the appliance by the handle and shake it. Then slide the basket back into the air fryer.
- When a signal sounds, this means that the set cooking time has elapsed. Remove the basket from the appliance and place it on the worktop.
- Check whether the ingredients are ready. If they are not, simply place the basket back in the appliance and add a few minutes to the timer.
- To remove the ingredients (such as chips), take the basket out of the air fryer, place it on a work surface and use tongs to remove the food.
WARNINGS!
- Do not turn the basket upside down with the metal rack in place, as any excess oil that has accumulated at the bottom of the basket may spill onto the ingredients.
- Depending on the type of ingredients cooked in the fryer, steam may escape from the basket.
- When the batch of ingredients is ready, the air fryer is immediately ready for a new batch.
Programming
Plug in the appliance. The indicator lights switch on briefly. A beep sounds. The start/pause button indicator remains on.
Press the start/pause button ▶ to activate the settings menus.
Select the zone you wish to use to cook your food, then press:
- the button for Zone 1

- the button for Zone 2

• or the Mega Zone button

CHOOSING A PROGRAMME
To choose a programme, you must first have selected the cooking zone of your choice (as indicated in the previous paragraph). The screen fl ashes.
To select a programme, press the button for the chosen zone once or several times (the button for Zone 1 1), the button for Zone 2 2 or the button for the Mega Zone 2) until you reach the desired menu. Ten pre-set menus will scroll down and the LED corresponding to each menu will be activated:

The selected programme starts automatically. Refer to the "Programme table".
CHANGING THE TEMPERATURE
A default temperature is displayed for each programme. You can change this temperature:
- Press the temperature button to select the temperature setting. - Press the buttons and to increase and decrease the temperature. Each press of the button decreases or increases the temperature by 5°C.
You can hold your finger on the + or - button to scroll quickly through the temperatures, from 80°C to 230°C.
You can change the temperature at any time by following this procedure, making sure you first press the relevant zone (Zone 1 1 , Zone 2 or Mega Zone ).
SETTING A COOKING TIME
A default cooking time is set for each programme. You can change this cooking time:
- Press the Timer button Ⓤ to select the timer setting.
- Press the buttons √ and to increase and decrease the cooking time. Each press of the button decreases or increases the cooking time by one minute.
You can hold your finger on the + or - to scroll quickly through the minutes, from 01:00 to 60:00.
You can change the cooking time at any time by following this procedure, making sure you first press the relevant zone (Zone 1 1 , Zone 2 or Mega Zone ).
LAUNCHING A PROGRAMME
Once you have chosen a programme, temperature and cooking time, press the start/pause button > to start the programme.
The fan indicator light and the heating element indicator light switch on.
Warning: do not touch the basket during use and for some time after use, as it becomes very hot. Hold the basket by the handle only.
PAUSING A PROGRAMME
It is advisable to stir the food from time to time to ensure even cooking. To pause a programme, do the following:
- to pause the "Mega Zone" (Zone 1 + Zone 2), press the start/pause button ➤ to pause cooking in both zones.
- to pause cooking in one or the other of the zones, fi rst press the relevant zone (Zone 1 1 or Zone 2 2 ), then press on the start/pause button > to pause cooking in the selected zone.
- Take the basket out of the appliance by the handle and shake it. Then slide the basket back into the air fryer. Cooking resumes when you press the start/pause button
Take great care when removing the basket from the appliance, as it will be hot and hot steam may escape. Do not touch hot surfaces. Risk of burns! Hold the basket by the handle only and use oven gloves.
CANCELLING A PROGRAMME IN PROGRESS
To cancel a programme in progress, press and hold the start/pause button ▶II. A signal sounds and the indicator lights switch off.
END OF COOKING
At the end of cooking, END displays on the screen. A beep sounds.
Remove the basket and place it on a heat-resistant surface (e.g. a trivet). Use heat-resistant kitchen utensils to remove food from the basket.
At the end of the programme, the appliance continues to ventilate for a few moments to cool down. This is normal.
Excess oil or melted grease is collected at the bottom of the basket. Carefully empty the excess after each portion before shaking or placing the basket back in the appliance to cook again.
The appliance switches off automatically after 60 seconds. Unplug it and allow it to cool down before moving it or cleaning it.
PROGRAMMING THE END OF COOKING
When you have chosen a different cooking time for each zone, the end of cooking programming function allows you to cook both zones so that they finish at the same time.
For example, if you cook chicken wings for 40 minutes in Zone 1 and chips for 20 minutes in Zone 2, the chicken will start cooking fi rst and the chips will start 20 minutes later, so that both fi nish at the same time.
- Pre-select the cooking times and temperatures for each zone, as described in the previous paragraphs.
- Press the end of cooking programming button 📂 to activate the function. The icon flashes.
- Press the start/pause button ▶: the zone with the longer cooking time will heat up first. The screen in the second zone displays "HOLD". Then the zone with the shorter cooking time starts, when the difference between the times of the two zones has elapsed, so that the two zones fi nish cooking simultaneously.
SYNCHRONISING COOKING
If you have chosen to use Zone 1 ① and Zone 2 ② with the separator, the cooking synchronisation function allows you to copy across the cooking time selected for the one zone to the other zone, to ensure the same cooking in both zones.
For example, if you cook food in Zone 1 at 180^ for 40 minutes, this function copies the settings to Zone 2, so you don't have to set the settings again.
- Pre-select the cooking times and temperatures for Zone 1 (1) OR Zone 2 (2) as indicated in the previous paragraphs.
- Press the cooking synchronisation button 📂 to activate the function. The cooking times and temperatures are copied to the other zone.
- Press the start/pause button >Ⅲ: both zones will start to heat up simultaneously. NOTE: Both screens display the same values. If you make changes to the temperature or cooking time, the changes will apply to both zones.
KEEPING FOOD WARM
The Keep warm function allows you to maintain a certain temperature within the appliance, if you do not remove your food immediately after cooking.
• After selecting the zone, press the Keep warm button 📋 to activate the function.
- Select a temperature between 65^ and 95^ and a time between 1 and 60 minutes.
REHEATING
The Reheat function allows you to reheat food after it has been cooked.
• After selecting the zone, press the reheat button to activate the function.
- Select a temperature between 80^ and 230^ and a time between 1 and 60 minutes.
DEHYDRATING
The Dehydration function removes moisture from foods, allowing you to obtain a dehydrated version (such as fruit, potatoes, etc.) to prolong their shelf life.
- The Dehydration function is available as one of the pre-set programmes (see the "Choosing a programme" section) and the settings options are between 50°C and 80°C and 1 to 24 hours.
Table of programmes
| Programmes | Temperature (in °C) Cooking time (in min) | |||
| Range of possible settings | By default | Range of possible settings | By default | |
| Chips | from 80°C to 200°C | 200 from | 1 to 60 min 22 | |
| Steak | from 80°C to 230°C | 230 from | 1 to 60 min 12 | |
| Chicken | from 80°C to 230°C | 230 from | 1 to 60 min 20 | |
| Fish | from 80°C to 230°C | 180 from | 1 to 60 min 18 | |
| Prawns | from 80°C to 230°C | 180 from | 1 to 60 min 10 | |
| Bread | from 80°C to 230°C | 140 from | 1 to 60 min 28 | |
| Cake | from 80°C to 230°C | 150 from | 1 to 60 min 20 | |
| Bacon | from 80°C to 230°C | 230 from | 1 to 60 min 8 | |
| Cookies | from 80°C to 230°C | 160 from | 1 to 60 min 20 | |
| Dehydration | from 50°C to 80°C | 65 from 1 | to 24 hours 8 hours | |
| Reheat from 80 to 230°C 180 from 1 to 60 min 5 | ||||
| Keep warm from 65 to 95°C 80 from 1 to 60 min 30 | ||||
NOTE Add 3 minutes to the cooking time when you start cooking while the air fryer is still cold.
Cooking guide
| Min. - Max. quantity (g) | Time (min) | Temp. (°C) | Stir | |
| Potatoes and chips | ||||
| Frozen shoestring fries 900-1,000 18-25 200 Yes | ||||
| Frozen thick fries | 900-1,000 20-25 200 Yes | |||
| Potato gratin | 900 | 20-25 200 Yes | ||
| Meat and poultry | ||||
| Steaks | 100-1,000 12-18 230 Yes | |||
| Pork chops | 100-1,000 12-18 180 Yes | |||
| Hamburger | 100-1,000 10-20 180 Yes | |||
| Sausage rolls | 100-1,000 13-15 200 Yes | |||
| Chicken drumsticks | 100-1,000 25-30 230 Yes | |||
| Chicken breast | 100-1,000 18-25 230 Yes | |||
| Snacks | ||||
| Spring rolls | 100-1,000 8-10 200 Yes | |||
| Frozen chicken nuggets | 100-1,000 | 8-12 | 230 | Yes |
| Frozen crumbed fish fingers | 100-1,000 | 6-10 | 200 | No |
| Frozen crumbed cheese | 100-1,000 | 8-10 | 180 | No |
| Stuffed vegetables | 100-1,000 12-20 160 | No | ||
| Oven cooking | ||||
| Cakes | 1,000 | 20-25 150 No | ||
| Quiche | 1,000 | 12-20 180 No | ||
| Muffins | 1,000 | 15-18 200 No | ||
| Sweet snacks | 1,000 | 20 | 160 | No |
NOTE: Add 3 minutes to the cooking time when you start cooking while the air fryer is still cold.
Preparation tips
- The programme table will help you to select the basic settings for your ingredients. Remember that these settings are only guidelines. As the ingredients are all of different origins, sizes and shapes, and are also of different brands, we cannot guarantee which settings are optimal for your ingredients.
- Since hot air technology instantly heats the air inside the appliance, briefly removing the basket from the appliance during frying disrupts this process.
- Smaller ingredients generally require a shorter cooking time than larger ones.
- A large quantity of ingredients requires only a slightly longer cooking time; a small quantity of ingredients requires only a slightly shorter cooking time.
- Shaking small ingredients halfway through cooking improves the end result and helps prevent uneven cooking.
- Add oil to fresh potatoes for extra crunch. Simply fry the ingredients in the air fryer for a few minutes after adding the oil.
- Do not cook very fatty ingredients, such as sausages, in the air fryer.
- Dishes that can be baked in the oven can also be cooked in the air fryer.
- The optimum quantity of chips for a crispy result is 500 grammes.
- Use ready-to-use pasta to prepare filled snacks quickly and easily. Ready-made pasta also requires a shorter cooking time than home-made pasta.
- You can also use the air fryer to heat up ingredients. To heat up ingredients, set the temperature to 150°C for a maximum of 10 minutes.
USING A CAKE TIN
- You can use a cake tin (not supplied) to bake a cake or quiche, or if you want to fry fragile or stuffed ingredients.
- Place the cake tin in the basket without the cooking racks or the separator.
cleaning & maintenance
- Clean the appliance after each use.
- Unplug the appliance from the socket and allow the basket (and cake tin if included), the cooking racks, separator and interior of the appliance to cool down completely before cleaning. Remove the basket from the appliance to allow the air fryer to cool down more quickly.
- Never immerse the appliance or the power cord in water or any other liquid.
- To avoid the risk of electric shock, do not allow water or other liquids to penetrate the appliance.
- Do not use metal utensils or utensils that could scratch the non-stick coating on the basket and rack.
- Discard any residual liquid left in the basket after cooking.
- Wash the basket, the cooking rack, and the separator with a soft sponge and hot water with dishwashing liquid. Rinse thoroughly with clean water and dry with a soft cloth. These parts can also be washed in the dishwasher.
- If the food residue is difficult to remove from the basket/grill/separator, soak these items in hot, soapy water for 10 to 15 minutes. The residue will then come off easily.
- Clean the inside of the appliance with hot water and a non-abrasive sponge.
- Do not use an abrasive scrubbing sponge to avoid damaging the non-stick coating.
- Clean the heating element with a cleaning brush to remove any food residue.
- Wipe the outside surfaces of the appliance with a damp cloth.
storage
• Always unplug the appliance before storing it.
- Store the appliance in a cool, dry and dust-free place, out of the reach of children and pets.
- Please keep the packaging and use it to store the appliance if you are not going to be using it for a long time.
troubleshooting guide
Please consult the troubleshooting guide below before calling your retailer's customer service department to find out if you can solve the problem yourself.
| Issues Possible causes Solutions | ||
| The air fryer is not working. | The appliance is not plugged in. | Connect the mains plug to an earthed wall socket. |
| You have not pressed the start/pause button [2752] | Check that you have pressed the start/pause button  . . | |
| Ingredients fried in the air fryer are not cooked through. | There is too much food placed on the cooking rack. | Place smaller quantities of food in the basket. Smaller batches ensure more even cooking. |
| The set temperature is too low. | Adjust the temperature to the required setting (see “Programme chart” and “Cooking guide”). | |
| The cooking time is too short. | Adjust the cooking time to the required duration (see “Programme chart” and “Cooking guide”). | |
| Ingredients cook unevenly in the air fryer. | Some types of ingredients need to be stirred halfway through cooking. | Ingredients placed on top of each other (such as chips, for example) should be shaken up or stirred halfway through the cooking time to ensure even cooking. |
| Fried snacks are not crispy when they come out of the air fryer. | You've used a type of snack that's supposed to be cooked in a traditional deep fryer. | Use oven-baked snacks or brush a little oil over them to make them crispier. |
| The basket cannot be inserted properly into the appliance. | There is too much food in the basket. | Do not fill the basket beyond the brim. |
Issues Possible causes Solutions
| White smoke emanates from the appliance. | You are trying to cook fatty ingredients. | When you fry fatty ingredients in the air fryer, a large amount of oil flows into the basket. This oil produces a white smoke and the basket may heat up more than usual. This does not affect the appliance or the fi nal result. |
| The basket still contains grease residue from previous use. | The white smoke is caused by grease heating up in the basket. Make sure you clean the basket properly after each use. | |
| Fresh chips cook unevenly in the air fryer. | You've used an unsuitable type of potatoes. | Use fresh potatoes and make sure they remain fi rm during frying. |
| You didn't rinse the chips properly before frying them. | Rinse the chips well to remove any starch from the surface. | |
| Fresh chips are not crispy when they come out of the air fryer. | The amount of oil and water in the chips affects their crispiness. | Make sure you dry the chips properly before adding the oil. Cut the chips smaller for a crispier result. Add a little more oil for a crispier result. |
If you are unable to solve the problem using the information above, please do not dismantle the appliance and contact your retailer's customer service department. Any repairs carried out by an unqualified person will not be covered by the warranty.
Ihr Produkt
Verpackungsinhalt
natural_image
Technical diagram showing a mechanical assembly with two components and a base housing (no text or symbols)natural_image
Technical diagram showing a mechanical assembly with two plates above a rectangular housing (no text or symbols)natural_image
Hand inserting a plug into an electrical outlet (no text or symbols visible)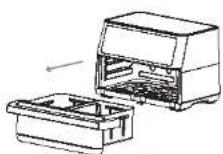
natural_image
Line drawing of a hand placing a small object into a container (no text or symbols)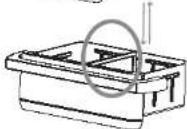
2
5
EEN LOPEND PROGRAMMA ANNULEREN
All information, designs, drawings and pictures in this document are the property of SOURCING & CREATION. SOURCING & CREATION reserves all rights to its brands, designs and information. Any copy and reproduction through any means shall be deemed and considered as counterfeiting.
Protection of the environment
This symbol attached to the product means that it is an appliance whose disposal is subject to the directive on waste from electrical and electronic equipment (WEEE). This appliance may not in any way be treated as household waste
and must be subject to a specific type of removal for this type of waste. Recycling and recovery systems are available in your area (waste removal) and by distributors. By taking your appliance at its end of life to a recycling facility, you will contribute to environmental conservation and prevent any harm to your health.

Umweltschutz
\* Tested in our laboratories
Warranty valid from the date of purchase (receipt as proof of purchase). This warranty does not cover defects or damage caused by improper set up, incorrect use, or normal wear and tear of this product.
\* In unseren Labors getestet
Ref. EAF5 Flex XXL 11L
SERVICE RELATION CLIENTS /
Customer Relations Department / Kundenservice / Klantenafdeling
Avenue de la Motte CS 80137
59811 Lesquin cedex