HIDD28471SVI - Cooker Atag - Free user manual and instructions
Find the device manual for free HIDD28471SVI Atag in PDF.


User questions about HIDD28471SVI Atag
0 question about this device. Answer the ones you know or ask your own.
Ask a new question about this device
Download the instructions for your Cooker in PDF format for free! Find your manual HIDD28471SVI - Atag and take your electronic device back in hand. On this page are published all the documents necessary for the use of your device. HIDD28471SVI by Atag.
USER MANUAL HIDD28471SVI Atag
natural_image
Simple diagram with a vertical rectangle and three circles below, no text or symbols present.GEBRUIKSHANDLEIDING
natural_image
Simple line drawing of a cooking pot with lid and side handles (no text or symbols)Inductiekokenissnel
text_image
Illustration showing cooking process with pots, stove, and cooking equipment, including a cooking step and a checkmark indicating action.text_image
Diagram showing a hand interacting with a screen before and after adjustment, with control buttons labeled in Chinese.text_image
Diagram showing finger pressing a button on a device, with labeled buttons and directional arrow indicating movement.natural_image
Diagram showing a cooking process: a rectangular stove being added to a pot on a flat surface, with no text or symbols present.- Steleenhogeroflagervermogenindoormetuwvingeroverdesliderteschuivenofopde slidertetippen.
text_image
Diagram showing a hand interacting with a control panel before and after adjustment, with labeled buttons and a numeric display.text_image
Diagram showing a hand interacting with a device interface, with control buttons and directional arrows indicating action.text_image
Diagram showing hand press application of a device control panel with numeric display and adjustment controlsnatural_image
Three kitchen utensils: a stand with a bulb, a pan with a lid, and a pan with a handle (no text or symbols visible)Chef'spanKoekenpanSonde
natural_image
Diagram showing a device being shifted from left to right, with no text or symbols present.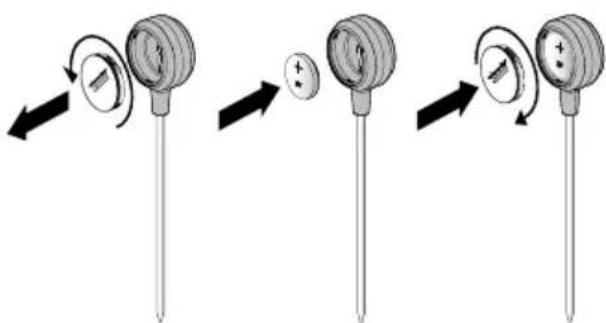
text_image
Diagram illustrating three-step mechanical or electrical component rotation, showing clockwise and circular motion with polarity indicators.DeCelsius°Cooking™-sondevoorbereiden
- Trekhetlipjeuithetbatterijvakvande Celsius°Cooking™-sonde.
- DeCelsius ^o Cooking ^TM -sondeisnuklaar voorgebruik. Vervangdebatterijindien nodig.
Plaatsingvandebatterijinde Celsius°Cooking™-sonde
text_image
Diagram illustrating cooking process steps with labeled components and a warning sign indicating distance to 1 cm.- Schuifdeophangbeugeloverderandvandepan.
2.Steekdesondevanbovenafindeophangbeugel.
LETOP!
text_image
Diagram illustrating a medical procedure involving a petri dish and a tool, with magnified views showing the process.Celsius°Cooking™-kookgerei
text_image
Diagram showing a hand interacting with a device control panel before and after adjustment, with labeled buttons and icons.text_image
Diagram showing hand gesture pointing to a control panel with labeled buttons and iconsBediening
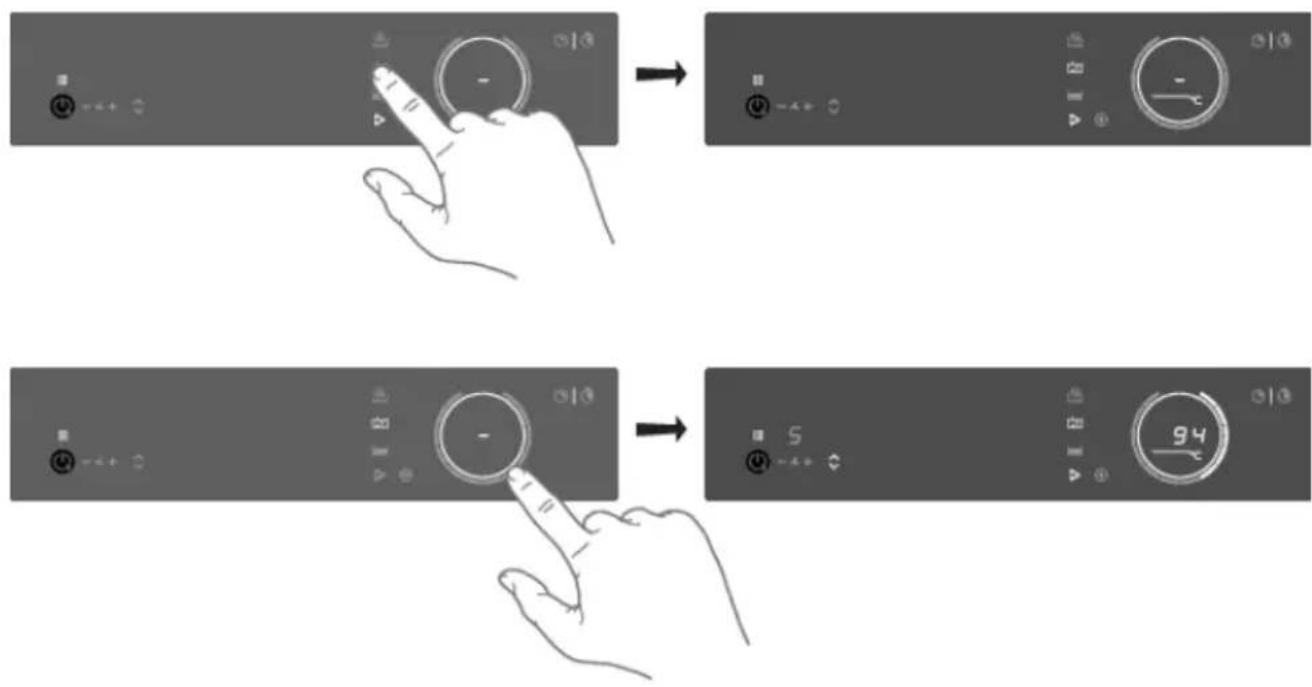
text_image
Diagram showing hand press application on a remote control interface with labeled buttons and directional arrowsOpwarmenebakken
text_image
QR code image containing encoded data, no visible human-readable texttext_image
Diagram showing finger pressing a button on a device, with two states of change to state 6text_image
Diagram showing a hand interacting with a control panel, displaying '8' and '2' controls with numeric input fields.text_image
Diagram showing hand pressing a button on a control panel with numeric display and status indicators- Decountdowntimertoetsen000knipperenophetdisplayvandekookzone.
text_image
Diagram showing a hand interacting with a control panel, displaying 8 and 3 buttons with directional arrows.Bediening
text_image
Diagram showing a hand interacting with a control panel labeled 'B' before and after transformation, with directional arrows indicating movement.text_image
QR code image with a central logo, likely linking to a digital resource or website.flowchart
graph TD
    A["Start"] --> B["Hand with Button -"]
    B --> C["3 sec."]
    D["Start"] --> E["Hand with Button -"]
    E --> F["3 sec."]
    G["Start"] --> H["Hand with Button -"]
    H --> I["3 sec."]
    J["Start"] --> K["Hand with Button -"]
    K --> L["3 sec."]
    M["Start"] --> N["Hand with Button -"]
    N --> O["3 sec."]
    P["Start"] --> Q["Hand with Button -"]
    Q --> R["3 sec."]
LETOP!
text_image
aFF 3 sec. Con 3 sec.Omhetmenuteverlaten, raaktugedurende3secondenmettweevingersergensdeslideraan.
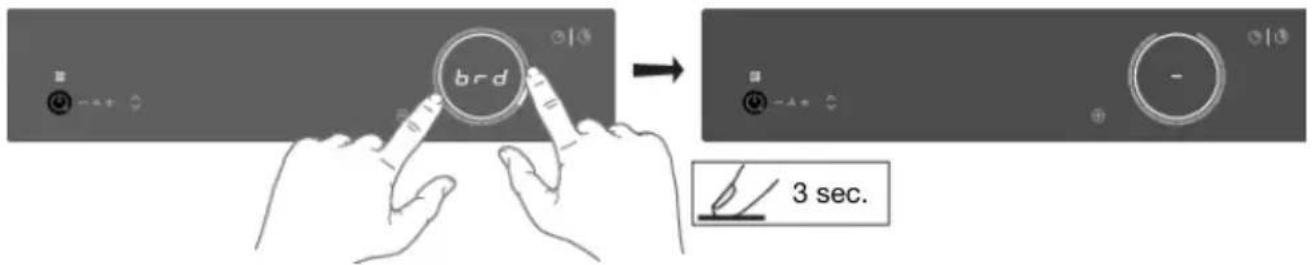
text_image
brd 3 sec.natural_image
Isometric illustration of a mechanical component with an upward arrow, placed on a flat surface (no text or symbols)natural_image
Illustration of a smartphone with an upward arrow emerging from its screen (no text or symbols)natural_image
Illustration of a pencil with an upward arrow emerging from it, symbolizing growth or progress (no text or symbols present)-
Leegdecondensreservoirsenreinigzemetwarmwatereneenbeetjeafwasmiddelofinde vaatwasser.
-
Reinighetinterieurvandeafzuigmodulemeteenvochtigdoekje.
Filterindicatie
natural_image
Stacked diagram of a device with a highlighted component and directional arrow (no text or symbols)text_image
Warning symbol for a trash bin with crossed lines indicating no waste or discharge, and a black rectangular block below.text_image
L N 230 Vtext_image
L1 L2 230 VLETOP!
natural_image
Technical line drawing of an electronic device with internal components and a magnified inset showing a close-up view (no text or symbols)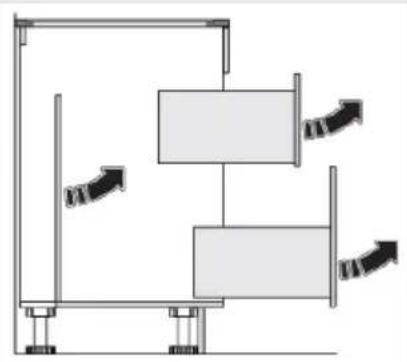
natural_image
Pure mechanical diagram showing two blocks connected by rods with directional arrows, no text or symbols present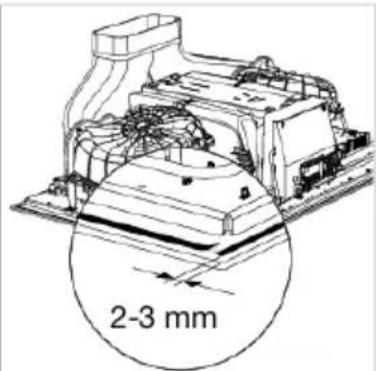
text_image
2-3 mmtext_image
Technical diagram showing four different indoor airway or ventilation system configurations with labeled components and dimensions.natural_image
Technical diagram of a mechanical or electrical component with no visible text, numbers, or symbols.
text_image
8 10 +30 mm 9
natural_image
Technical diagram of a mechanical assembly with pipes and a central component (no text or symbols)natural_image
Technical diagram of a mechanical assembly with no visible text, numbers, or symbolsnatural_image
Simple diagram with a vertical rectangle and three circles below, no text or symbols present.NOTICED'UTILISATION
36BridgeInductionfoyer......
37Pause....
37 Sécuritée
38Fonctions
39Fonctionr
42Connectl
42
44Miseàjour
45Réglages
49Entretien
49Nettoyage
49Nettoyage
52Indicateu
52
53Dépanna
53Généralité
53Tableaud
58Données
58
59Ficheproc
59Informatic
60Aspectse
60
61Installatio
61 Sécurité.
62Préparatic
70Installatio
Lespictogrammesfigurantdanscettenoticeontlessignificationssuivantes:

INFORMATION
Informations, conseils, astuces, ourecommandations

ATTENTION!
Attention-danger

RISQUDECHOCÉLECTRIQUE!
natural_image
Simple line drawing of a cooking pot with lid and side handles (no text or symbols)Lacuissonparinductionestrapide
text_image
incorrecttext_image
Illustration showing cooking process with pots, stove, and cooking equipment on a board, accompanied by Chinese text indicating correct and incorrect actions.text_image
Diagram showing a hand interacting with a screen before and after adjustment, with control buttons labeled in Chinese.text_image
Diagram showing finger pressing a button on a device interface with labeled buttons and directional arrownatural_image
Diagram showing a cooking process: a rectangular stove being added to a pot on a flat surface, with no text or symbols present.text_image
Diagram showing hand press application on a control panel with numeric display and control buttonstext_image
Diagram showing a hand interacting with a device interface, with control buttons and directional arrows indicating action.text_image
Diagram showing hand press application of a control panel with numeric display and adjustment controlsnatural_image
Three kitchen utensils: a stand with a measuring knob, a pan with a lid, and a pan with a handle (no text or symbols visible)CasserolePoêleSonde
Ensavoirplussurwww.celsiuscooking.com, www.atag.nl/www.atag.be.
CuisineravecdesrécipientsCelsius°Cooking™etles
programmes
natural_image
Diagram showing a device being shifted from left to right, with no text or symbols present.PréparerlasondeCelsius°Cooking™
text_image
Diagram illustrating the step-by-step transformation of a sensor or dial into a potentiometer, showing clockwise and circular motion.InstallationdelabatteriedelasondeCelsius°Cooking™
text_image
Diagram illustrating cooking process steps with labeled components and a warning sign indicating distance to 1 cm.- Faitesglisserlesupportdesuspensionsurleborddelacasserole.
- Faitesglisserlatigedelasondeparlehautdanslesupportdesuspension.
REMARQUE
text_image
Diagram illustrating a procedure for handling a petri dish, showing step-by-step assembly and final packaging.RécipientsCelsius°Cooking™
text_image
Diagram showing a hand interacting with a control panel before and after adjustment, with labeled buttons and directional arrows.text_image
Diagram showing a hand interacting with a device control panel, illustrating the process from press to display.Fonctionnement
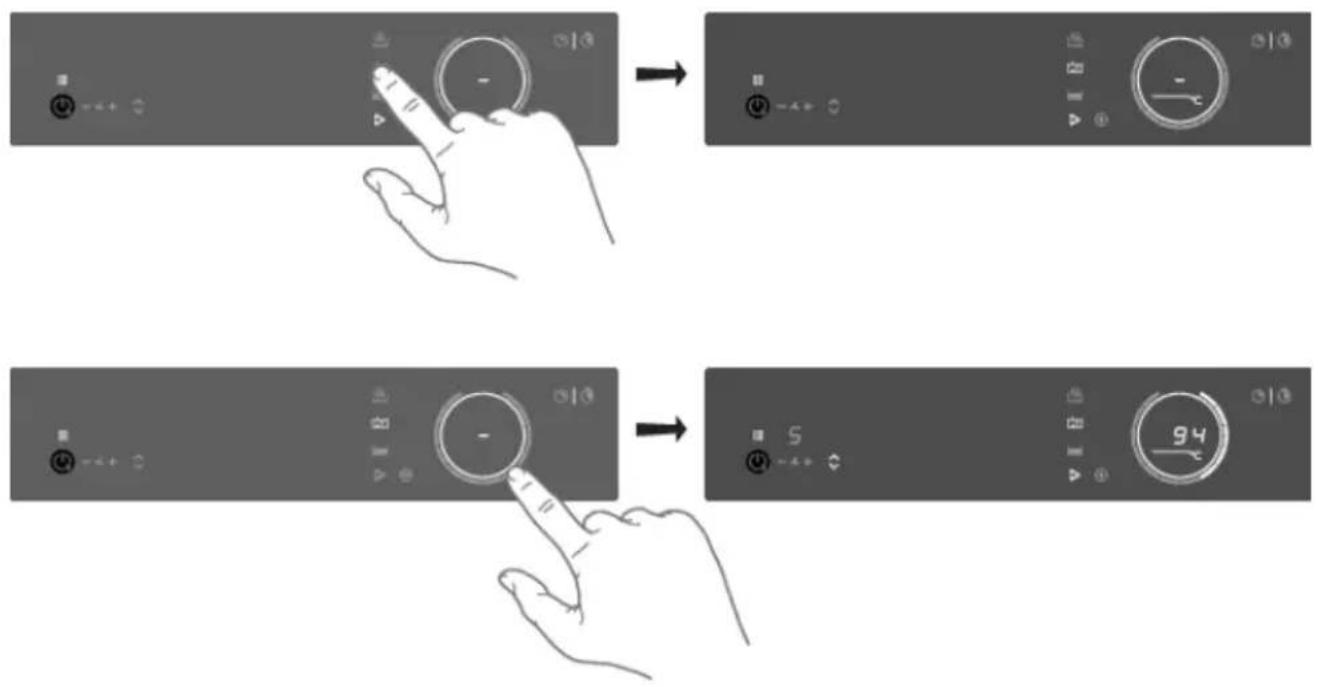
text_image
Diagram showing hand press application of a remote control interface with labeled buttons and status indicatorsChauffageetfriture
text_image
QR code image containing encoded data, no visible human-readable texttext_image
Diagram showing finger pressing a button on a device, with two states of change to state 6text_image
Diagram showing a hand interacting with a control panel, displaying icons for buttons 8 and 2.text_image
Diagram showing hand pressing a button on a device control panel with numeric display and status indicatorstext_image
Diagram showing a hand interacting with a control panel before and after adjustment, with labeled buttons and directional arrows.text_image
Diagram showing a hand interacting with a device control panel before and after transformation, with labeled buttons and directional arrows.text_image
QR code image with a central logo, likely linking to a digital resource or website.flowchart
graph TD
    A["Start"] --> B["Hand with Button -"]
    B --> C["3 sec."]
    D["Start"] --> E["Hand with Button -"]
    E --> F["3 sec."]
    G["Start"] --> H["Hand with Button -"]
    H --> I["3 sec."]
    J["Start"] --> K["Hand with Button -"]
    K --> L["3 sec."]
    M["Start"] --> N["Hand with Button -"]
    N --> O["3 sec."]
    P["Start"] --> Q["Hand with Button -"]
    Q --> R["3 sec."]
REMARQUE
text_image
OFF 3 sec. Con 3 sec.text_image
brd 3 sec.natural_image
Isometric illustration of a mechanical component with an upward arrow, placed on a flat surface (no text or symbols)natural_image
Illustration of a smartphone with an upward arrow emerging from its screen (no text or symbols)natural_image
Illustration of a pencil with an upward arrow emerging from it, symbolizing growth or progress (no text or symbols present)natural_image
3D diagram of a layered electronic device with a black arrow indicating rotation or movement (no text or symbols)text_image
Warning symbol for a trash bin with crossed and unshaded lines indicating no waste or dischargenatural_image
Pure schematic diagram of a mechanical or electrical assembly without any text, numbers, or symbols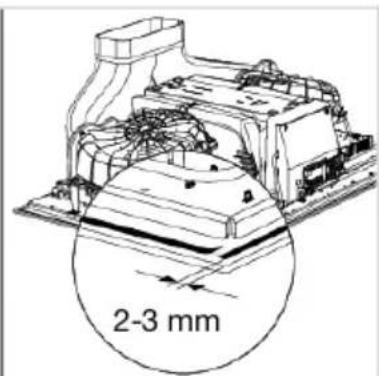
text_image
2-3 mmnatural_image
Technical line drawing of a mechanical component with no visible text or symbols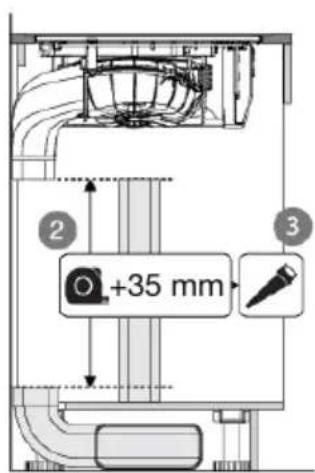
text_image
+35 mm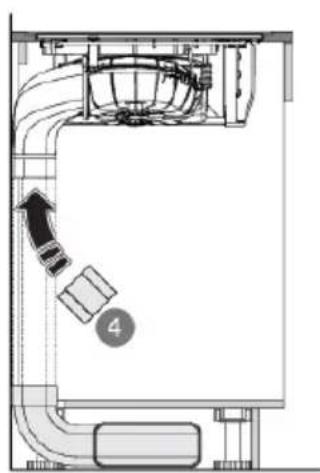
natural_image
Technical diagram of a mechanical or electrical component with labeled parts and directional arrows (no readable text or symbols)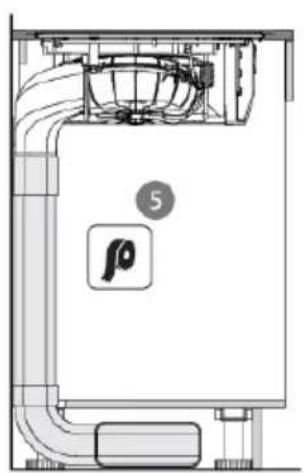
natural_image
Technical line drawing of a mechanical or electrical component with no visible text, numbers, or symbols.natural_image
Technical diagram of a mechanical assembly with no visible text or symbolsnatural_image
Simple diagram with a vertical rectangle and three circles below, no text or symbols present.GEBRAUCHSANWEISUNG
36BridgeInductionZone......
37Pause....
37Kindersic
38Zeitfunktio
39Bedienun
42Connectl
42Connectl
44Firmware.
45Einstellu
49Pflege.....
49Reinigenc
49Dunstabz
52Filteranze
52
53Probleml
53Allgemeir
53TabelleSt
58Technisc
58
59EU-Produ
59Informatic
60Umwelts
60Entsorgur
61FÜRDEU
63Installatio
63Sicherhe
64Vorbereit
72Einbau....
natural_image
Line drawing of a cooking pot with lid and side handles (no text or symbols)text_image
Illustration showing cooking process with pots, a stove, and steam rising, accompanied by Chinese text indicating preparation steps.text_image
Diagram showing a finger pressing a button on a screen, followed by a right-hand rule to press the button.text_image
Diagram showing finger pressing a button on a device control panel, with labeled buttons and directional arrownatural_image
Diagram showing a cooking process: a rectangular stove being added to a pot on a flat surface, with no text or symbols present.text_image
Diagram showing hand interacting with a control panel before and after adjustment, with numeric display and control buttons labeled.text_image
Diagram showing a hand interacting with a device interface, with control buttons and directional arrows indicating action.text_image
Diagram showing hand press application of a device control panel with numeric display and adjustment controlsnatural_image
Three kitchen utensils: a stand with a measuring knob, a pan with a lid, and a pan with a handle (no text or symbols visible)text_image
Diagram illustrating the step-by-step installation of a sensor device with labeled components and directional arrows.text_image
Diagram illustrating cooking process steps with labeled components and a warning sign indicating distance to 1 cm.text_image
Diagram illustrating a procedure for handling a petri dish, showing step-by-step insertion and final packaging.text_image
Diagram showing a hand interacting with a device control panel, illustrating the process from press to display.text_image
Diagram showing hand press application on a device control panel with labeled buttons and status indicatorsBetrieb
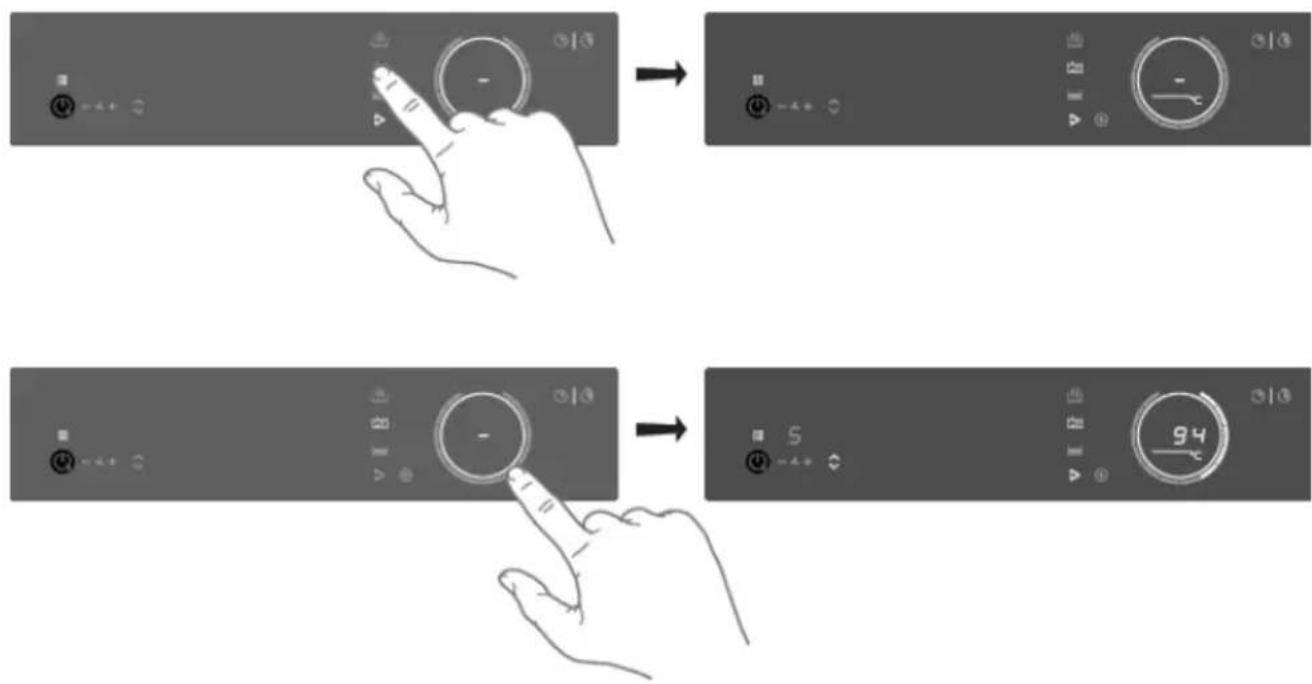
text_image
Diagram showing hand press application of a remote control interface with labeled buttons and status indicatorsErwärmenundbraten
text_image
QR code image containing encoded data, no visible human-readable texttext_image
Diagram showing finger pressing a button on a device, with two states of change to state 6text_image
Diagram showing a hand interacting with a control panel, displaying '8' and '2' controls with numeric input fields.text_image
Diagram showing hand press on a device control panel with numeric display and directional arrowtext_image
Diagram showing a hand interacting with a control panel before and after adjustment, with labeled buttons and directional arrows.text_image
Diagram showing finger pressing a button labeled 'B' before and after transformation, with icons for control buttons.text_image
QR code image with a central logo, likely linking to a digital resource or website.flowchart
graph TD
    A["Hand with +/- symbols"] --> B["Pointing to button -"]
    B --> C["30s: Boo, -4+, +"]
    C --> D["30s: Brd, -4+, +"]
    D --> E["30s: on, -4+, +"]
    E --> F["30s: aFF, -4+, +"]
    F --> G["30s: brd, -4+, +"]
    G --> H["30s: off, -4+, +"]
    H --> I["30s: off, -4+, +"]
Einstellungen
HINWEIS!
natural_image
Isometric illustration of a mechanical component with an upward arrow, placed on a flat surface (no text or symbols)natural_image
Illustration of a smartphone with an upward arrow emerging from its screen (no text or symbols)natural_image
Illustration of a pencil with an upward arrow emerging from it, symbolizing growth or progress (no text or symbols present)natural_image
Stacked diagram of a device with a highlighted component and directional arrow (no text or symbols)text_image
Warning symbol for a trash bin with crossed and uncorrected lines, indicating no waste or discharge.natural_image
Simple line drawing of a trash bin with crossed lines indicating no waste or discharge (no text or symbols)natural_image
Technical illustration of a mechanical assembly with exploded view and close-up detail (no text or symbols)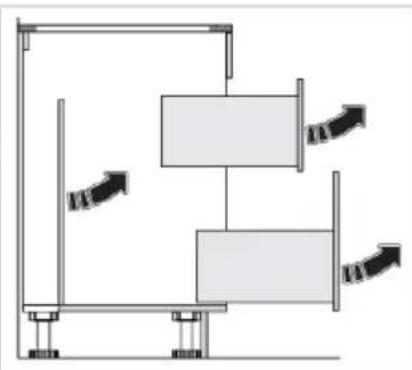
natural_image
Pure mechanical assembly diagram without any text, numbers, or symbols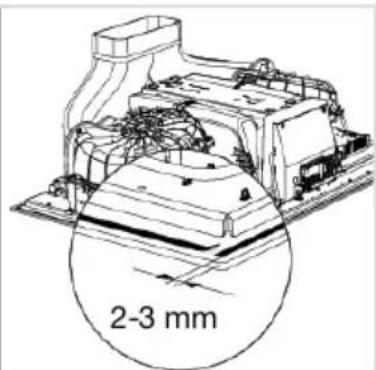
text_image
2-3 mmtext_image
Diagram showing a mechanical or electrical component with labeled parts and dimension lines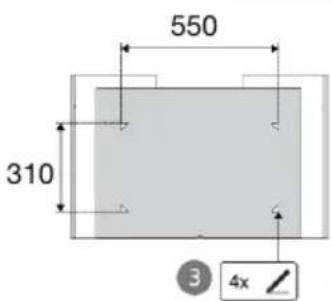
text_image
550 310 3 4x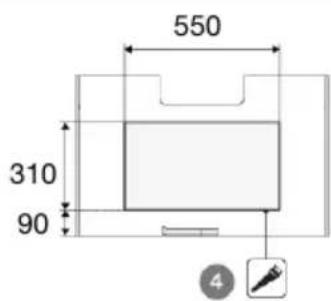
text_image
550 310 90 4Installation
natural_image
Technical diagram of a mechanical assembly with no visible text, numbers, or symbolsnatural_image
Simple diagram with a vertical rectangle and three circles below, no text or symbols present.INSTRUCTIONSFORUSE
Inductionhobwithintegratedextractor
EN
HIDD28471SV
HIDD28472SV
HIDD28471SVI
HIDD28472SVI
Contents
'Open window' function ....
3Pictogramsused....
4Safety....
8Safeuse....
9
9Powermanagement......
11Yourhobwithintegratedextractor......
11Dearcustomer!......
11 Theseinstructions......
13Description....
14Controlpanel....
17Indicationsonthedisplay......
18UseReplacingrecirculationfilter(whenusingthe
18Inductiondetikimqx)....
20Inductionsounds......
20Pansforinductioncooking......
22Cookingsettings......
23Usingtheextractionmodule......
26Operationaccordingtoregulation(EU)...
26Stad@2014ing....
26Standardcooking......
28CookingwiththePLUSmenu......
30CookingwithCelsius°Cooking™......
CookingwithCelsius ^° Cooking ^™ cookware andprograms....
Step-by-Stepcookingguideon
CelsiusCooking.com......
31
35
35Bridgelnductionzone......
36Pause....
37Childlock
37Timefunc
39Operating
41Connectl
41Connectl
43Firmware
44Settings.
48Maintena
48Cleaning
48Cleaningt
51Filterindic
51
52Troubles
52General...
52Troublesr
56Technica
56
57EUProduc
57Compliant
58Environn
58Disposalc
59Installatio
59Safety.....
60Preparatic
67Built-in....
Thefollowingsymbolsareusedthroughoutthemanual, and they havethefollowingmeanings:

INFORMATION!
Information, advice, tiporrecommendation

WARNING!
Warning–general danger

ELECTRICSHOCK!
Warning-dangerofelectricshock

HOTSURFACE!
Warning-dangerofhotsurface

DANGEROFFIRE!
Warning-dangeroffire

RIGHT!

WRONG!
It is important that you carefully read the instructions.
READCAREFULLYANDKEEPITFORFUTUREREFERENCE!
General
Themanufacturercannotbeheldliableforanydamageresulting fromfailuretofollowthesafetyinstructionsandwarnings.
Damagecausedbyincorrectconnection,incorrectfitting,orincorrect useisnotcoveredbythewarranty.

WARNING!
This appliance can be used by children aged from 8 years and above and persons with reduced physical, sensory or mental capabilities or lack of experience and knowledge if they have been given supervision or instruction concerning use of the appliance in asafeway and understand the hazards involved.
This appliance and the accessible parts will become hot during use. Donottouchhotparts. Keep children younger than 8 away from the appliance unless they are under continuous supervision.
Childrenshallnotplaywiththeappliance.Cleaningandusermaintenanceshallnotbemadebychildrenwithoutsupervision.

DANGEROFFIRE!
WARNING: Dangeroffire: donotstoreitemsonthecooking surfaces.
NOTE!
CAUTION! The cooking process hastobesupervised. A short-term cooking process hastobesupervised continuously.

DANGEROFFIRE!
WARNING: Cookingwithfatoroilonahobwithoutsupervision canbedangerousandcanleadtoafire.
NEVERtrytoextinguishafirewithwater.Instead,switchthe applianceoffandthencovertheflameswith,forexample,alidor afireblanket.
WARNING!
Useonlyhobguardsdesignedbythemanufacturerofthecooking applianceorindicatedbytheappliancemanufacturerinthe instructionsforuseassuitableorhobguardsincorporatedinthe appliance.Theuseofinappropriateguardscancauseaccidents.
Ifadrawerunderneathheapplianceispermitted(seetheinstallation instructions),withoutanintermediatebottom,thisshouldnotbeused tostorehighlyflammableobjects/materials.Ensurethatthereis adequateclearanceofafewcentimetresbetweenthebottomofthe hobandthecontentsofanydrawers.
Thehobisonlytobeusedforthepreparationoffood.
This appliance is only designed for household use.
The appliance is not designed for heating rooms.
The appliance is not intended to be operated by means of an external timer or separateremote control system.
Neveruseasteamcleanerforcleaningtheappliance.Onlyclean theappliancewhenswitchedoff.Thesteamofasteamcleanercould reachtheconductingpartsandcauseanelectricalshort.
ThehobisfittedwithaWi-FimodulethataIallowstheapplianceto connecttoamobiledevicesuchasasmartphoneortablet.Itoffers tomonitorthecookinghobstatusviathemobiledevice.Forsafety reasons,itisnotpossibletoremotelycontrol,turnonorturnoffthe hob.Themonitoringfunctionviamobiledeviceshallnotbeusedto replacethepersonalsupervisionofthecookingprocessdirectlyat thehob.
If you decide to discontinue using the appliance because of a fault, were recommend you cutoff the cable after removing the plug from
Safety
theplugsocket. Taketheappliancetoyourmunicipality'swaste disposalsite.
WARNING: If the surface is cracked, switch off the appliance to avoid the possibility of electric shock.
Ceramicglassplatebroke
- Shutimmediatelyoffallburnersandanyelectricalheatingelement andisolatetheappliancefromthepowersupply.
- Donottouchtheappliancesurface.
- Donotusetheappliance.
Inductionuse
Donotplacemetalobjectssuchasknives,forks,spoons,andlids onthesurfaceofthecookinghob;theymaybecomehot.
Whentheinductionhobisinuse, keepobjectsthataresensitiveto magneticfields(creditcards, bankcards, discs, watchesandsimilar items) awayfromthehob. Weadviseanyonewithapacemakerto consulttheircardiologistfirst.
Neverusealuminiumfoilforcooking, and neverplaceproducts packagedinaluminiumonthehob. The aluminium would melt and irreparably damage your device.
Extractionuse

WARNING!
Life-threatening, the danger of poisoning through back-drafting of combustiongasses!
Neverusetheappliancetoextractairwhileusingacookerthat consumesairfromtheroomunlessstheroomissufficientlyventilated. Cookingappliancesthatconsumeairintheroom(suchasequipment thatheatsusinggas,oil,woodorcoal,geysers,andhotwater appliances)drawthecombustionairoutoftheroomandcarrythese gassesoutsideviatheoutlet(e.g.chimney).Incombinationwithan activatedcookerhood,theairiswithdrawnfromthekitchenandthe adjacentrooms.Thiscreatesnegativepressureifthereisan insufficientairsupply.Poisonousgassesfromthechimneyoroutlet channelareback-draftedintothelivingarea.
Alwaysprovideadequateventilation!
Whentheextractionunitandappliancesuppliedwithenergyother thanelectricityaresimultaneouslyinoperation,thenegativepressure intheroommustnotexceed4Pa(4×10 ^-5 bar).
Localregulationsconcerningthedischargeofairhavetobefulfilled.

ELECTRICSHOCK!
Avoidtheriskofelectricshock;makesuretheapplianceis switchedoffbeforecleaningtheappliance.
Donotusetheextractionunitifthegreasefilterhasnotbeenfitted properly!
Topreventhotfatfromcatchingfire,youshouldonlydeep-fryunder continuous supervision.
Cleanthefiltersontime.
Followtheinstructionsinthemanualforcleaningorreplacingthe greasefiltersand/orcarbonfilters!

DANGEROFFIRE!
Thereisariskoffireiftheinstructionsforcleaningorreplacing greasefiltersand/orcarbonfiltersarenotfollowed.Consultchapter 'Maintenance'concerningthedetailsofthemethodandfrequency ofcleaning.
Greasedepositsinthemetalgreasefilterscancauseafire.
Neverflambéonacookingzonewiththeextractorswitchedon.
The high flame can cause a fire. Always use the appliance with the metal grease filter. Clean the grease filter regularly.
Overheatedfatoroilcanstartafire.Alwayssupervisetheheating offatandoil.Neverextinguishafirewithwater;alwaysuseafire blanket,lidorplate.
Safeuse
- Donotkeepobjectsthatchildrenmightfindinterestingincupboardsaboveorbehindthe appliance.
- Do not warm closed tins on the hob. There will be a build-up of pressure that will cause tins to explode. You might get injured dorscaled.
- Donotusetheapplianceintemperaturesbelow5°C.
- Theapplianceshouldnotbeplacedorusedoutdoors.
- When you use the hob for the first time, you will notice a "new smell". Don't worry, this is normal. If the kitcheniswellventilated, the smell will soon disappear.
- Neveropenthecasingoftheappliance.
- Assoonasyouremovethepanfromthehob, the cooking process will stop automatically. Get into the habit of switching off the cooking zone or hob manually to avoid unintentionally switching on the appliance.
- After use, switch off the hob element using the controls and don't rely only on the pan detector.
- Remember that if the hob is used in a high setting, the heating time will be very short. Do not leavethehobunattendedifyouareusingazoneinahighsetting.
Temperaturesafety
- Thehobisfittedwithacoolingfanwhichcoolstheelectroniccomponentsduringcooking. Thefanmayoperateforawhile,evenaftertheendofthecookingprocess.
- The induction cooking hob is also fitted with an overheating protector which protects the electronic componentsfromdamage.Theprotectoroperatesinseveralways.Whenthecookingzone temperaturegetsveryhigh,thecookingpowerisautomaticallyreduced.Ifthisdoesnotsuffice, thecookingzonepowercontinuestodecrease,untilthesafetymechanismsswitchchoffthecooking zonecompletely.Whenthecookinghobiscooleddown,itstotalpowerwillbeavailableagain.
Cookingtimelimiter

WARNING!
The cooking-timelimiterisasafetyfunctionofyourcookingappliance.Itwilloperateifyouforget to switchoffyourhob.
Dependingonthesettingyouhavechosen,thecookingtimewillbelimitedasfollows:
| Setting | Thecookingzoneswitchesoffautomatically after: |
| 9 hours1 and 2 | |
| 5 hours3, 4 and 5 | |
| 4 hours6, 7 and 8 | |
| 3 hours9 | |
| 2 hours10 | |
| 1 hour11 and 12 |
The cooking-time limiter switches the cooking zones off if the time in the table has elapsed.
| Setting | Thecookingzoneswitchesautomaticallyto setting12after: |
| 10 minutesBoost |
NOTE!
The Cooking-time limiter for the specific cooking zone is reset after the user has changed the cooking level of the specific cooking zone.
NOTE!
Cooking zone related timers take priority over the cooking-time limiter.
'Open window' function
If it is prescribed that an extraction unit, which is located in a room where a fireplace is present, may only be used when a (kitchen) window is open, then a window sensor must be installed.
The ‘open window’ function is automatically activated as soon as an ‘open window’ sensor is connected to the appliance. The use of an ‘open window’ sensor type ‘FDS 100’ is recommended.
Power management
This induction hob is equipped with a smart power management system. This system ensures a maximum permissible power cannot be exceeded for safety reasons.
- The smart power management system will arrange the power distribution across the zones automatically. This means the hob could automatically decrease the power on one zone when the power level of another zone is increased. The level of activity of the power management system depends on the available power per electrical phase, the setting of the current limiter and the connected load.
- The power level of one zone can affect the power of another zone as the maximum available power is distributed among the zones. If the combined zones reach the maximum available power when a new power level is set, the power levels of one or more zones are automatically reduced within the power limit. This is indicated by the flashing of the relevant control element.
- In case a zone is used for Celsius°Cooking ^TM , this zone always gets the highest priority.
Safety
- Interventionbythesmartpowermanagementsystemismorelikelywhenthecurrentlimiteris settoalowerlevel.
- The current limiter setting must be set according to your connection and circuit breakers by a registered and qualified installer (see 'Current limiter' for the details on currents and electrical installation).
Yourhobwithintegratedextractor
Dearcustomer!
Pleasereadtheoperatinginstructionsbeforeuse. Theyincludegeneraltips,informationaboutthe settingsandadjustmentsyoucanmake,andthebestwaytotakecareofyourappliance.
The manual also serves as reference material for service technicians. Please, therefore, stick the applianceidentificationcardinthespaceprovidedatthebackofthemanual.Theappliance identificationcardcontainsalltheinformationthattheservicetechnicianwillneedinordertorespond appropriatelytoyourneedsandquestions.
TIP!
You can find them most recent version of the instructions for use on our website.
Enjoy your cooking!
Theseinstructions
Theseinstructionsarewrittenfor:
- Theuser;toquicklybecomefamiliarandmakeoptimaluseoftheappliance.
- Aninstaller;toinstalltheapplianceinaccordancewiththeapplicablestandards.
Thetablebelowgivesyouinformationonthedifferentchaptersyoucanfindinorderinthese instructions.
| PurposePageChapter | ||
| Explainsthepictogramsusedintheseinstructions.3Pictogramsused | ||
| 4Safety | Providesinformation,warningsandtipsonusingtheappliance safelysothatyouwillnotgethurtandthedevicewillnot malfunction.Alwaysreadthissectionthoroughlybeforeusing theappliance. | |
| integratedextractor | 11Yourhobw | Describe the available function of the appliance. Thetables clearlyshowwhatthedifferentkeyscanbeusedfor.Thevariouspossibledisplaysandmessagesontheappliance arealsoexplained. |
| 18Use | Thischapterfindsinformationontheoperationanduseof inductionandtheexhaustmodule.Youwillalsofindadvice onthecookwaretobeusedandinformationoncookinglevels. | |
| 26Operation | Itgivesyoustep-by-stepinformationonhowtooperatethe device.Thestepsincludeillustrationsthatconsistofaleft-side drawingshowingtheaction(whichkeytotouch)anda right-sidedrawingshowingthereactionofthedevice. | |
| 41ConnectL | Referd this sectionifyouwanttoconnecttheapplianceto Wi-Fiinyourhome.Italsodescribeshowtousethe ConnectLifeappandhowtoupdatetheappliancefirmware. | |
| 44Settings | Youcanfullycustomisethisinductionhobtoyourcooking style!Severalsettingscanbeadjusted.Thischapteralso containssettingsfortheinstaller. | |
| Maintenance | 48 | Provides information on cleaning and maintaining your device. |
Yourhobwithintegratedextractor
Tablecontinuedfromlastpage
| PurposePageChapter | ||
| 52 Troubleshofingappliancedoesnotworkcorrectlyordisplaysunclear messages,pleaserefertothissection. | ||
| 56 Technical Data scribesthetechnicaldataandspecificationsofyour appliance. | ||
| 58 Environmentgivesyepackaginginformationandhowtodisposeofthe applianceresponsiblyattheendofitslife. | ||
| 59 Installation Thischapterisintendedfortheinstaller.Onlyaqualified installermayinstallthisappliance. | ||
Yourhobwithintegratedextractor
Description
Sincetheappliancesforwhichtheseinstructionsweredrawnupmayhavedifferentequipment, somefunctionsorequipmentmaybedescribedinthemanualthatmaynotbepresentinyour appliance.
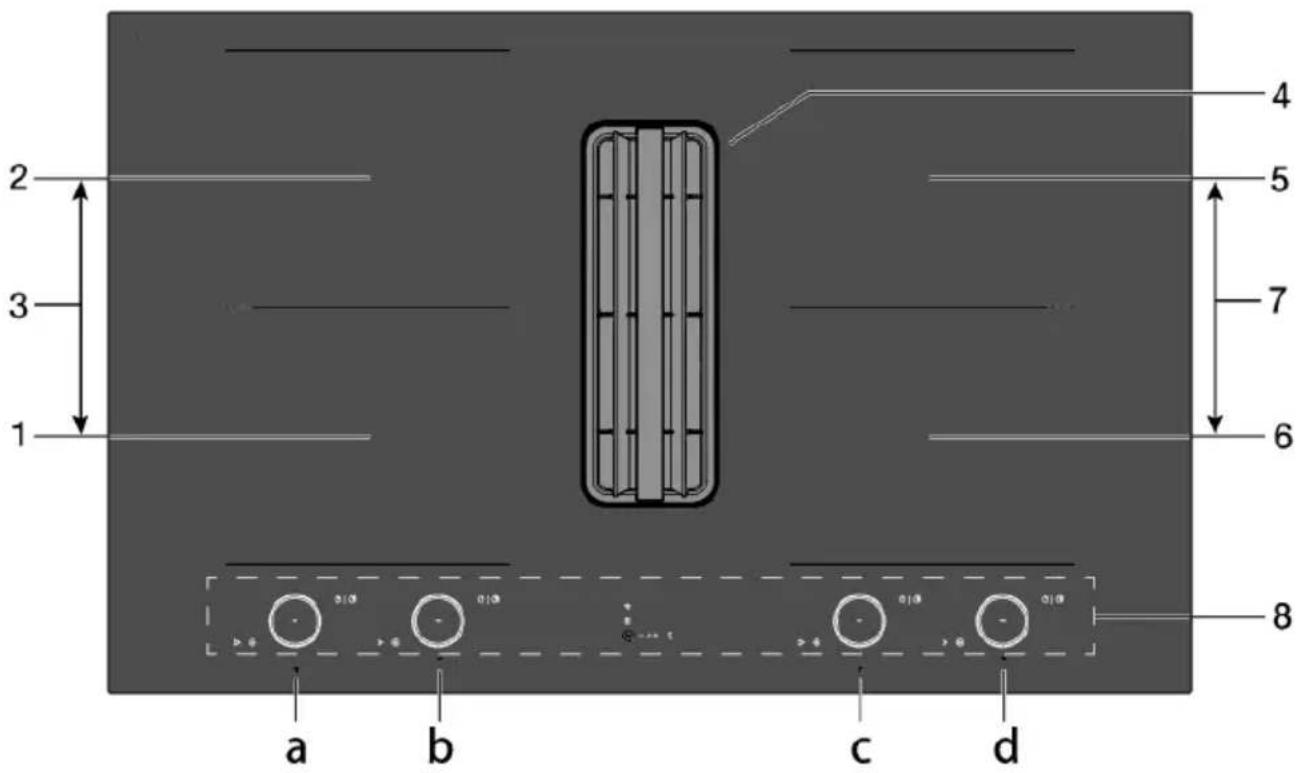
text_image
2 3 1 4 5 7 6 8 a b c d- BridgeInductionCookingzone 18x22cm/max.2.3kW/max.3.7kW(boost)tobeoperated with 'a'
2.BridgeInductionCookingzone18x22cm/max.2.3kW/max.3.7kW(boost)tobeoperated with'b' - Connected Bridge Induction cooking zones (1 and 2) to be operated with 'a'
- Extractionmodule
5.BridgeInductionCookingzone18x22cm/max.2.3kW/max.3.5kW(boost)tobeoperated with'd'
6.BridgeInductionCookingzone18x22cm/max.2.3kW/max.3.5kW(boost)tobeoperated with'c' - Connected Bridge Induction cooking zones (5 and 6) to be operated with 'c'
- Control panel (visible only when the hobisturned on)

INFORMATION!
Themaximumpoweroutputisdependingonthetypeofcookwareusedandthethermalcondition oftheappliance.
Yourhobwithintegratedextractor
Controlpanel
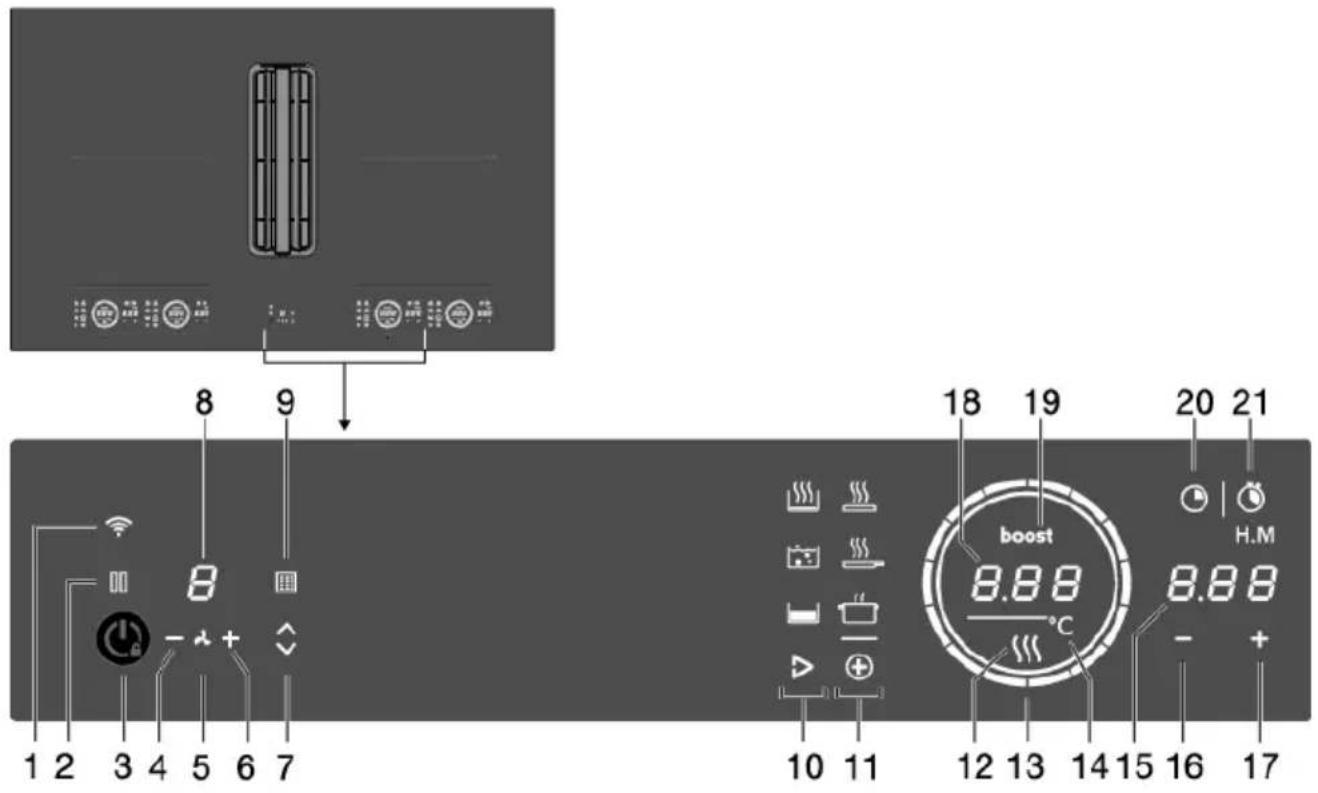
text_image
1 2 3 4 5 6 7 8 9 10 11 boost 8.88 °C 12 13 14 15 16 17 H.M 20 211.Wi-Fi/connectivitytouchkey
2.Pausetouchkey
3. On/OffandChildlocktouchkey
4.-(minus)touchkeyforlessextraction
5. Extractionon/offindication
6. +(plus)touchkeyformoreextraction
7.Towerup/downtouchkey
8. Display extraction level
9.Filterindicatortocleangreasefiltersorreplacerecirculationfilter/Touchkeytoresetfilter indicator
10. TouchkeytostartCelsius ^° Cooking ^™ programs(presentdependingontheappliancetype)
11. TouchkeytostartPLUSprograms
12.ResidualHeatindication
13.Slidecontrol(12settings)/Hobstandbyindication
14. Degrees Celsius indication for Celsius ^ Cooking ^™ and PLUS programs.
15. Displaytimefunction
16. Timesetting-(minus)touchkey
17. Timesetting + (plus)touchkey
18. Display cooking settings/Text display
19. Boostindicator
20.Count-downtimertouchkey
21. Touchkeyford display cooking time - stopwatch
Yourhobwithintegratedextractor
Explanationofthetouchkeysfunction
| Touchkey/slider | Description(seechapter'Operation') |
 On/Off On/Off | Switchingthehobon/offTheappliancecanbeswitchedonandoffwiththeon/offkey.Dependingonthe'SynchroStop'setting,onlythehobpartoralsothe extractionmoduleisswitchedoff.SynchroStopswitchedon(bydefault):theappliance(hobpart andextractionmodule)areswitchedoff.SynchroStopswitchedoff:onlythehobpartwillswitchoff.Switchofftheextractionmodulebysettingtheextractionlevelto'0'(orbyactivatingAir-Drymode). |
| ChildlockThecookingzonescanbelockedandunlockedtopreventthemfrom beingswitchedoninadvertently.Touchtheon/offkeyforapproximately 3seconds. | |
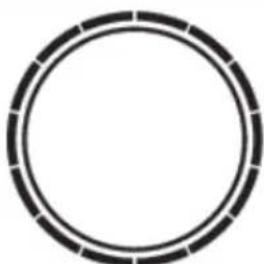 Slidecontrol(12settings) Slidecontrol(12settings) | SliderinnercircleHobswitchedonindication.Ifthehobisswitchedoffandatleastoneofthecookingzonesis stillhot,theinnercircleremainsilluminated.Whenthetemperature ofthehobdropsbelow65°C,theinnercirclealsogoesout. |
| SlideroutercircleSettingcookingzonepowerlevels.SettingtemperatureforCelsius°CockingTMandPLUSfunction. | |
 Pause Pause | PauseThepausefunctioncanbeusedtopausetheoperationoftheentire cookinghobforupto10minutes.Thisgivesyoutimetosafelyclean thecookinghobwithoutlosingyoursettings. |
| [Yccx]Wi-Fi | Wi-FiThecookinghobisequippedwithaWi-Fimodulethatallowsthe appliancetoconnecttoamobiledevicesuchasasmartphoneor tablet.ltofferstomonitorthecookinghobstatusviathemobiledevice.Itisnotpossibletoremotelycontrol,turnon,orturnoffthecookinghob forsafetyreasons.Themonitoringfunctionviamobiledeviceshallnotbeusedtodirectly replacethecookingprocesspersonalsupervisiononthecookinghob. |
 Count-downtimer Count-downtimer | Count-downtimerThecount-downtimermakesthecookingprocesseasierbysettingthe cookingtimefortheselectedcookingzone.Whenthetimesetonthe timerexpires,thecookingzonewillautomaticallyswitchoffandemit anacousticsignal.Youcanswitchofftheacousticsignalbytouching thecount-downtimerkey;alternatively,itwillswitchoffautomatically afterawhile.Youcansetthecount-downtimerindependentlyforall cookingzones. |
Yourhobwithintegratedextractor
Tablecontinuedfromlastpage
| Touchkey/slider | Description(seechapter'Operation') |
 | Cookingtimedisplay-stopwatch |
| Thestopwatchcanbeusedtoseehowlongyouhavebeencontinuouslycookingontheselectedcookingzoneandstartscounting | |
| Stopwatch | automaticallyinthebackground. |
Programfunctionexplanation
| Program | Description(seechapter'Operation') | |
 Celsius°CookingTMOnlyvisibleasaCelsius°CookingTMpanorprobeisdetected. Celsius°CookingTMOnlyvisibleasaCelsius°CookingTMpanorprobeisdetected. |  | HeatingupandfryingThisprogramistoreachhighttemperaturesrapidly.Highpanbottomtemperaturescanbereached.Alwaysaddoilorbutterbeforestartingit.Forhealthycookingdon'texceedthesmokepointoftheusedoil. |
 | Boiling/cookingwithwaterWiththisprogram,thewatergetstoboilquickly.Alwaysaddwaterbeforestarting. | |
 | SlowcookingorsousvideThisprogramistocontrollowtomediumtemperatures,preventinghighbottomtemperatures.Largerquantitiesandthickerdishesneedtobestirredoccasionallytoensureahomogeneousheatdistribution. | |
 PLUS(Automaticcookingprograms) PLUS(Automaticcookingprograms) |  | GrillThisfunctionisexclusivelyforBridgeInductioncookingzones,thatarelinkedtocreateonelargercookingzone.GrillingisoptimizedforATAGinductionaccessoriesgrillplateandteppanyaki.Butitwillalsoworkwithdifferentcookware,butperhapslessaccurate. |
 | Frying/wokWiththisfunction,youcancookvegetables,fish,bacon,meat,friedpotatoes,oreggsinbutteroroil. | |
 | Heatingup/keepingwarmWiththisfunctionyoucan,forexample,meltchocolate(45°C),keepfoodwarm(70°C),simmer(94°C)orbringittoboil(100°C). | |
Hobrecallfunction
Thisfeatureallowsyoutorecallallthesettingsofthecookingzonesifthehobwasaccidentally switchedoff.
Within6seconds, the hob must beswitched back on. Pressing any whereon the slider within 6 seconds recalls all these settings from before the last switching off of the appliance.
Panmovefunction
If you removethepan from an active cooking zone and within 6 seconds place it on a different cooking zone, you can transfer all the timer and cooking-related setting to thenew cooking zone by touching the slider of thenew cooking zone. To indicate this possibility, thenew cooking zone displays copied settings on the slider. When the confirmation is done, the previous cooking zone is deactivated.
Indicationsonthedisplay
| StatusIndisplay | ||
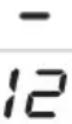 | Powerlevel'0'foracookingzone. | |
| Powerlevelthatissetforacookingzone;1=low/12=high. | ||
| boost | Boostfunctionactive. | |
 | Thelockingfunctionisactivated;thecontrolpanelislocked. | |
| Residualheatindicator:Thehobhasaresidualheatindicatorforeachcooking zonetoshowwhichcookingzonesarehotafterthecookingzoneisturnedoff.Althoughthehobisswitchedoff,theindicatorwillremainonaslongasthe cookingzoneishot!Avoidtouchingthosecookingzoneswhenthisindicator islit. | ||
 HOTSURFACE! HOTSURFACE! | ||
| Danger!Riskofburns. | ||
 | Errorcode;Seechapter'Troubleshooting'. | |
| -°C | DegreesCelsiusindicationforCelsius°CockingTMandPLUSprograms. | |
 | Filterindicator(andtouchkey)forcleaningthegreasefiltersorreplacingthe recirculationfilter.Touchthekeyfor2secondstoresetthefilterindicator. | |
 | Extractionindication•Steadylight:extractionison.•Whendimmed:extractionisdisabledorinAir-Drymode,orSynchroControl isenabled(automaticextraction). | |
Inductioncooking

natural_image
Line drawing of a cooking pot with lid and side handles (no text or symbols)Inductioncookingisfast
Tostartwith,youwillbesurprisedbythespeedofinductioncooking. Especiallyathighersettings,foodsandliquidswillcometoaboilvery rapidly.Itisbestnottoleavepansunattendedtoavoidthemboiling overorboilingdry.Withinductioncooking,thereisnoheatloss,and thehandlesstaycool.
Thepowerleveladjustsitself
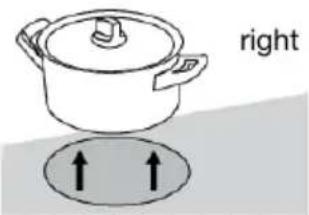
Ininductioncooking,onlythezoneonwhichthepanisplacedisused.Ifyouuseasmallpanona largezone,thezonewilladjustthepowertothepan'sdiameter.Thepowerwillthusbelower,and itwilltakelongerbeforethefoodcomestoaboil.
text_image
right
INFORMATION!
- Grainsofsandmaycausescratchesthatyoucannotremove. Therefore,onlyputpanswithacleanbaseonthecooking surfaceandalwayspickpansuptomovethem.
- Donotusethehobasaworktop.
- Alwayskeepthelidonthepanwhencooking,inordertoavoid energyloss.
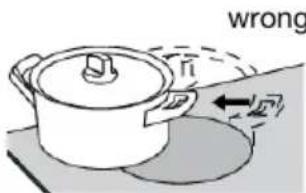
text_image
wrongOperationofthetouchkeysandsliders
- Thetouchcontrolsmaytakesomegettingusedtoifyouareusedtoother(rotary)controls. Placethetipofyourfingerflatonthecontroltoachievethebestresults.
- The touch sensors only react to the light pressure of a fingertip. Do not operate the controls with any other objects.
- The cooking hob is operated by a slider. You can either touch the selected part of the slider or slideinacircularmotionclockwisetoincreaseoranti-clockwisetodecreasethepowerlevel andtemperature.
- To set the cooking zone power level, touch the desired spot on the slider. As you touch the slider, theselectedpowerlevelwillappearonthecookingzonedisplayunit.
• Theselectedpartofthesliderwillbefullylit. - Donotuseanyobjectstoooperatetheslider.
Howinductionworks
text_image
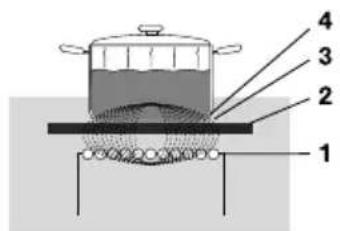
1 2 3 4Thecoil(1)inthehob(2)generatesamagneticfield(3).Byplacinga panwithanironbase(4)onthecoil,acurrentisinducedinthebase ofthepan.
Easy
The electronic controls are accurate and easy to set. On the lowest setting, you can melt chocolate directly in the pan, for example, or cooking ingredient that you would normally heat aubain marie.
Fast
Thankstotheinductionhobhighpowerlevels,bringingfoodtoaboilisveryquick.
Clean
Thehobiseasytoclean.Becausethecookingzonesdonotgetanyhotterthanthepansthemselves, foodspillsareunlikelytoburnintotheglass.
Safe
Theheatisgeneratedinthepanitself.Theglasstopdoesnotgetanyhotterthanthepan.Thismeans thatthecookingzoneisconsiderablycoolerthanaceramichob,forexample.
Onceapanhasbeenremoved, the cookingzonecoolsdownquickly.
Capacitydistributionofcookingzones
Dependingonthehobmodel,thecookingzonescanaffecteachother.Whenseveralcookingzonesareswitchedonsimultaneously,theavailablecapacityissharedautomaticallybetweenthem.
Whenthemaximumcapacityofthecombinationofcookinglevelsisreachedduringsetting,oneor morezonesareautomaticallyreducedtothehighestpossiblesettingatthatmoment.Thisisindicated bytheflashingoftherelevantcontrolelement.
Inductionsounds
- Tickingsound
This sound can be caused at lower power level settings or by the automatic pot detection.
•Panmakessounds
Panscanmakesomenoiseduringcooking. This is caused by the energy flowing from the hob to the pan. Athighsettings, this is perfectly normal for some pans. It will not damage either the pans or the hob.
• Ventilatormakessounds
To increase the lifespan and performance of the electronics, the appliance is equipped with fans. During intense appliance use, the fan is activated to cooldown the appliance, and you will hear a buzzings sound. The fan still runs for several minutes after the hob has been switched off.
Pansforinductioncooking
Induction cooking requires a particular type of panintermsof quality.
Pansthathavealreadybeenusedforcookingonagashobarenolongersuitableforuseonan inductionhob.
Onlyusepansthataresuitableforelectricandinductioncookingwith:
•athickbaseofaminimumof2.25mm;
- aflatbase.
TIP!
You can check for yourself whether your pans aresuitable using amagnet. A pan issuitable if the base of the pan iss sufficiently attracted by them magnet.
| UnsuitableSuitable | |
| EarthenwareSpecialstainlesssteelpans | |
| StainlesssteelClassInduction | |
| PorcelainSolidenamelledpans | |
| CopperEnamelledcast-ironpans | |
| Plastic | |
| Aluminium |

WARNING!
Becarefulwithenamelledsheet-steelpans:
- theenamelmaychip(theenamelcomesloosefromthesteel)ifyouswitchthehobonata highsettingwhenthepanis(too)dry;
- thebaseofthepanmaywarp-forexample:Duetooverheating;
•heatenamelledpansslowly.
Neverusepanswithamisshapenbase.Aholloworroundedbasecaninterferewiththeoperation oftheoverheatingprotection,causingtheappliancetobecometoohot.Thismayleadtothe glasstopcrackingandthepanbasemelting.Damagecausedbyusingunsuitablepansorboiling dryisexcludedfromtheguarantee.
Pandiameter
Thediameterofthebottomofthepanmustbeatleast12cm.Youwillachievethebestresultsby usingapanwiththesamediametaresthecookingzone.Ifapanistoosmall,thezonewillnotwork.
Pressurecookers
Inductioncookingisverysuitableforpressurecookers. Thefast-reactingcookingzonebringsthe pressurecookertopressurequickly. As soon as youswitchoffacookingzone, the dish stops cookingimmediately.
Pandetection
The cooking zone automatically detects suitable pan placed on a cooking zone. The cooking zone display lightsup.
Integratedpanrecognition
Ifacertainpowerlevelissetforacookingzoneandthereisno(suitable)panonthecookingzone, thecookingzonewillnotdeliveranypower. Afteracertainperiod, thecookingzonewillswitchoff automatically.
Grillplates
ThehobhasaGrillfunction(dependingonthemodel)forusingagrillplate. Thefunctionkeeps the grillplateatanidealtemperatureforgrilling.
Cookingsettings
Because the settings depend on the quantity and composition of the pan and its contents, the table below is intended as a guideline only.
| PurposeLevel | |
| Usesettings1-5to: | •simmerbouillon,•stewmeats,•simmervegetables,•meltchocolate,•poach,•meltcheese. |
| Usesettings6-9to: | •completethecookingoflargequantities,•defrosthardvegetables,•frythickslicesofbreadedmeat. |
| Usesettings10-11to: | •frythickpancakes,•frybacon(fat),•cookrawpotatoes,•makebreadedfish,•cookthroughfish,•frythinslicesofbreadedmeat. |
| Usesetting12to: | •searmeats,•cookfish,•cookomelettes,•fryboiledpotatoes,•deepfryfoods. |
| Usesettingboostto: | •bringliquidstoaboilquickly,•shrinkgreens,•heatoilandfat,•wok. |
Using the extraction module
The extraction module is equipped with a movable tower. Using the tower in the raised position, the extraction module will catch vapour more effectively, especially when using tall pans.
- Thetowerhastwopositions;loweredandraised. Thepositioncanbechangedbytouchingthe towerup/downkey. Bydefault, thetowerrisesautomaticallywhentheinductionhobisoperated. Thiscanbechangedinthe'Settings'menu.
- Change the extraction setting with the - (minus) and + (plus) keys for the fan (1-4 and boost).
Settingtheextractionlevelto'0'willmanuallyswitchofftheextractionmoduleoractivatetheAir-Dry functionifnecessary.UseSynchroStoptoautomaticallyswitchofftheextractionmoduleupon switchingoffthehob.
Whenthetowerup/downkeyistouchedduringmovement,thedirectionofmovementisimmediately changed. Also,ifupwardmovementisobstructed(byanobjectforexample)thedirectionof movementchanges.

WARNING!
Makesurenoobjectssobstructthetowerinitsmovement.Anyobjectthatisliftedortiltedmay damagethehobandcreateahazard(forexample,spillinghotcontents).

INFORMATION!
Normaloperationoftheinductioncookinghobelectroniccomponentsrequiressufficientair circulation.
NOTE!
Disablesetting'Automaticraisingofthetower'ifitisundesirableforthetowertoriseautomatically whentheextractionisswitchedon.Seechapter'Settings'.
If the hobisswitchedoff (manually or automatically) while the tower is in ther raised position, the tower automatically lowers.
Automaticextraction
The extraction module has three automatic extraction settings (see chapter 'Settings'):
- Synchro Control: Extraction is automatically controlled when a cooking zone is operated (the higher the power level of the cooking zone, the higher the extraction). Synchro Control overerrides Synchro Start.
- Synchro Start: Extraction switches on at a fixed setting when a cooking zone is operated. Set the fixedsettingviathesettingsmenu.
- Synchro Stop: The extraction module is automatically switched off and is set to the Air-Dry functionifnecessaryuponswitchingoffthehob.
Placingpansandlids
text_image
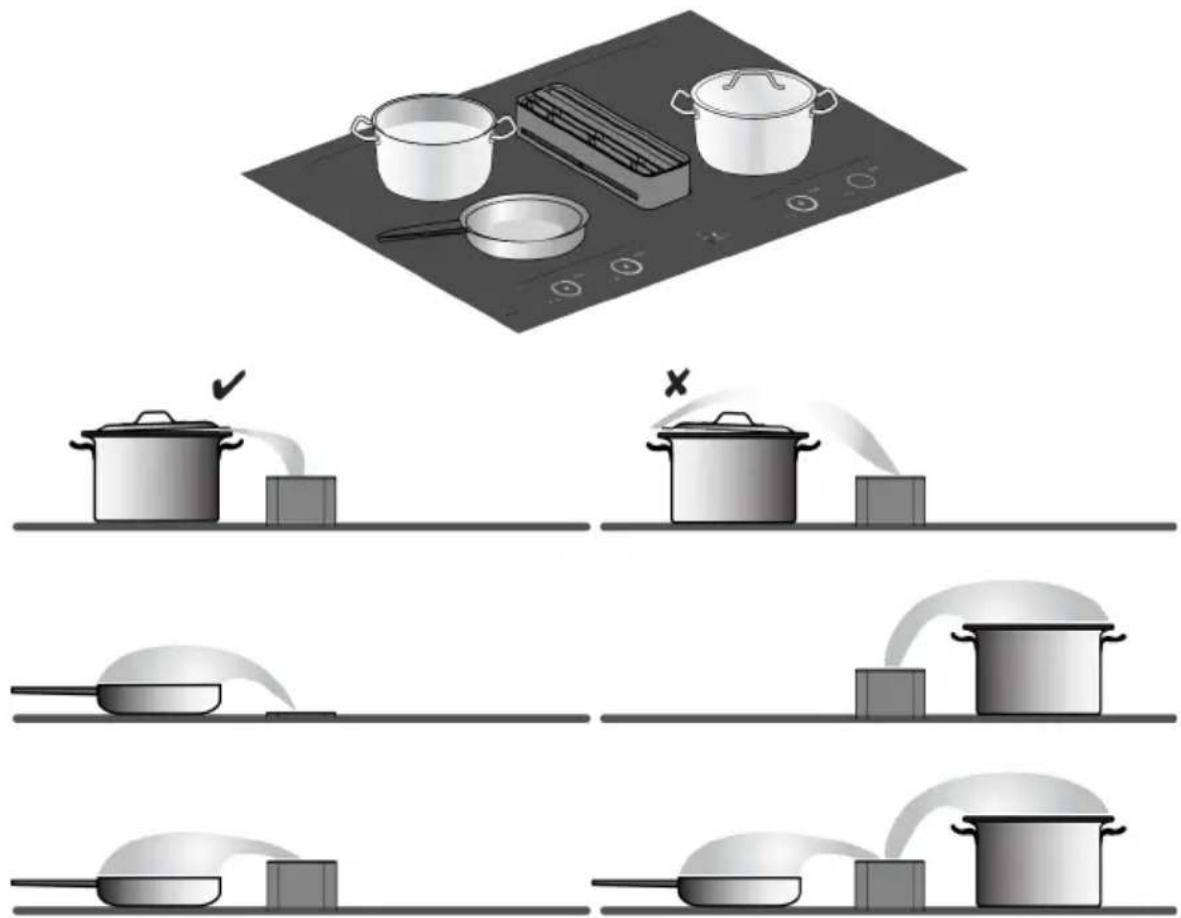
Illustration showing cooking process with pots, stove, and cooking equipment, including a checkmark and cross symbols indicating action steps.Werecommendplacingpansasclosetothetoweraspossible,withinthedimensionsofthecooking zones.Ifalidisused,placeitatanangleonthepanwiththeopeningtowardsthetower.This ensuresoptimalextraction.
TIP!
Theuseoflidshasadvantages:
- Theheatremainsinthepansothatthecontentsreachthedesiredtemperaturefaster. The energyconsumptionisconsequentlylower.
- Mostcookingvapourscondenseonthelid,allowingforless(moist)airextraction.With recirculation,humiditylevelsincreasesignificantlylessasaresult.Inaddition,theexhaust modulecouldrunatalowernoiselevel.
Usethetowerintheraisedpositionforgreatereffectiveness,especiallywhenusingtallpans.
Air-Dryfunction
TheAir-Dryfunctionensuresthattheextractionchannelsandgreasefiltersareblowndry. After10minutes,theAir-Dryfunctionswitchesoffautomatically.
Cleangreasefilterindicator
The extraction module has a filter indicator. This indicator flashes when the grease filters need to be cleaned. Three use intensities can be set, which determine the cleaning interval of the grease filters. By selecting the correct intensity of fuse based on cooking habits, the filters will not need to be cleaned more than necessary.
Seethetablefortherequiredgreasefiltercleaninginterval.
| IntensityofuseIndication | Filtercleaningafter (hour): | |
| L1 | oils. | 40Cookingandfryingwithlittleuseof |
| L2(default) | andoils. | 20Cookingandfryingwithmoderate |
| L3 | andoils. | 10Cookingandfryingwithlotsofused |
| off | (beforesignalledbythefilterindication).Thefilter indicationcanthenbereset.Note!Alwaysreset thefilterindicatoraftercleaningthefilters.Inthe 'off'setting,thefilterindicatorappearsonlyifyou havenotcleanedthefiltersforalongtime. | 40Manual:Thefilterscanbecleaned |
Replacerecirculationfilterindicator
The extraction module has a filter indicator. This indicator and the letter 'r' on the display flash when therecirculationfilterneedstobereplaced.
There circulation filter has a replacement interval of 300 operating hours. See 'Replacing the recirculation filter' in chapter 'Maintenance'.
Operation
StartPreparing
Threeecookingmodesareavailable:
- Standard cooking with power levels.
- CookingwiththePLUSmenu.
- Cooking with Celsius ^ Cooking ^TM by measuring cookware temperature (available depending on the model)
Standardcooking
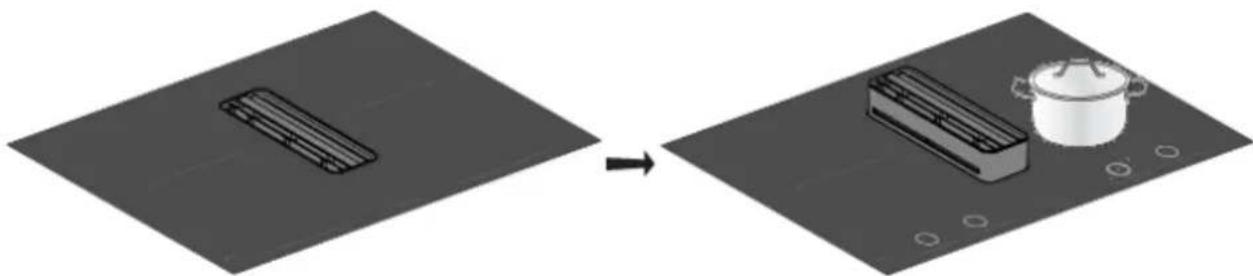
- Placeapanonacookingzone.
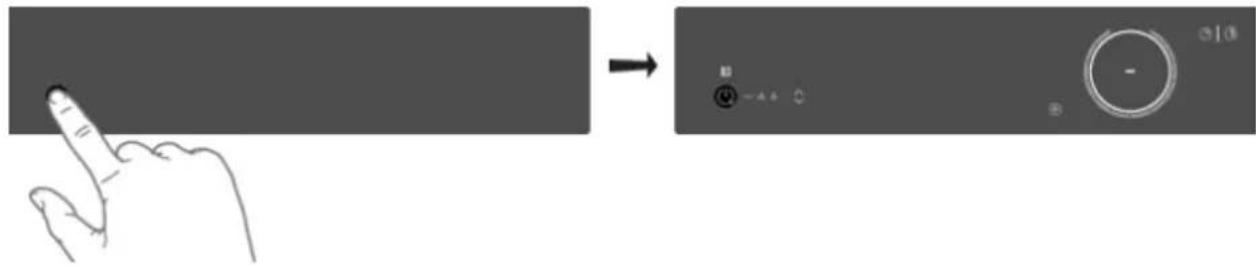
- Touchtheon/offkeytoswitchonthehob.
text_image
Diagram showing a hand interacting with a screen before and after adjustment, with control buttons labeled in Chinese.• Asingleaudiosignalsounds.
• Theinnerringswilllightup.
- All the sliders light up; then they gradually go out. The slider only remains lit for the selected cookingzonesonwhichyouhaveplacedapan.
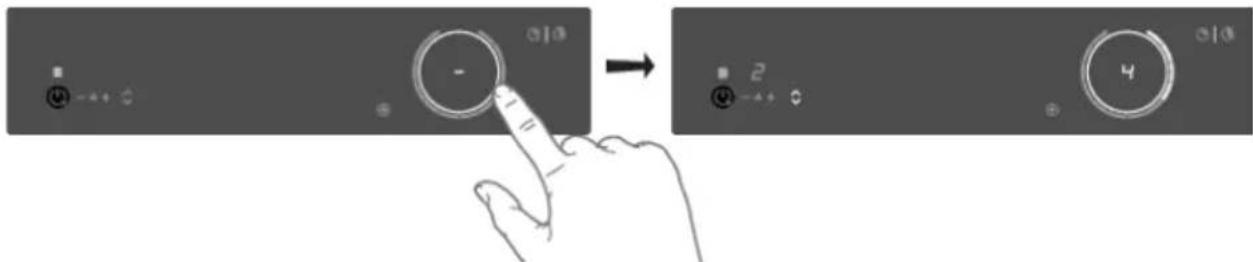
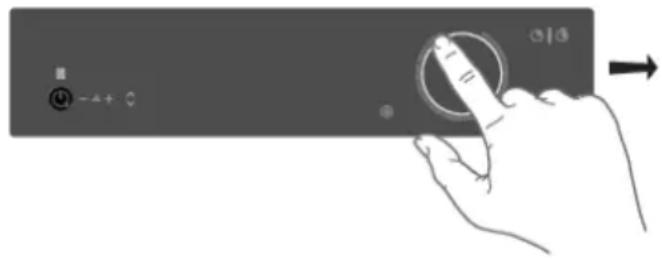
3.Slidewithyourfingerovertheslidecontrol(clockwise)ortapwithyourfingerontheslidecontrol tosetthedesiredsetting.
text_image
Diagram showing finger pressing a button on a device interface with labeled buttons and directional arrow- Thecookingzonestartsautomaticallyatthesettingthathasbeenset.

WARNING!
Dependingonthesettings,thetowercanmoveupanddownautomatically.
natural_image
Diagram showing a cooking process: a rectangular stove being added to a pot on a flat surface, with no text or symbols present.- Setahigherorlowersettingbyslidingovertheslidecontrolwithyourfingerorbytappingon theslidecontrol.
- The cooking zones have 12 settings. There is also a 'boost' setting.
- Removethepanortouchthesliderfor3secondstoswitchthecookingzoneoff.
NOTE!
Whennocookingzoneisactivefor60seconds,thecookinghobwillpoweroff.
Boost
You can use the 'boost' function for cooking at the highest power level during a short time (max. 10minutes). After them a maximum boost time has passed, the power will be reduced to setting 12.
- Placeapanonacookingzone.
- Touchlevel12ofthesliderorslidealonglevel12tosettheboostlevel.Touchlevel12twiceif 'AutoBoost'isoff(refertochapter'Settings').
text_image
Diagram showing a hand pressing a button on a device control panel with labeled buttons and an arrow indicating action.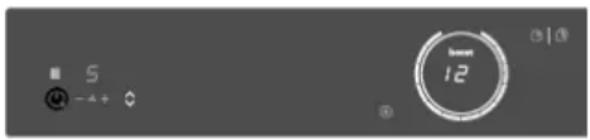
text_image
5 -4 + 12 0• '12' and 'boost' appear in the display.
- If 'Auto Boost' is active, boost is automatically activated when power level 12 is selected (consultchapter'Settings').
- Todeactivatetheboostfortheselectedcookingzone,againtouchlevel12ontheslider.
NOTE!
Toavoidoverheating, the electronic control system may automatically deactivate boost prematurely and decrease the power level to 12.
If there is nosuitablepanonthecookingzone, the setleveloftemperaturewillflash. Afterone minute, the cookingzonewillbeswitchedoff.

CookingwiththePLUSmenu
ThePLUSmenuallowscookingwithsemi-automaticprograms,enablingtemperaturecookingfor allkindsofcookwarethatfittheprogram'spurpose.
- Touch the PLUS menu key to display the program line: keeping warm/ heating up, frying/wok, and grill.
- WhenselectingtheGrillprogram,youmustuseagrillplatethatcoverstwolinkedcooking zones.
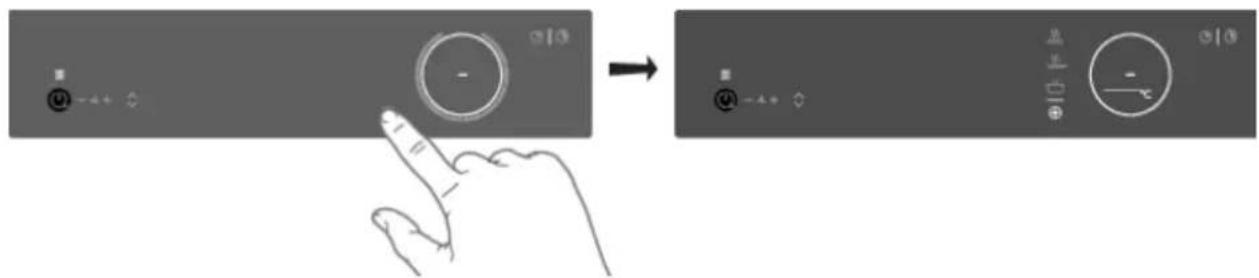
text_image
Diagram showing a hand interacting with a touchscreen device before and after transformation, with control buttons and directional arrows visible.- Select the desired program and temperature range by touching there relevant symbols. You can also toggle through them to warm temperature by long-pressing there relating touch key.
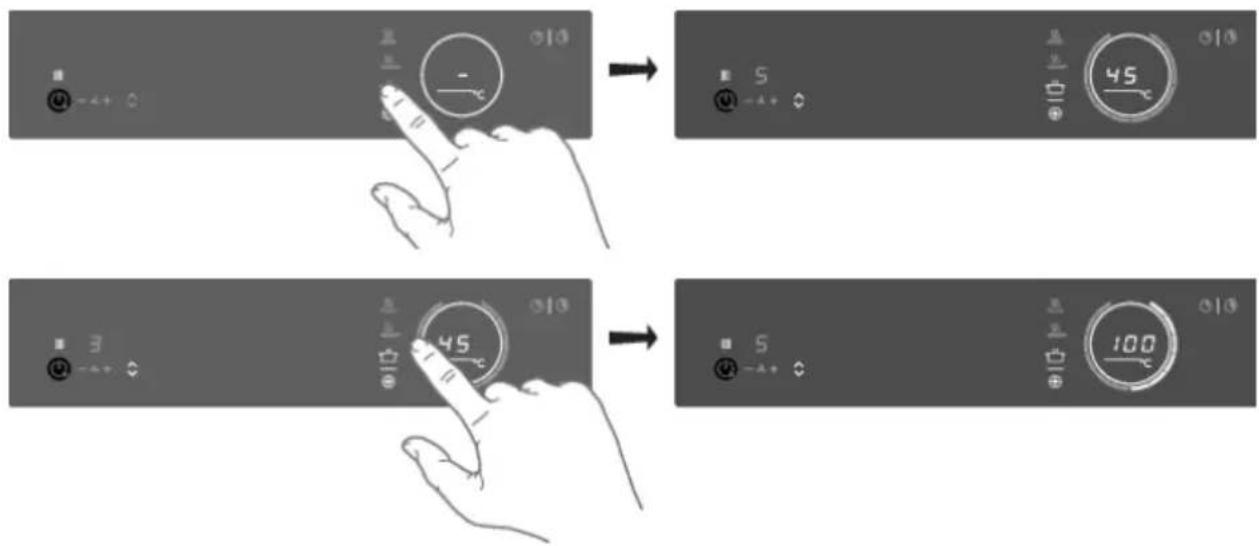
text_image
Diagram showing hand press application of a device control panel with numeric display and adjustment controlsWhen the program temperature selection does not change for 3 seconds, the program is activated. Todeactivate a PLUS program, press the active program key for about three seconds or select a power level manually.
NOTE!
Alwaysaddwater, oilorbutterbeforestartingaprogram; donotuseanemptypanorpot.
KeepingwarmandHeatingup
| UseTemperature(°C) | |
| meltchocolate45 | |
| heatingup/keepingwarm70 | |
| simmervegetables94 | |
| bringfoodorliquidtotheboilquickly100 |
Frying/wok
| UseTemperature(°C) | |
| fish,bacon,friedegg,vegetablesinbutter140/160 | |
| schnitzel,sausages,jacketpotatoes180/200 | |
| wok220 |
Grill
ThisfunctionisexclusivelyforconnectedBridgeInductioncookingzonesthatarecombinedtoformalargercookingzone.
GrillingisoptimizedforATAGinductionaccessories:thegrillplateandtheteppanyaki.Itwillalso workwithdifferentcookware,butperhapslessaccurate.
Some functions are indicating the heat uptime, counting down. In the heating-up stage, the slider and the set temperature will flash. When the set temperature is reached, as short beep will be emitted, and the slider will be constantly lit. You may then start cooking.
ThesensorwhichmeasuresthetemperaturewhilecookingwithinthePLUSmenuprogramsislocated intheglassbelowthecookware.Becauseofthis,thereisalwaysanoffsetbetweenthesetpointand theactualtemperatureofthecontentinsidethecookware.Thetemperatureofthecontentinside thecookwareisthereforealsodependentonfactorssuchasthetypeofpan,thevolumeofliquid andwhetheralidisplacedonthepan.
NOTE!
Uptoatemperatureof94°C, theprogramsallowthehobtoreachandmaintaintheset temperatureautomaticallybymeasuringtheglasssurfacetemperature. Thiswillavoidliquids overflowingandburningonthebottomofthepan.
NOTE!
From 100°Contheseprogramswillheatcookwarewithdifferenttimedpowersteps. Theset temperatureservesasanindicationoftheapproximatelytobereachedtemperaturerange. Someone mustalwaysbepresenttosupervisethecookingprocess.
NOTE!
For more accuracy, Celsius ^° Cooking ^™ cookware such as Frying Pan, Chef's Pot or the Probe is recommended, with separate functions for it (see chapter 'Cooking with Celsius ^° Cooking ^™ ).
NOTE!
Startingthesemenufunctionsatthebeginningofthecookingprocesswillgivethebestresults. Analreadyhotsurfacewillinfluencetheperformance.
CookingwithCelsius°Cooking™
Introduction
WelcometoCelsius ^° Cooking ^TM .
TheCelsius ^° Cooking ^™ programshavebeendevelopedincooperationwithHestanCue.Yournew inductionhobisfullypackedwithsmartfunctionsandfeaturesthatmakecookingeasierandmore pleasant.
In order to get the most out of these and explore what's possible with Celsius ^® Cooking ^™ , you can also buy some additional connected equipment that will help you gain total control over temperatures and timings.
Additionalaccessoriesareincludedwithsomemodels.
This equipment lets you unlock the full power of Celsius ^o Cooking ^TM , reading and communicating exact information about the temperature of your ingredients, giving perfect results. The equipment is:
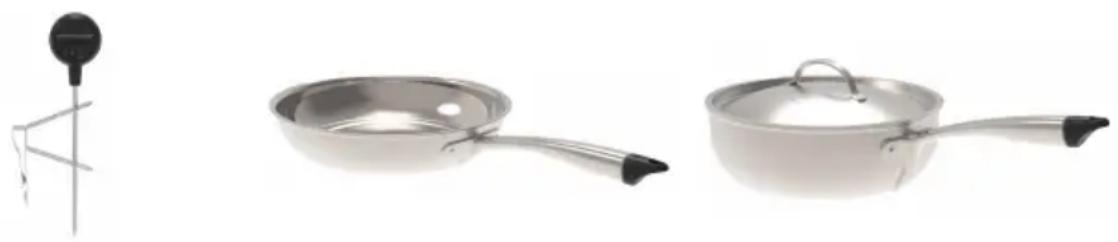
natural_image
Three kitchen utensils: a stand with a black bulb, a pan with a lid, and a pan with a handle (no text or symbols visible)Chef'spotFryingpanProbe
Findoutmoreatwww.celsiuscooking.com, www.atag.nl/www.atag.be.
▶ CookingwithCelsius°Cooking™cookwareandprograms
This option involves cooking using either the Celsius°Cooking™ (frying pan or pot's) that continuously measuresthetemperatureinsidethecookwareortheCelsius°Cooking™temperatureprobe.Alluse Bluetoothconnectiontosendinformationaboutthetemperaturetothecookinghob.
Preparingthesystem
Before you start cooking, please make sure you complete all the preparation steps. Otherwise, you may run into difficulties or inadvertently caused damage to the system.
Using Celsius ^° Cooking ^™ ensures the cookware is always at the right temperature needed to prepare the foodyouarecooking.
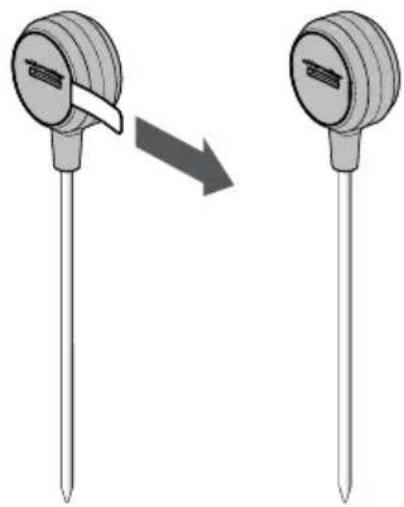
natural_image
Diagram showing a device being shifted from left to right, with no text or symbols present.PrepareCelsius ^° Cooking ^™ Probe
-
Pullthebatteryprotectionaboutofthe Celsius ^° Cooking ^TM Probehousing.
-
The Celsius ^° Cooking ^™ Probeisready to be used. If necessary, replace the battery.

text_image
Diagram illustrating the step-by-step transformation of a sensor or meter device with directional arrows indicating rotation and change.BatteryinstallationCelsius ^° Cooking ^TM Probe
-
Unscrewandremovethebatterycover andreplacethebattery(negative(-)side goesinfirst).
-
Replacethebatterycover. Donot overtighten.
InserttheCelsius°Cooking™Probeintoacookingpan
The Celsius ^° Cooking ^™ Probe can be used with different types and sizes of pans. Due to the use of asuspensionbracketwithdifferentholes,theProbecanbesuspendedindifferentways.
Operation
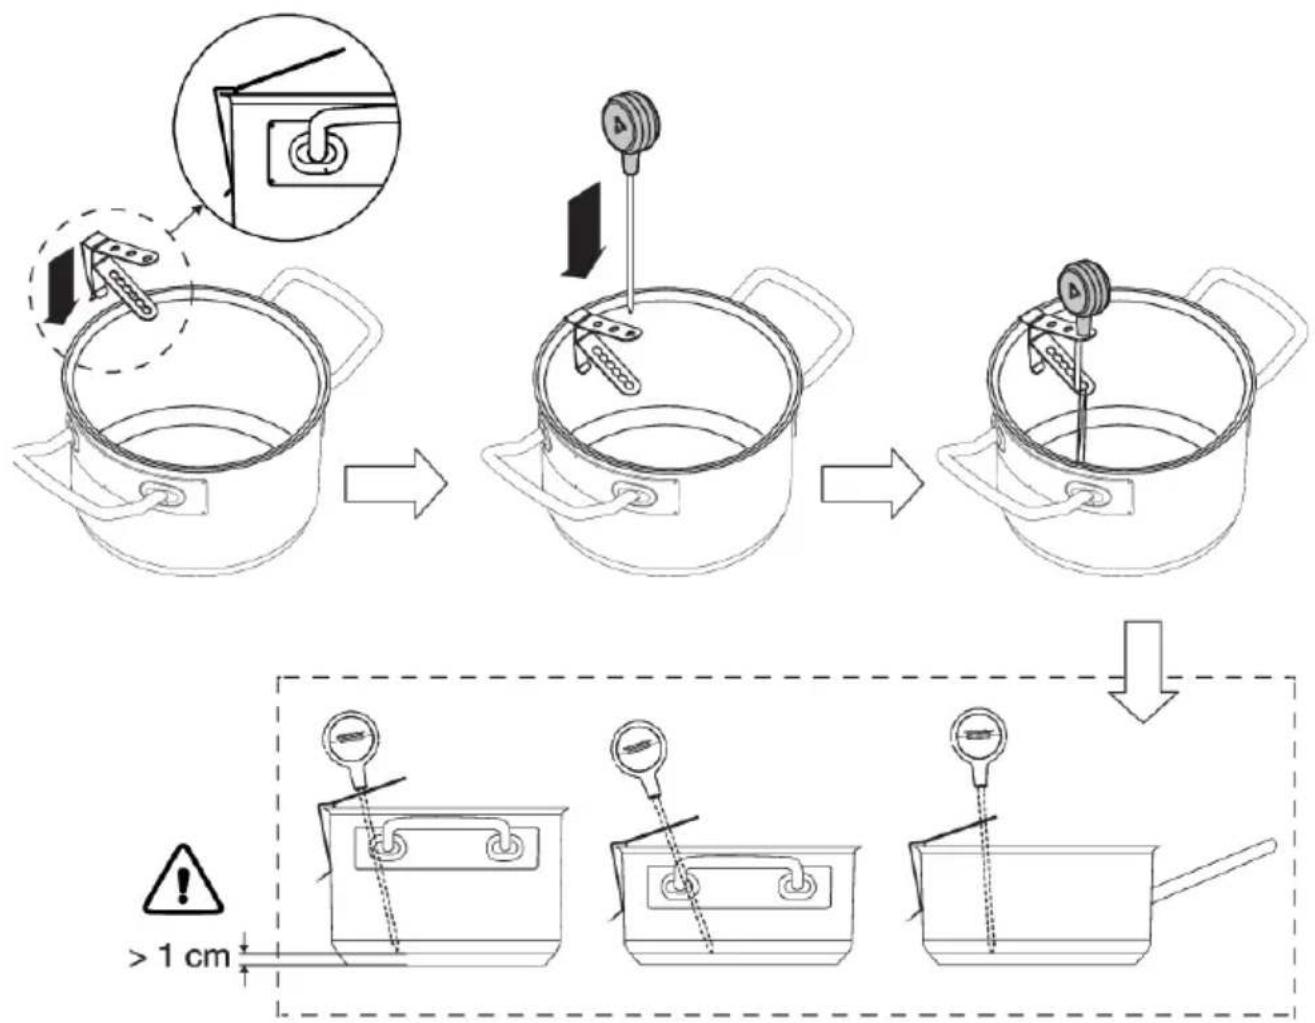
text_image
Diagram illustrating cooking process steps with labeled components and a warning sign indicating distance to 1 cm.1.Slidethesuspensionbracketoverthepanedge.
2. Insert the probe into the suspension bracket from above.
NOTE!
- Leaveaminimumdistanceof1cmbetweenthepanbaseandthemeasuringpointofthe probe!
- Incasetheconnectivitybetweencookwareandthehobisunstable,thiscouldbeduetoalowbattery.Inthosecases,werecommendchangingthebattery.
text_image
Diagram illustrating a medical procedure involving a needle inserted into a bowl, with magnified views showing the insertion and dissection steps.Celsius ^° Cooking ^™ Cookware
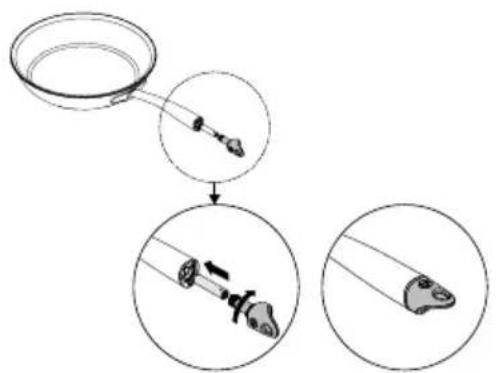
- InsertanAAAbatteryinthepanhandle (negative(-)endgoesinfirst).
- Insert the handle end into the pan handle and turn a quarter to secure.
NOTE!
Donotexchangethehandlecapofachef's pot(31620)withthatofafryingpan(31619) orviceversa.
Assigningthecookwaretothecookingzone
Switchonthehobandwaituntiltheendofthestart-upanimation.
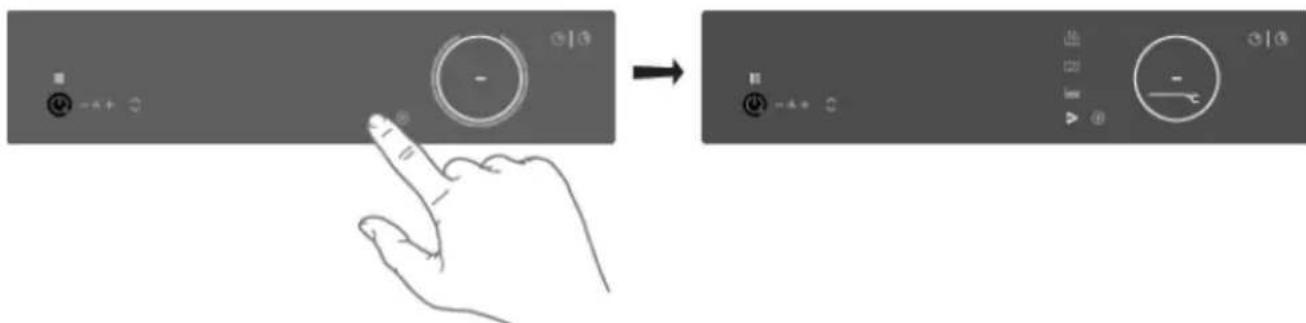
Place the Celsius°Cooking™ cookware or a regular pan fitted with the Celsius°Cooking™ probe on thedesiredcookingzone. Afterithasbeendetected, quicklytaptwicewithyourfingertiponthe sensorintheendcaportheprobehousingtoactivateit. ThentheCelsius°Cooking™modekey will immediately light up. To assign the probe, the Celsius°Cooking™ mode key will light upon every possiblecookingzone. PresstheCelsius°Cooking™modekeyofthedesiredcookingzone. The Celsius°Cooking™menuwillbeopened. Withashortpressagain, itcanbeclosed.
text_image
Diagram showing a hand interacting with a device control panel before and after transformation, with labeled buttons and icons.CookingwiththeembeddedCelsius°Cooking™programs
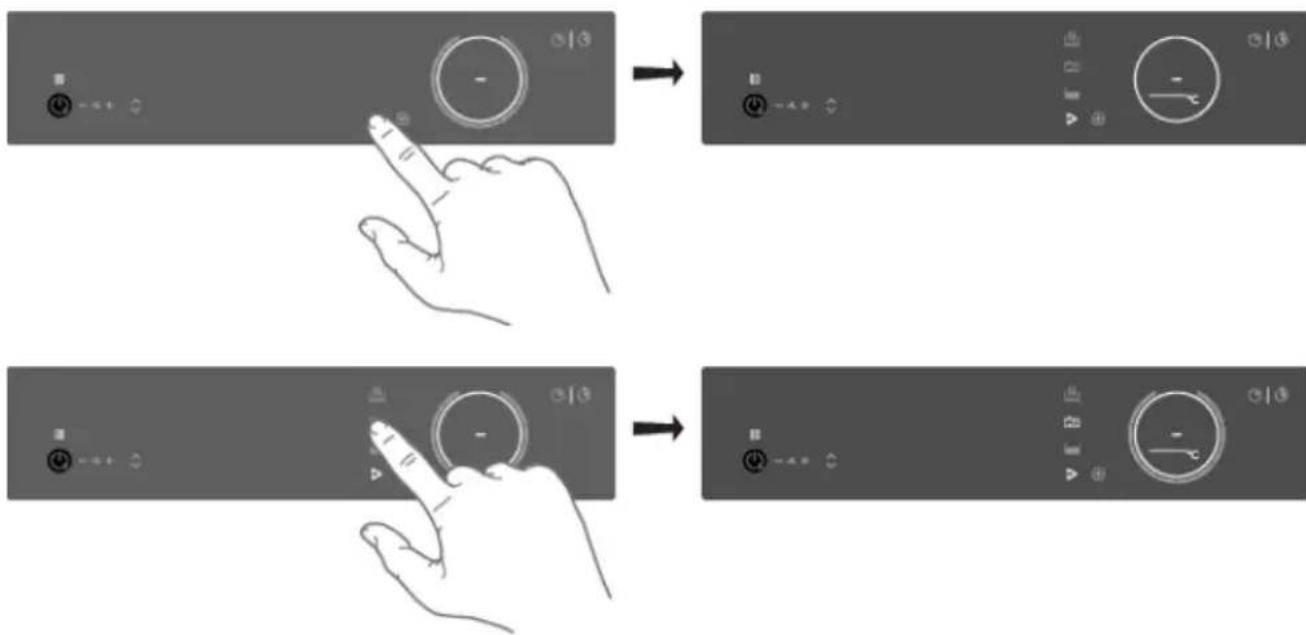
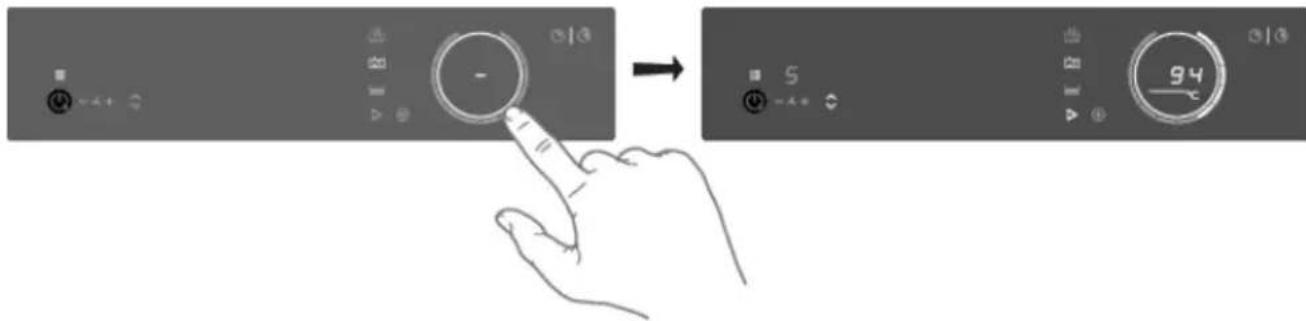
The hob comes along with integrated Celsius°Cooking™ programs, optimized for Celsius°Cooking™ cookware.Withtheopenedmenu,3differentcookingmethodscanbechosen,withdifferent temperatureranges.Iftheprobeisused,onlytwosuitableCelsius°Cooking™methodsareshown. Usetheonethatfitsthedesiredpurpose:
flowchart
graph TD
    A["User Interface"] --> B["User Interface with Button"]
    B --> C["User Interface with Display"]
    C --> D["User Interface with OK/Cancel buttons"]
Operation
text_image
Diagram showing a hand interacting with a device control panel, with icons and a numeric display showing 94.Heatingupandfrying
Thisprogramistoreachhightemperaturesrapidly.Highpanbottomtemperaturescanbereached. Always add oil or butter before starting it. For healthy cooking don't exceed the smoke point of the usedoil.
Boilingorcookingwithwater
Withthisprogram,thewatergetstoboilquickly.Alwaysaddwaterbeforestarting.
Slowcookingorsousvide
This programistocontrollowtomediumtemperatures, preventing high bottom temperatures. Larger quantities and thicker dishes need to best red occasionally to ensure a homogeneous heat distribution.
Usingtheprobeasacookingthermometer
WhenaCelsius°Cooking™probeisuseditcanalsobeusedasathermometertojustmonitore.g. thecoretemperatureofacertaindish.ThiscanbedoneonnormallevelcookingorPLUSmenu programs.Tousetheprobeasthermometer,liftupthepanyouwanttouseforafewseconds,place itbackonthezoneandactivatetheprobebytapping.WhentheCelsius°Cooking™symbolappears onthedisplay,touchit.

INFORMATION!
PleasemakesurethattheapplianceisalreadyswitchedonbeforeplacingtheCelsius°Cooking™ cookwaresothatthesystemcanclearlyidentifyitsposition.
TIP!
WhentheCelsius ^° Cooking ^™ Probeisrecognizedonacookingzone,itcanalsobeusedasa thermometer.Thedisplaythenshowsthetemperatureinsteadofthepowerlevel.Asthepower levelchanges,itistemporarilydisplayedinplaceoftheactualtemperature.
Proberemovaldetection
If the probe is moved out during cooking, the hob will detect that and stop heating. When placed back, the user can confirm that by touching the now blinking Celsius ^ Cooking ^™ mode button, or it might get re-detected automatically.
E.g.addingcoldwatertothepotmighttriggerthisdetectiontoo!
Step-by-StepcookingguideonCelsiusCooking.com

text_image
QR code image containing encoded data, no visible human-readable textThebest-tastingfoodispreparedattherighttemperatureandforthe rightlengthoftime. Theabilitytosettemperatureinsteadofpowerlevels supportedbyhow-to(video)guidanceletsyoucreatechef-likemeals cookedtoperfection.TheCelsiusCooking.Comwebsiteisfullofinspiring recipeswithstep-by-stepinstructionsbasedonchef=testedtechniques guidingyoutopreparedeliciously,fail-proofrecipesoverandover again.
CelsiusCooking.com
- Whether you are a chef or a beginner, CelsiusCooking.com is going to help you cook better food moreoftenbyactingasyourguideinthekitchen.You'lllearnnewtechniques,novelcombinations, andgainconfidenceinmoredifficuldishes.Insteadofjustcookingatapowerlevel,youwill becookingatanexacttemperaturelevel.
- Our recipes lead you through the process of 'Mise en place' where you'll gather and prepare all of your ingredients in advance. This is particularly important following the recipes on Celsius Cooking.com as each recipe has been carefully timed to give you the perfect results.
- Just follow the steps. The timing and temperature guide will make sure your food is prepared to perfection. It may take some getting used to, but you will end up with an even better meal.
Switchingoffthecookingzone
Switching off a Celsius ^ Cooking ^™ controlled zone is possible by setting the temperature to zero (0). The display will show a dash. Alternatively, touch the Slider or the Celsius ^ Cooking ^™ key from the zone to be switched off for at least 3 seconds to deactivate the Celsius ^ Cooking ^™ mode completely.

INFORMATION!
WhiletheCelsius°Cooking™probeisusedtocontrolthetemperatureofthecontentinsideapan (e.g.waterorsoup)theCelsius°Cooking™cookwareiscontrolledonthepanbottomtemperature. Duethothis,thereisalwaysanoffsetbetweentheset-pointandactualtemperatureofthecontent INSIDEthecookware.When,e.g.trytoboilaliquidontheCelsius°Cooking™cookwaremay benecessarytosetahighertemperaturetoreachtheboilingpoint.Reachingtheboilingpoint isalsofurtherdependentonthevolumeoftheliquidandwhetheralidisplacedontopofthe cookware.Furthermore,regularstirringimprovesthisbehaviour,evenwhencookingwiththe probe.
Bridgelnductionzone
TheBridgelnductionzonescanbelinkedtogether. Thiscreatesonelargezonethatcanbeused, forexample,foralargefishpanorvariouspansatthesamepower.
- Pan position recognition is activated automatically after the appliance is switched on. When a panisplacedonthehob, thepanrecognitionfunctionrecognizesitspositionandautomatically bridgesthecookingzonesdependingonthesizeofthepan(onlyifthehobwasalreadyswitched on).
- If the Bridge Induction zones are linked, they cannot be set to boost and themenu functions cannot be used.
• Use a fish pan or other pan covering at least one of the Bridge Induction zones in the middle.
Operation
ConnectingBridgeInductionzones
- Placealargepanonbothcookingzonessothatbothzonesarewellcovered.
- Ifthebrd (auto-connecting)functionisactive,thezonesarelinkedautomatically(consult chapter'Settings').
- Touch the sliders of both left for both right cooking zones.
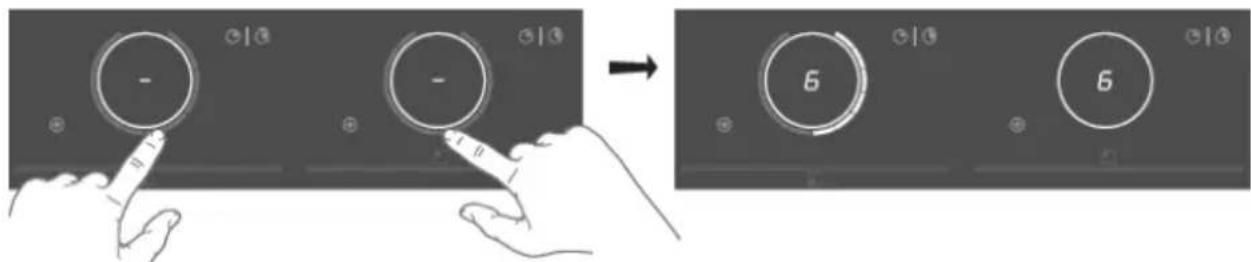
text_image
Diagram showing finger pressing a button on a device, with two states of change to state 6- The power level or temperatures are displayed simultaneously on both connected cooking zones.
- Use the slider of the front cooking zonetosetthedesired cooking setting forthelinked cooking zones.
- Touch both sliders again toun link the cooking zones.
Pause
Thepausefunctioncanbeusedtopausetheoperationoftheentirecookinghobforupto10minutes. Thus,youcanwalkawayfromtheapplianceorsafelycleanthecookinghob,withinashortperiod, withoutlosingyoursettings.
Switchingonthepause
Atleastonecookingzonemustbeactive.
Touchthepausekey.
- Youwillhearashortbeep.
- Thesettingsonallactivehobsarereducedtolevel2.

text_image
Diagram showing a hand interacting with a touchscreen controller, labeled with controls 8 and 2, and a numeric input box.- Alltimerfunctionsarepaused.
• Thepausekeyflashes. - Allkeysareinactiveexceptthepauseandon/off-key.
Ifnokeyistouchedwithin10minutes,allactivehobsautomaticallyturnoff.
Celsius°Cooking™programsarenotpausedsincetheyareaautomaticallyoperated.
Switchingoffthepause
Touchthepausekeyagainwithin10minutes.
• The hob continuesto operate with the same settings.
Childlock
The cooking zones can be locked to prevent them from being switched on inadvertently.
- Touchtheon/offkeytoswitchonthehob.
2.Touchtheon/offkeyforapproximately3seconds.
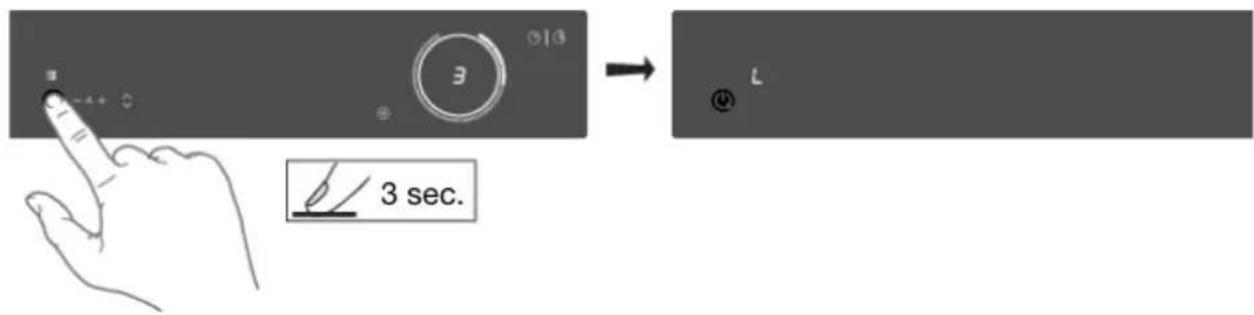
text_image
3 sec.• Theindication'L'appearsonthedisplayandthehobcontrolsarelocked.
- Proceedingsamewaytounlockthecontrols.
- When touching and holding the on/off key, 'L' appears on the display and then disappears. The controls are unlocked.
Timefunctions
Everycookingzonehastwotimers:acount-downtimerandastopwatch(count-uptimer).

Count-downtimer
Thecount-downtimermakesthecookingprocesseasierbysettingthecookingtimefortheselected cookingzone.Whenthetimesetonthetimerexpires,thecookingzonewillautomaticallyswitchoff andemitanacousticsignal.Youcanswitchofftheacousticsignalbytouchingthecount-downtimer key;alternatively,itwillswitchoffautomaticallyafterawhile.Youcansetthecount-downtimer independentlyforallcookingzones.
Settingthecount-downtimer
- Touchthecount-downtimerkeyofthedesiredactivecookingzone.
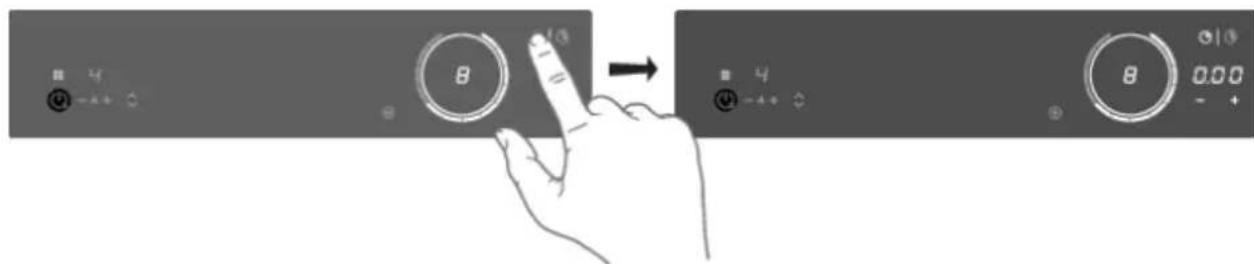
text_image
Diagram showing hand press on a device control panel with numeric display and directional arrow- Thecount-downtimerkeyand000willflashonthecookingzonedisplayunit.
Operation
- Set the desired cooking timewith + (plus) and - (minus) touch keys.
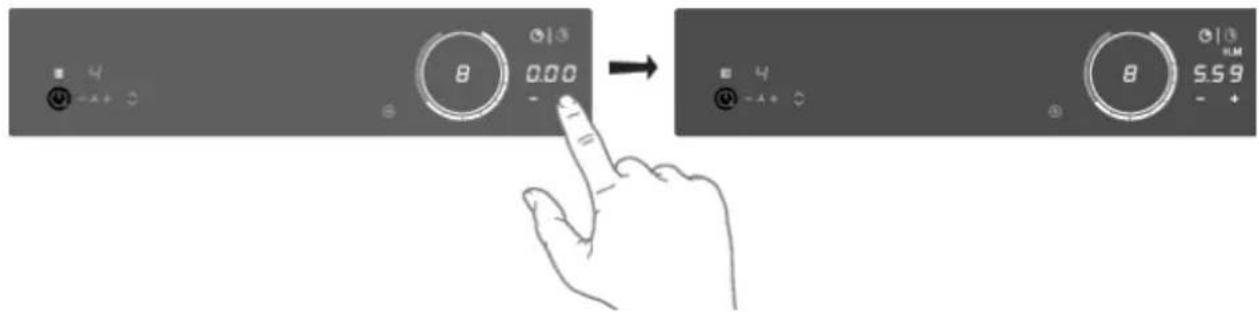
text_image
4 0.00 8 - → 4 -+ + 8 5.59 - +- Touchthe-(minus)keytoincreasethetimeinhours. Touchthe+(plus)keytoincrease the timeinminutes. Then, ifdesired, touchthe-(minus)keytodecreasethetimeinminutes.
- If the time is not set within five seconds, the count-downtimer is disabled.
- If desired, repeat the same step to set the count - downtimer for another active cooking zone.
- When a Celsius ^ Cooking ^™ program is active, the timer will start counting down when the programreachesthedesiredtemperature.
TIP!
If you movethepan from the cooking zone, all timer functions set forth at cooking zonewill be paused.
Deactivatingthecount-downtimer
Longtouchthecount-downtimerkeyofthedesiredactivecookingzone.
- Thetimerisswitchedoff.
- Deactivating the count-downtimer alarm.
- When the set time expires, alarm will be sounded, the key for the relevant cooking zone will flash, and 0:00 will flash on the count - downtimer display unit.
- Toacknowledgeandstopthealarm,touchthecount-downtimerkey,orremovethepanfrom thecookingzone.

Cookingtimedisplay—stopwatch
Thestopwatchcanbeusedtoseehowlongyouhavebeencontinuouslycookingontheselected cookingzoneandstartscountingautomaticallyinthebackground.
Touchthestopwatchkey.
- Thestopwatchtimewillbedisplayedonthecookingzonedisplayunit.
- Thestopwatchcanberesetifyoupressthestopwatchkeyfor3seconds.
Operatingtheextractionmodule
The extraction module is set to Synchro Control by default (see 'Automatic Extraction' in the 'Use' chapter). In SynchroControl, the extraction module keys/indicators are dimmed. Thesuction is adjusted according to the use of the cooking zones. Setting 5 (boost) is atemporary setting in SynchroControl too. The tower automatically rises when the extraction module becomes active (if the setting 'Automatic raising of the tower' is switched on).
NOTE!
Disable setting 'Automatic raising of the tower 'ifitis undesirable for the tower to fort or is automatically when the extraction is switched on. See chapter 'Settings'.
Settingtheextractionlevelmanually:
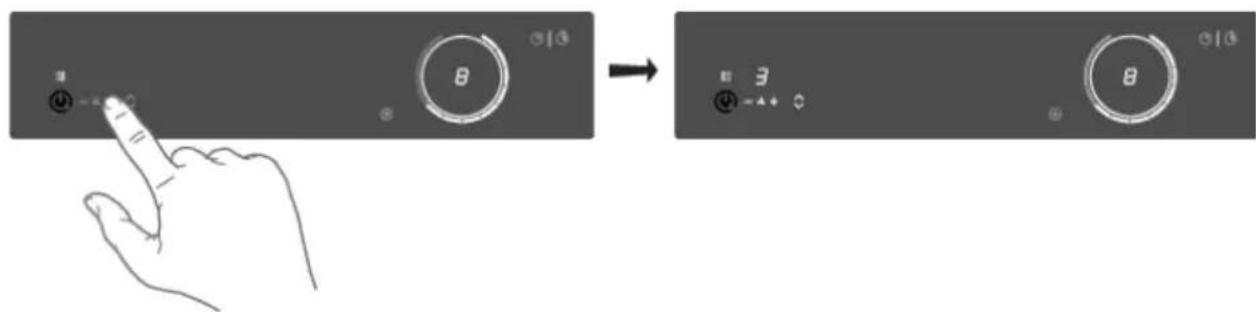
- Touchthe+(plus)keytostarttheextraction.
- Towerrises(if'Automaticraisingofthetower'isenabled).
text_image
Diagram showing a hand interacting with a control panel, displaying '8' and '3' buttons before and after transformation.-
Usethe+(plus)and-(minus)keystosetthedesiredextractionlevel.
-
Thereare4extractionlevelsandaboostlevel(level5)available.
- Longtouchthe+(plus)touchkeytodirectlyselectboostmode.
• After 10 minutes, the boost level automatically switches back to setting 4.
NOTE!
Simplytouchthe-(minus)or+(plus)touchkeytooverrideSynchroControl.WhenSynchro Controlisoverruled,simultaneouslytouchthe-(minus)and+(plus)touchkeystosettheextraction toautomaticoperation(SynchroControl).
Operation
Raisingorloweringthetowermanually:
Touchthetowerup/downkey.

text_image
Diagram showing a hand interacting with a device control panel, labeled with 'B' and directional arrows.- Thetowerrises.
- Touchingtheup/downkeyagainwhilethetowermovesup/downreversesthedirectionof movement. If somethingstopsthetowerwhileitismovingup, thetowerwillmovedownagain.
Air-Dryfunction
TheAir-Dryfunctionisautomaticallyactivatedassoonastheextractionmoduleisswitchedoff.If thecookingareaisalreadyswitchedoff,theAir-Dryfunctionisautomaticallyactivatedassoonas theextractionmoduleisalsoswitchedoff(bysettingtheextractionlevelto'0').
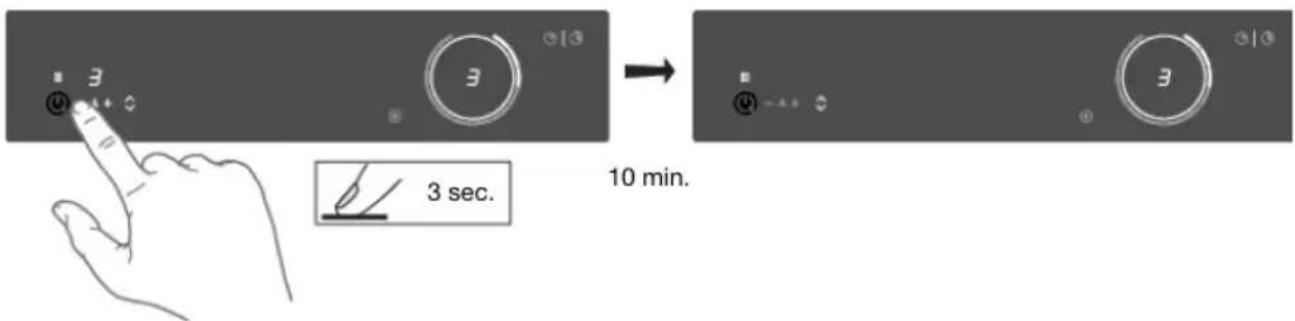
Touchthe-(minus:keyfor3secondstoactivatetheAir-Dryfunctionduringcooking.
text_image
3 3 3 3 3 3 sec. 10 min.• The extraction indicator pulses (dimmed).
- SwitchofftheAir-Dryfunctionatanytimebytouchingthe-(minus:keyfor2seconds.
• After 10 minutes, the Air-Dryfunctions switches off automatically.

ConnectLife-appendWi-Ficonnection
ThehobisequippedwithaWi-Fimodulethatallowstheappliancetoconnecttotheinternetviayour home network and to use it with the ConnectLife-app, installed on a mobile device like a smartphone ortablet.
TheappisavailableontheAppleAppStoreandGooglePlayStore.Youwillneedtheapptoconnect thehobtoyournetwork.Afteryouruseraccountispairedwiththecookinghob,theappcanbe usedtomonitorthestatusofthecookinghobandenablestoupdateitsfirmware(seechapter 'FirmwareUpdate').
You can find direct links for the different store to the ConnectLife-appunder www.connectlife.io/getstartedandmoreinformationaboutthesystem,support,available functionalities,and additional options under www.connectlife.io.
Forsafetyreasons, itisnotpossibletoremotelycontrol, turnonorturnoffthehob.
Preparation
- Make sure you know the name/SSID of your router's Wi-Fi network and its password ^1) .
- Make sure you have the label with the QR code of the appliance unique ID ('AUID') accessible –youneedtoscanitwithyourmobiledevicewhentheAppromptstodoso.
- Yoursmartdevice'sBluetoothisturnedon.

text_image
QR code image with a central logo, likely linking to a digital resource or website.• InstalltheConnectLife-apponamobiledevice-scantheQR codetofindit.
- LaunchtheApp.Pleaseregisterifyoudon'thaveanaccountyet.
- Loginwithyouraccount.
- TheAppwillneedaccessthemobile'slocationtosearchforWi-Fi networksandtothecameratoscanQRcodes.
Wi-FiConnectionsetup
You will first connect your mobile device directly to the appliance via Wi-Fi, and then us this connection to share the data of your Wi-Fi home network. The Hobcan then connect to the home network.
- LaunchtheConnectLife-app.
- In the Connect Life application, goto the "Add device" menu and select the appropriate type of device. Thenscan the QR code (it can be found on the rating plate of the appliance; you can also enter the AUID/SN codemanually).
FollowtheinstructionsintheConnectLife-app.
TheuseraccountsignedinonthemobiledeviceusedfortheConnectionsetupwillautomatically be paired with the cloud. If you'd like to pair another account, e.g. on a second user's mobile device see"Pairingadditionaluser".
Forsafetyreasons,onlypaireduserscancommunicatewiththehob.
1) NOTE: only2,4Ghznetworksaresupported
ActivateWi-Fi
1.Switchoffthehob.
- Touchtheon/offkeyfor5seconds.
- Ashortbeepwillbeemitted. TheWi-Fikeywillappear.
Wi-Fimenu
ActivateWi-FitoenabletheWi-Fimenu.Thehobmustbeswitchedon.
- TouchtheWi-Fikeyfor3secondstoopentheWi-Fimenu.
- Depending on the Wi-Fi state, there are 1 to 3 options available in the menu: 'C' (connection) to set up a connection, 'P' (pair) to pair an additional user, and 'U' (unpair) to unpair all users.
-
Usethe+(plus)and-(minus)keystoswitchbetweenthem, if more than 1 option is available.
-
TouchtheWi-Fikeytoconfirmtheselectedoption.
-
Touchtheon/offkeyortouchtheslidertoclosethemenu.
- Ifnokeyispressedwithin60seconds,themenuwillbeswitchedoffautomatically.
Connectionsetup
- Selectoption 'C' in the Wi-Fimenu.
- The appliance is in "Connection Setup Mode" for 5 minutes.
- 'C' will flash, and the + (plus) and - (minus) keys will be switched off.
- On the mobile app, start the process to 'Add appliances' and follow the instructions to set up thenetwork.
Pairingadditionaluser
Thisoptionrequiresthattheconnectionsetuphasbeenperformedsuccessfullyandthehobis connectedtothecloud(Wi-Fikeyisconstantlyfulllit).
- Selectoption 'P'intheWi-Fimenu.
• The appliance is in "Pairing Mode" for 3 minutes.
- The Wi-Fi key will flash, and the + (plus) and - (minus) keys will be off.
- On the mobile app, start the process to 'Add appliances' and follow the instructions to pair the appliance.
Unpairallusers
Thisoptionrequiresthattheconnectionsetuphasbeenperformedsuccessfullyandthehobis connectedtothecloud(Wi-Fikeyisconstantlyfulllit).
- Select option 'U' in the Wi-Fi menu to unpair all users and disconnect from the cloud.
• TheWi-Fikeywillflash3times.
- The hob will delete all paired users and disconnects from the cloud ("unpair").
SwitchingoffWi-Fi
-
EntertheWi-Fimenuasexplainedin'Wi-Fimenu'.
-
TouchtheWi-Fikeyfor3secondstodeactivateWi-Fi.
- Ashortbeepwillbeemitted. TheWi-Fikeywillbeoff.
FirmwareUpdate
The cooking hobisequipped with a Wi-Fimodule that you could set to receive updates of the appliance firmware (forexample, improved function updates safety relevant updates). This requires that the cooking hobis connected to the cloud and paired with a registered user account on the ConnectLife-app. If this is not yet established, consult chapter 'ConnectLife and Wi-Fi'.
When new firmware is available, a notification is sent to the ConnectLife-app. Please follow the instructions.
To start the update process, the cooking hob needs to have the FoA setting set to ON in the settings menu (see 'Settings'). This confirms your presence at the cooking hob. After 90 minutes, this setting is automaticallyresettoOFF.
AftertheFoAsettingonthecookinghobissettoON,starttheupdateprocessonyour ConnectLife-app. The cooking hob will switch OFF. As an indication, the Wi-Fi symbol flashes during theprocess.Dependingontheconfiguration,theupdateprocesscantakeupto60minutes.
NOTE!
During the update process, you cannot set the hob. The hob will restart several times and will not respond for periods. Makes sure that the powers supply and the Wi-F icon connection are not interrupted during the update.
If the update fails, the hob will remain on the previous firmware version and operate as usual. Try again after a short period of time. If the update continues to fail, please get into touch with the service department for further assistance.
If the hobisnot responding after updating, it may not have completed the update. Wait for the update process to complete. If the hobstill does not respond after awhile, please contact the service department for further assistance.
Settings
Youcantailorthebehaviourofthisinductionhobtosuityourcookingstyle!Therearevarioussettings availableforadjustment.
Whiletherearenopansonanyzone,touchanysliderwithtwofingersandkeepittouchedfor 3seconds.Differentsettingscannowbetoggledthroughusingtheslider.Tovieworchangea particularsetting,touchthehighlightedelementofthesliderwithonefingerandkeepittouchedfor 3seconds.Nowyoucanchoosetochangeordisablethatsetting.Todothis,toggletothedesired value.After3secondsofinactivity,thenewsettingwillbeconfirmed.
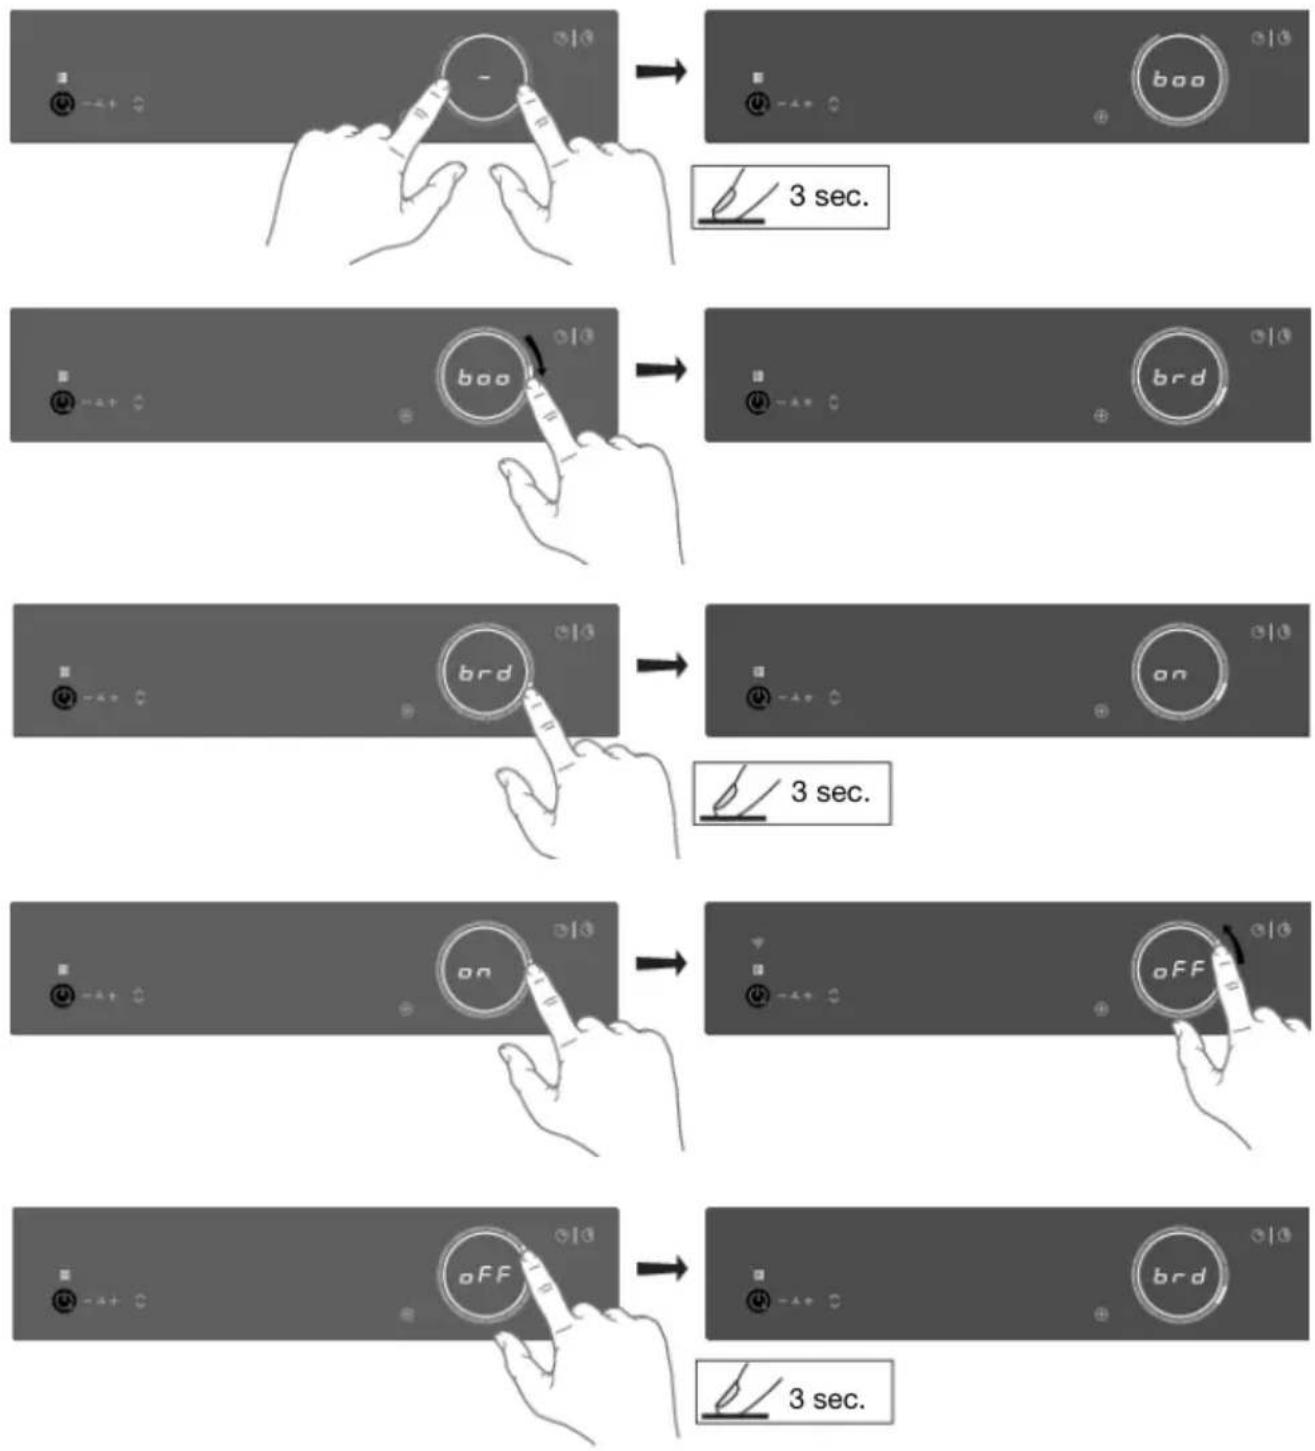
flowchart
graph TD
    A["Start"] --> B["Hand with的手按钮"]
    B --> C["3 sec."]
    D["Start"] --> E["Hand with的手按钮"]
    E --> F["3 sec."]
    G["Start"] --> H["Hand with的手按钮"]
    H --> I["3 sec."]
    J["Start"] --> K["Hand with的手按钮"]
    K --> L["3 sec."]
    M["Start"] --> N["Hand with的手按钮"]
    N --> O["3 sec."]
    P["Start"] --> Q["Hand with的手按钮"]
    Q --> R["3 sec."]
NOTE!
Topreventunintentionaladjustmentofthe'Con-connectedpower',Consettingmustbeconfirmed whenchangedbytouchingthesliderfor3seconds.Achangewithoutconfirmationwillnotbe implemented!
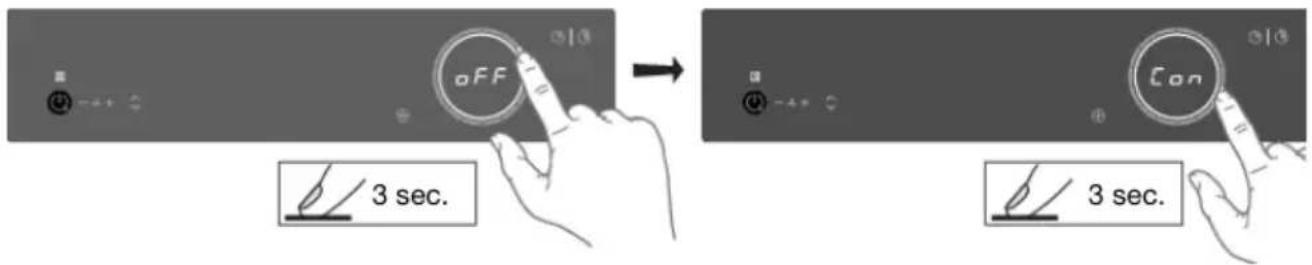
text_image
aFF 3 sec. Con 3 sec.Toexitthemenu,touchwithtwofingersanywherethesliderfor3seconds.
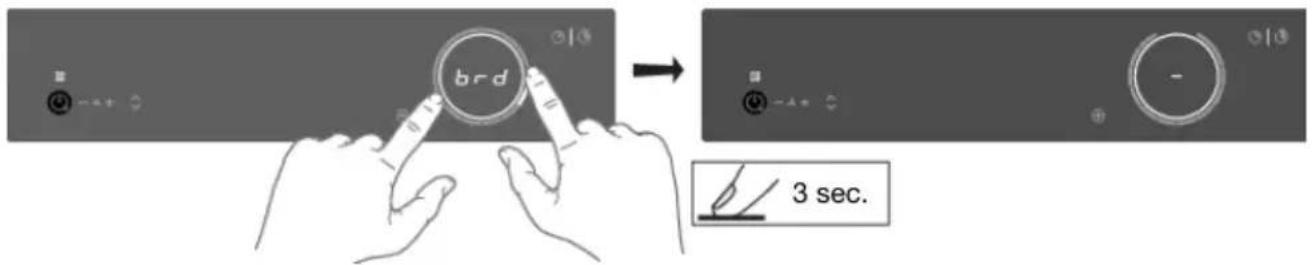
text_image
brd 3 sec.The following settings are available (depending on the model).
| boo-AutoboostAutomaticBoostactivation | Whileon,boostisautomaticallyactivatedwhenpowerlevel12is activated.Whileoff,theboostisactivatedbyslidingpastthepower level12ortouchingpowerlevel12twice. |
| brd-AutobridgeAutomaticccoupling | Whileon,whenanewpanisdetectedontwoconnectedBridge Inductioncookingzones,thecookingzonesareautomatically connectedintoonebigcookingzone.Whileoff,connectingmustbe donemanuallybypressingontheslidersoftwoBridgelnduction cookingzonesatthesametime. |
| rEC-RecoveryfunctionRecoveryfunction | Whileon,therecoveryfunctionisactiveand,settingscanbemoved fromonecookingzonetotheotherwhenapanswitchesposition. |
| Ati-AutotimerAutomaticstopwatchtimer | Whileon,thestopwatch(count-uptimer)startscountinginthe backgroundwheneveracookingzoneisactivated.Whileoff,the stopwatchmustbeactivatedmanuallyandstartscountingfrom0:00. |
| ACL - Auto child lockAutochildlock | While on, the hob is automatically locked at every switch off. |
| Snd-SoundvolumeSoundvolume | Soundvolumehas4differentoptions.L3(high),L2(medium),L1 (low),off(onlyerrorandalarmsounds). |
| SEn-KeysensitivenessKeyresponsiveness | Keyresponsivenesshas3differentspeedoptions.L3(quick),L2 (medium),L1(slow). |
Tablecontinuedfromlastpage
| hSt-SynchroStart(SynchroStartLevel | Thissettingallowstheinductionhobtoautomaticallyactivatethesuctionoftheextractionmoduleeverytimetheinductionhobisturnedon.Dependingonthevalueyouset,thesuctionwillautomaticallystartatthatspeedlevelwhenanycookingzoneisactivated. |
| hSc-SynchroControlSynchroControlresponseLevel | Thissettingallowstheinductionhobtocontroltheextractionmodule.Theextractionmodulewillautomaticallyswitchonwhensettinga cookingzonepower.Thecookingzonewiththehighestpowersettingdeterminesthedegreeofextraction.SynchroControlcanbeoverruledbyusingthe+(plus)and-(minus)keysanditcanbereactivatedbytouchingthe+(plus)and-(minus,keyssimultaneously.Theresponse sensitivitycanbeset:L3(high),L2(medium),L1(low),off. |
| hSP-SynchroStopSynchroStop,switchoff functionextractionmodule | Withthissetting,whentheapplianceisswitchedoff,theextraction modulecanalsobeswitchedoffautomaticallyandtheAir-Dryfunction canbeactivatedifnecessary.Iftherearestillhotpansonthehob,theAir-Dryfunctionwillstartatahighersettingifessentialuntilall cookingzoneshavecooleddown.ThenAir-Drycontinueswiththe normalcycleof10minutesonextractionlevel1. |
| Ato-Automaticraisingofthe towerAutomaticraisingofthe tower | Disablethissettingifitisundesirableforthetowertoriseautomatically whentheextractionisswitchedon. |
| rCi-Recirculationfilter Recirculationfilter | Activatethissettingifarecirculationfilterisinstalled.Thereare3 optionsavailable: |
| off-(default) | |
| CAr-Recirculationfilter | |
| PLA-Plasma | |
| GrF-Cleangreasefilters indicatorCleangreasefiltersindicator | Activatethissettingifthefiltercleaningindicationisdesired.There are4optionsavailable: |
| off-Manually | |
| L1-Cookingandfryingsmallquantities | |
| L2-Cookingandgrillingmediumquantities(standard) | |
| L3-Frying,grilling,andwoking | |
| btP-Bluetoothpairing Bluetoothdevicepairing | Topairabluetoothdevice,setthissettingtoon.Younowhave3 minutestopairanewbluetoothdevicetothisinductionhob. |
| btC-Bluetoothclear Bluetoothclearpaired devices | Tounpair,alltheBluetoothdevicessetthissettingtoClr.Allyour connectedBluetoothdevicesarenowunpaired. |
| Fir-Displayfirmwareversion Firmwareversion | Todisplaythecurrentsoftwareversionsofthehob.TheUIsoftware versionandtheCelsius°Cooking TM softwareversionwillbeshownin alternatingorder. |
Tablecontinuedfromlastpage
| FoA-Firmwareupdateover theairFirmwareupdateviaWi-Fi | Toreceivefirmwareupdatesforthecookinghob,youneedtobe pairedtothecookinghobviathemobileapp.Youwillreceivea notification,oryoucancheckavailablefirmwareupdatesonthe mobileappmenuforupdates.Inordertostartthefirmwareupdateviathemobileapp,setthissetting toontoconfirmyourpresenceatthecookinghob.Formore information,seechapter"ConnectLifeandWi-Fi".After10min,this settingisautomaticallyresettooff. |
| Con-ConnectionpowerCurrentlimiter(connectiontopowergrid) | Ifyourelectricalwiringorcircuitbreakersdonotmeetthespecified currentdrawontheratingplate,thecurrentlimitercanbeactivated byreducingthevalueofthissetting.Doingsowillcauseareduced performanceoftheinductionhob.Thefollowingnumberingformatofthesettingisavailable:X.XX.Thenumberleftofthedotrepresentsthenumberofconnected phases,whilethenumberrightofthedotrepresentstheelectrical currentperphaseinAmpere.NOTE!Topreventunintentionaladjustmentofthe'Con-connected power',Consettingmustbeconfirmedwhenchangedbytouching thesliderfor3seconds.Achangewithoutconfirmationwillnot beimplemented!WARNING!Theappliancemustalwaysbesettotheactualorlowerratingof theelectricalwiringorcircuitbreakers.Thissettingcanonlybe setbyanauthorisedexpert. |
| Factoryreset | Resetstodefaultsettings.rES-Factoryreset |
| dE-DemomodeDemoModeforDealerShowroomsWhenset,thiswillbeindicatedafterswitchingontheappliancewithashort"d"indication.Withoutanyuserinteraction,theappliancewillautomaticallyswitch offafter10minutes. | Indemomode,theappliancewillactasusual,withoutthepossibility toheatthecookware.beindicatedafterswitchingontheappliancewithashort"d"indication.Withoutanyuserinteraction,theappliancewillautomaticallyswitch offafter10minutes. |
Cleaningglasstop
TIP!
Activatethechildlockbeforecleaningthehob.
Dailycleaning
- Although food spill cannot burn into the glass, whenever the recommend you clean the object immediately after use.
- Fordailycleaning, adampcloth with amildcleaning agentis best.
•Dryoffwithkitchenpaperoradryteatowel.
Stubbornstains
- Stubborn stains can also be removed with a mild cleaning agent, washing-up liquid, for example.
- Removewatercirclesandlimescalewithcleaningvinegar.
- Tracesofmetals(causedbyslidingpans)canbedifficulttoremove.Specialproductsare availableforthis.
- Use a glass scraper to remove food spills. Melted plastic and sugar are also best removed with aglasscraper.
NOTE!
- Neveruseabrasives. These leaves scratches in which dirt and limescale can accumulate.
- Neveruseanythingsharpsuchassteelwoolorscourers.
Cleaningtheextractionmodule

WARNING!
The extraction module must be cleaned regularly. Mind that the pins bearing the tower are cleaned after every use.
Donotuseabrasivecleaningproducts.Donotusealcohol!
If the instructions regarding cleaning the appliance or replacing the filters are not followed, this can cause a fire. These instructions must be followed! The manufacturer is not liable for damage to the appliance or fired damage resulting from incompetent maintenance or from non-adherence to the safety instruction above.
Cleaningthetower
Removethetower.

natural_image
Isometric illustration of a mechanical component with an upward arrow, placed on a flat surface (no text or symbols)Rinsethetowerdailyunderthetapwithwarmwater.Cleanthetowerweeklywithwaterandalittle washing-upliquid.Thetowercanalsobecleanedinthedishwasher.
Theglasstrimisnotresistanttofallsorbumps.

WARNING!
Replacethetowerifthetower'sglasstrimisdamaged.Sharpedgesonthestripcancause injuries.
TIP!
Theundersideofthetowerismarkedwithanarrow. Thetowerwillbebestalignedwiththeglass whenthearrowispointedbackwards.
Cleaninggreasefilters
Removethegreasefiltersfromtheextractionmodule. Themetalfilterscanbepushedoutoftheir plasticframeifnecessary.
Maintenance
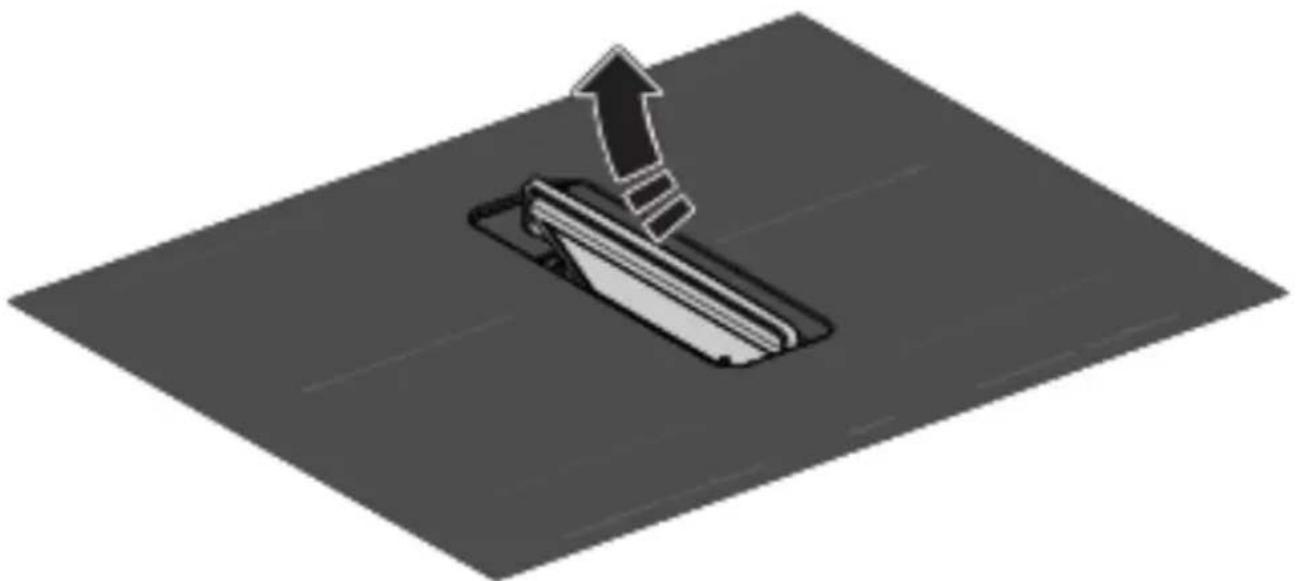
natural_image
Illustration of a smartphone with an upward arrow emerging from its screen (no text or symbols)When indicated by the filter indicator, themetalfilters must be cleaned by handorinthedishwasher at low temperatures with a short program. Never put the plastic frames in the dish washer separately, without metal grease filters. See chapter 'Settings' for filter cleaning settings.
NOTE!
It is important that the grease filters are thoroughly dried before they are fitted again.
Cleaningthecondensatereservoirs
It is recommended to check and empty the condensater reservoir every two weeks.
- Removethecondensatereservoirs from the exhaust inlet with the handles.
- Attention:removethefiltersfirstbeforeremovingthecondensatereservoirs.
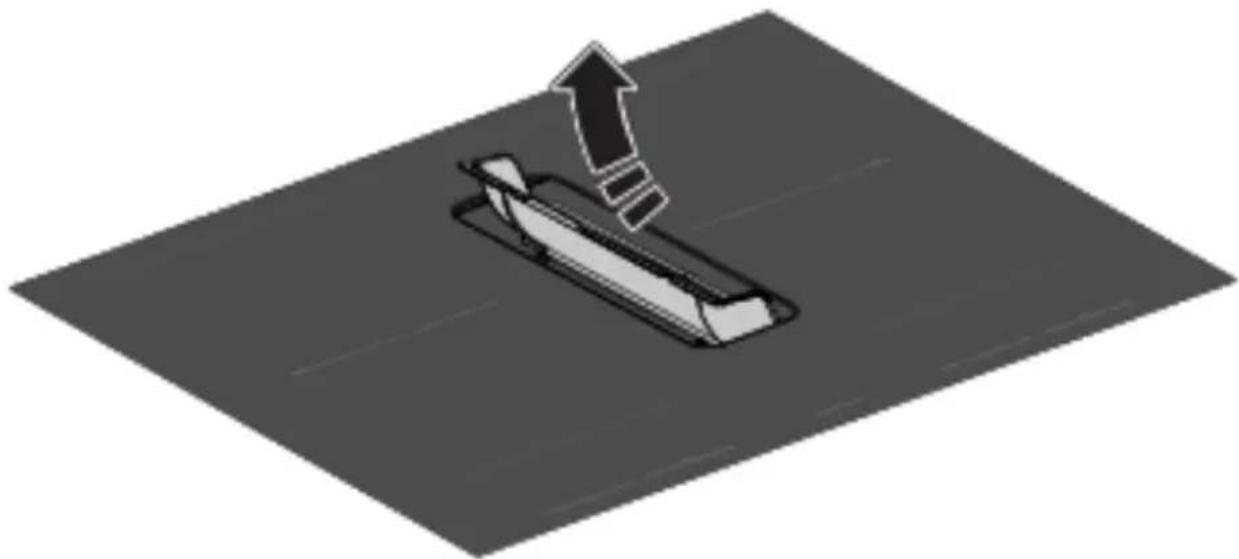
natural_image
Illustration of a pencil with an upward arrow emerging from it, symbolizing growth or progress (no text or symbols present)- Emptythecondensatereservoirsandcleanthemwithwarmwaterandalittlewashing-upliquid orinthedishwasher.
- Cleantheinterioroftheextractionmodulewithadampcloth.
Filterindication
Saturationofgreasefilterandrecirculationfilter
Ifonlythefilterindicatorisflashing, thegreasefiltersneedtobecleaned. Ifboththefilterindicator and the letter 'r' flash in the display, replace the recirculation filter.
Greasefilter
After 10, 20, or 40 hour of operation, the grease filter indicator lights up (depending on the intensity of use).
• The greasefilters should then be cleaned.
- Resetthefilterindicatorbytouchingthefilterindicatorkeyfor2seconds.
Recirculationfilter(ifinrecirculationmode)
After 300 operating hours (recirculation filter), the filter indicator and the letter 'r' flash on the display.
•Replacetherecirculationfilter.
- Resetthefilterindicatorbytouchingthefilterindicatorkeyfor2seconds.
Replacingrecirculationfilter(whenusingtherecirculationbox)
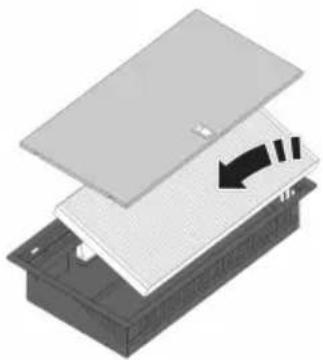
natural_image
Stacked diagram of a device with a highlighted component and directional arrow (no text or symbols)There circulation box with a filter is located under the bottom of the cabinet and is accessible from the kitchen cabinet.
- Openorremovethebottomdrawerofthekitchencabinet.
- Removethecoveroftherecirculationbox.
- Removethefilter.
- Fitanewfilter with the arrow (see on the side of the filter) pointing upwards.
5.Fitthecoveroftherecirculationbox,andclosethedrawerorput itbackinplace. - Resetthefilterindicatorbytouchingthefilterindicatorkeyfor2 seconds.
TIP!
Consultthewebsiteforadditionalmaintenanceandcleaninginstructions!
General
NOTE!
If you notice a crack in the glass stop (however small), switch off the hob immediately and disconnect the powers supply (removethe plug from the socket).
ThencontacttheServiceDepartment.
Troubleshootingtable
If your hob does not work properly, it does not always mean that it is defective. Makes sure to check the points mentioned below in the table, or visit our website form more information.
Inductionzones
| SolutionPossiblecauseSymptom | ||
| Charactersappearinthe displayswhentheapplianceis connectedforthefirsttime. | routine. | Normaloperation.Thisisthestandardset-up |
| minutesafterthehobhasbeen switchedoff. | Normaloperation.Thehobiscoolingdown.The | |
| Aslightsmellisnoticeablethe firstfewtimesthehobisused. | Thenewapplianceisheating up. | Thisisnormalanddisappears afterthehobhasbeenuseda fewtimes.Ventilatethekitchen. |
| Youcanhearatickingsoundin yourhob. | limiteronthefrontandback zones.Asofttickingsoundcan alsooccuratlowersettings. | Normaloperation.Thisiscausedbythecapa |
| Circleofpanbottomremains visibleaftercleaning. | Contaminatedpanbottomused onthecookingzone. | Cleantheinductionhobwitha ceramichobcleanerand removethedirt/greasefromthe panbottom. |
| Thepansmakenoisewhile cooking. | Thisiscausedbytheenergy flowingfromthehobtothe saucepan. | Thisisnormalforcertainpans, particularlyathighsettings. Thisisnotharmfultothepans orthehob. |
| Youhaveswitchedacooking zoneon,butthedisplaykeeps flashing. | Thepanyouareusingisnot suitableforinductioncookingor hasadiameteroflessthan 12cm. | Useasuitablepan(seechapter 'Use'). |
| workingandyouhearasignal. | Thepresettimehasended.Acooking Switch of the system pressing the-or+keyonthetimer. | |
| Thehobisnotworkingand nothingappearsinthedisplay. | Thereisnopowersupplydueto adefectivecableorafaulty connection. | Checkthefusesortheelectric switch(ifthereisnoplug). |
Tablecontinuedfromlastpage
| SolutionPossiblecauseSymptom | ||
| residualheatindicatorisshown. | Zoneisoverheated.Zonestopsunin | Affectedandhascooleddown, cookingcanbecontinued. |
| Afuseblowsassoonasthehob isswitchedon. | Theapplianceisincorrectly connected. | Checktheelectrical connections. |
| Celsius°CookingTMkeyis blinking,togetherwithset cookingmethodkeyand display. | Celsius°CookingTMcookwareis assignedtowrongcooking zone. | Removecookwareandassign again. |
| Unstableconnectionbetween cookwareandhob. | Lowbatteryofcookwareor unstablebluetoothconnection | Switchoffthecooktopfor10 secondsand/orchangethe battery. |
| SetCelsius°CookingTMcooking methodkeyisblinkingtogether withsettemperaturedisplay whileusingtheprobe. | Celsius°CookingTMProbeis removedornotintouchwiththe content.Orthetemperaturehas fallenrapidly,e.g.duetoadding coldwater. | PlaceProbebackorreposition -presscookingmethodkeyif probeisn'tautodetect. |
| Theceramicglassplatebroke. | Pulltheplugoutofthesocket. Contactyourinstaller. | |
| Pleasenote!Donotthrowa brokenceramicglassplatein theglassrecyclingbinbuttake thistotheMunicipality'swaste recyclingcentre. |
Extractionmodule
| SolutionPossiblecauseSymptom | ||
| Themovementofthetoweris laboredand/ormakesmore noise. | Thepinsbearingthetowerare dirty. | Cleanthepinsbearingthe tower. |
| Whenswitchingoffthehob,the hobwillcontinuetoextractat levels1,2,or3,andthe extractionindicatorpulses. | TheAir-Dryfunctionisactive. Thisafter-runfunctionensures thattheextractionchannelsand greasefiltersareblowndry. | TheAir-Dryfunctionisnota setting.However,byturningoff theSynchroStopsetting,Air-Dry willonlybeactivatedat extractionlevel1. |
Errorcodes
| SolutionPossiblecauseSymptomE | |||
| Er03appearsondisplay.Er03orhaswateronit. | Cleanthecontrolpanel.Thecontrolpar | ||
| E2appearsondisplay.E2 | Emptypanwasheatedon thecookingzone. | Waitforcookingzoneto cooldownorfillthepan withfoodstuff. | |
Troubleshooting
Tablecontinuedfromlastpage
| SolutionPossiblecauseSymptomE | |||
| U400 | U400appearsondisplay withcontinuoussound tone. | Voltageofthemainsistoo high. | Connecttheappliancein accordancetoratingplate andinstructions. |
| E7 | E7appearsondisplay aftersettinguptheWi-Fi connection. | FailedtoconnecttoWi-Fi network. | Trytoconnectthedevice toyournetworkagain.Makesurethatnew devicescanconnectto thenetwork(e.g.MAC addressfilteringis disabled). |
| E8appearsondisplay.E8 | Ventilatorisblocked(eg possiblebyiteminthe drawer). | Unblocktheventilator; disconnectappliance frommainvoltagefor 10sec. | |
| E65 | Celsius°CookingTMkeyis blinking,togetherwith E65. | Non-Celsius°CookingTM cookwareisnot supported. | UseCelsius°CookingTM cookware. |
| E66 | E66isblinkingtogether withthe Celsius°CookingTMkey. | cookwarewasnotfound (emptybattery,outof range,etc.). | Replacebattery.Celsius°CookingTM |
| E67 | E67isblinkingtogether withthe Celsius°CookingTMkey. | Celsius°CookingTM cookwaremissing. | lfhandlecapismounted correctly;Replacebattery . |
| Extractionmodule | |||
| E80appearsondisplay.E80 | Thewindow,withmounted windowsensorisnot opened. | Openthewindowtobe abletousetheextraction moduleorstopthe messagebytouchingthe flashing-(minus)or+(plus:key(s). | |
NOTE!
In case of other error codes: please writed down the error code and contact the serviced department.
TroubleshootingWi-Fi
| SolutionPossiblecauseSymptom | ||
| Wi-Fiturnedoff.Wi-Fiiconnotshown | Thehobmustbeswitchedoff, thentouchtheon/offkeyand holditfor5seconds. | |
| Homenetworkissues.Wi-Fisetupfa | Checkthatyourhomenetwork signalisstrongandinternet connectionisworking. |
Tablecontinuedfromlastpage
| SolutionPossiblecauseSympt | ||
| Homenetworkisnotdisplayed duringtheconnectionsetup process. | Thehomenetworkisnoton 2.4GHz,thenetworkishidden,orthesignalstrengthistoo weak. | Pleasecheckthenetwork settings.Ensurea2.4GHzand visiblenetwork.Ifthesignalis tooweak,trytomovethe networkrouterclosertothe appliance. |
| Cookinghobisshown disconnectedonthemobileapp | Wi-Fiisdisabledorhome networkissues. | EnsurethatWi-Fiisenabled, andtheinternetconnectionof yourhomenetworkisworking.Repeattheconnectionsetupif necessary. |
| Differentcauses.OtherWi-Fiproblem | FirstdisabletheWi-Fiand enableitagain.Checkthatthe internetconnectioninyourhome networkisworking.Repeatthe connectionsetupifnecessary.Furthertroubleshootingavailable onwww.connectlife.ioorcontact theservicedepartment. | |
| Firmwareupdateprocessfailed. | Internetconnectionlostorpower supplyterminated. | Ensurethepowersupplyisnot terminatedandastableinternet connectionbeforeretryng again.Iffailedagain,contactthe servicedepartment. |
Informationaccordingtoregulation(EU)66/2014
MeasurementsaccordingEN60350-2/EN30-2-1
| Modelidentification | HIDD28471SV/HIDD28472SVHIDD28471SVI/HIDD28472SVI |
| Trademark | ATAG |
| Typeofhob | Inductionhobwithintegratedextractor |
| Numberofelectriccookingzonesand/orareas | 4 |
| Heatingtechnology | Inductioncookingzonesandcooking areas |
| Fornon-circularcookingzonesorareas:lengthbandwidth ofusefulsurfaceareaperelectricheatedcookingzoneor area | 22.0x18.0cm |
| Energyconsumptionpercookingzoneorareacalculated perkg(ECelectriccooking)inWh/kg | 188.8 |
| Energyconsumptionofthehob,calculatedperkg (ECelectricoh)inWh/kg | 188.8 |
| AnnualEnergyConsumption(AEChood)[kWh/a] | 28.3 |
| Energyefficiencyclass | A |
| FluidDynamicEfficiency(FDEhood)[%] | 28.6 |
| FluidDynamicEfficiencyclass | A |
| GreaseFilteringEfficiency(GFEhood)[%] | 95.7 |
| GreaseFilteringEfficiencyclass | A |
| Airflowatminimumandmaximumspeedinnormaluse [m3/h] | 213.8-449.4 |
| Airflowatintensiveorboostsetting[m 3/h] | 617.2 |
| AirborneacousticalA-weightedsoundpoweremissionsat minimumandmaximumspeedinnormaluse[dB(A)] | 44-60 |
| AirborneacousticalA-weightedsoundpoweremissionsat intensiveorboostsetting[dB(A)] | 68 |
| Powerconsumptionoffmode(Po) | - |
| Measuredpowerconsumptioninstandbymode(Ps)[W] | 0.48-0.70(WiFi) |
EUProductFiche
| Modelidentification | HIDD28471SV/HIDD28472SVHIDD28471SVI/HIDD28472SVI |
| Timeincreasefactor(f) | 1 |
| EnergyEfficiencyIndex(EEI hood) | 48.8 |
| Measuredairflowrateatbestefficiencypoint(Q BEP) [m3/h] | 346.8 |
| Measuredairpressureatbestefficiencypoint(P BEP) | 230 |
| Measuredelectricpowerinputatbestefficiencypoint (WBEP) | 77.6 |
Complianceinformation
| HSCIM-1moduleRadioequipmenttype | |
| 2402.0-2480.0MHzOperatingfrequencyrange | |
| 7.63dBmEIRPaverage(calculated)Maximumoutputpower | |
| G1DEmissiontype |
| Wi-FimoduleRadioequipmenttype | |
| 2412-2472MHzOperatingfrequencyrange | |
| 16.8dBmEIRPaverage(calculated)Maximumoutputpower | |
| 0dBiMaximumantennagain |
| BLEmoduleRadioequipmenttype | |
| 2402-2480MHzOperatingfrequencyrange | |
| 7.63dBmEIRPaverage(calculated)Maximumoutputpower | |
| 0dBiMaximumantennagain |
ATAG, with this, declares that the induction hob with integrated extractor including radio equipment complies with Directive 2014/53/EU.
ThefulltextoftheEUdeclarationofconformityisavailableatthefollowinginternetaddress: www.celsiuscooking.com/DoC.
CMIITID:24J99T960001
Environmentalaspects
Disposal of the appliance and packaging
Sustainable material have been used during the manufacture of this appliance. This appliance must be disposed of responsibly at the end of its service life. Ask your local authorities for more information about how to do this.
The appliance packaging is recyclable. The following may have been used:
- cardboard;
•polyethylenefilm(PE);
Disposeofthesematerialsinaresponsiblemannerandinaccordancewithgovernmentregulations.

WARNING!
Neverallowchildrentoplaywithpackagingmaterialduetothedangerofinjuryorsuffocation. Storethepackagingmaterialsafelyordisposeofitinanenvironmentally-friendlyway.
text_image
Warning symbol for a trash bin with crossed lines indicating no waste or discharge, and a black rectangle below.Theproducthasbeenmarkedwithacrossed-outdustbinsymbolto remindyouoftheobligationtodisposeofelectricalhousehold appliancesseparately.Thismeansthattheappliancemaynotbe includedwithnormaldomesticrefuseattheendofitsservicelife. Theappliancemustbetakentoaspecialmunicipalcentreforseparated wastecollectionortoadealerprovidingthisservice.
Aseparate collection of household appliances help to prevent any potential negative impact on the environment and human health caused by improper disposal. It ensures that them also of which the appliance is composed can be recovered to obtain significant savings in energy and raw materials.
NOTE!
Pleasenote!Donotthrowabrokenceramicglassplateintheglassrecyclingbinbuttakethis totheMunicipality'swasterecyclingcentre.

Declarationofconformity
WeherebydeclarethatourproductssatisfytheapplicableEuropean directives, ordersandregulations, aswellastherequirementsstated inthereferencedstandards.
Safety
Faultypartsmayonlybereplacedbyoriginalparts.Themanufacturer canonlyguaranteethatoriginalpartsmeetsafetyrequirements.
If the supply cord is damaged, it must bere placed by the manufacturer, its service agent or similarly qualified persons in order to avoid a hazard.
Disconnect the appliance from them in supply before starting any repair work.
If the safety instructions and warnings are not followed, the manufacturer cannot be held responsible for any resulting damage.
Thisapplianceshouldonlybeconnectedbyaregisteredinstaller.
Check the appliance for transport damage. Donot connect adamaged appliance.
Theairmustnotbedischargedintoafluethatisusedforexhaustingfumesfromappliancesburning gasorotherfuels(notapplicabletoappliancesthatonlydischargetheairbackintotheroom).
Extractionhoodsandotherappliancesthatextractcookingvapourscanaffectthesafeoperation ofappliancesthatburngasorotherfuel(includingthoseinotherrooms)bybackflowingcombustion gases. Thesegasescanpotentiallyleadtocarbonmonoxidepoisoning. Afterinstallinganextraction hoodorothervapoure extractor, theoperationofapplianceswithfluegasextractionmustbetested byacompetentpersontoensurethatthecombustiongasesdonotflowback.
Localregulationsconcerningthedischargeofairhavetobefulfilled.
Preparationsforinstallation
Freespacearoundtheappliance
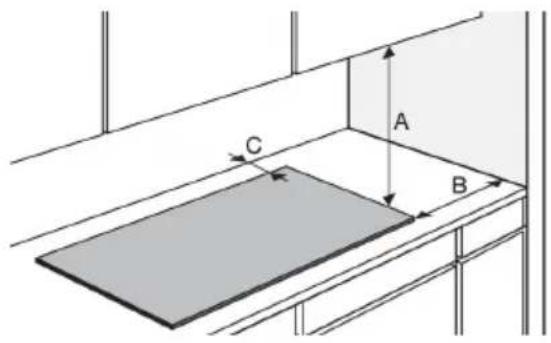
text_image
A B C| min.550mmA | |
| min.40mmB | |
| min.35mmC |
Appliancedimensions
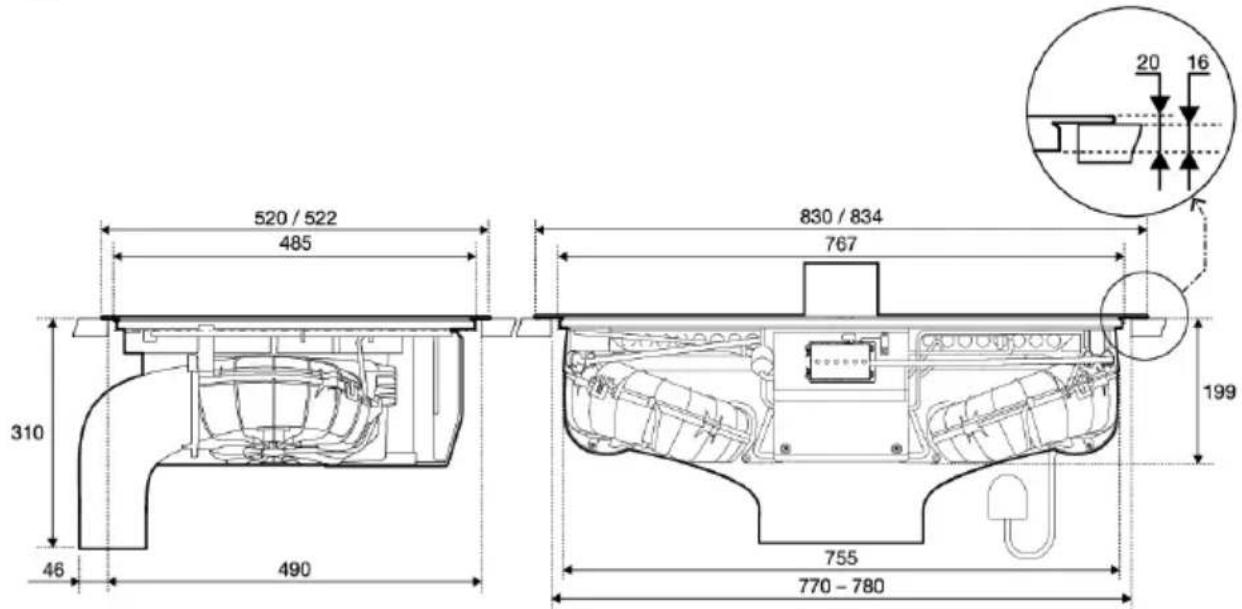
text_image
520 / 522 485 310 46 490 830 / 834 767 199 755 770 - 780 20 16Cut-outintheworktop
NOTE!
Applianceswithoutdecorativeframesaresuitableforflushmounting.
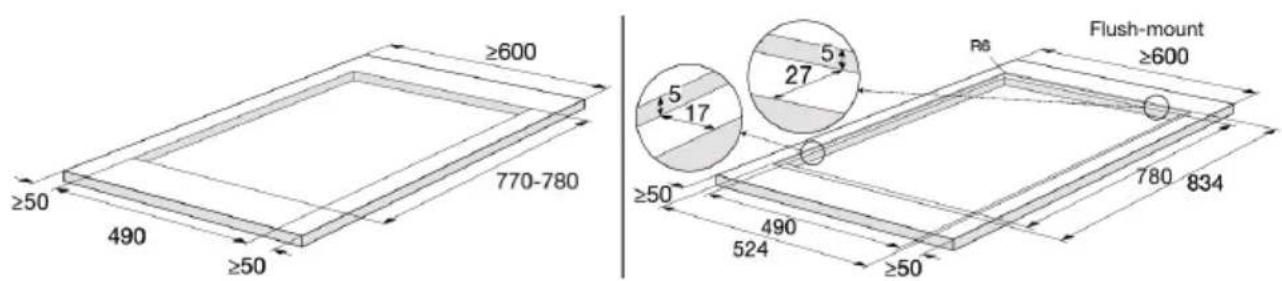
text_image
≥600 770-780 ≥50 490 ≥50 R6 Flush-mount ≥600 27 5 17 ≥50 490 524 ≥50 780 834Kitchencabinetdimensions
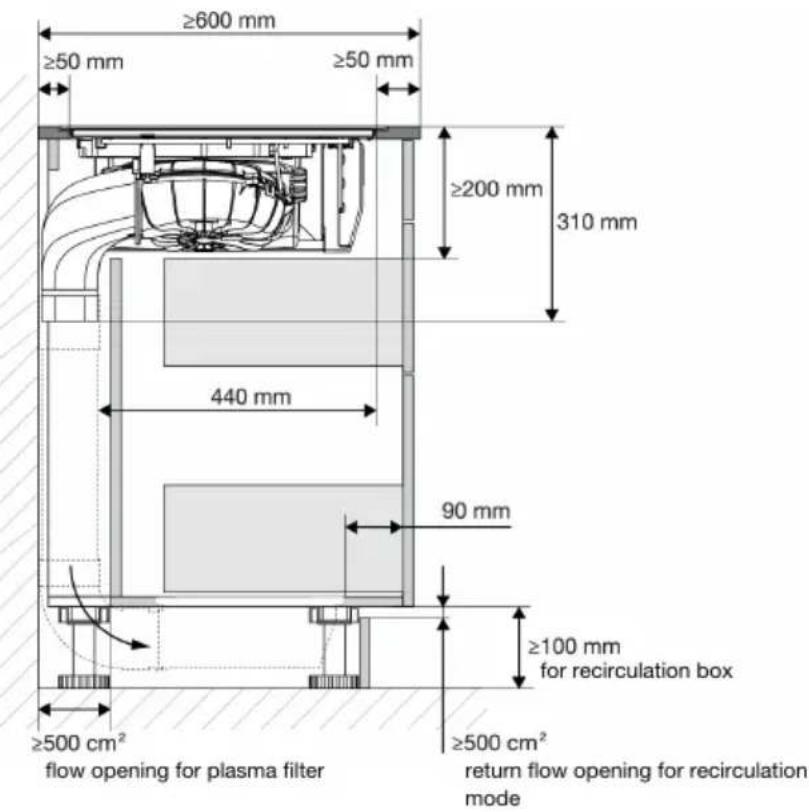
text_image
≥600 mm ≥50 mm ≥50 mm ≥200 mm 310 mm 440 mm 90 mm ≥100 mm for recirculation box ≥500 cm² flow opening for plasma filter ≥500 cm² return flow opening for recirculation mode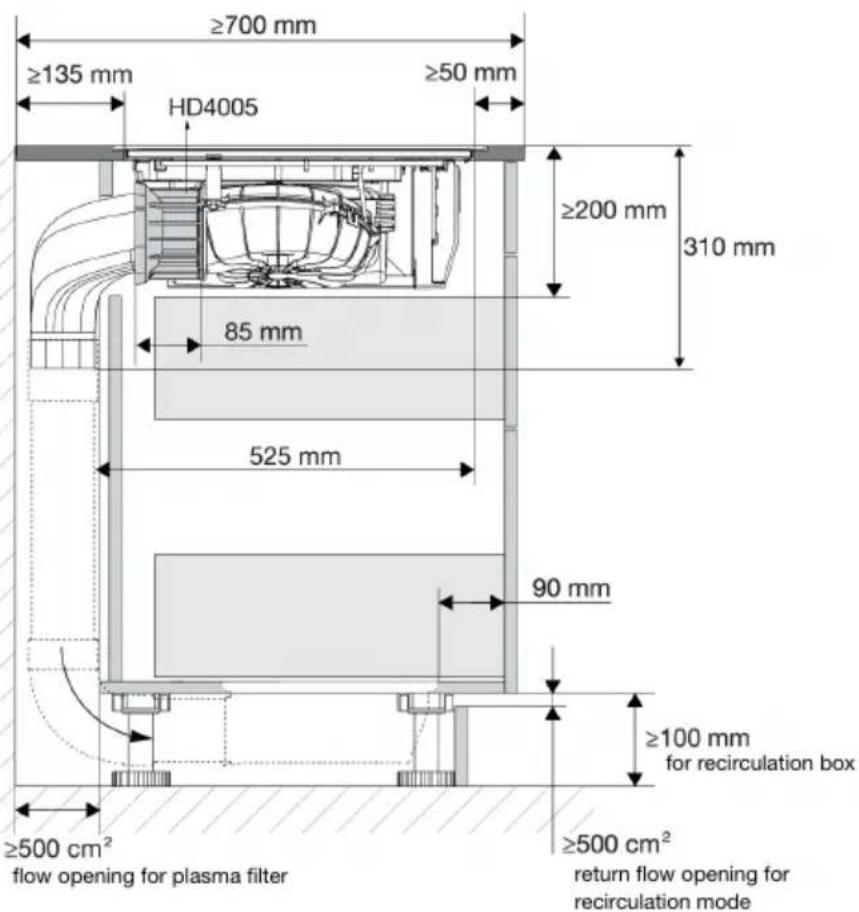
text_image
≥700 mm ≥135 mm HD4005 ≥50 mm ≥200 mm 310 mm 85 mm 525 mm 90 mm ≥100 mm for recirculation box ≥500 cm² flow opening for plasma filter ≥500 cm² return flow opening for recirculation modeNOTE!
•Minimumcabinetwidth:800mm.
- Installedductsmustbeaccessibleforservice.
- Withrecirculation,thehumiditycanrise.Therefore,areturnopeningofatleast500cm ^2 must beprovidedandthecutsurfacesmustbemademoistureresistant.
- Withrecirculation,pleasenotethatcondensationmayoccurifthekitchenunitisinstalled againstan uninsulatedwallorfloor.Ifnecessary,chooseanalternativerecirculationsetthat ismountedintheplinth.
- The powercord connection is located at the front of the appliance. At least 900 mm length of the power cord is required to lead to the socket designated location behind the appliance.
- Checktheappliancefortransportdamage.Donotconnectadamagedappliance.
- Thewallsandtheworktopsurroundingtheappliancemustbeheatresistantuptoatleast 105^ .
- Theworktopintowhichthehobisfittedshouldbeflat.
NOTE!
Forregularrhoboperationandperformance,pleaseprovidesufficientaircirculationforthe electronicsoftheinductionhob.
Thebackpanelmayneedtoberemovedforinstallation.
Electricalconnection
•Thisappliancemustbeearthed.
- Theelectrical connection must comply with national and local regulations.
- Prior to installation, ensure that the local distribution conditions (voltage and frequency) and the adjustment of the appliance are compatible.
- The voltage, frequency, power and the country for which the appliance has been designed are shown on the appliance rating plate.
- For class I appliances, check that your home's electrical system provides proper earthing.
- Thewallplugsocketandplugshouldalwaysbeaccessible.
- If a stationary appliance is not fitted with a supply cord and a plug, or with other means for disconnectionfromthesupplymainshavingacontactseparationinallpolesthatprovidefull disconnectionunderovervoltagecategorylllconditions,themeansfordisconnectionmustbe incorporatedinthefixedwiringinaccordancewiththewiringrules. Thisisalsoapplicablefor applianceswithasupplycordandplugwhentheplugisnotaccessibleafterinstallingthe appliance. Usinganomnipolarswitchwithacontactseparationofatleast3mmfittedinthe fixedwiringwillfulfilthisrequirement.
- Thesupplycordmusthangfreelyandshouldnotbefedthroughadrawer.
- Useanapprovedcablewiththecorrectcablediametersappropriatefortheconnection. The cablecasingshouldbeabletowithstandatleast 70^ Candthereforepreferablybeoftype H05V2V2orH07V2V2.
- Beforeconnectingtheappliance, makesurethevoltageindicatedontheratingplateconforms tothevoltageinyourpowermains.
- The connections should be adjusted to the current and fuses.
- The appliance should not be connected to the mains via a multi-plug adapter or extension cable, asthesafeuseoftheequipmentcannotbeguaranteed.
- After installation, the parts carrying electrical current and insulated parts shall be protected against contact.
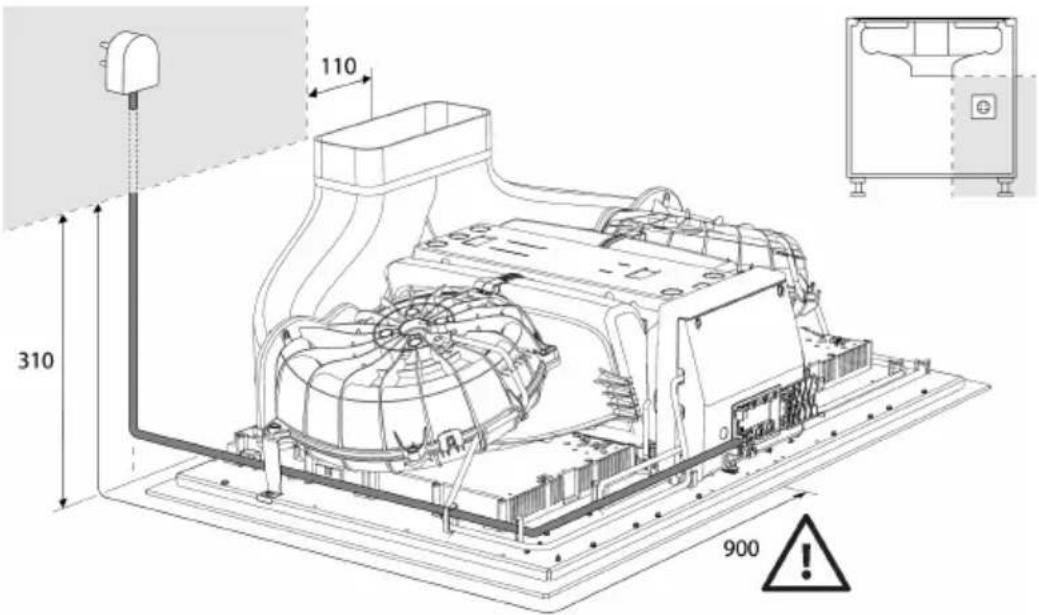
text_image
110 310 900
WARNING!
The appliancemayonlybeconnectedbyanauthorisedexpert.Falseconnectioncandestroy partsoftheappliance.Insuchcase,thereisnorighttowarranty.Disconnecttheappliancefrom thepowermainsbeforeanyrepairormaintenanceoperation.
NOTE!
The powercord connection is located at the front of the appliance. At least 900 mm length of the power cord is required to lead to the socket designated location behind the appliance.
Determining the existing electrical connection
NOTE!
Checkthevoltage.Beforeconnectingtheappliance,makesurethevoltagespecifiedonthe ratingplateconformstothevoltageofyourpowermains.Thevoltageofyourpowermains (220-240VbetweenLandN)shouldbecheckedbyanexpertusinganappropriatemeasuring device.
Checkthevoltagespresentasindicatedinthediagramsbelow.
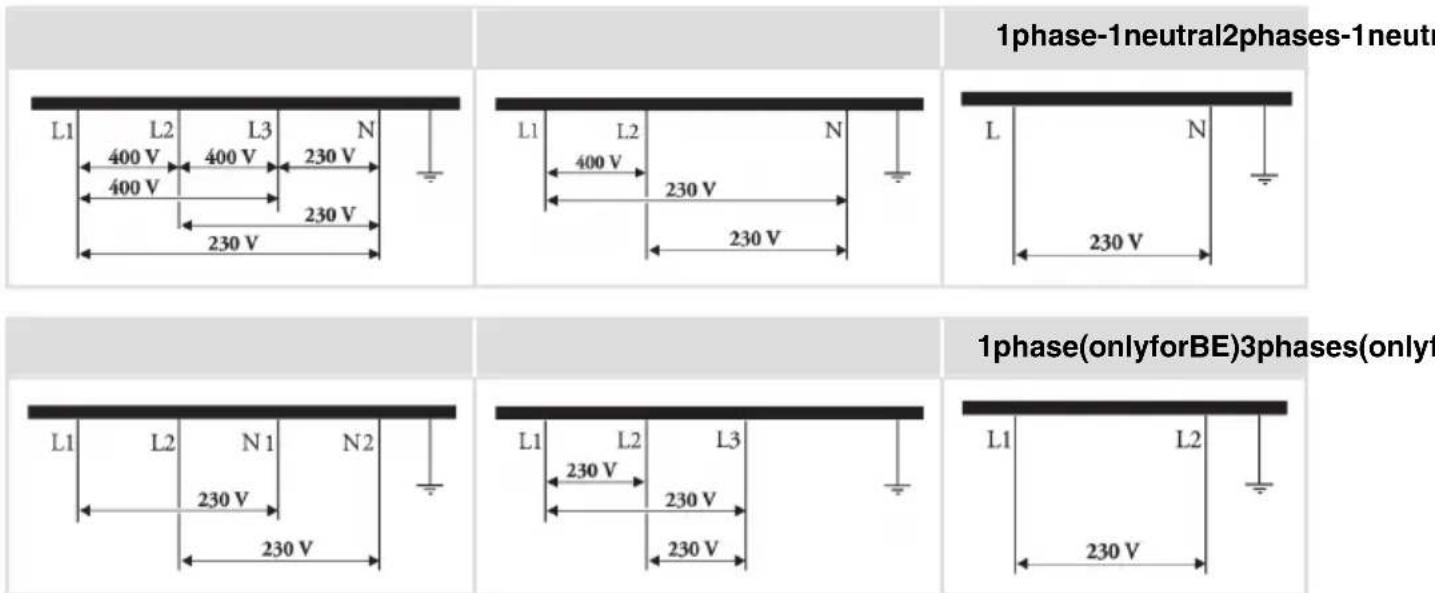
NOTE!
*The2phases(L1andL2)shouldbesecuredbyonlyoneandthesameearthleakagebreaker. RunningL1/N1threwadifferentearthleakagebreakerthanL2/N2isnotallowed.
Connectiondiagram
NOTE!
Consultthewiringdiagramsonthefrontoftheappliance.
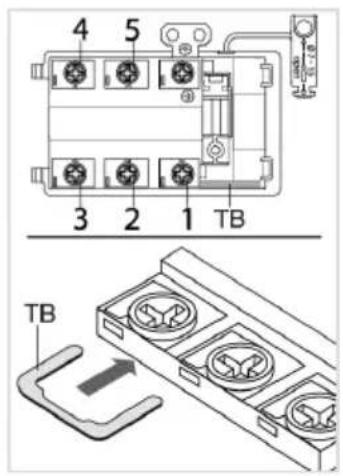
text_image
4 5 3 2 1 TB TB- Openthecoveroftheconnectionterminalbox.
- Runthepowercordthroughacordstrainrelief(clamp)which protectsthecablefrombeingpulledout.
- Connectthewiresaccordingtoyourtypeofappliance.
- Makethenecessary connections between the terminals using the supplied terminal bridges. The terminal bridges are located in the connection box.
Currentlimiter
See chapter 'Settings', under parameter Con - Current limiter to set the parameter. This parameter must beset before any panis placed on the hobor cooking zone activated.

WARNING!
A registered and qualified installermustset the current limit to match your connection and circuit breakers. Pleasereadthesafety regulations and the installation instructions carefully.
NOTE!
SettingalowervalueoftheCurrentlimiterparameterwillcauseareducedperformanceofthe inductionhob.
Seetheconnectiondiagramsforthevoltagebetween thephaseandneutralconductorsandvoltage between thephaseconductors.
Powercordcorecrosssectionalareashouldbeatleast1,5mm forthefollowingcurrentlimiter settingswhichshouldbeadjustedtoyourcircuitbreakers:
| PowercordTypeCuNumber of Settings Connection sectionof Power cordwires | ||
| 3phases-1 neutral | * | 5x1.5mm H05V2V2-F2x16A/2x13 |
| 2phases-1 neutral | * | 4x1.5mm H05V2V2-F2x16A/2x13 |
| neutral(onlyfor NL) | 5x1.5mm H05V2V2-F2x16A2pha | |
| BE) | 4x1.5mm H05V2V2-F2x16A3pha | |
| 3x4.0mm H05V2V2-F1x32A/1x25 | ||
| 3x2.5mm H05V2V2-F1x20A1pha | ||
| 3x1.5mm H05V2V2-F1x13A/1x10 |
Connectingan'openwindow'sensor
The use of sensor type 'FDS 100' is recommended if a window sensor must be installed. The sensor must be of the potential-free NO (normally open) contact type. It must be connected to the designated port on themotor control unit (MCU) in the enclosure at the front of the appliance. Acordo type H05VV-F2x0,5mm ^2 (orsimilar) is recommended for connecting a window sensor. Without a window sensor, a jumper close the electrical circuit.
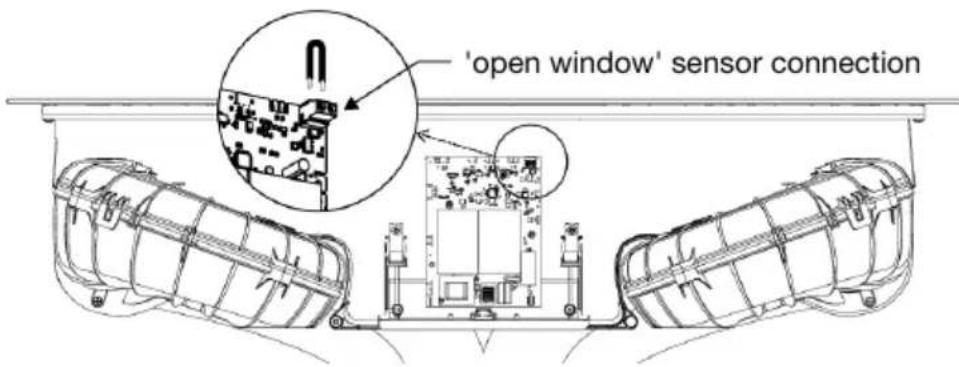
text_image
'open window' sensor connection- UnscrewandremovethecoveroftheMCUenclosure.
- Removethejumperofthesensorconnection.
Installation
- Connect the wires of the cord to the sensor connection.
- Usetheavailablestrainreliefclamptosecurethecord.
- Connect the wires of the record to the window sensor in such a way the contact is open when the window is closed (consult the instructions included with the window sensor).
Flush-mount
Theappliancemayonlybeinstalledintoatemperature-andwater-resistantcountertop,suchasa countertopmadeof(natural)stone(marble,granite),orsolidwood(theedgesalongthecut-out havetobesealed).Wheninstallingintoacountertopmadeofceramics,wood,orglass,awooden sub-frameshouldbeused.Theframeisnotsuppliedwiththeappliance.Theappliancemayonly beinstalledintoacountertopmadeofothermateriafsafteryouhaveconsultedthecountertop manufacturerandobtainedhisexpressapproval.Internaldimensionofthebasicunitshouldbeat leastequaltotheinternalcutoutfortheappliance.Thiswillallowsimpleremovaloftheappliance fromthecountertop.Attachsealingtapealongtheperimeterofthebottomoftheglasspanel.
Install the appliance (see 'Installation') and connect the appliance to the mains power supply (see instructions for connecting the appliance). Test the operation of the appliance before applying the seal. Seal the groove between the appliance and the kitchen worktop with basiliconesealant.
Thesiliconesealantusedtosealtheappliancemustbetemperature-resistant(toatleast160°C). Smoothoutthesiliconesealantusingsuitabletools. Observetheinstructionsforuseoftheselected siliconesealant.Donotswitchontheapplianceuntilthesiliconesealanthasdriedcompletely.
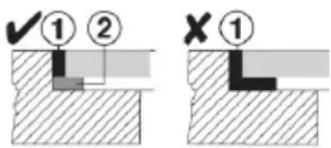
text_image
✓①② X①- Siliconesealant, 2. Sealingtape
NOTE!
Payparticularattentiontobuilt-indimensionswith(natural)stonecountertops.Whenchoosing thesiliconesalant,observethecountertopmaterialandconsultthecountertopmanufacturer. Useofinappropriatesiliconesalantscanresultinpermanentdiscolourationofsomeparts.
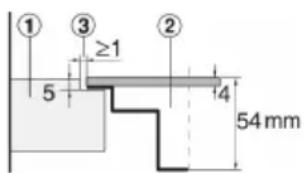
text_image
① ③ ≥1 ② 5 4 54 mmStonecountertop
- Countertop
- Appliance
3.Slot
Giventhemarginoferror(tolerance)fortheglassceramicplateoftheappliance,andthecutoutin thecountertop,theslotisadjustable(min.2mm).
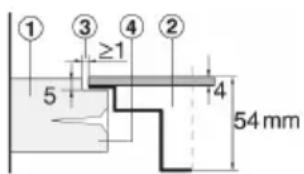
text_image
① ③ ≥1 ④ ② 5 4 54 mmCeramic,wooden,orglasscountertop
- Countertop
- Appliance
3.Slot - Woodenframe, thickness 16mm
WARNING!
Theservicedepartmentshallonlyberesponsibleforrepairingandservicingthecookinghob. Consultyourspecializedkitchenequipmentdealerregardingre-installingtheflush-mountcooking hob.
Built-in
This unit can be connected to various discharges systems:
| Toanexhaustduct(outlet)Afterfiltrationthroughgrease filters,theextractedairis dischargedtotheoutside throughaseriesofducts(tobe purchasedseparately).Requiredparts:•PlasmaMadefilter(Ref4003)Connectionpiece(HD2001)•Exhaustairduct(HD1001)•Vertical/horizontalelbow | ToarecirculationfilterAfterfiltrationthroughgrease filtersandtheodourcontrol/fine particlefilter,theextractedair isdischargedbackinto the room. | ToaplasmafilterAfterfiltrationthroughgrease filtersandtheplasmafilter,the extractedairisdischargedback intotheroom.Requiredpart: |
Preparation
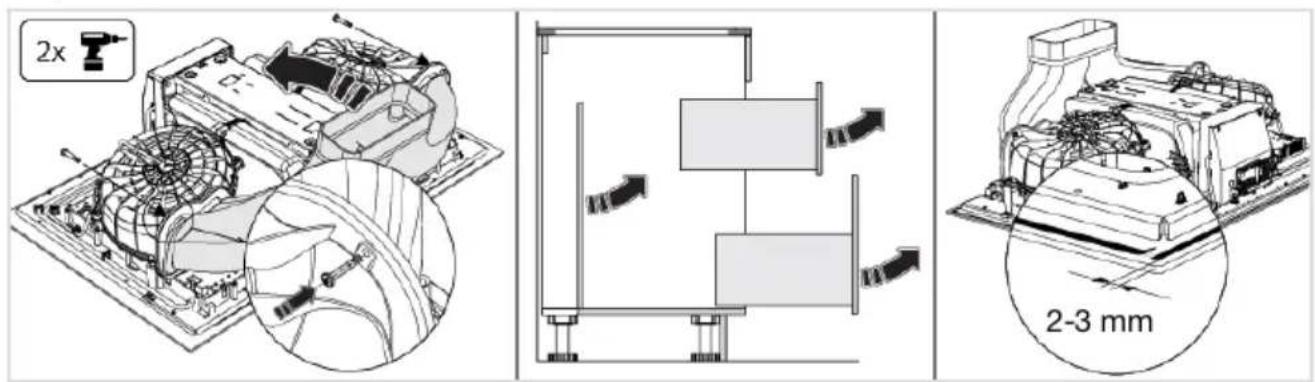
Installation
- HooktheY-ductintotheloweredgeofbothmotorhousingsandtilttheY-ductup.
- Attach the Y-duct to themotor housings with the twoscrews.
- Removethedrawersandthebackpanelfromthekitchencabinet.
- Before installing the appliance into a kitchen worktop, attach the foam gaskets supplied with the appliance to the bottom side of the glass ceramichob.
- Removetheprotectivefilmfromthegasket.
- Attach the gasket to the bottom side of the glass (2–3 mm away from the edge). The gasket has to be applied along the entire edge of the glass. The gasket may not overlap in the corners. When fitting the gasket, makes sure it is not damaged by or in contact with any sharp objects.

Connectingtoanexhaustduct(outlet)
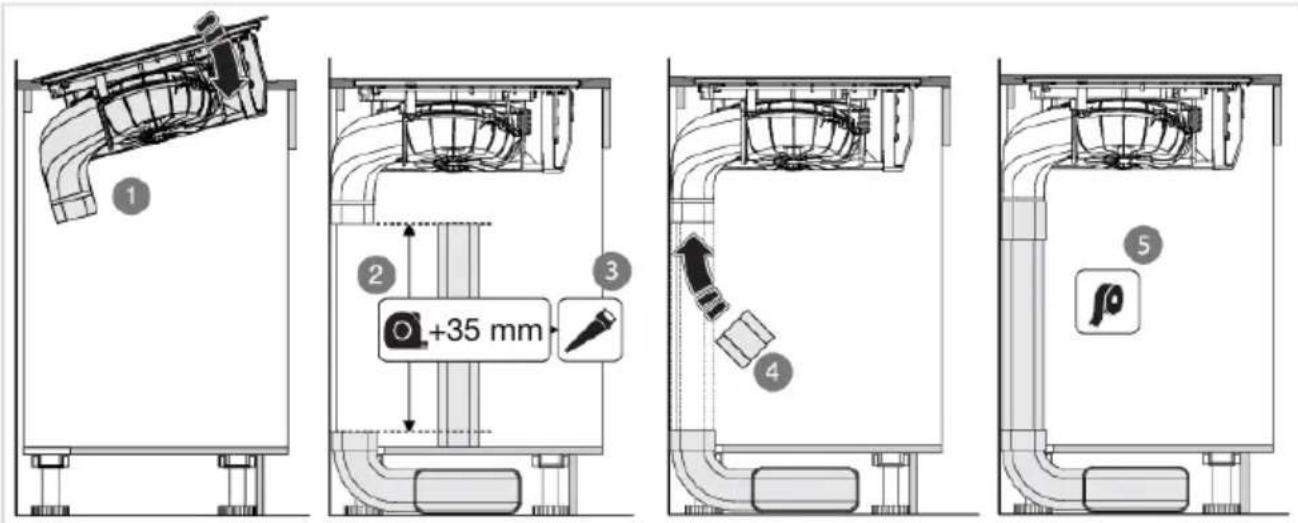
text_image
1 2 +35 mm 3 4 5- Placetheapplianceinthecut-outintheworktop.
- Measurethedistanceasindicatedinthefigureandadd35mm.
- Sawtheflatducttosize.
- Installthecoupling, flatduct, and Naberelbowset.
- Maketheductairtightwithsealingtape.
Gotostep16.

Connectingtoarecirculationfilter
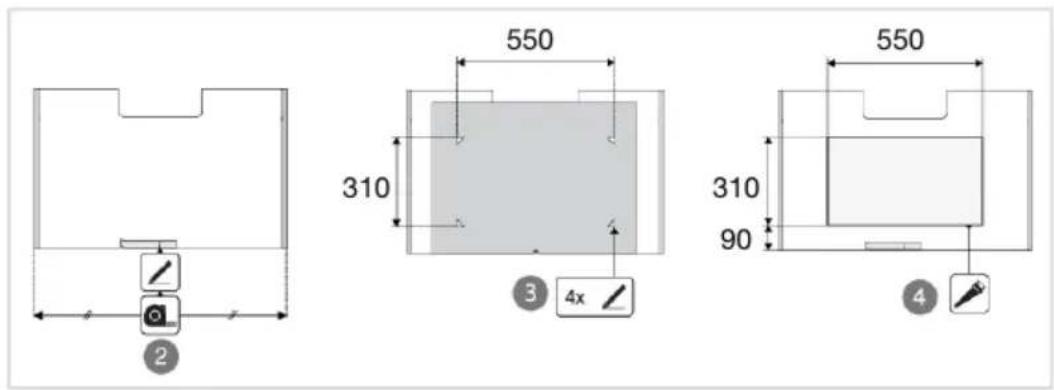
text_image
2 3 4x 550 310 550 310 90 4- Placetheapplianceinthecut-outintheworktop.
- Markthecentreofthecabinetbottomwithastripofmaskingtape.
- Markthecornersofthecut-outusingthetemplateprovided.
- Sawthecut-outinthecabinetbottomandfinishthecutsurfacesmoistureresistant.
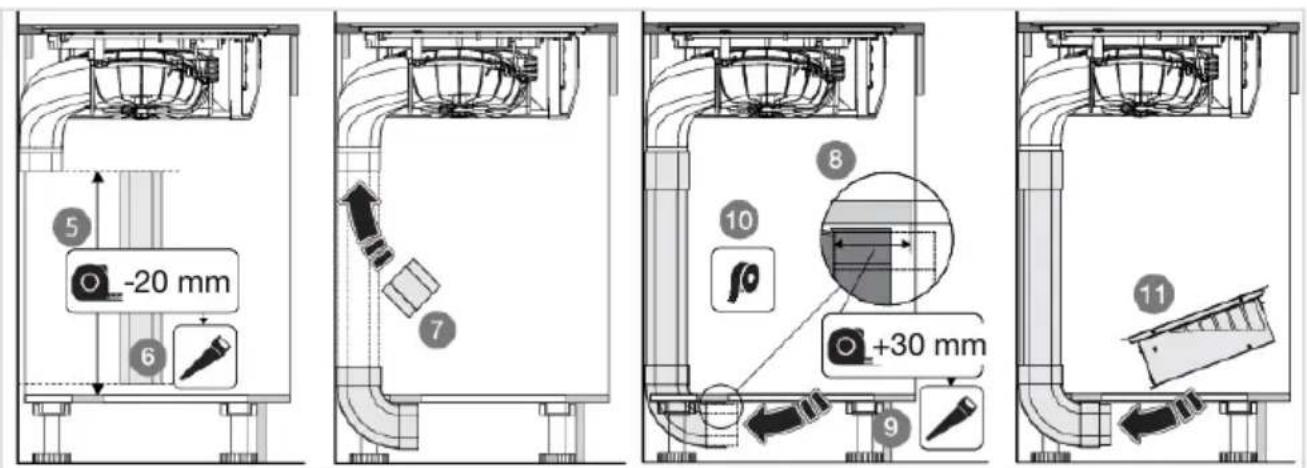
text_image
-20 mm -20 mm +30 mm- Measure the distance as indicated in the figure and subtract 20mm.
6.Sawtheflatducttosize. - Install the coupling, the vertical elbow and the flat duct.
- Measurethedistancebetweentheverticalelbowandthecut-outandadd30mm.
9.Sawthecouplingtosize.Ifnecessary,usethesawn-offpartoftheflatchannelforthis. - Maketheductairtightwithsealingtape.
- Placethebox.
Installation
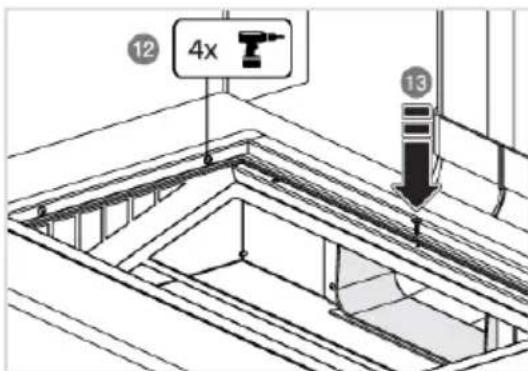
text_image
12 4x 13- Removethecoveroftheboxandscrewtheboxinplacefromtheinside.
- Fix the position of the coupling with a screw from the top. Donot forgettopre-drillahole for the screw.
- Fitthefilterandthecoverofthebox.
15.Fittherecirculationfilterandthecover.
Gotostep16.

Connectingtoaplasmafilter
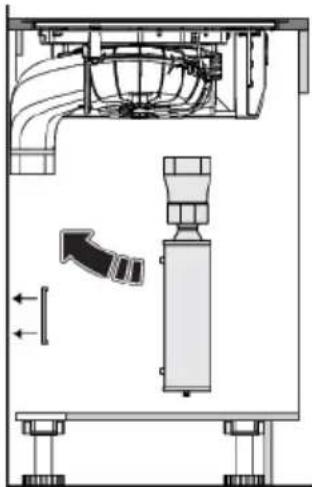
natural_image
Technical diagram of a mechanical assembly with no visible text or symbolsRefertotheinstallationinstructionssuppliedwiththeplasmafilter.
Finishinstallation
- Connect the appliance to the powers supply with plug. Thesocket must be earthed. Thenominal voltage and frequency required for the appliance are shown on the appliance's type plate/label with basic information.
- Fitthebackofthecabinetandthedrawers.
- Placethecondensationreservoirs, filters, and the tower in the extraction module.
- Testiftheapplianceoperatescorrectly.
- For flushmounting, seal thehob.
Removingthebuilt-inappliance
Disconnecttheappliancefromthepowermainsanddisconnectitfromthedischargeduct. Usea suitabletooltoremovethesiliconesealfromaroundtheedge.Removetheappliancebypushing itupwardsfromthebottom.
NOTE!
Donotattempttoremovetheappliancefromtheuppersideofthecounter!
The appliance identification card is located on the bottom of the appliance.
Sticktheapplianceidentificationcardhere.
ATAG
www.atag.nl
www.atag.be
