
HG9611ME - Cooker Atag - Free user manual and instructions
Find the device manual for free HG9611ME Atag in PDF.


| Product type | Built-in gas hob |
| Brand | Atag |
| Model | HG9611ME |
| Number of burners | 4 |
| Burner types | Simmer (1.0 kW), Normal (2.0 kW), Power (3.0 kW), Wok (5.7 kW) for G20 |
| Maximum power | 5.7 kW (Wok burner) |
| Overall dimensions (W x D) | 904 x 522 mm |
| Cut-out dimensions (W x D) | 860 x 490 mm |
| Electrical supply | 230 V - 50 Hz - 3 W |
| Compatible gas type | Natural gas (G20, G25) and LPG (G30, G31) depending on setting |
| Child safety | Child lock via on/off button (4 seconds) |
| Flame protection | Automatic re-ignition and gas cut-off if flame goes out |
| Residual heat indicator | Indicator light per burner, duration varies with use |
| Emergency stop | On/off button turns off all burners simultaneously |
| Daily maintenance | Clean with mild product and sponge, avoid dishwasher |
| Cleaning the glass plate | Special ceramic cleaner, white vinegar for limescale marks |
| Cleaning the burners | Disassemble and clean gently, do not immerse hot in water |
| Hob material | Glass |
| Burner material | Enamel and copper (Wok) with Keradur® coating |
| Automatic shut-off | Stops after 6 hours of continuous operation |
| Warranty | On provided warranty card |
| After-sales service | Contact via website www.hps.nl or warranty card |
| Installation | Only by a certified gas installer |
Frequently Asked Questions - HG9611ME Atag
User questions about HG9611ME Atag
0 question about this device. Answer the ones you know or ask your own.
Ask a new question about this device
Download the instructions for your Cooker in PDF format for free! Find your manual HG9611ME - Atag and take your electronic device back in hand. On this page are published all the documents necessary for the use of your device. HG9611ME by Atag.
USER MANUAL HG9611ME Atag
natural_image
Close-up of a black triangular panel with four metallic blades and a central circular component (no text or symbols visible)uw gaskookplaat
natural_image
Abstract geometric design with a circular element and curved lines, no text or symbols present.natural_image
Pure mechanical component diagram without any text, numbers, or symbolsnatural_image
Technical line drawing of a mechanical clamp or bracket assembly (no text or symbols)natural_image
Two identical 3D-rendered cooking pots on a stove, shown from different angles (no text or symbols)FOUT GOED
natural_image
Technical line drawing of a mechanical assembly with a base and rotating component (no text or symbols)natural_image
Symbol of a trash bin with crossed lines indicating no waste or restriction, plus a solid black rectangle below (no text or symbols)text_image
Technical diagram showing a cross-section with labeled section A and directional arrow indicating movement or forcenatural_image
Pure mechanical component diagram without any text, numbers, or symbolsnatural_image
Technical line drawing of a circular mechanical component with four symmetrical arms (no text or symbols)natural_image
Technical line drawing of a mechanical component with symmetrical arms and central hub (no text or symbols)natural_image
Two identical 3D-rendered cooking pots with heat exchanger and side legs, placed on a surface (no text or symbols)FAUTE CORRECT

natural_image
Technical line drawing of a mechanical assembly with a base and component, no text or symbols presentnatural_image
Symbol of a trash bin with crossed x-marks and a blank rectangular base (no text or numbers)natural_image
Abstract geometric design with a central vertical bar and curved lines, no text or symbols present.natural_image
Pure mechanical component diagram without any text, numbers, or symbolsnatural_image
Technical line drawing of a mechanical component with symmetrical arms and central hub (no text or symbols)natural_image
Two identical 3D-rendered cooking pots on a stovetop (no text or symbols visible)FALSCH GUT

natural_image
Technical line drawing of a mechanical component with a base and arrow indicating motion (no text or symbols)natural_image
Symbol of a trash bin with crossed lines indicating no waste or discharge, and a solid black rectangle below (no text or labels)igniting and adjusting GB 7
details . . . . . . . . . . . . . . . . . . . . . . . . . . . . . . . . . . . . . . . . . . . . . . . . . . . . . . . . . . . GB 8
comfortable cooking
optimal use of the hob . . . . . . . . . . . . . . . . . . . . . . . . . . . . . . . . . . . . . . . . . . . . . GB 10
maintenance
general GB 11
faults
table GB 14
environmental aspects
disposal of packaging and appliance . . . . . . . . . . . . . . . . . . . . . . . GB 15
installation instructions
general GB 16
building in....GB 18
technical information GB 23
NL
handleiding....NL 4-23
FR
- rapid burner
- semi-rapid burner
- simmer burner
- wok burner
- pan supports
- glass plate
- on/off button
- control button
text_image
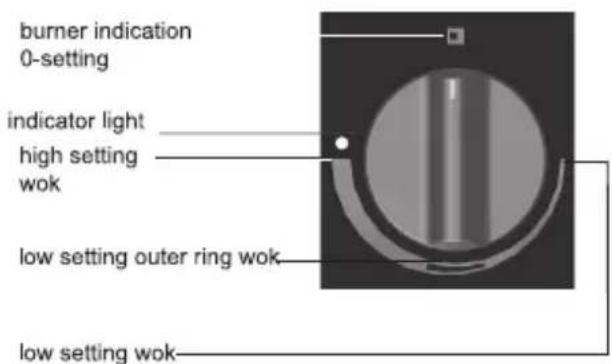
burner indication 0-setting indicator light high setting wok low setting outer ring wok low setting wok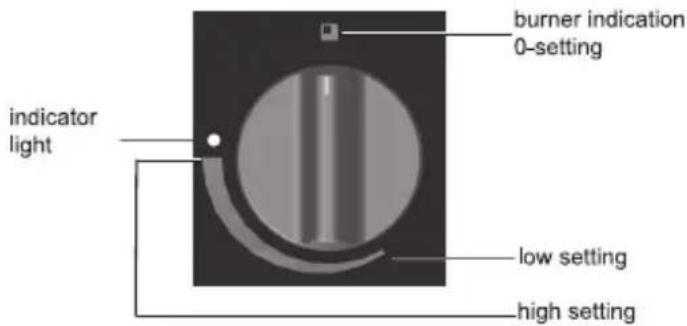
text_image
indicator light burner indication 0-setting low setting high settingKOOKKEUR
This ATAG gas hob has been designed for the real lover of cooking. The differences in burner capacity mean that you can cook any type of dish.
This appliance complies with all requirements of the Cooking Approval quality mark. The gas hob combines high efficiency with a minimum of incompletely burned combustion gases.
Various electronic safety devices have been incorporated into the hob, such as achildproof lock, residual heat indicator, maximum cut-out and a flame failure device which ensures that unburned gas can never pass through the burner. Your hob has a synchrocontrol feature as well.
This manual explains optimum use of the gas hob. In addition to information on operation, you will also find background information that may be useful to you when using this product.
Keep this manual carefully so that possible subsequent users can also benefit from it.
The manual also serves as reference material for service technicians. Please, therefore, stick the data card in the space provided, at the back of the manual. Where applicable, the data card supplied with a conversion kit should also be stuck here. The data cards contain all the information that the service technician will need in order to respond appropriately to your needs and questions.
Enjoy your cooking!
pictograms used in this manual


important information
tip

Ensure that there is adequate ventilation during use
- Keep natural ventilation openings open.
- When using the hob for long periods, extra ventilation is necessary.
Open a window for instance or install a mechanical fan.
Use the hob only for preparing dishes
- The appliance is not suitable for space heating.
Never flambé under an extractor hood
- The high flames can cause a fire, even if the fan is switched off.
The burner parts are hot during and immediately after use
- Do not touch them, and avoid contact with non-heat-resistant materials.
- Never immerse hot burner parts in cold water. The rapid cooling can damage the enamel.
The distance from the pan to a knob or non-heat-resistant wall should always be greater than two centimetres
- In the case of smaller distances the high temperature may cause the knobs or wall to discolour and/or distort.
Always use the pan supports and suitable cooking utensils
- Always place the pan on the pan support. Placing the pan directly on the burner head can result in dangerous situations.
– Aluminium trays or foil are not suitable as cooking utensils. They can become burnt into the burners and pan supports.
Installing burner parts and pan supports
- The hob can only function effectively if the burner parts have been assembled using the guide ridges.
- Ensure that the pan supports lie properly against each other and flat on the glass plate. Only then can the pans be positioned stably.
Various electronic safety devices have been incorporated in this gas hob to monitor it. As soon as you plug the hob in it will be on stand-by and the safety devices activated.
switching on and igniting
text_image
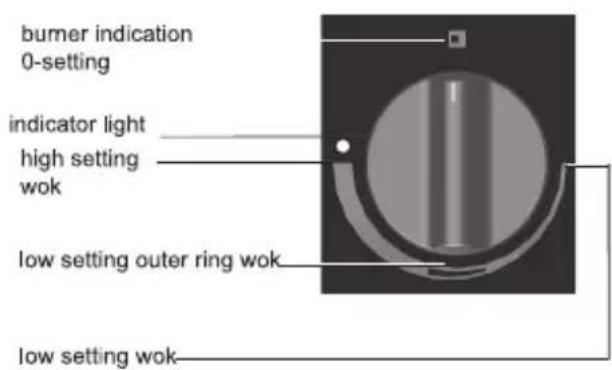
burner indication 0-setting indicator light high setting wok low setting outer ring wok low setting wok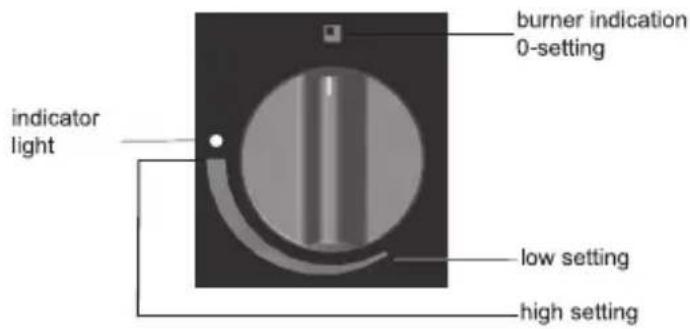
text_image
indicator light burner indication 0-setting low setting high setting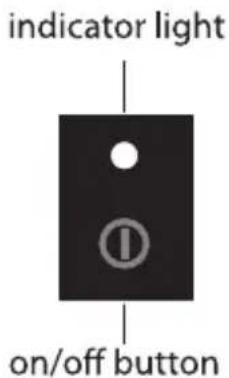
text_image
indicator light on/off button- Press the on/off button.
The indicator light above the button will come on.
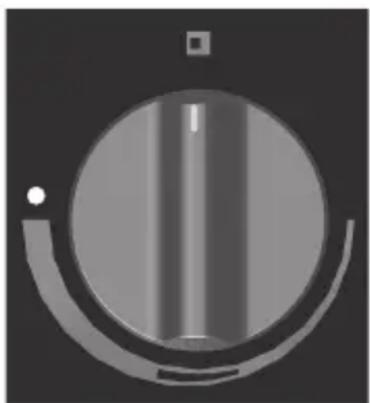
- Turn the control to the required setting within 3 minutes.
The burners will ignite automatically. A safety device will check that there is a flame.
If no flame is detected within 10 seconds the gas supply to the appropriate burner will be shut off automatically.
- Turn the control back to "0" and try to ignite the burner again.
Each burner can be adjusted continuously between the full and low positions.
synchrocontrol
Your hob has a synchrocontrol feature. If you have installed an ATAG cooker hood type WS4111S above the hob, it will be switched on and off automatically at the same time as the hob.
emergency stop
Using the on/off switch will enable you to turn all the burners off at once.
childproof lock
The childproof lock enables you to lock the hob when it is switched off. This prevents it being switched on unintentionally by children.
- Press the on/off switch for 4 seconds to activate the childproof lock. During cooking you can not activate the childproof lock.
- The indicator light above the on/off switch will flash at long intervals. If you turn the control knob, the childproof lock will be activated and the indicator above the knob will start to flash.
residual heat indication
natural_image
Abstract geometric design with concentric circles and curved lines (no text or symbols)The burners have a residual heat indicator. Once a burner has been switched off the indicator next to the relevant control will stay on for some time, depending on how long the burner had been used. The longer the burner had been on, the longer the light will stay on.
Safety devices
Flame failure device
The gas hob has a flame failure device which ensures that the burner will automatically reignite should it accidentally go out. If the burner cannot be reignited automatically the gas supply to the burner concerned will be shut off, the control-indicator light will flash.
- First turn the control to "0" to reignite the burner.
wok burner

With the wok burner you can prepare dishes at a very high temperature.
For this purpose it is important:
- to cut the ingredients into strips, slices or pieces before cooking;
- to use good-quality oil, such as olive, maize, sunflower or peanut oil when stir-frying. A small quantity is enough. Butter and margarine on the other hand will burn because of the high heat;
- to place the dishes with the longest cooking time in the pan first, so that at the end of the cooking time all ingredients are cooked al dente at the same time;
- this wok has a very small low setting. With reduction support you can also use it as simmer burner.
wok auxiliary support
natural_image
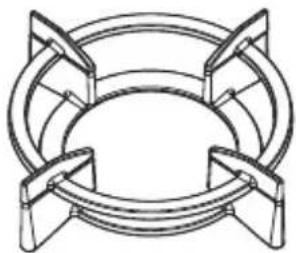
Technical line drawing of a circular mechanical component with four symmetrical arms (no text or symbols)The auxiliary support supplied for the wok burner or available as an accessory provides additional stability in the case of a wok with a round base. Place the auxiliary support on the wok support as indicated in the illustration.
reduction support
natural_image
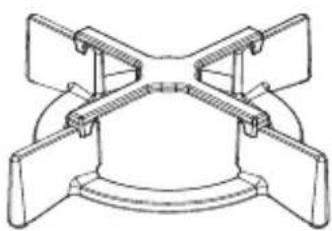
Pure mechanical assembly diagram without any text, numbers, or symbolsThe reduction support supplied with the unit or available as an accessory enables you to use very small pans.
This gas ring reducer can be used on all burners (including the wok burner).

- Always ensure that the flames remain below the pan. If flames play around the pan, a lot of energy is lost. In addition, the handles can get too hot.
Do not use pans with a base diameter less than 12 cm. Smaller pans will not be stable.
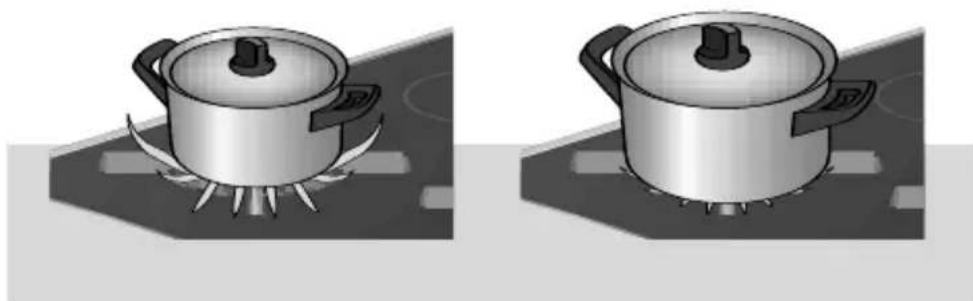
natural_image
Two identical 3D illustrations of a cooking pot on a stovetop, shown from different angles (no text or symbols)WRONG RIGHT

- When frying, stir-frying, heating through large quantities and deep-frying it is better to use the strong, super-strong or wok burner.
Preparing sauces, simmering and boiling can be done best on the simmer burner, or the wok burner on lower setting. On its high setting this simmer burner is large enough for cooking food right through.
For all other dishes use the normal burners.
- Cook with the lid on the pan. This way you save up to 50% energy.
- Use pans with a flat, clean, dry base. Pans with a flat base stand stably and pans with a clean base transfer the heat more effectively to the food.

- Regular cleaning immediately after use prevents over-cooked food being able to become ingrained and cause stubborn stains that are difficult to remove. Use a mild cleaning agent.
- Clean the control knobs, burners and pan supports first and then the glass plate. This avoids the glass plate getting dirty again during cleaning.
ATAG Shine

Atag supplies a range of cleaning agents under the name ATAG Shine. These can be obtained via the website at www.hps.nl, where you will also find various cleaning and operating tips.
Attention
Never immerse hot burner caps in cold water. The sudden change in temperature could damage the enamel.
stubborn stains on the glass hob
Clean the glass hob with a cleansing agent intended specifically for ceramic hobs. Water stains or limescale are most easily cleaned using a non-abrasive limescale remover.
Your appliance has been manufactured from high-grade materials, which are easy for you to clean.

– Burner parts should not be cleaned in the dishwasher. The parts may be damaged by the dishwasher detergent!
Do not use to much water as this can penetrate into the burner or ventilation openings.
- Clean the spark plugs preferably with a cloth. Do this carefully. If too much pressure is applied, the distance from the point of the sparkplug to the burner may change, causing the burner to ignite poorly or not at all. The sparkplug will only operate correctly in a dry environment. If the plug is very dirty, you may clean the point with a tiny brush.
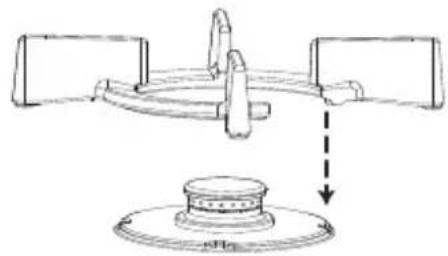
natural_image
Technical line drawing of a mechanical component with a base and arrow indicating motion (no text or symbols)- Don't slide the pan supports over the glass plate.
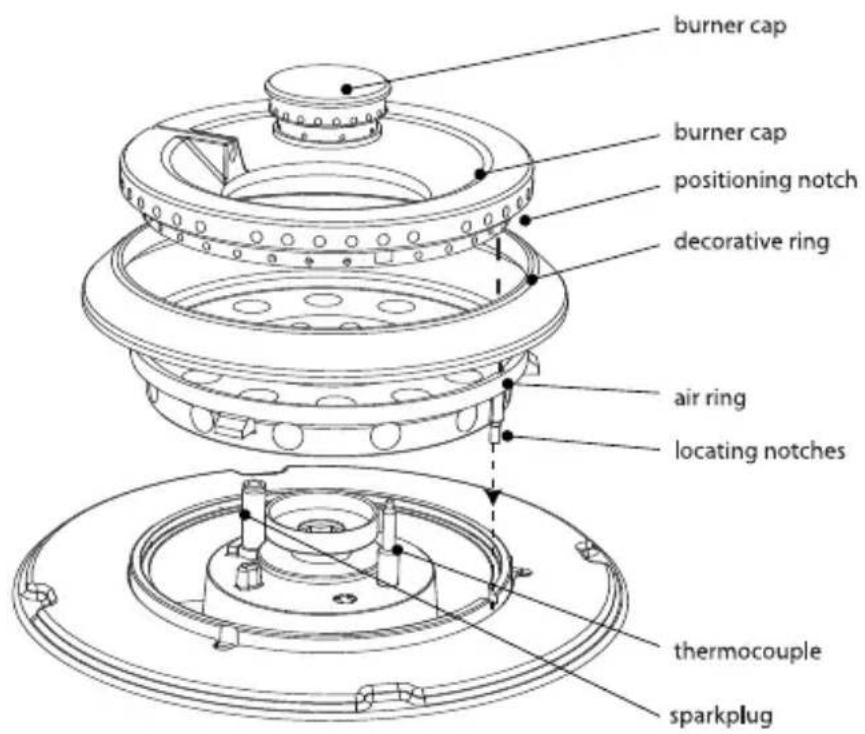
text_image
burner cap burner cap positioning notch decorative ring air ring locating notches thermocouple sparkplugAssemble the burner parts using the guide ridges and positioning notches.
Keradur ^® burner bases
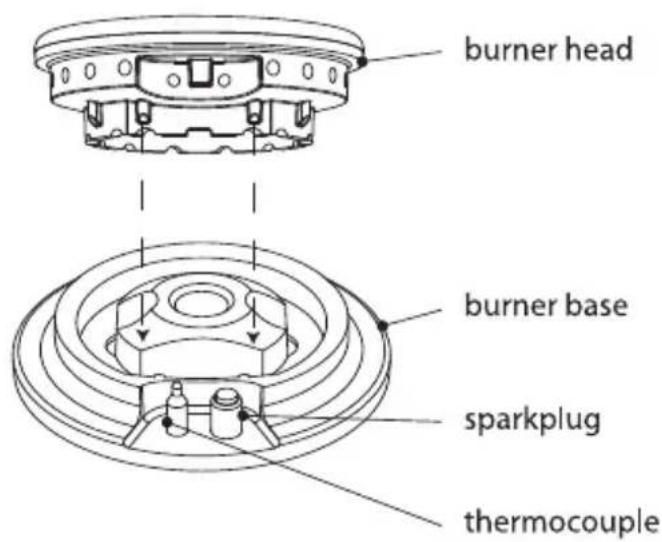
text_image
burner head burner base sparkplug thermocoupleThe burner bases have a unique Keradur ^® surface coating.
The special dirt-repelling lacquer has a ceramic filling which makes cleaning easier and substantially improves the durability of the burners. The burner bases are best cleaned with a mild cleaning product and a soft cloth.
stubborn stains on enamel (pan supports, burner caps)
Remove with a non-abrasive cream or a soft sponge. Never use scouring powder, scouring pads, sharp objects or aggressive cleansing agents.
cleaning removable burner components
The removable burner components (including wok) are best cleaned with a mild cleaning product and a soft cloth. In the case of obstinate stains you can soak the parts in hot suds.
Never use scouring powder, scouring pads, sharp objects or aggressive cleansing agents.
brass wok burner parts
A few parts of the work burner are made from brass. It is normal for the colour of the brass to change as a result of the high temperatures that occur when cooking with a wok.
If the appliance does not work properly, this does not always mean that it is defective. Try to deal with the problem yourself first by checking the points mentioned below:
| fault | cause | solution |
| There is a smell of gas in the vicinity of the appliance. | - Leak at the connection. | - Check with soap.- Tighten the coupling. |
| A burner does not ignite.Indicator light flashes. | - Plug not in socket.- Appliance not switched on.- Fuse defective/fuse in meter cabinet switched off.- Sparkplug dirty/damp.- Burner parts not correctly installed.- Burner parts dirty/damp.- Main gas tap closed.- Fault in the gas network.- Gas bottle or tank is empty.- Wrong type of gas used (where bottled gas is used).- Childproof lock switched on. | - Push the plug into the socket.- Switch on appliance.- Fit a new fuse or switch the automatic fuse back on.- Clean and dry the sparkplug.- Assemble the burner parts using the centring ridges.- Clean and dry the burner parts, making sure that the outflow holes are open.- Open the main gas tap.- Check with your gas supplier.- Connect a new gas bottle or have the tank filled.- Check that the gas used is suitable for the appliance.- Switch off childproof lock. |
| The burner does not burn evenly. | - Burner parts incorrectly installed.- Burner parts dirty or damp.- Wrong type of gas used (where bottled gas is used). | - Assemble the burner parts using the centring ridges.- Clean and dry the burner parts, making sure that the outflow holes are open.- Check that the gas used is suitable for the appliance. |
| Indicator light flashes. | - No flame.- Childproof lock.- Appliance is too hot. | - Try to re-ignite the burner.- Switch off childproof lock.- Allow the appliance to cool. |
| Indicator lights flashing consecutively.see page 23 | - Electronic fault. | - Contact the service department. |
In case of trouble contact the service department.
The service department telephone number can be found on the guarantee card provided or on www.hps.nl.
This appliance may only be connected by a qualified installer!
In the manufacturing of this appliance use has been made of durable materials.
The appliance packaging is recyclable. The following may have been used:
- cardboard;
• paper;
• polythene film (PE);
• CFC-free polystyrene (PS hard foam);
• polypropylene tape (PP).
Dispose of these materials in a responsible manner and in accordance with government regulations.
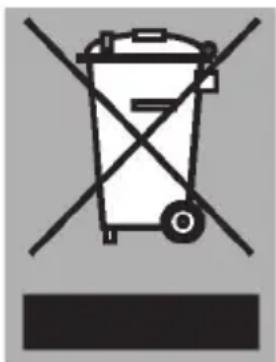
On the data plate is put the symbol of a crossed-out wheeled dustbin:
natural_image
Symbol of a trash bin with crossed lines indicating no waste, no text or numbers presentThis means that at the end of its working life, the product must not be disposed of as urban waste. It must be taken to a special local authority differentiated waste collection centre or to a dealer providing this service. Disposing of a household appliance separately avoids possible negative consequences for the environment and health deriving from inappropriate disposal and enables the constituent materials to be recovered to obtain significant savings in energy and resources.
As a reminder of the need to dispose of household appliances separately, the product is marked with a crossed-out wheeled dustbin.
The fitting of the appliance should only be carried out by a registered Corgi gas fitter.
attention
The type of gas and the country for which the appliance has been designed are indicated on the ratings plate.
This is a category 3 appliance (built-in appliance).
gas connection
The gas connection must comply with national and local regulations.
We recommend that the hob be connected by means of a fixed pipe. Connection using a specially designed safety hose is also permitted.
Behind an oven use must be made of a pipe made entirely out of metal.
attention
A safety hose may not be bent and must not come into contact with moving parts of kitchen units.
In all cases the connection tap for the appliance must be positioned such that it is easily accessible.
Before using the appliance for the first time check the connections using water and washing-up liquid to ensure that there are no gas leaks.

electrical connection
230 V - 50 Hz - 3 Watt
The electrical connection must comply with national and local regulations.
Wall socket and plug must be accessible at all times.
If you want to make a fixed connection, ensure that a multi-pole switch with a distance between contacts of 3 mm is installed in the supply cable.

attention
This appliance must be earthed.
If the connecting cable is damaged, it may only be replaced by the manufacturer, the manufacturer's service organisation or equivalently qualified persons, in order to avoid dangerous situations.
preparing the hob
text_image
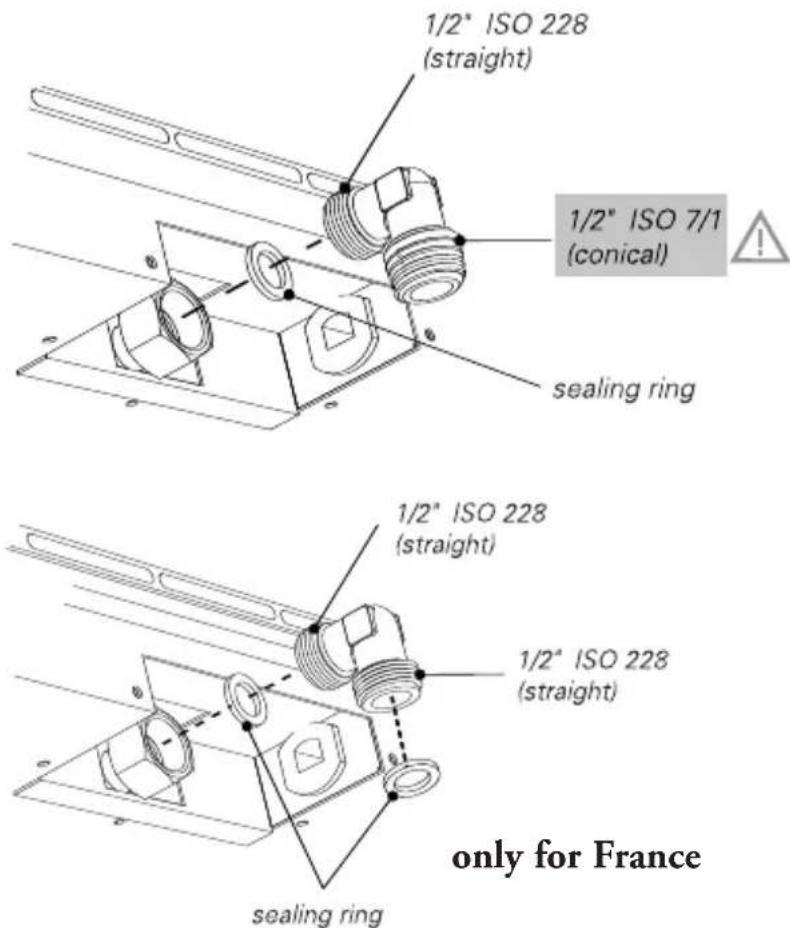
1/2" ISO 228 (straight) 1/2" ISO 7/1 (conical) sealing ring 1/2" ISO 228 (straight) 1/2" ISO 228 (straight) sealing ring only for FranceFit the elbow supplied on the appliance's gas connection.
text_image
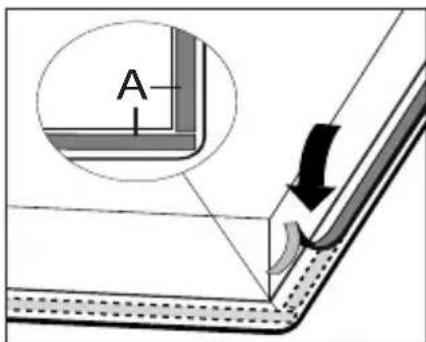
ARemove the protective foil of the sealing strip (A) and attach the sealing strip in the groove of the aluminium profiles or the edge of the glass plate. Do not attach the sealing strip through the corner. Instead, cut 4 pieces that fit tightly together in the corners.
cut opening in worktop
Saw the opening in the worktop. This should be done very accurately (building in dimensions).
If the woodtop is made of treated wood, then coat the sawn surfaces of the top with sealing varnish, to prevent moisture causing the top to swell.
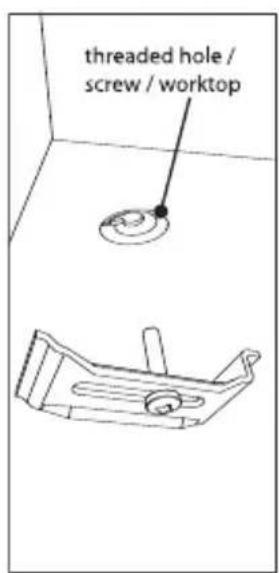
attachment points for mounting brackets
text_image
threaded hole / screw / worktop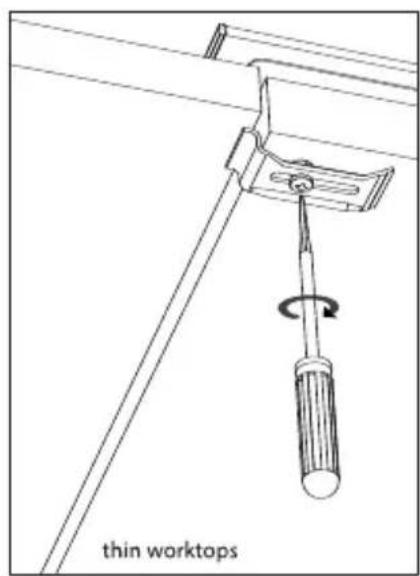
text_image
thin worktops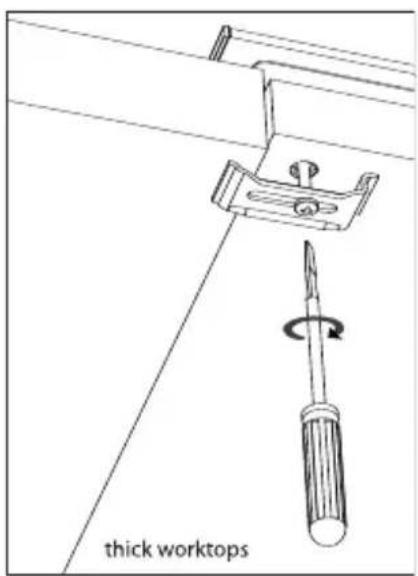
text_image
thick worktopsbuilding in dimensions HG9611ME
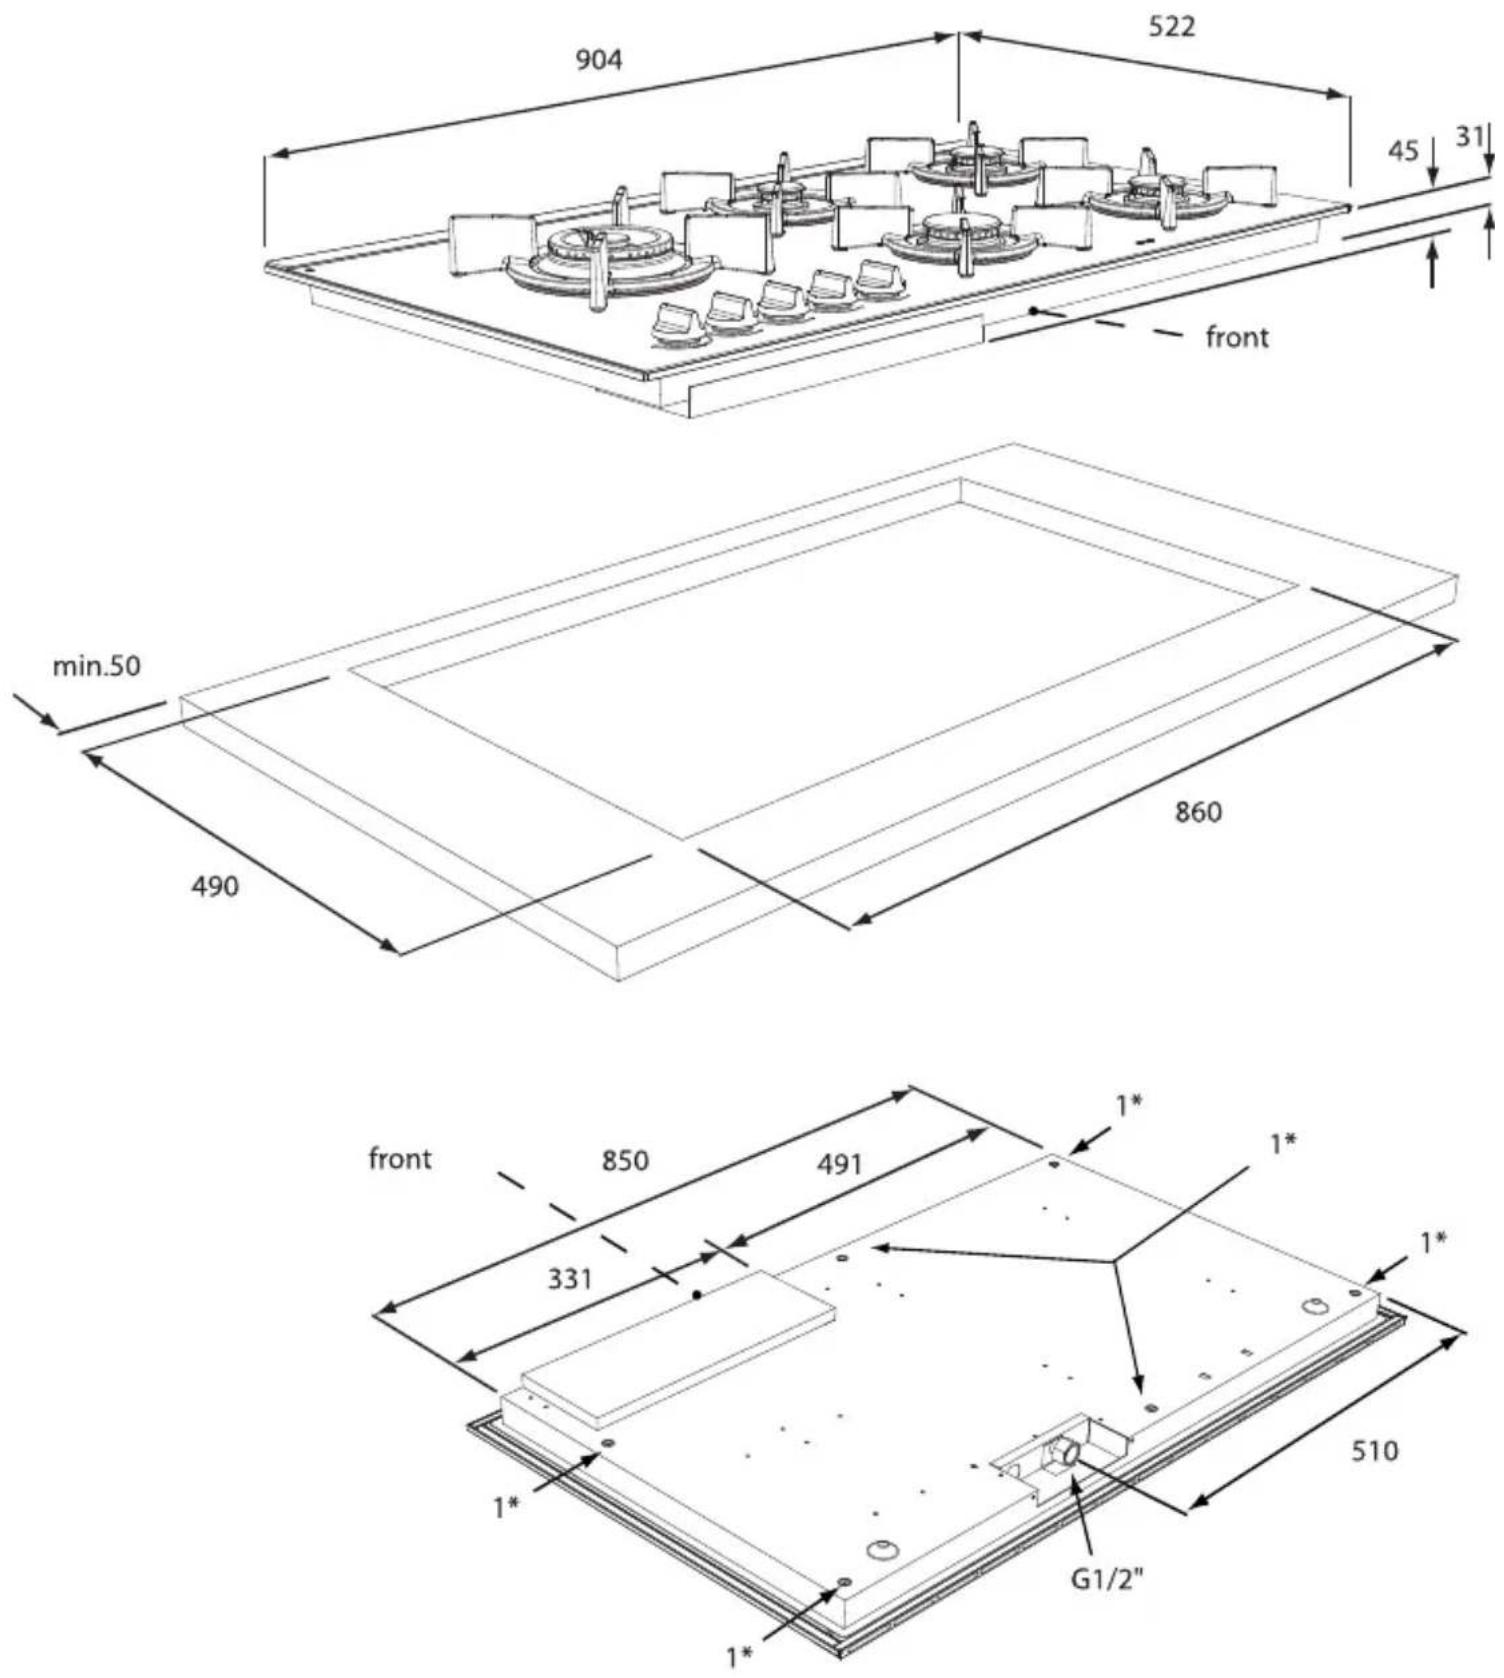
fitted-unit situations
fitted-unit dimensions in 60 cm corpus
$$ \begin{array}{l} \mathrm{X} < 3 1 \mathrm{mm}: \quad \mathrm{Y} = 3 1 \mathrm{mm} - \mathrm{X}: \quad \mathrm{Z} = 4 5 - \mathrm{X} - \mathrm{Y} \ \mathrm{X} > = 3 1 \mathrm{mm}: \quad \mathrm{Y} = 0 \mathrm{mm}: \quad \mathrm{Z} = 4 5 - \mathrm{X} \ \end{array} $$
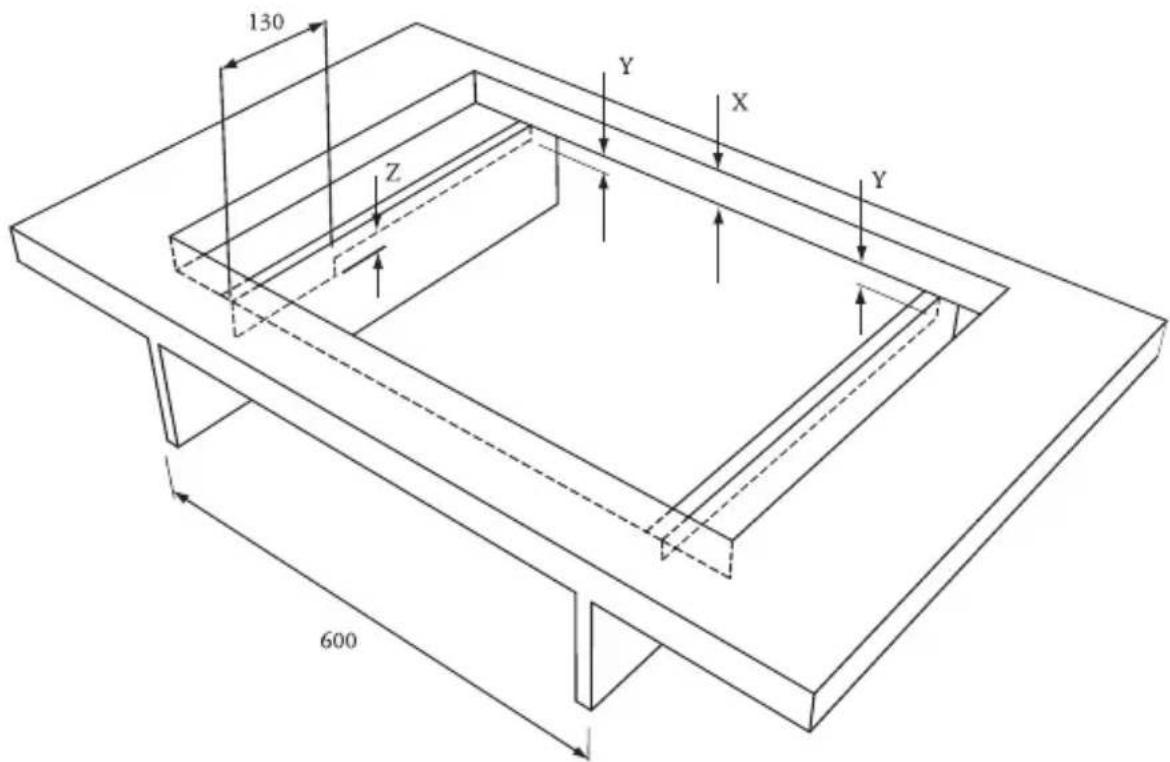
text_image
130 Z Y X Y 600space to be left free around the appliance
A hob generates heat. Leave a sufficient distance between the appliance and non heat-resistant materials. Take care also with materials that may discolour (such as stainless steel).
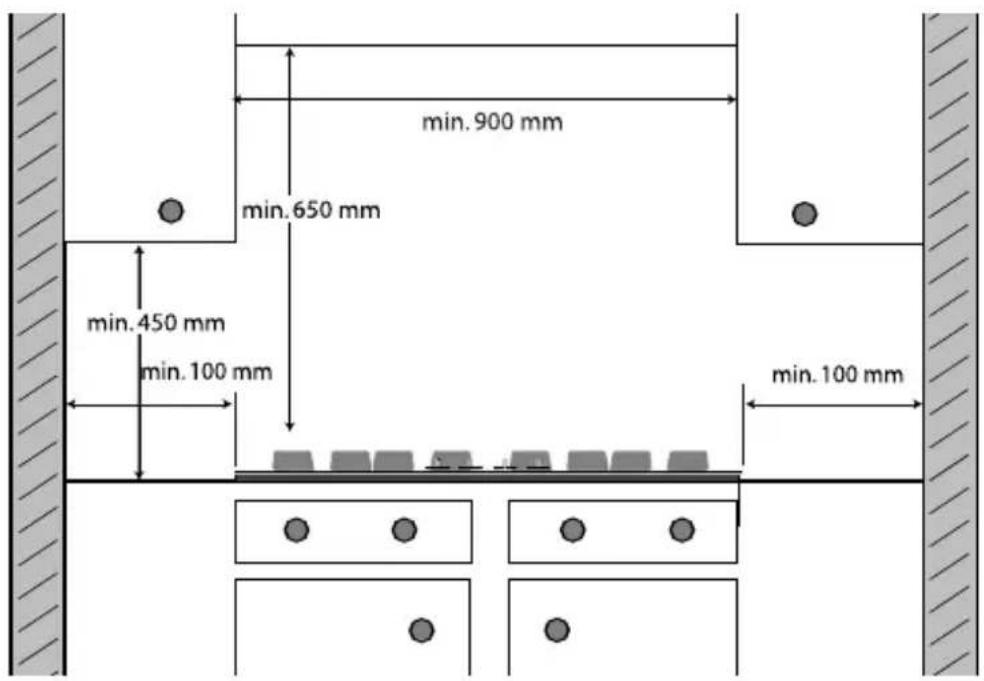
The gas hob may only be built in next to one vertical wall.

attention
The bottom of the hob becomes hot. Do not place combustible items in a drawer if the drawer is fitted directly below the hob.
install appliance and make connections
Place the appliance in the worktop and secure it using the mounting brackets and screws supplied.
Connect to the gas supply.
Check with soap suds that the connection is gastight.
Connect the appliance to mains electricity.
gas information
| G25/25 mbar | G20/20 mbar | G25/20 mbar G30 | 0/29 mbar G31/ | 29 mbar G31/37 | mbar G30/50 | mbar G31/50mbar | ||
| burner type (kW) | (kW) (kW) (kW / g/h) | (kW / g/h) | (kW / g/h) | (kW / g/h) | (kW / g/h) | |||
| simmer 1.00 1.00 | 0.90 0.90 / 65 | 0.79 / 57 0.90 / | 65 1.00 / 72 | 0.88 / 63 | ||||
| semi-rapid | 2.00 | 2.00 | 1.80 | 1.60 / 115 | 1.41 / 101 | 1.60 / 115 | 2.00 / 144 | 1.76 / 127 |
| rapid | 3.00 | 3.00 | 2.70 | 2.30 / 166 | 2.02 / 146 | 2.30 / 166 | 2.70 / 194 | 2.38 / 171 |
| wok HG9611M | 5.70 | 5.70 | 5.00 | 5.50 / 396 | 4.85 / 350 | 5.50 / 396 | 5.50 / 396 | 4.75 / 342 |
Safety devices
Maximum cut-out
The hob has a maximum cut-out which will automatically switch the hob off if a burner has been continuously ignited for 6 hours. After 6 hours you will have to reignite the burner.
Electronic failure
text_image
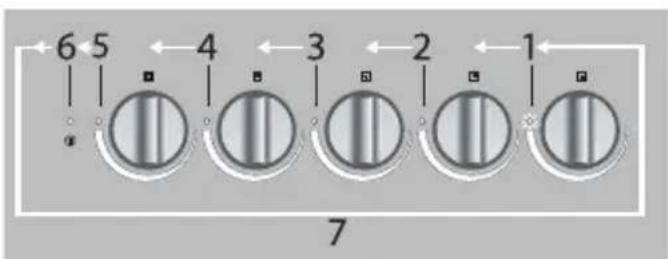
6 5 4 3 2 1 7If an electronic failure occurs the lights will flash consecutively. If this happens, unplug the appliance and then plug it in again. If this does not solve the problem, call the service desk.

natural_image
Warning symbol: gray triangle with exclamation mark (no text or numbers)plak hier het toestel-identificatieplaatje placez ici la plaque d'identification de l'appareil kleben Sie hier das Gerätetypenschild ein stick the appliance identification card here
This card is located on the top of the appliance.
When contacting the service department, have the production code (PCODE) and complete item number (ITEMNR) to hand.