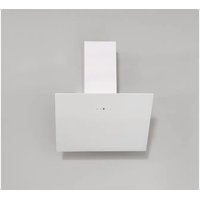
HD600 INC60B/23A - Basket SABA - Free user manual and instructions
Find the device manual for free HD600 INC60B/23A SABA in PDF.


| Product type | Range hood |
| Brand | SABA |
| Model | HD600 INC60B/23A |
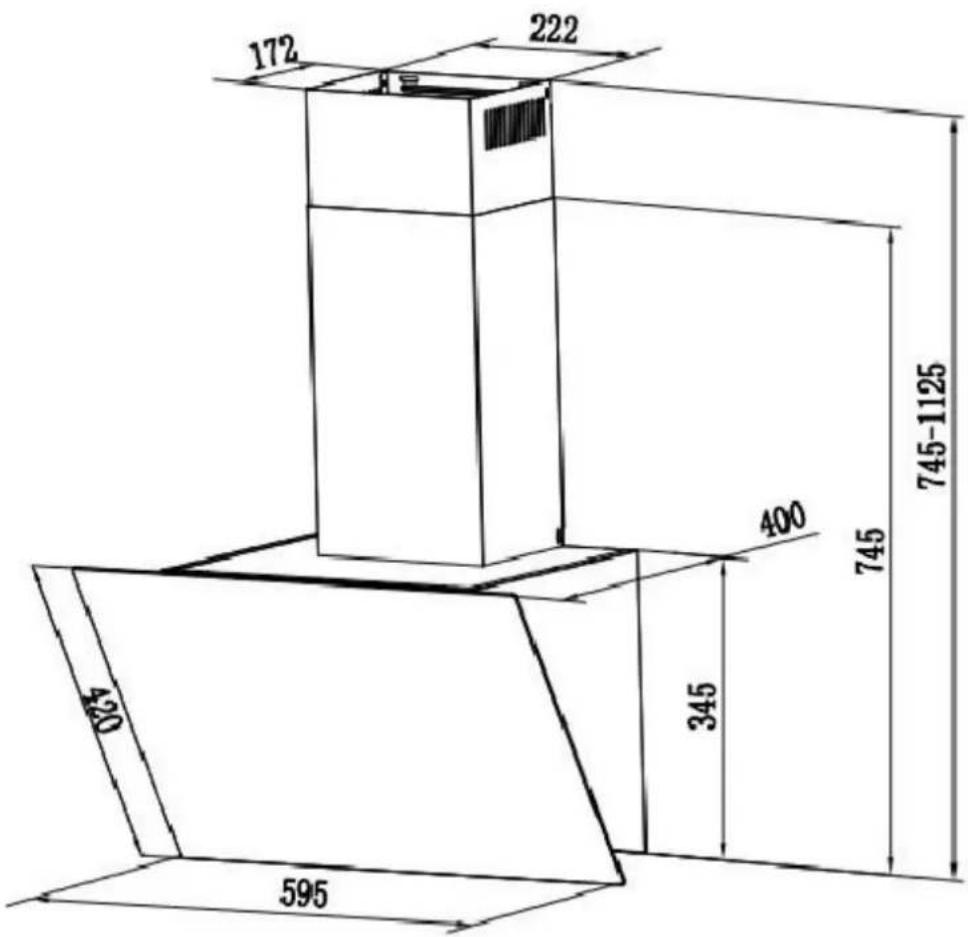
| Dimensions (L x D x H) | 595 x 420 x 745~1125 mm |
| Supply voltage | 220-240 V ~ 50 Hz |
| Motor power | 85 W (1 motor) |
| Lighting power | 1 x 1 W (LED) |
| Maximum air flow (booster) | 587.4 m³/h |
| Air flow (maximum speed) | 438.6 m³/h |
| Noise level (booster) | 62 dB(A) |
| Noise level (maximum speed) | 58 dB(A) |
| Noise level (minimum speed) | 46 dB(A) |
| Annual energy consumption | 10.7 kWh/year |
| Fluid dynamic efficiency | 32.9 |
| Energy efficiency index | 30.9 |
| Grease filter type | Aluminum, dishwasher safe |
| Charcoal filter | Optional, replace every 2-4 months |
| Minimum installation height (electric) | 65 cm |
| Minimum installation height (gas) | 75 cm |
| Operating modes | Extraction or recirculation |
| Control | Touch panel with digital display |
| Special features | 5 min timer, booster, automatic shut-off, thermal protection |
| Included accessories | Aluminum duct, dowels, screws, brackets, chimneys |
| Repairability | Spare parts available for 10 years, replaceable LED |
Frequently Asked Questions - HD600 INC60B/23A SABA
User questions about HD600 INC60B/23A SABA
0 question about this device. Answer the ones you know or ask your own.
Ask a new question about this device
Download the instructions for your Basket in PDF format for free! Find your manual HD600 INC60B/23A - SABA and take your electronic device back in hand. On this page are published all the documents necessary for the use of your device. HD600 INC60B/23A by SABA.
USER MANUAL HD600 INC60B/23A SABA
natural_image
Black industrial chimney with a vertical smokestack and control panel (no text or symbols visible)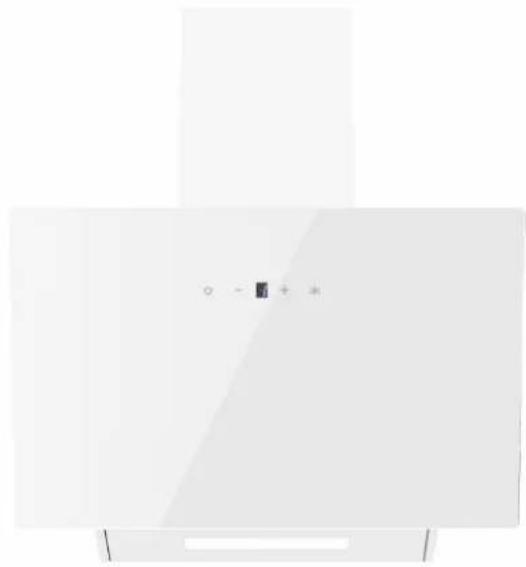
natural_image
Pure electrical circuit lines without any symbolsFR
GB
Part 9 : Support mural × 1
flowchart
graph TD
    A["House with bidirectional arrow"] --> B["Upward arrow"]
    C["House with bidirectional arrow"] --> D["Downward arrow"]
    E["Downward arrow"] --> F["Upward arrow"]
    G["Downward arrow"] --> H["Upward arrow"]
    I["Downward arrow"] --> J["Upward arrow"]
natural_image
Technical diagram showing two mechanical assembly views with hatched shading (no text or symbols)Installer la hotte (Evacuation):
Part 10: Support mural X 1
natural_image
Simple line drawing of a cabinet with three drawers and two doors, no text or symbols presentflowchart
graph TD
    A["Receiving Washing Machine"] --> B["Lighting Panel"]
    B --> C["Lighting Panel with Hand Placement"]
    C --> D["Lighting Panel with Lamp"]
    D --> E["Lighting Panel with Lamp"]
    E --> F["Lighting Panel with Lamp"]
    F --> G["Lighting Panel with Lamp"]
    G --> H["Lighting Panel with Lamp"]
    H --> I["Lighting Panel with Lamp"]
    I --> J["Lighting Panel with Lamp"]
    J --> K["Lighting Panel with Lamp"]
    K --> L["Lighting Panel with Lamp"]
    L --> M["Lighting Panel with Lamp"]
    M --> N["Lighting Panel with Lamp"]
    N --> O["Lighting Panel with Lamp"]
    O --> P["Lighting Panel with Lamp"]
    P --> Q["Lighting Panel with Lamp"]
    Q --> R["Lighting Panel with Lamp"]
    R --> S["Lighting Panel with Lamp"]
natural_image
Technical line drawing of two mechanical mounting base assemblies (no text or symbols)Montage
FR
natural_image
Simple line drawing of a rectangular object with two side clips and a central hole (no text or symbols)https://sav-client.conforama.fr
09 69 32 05 05
Thank you for choosing SABA quality. This product has been developed by our team of professional and according to European regulations. In order to get the most out of your new appliance, we recommend that you read this instruction manual carefully and keep it for future reference.
TABLE OF CONTENTS
Safety....31-35
Specifications....36
Before Using the Cooker Hood. 37
Prepare for Installation....38
Installation....40-49
Operation....50
Cleaning and Maintenance....51-53
Technical information . . . . . . . . . . . . . . . . . . . . . . . . . . . . . . . . . . . . . . . . . . . . . . . . . . . . . . . . . . . . . . . . . . . . . . . . . . . . . . 54-55
Troubleshooting 56
Environmental Protection. 57
Safety
■ Use this unit only in the manner intended by the manufacturer. If you have questions, contact the manufacturer at the address or telephone number listed in the warranty.
■ Before servicing or cleaning unit, unplug or disconnect the cooker hood from the power supply.
■ Installation work and electrical wiring must be done by a qualified person(s) in accordance with all applicablecodes and standards, including fire-rated construction.
■ Sufficient air is needed for proper combustion and exhausting of gases through the flue (chimney) of fuel burning equipment to prevent back drafting.
■ When cutting or drilling into a wall or ceiling, do not damage electrical wiring and other hidden utilities.
■ Ducted fans must always be vented to the outdoors.
■ Ensure the requirements of the local authorities are adhere to concerning the discharge of exhaustair.
■ This unit must be grounded.
■ When applicable local regulations comprise more restrictive installation and/or certification requirements, the aforementioned requirements prevail on those of this document and the installer agrees to conform to these ath own expense.
■ Clean cooker hood frequently. Grease should not be allowed to accumulate on fans, filters or in exhaust ducts.
■ This appliance is intended to be used in household and similar applications such as:
- staff kitchen areas in shops, offices and other working environments;
- farm houses;
- by clients in hotels, motels and other residential type environments;
- bed and breakfast type environments.
■ This appliance can be used by children aged from 8 years above and persons with reduced physical, sensory or mental capabilities or lack of experience and knowledge if they have been given supervision or instruction concerning use of the appliance in a safe way and understand the hazards involved. Children shall not play with the appliance. Cleaning and use maintenance shall not be made by children without supervision.
■ If the supply cord is damaged, it must be replaced by the manufacturer, its service agent or similarly qualified persons in order to avoid a hazard.
■ There shall be adequate ventilation of the room when the range hood is used at the same time as appliances burning gas or other fuels.
There is a fire risk if cleaning is not carried out in accordance with the instructions. Do not flambé under the range hood. CAUTION: Accessible parts may become hot when used with cooking appliances.
■ Regulations concerning the discharge of air must be fulfilled.
■ Regarding the information pertaining to the installation, handling, servicing and disposal of the appliance, thanks to refer to the below paragraph of the manual.
■ Replacing certain parts of your household electrical appliance may lead to a danger. Please ensure that you have the necessary skills and own all tools required to carry out the self-repair operations safely. Otherwise, please contact a qualified professional.
■ The air must not be discharged into a flue that is used for exhausting fumes from appliances burning gas or other fuels.
■ Cleaning and Maintenance the hood regularly at 1 time per week;
■ Regarding the instructions for cleaning and maintenance, thanks to refer to the below paragraph of the manual.
■ Use type lamp (or use in alternative type lamp) DSS-1-S-275 (ILCOS D code in according to standard IEC 61231).
| Max power voltage | picture ILCOS D code | ||
| LED module 1 | W DC 12V Diameter :275*32mm D | 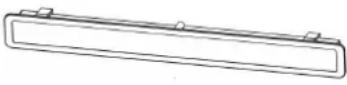 SS-1-S-275 SS-1-S-275 |
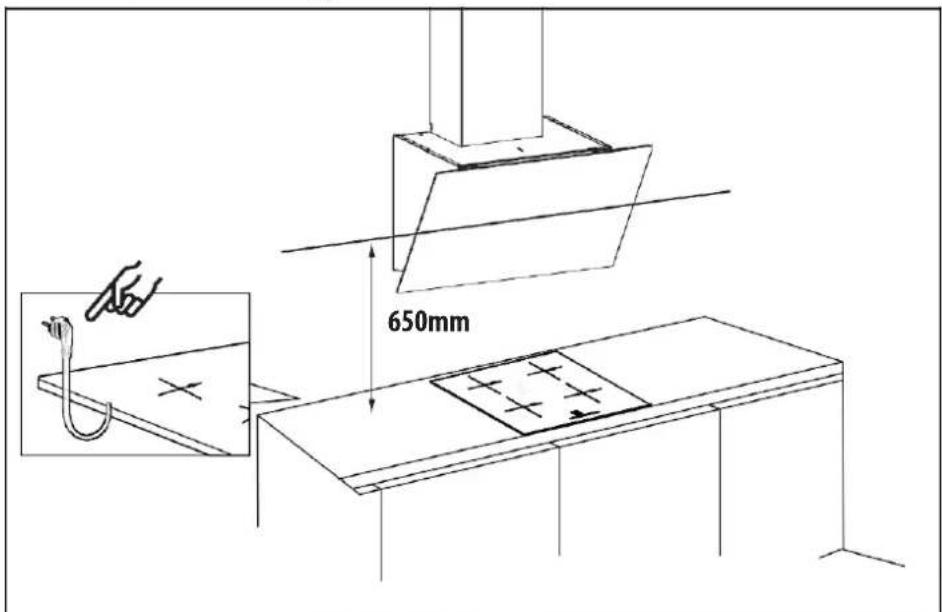
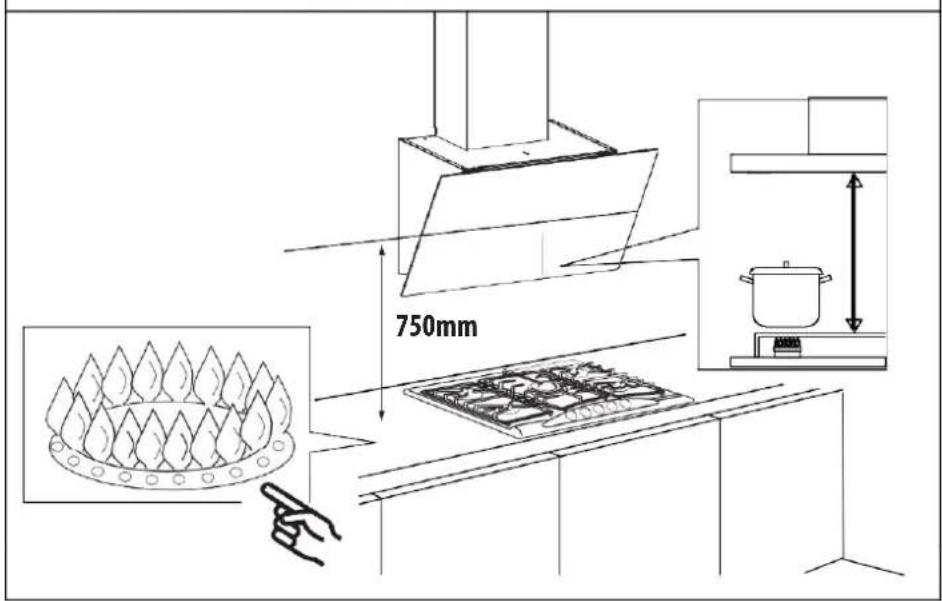
■ The minimum distance between the stove and the lowest part of the range hood: 65 cm for electric stoves and 75 cm for gas stoves.

Warning: Failure to install the screws or fixing device in accordance with these instructions may result in electrical hazards.
CAUTION
■ For indoor use only.
■ For general ventilating use only. Do not use to exhaust hazardous or explosive materials and vapors.
■ To avoid motor bearing damage and noisy and/or unbalanced fan blade, keep drywall spray, construction dust, etc. off cookerhood.
- Your hood motor has a thermal overload which will automatically shut off the motor if it becomes overheated. The motor will restart when it cools down. If the motor continues to shut off and restart, have the hood serviced.
- Always follows the cooking equipment manufacturer's requirements regarding the ventilation needs.
■ To reduce the risk of fire and to properly exhaust air, be sure to duct air outside — Do not exhaust air into spaces within walls of ceiling or into attics, crawl space or garage.
■ When installing, servicing or cleaning the unit, it is recommended to wear safety glasses and gloves.
■ Please read specification label on product for further information and requirements.
Specifications
| Voltage | 220V-240V~ 50Hz |
| Power of Motor | 1 x 85W |
| Power of lamps | 1 x 1W |
| Appliance Dimension | 595*420*745~1125mm (W x D x H) |
| Note: The manufacturer reserves the right to change any technological improvement or modification without prior notice. | |
Before Using the Cooker Hood

CAUTION: Before proceeding to the installation, check if items are missing or damaged, contact the manufacturer.
Observe all governing codes and ordinances. Have a qualified technician install the cooker hood. It is the installer's responsibility to comply with installation clearances specified on the model/serial rating plate. The manufacturer declines all responsibility for improper installation and does not accept responsibility for appliance warranty in the event of damage caused by incorrect installation.
COMPONENTS:

Part 1 : Wall Plug X 9
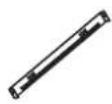
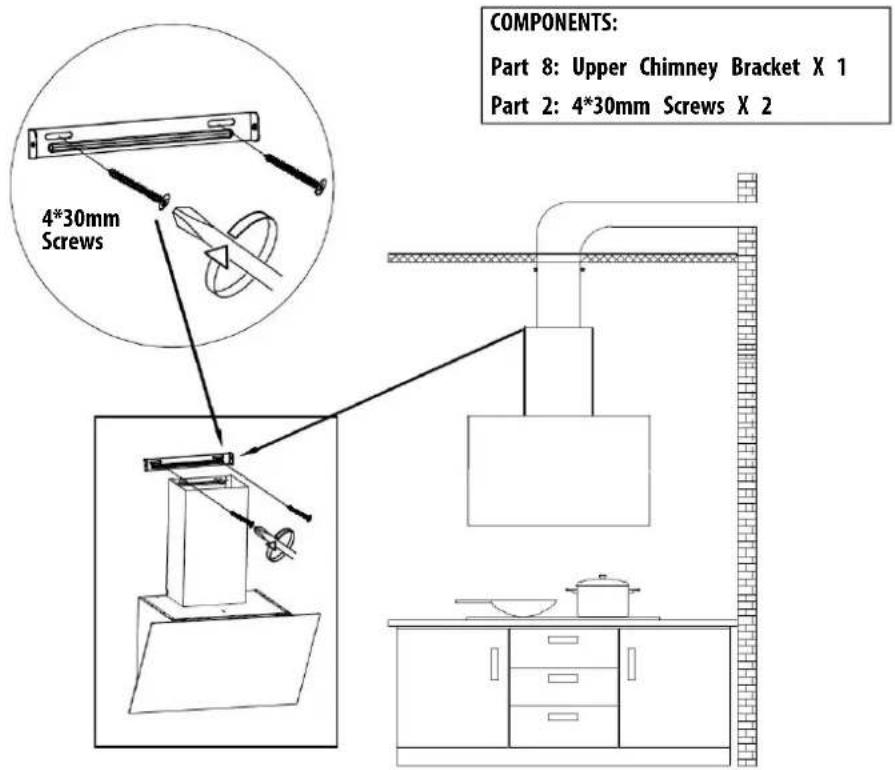
Part 8: Upper Chimney Bracket X 1

Part 2 : 4*30mm Screws X 9

Part 9 : Wall Bracket X 1

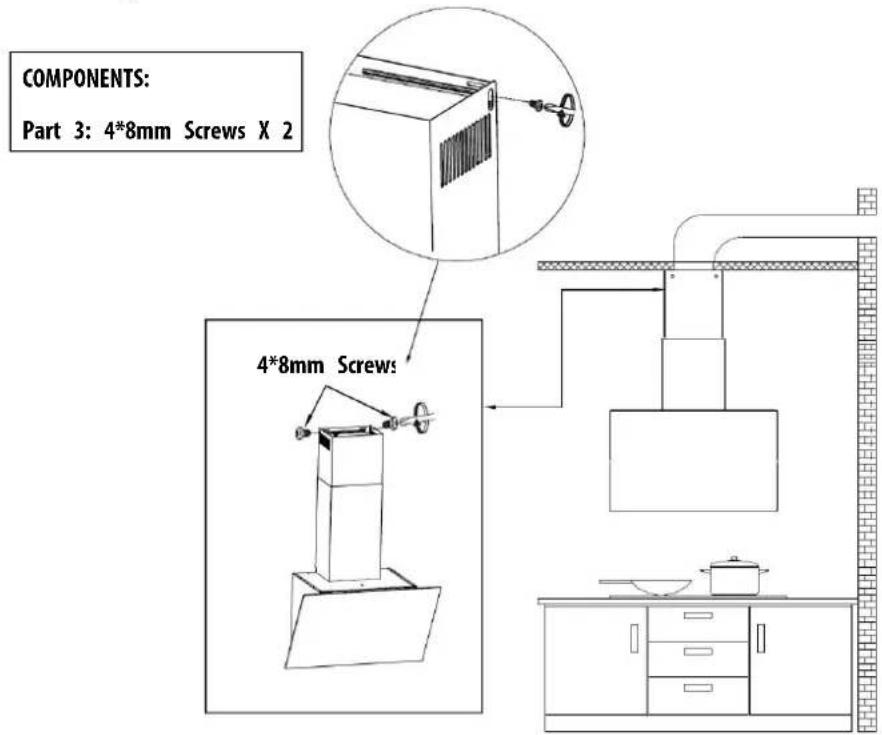
Part 3 : 4*8mm Screws X 6
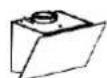
Part 10: Cooker Hood Body X 1

Part 4 : Aluminum Exhaust Pipe X
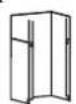
Part 11 : Lower Chimney X 1

1 Part 5 : Cable Ties X 1
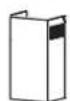
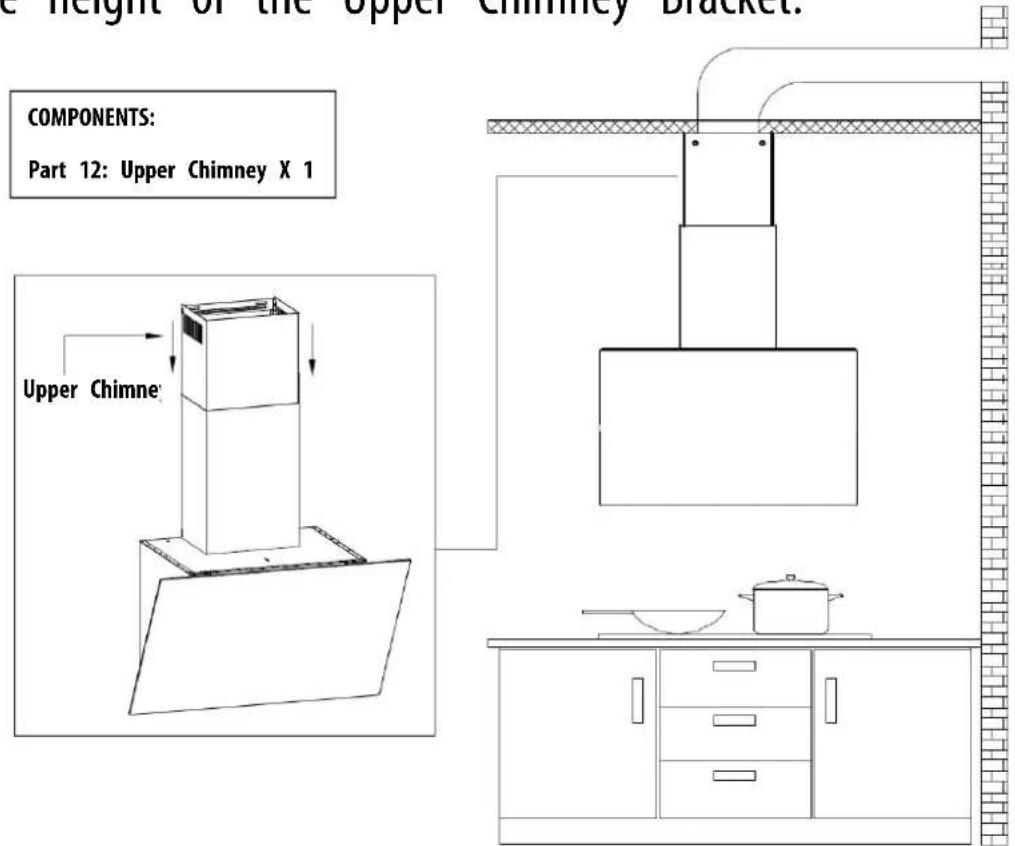
Part 12 : Upper Chimney X 1
Part 6 : Installation Manual X 1

Part 13 : Aluminum tape X 1
Part 7 : Lower Chimney Bracket X
YOU WILL BE NEEDING THESE TOOLS FOR INSTALLATION

- Protective Gloves

- Double Sided Tape or Tape
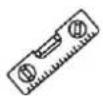
- Spirit Level Ruler

- Cross-Head Screwdriver Set

- Measuring Tape

- Electric drill and 8mm drill
Prepare for Installation
Prepare for Installation:
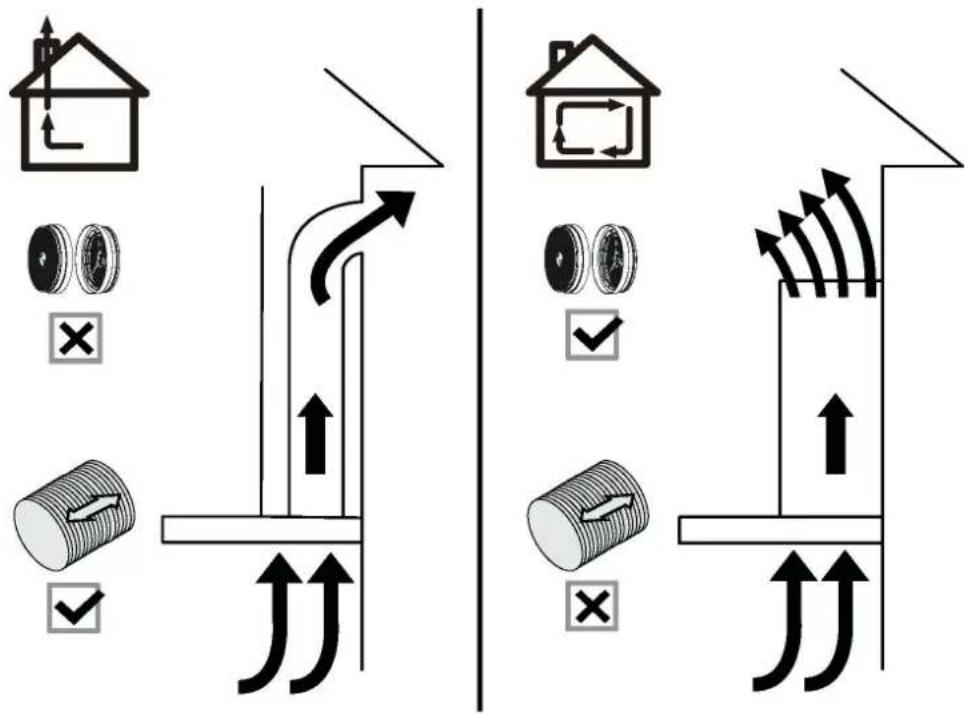
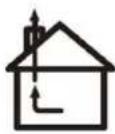
a) Ventilation Mode
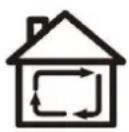
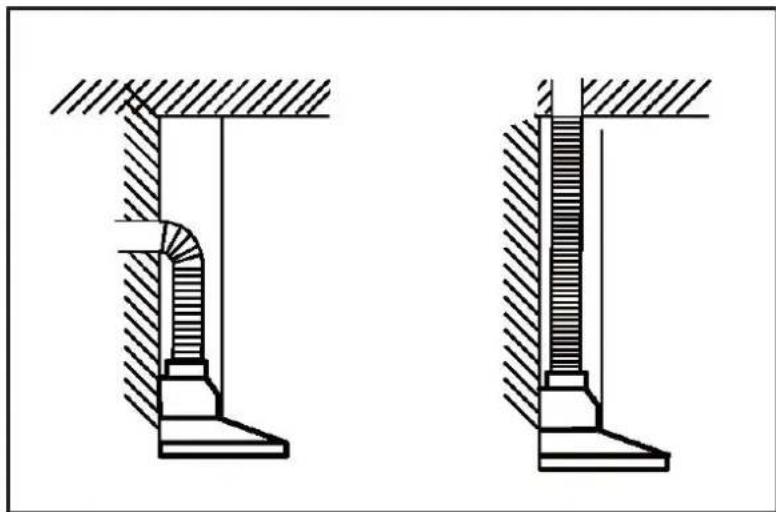
Recirculation Mode: Recirculating with carbon filter (required), the smells and odors can be filtered and vented through the top vente hole and the exhaust pipe is not required.
Extraction Mode: You can install the 1.5m long and 150mm diameter aluminum exhaust pipe for extracting, which is included in the installation kit.
GB
flowchart
graph TD
    A["House"] --> B["Upward Arrow"]
    C["Warehouse"] --> D["Downward Arrow"]
    B --> E["Upward Arrow"]
    D --> F["Upward Arrow"]
    style A fill:#f9f,stroke:#333
    style C fill:#f9f,stroke:#333
    style B fill:#ccf,stroke:#333
    style D fill:#ccf,stroke:#333
    style E fill:#dfd,stroke:#333
    style F fill:#dfd,stroke:#333
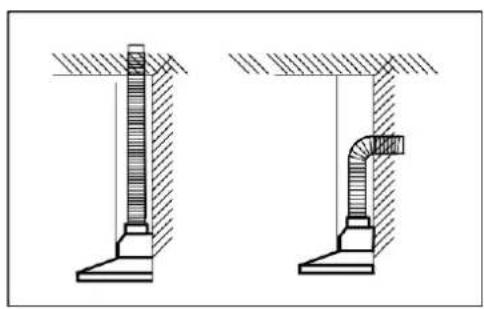
b) When possible, use at least 60cm straight runs before any turns. Larger duct work may be required for bestperformance with longer duct runs.
natural_image
Technical drawing of two mechanical components with hatched areas indicating material sections (no text or symbols)c) Before installation, don't connect the power.
Installation
Install the Hood (Extraction) :
1) Remove all protective poly film from the hood and/or parts.
2) Recommend installation height: 65\~75cm above the cooktop for best extraction.
◆ Required height over gas hob: 750mm;
◆ Required height over electric hob: 650mm.
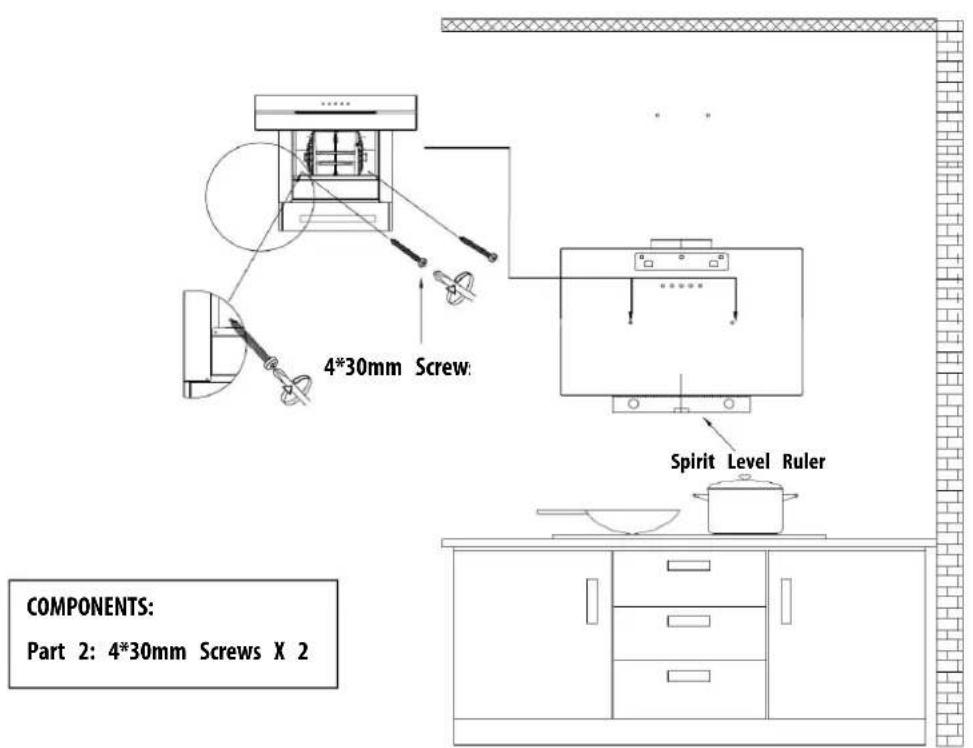
3) First use a pencil to mark the installation position on the wall, then use a Measuring Tape to measure the height from the stovesurface the hood (the center point of aluminum grease filter) and use a S Level Ruler to maintain the level, then use a pencil to draw a horizontal line along the level.
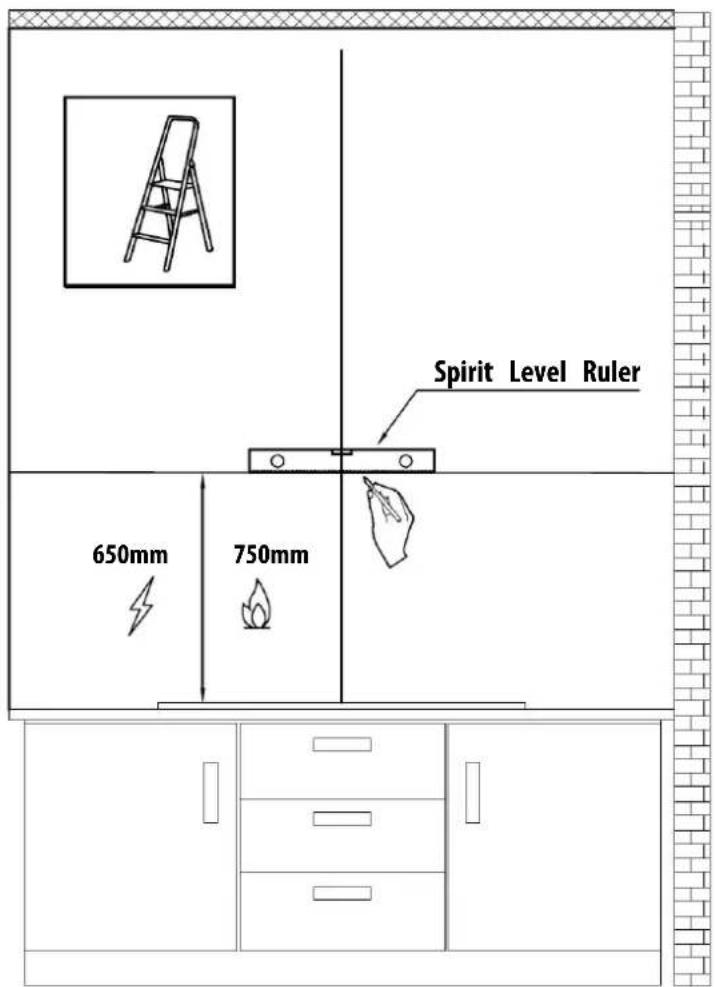
4) Determine the maximum chimney installation height according to the actual scenario and mark the chimney installation locations.


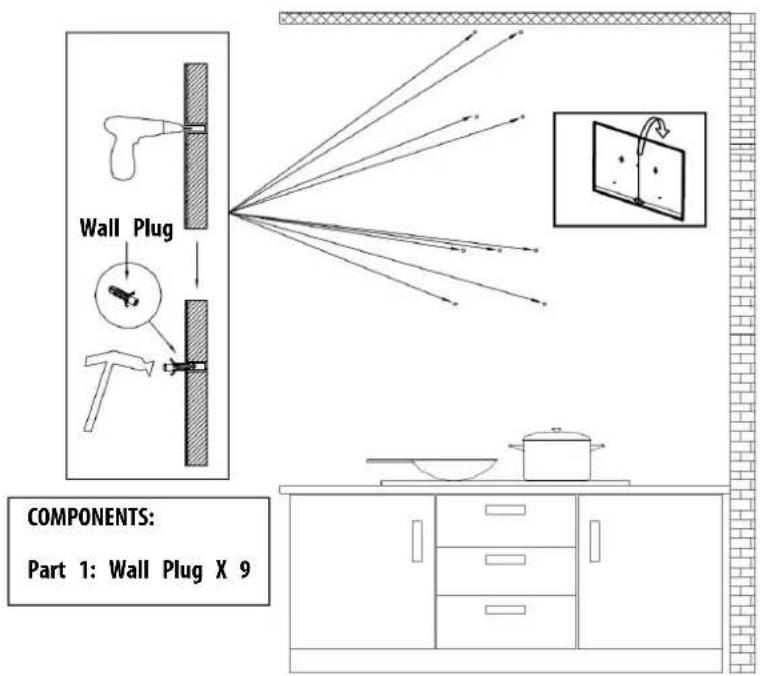
5) Drill the holes that have been marked on the wall with an Electri (8mm drill), and hammer theWall Plug into thewall.
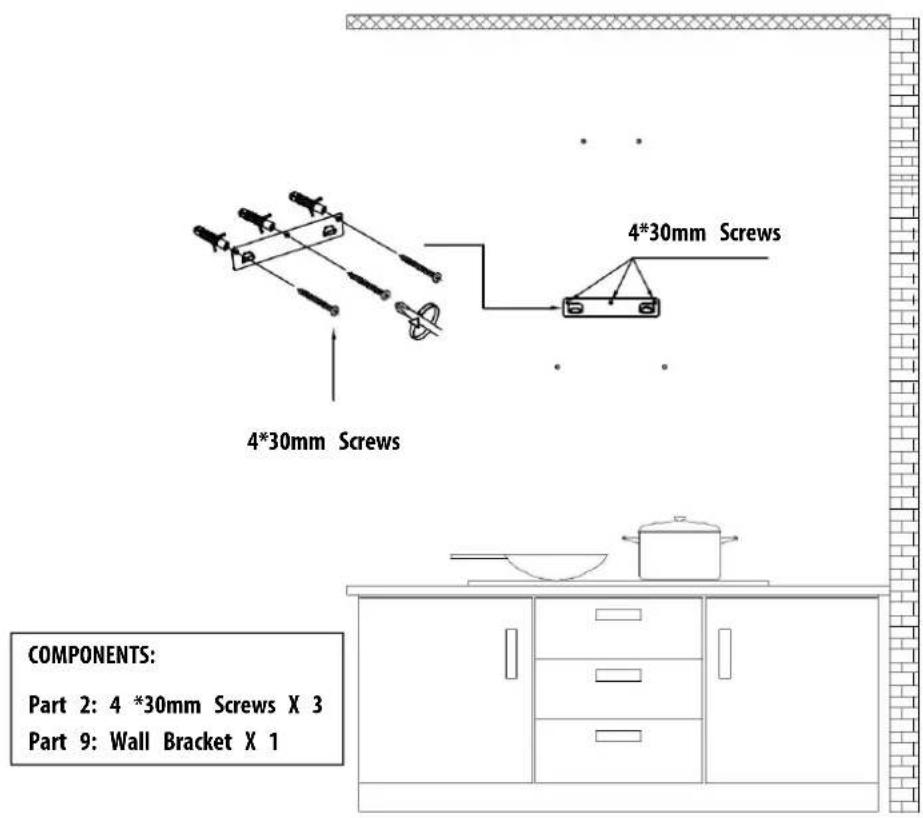
6) Use three 4*30mm Screws to fasten the Wall Bracket on the wall.
7) Remove the aluminum grease filter and hang the hood on the corresponding hook of the Wall Bracket.
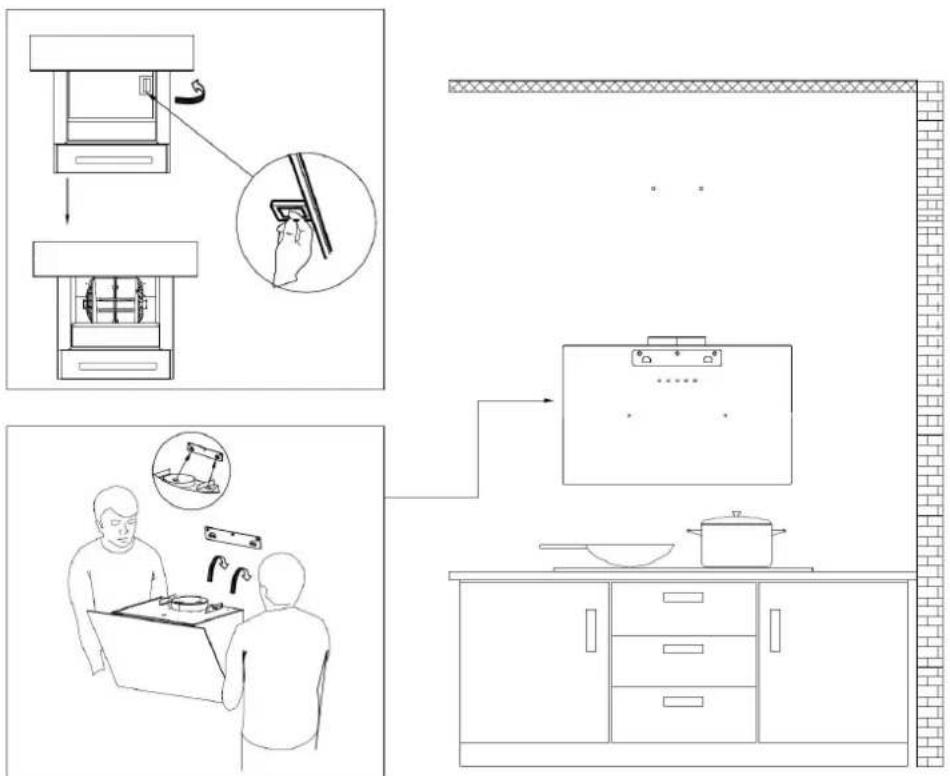
8) Use a Spirit Level Ruler to measure whether the hood is in a horizontal level, and use two 4*30mm Screws to lock into the safe hole position of the hood (not mandatory, according to user's wishes to choose whether to lock).
GB
9) Tearoff the tape from the air outlet.
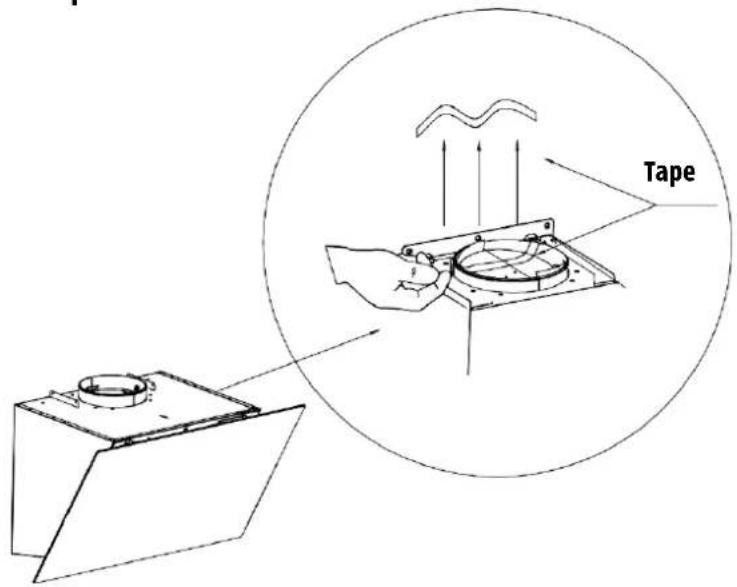
NOTE:
Make sure you remove the tape on the damper and check if the damper opens and closes freely, otherwise it makes noises, and the cooker hood will be shaking.
10) Install the Aluminum Exhaust Pipe into the air outlet and lock it a Cable Tie; the other end of the Aluminum Exhaust Pipe will be pulled upward to outdoor and lock it with a Cable Tie (Note: This step can be ignored if use as recirculation mode with carbon filte
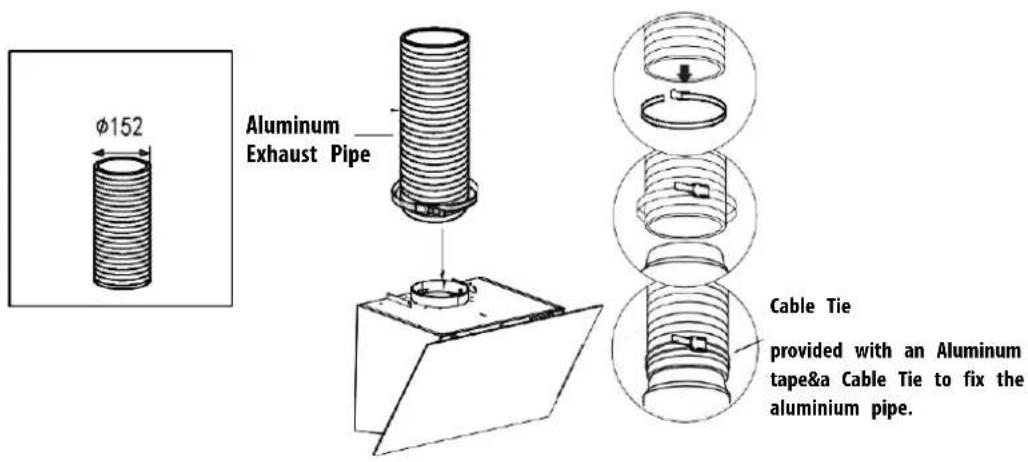
COMPONENTS:
Part 4: Aluminum Exhaust Pipe X1
Part 5: Cable Tie X 1
Part 13 : Aluminum tape X 1
natural_image
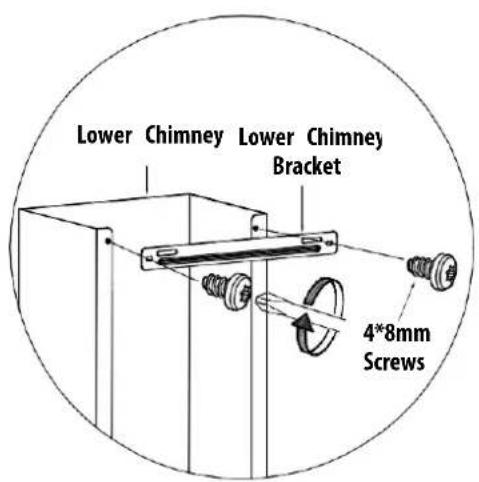
Technical line drawing of two mechanical mounting components with hatched surfaces (no text or symbols)11) Use two 4*8mm Screws to fasten the Lower Chimney Bracket on Lower Chimney.
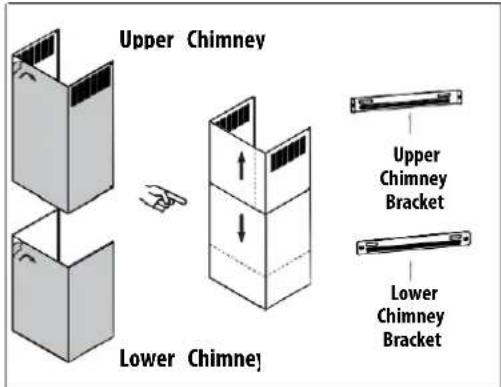
COMPONENTS:
Part 7: Lower Chimney Bracket X 1
Part 11: Lower Chimney X 1
Part 3: 4*8mm Screws X 2
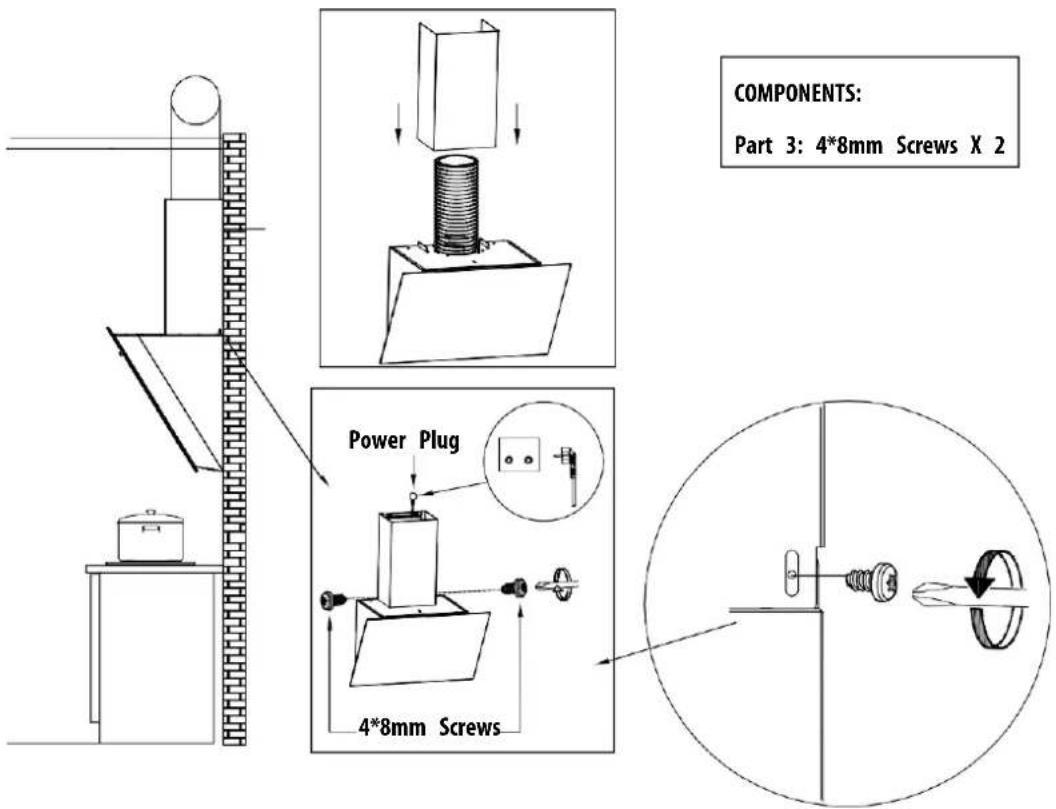
12) Insert the Lower Chimney into the hood and fix it to the corresponding positioning hole with two 4*8mm Screws. (Note: That the power cord needs to go through the chimney and conn the power).
13) Use two 4*30mm Screws to lock the Lower Chimney Bracket into the corresponding positioning holes on the wall.
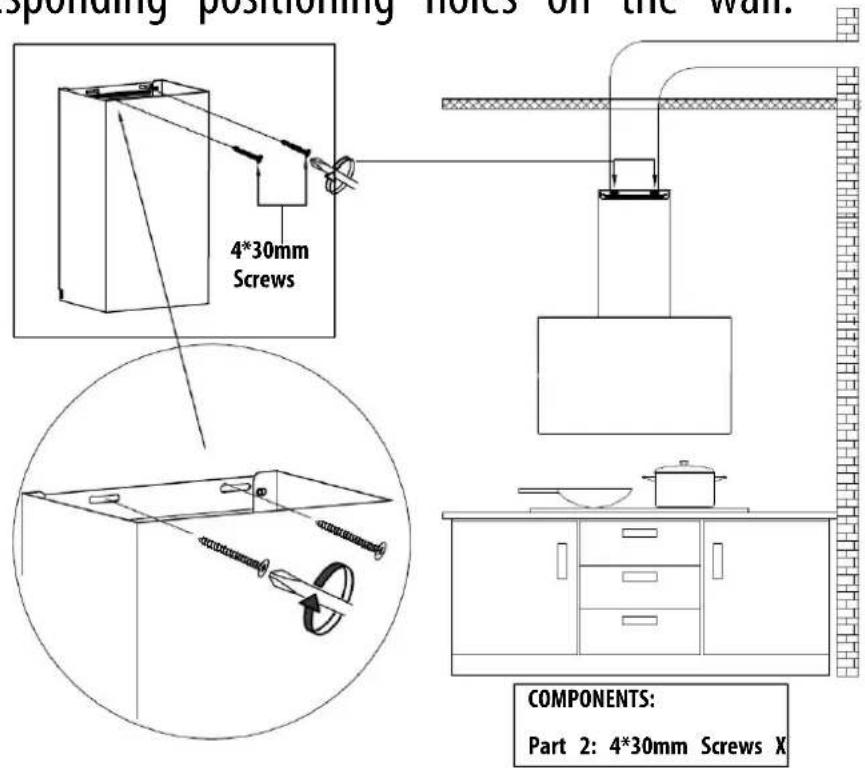
14) Use two 4*30mm Screws to lock the Upper Chimney Bracket to t corresponding positioning holes on thewall.
15) Put the Upper Chimney into the Lower Chimney, and then pulled the height of the Upper Chimney Bracket.
16) Use two 4*8mm Screws to assemble the Upper Chimney on the Upper ChimneyBracket.
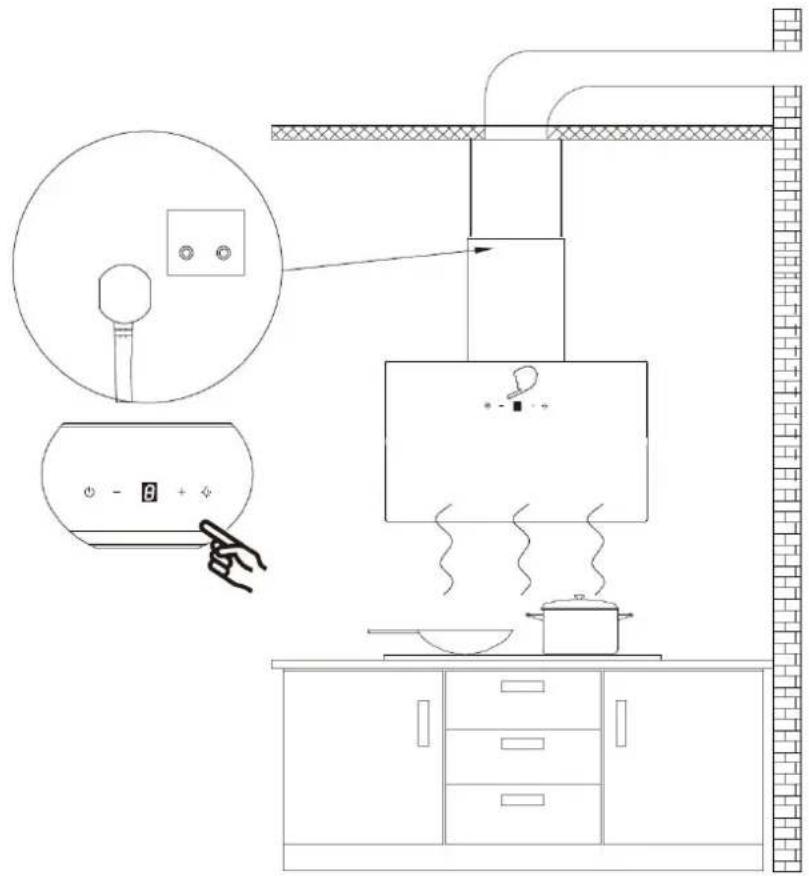
17) Turn the LED lights on/off, and test whether the functions are working properly.
Installation
- Carbon filter can be used to trapodors.
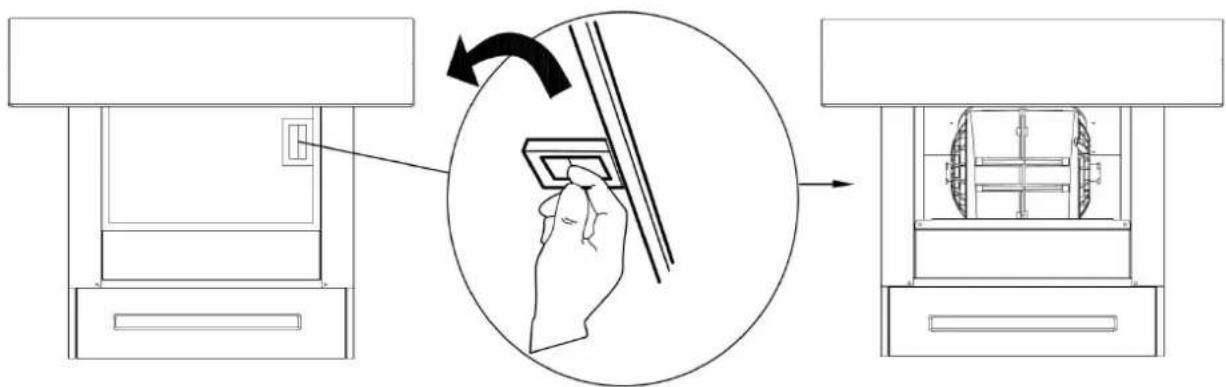
In order to install the carbon filter, the grease filter should be detach first. Press the lock and pull it down.
- Place the carbon filter into the unit and turn it in the clockwise direction to lock it in place.
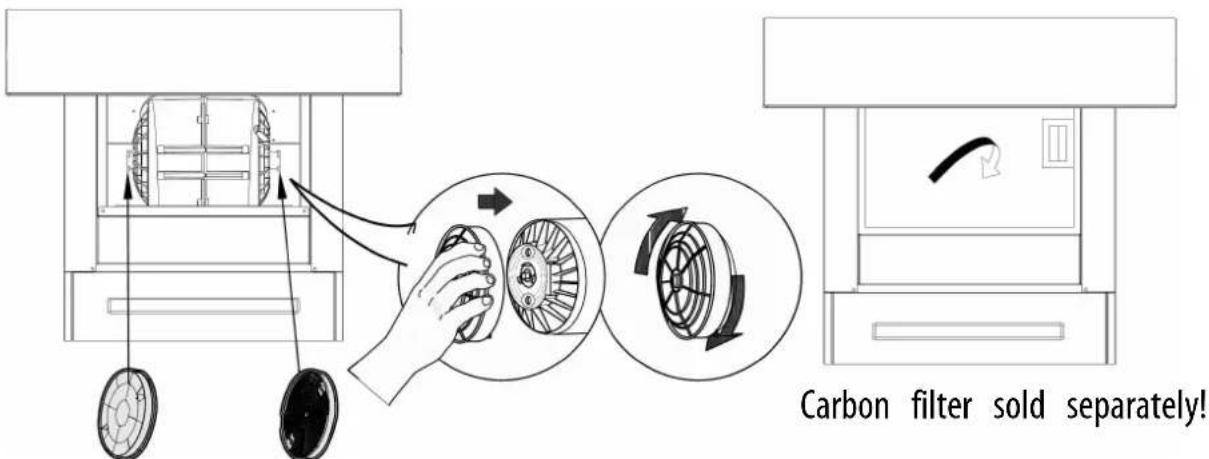
- If the carbon filter needs to be replaced, please turn it in the anti-clockwise direction.
NOTE:
Make sure the carbon filter is securelylocked.
When thecarbon filter is installed, the suction of the cooker hood will be reduced.
Thecarbon filtersshouldbechangedevery2-4months depending on the conditions ofuse.
Operation
Always turn your hood on before you begin cooking to establish an airflow in the kitchen.
Let the blower run for a few minutes to clear the air after you turn the hood. This will help to keep the entire kitchen clean and fresh.
Electronic button

Operate the hood as follows:
GB

On/Off button
Press 2S to power on, press 1S to power off.

Speed increase button
For increasing the speed of the fan.

Speed decrease button
For decreasing the speed of the fan.

Light button
It's used for turning on/off the light.
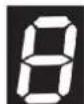
Digital display
Fan speed display:"1" for Low speed, "2" for Medium speed, "3" for High speed, "4" for Booster button, Instant access to maximum suction power, jump to 3 speed after 5 minutes.
Quick timer
Press [+] & [-] hold for more then 1 second, Digital display will be flashing & into 5 minutes count down, after 5 minutes motor & light will turn off automatic & Buzzer sound for 1 second.
Cleaning and Maintenance
Proper maintenance of the Cooker Hood will assure proper performance of the unit. Before cleaning unit, unplug or disconnect the cooker hood from the power supply.
GREASE FILTERS
The grease filters should be cleaned frequently. Can be cleaned in dishwashe under high temperature without using any detergent.
CARBON FILTER
The carbon filter should be changed every 2-4 months depending on the conditions of use. Replace more often if your cooking style generates lots of greases, such as stir frying. These filters are not washable and cannot be re Refer to installation instructions included with a carbon filter.
STAINLESS STEEL CLEANING
Do:
- Regularly clean it with a cloth or rag soaked with warm water and mild soap or liquid dish detergent.
- You may also use a specialized household stainless steelcleaner.
Don't:
- Use any steel or stainless-steel wool or any other scrapers to remove stubborn dirt.
- Use any harsh or abrasivecleansers.
- Let plaster dust or any other construction residues reach the hood. During construction/ renovation, cover the cooker hood to make sure no dust sticks to the stainless-steel surface.
Avoid when choosing a detergent:
- Any cleaners that contain bleach will attack stainless steel.
- Any products containing: chloride, fluoride, iodide, bromide will deterioratesurfacesrapidly.
- Any combustible products used for cleaning suaketone, alcohol, ether, benzoletc., are highly explosive and should never be used close to a range.
PAINTED FINISH CLEANING:
Clean with warm water and mild detergent only. If discoloration occurs, use finish polish such as automotive polish. (DO NOT use a rough abrasive clean porcelain cleaner.)
LED REPLACEMENT
- Rectangle LED lamp:
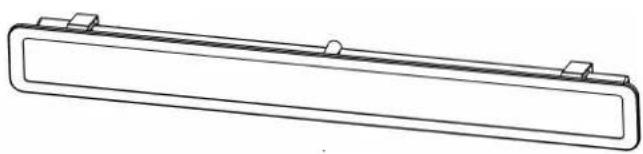
natural_image
Simple line drawing of a rectangular object with two side clips and a central hole (no text or symbols)- Self-ballasted fluorescent reflector lamp - Integral induction type ballast
- Max wattage: 1W
- Voltage range: 12 V DC
- Dimensions: 275mm
This product contains a light source of energy efficiency class < G> .

CAUTION:
Before cleaning or repairing and replacing accessories, please make sure to shut down the power before operation, so as to avoid electric shock, damage to human body and even endanger life safety!
Technical information
| Symbol | Value Unit | ||
| Model identification - | HD600 INC-60/23A HD600 INC-60B/23A | - | |
| Annual Energy Consumption AEC hood | 10,7 kWh/a | ||
| Time increase factor f 0,8 - | |||
| Fluid Dynamic Efficiency FDE | hood | 32,9 - | |
| Energy Efficiency Index EEI | hood | 30,9 - | |
| Measured air flow rate at best efficiency point | Q_BEP | 218,0 m | ^3/h |
| Measured air pressure at best efficiency point | P_BEP | 218 Pa | |
| Maximum air flow Q | max | Boost setting: 587,4 highest setting: 438,6 | m^3/h |
| Measured electric power input best efficiency point | at W_BEP | 33,9 W | |
| Nominal power of the lighting system | W_L | 1,1 W | |
| Average illumination of the lighting system on the cooking surface | E_middle | 43 | lux |
| Measured power consumption in standby mode | P_S | - | W |
| Measured power consumption off mode | P_0 | 0,48 W | |
| Sound power level L | WA | Boost setting: 62Highest setting: 58Lowest setting: 46 | dB |
The above table indicates the information for the cooker hood. The test result is done as per the relevant requirement of EU No 65/2014 and EU No 66 / 2014.
Troubleshooting
| Fault | Cause | Solution |
| Lighton,but fan does not work | The fan blade is jammed. | Switch of the unit and repair by qualified service personnel only. |
| The motor is damaged. | ||
| Both light and fan do not work | light bulb burn. | Replace the bulb with correct rating. |
| Power cord looses. | Plug in to the power supply again. | |
| Serious Vibration of the unit | The fan blade is damaged. | Switch of the unit and repair by qualified service personnel only. |
| The fan motor is not fixed | Switch of the unit and repair by qualified service personnel only. | |
| The unit is not hung properly on the bracket. | Take down the unit and check whether the bracket is in proper location. | |
| Suction performance not good | Too long distance between the unit and the cooking plane. | Readjust the distance to 65-7 |
Environmental Protection
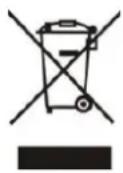
European directive 2012/19/EU on Waste from Electrical and Electronic Equipment (WEEE), requires that used household appliances are not thrown into the normal municipal waste stream.
Used appliances must be collected separately in order to optimize the rate of recovery and recycling of materials that compose them, and to reduce the impact on human health and on the environment. The crossed bin symbol is affixed to all the products to remind you of the obligations of separated collection.



This instruction book is also available on our website: www.conforama.fr If you have a problem with your product, before going to your Conforama store, please get in touch with our aftersales services for electrical household appliances: https://sav-client.conforama.fr 09 69 32 05 05 The minimum period during which spare parts are available: 10 years.

SABA is a German brand born in 1923 in the heart of the black forest.
Pioneers in electrical equipment, it continues its search for quality by offering smart products that will accompany you on a daily life.
This product has been manufactured and sold under the responsibility of CONFORAMA FRANCE S.A..
SABA, and the SABA logo are trademarks used under license by CONFORAMA FRANCE S.A. – further information at www.saba-brand.com.
All other products, services, companies, trademarks, trade or product names and logos referenced herein are the property of their respective owners.
natural_image
Curved grid pattern with intersecting lines, no text or symbols presentCONFORAMA France SA

- Installer la hotte (Evacuation):
- Montage
- TABLE OF CONTENTS
- Safety
- CAUTION
- Specifications
- Before Using the Cooker Hood
- COMPONENTS:
- YOU WILL BE NEEDING THESE TOOLS FOR INSTALLATION
- Prepare for Installation
- Prepare for Installation:
- a) Ventilation Mode
- Installation
- Install the Hood (Extraction) :
- NOTE:
- Operation
- Always turn your hood on before you begin cooking to establish an airflow in the kitchen.
- Electronic button
- On/Off button
- Speed increase button
- Speed decrease button
- Light button
- Digital display
- Quick timer
- Cleaning and Maintenance
- GREASE FILTERS
- CARBON FILTER
- STAINLESS STEEL CLEANING
- Do:
- Don't:
- Avoid when choosing a detergent:
- PAINTED FINISH CLEANING:
- LED REPLACEMENT
- - Rectangle LED lamp:
- CAUTION:
- Technical information
- Troubleshooting
- Environmental Protection
Brand : SABA
Model : HD600 INC60B/23A
Category : Basket