Coachella 60 Smart - Fridge Klarstein - Free user manual and instructions
Find the device manual for free Coachella 60 Smart Klarstein in PDF.

| Product Type | Beverage Refrigerator |
| Brand | Klarstein |
| Model | Coachella 60 Smart |
| Capacity | 47 L (10046571) or 60 L (other models) |
| Dimensions (H x W x D) | 485 x 470 x 440 mm (10046571) / 635 x 470 x 440 mm (others) |
| Power Supply | 220-240 V ~ 50 Hz |
| Annual Consumption | 76 kWh/year |
| Energy Class | E |
| Climate Class | Temperate zone (16-32 °C) |
| Noise | 44 dB(A) (10046571) / 42 dB(A) (others) – Class D |
| Refrigerant | R600a (Isobutane) |
| Adjustable Temperature Range | 3 °C to 18 °C |
| Interior Lighting | Multi-color LED (7 colors, 5 modes) |
| Built-in WiFi | Yes (2.4 GHz, 802.11 b/g/n) |
| Smartphone Control | Yes, via Klarstein app |
| Defrosting | Manual |
| Number of Shelves | 2 (10046571) or 3 (other models) |
| Adjustable Feet | Yes |
| Warranty | 24 months |
| Maintenance and Cleaning | Clean surfaces and water drain regularly; defrost manually |
| Safety | Do not use extension cord; leave 5 cm space on sides and 10 cm at rear |
| Spare Parts | Contact Klarstein after-sales service |
| General Information | Freestanding refrigerator, not suitable for freezing |
Frequently Asked Questions - Coachella 60 Smart Klarstein
User questions about Coachella 60 Smart Klarstein
0 question about this device. Answer the ones you know or ask your own.
Ask a new question about this device
Download the instructions for your Fridge in PDF format for free! Find your manual Coachella 60 Smart - Klarstein and take your electronic device back in hand. On this page are published all the documents necessary for the use of your device. Coachella 60 Smart by Klarstein.
USER MANUAL Coachella 60 Smart Klarstein
KLARSTEIN
www.klarstein.com

area
| Category | Value | | -------- | ----- | | A | 100 | | B | 100 | | C | 100 | | D | 100 | | E | 100 | | F | 100 | | G | 100 | | H | 100 | | I | 100 | | J | 100 | | K | 100 | | L | 100 | | M | 100 | | N | 100 | | O | 100 | | P | 100 | | Q | 100 | | R | 100 | | S | 100 | | T | 100 | | U | 100 | | V | 100 | | W | 100 | | X | 100 | | Y | 100 | | Z | 100 |INHALTSVERZEICHNIS
Produktdatenblatt 4
natural_image
Symbol of a trash bin crossed with a diagonal line, no text or numbers presentBerlin Brands Group UK Limited
PO Box 42
272 Kensington High Street
London, W8 6ND
United Kingdom
Congratulations on purchasing this device. Please read the following instructions carefully and follow them to prevent possible damages. We assume no liability for damage caused by disregard of the instructions and improper use. Scan the QR code to get access to the latest user manual and more product information.

CONTENTS
Product Data Sheet 24
Safety Instructions 28
Installation Notes 31
Getting Started 31
Control Panel and Buttons 33
Operation 34
WLAN Function 36
Device Control by Smartphone 37
Troubleshooting 39
Disposal Considerations 40
Declaration of Conformity 40
TECHNICAL DATA
| Item number 10046570, 10046571, 10046572, 10046573 | |
| Power supply 220-240 V ~ 50 Hz | |
| WiFi standard | IEEE 802.11 b/g/n (channels: 1-14) |
| WiFi frequency | 2.412-2.472 GHz |
| WiFi transmit power (max.) | +20 dBm |
PRODUCT DATA SHEET
Information according to Regulation (EU) No. 2019/2016
| Supplier's name or trademark: Klarstein | ||||
| Supplier's address: Wallstraße 16, 10179 Berlin, DE | ||||
| Model identifier:10046571 | ||||
| Type of refrigerating appliance: | ||||
| Low-noise appliance: No Design type: freestanding | ||||
| Wine storage appliance: No Other refrigerating appliance: | Yes | |||
| General product parameters: | ||||
| Parameter Value Parameter Value | ||||
| Overall dimensions (mm) | Height 485 | Total volume (dm3 or L) 47 | Width 470 | |
| Depth 440 | ||||
| EEI 99 Energy efficiency class E | ||||
| Airborne acoustical noise emissions (dB(A) re 1 pW) | 44 | Airborne acoustical noise emission class | D | |
| Annual energy consumption (kWh/a) | 76 Climate class temperate zone | |||
| Minimum ambient temperature (°C), for which the refrigerating appliance is suitable | 16 | Maximum ambient temperature (°C), for which the refrigerating appliance is suitable | 32 | |
| Winter setting | No | |||
| Compartment Parameters: | |||||
| Compartment type | Compartment parameters and values | ||||
| Compartment volume (dm3 or L) | Recommended temperature setting for optimised food storage (°C) These settings shall not contradict the storage conditions set out in Annex IV, Table 3 | Freezing capacity (kg/24h) | Defrosting type (auto-defrost=A, manual defrost=M) | ||
| Pantry Yes 47.0 17 - M | |||||
| Wine storage No ---- | |||||
| Cellar No ---- | |||||
| Fresh food No ---- | |||||
| Chill No ---- | |||||
| 0-star or icemaking No ---- | |||||
| 1-star No ---- | |||||
| 2-star No ---- | |||||
| 3-star No ---- | |||||
| 4-star No ---- | |||||
| 2-star section No ---- | |||||
| Variable temperature compartment | ---- | ||||
| For 4-star compartments | |||||
| Fast freeze facility No | |||||
| Light source parameters: | |||||
| Type of light source - | |||||
| Energy efficiency class | - | ||||
| Minimum duration of the guarantee offered by the manufacturer: 24 months | |||||
| Additional information: | |||||
| Weblink to the manufacturer's website, where the information in point 4 (a) Annex of Commission Regulation (EU) 2019/2019 is found: www.klarstein.co.uk | |||||
Information according to Regulation (EU) No. 2019/2016
| Supplier's name or trademark: Klarstein | ||||
| Supplier's address: Wallstraße 16, 10179 Berlin, DE | ||||
| Model identifier: 10046570, 10046572, 10046573 | ||||
| Type of refrigerating appliance: | ||||
| Low-noise appliance: No Design type: freestanding | ||||
| Wine storage appliance: No Other refrigerating appliance: | Yes | |||
| General product parameters: | ||||
| Parameter Value Parameter Value | ||||
| Overall dimensions (mm) | Height 635 | Total volume (dm3 or L) 60 | Width 470 | |
| Depth 440 | ||||
| EEI 98 Energy efficiency class E | ||||
| Airborne acoustical noise emissions (dB(A) re 1 pW) | 42 | Airborne acoustical noise emission class | D | |
| Annual energy consumption (kWh/a) | 76 Climate class temperate zone | |||
| Minimum ambient temperature (°C), for which the refrigerating appliance is suitable | 16 | Maximum ambient temperature (°C), for which the refrigerating appliance is suitable | 32 | |
| Winter setting | No | |||
| Compartment Parameters: | |||||
| Compartment type | Compartment parameters and values | ||||
| Compartment volume (dm3 or L) | Recommended temperature setting for optimised food storage (°C) These settings shall not contradict the storage conditions set out in Annex IV, Table 3 | Freezing capacity (kg/24h) | Defrosting type (auto-defrost=A, manual defrost=M) | ||
| Pantry Yes 60.0 17 - M | |||||
| Wine storage No ---- | |||||
| Cellar No ---- | |||||
| Fresh food No ---- | |||||
| Chill No ---- | |||||
| 0-star or icemaking No ---- | |||||
| 1-star No ---- | |||||
| 2-star No ---- | |||||
| 3-star No ---- | |||||
| 4-star No ---- | |||||
| 2-star section No ---- | |||||
| Variable temperature compartment | ---- | ||||
| For 4-star compartments | |||||
| Fast freeze facility No | |||||
| Light source parameters: | |||||
| Type of light source - | |||||
| Energy efficiency class | - | ||||
| Minimum duration of the guarantee offered by the manufacturer: 24 months | |||||
| Additional information: | |||||
| Weblink to the manufacturer's website, where the information in point 4 (a) Annex of Commission Regulation (EU) 2019/2019 is found: www.klarstein.co.uk | |||||
SAFETY INSTRUCTIONS
- Check that the voltage of the power supply in your home is the same as the voltage shown on the rating label of this product.
- This device may be only used by children 8 years old or older and persons with limited physical, sensory and mental capabilities and / or lack of experience and knowledge, provided that they have been instructed in use of the device by a responsible person who understands the associated risks.
- Keep ventilation opening, in the appliance enclosure or in the built-in structure, clear of obstruction.
- Do not use mechanical devices or other means to accelerate the defrosting process, other than those recommended by the manufacturer.
- Do not use electrical appliances inside the food storage compartments of the appliance, unless they are of the type recommended by the manufacturer.
- Do not damage the refrigerant circuit.
- If the supply cord is damaged, it must be replaced by the manufacturer or its service agent or a similarly qualified person in order to avoid a hazard.
- It is recommended to check regularly the supply cord for any sign of possible deterioration, and the appliance should not be used if the cable is damaged.
- To avoid injury or death from electrical shock, do not operate the appliance with wet hands, while standing on a wet surface.
- It is not recommended to use this refrigerator with an extension cord or power board. Please ensure that the appliance is plugged directly into the electrical outlet.
- When positioning the appliance, ensure that there is at least a 5 cm clearance at the sides and a 10 cm clearance at the back as this is the main outlet for heat. This will allow for adequate ventilation.
- Do not place hot food or drink into the refrigerator before it cools down to room temperature.
- Close the door immediately after putting in any items so the inside temperature will not rise dramatically.
- Keep appliance away from any heat source or direct sunlight.
- To fix stably, the appliance must be placed on a flat and solid surface. It should not be laid on any soft material.
- Do not place any other appliance on top of the refrigerator, and do not wet it.
- Do not store something like ether, methanol, gasoline, which is easy to evaporate burn or explode.
- Do not use outdoors or in wet conditions.
- Never pull the cord to disconnect it from the outlet. Grasp the plug and pull it from the outlet.
- Keep the cord away from heated surfaces.
- This appliance has been incorporated with a grounded plug. Please ensure the wall outlet in your house is well earthed.
- Connect your refrigerator to an independent electrical socket and use a safe ground wire.
- Defrost the freezer at least once a month because too much frost may affect refrigeration.
- Turn on electricity only 5 minutes later after electricity goes off. Otherwise, the compressor may be damaged.
This appliance contains the coolant isobutane (R600a), a natural gas which is environmentally friendly. Although it is flammable, it does not damage the ozone layer and does not increase the greenhouse effect. The use of this coolant has, however, led to a slight increase in the noise level of the appliance. In addition to the noise of the compressor, you might be able to hear the coolant flowing around the system. This is unavoidable, and does not have any adverse effect on the performance of the appliance. Care must be taken during the transportation and setting up of the appliance that no parts of the cooling system are damaged. Leaking coolant can damage the eyes.
Special Notes
- Children between the ages of 3 and 8 are allowed to fill refrigerators with food and remove food.
- When positioning the unit, make sure that the power cord is not pinched or damaged.
- Make sure that there are no multiple sockets or power supplies on the back of the unit.
To avoid contamination of food, please follow the instructions below:
- A prolonged opening of the door can lead to a significant rise in temperature in the compartments of the appliance.
- Regularly clean surfaces that may come into contact with food. Clean the water drain regularly.
- Store raw meat and fish in suitable containers in the refrigerator so that meat and fish do not come into contact with or drip on other foods.
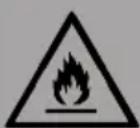
WARNING
When using, servicing and disposing of the unit, pay attention to the left symbol on the rear of the unit or on the compressor. This symbol warns of possible fires. There are flammable substances in the refrigerant lines and in the compressor. Keep the appliance away from sources of fire during use, maintenance and disposal.
Notes on correct use
- This device is intended exclusively for the storage of drinks.
- This appliance is not intended for use as a built-in appliance unless explicitly mentioned in the instructions.
- This appliance is not suitable for freezing food.
Special notes on the shelves
- The shelves were placed in advance in such a way that they allow the most efficient use of energy.
- Only use the shelves provided by the manufacturer.
- Never block the holes in the shelves or use other types of shelves not approved by the manufacturer, which may cause poor cooling or increase energy consumption.
- We recommend that you use the shelves as shown to ensure the most efficient use of energy.
Notes on ambient temperature
Install this unit in a location where the ambient temperature corresponds to the climate class indicated on the unit's nameplate.
| SN Low | This cooling unit is designed for use at ambient temperatures of 10-32 °C. | |
| N Moderate | This cooling unit is intended for use at ambient temperatures of 16-32 °C. | |
| ST Subtropical | This cooling unit is intended for use at ambient temperatures of 16-38 °C. | |
| T Tropical | This cooling unit is intended for use at ambient temperatures of 16-43 °C. | |
The ambient temperature influences the internal temperature and humidity of the beverage cooler. For optimal operation of the beverage cooler, we recommend an ambient temperature of 23^ C to 25^ C.
INSTALLATION NOTES
It is important that you leave your device upright for at least 4 hours before switching it on to allow the cooling system to adjust.
- When you move the unit, do not tilt it more than 45 degrees. Do not apply force to parts such as the condenser, door or handle. They can distort and interfere with the operation of the cooler. Make sure ALL packaging is removed before installation.
- Make sure there is enough space around the product to allow air to circulate freely.
- Do not place the product near heat sources, in direct sunlight or in humid rooms.
- Make sure that the supply voltage of the power outlet corresponds to the voltage indicated on the type plate.
- Insert the plug firmly into the socket.
- The socket outlet must be earthed. Do not plug the plug into unearthed sockets and do not use an extension cable.
- The product is equipped with adjustable feet. Once the product is in place, adjust them so that the refrigerator is level and does not slip.
Note: Do not place the product in places where the ambient temperature can fall below 5 °C, e.g. in the garage or shed.
GETTING STARTED
Notes on Energy Consumption
If the ambient temperature is 25^ C and the beverage cooler is not filled, it takes about 30 minutes to reduce the temperature of the beverage cooler from 25^ C to 17^ C.
The recommended operating temperature of the beverage cooler is 17 °C . The energy consumption is 0.233 kWh/24 h.
If the set temperature is higher than 17 °C , the energy consumption is lower. If the set temperature is lower than 17 °C , the energy consumption is higher.
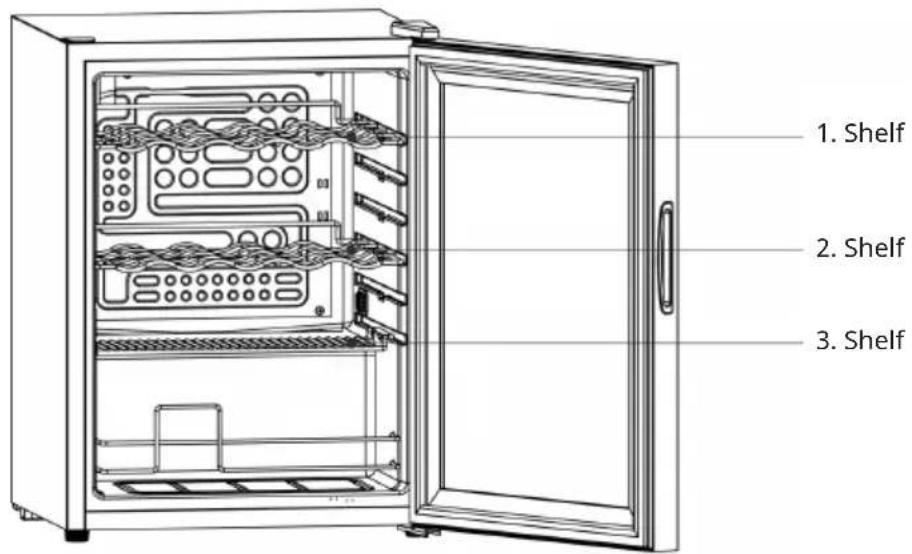
Positioning the Shelves
For energy-efficient use of the beverage cooler, the following positioning of the shelves is recommended:
Models and 10046571 have two shelves.

The models 10046570 and 10046572 have three shelves.
CONTROL PANEL AND BUTTONS
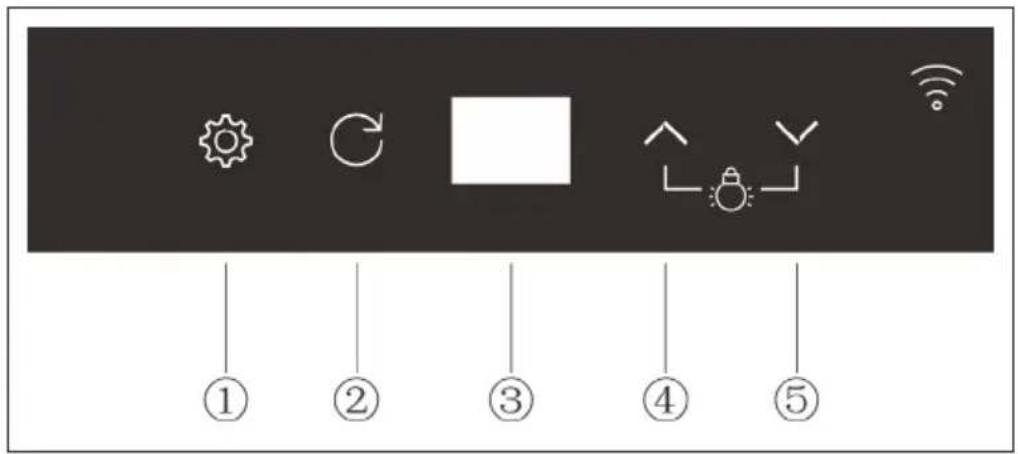
| No. Key Function | |||
| 1 SETTINGS |  | Press and hold the button for 2 seconds to quickly increase the set temperature. | |
2 RETURN Exit the current  ng. ng. | |||
| 3 Display Numerical display | |||
4 UP Set the temperature  n on light n on light | |||
5 DOWN Set the temperat  turn off light turn off light | |||
OPERATION
Note: The recommended operating temperature is 17 °C.
Setting the temperature
- If you press and hold the SETTINGS button for 3 seconds, the numeric display on the screen flashes and the temperature setting will be called up.
- Adjust the temperature by pressing the UP or DOWN buttons.
- To complete the setting, press the Settings button again .
| Temperature setting range Temperature display range | |
| Min. 3 °C Min. -9 °C | |
| Max. 18 °C Max. 40 °C | |
Switching the LED interior lighting on and off
• To switch on the LED lighting, briefly press the UP button .
• To switch off the LED lighting, briefly press the DOWN button.
Switching the backlight on and off
- To switch the backlight on or off, briefly press the UP ∧ and DOWN ∨ buttons simultaneously.
Adjusting the backlight
- To enter the backlight setting mode, press the UP and DOWN buttons simultaneously for at least 3 seconds.
- Press UP of DOWN to select the desired setting.
- To confirm your selection, press the SETTINGS button

NOTE: After you have made the setting, the Settings button must be pressed to save and exit the settings mode. If you press the RETURN button, your changes will not be saved and the backlight setting mode will be exited.
Light settings
• F1: Light adjustment in 5 modes
| n1 flashes when changing colour | |
| n2 is always on for one colour | |
| n3 flashes for single colours | |
| n4 flashes when light pulses with changing colours | |
| n5 flashes when light pulses in one colour |
• F2: Adjusting the light colour
You can choose between 7 colours: red, green, blue, yellow, purple, turquoise and white. The colour setting is only relevant for the "n2" mode.
• F3: Adjusting the brightness
The brightness can be adjusted in 5 different levels.
The brightness setting is only relevant for the modes "n1", "n2" and "n3".
Memory function
After a power failure or when the mains plug is plugged back into the socket after a longer period of time, the settings will be the same as before the power failure. It does not matter how long the power failure has lasted.
WLAN FUNCTION
WLAN display
The decimal point at the bottom right of the numeric display on the screen (see illustration below) represents the WLAN indicator.
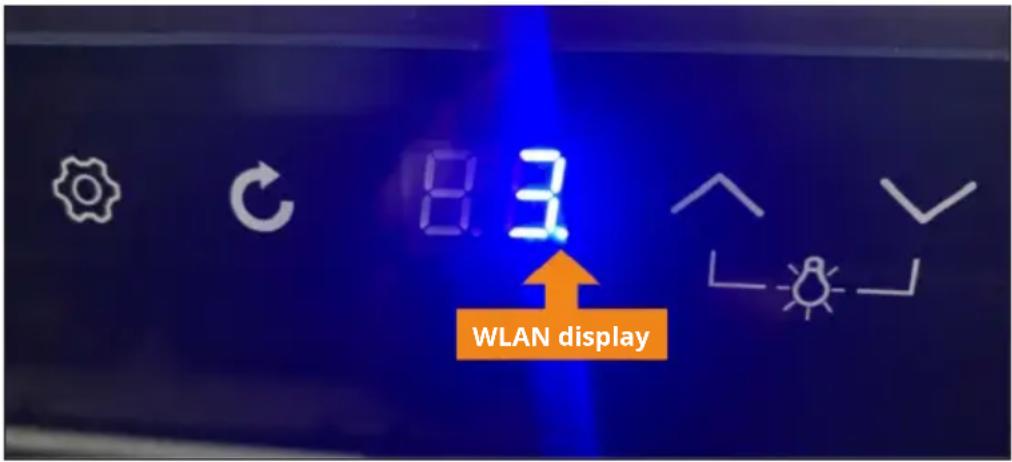
| The WLAN indicator will flash. The WLAN | connection can be established. |
| The WLAN indicator will light up continuously. | The WLAN connection has been successfully established |
Resetting the WLAN function
Press the SETTINGS button and the DOWN button simultaneously for 3 seconds. The decimal point (WLAN status indicator) on the lower right side of the digital screen will flash. The screen will enter WiFi connection mode and the WiFi connection can be established.
DEVICE CONTROL BY SMARTPHONE
If you integrate the device into your home WiFi, you can conveniently operate it via the associated Klarstein app. The app not only allows you to remotely control the device via your smartphone, but also gives you access to recipes and additional information.
Follow these steps to connect your smartphone to your Klarstein device:
- Download the Klarstein app first by scanning the QR code with your smartphone (see below), or download it directly from App Store or Google Play.
- Make sure your smartphone is connected to the same WiFi network that your Klarstein device is to be connected to.
- Open the Klarstein app.
- Sign in to your account. If you do not have an account, sign up in the Klarstein app.
- Follow the instructions from the app.
App Download
Use the scan function of your smartphone to scan the QR code and save the app on your smartphone.
Note: The app provides further information on how to use the app and help on how to connect to your device as soon as you open it for the first time.
| iOS Android | |
Troubleshooting connection problems
If your Klarstein device cannot be found in the WLAN, check the following:
- The device is not plugged in. Make sure that your device is plugged into an electric socket.
- The device is not in pairing mode. Make sure that the WiFi indicator (LED) on the smart device control panel is blinking as described in the "Reset WiFi settings" instruction of your smart device (instructions are usually available on device connection process).
- The WiFi access point does not operate on 2.4 GHz. Make sure that your access point operates on 2.4 GHz band and you have a separate SSID on 2.4 GHz band. If you are not sure about the operating band of your access point, please contact your internet provider company.
Important: please note that if your WiFi router is dual band - operating on both 2.4 GHz and 5 GHz band - you need to separate the SSIDs for each band and use the 2.4 GHz SSID for connection.
-
Firewall settings of your WiFi network; the firewall setting of your WiFi network may not allow the Klarstein app to configure the WiFi settings on your smart device. Please make sure that you are not using a public WiFi network, e.g. airports, dormitories, companies, etc.
-
Different credentials used in smartphone and the app. Make sure that the WiFi credentials entered in the Klarstein app are the same as the ones that your smartphone is connected to.
Following the above mentioned points, if your smart device still fails to connect to the app, please contact us via email for support: appsupport@go-bbg.com
TROUBLESHOOTING
Note: If the unit does not work properly, check it according to the troubleshooting information shown below. If the unit still has problems after this, contact customer service and be sure to give the model name and item number.
| Problem Possible cause / solution | |
| The refrigerator does not work. Is the power plug plugged into the mains socket? Is the power supply secure? | |
| Is the supply voltage too low? | |
| The device is too loud. Is it on a level surface and is the refrigerator stable? | |
| Is the outer surface of the unit making contact with other objects or walls? | |
| The refrigerator does not cool properly (the internal temperature is too high). | The temperature has been set incorrectly, select the appropriate temperature. |
| The door is not closed properly or has been opened too often and the door has been open too long. | |
| Is the refrigerator exposed to direct sunlight or is it too close to the oven or other heat sources? | |
| Poor heat dissipation. Check that there is enough space around the unit for air circulation. | |
DISPOSAL CONSIDERATIONS
natural_image
Symbol of a trash bin crossed with a diagonal line, no text or numbers presentIf there is a legal regulation for the disposal of electrical and electronic devices in your country, this symbol on the product or on the packaging indicates that this product must not be disposed of with household waste. Instead, it must be taken to a collection point for the recycling of electrical and electronic equipment. By disposing of it in accordance with the rules, you are protecting the environment and the health of your fellow human beings from negative consequences. For information about the recycling and disposal of this product, please contact your local authority or your household waste disposal service.
DECLARATION OF CONFORMITY

Manufacturer:
Chal-Tec GmbH, Wallstrasse 16, 10179 Berlin, Germany.
Importer for Great Britain:
Berlin Brands Group UK Limited
PO Box 42
272 Kensington High Street
London, W8 6ND
United Kingdom
Hereby, Chal-Tec GmbH declares that the radio equipment type [designation of type of radio equipment] is in compliance with Directive 2014/53/EU. The full text of the EU declaration of conformity is available at the following internet address: use, berlin/
For Great Britain: Hereby, Chal-Tec GmbH declares that the radio equipment type Coachella is in compliance with the relevant statutory requirements. The full text of the declaration of conformity is available at the following internet address: use.berlin/10046570
Chère cliente, cher client,
SOMMAIRE
FICHE DE DONNÉES PRODUIT
PANNEAU DE COMMANDE ET TOUCHES

natural_image
Symbol of a trash bin crossed with a diagonal line, no text or numbers presentDÉCLARATION DE CONFORMITÉ

Fabricant :
Chal-Tec GmbH, Wallstraße 16, 10179 Berlin, Allemagne.
Berlin Brands Group UK Limited PO Box 42 272 Kensington High Street London, W8 6ND United Kingdom
ÍNDICE
natural_image
Symbol of a trash bin crossed with a diagonal line, no text or numbers presentBerlin Brands Group UK Limited
PO Box 42
272 Kensington High Street
London, W8 6ND
United Kingdom
INDICE
natural_image
Symbol of a trash bin crossed with a diagonal line, no text or numbers presentBerlin Brands Group UK Limited PO Box 42
272 Kensington High Street
London, W8 6ND
United Kingdom
area
| Category | Value | | -------- | ----- | | 1 | 100 | | 2 | 100 | | 3 | 100 | | 4 | 100 | | 5 | 100 | | 6 | 100 | | 7 | 100 | | 8 | 100 | | 9 | 100 | | 10 | 100 | | 11 | 100 | | 12 | 100 | | 13 | 100 | | 14 | 100 | | 15 | 100 | | 16 | 100 | | 17 | 100 | | 18 | 100 | | 19 | 100 | | 20 | 100 | | 21 | 100 | | 22 | 100 | | 23 | 100 | | 24 | 100 | | 25 | 100 | | 26 | 100 | | 27 | 100 | | 28 | 100 | | 29 | 100 | | 30 | 100 | | 31 | 100 | | 32 | 100 | | 33 | 100 | | 34 | 100 | | 35 | 100 | | 36 | 100 | | 37 | 100 | | 38 | 100 | | 39 | 100 | | 40 | 100 | | 41 | 100 | | 42 | 100 | | 43 | 100 | | 44 | 100 | | 45 | 100 | | 46 | 100 | | 47 | 100 | | 48 | 100 | | 49 | 100 | | 50 | 100 | | 51 | 100 | | 52 | 100 | | 53 | 100 | | 54 | 100 | | 55 | 100 | | 56 | 100 | | 57 | 100 | | 58 | 100 | | 59 | 100 | | 60 | 100 | | 61 | 100 | | 62 | 100 | | 63 | 100 | | 64 | 100 | | 65 | 100 | | 66 | 100 | | 67 | 100 | | 68 | 100 | | 69 | 100 | | 70 | 100 | | 71 | 100 | | 72 | 100 | | 73 | 100 | | 74 | 100 | | 75 | 100 | | 76 | 100 | | 77 | 100 | | 78 | 100 | | 79 | 100 | | 80 | 100 | | Note: The actual values are not provided in the code. I have used the label 'Value' as a placeholder for the value detection. You would need to run the code to get the actual values from the code list. Please note that the actual values would be the result of this example. You would need to run the code to get the actual values from the code list. You would need to run the code to get the actual values from the code list. You would need to run the code to get the actual values from the code list. You would need to run the code to get the actual values from the code list. You would need to run the code to get the actual values from the code list. You would need to run the code to get the actual values from the code list. You would need to run the code to get the actual values from you would need to run the code. You would need to run the code to get the actual values from you would need to run the code.