
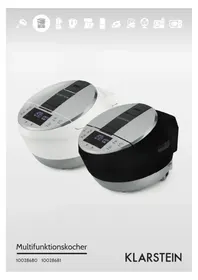
AuraAir - Multi-cooker Klarstein - Free user manual and instructions
Find the device manual for free AuraAir Klarstein in PDF.

| Product type | Multi-cooker / Air fryer |
| Brand | Klarstein |
| Model | AuraAir |
| Power supply | 220-240 V ~ 50/60 Hz |
| Power consumption | 1700 W |
| Capacity | 11 L (two cooking baskets) |
| Temperature range | 35 °C to 200 °C |
| Timer | 1 to 60 minutes (dehydration: up to 1440 minutes) |
| Technology | Hot air (Rapid Air) |
| Preset cooking modes | 8 modes: steak, chicken, fish, shrimp, french fries, pizza, cake, dehydration |
| Special functions | Sync, Dual Cook, independent basket cooking |
| Control panel | LED screen, time/temperature knob, Start/Pause, On/Off, Menu, Sync, Dual Cook, basket selection buttons |
| Material | Non-stick coating on baskets and grill plates |
| Care and cleaning | Baskets and plates hand wash only (not dishwasher safe). Do not immerse the appliance. |
| Safety | Safety switch on each basket, automatic shut-off if basket removed, overload protection |
| Spare parts | Cooking baskets (2), grill plates (2), accessories recommended by the manufacturer |
| Repairability | Consult a qualified electrician for repairs; use original parts |
| General information | For domestic use only. Manual available in multiple languages via QR code. Manufactured by Chal-Tec GmbH, Germany. |
Frequently Asked Questions - AuraAir Klarstein
User questions about AuraAir Klarstein
0 question about this device. Answer the ones you know or ask your own.
Ask a new question about this device
Download the instructions for your Multi-cooker in PDF format for free! Find your manual AuraAir - Klarstein and take your electronic device back in hand. On this page are published all the documents necessary for the use of your device. AuraAir by Klarstein.
USER MANUAL AuraAir Klarstein
KLARSTEIN
www.klarstein.com

area
| Category | Value | | -------- | ----- | | 1 | 100 | | 2 | 100 | | 3 | 100 | | 4 | 100 | | 5 | 100 | | 6 | 100 | | 7 | 100 | | 8 | 100 | | 9 | 100 | | 10 | 100 | | 11 | 100 | | 12 | 100 | | 13 | 100 | | 14 | 100 | | 15 | 100 | | 16 | 100 | | 17 | 100 | | 18 | 100 | | 19 | 100 | | 20 | 100 | | 21 | 100 | | 22 | 100 | | 23 | 100 | | 24 | 100 | | 25 | 100 | | 26 | 100 | | 27 | 100 | | 28 | 100 | | 29 | 100 | | 30 | 100 | | 31 | 100 | | 32 | 100 | | 33 | 100 | | 34 | 100 | | 35 | 100 | | 36 | 100 | | 37 | 100 | | 38 | 100 | | 39 | 100 | | 40 | 100 | | 41 | 100 | | 42 | 100 | | 43 | 100 | | 44 | 100 | | 45 | 100 | | 46 | 100 | | 47 | 100 | | 48 | 100 | | 49 | 100 | | 50 | 100 | | 51 | 100 | | 52 | 100 | | 53 | 100 | | 54 | 100 | | 55 | 100 | | 56 | 100 | | 57 | 100 | | 58 | 100 | | 59 | 100 | | 60 | 100 | | 61 | 100 | | 62 | 100 | | 63 | 100 | | 64 | 100 | | 65 | 100 | | 66 | 100 | | 67 | 100 | | 68 | 100 | | 69 | 100 | | 70 | 100 | | 71 | 100 | | 72 | 100 | | 73 | 100 | | 74 | 100 | | 75 | 100 | | 76 | 100 | | 77 | 100 | | 78 | 100 | | 79 | 100 | | 80 | 100 | | Note: The actual values are not provided in the code. I have used the label 'Value' as a placeholder for the value detection. You would need to run the code to get the actual values from the code list. Please note that the actual values would be the result of this example. You would need to run the code to get the actual values from the code list. You would need to run the code to get the actual values from the code list. You would need to run the code to get the actual values from the code list. You would need to run the code to get the actual values from the code list. You would need to run the code to get the actual values from the code list. You would need to run the code to get the actual values from the code list. You would need to run the code to get the actual values from you would need to run the code. You would need to run the code to get the actual values from you would need to run the code.INHALT
natural_image
Symbol of a trash bin with crossed x and y axes, no text or labels presentBerlin Brands Group UK Limited
PO Box 42
272 Kensington High Street
London, W8 6ND
United Kingdom
Dear customer,
Congratulations on your purchase. Please read the following instructions carefully and follow them to prevent potential damage. We accept no liability for damage caused by disregarding the instructions and improper use. Please scan the QR code to access the latest operating instructions and further information about the product.

CONTENTS
Safety Instructions 22
Device overview 24
Control panel and buttons 25
Operation 26
Cleaning and Care 34
Troubleshooting 35
Disposal Considerations 37
Manufacturer & importer (UK) 37
TECHNICAL DATA
| Article number 10046503, 10046518 | |
| Power supply 220-240 V ~ 50/60 Hz | |
| Technology Hot air | |
| Power consumption 1700 W | |
| Volume 11 L | |
| Temperature range 35-200 °C | |
| Timer 1-60 minutes |
SAFETY INSTRUCTIONS
- Before using for the first time, check that the voltage of your socket corresponds to the voltage specified.
- To avoid electric shock, do not immerse the power cord or the device itself in water or other liquids.
- Keep children and pets away from the device while it is in operation.
- Switch off the device after use and pull the power plug out of the socket.
- The device should be operated on a power circuit separate from other devices. If the electrical circuit is overloaded with other devices, this device may not function properly.
- Use extreme caution when moving a container containing hot food.
- Do not let the power cord hang over the edge of tables or work surfaces, and make sure that the power cord does not come into contact with the hot surfaces of the device.
• Always place the device securely in the centre of the table or work surface. - Never touch hot device surfaces. Use the handles to move or lift.
- The device may not be used by children.
- The use of accessories that are not expressly recommended by the manufacturer can lead to injuries.
- Do not place or use the device on heat-sensitive glass surfaces, wooden surfaces or tablecloths. With these surfaces, it is essential to place a heat-insensitive plate with thermal protection under the device.
- Do not use the device if the power cord is damaged, the device is malfunctioning, or has been damaged in any other way.
- Before cleaning and when not using the device, switch it off and pull the power plug out of the socket. Let the device cool down first before removing or adding device parts.
- Do not place the device in the immediate vicinity of hot gas or electric ovens or in a heated oven.
- If the power plug does not fit properly, be sure to consult a qualified electrician to reduce the potential risk of electric shock. Never attempt to tamper with the power plug in any way.
-
Do not clean the device with metallic scouring pads. Small metal parts could break off and short out electrical components in the device, which could result in an electric shock and damage the device.
-
To reduce the risk of electric shock, only prepare food in the coated, non-stick container provided.
- The device is designed for domestic use only.
- Only use the device for its intended purpose.
- Keep these operating instructions for future reference.
- Children over 8 years as well as mentally, sensory and physically impaired persons may only use the device if they have been informed in detail about the functions and safety precautions by a supervisor responsible for them beforehand and understand the associated risks.

CAUTION
Risk of burns! When hot air frying, hot steam is released through the air outlets. Keep your hands and face a safe distance from steam and air vents. Also watch out for hot steam and air when removing parts of the device from the device.
DEVICE OVERVIEW
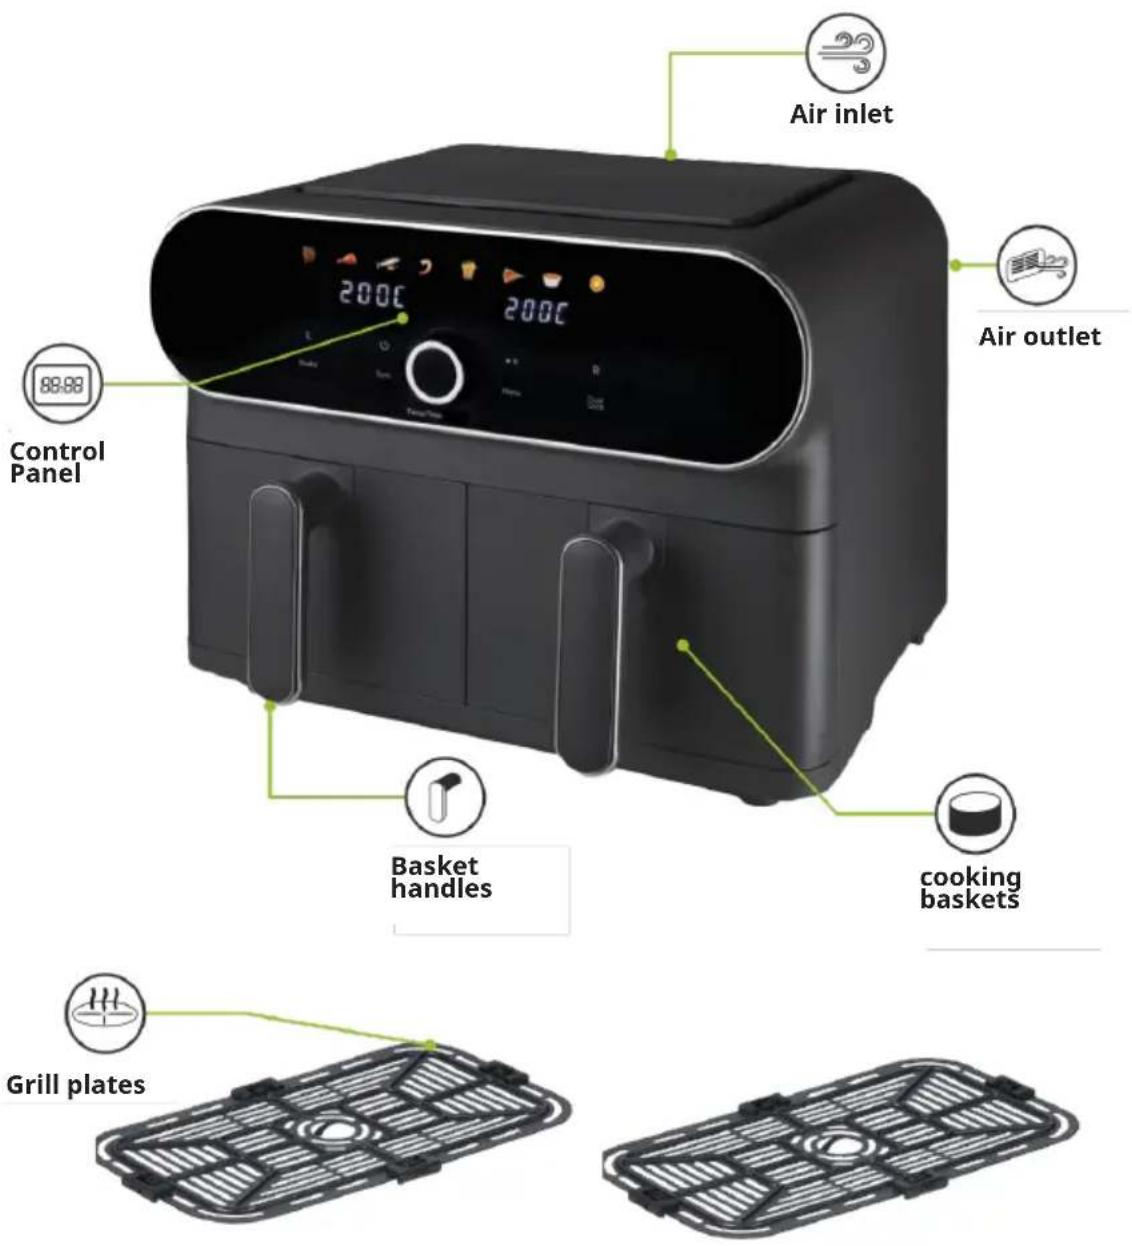
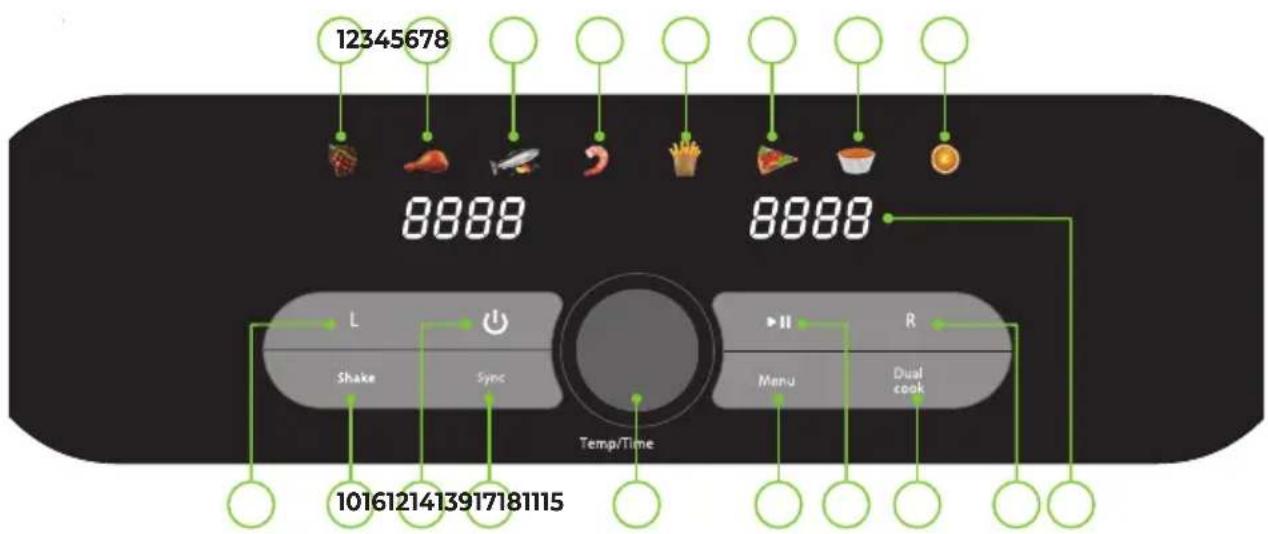
CONTROL PANEL AND BUTTONS
flowchart
graph TD
    A["12345678"] --> B["8888"]
    C["Shake"] --> D["L"]
    E["Syc"] --> F["Switch"]
    G["II"] --> H["Menu"]
    I["Dual cook"] --> J["R"]
    K["Temp/Time"] --> L["1016121413917181115"]
    B --> M["8888"]
    F --> M
    H --> M
    J --> M
    L --> M
| 1 Steak preset indicator 10 Shake key | |||
| 2 | Chicken preset indicator | 11 | Power On/Off key |
| 3 Fish preset indicator | 12 Sync key | ||
| 4 | Shrimp preset indicator | 13 | Time/Temperature dial |
| 5 Fries preset indicator | 14 Menu key | ||
| 6 Pizza preset indicator | 15 Start/Pause key | ||
| 7 Bake preset indicator | 16 Dual Cook key | ||
| 8 Dehydrate preset indicator | 17 | Right cooking basket selection key | |
| 9 | Left cooking basket selection key | 18 LED display | |
OPERATION
Preparing for use
- Read all instructions and safety information carefully before first use. Please keep this information for future reference.
- Remove the unit from its packaging.
- Check that there is no damage to the cable or visible damage to the casing.
- Dispose of the packaging responsibly.
- Remove any stickers or labels from the unit. DO NOT remove the rating plate.
- Thoroughly clean the grill and cooking plates with hot water, a little washing-up liquid and a non-abrasive sponge. Dry thoroughly.
- Place the grill plates in the bottom of the cooking basket before use.
- Wipe the inside and outside of the appliance with a damp cloth. Dry thoroughly.
- Do not fill the appliance with oil or frying fat. This appliance uses hot air and requires very little or no oil.
- Familiarise yourself with the control panel shown in the Specifications section.
- Place the appliance in accordance with the Important Safety Instructions section.
Note: When using the appliance for the first time, there may be some smoke or odour. This is normal and will soon dissipate. Ensure that there is sufficient
Use
This appliance allows you to use either one or both baskets during cooking. The two baskets, together with the dedicated 'Sync' and 'Dual Cook' settings, allow dual-zone cooking, so that different foods can be cooked simultaneously at different cooking times and temperatures, while still being ready for use. temperatures, while still being ready at the same time.
Air fryer cppking basket safety switch
For your safety, this fryer has a safety switch in each of the cooking baskets to prevent it from being switched on accidentally if the cooking baskets are not placed correctly in the appliance or the timer is not set. timer is not set. Before using your air fryer, please ensure that the grill plates are in the baskets and that the baskets are fully closed.
Removing the cooking baskets
The baskets can be completely removed from the fryer. Pull on the handle at any time to slide each basket out of the fryer.
Note: If a basket is removed from the main body of the fryer while it is in operation, the appliance will automatically stop working, the word 'Pot' will appear on the LED display of the appliance and the digits on the display will start flashing. The unit will continue to display 'Pot' until the basket is replaced. When the basket is replaced, the fryer will resume operation with the last settings selected.
Turning the appliance on/off
- Plug the unit into a wall outlet. You will hear an audible prompt and the LED display will show '--- ---'.
- Press the On/Off button on the control panel to switch the unit on. You will hear a tone and the control panel will light up.
- Press the On/Off key again while the unit is switched on to put it into standby mode. A twenty second countdown will start on the LED screen to indicate that the appliance is entering standby mode.
Selecting the cooking drawers
- This appliance allows you to cook on either of its two baskets separately or to use both for simultaneous cooking.
- To select the basket you want to use, press the corresponding button on the appliance's control panel. The corresponding side of the LED display will start to flash.
Pre-set menus
The cooking temperature of the appliance can be set manually between 35^ C and 200^ C.
-
Once the appliance is switched on and the required basket or baskets have been selected, select one of the eight preset modes to start a cooking cycle. Press the Menu button on the control panel to scroll through and select the available modes. The relevant display will start to flash and the default time and temperature settings for that mode will flash on the machine's LED screen to indicate which mode has been selected.
-
Once the desired cooking mode has been selected, press the Start/Pause button to start a cooking cycle. Alternatively, you can set the time and temperature as described in the corresponding section of this manual.
Note: It is not possible to change the mode in the middle of a cooking cycle. To change the mode while a cooking cycle is in progress, the cycle must first be paused, cancelled or finished before the new cooking mode can be selected.
Note: A cooking mode MUST be selected before starting a cooking cycle or adjusting any of the time and temperature settings.
Note: The preset times and temperatures for each programme should be adjusted if necessary to ensure that the food is fully cooked. Adjustments can also be made during cooking. Refer to the 'Setting the temperature' and 'Setting the timer' sections of this manual for instructions on how to adjust each setting manually.
Setting the temperature
To set the temperature for a preset programme, press the centre of the time/temperature/menu dial down to activate the temperature selection function. The numbers in the top half of the LED display will start to flash to indicate that this function has been activated.
Once the temperature selection function is activated, turn the Time/Temperature/Menu dial to increase or decrease the temperature in 5 degree increments. Turn this dial clockwise to increase the temperature or counter-clockwise to decrease it.
Note: The temperature ranges vary depending on the function or mode selected.
Setting the timer
- To set the cooking time for a cooking mode, press the centre of the time/temperature/menu dial down twice to activate the time selection function. The digits in the lower half of the LED display will start to flash to indicate that this function has been activated.
- Once the time selection function is activated, turn the Time/Temperature/Menu dial to increase or decrease the time in 1 minute increments. Turn this dial clockwise to increase the cooking time or counter-clockwise to decrease it..
Note: The cooking time ranges are different depending on the function or mode selected.
- Alternatively, press the on/off button again to interrupt and cancel the cooking cycle. A twenty second countdown will start on the LED display to indicate that the cooking process has finished.
Starting and pausing the cooking process
- Once the appropriate function, time and temperature have been selected, touch the Start/Pause button on the control panel to start the cooking process. Alternatively, press the Start/Pause button without programming the time or temperature to start a cooking session with the default settings for each mode.
- Touch the Start/Pause button or the basket selection button while the appliance is running to pause the cooking process, and again while the appliance is paused to resume the cooking process.
- Alternatively, press the on/off button again to interrupt and cancel the cooking cycle. A twenty-second countdown will start on the appliance's LED display to indicate the end of the cooking process.
Cooking with both cooking baskets
This appliance offers a choice of two functions when cooking with both baskets at the same time. The 'Sync' function allows you to cook separate ingredients on each basket so that they are ready at the same time, while the 'Dual' function allows you to set both baskets of the oven to allows you to set both baskets to the same settings, allowing you to cook larger batches.
Cooking separate ingredients - The "Sync"-Function
- To use each of the air fryer's cooking baskets with separate time and temperature settings, start by programming the first basket as described in the relevant section of these instructions.
- Once the first basket has been programmed, press the 'Sync' button on the appliance's control panel. The digits on the LED display of the appliance will start to flash.
Note: Once a preset has been selected, the default cooking time and temperature settings can be manually adjusted to suit individual preferences. See 'Setting the temperature and 'Setting the timer' sections of this manual for instructions on how to select and set the required time and temperature.
-
Once the 'Sync' function is activated, press the selection button for the other basket to continue programming.
-
Repeat the above procedure to programme the second basket. Press the Start/Pause button to start the cooking process. The appliance will automatically stagger the two programmed cycles, delaying the start of the shorter one so that both cycles finish at the same time.
Cooking larger batches – the "Dual" function
- To select and set the same time and temperature settings for both baskets of the air fryer, allowing larger batches of ingredients to be cooked at once, press the 'Dual Cook' button on the appliance's control panel. The basket selection buttons and the numbers on the appliance's LED display will start to flash.
- Once the Dual Cook function has been selected, select the required preset and set the required time and temperature settings for the ingredients you wish to cook. Refer to the 'Preset menus', 'Setting the temperature' and 'Setting the timer' sections of this manual to select and set the required preset menu, time and temperature.
- Once the cooking programme and settings have been selected, press the Start/Pause button on the control panel to start a cooking cycle. The appliance will automatically perform identical cooking cycles on both baskets.
Tips
- To remove large or fragile ingredients, use tongs to lift them out of the basket.
- The cooking time depends on the size of your ingredients. Smaller sizes may require a shorter cooking time.
- A larger quantity of ingredients requires a slightly longer cooking time than a smaller quantity of ingredients.
- Shaking smaller ingredients halfway through cooking optimises the end result and can help prevent uneven cooking.
- For perfectly fluffy chips, it is recommended that potatoes are
• parboiled before frying. - Add a little oil to fresh potatoes for a crispy result. Fry your ingredients in the air fryer within a few minutes of adding the oil.
- The optimum amount for crispy chips is 500 grams.
- Be careful when using extremely fatty ingredients such as sausages in the fryer.
- Snacks that can be prepared in the oven can also be prepared in an air fryer.
- Pre-made dough is a quick and easy way to make filled snacks. Ready-made dough also takes less time to cook than homemade dough.
- Place a baking tray or ovenproof dish in the cooking basket of the air fryer. If you want to bake a cake or quiche, or if you want to fry delicate or stuffed ingredients.
- The air fryer can be used to reheat ingredients. To reheat ingredients, set the temperature to 150^ for up to 10 minutes.
- When the food is done, empty the basket into a bowl or onto a plate. Take care when tipping the basket, as any excess oil that has collected at the bottom of the basket will drip onto the ingredients and the grill.
- The grill plate can also become detached from the cooking basket and fall onto the food.
- When one batch of food is finished, the appliance is immediately ready to prepare another batch.
- Unplug the appliance when not in use.
Suggested times and temperatures
Settingstable
- Once a preset mode has been selected, the cooking time and temperature can be manually adjusted to suit any number of foods. This settings chart will help you select the basic settings for a variety of common ingredients.
- Please note that these settings are indicative. As ingredients vary in origin, size, shape and brand, the best settings for ingredients cannot be guaranteed.
- As the Rapid Air technology heats the air inside the appliance instantly, removing the
- As the Rapid Air technology immediately heats the air inside the appliance, removing the tray from the appliance for a short time while you are frying does not interfere with the process.
- If the appliance is cold, add 3 minutes to the preheat time before you start frying.
| Menu Default Temp (°C) Default time | (mins.) | Dual cook time (mins.) | Temp. range (°C) | Time range (mins.) |
| Steak 190 15 20 80-200 1-60 | ||||
| Chicken 200 25 30 80-200 1-60 | ||||
| Fish 200 15 20 80-200 1-30 | ||||
| Prawns 200 08 10 80-200 1-60 | ||||
| Fries 200 23 30 80-200 1-60 | ||||
| Pizza 150 12 12 80-200 1-60 | ||||
| Cake 150 12 12 80-200 1-60 | ||||
| Dehydrate 55 480 480 35-80 | 60-1.440 | |||
CLEANING AND CARE
- Do not immerse the appliance in water or other liquids.
- Clean the machine after each use.
- Do not use metal utensils or abrasive cleaners to clean the cooking baskets and grill plates as this may damage the non-stick coating.
- Clean the cooking baskets and grill plates with hot water, a little washing-up liquid and a non-abrasive sponge or brush.
- If food is stuck to the grill plates or the bottom of the cooking baskets, soak them in hot water and a little washing-up liquid for a few hours or overnight.
- Do not spill water or other liquids inside the appliance.
- Wipe the outside of the machine with a damp cloth.
- Wipe the inside of the machine with hot water and a non-abrasive sponge.
- Clean the heating element with a cleaning brush to remove any food residue.
- Ensure that all parts are completely dry before use.
Note: The cook baskets are NOT dishwasher safe. NEVER put the baskets in the dishwasher.
Storage
- Ensure that the fryer is cool, clean and dry before storing.
- Store the appliance in a cool, dry place.
TROUBLESHOOTING
| Problem Possible Cause Solution | ||
| The air fryer does not work | The appliance is not plugged in. | Plug the appliance into an earthed socket. |
| No basket or cooking mode has been selected. | Select the desired cooking basket and cooking mode by pressing the corresponding buttons on the appliance's control panel. | |
| The Start/Stop button has not been pressed. | Press the Start/Stop button. | |
| The pots are open and the selected function is paused. | Close the pots to automatically resume the selected function. | |
| The cooking pots will not slide inside the unit properly | There is too much food in the cooking pots. | Take care not to overfill the cooking pots. |
| The fried ingredients are not done. | Too much food has been added to the air fryer. | Put smaller batches of ingredients in the air fryer. Smaller batches are fried more evenly. |
| The set temperature is too low. | Set to an appropriate temperature or select the appropriate pre-set program from the unit's control panel. | |
| The cooking time is too short. Set | an appropriate cooking time or select the appropriate pre-set program from the unit's control panel. | |
| Fresh fries are fried unevenly in the air fryer. | Wrong type of potatoes used. Use | fresh potatoes and make sure they stay firm during frying. |
| The potato sticks were not rinsed adequately before frying. | Rinse the potato sticks properly to remove starch from the outside. | |
| Fried snacks are not crispy or evenly fried when they come out of the air fryer. | Some food materials have to be fried with oil. | Brush a thin layer of oil on the surface of the food first, then start to fry it. |
| Wrong type of snacks used. Use | oven snacks or lightly brush some oil onto the snacks for a crispier result. | |
| Food is stuck together or not in an even layer. | Shake or turn the food periodically through the cooking process. | |
| Fresh fries are not crispy when they come out of the air fryer. | The crispiness of the fries depends on the amount of oil and water in the fries. | Make sure you dry the potato sticks properly before you add the oil. Cut the potato sticks smaller for a crispier result and add slightly more oil for a crispier result. |
| The appliance is smoking. | The ingredients have a high oil content. | Smoking will be normal. |
| The appliance contains grease from a previous use. | White smoke is caused by grease heating up inside the fryer. Clean the appliance properly after each use. | |
| An inappropriate temperature has been set. | Follow the suggested settings or food manufacturer's recommendations. | |
| The food is burned The food was added before pre-heating was complete. | Add food to the appliance only once preheating is completed. | |
| Check on the progress of the food periodically throughout the cooking process. | ||
| Remove the food from the appliance as soon as the cooking time has elapsed. | ||
DISPOSAL CONSIDERATIONS
natural_image
Symbol of a trash bin crossed with a diagonal line, no text or labels presentIf there is a legal regulation in your country regarding the disposal of electrical and electronic equipment, this symbol on the product or on the packaging indicates that this product must not be disposed of with household waste. Instead, it must be taken to a collection point for the recycling of electrical and electronic equipment. By disposing of this product in accordance with the regulations, you protect the environment and the health of those around you from negative consequences. For information on recycling and disposal of this product, contact your local government or household waste disposal service.
MANUFACTURER & IMPORTER (UK)
Manufacturer:
Chal-Tec GmbH, Wallstrasse 16, 10179 Berlin, Germany.
Importer for Great Britain:
Berlin Brands Group UK Limited
PO Box 42
272 Kensington High Street
London, W8 6ND
United Kingdom
Estimado cliente
ÍNDICE
natural_image
Symbol of a trash bin with crossed lines and a horizontal bar below (no text or labels)Berlin Brands Group UK Limited
PO Box 42
272 Kensington High Street
London, W8 6ND
United Kingdom
Chère cliente, cher client,
SOMMAIRE
natural_image
Symbol of a trash bin with crossed lines indicating no waste or discharge (no text or labels)Berlin Brands Group UK Limited
PO Box 42
272 Kensington High Street
London, W8 6ND
United Kingdom
Gentile cliente,
INDICE
Durate e temperature consigliate
natural_image
Symbol of a trash bin with crossed lines and a horizontal bar below (no text or labels)Berlin Brands Group UK Limited
PO Box 42
272 Kensington High Street
London, W8 6ND
United Kingdom

area
| Category | Value | | -------- | ----- | | A | 100 | | B | 100 | | C | 100 | | D | 100 | | E | 100 | | F | 100 | | G | 100 | | H | 100 | | I | 100 | | J | 100 | | K | 100 | | L | 100 | | M | 100 | | N | 100 | | O | 100 | | P | 100 | | Q | 100 | | R | 100 | | S | 100 | | T | 100 | | U | 100 | | V | 100 | | W | 100 | | X | 100 | | Y | 100 | | Z | 100 |
KLARSTEIN

- INHALT
- Dear customer,
- CONTENTS
- SAFETY INSTRUCTIONS
- CAUTION
- DEVICE OVERVIEW
- CONTROL PANEL AND BUTTONS
- OPERATION
- Preparing for use
- Use
- Air fryer cppking basket safety switch
- Removing the cooking baskets
- Turning the appliance on/off
- Selecting the cooking drawers
- Pre-set menus
- Setting the temperature
- Setting the timer
- Starting and pausing the cooking process
- Cooking with both cooking baskets
- Cooking separate ingredients - The "Sync"-Function
- Cooking larger batches – the "Dual" function
- Tips
- Suggested times and temperatures
- Settingstable
- CLEANING AND CARE
- Storage
- TROUBLESHOOTING
- DISPOSAL CONSIDERATIONS
- MANUFACTURER & IMPORTER (UK)
- Manufacturer:
- Importer for Great Britain:
- Estimado cliente
- ÍNDICE
- SOMMAIRE
- Gentile cliente,
- INDICE
- Durate e temperature consigliate
- KLARSTEIN
Brand : Klarstein
Model : AuraAir
Category : Multi-cooker