
TotalClean AP-T43 - Air purifier HOMEDICS - Free user manual and instructions
Find the device manual for free TotalClean AP-T43 HOMEDICS in PDF.

| Product Type | Air Purifier |
| Brand | Homedics |
| Model | TotalClean AP-T43 |
| Power Supply | 120 VAC, 60 Hz, 65 W |
| Filtration System | True HEPA 3-in-1 (pre-filter + activated carbon + HEPA) |
| HEPA Efficiency | Removes up to 99.97% of particles ≥ 0.3 µm |
| UV-C Technology | Yes, reduces bacteria, viruses, mold and fungi |
| Aromatherapy | Integrated oil tray with 3 included essential oil pads |
| Fan Speeds | Auto, Sleep, 1, 2, 3, 4 |
| Air Quality Indicator | Color-coded PM2.5: green, yellow, orange, red |
| Coverage Area | 349 ft² / 32.4 m² (AHAM AC-1 tested) |
| Air Changes per Hour | Up to 1692 ft²/h (1 time/h) at max speed |
| Noise Level | 29-60 dBA |
| HEPA Filter Lifespan | Approximately 12 months (12 h/day) |
| UV-C Bulb Lifespan | Approximately 10,000 hours |
| Replacement Parts | HEPA Filter: AP-T40FL ; UV-C Bulb: PP-APUVC1 |
| Warranty | 3-year limited |
| Certification | ENERGY STAR |
Frequently Asked Questions - TotalClean AP-T43 HOMEDICS
User questions about TotalClean AP-T43 HOMEDICS
0 question about this device. Answer the ones you know or ask your own.
Ask a new question about this device
Download the instructions for your Air purifier in PDF format for free! Find your manual TotalClean AP-T43 - HOMEDICS and take your electronic device back in hand. On this page are published all the documents necessary for the use of your device. TotalClean AP-T43 by HOMEDICS.
USER MANUAL TotalClean AP-T43 HOMEDICS
INSTRUCTION MANUAL AND WARRANTY INFORMATION
3-year limited warranty
AP-T43 | L-03100 Rev. 2
IMPORTANT SAFETY INSTRUCTIONS:
WHEN USING ELECTRICAL PRODUCTS, ESPECIALLY WHEN CHILDREN ARE PRESENT, BASIC SAFETY PRECAUTIONS SHOULD ALWAYS BE FOLLOWED, INCLUDING THE FOLLOWING:
READ ALL INSTRUCTIONS BEFORE USING.
DANGER – TO REDUCE THE RISK OF ELECTRIC SHOCK:
- ALWAYS unplug the air purifier from the electrical outlet immediately after using and before cleaning or replacing filters.
- When replacing filters, only use manufacturer recommended replacement filters.
- Keep cord away from heated surfaces.
- ALWAYS place the air purifier on a firm, level surface.
- ALWAYS place the air purifier at least 6 inches away from walls and 3 feet from heat sources, such as stoves, radiators, or heaters.
- DO NOT reach for an appliance that has fallen into water. Unplug it immediately.
- DO NOT place or store appliance where it can fall or be pulled into a tub or sink.
- DO NOT place in or drop into water or other liquid.
- Keep dry — DO NOT operate in wet or moist conditions.
- Check your air purifier cord and plug connections. Faulty wall outlet connections or loose plugs can cause the outlet or plug to overheat. Be sure the plug fits tightly in the outlet.
This product complies with the maximum allowable concentration of ozone of 0.050 parts per million by volume (ppmv) in a 24-hour period.
NOTE: To reduce the risk of electric shock, this equipment has a polarized plug (one blade is wider than the other). This plug will fit in a polarized outlet only one way. If the plug does not fit fully in the outlet, reverse the plug. If it still does not fit, contact qualified personnel to install the proper outlet. Do not alter the plug in any way.
WARNING – TO REDUCE THE RISK OF BURNS, FIRE, ELECTRIC SHOCK, OR INJURY TO PERSONS:
- ALWAYS unplug the air purifier when not in use.
- DO NOT operate the air purifier with a damaged cord or plug, or after the air purifier malfunctions, or has been dropped or damaged in any manner. Return to a Homedics Service Center for examination, electrical or mechanical adjustment, or repair.
- This air purifier is NOT intended for use in bathrooms, laundry areas, or similar moist indoor locations.
- DO NOT run cord under carpeting. DO NOT cover cord with throw rugs, runners, or similar coverings. DO NOT route cord under furniture or appliances. Arrange cord away from traffic areas where it can be tripped over.
- To disconnect the air purifier, first turn controls to the off position, then remove plug from outlet.
- DO NOT tilt or move the air purifier while it is in operation. Shut off and remove plug from outlet before moving.
- DO NOT insert or allow foreign objects to enter any ventilation or exhaust opening as this may cause an electric shock or fire, or damage the air purifier.
- DO NOT block air intakes or exhaust in any manner. DO NOT use on any soft surface, like a bed, where openings may become blocked.
- Use this air purifier ONLY for its intended use as described in this manual. Any other use not recommended by the manufacturer may cause fire, electric shock, or injury to persons.
- WARNING: To reduce the risk of fire, electric shock or injury to persons, do not use replacement parts that have not been recommended by the manufacturer (e.g. parts made at home using a 3D printer).
• DO NOT use outdoors. - This product is intended for household use only.
WARNING: Skin or eye damage may result from directly viewing the light produced by the lamp in this apparatus. Always disconnect power before relamping or servicing. Replace lamp with Homedics lamp model no. PP-APUVC1 at homedics.com.
SAVE THESE IMPORTANT INSTRUCTIONS FOR EASY REFERENCE.
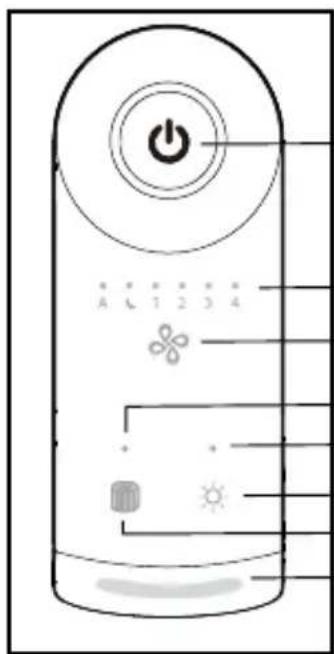
CONTROL PANEL
POWER
FAN SPEED INDICATOR
FAN SPEED
REPLACE FILTER INDICATOR
REPLACE UV-C BULB INDICATOR
LIGHTS ON/OFF
FILTER RESET BUTTON
AIR QUALITY STATUS
LOCATION OF PARTS AND CONTROLS
MAIN UNIT
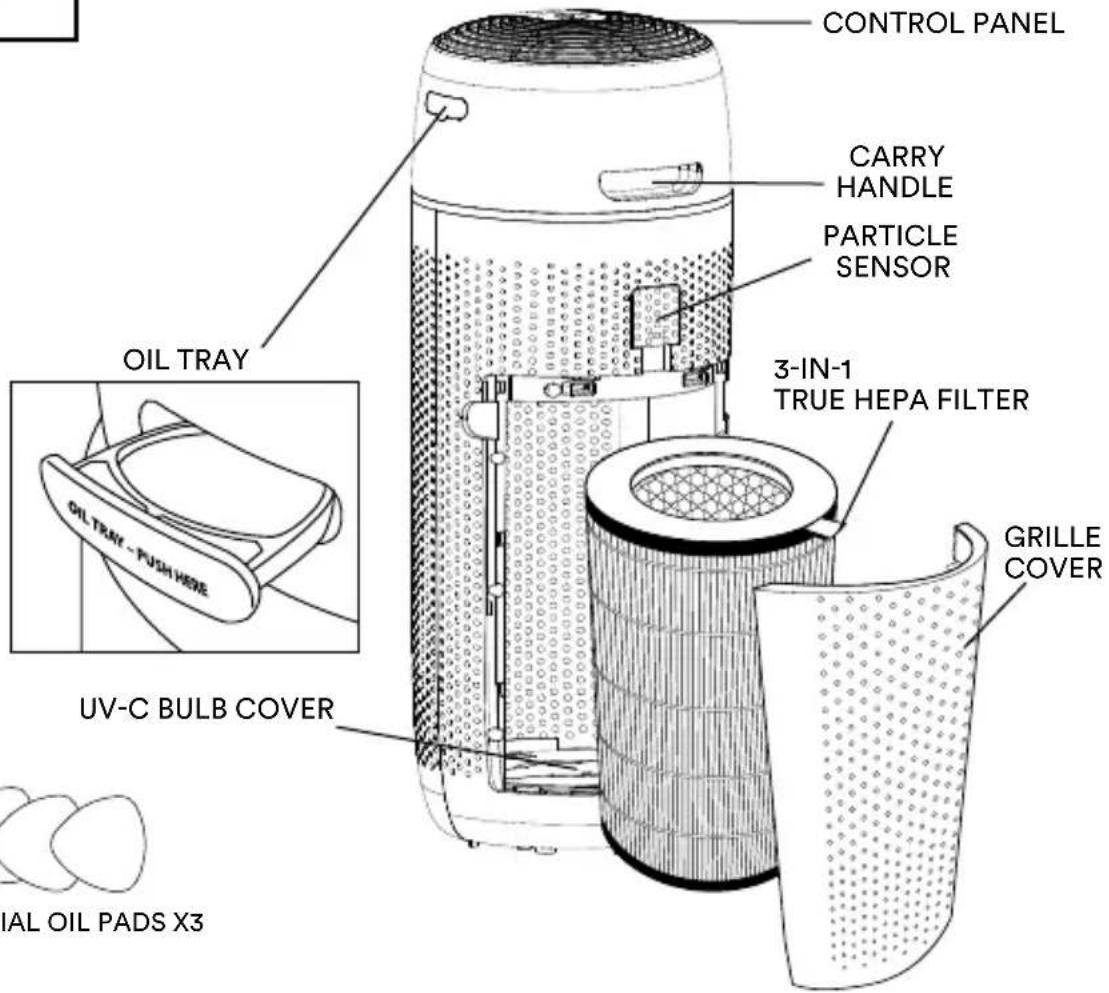
ESSENTIAL OIL PADS X3
HOW TO OPERATE
BEFORE TURNING THE AIR PURIFIER ON
• Take the air purifier out of the box and remove the clear protective plastic bag.
- Place the air purifier on a firm, level surface.
- Plug the air purifier into a 120-volt AC electrical outlet.

POWER BUTTON
Turns the air purifier on/off.

FAN SPEED
Cycles through fan speed settings: Auto, Sleep, 1, 2, 3, 4.
When “A” Auto Mode is selected, the fan speed automatically adjusts based on indoor air quality. The room air quality PM2.5 particle value is color-coded as:
- Green (good) – operates on fan speed 1.
- Yellow (moderate) – operates on fan speed 2.
- Orange (unhealthy for sensitive groups) – operates on fan speed 3.
- Red (unhealthy) – operates on fan speed 4.
To exit auto mode, select a different speed.
When sleep is selected, the fan speed is set to a minimum speed lower than speed 1. The lights will automatically turn off after a few seconds. To exit sleep, select another fan speed.
Press fan speed 1-4 to manually select desired fan speed.

LIGHTS ON/OFF
Press the Light button to turn the control panel lights on/off.
FILTER RESET
Push and hold the filter reset button until the replace filter light turns off.
HOW TO USE ESSENTIAL OILS
WARNING: Putting oil anywhere but the oil tray will damage the air purifier.
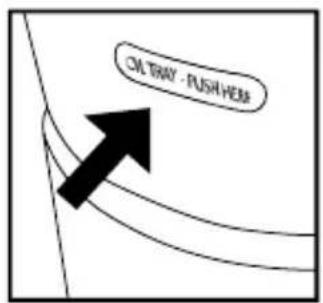
- The oil tray is located on the side of the air purifier.
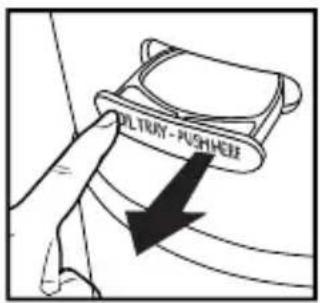
- Push to open and remove the tray.
natural_image
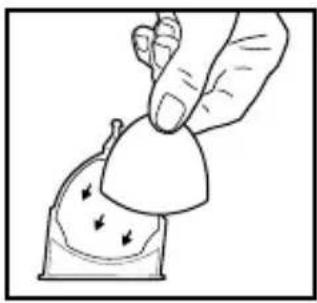
Illustration of a hand holding a small object with arrows indicating motion or force (no text or symbols)- Use the 1 preinstalled essential oil pad in the oil tray (3 total included).
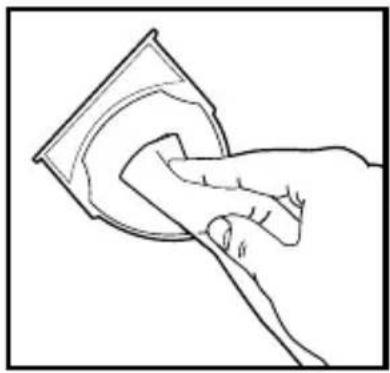
natural_image
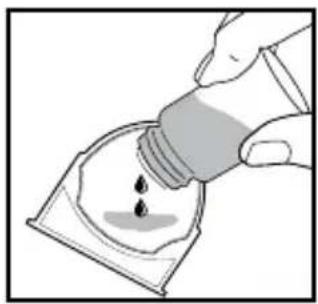
Illustration of a hand pouring liquid into a container with droplets (no text or symbols)- Add 5–7 drops of essential oil to the pad. You may use more or less depending on personal preference. WARNING: Only place essential oil on the pad and NOT directly into the tray.
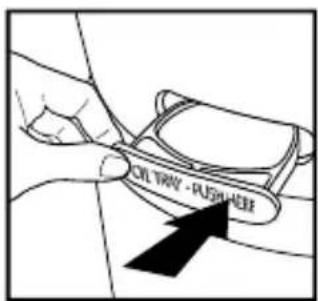
- Place the oil tray back in its compartment and push to close. The scent will start automatically when the air purifier is turned on.
NOTE: For use with the included Homedics essential oil pads only.
NOTE: Do not leave a filled essential oil pad in the oil tray if it will be out of use for a long period of time.
ARE ESSENTIAL OILS SAFE TO USE AROUND PETS?
We should always exercise caution when using essential oils around our pets. Keep all essential oil and aromatherapy products (like diffusers) out of reach of pets. Keep open bottles away from pets to avoid internal consumption. We do not recommend the topical use of essential oils on pets, as they have a strong sense of smell and cannot get rid of the oil if they don't like it or it is disturbing them. When diffusing essential oils around pets, always diffuse in a well-ventilated area and leave an option for them to remove themselves from the space, such as leaving a door open. Every animal is different, so carefully observe how each animal responds when introducing an essential oil for the first time. If irritation occurs, discontinue the use of the essential oil. We recommend seeking medical attention if ingestion of essential oil occurs.
HOW TO REPLACE THE FILTER
REPLACE FILTER LIGHT
The replace filter light illuminates when it is time to replace the True HEPA filter based on the air purifier's hours of use.
REPLACING THE TRUE HEPA FILTER
For optimal performance, replace every 12 months under normal usage conditions based on 12 hours per day for 365 days.
natural_image
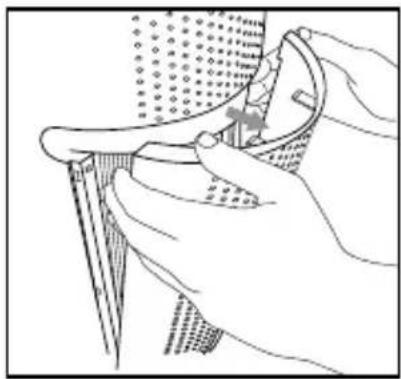
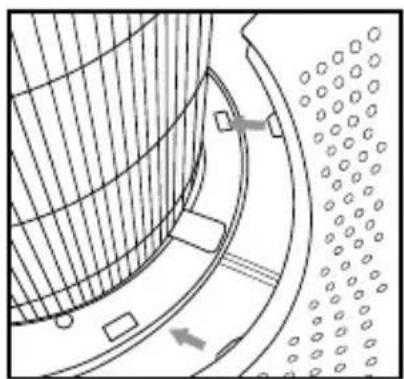
Illustration of a hand using a tool to adjust or install a component, with no visible text or symbols.- Unplug the air purifier. Pull the indents on each side of the grille cover.
natural_image
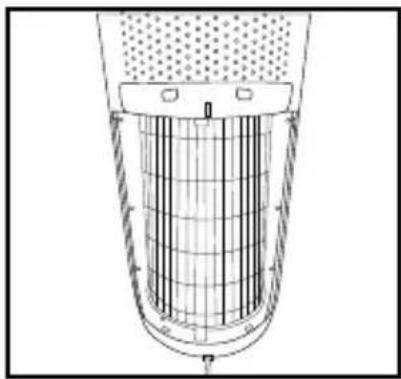
Cross-sectional diagram of a cylindrical container with internal grid structure (no text or symbols)- Remove the grille cover and set aside.
natural_image
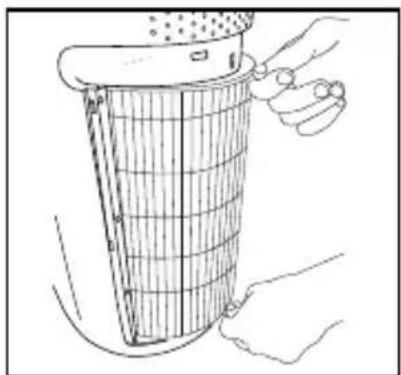
Line drawing of hands cleaning a grid-patterned object from a container (no text or symbols)- Pull the tabs to remove the old filter.
natural_image
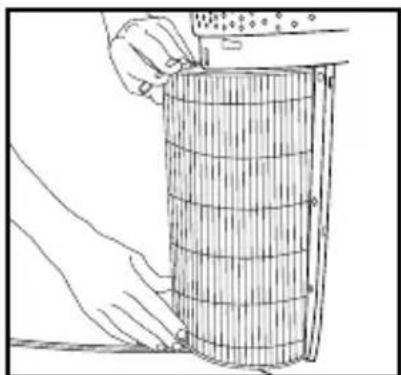
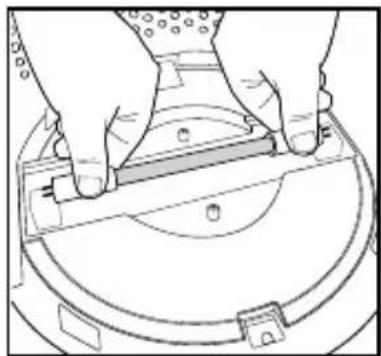
Line drawing of hands holding a cylindrical object with a ruler, no text or symbols present- With the filter tabs facing outward, slide the new True HEPA filter into the filter cavity.
natural_image
Technical line drawing of a curved mechanical component with internal structure and mounting holes (no text or symbols)- Place the tabs at the bottom of the grille cover into the base of the air purifier. Gently push the grille cover until it snaps into place.
natural_image
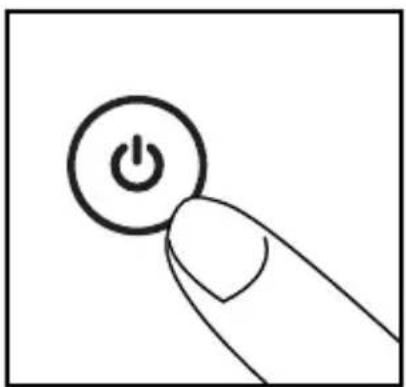
Hand holding a button with a power symbol, no text or labels present- Plug the power cord into a standard AC outlet. Turn the air purifier on.

natural_image
Simple line drawing of a finger pressing a cylindrical component (no text or symbols)- Press and hold the filter reset button until the replace filter light turns off.
HOW TO CLEAN AND CARE HOW TO CLEAN THE PREFILTER
natural_image
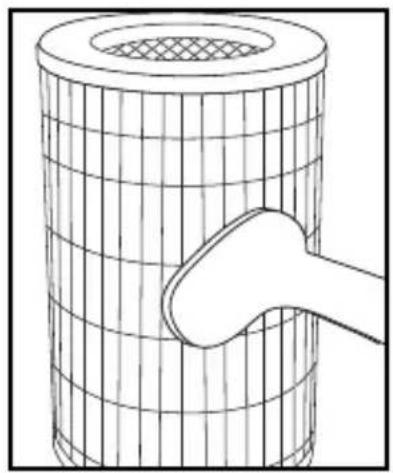
Line drawing of a cylindrical object with a mesh grid and a curved pipe inserted into it (no text or symbols)NOTE: For best performance, vacuum the prefilter once a month under normal usage.
- Unplug the air purifier.
- Remove the True HEPA filter as described in the Replacing the True HEPA Filter section.
- Vacuum the outside of the True HEPA filter using the brush attachment of your vacuum cleaner, cleaning it thoroughly.
- Place the True HEPA filter back into the air purifier and close grille.
- Plug the power cord into a standard AC outlet.
HOW TO CLEAN THE PARTICLE SENSOR
NOTE: The particle sensor needs to be vacuumed monthly under normal usage.
natural_image
Simple line drawing of a container with liquid and a small object inside, no text or symbols present.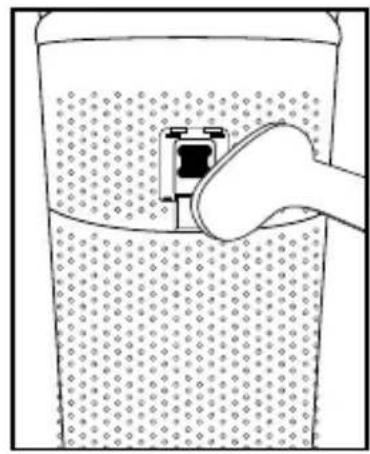
natural_image
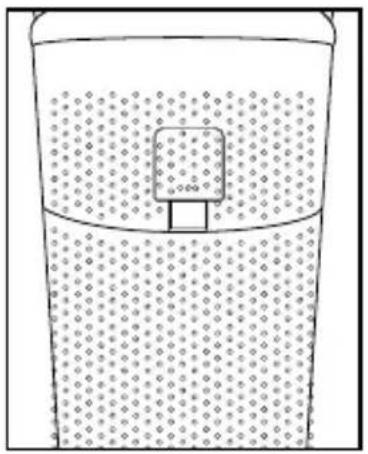
Illustration of a hand inserting a plug into a container filled with liquid (no text or symbols)- Unplug the air purifier.
- Remove the particle sensor door.
- Vacuum the particle sensor using the brush attachment of your vacuum cleaner.
- Reattach the particle sensor door.
- Plug the power cord into a household electrical outlet.
HOW TO CLEAN THE OIL TRAY
natural_image
Line drawing of a hand cleaning a circular object with a magnifying glass (no text or symbols)Open the oil tray and remove the pad. Essential oil pads should be changed when switching to a different essential oil scent. If continuing to use the same scent, set the essential oil pad aside for reuse. Wipe down the inside of the oil tray with a soft cloth. Place the essential oil pad back in the tray and close.
NOTE: Remove the essential oil pad from the tray when storing.
FOR BEST PERFORMANCE:
- NEVER use water or any household cleaners or detergents to clean the True HEPA filter.
- Clean off the outside of the unit with a soft, dry cloth as needed.
- NEVER use water, wax, polish, or any chemical solution to clean the outside of the unit.
- Clean off the grille cover using a soft, damp cloth or the brush attachment of your vacuum as needed.
• Vacuum the prefilter monthly under normal usage conditions. - Replace the True HEPA filter every 12 months under normal usage conditions.
- Always use a genuine Homedics replacement filter for optimal performance.
HOW TO REPLACE THE UV-C BULB
The UV-C bulb is designed to last for approximately 10,000 hours of use. The replace UV-C bulb indicator will flash for a few seconds and turn off. This repeats each time the air purifier is turned on until the UV-C bulb is replaced.
NOTE: The air purifier will continue to operate without the UV-C function when the UV-C bulb burns out.
CAUTION: DO NOT operate the air purifier without the protective UV-C bulb cover.
CAUTION: Unplug the power cord before servicing or replacing the UV-C bulb.
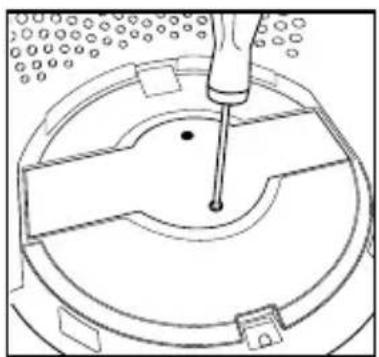
natural_image
Technical line drawing of a mechanical assembly with a central component and surrounding components (no text or symbols)- Unplug the air purifier and remove the True HEPA filter. Using a Phillips-head screwdriver (not included), unscrew the 2 screws located on the UV-C bulb cover.

natural_image
Technical line drawing of a circular mechanical component with internal channels and mounting brackets (no text or symbols)- Remove the cover to expose the UV-C bulb.
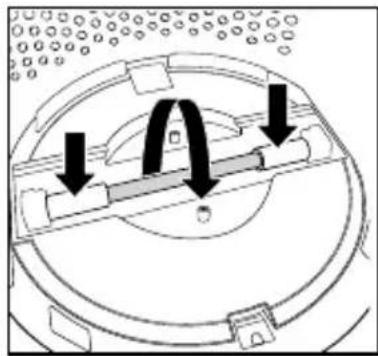
natural_image
Diagram of a mechanical component with arrows indicating motion or force direction (no text or symbols)- Gently push from the sides and rotate the UV-C bulb to remove.
natural_image
Line drawing of hands installing or adjusting a component on a circular base (no text or symbols)- Remove and replace the UV-C bulb. Reinstall the UV-C bulb cover, True HEPA filter, and grille cover.
NOTE: The UV-C bulb contains mercury (Hg). Dispose of according to local, state, and federal law / www.lamprecycle.org.
SPECIFICATIONS
3-IN-1 TRUE HEPA FILTRATION SYSTEM
Removes up to 99.97% of airborne particles as small as 0.3 microns, such as allergens, pollen, dust, germs, pet dander, odor, mold spores, and smoke that pass through the filter media.
• ACTIVATED CARBON ODOR FILTRATION
Reduces household odors and VOCs (volatile organic compounds)/gases as shown by independent laboratory testing.
- PREFILTER
Captures large particles.
UV-C TECHNOLOGY
UV-C Technology reduces E. coli bacteria, Phi-X174 virus, A. niger mold, and P. citrinum fungus in the air with UV-C on. Shown by independent laboratory testing.
SUGGESTED ROOM SIZE
349 ft ^2 /32.4 m ^2 . Portable air purifiers will be more effective in rooms where all the doors and windows are closed. Suggested room size is based on AHAM AC-1 test results.
AIR CHANGES PER HOUR
This air purifier will purify the air in a 349 ft/32.4 m² room (assuming an 8 ft/2.43 m ceiling) every 12.5 minutes or up to 1692 ft²/157.1 m² once an hour on the highest speed setting in a closed room.
QUIET OPERATION
29-60 dBA
ELECTRICAL RATING
120VAC 60Hz 65W
REPLACEMENT PARTS
To purchase genuine Homedics Replacement parts, go to the retailer where you purchased your Homedics Air Purifier, or visit www.homedics.com (US), www.homedics.ca (CAN).

TRUE HEPA FILTER
MODEL #: AP-T40FL
natural_image
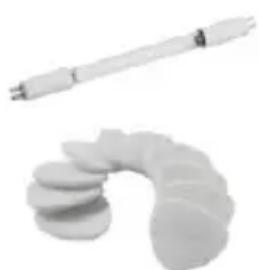
Two white cylindrical objects: a long rod and a curved, segmented object (no text or symbols visible)UV-C BULB
MODEL #: PP-APUVC1
AROMA PADS
MODEL #: UHE-PAD1

This product earned the ENERGY STAR label by meeting strict energy efficiency guidelines set by the U.S. EPA. Room air cleaners have demonstrated the potential for improving air quality and providing health benefits. EPA does not endorse manufacturer claims regarding the degree to which a specific product will produce healthier indoor air. The energy efficiency of this ENERGY STAR certified model is measured based on a ratio between the model's CADR for Smoke and the electrical energy it consumes, or CADR/Watt.
TROUBLESHOOTING
| PROBLEM POSSIBLE CAUSE SOLUTION | ||
| Unit will not operate | Unit is not plugged inPower button not pressedNo power to unitTrue HEPA filter not installed correctlyGrille cover not installed correctly | Plug unit inPress the power button to turn the power onCheck circuits, fuses, try a different outletReinstall the True HEPA filterReinstall the grille cover |
| Reduced airflow • The grille | may be blockedPrefilter needs to be vacuumedThe True HEPA filter needs to be replaced | Check to make sure nothing is blocking the grille and air outletVacuum the prefilter with the brush attachment of your vacuum cleanerReplace the True HEPA filter |
| Reduced odor removal • The | The True HEPA filter needs to be replaced | Replace the True HEPA filter |
| Excessive noise | The unit is not level | Place the unit on a flat, level surface |
| Replace filter light remains lit after filter replacement | The replace filter indicator needs to be reset | Press and hold the filter reset button until the replace filter light turns off |
| Display lights are off • Lights | ON/OFF settingSleep fan speed setting | Press the lights on/off buttonPress the fan speed button to select another speed |
| The replace UV-C bulb flashes for a few seconds when the air purifier is turned on | UV-C bulb needs replacing • | Replace the UV-C bulb |
Homedics
3-YEAR LIMITED WARRANTY
Homedics sells its products with the intent that they are free of defects in manufacture and workmanship for a period of 3 years from the date of original purchase, except as noted below. Homedics warrants that its products will be free of defects in material and workmanship under normal use and service. This warranty extends only to consumers and does not extend to Retailers.
To obtain warranty service on your Homedics product, contact a Consumer Relations representative for assistance. Please make sure to have the model number of the product available.
Homedics does not authorize anyone, including, but not limited to, Retailers, the subsequent consumer purchaser of the product from a Retailer or remote purchasers, to obligate Homedics in any way beyond the terms set forth herein. This warranty does not cover damage caused by misuse or abuse; accident; the attachment of any unauthorized accessory; alteration to the product; improper installation; unauthorized repairs or modifications; improper use of electrical/power supply; loss of power; dropped product; malfunction or damage of an operating part from failure to provide manufacturer's recommended maintenance; transportation damage; theft; neglect; vandalism; or environmental conditions; loss of use during the period the product is at a repair facility or otherwise awaiting parts or repair; or any other conditions whatsoever that are beyond the control of Homedics.
This warranty is effective only if the product is purchased and operated in the country in which the product is purchased. A product that requires modifications or adoption to enable it to operate in any other country than the country for which it was designed, manufactured, approved and/or authorized, or repair of products damaged by these modifications is not covered under this warranty.
THE WARRANTY PROVIDED HEREIN SHALL BE THE SOLE AND EXCLUSIVE WARRANTY. THERE SHALL BE NO OTHER WARRANTIES EXPRESS OR IMPLIED INCLUDING ANY IMPLIED WARRANTY OF MERCHANTABILITY OR FITNESS OR ANY OTHER OBLIGATION ON THE PART OF THE COMPANY WITH RESPECT TO PRODUCTS COVERED BY THIS WARRANTY. HOMEDICS SHALL HAVE NO LIABILITY FOR ANY INCIDENTAL, CONSEQUENTIAL, OR SPECIAL DAMAGES. IN NO EVENT SHALL THIS WARRANTY REQUIRE MORE THAN THE REPAIR OR REPLACEMENT OF ANY PART OR PARTS WHICH ARE FOUND TO BE DEFECTIVE WITHIN THE EFFECTIVE PERIOD OF THE WARRANTY. NO REFUNDS WILL BE GIVEN. IF REPLACEMENT PARTS FOR DEFECTIVE MATERIALS ARE NOT AVAILABLE, HOMEDICS RESERVES THE RIGHT TO MAKE PRODUCT SUBSTITUTIONS IN LIEU OF REPAIR OR REPLACEMENT.
This warranty does not extend to the purchase of opened, used, repaired, repackaged and/or resealed products, including but not limited to sale of such products on internet auction sites and/or sales of such products by surplus or bulk resellers. Any and all warranties or guarantees shall immediately cease and terminate as to any products or parts thereof which are repaired, replaced, altered, or modified, without the prior express and written consent of Homedics.
This warranty provides you with specific legal rights. You may have additional rights which may vary from state to state and country to country. Because of individual state and country regulations, some of the above limitations and exclusions may not apply to you.
For more information regarding our product line in the USA, please visit www.Homedics.com. For Canada, please visit www.Homedics.ca.
FOR SERVICE IN THE USA
cservice@Homedics.com
8:30am-7:00pm EST Monday-Friday
1-800-466-3342
FOR SERVICE IN CANADA
cservice@Homedicsgroup.ca
8:30am-5:00pm EST Monday-Friday
1-888-225-7378
©2022-2023 Homedics, LLC. All rights reserved.
Homedics is a registered trademark of Homedics, LLC.
Distributed by Homedics, LLC, 3000 N Pontiac Trail, Commerce Township, MI 48390
IB-APT43A
Made in China
Homedics
MANUEL D'INSTRUCTIONS ET INFORMATION SUR LA GARANTIE
garantie limitée de 3-ans
AP-T43 | L-03100 Rev. 2
INSTRUCTIONS DE SÉCURITÉ IMPORTANTES:
LORS DE L'UTILISATION D'APPAREILS ÉLECTRIQUES, EN PARTICULIER LORSQUE DES ENFANTS SONT PRÉSENTS, DES MESURES DE SÉCURITÉ DE BASE DOIVENT TOUJOURS ÊTRE SUIVIES, DONT LES SUIVANTES:
LIRE TOUTES LES INSTRUCTIONS AVANT L'UTILISATION.
DANGER - POUR RÉDUIRE LE RISQUE DE CHOC ÉLECTRIQUE:
natural_image
Illustration of a hand holding a small object with arrows indicating motion or force (no text or symbols)natural_image
Illustration of a hand pouring liquid into a container with droplets (no text or symbols)natural_image
Illustration of a hand using a tool to adjust or install a mechanical component (no text or symbols visible)natural_image
Technical line drawing of a cylindrical industrial component with internal grid structure (no text or symbols)natural_image
Line drawing of hands cleaning a cylindrical object with a mesh structure (no text or symbols)natural_image
Line drawing of hands holding a cylindrical object with measurement markings (no text or symbols)natural_image
Technical line drawing of a curved mechanical component with internal structure and mounting holes (no text or symbols)natural_image
Hand holding a button with a power symbol, no text or labels presentnatural_image
Simple line drawing of a finger pressing a cylindrical component (no text or symbols)natural_image
Diagram of a cylindrical object with a mesh top and a curved handle inserted into it (no text or symbols)natural_image
Simple line drawing of a container with liquid and a submerged square (no text or symbols)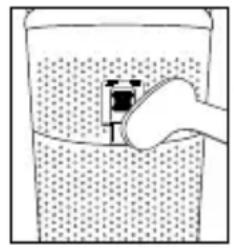
natural_image
Simple line drawing of a hand holding a container with liquid, no text or symbols presentnatural_image
Line drawing of a hand cleaning a circular object with a magnifying glass (no text or symbols)COMMENT REMPLACER L'AMPOULE UV-C
natural_image
Technical line drawing of a mechanical component with a tool inserted, no visible text or symbolsnatural_image
Technical line drawing of a circular mechanical component with internal components and mounting holes (no text or symbols)natural_image
Diagram of a mechanical assembly with arrows indicating motion or force direction (no text or symbols)natural_image
Line drawing of hands holding a mechanical component with a circular base and mounting bracket (no text or symbols)natural_image
Two white cylindrical objects: one with a long rod and another with a curved, segmented object (no text or symbols visible)AMPOULE UV-C
MODÈLE #: PP-APUVC1
TAMPONS D'ARÔME
MODÈLE #: UHE-PAD1

POUR OBTENIR DU SERVICE AU CANADA
cservice@Homedicsgroup.ca
AP-T43 | L-03100 Rev. 2
PANEL DE
CONTROL
ENCENDIDO
natural_image
Illustration of a hand holding a small container with arrows indicating flow or movement (no text or symbols)natural_image
Illustration of a hand pouring liquid into a container with a droplet (no text or symbols)natural_image
Line drawing of a hand using a tool to adjust or install a component, no text or symbols presentnatural_image
Technical line drawing of a cylindrical industrial component with internal grid structure (no text or symbols)natural_image
Line drawing of hands cleaning a cylindrical object with a grater (no text or symbols)natural_image
Line drawing of hands holding a cylindrical object with measurement markings (no text or symbols)natural_image
Technical diagram of a curved mechanical component with internal structure and directional arrows (no text or symbols)natural_image
Simple line drawing of a finger pressing a button with an 'Power' button (no text or symbols)natural_image
Simple line drawing of a finger pressing a cylindrical object with a dot above (no text or symbols)natural_image
Technical line drawing of a cylindrical mechanical component with grid pattern and a handle (no text or symbols)natural_image
Simple line drawing of a container with liquid and a small square object inside (no text or symbols)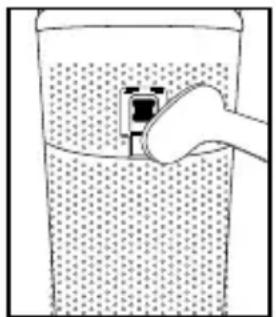
natural_image
Simple line drawing of a container with liquid and a hand holding an object, no text or symbols present.natural_image
Line drawing of a hand cleaning a circular object with a magnifying glass (no text or symbols)natural_image
Technical line drawing of a mechanical component with a central pin and surrounding holes (no text or symbols)natural_image
Technical line drawing of a circular mechanical component with internal components and mounting holes (no text or symbols)natural_image
Diagram of a mechanical assembly with arrows indicating motion or force directions (no text or symbols present)natural_image
Line drawing of hands holding a tool over a circular mechanical component (no text or symbols)
- INSTRUCTION MANUAL AND WARRANTY INFORMATION
- IMPORTANT SAFETY INSTRUCTIONS:
- DANGER – TO REDUCE THE RISK OF ELECTRIC SHOCK:
- WARNING – TO REDUCE THE RISK OF BURNS, FIRE, ELECTRIC SHOCK, OR INJURY TO PERSONS:
- LOCATION OF PARTS AND CONTROLS
- HOW TO OPERATE
- BEFORE TURNING THE AIR PURIFIER ON
- POWER BUTTON
- FAN SPEED
- LIGHTS ON/OFF
- FILTER RESET
- HOW TO USE ESSENTIAL OILS
- ARE ESSENTIAL OILS SAFE TO USE AROUND PETS?
- HOW TO REPLACE THE FILTER
- REPLACE FILTER LIGHT
- REPLACING THE TRUE HEPA FILTER
- HOW TO CLEAN AND CARE HOW TO CLEAN THE PREFILTER
- HOW TO CLEAN THE PARTICLE SENSOR
- HOW TO CLEAN THE OIL TRAY
- FOR BEST PERFORMANCE:
- HOW TO REPLACE THE UV-C BULB
- SPECIFICATIONS
- 3-IN-1 TRUE HEPA FILTRATION SYSTEM
- UV-C TECHNOLOGY
- SUGGESTED ROOM SIZE
- AIR CHANGES PER HOUR
- QUIET OPERATION
- ELECTRICAL RATING
- REPLACEMENT PARTS
- Homedics
- 3-YEAR LIMITED WARRANTY
- MANUEL D'INSTRUCTIONS ET INFORMATION SUR LA GARANTIE
- INSTRUCTIONS DE SÉCURITÉ IMPORTANTES:
- DANGER - POUR RÉDUIRE LE RISQUE DE CHOC ÉLECTRIQUE:
- COMMENT REMPLACER L'AMPOULE UV-C
- AMPOULE UV-C
- TAMPONS D'ARÔME
- POUR OBTENIR DU SERVICE AU CANADA
Brand : HOMEDICS
Model : TotalClean AP-T43
Category : Air purifier