
Skylux 60/700 AZ - Telescope BRESSER - Free user manual and instructions
Find the device manual for free Skylux 60/700 AZ BRESSER in PDF.

| Product type | Azimuthal refractor telescope |
| Brand | Bresser |
| Model | Skylux 60/700 AZ |
| Objective diameter | 60 mm |
| Focal length | 700 mm |
| Mount | Azimuthal mount with fine adjustment |
| Tripod | Aluminium, adjustable height with accessory tray |
| Finder scope | 5x24 optical finder |
| Supplied eyepieces | SR-4 mm, H-20 mm |
| Included accessories | Diagonal mirror, 3x Barlow lens, 1.5x erecting lens, solar filter, smartphone adapter |
| Maximum magnification (with accessories) | 525x |
| Weight | Approximately 4.5 kg |
| Power supply | None (manual instrument) |
| Main functions | Terrestrial and celestial observation, astronomical aiming with finder scope |
| Maintenance and cleaning | Clean lenses with a soft microfiber cloth; glasses cleaning solution if needed |
| Safety | ⚠️ Danger of blindness: never observe the sun without solar filter; remove finder scope during solar observation |
| Spare parts and repairability | Contact BRESSER customer service (sav@bresser.fr) |
| General information | Manual available for free download at notice-facile.com |
Frequently Asked Questions - Skylux 60/700 AZ BRESSER
User questions about Skylux 60/700 AZ BRESSER
0 question about this device. Answer the ones you know or ask your own.
Ask a new question about this device
Download the instructions for your Telescope in PDF format for free! Find your manual Skylux 60/700 AZ - BRESSER and take your electronic device back in hand. On this page are published all the documents necessary for the use of your device. Skylux 60/700 AZ by BRESSER.
USER MANUAL Skylux 60/700 AZ BRESSER
natural_image
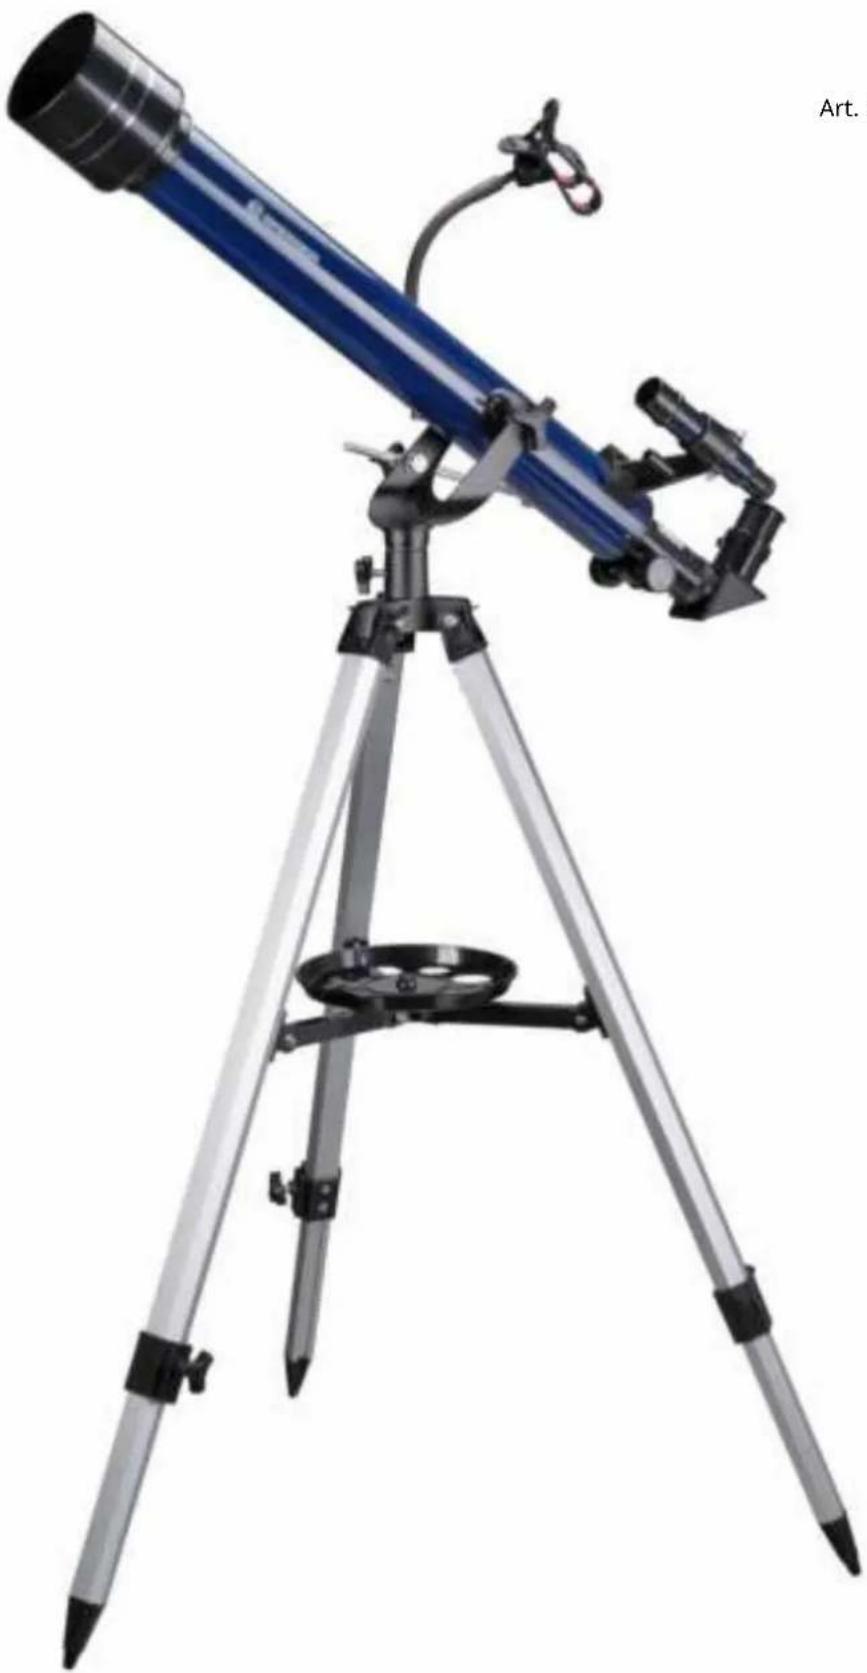
Blue telescope mounted on a tripod, no visible text or symbols on the instrument bodynatural_image
Illustration of a blue telescope mounted on a tripod, no text or symbols visibleArt. No. 9618761000000
FIG. 1
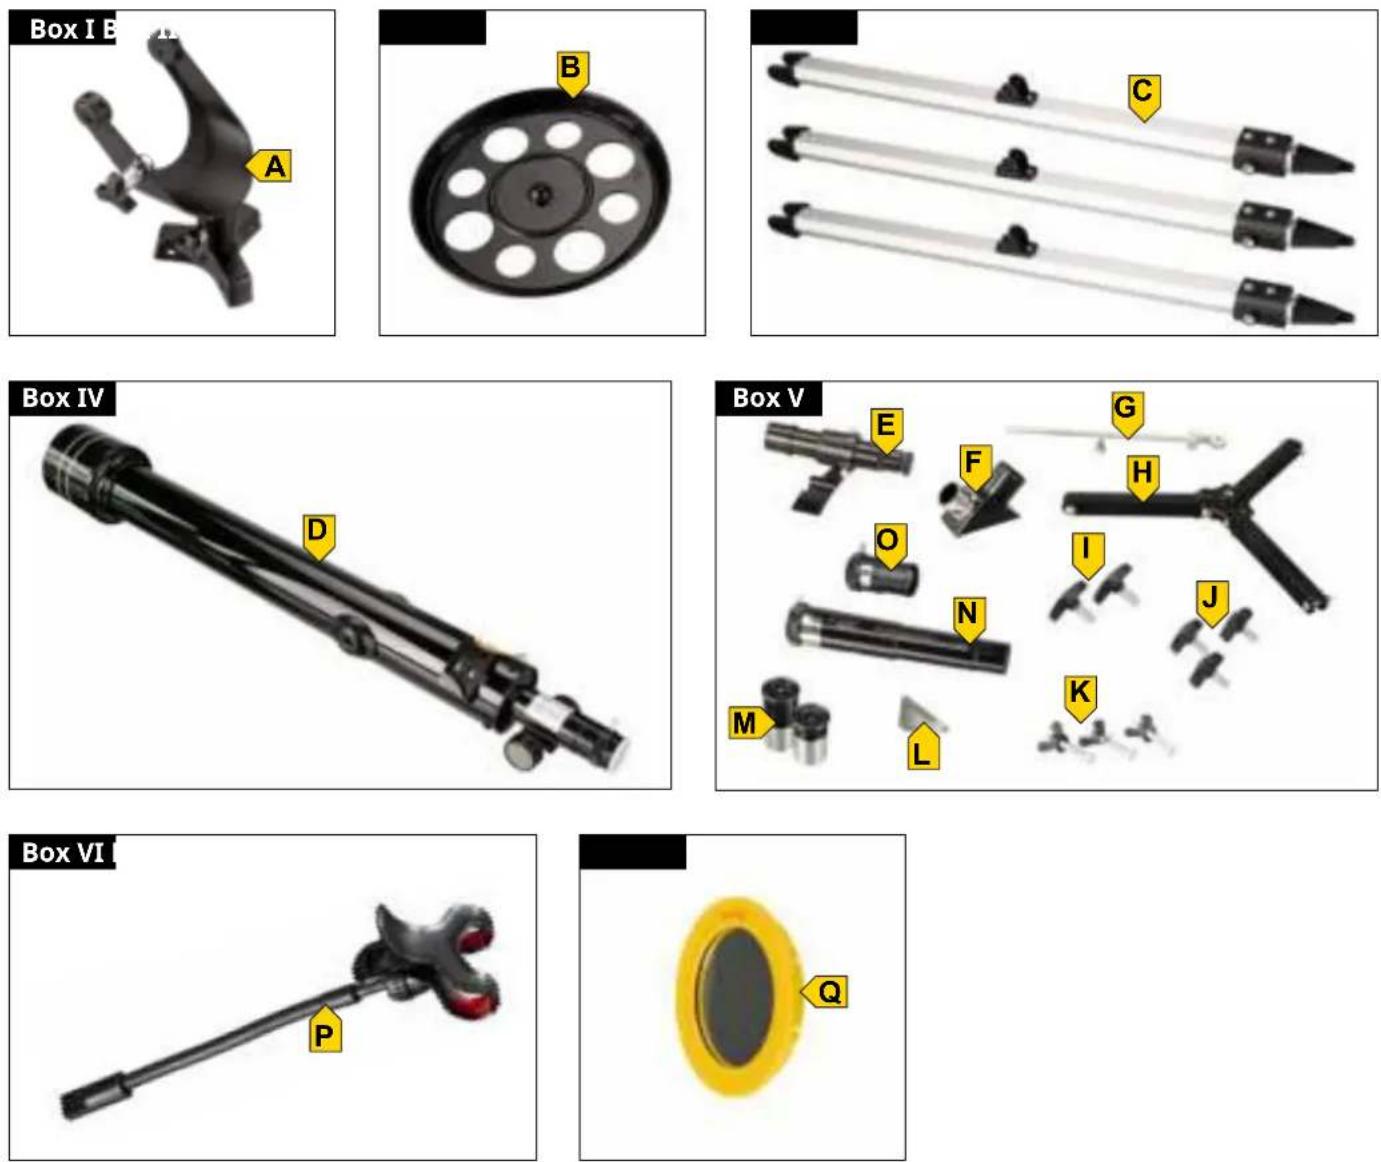
FIG. 2

INHALT
EIGENSCHAFTEN 5
natural_image
Close-up of a black pen with red arrows indicating movement or force (no text or symbols)


natural_image
Close-up of a mechanical component with a red arrow pointing to a circular feature on a black circular plate (no text or symbols visible)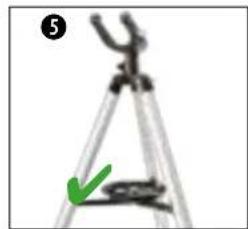
natural_image
Close-up of a tripod with a green arrow pointing to the base (no text or symbols visible)
natural_image
Close-up of a mechanical linkage with numbered components (no visible text or symbols)

natural_image
Illustration of a cartoon character with a large horn and a compass rose nearby (no text or symbols)natural_image
Close-up of mechanical components with a red star marking a specific part (no visible text or symbols)
natural_image
Close-up of a mechanical device with a compass rose and green checkmark (no visible text or symbols)
natural_image
Close-up of a hand holding a black plastic clamp next to a yellow bag (no visible text or symbols)
natural_image
Close-up of a hand holding a small metallic object next to a black mechanical device (no visible text or symbols)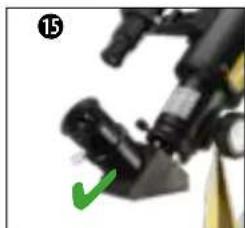
natural_image
Close-up of a mechanical device with a green checkmark pointing to a component (no visible text or symbols)natural_image
Close-up of a microscope objective with an orange and green eye icon, no visible text or symbolsERBLINDUNGSGEFAHR!
natural_image
Close-up of mechanical components with a red circle highlighting a specific part, labeled 'BARROW' (no other text or symbols visible)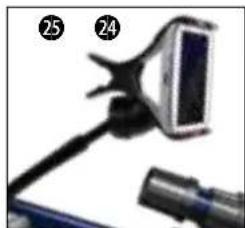
natural_image
Close-up of a handheld device with a screen and cable (no visible text or symbols)natural_image
Close-up grayscale image of the full moon against a dark background (no text or symbols)
natural_image
Close-up grayscale image of the Moon's surface showing craters and maria (no text or symbols)MOND
Durchmesser: 3.476 km
natural_image
Circular dark image with a faint, blurry bright spot in the center (no text or symbols)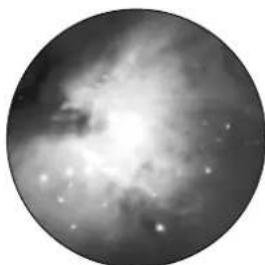
natural_image
Black-and-white astronomical image of a nebula or star formation with bright central glow and scattered stars (no text or symbols)natural_image
Two circular astronomical images showing a bright celestial object and a diffuse ring-like structure against a dark background (no text or symbols)natural_image
Two circular grayscale astronomical images showing star fields and nebulae (no text or symbols)Refractor telescope with azimuthal mount
natural_image
Illustration of a blue telescope mounted on a tripod, no text or symbols visibleArt. No. 9618761000000
FIG. 1

FIG. 2

TABLE OF CONTENTS
FEATURES
5
ABOUT THIS INSTRUCTION MANUAL 5
GENERAL SAFETY INSTRUCTIONS 5
SCOPE OF DELIVERY (FIG. 1) 6
PARTS LIST (FIG. 2) 6
A | SETTING UP THE TRIPOD AND MOUNTING THE ACCESSORY TRAY 6
B | FASTENING THE TELESCOPE IN THE MOUNT AND ALIGNING IT 7
C | ATTACHING ACCESSORIES FOR VISUAL OBSERVATION 7
D | FIRST OBSERVATION 8
E | ATTACHING OPTIONAL ACCESSORIES 8
F | MOUNTING THE SMARTPHONE HOLDER 8
G | ASTRO SOFTWARE 9
H | POSSIBLE OBSERVATION OBJECTS 9
CLEANING & MAINTENANCE 10
STORAGE 10
TROUBLESHOOTING 10
TECHNICAL DATA 10
DISPOSAL 11
IMPRINT
Bresser GmbH
Gutenbergstr. 2
46414 Rhede
Germany
www.bresser.de
For warranty claims or service inquiries, please refer to the notes on "Warranty" and "Service" in this documentation.
We ask for your understanding that unsolicited returns cannot be processed.
Errors and technical changes reserved.
© 2023 Bresser GmbH. All rights reserved.
The reproduction of this documentation - also in extracts - in any form (e.g. photocopy, print etc.) as well as the use and distribution by means of electronic systems (e.g. image file, website etc.) requires the prior written consent of the manufacturer. The designations and brand names of the respective companies used in this documentation are generally protected by trade, trademark and/or patent law in Germany, the European Union and/or other countries.
VALIDITY NOTE
This documentation is valid for the products with the following part numbers: 9618761000000
Version: 0323
Description: Manual_9618761000000_Skylux-60-700-AZ_en_BRESSER_v032023a
Always have this information available when requesting service.
FEATURES
- Achromatic refractor with glass lens system
- Azimuthal mount with fine adjustment
• Height adjustable tripod with accessory tray
• 2 eyepieces included
• 3x Barlow lens included - Zenith mirror included
- Smartphone holder with bendable suspension included
- Up to 525x magnification with included accessories
ABOUT THIS INSTRUCTION MANUAL
NOTE
This instruction manual is to be regarded as an integral part of the device.
Read the safety instructions and the operating instructions carefully before using this device. Keep these instruction manual in a safe place for future reference. If the device is sold or passed on, the instruction manual must be handed over to the new owner/user of the product.
GENERAL SAFETY INSTRUCTIONS
⚠️ DANGER OF BLINDNESS!
- Never look directly at or near the sun with this device without a suitable solar filter! Direct sunlight will cause serious damage to your eyes or even blindness within a few seconds.
- When observing the sun, remove the finder scope and insert only the supplied solar filter in front of the objective lens before observing. Be sure to also read the separate operating instructions for the solar filter!
⚠️ DANGER OF SUFFOCATION!
- Keep packaging materials (plastic bags, rubber bands, etc.) away from children!
- Contains small parts that can be swallowed.
! FIRE HAZARD!
- Do not expose this device - especially the lenses - to direct sunlight! The concentration of light rays could cause a fire.
⚠️ DANGER OF PROPERTY DAMAGE!
- Do not disassemble the device! In the event of a defect, contact the service center responsible for your country.
- Do not subject the device to strong vibrations.
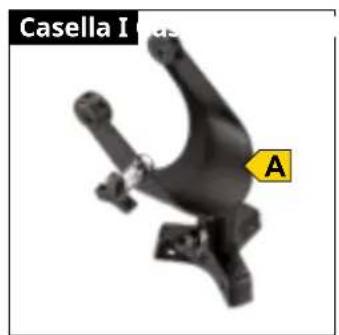
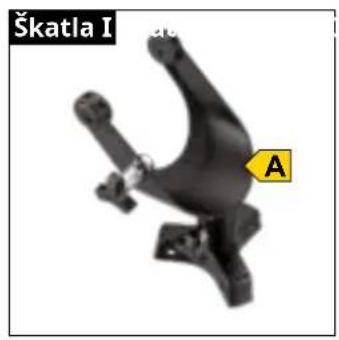
SCOPE OF DELIVERY (FIG. 1)
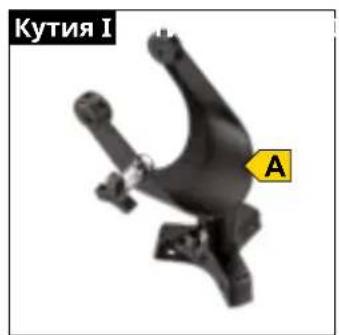
BOX I: Mounting head (A)
BOX II: Accessory tray (B)
BOX III: 3 pcs. tripod legs (c)
BOX IV: Optical tube (D)
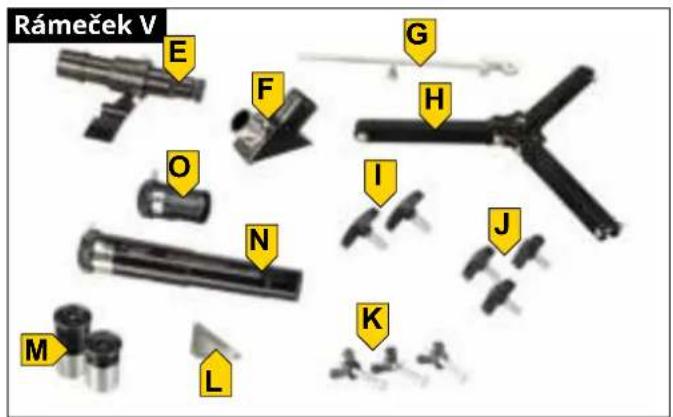
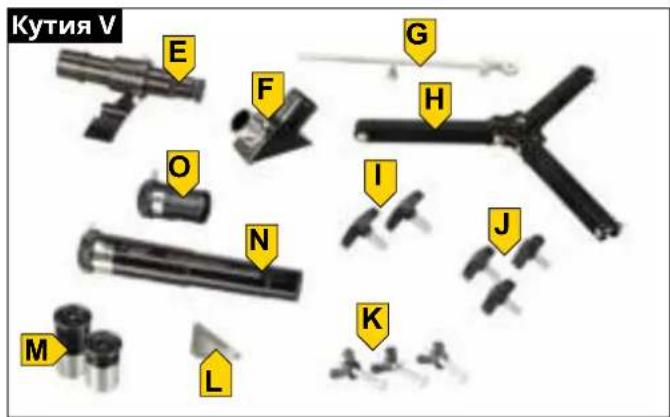
BOX V: 5x24 finder scope with bracket (E), diagonal mirror (F), stabilizing rod with short threaded screw (G), tripod spider with 3 pcs. small screws and lock nuts (preassembled) (H), 2 pcs. large wing screws (I), 3 pcs. small wing screws (J), 3 pcs. hexagon head screws with washers and wing nuts (K), screwdriver (L), 2 pcs. eyepieces (M), 1.5x erecting lens (N), 3x Barlow lens (O)
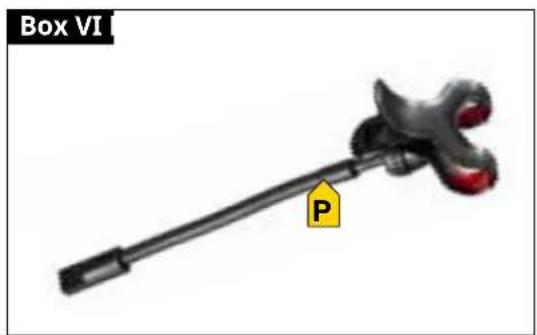
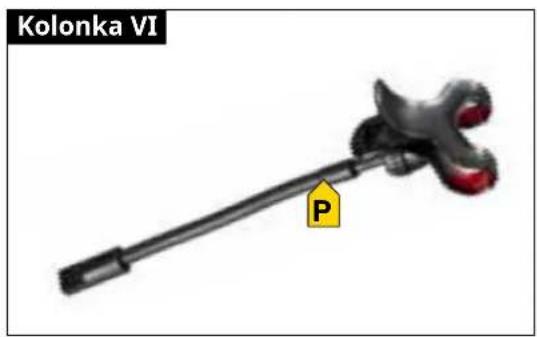
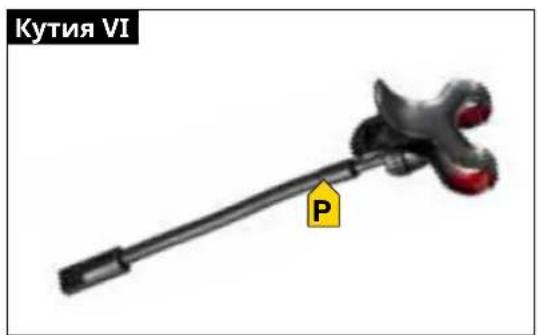
BOX VI: Smartphone holder (P),
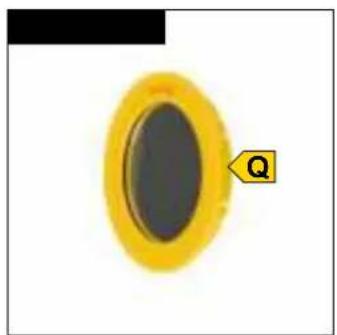
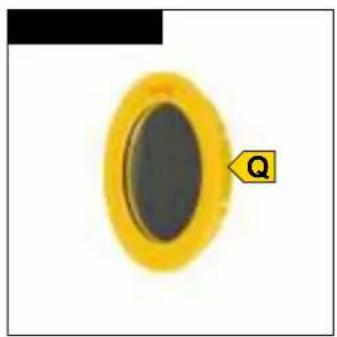
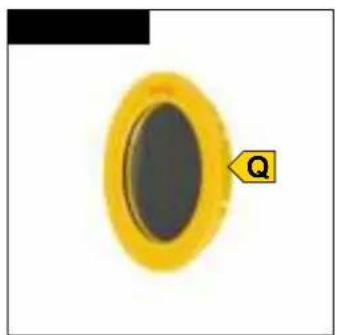
BOX VII: Solar filter (Q)
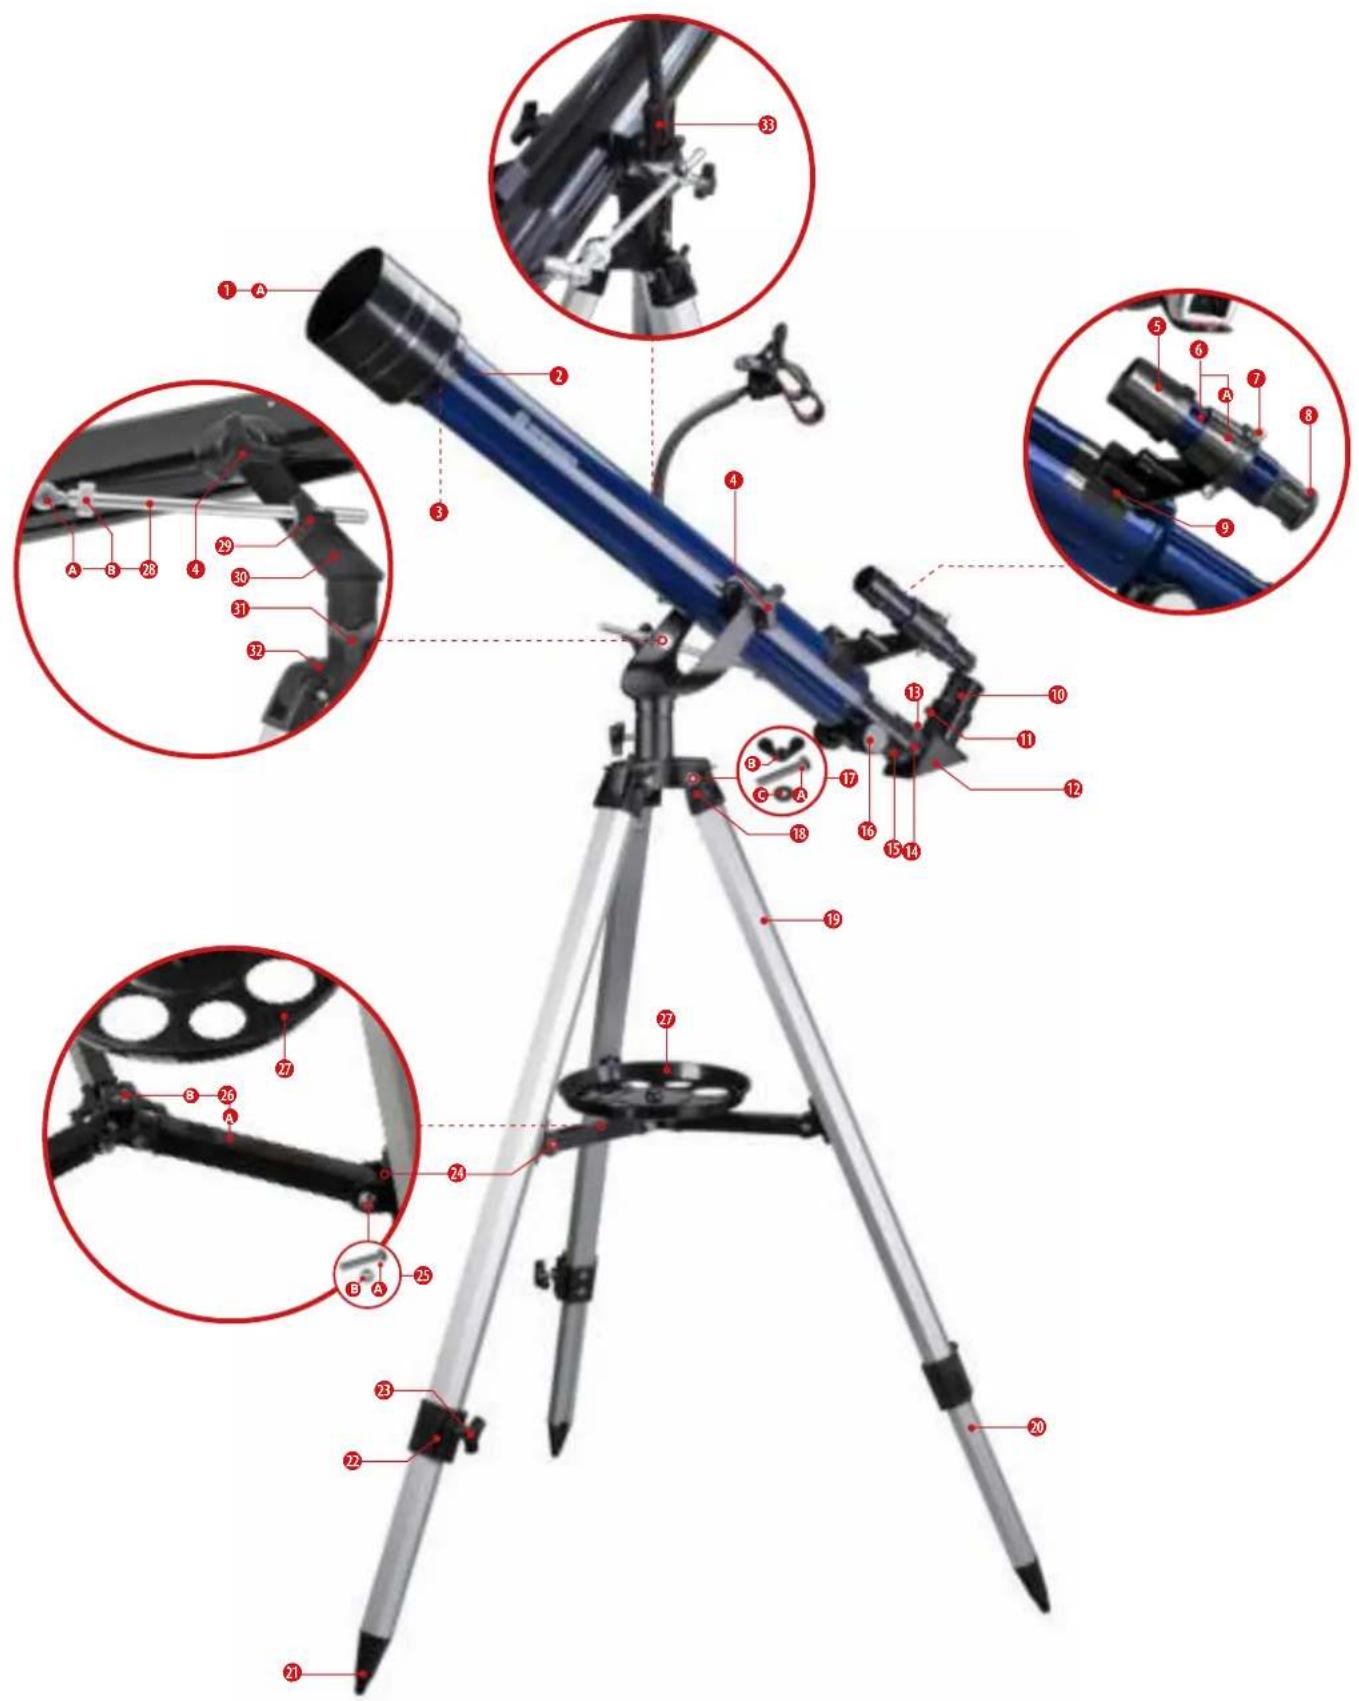
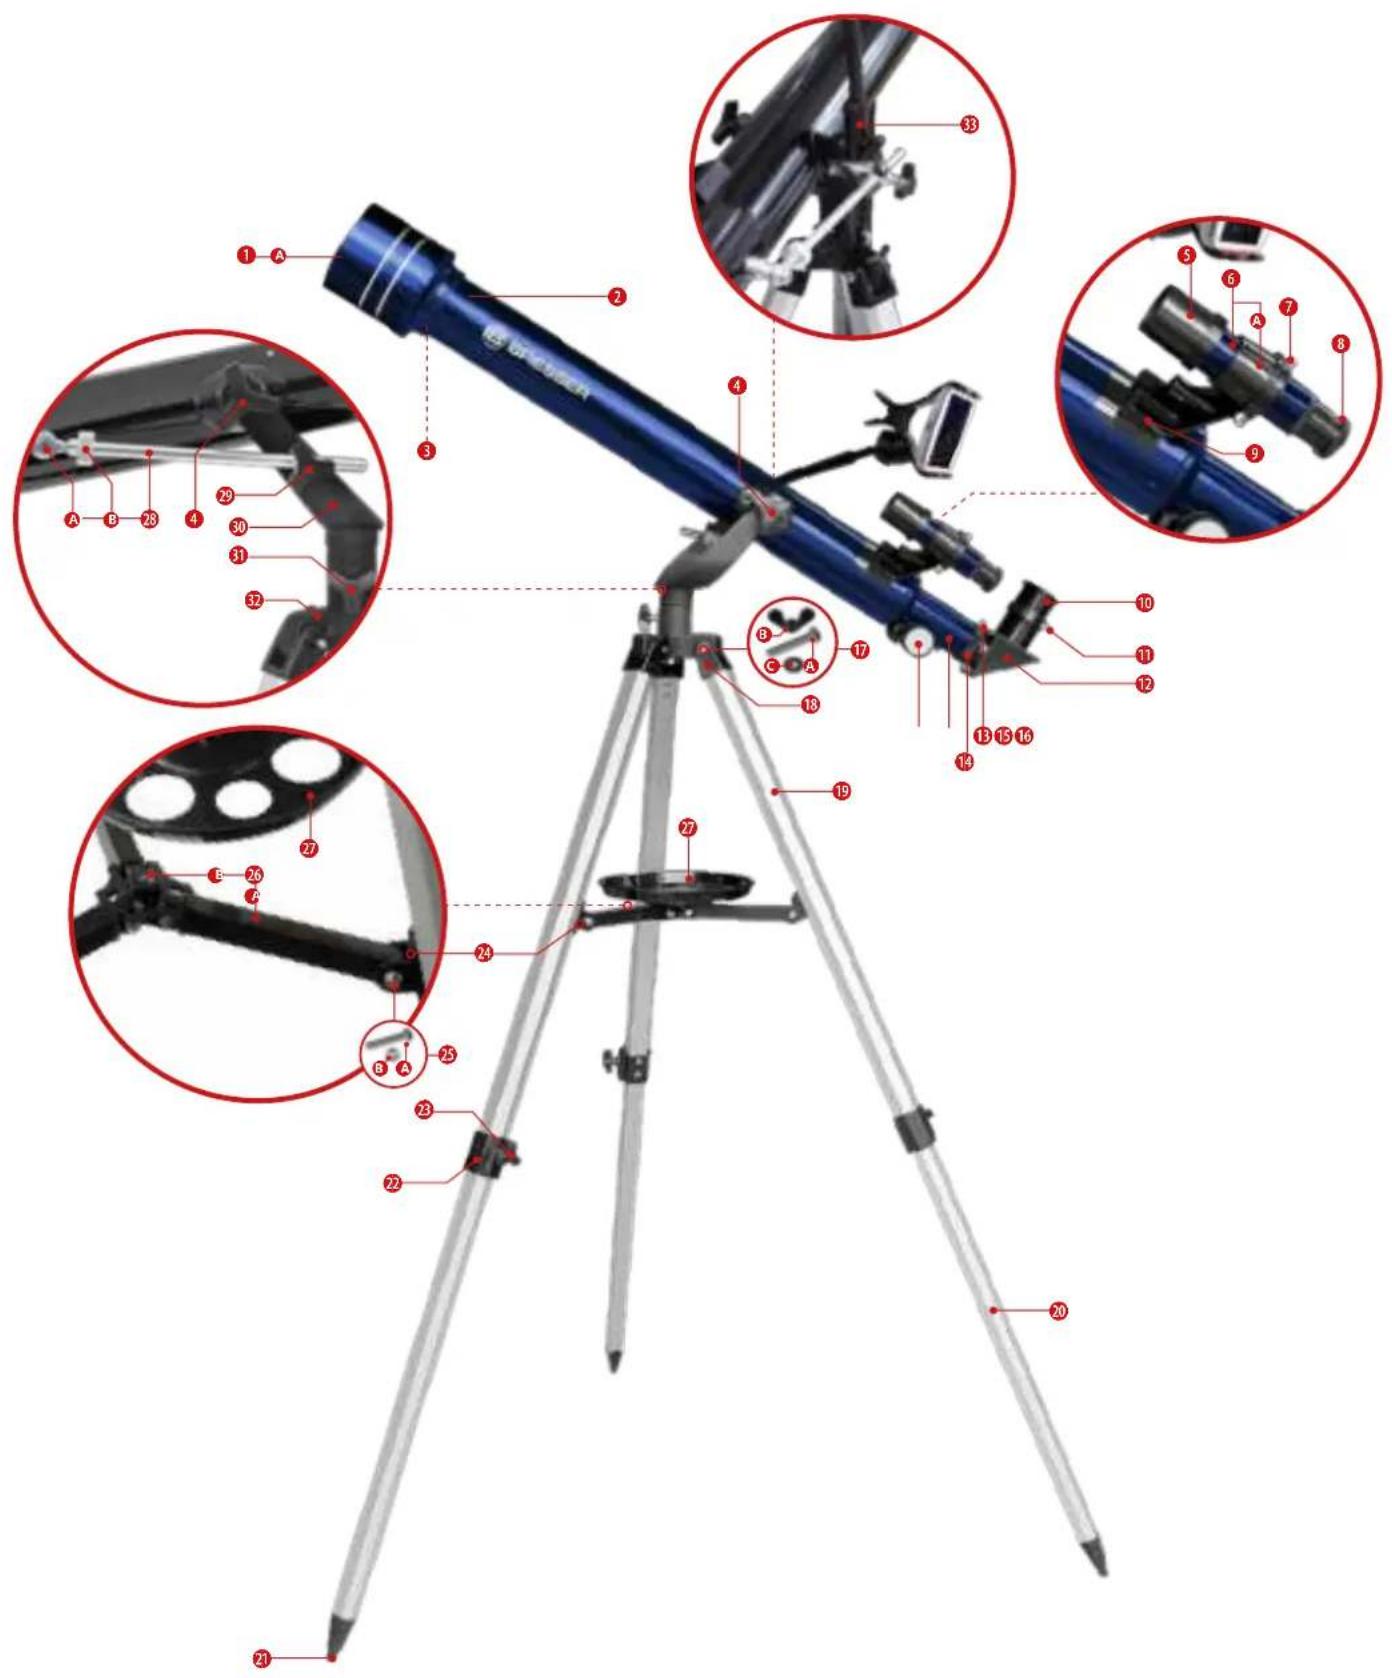
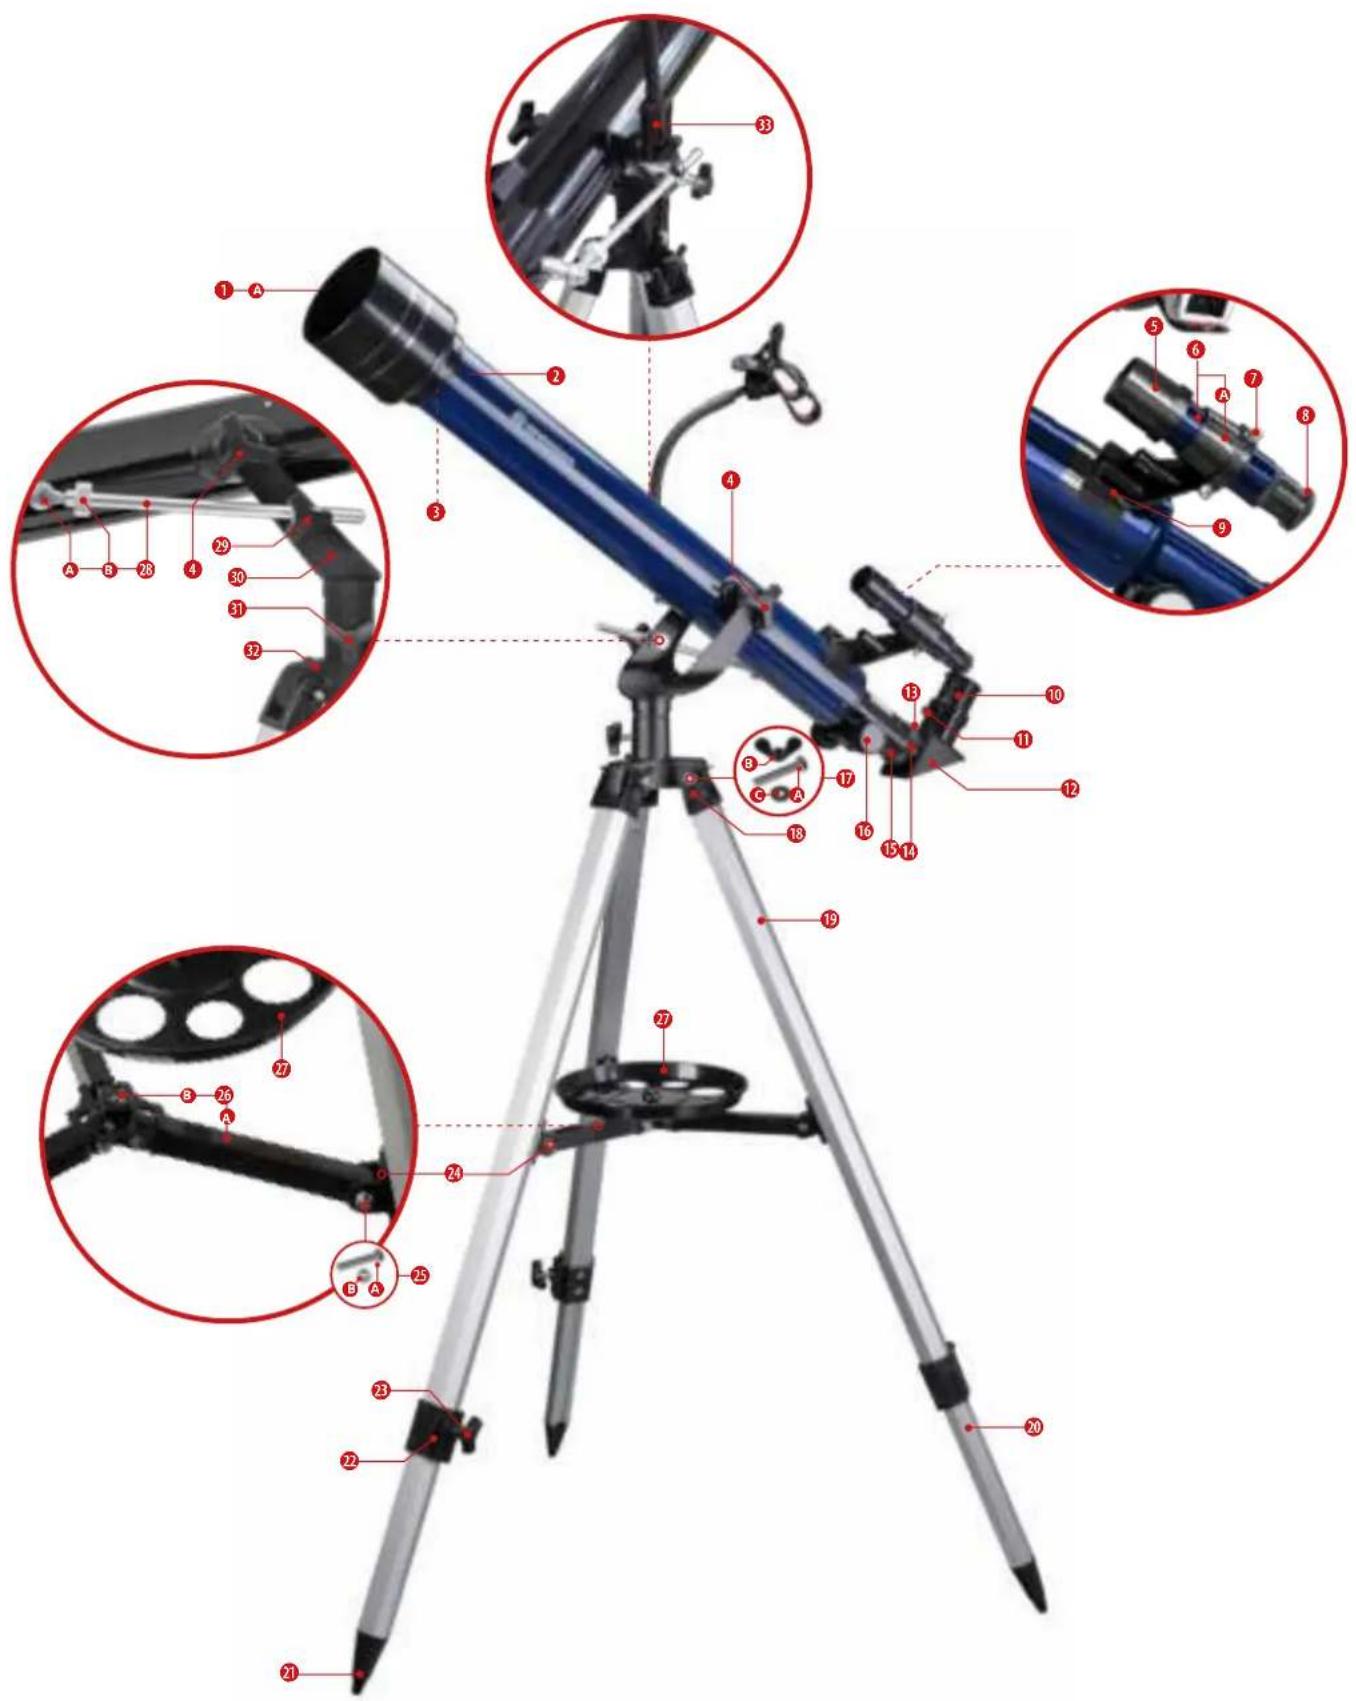
PARTS LIST (FIG. 2)
① Dew shield with A dust cap (not visible)
② Optical tube with A internal thread (not visible)
③ Objective lens (internal)
④ Fixation screws (for the tube, 2 pcs., enclosed)
⑤ Viewfinder objective
⑥ Viewfinder scope with A viewfinder bracket (parts preassembled)
⑦ Adjustment screws (on the viewfinder, 3 pcs., preassembled)
⑧ Viewfinder eyepiece with focusing ring
⑨ Viewfinder shoe (on the tube, preassembled)
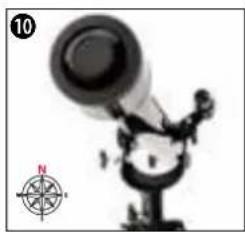
10 Eyepiece
11 Fixing screw (on the diagonal mirror, 1 pc., preassembled)
⑫ 90° Diagonal mirror
⑬ Fixing screw (on the extension ring, 1 pc., preassembled)
14 Extension ring (on the eyepiece extension)
15 Eyepiece extension
16 Focus wheel
18 Mounting fork (on the tripod leg)
19 Upper part of the tripod leg
20 Lower part of the tripod leg (extendable)
21 Foot tip (on the tripod leg)
22 Tripod leg clamp
23 Wing screw (enclosed)
24 Mounting pegs (pre-mounted on the tripod leg)
26 Tripod spider with A bar, B central thread
27 Accessory tray
28 stabilizing rod (one-sided) with A fixing screw, B fine adjustment wheel
29 Fixing screw with locating hole (pre-mounted on the mounting fork)
30 Mounting fork with A openings
31 Fixing screw for horizontal movement (pre-mounted on the mounting fork).
32 Mounting shaft (three-sided)
33 End piece with hole (on the smartphone holder)
⑰ Mounting screw (for mounting shaft) with A hexagon head screw, B wing nut, C washer (all parts enclosed)
25 fixing screw (for mounting of the tripod spider) with A threaded screw, B lock nut (parts preassembled on tripod spider)
A | SETTING UP THE TRIPOD AND MOUNTING THE ACCESSORY TRAY
natural_image
Close-up of a black pen with red arrows indicating movement or force (no text or symbols)
natural_image
Close-up of a black film reel with red circular annotation and arrow pointing to a handle (no text or symbols visible)
natural_image
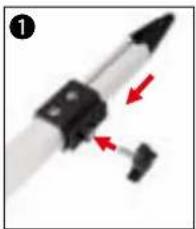
Close-up of a tripod measuring instrument with a green arrow indicating the measurement (no text or symbols visible)1) Screw the three wing screws (23) into the threads of the tripod leg clamps (22) and tighten them hand-tight.
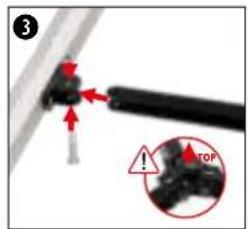
2) Slide the mounting forks (18) of the three tripod legs onto the mounting shafts (32) and attach them to the mounting pins (30) with the fastening screws (17).
IMPORTANT: When mounting, make sure that the mounting pins (24) point downwards and the head of the hexagon head screw (17A) engages in the corresponding recess on the mounting fork.
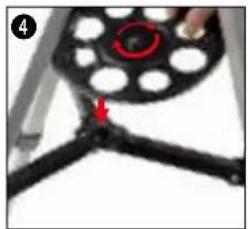
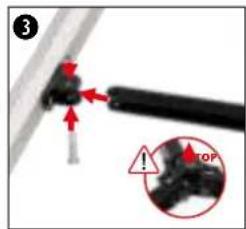
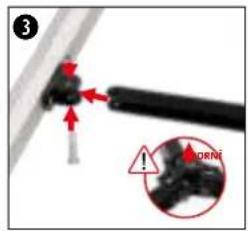
3) Remove the small mounting screws (25) from the ends of the tripod spider (26) and set them aside within reach. Place the ends of the tripod spider (26) on the mounting pins (24) and fasten them with the fastening screws previously removed.
IMPORTANT: Make sure that the central thread (26B) of the tripod spider points upwards in the direction of the mounting fork (30) when mounting.
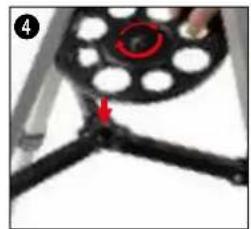
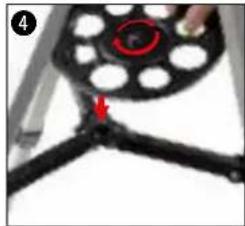
4) Place the tripod upright on a firm, preferably level surface so that it is horizontal and secure. Screw the accessory tray (27) into the central thread (26B).
5) The base of the telescope with tripod, mount and accessory tray is now ready for use.
NOTE: The foot tips of the tripod legs can compensate for slight unevenness of the ground. For more uneven surfaces, the heights of the tripod legs can be adjusted independently. To do this, loosen the wing screws (23) on the tripod leg clamps (22) slightly and pull the lower tripod leg parts further apart or push them in accordingly. Then hand-tighten the wing screws (23) again. To check a level stand, place a spirit level on the accessory tray.
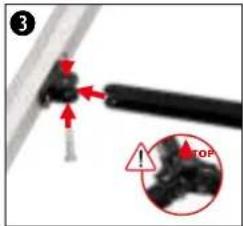
B | FASTENING THE TELESCOPE IN THE MOUNT AND ALIGNING IT
natural_image
Close-up of a mechanical arm with red annotation arrows pointing to specific parts (no text or symbols visible)
natural_image
Illustration of a person using a telescope with a compass rose nearby (no text or symbols)ATTENTION! Always hold the tube with one hand during the following assembly steps to prevent it from falling or turning over. This can lead to irreparable damage to the tube and optics!
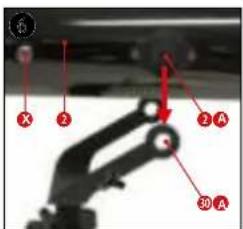
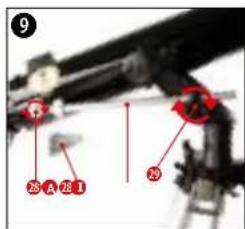
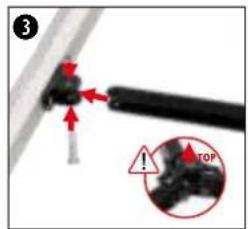
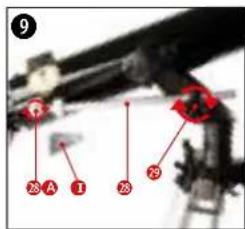
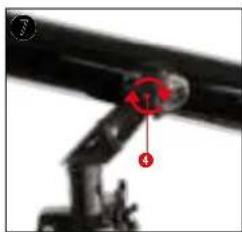
6) Keep the fixing screws (4), the stabilizing rod (28) and the fixing screw (28A) within reach. Position the optical tube (2) from above in the mounting fork so that the internal threads (2A) on the optical tube (2) are located exactly behind the openings (30A) of the mounting fork.
7) Take the fixing screws (4) and screw them through the openings (30A) of the mounting fork into the internal threads (2A) on the optical tube and tighten them hand-tight.
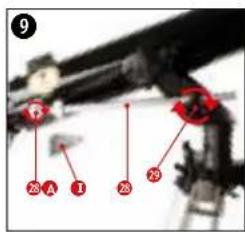
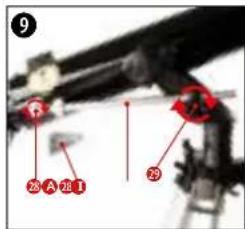
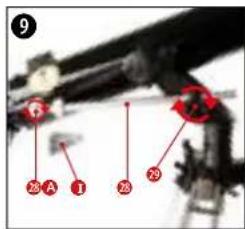
8) Take the stabilizing rod (28) and push it through the locating hole of the fixing screw (29) and tighten the fixing screw slightly.
9) Screw the stabilization rod hand-tight to the internal thread (X) of the optical tube (2) using the small fixing screw (28A) and the screwdriver (I).
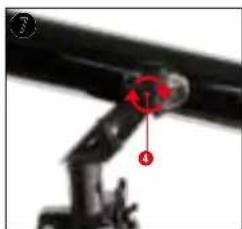
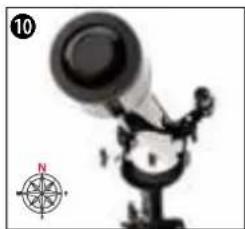
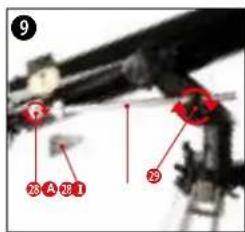
10. Loosen the fixing screw (31) for horizontal movement to move the optical tube (2) horizontally (to the right or left). For fixing in a specific horizontal position, hand-tighten the fixing screw (31). To move the optical tube (2) vertically, slightly loosen the fixing screws (4) for the optical tube (2) and the fixing screw (29) on the mounting fork. After reaching the desired position, hand-tighten all fixing screws again.
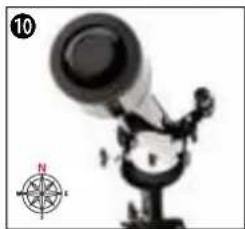
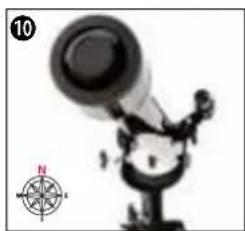
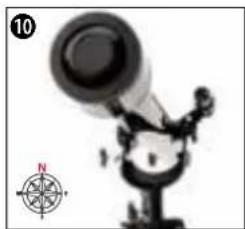
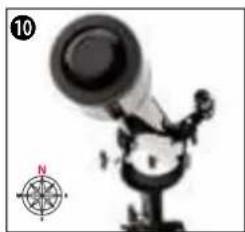
NOTE: Before each night observation, the optical tube (2) should be aligned horizontally and with the objective lens (3) facing north. A small compass can help with accurate alignment.
C | ATTACHING ACCESSORIES FOR VISUAL OBSERVATION

natural_image
Close-up of a black mechanical device with a red indicator light and a numbered label (11) in the corner, no readable text or symbols on the device itself.
natural_image
Close-up of a mechanical device with a compass rose and green checkmark (no visible text or symbols)
natural_image
Close-up of a hand holding a black plastic clip next to a yellow object with a magnifying glass (no visible text or symbols)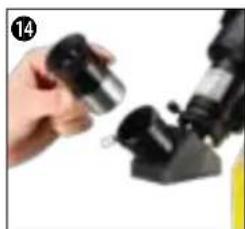
natural_image
Close-up of a hand holding a small metallic object next to a black mechanical device (no visible text or symbols)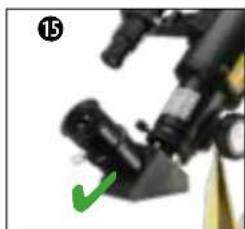
natural_image
Close-up of a mechanical device with a green checkmark indicating a detail (no visible text or symbols)BASIC ACCESSORIES - VIEWFINDER, DIAGONAL MIRROR AND EYEPIECES
11) Insert the viewfinder (6) with the viewfinder bracket (6a) into the viewfinder shoe (7) on the optical tube (2).
12) The viewfinder (6) is correctly mounted when the objective lens (3) and the viewfinder lens (5) point in the same direction.
13) Loosen the fixing screw (13) on the focuser ring (14) so that the protective cap can be removed and the opening of the eyepiece extension (15) is not blocked. Insert the diagonal mirror (12) into the eyepiece extension (15) and hand-tighten the fixing screw (13) on the focuser ring (14) again.
14) Loosen the fixing screw (11) on the diagonal mirror (12) so that its opening is not blocked. Insert an eyepiece (10) into the diagonal mirror (12) and hand-tighten the fixing screw (11) on the diagonal mirror (12) again.
TIP! Start each observation with a low magnification eyepiece. The following applies to this: The larger the focal length in mm, the lower the magnification. Example: a 10mm eyepiece provides less magnification than a 4mm eyepiece
15) The telescope is now ready for use.
D | FIRST OBSERVATION
D-1 LAND OBSERVATION
natural_image
Close-up of a mechanical component with red arrows indicating motion, no visible text or symbols
natural_image
Medical imaging scan showing a cross-sectional view of a human head with an eye and green checkmark (no text or symbols)
natural_image
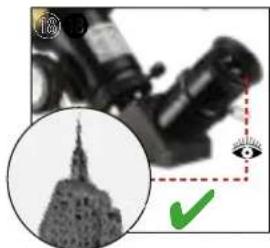
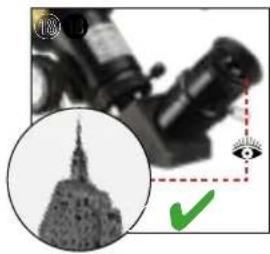
Close-up of a microscope with an inset image of the Statue of Liberty (no visible text or symbols)16) Remove the dust cap (1A) from the dew shield (1).
17) Point the entire telescope at the object to be viewed. Look through the viewfinder eyepiece (8) and set the object in the center of the field of view (crosshairs) by adjusting the telescope horizontally and vertically. If necessary, the image sharpness can be adjusted using the focusing ring on the viewfinder eyepiece (8).
18) When looking through the eyepiece (10), the object can be seen magnified. If necessary, the image sharpness can be adjusted using the focus wheel (16).
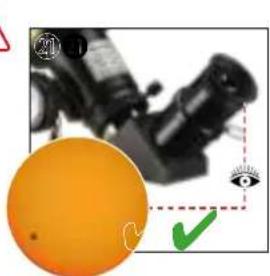
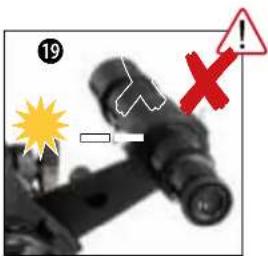
D-2 SOLAR OBSERVATION
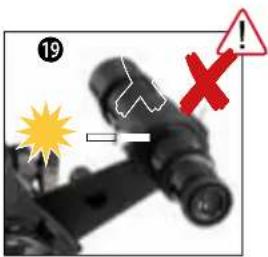
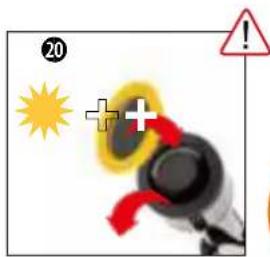

natural_image
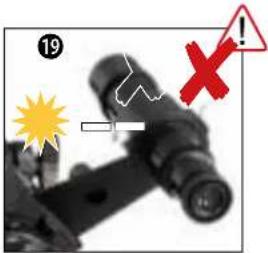
Close-up of a black optical instrument with an orange circular component and a green checkmark, no visible text or symbols.DANGER OF BLINDNESS!
- Never look directly at or near the sun with this device without a suitable solar filter! Direct sunlight will cause serious damage of your eyes or even blindness within a few seconds.
- When observing the sun, remove the finder scope and insert only the supplied solar filter in front of the objective lens before observing. Be sure to also read the separate operating instructions for the solar filter!
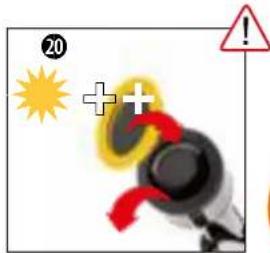
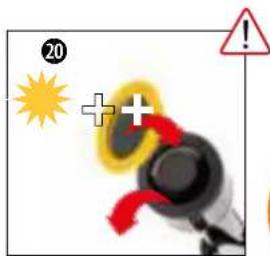
19) Completely disassemble the finder scope (6) from the optical tube (2).
20) Remove the dust cap (1A) from the dew shield (1). Place the sun filter (Q) on the dew shield (1) instead of the dust cap (1A).
21) When looking through the eyepiece (10), the sun can be seen magnified. If necessary, the image sharpness can be adjusted using the focus wheel (16).
E | ATTACHING OPTIONAL ACCESSORIES
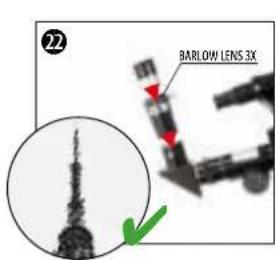
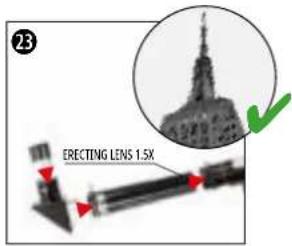
BARLOW LENS AND/OR ERECTING LENS
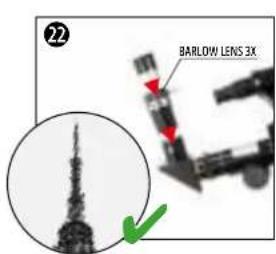

Chapter C describes how to mount the basic accessories to the telescope.
In addition, special accessories can still be used. The assembly and function of the special accessories included in this telescope set are explained below.
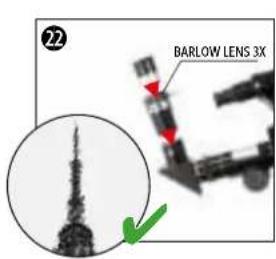
22) The 3x Barlow lens is inserted into the beam path between the diagonal mirror (12) and the eyepiece (10). It provides a (calculated) increase in magnification of 3 times.
NOTE: Besides the image enlargement, there is no optical image change. I.e. the image inversion (laterally reversed) caused by the diagonal mirror (12) remains.
23) The 1.5x erecting lens is inserted between the eyepiece extension (15) and the diagonal mirror (12) in the beam path. In addition to a 1.5x increase in magnification, it also offers image reversal.
F | MOUNTING THE SMARTPHONE HOLDER
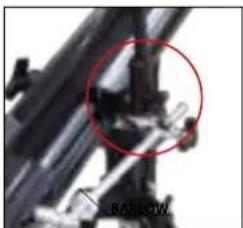
natural_image
Close-up of mechanical components with a red circle highlighting a specific part, labeled 'BARLOW' (no other text or symbols visible)
natural_image
Close-up of a handheld device with a screen and cable, no visible text or symbolsThe smartphone holder (P) is mounted in the direct field of view of the observer.
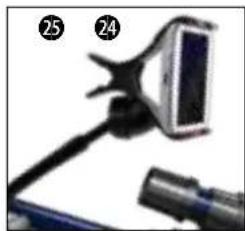
24) Hold the optical tube (2) with one hand and simultaneously unscrew one of the two fixing screws (4) on the mounting fork (30) and put it aside within reach. Insert the fixing screw (4) through the hole on the end piece of the smartphone holder (P) and the opening on the mounting fork (30) and screw it back onto the optical tube (2).
25) Clamp the smartphone in the gripper arm of the smartphone holder. Open any Sky app on the smartphone and bend the movable arm of the mount to the desired position for observation.
G | ASTRO SOFTWARE
For better orientation on the night sky, we provide the Astro software "Stellarium" for download on our internet platform. Download the software and a detailed user manual via the following web link: http://www.bresser.de/download/stellarium
H | POSSIBLE OBSERVATION OBJECTS
Below we have selected and explained some very interesting celestial bodies and star clusters. In the accompanying illustrations at the end of the manual you can see how you will see the objects through your telescope with the supplied eyepieces - in good viewing conditions:
natural_image
Close-up grayscale image of the full moon showing visible craters and maria (no text or symbols)
natural_image
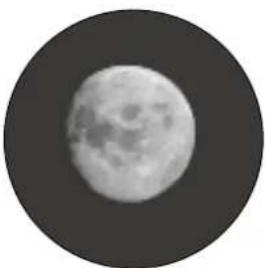
Close-up grayscale image of the Moon's surface showing craters and maria (no text or symbols)MOON
The moon is the only natural satellite of the earth
Orbit: approx. 384,400 km from the earth
Diametre: 3,476 km
Distance: 384,401 km
The moon has been known since prehistoric times. It is the second brightest object in the sky after the sun. As the moon orbits the earth once a month, the angle between the earth, the moon and the sun is constantly changing; you can see this in the cycles of the moon's phases. The time between two consecutive new moon phases is about 29.5 days (709 hours).
natural_image
Circular grayscale image with a diffuse bright spot and faint central glow, resembling a celestial object or astronomical light source (no text or symbols)
natural_image
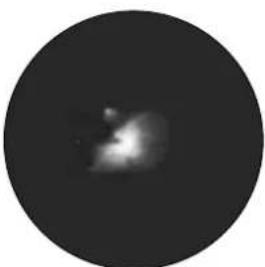
Black-and-white astronomical image showing a nebula or star field with bright spots and diffuse cloud structure (no text or symbols)CONSTELLATION ORION / M42
Right Ascension (R.A): 05:32.9 (hours : minutes)
Declination (DEC): 05:25 (degrees : minutes)
Distance: 1,500 light years
At a distance of about 1500 light-years, the Orion Nebula (M42) is the brightest diffuse nebula in the sky - visible to the naked eye, and a rewarding object for telescopes of all sizes, from the smallest binoculars to the largest Earth-based observatories and the Hubble Space Telescope.
It is the main part of a much larger cloud of hydrogen gas and dust, extending at more than 10 degrees over about half of the constellation of Orion. The extent of this enormous cloud is several hundred light years.

natural_image
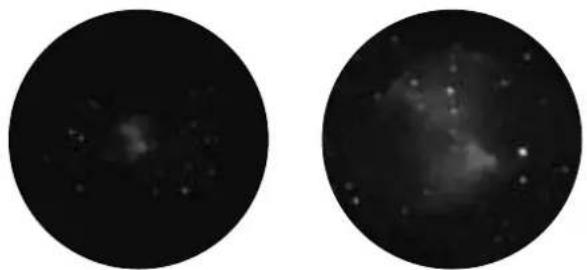
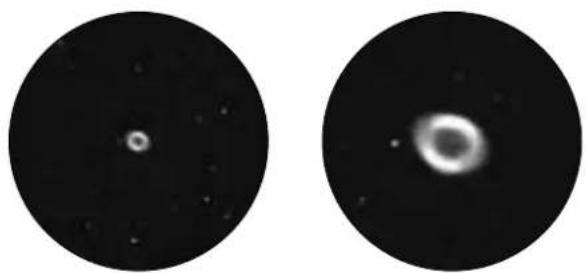
Two circular astronomical images showing a bright celestial object and a diffuse ring-like structure against a dark background (no text or symbols)CONSTELLATION LEIER / M57
Right Ascension (R.A): 18:51.7 (hours : minutes)
Declination (DEC): 32:58 (degrees : minutes)
Distance: 4.100 million light years
The famous Ring Nebula M57 in the constellation Lyra is often considered to be the prototype of a planetary nebula; it is one of the splendours of the northern hemisphere summer sky. Recent studies have shown that it is most likely a ring (torus) of brightly glowing matter surrounding the central star (visible only with larger telescopes), rather than a spherical or ellipsoidal gas structure. If the Ring Nebula were viewed from the side plane, it would resemble the Dumbell Nebula M27. We are looking right at the pole of the nebula for this object.
natural_image
Two circular astronomical images showing star fields and nebulae against a dark background (no text or symbols)CONSTELLATION VIXEN / M27
Right Ascension (R.A): 19:59.6 (hours : minutes)
Declination (DEC): 22:43 (degrees : minutes)
Distance: 1,250 million light years
The Dumbbell Nebula M27 or Dumbbell Nebula in the Vixen was the first planetary nebula ever discovered. On July 12, 1764, Charles Messier discovered this new and fascinating class of objects. We see this object almost exactly from its equatorial plane. If the Dumbell Nebula were seen from one of the poles, it would probably have the shape of a ring and resemble the sight we know from the Ring Nebula M57.
This object can already be seen well in reasonably good weather conditions at low magnifications.
CLEANING & MAINTENANCE
- Clean the lenses (eyepieces and/or objective lenses) only with a soft and lint-free cloth (e.g. microfibre cloth). To avoid scratching the lenses, use only gentle pressure with the cleaning cloth.
• To remove more stubborn dirt, moisten the cleaning cloth with an eyeglass-cleaning solution and wipe the lenses gently. - Protect the device from dust and moisture! After use, particularly in high humidity, let the device acclimatize at room temperature for a short period of time, so that the residual moisture can dissipate.
STORAGE
- Store it in the shipping carton if it will not be used for a long time.
TROUBLESHOOTING
| Faults: Help | |
| No image Remove the dust cap from the lens opening. | |
| Blurred picture Focusing with the focus wheel | |
| Focusing not possible Wait for temperature equalisation (approx. 30 minutes) | |
| Bad image Never watch through a pane of glass | |
| Observation object visible in the viewfinder but not in the telescope | Adjust the viewfinder |
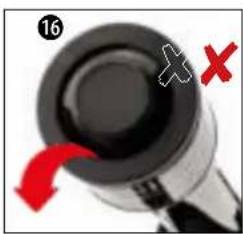
| "Crooked" image despite the diagonal mirror | The diagonal mirror must be aligned vertically to the eyepiece extension. |
TECHNICAL DATA
| Model Skylux 60/700 AZ | |
| Objective lens diam. 60 mm | |
| Focal length (opt. tube 700 mm) | |
| Mount azimuthal mount | |
| Tripod height adjustable aluminum tripod | |
| Viewfinder optical, 5x24 | |
| Eyepieces SR-4 mm, H-20mm | |
| Other accessories diagonal mirror, 1.5x erecting lens, 3x Barlow lens, solar filter, Smartphone holder | |
DISPOSAL

Dispose of the packaging materials by type. Contact your local waste-disposal service or environmental authority for information about the proper disposal.
Observe the current legal regulations when disposing of the device! Information on proper disposal can be obtained from municipal waste disposal service providers or the Environmental Agency.
natural_image
Illustration of a blue telescope mounted on a tripod, no text or symbols visibleArt. N° 9618761000000
FIG 1
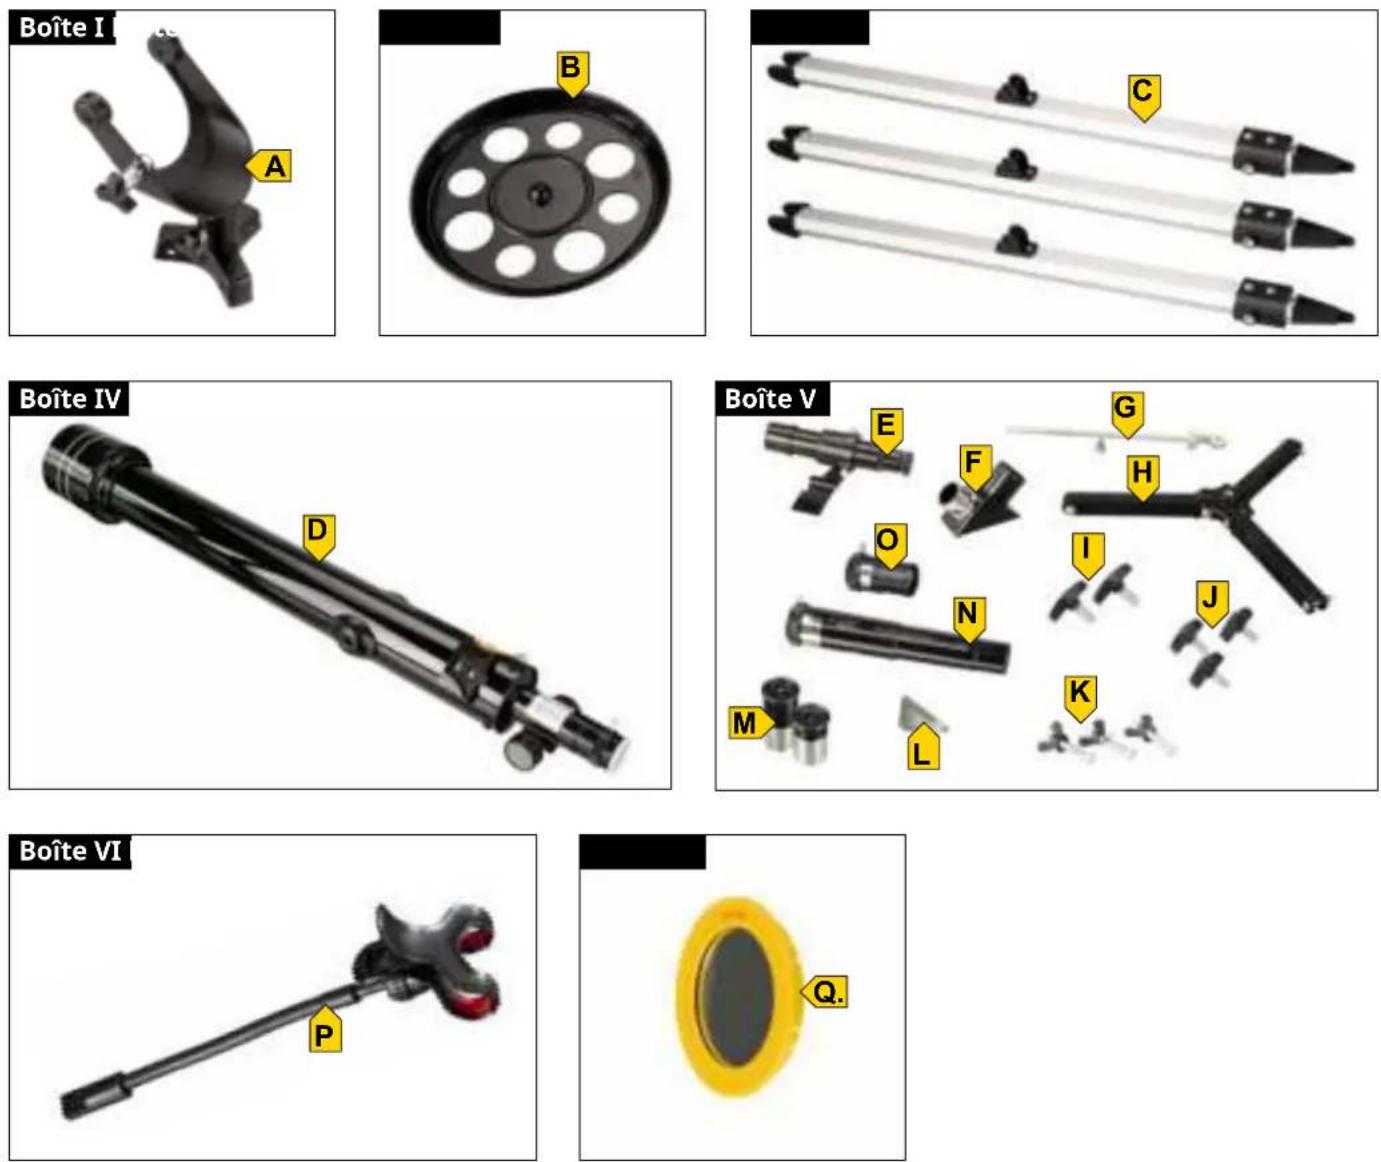
FIG 2
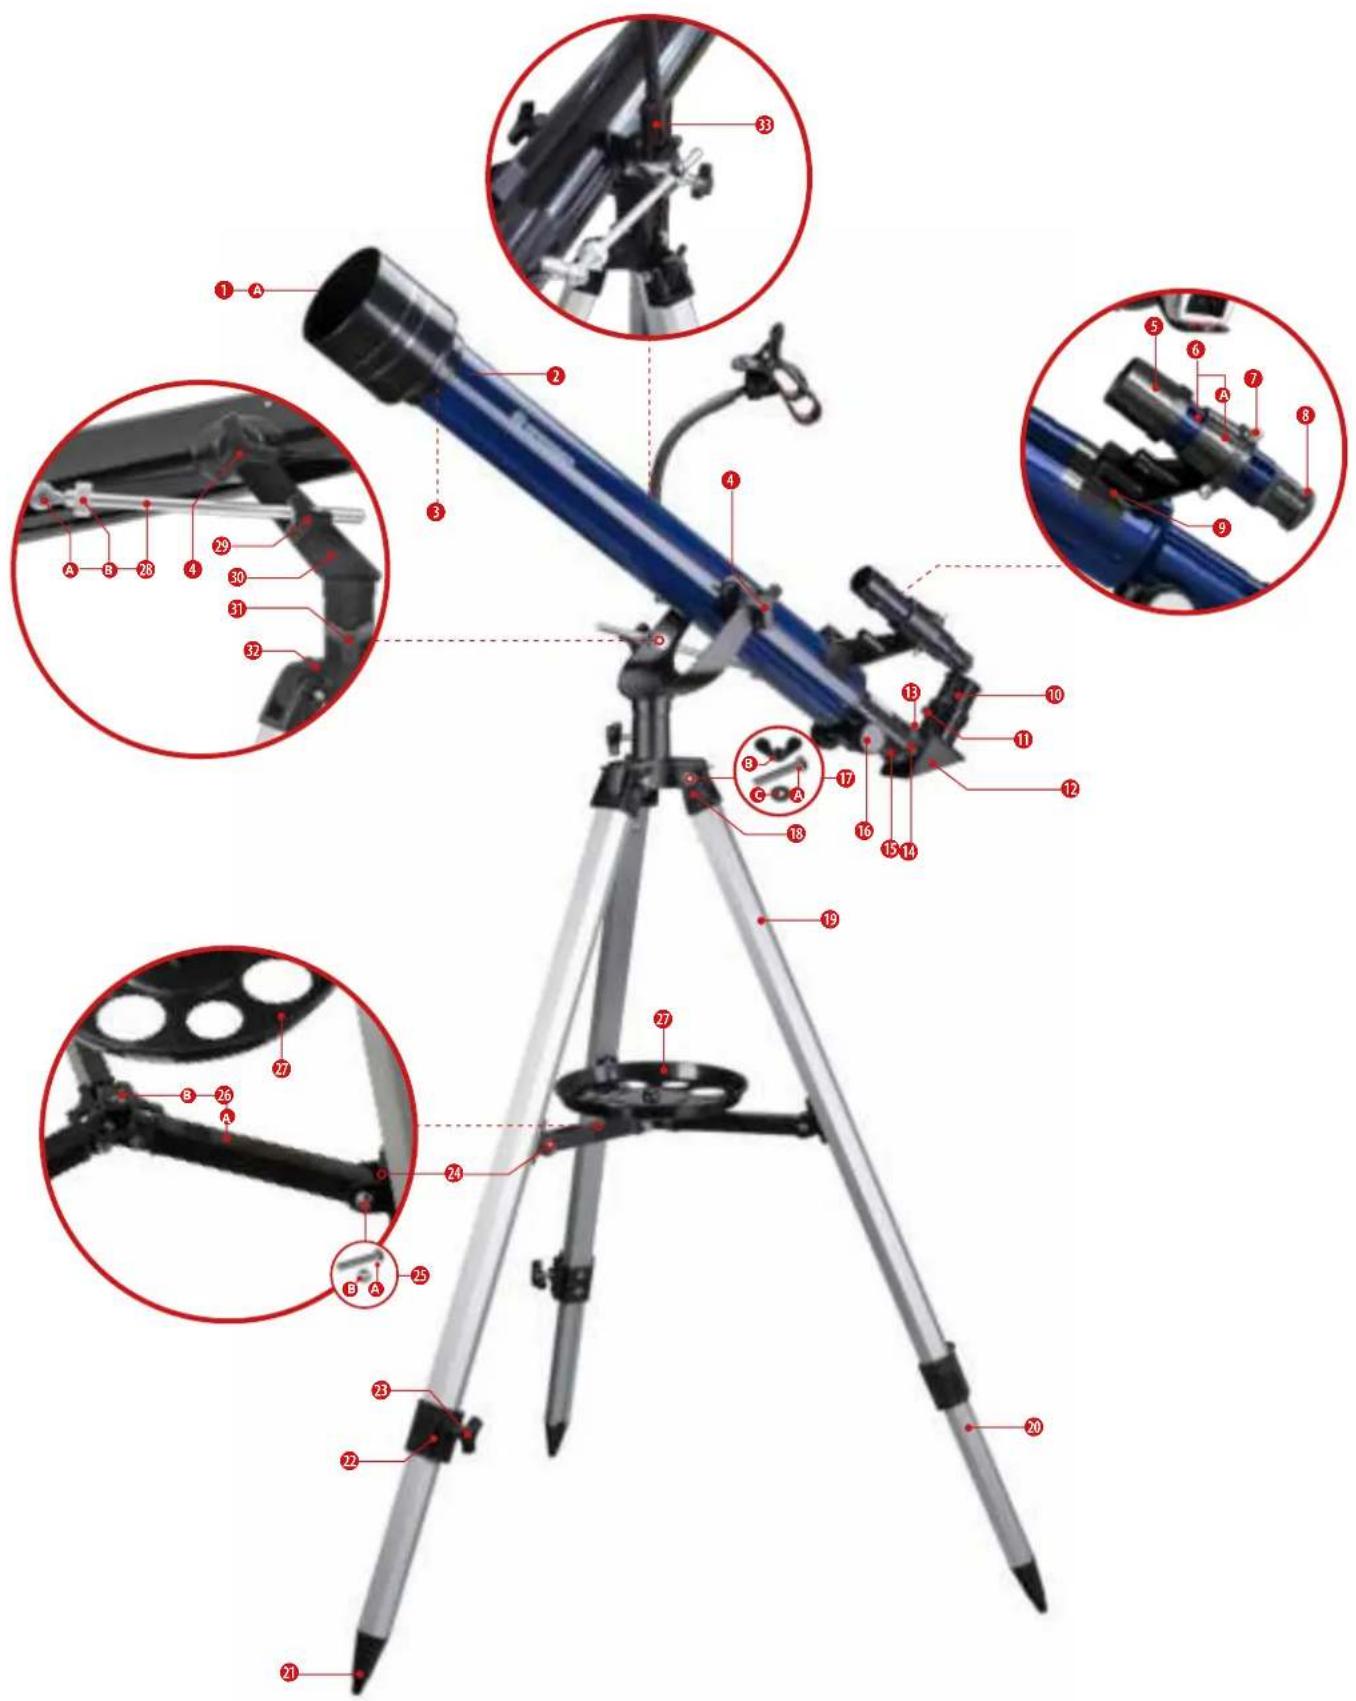
TABLE DES MATIÈRES
CARACTÉRISTIQUES
A PROPOS DE CE MODE D'EMPLOI 5
CONSIGNES GÉNÉRALES DE SÉCURITÉ 5
CONTENU DE LA LIVRAISON (FIG. 1) 6
LISTE DES PIÈCES (FIG. 2) 6
A | MISE EN PLACE DU TRÉPIED ET MONTAGE DU PLATEAU D'ACCESSOIRES 6
B | FIXER LE TÉLESCOPE DANS LA MONTURE ET L'ALIGNER 7
C | FIXATION D'ACCESSOIRES POUR L'OBSERVATION VISUELLE 7
D | PREMIÈRE OBSERVATION 8
E | FIXATION DES ACCESSOIRES EN OPTION 8
F | MONTAGE DE L'ADAPTATEUR POUR SMARTPHONE 8
G | ASTRO SOFTWARE 9
H | OBJETS D'OBSERVATION POSSIBLES 9
NETTOYAGE ET ENTRETIEN 10
STOCKAGE 10
DÉPANNAGE 10
Never look directly at or near the sun with this device without solar filter! Direct sunlight will cause serious damage of your eyes or even blindness within a few seconds.
natural_image
Close-up of a black pen with red arrows indicating movement or force direction (no text or symbols)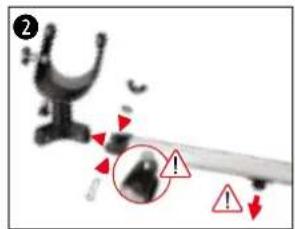


natural_image
Close-up of a mechanical component with a red arrow pointing to a circular feature on a black circular plate (no text or symbols visible)
natural_image
Close-up of a tripod with a green arrow pointing to the base (no text or symbols visible)
natural_image
Close-up of a mechanical arm joint with red annotation arrows (no visible text or symbols)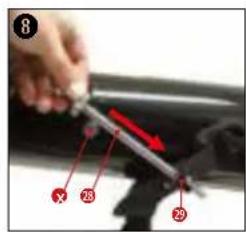
natural_image
Illustration of a cartoon character with a large telescope and a compass rose, no text or symbols present.natural_image
Close-up of a black mechanical device with adjustment knobs and a red indicator knob (no visible text or symbols)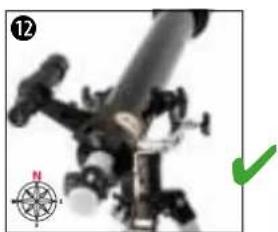
natural_image
Close-up of a mechanical device with a green checkmark and compass rose (no readable text or symbols)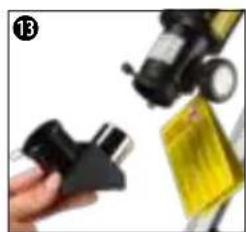
natural_image
Close-up of a hand holding a black plastic clip next to a yellow rectangular object (no visible text or symbols)
natural_image
Close-up of a hand holding a small metallic object next to a black mechanical component (no visible text or symbols)
natural_image
Close-up of a mechanical device with a green checkmark indicating a detail (no visible text or symbols)ACCESSOIRES DE BASE - VISEUR, MIROIR DIAGONAL ET OCULAIRES
Never look directly at or near the sun with this device without solar filter! Direct sunlight will cause serious damage of your eyes or even blindness within a few seconds.
natural_image
Close-up of a handheld device with a screen and cable (no visible text or symbols)H | OBJETS D'OBSERVATION POSSIBLES
natural_image
Close-up grayscale image of the full moon showing visible craters and maria (no text or symbols)
natural_image
Close-up grayscale image of the Moon's surface showing craters and maria (no text or symbols)LUNE
natural_image
Circular grayscale image with a diffuse bright spot in the center, resembling a celestial body or light source (no text or symbols)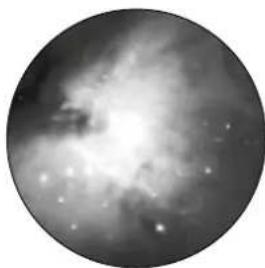
natural_image
Circular grayscale astronomical image showing a bright central region surrounded by diffuse nebulae and scattered stars (no text or symbols)CONSTELLATION ORION / M42
natural_image
Two circular astronomical images showing a bright celestial object and a diffuse ring-like structure against a dark background (no text or symbols)CONSTELLATION LEIER / M57
natural_image
Two circular grayscale astronomical images showing star fields and nebulae against a dark background (no text or symbols)CONSTELLATION VIXEN / M27
natural_image
Illustration of a blue telescope mounted on a tripod, no text or symbols visibleArt. No. 9618761000000
FIG. 1
natural_image
3D mechanical component labeled 'Casella I' with a yellow arrow pointing to component A (no other text or symbols visible)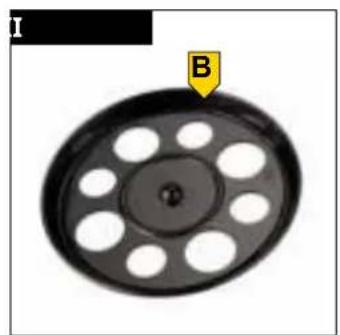
natural_image
Circular mechanical component with evenly spaced holes and a labeled point B (no text or symbols beyond labels)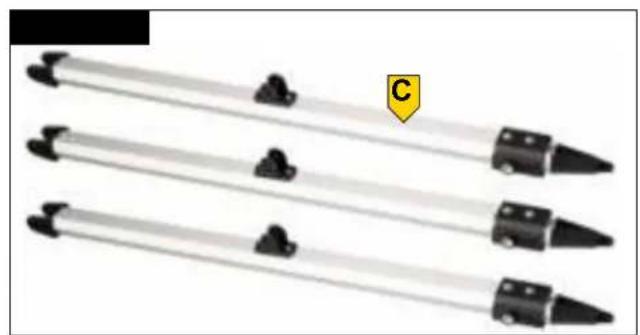
natural_image
Three identical black-and-white tool tips arranged horizontally, with a yellow label 'C' on the right (no text or symbols on the tools themselves)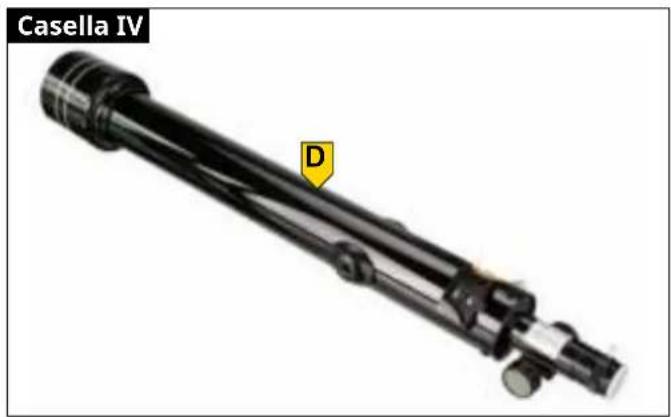
natural_image
Mechanical assembly labeled 'Casella IV' with a yellow label 'D' pointing to a component (no other text or symbols visible)

natural_image
Close-up of a yellow oval object with a black interior, labeled 'Q' with an arrow pointing to it (no other text or symbols)FIG. 2
INHALT
CARATTERISTICHE
5
natural_image
Close-up of a pen with red arrows indicating movement or force direction (no text or symbols)


natural_image
Close-up of a film reel with a red arrow pointing to a circular component (no text or symbols visible)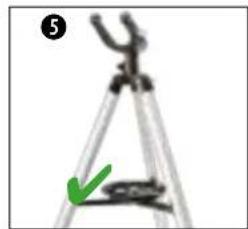
natural_image
Close-up of a tripod caliper with a green arrow pointing to the base (no text or symbols visible)
natural_image
Close-up of a mechanical arm joint with red annotation arrows (no visible text or symbols)

natural_image
Illustration of a cartoon character with a telescope and compass rose (no text or symbols)natural_image
Close-up of mechanical components with a red star marker (no visible text or symbols)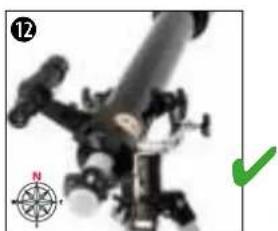
natural_image
Close-up of a mechanical device with a compass rose and green checkmark (no visible text or symbols)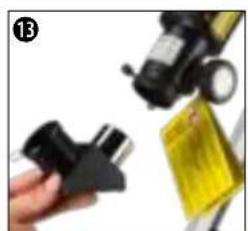
natural_image
Close-up of a hand holding a black plastic clamp next to a yellow product box (no visible text or symbols)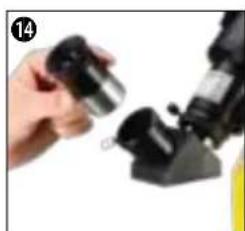
natural_image
Close-up of a hand holding a small black object next to a black mechanical component (no visible text or symbols)
natural_image
Close-up of a mechanical device with a green checkmark pointing to a component (no visible text or symbols)ACCESSORI DI BASE: MIRINO, SPECCHIO DIAGONALE E OCULARI
natural_image
Close-up of a mechanical component with red arrows indicating motion or force, no visible text or symbols

natural_image
Close-up of a microscope with a magnified inset showing a landmark (no visible text or symbols)natural_image
Close-up of a microscope objective with an orange light source and eye icon (no text or symbols)PERICOLO DI CECITÀ!

natural_image
Close-up of a handheld device with a screen and cable, no visible text or symbolsnatural_image
Monochrome close-up of the full moon showing visible craters and maria (no text or symbols)
natural_image
Close-up grayscale image of the Moon's surface showing craters and maria (no text or symbols)LUNA
natural_image
Circular grayscale image with a diffuse bright spot and a faint central glow, no text or symbols present.
natural_image
Circular grayscale astronomical image showing a bright nebula or starburst structure with diffuse dust clouds (no text or symbols)natural_image
Two circular astronomical images showing a bright celestial object and a diffuse ring-like structure against a dark background (no text or symbols)CONSTELLATION LEIER/M57
Ascensione retta (R.A): 18:51 .7 (ore: minuti)
natural_image
Two circular grayscale astronomical images showing star fields and nebulae against a dark background (no text or symbols)CONSTELLATION VIXEN/M27
natural_image
Blue telescope mounted on a tripod, no visible text or symbolsBr. art. 9618761000000
SL.1

SL. 2

SADRŽAJ
SVOJSTVA
O OVIM UPUTAMA ZA UPOTREBU 5
OPĆE SIGURNOSNE NAPOMENE 5
OPSEG ISPORUKE 6
POPIS DIJELOVA 6
A | POSTAVLJANJE STATIVA I MONTAŽA POLICE ZA PRIBOR 7
natural_image
Close-up of a black mechanical component with red arrows indicating motion direction (no text or symbols)


natural_image
Close-up of a film reel with a red arrow pointing to a circular button on its side (no text or symbols visible)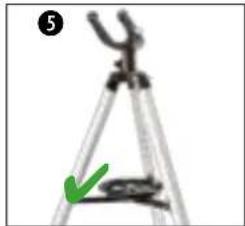
natural_image
Close-up of a tripod with a green arrow pointing to the base (no text or symbols visible)- Zavrnite tri krilna vijka (23) u obujmice noge stativa (22) i zategnite ih rukom.
- Gurnite montažne vilice (18) s tri noge stativa na montažne osovine (32) i pričvrstite ih na montažne klinove (30) s pomoću pričvrsnih vijaka (17).
VAŽNO: Prilikom sastavljanja pazite da montažni klinovi (24) budu usmjereni prema dolje i da glava šesterokutnog vijka (17A) dosegne odgovarajuće udubljenje na montažnoj vilici.
- Uklonite male pričvrsne vijke (25) na krajevima držača pauka (26) i odložite ih na dohvat ruke. Postavite krajeve držača pauka (26) na montažne klinove (24) i pričvrstite ih s pomoću pričvrsnih vijaka koje ste prethodno uklonili.

natural_image
Close-up of a mechanical linkage component with numbered parts (1, 4) and a red circular annotation (no readable text or symbols)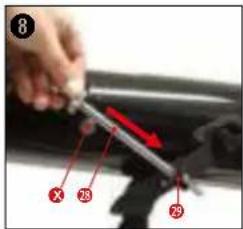


natural_image
Cartoon character holding a large telescope with a compass rose nearby (no text or symbols)natural_image
Close-up of mechanical components with a red accent, no visible text or symbols
natural_image
Close-up of a mechanical device with a compass rose and green checkmark (no visible text or symbols)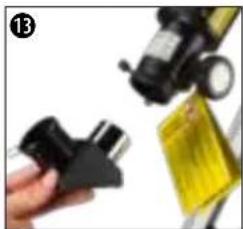
natural_image
Close-up of a hand holding a black plastic clip and a yellow tape measure (no visible text or symbols)
natural_image
Close-up of a hand holding a small metallic object next to a black mechanical component (no visible text or symbols)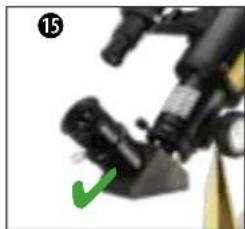
natural_image
Close-up of a mechanical device with a green checkmark pointing to a component (no visible text or symbols)OSNOVNI PRIBOR - TRAŽILO, ZENITNO ZRCALO I OKULARI
- Gurnite teleskop tražila (6) s nosačem tražila (6a) u bazu tražila (7) na optičkom tubusu (2).
- Teleskop tražila (6) pravilno je montiran kada su leća objektiva (3) i objektiv tražila (5) okrenuti u istom smjeru.
- Otpustite vijak za fiksiranje (13) na produžnom prstenu (14) tako da se zaštitni poklopac može ukloniti i da izvadak okulara (15) ne bude blokiran. Umetnite zenitno zrcalo (12) u izvadak okulara (15) i rukom ponovno zategnite vijak za fiksiranje (13) na produžnom prstenu (14).
- Otpustite vijak za fiksiranje (11) na zenitnom zrcalu (12) tako da njegov otvor ne bude blokiran. Umetnite okular (10) u zenitno zrcalo (12) i rukom ponovno zategnite vijak za fiksiranje (11) na zenitnom zrcalu (12).
natural_image
Close-up of a mechanical component with red arrows indicating motion, no visible text or symbols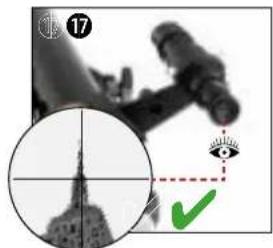
natural_image
Composite image showing a microscope, a circular inset of the U.S. Capitol dome, and a green checkmark with an eye symbol (no readable text or symbols)- Uklonite poklopac za zaštitu od prašine (1A) sa štitnika od zamagljivanja (1).
- Cijeli teleskop usmjerite prema objektu koji želite promatrati. Pogledajte kroz okular tražila (8) i postavite objekt na sredinu vidnog polja (sredina križića) putem vodoravnog i okomitog podešavanja teleskopa. Po potrebi se oštrina slike može podesiti s pomoću prstena za fokusiranje na okularu tražila (8).
- Promatranjem kroz okular (10) objekt se vidi uvećano. Po potrebi se oštrina slike može podesiti s pomoću kotačića za fokusiranje (16).
D-2 PROMATRANJE SUNCA
natural_image
Close-up of a microscope objective with an orange and green eye icon, no visible text or symbolsOPASNOST OD OSLJEPLJENJA!
- Ovim uređajem nemojte nikada izravno gledati u Sunce ili u blizinu Sunca ako ne upotrebljavate odgovarajući filtar za Sunce! Izloženost izravnoj sunčevoj svjetlosti već nakon nekoliko sekundi uzrokuje teška oštećenja na oku ili čak sljepoću.
-
Pri promatranju Sunca uklonite teleskop tražila i prije promatranja umetnite isključivo isporučeni filtar za Sunce ispred leće objektiva. Svakako pročitajte i zasebne upute za upotrebu filtra za Sunce!
-
Teleskop tražila (6) u potpunosti demontirajte s optičkog tubusa (2).
- Uklonite poklopac za zaštitu od prašine (1A) sa štitnika od zamagljivanja (1). Postavite filtar za Sunce (Q) na štitnik od zamagljivanja (1) umjesto poklopca za zaštitu od prašine (1A).
- Promatranjem kroz okular (10) Sunce se vidi uvećano. Po potrebi se oštrina slike može podesiti s pomoću kotačića za fokusiranje (16).
E | POSTAVLJANJE POSEBNOG PRIBORA
BARLOW LEĆA I/ILI LEĆA ZA OKRETANJE SLIKE
natural_image
Close-up of mechanical components with a red circle highlighting a specific part, labeled 'BARLOW' (no other text or symbols visible)
natural_image
Close-up of a handheld device with a screen and cable, no visible text or symbolsNosač za pametni telefon (P) montira se tako da bude u izravnom vidnom polju promatrača.
-
Jednom rukom držite optički tubus (2) i istovremeno odvrnite jedan od dvaju vijka za fiksiranje (4) na montažnoj vilici (30) i odložite nadohvat ruke. Provucite vijak za fiksiranje (4) kroz otvor na završnom elementu nosača za pametni telefon (P) i otvor na montažnoj vilici (30) te ga zatim ponovno zavrnite na optičkom tubusu (2).
-
Pričvrstite pametni telefon u hvataljku nosača za pametni telefon. Otvorite bilo koju aplikaciju Sky na svom pametnom telefonu i savijte pokretnu hvataljku nosača tako da postignete željeni položaj za promatranje.
G | ASTRONOMSKI SOFTVER
Kako biste se mogli bolje orijentirati na noćnom nebu, omogućili smo preuzimanje astronomskog softvera „Stellarium” na našoj internetskoj platformi. Preuzmite softver i detaljne upute za upotrebu putem sljedeće poveznice: http://www.bresser.de/download/stellarium
H | MOGUĆI OBJEKTI ZA PROMATRANJE
natural_image
Close-up grayscale image of the full moon showing craters and maria (no text or symbols)
natural_image
Close-up grayscale image of the Moon's surface showing craters and maria (no text or symbols)MJESEC
Mjesec je jedini prirodni Zemljin satelit. Putanja kruženja: oko 384 400 km udaljena od Zemlje Promjer: 3476 km Udaljenost: 384 401 km
natural_image
Circular grayscale image with a diffuse bright spot and faint central glow, resembling a celestial object or astronomical light source (no text or symbols)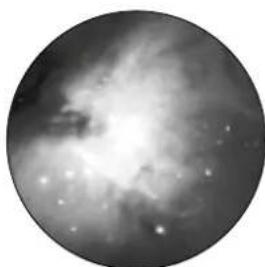
natural_image
Black-and-white astronomical image showing a nebula or starburst structure with bright spots (no text or symbols)ZVIJEŽDE ORION / M42
Rektascenzija: 05:32,9 (sati : minute) Deklinacija: -05:25 (stupanj : minute) Udaljenost: 1500 svjetlosnih godina
Sa svojom udaljenošću od približno 1500 svjetlosnih godina, Orionova maglica (M42) najsvjetlija je difuzna maglica na nebu - vidljiva je golim okom i vrijedan je objekt za teleskope svih veličina, od najmanjih dalekozora do najvećih zemaljskih opservatorija i svemirskog teleskopa Hubble.
natural_image
Two circular astronomical images showing a bright celestial object and a diffuse ring-like structure against a dark background (no text or symbols)ZVIJEŽDE LEIER / M57
Rektascenzija: 18:51,7 (sati : minute)
Deklinacija: +32:58 (stupanj : minute)
natural_image
Two circular astronomical images showing star fields and nebulae against a dark background (no text or symbols)ZVIJEŽDE LISICA / M27
Rektascenzija: 19:59,6 (sati : minute)
Deklinacija: +22:43 (stupanj : minute)
natural_image
Illustration of a blue telescope mounted on a tripod, no text or symbols visiblenatural_image
Mechanical component labeled 'Box I B' with a yellow arrow pointing to component A (no other text or symbols visible)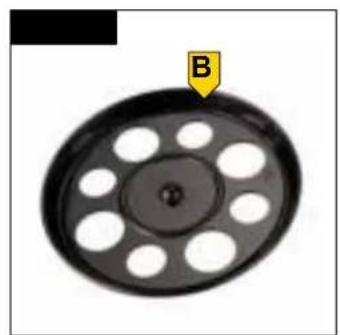
natural_image
Circular mechanical component with evenly spaced holes and a labeled arrow pointing to point B (no text or symbols beyond label)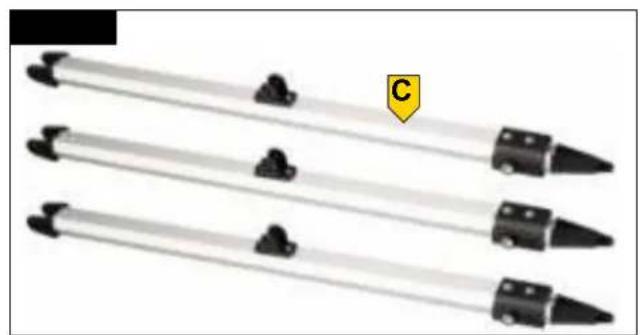
natural_image
Three identical black-and-white tool tips arranged horizontally, with a yellow label 'C' on the right (no text or symbols on the tips themselves)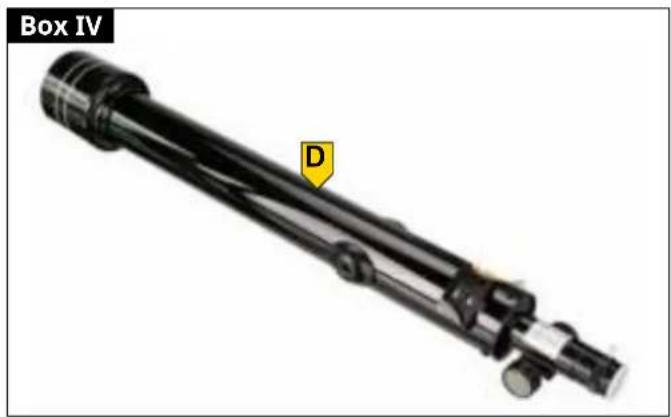
natural_image
Mechanical device labeled 'Box IV' with a yellow arrow pointing to component D (no other text or symbols visible)
natural_image
3D model of a handheld device labeled 'Box VI' with a yellow arrow pointing to the handle (no text or symbols on the device itself)
natural_image
Close-up of a yellow oval object with a black center and a small labeled arrow pointing to it, against a white background (no text or symbols)OBR. 2

INHALT
FEATURES
5
ABOUT THIS INSTRUCTION MANUAL 5
GENERAL SAFETY INSTRUCTIONS 5
SCOPE OF DELIVERY (FIG. 1) 6
PARTS LIST (FIG. 2) 6
A | SETTING UP THE TRIPOD AND MOUNTING THE ACCESSORY TRAY 6
B | FASTENING THE TELESCOPE IN THE MOUNT AND ALIGNING IT 7
C | ATTACHING ACCESSORIES FOR VISUAL OBSERVATION 7
D | FIRST OBSERVATION 8
E | ATTACHING OPTIONAL ACCESSORIES 8
F | MOUNTING THE SMARTPHONE HOLDER 8
G | ASTRO SOFTWARE 9
H | POSSIBLE OBSERVATION OBJECTS 9
CLEANING & MAINTENANCE 10
STORAGE 10
TROUBLESHOOTING 10
TECHNICAL DATA 10
DISPOSAL 11
ODTLAČOK
Bresser GmbH
Gutenbergstr. 2
46414 Rhede
Nemecko
www.bresser.de
natural_image
Close-up of a black pen with red arrows indicating movement or force direction (no text or symbols)

natural_image
Close-up of a black film reel with a red arrow pointing to a circular feature, no visible text or symbols
natural_image
Close-up of a tripod with a green arrow pointing to the base (no text or symbols visible)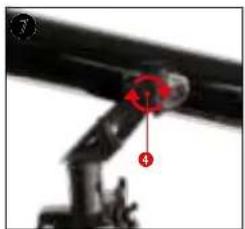
natural_image
Close-up of a mechanical arm joint with red annotation arrows (no visible text or symbols)

natural_image
Illustration of a cartoon character with a large telescope and a compass rose, no text or symbols present.natural_image
Close-up of a black mechanical device with a red indicator light and a numbered label (11) in the corner, no readable text or symbols on the device itself.
natural_image
Close-up of a mechanical device with a compass rose and green checkmark (no visible text or symbols)
natural_image
Close-up of a hand holding a black plastic clip and a yellow bag, with no visible text or symbols.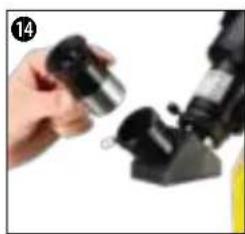
natural_image
Close-up of a hand holding a small mechanical component next to a black mechanical device (no visible text or symbols)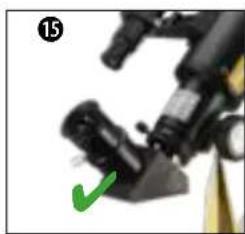
natural_image
Close-up of a mechanical device with a green checkmark pointing to a component (no visible text or symbols)ZÁKLADNÉ PRÍSLUŠENSTVO - HL'ADÁČIK, DIAGONÁLNE ZRKADLO A OKULÁRE
natural_image
Close-up of a mechanical component with red arrows indicating motion, no visible text or symbols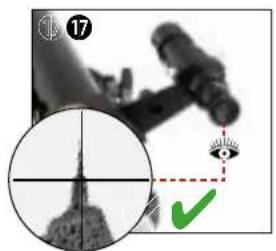
natural_image
Medical imaging scan showing a cross-sectional view of a human head with an eye and green checkmark (no text or symbols)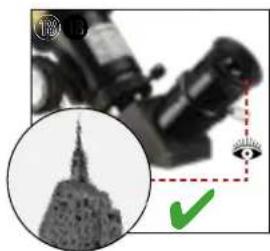
natural_image
Close-up of a microscope with a magnified inset showing a cityscape silhouette (no text or symbols visible)natural_image
Close-up of a black optical instrument with an orange and green checkmark overlay (no readable text or symbols)NEBEZPEČENSTVO SLEPTY!

natural_image
Close-up of a handheld device with a screen and cable (no visible text or symbols)natural_image
Close-up grayscale image of the full moon against a dark background (no text or symbols)
natural_image
Close-up grayscale image of the Moon's surface showing craters and maria (no text or symbols)MESIAC
natural_image
Circular grayscale image with a diffuse bright spot and faint central glow, resembling a celestial object or astronomical light source (no text or symbols)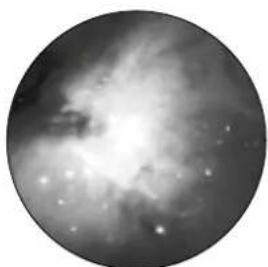
natural_image
Black-and-white astronomical image of a nebula or star field with bright central region and diffuse arms (no text or symbols)SÚHVEZDIE ORION / M42
Rektascenzia (RA): 05:32.9 (hodiny : minúty)
Deklinácia (DEC): 05:25 (stupne : minúty)
natural_image
Two circular astronomical images showing a bright celestial object and a diffuse ring-like structure against a dark background (no text or symbols)SÚHVEZDIE LEIER / M57
natural_image
Two circular grayscale astronomical images showing star fields and nebulae (no text or symbols)SÚHVEZDIE LIŠKA / M27
natural_image
Blue telescope on a tripod with visible optical components, no text or symbols present.SL. 1
natural_image
Mechanical component labeled 'Škatla I' with a yellow arrow pointing to component A (no other text or symbols visible)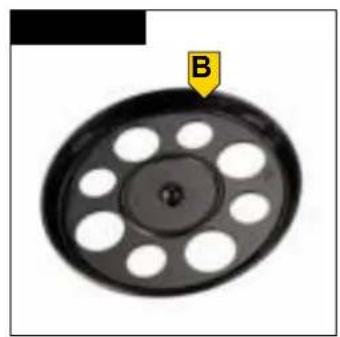
natural_image
Circular mechanical component with evenly spaced holes and a labeled arrow pointing to point B (no text or symbols on the object itself)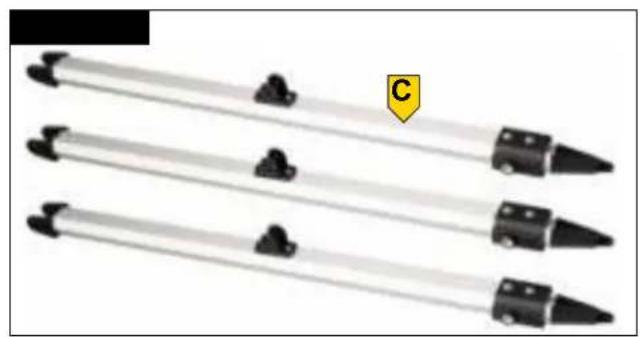
natural_image
Three identical black-and-white tool tips arranged vertically, with a yellow label 'C' on the right (no text or symbols on the tips themselves)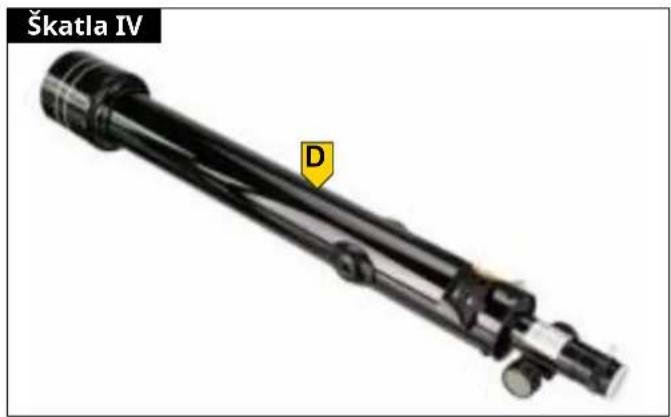
natural_image
Mechanical component labeled Škatla IV with a yellow warning symbol and letter D, shown without any readable text or symbols beyond the label.

natural_image
3D model of a mechanical tool with a labeled point P (no text or symbols on the object itself)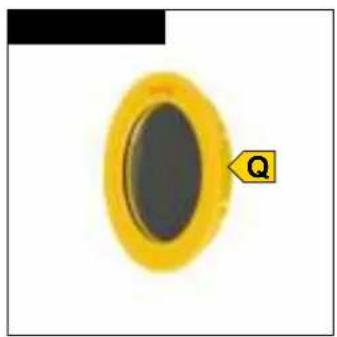
natural_image
Close-up of a yellow oval object with a black inner ring, labeled 'Q' with an arrow pointing to it (no other text or symbols)SL. 2
VSEBINA
LASTNOSTI
O TEH NAVODILIH ZA UPORABO 5
SPLOŠNI VARNOSTNI NAPOTKI 5
OBSEG DOBAVE 6
SEZNAM DELOV 6
A | POSTAVITEV STATIVA IN MONTAŽA ODLAGALNE POVRŠINE ZA OPREMO 7
B | PRITRDITEV TELESKOPA NA MONTAŽNO MESTO IN NJEGOVA USMERITEV 7
C | NAMESTITEV DODATNE OPREME ZA VIZUALNO OPAZOVANJE 7
D | PRVA OPAZOVANJA 8
E | NAMEŠČANJE POSEBNE DODATNE OPREME 8
F | NAMESTITEV DRŽALA ZA PAMETNI TELEFON 9
G | PROGRAMSKA OPREMA ZA ASTRONOMIJO 9
H | MOŽNI OBJEKTI ZA OPAZOVANJE 9
ČIŠČENJE IN VZDRŽEVANJE 10
SKLADIŠČENJE 10
ODPRAVLJANJE NAPAK 10
TEHNIČNI PODATKI 11
ODSTRANJEVANJE MED ODPADKE 11
IMPRESUM
Bresser GmbH
Gutenbergstr. 2
46414 Rhede
Nemčija
www.bresser.de
⚠️ NEVARNOST OSLEPITVE!
natural_image
Close-up of a black pen with red arrows indicating movement or force direction (no text or symbols)
natural_image
Close-up of a black film reel with a red arrow pointing to a circular component (no text or symbols visible)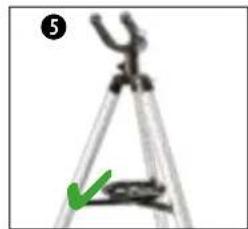
natural_image
Close-up of a tripod with a green arrow pointing to a small object, no visible text or symbols-
Tri krilate vijake (23) uvijte v navoj ohišja nog stativa (22) in jih ročno privijte.
-
Montažne vilice (18) treh nog stativa potisnite na montažne gredi (32) in jih s pritrdilnimi vijaki (17) namestite na montažni zatič (30).
natural_image
Close-up of a mechanical arm joint with red annotation arrows (no visible text or symbols)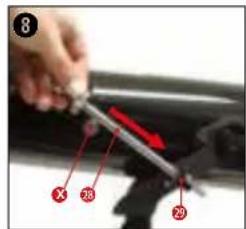

natural_image
Cartoon character holding a large object with a compass rose nearby (no text or symbols)natural_image
Close-up of mechanical components with no visible text or symbols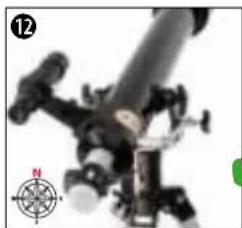
natural_image
Close-up of a mechanical device with a compass rose and a numbered label (12), no readable text or symbols present.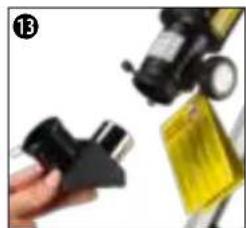
natural_image
Close-up of a hand holding a black mechanical component next to a yellow safety clip (no visible text or symbols)
natural_image
Close-up of a hand holding a small metallic object next to a black mechanical device (no visible text or symbols)
natural_image
Close-up of a mechanical device with a green checkmark indicating a detail (no visible text or symbols)OSNOVNA OPREMA - ISKALO, OGLEDALO ZA ZENIT IN OKULARJI
natural_image
Close-up of a mechanical component with red arrows indicating motion, no visible text or symbols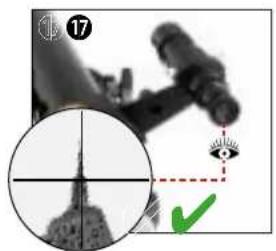
natural_image
Medical imaging scan showing a cross-sectional view of a human head with an eye and green checkmark (no text or symbols)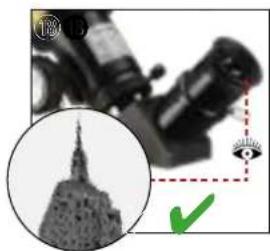
natural_image
Close-up of a microscope with a magnified inset showing a telescope tip and a green checkmark (no text or symbols)natural_image
Close-up of a microscope objective with an orange lens and eye, no visible text or symbolsNEVARNOST OSLEPITVE!
LEČA BARLOW IN/ALI ZRCALNA LEČA


natural_image
Close-up of mechanical components with a red circle highlighting a specific part, labeled 'BARLOW' (no other text or symbols visible)
natural_image
Close-up of a handheld device with a screen and cable, no visible text or symbolsnatural_image
Close-up grayscale image of the full moon showing visible craters and maria (no text or symbols)
natural_image
Close-up grayscale image of the Moon's surface showing craters and maria (no text or symbols)LUNA
Luna je edini naravni zemeljski satelit. Orbita: pribl. 384.400 km oddaljena od Zemlje Premer: 3.476 km Oddaljenost: 384.401 km
natural_image
Circular grayscale image with a diffuse bright spot and faint central glow, resembling a celestial object or astronomical light source (no text or symbols)
natural_image
Black-and-white astronomical image showing a nebula or starburst structure with bright spots (no text or symbols)OZVEZDJE ORION/M42
Rektascenzija: 05:32.9 (ure:minute) Deklinacija: -05:25 (stopinje:minute) Oddaljenost: 1.500 svetlobnih let
natural_image
Two circular astronomical images showing a bright celestial object and a diffuse ring-like structure against a dark background (no text or symbols)OZVEZDJE LEIER/M57
Rektascenzija: 18:51.7 (ure:minute)
Deklinacija: +32:58 (stopinje:minute)
natural_image
Two circular grayscale astronomical images showing star fields and nebulae (no text or symbols)OZVEZDJE LISIČKA/M27
Rektascenzija: 19:59.6 (ure:minute)
Deklinacija: +22:43 (stopinje:minute)
natural_image
Illustration of a blue telescope mounted on a tripod, no text or symbols visiblenatural_image
3D rendered mechanical component labeled 'Krabice I' with a yellow arrow pointing to component A (no other text or symbols)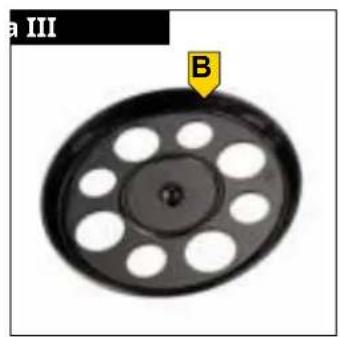
natural_image
Circular mechanical component with evenly spaced holes and a labeled point B (no text or symbols beyond label)
natural_image
Three identical cylindrical pens with black connectors and a yellow label 'C' on the right (no text or symbols on the pens themselves)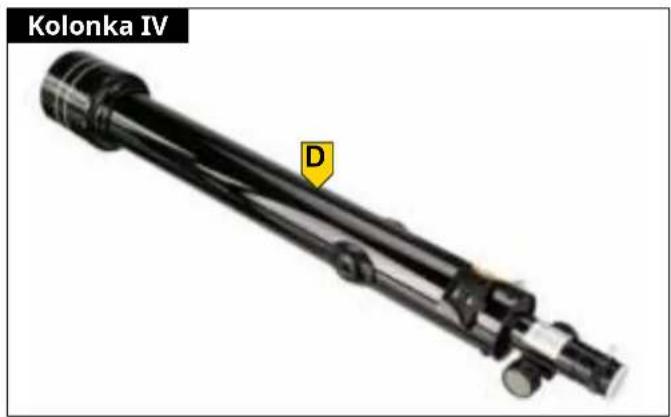
natural_image
Close-up of a yellow oval object with a black center and a small labeled arrow pointing to it, against a white background (no text or symbols)OBR. 2
OBSAH
VLASTNOSTI
O TOMTO NÁVODU K POUŽITÍ 5
OBECNÉ BEZPEČNOSTNÍ POKYNY 5
ROZSAH DODÁVKY (OBR. 1) 6
SEZNAM DÍLŮ (OBR. 2) 6
A | NASTAVENÍ STATIVU A MONTÁŽ ZÁSOBNÍKU PŘÍSLUŠENSTVÍ 6
B | UPEVNĚNÍ DALEKOHLEDU V DRŽÁKU A JEHO ZAROVNÁNÍ 7
C | UPEVNĚNÍ PŘÍSLUŠENSTVÍ PRO VIZUÁLNÍ POZOROVÁNÍ 7
D | PRVNÍ POZOROVÁNÍ 8
E | PŘIPOJENÍ VOLITELNÉHO PŘÍSLUŠENSTVÍ 8
F | MONTÁŽ DRŽÁKU SMARTPHONU 8
G | ASTRO SOFTWARE 9
H | MOŽNÉ POZOROVACÍ OBJEKTY 9
ČIŠTĚNÍ A ÚDRŽBA 10
SKLADOVÁNÍ 10
ODSTRAŇOVÁNÍ PROBLÉMŮ 10
TECHNICKÉ ÚDAJE 10
LIKVIDACE 11
OTISK
Bresser GmbH
Gutenbergstr. 2
46414 Rhede
Německo
www.bresser.de
natural_image
Close-up of a pen-like object with red arrows indicating movement or force (no text or symbols visible)

natural_image
Close-up of a black film reel with red circular annotation and arrow pointing to a small object (no text or symbols visible)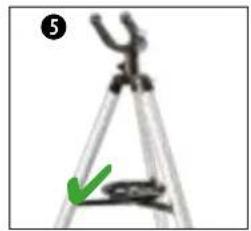
natural_image
Close-up of a tripod with a green arrow pointing to the base (no text or symbols visible)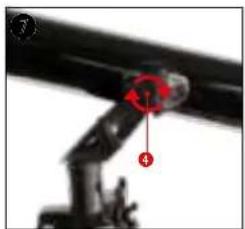
natural_image
Close-up of a mechanical arm joint with red annotation arrows (no readable text or symbols)
natural_image
Cartoon character holding a large telescope with a compass rose nearby (no text or symbols)natural_image
Close-up of mechanical components with a red indicator light (no visible text or symbols)
natural_image
Close-up of a mechanical device with a green checkmark and compass rose (no readable text or symbols)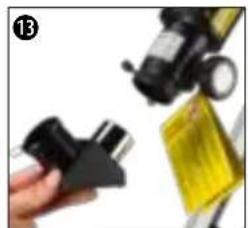
natural_image
Close-up of a hand holding a black plastic clip and a yellow tape measure (no visible text or symbols)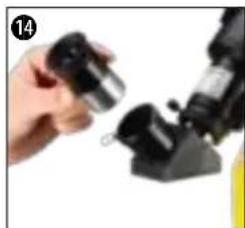
natural_image
Close-up of a hand holding a small mechanical component, possibly a tool or device (no visible text or symbols)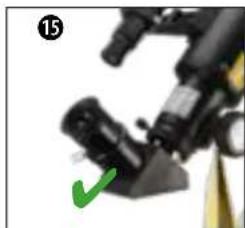
natural_image
Close-up of a mechanical device with a green checkmark pointing to a component (no visible text or symbols)ZÁKLADNÍ PŘÍSLUŠENSTVÍ - HLEDÁČEK, DIAGONÁLNÍ ZRCADLO A OKULÁRY
natural_image
Close-up of a mechanical component with red arrows indicating motion, no visible text or symbols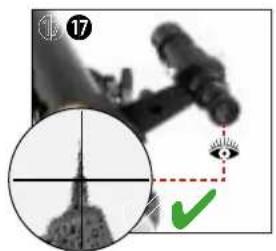
natural_image
Medical imaging scan showing a cross-sectional view of a human arm and an eye with a green checkmark (no text or symbols present)
natural_image
Close-up of a microscope with a magnified inset showing a telescope and a green checkmark (no text or symbols)natural_image
Close-up of a microscope objective with an orange and green eye icon, no visible text or symbolsNEBEZPEČÍ SLEPOTY!

natural_image
Close-up of a handheld device with a screen and cable, no visible text or symbolsnatural_image
Close-up grayscale image of the full moon showing visible craters and maria (no text or symbols)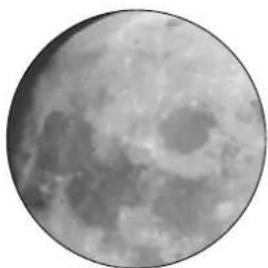
natural_image
Close-up grayscale image of the Moon's surface showing craters and maria (no text or symbols)MĚSÍC
natural_image
Circular grayscale image with a diffuse bright spot and faint central glow, resembling a celestial body or light source (no text or symbols)
natural_image
Circular grayscale astronomical image showing a bright nebula or starburst structure with diffuse dust clouds (no text or symbols)SOUHVĚZDÍ ORION/M42
natural_image
Two circular astronomical images showing a bright celestial object and a faint spiral galaxy against a dark background (no text or symbols)CONSTELLATION LEIER / M57
natural_image
Two circular grayscale astronomical images showing star fields and nebulae (no text or symbols)SOUHVĚZDÍ VIXEN/M27
Pravý vzestup (R.A): 19:59 .6 (hodiny: minuty)
natural_image
Illustration of a blue telescope mounted on a tripod, no text or symbols visibleЧл. No. 9618761000000
ФИГ. 1
natural_image
Mechanical component labeled 'Кутия I' with a yellow arrow pointing to component A (no other text or symbols visible)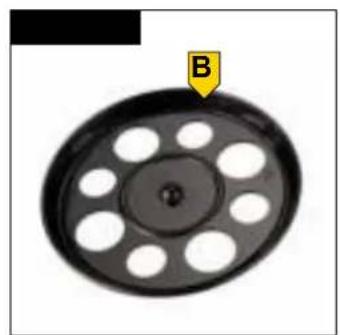
natural_image
Circular mechanical component with evenly spaced holes and a labeled arrow pointing to point B (no text or symbols beyond label)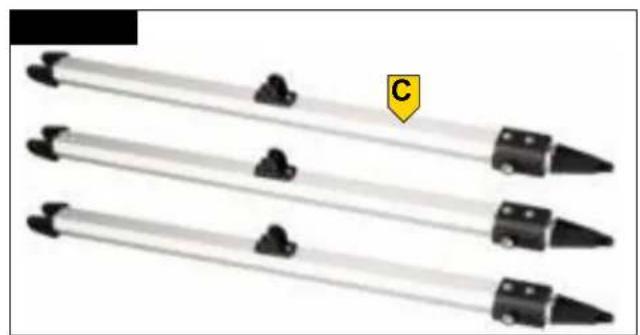
natural_image
Three identical black tool tips arranged horizontally on a white background, with a yellow label 'C' in the top right corner (no text or symbols on the tips themselves)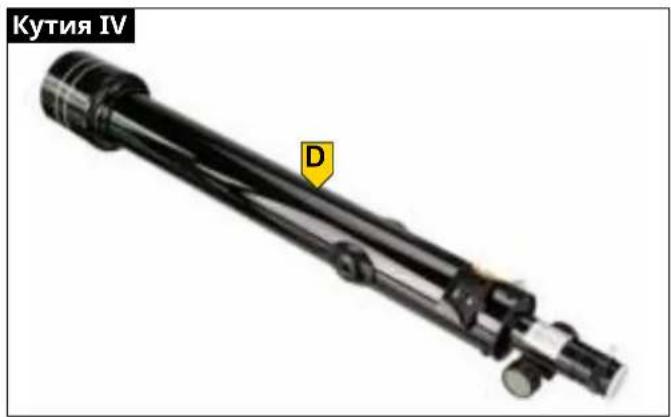
natural_image
Close-up of a yellow oval object with a black interior, labeled 'Q' with an arrow pointing to it (no other text or symbols)ФИГ. 2

СЪДЪРЖАНИЕ
ХАРАКТЕРИСТИКИ 5
natural_image
Close-up of a pen with red arrows indicating movement or force direction (no text or symbols)


natural_image
Close-up of a mechanical component with a red arrow pointing to a circular feature on a black circular plate (no text or symbols visible)
natural_image
Close-up of a tripod caliper with a green arrow pointing to the base (no text or symbols visible)
natural_image
Close-up of a mechanical arm joint with numbered parts (1, 4) and a red circular annotation (no readable text or symbols)

natural_image
Cartoon character holding a large telescope with a compass rose nearby (no text or symbols)natural_image
Close-up of mechanical components with a red star marker, no visible text or symbols
natural_image
Close-up of a mechanical device with a compass rose and green checkmark (no visible text or symbols)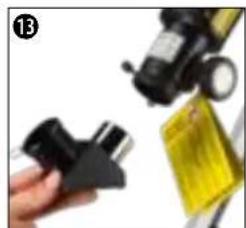
natural_image
Close-up of a hand holding a black plastic clamp next to a yellow bag and a small device (no visible text or symbols)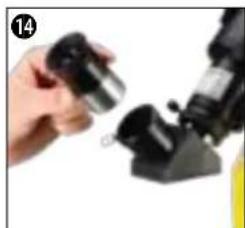
natural_image
Close-up of a hand holding a small metallic object next to a black mechanical component (no visible text or symbols)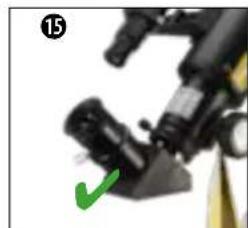
natural_image
Close-up of a mechanical device with a green checkmark pointing to a component (no visible text or symbols)natural_image
Close-up of a black mechanical component with red arrows indicating motion or force, no visible text or symbols
natural_image
Microscopic view of a microscope with an eye icon and a circular inset showing the U.S. Capitol Building (no text or symbols on the image itself)natural_image
Close-up of a microscope objective lens and an orange, with a green checkmark and dashed line indicating alignment (no text or symbols)
natural_image
Close-up of a handheld device with a screen and cable, no visible text or symbolsnatural_image
Close-up grayscale image of the full moon showing visible craters and maria (no text or symbols)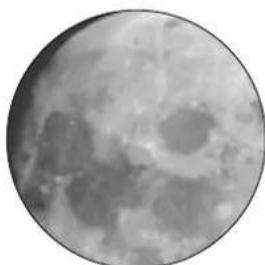
natural_image
Close-up grayscale image of the Moon's surface showing craters and maria (no text or symbols)ЛУНА
natural_image
Circular grayscale image with a diffuse bright spot, resembling a celestial body or light source against a dark background (no text or symbols)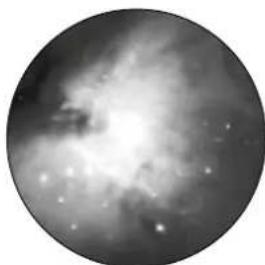
natural_image
Circular grayscale astronomical image showing a bright central region with diffuse surrounding structures and scattered stars (no text or symbols)СЪЗВЕЗДИЕ ORION / M42
natural_image
Two circular astronomical images showing a bright celestial object and a diffuse ring-like structure against a dark background (no text or symbols)СЪЗВЕЗДИЕ LEIER / M57
natural_image
Two circular grayscale astronomical images showing star fields and nebulae (no text or symbols)СЪЗВЕЗДИЕ VIXEN / M27
natural_image
Blue telescope mounted on a tripod with visible optical components (no text or symbols)SL. 1

SL. 2

SADRŽAJ
KARAKTERISTIKE
O OVOM UPUTSTVU ZA UPOTREBU 5
OPŠTE BEZBEDNOSNE NAPOMENE 5
OBIM ISPORUKE 6
LISTA DELOVA 6
A | POSTAVLJANJE STATIVA I MONTAŽA TACNE ZA DODATNU OPREMU 7
B | PRIČVRŠĆIVANJE I PORAVNANJE TELESKOPSKE CEVI U MEHANIZAM 7
C | POSTAVLJANJE DODATNE OPREME ZA VIZUELNO POSMATRANJE 7
D | PRVA POSMATRANJA 8
E | POSTAVLJANJE DODATNE OPREME 8
F | POSTAVLJANJE DRŽAČA ZA PAMETNI TELEFON 9
G | ASTRO-SOFTWARE 9
H | MOGUĆI OBJEKTI ZA POSMATRANJE 9
ČIŠĆENJE I ODRŽAVANJE 10
SKLADIŠTENJE 10
REŠAVANJE PROBLEMA 10
TEHNIČKI PODACI 11
ODLAGANJE NA OTPAD 11
BELEŠKA O IZDAVAČU
Bresser GmbH
Gutenbergstr. 2
46414 Rhede
Nemačka
www.bresser.de
O OVOM UPUTSTVU ZA UPOTREBU
NAPOMENA
Ovo uputstvo za upotrebu treba smatrati sastavnim delom uređaja.
Pre upotrebe ovog uređaja, pažljivo pročitajte bezbednosne napomene i uputstvo za upotrebu. Čuvajte ovo uputstvo za upotrebu na sigurnom mestu za kasniju upotrebu. Ako se uređaj prodaje ili deli sa drugima, uputstvo za upotrebu mora biti prosleđeno novom vlasniku / korisniku proizvoda.
OPŠTE BEZBEDNOSNE NAPOMENE

OPASNOST OD GUBITKA VIDA!
- Nemojte nikada da gledate direktno u sunce ili oblast u blizini sunca korišćenjem ovog uređaja bez odgovarajućeg solarnog filtera! Direktna sunčeva svetlost izaziva ozbiljno oštećenje očiju ili čak slepilo nakon samo nekoliko sekundi.
- Kada posmatrate Sunce, uklonite cev tražioca i pre početka posmatranja postavite samo isporučeni solarni filter ispred sočiva objektiva. Obavezno pogledajte zasebno uputstvo za upotrebu solarnog filtera!

OPASNOST OD GUŠENJA!
- Materijal za pakovanje (plastične kese, gumene trake itd.) držati dalje od dece!
- Sadrži sitne delove koji se mogu proguutati.

OPASNOST OD POŽARA!
natural_image
Close-up of a black mechanical component with red arrows indicating movement or force direction (no text or symbols)
natural_image
Close-up of a film reel with a red arrow pointing to a circular button on its side (no text or symbols visible)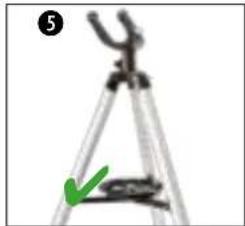
natural_image
Close-up of a tripod caliper with a green checkmark indicating a measurement (no text or symbols)- Zavrnite tri krilna zavrtnja (23) u navoje priključka za stativ (22) i zategnite ručno.
- Gurnite montažne viljuške (18) tri nogice stativa na montažnu osovinu (32) i pričvrstite zavrtnjima za pričvršćivanje (17) na montažnu šipku (30).
VAŽNO: Pazite da tokom montaže montažna šipka (24) bude okrenuta nadole, a glava šestougaonog zavrtnja (17A) ulazi u odgovarajuće udubljenje na montažnoj viljušci. - Uklonite male zavrtnje za pričvršćivanje (25) na krajevima kraka stativa (26) i odložite ih tako da budu pri ruci. Stavite krakove stativa (26) na montažnu šipku (24) i pričvrstite ih prethodno uklonjenim zavrtnjima za pričvršćivanje.
VAŽNO: Pazite da prilikom montaže centralni navoj (26B) kraka stativa bude okrenut prema gore u smeru montažne viljuške (30). - Postavite stativ vertikalno na čvrstu, po mogućstvu ravnu površinu, tako da stoji ravno i stabilno. Zavrnite tacnu za dodatnu opremu (27) u centralni navoj (26B).
- Osnova teleskopa sa stativom, mehanizmom i tacnom za dodatnu opremu je sada spremna za rad.
NAPOMENA: Vrhovi nogica stativa mogu da nadoknade male neravnine na podu. U slučaju većih neravnina, visina nogica stativa se može podešavati nezavisno. Da biste to uradili, malo otpustite leptir zavrtnje (23) na priključcima za stativ (22) i malo razdvojite ili gurnite donje delove stativa dalje jedan od drugog. Nakon toga, ponovo ručno zategnite krilne zavrtnje (23). Postavite libelu na tacnu za dodatnu opremu da biste proverili da li je u horizontalnom položaju.
B | PRIČVRŠĆIVANJE I PORAVNANJE TELESKOPSKE CEVI U MEHANIZAM

natural_image
Close-up of a mechanical arm joint with red annotation arrows indicating specific points (no text or symbols present)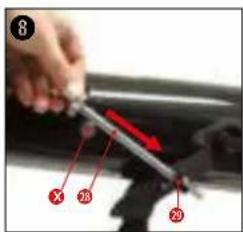
natural_image
Illustration of a cartoon character with a telescope and compass (no text or symbols)natural_image
Close-up of mechanical components with a red accent, no visible text or symbols
natural_image
Close-up of a mechanical device with a green checkmark and compass rose (no readable text or symbols)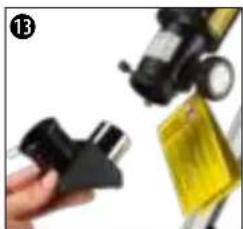
natural_image
Close-up of a hand holding a black plastic clip and a yellow bag, with no visible text or symbols.
natural_image
Close-up of a hand holding a small metallic object next to a black mechanical component (no visible text or symbols)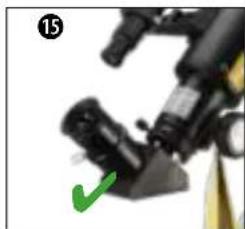
natural_image
Close-up of a mechanical device with a green checkmark pointing to a component (no visible text or symbols)OSNOVNA DODATNA OPREMA - TRAŽILAC, AMIČI PRIZMA I OKULARI
- Umetnite cev tražioca (6) sa držačem tražioca (6A) u papučicu tražioca (7) na optičkom tubusu (2).
- Cev tražioca (6) je pravilno postavljena ako su sočivo objektiva (3) i objektiv tražioca (5) usmereni u istom smeru.
- Otpustite zavrtanj za fiksiranje (13) na prstenu za izvlačenje (14) da biste uklonili zaštitni poklopac i da se otvor fokusera (15) ne bi blokirao. Umetnite Amiči prizmu (12) u fokuser (15) i ručno zategnite zavrtanj za fiksiranje (13) na prstenu za izvlačenje (14).
- Otpustite zavrtanj za fiksiranje (11) na Amiči prizmi (12) tako da njen otvor ne bude blokiran. Postavite okular (10) u Amiči prizmu (12) i ručno zategnite zavrtanj za fiksiranje (11) na Amiči prizmi (12).
SAVET! Svako posmatranje započnite okularom manjeg uvećanja. Ovde važi: Što je veća žižna daljina u mm, to je manje uvećanje. Primer: okular od 10 mm pruža manje uvećanje od okulara od 4 mm
natural_image
Close-up of a mechanical component with red arrows indicating motion, no visible text or symbols

natural_image
Close-up of a microscope with an inset image of a landmark tower and a green checkmark (no readable text or symbols)- Uklonite poklopac za zaštitu od prašine (1A) sa poklopca za rosu (1).
- Poravnajte ceo teleskop sa objektom koji gledate. Posmatrajte kroz okular tražioca (8) i horizontalnim i vertikalnim podešavanjem teleskopa podesite objekat u centar vidnog polja (krstić). Ako je potrebno, oštrina slike može se podesiti pomoću prstena za fokusiranje na okularu tražioca (8).
- Pri posmatranju kroz okular (10), objekat se vidi uvećano. Ako je potrebno, oštrina slike se može podesiti pomoću točkića za fokusiranje (16).
D-2 POSMATRANJE SUNCA

natural_image
Close-up of a black mechanical device with an orange and green circular inset showing a green checkmark (no text or symbols)OPASNOST OD GUBITKA VIDA!
- Nemojte nikada da gledate direktno u sunce ili oblast u blizini sunca korišćenjem ovog uređaja bez odgovarajućeg solarnog filtera! Direktna sunčeva svetlost izaziva ozbiljno oštećenje očiju ili čak slepilo nakon samo nekoliko sekundi.
-
Kada posmatrate Sunce, uklonite cev tražioca i pre početka posmatranja postavite samo isporučeni solarni filter ispred sočiva objektiva. Obavezno pogledajte zasebno uputstvo za upotrebu solarnog filtera!
-
Potpuno odvojite cev tražioca (6) od optičkog tubusa (2).
- Uklonite poklopac za zaštitu od prašine (1A) sa poklopca za rosu (1). Postavite solarni filter (K) na poklopac za rosu (1) umesto poklopca za zaštitu od prašine (1A).
- Kada se gleda kroz okular (10), Sunce se vidi uvećano. Ako je potrebno, oštrina slike se može podesiti pomoću točkića za fokusiranje (16).
E | POSTAVLJANJE DODATNE OPREME
BARLOW OBJEKTIV I/ILI AMIČI OBJEKTIV

natural_image
Close-up of mechanical components with a red circle highlighting a specific part, labeled 'BANLOW' (no other text or symbols visible)
natural_image
Close-up of a handheld device with a screen and cable, no visible text or symbolsDržač za pametni telefon (P) se montira u direktnom vidnom polju posmatrača.
-
Držeći optički tubus (2) jednom rukom, istovremeno odvrnite jedan od dva zavrtnja za fiksiranje (4) na montažnoj viljušci (30) i odložite ga tako da bude pri ruci. Umetnite zavrtanj za fiksiranje (4) u rupu na kraju držača pametnog telefona (P) i u rupu na montažnoj viljušci (30) i ponovo ga zavrnite na optički tubus (2).
-
Umetnite pametni telefon u krak držača za pametni telefon. Otvorite aplikaciju na pametnom telefonu i savijte pokretni krak držača kako biste osigurali željeni položaj za posmatranje.
G | ASTRO-SOFTWARE
Za bolju orijentaciju na noćnom nebu, na našoj internet platformi postavljamo astro softver „Stellarium“ koji je dostupan za preuzimanje. Preuzmite softver i detaljno uputstvo za upotrebu na sledećem veb linku: http://www.bresser.de/download/stellarium
H | MOGUĆI OBJEKTI ZA POSMATRANJE
U nastavku smo odabrali i objasnili neka veoma zanimljiva nebeska tela i zvezdana jata. Pogledajte priložene ilustracije da biste videli kako ćete videti objekte kroz teleskop pomoću isporučenih okulara (levo 20 mm, desno 4 mm) pri dobrim uslovima posmatranja:

natural_image
Close-up grayscale image of the full moon showing visible craters and maria (no text or symbols)
natural_image
Close-up grayscale image of the Moon's surface showing craters and maria (no text or symbols)MESEC
Mesec je jedini Zemljin prirodni satelit
Orbita: oko 384.400 km od Zemlje
Prečnik: 3.476 km
Udaljenost: 384.401 km
natural_image
Circular grayscale image with a diffuse bright spot and a faint central glow, no text or symbols present.
natural_image
Circular grayscale astronomical image showing a bright central region surrounded by diffuse nebulae and scattered stars (no text or symbols)SAZVEŽDE ORION / M42
Rektascenzija: 05:32.9 (sati : minuti)
Deklinacija: -05:25 (stepeni : minuti)
Udaljenost: 1.500 svetlosnih godina
Na udaljenosti od oko 1500 svetlosnih godina, Orionova maglina (M42) je najsajnija difuzna maglina na nebu, vidljiva golim okom, i vredan objekat za posmatranje teleskopima svih veličina, od najmanjih dvogleda do najvećih opservatorija na zemlji i Hubble Space teleskopa.
Ona predstavlja glavni deo mnogo većeg oblaka vodonika i prašine čija veličina dostiže 10 stepeni, što je više od polovine sazvežđa Orion. Širina ovog ogromnog oblaka je nekoliko stotina svetlosnih godina.
natural_image
Two circular astronomical images showing a bright celestial object and a diffuse ring-like structure against a dark background (no text or symbols)SAZVEŽDE LIRA / M57
Rektascenzija: 18:51.7 (sati : minuti)
Deklinacija: +32:58 (stepeni : minuti)
Udaljenost: 4.100 svetlosnih godina
Čuvena prstenasta maglina M57 u sazveždu Lira često se smatra prototipom planetarne magline; ona je jedan od dragulja letnjeg neba na severnoj hemisferi. Najnovija istraživanja su pokazala da je to najverovatnije prsten (torus) svetle svetleće materije koja okružuje centralnu zvezdu (vidljiva samo većim teleskopima), a ne sferna ili elipsoidna gasovita struktura. Ako se ova prstenasta maglina posmatra iz bočne ravne, ona liči na maglinu Dambel M27. Kod ovog objekta gledamo pravo na pol magline.

natural_image
Two circular grayscale astronomical images showing star fields and nebulae (no text or symbols)SAZVEŽDE LISICA / M27
Rektascenzija: 19:59.6 (sati : minuti)
Deklinacija: +22:43 (stepeni : minuti)
Udaljenost: 1.250 svetlosnih godina
Maglina Dambel M27 ili „teg“ u sazvežđu Lisica je prva otkrivena planetarna maglina. Dana 12. jula 1764. godine, Šarl Mesje je otkrio ovu novu i fascinantnu klasu objekata. Ovaj objekat vidimo skoro baš od njegove ekvatorijalne ravni. Ako biste Dambel maglinu videli sa jednog od polova, verovatno bi imala oblik prstena i ličila bi na oblik koji poznajemo kod prstenaste magline M57.
Please contact the service centre fi rst for any questions regarding the product or claims, preferably by e-mail.
E-Mail: service@bresseruk.com
Telephone*: +44 1342 837 098
BRESSER UK Ltd.
Suite 3G, Eden House
Enterprise Way
Edenbridge, Kent TN8 6HF
Great Britain
*Number charged at local rates in the UK (the amount you will be charged per phone call will depend on the tariff of your phone provider); calls from abroad will involve higher costs.
FR BE

- INHALT
- ERBLINDUNGSGEFAHR!
- MOND
- Refractor telescope with azimuthal mount
- TABLE OF CONTENTS
- FEATURES
- IMPRINT
- VALIDITY NOTE
- ABOUT THIS INSTRUCTION MANUAL
- NOTE
- GENERAL SAFETY INSTRUCTIONS
- ⚠️ DANGER OF BLINDNESS!
- ⚠️ DANGER OF SUFFOCATION!
- ! FIRE HAZARD!
- ⚠️ DANGER OF PROPERTY DAMAGE!
- SCOPE OF DELIVERY (FIG. 1)
- PARTS LIST (FIG. 2)
- A | SETTING UP THE TRIPOD AND MOUNTING THE ACCESSORY TRAY
- B | FASTENING THE TELESCOPE IN THE MOUNT AND ALIGNING IT
- C | ATTACHING ACCESSORIES FOR VISUAL OBSERVATION
- BASIC ACCESSORIES - VIEWFINDER, DIAGONAL MIRROR AND EYEPIECES
- D | FIRST OBSERVATION
- D-1 LAND OBSERVATION
- D-2 SOLAR OBSERVATION
- DANGER OF BLINDNESS!
- E | ATTACHING OPTIONAL ACCESSORIES
- BARLOW LENS AND/OR ERECTING LENS
- F | MOUNTING THE SMARTPHONE HOLDER
- G | ASTRO SOFTWARE
- H | POSSIBLE OBSERVATION OBJECTS
- MOON
- CONSTELLATION ORION / M42
- CONSTELLATION LEIER / M57
- CONSTELLATION VIXEN / M27
- CLEANING & MAINTENANCE
- STORAGE
- DISPOSAL
- TABLE DES MATIÈRES
- CARACTÉRISTIQUES
- ACCESSOIRES DE BASE - VISEUR, MIROIR DIAGONAL ET OCULAIRES
- H | OBJETS D'OBSERVATION POSSIBLES
- LUNE
- CARATTERISTICHE
- ACCESSORI DI BASE: MIRINO, SPECCHIO DIAGONALE E OCULARI
- PERICOLO DI CECITÀ!
- LUNA
- CONSTELLATION LEIER/M57
- CONSTELLATION VIXEN/M27
- SADRŽAJ
- SVOJSTVA
- OSNOVNI PRIBOR - TRAŽILO, ZENITNO ZRCALO I OKULARI
- D-2 PROMATRANJE SUNCA
- OPASNOST OD OSLJEPLJENJA!
- E | POSTAVLJANJE POSEBNOG PRIBORA
- BARLOW LEĆA I/ILI LEĆA ZA OKRETANJE SLIKE
- G | ASTRONOMSKI SOFTVER
- H | MOGUĆI OBJEKTI ZA PROMATRANJE
- MJESEC
- ZVIJEŽDE ORION / M42
- ZVIJEŽDE LEIER / M57
- ZVIJEŽDE LISICA / M27
- 2
- ABOUT THIS INSTRUCTION MANUAL 5
- GENERAL SAFETY INSTRUCTIONS 5
- SCOPE OF DELIVERY (FIG. 1) 6
- PARTS LIST (FIG. 2) 6
- CLEANING & MAINTENANCE 10
- ODTLAČOK
- ZÁKLADNÉ PRÍSLUŠENSTVO - HL'ADÁČIK, DIAGONÁLNE ZRKADLO A OKULÁRE
- NEBEZPEČENSTVO SLEPTY!
- MESIAC
- SÚHVEZDIE ORION / M42
- SÚHVEZDIE LEIER / M57
- SÚHVEZDIE LIŠKA / M27
- VSEBINA
- LASTNOSTI
- IMPRESUM
- ⚠️ NEVARNOST OSLEPITVE!
- OSNOVNA OPREMA - ISKALO, OGLEDALO ZA ZENIT IN OKULARJI
- NEVARNOST OSLEPITVE!
- LEČA BARLOW IN/ALI ZRCALNA LEČA
- OZVEZDJE ORION/M42
- OZVEZDJE LEIER/M57
- OZVEZDJE LISIČKA/M27
- OBSAH
- VLASTNOSTI
- OTISK
- ZÁKLADNÍ PŘÍSLUŠENSTVÍ - HLEDÁČEK, DIAGONÁLNÍ ZRCADLO A OKULÁRY
- NEBEZPEČÍ SLEPOTY!
- MĚSÍC
- SOUHVĚZDÍ ORION/M42
- SOUHVĚZDÍ VIXEN/M27
- СЪДЪРЖАНИЕ
- ХАРАКТЕРИСТИКИ 5
- ЛУНА
- СЪЗВЕЗДИЕ ORION / M42
- СЪЗВЕЗДИЕ LEIER / M57
- СЪЗВЕЗДИЕ VIXEN / M27
- KARAKTERISTIKE
- LISTA DELOVA 6
- BELEŠKA O IZDAVAČU
- O OVOM UPUTSTVU ZA UPOTREBU
- NAPOMENA
- OPŠTE BEZBEDNOSNE NAPOMENE
- OPASNOST OD GUBITKA VIDA!
- OPASNOST OD GUŠENJA!
- OPASNOST OD POŽARA!
- B | PRIČVRŠĆIVANJE I PORAVNANJE TELESKOPSKE CEVI U MEHANIZAM
- OSNOVNA DODATNA OPREMA - TRAŽILAC, AMIČI PRIZMA I OKULARI
- D-2 POSMATRANJE SUNCA
- E | POSTAVLJANJE DODATNE OPREME
- BARLOW OBJEKTIV I/ILI AMIČI OBJEKTIV
- G | ASTRO-SOFTWARE
- H | MOGUĆI OBJEKTI ZA POSMATRANJE
- MESEC
- SAZVEŽDE ORION / M42
- SAZVEŽDE LIRA / M57
- SAZVEŽDE LISICA / M27
- BRESSER UK Ltd.
- FR BE
Brand : BRESSER
Model : Skylux 60/700 AZ
Category : Telescope