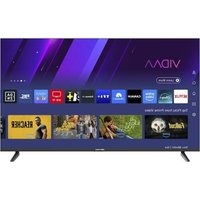
USER MANUAL ED40A06FHD-RE EDENWOOD
natural_image
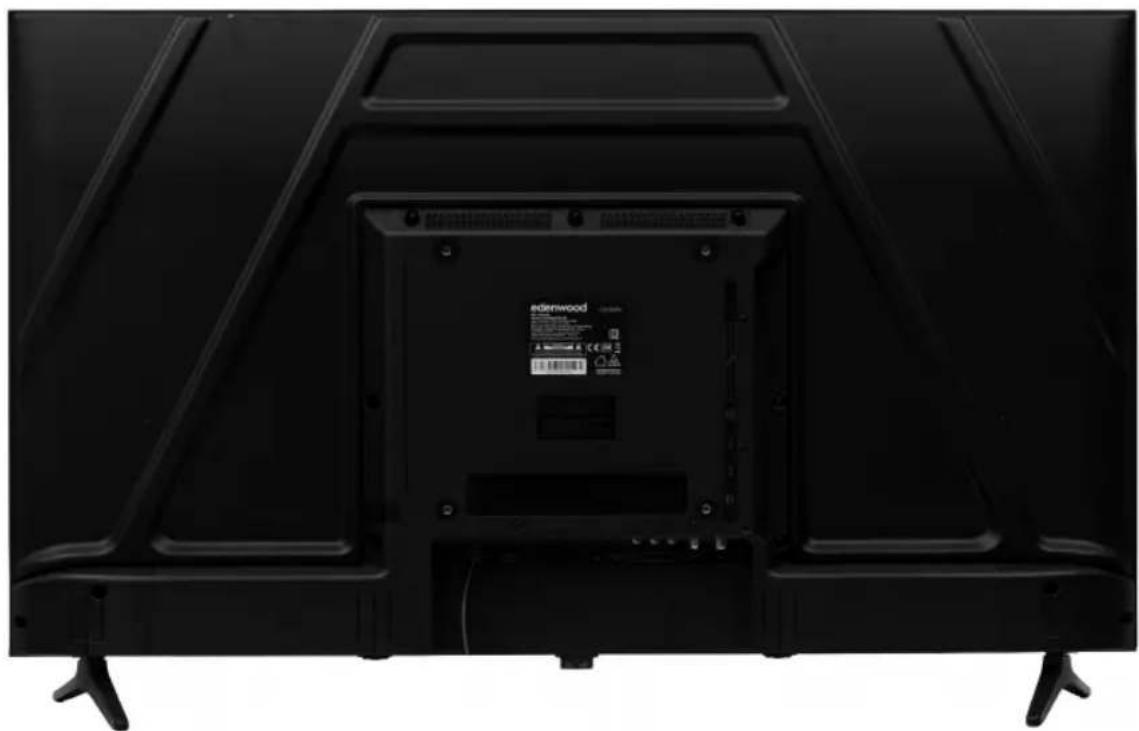
Back view of a black electronic TV unit with visible rear panels and a back panel, no text or symbols on the device itself.

NOTE:
The illustrations in this manual are for reference purpose only. As our products are subject to continual improvement, the appearance, color and functional parts of your actual product may vary from the illustrations.
Thank you!
Thank you for choosing this EDENWOOD product. EDENWOOD products are chosen, tested, and recommended by ELECTRO DEPOT, so you can be sure you are getting a top-quality, easy-to-use product that won't let you down. We're confident your new device will be a pleasure to use every day!
Welcome to ELECTRO DEPOT.
Table of Contents

Product overview
Specifications
Data Sheet
Licensing Information's
Safety Instructions
Symbols on the TV
CE Declaration of Conformity

Product usage
Contents in the packaging and accessories
Control Panel
Installing the Stands
Wall Mounting Instructions
Connection Cables
Remote control
Basic Usage
Parental Controls
Live TV
Connection
Multi-screen
Smart Functions
Picture & Sound
Accessibility
System & Support

Cleaning and maintenance
Cleaning and maintenance
Troubleshooting
Technical Information
| Model | ED40A06FHD-RE |
| Lifetime | 30.000 hours |
| Tuner | DVB - C/T/T2/S2 |
| TV power supply | Ac 100-240V, 50/60HZ |
| Consumption | Max. 75W |
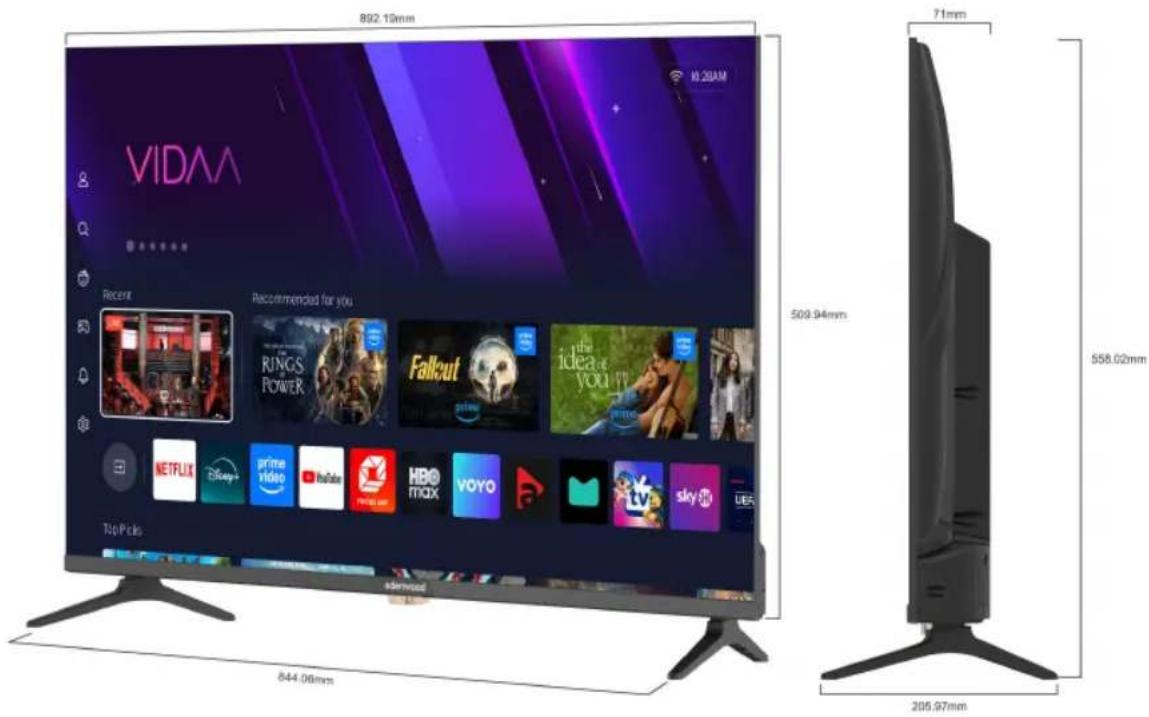
| Dimensions | 892 (W) x 206 (D) x 558 (H) mm |
| Weight | Approx. 4.2 Kg |
| Operating temperature | 5°C to 40°C |
| Remote control power supply: | AAA*2pcs (not provided) |
| Usb port power supply | 5V, 500mA |
| Hotel Mode: | Yes |
| Loudspeaker | Earphone, Optical out |
| Input: | RF*2, HDMI*3, AV IN, LAN, CI, USB*2 |
| Output | 2*10W |
Data Sheet
Information for Electronic Displays for Commission Regulation 2019/2013
| Value | Unit |
| Model identification | ED40A06FHD-RE |
| Manufacturer's name or trademark | EDENWOOD |
| Energy efficiency class for standard Dynamic Range (SDR) | E | A-G |
| On mode power demand for Standard Dynamic Range (SDR) | 36kWh/1000h | W |
| Energy efficiency class (HDR) | - | A-G |
| On mode power demand in High Dynamic Range (HDR) mode | - | W |
| Off mode, power demand | 0 | W |
| Standby mode power demand | 0.2 | W |
| Networked standby mode power demand | - | W |
| Electronic display category | television | television/monitor/signage/other |
| Size ratio | 16:9 | Integer |
| Screen resolution (pixels) | 1920x1080 | Pixels |
| Screen diagonal | 101,6 | cm |
| Screen diagonal | 40" | Inches |
| Visible screen area | 42.6 dm2 | |
| Panel technology used | LED LCD | E.g. LCD/LED LCD/QLED LCD/OLED/MicroLED/QDLED/SED / FED/EPD, etc. |
| Automatic Brightness Control (ABC) available | No | Yes/No |
| Voice recognition sensor available | No | Yes/No |
| Room presence sensor available | No | Yes/No |
| Image refresh frequency rate | 60Hz | Hz |
| Power supply type: | Internal | Internal/External/Standardised |
| WiFi (Wireless) Frequency | 2400 - 2483 MHz |
| Maximun transmitted Wi-Fi power | 2.4G: ≥ 13dBm |
A
Product overview
- Energy efficiency class is designated by letters ranging from A (very economical) to G (not very economical).
- TV consumption is based on 1000 hours usage. Actual power consumption may vary depending on run time and contrast or brightness settings.
The product information sheet in accordance with EU Regulation No. 2019/2013 Energy labelling for electronic signage and TV can be found under the URL or QR code shown on the URL of the energy label:
Auto Standby
To save energy, the consumption of this product has been reduced in operation and standby. In addition, if no operation is performed for four consecutive hours, the device will automatically switch to standby mode.

Digital Video
Broadcasting
DVB and the DVB logo are trademarks of the DVB Project.

HIGH-DEFINITION MULTIMEDIA INTERFACE
The terms HDMI, HDMI High Definition Media Interface and HDMI Trade Dress, and HDMI logos are trademarks and registered trademarks of HDMI Licensing Administrator, Inc.
Dolby Audio
Manufactured under license from Dolby Laboratories.
Dolby, Dolby Audio, and the double-D symbol are registered trademarks of Dolby Laboratories Licensing Corporation.

Disney+ subscription required, see terms at https://www.disneyplus.com.
©2025 Disney and its related entities.
NETFLIX
Netflix streaming membership required. 4K Ultra HD and HDR availability subject to your subscription plan, Internet service, device capabilities, and content availability.
www.netflix.com/TermsOfUse
prime video
©2025 Amazon.com, Inc. or its affiliates. Amazon, Prime Video, and all related marks are trademarks of Amazon.com, Inc. or its affiliates. Amazon Prime membership or Prime Video fees apply. See primevideo.com/terms for details.
Safety Instructions
WARNING!
To reduce the risk of fire or electric shock, do not expose this product to water, rain, or moisture. To reduce the risk of electric shock, do not remove the casing or back panel from this product. In the event of a product failure, only qualified personnel can carry out the repair. No part contained inside can be repaired by the user.
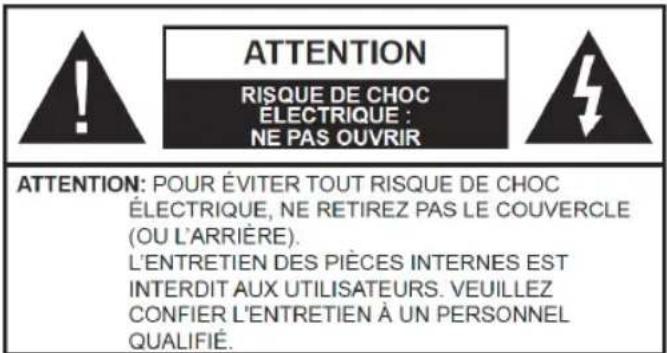

WARNING!
Dangerous voltage inside the product! Do not open. Risk of electrocution! No internal parts can be repaired by the user. Only qualified personnel can repair and maintain this product.
If the power cable is damaged, it should be replaced by the manufacturer or an authorized service agent to avoid danger.
This product must be installed in accordance with local standards. Damaged batteries must be disposed of properly. In order to protect the environment, please dispose of batteries properly in accordance with applicable local laws (this information is available from your dealer).
A Product overview
Where to install the product
-Place the device on a flat, rigid, stable surface. Do not place the appliance on a rug or carpet.
- Do not place the device on top of any other product that could cause overheating (e.g., a receiver or amplifier).
- Do not place anything underneath the product (e.g., CDs or magazines).
Adequate ventilation
-Place the product in a sufficiently ventilated area to avoid overheating. To avoid overheating, leave at least 10 cm in front and behind the product, and 5 cm on each side.
-Minimum distance around the appliance for sufficient ventilation: 10 cm Ventilation should not be hindered by the obstruction of the ventilation openings by objects such as newspapers, tablecloths, curtains, etc.
Do not expose the product to high temperatures, moisture, water, or dust.
-The device is intended for use in a temperate climate.
-The appliance should not be exposed to dripping water or splashing. No liquid-filled objects such as vases should be placed on the appliance.
-Never place an object containing liquid, such as a vase, near the appliance.
- Do not place any other object that could damage it near the product (e.g., objects containing water or lit candles).
-Never place open flame sources, such as lit candles, on the appliance.
Power supply
-Please unplug the appliance in case of prolonged non-use.
-If the power cable is damaged, it should be replaced by the manufacturer or an authorized service agent to avoid danger.
-This product must be connected to a power supply of 100-240 V \~ 50/60 Hz.
-The socket plug must remain easily accessible.
-The appliance must be connected to an electrical outlet equipped with a ground.
- To avoid high sound pressure and risk of hearing damage, do not listen at a high sound level for a long time.

WARNING!
A television set is likely to fall and cause serious bodily injury or death. Many injuries, especially on children, can be prevented by taking simple precautions such as:
- ALWAYS use the boxes, brackets, or mounting methods recommended by the TV manufacturer.
- ALWAYS use only furniture that can support the TV in a secure manner.
- ALWAYS make sure that the TV does not protrude from the edge of the furniture that supports it.
- ALWAYS teach children the dangers of climbing on furniture to reach the TV or its controls.
- ALWAYS route cords and cables connected to your TV so that you don't step on, pull or tear them off.
- NEVER place a TV in an unstable area.
- NEVER place the TV on tall furniture (e.g., cabinets or bookcases) without hanging the stand and TV on a suitable stand.
- NEVER place the TV on fabric or other materials that may be between the TV and the furniture that supports it.
- NEVER place objects that could entice children to climb on the TV or the furniture on which it is placed (a toy or the remote control, for example).
If an existing TV is to be moved, the same considerations should be applied as above.
- Warn children about the dangers of climbing on the furniture to reach the TV or its control buttons.
- Before moving the TV to a different location, keep in mind and apply all the following safety instructions.
Changing certain parts of your appliance may result in a hazard. Make sure you have all the required skills and tools to perform self-healing operations safely. If not, call a licensed professional.
Symbols on the TV
| CE | This marking indicates that the unit complies with the European Radio Equipment Directive. |
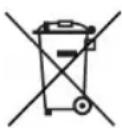 | This logo on the product means that the recycling of this device is in line with Directive 2012/19/EU of 4 July 2012 on waste electrical and electronic equipment (WEEE Directive). |
 | This symbol indicates DC voltage (for USB only). |
 | This symbol indicates AC voltage. |
 | This symbol indicates that the operating instructions supplied with the appliance contain important instructions for the use and maintenance of the appliance. |
 | This symbol indicates that a dangerous voltage with a risk of electric shock is present in this unit. |
 | This symbol reads "Indoor use only". |
 | Class II Equipment: This symbol indicates that the unit is double-insulated. |
 | Cadmium Free |
  | The terms HDMI, HDMI High Definition Media Interface and HDMI Trade Dress, and HDMI logos are trademarks and registered trademarks of HDMI Licensing Administrator, Inc |
CE
This TV-type device complies with the essential requirements and other provisions of Directive 2014/35/EU & 2014/30EU as well as the Radio Equipment Directive (RED) 2014/53/EU which came into force on 12 June 2016.
Product description: Television
Manufacturer reference: LD395R02MS72690
Declarant's Mark: EDENWOOD
Registrant reference: ED40A06FHD-RE
natural_image
Modern flat-screen TV displaying multiple app icons and a central screen (no readable text or symbols)
EN IEC 63000:2018
| REGLEMENTATION | NORMES APPLICABLES |
| Directive RED 2014/53/UE | EN 62368-1:2014 +A11:2017EN 55032:2015 +A1:2020 +A11:2020EN 55035:2017 +A11:2020EN 61000-3-3:2013 +A1:2019 +A2:2021EN IEC 61000-3-2:2019 +A1:2021ETSI EN 303 340 - V1.2.1 |
| Directive ErP 2009/125/CERèglement étiquetage énergétique2019/2013/UERèglement éco-conception 2019/2021/UE | EN 50564:2011 |
| Directive RoHS 2011/65/EU et 2015/863/EU | EN IEC 63000:2018IEC 62321-3-1:2013IEC 62321-4:2017IEC 62321-5:2013IEC 62321-7-2:2017IEC 62321-6:2015IEC 62321-8:2017IEC 62321-5:2013 |
The product also complies with the provisions of Law No. 2022-300 of March 2, 2022 aimed at strengthening parental control over internet access means.
B
Product usage
Content in the packaging and accessories
Table Stand 1
Table Bracket Fixing Screws ....4
Instruction Manual ....1
Remote Control ....1
Conditions and options may vary depending on the model.
Control Panel
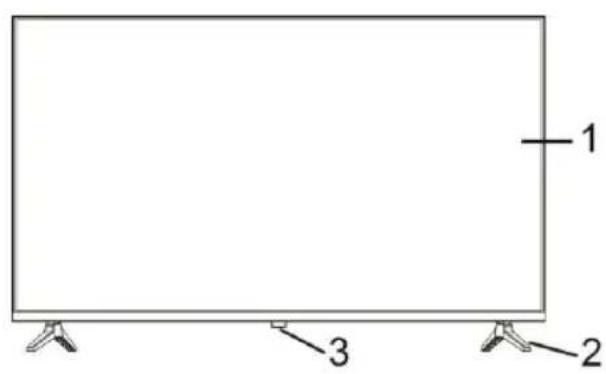
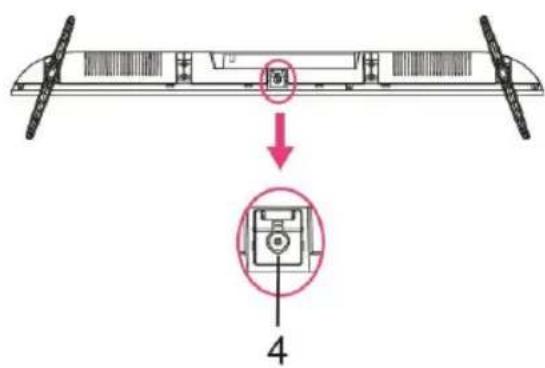
- LED display screen
- Stand Holder
- Standby: To TURN the TV ON/OFF and access MIX Bar.
- Remote Control Sensor/Power Indicator: In standby mode, the indicator light is red; when on, the indicator light is OFF.
B
Product usage
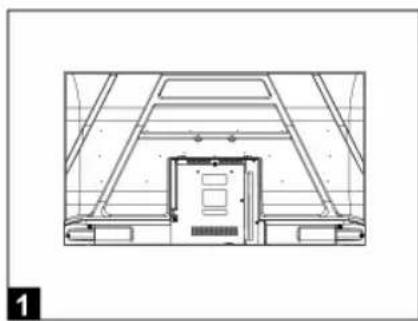
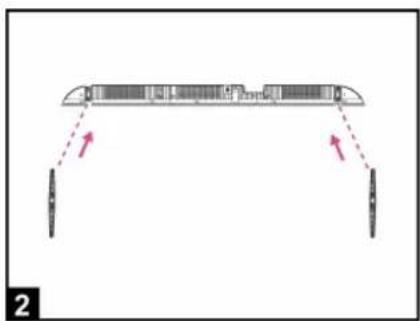
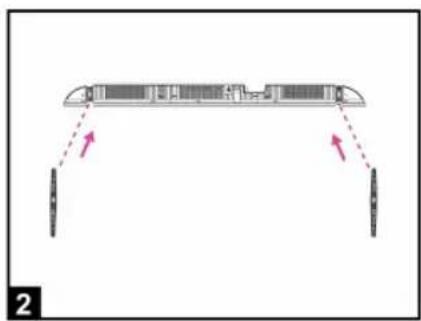
Installing the Stands
- Mounting the bracket.
natural_image
Architectural floor plan showing room layout and structural elements (no text or labels)
natural_image
Diagram of a mechanical or structural component with two downward supports and a central horizontal bar, marked with red arrows indicating direction (no text or symbols present)
natural_image
Diagram of a structural beam with supports and load indicators, no text or symbols present
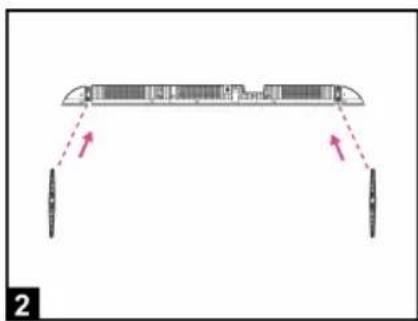
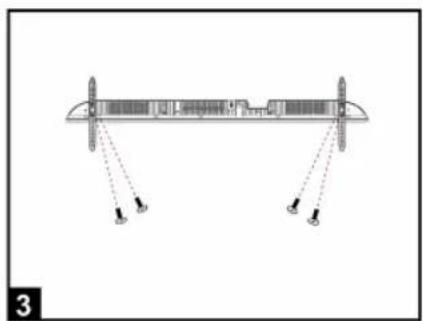
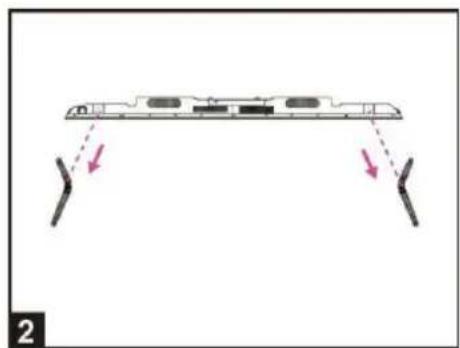
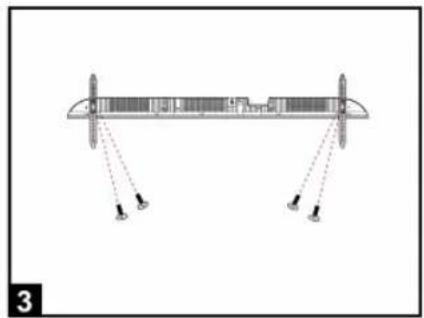
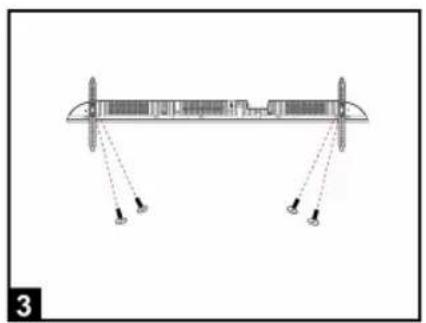
- Place the TV flat on a table (Caution: Place a foam cushion underneath the machine to prevent scratches.)
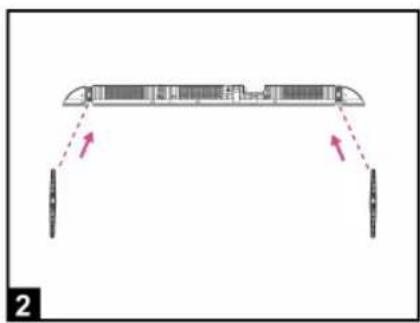
- Align the screw threads of the bracket and the bottom of the TV (Figure 2)
- Secure the bracket and screen with the 4 screws provided. (Figure 3)
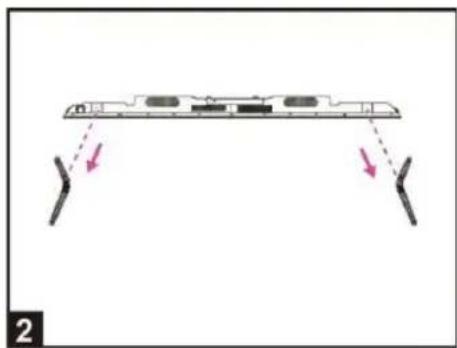
• Disassembling the bracket

natural_image
Diagram of a mechanical or structural assembly with two vertical supports and three labeled points (no text or symbols present)
natural_image
Diagram of a device with two vertical supports and a horizontal panel, showing directional arrows indicating movement (no text or symbols)
- Loosen the screws between the TV and the bracket (Figure 1).
- Remove the bracket from the TV (Figure 2).
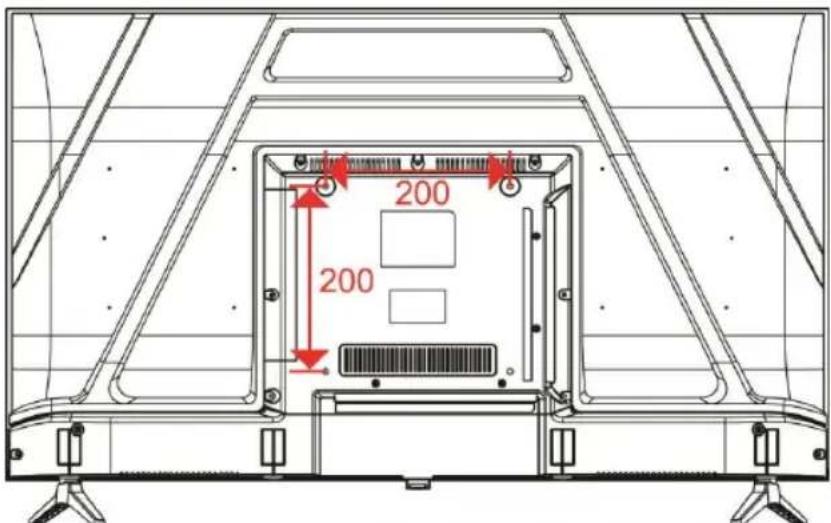
Wall Mounting Instructions
Hanging the TV on a wall
Warning: For safe installation, follow these safety precautions:
- Check that the nature of the wall or partition can support the weight of the TV and wall mount.
- Be sure to use the right type of dowel depending on the nature of the wall (concrete, brick, plasterboard, plaster tile, etc.). When in doubt, seek professional advice.
- Follow the installation instructions that came with the wall bracket and use the screws recommended by the manufacturer.
• Install the TV on a vertical wall.
- Check that the cable route is safe for people (Stumbling, falling).
- Use standard screws BM6*8mm (4 screws, not included) to mount this TV. Using different screws of the specified type will damage the wall mounting bracket and void the product warranty.
- Contact a professional for help when wall-mounting your TV.
- Do not mount the TV to the wall when it is turned on.
- Refer to the instructions for your wall mount bracket.
CAUTION!
MAKE SURE THAT ALL EQUIPMENT AND THE POWER PLUG ARE PROPERLY PLUGGED IN AND THAT THE APPLIANCE IS SET TO THE CORRECT MODE BEFORE ANY TYPE OF MANIPULATION.
B
Product usage
Connection cables
Connecting to the Power Source
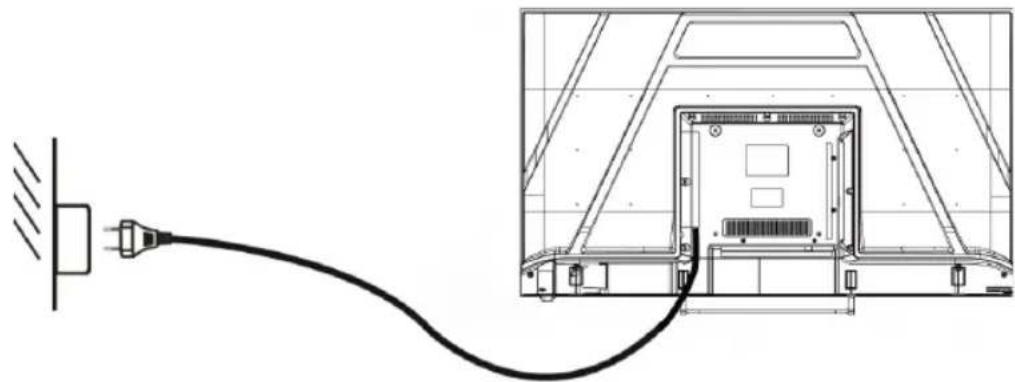
natural_image
Diagram showing a cable inserted into a device panel, with an inset view of the internal structure (no text or symbols present)
- The TV is in a standby state when no picture appears and the red light is illuminated.
- Press the sleep button on the TV remote again, and the light will glow blue.
Connecting the External Antenna to the Unit
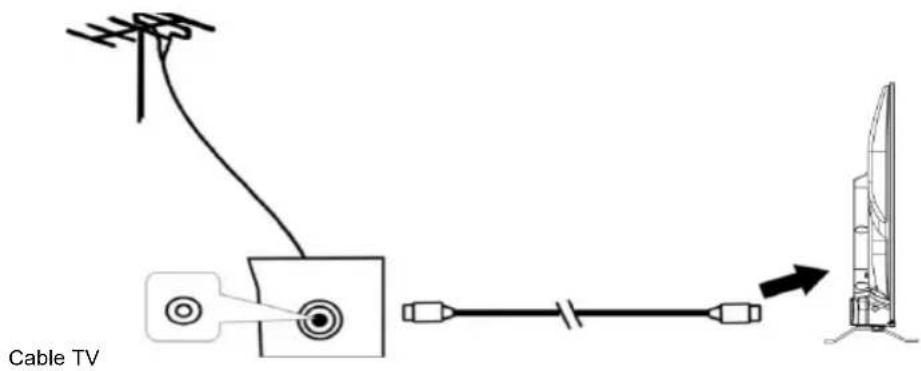
We recommend using a 75 Ω antenna cable to eliminate interference caused by poor impedance matching. The antenna cable should not be close to the power cord.
Insert the 75 Ω antenna cable plug directly into the antenna jack when using cable TV.
NOTE:
The antenna should be checked periodically. If a clear image is not displayed, turn off the power and then check the antenna carefully.
B
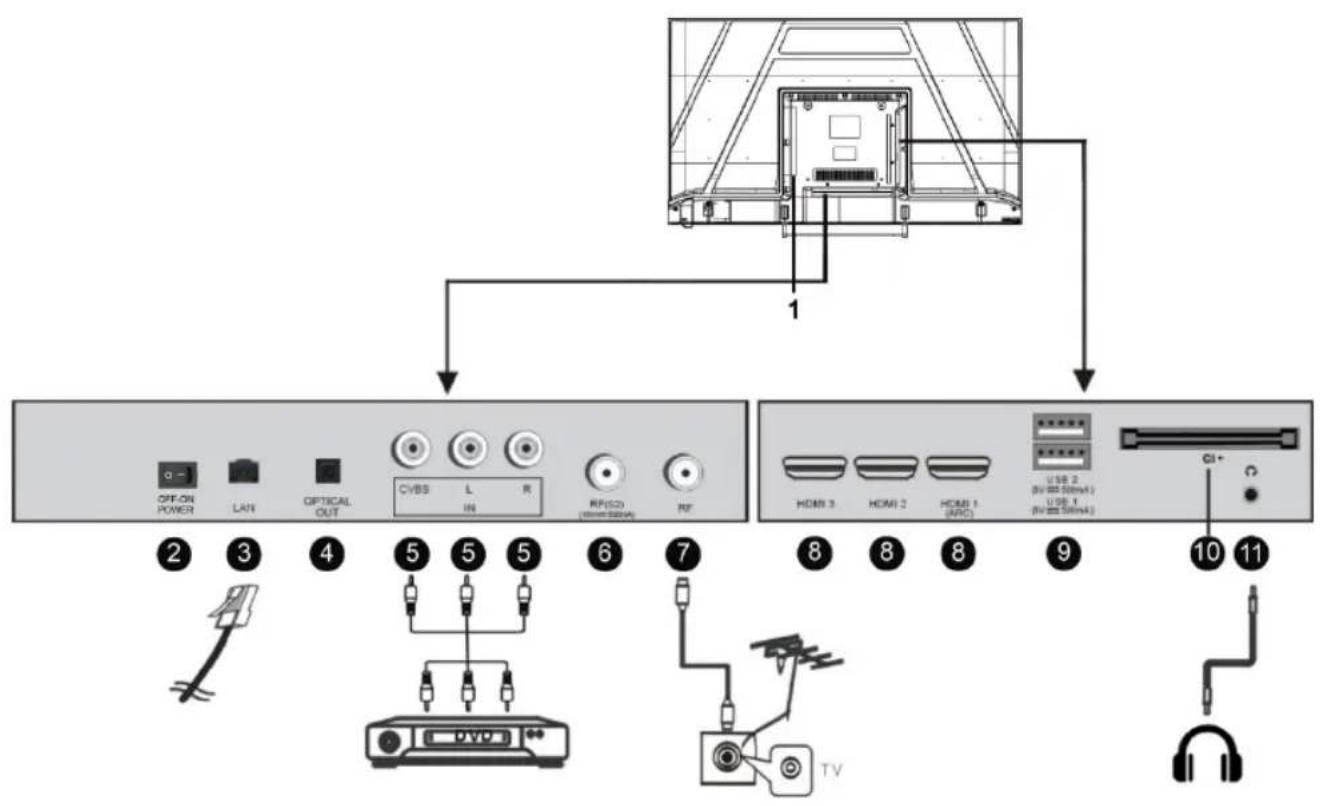
Product usage
Connection Cables
This TV has digital media features and can be connected to multiple external devices. The following diagram shows the connections.
flowchart
graph TD
    A["Device 1"] --> B["Device 2"]
    B --> C["Device 3"]
    C --> D["Device 4"]
    D --> E["Device 5"]
    E --> F["Device 6"]
    F --> G["Device 7"]
    G --> H["Device 8"]
    H --> I["Device 9"]
    I --> J["Device 10"]
    J --> K["Device 11"]
    style A fill:#f9f,stroke:#333
    style B fill:#ccf,stroke:#333
    style C fill:#cfc,stroke:#333
    style D fill:#fcc,stroke:#333
    style E fill:#cff,stroke:#333
    style F fill:#ffc,stroke:#333
    style G fill:#cfc,stroke:#333
    style H fill:#fcc,stroke:#333
    style I fill:#ffc,stroke:#333
    style J fill:#cfc,stroke:#333
    style K fill:#fcc,stroke:#333
- AC IN
- OFF-ON POWER: Used to control the power on and off of the television.
- LAN input terminal
- OPTICAL output terminal
- CVBS and Audio L/R input terminal
- RF IN : Connect to the external Satellite TV Antenna (DVB-S2).
- RF IN : Connect to the external TV Antenna.
- HDMI1/2/3 IN : High-definition multimedia interface. ARC is in HDMI 1 only.
- USB IN
Access multi-media files stored in the USB device.
-
CI SLOT : Insert a CI (common interface) card.
-
EARPHONE OUTPUT.
Remote Control
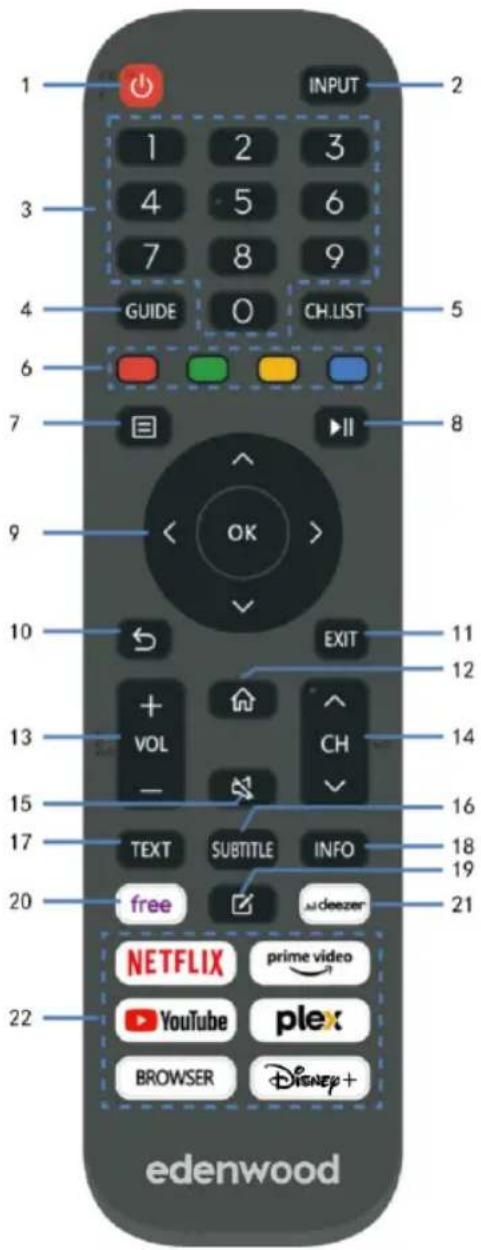
| 1 STANDBY | Set the unit in standby mode; press it again to switch it on |
| 2 INPUT (SOURCE) | Select desired input source. |
| 3 Pavé numériques (0-9) | Input the number information, such as channel number and so on. |
| 4 GUIDE | Launch the Program Guide. |
| 5 CH.LIST | Press to show channel list. |
| 6 Quatre Couleurs | Customized in different page. |
| 7 (MENU) | Call out the main menu or return to previous menu. |
| 8 ▶II | Press to operate start/pause playing; Move fast forward; Move fast backward |
| 9 DIRECTION/ OK | Move up, down, left, right/Confirm. |
| 10 ⇌ | Return to the previous interface or menu |
| 11 QUITTER | Exit the current interface or menu. |
| 12 Ⓜ | |
| 13 VOL+/- | Increase/decrease the volume level. |
| 14 CH +/- | Play the next/previous program. |
| MUTE | Mute the sound. |
| 16 SOUS-TITRES | Select available subtitles. |
| 17 TEXTE | Turn on/off the Teletext. |
| 18 INFO | Display the available program informatic |
| 19 📋 | Set up APP shortcut key. |
| 20 Free | To view free videos. |
| 21 DEEZER | Enter to the deezer directly. |
| 22 Zone de contenu | Six buttons for CSP Apps. |
B
Product usage
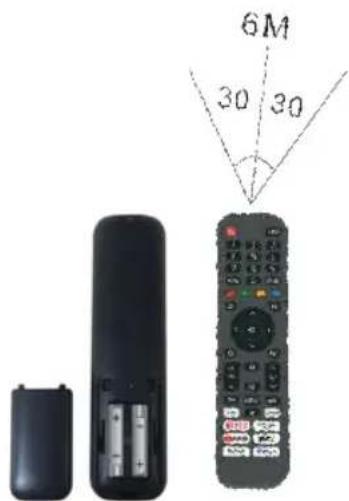
The remote control must be used within the effective reception range of the television. Point the remote at the TV's IR receiver and make sure there are no obstacles in between. Its normal operating distance will be reduced by direct sunlight or light from a lamp. Caution when using the remote control. Do not drop it, step on it, or expose it to liquids.

NOTE:
The symbols and position of the remote controls may vary by model.
Preparing the remote control
Insert two AAA batteries into the remote control according to the polarity (+/-) symbols indicated. (Batteries not included)
Different types of batteries or new and used batteries should not be mixed. Batteries must be set up in a polarity manner. Used batteries should be removed from the product. Batteries should be disposed of safely. Place them in designated collection bins (check with your retailer) to protect the environment.

WARNING!
Batteries should not be exposed to excessive heat such as sunlight, fire, or similar origin.
Basic Use
- Press the Standby button on the device or remote control to turn on the device (the light is blue); Press this key again to turn off (sleep mode) the device (the light turns red).
SELECT THE DESIRED PROGRAM
- Press the CH+ key to play the next channel.
- Press the CH-key to play the previous channel.
- Press the number keys on the remote control directly to select the desired program.
VOLUME CONTROL
- Press the VOL+ or VOL button - to adjust the current volume level. Available Adjustment Range: 0-100.
MUTE CONTROL
- Press the MUTE key to mute the sound, press it again to turn the sound back on.
SOURCE SETTINGS
- Press the SOURCE button on the remote control to display the list of sources.
- Press the UP and DOWN navigation key to select the desired input source, and then press OK to confirm the selection.
MULTIAUDIO TUNING
- Press the MENU button on the remote control and use the navigation keys to select the desired audio language.

NOTE:
To enable this feature, make sure the channel you're watching supports multiaudio languages.
- Press the INFO button on the remote control to display the current program information.
- Insert a USB storage device into the USB port before performing the following steps.
- Press the SOURCE button on the remote control to switch the unit to USB mode.
- Press the UP/DOWN/LEFT/RIGHT navigation keys to move the cursor.
- Press the BACK button to return to the previous page of the menu.
Parental Control

All Settings > System > Parental Control
Turn on Parental Controls to prevent children from being able view certain content.
PIN code is needed to enter the Parental Control. If you have not set the PIN code before, create and confirm PIN window will be displayed. If you have set the PIN code before, enter PIN window will be display.
("0000" is not allowed as PIN code; If you forget your created PIN code, using the universal PIN code "0532".)
Locks: Turn on Locks to enable the Parental Control function.
Block Time: Block the whole TV usage for a defined period of time, including Live TV, HDMI and apps.
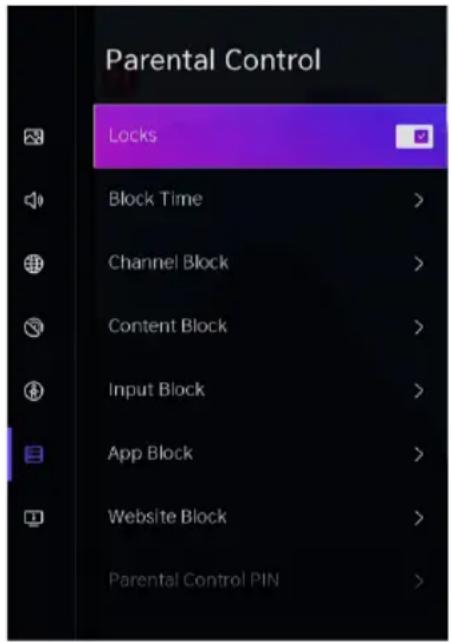
Channel Block: Block all or individual channels when you turn on the Parental Control feature.
Content Block: Certain programmes are blocked by age rating. This is controlled by the broadcaster.
Input Block: Block content from devices that are connected to external inputs.
App Block: Block access to certain apps. If an an app that you want to restrict does not appear here, then check the Parental Control settings in the apps.
Website Block: Set the range of URLs that the browser can access.
Parental Control PIN: You can set or change your PIN here. PIN is used for parental control and your system protection from unauthorized use.
Reset to Default: Restore Parental Control back to the factory default setting.

NOTE:
The above options may not be available in some models/countries/regions.
Important:
1. Content filtering:
Use parental control settings to block access to certain programs or channels that may not be appropriate for your children's age.
2. Screen Time Control:
Set usage time limits for your TV to ensure your kids don't spend too much screen time.
3. Online Risk Awareness:
As parents, it is important to be aware of the potential risks associated with using television and the internet. Here are some tips to protect your family:
Limit screen time: Encourage regular breaks away from the screen and limit TV time to promote a balanced lifestyle.
Content monitoring: Take the time to watch what your children are watching on TV and discuss the topics with them to help them understand what they are seeing.
4. Preventing overexposure to screens:
Overexposure to screens can have adverse health effects for the whole family. Here's how to avoid these risks:
Limit TV time: Encourage alternative family activities that don't involve screen use, such as board games, art activities, or outdoor sports.
Model healthy behavior: Lead by example by limiting your own time in front of the TV and encouraging quality family interactions off screen.
Be aware of the signs of overexposure: Watch for signs of fatigue, irritability, or difficulty concentrating in your children, which could indicate excessive exposure to screens.
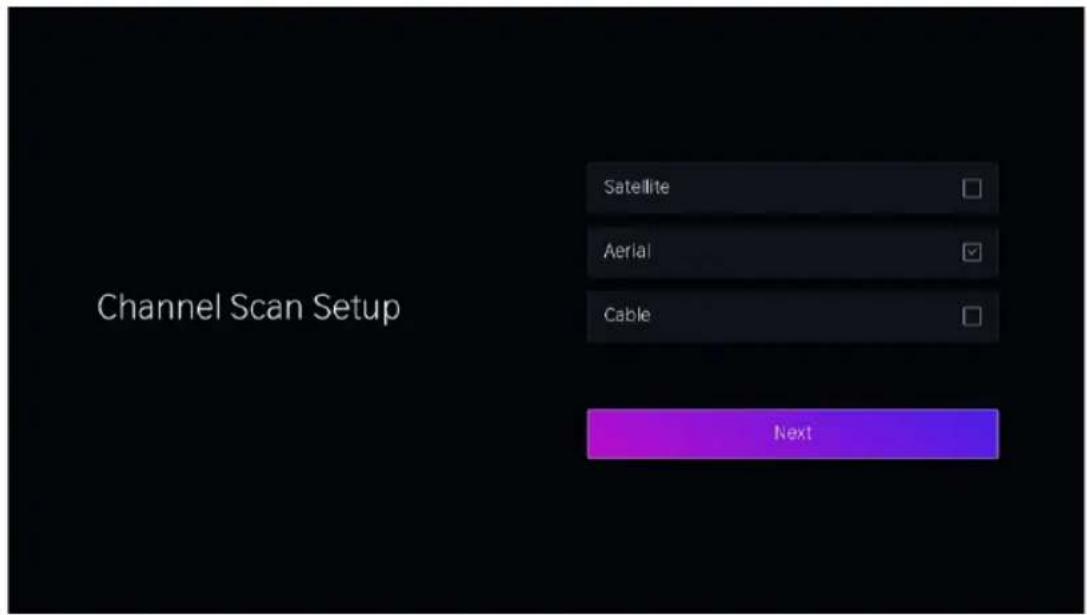
Live TV
Channel Scan
Auto Channel Scan

All Settings > Channel > Auto Scan

NOTE:
Before you select Auto Channel Scan, you can press 📄 > All Settings > Channel > Auto Scan, press OK button into the submenu, select Change Setup and press OK button to select Satellite, Aerial or Cable.
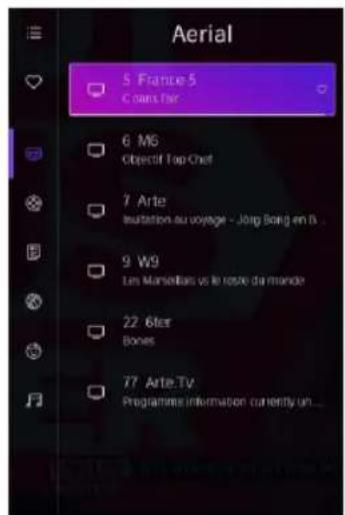
Channel List
• Display the channel list
- In Live TV, press ok button on the remote control to display the channel list menu.
B
Product usage
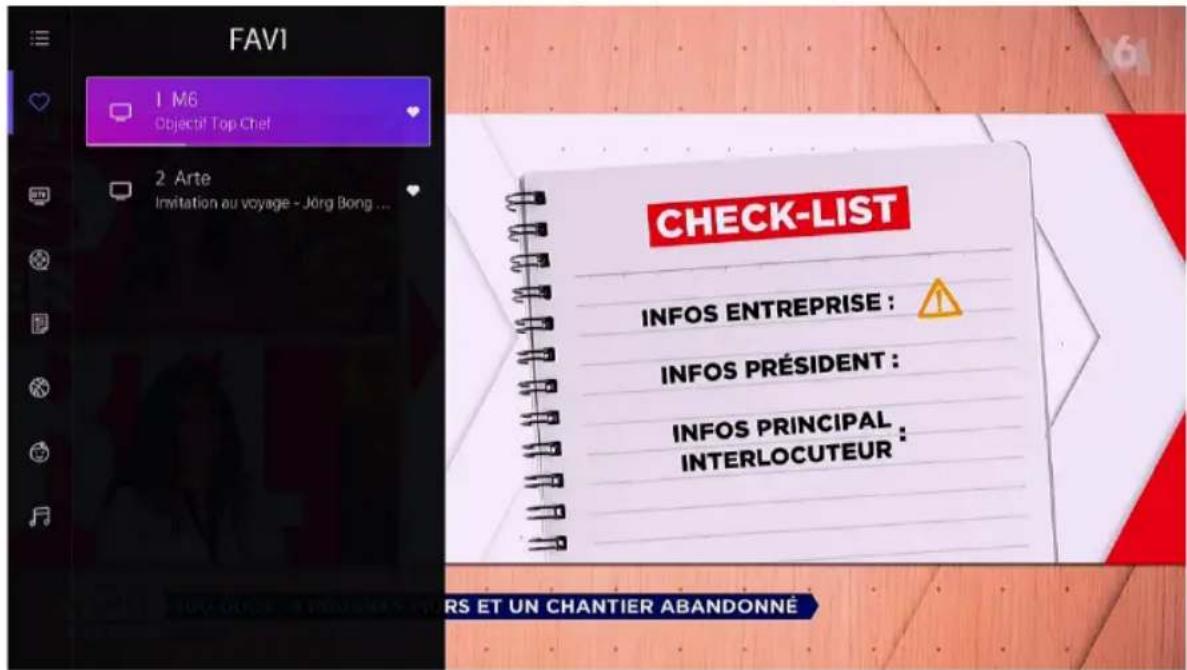
Favorite
Adding channels to your 'Favorites' list
- Press ok button to call out the channel list, the channel list appears on the left side of the screen.
- Select the channel you like, then press and hold OK button on remote control to add.
A heart-shaped icon will appear next to your favorite channel.
(The favorite channel will be placed in FAV 1 by default. If you want to place in other list like FAV2/3/4, press MENU - All Settings - Channel - Channel Edit. Select FAV2, Fav3 or FAV4 and press OK to enter the list. Highlight "Add channels" and press OK button to enter the channel list to add the favorite channels.)

Viewing your 'Favorites' list
Press ok to call out the channel list, the channel list appears on the left side of the screen.
Press navigation button to select "FAV" and press OK button to confirm. Then your favorite channel with a heart-shaped icon will appear on the favorite list.
B
Product usage
Deleting channels from your 'Favorite' list.
Press ok to call out the channel list, the channel list appears on the left side of the screen.
Press navigation button to select "FAV" and press OK button to enter the list. Press navigation button to select the desired channel, then press and hold OK button to remove the selected channel from favorite list.
Remark:
These steps must be performed in the TV inputs.
Search for a channel before editing your favorite channels.
PVR(Record)
The PVR function allows you to easily record digital television content for later viewing.
A storage device is needed to connect before using PVR function. The format of the storage device can be NTFS or FAT32, and should be no less than 2GB.
B
Product usage
PVR is only available for digital channels, and not supported for analogue and internet channels.
The PVR function may not be applicable in some models/countries/regions.
In Live TV, press 📄 button on remote control, select More - PVR, and press OK button to confirm. The schedule recording list will pop up as below:
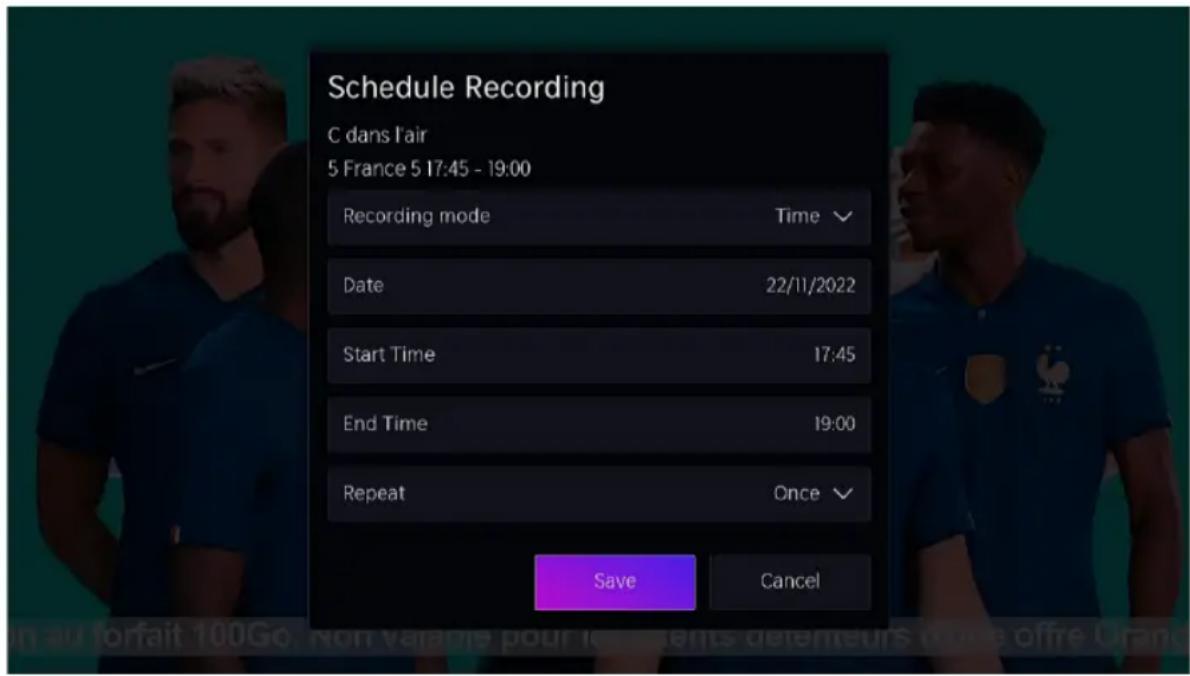
Recording mode
Select recording mode. Manual stop mode sets the actual start time but the user can stop at any time; Time mode sets the actual start and stop time; Programme mode follows the broadcast schedule.
Date, Start Time End Time
Repeat
Define if the programme should be recorded once or at regular intervals.
B
Product usage
After setting, highlight "Save" and press OK to start recording. The recording control bar will pop up as below:

- Recording time
- Total time
- Rewind
- Pause/Play
- Fast forward
- Stop.
The recording control bar is not always showing on the screen, press Left/Right navigation button to call it out again.
Stop recording
To stop the recording manually, press UP/DOWN navigation button to pop up the information box. You can select Save or Delete, and press OK button to stop the recording.
View recording
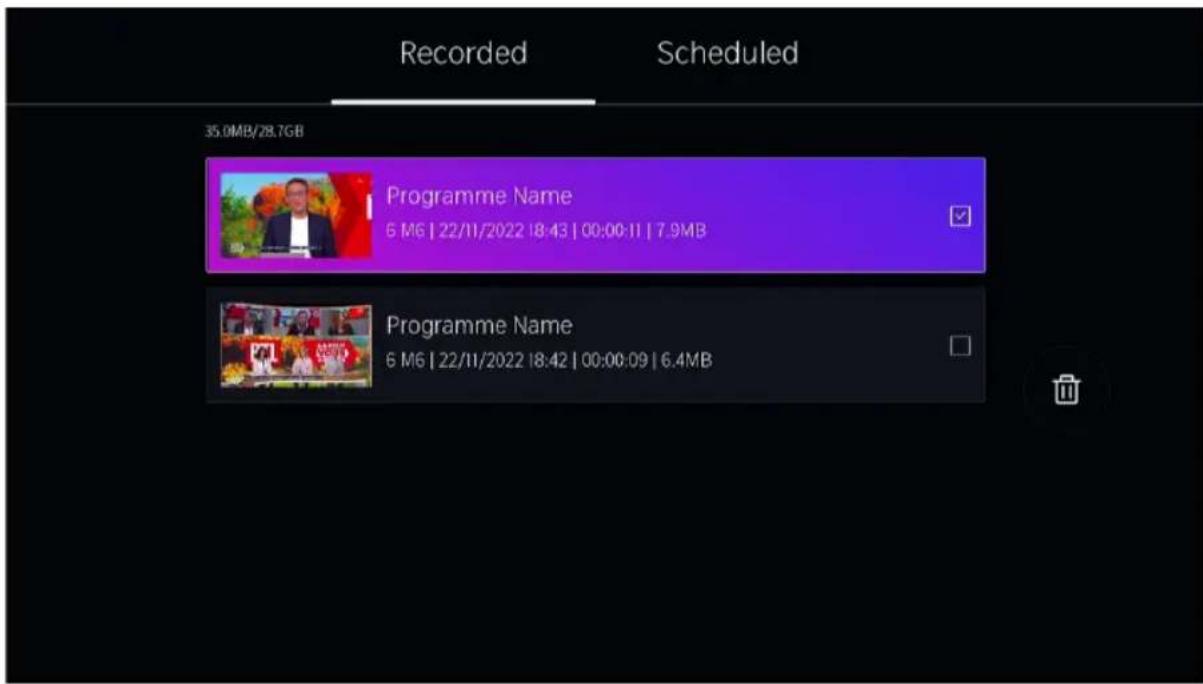
Press 📄 button on remote control, select More - Recording List, and press OK button to enter the recording list. Select the desired recording and press OK button to view.
Delete recording
Press 📄 button on remote control, select More - Recording List, and press OK button to enter the recording list. Press and hold OK button to enter the edit mode. Tick the recordings you want and press Right navigation button to delete.
There are several other ways to use PVR (In Live TV):
- Press Left/Right navigation button to display the information bar and choose camera icon.
- If your remote control has ▶ button, press it and then press UP navigation button to select ● to set up PVR.
- Press GUIDE button to display programme guide. Select a programme and choose PVR.
Connection
Wired LAN
Connecting to the Internet
All Settings > Connection > Network > Network Configuration
You set the TV network by selecting Configuration and press the OK button to enter the submenu.
Automatically obtain an IP address
- If you connect to the wired network, the TV will automatically obtain an IP address and connect to the network.
- If the connection fails, disconnected message will display for the Ethernet status. Retry or enter the IP settings, and select Manual to input the information again.
Manually enter the IP address
- Enter the IP settings to select Manual.
- Enter the IP Address, Netmask, Gateway, DNS Server 1 and DNS Server 2 in the menu.
NOTE:
• You get access to the Internet through your TV.
• The default option of IP Settings Mode is DHCP.
B
Product usage
Wireless
Connecting to the Internet


NOTE:
• You get access to the Internet through your TV.
- Connect to an available wireless network.
- Make sure that you have the wireless router's SSID and password before attempting to connect.
Connecting to a Wireless Network
All Settings > Connection > Network > Network Configuration
You set the TV network by selecting Configuration and press the OK button to enter the submenu.
Connection Type
Choose a wireless network connection to access the Internet.
Refresh
Refresh wireless network.
Advanced Settings
Configure the advanced wireless network settings for the TV.
Add
You can add wireless network.

NOTE:
- If no wireless router is found, select Add and enter the network name in the SSID.
• If no wireless router is found, select Refresh.
HDMI-CEC
You can use your TV remote to control the external devices that are connected to the TV by HDMI cable. The external devices need to support HDMI & CEC Function (HDMI-CEC).
Connecting an external device through HDMI-CEC Function 📄> All Settings > Connection > HDMI&CEC
- Set HDMI Control to On.
- Connect a HDMI-CEC-compliant device to the TV.
- Turn on the connected external device. The device is automatically connected to the TV. After connection is finished, you can access the menu of the connected device on your TV screen using your TV remote and control the device.
natural_image
Black rectangular icon with a white lowercase 'i' symbol in the center, representing information (no text or numbers present)
NOTE:
- DMI cables must be used to connect HDMI CEC-compatible devices to your TV.
- The HDMI CEC feature of the connected device must be turned on.
-
If you connect an HDMI device that is not HDMI CEC-compatible, all the HDMI-CEC control features do not work.
-
When CEC control is enable and HDMI&CEC compatible external devices are turned off, the TV will enter the standby mode. Time function needs to be support by the external device.
HDMI Device
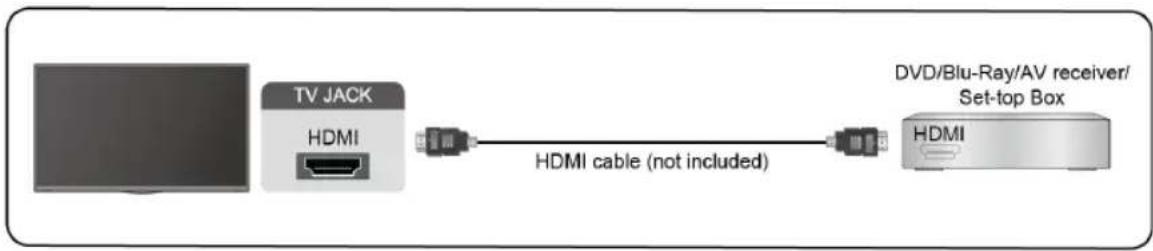
Connect an HDMI cable from an external A/V equipment.
Some devices such as DVD player require HDMI signal to be set to output in the device's settings. Please consult your device user manual for instructions.
Please note that the HDMI connector provides both video and audio signals, it's not necessary to connect an audio cable.
B
Product usage
flowchart
graph LR
    A["TV JACK"] -->|HDMI cable (not included)| B["DVD/Blu-Ray/AV receiver/Set-top Box"]
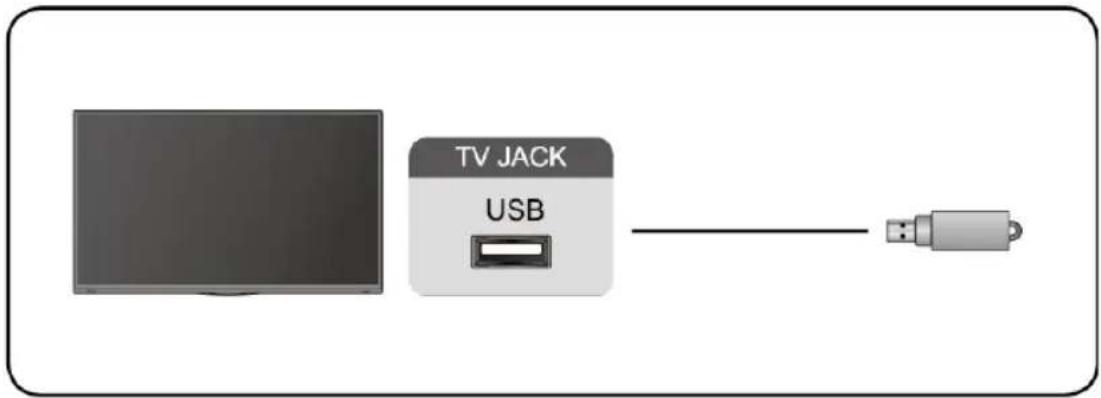
USB Device
Connect the USB devices such as hard drives, USB sticks and digital cameras for browsing photos, listening to music.
natural_image
Diagram showing a monitor connected to a TV jack labeled 'USB' with a USB cable (no text or symbols beyond labels)
Support format: NTFS, FAT32.
Multi-screen
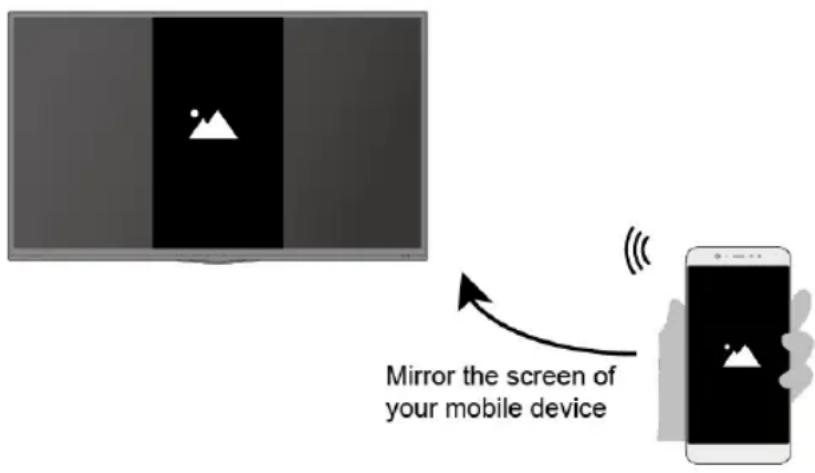
Screen Sharing
Mirror content from your device to the TV. INPUT > Screen Sharing
- Turn on the casting function of your Android/Windows10 device/computer device.
- Find the TV name in the searching list of your device and select it. Wait for the connection progress to complete and the content on your device will be displayed on the TV.

NOTE:
Some Android devices may not support casting.
Content Sharing
Share media content, like videos, music or photos, from your device to the TV screen.
Before you use this function, turn on Content Sharing at 📋 > Settings > Connection > Mobile Device Connection > Content Sharing.
- Establishing Content Sharing connection between the TV and your device.
- Turn on the content sharing function of your device.
- Find the TV name in the searching list of your device and select it.
- Wait for the connection progress to complete, and select the content you want to share.
Smart Functions
Playing Media contents
Press 📄 button on remote control and select media.
By default, there are Content Sharing displayed on the Media screen. If your mobile device is connected to the TV, its name also appears on the Media screen.
NOTE:
For more information about Content Sharing, refer to its detailed introduction.

Media > connected device
Select the content you want to play on the screen, like pictures, videos and music.
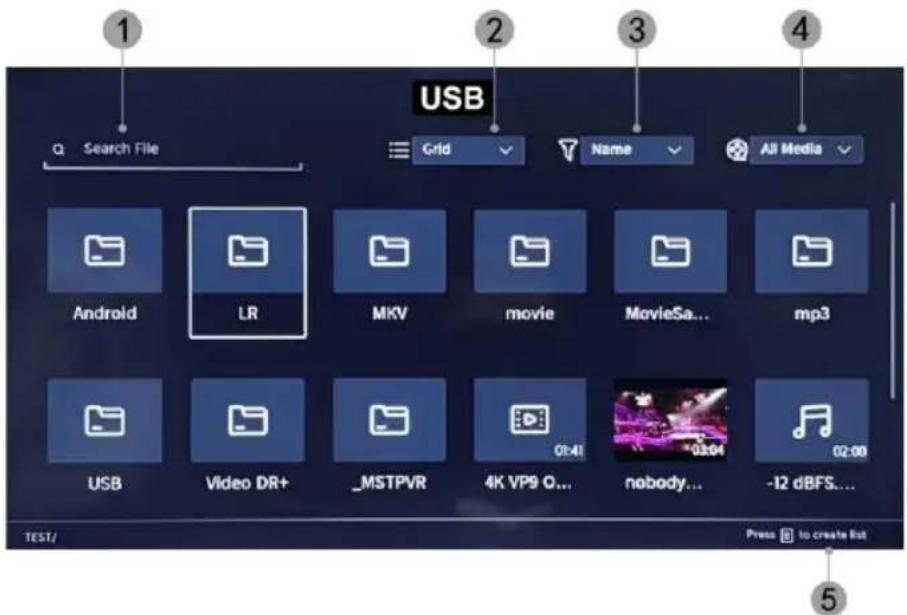
- Input the content name you want to play.
- Arrange the content list by Grid, List.
- Arrange the content list by Name, Date Modified, Size.
- Filter the content list by All Media, Photo, Video, Music, Recorded.
- Create a photo, music, or video playlist.
B
Product usage
Playing background music during viewing pictures
You need to:
- Choose a picture to playback.
- Press ∧ / ∨ button to call out playbar.
- Select Background Music and choose your music to create a Music Playlist.
- Play the background music during viewing pictures.
Note:
- The TV may be support the following file formats:
| Medium | File Format |
| Video | .MP4, .MOV, .MPG, .MPEG, .FLV |
| Picture | .jpg, .BMP, .PNG, .GIF |
| Music | .MP3, .AAC, .WAV |
- For more information about connection to other device, refer to the detailed introduction of each part.
Home
Getting familiar with the Home screen
Press 📄 button on remote control to enter the Home screen.
- Manage apps
Select the item you want to move, and long press ok button to manage.
VIDAA Account
Sign in your VIDAA account.
A VIDAA account gives you all the best feature of your smart TV and always keeps it up to date.
Search
Search the content you want.
B
Product usage
Kids
Vidaa Kids: Endless fun for your kids.
After sign in account of vidaa kids, you can mange time limits, content and more for kids.
Notifications
Allows pop-up notifications to be displayed for useful information and events that occur on your TV.
- Select Notifications on the home screen, select Settings, and then enter Advertising, What's New, Warnings & Legal, System Message, where you can choose the types of notifications you want to receive.
VIDAA Account
Log in to your VIDAA account.
A VIDAA account gives you all the best features of your smart TV and always keeps it up to date.
Picture & Sound
Adjust image quality
Adjust the current image mode to apply to all sources or only to the current source.
The menu is for reference only. The following modes may differ from the actual product.
Choosing a picture mode

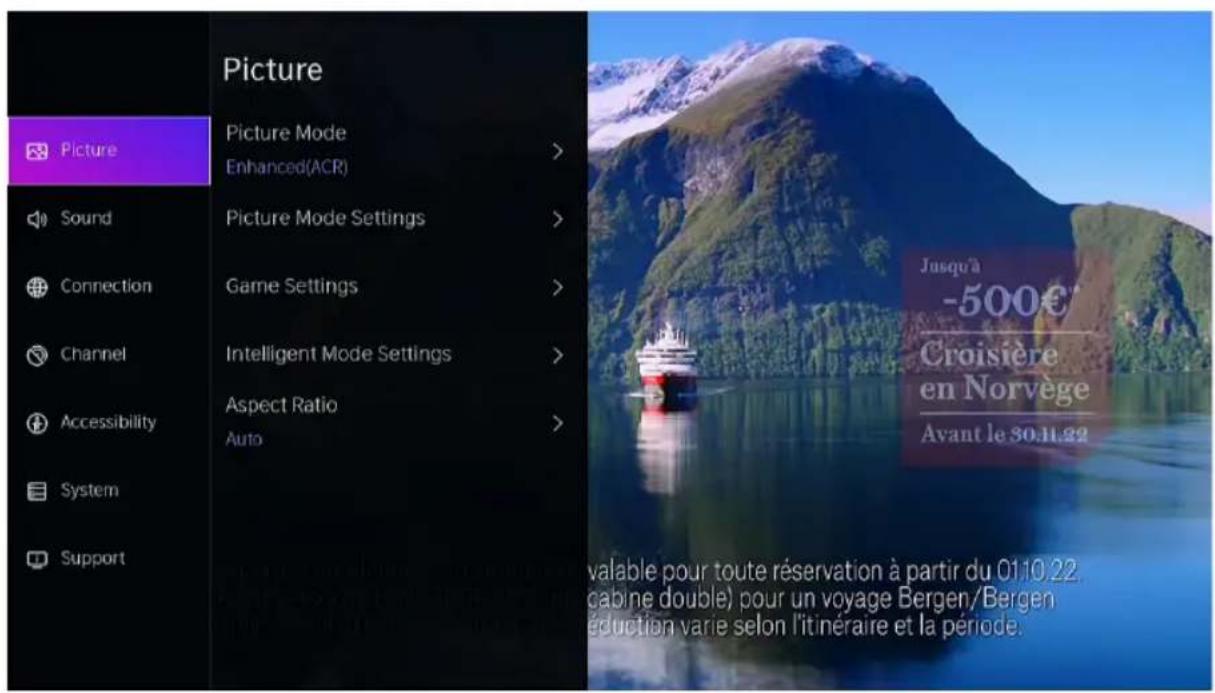
All Settings > Picture > Picture Mode
You can select the Picture Mode that provides the best viewing experience.
- Standard: The default mode, to make users experience high-quality images under normal light.
- Enhanced(ARC): By enabling Enhanced(ARC) mode, your viewing data will be used to automatically enhance both the image and sound quality for all input sources.
B
Product usage
• Cinema: Use Cinema for watching movies in a bright environment.
• Energy Saving: Energy conservation.
- Dynamic: Enhance the contrast, color and clarity of the screen, so that the picture in the dynamic will balance the color.
- Sports: This mode is more suitable for watching sport video.
Configuring advanced picture settings

All Settings > Picture > Picture Mode Settings
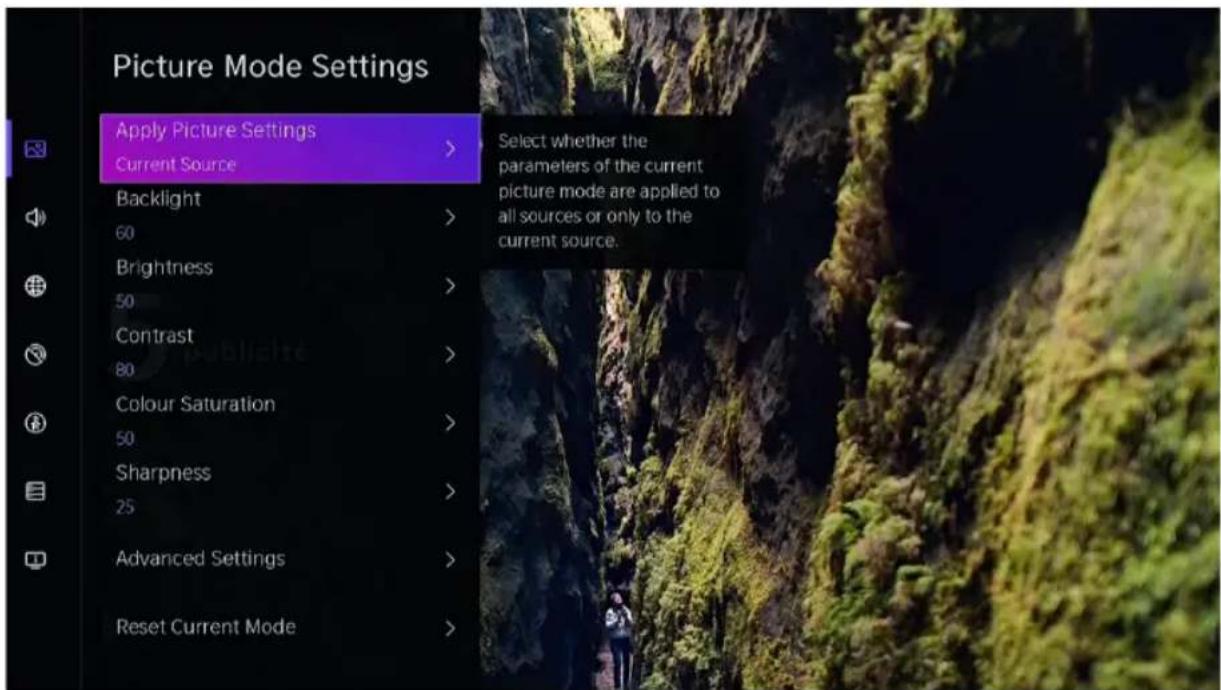
Adjust display setting for each Picture Mode.
- Apply Picture Settings: Adjust current picture mode to apply to all sources or just current source.
- Backlight: Adjust image backlight. (Optional: 0\~100)
- Brightness: Adjust image brightness.(Optional: 0\~100)
- Contrast: Adjust image contrast. (Optional: 0\~100)
• Color Saturation: Adjust image color density. (Optional: 0\~100)
- Sharpness: Adjust the image edge sharpness. (Optional: 0\~50)
- Advanced Settings: Adjust the color space and Gamma to best suit the content you are viewing.
- Reset Current Mode: Restore all the picture settings in the current picture mode to the factory default values.
Game Settings

All Settings > Picture > Game Settings
Adjust game related settings.
Intelligent Mode Settings

All Settings > Picture > Intelligent Mode Settings
Configure intelligent mode related settings.
Choosing a Aspect Ratio

All Settings > Picture > Aspect Ratio
You can adjust the Aspect Ratio to stretch or zoom the picture.
- Auto
• 16:9
4:3
- Movie Zoom
Adjusting the Sound Quality
Adjust current sound mode to apply to all sources or just current source. The menu is only for reference. The following modes may differ from the actual product.
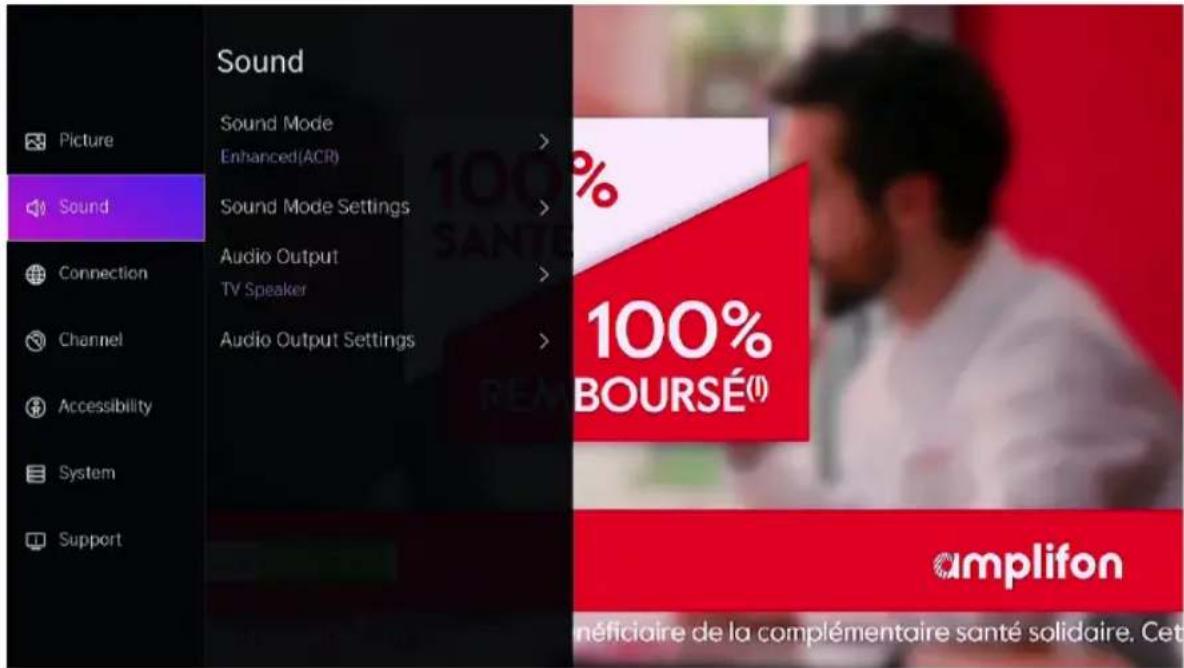
Choosing a sound mode

All Settings > Sound > Sound Mode
You can select a favourite sound mode suitable for the content type or the listening environment.
• Standard: Produced a balanced sound in all environment.
- Enhanced(ARC): By enabling Enhanced(ARC) mode, your viewing data will be used to automatically enhance both the image and sound quality for all input sources.
- Theater: Increased the surround sound effect and provides a more prominent bass response.
• Music: Preserves the original sound. Good for musical programs.
- Speech: Low and high frequencies are attenuated to improve the reproduction and clarity of the human voice.
B
Product usage
Late Night: Improve the reproduction and clarity of the human voice with a low volume level.
Sports: Optimised sound for watching Sports events.
All Settings > Sound > Sound Mode Settings
Adjust the audio settings of the TV.
All Settings > Sound > Audio Output
Select the audio connection method.
All Settings > Sound > Audio Output Settings
Select the digital audio output format that best suits the audio device type.
Accessibility
Press Navigation button to select Accessibility

All Settings > Accessibility
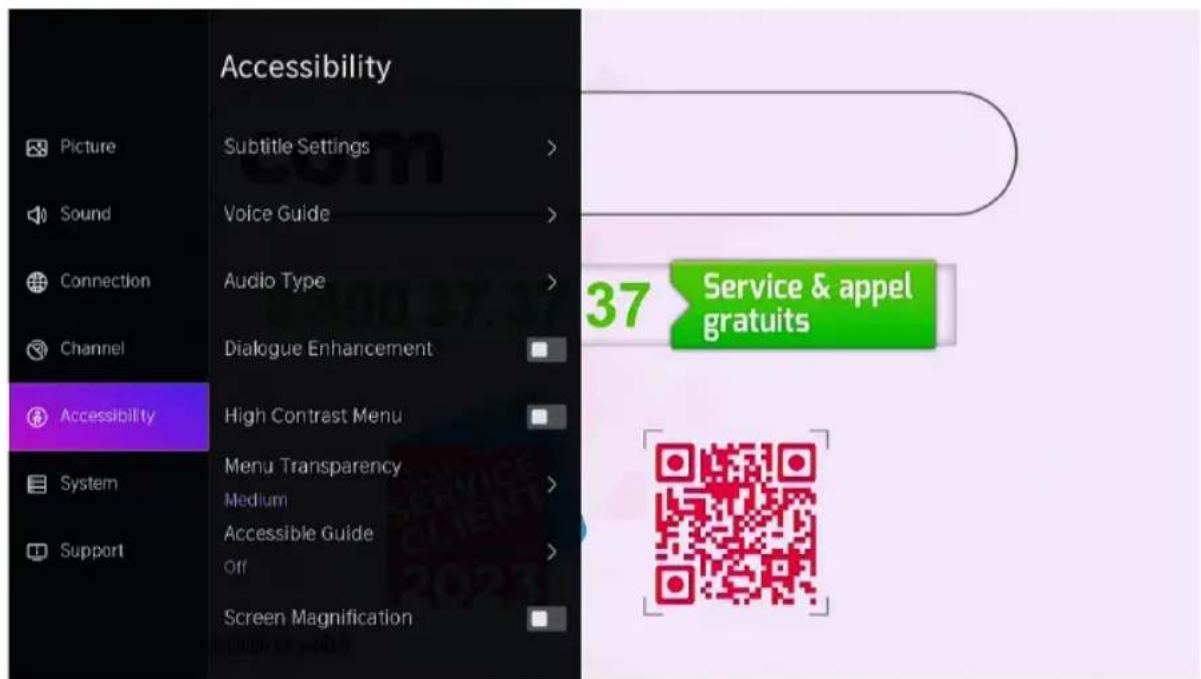
- Subtitle Settings: Adjust subtitle settings for digital broadcast content.
- Voice Guide: Lower the background volume when the voice guide is spoken.
• Audio Type: Accessibility audio settings.
- Dialogue Enhancement: Enable or disable dialogue enhancement.
• High Contrast Menu: Turn High Contrast Menu On or Off.
- Menu Transparency: Set the transparency of the menu.
- Accessible Guide: For the visually impaired.
- Screen Magnification: Allow visually impaired/partially sighted viewers to magnify an area of the screen.
System & Suport
Setting Time
All Settings > System > Time
Set the current time based on your location.
- Time Format
Set the time to display in a 12 or 24-hour format.
- Date/Time
Set the date and time.
- Time Zone
Set the time zone.
- Daylight Savings
Select whether to apply Daylight Savings Time to the TV.
Using the timer
All Settings > System > Timer Setting
Adjust the timer settings to suit your preference.
- Sleep Timer
Set the sleep timer to automatically turn the TV Off within a specified time: Off, 15 Minutes, 30 Minutes, 60 Minutes, 90 Minutes, 120 Minutes, User Defined.
- Power On Timer
Set the clock for the time you want the TV to turn on automatically. You can set the time only once or set the time in specified date weekly.
- Power Off Timer
Set the clock for the time you want the TV to turn off automatically. You can set the time only once or set the time in specified date weekly.
- Menu Timeout
Set the amount of time that you would like for the menu to display: Off, 10s, 20s, 30s, 60s.
B Product usage
- Auto Sleep
Set the amount of time that you would like the TV to auto power off after a period of no activity : Off, 3H, 4H.
• Auto Standby with No Signal
TV will go to standby if there is no signal after the set time: Off, 15min.
Set Usage Mode
- Home Mode
Select Home Mode for normal TV usage.
If you want to switch to Home Mode when the TV is in Store Mode, press

button on remote control to select ⚙ All Settings, then select System > Advanced Settings > Usage Mode and choose choose Home Mode.
Upgrade
All Settings > Support > System Update
Set your TV to receive the latest firmware.
Auto Upgrade
Set your TV to automatically receive the latest firmware.
Check Upgrade
Check to ensure that your TV has received the latest
firmware.
Note: Please ensure your TV is connected to the Internet.
Upgrade From USB
Upgrade TV software from USB device.

NOTE:
- Please ensure the USB flash drive insert to USB2.0 port of the TV.
- The updating files must be available in root directory.
- The format of the USB must be FAT32 and the partition table type must be MBR.
E-Manual
All Settings > Support > E-Manual
Launch the E-Manual and get to know more about your TV.
Cleaning and maintenance
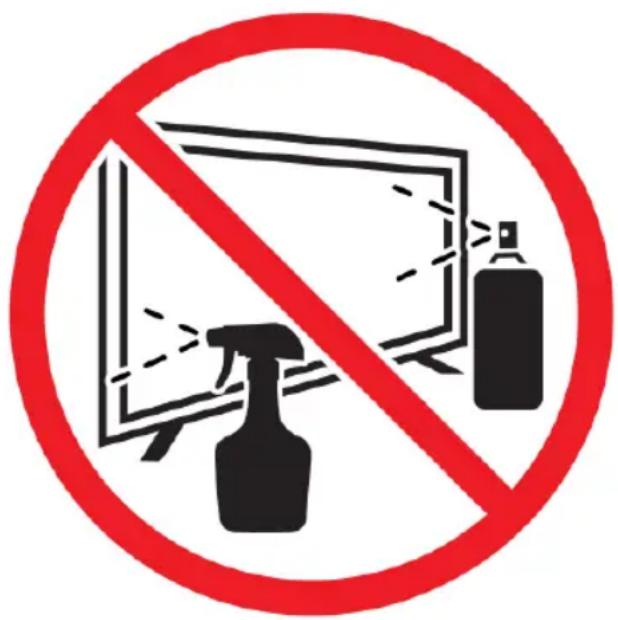
- Before cleaning this product, press the STANDBY button to put it in standby mode and wait a few minutes before disconnecting the AC plug.
- Wipe this product with a soft, dry cloth. Do not spray water directly on the TV, but apply a small amount of water to the corner of the cloth and wipe it as gently as possible. Never use cleaning fluids, wax or chemicals.
- Never use alcohol, benzene, thinner, cleaning fluid or other chemicals. Do not use compressed air to remove dust.
- If the surface is extremely dirty, wipe it with a cloth dampened with a weak solution of soapy water and wrung out well, then wipe again with a dry cloth.
- Before plugging the TV back in, allow the screen to dry completely.
Trubleshooting
No picture or sound

Possible cause:
- The power cord, antenna cable, or input source is not plugged in properly.
• The TV is not turned on.
Solution:
- Check the power cord, antenna cable, and input source.
- Press the STANDBY button on the remote control.
- Turn off the TV and turn it back on five seconds later.
No sound


Possible cause:
- Either the volume is too low or the sound is muted.
- The sound system is misconfigured.
- Either the volume is too low or the sound is muted.
- The sound system is misconfigured.
Solution:
- Turn up the volume.
- Turn the sound back on by pressing the MUTE button.
- Adjust the sound configuration.
Noise or Snow Effect

Possible cause:
- The antenna cable is damaged or improperly connected.
- The chain is installed incorrectly.
- The antenna is incorrectly positioned.
- The antenna cable is damaged or improperly connected.
- The chain is installed incorrectly.
- The antenna is incorrectly positioned.
Solution:
- Check the antenna cable and its connection.
- Adjust the chain manually.
- Adjust the position of the antenna.
- Check the antenna cable and its connection.
- Adjust the chain manually.
- Adjust the position of the antenna.
Black and white image
natural_image
Simple 3D geometric shapes including cube, pyramid, cone, and sphere (no text or symbols)

Possible cause:
- The antenna is incorrectly positioned.
Solution:
- Adjust the color configuration.
- Adjust the position of the antenna.

natural_image
Solid gray rectangular shape with no text, symbols, or discernible features
Merci !
Informations techniques
Digital Video Broadcasting
https://www.disneyplus.com. ©2025
AVERTISSEMENT!
natural_image
Modern flat-screen TV displaying a dark screen with colorful app icons and no visible text or symbols on the screen.
EN CEI 63000:2018
| RÉGLEMENTATION | NORMES APPLICABLES |
| Directive RED 2014/53/UE | EN 62368-1:2014 +A11:2017EN 55032:2015 +A1:2020 +A11:2020EN 55035:2017 +A11:2020EN 61000-3-3:2013 +A1:2019 +A2:2021EN CEI 61000-3-2:2019 +A1:2021ETSI EN 303 340 - V1.2.1 |
| Directive ErP 2009/125/CERèglement étiquetage énergétique2019/2013/UERèglement éco-conception 2019/2021/UE | EN 50564:2011 |
| Directive RoHS 2011/65/UE et2015/863/UE | EN CEI 63000:2018 CEI 62321-7-2:2017CEI 62321-3-1:2013 CEI 62321-6:2015CEI 62321-4:2017 CEI 62321-8:2017CEI 62321-5:2013 |
Installation des supports
natural_image
Architectural floor plan showing room layout and structural elements (no text or labels)
natural_image
Diagram of a structural beam with supports and load arrows, no text or symbols present

natural_image
Diagram of a structural beam with supports and load indicators, no text or symbols present
natural_image
Diagram of a mechanical or structural assembly with suspended components and dashed lines indicating alignment (no text or symbols)
natural_image
Diagram of a vehicle chassis with two legs and two side legs, showing structural components and directional arrows (no text or labels)
natural_image
Diagram showing a cable inserted into an electrical outlet, with an inset view of the internal structure (no text or symbols present)
natural_image
Icon of an information symbol inside an oval shape, no text or numbers present
REMARQUE :
Liste des chaînes

REMARQUE :
natural_image
Black rectangular icon with a white circular symbol containing an lowercase 'i' in the center, representing information (no text or symbols beyond the icon itself)
NOTE:
flowchart
graph LR
    A["TV JACK"] -->|HDMI cable (not included)| B["DVD/Blu-Ray/AV receiver/Set-top Box"]
Périphérique USB

NOTE:
natural_image
Simple 3D geometric shapes including cube, pyramid, cone, and sphere (no text or symbols)

WAARSCHUWING!
natural_image
Architectural floor plan showing a central room with structural beams and supports (no text or labels)
natural_image
Diagram of a structural beam with supports and load arrows, no text or symbols present
natural_image
Diagram of a long horizontal structure with two vertical supports and three small circular elements, connected by dashed lines (no text or symbols)
natural_image
Diagram of a mechanical or structural assembly with two vertical supports and three horizontal supports, no text or symbols present.

natural_image
Diagram of a device with two curved supports and directional arrows indicating movement or force (no text or symbols)
natural_image
Diagram showing a cable inserted into a device panel, with an inset view of the internal structure (no text or symbols present)
MULTIAUDIO AFSTEMMING
natural_image
Icon of an information symbol inside an oval shape, no text or numbers present
OPMERKING:
Lijst met zenders
OPMERKING:
natural_image
Black rectangular icon with a white circular symbol containing an lowercase 'i' in the center, representing information (no text or symbols beyond the icon itself)
NOTITIE:
flowchart
graph LR
    A["TV JACK"] --> B["HDMI"]
    B --> C["HDMI cable (not included)"]
    C --> D["DVD/Blu-Ray/AV receiver/Set-top Box"]
USB-apparaat
natural_image
Diagram showing a monitor connected to a TV jack labeled 'USB' with a USB cable (no text or symbols beyond labels)

NOTITIE:
Upgrade controlleren
natural_image
Black and white icon of an information symbol (no text or numbers)
NOTITIE:
natural_image
Simple 3D geometric shapes including cube, cone, and sphere (no text or symbols)
Información técnica
Digital Video Broadcasting
¡ADVERTENCIA!
natural_image
Architectural cross-section diagram of a building facade with structural beams and central door (no text or labels)
natural_image
Diagram of a structural beam with supports and load arrows, no text or symbols present
natural_image
Diagram of a structural beam with supports and load indicators (no text or symbols)
natural_image
Diagram of a mechanical or structural assembly with two vertical supports and three circular components, no text or symbols present.

natural_image
Diagram of a vehicle chassis with two side supports and directional arrows indicating movement (no text or symbols)
natural_image
Diagram showing a cable inserted into a device panel, with an inset view of the internal structure (no text or symbols present)
natural_image
Icon of an information symbol inside an oval shape, no text or numbers present
NOTA:
Lista de canales
natural_image
Plain gray rectangular panel with no visible text, symbols, or markings
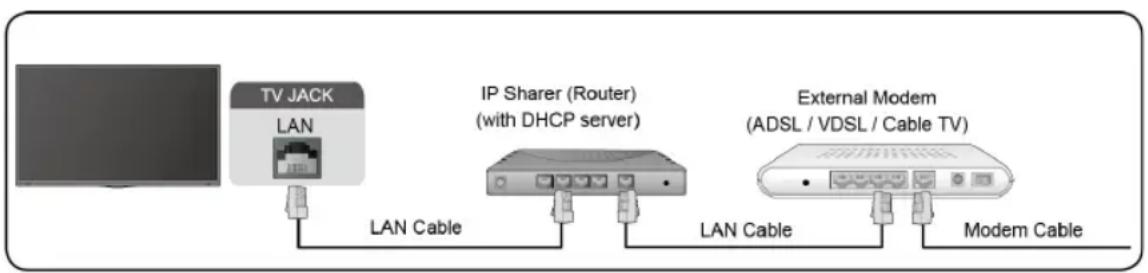
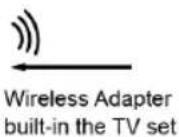
Wireless Adapter built-in the TV set

LAN Cable

NOTA:
natural_image
Black rectangular icon with a white circular symbol containing an lowercase 'i' in the center (no text or numbers)
NOTA:
flowchart
graph LR
    A["TV JACK"] -->|HDMI cable (not included)| B["HDMI"]
    B --> C["DVD/Blu-Ray/AV receiver/Set-top Box"]
Dispositivo USB

NOTA:
natural_image
Simple line drawing of three geometric shapes: cube, cone, and sphere (no text or symbols)


natural_image
Solid gray rectangular shape with a vertical white line on the left side (no text or symbols)
WARRANTY CONDITIONS
E
This product is guaranteed against faults caused by defects in manufacturing or the materials used for a period of two years, starting from the date of purchase.* This warranty does not cover defects or damage caused by failure to install the device correctly, incorrect use of the product, or excessive wear and tear.
*proof of purchase required.
CONDITION DE GARANTIE
FR