
G30 - Ice crusher Ceado - Free user manual and instructions
Find the device manual for free G30 Ceado in PDF.


User questions about G30 Ceado
0 question about this device. Answer the ones you know or ask your own.
Ask a new question about this device
Download the instructions for your Ice crusher in PDF format for free! Find your manual G30 - Ceado and take your electronic device back in hand. On this page are published all the documents necessary for the use of your device. G30 by Ceado.
USER MANUAL G30 Ceado
ICE CRUSHER models V90 and V100 AUTOMATIC ICE CRUSHER model G30
V90 and V100 are two ice crushers for the production of crushed ice for cocktails.
The Automatic Ice Crusher G30 is a professional appliance for preparing ice for slushes.
Like all appliances, it should be used with particular care to avoid injury to the personnel and damage to the appliance.
It is therefore essential to read these instructions carefully before using the appliance and to follow the safety recommendations.

Do not use the appliance if you are not sufficiently familiar with the instructions!
GB
Page 12
text_image
Labeled diagram of a blender with numbered parts and electrical plug, showing internal components and wiring.Fig. 1
text_image
Labeled diagram of a portable electronic device with numbered components for identification.Fig. 2
TRITAGHIACCIO G30
Componenti principali (Fig. 3 - Fig. 4)
text_image
Labeled diagram of a kitchen grater with numbered parts including a bowl, plate, and handleFig. 4
NORME DI SICUREZZA AVVERTENZE GENERALI
natural_image
Two technical diagrams showing a blender and a device with a lid, labeled Fig. 5 and Fig. 6 (no text or symbols on the devices themselves)
natural_image
3D diagram of a box with an open lid, labeled 'Fig. 7' (no text or symbols on the diagram itself)Modello G30

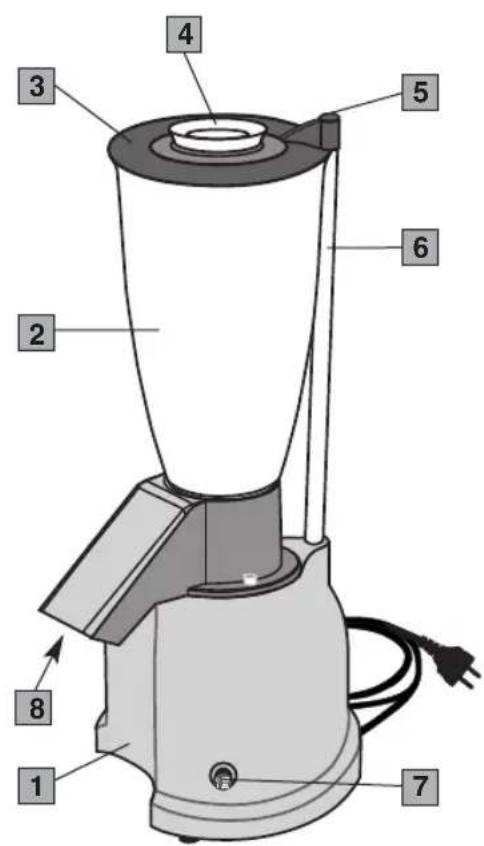
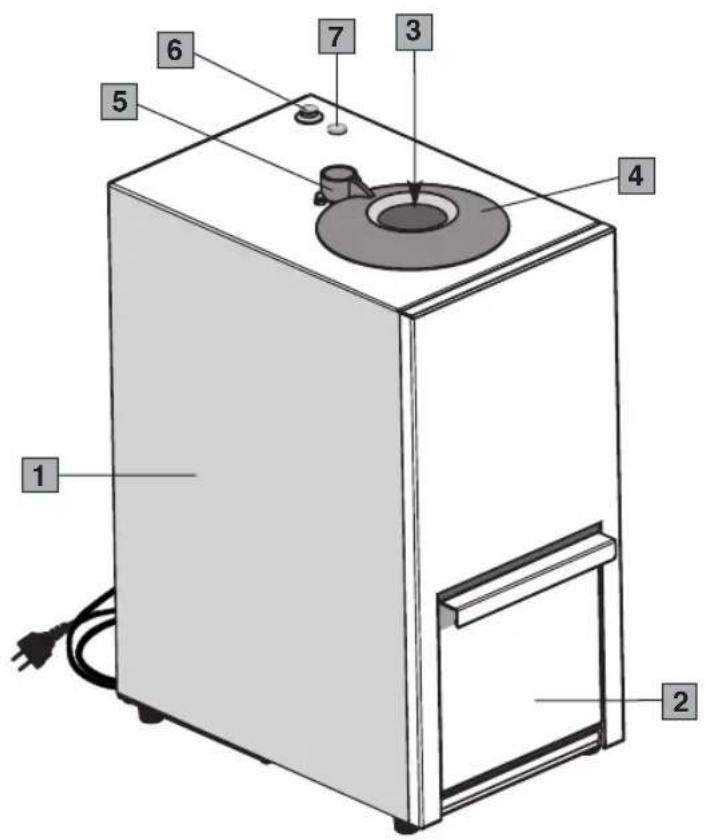
Main parts of model V90 (Fig. 1)
1 Motor housing
2 Container
3 Lid
4 Filler cap
5 Magnetic sensor
6 Safety arm
7 ON-OFF switch
8 Spout
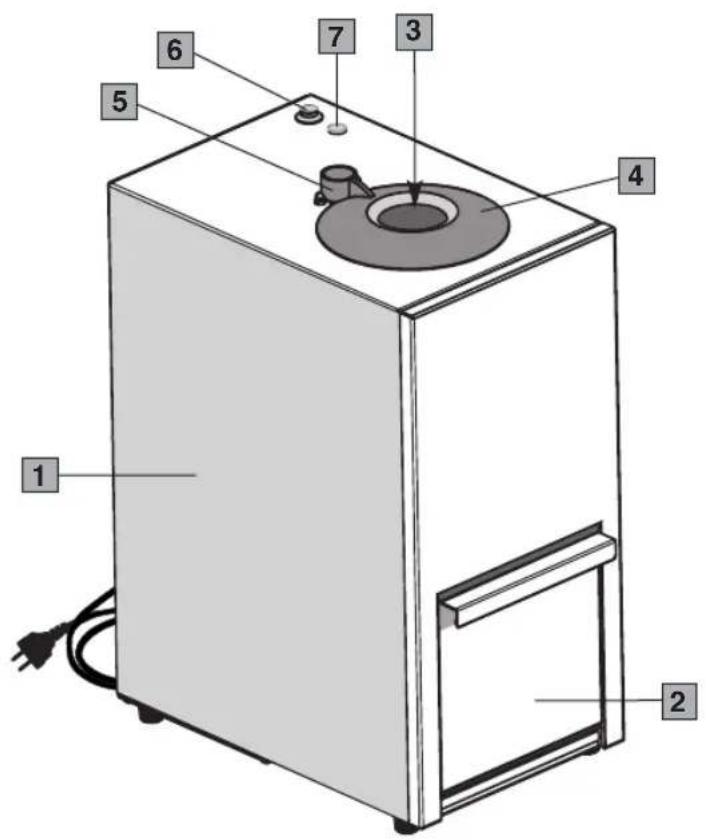
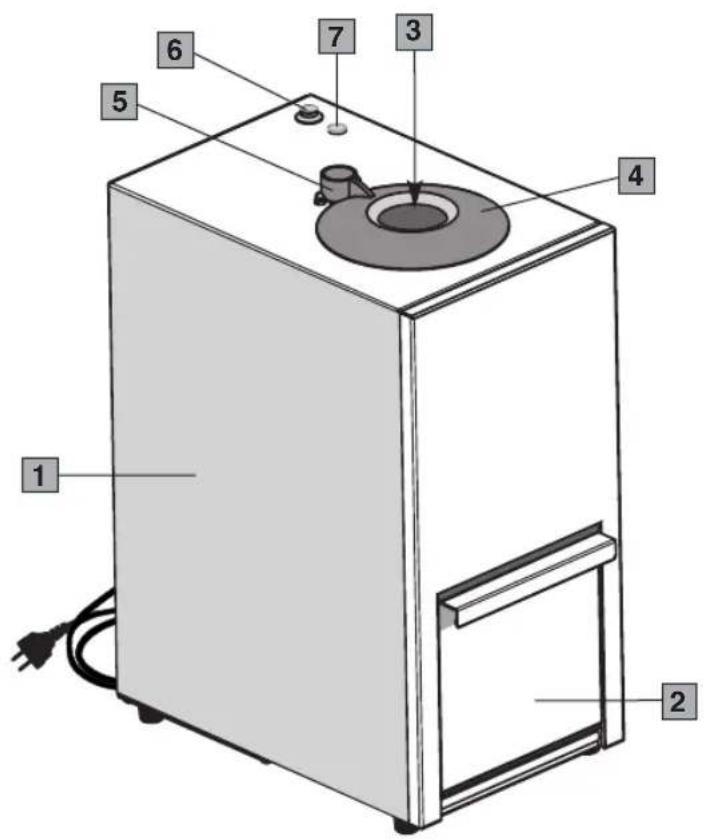
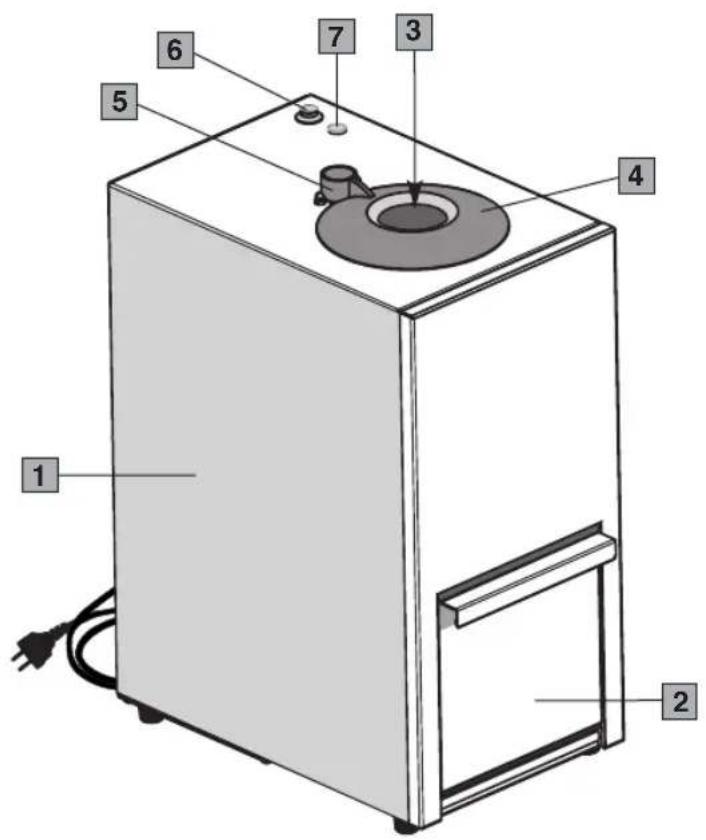
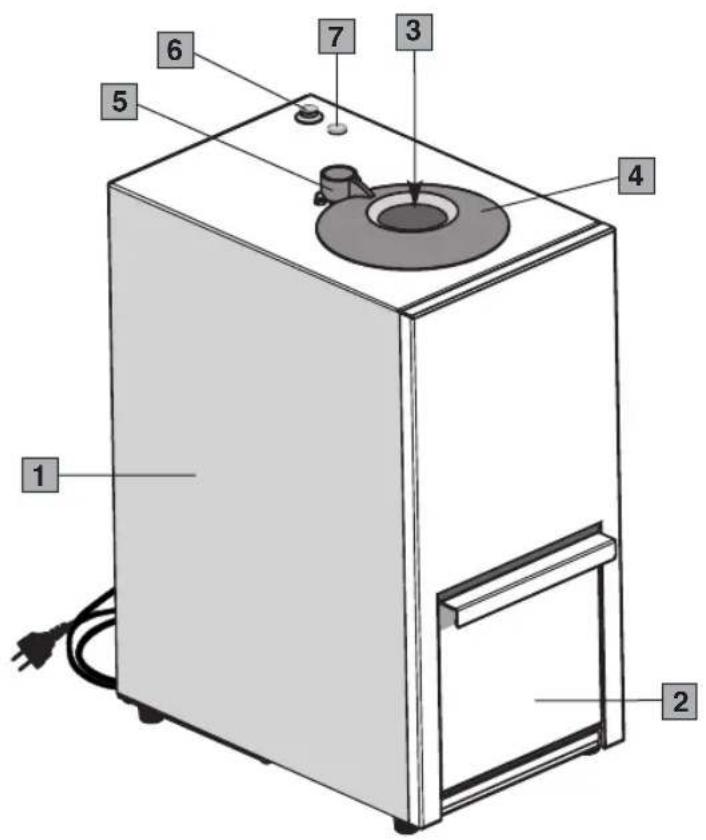
Main parts of model V100 (Fig. 2)
1 Housing
2 Tray
3 Container
4 Lid
5 Magnetic sensor
6 ON-OFF switch
7 Indicator light
text_image
Labeled diagram of a blender with numbered parts and an electrical plug, showing internal components and wiring.Fig. 1
text_image
Labeled diagram of a portable electronic device with numbered components for identification.Fig. 2
AUTOMATIC ICE CRUSHER G30
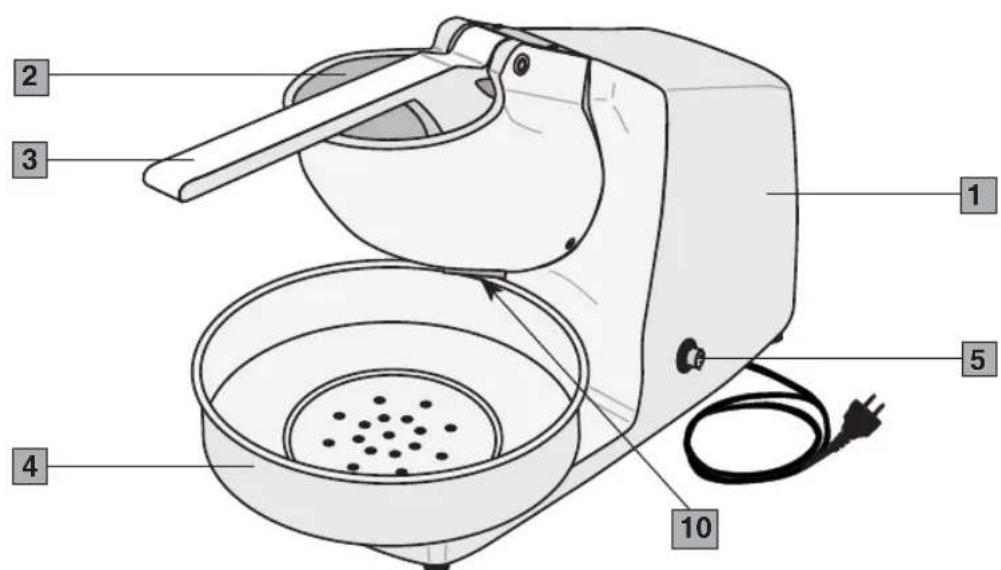
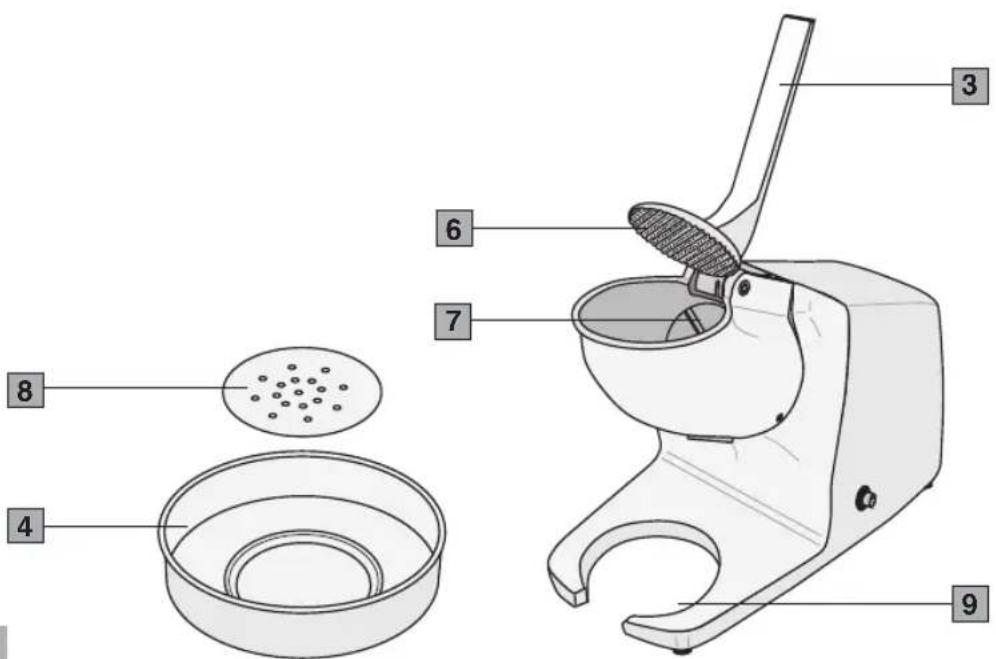
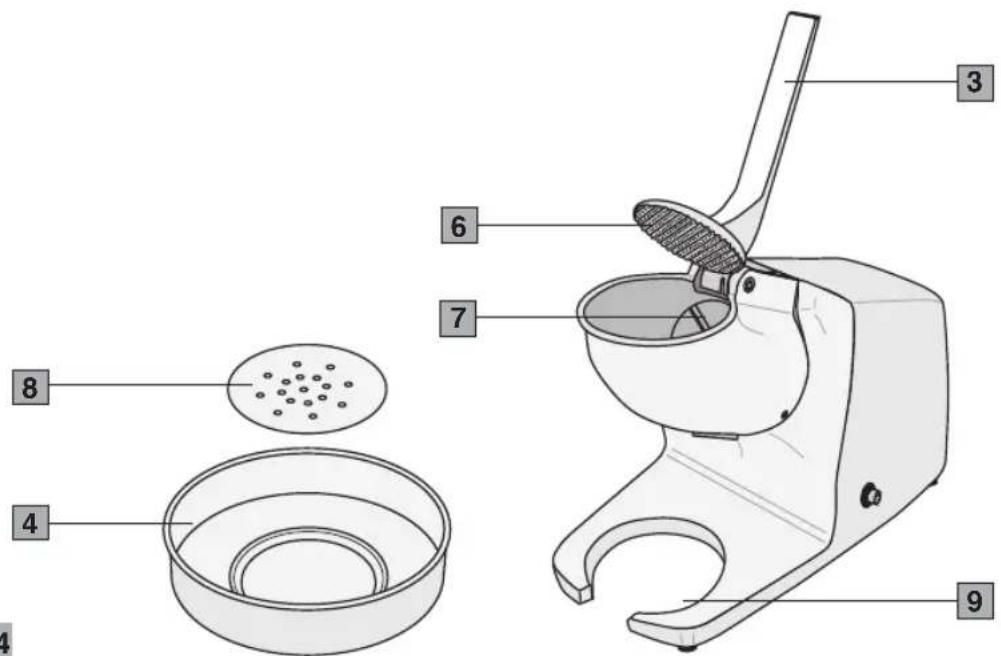
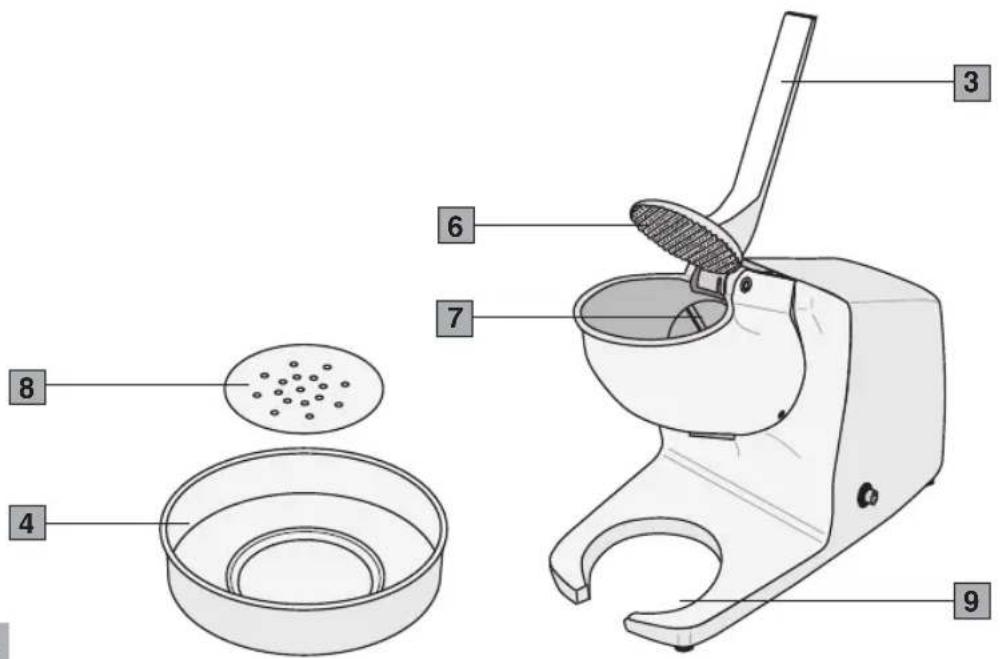
Main parts (Fig. 3 - Fig. 4)
1 Housing
2 Inlet
3 Lever with safety microswitch
4 Bowl
5 ON-OFF (I-O) switch
6 Ice presser cover
7 Blade
8 Water drain
9 Bowl housing
10 Spout
text_image
Labeled diagram of a coffee maker with numbered parts including handle, bowl, and power plugFig. 3
text_image
Labeled diagram of a kitchen grater with numbered parts including lid, bowl, and handleFig. 4
SAFETY RECOMMENDATIONS GENERAL INSTRUCTIONS
- Read the following instructions carefully before using the appliance.
- Installation and any maintenance should be carried out by specialized personnel.
- This appliance is intended for professional use, and should therefore be used by adults and qualified personnel only. This appliance is NOT intended for industrial food processing in mass production.
CHILDREN SHOULD BE SUPERVISED SO AS TO ENSURE THAT THEY DO NOT PLAY WITH THE APPLIANCE.
-
Never use this appliance for any operations other than crushing ice cubes. Any other use is dangerous.
-
Always work under safe conditions: do not use the appliance with wet hands or feet. Do not use outdoors.
-
Keep the original package for possible future use. It is the most suitable protection against impact during transportation.
-
In case of fire use CO₂ extinguishers. Do not use water or powder extinguishers.
-
Never place the appliance in water!
-
Do not disassemble the appliance or attempt to perform any repairs inside it.
-
Always unplug the appliance before performing any maintenance or cleaning and when it is not in use.
-
Never pull the appliance by the cord to move it. Never unplug it by pulling the cord or touching it with wet hands.

If the cord is damaged, it must be replaced by an Authorized Service Center.
-
The appliance is equipped with a safety device to prevent any contact with moving parts. DO NOT ATTEMPT TO BY-PASS THE SAFETY DEVICE.
-
WARNING: Never place any utensils, metal or other hard materials, in the container. This is dangerous and could cause damage.
-
Do not use the appliance if it is damaged or had any loosened parts such as blades, couplings, etc. In these cases, contact an Authorized Service Center immediately.
-
WARNING: BLADES ARE SHARP. HANDLE WITH CARE!
SAVE THESE INSTRUCTIONS!
Technical specifications
| MODEL V90 | |||||
| Power | Voltage | Dimensions | Net weight | Gross weight | Output |
| V/HzW | mm | kg | kg | ||
| 150 230/50 | 210x230x460 h | 4,2 5,1 | 120 | ||
| MODEL V100 | |||||
| 300 230/50 | 240x340x470 h | 15,5 | 16,8 | 360 | |
| MODEL G30 AUTOMATIC ICE CRUSHER | |||||
| 300 230/50 | 450x210x430 h | 9,2 10,5 120 | |||
CE
The EC declaration of conformity for this appliance is available in the Products section of our website www.ceado.com.
INSTALLATION
Comply with the safety recommendations indicated above and hereafter when installing the appliance.
-
Make sure that the mains voltage is as indicated on the rating label of the appliance and that the electric system is grounded and equipped with a differential switch.
-
Install the appliance in a DRY, PROTECTED place, far from water sprays or splashes, heat sources, open flames and inflammable substances.
Place the appliance on a flat, horizontal, stable surface where it cannot tip over.
- Make sure the switch on the appliance is in the "OFF" position and plug it into a socket protected by a magneto thermal switch or fuses.
Do not use a multiple outlet plug.
- Stretch the power cable out to full length. Do not let it pass over sharp edges or hot surfaces. Do not let oil spill on it. Do not let the power cable hang loose from the counter on which the appliance stands.
USE
Models V90 and V100

Before first use: rinse all of the parts that will have contact with food in running water i.e.: container, lid, filler cap, spout, tray.
1 Make sure the switch is in the "OFF" position.
2 On model V90, place an empty container under the spout.
3 Place the ice cubes in the container.
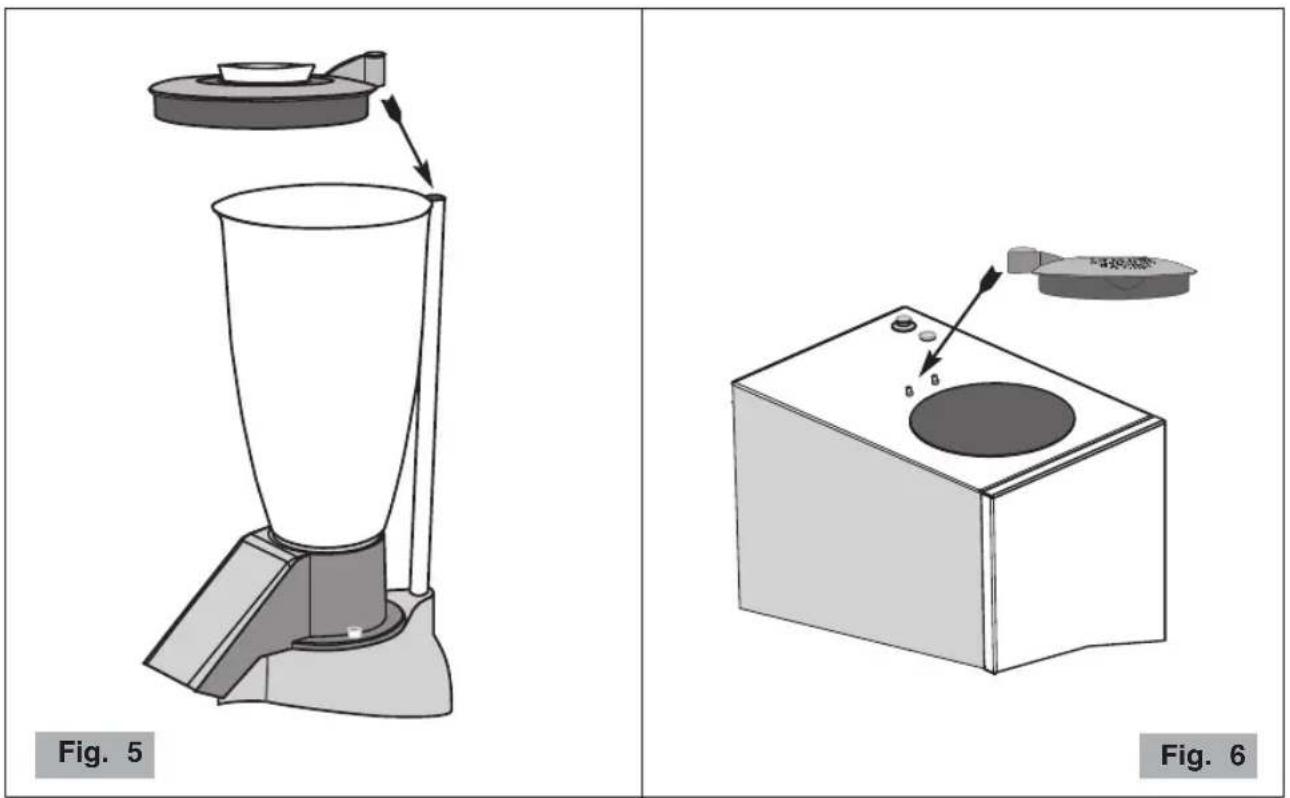
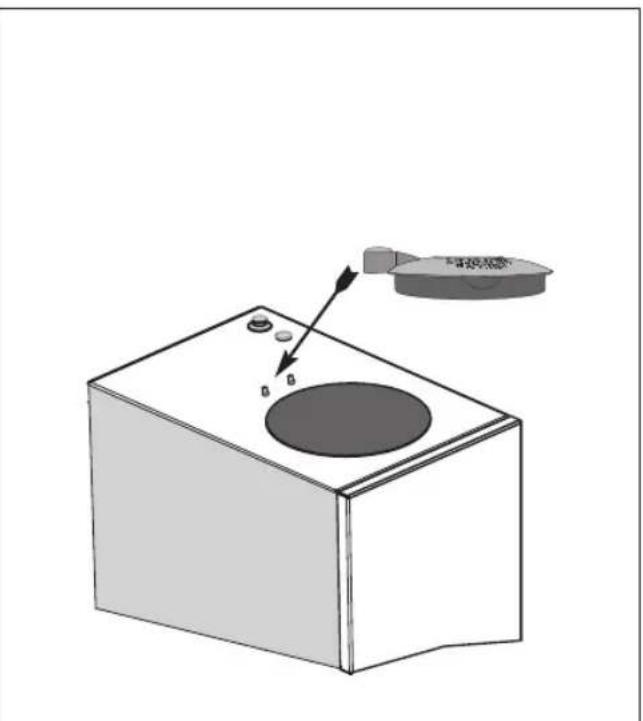
4 On model V90, fit the lid on the container so that the magnetic sensor is in contact with the end of the safety arm (Fig. 5). On model V100, fit the lid so that the magnetic sensor is between the two positioning screws (Fig. 6).

Any attempt to by-pass the safety device and use the appliance without its lid may cause personal injury and/or damage to the appliance.
5 Start the motor by turning the switch to "ON". Run the appliance for the time necessary to crush the ice in the container (about 30 seconds are needed to crush a full container).
6 Switch the motor off by turning the switch to "OFF".
Note: Always wait for the motor to come to a complete stop before removing the lid.
natural_image
Two technical diagrams showing a blender and a device with a lid, labeled Fig. 5 and Fig. 6 (no text or symbols on the devices themselves)7 Model V100: if the device is not switched off with the switch, replacing the tray will start the motor again.
natural_image
3D diagram of a box with an open lid, labeled Fig. 7 (no text or symbols on the diagram itself)Model G30

Before first use: rinse all of the parts that will have contact with food in running water i.e.: inlet, lever, bowl, ice presser cover, blade, water drain.
1 Prepare a container with the ice cubes to be crushed.
2 Place the bowl under the crushed ice spout.
3 Lift up the lever, pour the ice cubes into the inlet.
4 Start the appliance by operating the ON-OFF switch.
5 Lower and push on the lever steadily without forcing.
6 Repeat the above procedure as many times as necessary.
7 After use, stop the motor by turning the switch to "OFF".
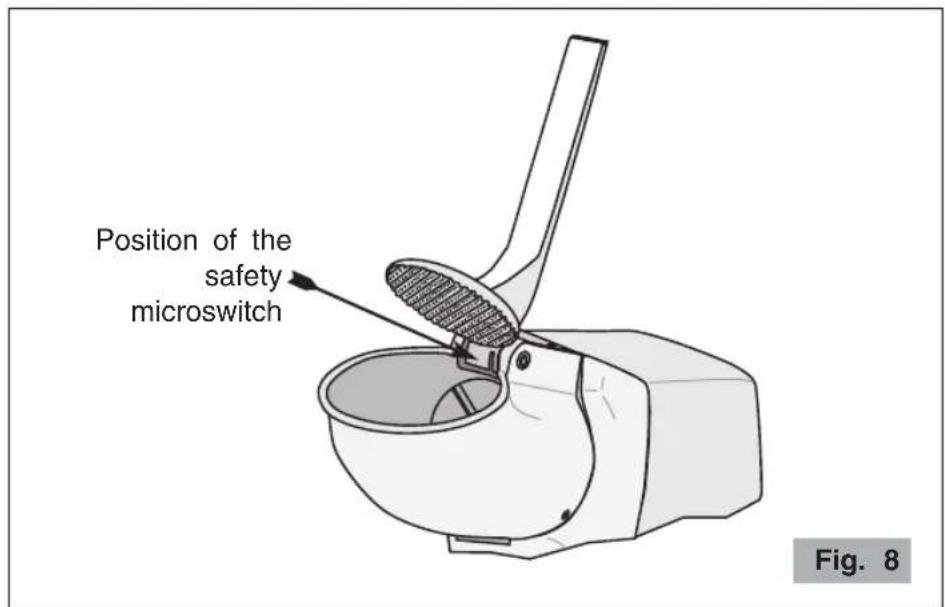
NOTE: The lever with the ice presser cover is equipped with a safety microswitch that stops the motor when the lever is raised (Fig. 8). The fact of lifting the lever to add more ice cubes in the inlet will therefore stop the motor without switching off the appliance. When the lever is lowered again the motor starts.

Any attempt to by-pass the safety device may cause personal injury and/or damage to the appliance.
text_image
Position of the safety microswitch Fig. 8CLEANING AND MAINTENANCE
It is important to keep the appliance clean and in good working order to ensure optimum quality of the products and long life of the appliance.
To clean the appliance, unplug the appliance and clean with a damp cloth or alcohol, or use a generic spray detergent. Dry with a dry cloth.

Never wash the appliance with jets of water or immerse the motor housing.

Models V90 and V100: Do not expose the lid to temperatures above 60^ C. This would damage the magnetic sensor.
TROUBLESHOOTING
In case of any malfunction, defect of the appliance or if you suspect any breakage after a fall, unplug the appliance immediately.
If you are unable to solve the problem referring to the table below, contact an Authorized Service center.
Only qualified experts should repair the appliance.
We are not liable for any damage caused by repairs not made correctly by unauthorized personnel. In these cases the warranty does not apply.
| Problem | Solution |
| The ice crusher does not start. | Make sure it is plugged in.Make sure the safety circuit breaker is closed.On models V90 and V100, make sure the magnetic sensor in the lid is in the correct position.Make sure the switch on the appliance is turned to ON.On model V100, make sure the tray is in the correct position.If the problem occurs after a long period of intensive use the motor may have overheated. Wait at least 20 minutes and try again. If you put the appliance in a cool place this will reduce the waiting time.On model V100, if the problem occurs after an overload, the circuit breaker on the motor may have been tripped! Push the button on the back of the appliance. |
DISPOSAL
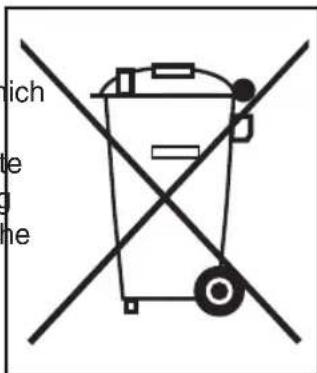
Correct disposal of this product (waste electrical and electronic equipment)
(Applicable in the European Union and other countries with separate collection systems)
This product has been made from high-quality parts and materials, which can be re-used and recycled.
Therefore, do not throw the product away with normal household waste at the end of its working life. Take it to a collection point for recycling electrical and electronic devices. This is indicated by this symbol on the product and in the operating manual.
Please contact your local government office for information about the exact location of the closer collection point.
text_image
ich e eWARRANTY
This product is guaranteed against faulty materials and workmanship.
The warranty period may vary according to local laws or commercial uses of the country where the product is marketed. Therefore, please contact the retailer from whom the product was purchased.
During the warranty period, this product can either be repaired or replaced, at the manufacturer's discretion, at no additional cost only if it has been used according to the instructions in this use and maintenance manual.
If the products needs maintenance or repairs during the warranty period, contact your retailer for shipping instructions. The product should be shipped in its original package or other suitable packing.
The warranty does not apply in case of neglect, misuse, abuse or unauthorized repairs. This warranty does not apply to parts subject to deterioration through normal use such as wear to the container, blades, joints, etc.
The warranty is limited to the costs of repair or replacement of the product or its defective parts, or an amount equivalent to the price paid for its purchase. No additional requests of damages will be available to the purchaser.
The above instructions must be followed, otherwise the warranty is invalidated and the manufacturer has no liability.
In any case these instructions cannot cover every possible condition and the user is recommended to make responsible use of the appliance.
THE MANUFACTURER RESERVES THE RIGHT TO MAKE ANY ALTERATIONS TO THE APPLIANCE WITHOUT NOTICE
text_image
Labeled diagram of a blender with numbered parts and an electrical plug, showing internal components and wiring.Fig. 1
text_image
Labeled diagram of a portable electronic device with numbered components for identification.Fig. 2
PILEUR À GLACE G30
text_image
Labeled diagram of a kitchen grater with numbered parts including lid, bowl, and handleFig. 4
NORMES DE SÉCURITÉ INSTRUCTIONS GÉNÉRALES
GARDER CES INSTRUCTIONS!
natural_image
Line drawing of a blender with a lid and base, showing a drop in the top portion (no text or symbols)Fig. 5
natural_image
Diagram of a device with a circular base and two labeled components, showing an arrow pointing to a component (no text or symbols present)Fig. 6
natural_image
3D diagram of a box with an open lid, labeled 'Fig. 7' (no text or symbols on the diagram itself)Modèle G30

CONDITIONS DE GARANTIE
text_image
Labeled diagram of a blender with numbered parts and electrical plug, showing internal structure and component positioning.Abb. 1
text_image
Labeled diagram of a portable electronic device with numbered components for identification.Abb. 2
AUTOMATIK-EISZERKLEINERER G30
text_image
Labeled diagram of a microwave oven with numbered parts for identificationAbb. 3
text_image
Labeled diagram of a food grater with numbered parts including lid, bowl, and handleAbb. 4
natural_image
3D diagram of a box with an open lid, showing internal structure and no text or symbolsModell G30

natural_image
Symbol of a trash bin crossed with a diagonal line, representing no waste or discharge (no text or labels)GARANTIEBEDINGUNGEN
text_image
Labeled diagram of a blender with numbered parts and an electrical plug, showing internal components and wiring.Fig. 1
text_image
Labeled diagram of a portable electronic device with numbered components for identification.Fig. 2
text_image
Labeled diagram of a microwave oven with numbered parts for identificationFig. 3
text_image
Labeled diagram of a microwave oven with numbered parts including lid, bowl, and slurry.Fig. 4
natural_image
Two technical diagrams showing a blender and a device with a lid, labeled Fig. 5 and Fig. 6 (no text or symbols on the devices themselves)natural_image
3D diagram of a box with an open lid, labeled Fig. 7 (no text or symbols on the diagram itself)Modelo G30
think strong, work better
Ceado S.r.l.
Tel.: (00-39) 041 50 30 767
Fax: (00-39) 041 50 38 413
E-mail: info@ceado.com
www.ceado.com