Stratos 35.1077 - Weather Station TFA - Free user manual and instructions
Find the device manual for free Stratos 35.1077 TFA in PDF.

User questions about Stratos 35.1077 TFA
0 question about this device. Answer the ones you know or ask your own.
Ask a new question about this device
Download the instructions for your Weather Station in PDF format for free! Find your manual Stratos 35.1077 - TFA and take your electronic device back in hand. On this page are published all the documents necessary for the use of your device. Stratos 35.1077 by TFA.
USER MANUAL Stratos 35.1077 TFA
No part of this manual may be reproduced without written consent of TFA Dostmann. The technical data are correct at the time of going to print and may change without prior notice. The latest technical data and information about this product can be found in our homepage by simply entering the product number in the search box.
EU declaration of conformity
Hereby, TFA Dostmann declares that the radio equipment type 35.1077 is in compliance with Directive 2014/53/EU. The full text of the EU declaration of conformity is available at the following Internet address: www.tfa.dostmann.de/service/download/sce
www.tla-dostmann.de
E-Mail: info@ta dostmann.de
TFA Dostmann GmbH & Co.KG, Zum Ottersberg 12, D-97877 Wertheim, Germany

Instruction manuals
www.Ila-dostmann.de/en/service/downloads/instruction-manuals
Kat. Nr. 35.1077
STRATOS - Funk-Wetterstation
D
Inhaltsverzeichnis
- Einführung ....4
natural_image
Technical diagram of a mechanical device with two circular components and directional arrows indicating movement (no text or labels)b.) Montage des Regensensors

natural_image
Technical line drawing of a mechanical assembly with no visible text or symbolsc.) Montage des Thermo-Hygro-Sensors

natural_image
Technical line drawing of a mechanical assembly with no visible text or symbolstext_image
Technical diagram of an electrical measurement device with labeled components and a magnified inset showing internal components.STRATOS - Wireless weather station
GB
7. Batteriewechsel
- Inventory of contents....18
2.1 Feature of the base station ..... 19
2.2 Feature of the thermo-hygro sensor .....19
2.3 Feature of wind sensor ....20
2.4 Feature of rain sensor ....20
- Getting started .....20
3.1 Battery installation .....20
3.2 Mounting 22
- LCD display 24
4.1 LCD overview .....24
4.2 Weather forecast .....25
4.3 Weather forecast tendency indicator .....25
4.4 Storm warning indicator .....25
- Program modes....26
5.1 Quick display mode .....26
5.2 Setting mode ..... 26
5.3 History mode .....27
5.4 Alarm mode .....27
5.5 Min/Max mode .....28
-
Specification 2
-
Battery replacement, Notes, Waste disposal 30
16
17

STRATOS - Wireless weather station
STRATOS – Wireless weather station

1. Introduction
This new wireless weather station consists on a base station with indoor sensors for room temperature, humidity and atmospheric pressure and several outdoor sensors for measuring outdoor temperature, humidity, wind velocity and quantity of rainfall.
So you get useful information about climate and weather in and around your house. This is fun and makes you curious to know more.
Please read this instruction manual thoroughly to fully understand the correct operation of your weather station and benefit from its unique features.
1.1 Features
- Wireless transmission of outdoor temperature, humidity, quantity of rainfall and wind velocity from the exterior sensors to the weather station (868 MHz)
- Particularly secure data transmission by connecting each transmitter with cable, long-distance range up to 100 m (free field)
- Indoor temperature and humidity
- Weather forecast with symbols and tendency of atmospheric pressure
• Absolute and relative atmospheric pressure - Bar graph indication of atmospheric pressure for the last 24 hours
• 24 hours history
• Windchill factor and dewpoint - Programmable alarm functions for certain weather conditions, like temperature alarm, storm warning
• Maximum and minimum values with time and date of recording
• Radio controlled clock with alarm and date
• Time zone ±12 hours, manual time setting possible - Backlight (when using buttons)
- For wall mounting or table standing
2. Inventory of contents
Content
Weather station:
- Batteries 3 × 1,5 V AA
Sensor:
• Thermo-Hygro-Sensor
- Batteries 2 × 1,5 V AA
- Rain protection cover
- Wind sensor
- Rain sensor
• 2 connecting cables to Thermo-Hygro-Sensor
- Mast
- Mounting material
Manual
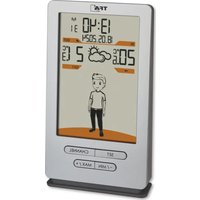
2.1 Base station
Front view
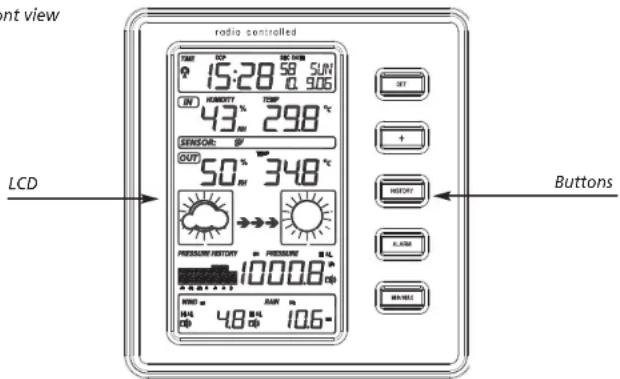
text_image
rent view LCD radio controlled 15:28 58 SUN 0.906 43 ° 298 °C SENSOR: OUT 50 ° 348 °C PRESSURE HISTORY PRESSURE HL 10008 dB WIND 48 BHL 10.6- BUTS + DOWN R. LAIN WIN RELT ButtonsBack view
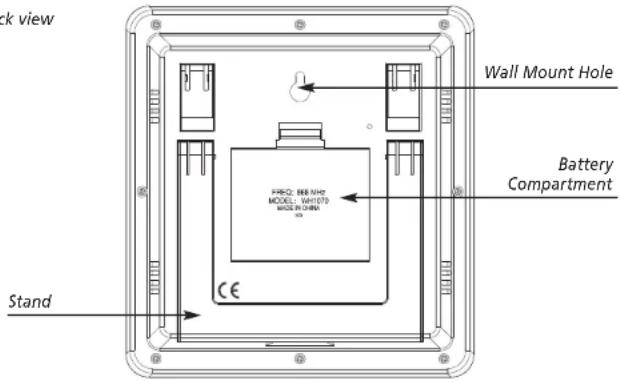
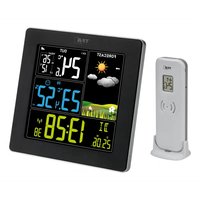
text_image
ck view Wall Mount Hole Battery Compartment Stand FREQ: 100.1/100 MODEL: WH1079 MODEL IN CHINA CE2.2 Thermo-hygro sensor
The thermo-hygro-sensor measures the outdoor temperature and humidity. In addition it is the main data communication unit: The wind and rain sensors are connected to the thermo-hygro-sensor for operating power and to communicate to the base station. Weather data sent from the thermo-hygro-sensor is transmitted through wireless link. The radio controlled time receiver is built inside the sensor.

STRATOS - Wireless weather station
STRATOS - Wireless weather station

2.3 Wind sensor

The wind sensor measures wind speed and sends the data to thermo-hygro-sensor, which transmits the data to the base station. Operating power is taken from the thermo-hygro-sensor by a cable connection.
2.4 Rain sensor
The rain sensor measures the rainfall and sends the data to thermo-hygro-sensor, which transmits the data to the base station. Operating power is taken from the thermo-hygro-sensor by a cable connection.
3. Getting started
- Before placing and installing all components of the weather station at their final destination, please set up the weather station with all parts being nearby for testing the correct function.
3.1 Battery installation
Thermo-hygro-sensor
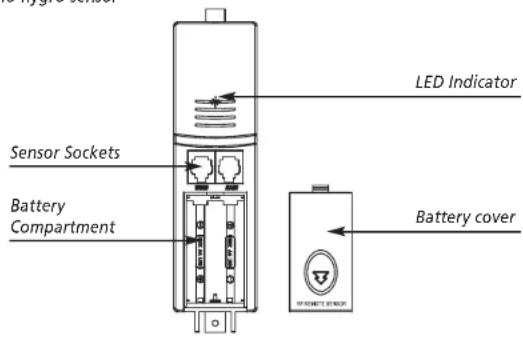
text_image
LED Indicator Sensor Sockets Battery Compartment Battery cover- Remove the protective cover of the thermo-hygro-sensor to reveal the two sockets (for the wind sensor and rain sensor)
- Connect the attached cables of wind and rain sensors to the corresponding sockets at the thermo-hygro-sensor by clicking them into place. Make sure not to swap the sockets.
- Open the base station's battery cover located at the back of the unit and insert 3 x AA, 1.5V Alkaline batteries into the battery compartment and close the battery cover
- Open the battery cover of the thermo-hygro-sensor located below the two sockets and insert 2 x AA, 1.5V Alkaline batteries and close the cover.
Transmission of outdoor values and DCF time
- When the base station is powered up, a short beep will sound and all LCD segments will light up for about 3 seconds before it enters into learning mode to learn the sensors security code.
- When the thermo-hygro-sensor is powered up (also after a change of batteries), the LED indicator will light up for 4 seconds. If the LED does not light up, make sure the batteries are inserted the correct way.
- After the thermo-hygro-sensor is powered up, the sensor will transmit weather data for 24s, and then the sensor will start the radio controlled time reception. During the DCF time reception period (maximum 5 minutes), no weather data will be transmitted. The LED indicator will be flashing 5 times once DCF signal was synchronized.
Note: DO NOT PRESS ANY BUTTONS during the first 10 minutes learning period or before radio controlled time is displayed on the receiver. After both outdoor weather data and radio controlled time are displayed you can place your remote sensor outdoors at the final destination. In case the clock cannot detect the DCF-signal (for example due to disturbances, transmitting distance, etc.), the time can be set manually. If the outdoor weather data is not displayed or if any button is pressed before the weather station receives the signal, you will need to follow the battery installation procedure again. Please wait minimum 10 seconds before re-inserting the batteries to make a proper reset for both transmitter and receiver.
Note for Radio Controlled Time DCF
- The time base for the radio controlled time is a Caesium Atomic Clock operated by the Physikalisch Technische Bundesanstalt Braunschweig which has a time deviation of less than one second in one million years. The time is coded and transmitted from Mainflingen near Frankfurt via frequency signal DCF-77 (77.5 kHz) and has a transmitting range of approximately 1,500 km. Your radio-controlled clock receives this signal and converts it to show the precise time in summer or wintertime. The quality of the reception depends greatly on the geographic location. In normal cases, there should be no reception problems within a 1,500 km radius around Frankfurt.
Please take note of the following:
- The radio-controlled time receiver is built inside the thermo-hygro-sensor. It is recommended to keep distance to any interfering sources and ferro-concrete buildings.
- During night-time, the atmospheric disturbances are usually less severe and reception is possible in most cases. A single daily reception is adequate to keep the accuracy deviation under 1 second.
- If the reception is not successful, the DCF reception symbol disappears, but the DCF time reception will be repeated again. The manually set time will be overwritten by the DCF time when the signal is received successfully.
3.2 Mounting
- Before installing the sensors and the base station at their final destination please check if the data transmission is continuously possible (transmission range max. 100 m free field, within ferro-concrete rooms the received signal is naturally weakened). If necessary chose another position for transmitter and / or base station.
20
21
GB
STRATOS - Wireless weather station
STRATOS - Wireless weather station
GB
1) Base station
With the foldable leg at the back of the unit, the base station can be placed onto any flat surface or wall mounted at the desired location by the hanging hole at the back of the unit.
2) Remote sensor
For accurate results, the remote sensor mast should be securely mounted onto a horizontal surface and in an open area away from trees or other coverings where rainfall or wind speed may be reduced causing inaccurate reading.
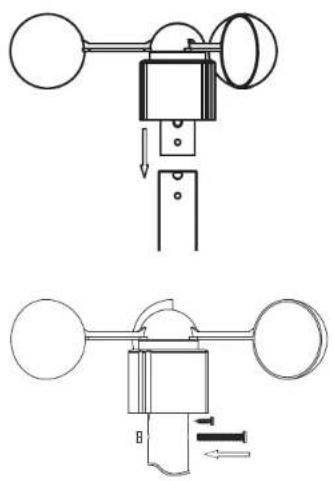
a.) Mounting the wind sensor
Assemble the mast. Firstly, check that the wind-fan can rotate freely before fixing the unit. The wind sensor should now be mounted using the screw onto a mast provided to allow the wind to travel around the sensor unhindered from all directions.
natural_image
Technical diagram of a mechanical device with two circular components and directional arrows indicating movement (no text or labels)b.) Mounting the rain sensor
natural_image
Technical line drawing of a mechanical assembly with no visible text or symbolsc.) Mounting the thermo-hygro-sensor same as rain sensor

text_image
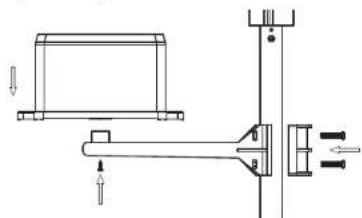
Technical diagram of a mechanical or electrical device with labeled components and directional arrows indicating flow or movement.d.) Fix the whole set to a pole with the two adjustable hoops.
text_image
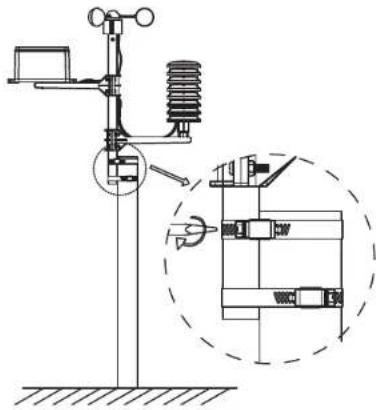
Technical diagram of an electrical measurement device with labeled components and a magnified inset showing internal components.Once the wind sensor and rain sensor are fixed onto the mast, connect the cable to the corresponding thermo-hygro-sensor socket.
22
23

STRATOS - Wireless weather station
STRATOS - Wireless weather station

4. LCD display
4.1 LCD overview
The following illustration shows the full segments of the LCD for description purposes only and will not appear like this during normal operation and use.

text_image
29. TIME OFF ON/WNS OFF SEC DATE ALAM ON 30. 88:88 88 88.88 2. IN HUMIDITY ON TEMP 6. 88 % -1888 °C 7. HI AL RH SENSOR:123 MIN MAX 10. 12. OUT 88 % -1888 °C 13. HI AL RH 16. TX 17. PRESSURE HISTORY rel abs PRESSURE LO AL HI AL 19. 188.88 23. WIND m/s/Hz/Hz/Hz/Hz/Hz/Hz/Hz/Hz/Hz/Hz/Hz/Hz/Hz/Hz/Hz/Hz/Hz/Hz/Hz/Hz/Hz/Hz/Hz/Hz/Hz/Hz/Hz/Hz/Hz/Hz/Hz/Hz/Hz/Hz/Hz/Hz/Hz/Hz/Hz/Hz/Hz/Hz/Hz/Hz/Hz/Hz/Hz/Hz/Hz/Hz/ Hz 24. HI AL 8.8.8 HI AL 88.8.8 mm 25. 27. 28.- Time
- Alarm on indicator
- Day of week/ time zone / history
- Date
- Indoor temperature display
- Indoor humidity display
- Indoor temperature and humidity low alarm and high alarm
- Temperature display unit
- General indoor alarm icon
- MINIMAX information
- Wind chill and dew point temperature display
- Outdoor temperature and humidity display
- Outdoor temperature and humidity low alarm and high alarm
- Temperature display unit
-
General outdoor alarm icon
-
Weather forecast icon
- Weather tendency indicator
- Pressure unit (relative or absolute)
- Pressure with 24 hour history graph
- Pressure low alarm and high alarm
- Pressure display unit (inHg or hPa)
- Pressure alarm on indicator
- Wind speed display unit (mls, km/h, knots, chill mph, bft)
- Wind speed high alarm
- Wind alarm on indicator
- Rainfall 1h, 24h, week, month or total hour display
- Rainfall display unit (mm/in)
- Rainfall alarm on indicator
- Radio controlled time version DCF
- Radio controlled time icon
- Low battery indicator (transmitter)
- Low battery indicator (base station)
4.2 Weather forecast
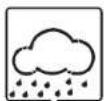
The four weather symbols (sunny, partly cloudy, cloudy and rainy) represent the weather forecast.
The weather forecast symbols indicate an improvement or worsening of the future weather conditions based on the current weather, which does not have to correspond exactly with the weather indicated on the symbol.
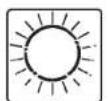
Sunny Partly

cloudy
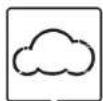
Cloudy Rainy
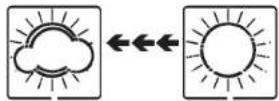
4.3 Weather forecast tendency indicator
The weather tendency indicators arrow is located between the weather icons to show the air pressure tendency and provide a forecast of the weather to be expected by the decreasing or increasing air pressure. The rightward arrow means that the air pressure is increasing and the weather is expected to become better. The leftward arrow means that the air pressure is decreasing and the weather is expected to become worse.
The change of weather forecast icon is in accord to the relationship between current relative pressure and the pressure change since last twelve hours. If the weather is changing, weather tendency indicator (animated arrows) will be flashing. And after the next three hours if weather conditions have become stable, the arrows will fix indicating a stable condition happened.
Examples of changing weather icons:
Notes to pressure sensitivity setting for weather forecasting:
The pressure threshold can be set to suit the user's requirement for weather forecasting from 2-4hPa (default 2hPa). For areas that experience frequent changes in air pressure requires a higher setting compared to an area where the air pressure is stagnant. For example if 4hPa is selected, then there must be a fall or rise in air pressure of at least 4hPa before the weather station will register this as a change in weather.
4.4 Storm warning indicator

The storm threshold can be set to suit the user's requirement for storm forecasting from 4-9hPa (default 4hPa). When there is a fall over pressure threshold within 3 hours, the storm forecasting will be activated, the clouds with rain icon and tendency arrows will flash for 3 hours indicating the storm warning feature has been activated.
GB
STRATOS - Wireless weather station
STRATOS - Wireless weather station
GB
5. Program Modes
The base station has five buttons for easy operation: SET button, + button, ALARM button, HISTORY button and MIN/MAX button. And there are five program modes available: Quick Display Mode, Setting Mode, Alarm Mode, History Mode and Min/Max Mode.
The program mode can be exited at any time by either pressing the HISTORY button, or waiting for the 10-second time-out to take effect.
5.1 Quick Display Mode
In Quick Display Mode you get a quick information about several weather data. While in normal mode, press the SET button to enter the Quick Display Mode and to toggle through the display mode. Press + button or MIN/MAX button to select the desired information:
-
Outdoor Temperature / Wind chill / Dew point
-
Absolute pressure / Relative pressure
-
Wind speed / Gust speed
-
1 hour/24 hour/week/month/total rainfall quantity
Press the SET button for two seconds while the rainfall total quantity is displayed to reset the rainfall total value to zero and to cumulate the rainfall quantities until the next reset.
5.2 Setting Mode
- Press the SET button for 3 second while in normal mode to enter the normal setting mode.
- In the setting modes, press + button or MIN/MAX button to select the units or scrolls the value. Holding the + button or MIN/MAX button for 3 second will increase/decrease digits in great steps.
-
Press the SET button to select the following setting in sequence:
-
Time Zone Setting ±12 hrs.: The time zone is used for countries where the DCF signal can be received but the time zone is different from the German time (e.g. +1=one hour later).
-
12/24 hour format
- Manual time setting (hours/minutes)
- Calendar setting (year/month/date, weekday will be calculated thus no need to set weekday)
- Temperature display unit degree Celsius or Fahrenheit
- Air pressure display units in hPa or inHg
-
Relative pressure setting from 300hPa – 1100hPa (default 1013.2hPa). Relative pressure is referred to sea level's pressure and has to be adjusted first to your local altitude. Ask for the present atmospheric pressure of your home area (Local weather service, www, optician, calibrated instruments in public buildings, airport).
-
Pressure threshold setting (default 2hPa, see 4.3)
- Storm threshold setting (default 4hPa, see 4.4)
- Wind speed and gust display units in km/h, mph, m/s, knots, bft
- Rainfall display units in mm or inch
Note: Please set the units firstly before change units' value. During change of units setting, the previous set value will be changed according to the new units. However it might cause resolution loss due to its internal calculation algorithm.
5.3 History Mode
• While in Normal Mode, press the HISTORY button to enter the History Mode.
- In the History Mode, press the + button to select the record over the past 24 hours at increments of -3 hours, -6 hours, -9 hours, -12 hours, -15 hours, -18 hours, -21 hours, -24 hours
5.4 Alarm Mode
- The weather station can be programmed in that way that in certain weather conditions an alarm is activated. For this purpose an upper (High Alarm) and lower limit (Low Alarm) can be set for many parameters.
- While in Normal Mode press the ALARM button to enter the High Alarm Mode.
- Press the SET button to select the following alarm modes. Press + button or MIN/MAX button to set the high alarm value. Press and hold the buttons to change the number in great step.
-
Press the ALARM button to choose the alarm on or off. "HI AL" and an alarm symbol appears or disappears next to the corresponding parameter in the display.
-
Time alarm (hours/minutes, at low alarm setting mode, the same time alarm setting sequence will repeat)
-
Indoor humidity high alarm
- Indoor temperature high alarm
- Outdoor humidity high alarm
- Outdoor temperature high alarm
- Wind chill high alarm
- Dew point high alarm
- Pressure high alarm
- Wind speed high alarm
- Gust speed high alarm
- 1 Hour rain high alarm
- 24 hour rain high alarm
- While in Normal Mode press twice the ALARM button to enter the Low Alarm Mode.
- Press the SET button to select the following alarm modes. Press + button or MIN/MAX button to set the low alarm value. Press and hold the buttons to change the number in great step.
-
Press the ALARM button to choose the alarm on or off. "LO AL" and an alarm symbol appears or disappears next to the corresponding parameter in the display.
-
Time alarm (hours/minutes, at high alarm setting mode, the same time alarm setting sequence will repeat)
-
Indoor humidity low alarm
- Indoor temperature low alarm
- Outdoor humidity low alarm
- Outdoor temperature low alarm
- Wind chill low alarm
- Dew point low alarm
- Pressure low alarm
Remark: after the initial pressing of ALARM button, “--” will be displayed for all segments. Later the high and low alarm values appear if they are activated.
26
27
GB
STRATOS - Wireless weather station
STRATOS – Wireless weather station
GB
Alarm signal
When a set weather alarm condition has been triggered, that particular alarm will sound for 120 seconds. The corresponding value, "HI AL" or "LO AL" and the alarm symbol are flashing until the weather condition doesn't meet the user set level. Press any button to mute the alarm.
Example
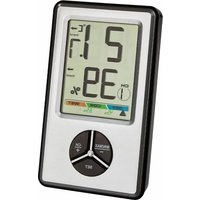
Dew point high alarm was triggered:

text_image
OUT HI AL 60 % RH 30.2 °C DIG DIG digit flashing digit flashing digit flashing5.5 Min/Max Mode
• While in Normal Mode, press the MIN/MAX button to enter the maximum mode.
- In the maximum reading Mode, press the + button to display the following maximum values together with the time and date stamp when these values were recorded. Press SET button while the corresponding maximum value is displayed to reset to the current reading together with the current time and date.
- Indoor humidity maximum
- Indoor temperature maximum
- Outdoor humidity maximum
- Outdoor temperature maximum
- Wind chill temperature maximum
- Dew point temperature maximum
- Pressure maximum
- Wind speed maximum
- Gust speed maximum
- 1 Hour rain maximum
- 24 hour rain maximum
- Week rainfall maximum
- Month rainfall maximum
- While in Normal Mode, press twice the MIN/MAX button to enter the minimum mode.
- In the minimum reading Mode, press the + button to display the following maximum values together with the time and date stamp when these values were recorded. Press SET button while the corresponding minimum value is displayed to reset to the current reading together with the current time and date.
- Indoor humidity minimum
- Indoor temperature minimum
- Outdoor humidity minimum
- Outdoor temperature minimum
- Wind chill temperature minimum
- Dew point temperature minimum
- Pressure minimum
6. Specifications
Transmission distance in open field: 100 meter max.
Transmission frequency: 868MHz
Maximum radio-frequency power: < 25mW
Measuring interval
thermo-hygro-sensor: 48 sec
Alarm duration: 120 sec
Temperature:
Measuring unit: °C/°F
Measuring range:
outdoor: -40°...+65°C
-40°...+149°F
indoor: 0^ ...+ 60^ C
32^ +140^
(show OFL if outside range)
Resolution: 0.1°C
±1°C
Accuracy:
Humidity
Measuring unit: %RH
Measuring range: 10%...99% RH
Resolution: 1%
Accuracy: ±3% for 20...80% RH, otherwise ±5%
Rain volume
Measuring unit: mm/inch
Rain volume display: 0 - 9999mm
0-393.6 inch
(show OFL if outside range)
Resolution: 0.3mm (if rain volume < 1000mm)
1mm (if rain volume > 1000mm)
d speed
Measuring unit: km/h, m/s, mph, knots, Beaufort
Wind speed : 0\~180km/h / 0-50 m/s, 0-111.8 mph
(show OFL if outside range)
Atmospheric pressure
Measuring unit: hPa / inHg
Measuring range: 300hPa - 1100hPa
8.85 - 32.5inHg
Resolution: 0.1hPa
Accuracy: ±3hPa
Power consumption
Base station: 3 x AA 1.5V LR6 Alkaline batteries
Remote sensor: 2 x AA 1.5V LR6 Alkaline batteries
Battery life: About 12 months for base station
About 24 months for thermo-hygro-sensor
GB
STRATOS - Wireless weather station
7. Battery replacement
- When batteries require replacement for the base station, the low battery indicator (RX) will light up on the LCD.
- When batteries require replacement for the transmitter, the low battery indicator (TX) will light up on the LCD.
Note: If a battery change for the transmitter happened, the base station will be resynchronized to the transmitter again within the next 3 hours. If you want to shorten the receiving data time, you have to re-install the batteries of the base station as well. But in this case the previous weather data and alarm value settings of the base station will be lost. - Batteries must not be thrown into a fire, short-circuited, taken apart or recharged. Risk of explosion!
- Batteries contain harmful acids. Low batteries should be changed as soon as possible to prevent damage caused by leaking. Never use a combination of old and new batteries together, nor batteries of different types. Wear chemical-resistant protective gloves and safety glasses when handling leaking batteries.
8. Notes
- Keep your weather station in a dry place.
- Do not place your device near extreme temperatures, vibrations or shocks.
- Clean your device with a soft damp cloth. Do not use solvents or scouring agents.
- Avoid placing the device near interference sources/metal frames such as computer or TV sets.
- Please reset the device and follow the battery installation procedure if the unit does not work properly. Change the batteries.
- Keep the devices and the batteries out of the reach of children.
- The products should only be used as described within these instructions.
- Unauthorized repairs, modifications or changes to the product are prohibited.
9. Waste disposal
This product has been manufactured using high-grade materials and components which can be recycled and reused.

Never dispose of empty batteries and rechargeable batteries in household waste.
As a consumer, you are legally required to take them to your retail store or to an appropriate collection site depending on national or local regulations in order to protect the environment.
The symbols for the heavy metals contained are: Cd=cadmium, Hg=mercury, Pb=lead

This instrument is labelled in accordance with the EU Waste Electrical and Electronic Equipment Directive (WEEE).
Please do not dispose of this instrument in household waste. The user is obligated to take end-of-life devices to a designated collection point for the disposal of electrical and electronic equipment, in order to ensure environmentally-compatible disposal.
Sommaire
- Introduction ......32
1.1 Fonctions ....32
- Composants ....33
2.1 Station de base ....33
2.2 Sonde thermo-hygrométrique ....34
3.2 Installation ....36
- Écran LCD 38
4.1 Aperçu LCD 38
- Mode programmation ....40
5.1 Mode affichage rapide ....40
5.2 Mode réglage ....40
5.5 Mode Mini/Maxi....42
natural_image
Technical line drawing of a mechanical assembly with two views (top and bottom) showing internal components and directional arrows (no text or labels)natural_image
Technical line drawing of a mechanical assembly with no visible text or symbolstext_image
Technical diagram of a mechanical or electrical device with labeled components and schematic linestext_image
Technical diagram of an electrical measurement device with labeled components and a magnified inset showing internal components.text_image
OUT HI AL 60% RH 30.2°C DEW POINT °C DIGIT digit flashing digit flashing5.5 Mode Min/Max
natural_image
Technical line drawing of a mechanical assembly with two views (top and bottom) showing internal components and directional arrows (no text or symbols)natural_image
Technical line drawing of a mechanical assembly with no visible text or symbolsnatural_image
Technical line drawing of a mechanical assembly with no visible text or symbolstext_image
Technical diagram of an electrical measurement device with labeled components and a magnified inset showing internal structure.natural_image
Technical diagram of a mechanical assembly with two views (top and bottom) showing internal components and directional arrows (no text or labels)b.) Montage van de regensensor

natural_image
Technical line drawing of a mechanical assembly with no visible text or symbolsc.) Montage van de thermo-hygro-sensor