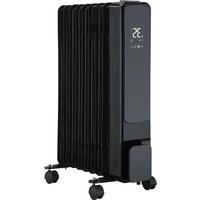
OFR 9 L - Heating Sonnenkönig - Free user manual and instructions
Find the device manual for free OFR 9 L Sonnenkönig in PDF.


User questions about OFR 9 L Sonnenkönig
0 question about this device. Answer the ones you know or ask your own.
Ask a new question about this device
Download the instructions for your Heating in PDF format for free! Find your manual OFR 9 L - Sonnenkönig and take your electronic device back in hand. On this page are published all the documents necessary for the use of your device. OFR 9 L by Sonnenkönig.
USER MANUAL OFR 9 L Sonnenkönig
natural_image
Black rectangular solar water heater with digital display and wheels (no visible text or symbols)text_image
My Home ... Add Device No devices Add Device Add Manually Auto Scan Electrician Smart alarm clock Show cabinet ventilation Show pump Lighting Large Home ... Stop Large Inverter Hadar (RLE) Small Home ... Kitchen Appliances Driver (GHz)... Driver (other) Off Heater Security & Sensors Door/Wire/Window Curtain Curtain (Digital) Exercise & Health Curtain Motor (Zipflet) Drying Stack Video Surveillance Electric Market Gateway Control Warning Table (BLCA(WAF)) Curtain (RLE) Energy Entertainment Show cabinet Curtain Motor (Roll Tube) (RLE) Industry & Agriculture... Pelt Others Pet Rounters Pet Door Forder Pet Roll Throat Cancel E2 Mode = Reset the device first. Please turn on the device and confirm that indicator is drinking fast. Attention: please complete pairing process within 3 minutes after device reset. Resetting Devices > Transfers indicator rapidly blink NextFestnetz 14 Cent/Minute
natural_image
Black rectangular electronic heater with a digital display and wheels, no visible text or symbols on the device itself.Article-nr.: 20800712 | 20800812
INDEX
natural_image
Diagram of a cart with a curved handle and downward arrow, labeled '1' (no text or symbols on the diagram itself)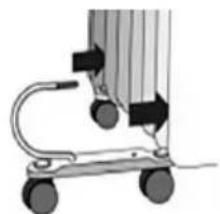
natural_image
Mechanical device with wheels and attached components (no visible text or symbols)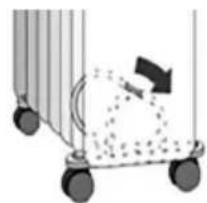
natural_image
Illustration of a cart with wheels and a flag, no text or symbols present3
4
text_image
My Home ... Add Device No devices Add Manually Auto Scan Electrician Smart alarm clock Shoe cabinet sterilizer Dress pump Lighting Large Home ... Sleep pump Heater Heater (8x8) Small Home ... Kitchen Appliances Heater (24pcs) Heater (other) 61 heater Security & Sensors Door/Window Curtain Curtain (24pcs) Exercise & Health Curtain Minor (24pcs) Drying Back Electric Blanket Video Survey Alliance Gateway Control Nursing Table (50x+50x) Curtain (3LC) Curtains (other) Energy Entertainment Intl Shoe cabinet Curtain Motor (Ball Chain) (8LC) Industry & Agriculture... Pet Others Pet Fountain Pet Trust Reader Pet Ball Discover Cancel E2 Mode For Reset the device first. Please turn on the device and confirm that indicator is blanking text. Attention: please complete passing process within 3 minutes after device reset. Resetting Devices Confirm indicator rapidly blank NextModifications techniques
natural_image
Black rectangular electronic heater with a digital display and wheels, no visible text or symbols on the device itself.Nr. articolo: 20800712 | 20800812
IT
INDEX
text_image
Diagram illustrating four sequential steps of a cart rolling motion, labeled 1 to 4 with directional arrows and motion indicators.text_image
My Home ... Add Device Add Manually Auto Scan Electrician Smart alarm clock Shoe cabinet shellbox Smart pump Lighting Large Home ... Sleep-Large Heater Heater (BLZ) Small Home ... Kitchen Appliances Heater (Zipbox) Heater (other) Cell Manager Security & Sensors Door/Wheel Curtain Curtain (Zipbox) Exercise & Health Video Survey Fanoe Gateway Control Running Tables (BLE+WiFi) Curtains (BLZ) Curtains (other) Energy Entertainment Shoe cabinet Custom Motor (Ball Chain) (BLZ) Industry & Agriculture Pet Others Pet Fountain Pet Dress Heater Pet Ball Thermostat Reset the device first. Please turn on the device and confirm that indicator is talking fast. Attention: please complete pairing process within 3 minutes after device reset. Resetting Devices > Confirm indicator rapidly blink Nextnatural_image
Black rectangular electronic heater with a digital display and wheels, no visible text or symbols on the device itself.Important Instructions & Safety Warning.... 42
Description of parts.... 44
Assembly.... 44
Instruction for use.... 45
Tecnical informations.... 45
Care an Maintenance.... 45
Controll panel and remote control functions.... 46
Connection Troubleshooting.... 49
CE / Warranty / Disposal / Technical change.... 50
ERP.... 50
Please read the safety instructions carefully before first commissioning and observe the safety instructions to prevent damage due to misuse, improper operation, and improper environmental conditions. Keep them for later reference.
WARNING: TO AVOID THE RISK OF ELECTRICAL SHOCK, FIRE OR INJURY TO PERSON, ALWAYS MAKE SURE THE PRODUCT IS UNPLUGGED FROM THE ELECTRICAL OUTLET BEFORE RELOCATING, SERVICING, OR CLEANING IT.
To reduce the risk of fire, electrical shock, or injury to person:
- Ensure the power source conforms to the electrical requirements of the appliance 220-240V\~50/60Hz.
- Connect the appliance to a single-phase AC power supply of the voltage specified on the rating label.
- This product is intended for indoor, non-commercial, non-industrial, household use only. Do not use outdoors. Do not use the product for any other purpose.
- This appliance will get hot when in use. To avoid injury, do not touch hot surfaces.
- This appliance is not intended for use by persons (including children) with reduced physical, sensory or mental capabilities, or lack of experience and knowledge, unless they have been given supervision or instruction concerning use of the appliance by a person responsible for their safety.
• Children should be supervised to ensure that they do not play with the appliance. - In order to avoid overheating, do not cover the heater.
- Never leave the heater unattended while it is in use. Always turn the product to the OFF position and unplug it from the electrical outlet when not in use.
- Do not use the product while sleeping or place it near a person who is sleeping.
- Extreme caution is necessary when any heater is used by or near children, invalids or elderly person and whenever the heater is left operating and unattended.
- The heater must not be located immediately below an electrical socket- outlet.
- Do not place the cord under carpets, cover it under a rug. Make sure the cord is free from any obstacles where it will not be tripped over.
- Do not operate the heater with a damaged cord or plug, or after the heater malfunctions, has been dropped, or damaged in any manner.
- If the supply cord is damaged, it must be replaced by the manufacturer, its service agent or a similarly qualified person in order to avoid a hazard.
- Avoid the use of an extension cord as this may overheat and cause a risk of fire.
- Do not use extension leads, unless advised by a qualified electrician. Using the wrong type could cause increased resistance resulting in heat damage to carpets, fixtures, and fittings.
- Use the heater in a well-ventilated area. Do not insert or allow objects to enter any ventilation or exhaust opening. To prevent a possible fire, do not block air intakes or exhaust openings in any manner. Do not use on soft surfaces, like a bed, where openings may become blocked. Use the heater on flat, dry surfaces only.
- Do not place this heater near flammable materials, surfaces, or substances such as furniture, pillows, beddings, papers, clothes and curtains, as there may be a risk of fire. Keep the above flammable materials, surfaces, or substances at least 1m away from the front, rear and sides of the heater.
- Never cover the appliance or use to dry laundry or sit on it.
- Do not use the heater in any areas where petrol, paint or other flammable liquids are stored e.g. Garages or workshops as a hot, arcing or sparking parts inside the heater.
- Don't use this heater in the immediate surroundings of a bath, a shower or a swimming pool. Never locate the heater where it may fall into bathtub or other water container.
- This heater is hot when in use. To avoid burns and personal injury, do not let bare skin touch hot surfaces. If provided, use handles when moving the product.
- To disconnect the appliance, turn the controls to the "0" position, then remove the plug from the electrical outlet. Disconnect the plug (do not pull on the power cord) from the electrical outlet.
- Be sure that no other appliances are in use on the same electrical circuit as your product as an overload can occur.
- This heater is filled with a precise quantity of special oil.
- Repair requiring opening of the oil container are only to be made by the manufacturer or his service agent who should be contacted if there is an oil leakage.
- Regulations concerning the disposal of oil when scrapping the appliance have to be followed.
- The heater should not be used in a room, of which the floor area is less than 5 m.
- The cord shouldn't be placed nearby the hot surface of the appliance.
- Do not use this heater if it has been dropped.
- Do not use if there are visible signs of damage to the heater
- Use this heater on a horizontal and stable surface, or fix it to the wall, as applicable.
- Children aged from 3 years and less than 8 years shall only switch on/off the appliance provided that it has been placed or installed in its intended normal operating position and they have been given supervision or instruction concerning use of the appliance in a safe way and understand the hazards involved. Children aged from 3 years and less than 8 years shall not plug in, regulate and clean the appliance or perform user maintenance.
• Children of less than 3 years should be kept away unless continuously supervised.
- Children shall not play with the appliance. Cleaning and user maintenance shall not be made by children without supervision.
- This appliance can be used by children aged from 8 years and above and persons with reduced physical, sensory or mental capabilities or lack of experience and knowledge if they have been given supervision or instruction concerning use of the appliance in a safe way and understand the hazards involved.
- Do not plug or unplug the appliance from the electrical outlet with wet hands.
- This heater is filled with a precise quantity of special oil. Repairs requiring opening of the oil container are only to be made by the manufacturer or his service agent who should be contacted if there is an oil leak.
- The meaning of figure in marking is "DO NOT COVER

WARNING: Do not use this heater in small rooms when they are occupied by persons not capable of leaving the room on their own, unless constant supervision is provided.
WARNING: To reduce the risk of fire, keep textiles, curtains, or any other flammable material a minimum distance of 1 m from the air outlet.
CAUTION: Some parts of this product can become very hot and cause burns. Particular attention has to be given where children and vulnerable people are present.
WARNING: This heater is not equipped with a device to control the room temperature. Do not use this heater in small rooms when they are occupied by persons not capable of leaving the room on their own, unless constant supervision is provided.
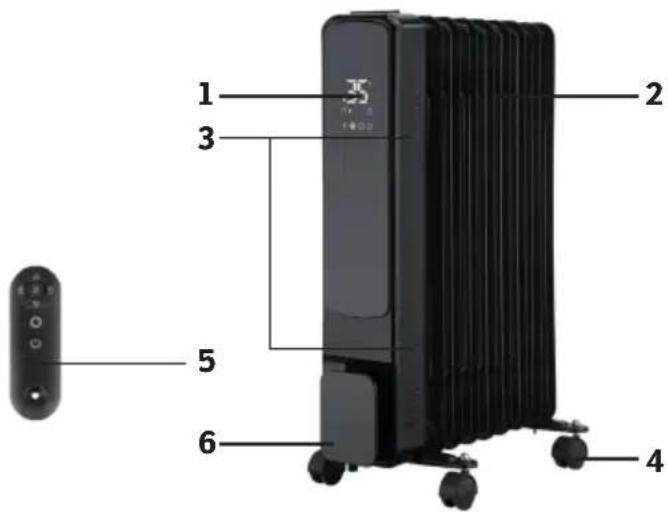
Description of parts
EN
- LED control panel
- Radiant fins
- Ventilation slots
- Castors
- Remote control
- Power cord
text_image
1 2 3 5 6 4Assembly
The heater is packaged with the wheels and brackets unattached. Once fitted allow at least five minutes for all the oil to reach the heating element prior to connecting the power supply.
WARNING: Do not operate without the wheels attached.
Always operate the heater only in upright position (feet on the bottom, controls on the top), any other position could cause irreparable harm.
It is normal when heaters are turned on for the first time, or when they are turned on after having not been used for a long period, they may emit some smells and fumes. This will disappear when the heater has been on for a short while.
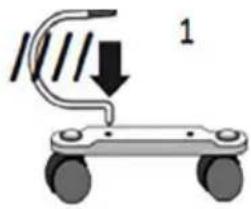
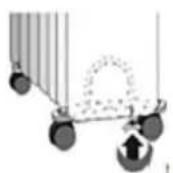
- Place the radiator body upside-down on a scratch-free location, make sure it is stable and will not fall.
- Screw off the wing nuts from the U-shaped bolt provided, attach the U-shaped bolt to the U-facing flange between first and second fins (near the front cover).
• To attach the castor mounting plate to the radiator body, you should insert the threaded ends of the U bolt in the holes on the castor mounting plate. - Screw the wing nuts back to the U bolt and fasten the wing nut properly.
Note: Do not over tighten as you may cause damage to the radiator flange.
- Screw off spherical nut from the castor, align the shaft to the hole of the castor mounting plate, insert
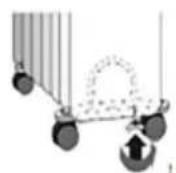
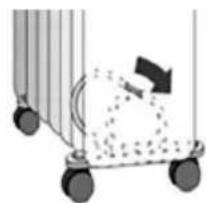
• in, and screw on the spherical nut. - Repeat the steps 1,2,3,4 and 5 on the rear of the radiator for mounting the rest of the castors.
Note: 1. The rear castors must be mounted between the end two fins. 2. Please do assemble the front wheels and panel as the product as described on the manual, if not, the oil heater will fall off.
natural_image
Mechanical device with a curved handle and downward arrow, labeled '1' (no text or symbols on the diagram itself)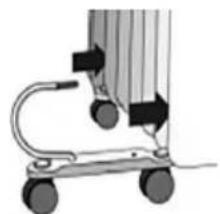
natural_image
Mechanical device with wheels and a curved handle, no visible text or symbols2
natural_image
Illustration of a cart with wheels and a dotted pattern on the side (no text or symbols)3
4
Instructions for use
Positioning the heater:
The heater is for floor-standing use only. Place it in an upright position on a firm, level, dry and heatresistant floor surface, taking into considering all relevant safety information on the previous pages. Make sure there are no flammable or heat sensitive materials or substances within 1 m of the heater.
Connecting the heater:
Make sure the unit is properly assembled before use.
Plug in the heater making sure the voltage indicated on its rating label coincides with the power supply.
To avoid overloading a circuit, only plug the heater into a circuit that has no other appliances connected.
Do not plug it into a power board or socket adaptor; do not use an extension cord.
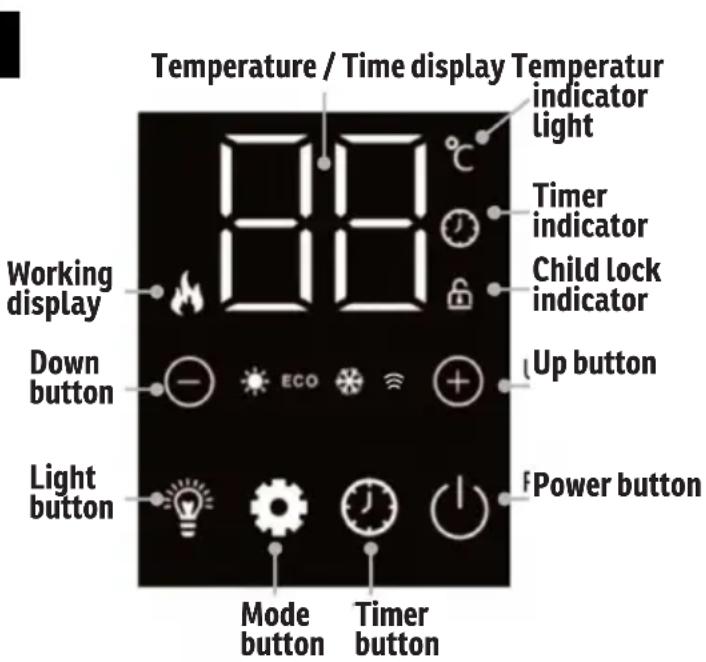
The heater can be operated from the control panel on the unit, or with the supplied remote control. The buttons on both operate the same functions. When using the remote control, ensure it contains 2 x "AAA" size batteries. When using the remote control, always point at the control panel of the heater with a maximum distance of 2 meters.
Technical Informations
| OFR 7 L OFR 9 L | ||
| Power 2000 W 1500 W | ||
| Frequency 220-240 Volt ~ 50/60 Hz | ||
| Weight 6.2 kg 7.8 kg | ||
| Dimensions 355 x 235 x 605 mm 420 x | 235 x 605 mm | |
| Wifi YES | ||
| Remote Control YES | ||
Care and Maintenance
- Switch the heater off, unplug it from the wall socket and let it cool before cleaning it and putting it away.
- Allow the appliance to cool down completely before cleaning.
- Clean the heater using a slightly moistened cloth. Use only mild cleaning agents.
- Do not use any cleaning chemicals such as detergents and abrasives.
- Don't allow water to seep into the openings or come in contact with electrical connections.
- To store away the heater, wind the cable round and store it in a clean and dry location.
EN
text_image
Temperature / Time display Temperatur indicator light Timer indicator Child lock indicator Working display Down button Up button Light button Power button Mode button Timer button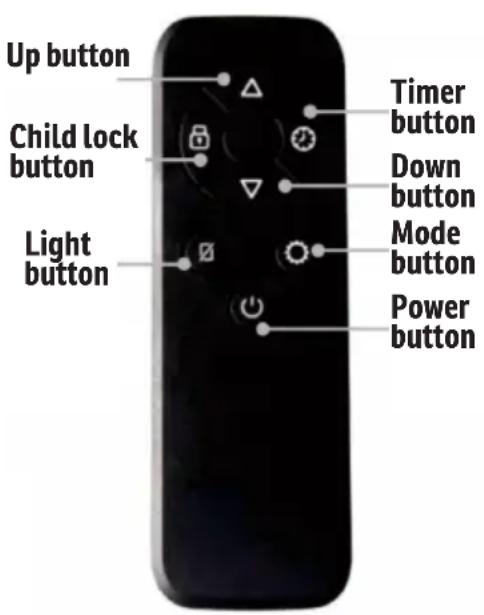
text_image
Up button Child lock button Light button Timer button Down button Mode button Power buttonHeating Modes
Once the heater is plugged in, press the side switch, it will enter into standby mode.
To initiate the heating, press the Power button Select the different heating modes by pressing the MODE button the heating icon in locating that the heater is functioning :,
Eco mode: The Eco mode is the energy saving setting mode, In this mode, the heater operates at a low power of approximately 600W for the 7 Fins model and 800W for the 9 fins model, hence consuming less electricity. (Note: Upon activation the Heater will resume its previous mode from the time it was last powered off, in order to facilitate future usage).
Comfort mode: In Comfort mode, the heater works at its maximum power 1500W for the 7 Fins model and 2000W for the 9 fins model.
Anti-frost mode: Anti-frost model is an automatic setting designed to prevent frosting. In this mode, the heater starts operating when the ambient temperature drops below 5^ C. It will stop heating once the ambient temperature rises above 7^ C.
Temperature setting: To set the temperature while in Eco or Comfort mode, press the DOWN ▼/ or UP ▼ buttons. The temperature in Eco or Comfort can be set within a range of 5°C to 35°C, while in anti-frost mode, the temperature cannot be adjusted.
Timer setting: To set the timer, press the Timer button. The timer can be set from 1 to 24 hours. After configuring the time, the digits will flash, and the screen will revert to its original heating mode. On the control panel display the time icon with light up, indicating that the timer has been set.
On Off-Timer mode, The heater will automatically return to standby mode after the set time. On On-Timer mode, The heater will automatically to functioning mode after the set time.
Setting up the child lock: To avoid children playing with the heater, the unit includes a child lock safety system.
Press and hold the DOWN and UP on the control panel or the button, if you are using the remote control. The child lock icon appears on the display. At this moment the control panel will be locked preventing unauthorized adjustments. (Please note the remote control can still be used, except for the light function.)
To cancel the child lock, press and hold down the same two buttons on the control panel or the lock button on the remote control until the icon disappears from the display. All functions will be enabled.
Adjusting the light display: To adjust the brightness of the light on the display, press the light button. Press it once to dimmer the light to 50%.
Press it once more to completely off the display.
Press it once more to on the display at its maximum luminance.
When using the remote control, hold the button to switch off the display light while the heater is operating. Press it once more to switch on the display light
Switching off the heater: To shut down the heater, press the POWER button to enter standby mode.
Let the heater cool down before unplugging it or restarting it.
To switch off the heater completely, push the side power switch, and then to unplug the supply cord from the power supply.
Note: The heater will take some time to cool down after the power is shut off. Always wait until it has cooled before moving it.
WIFI & Bluetooth: The heater has 3 different setup modes, Bluetooth connection, Quick Connection and AP (Access Point). The Bluetooth connection and quick connection are quick and simple way to set the unit up. The AP connection uses a direct local Wi-Fi connection between your phone and the heater to upload the network details.
When first turned on using the switch on the rear of the unit, the power indicator will initiate, showing that the unit is in Quick connection mode, and ready to set up.
Please ensure your device is in the correct Wi-Fi connection mode for the connection type you are attempting, the flashing of the power indicator on your heater will indicate this
| Connection Type Frequency of Flashes | |
| Bluetooth Flashes twice per second or flashes once per second | |
| Quick Connection Flashes twice per second | |
| AP (Access Point Flashes once per second | |
CHANGING BETWEEN CONNECTION TYPES
To change the unit into AP or Quick mode, Power switch on and unit turned on, press and hold the button for 5 Seconds.
DOWNLOAD THE APP TO YOUR PHONE
Download the" SMART REMOTE KING" app, from your chosen app store, using the QR codes below, or by searching for the app in your chosen store.
Bluetooth & WIFI Connection:
This heater can be operated via Bluetooth & WIFI.
1: Please install the Tuya App from your mobile APP store;
2: Touch the sign for 5s, the sign will hash in the display;
3: Open your mobile, find the TUYA App to connect heater via Bluetooth or WIFI;
4: The sign 🚗 luminate after connected successfully, or it will disappear 3 minutes later if connection failed.
Restart the sign please touch sign for 5s again, then repeat the above steps
CONNECTING USING THE BLUETOOTH CONNECTION METHOD:
Before initiating the connection, make sure the unit is in standby mode (Power switch ON), with the power indicator flashing twice per second. If not follow the instructions for changing the connection mode. Also ensure your phone is connected to the Wi-Fi network. (We advise turning mobile data off during setup)
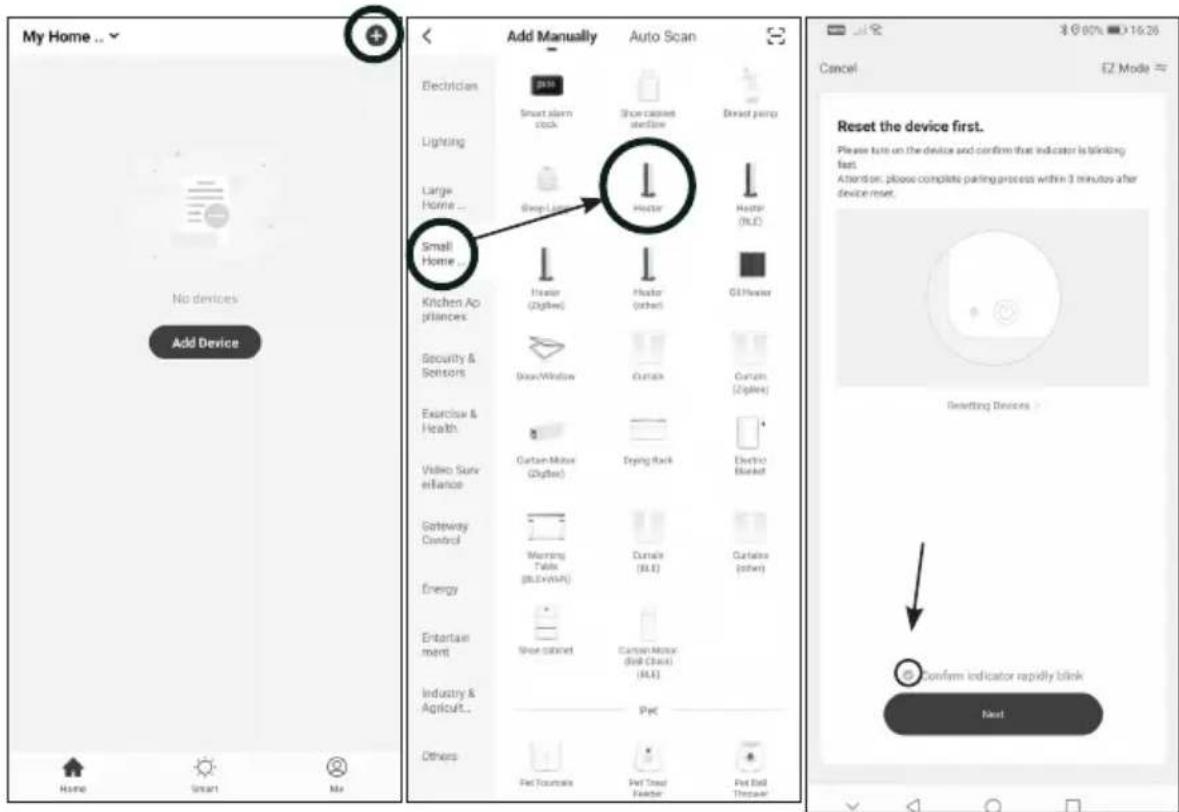
- After you connect the device to the power supply and press the main switch, the WIFI symbol on the display will start flashing quickly. The WIFI module is now ready for normal connection mode.
text_image
My Home Add Device No devices Add Manually Auto Scan Electrician 2015 Smart alarm clock Shoe cassette timerline Direct pump Lighting Large Home... Sweep screen Hadar Hadar (RGB) Small Home... Kitchen Appliances Heater (Digital) Heater (other) GI Heater Security & Sensors Box/Window Curtail Curtail (Digital) Exercice & Health Cartan Motor (Digital) Drying Rack Electric Blanket Video Surveillance Gateway Control Warning Table (RGB+Shift) Curtail (RGB) Curtail (other) Energy Entertainment Show cabinet Cartan Motor (Disk Clock) (RGB) Industry & Agriculture... Pvt Others Pet Tournaments Pet Tree Feather Pet Bell Thrower Reset the device first. Please turn on the device and confirm that indicator is blocking fast. Attention: please complete parking process within 3 minutes after device reset. Resetting Devices Confirm indicator rapidly blink Next- press the + icon or the "Add Device" button in your app
- Select "Small Home Appliances first and then "Heater".
- Ensure the Ambient Light indicator on the heater is slowly flashing (once per second), then press on the orange button at the bottom of the screen to confirm
- Enter your WIFI password
Connection Troubleshooting
- Check whether the device is powered on and is in the correct Wi-Fi connection mode, if not please refer to the CHANGING BETWEEN CONNECTION MODES section.
- Ensure the Wi-Fi password has been entered into the app correctly (Case sensitive)
- Check that the phone is connected to the Wi-Fi you are connecting the device to.
- Ensure the network you are connecting it to is 2.4Ghz (5Ghz Wi-Fi networks are not supported), and that there is a strong Wi-Fi signal to the item.
- If your router is dual band, ensure that the 2.4ghz network has a different network name (SSID). Further advice on changing router settings will be available from your Internet service provider /Router manufacturer.
- Check the settings on the router. Encryption should be WPA2-PSK and authorization type should be set to AES
- Try using the alternative connection method. i.e. If connection is failing when attempting to connect through CF mode, try AP mode.
Thermostat safety protection:
When encountering overheating, the heater automatically transitions to low gear heating and resets once the temperature returns to a normal level following a brief cooling period. If over-heating or malfunctions persist, please reach out to our after-sales support center to schedule an examination of the product.
Automatic thermal cut-off:
This system switches off the heater in the event of overheating or malfunction. It cannot recover. Please contact our after-sales support center and arrange an examination of the product or get the automatic thermal cut-off replaced.
Tip Over switch:
This technology switches off the heater if it is knocked over or tilted to a position where safe operation is in jeopardy. Should this happen, place the heater upright again but take care as it will still be hot. Once the heater is restored to an upright position, the heater will reset to work.
Battery replacement for the remote control:
The remote control is powered by 2 x "AAA" size batteries. To install them, or to replace them when required, proceed as follows: Open the cover of the battery compartment located at the back of the remote control and insert 2 x "AAA" batteries, making sure to match the polarity markings (+/-) on the batteries with those inside the compartment. Close the battery compartment.
Battery precautions:
Do not open the batteries or short circuit them.
Do not mix different types of batteries. Due to increased risk of leakage, empty batteries should be removed. The batteries should also be removed from the remote control if it is not being used for long periods. Only dispose of batteries when they are fully discharged.
WARNING: Danger of explosion! To prevent a risk of explosion, batteries must not be charged, heated or disposed of by burning. Never throw batteries into a fire or subject batteries to high temperatures. Used batteries should not be disposed of in household waste. Dispose them in accordance with your local regulations.
Warranty / Disposal / Technical change
Warranty
The Products are controlled just before delivery. If despite a lack of your product, try trustfully your seller. Please bring your receipt, as this is to be submitted for each warranty. The guarantee period is 24 months from date of purchase.
Disposal
The device must be disposed of properly. The device can be distributed free of charge for disposal at each dealer.
Technical changes
We reserve the right to modify the price, the design and the technical features
Please save the packaging materials of the unit.
CE Declaration of Conformity
This product is CE marked to denote conformity with Directives 2014/35/EU (Low Voltage) and the EMC directive (2014/30/EU), as amended. RoHS 2015/863/EU, RED 2014/53/EU: EN 300 328 V2.2.2
EMC EN IEC 55014-1:2021
EN IEC 55014-2:2021
EN IEC 61000-3-2:2019 + A1:2021 + A2:2024
EN 61000-3-3:2013 + A1:2019 + A2:2021
LVD EN 60335-1:2012 + A11:2014 + A13:2017 + A1:2019 +
A2:2019 + A14:2019 + A15:2021 + A16:2023
EN 60335-2-30:2009 + A11:2012 + A12:2020 + A1:2020 + A2:2022 + A13:2022
EN 62233:2008
| MODEL: OFR 7 L / OFR 9L | SONNENKÖNIG | ||
| Item Symbol Value Unit | |||
| HEAT OUTPUT | |||
| Nominal heat output P | nom | 1.5 / 2.0 kW | |
| Minimum heat output (indicative) P | min | 0.6 / 0.8 kW | |
| Maximum continuous heat output P | max,c | 1.5 / 2.0 kW | |
| AUXILIARY ELECTRICITY CONSUMPTION | |||
| At nominal heat output el | max | 0.000 kW | |
| At minimum heat output | elmin | 0.000 kW | |
| In standby mode | elSB | 0.0008 | kW |
| Item | Unit | ||
| Type of heat input, for electric storage local space heaters only (select one) | |||
| manual heat charge control, with integrated thermostat | [no] | ||
| manual heat charge control with room and/or outdoor temperature feedback | [no] | ||
| electronic heat charge control with room and/or outdoor temperature feedback | [no] | ||
| fan assisted heat output | [no] | ||
| Item | Unit |
| Type of heat output/room temperature control (select one) | |
| single stage heat output and no room temperature control | [no] |
| Two or more manual stages, no room temperature control | [no] |
| with mechanic thermostat room temperature control | [no] |
| with electronic room temperature control | [yes] |
| electronic room temperature control plus day timer | [no] |
| electronic room temperature control plus week timer | [no] |
| Other control options (multiple selections possible) | |
| room temperature control, with presence detection | [no] |
| room temperature control, with open window detection | [no] |
| with distance control option | [yes] |
| with adaptive start control | [no] |
| with working time limitation | [yes] |
| with black bulb sensor | [no] |
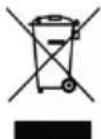

DISPOSAL INSTRUCTIONS FOR THE ELECTRICAL PART OF THE PRODUCT
In accordance with Article 26 of the Decree-Law of 14 March 2014 implementing Directive 2012/19/EC, and the Law of 31 March 2015 implementing Directive 2015/863/EU on the reduction of the use of hazardous substances in electrical and electronic equipment and on waste management.
The crossed-out dustbin symbol on the machine or packaging indicates that the waste generated at the end of its useful life must be collected separately from other waste. The user must therefore take the device to the appropriate collection points at the end of its service life. Sort electronic and electrical waste or send back to the retailer when purchasing new, equivalent devices in a one-to-one process. Appropriate separate collection for subsequent commissioning of the equipment to be recycled, treatment and environmentally sound disposal helps to avoid possible adverse effects on the environment and health, and promote the reuse and/or recycling of the materials to which they belong. Misuse of this product by the user will result in the application of the administrative penalties provided for in the applicable legislation. Batteries contained in the device must be disposed of separately in the appropriate containers for the collection of used batteries.
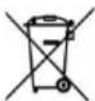
DISPOSAL OF BATTERIES AND ACCUMULATORS
In accordance with Legislative Decree 188 of 20 November 2008 implementing Directive 2006/66/EC on batteries, accumulators and related waste, the symbol of the crossed-out waste bin on the battery indicates that the disposal of used batteries is prohibited in household waste.
Single-use and rechargeable batteries contain substances that are highly polluting for the environment. The user is obliged to dispose of used batteries at collection points in the municipality or in appropriate containers. This service is free. In this way, legal requirements are adhered to and the environment protected. The symbols identifying hazardous materials that may be present in single-use and rechargeable batteries are as follows: Hg = Mercury, Cd = Cadmium, Pb = Lead.
Company
Sonnenkönig
Olensbachstrasse 9-15
CH-9631 Ulisbach
Tel. Int. +41 71 987 60 60
Tel. Nat. 0848870850