Clayton ABY781N - Bathtub TOTO - Free user manual and instructions
Find the device manual for free Clayton ABY781N TOTO in PDF.


User questions about Clayton ABY781N TOTO
0 question about this device. Answer the ones you know or ask your own.
Ask a new question about this device
Download the instructions for your Bathtub in PDF format for free! Find your manual Clayton ABY781N - TOTO and take your electronic device back in hand. On this page are published all the documents necessary for the use of your device. Clayton ABY781N by TOTO.
USER MANUAL Clayton ABY781N TOTO
Acrylic Bathtub Installation Instructions
Safety Instructions
Always follow the safely precautions/warnings when using and installing the Acrylic Bathtub.
Failure to follow any of these Installation Instructions will void the warranty.
WARNING: Improper use or installation of this product may result in death or serious injury.
CAUTION: Improper use or installation of this product may result in injury or property damage.
This symbol indicates a prohibited use of the product.
This symbol is used to indicate a required step in the use of this product.

WARNING:
Please carry out the installation as described in this manual. Improper installation could result in damage, leaks, fire or electrical shocks.
Be sure that any electrical installation is performed by a licensed electrician in accordance with all laws and regulations.
Do not climb into the bathtub to perform any tasks other than intended use. Injury or bathtub damage could result.
Connect to a proper water source to avoid the risk of skin irritation.
The electrical circuit supplied for the AirBath must include a suitable ground fault circuit interrupter (GFCI) as required by NEC article 680.70. The unit must be connected only to a supply circuit that is protected by a ground fault circuit interrupter (GFCI). Such GFCI should be provided by the installer and should be tested on a routine basis. To test the GFCI push the reset button. Power should be restored. If the GFCI fails to operate in this manner, the GFCI is defective. If the GFCI interrupts power without the test button being pushed there is a ground current flowing, indicating the possibility of electric shock. Do not use the AirBath. Disconnect the AirBath and have the problem corrected by a qualified service representative before using.
After opening, properly dispose of any unneeded packaging materials. Box or plastic materials my pose a suffocation hazard.

CAUTION:
When transporting the bathtub, do not hold by the air hose, pump, control box or other external parts or bump them against hard objects. Leaks may result.
When installing, leave a 1/8" (3 mm) gap between the tub and any rigid wall or tile. Also, carefully caulk all the edges to prevent leaks or damage from thermal expansion.
Do not install the hot and cold water lines in backwards. Scalding could result.
Do not bump the bathtub against, drop or store any rigid objects into the tub. The tub may become cracked, damaged and/or leak.
Avoid mortar, plaster, or other adhesives from contact with the bathtub surface. Damage to the bathtub surface may result.
Check local laws and codes for any specific instructions on installation and/or use not covered in this manual.
Notes
- Ensure that the unit is the correct model and color and that expected parts are present.
- Inspect for shipping damage. Any damage claims must be made to the carrier immediately. Do not install the bathtub if any finish damage is revealed.
- For AirBaths make sure that all air hoses and electrical connections are properly connected.
- Observe all installation procedures and local plumbing codes and regulations.
-
Provide an appropriate, clean and level sub-floor.
-
Ensure adequate space for the bathtub and provide properly dimensioned framing.
- Do not remove protective plastic until necessary. Cover the bathtub with cardboard for additional protection.
- Do not place ladders, tripods, building material, waste or other equipment in the bathtub.
- See spec sheet for dimensional information.
- Power Supply Specification (AirBath only): 60 Hz, 120 V, 1050 W
ABA & ABY Installation
Prepare Location
- Remove old bathtub, if necessary.
Prepare sub-floor and level, if necessary. - Construct wooden frame.
- Use template to ensure correct framing.
- For AirBaths an access panel of at least 16'' × 20'' wide, or per local code, must be installed at the blower end of the unit for maintenance or servicing.
- Locate and install rough plumbing.
All framing must be square and plumb. - The bathtub cannot be hung by its lip. The bathtub weight must be transferred solely through the feet.
Install Drain (Sold Separately)
Install the drain according to the manufacturer's directions and local codes. The template is designed for bathtubs using Toto drains.
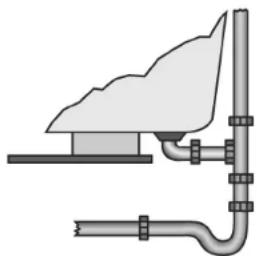
Note: Take care not to scrape or mar the bathtub while installing the drain.
3 Test Fit
Test fit (dry fit) the bathtub in the frame to make sure the bathtub will fit.
4 Seat the bathtub into the framing.
- Leave a 1/8 (3 mm) gap between the flange and the framing.
- Mortar should be used to secure and level the bathtub.
Use two people to move the bathtub.
Assure the bathtub is level in both directions for proper water drainage. - Any attached wood base should remain attached.
ABA & ABY Installation (continued)
Connect the drain to plumbing
- Follow local codes
Make sure that connections are tight to avoid leaks.
Make electrical connections (AirBath)
- All electrical connections must be made by a licensed electrician and meet local codes. Refrain from using extension cords.
Class A, 15 amp Ground Fault Control Interrupter (GFCI) with grounding is required.
The controller, blower and GFCI must be accessible.
Finish decking and seal bathtub
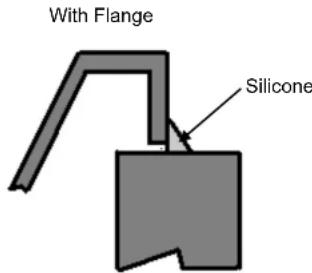
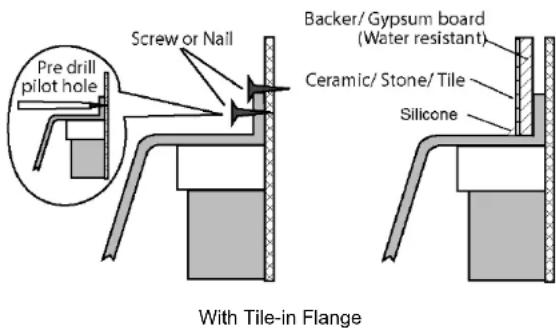
Pre-drill pilot holes through the tile-in flange.
Mount with screw or nail to studs
- Finish tiling the bathtub deck and be sure to seal the bathtub lip to prevent leaks.
Optional Under Mount
See spec sheet to determine if this is available
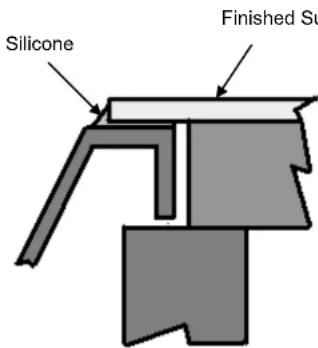
Cut finished surface to desired dimensions.
Dry fit to the bathtub.
- Temporarily mark on the bathtub the edge of the opening of the finished surface.
- Remove the finished surface and apply silicone to the bathtub (underneath the finished surface location).
- Replace the finished surface and secure it.
Add and/or remove silicone as desired.
- Make sure the finished surface is not supported by the bathtub and is secured per local codes.
ABA & ABY Installation (continued)
Check Installation
AirBaths: Make sure the blower has ample unobstructed space to draw air and that the space is clear of dust and debris. All bathtubs: Make sure the bathtub is level and supported by the feet or wood base or mortar sub-floor and not the flange lip.
Clean Up
- When cleaning after installation, do not use abrasive cleaners, as they may scratch and dull the surface. Use warm water and a liquid non-abrasive detergent to clean the surface.
- Stubborn stains, paint or far can be removed with isopropyl (rubbing) alcohol. Rinse well and dry with a soft, clean cloth.
- Do not use metal scrapers, wire brushes or other metal tools.
Trial Operation
- Close the drain.
- Fill the bathtub.
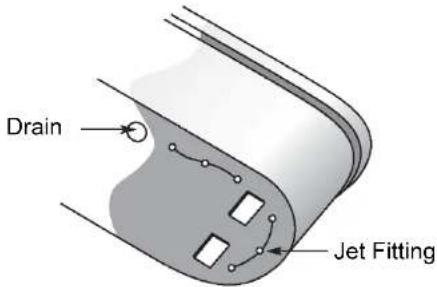
- Check for leaks from the air jets (AirBath only).
- Check for leaks from the drain.
- Check plug voltage and verify the AirBath activates when the "ON" button is pressed. Note: The remote may need synchronization. Cycle power to the AirBath. Within 15 seconds, press and hold the Up Blower and Down Blower buttons for 4 seconds.(AirBath only - see Owner manual)
- Check operation. (AirBath only - see Owner manual)
After operation, drain the bathtub and run the Automatic Drying Cycle. (AirBath only - see Owner manual)
ABF Installation with access under the floor
Preparation
- Clean, level and prepare the floor for installation.
- Place the unit in the exact installed position on the floor. Be sure the tub is resting on the bottom supports and not the acrylic.
- Determine the location of the drain pipe on the floor by taking measurements of the drain and waste location underneath the unit. (Drain and waste locations will vary by model.)
Carefully place the unit on a blanket, cardboard, or other clean protective surface so that the unit is properly supported. - Clean the drain hole area in preparation of setting the drain. The area should be dry and free of any debris.
ABF Installation with access under the floor (continued)
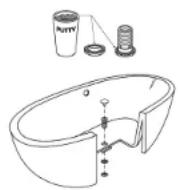
Install Drain Hardware
- Apply a bead of clear silicone or plumbers putty around the drain body and pass it through the drain hole.
- Apply Teflon tape to the threaded portion of the drain body.
- Apply plumbers putty to the washer and slide it over the bottom of the drain body.
- Attach the drain body nut on the drain body and tighten until the nut and washer have created a seal with the bottom of the bathtub. Do not over tighten.
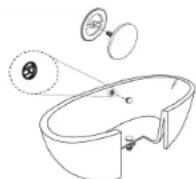
Install Overflow Hardware
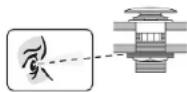
- Place the back plate over the screw of the overflow cover.
- Align the overflow cover with the bar (installed at the factory) in the overflow hole.
- Carefully hand tighten the overflow cover until it stops. Do not over tighten.
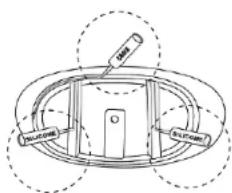
Install Bathtub
- Apply a generous bead of adhesive or silicone (such as GE 5040 Silicone II) to the bottom of the tub supports.
- Apply a bead of tub and tile caulk (such as GE 7000 Silicone II Paintable Silicone) around the edge of the base.
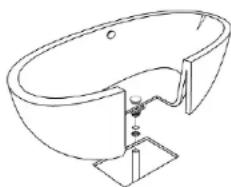
- Carefully set the tub into position and finish the installation of the tailpiece (supplied by the installer).
- Be sure the tub is resting on the bottom supports and not the acrylic.
Complete Installation
- Fill the tub with water to the overflow and drain the tub while inspecting the waste connections below the floor for leaks. Access from below will be necessary for this step.
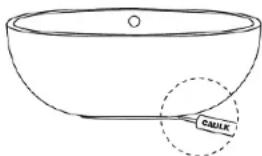
- With the bathtub now in place, wipe off any excess tub and tile caulk around the bottom edge of the bathtub where it meets the floor.
- Run a bead of tub and tile caulk around the bottom edge of the bathtub where it meets the floor. Wipe off any excess caulk with a wet cloth.
ABF Installation without access under the floor
Preparation
- Clean, level and prepare the floor for installation.
- Clean the drain hole area in preparation of setting the drain. The area should be dry and free of any debris.
- Apply plumbers putty around the drain body (with top installed) and pass it through the drain hole.
- Apply Teflon tape to the threaded portion of the drain body.
- Apply plumbers putty to the washer and slide it over the bottom of the drain body.
- Attach the drain body nut on the drain body and tighten until the nut and washer have created a seal with the bottom of the bathtub. Do not over tighten.
- Place the unit in the exact installed position on the floor. Be sure the tub is resting on the bottom supports and not the acrylic.
- Determine the location of the drain pipe in the floor (provided by the installer) by taking measurements of the installed drain with respect to the tub. This should include the position of the drain footprint on the floor and the depth of the drain body.
- Carefully place the unit on a blanket, cardboard, or other clean protective surface so that the unit is properly supported.
Install Drain body to floor pipe
Install the floor pipe using the measurements from the installed drain and tub.
- Dry fit the tub with installed drain to the floor pipe.
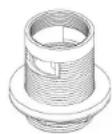
- Unscrew the stopper
- Unscrew the drain body top and remove the drain body from the tub without unthreading the nut.
- Install the drain body (with nut and washer) to the floor pipe.
- Re-apply plumbers putty to the washer and/or the drain body top as needed.
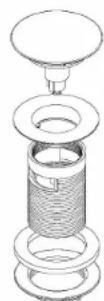
stopper
drain body top
drain body
washer
nut
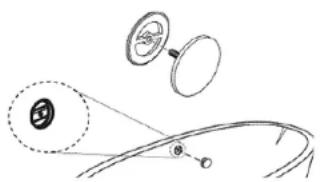
Install Overflow Hardware
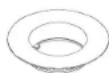
- Place the back plate over the screw of the overflow cover.
- Align the overflow cover with the bar (installed at the factory) in the overflow hole.
- Carefully hand tighten the overflow cover until it stops. Do not over tighten.
ABF Installation without access under the floor (continued)
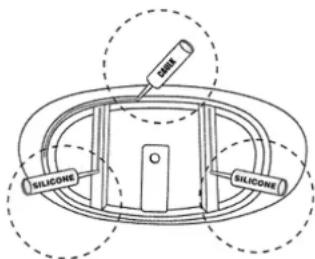
4 Install Bathtub
- Apply a generous bead of adhesive or silicone (such as GE 5040 Silicone II) to the bottom of the tub supports.
- Apply a bead of tub and tile caulk (such as GE 7000 Silicone II Paintable Silicone) around the edge of the base.
- Carefully set the tub into position over the drain body.
From inside the tub thread on the drain body top. Do not over tighten. - Be sure the tub is resting on the bottom supports and not the acrylic.
Complete Installation
- Fill the tub with water to the overflow and drain the tub while inspecting the waste connections below the floor for leaks.
- With the bathtub now in place wipe off any excess tub and tile caulk around the bottom edge of the bathtub where it meets the floor.
- Run a bead of tub and tile caulk around the bottom edge of the bathtub where it meets the floor. Wipe off any excess caulk with a wet cloth.
- Replace the stopper.
To the installer
- Be sure to provide the customer with the Installation manual.
- Fill out the necessary warranty information on the back off the Owner manual (for AirBaths).