M18 0880-20 - Vacuum Cleaner MILWAUKEE - Free user manual and instructions
Find the device manual for free M18 0880-20 MILWAUKEE in PDF.

| Product Type | Cordless Vacuum |
| Brand | Milwaukee |
| Model | M18 0880-20 |
| Rated Voltage | 18 V DC |
| Tank Capacity | 7.5 L |
| Compatible Batteries | 48-11-1830 V18™, 48-11-2230 NiCd 18 V, 48-11-1815/1828/1820/1840 Li-Ion 18 V |
| Compatible Chargers | 48-59-2818, 48-59-0280, 48-59-0255, 48-59-0186, 48-59-0260, 48-59-1801, 48-59-1812 |
| Functions | Vacuuming and blowing debris |
| Filter | Washable cartridge filter |
| Suction Modes | Dry and wet |
| Overflow protection system | Automatic float shut-off |
| Accessory connection diameter | 32 mm (1-1/4 in) |
| Weight (estimated) | Approximately 3.5 kg (without battery) |
| Dimensions (L x W x H) | Approximately 35 x 25 x 40 cm (estimated) |
| Warranty | 5 years (United States and Canada) |
| Maintenance | Regular cleaning of filter and tank; periodic inspection and lubrication at authorized service center |
| Spare parts | Accessories and filters available via Milwaukee catalog or website |
| Repairability | Repair by Milwaukee authorized service center only |
Frequently Asked Questions - M18 0880-20 MILWAUKEE
User questions about M18 0880-20 MILWAUKEE
0 question about this device. Answer the ones you know or ask your own.
Ask a new question about this device
Download the instructions for your Vacuum Cleaner in PDF format for free! Find your manual M18 0880-20 - MILWAUKEE and take your electronic device back in hand. On this page are published all the documents necessary for the use of your device. M18 0880-20 by MILWAUKEE.
USER MANUAL M18 0880-20 MILWAUKEE
natural_image
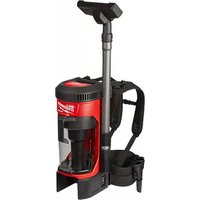
Black and white Milwaukee industrial tool kit with handle and spool (no visible text or symbols on main body)CORDLESS WET/DRY VACUUMS ASPIRATEUR D'ATELIER SANS FIL ASPIRADORAS PARA SUPERFICIES HÚMEDAS Y SECAS INALÁMBRICAS
TO REDUCE THE RISK OF INJURY, USER MUST READ AND UNDERSTAND OPERATOR'S MANUAL. AFIN DE RÉDUIRE LE RISQUE DE BLESSURES, L'UTILISATEUR DOIT LIRE ET BIEN COMPRENDRE LE MANUEL DE L'UTILISATEUR. PARA REDUCIR EL RIESGO DE LESIONES, EL USUARIO DEBE LEER Y ENTENDER EL MANUAL DEL OPERADOR.
IMPORTANT SAFETY INSTRUCTIONS
WARNING WHEN USING AN ELECTRICAL APPLIANCE, BASIC PRECAUTIONS SHOULD ALWAYS BE FOLLOWED, INCLUDING THE FOLLOWING: READ ALL INSTRUCTIONS BEFORE USING VACUUM. FOR HOUSEHOLD USE ONLY.
WORK AREA SAFETY
- Keep work area clean and well lit. Cluttered or dark areas invite accidents.
• Vacuum cleaners have motors and other parts that can produce sparks during normal use. Do not use within 30 feet of areas where explosive materials may be present (such as gasoline pumps and places where liquids like paint thinners, cleaners, solvents, etc. are stored).
- Do not use in the presence of explosive dust, liquids or vapors.
- Do not use where oxygen or anesthetics are used.
- Do not allow to be used as a toy. Close attention is necessary when used by or near children.
- Use extra care when cleaning on stairs.
ELECTRICAL SAFETY
- Wear electrically insulated footwear, such as rubber boots, when vacuuming wet material.
- Do not handle battery pack or vacuum with wet hands.
PERSONAL SAFETY
- STAY ALERT. Watch what you are doing and use common sense. Do not use vacuum cleaner when you are tired, distracted or under the influence of drugs, alcohol or medication causing diminished control.
- The operation of a utility vacuum can result in foreign objects being blown into eyes, which can result in eye damage. Always wear safety goggles when operating vacuum.
• Always wear safety goggles or glasses with side shields.
•Wear a face or dust mask when working in dust situations. Dust particles can harm your lungs.
- Avoid accidental starting. Ensure the switch is in the off-position before inserting battery pack. Inserting battery packs in vacuums that have the switch on invites accidents.
- Do not overreach. Keep proper footing and balance at all times. This enables better control of the vacuum in unexpected situations.
- Never stand on vacuum or use as a step stool. - Keep hair, loose clothing, fingers, and all parts
of body away from openings and moving parts.
- If devices are provided for the connection of dust extraction and collection facilities, ensure these are connected and properly used. Use of these devices can reduce dust-related hazards.
USE AND CARE
- Use only as described in this manual. Use only manufacturer's recommended attachments.
- Do not use without dust bag and/or filters in place. - Do not use to pick up flammable or combustible liquids such as gasoline or use in areas where they may be present.
- Do not pick up anything that is burning or smoking such as cigarettes, matches, or hot ashes.
- Do not pick up soot, cement, plaster or drywall dust without sifter in place. These are very fine particles that may affect the performance of the motor or be exhausted back into the air.
• To reduce the risk of health hazards from vapors or dust, do not vacuum toxic, carcinogenic or other hazardous materials such as asbestos, arsenic, barium, beryllium, lead, pesticides or other health endangering materials.
- WARNING: Some dust created by power sanding, sawing, grinding, drilling, and other construction activities contains chemicals known to cause cancer, birth defects or other reproductive harm. Some examples of these chemicals are:
- lead from lead-based paint
• crystalline silica from bricks and cement and other masonry products, and
• arsenic and chromium from chemically-treated lumber.
Your risk from these exposures varies, depending on how often you do this type of work. To reduce your exposure to these chemicals: work in a well ventilated area, and work with approved safety equipment, such as those dust masks that are specially designed to filler out microscopic particles. • Do not use your cleaner as a sprayer of ammable liquids such as oil base paints, lacquers, household cleaners, etc.
- Use special care when emptying heavily loaded tanks.
• To avoid spontaneous combustion, empty tank after each use.
- Do not leave vacuum unattended when battery pack is installed. Remove battery pack when not in use and before servicing.
- Do not put any object into openings. Do not use with any opening blocked; keep free of dust, lint, hair, and anything else that may reduce air snow.
- Maintain vacuum. Check for misalignment or binding of moving parts, breakage of parts and any other condition that may affect the vacuum's operation. If damaged, have the vacuum repaired before use. Many accidents are caused by poorly maintained tools.
- Maintain labels and nameplates. These carry important information. If unreadable or missing, contact a MILWAUKEE service facility for a free replacement.
BATTERY PACK USE AND CARE
• Turn off all controls before removing battery pack.
- Remove battery pack whenever motor head is removed from tank.
- Before using the battery pack or charger read the operator's manuals, and any labels on the battery pack, charger and vacuum.
- Recharge only with the charger specified by the manufacturer. A charger that is suitable for one type of battery pack may create a risk of it re when used with another battery pack.
- Use vacuum only with specifically designated battery packs. Use of any other battery packs may create a risk of injury and sire.
- When battery pack is not in use, keep it away from other metal objects like paper clips, coins, keys, nails, screws, or other small metal objects that can make a connection from one terminal to another. Shorting the battery terminals together may cause burns or a li re.
- Do not use damaged battery pack or vacuum. If battery pack or appliance are not working as they should, have been dropped, damaged, left outdoors, or dropped into water, return them to a service center.
SERVICE
• Have your power tool serviced by a qualified repair person using only identical replacement parts. This will ensure that the safety of the power tool is maintained.
READ AND SAVE ALL INSTRUCTIONS FOR FUTURE USE
| SYMBOLOGY | |||
| Underwriters Laboratories, Inc., United States and Canada | V --- | Direct Current | |
FUNCTIONAL DESCRIPTION
| SPECIFICATIONS | ||||
| Cat. No. Volts | Capacity | For use with Battery Packs: | Battery packs for use with chargers: | |
| 0780-20 28 DC | 2 Gal.(7.5 L) | 48-11-2830 M28TM | 48-59-2818, 48-59-0280 | |
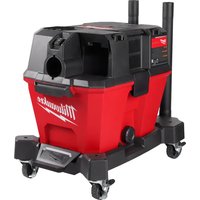
| 0880-20 18 DC | 2 Gal.(7.5 L) | 48-11-1830 V18TM | 48-59-2818, 48-59-0280 | |
| 48-11-2230 18 V NiCd | 48-59-2818, 48-59-0255, 48-59-0186,48-59-0260, 48-59-0280 | |||
| 48-11-1815, 48-11-1828,48-11-1820, 48-11-184018 V Li-Ion | 48-59-1801, 48-59-1812 | |||
ASSEMBLY
WARNING Always remove battery pack before changing or removing accessories. Only use accessories specifically recommended for this tool. Others may be hazardous.
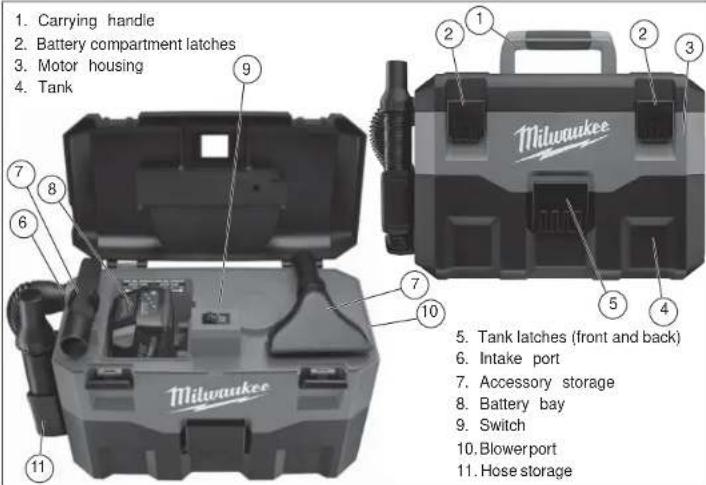
Installing/Removing Battery Pack
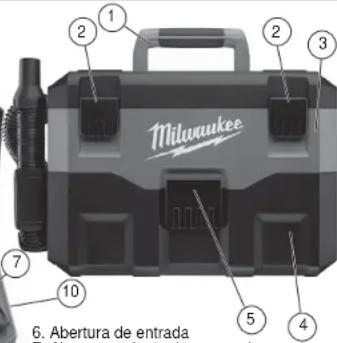
1. Lift and release battery compartment latches and open battery compartment.
2. To remove the battery pack, pull it off of the bay.
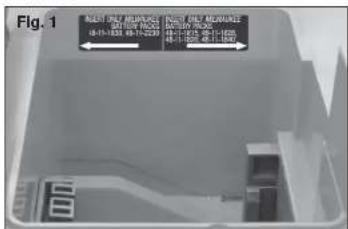
3. To insert the battery pack, slide it into the battery bay.
NOTE: The 18 V Vacuum has 2 bays available. Use the left side bay for 48-11-1830 V18™ and 48-11-2230 18 V NiCd battery packs. Use the right side bay for 48-11-1815, 48-11-1828, 48-11-1820, and 48-11-1840 18 V Li-ion battery packs.
- Close battery compartment and secure both latches.
WARNING To reduce the risk of injury, always remove the battery pack before releasing the tank latches.
Installing/Removing the Filter
Use the cartridge if liter for dry and wet pickup.
- Remove the battery pack. Close and latch the battery compartment.
-
Release the tank latches and lift off the motor housing. Place it upside down on a flat surface.
-
To remove the filter, turn it 1/2" counter clockwise and pull it off of the motor housing/ti oat cage.
- Empty all debris from the tank.
- To clean the £iter, shake off excess dirt or rinse the outside with water. Dry completely.
- To Install the alter, slide it over the float cage. Line up the if liter tabs with the motor housing notches and turn it 1/2" clockwise to lock in place.
- Replace the motor housing and secure both latches.
CAUTION Keep filters clean. Efficiency of the vacuum is largely dependent on the filters. Dirty filters will reduce the air flow and efficiency of the filtration system. Do NOT machine wash or dry.
WARNING To reduce the risk of injury, wear safety goggles or glasses with side shields and dust mask when using the vacuum as a blower. Clean tank completely before use.
Pickup/Blower
The vacuum can be used for debris pickup or as a blower, depending on the port used.
- For debris pickup, insert the large end of hose into the intake port of the motor housing, lining up the tabs on the hose with the notches in the port. Twist to secure and form a tight fit.
- To use as a blower, insert the large end of hose into the blower port → of the motor housing, lining up the tabs on the hose with the notches in the port. Twist to secure and form a tight fit.
- Attach one of the accessories to the other end of the hose. Twist to form a light fit. Use 1-1/4" opening accessories.
OPERATION
WARNING To reduce the risk of re and injury, do not use to pick up ammable or combustible materials.
WARNING To reduce the risk of injury, wear safety goggles or glasses with side shields. Remove the battery pack before changing accessories, making adjustments, and removing the motor housing.
Starting and Stopping Vacuum
To turn on the vacuum, push the switch to the ON (I) position.
To turn off the vacuum, push the switch to the OFF (O) position.
Wet Pick-Up Operation
-
Remove ALL dirt and debris found in the tank. Install the filter.
-
Turn on the vacuum and begin pick-up.
-
Turn off the vacuum immediately upon completing a wet pick-up job or when tank is full and ready to be emptied.
-
Remove the battery pack.
-
Raise the hose to drain any excess liquid into the tank.
-
Remove motor housing and pour liquid waste into a suitable drain.
-
Clean the interior of the tank, the silter, and pick-up accessories periodically, more often when used to pick up wet, sticky materials. Use warm, soapy water.
Automatic suction Shut-Off
When picking up liquids, an internal oat rises until it seats itself against a seal at the intake of the motor, shutting off suction. When this happens, the motor will develop a higher than normal pitch noise and the suction is drastically reduced. If this occurs, turn off the vacuum immediately. Failure to turn off unit after oat rises and shuts off suction will result in extensive damage to the motor. To continue use, empty the liquid waste from the tank.
NOTE: If the vacuum is accidentally tipped over, it could lose suction. Turn off the vacuum and return it to an upright position. The float will return to its normal position.
Storage
Before storing your vacuum, empty and clean the tank, a liter, and accessories. Remove the battery pack.
MAINTENANCE
⚠ WARNING To reduce the risk of injury, always unplug the charger and remove the battery pack from the charger or tool before performing any maintenance. Never disassemble the tool, battery pack or charger. Contact a MILWAUKEE service facility for ALL repairs.
Maintaining Tool
Keep your tool, battery pack and charger in good repair by adopting a regular maintenance program. After six months to one year, depending on use, return the tool, battery pack and charger to a MILWAUKEE service facility for:
- Lubrication
- Mechanical inspection and cleaning (gears, spindles, bearings, housing, etc.)
• Electrical inspection (battery pack, charger, motor)
- Testing to assure proper mechanical and electrical operation
If the tool does not start or operate at full power with a fully charged battery pack, clean the contacts on the battery pack. If the tool still does not work properly, return the tool, charger and battery pack, to a MILWAUKEE service facility for repairs.
⚠ WARNING To reduce the risk of personal Injury and damage, never immerse your tool, battery pack or charger in liquid or allow a liquid to ① ow Inside them.
Cleaning
Clean dust and debris from charger and tool vents. Keep tool handles clean, dry and free of oil or grease. Use only mild soap and a damp cloth to clean the tool, battery pack and charger since certain cleaning agents and solvents are harmful to plastics and other insulated parts. Some of these include gasoline, turpentine, lacquer thinner, paint thinner, chlorinated cleaning solvents, ammonia and household detergents containing ammonia. Never use flammable or combustible solvents around tools.
Repairs
For repairs, return the tool, battery pack and charger to the nearest service center listed on the back cover of this operator's manual.
ACCESSORIES
WARNING Always remove battery pack before changing or removing accessories. Only use accessories specifically recommended for this tool. Others may be hazardous.
For a complete listing of accessories refer to your MILWAUKEE Electric Tool catalog or go online to www.milwaukeeetool.com. To obtain a catalog, contact your local distributor or a service center listed on the back cover of this operator's manual.
LIMITED WARRANTY - USA AND CANADA
Every MILWAUKEE power tool (including cordless product - tool, battery pack(s) - see separate & distinct CORDLESS BATTERY PACK LIMITED WARRANTY statements & battery charger and Work Lights") is warranted to the original purchaser only to be free from defects in material and workmanship. Subject to certain exceptions, MILWAUKEE will repair or replace any part on an electric power tool which, after examination, is determined by MILWAUKEE to be defective in material or workmanship for a period of five (5) years' after the date of purchase unless otherwise noted. Return of the power tool to a MILWAUKEE factory Service Center location or MILWAUKEE Authorized Service Station, freight prepaid and insured, is required. A copy of the proof of purchase should be included with the return product. This warranty does not apply to damage that MILWAUKEE determines to be from repairs made or attempted by anyone other than MILWAUKEE authorized personnel, misuse, alterations, abuse, normal wear and tear, lack of maintenance, or accidents.
*The warranty period for, Job Site Radios, M12™ Power Port, M18™ Power Source, and Trade Titan™ Industrial Work Carls is one (1) year from the date of purchase. The warranty period for a LED Work Light and LED Upgrade Bulb is a limited LIFETIME warranty to the original purchaser only, if during normal use the LED bulb fails the Work Light or Upgrade Bulb will be replaced free of charge.
*This warranty does not cover Air Nailers & Stapler, Airless Paint Sprayer, Cordless Battery Packs, Gasoline Driven Portable Power Generators, Hand Tools, Hoist – Electric, Lever & Hand Chain, M12™ Heated Jackets, Reconditioned product and Test & Measurement products. There are separate and distinct warranties available for these products.
Warranty Registration is not necessary to obtain the applicable warranty on a MILWAUKEE power tool product. The manufacturing date of the product will be used to determine the warranty period if no proof of purchase is provided at the time warranty service is requested.
ACCEPTANCE OF THE EXCLUSIVE REPAIR AND REPLACEMENT REMEDIES DESCRIBED HEREIN IS A CONDITION OF THE CONTRACT FOR THE PURCHASE OF EVERY MILWAUKEE PRODUCT. IF YOU DO NOT AGREE TO THIS CONDITION, YOU SHOULD NOT PURCHASE THE PRODUCT. IN NO EVENT SHALL MILWAUKEE BE LIABLE FOR ANY INCIDENTAL, SPECIAL, CONSEQUENTIAL OR PUNITIVE DAMAGES. OR FOR ANY COSTS, ATTORNEY FEES, EXPENSES, LOSSES OR DELAYS ALLEGED TO BE AS A CONSEQUENCE OF ANY DAMAGE TO, FAILURE OF, OR DEFECT IN ANY PRODUCT INCLUDING, BUT NOT LIMITED TO. ANY CLAIMS FOR LOSS OF PROFITS. SOME STATES DO NOT ALLOW THE EXCLUSION OR LIMITATION OF INCIDENTAL OR CONSEQUENTIAL DAMAGES, SO THE ABOVE LIMITATION OR EXCLUSION MAY NOT APPLY TO YOU. THIS WARRANTY IS EXCLUSIVE AND IN LIEU OF ALL OTHER EXPRESS WARRANTIES, WRITTEN OR ORAL. TO THE EXTENT PERMITTED BY LAW, MILWAUKEE DISCLAIMS ANY IMPLIED WARRANTIES, INCLUDING WITHOUT LIMITATION ANY IMPLIED WARRANTY OF MERCHANTABILITY OR FITNESS FOR A PARTICULAR USE OR PURPOSE; TO THE EXTENT SUCH DISCLAIMER IS NOT PERMITTED BY LAW, SUCH IMPLIED WARRANTIES ARE LIMITED TO THE DURATION OF THE APPLICABLE EXPRESS WARRANTY AS DESCRIBED ABOVE. SOME STATES DO NOT ALLOW LIMITATIONS ON HOW LONG AN IMPLIED WARRANTY LASTS, SO THE ABOVE LIMITATION MAY NOT APPLY TO YOU. THIS WARRANTY GIVES YOU SPECIFIC LEGAL RIGHTS, AND YOU MAY ALSO HAVE OTHER RIGHTS WHICH VARY FROM STATE TO STATE. This warranty applies to product sold in the U.S.A. and Canada only.
Please consult the 'Service Center Search' in the Parts & Service section of MILWAUKEE's website www.mil-waukeetool.com or call 1.800.SAWDUST (1.800.729.3878) to locate your nearest service facility for warranty and non-warranty service on a Milwaukee electric power tool.
LIMITED WARRANTY - MEXICO, CENTRAL AMERICA AND CARIBBEAN
TECHTRONIC INDUSTRIES' warranty is for 5 year since the original purchase date. This warranty card covers any defect in material and workmanship on this Power Tool.
To make this warranty valid, present this warranty card, sealed/stamped by the distributor or store where you purchased the product, to the Authorized Service Center (ASC). Or, if this card has not been sealed/stamped, present the original proof of purchase to the ASC.
Call toll-free 1 800 832 1949 to find the nearest ASC, for service, parts, accessories or components.
Procedure to make this warranty valid
Take the product to the ASC, along with the warranty card sealed/slamped by the distributor or store where you purchased the product, and there any faulty piece or component will be replaced without cost for you. We will cover all freight costs relative with this warranty process.
Exceptions
This warranty is not valid in the following situations:
a) When the product is used in a different manners from the end-user guide or instruction manual.
b) When the conditions of use are not normal.
c) When the product was modified or repaired by people not authorized by TECHTRONIC INDUSTRIES.
Note: If cord set is damaged, it should be replaced by an Authorized Service Center to avoid electric risks.
SERVICE AND ATTENTION CENTER
Model.
Date of Purchase:
Distributor or Store Stamp:
Av Presidente Mazarik 29 Piso 7, 11570 Chapultepec Morales Miguel Hidalgo, Distrito Federal, Mexico Ph. 52 55 4160-3547
IMPORTED AND COMMERCIALIZED BY:
TECHTRONIC INDUSTRIES MEXICO, .S.A. DE C.V.
Av Presidente Mazarik 29 Piso 7, 11570 Chapultepec Morales Miguel Hidalgo, Distrito Federal. Mexico
RÈGLES GÉNÉRALES DE SÉCURITÉ
AVERTISSEMENT
AU MOMENT D'UTILISER UN
APPAREIL ÉLECTRIQUE, IL IMPORTE DE TOUJOURS RESPECTER LES NORMES GENERALES DE SECURITE, INCLUANT LES SUIVANTES : LIRE TOUTES LES INSTRUCTIONS AVANT D'UTILISER L'ASPIRATEUR. POUR USAGE DOMESTIQUE SEULEMENT.
SÉCURITÉ DU LIEU DE TRAVAIL
▲AVERTISSEMENT
UNITED STATES MILWAUKEE Service
MILWAUKEE prides itself in producing a premium quality product that is NOTHING BUT HEAVY DUTY ^9 . Your satisfaction with our products is very important to us! If you encounter any problems with the operation of this tool, or you would like to locate the factory Service/Sales Support Branch or authorized service station nearest you, please call...
Additionally, we have a nationwide network of authorized Distributors ready to assist you with your tool and accessory needs. Check your "Yellow Pages" phone directory under "Tools-Electric" for the names & addresses of those nearest you or see the 'Where To Buy' section of our website.
1-800-SAWDUST
(1.800.729.3878)
Monday-Friday
7:00 AM - 6:30 PM
Central Time
or visit our website at
www.milwaukeetool.com
For service information, use the 'Service Center Search' icon found in the 'Parts & Service' section.
Contact our Corporate After Sales Service Technical Support about ...
•Technical Questions
•Service/Repair Questions
•Warranty
call: 1-800-SAWDUST
fax: 1.800.638.9582
email: metproductsupport@milwaukeeetool.com
Register your tool online at
www.milwaukeetool.com and.
- receive important notifications regarding
your purchase
- ensure that your tool is protected under the
warranty
- become a HEAVY DUTY club member
CANADA - Service MILWAUKEE
MILWAUKEE prides itself in producing a premium quality product that is NOTHING BUT HEAVY DUTY*. Your satisfaction with our products is very important to us!
If you encounter any problems with the operation of this tool, or you would like to locate the factory Service/Sales Support Branch or authorized service station nearest you, please call...
1.800.268.4015
Monday – Friday 7:00 – 4:30 CST
fax: 866.285.9049
Milwaukee Electric Tool (Canada) Ltd
140 Fernstaff Court, Unit 4 18129 111 Avenue NW Vaughan, ON L4K 3L8 Edmonton. AB T5S 2P2
Additionally, we have a nationwide network of authorized Distributors ready to assist you with your tool and accessory needs. Call 1.800.268.4015 to find the names and addresses of the closest retailers or consult "Where to buy" on our Web site
www.milwaukeetool.com
Milwaukee Electric Tool (Canada) Ltd
140 Fennistan Court, Unit 4 18129 TTT Avenue NW Vaughan, ON L4K 3L8 Edmonton, AB T5S 2P2
MILWAUKEE ELECTRIC TOOL CORPORATION
13135 West Lisbon Road • Brookfield, Wisconsin, U.S.A. 53005
58-14-0700d5 06/13 Printed in China