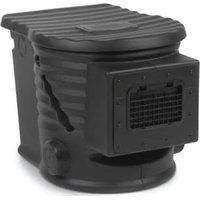
SK10 - Water pump Little Giant - Free user manual and instructions
Find the device manual for free SK10 Little Giant in PDF.


User questions about SK10 Little Giant
0 question about this device. Answer the ones you know or ask your own.
Ask a new question about this device
Download the instructions for your Water pump in PDF format for free! Find your manual SK10 - Little Giant and take your electronic device back in hand. On this page are published all the documents necessary for the use of your device. SK10 by Little Giant.
USER MANUAL SK10 Little Giant
Franklin Electric Co., Inc.
P. O. Box 12010
Oklahoma City, OK 73157-2010
88-956-0000 • Fax: 405-947-8720
www.LittleGiantLandscapeProducts.com
CustomerService-WTS@fele.com
SK2.5 · SK5 ·
SK10
Pond Skimmer
Système d'écumage
pour plan d'eau
Depuradora para estanques
EN INTRODUCTION
You are now the owner of the finest fish-safe pond skimmer designed specifically for garden and koi ponds. Please follow these instructions to ensure a successful installation.
The pond skimmer is an important element of your water garden pond. It establishes the water level, houses the pump and plumbing, and removes floating debris (and submerged debris when using the optional bottom drain). It serves as a small biological filter, and circulates oxygenated water to additional filters and back to the pond. It is also a pump pre-filter to prevent the pump from clogging.
SKIMMER FEATURES
- Leaf net to catch floating debris
- Biological brushes to aid in catching debris and eliminate clogging problems
- Easy-to-install liner weir cover plate
- Latching gate with a built-in seal allows the gate to be latched for temporary maintenance and servicing
- Removable inlet screen inhibits fish, frogs, and other aquatic life from entering the skimmer
- Heavy-duty, corrugated skimmer design with built-in anti-floatation lip
- Discharge ports on both sides of the skimmer offer installation flexibility
- Optional bottom drain ports on both sides of the skimmer for installation flexibility
• Built-in power cord routing slot in lid - PVC supports stay permanently in place and provide additional support to skimmer walls during back-filling process
- Optional grommet provided for installing overflow line on back of skimmer wall
INSTALLATION
IMPORTANT: Before beginning, read all instructions to familiarize yourself with the products and additional accessories that can be used. This will help to ensure that your water garden pond has been developed to meet your needs and properly installed.
Figure 1
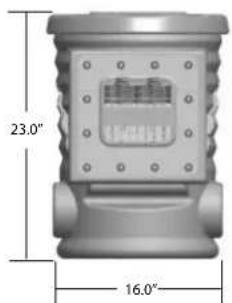
natural_image
3D mechanical component with angular dimensions labeled (23.0° and 16.0°), no readable text or symbols beyond measurement lines.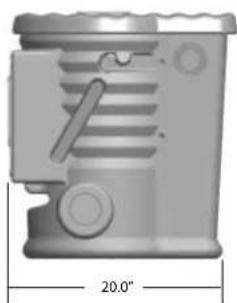
natural_image
3D rendered mechanical component with no visible text or symbols, dimension标注 20.0" (no text or symbols on the component itself)Model: SK2.5
Pump Range: Up to 2,500 GPH
Material: High-density polyethylene
Contents: Skimmer vault, lid, fish inlet screen, weir plate, gate (with hinge pin/spring), foam float, seal, twelve 1/4" - 20 hex-head bolts (with washers), net, four biological filter brushes, 3/8" fiberglass rod, 2" grommet, upper PVC support.
OPTIONAL ACCESSORIES
Discharge kits:
- 14940175 (DK-A) for 1-1/4" discharge pumps. Includes check valve and fitting required to convert from 1-1/4" vertical pump discharge to 2" PVC pipe or 2" flexible PVC hose.
- 14940176 (DK-B) for 1-1/2" and 2" discharge pumps. Includes check valve and fitting required to convert from 1-1/2" or 2" vertical pump discharge to 2" PVC pipe or 2" flexible PVC hose.
- 14940177 (DK-C) for 3" discharge pumps. Includes check valve and fitting required to convert from 3" vertical pump discharge to 3" PVC pipe or 3" flexible PVC hose.
Bottom drain kit:
• 566181 (PRS-BDK-2)
Includes the bottom drain, gate valve, and all fittings except for the 2" connecting pipe.
Matala mat:
• 170473 (SK2.5), 170338 (SK5), 170337 (SK10)
The pond skimmer can be hidden under cover stones, tall grasses, decks, etc. When possible, it is best to position the skimmer on the pond edge opposite the waterfall. This allows the waterfall and skimmer to interact together in cleansing the pond of surface debris. Consider the general layout of the pond before any excavation occurs, as well as the proximity of the power source to operate the pumps, lights, and additional water features. For very large or irregularly shaped ponds, use multiple skimmers for a more efficient pond cleansing.
Figure 2
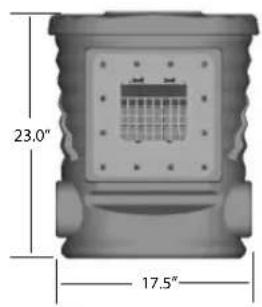
text_image
23.0" 17.5"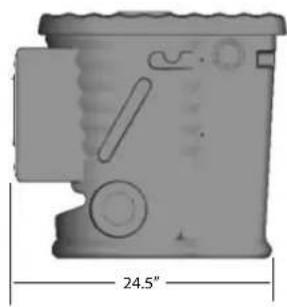
natural_image
3D mechanical component diagram with dimension标注 (no readable text or symbols)Model: SK5
Pump Range: Up to 5,000 GPH
Material: High-density polyethylene
Contents: Skimmer vault, lid, fish inlet screen, weir plate, gate (with hinge pin/spring), foam float, seal, twelve 1/4" - 20 hex-head bolts (with washers), net, five biological filter brushes, 3/8" fiberglass rod, 2" grommet, upper and lower PVC supports.
Figure 3
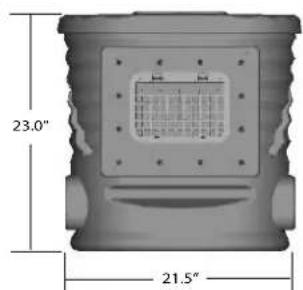
text_image
23.0" 21.5"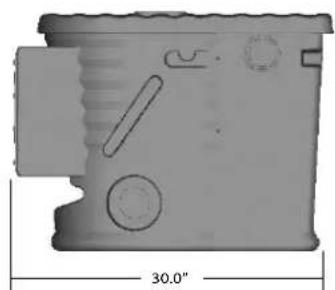
natural_image
3D rendered mechanical part with dimension标注 (30.0") and internal features (no readable text or symbols)Model: SK10
Pump Range: Up to 10,000 GPH
Material: High-density polyethylene
Contents: Skimmer vault, lid, fish inlet screen, weir plate, gate (with hinge pin/spring), foam float, seal, twelve 1/4" - 20 hex-head bolts (with washers), net, six biological filter brushes, 3/8" fiberglass rod, 2" grommet, 3" grommet, upper and lower PVC supports.
EXCAVATING FOR SKIMMER
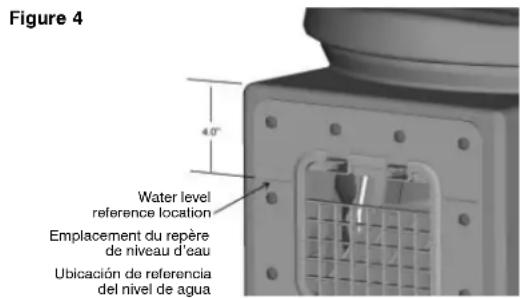
Refer to Fig. 1 - 3 for rough-sizing the hole for the skimmer. Be sure the bottom of the hole is heavily compacted to prevent settling. It is important to have the general pond layout finalized at this time with an overall idea of the final desired water level. The pond water level can be determined by using a string level at various locations in the excavated pond. The desired water level should be located 4" below the top edge of the protruding surface on the skimmer (Fig. 4). The weir cover plate has two water-level marks on the front to indicate the proper pond water level for optimum skimming.
It would be recommended to cut the hole in the side of the skimmer for the plumbing of the pump discharge (Fig. 5).
IF USING A BOTTOM DRAIN, IT IS IMPORTANT TO ADDRESS THE LAYOUT DURING THIS PHASE OF THE INSTALLATION.
OPTIONAL BOTTOM DRAIN KIT
Installation of a bottom drain kit transforms the skimmer into a dual-flow pre-filter, allowing it to automatically draw dirty water from the bottom of the pond in addition to skimming the water surface. FOLLOW THE INSTRUCTIONS SUPPLIED SEPARATELY WITH THE BOTTOM DRAIN KIT, LOCATING THE DRAIN IN THE DEEPEST PORTION OF YOUR POND.
INSTALLING AND BACKFILLING SKIMMER
Place the empty skimmer vault in the excavated hole and check for clearance around the skimmer on all sides before backfilling.
- Install the PVC pipe support rod(s). Model SK2.5 uses only one support rod; install it on the larger set of protrusions nearest the brush rod. Models SK5 and SK10 use two support rods, one upper and one lower. The short rod is the lower support and the longer rod is the upper support. These are designed to permanently fit on the protrusions inside the skimmer.
- Check to make sure the vault is level from side to side and front to back.
- Check to make sure the discharge port is accessible on the side being used. The opposite side, not being used, can be covered with soil. Do not backfill so high that the lid does not fit on top.
- Check to make sure the desired water level of the pond matches up with the mark on the weir cover plate (Fig. 4).
text_image
Figure 4 Water level reference location Emplacement du repère de niveau d'eau Ubicación de referencia del nivel de aguaFigure 5
Hole saw sizes
SK2.5/S1000: 2", 2-1/2", 3"
S5000: 2-1/2", 3", 3-1/2"
Tailles de scie à trou
SK2.5/S1000 : 5.1 cm (2 pp), 6.4 cm (2 ½ pp), 7.6 cm (3 pp)
S5000 : 6,4 cm (2 ½ po), 7.6 cm (3 po), 8.9 cm (3 ½ po)
Tamaños de sierra de perforación
SK2.5/S1000: 2", 2-1/2", 3" (5,1 cm, 6,4 cm, 7,6 mm)
S5000: 2-1/2", 3", 3-1/2" (6,4 cm, 7,6 cm, 8,9 cm)
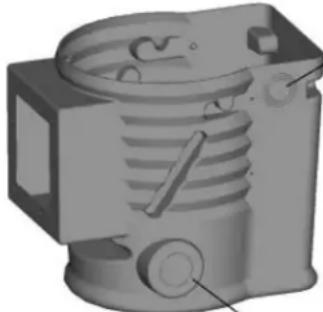
natural_image
3D rendered mechanical component with internal channels and mounting features (no text or symbols)Discharge holes (both sides)
Trous d'évacuation (des deux côtés)
Agujeros de descarga (ambos lados
Holes saw size
SK2.5/S1000/S5000: 3"
Taille de la scie à trou
SK2.5/S1000/S5000:7,6cm(3po)
Tamaño de sierra de perforación
SK2.5/S1000/S5000: 3" (7,6 cm)
Bottom Drain Port (both sides)
Orifice du drain de fond (des deux côtés)
Puerto de drenaje inferior (ambos lados)
- Backfill soil directly under the skimmer entrance. Try to compact the soil so that it is nearly flush with the front face of the skimmer. This should be done to provide a solid surface for the pond liner so that it isn't forced into the excavated space.
- Backfill with soil around all surfaces on the skimmer.
ATTACHING LINER AND WEIR
NOTE: By this time the skimmer should be backfilled and the liner can be attached.
Allow about 12" of slack in the liner (below the skimmer) to minimize strain. This reduces strain on the liner as the pond is being filled with water, and could be advantageous if the liner requires being re-cut.
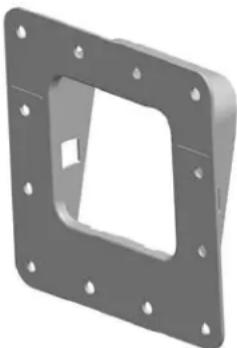
Before beginning this portion, familiarize yourself with the weir cover plate (Fig. 6), which is used to install the liner. The front portion of the weir is flat. The reverse side of the weir cover plate has a protruding feature that will be used to locate the liner.
- Pull approximately 6 - 8" of liner up and lay it over the top of the skimmer.
- Lay the weir cover plate over the liner, approximately 6" down from the edge of the liner. From the front side of the weir cover plate, make two diagonal cuts from corner to corner, stopping the cut about 1/4" from the corner.
- Lightly stretch the liner and slide it over the edge of the weir cover plate. Pull the liner up until it is held in place against the back. Make sure that the liner lays flat against the plate.
- Cut away the excess liner on the back side of the weir cover plate and install the plate (with installed liner) onto the front of the skimmer. Check to make sure the plate fits flush to the skimmer weir opening.
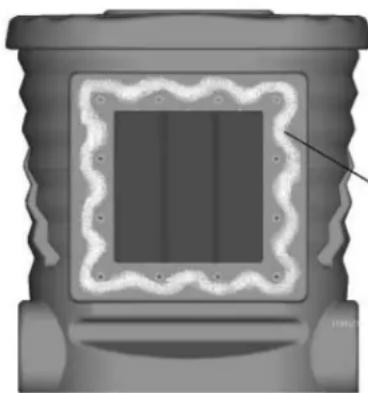
- Apply RTV silicone (included) onto the front face of the skimmer (Fig. 7).
- Install the weir cover plate (with installed liner) onto the face of the skimmer. Apply pressure so that the silicone is evenly compressed and distributed on the sealing surface
- Using a sharp point, pierce through the liner into each of the four corner holes in the weir cover plate.
- Install a 1/4"-20 bolt with washer into each of the four corner holes (where the liner was pierced through) and hand-tighten them.
Figure 6
natural_image
3D rendering of a gray metal bracket with mounting holes and a central square cutout (no text or symbols)Figure 7
natural_image
3D rendering of a cylindrical mechanical component with a central square and flanged side (no text or symbols visible)Silicone bead Joint de silicone Gota de silicona
- Using a sharp point, pierce through the liner into the remaining 8 holes, install the remaining eight 1/4"-20 bolts with washers, and hand tighten them.
- Hand-tighten all screws in a criss-cross pattern.
PUMP SIZING
For a 1,000 gallon pond use a 1,000 GPH rated pump. For a 5,000 gallon pond use a 5,000 GPH rated pump.
INSTALLING PUMP AND PLUMBING
Submersible pumps:
Route the discharge pipe through either side of the skimmer. The skimmers are equipped with a hole saw template to locate the discharge hole (Fig. 5). If using discharge kit DK-A or DK-B, use 2" flexible hose or PVC pipe to connect the kit. If using discharge kit DK-C, use 3" flexible hose or pipe.
Out-of-pond (non-submersible) pumps:
The skimmer can also be used with out-of-pond pumps that use a suction line or a flooded suction with a check valve. The check valve is needed to maintain water in the suction line. It is recommended to also install a ball valve in-line next to the out-of-pond pump (on the discharge side of the pump) to shut off the water supply during pump servicing.
If installing a waterfall with the skimmer, it is always recommended to install a check valve somewhere in-line between the skimmer and waterfall. This prevents the waterfall vault from draining back into the skimmer, drying out the filters and killing the bacteria when the pump is off due to servicing or during a power outage.
OPTIONAL OVERFLOW LINE
In times of heavy rain, it is common for the pond level to rise and/or overflow. The skimmer weir cover plate has two marks on the front to indicate the proper water level (Fig. 4). It is possible that the skimmer vault may not sit perfectly level after installation due to settling or other conditions.
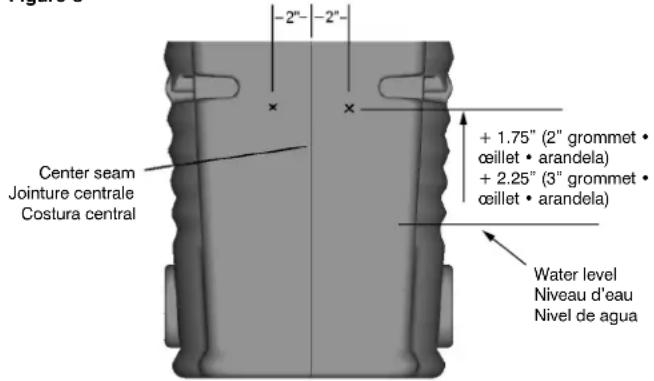
To determine the best location for the overflow line, find the center seam (Fig. 8) on the outside back of the skimmer, then take two measurements:
- Measure 2" to the left or right of this seam (depending upon your preference) and make a vertical mark.
- On the outside of the skimmer's back wall, make a horizontal mark 1-3/4" above water level (if using a 2" grommet) or 2-1/4" above water level (if using a 3" grommet), intersecting it with the vertical mark. This will be the center point of the hole that will be drilled (Fig. 8). This hole should be drilled only after the skimmer has been installed and the pond water level has been established.
As a check for the measurement in step 2, make a reference mark inside the skimmer on the back wall and place the grommet inside against the skimmer wall. Try to line up the center of the 2" grommet with the mark while checking the water level. If the water level is higher than the inner diameter of the grommet, adjust the measurement until the water level is approximately 1/2" below the inner diameter. If you make this correction, transfer it to the outside before drilling.
Figure 8
text_image
Center seam Jointure centrale Costura central -2"- -2" + 1.75" (2" grommet • œillet • arandela) + 2.25" (3" grommet • œillet • arandela) Water level Niveau d'eau Nivel de aguaIf the measurements are acceptable and the grommet appears to be in the proper location, drill the hole using a 3" hole saw (2" grommet) or 4" hole saw (3" grommet). The final overflow line will be set approximately 1/2" above the water level. At this level, it should be in the safe range to keep the water from overflowing except in times of heavy rain.
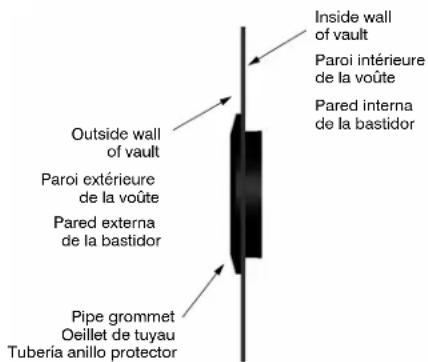
Install the grommet as shown in Fig. 9. For easier installation, apply the provided lubricant to the inside of the pipe grommet and the outside of the pipe to be installed.
SKIMMER MAINTENANCE
Skimmer Net:
The skimmer is supplied with a net that is used to catch surface debris from the pond. Inside the skimmer there are two side ledges and a lower ledge that support the net. Remove this net periodically and clean out the debris it has collected.
Biological Brushes:
The skimmer is supplied with biological brushes, which hang from a support rod. The brushes offer increased surface area, enhancing the growth of beneficial bacteria, and breaking up smaller debris. If the brushes become clogged, gently wash them in a 5-gallon bucket of pond water to get rid of the excess debris and then re-install in the skimmer. Do not use tap water to rinse the brushes, as it may harm the bacterial growth on the brushes.
OPTIONAL – Sand-Fill Plug (for lid):
For extra weight, you may add up to 10 pounds of sand to the lid through the hole in the bottom. For easier installation, tilt the lid so the sand enters freely. Use the included sand-fill plug to seal the hole.
Cleaning the Skimmer:
You may latch the weir gate closed while cleaning the skimmer vault without removing water from the pond. NOTE: The weir gate should be latched shut only for temporary skimmer maintenance. It is not recommended to leave the weir gate latched shut for longer periods.
Be sure that you have access to the power supply to the pump before following these steps:
- If you are using a bottom drain, close the gate valve.
- Remove the net and biological brushes by lifting the support rod.
- Move the weir gate up into the vertical position until the two side latches lock into place. The water level inside the skimmer will begin to drop.
- Allow the pump to run until about 4 - 5" of water remain in the skimmer. If the water is pumped down any lower it will introduce air bubbles into the plumbing and may cause a future air-lock (or prime loss). To remedy a pump air-lock, with the skimmer box filled with water, raise the pump slightly and jiggle the pump until the air bubbles leave the pump chamber.
After cleaning, replace the net and biological brushes. Skimmer maintenance should take only a short time every 1 - 2 weeks. It is recommended to keep the skimmer maintenance time at a minimum to keep the bacteria from being deprived of water for too long. If longer maintenance time is required, put the biological brushes in a 5-gallon bucket of pond water for temporary storage.
Figure 9
text_image
Inside wall of vault Paroi intérieure de la voûte Pared interna de la bastidor Outside wall of vault Paroi extérieure de la voûte Pared externa de la bastidor Pipe grommet Oeillet de tuyau Tubería anillo protectorWinter Care:
In cold climates (32°F and below) the pump may be shut off for winter. Remove the pump and pump discharge kit assembly (including check valve). Remove the net and biological brushes and leave the gate open with the pond at its normal level. If there is a chance that the pond will freeze, remove the gate by pressing the hinge pin inward until the gate releases. Store the gate until the winter season has passed and then re-install.
If the pump is left running during freezing weather, close the bottom drain gate valve to prevent mixing warm bottom water with colder surface water. Fish become dormant during the winter and if the bottom drain is open it disrupts their ability to become less active. In the spring, do not open the bottom drain gate valve until the surface water temperature averages above 40^ F for at least one week.
FR INTRODUCTION
text_image
Exploded view diagram of a device with numbered parts labeled 1 to 4Figure 10
| Item No.N° d'articleNo de elemento | DescriptionDescriptionDescripción | Part No.N° de pièceNo de pieza SK2.5 SK5 SK10 | |||
| 1 Lid • Couvercle • Tapa | 170461 1 -- | -- | |||
| 170311 -- 1 | -- | ||||
| 170312 -- -- | 1 | ||||
| 2 Brush kit • Trousse de brosse • Kit de cepillo 14940343 1 1 1 | |||||
| 3 Net • Filet • Malla | 170465 1 -- | -- | |||
| 170299 -- 1 | -- | ||||
| 170300 -- -- | 1 | ||||
| 4 Fish screen • Grillage pour poissons • Rejilla para peces | 170463 1 -- | -- | |||
| 170303 -- 1 | -- | ||||
| 170304 -- -- | 1 | ||||
LIMITED WARRANTY
Your product is guaranteed to be in perfect condition when it leaves our Factory. It is warranted against defective materials and workmanship for a period of 12 months from date of purchase by the user.
Any product that should fail for either of the above two reasons and is still within the warranty period will be repaired or replaced at the option of Little Giant Pump Company, Inc. dba Franklin Electric Water Transfer Systems (hereafter "the Manufacturer") as the sole remedy of buyer. For our customers in the CONTINENTAL UNITED STATES: Please return the defective unit, postage paid, to the factory at 301 N. MacArthur, Oklahoma City, OK 73127-6616. All defective product returned under warranty will be fully inspected to determine the cause of failure before warranty is approved.
For our customers located elsewhere; it is not economical, due to duties and freight, to return the product to the factory for inspection. Please return the defective unit to any authorized distributor or dealer with a brief written explanation of the problem. If there are no apparent signs of customer abuse, unit will be repaired or replaced. If dispute arises over replacement of the product, the distributor or dealer is to segregate such items and hold for inspection by a representative of the Manufacturer or notify factory with details of the problem for factory disposition and settlement of warranty claim.
DISCLAIMER:
THE FOREGOING WARRANTY IS AN EXCLUSIVE WARRANTY IN LIEU OF ANY OTHER EXPRESS WARRANTIES. ANY IMPLIED WARRANTIES (INCLUDING, BUT NOT LIMITED TO ANY IMPLIED WARRANTY OF MERCHANTABILITY OR FITNESS FOR A PARTICULAR PURPOSE) TO THE EXTENT EITHER APPLIES TO A PRODUCT SHALL BE LIMITED IN DURATION TO THE PERIODS OF THE EXPRESS WARRANTIES GIVEN ABOVE.
Warranty will be VOID if any of the following conditions are found:
- Product is used for purposes other than those for which it was designed and manufactured.
- Product was not installed in accordance with applicable codes, ordinances and good trade practices.
- Product was damaged as a result of negligence, abuse, accident, misapplication, tampering, alteration, improper installation, operation, maintenance or storage, nor to an excess of recommended maximums as set forth in the product instructions.
Any oral statement's about the product made by the seller, the manufacturer, the representatives or any other parties, do not constitute warranties, shall not be relied upon by the user and are not part of the contract for sale. Seller's and manufacturer's only obligation, and buyer's only remedy, shall be the replacement and/or repair by the manufacturer of the product as described above. NEITHER SELLER NOR THE MANUFACTURER SHALL BE LIABLE FOR ANY INJURY, LOSS OR DAMAGE, DIRECT, INCIDENTAL OR CONSEQUENTIAL (INCLUDING, BUT NOT LIMITED TO INCIDENTAL OR CONSEQUENTIAL DAMAGES FOR LOST PROFITS, LOST SALES, INJURY TO PERSON OR PROPERTY, OR ANY OTHER INCIDENTAL OR CONSEQUENTIAL LOSS), ARISING OUT OF THE USE OR THE INABILITY TO USE THE PRODUCT AND THE USER AGREES THAT NO OTHER REMEDY SHALL BE AVAILABLE TO IT. Before using, the user shall determine the suitability of the product for the intended use, and user assumes all risk and liability whatsoever in connection therewith.
Some states and countries do not allow limitations on how long an implied warranty lasts or the exclusion or limitation of incidental or consequential damages, so the above limitations or exclusions may not apply to you. This warranty gives you specific legal rights, and you may also have other rights which vary from state to state and country to country.
The National Electric Code (in the USA) and similar codes in other countries require a Ground Fault Circuit Interrupter (GFCI) to be installed in the branch circuit supplying fountain equipment rated above 15 volts. 115 volt GFCI's (with various cord lengths) are in stock, and we recommend each product be used with a GFCI.