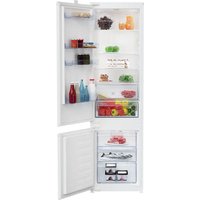
BFSB3612XSS - Fridge BEKO - Free user manual and instructions
Find the device manual for free BFSB3612XSS BEKO in PDF.

User questions about BFSB3612XSS BEKO
0 question about this device. Answer the ones you know or ask your own.
Ask a new question about this device
Download the instructions for your Fridge in PDF format for free! Find your manual BFSB3612XSS - BEKO and take your electronic device back in hand. On this page are published all the documents necessary for the use of your device. BFSB3612XSS by BEKO.
USER MANUAL BFSB3612XSS BEKO
Congratulations on the purchase of your new Beko Refrigerator! This refrigerator has been manufactured in modern facilities with the utmost care and meticulous quality controls. We are so confident in the quality of this product that we back it with a two year parts and labor warranty, and five years on the sealed system! Please read this entire user manual before using your product, to ensure you understand all of its features and benefits and know how to operate it properly. This manual should be kept in an easily accessible location and passed on to any future owners.
This guide will help you use the product quickly and safely.
Please read the user guide carefully before installing and operating the product.
- Always observe the applicable safety instructions.
- Please read any other documents provided with the product.
- Keep in mind that this user guide may apply to several product models. Please note the various symbols used throughout this manual and what they represent.
| i | Important information and useful tips. | Fill this out and keep for future reference | |
| Model | |||
| ! | Risk of life and property. | Serial No | |
| Date of Purchase | |||
| 4 | Risk of electric shock. | Original Purchaser | |
| Dealer | |||
| The product's packaging is made of recyclable materials, in accordance with the National Environment Legislation. | City | ||
| State | |||
| Zip Code | |||
| Country | |||
1 Important Instructions Regarding Safety and Environment 3
1.1 General Safety 3
1.1.1 Hydrocarbon (HC) Warning. 5
1.1.2 For Products with a Water Dispenser/Ice Machine 5
1.2 Intended Use 6
1.3 Children's Safety 6
2 Environmental instructions 7
3 Your Refrigerator 8
4 Installation 9
4.1 Before Installation. 10
4.2 Appropriate installation location. 10
4.3 Inset installations 11
4.4 Electrical connection. 11
4.5 Adjusting the feet 11
4.6 Illumination lamp 12
4.7 Door/Drawer Open Warning 12
4.8 Water connection 12
4.9 Connecting the water hose to the refrigerator12
4.10 Connecting the water line to the water supply 12
5 Preparation 13
5.1 What to do for energy saving 13
5.2 First operation 13
6 Operating the Product 14
6.1 Turning off the product 14
6 Operation of the Product 15
6.2 Indicator panel 15
6.3 Humidity controlled crisper (EverFresh+) . . . 18
6.4 Dairy (cold storage) bin 18
6.5 Crisper 18
6.6 lonizer 18
6.7 Odour filter 18
6.8 Taking ice / water 19
6.9 Drip tray 19
6.10 Ice Machine 20
6.11 Freezing fresh food. 21
6.12 Recommendations for storing frozen foods 21
6.13 Deep freezer details 21
6.14 Placing the food 22
6.15 Door open alert 22
6.16 Illumination lamp 22
7 Maintenance and cleaning 23
7.1 Stainless Steel External Surfaces. 23
7 Maintenance and cleaning 24
7.2 Cleaning of the Products with Glass Doors. . 24
7.3 Preventing Odours. 24
7.4 Protecting Plastic Surfaces 24
8 Troubleshooting 25
1 Important Instructions Regarding Safety and Environment
This chapter contains safety information that will help you avoid the risk personal injury or property damage. Failure to follow these instructions shall render any product warranty void.
Intended use
| 警告 ! | WARNING: Keep ventilation openings, in the appliance enclosure or in the built-instructure, clear of obstruction. |
| 警告 ! | WARNING: Do not use mechanical devices or other means to accelerate the defrosting process, other than those recommended by the manufacturer. |
| 警告 ! | WARNING: Do not damage the refrigerant circuit. |
| 警告 ! | WARNING: Do not use electrical appliances inside the food storage compartments of the appliance, unless they are of the type recommended by the manufacturer. |
This appliance is intended to be used in household and similar applications such as
- staff kitchen areas in shops, offices and other working environments;
- farm houses and by clients in hotels, motels and other residential type environments;
-
bed and breakfast type environments;
-
catering and similar non-retail applications.
1.1 General Safety
- This appliance is not intended for use by persons (including children) with reduced physical, sensory or mental capabilities, or lack of experience and knowledge, unless they have been given supervision or instruction concerning use of the appliance by a person responsible for their safety. Children should be supervised to ensure that they do not play with the appliance.
- Failure to follow the instructions and uncontrolled use of the product lead to dangerous results!
- Unplug the product if you encounter a failure during use.
If the product malfunctions, it must not be operated until repaired by the authorised service provider. Risk of electric shock!
Plug the product into a grounded socket protected by a fuse that corresponds to the value on its nameplate. Have a qualified electrician ground the product. Our company cannot be held responsible for damages resulting from the failure to use the product with a grounded socket pursuant to local regulations.
Unplug the product when not in use. - Never wash the product by spreading or pouring water onto it! Risk of electric shock!
- Never touch the plug with wet hands!
- Never unplug the product by pulling the cable. Always pull the plug by holding the socket.
Safety instructions

- Do not plug the refrigerator if the wall socket is loose.
- Never connect your refrigerator to energy saving devices. Such systems are harmful to your product.
- Unplug the product during installation, care, cleaning and repairing procedures.
- Always have the Authorised Service Provider install the product and establish its electrical connections. The manufacturer cannot be held responsible for damages caused by procedures performed by unauthorised persons.
- Do not eat cone ice cream or ice cubes immediately after you take them out of the freezer compartment! This may cause frostbite in your mouth!
- Do not touch frozen food with wet hands! They may stick to your hand!
- Do not put bottled or canned liquid beverages in the freezer compartment. They may burst!
-
Never use steam or steam cleaners to clean or defrost the refrigerator. Steam gets into contact with the live parts in your refrigerator, causing short circuit or electric shock!
WARNING: When positioning the appliance, ensure the supply cord is not trapped or damaged. If the supply cord is damaged, it must be replaced by the manufacturer, its service agent or similarly qualified persons in order to avoid a hazard. -
WARNING: Do not locate multiple portable socket-outlets or portable power supplies at the rear of the appliance.
- Do not use mechanical devices or other means to accelerate the defrosting process other than those recommended by the manufacturer.
- Never use the parts in your refrigerator such as the door and drawer as a means of support or step. This may cause the product to tip over or damage the parts of it.
- Do not damage the parts where the refrigerant is circulating with drilling or cutting tools. The refrigerant that might blow out when the gas channels of the evaporator, pipe extensions or surface coatings are punctured causes skin irritations and eye injuries.
- Do not cover or block the ventilation holes in your refrigerator with any object.
- Place the beverage with higher proofs tightly closed and vertically.
- Do not use gaseous sprays near the product since there is the risk or fire or explosion!
- Flammable items or products that contain flammable gases (e.g. spray) as well as explosive materials should never be kept in the appliance.
- Do not place vessels filled with liquid onto the product. Splashing water on an electrical part may cause electric chock or the risk of fire.
- Do not store items that need precise temperature adjustment (such as vaccines, heat-sensitive medication, science materials etc.) in the refrigerator.
If you are not going to use the product for a long time, unplug it and remove the food in it.
Safety instructions
If there is a blue light on the refrigerator, do not look at this light with optical tools.
- Exposing the product to rain, snow, sun or wind is dangerous in terms of electrical safety.
In products with mechanical control (thermostat), wait for 5 minutes to plug in the product again after unplugging.
- Do not overload the refrigerator. Objects in the refrigerator may fall down when the door is opened, causing injury or damage. Similar problems may arise if any object is placed onto the product.
If the product has a door handle, do not pull the handle when re-locating the product. The handle might be loose.
- Be careful not to jam your hand or any other body part in the moving parts of the refrigerator.
- Do not put your hand or any other foreign materials into the ice machine while it is operating.
1.1.1 Hydrocarbon (HC) Warning
- If your product's cooling system contains R600a: This gas is flammable. Therefore, pay attention not to damage the cooling system or the piping during use and transportation. If damaged, keep the product away from potential fire sources that may cause it to catch fire and ventilate the room where the product is placed.

If the product is damaged and if you see gas leak, please keep away from the gas. It may cause frostbite when it gets into contact with the skin. (including R134)

Ignore this warning if the cooling system of your product contains R134a.

Type of gas used in the product is stated on the type plate which is on the left wall inside the refrigerator.

WARNING: Never throw the product into fire for disposal.
1.1.2 For Products with a Water Dispenser/Ice Machine
- Use only drinking water. Do not fill the water tank with fruit juice, milk, fizzy beverages, alcoholic beverages or any other liquids incompatible for use in the water fountain. This may cause risk to your health and safety.
- Do not allow the children to play with the water dispenser or Ice Maker to prevent accidents and injuries.
- Do not insert your fingers or other objects inside the hole of the water dispenser, ice channel or inside the container of the Ice Maker. This may cause injuries or material damages.
- Pressure for cold water inlet shall be maximum 90 psi (620 kPa). If your water pressure exceeds 80 psi (550 kPa), use a pressure limiting valve in your mains system. If you do not know how to check your water pressure, ask for the help of a professional plumber.
- If there is a risk of water impact in your installation, always use a water impact protection equipment in that installation. Please consult professional plumbers if you are not sure if there is water impact in your installation.
Safety instructions
- Do not make installation on the hot water inlet.
- Take the necessary measures against the freezing risk of the hoses. The water temperature operating range must be 0.6^ ( 33^ ) minimum and 38^ ( 100^ ) maximum.

WARNING:
Never connect the product to a cold water mains with a pressure of 550kPa (80 psi) or above.
1.2 Intended Use
This product has been designed for domestic use. It is not suitable for commercial use and it must not be used out of its intended use.
It must be used only for storing food.
- The manufacturer will not take any responsibility for damages resulting from improper use or transport.
- Original spare parts will be available for 10 years after the purchase date of the product.
1.3 Children's Safety
If there is a lock on the door of the product, the key should be kept out of the reach of children.
- Do not let children play with the product.

CAUTION:
To Prevent A Child From Being Entrapped, Keep Out Of Reach Of Children And Not In The Vicinity Of Freezer Or Refrigerator.

WARNING:
Before disposing your old refrigerator or freezer:
Children may get locked inside.
- Remove the doors.
- Leave the shelves to prevent children from getting inside the product easily.

DANGER:
Risk of Fire or Explosion:
- This product uses flammable refrigerant.
- Do not use mechanical devices to defrost the refrigerator.
- Do not use chemicals for cleaning.
- Do not pierce the refrigerant pipe.
If the refrigerant pipe is pierced, it must be repaired only by licensed service personnel. - Please consult the repair/user manual before cleaning the product. All safety instructions must be followed.
- Dispose the product according to federal or local regulations.
2 Environmental instructions
2.1 Compliance with the WEEE Directive and Disposing of the Waste Product:
This product complies with EU WEEE Directive (2012/19/EU). This product bears a classification symbol for waste electrical and electronic equipment (WEEE).
This symbol indicates that this product shall not be disposed with other household wastes at the end of its service life. Used device must be returned to official collection point for
recycling of electrical and electronic devices. To find these collection systems please contact to your local authorities or retailer where the product was purchased. Each household performs important role in recovering and recycling of old appliance. Appropriate disposal of used appliance helps prevent potential negative consequences for the environment and human health.
2.2 Compliance with RoHS Directive
The product you have purchased complies with EU RoHS Directive (2011/65/EU). It does not contain harmful and prohibited materials specified in the Directive.
2.3 Package information

Packaging materials of the product are manufactured from recyclable materials in accordance with our National
Environment Regulations. Do not
dispose of the packaging materials together with the domestic or other wastes. Take them to the packaging material collection points designated by the local authorities.
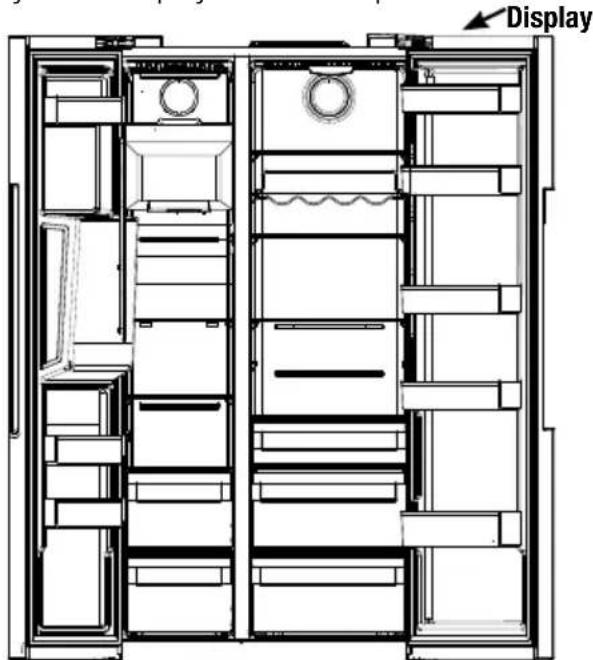
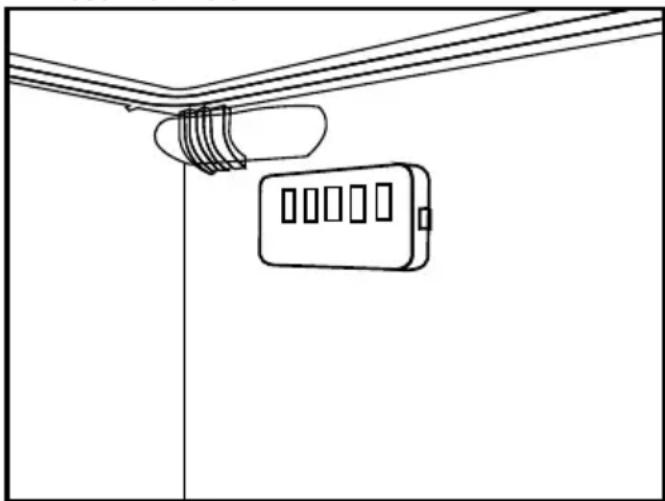
3 Your Refrigerator
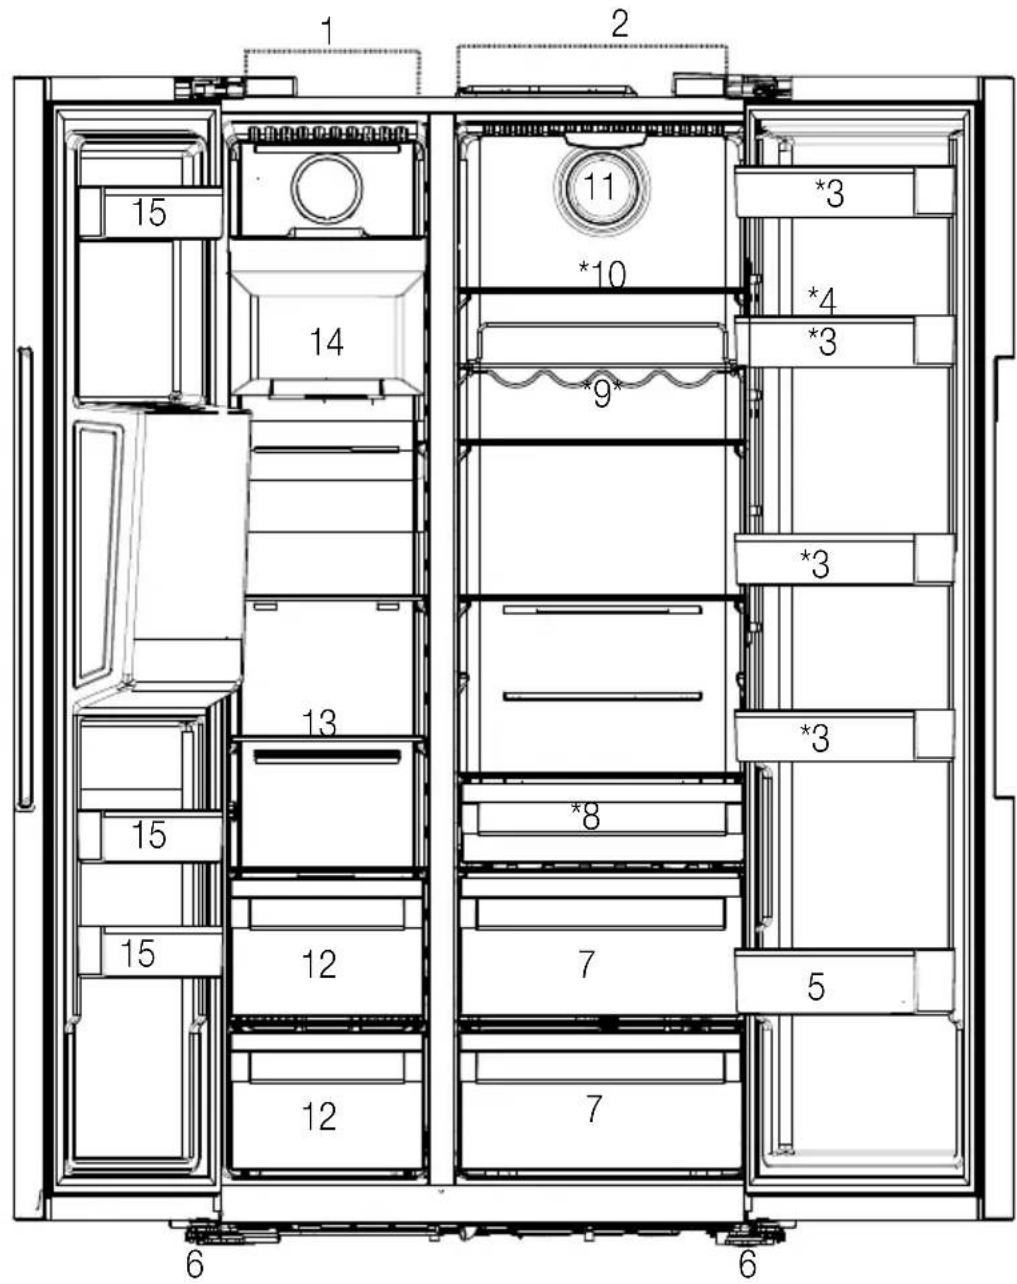
1- Freezer compartment
2-Cooler compartment
3-Cooler compartment door shelves
4-Egg Holder
5-Bottle shelf
6- Adjustable stands
7-Crispers
8-Dairy (cold storage)bin
9- Bottle shelf
10-Glass shelves
11-Fan
12-Frozen food storing compartments
13- Freezer compartment glass shelf
14- Ice machine
15- Freezer compartment door shelves
*Optional
May not be available in all models

*Optional: Figures in this user guide are schematic and may not be exactly match your product. If your product does not comprise the relevant parts, the information pertains to other models.
4 Installation

| Height (cm/inch) unpacked | 71 ¾"-182 cm |
| Width (cm/inch) unpacked | 35 7/8" -91cm |
| Depth (cm/inch) unpacked | 28 5/16" -72 cm |
| Height (cm/inch)packed | 75 1/4" - 191cm |
| Width (cm/inch)packed | 38 1/2" -98 cm |
| Depth (cm/inch) packed | 30 5/8" - 78 cm |
| Gross Weight (kg) / lbs | 282.2 lbs-128 kg |
| Net Weight (kg) / lbs | 255.7lbs- 116 kg |
4.1 Before Installation
- Before installing, be sure the opening measurements are sufficient to receive the product and that the appropriate electrical and plumbing connections are present.
| Water line pressure values | psi | kPa | bar |
| Max Operating pressure: | 90 | 620 | 6.2 |
| Max pressure for limiting valve device requirement: | 80 | 550 | 5.5 |
| Electrical requirements | |
| Voltage | 120V AC |
| Frequency | 60 Hz |
| Current | 15 A |
- Refer to the nearest Authorized Service Agent for installation of the product. To make the product ready for use, make sure that the electricity installation is appropriate before calling the Authorized Service Agent. If not, call a qualified electrician to have any necessary arrangements carried out.
- Your product comes with an internal water filter. Part number of the filter is 4918450200 and you can use this part number when ordering replacement filters.
| i | Preparation of the location and electrical installation at the place of installation is under customer's responsibility. |
| i | Plumbing: The refrigerator should only be connected to the cold water line. |
| 4 | Product must not be plugged in during installation. Otherwise, there is the risk of death or serious injury! |
| 4 | WARNING: Installation and electrical connections of the product must be carried out by the Authorized Service Agent. Manufacturer shall not be held liable for damages that may arise from procedures carried out by unauthorized persons. |
| ! | WARNING: Prior to installation, visually check if the product has any defects on it. If so, do not have it installed. Damaged products cause risks to your safety. |
4.2 Appropriate installation location
- Install the product at least 12''(30cm) away from heat sources such as cooktops, ovens, space heaters, radiators and stoves at least 2'' (5 cm) away from electrical ovens. Product must not be subjected to direct sun light and kept in humid places after installation.
- Do not place the product on the materials such as rugs or carpets.
- Place the product on an even floor surface to prevent wobbling.
- Do not install the product in places where the temperature falls below 50^ / 10^ .

If two refrigerators are to be installed side by side, there should be at least 1 1/2 (4 cm) distance between them.
- Make sure that sufficient room is provided around the appliance to ensure free air circulation.
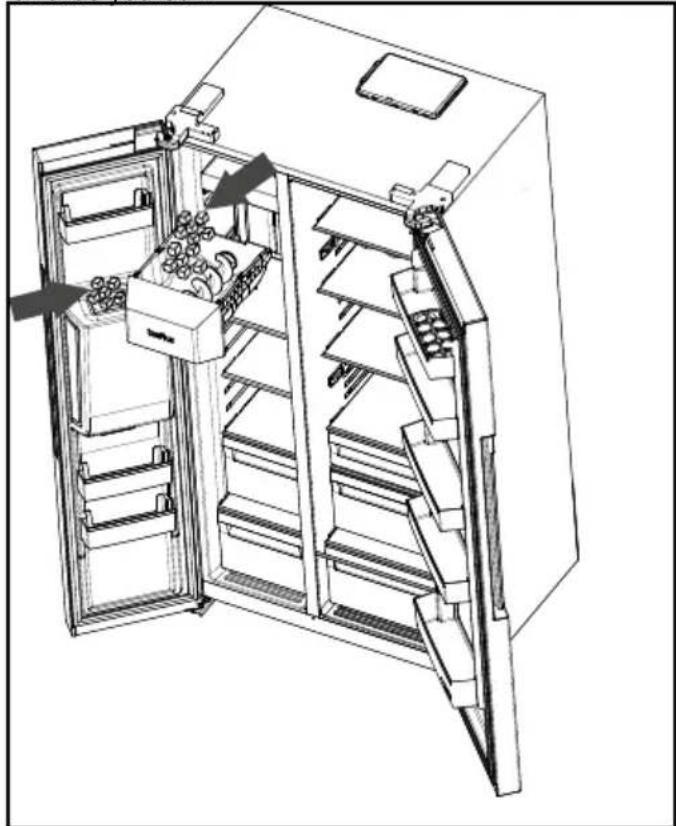
- For proper functionality, there should be a gap of at least 13/8 (35 mm) between the refrigerator and the rear wall. To ensure this, attach the gray, circular buffers, to be installed on the rear back metal cover of the refrigerator. These are shipped inside the crisper drawer in the Fresh Food compartment.
Installation
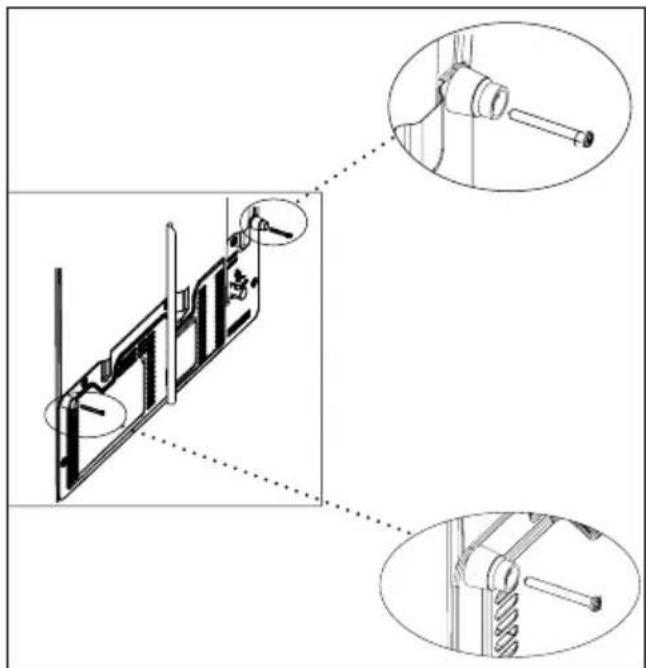
4.3 Inset installations
- If the product will be installed within surrounding cabinetry or in an alcove, be sure there is adequate airflow around the product for proper functionality. This refrigerator requires at least 2" from the top of the unit to the ceiling or enclosure, 5/8" on each side and 1 3/8" in the back.
- For proper air flow when installed in an inset or alcove, be sure the parts shown below are installed on the unit.

circulation part
4.4 Electrical connection
120VAC, 60Hz, Dedicated 15Amp Circuit.
- GFCI outlets will provide added protection, but any failure of the GFCI could cause food spoilage, which is not covered by the manufacturer's warranty.
- Electrical connection must comply with national regulations.
- Power cable plug must be within easy reach after installation.
- Do not make connections via extension cables or multi-plugs.
| 5 | WARNING: Damaged power cable must be replaced by the Authorized Service Agents. |
| 4 | WARNING: If the product has a failure, it should not be operated unless it is repaired by the Authorized Service Agent! There is the risk of electric shock! |
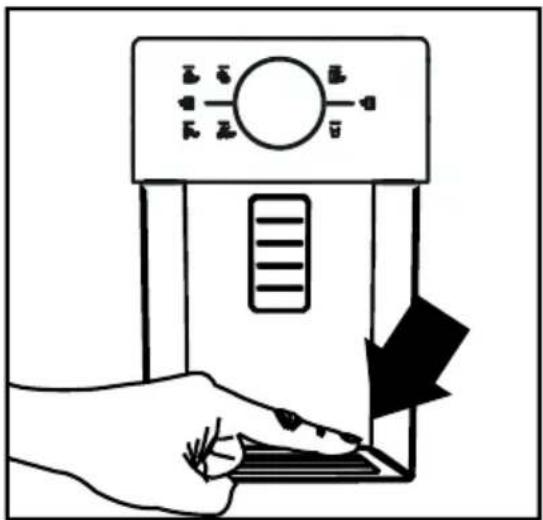
4.5 Adjusting the feet
After moving the refrigerator into place, we recommend lowering the feet to secure the product in place. You can also adjust the feet if the product is not balanced. Twist the feet in the desired direction according to the illustration below. Adjusting the feet can also be used to align the doors.
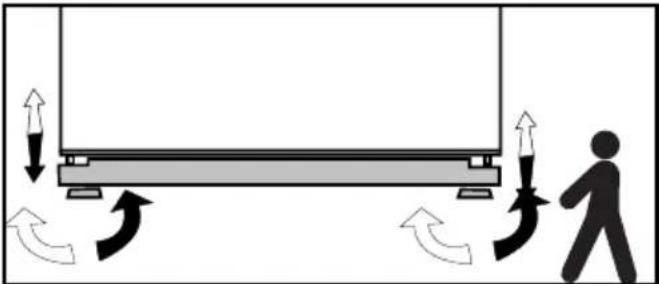
WARNING: First unplug the product. Product must not be plugged in when adjusting the feet. There is the risk of electric shock!
Installation
4.6 Illumination lamp
Do not attempt to repair yourself but call the Authorized Service Agent if the LED illumination lamps do not go on.
The lamp(s) used in this appliance is not suitable for household room illumination. The intended purpose of this lamp is to assist the user to place foodstuffs in the refrigerator/freezer in a safe and comfortable way.
4.7 Door/Drawer Open Warning
An audio warning signal will be given when the door of your product is left open for 1 minute. This warning will be muted when the door is closed or if any of the display buttons are pressed.
4.8 Water connection
First you must connect the water hose to the refrigerator.
WARNING: Refrigerator and the pump, if any, must be unplugged during connection
4.9 Connecting the water hose to the refrigerator
-
Remove the valve channel cover (A) from the water inlet valve.
-
Connect the water line (C) to the inlet valve (B) and tighten by hand to secure it. It is not necessary to use pliers, but if there is a leak, you may tighten slightly with a pair of pliers.
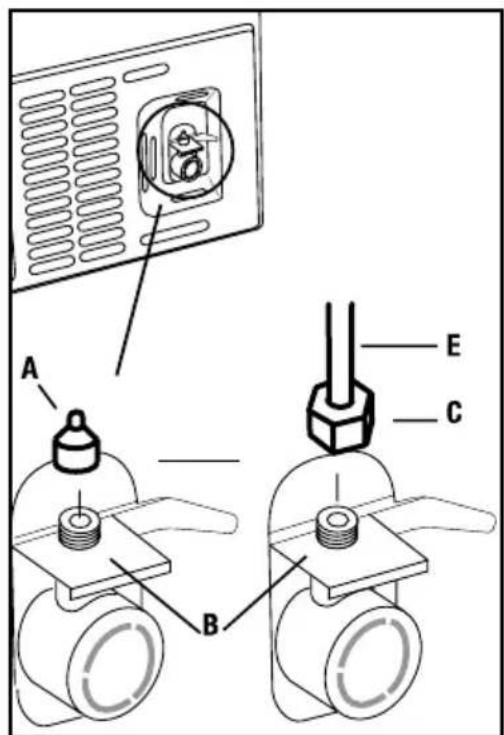
4.10 Connecting the water line to the water supply
Connect the water line to a water supply valve. If a valve is not present or you are not sure, consult a qualified plumber.
5 Preparation

Read the "Safety Instructions" section first!
5.1 What to do for energy saving

Connecting the product to electronic energy-saving systems is harmful, as it may damage the product.
- For a freestanding appliance; 'this refrigerating appliance is not intended to be used as a built-in appliance';
- Do not keep the refrigerator doors open for long periods.
- Do not place hot food or beverages into the refrigerator.
- Do not overfill the refrigerator; blocking the internal air flow will reduce cooling capacity.
Depending on the product's features; defrosting frozen foods in the cooler compartment will ensure energy saving and preserve food quality. - Food shall be stored using the drawers in the cooler compartment in order to ensure energy saving and protect food in better conditions.
Make sure the foods are not in contact with the cooler compartment temperature sensor described below.
- Since hot and humid air will not directly penetrate into your product when the doors are not opened, your product will optimize itself in conditions sufficient to protect your food. In this energy saving function, functions and components such as compressor, fan, heater, defrost, lighting, display and so on will operate according to the needs to consume minimum energy while maintaining the freshness of your foodstuff.
5.2 First operation
Before using your refrigerator, make sure the necessary preparations are made in line with the instructions in "Safety and environment instructions" and "Installation" sections.
- Keep the product running without placing any food inside for 12 hours and do not open the door, unless absolutely necessary.
| i | A sound will be heard when the compressor is engaged. It is normal to hear sound even when the compressor is inactive, due to the compressed liquids and gasses in the cooling system. |
| i | It is normal for the front edges of the refrigerator to be warm. These areas are designed to warm up in order to prevent condensation. |
| i | For some models, indicator panel turns off automatically 1,5 minutes after the door closes. It will be reactivated when the door is open or any button is pressed. |
6 Operating the Product

Read the "Safety Instructions" section first!
- Do not use any mechanical tools or any other tools than the recommendations of the manufacturer to speed up the thawing operation.
- Do not use parts of your refrigerator such as the door or drawers as a support or a step. This may cause the product to trip over or its components to be damaged.
The product shall be used for storing food only. - Turn off the water valve if you will be away from home (e.g. at vacation) and you will not be using the Ice Maker or the water dispenser for a long period of time. Otherwise, water leaks may occur.
6.1 Turning off the product
- If you shall not be using the product for a long period;
- unplug it,
- remove the food to prevent odours,
- wait until the ice is thawed,
- clean the inside and wait until it is dried.
- leave the doors open to prevent damage to internal body plastics.
6 Operation of the Product
Read the "Safety Instructions" section first!
6.2 Indicator panel
Indicator panels may vary depending on the model of your product.
Audial and visual functions of the indicator panel will assist in using the refrigerator.
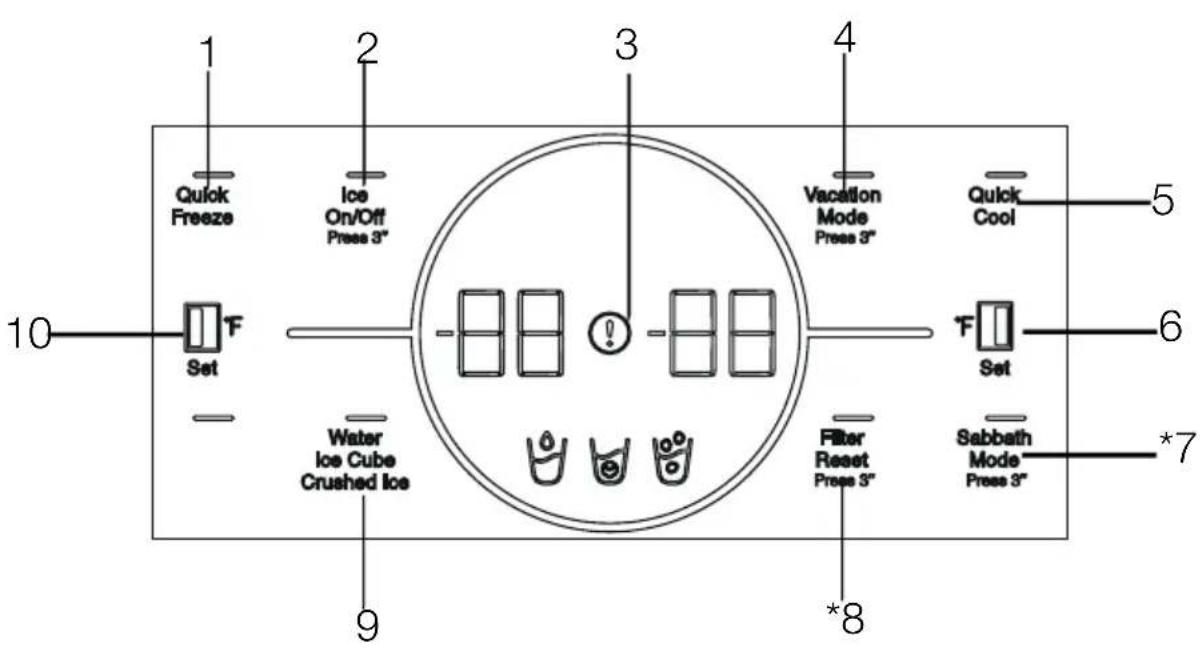
1- Quick Freeze Key
2- Ice Maker On/Off Button
3- Fault Condition Indicator
4- Cooling Compartment OFF (Vacation) Function Key
5- Quick Cooling Key
6- Cooling Compartment Temperature Setting Key
7- *Sabbath Mode Key
8-Filter Replacement Warning Key
9- Water, Ice Cube, Ice Particles Selection Key
10- Freezer Compartment Temperature Adjustment Key
May not be available in all models

Shown functions are optional, there may be differences of shape and location in functions found on your device's display panel.
Using the product
1. Quick Freezing Key
When the quick freeze key is pressed, the LED on the key is illuminated and the quick freeze function shall be activated. Freezing compartment temperature is set to -16^ / -27^ . Press the key again to cancel function. Quick freeze function will automatically self-cancel in 24 hours. To freeze a large amount of fresh food, press the quick freeze key before placing the food in the freezer compartment.
2. Ice Maker On/Off Button
Pressing on this key for 3 seconds activates the ice making operation and the LED on the key illuminates. When the key is pressed for 3 seconds again, ice makin operation is cancelled, and ice cubes prepared before may be used even if the function is cancelled.
3. Fault Condition Indicator
This indicator (!) shall be active when your refrigerator cannot perform adequate cooling or in case of any sensor error. "E" shall be displayed on the Freezing Compartment temperature indicator and figures such as 1,2,3... shall be displayed on the cooling compartment temperature indicator.
These figures provide information to the authorized service on the error that has occurred.
Exclamation mark may be displayed when you load warm food to the freezing compartment or keep the door open for a long period of time. This is not a fault, this warning shall be removed when the food is cooled down or when any key is pressed.
4. Cooling Compartment OFF (Vacation) Function Key
To activate vacation function, press the key for 3 seconds.
The vacation mode will be activated and the LED on the button will be lit. " - - " shall be displayed on the Cooling Compartment temperature indicator and the cooling compartment does not actively perform cooling. You shall not keep your food in the cooling compartment when this function is activated. The other compartments continue to cool according to the set temperatures. Press the key for 3 seconds again to cancel this function.
5. Quick Cooling Key
When the quick cooling key is pressed, the LED on the key is illuminated and the quick cooling function shall be activated. Cooling compartment temperature is set to 33^ / 1^ . Press the key again to cancel function. The quick freezing function shall be automatically cancelled by itself when the cooling is performed.
6. Cooling Compartment Temperature Setting Key
Allows setting of temperature for cooler compartment. When the key is pressed, compartment temperature may be set at 46,45,43,41,39,37,36°F /8,7,6,5,4,3,2 °C respectively.
7.Sabbath Mode Key
Press the Sabbath Mode key for 3 seconds to activate or deactivate the Sabbath Mode. When Sabbath Mode is activated, the display, alarm, door opening or light buttons will not function. "SA" will appear in the display. The cooling algorithm is set according to the sabbath fashion. If the user does not deactivate the Sabbath mode, the refrigerator will automatically cancel it in 72 hours.
8. Filter Replacement Warning Key
The water inlet filter of the refrigerator shall be replaced in regular intervals. Your refrigerator calculates this period automatically. The LED on the filter replacement warning key is illuminated when the operation period of the filter is expired. After replacing the filter, press and hold the key for 3 seconds to turn off the filter replacement warning LED.
9. Water, Ice Cube, Ice Particles Selection Key You may select between water (y), ice cubes and ice particles (using this key. The light of the activated symbol shall remain lit.
When the initial connection is established, you may activate/deactivate the connection with a short press on this key. Until the connection is established, the LED on the key blinks quickly (with the interval of 0.2 seconds). When the connection is active, the LED shall light up continuously.
Using the product
If the connection cannot be established for a long period, check your connection settings and refer to the "Troubleshooting" section provided in the user manual.
HomeWhiz application shall be used for wireless connection. Installation steps are described on the application during installation.
You may access the application by reading the QR code available on the HomeWhiz label on the product. The App is offered through App Store for IOS devices, and through Play Store for Android devices.
Visit https://www.homewhiz.com/ for detailed information.
10. Freezing Compartment Temperature Setting Key
Temperature setting is made for cooler compartment. Pressing this key will enable the freezer compartment temperature to be set at 5,3,1,-2,-4,-6,-8 ^ F / - 15 -16,-17,-19,-20,-21, 22^

* Energy Saving (Display Off) Mode
Energy saving function is enabled automatically when the door of the product is not opened and closed, and all symbols other than the one selected last amongst the water ( ) ice cube and ice particles ( ) symbols are turned off. When the energy-saving function is active, pressing any key or opening the door will deactivate the energy-saving function and the display signals will return to normal. The energy-saving function is a function activated ex-factory and cannot be cancelled.
Using the product
6.3 Humidity controlled crisper (EverFresh+)
Thanks to the humidity controlled crisper, vegetables and fruits may be stored for a longer period at an environment with ideal humidity conditions. With the humidity setting system with 3 options in front of your crisper, you may control the humidity inside the compartment as per the food you store. We recommend you to store your food by selecting vegetable option when you store vegetables only, fruit option when you store fruit only and mixed option when you store mixed food. We recommend that the vegetables and fruits shall not be stored in bags to improve the storage period of the food and to better benefit from the humidity control system. Leaving them in plastic bags causes vegetables to rot in a short time. We recommend that cucumbers and broccoli, in particular, are not stored in closed bags. In situations where contact with other vegetables is not preferred, use packaging materials such as paper that has a certain level of porosity in terms of hygiene.
When placing the vegetables, place heavy and hard vegetables at the bottom and light and soft ones on the top, taking into account the specific weights of vegetables.
Do not put fruits that have a high ethylene gas production such as pear, apricot, peach and particularly apple in the same crisper with other vegetables and fruits. The ethylene gas coming out of these fruits might cause other vegetables and fruits to mature faster and rot in a shorter period of time.
6.4 Dairy (cold storage) bin
"The dairy (cold storage) bin" provides lower temperature within the refrigerator compartment. Use this bin to store delicatessen (salami, sausages, dairy products and etc.) that requires lower storage temperature or meat, chicken or fish products for immediate consumption. Do not store fruits and vegetables inside this bin.
6.5 Crisper
The refrigerator's vegetable bin is designed to keep crispers fresh by preserving humidity. For this purpose, the overall cold air circulation is intensified in the crisper bin. Keep fruits and vegetables in this compartment. Keep the green-leaved crispers and fruits separately to prolong their life.
6.6 Ionizer
The ionizer system in the cooler compartment's air duct serves to ionize the air. The negative ion emissions will eliminate bacteria and other molecules causing odour in the air.
6.7 Odour filter
The odour filter in the cooler compartment's air duct will prevent undesirable odour formation.
Using the product
6.8 Taking ice / water (Optional)
To take water (1) /ice cube (1) /fragmented ice (1) , use the display to select the respective option. Take water/ice by pushing the trigger on the water fountain forward. When switching between ice cube (1) /fragmented ice (1) options, the previous ice type may be discharged a few more times.
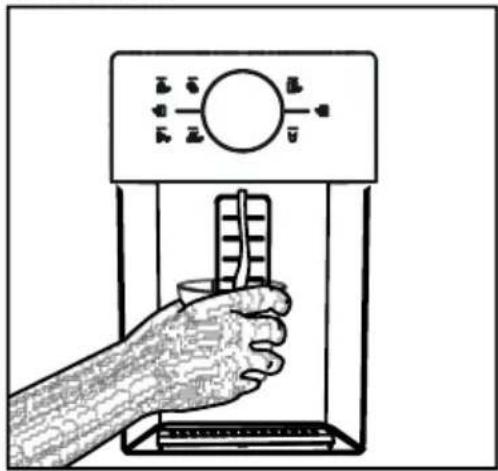
- You must wait approximately 12 hours before taking ice from the ice / water fountain for the first time. The fountain may not discharge ice if there is insufficient ice in the ice box.
The 30 pieces of ice cubes (3-4 Litres) taken after first operating should not be used. - In case of power blackout or temporary malfunction, the ice may partly melt and refreeze. This will cause the ice pieces to merge with each other. In case of extended power blackouts or malfunction, the ice may melt and leak out. If you experience this problem, remove the ice in the ice box and clean the box.
WARNING: The product's water system should be connected to cold water line only. Do not connect to hot water line.
- The product may not discharge water during first operation. This is caused by the air in the system. The air in the system must be discharged. To do this, push the water fountain trigger for 1-2 minutes until the fountain discharges water. The initial water flow may be irregular. The water will flow normally once the air in the system is discharged.
The water may be cloudy during first use of the filter; do not consume the first 10 glasses of water.
- You must wait approximately 12 hours to get cold water after first installation.
The product's water system is designed for clean water only. Do not use any other beverages.
It is recommended to disconnect the water supply if the product will not be used for long periods during vacation etc.
If the water fountain is not used for a long time, the first 1-2 glasses of water received may be warm.
6.9 Drip tray
(optional)
The water dripping from the water fountain accumulates on the drip tray; no water drainage is available. Pull the drip tray out or push on the edges to remove the tray. You may then discharge the water inside the drip tray.
Using the product
6.10 Ice Machine
Ice machine is on the upper section of the freezer body.
By grabbing the handle under the front part, pull the ice storage bin towards yourself to remove.
To remove the ice storage bin:
Grab the handle on the bottom of the bin and pull it towards yourself.
To reinstall the ice storage bin:
Put the bin to its slot and push it back holding parallel to the ground. Please be sure that you fit the bin properly in the slot.
In case you cannot get the all the ice cubes produced:
Ice cubes remaining in the storage bin for a long time may stick together and form large ice blocks
In this case, remove the ice storage bin as described in the manual, separate ice cubes, remove the ones that cannot be separated from the bin and put the remaining cubes back into the bin.
If the problem persists, please check the ice channel, and clear if it is blocked.
When using the ice machine for the first time or after a long period of disuse
Ice cubes may get smaller due to the residual air in the water system. The air will be automatically flow away after the first use.
Do not use the ice cubes produced on the first day so that you can consume the all remaining water in the system.
WARNING: Do not insert your hand or any other object into the ice channel and ice crushing blades while the refrigerator is operating
Do not allow kids to hang onto the ice machine, ice storage bin or water/ice dispenser.
Grasp the ice storage bin firmly with both hands so as not to drop it.
When you close the door of your appliance fast, the water in the freezer may splash into the ice storage bin.
Do not disassemble the ice storage bin unless necessary.
In case of a jam (appliance does not drop ice cubes) while getting crushed ice, try getting ice cube first. Then you can retry getting crushed ice.
When removing crushed ice, the appliance may produce ice cubes first. It means when getting crushed ice, the appliance may produce ice cubes.
The freezer door of the ice machine may be covered by a light frost and a film layer.
It is expected, and we recommend you to immediately clean it.
After some time, water may fill in the grid which is at the bottom of the water dispenser. Clean the grid regularly. Remove the water in the grid regularly.
It is normal to hear a sound when ice cubes are falling down from the ice storage. This does not mean any malfunction.
The blade mechanism of the ice bin is sharp and may injure your hand.
If ice cubes aren't released from the ice dispenser, it means that the ice cubes may be stuck together. You need to clean the bin to continue to get ice cubes.
To change the ice type on the display please release the trigger. Releasing, you can get the ice cubes.
Using the product
6.11 Freezing fresh food
- To preserve food quality, the food items placed in the freezer compartment must be frozen as quickly as possible, use the rapid freezing for this.
- To freeze a large amount of fresh food, press the rapid freeze button 24 hours before placing the food in the freezer compartment.
Freezing the food items when fresh will extend the storage time in the freezer compartment. - Pack the food items in air-tight packs and seal tightly.
-
Make sure the food items are packed before putting in the freezer. Use freezer holders, tinfoil and damp-proof paper, plastic bag or similar packaging materials instead of traditional packaging paper.
-
Mark each food pack by writing the date on the package before freezing. This will allow you to determine the freshness of each pack every time the freezer is opened. Keep the earlier food items in the front to ensure they are used first.
- Frozen food items must be used immediately after defrosting and should not be frozen again.
- Do not free large quantities of food at once.
| Freezer Compartment Setting | Cooler Compartment Setting | Descriptions |
| 0 °F/-18°C 39 °F/ 4°C This is the default, recommended setting. | ||
| -4,-8,-11°F/ -20,-22 or -24°C | 39 °F/ 4°C | These settings are recommended for ambient temperatures exceeding 86°F/30°C. |
| Rapid Freeze 39 °F/ 4°C | Use this to freeze food items in a short time, the product will reset to previous settings when the process is completed. | |
| 0 °F/-18°C or colder | 36 °F/ 2°C | Use these settings if you believe the cooler compartment is not cold enough due to ambient temperature or frequently opening the door. |
Recommended Using Temperature: FF: 39^ / 4^ Frz: 0^ / -18^
6.12 Recommendations for storing frozen foods
The compartment must be set to at least 0^/-18^ .
- Place the food items in the freezer as quickly as possible to avoid defrosting.
- Before freezing, check the "Expiry Date" on the package to make sure it is not expired.
- Make sure the food's packaging is not damaged.
6.13 Deep freezer details
As per the IEC 62552 standards, the freezer must have the capacity to freeze 4,5kg of food items at 0^ / -18^ or lower temperatures in 24 hours for each 100 litres of freezer compartment volume. Food items can only be preserved for extended periods at or below temperature of 0^ / -18^ . You can keep the foods fresh for months (in deep freezer at or below temperatures of 0^ / -18^ ). The food items to be frozen must not contact the already-frozen food inside to avoid partial defrosting.
Using the product
Boil the vegetables and filter the water to extend the frozen storage time. Place the food in air-tight packages after filtering and place in the freezer. Bananas, tomatoes, lettuce, celery, boiled eggs, potatoes and similar food items should not be frozen. Freezing these food items will simply reduce the nutritional value and food quality, as well as possible spoiling which is harmful to health.
6.14 Placing the food
| Freezer compartment shelves | Various frozen goods including meat, fish, ice cream, vegetables etc. |
| Cooler compartment shelves | Food items inside pots, capped plate and capped cases, eggs (in capped case) |
| Cooler compartment door shelves | Small and packed food or beverages |
| Vegetable bin | Fruits and vegetables |
| Fresh food compartment | Delicatessen (breakfast food, meat products to be consumed in short notice) |
6.15 Door open alert
The door open alert system of your refrigerator may differ depending on the model.
Version 1;
If the door of the product remains open for a certain time (between 60 s and 120 s), an audio warning signal sounds; depending on the product model, a visual warning signal (light flash) can also be displayed. If you close the door of the device or press a button on the screen of the device, if any, the warning sound will stop.
Version 2;
If the door of the device remains open for a certain period of time (between 60 s and 120 s), the door open alert is sounded. The door open alert is sounded gradually. First, an audible warning starts to sound. After 4 minutes, if the door is still not closed, a visual warning (lighting flash) is activated. The door open alert will be delayed for a certain period of time (between 60 s and 120 s) when any key on the product screen, if any, is pressed. Then the process will start again. When the device door is closed, the door open alert will be cancelled.
6.16 Illumination lamp
Interior light uses a LED type lamp. Contact the authorized service for any problems with this lamp. Lamp(s) used in this appliance cannot be used for house lighting. Intended use of this lamp is to help the user place food into the refrigerator / freezer safely and comfortably.
7 Maintenance and cleaning
WARNING: Read the "Safety Instructions" section first!.
WARNING: Unplug the refrigerator before cleaning it.
- Do not use sharp or abrasive tools to clean the product. Do not use materials such as household cleaning agents, soap, detergents, gas, gasoline, alcohol, wax, etc.
- The dust shall be removed from the ventilation grill on the rear of the product at least once a year (without opening the cover). Cleaning shall be performed with a dry cloth.
For Products With Water Fountain / Ice Maker
- If the water in the water tank has waited for 2-3 weeks, it shall be replaced.
- The water tank and the components of the water fountain shall not be washed in dishwashers.
- Melt a teaspoonful of carbonate in the water. Moisten a piece of cloth in the water and wring out. Wipe the device with this cloth and dry off thoroughly.
Take care to keep water away from the lamp's cover and other electrical parts.
- Clean the door with a damp cloth. Remove all contents to remove the door and body racks. Remove the door racks by lifting them upwards. Clean and dry the shelves, then attach back in place by sliding from above.
- Do not use chlorinated water or cleaning products on the exterior surface and chrome-coated parts of the product. Chlorine will cause rust on such metallic surfaces.
- Do not use sharp and abrasive tools, soap, house cleaning materials, detergents, gas, gasoline, varnish and similar substances to prevent deformation of the plastic part and removal of prints on the part. Use warm water and a soft cloth for cleaning, and then dry it.
- On the products without a No-Frost feature, water droplets and icing up to a thickness of a finger may occur on the rear wall of the freezer compartment. Do not clean, and never apply oils or similar materials.
- Use a mildly dampened micro-fiber cloth to clean the external surface of the product. Sponges and other types of cleaning clothes may cause scratches.
- To clean all removable components during the cleaning of the interior surface of the product, wash these components with a mild solution consisting of soap, water and carbonate. Wash and dry thoroughly. Prevent contact of water with illumination components and the control panel.

CAUTION:
Do not use vinegar, rubbing alcohol or other alcohol based cleaning agents on any interior surface.
7.1 Stainless Steel External Surfaces
Use a non-abrasive stainless steel cleaning agent and apply it with a soft lint-free cloth. To polish, gently wipe the surface with a micro-fiber cloth dampened with water and use dry polishing chamosis. Always follow the veins of the stainless steel.
7.2 Cleaning of the Products with Glass Doors
Remove the protective foil on the glasses.
There is a coating on the surface of the glasses. This coating minimizes formation of stains and provides easy cleaning of the stains and dirt that have been formed. Glass that is not protected by coating may be exposed to permanent bonding of organic or inorganic, air and water-based contaminants such as limestone, mineral salts, unburned hydrocarbons, metal oxides and silicones, which cause staining and physical damage easily in a short period of time. Keeping the glasses clean becomes very difficult, if not impossible, despite the fact they are cleaned regularly. As a result, the transparency and appearance of the glass deteriorates. Hard and abrasive cleaning methods and agents further increase these defects and accelerate the process of deterioration.
For routine cleaning processes, *non-alkaline and non-corrosive water based cleaning products shall be used.
In order to have a longer service life of this coating, alkaline and corrosive substances shall not be used during cleaning.
A tempering process is applied to increase the resistance of these glasses against impacts and breakage.
As an additional safety precaution, a safety film has been applied to the rear surface of these glasses to prevent harm to the environment in case it breaks.
7.3 Preventing Odours
The product is manufactured free of any odorous materials. However, keeping the food in inappropriate sections and improper cleaning of internal surfaces may lead to odours.
To avoid this, clean the inside with carbonated water every 15 days.
- Keep the foods in sealed holders.
Microorganisms may spread out of unsealed food items and cause malodour.
- Do not keep expired and spoilt foods in the refrigerator.

Tea is one of the most effective odour removers. Place the pulp of the brewed tea in the product inside an open container and remove it after 12 hours at the latest. If you keep the tea pulp inside the product for longer than 12 hours, it will collect the organisms that cause the odour so it can be the source of odour itself.
7.4 Protecting Plastic Surfaces
Oil spilled on plastic surfaces may damage the surface and must be cleaned immediately with warm water.
8 Troubleshooting
Check this list before contacting the service. Doing so will save you time and money. This list includes frequent complaints that are not related to faulty workmanship or materials. Certain features mentioned herein may not apply to your product.
The refrigerator is not working.
- The power plug is not fully settled. >> Plug it in to settle completely into the socket.
- The fuse connected to the socket powering the product or the main fuse is blown. >> Check the fuse.
Condensation on the side wall of the cooler compartment (MULTI ZONE, COOL, CONTROL and FLEXI ZONE).
- The door is opened too frequently >> Take care not to open the product's door too frequently.
- The environment is too humid. >> Do not install the product in humid environments.
- Foods containing liquids are kept in unsealed holders. >>> Keep the foods containing liquids in sealed holders.
- The product's door is left open. >>> Do not keep the product's door open for long periods.
The thermostat is set to a very cool - temperature. >> Set the thermostat to an appropriate temperature.
Compressor is not working.
- In case of sudden power failure or pulling the power plug off and putting back on, the gas pressure in the product's cooling system is not balanced, which triggers the compressor thermic safeguard. The product will restart after approximately 6 minutes. If the product does not restart after this period, contact the service.
Defrosting is active. This is normal for a fully-automatic defrosting product. The defrosting is carried out periodically. - The product is not plugged in. >>Make sure the power cord is plugged in.
- The temperature setting is incorrect. Select the appropriate temperature setting.
The power is out. >> The product will continue to operate normally once the power is restored.
The refrigerator's operating noise is increasing while in use.
- The product's operating performance may vary depending on the ambient temperature variations. This is normal and not a malfunction.
The refrigerator runs too often or for too long.
Troubleshooting
- The new product may be larger than the previous one. Larger products will run for longer periods.
The room temperature may be high. >> The product will normally run for long periods in higher room temperature.
The product may have been recently plugged in or a new food item is placed inside. The product will take longer to reach the set temperature when recently plugged in or a new food item is placed inside. This is normal.
Large quantities of hot food may have been recently placed into the product. Do not place hot food into the product. - The doors were opened frequently or kept open for long periods. >> The warm air moving inside will cause the product to run longer. Do not open the doors too frequently.
- The freezer or cooler door may be ajar. >> Check that the doors are fully closed.
- The product may be set to temperature too low. >> Set the temperature to a higher degree and wait for the product to reach the adjusted temperature.
- The cooler or freezer door washer may be dirty, worn out, broken or not properly settled. >> Clean or replace the gasket. Damaged / torn door washer will cause the product to run for longer periods to preserve the current temperature.
The freezer temperature is very low, but the cooler temperature is adequate.
- The freezer compartment temperature is set to a very low degree. >> Set the freezer compartment temperature to a higher degree and check again.
The cooler temperature is very low, but the freezer temperature is adequate.
- The cooler compartment temperature is set to a very low degree. >> Set the freezer compartment temperature to a higher degree and check again.
The food items kept in cooler compartment drawers are frozen.
- The cooler compartment temperature is set to a very low degree. >> Set the freezer compartment temperature to a higher degree and check again.
The temperature in the cooler or the freezer is too high.
- The cooler compartment temperature is set to a very high degree. Temperature setting of the cooler compartment has an effect on the temperature in the freezer compartment. Wait until the temperature of relevant parts reach the sufficient level by changing the temperature of cooler or freezer compartments.
- The doors were opened frequently or kept open for long periods. Do not open the doors too frequently.
- The door may be ajar. >>> Fully close the door.
- The product may have been recently plugged in or a new food item is placed inside. This is normal. The product will take longer to reach the set temperature when recently plugged in or a new food item is placed inside.
Large quantities of hot food may have been recently placed into the product. Do not place hot food into the product.
Shaking or noise.
- The ground is not level or durable. >> If the product is shaking when moved slowly, adjust the stands to balance the product. Also make sure the ground is sufficiently durable to bear the product.
- Any items placed on the product may cause noise. >> Remove any items placed on the product.
The product is making noise of liquid flowing, spraying etc.
- The product's operating principles involve liquid and gas flows. This is normal and not a malfunction.
There is sound of wind blowing coming from the product.
The product uses a fan for the cooling process. This is normal and not a malfunction.
There is condensation on the product's internal walls.
- Hot or humid weather will increase icing and condensation. This is normal and not a malfunction.
- The doors were opened frequently or kept open for long periods. >> Do not open the doors too frequently; if open, close the door.
- The door may be ajar. >>>> Fully close the door.
There is condensation on the product's exterior or between the doors.
- The ambient weather may be humid, this is quite normal in humid weather. >>> The condensation will dissipate when the humidity is reduced.
The interior smells bad.
- The product is not cleaned regularly. >> Clean the interior regularly using sponge, warm water and carbonated water.
Certain holders and packaging materials may cause odour. >> Use holders and packaging materials without free of odour. - The foods were placed in unsealed holders. Keep the foods in sealed holders. Microorganisms may spread out of unsealed food items and cause malodour.
- Remove any expired or spoilt foods from the product..
The door is not closing.
- Food packages may be blocking the door. Relocate any items blocking the doors.
- The product is not standing in full upright position on the ground. >> Adjust the stands to balance the product.
- The ground is not level or durable. >>> Make sure the ground is level and sufficiently durable to bear the product.
The crisper is jammed.
- The food items may be in contact with the upper section of the drawer. >> Reorganize the food items in the drawer.
In case of a Hot Surface on the Product,
- High temperature may be observed between two doors, on the side panels and on the rear grill area while your product is operated. This is normal and it does not require servicing!
Fan continues to operate when the door is opened.
Fan may continue to operate when the the freezer door is open.

WARNING: If the problem persists after following the instructions in this section, contact your vendor or an Authorized Service. Do not try to repair the product.
BEKO US RESIDENTIAL PRODUCT WARRANTY
The warranties provided by Beko in these statements only apply to Beko appliance sold to the original purchaser or homeowner in the US (Including Alaska, Hawaii, Puerto Rico and the US Virgin Islands) and The Cayman Islands
The factory warranty applies only to products purchased through an authorized dealer or authorized reseller. Go to www.bekoappliances.com/where-to-buy for a list of authorized dealers. Products purchased through non-authorized dealers and wholesalers will not be covered under the manufactures warranty
The warranty is not transferable. To obtain warranty service, please contact your dealer or contact us at https://www.bekoappliances.com/support/beforecallcenter/ You will need your product model number, serial number, retailer name and address, where purchased and purchase date / installation date. This warranty gives you specific legal rights, and you may also have other rights which vary from state to state. Also, please make sure you register your product for warranty at: https://www.bekoappliances.com/product-registration/
2 year (^*) full warranty from date of first Installation (All Beko Products)
Beko will repair or replace at no cost to the consumer any defective parts if used under normal household conditions
(Warranty is void if the product is used commercially e.g., bed + breakfast, nursing home etc.). Service must also be performed by an authorized Beko service agency. (Cosmetic defects must be reported within 10 business days from installation). 1 year warranty on the accessories is for the parts only and does not include labor.
3^rd thru 5^th year (, *) Sealed System Warranty on refrigerators - Parts Only
Beko will provide (No Charge) any compressor, evaporator, condenser and filter Dryer to the consumer if material defects or workmanship have caused the damage or failure of these components.
(Trip and Labor charges are the responsibility of the consumer)
3^rd thru 10^th year (^,^*) ProSmart™ Inverter Motor on Dishwashers - Part Only
Beko will provide (No Charge) a ProSmart Inverter Main Wash Motor if material defects or workmanship have caused the damage or failure of this component.
(Trip and Labor charges are the responsibility of the consumer)
Disclaimers of warranties and exclusions:
Warranty does not cover service costs by an authorized service agent to correct installation, electrical problems or educational instruction on the use of the electric and gas ranges. The warranty also does not cover defects or damage caused by an act of God (such as storms, floods, fires, mudslides, etc.), damage cause by use of the electric and gas ranges for purposes other than those for which it was designed, misuse, abuse, accident, alteration, improper installation, maintenance, travel fees, service calls outside normal service hours, pick up and delivery, any food loss due to product failure, unauthorized service work or work.
This product is fully tested and went through official quality assurance inspections before leaving the original manufacturing site. Warranty terms for this Beko household appliance is not valid if the product is altered, tampered, modified, additional parts assembled, fixed and re-packed by an authorized distributor, servicer, a third party retailer, reseller or by any other unauthorized person(s).
TO THE EXTENT PERMITTED BY LAW, THIS WARRANTY IS IN LIEU OF ALL OTHER EXPRESSED AND IMPLIED WARRANTYES, INCLUDING THE IMPLIED WARRANTYES OF MERCHANTABILITY AND FITNESS FOR A PARTICULAR PURPOSE. BEKO UNDERTAKES NO RESPONSIBILITY FOR THE QUALITY OF THIS PRODUCT EXCEPT AS OTHERWISE PROVIDED IN THIS WARRANTY STATEMENT. BEKO ASSUMES NO RESPONSIBILITY THAT THE PRODUCT WILL BE FIT FOR ANY PARTICULAR PURPOSE FOR WHICH YOU MAY BE BUYING THIS PRODUCT, EXCEPT AS OTHERWISE PROVIDED IN THIS WARRANTY STATEMENT.
Beko does not assume any responsibility for incidental or consequential damages. Such damages include, but are not limited to, loss of profits, loss of savings or revenue, loss of use of the electric and gas ranges or any associated equipment, cost of capital, cost of any substitute equipment, facilities or services, downtime, the claims of third parties, and injury to property. Some states do not allow the exclusion or limitation of incidental or consequential damages, so the above limitations or exclusion may not apply to you.
() Installation date shall refer to either purchase date or 5 business days after delivery of the product to the home, whichever is later.
(*) Parts replaced will assume the identity of the original parts + their original warranty.
No Other Warranties. This Warranty Statement is the complete and exclusive warranty from the manufacturer. No employee of Beko or any other party is authorized to make any warranty statements in addition to those made in this Warranty Statement.
Please keep this warranty card, user manual and your sales slip for future reference.
HOW TO CONTACT BEKO
Please contact Beko US at 1 (888) 352-2356 and select option 2 for customer service
HOW TO GET SERVICE
Please contact you authorized Beko dealer or visit www.bekoappliances.com to locate and get information for the closes authorized Beko service center.
Beko Warranty Information - Version 2-2-2019