
SelectTech 5.1S - Strength Equipment BOWFLEX - Free user manual and instructions
Find the device manual for free SelectTech 5.1S BOWFLEX in PDF.


| Product Type | Adjustable weight bench with leg extension |
| Brand | Bowflex |
| Model | SelectTech 5.1S Bench |
| Dimensions (L × W × H) | 60.6 × 132.9 × 71.3 cm (23.9 × 52.3 × 28.1 in) |
| Product weight | 27 kg (60 lb) |
| Max user weight | 136 kg (300 lb) |
| Max training load (user + lifted weight) | 272 kg (600 lb) |
| Frame material | Steel |
| Backrest adjustments | Decline and incline (multiple positions with pin knob) |
| Seat adjustments | Two positions: flat and elevated |
| Leg extension | Yes, with release button and pivot |
| Transport wheels | 2 wheels on front stabilizer |
| Vertical storage | Possible (seat and backrest lowered, extension raised) |
| Lifting handles | Integrated into the base for transport |
| Included tools | 4 mm and 5 mm Allen wrenches, hardware (screws, nuts, washers, leveling feet, pin knob, handle) |
| Daily maintenance | Wipe off perspiration after each use with a dry cloth |
| Weekly maintenance | Clean with a cloth and ammonia-based cleaner |
| Monthly maintenance | Check frame for cracks or deformation; do not use if damaged |
| Warranty | Contact local customer service for warranty repairs |
| Intended use | Indoor household use only |
| Clearance required around the equipment | ≥ 1.3 m on each side, ≥ 60 cm from exercise range |
| Serial number | On white sticker (record for service) |
Frequently Asked Questions - SelectTech 5.1S BOWFLEX
User questions about SelectTech 5.1S BOWFLEX
0 question about this device. Answer the ones you know or ask your own.
Ask a new question about this device
Download the instructions for your Strength Equipment in PDF format for free! Find your manual SelectTech 5.1S - BOWFLEX and take your electronic device back in hand. On this page are published all the documents necessary for the use of your device. SelectTech 5.1S by BOWFLEX.
USER MANUAL SelectTech 5.1S BOWFLEX
Thanks for choosing BowFlex SelectTech 5.1s Bench as your fitness equipment. We are sincerely encourage you to read through this Owner's manual carefully before the assembling of your equipment started, especially of below WARNINGS! WARNINGS WILL REDUCE THE RISK OF BURNS, FIRE, ELECTRICAL SHOCK OR INJURY TO PERSONS.
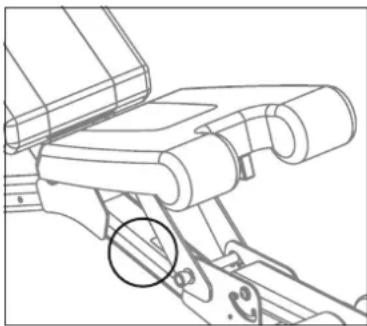
Before exercising, find your equipment's serial number located on a white barcode sticker on product, and exercise in the space provided below.
ENTER YOUR SERIAL NUMBER AND MODEL NAME IN THE BOXES BELOW:
SERIAL NUMBER:
MODEL NAME: BowFlex SelectTech 5.1s Bench
» Refer to the SERIAL NUMBER and MODEL NAME when calling for service.
SERIAL NUMBER LOCATION
natural_image
Technical line drawing of a mechanical assembly with no visible text or symbols
WARNING
- READ ALL INSTRUCTIONS BEFORE USING THIS EXERCISE EQUIPMENT.
- All warnings and instructions should be read and proper instruction obtained prior to use. Use this equipment for its intended purpose ONLY.
- If at any time the Warning stickers become loose, unreadable or dislodged, replace the labels, contact your local distributor for them.
- Keep children under the age of 13 away from this strength training equipment. Teenagers must be supervised at all times while using this equipment.
- This equipment is not intended for use by persons with reduced physical, sensory or mental capabilities, or lack of experience and knowledge, unless they have been given supervision or instruction concerning use of the equipment by a person responsible for their safety.
- Inspect the machine before use. DO NOT use machine if it appears damaged or inoperable.
- DO NOT exceed weight capacity of this equipment.
- Make sure all adjustment devices are fully inserted and properly adjusted before use to avoid injury.
- Injuries to health may result from incorrect or excessive training. Cease exercise if you feel faint or dizzy. Obtain a medical exam before beginning an exercise program.
- Keep body, clothing, hair, and fitness accessories free and clear of all moving parts.
- Make sure machine is stabilized on the floor and uneven surfaces are leveled before use.
- It is essential that your equipment is used only indoors, in a climate controlled room.
- Always fully stow all accessories between workouts. This helps keep you and everyone in your household safe, and helps preserve longevity of your equipment.
- To assure that the safety level of this product is maintained, examine components for wear and tear on a regular basis. Components that are worn excessively or inoperable should be replaced immediately or the product should be put out of use until it is repaired.
- DO NOT over exert yourself during exercise.
• The equipment is only for indoor use at home, DO NOT to use in any commercial, rental, school or institutional setting.. - Consult a physician before starting an exercise program. Stop exercising if you feel pain or tightness in your chest, become short of breath, or feel faint. Contact your doctor before using the machine again.
• Periodically inspect and test the locking mechanism for correct function. Follow the test procedures included in this manual. - Before you start your workout, make sure that your surroundings are free from possible interference and third parties. Your workout free space should be 60 cm(2 feet) more than the maximum reach of the exercise in all directions.

ADDITIONAL WARNING - ADJUSTABLE EQUIPMENT (FREE WEIGHT)
- DO NOT engage the locking mechanism and use the handle to try to lift the main body and base together. To lift the main body and base together, engage the locking mechanism and use the lift handles molded into the base assembly.
- DO NOT try to force the Adjustment Knob to turn when the main body has been removed from the base.
- DO NOT Drop to the floor. Damage to the product and possible personal injury can occur.
- DO NOT let the equipment's forcefully hit together during operation. Damage to the product and possible personal injury can occur.
- DO NOT lean on the equipment's handles or use them to support your body weight, such as using them as a base to perform a push up. Damage to the product and possible personal injury can occur.
- DO NOT try to disassemble your equipment's handles, or base assembly.
- The equipment are very heavy. If you are not using the optional Stand, put the equipment assembly directly on the floor for best support.
- If use with Dumbbell stand, please keep at least 1.3 m (50 inch) on each side of the stand clear. This is the recommended safe distance for access and passage around and emergency dismounts from the machine.
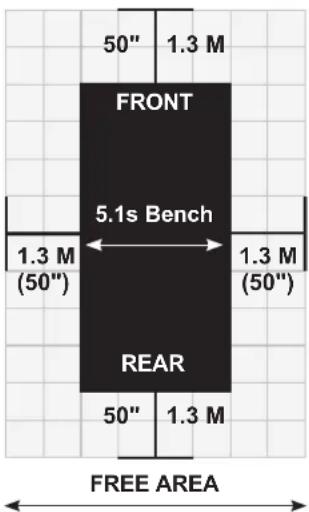
LOCATION OF THE BENCH
- Place the Bench on a level and stable base. There should be 1.3m (50") of free space each side surrounding.
- Do not place the bench in any area that will block any vent or air openings. The equipment should not be located in a garage, covered patio, near water or outdoors.
MOVING THE BENCH
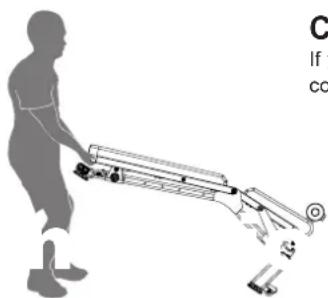
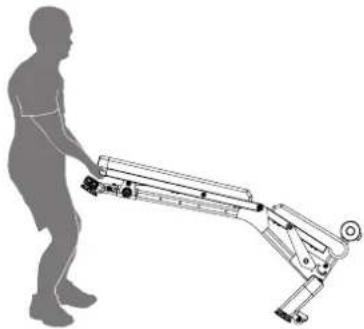
- The Front Stabilizer has two Transport Wheels to assist with moving the bench. Carefully move the bench to the desired location and then lower it.
- With the Seat and Bench fully lowered, grasp the Handle and slightly lift until the weight of the Bench is on the Transport Wheels. Push the Bench into position, and safely lower into place.
• Make sure bench is stabilized before start exercise.
• To reduce the risk of injury, use extreme caution while moving the bench. - Do not attempt to move it over uneven surfaces and make sure there's a safety space of 51 cm (20") minimum to other equipment nearby is strongly recommended.
natural_image
Silhouette of a person pushing a cart with motion lines, no text or symbols visibleCAUTION!
If you experience chest pains, nausea, dizziness or shortness of breath, stop exercising immediately and consult your physician before continuing.
TECH SPECS
| Assembled Dimensions (L x W x H) | 60.6 x 132.9 x 71.3 cm / 23.9" x 52.3" x 28.1" |
| Product Weight 27 kg / 60 lbs. | |
| Max user weight 136 kg / 300 lbs. | |
| Max training weight (User + Lifted weight) | 272 kg / 600 lbs. |
WARRANTY
If your equipment requires warranty service, please contact local Customer Tech Support.

From now on, you can assemble your equipment at your convenience. For detailed instructions on assembly, operation, programs, troubleshooting, and maintenance, please scan the QR code on the left side to access the complete manual.
If scanning the QR code fails, you can visit the website provided here: https://global.bowflex.com/en/manuals.html

For assembly video, please visit: https://global.bowflex.com/en/assembly-videos.html

NEED HELP?
If you have any questions, need assistance with missing parts, or require technical support or maintenance for your equipment, please contact Customer Tech Support.
Manufacturer: Johnson Industries (Shanghai) Co., Ltd. | Manufacturer address: No.2217, Hechen Rd., JiaDing District, Shanghai, China
FEATURES
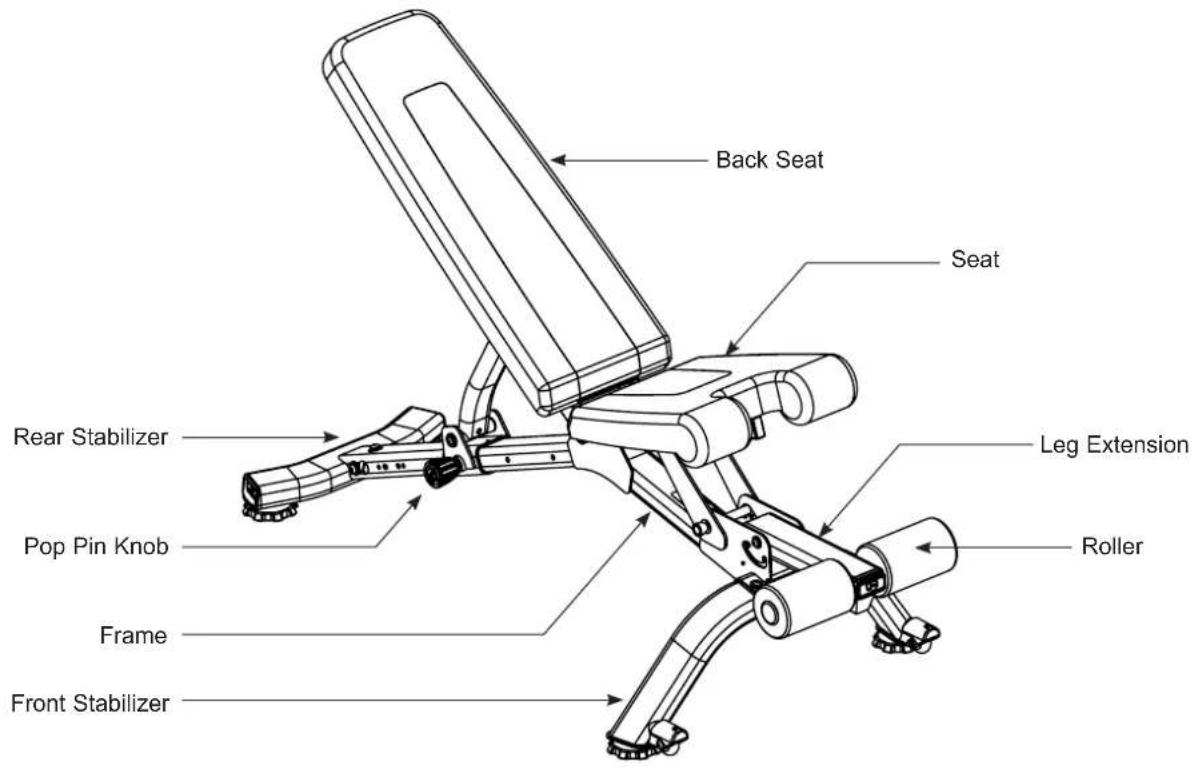
HARDWARE & TOOLS INCLUDED
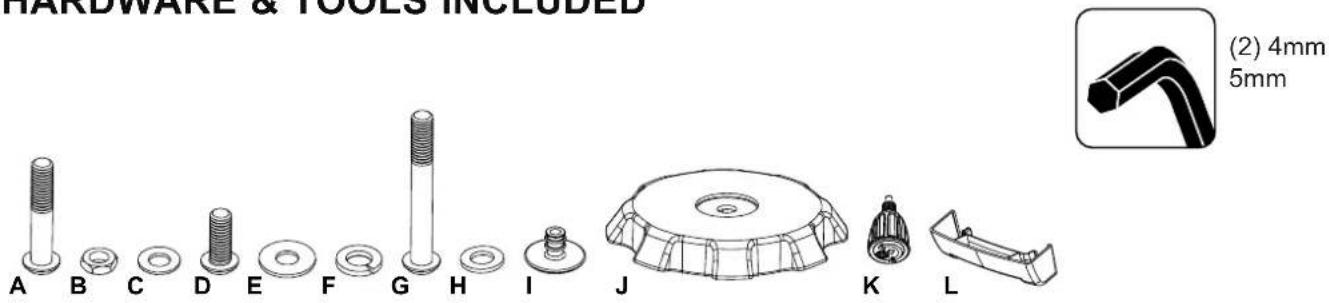
| Item Qty Description Item Qty Description | |||||
| A 4 Button Head Cap Screw, M8x45 G 12 Button Head Cap Screw, M8x60 | |||||
| B 8 Nut, M8 Thin H 8 Flat Washer, M8 Narrow | |||||
| C 4 Flat Washer, M8 I | 2 | Cap | |||
| D | 3 | Button Head Cap Screw, M8x25 | J | 4 | Leveler |
| E 5 Flat Washer, M8 K 1 | Pop Pin Knob | ||||
| F | 5 Lock Washer, M8 | L 1 | Handle | ||
Note: Select pieces of Hardware have been provided as spares on the Hardware Card. Be aware that there may be remaining Hardware after the proper assembly of the equipment.
PARTS
| Item Qty Description Item Qty Description | |||
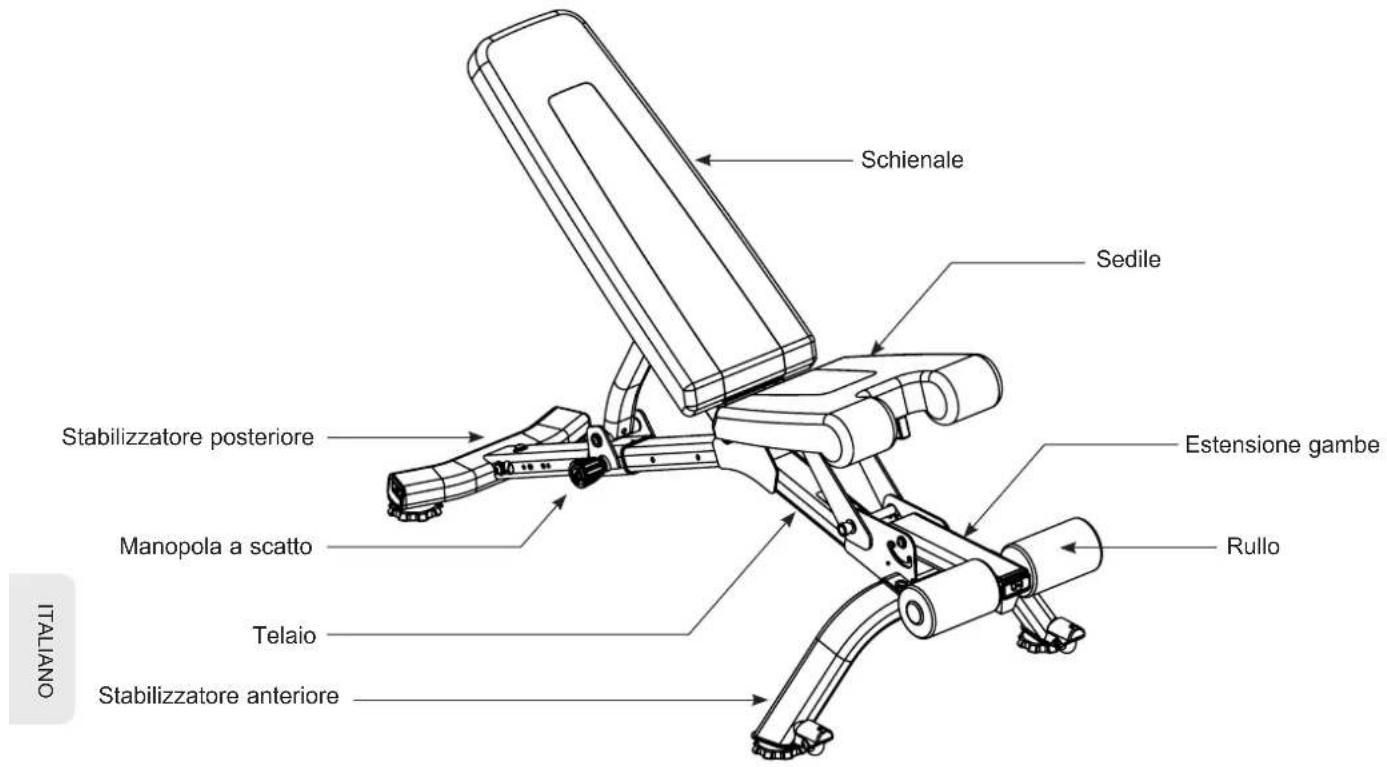
| 1 1 Frame Assembly 5 1 Seat Back | |||
| 2 1 Rear Stabilizer 6 1 Leg Extension | |||
| 3 1 Front Stabilizer 7 1 Foam Roller Tube | |||
| 4 1 Seat 8 2 Foam Roller |
Note: Install the Parts in numerical order.
ASSEMBLY
! WARNING
DO NOT CUT the Shipping Zip-Ties on the Frame Assembly until it has been removed from the packaging and placed in the assembly area.
Step 1.
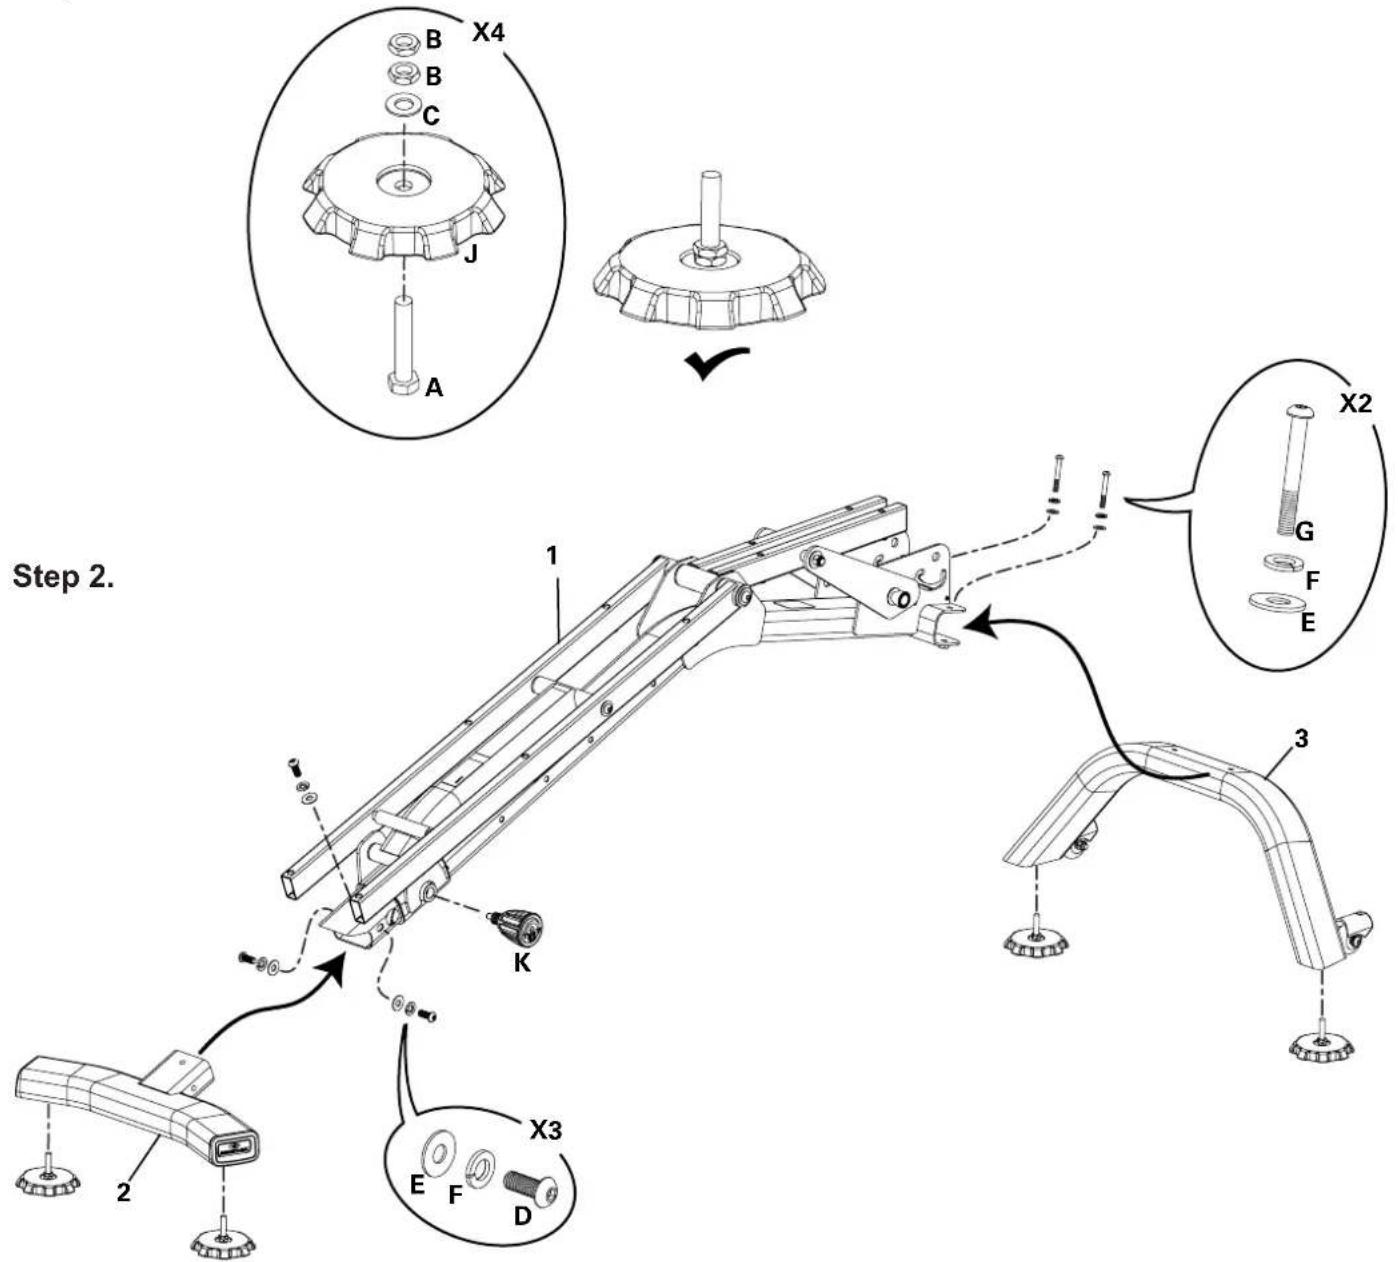
ASSEMBLY
Step 3.
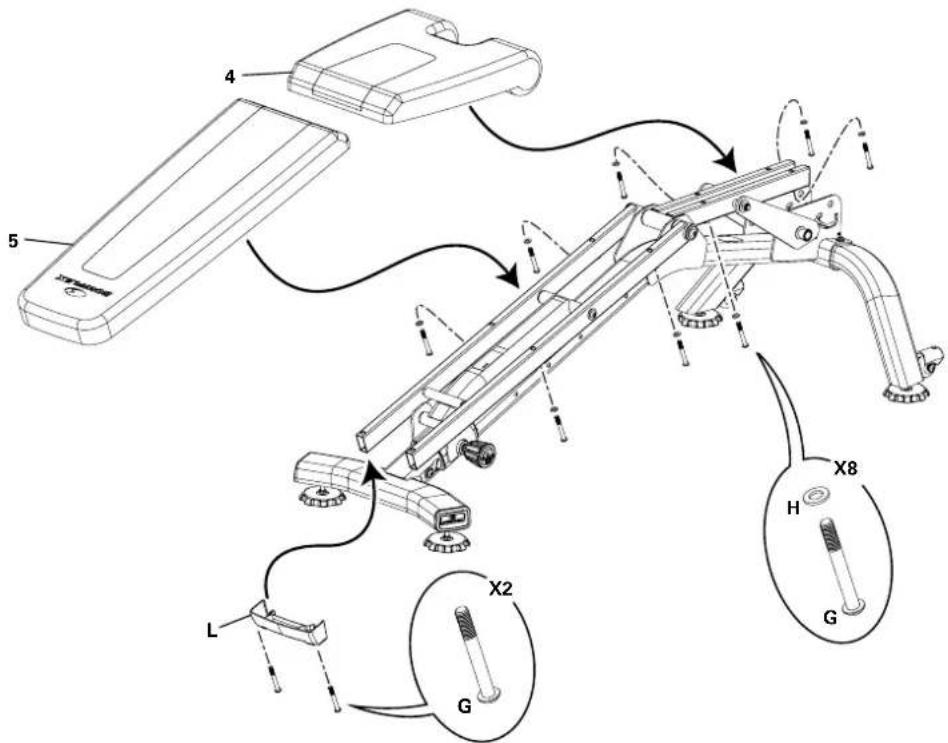
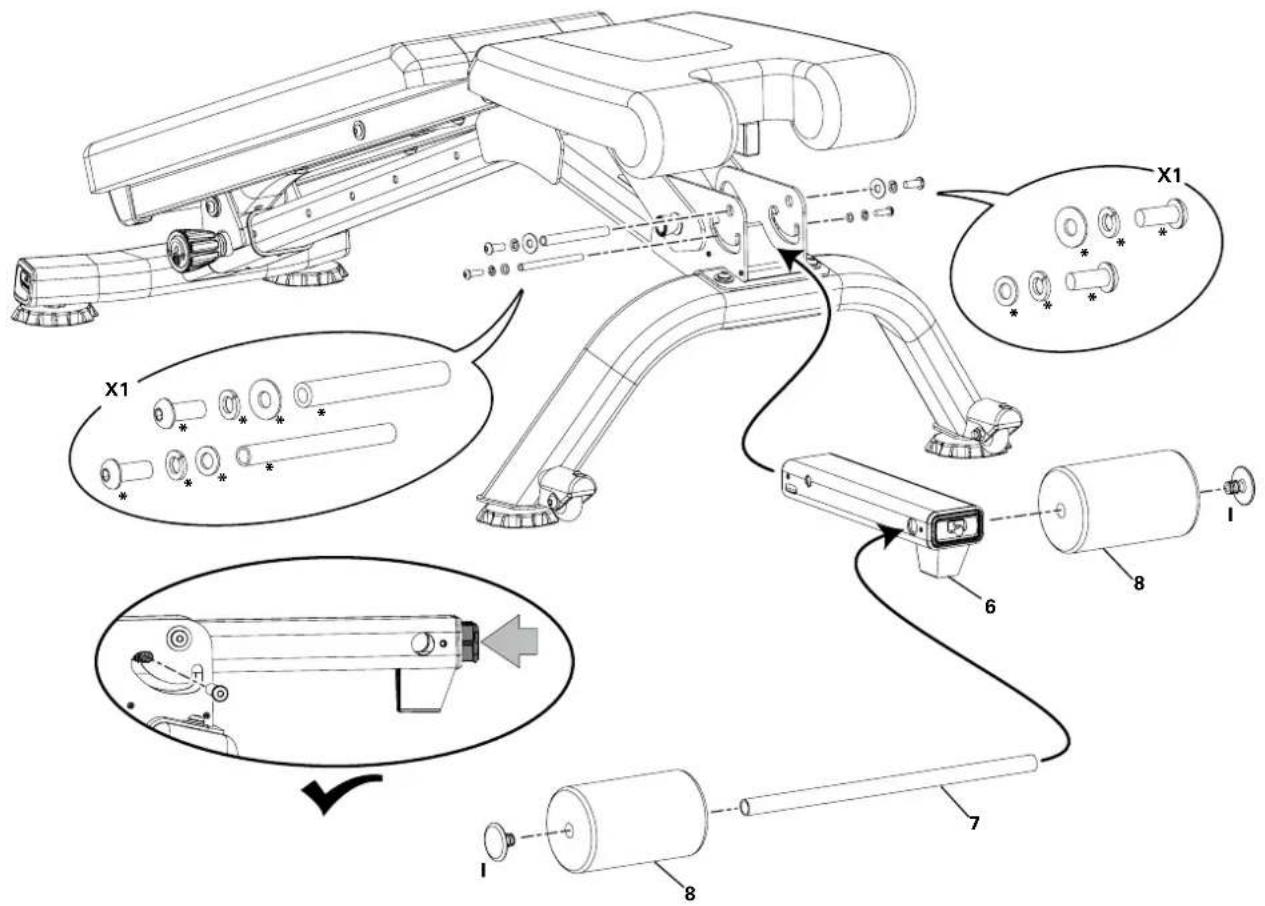
Step 4.
(*) Hardware is pre-installed and not on the Hardware Card.
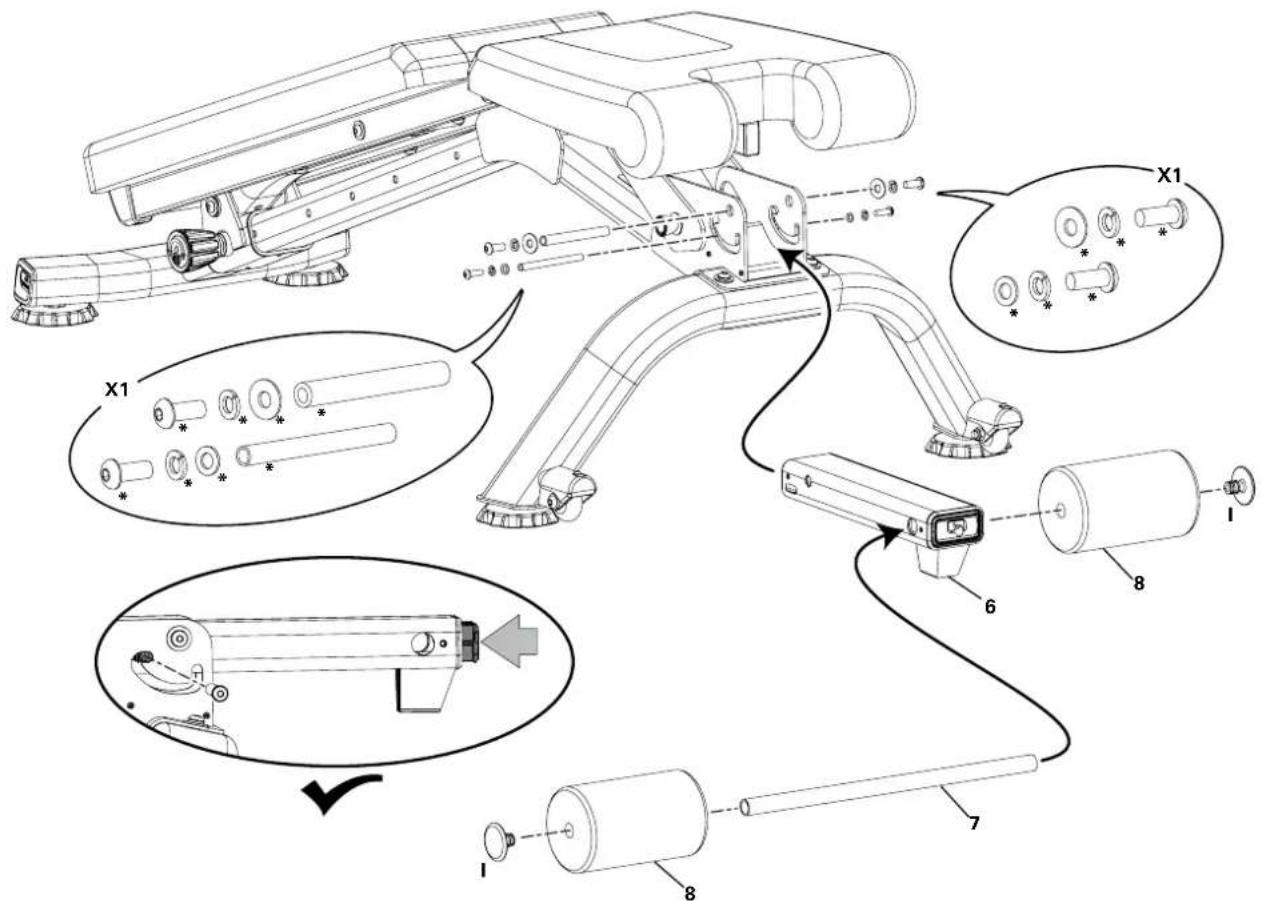
Step 5. Final Inspection
Inspect your equipment to ensure that all fasteners are tight and components are properly assembled.

Do not use or put the equipment into service until the equipment has been fully assembled and inspected for correct performance in accordance with the User's Guide. Review all warnings affixed to the equipment.
BASIC OPERATION
Adjusting the Bench
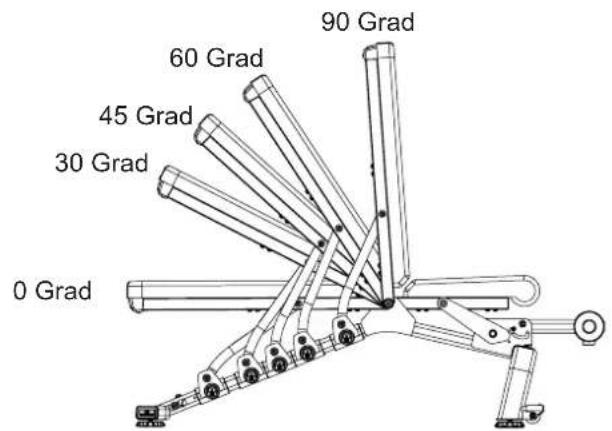
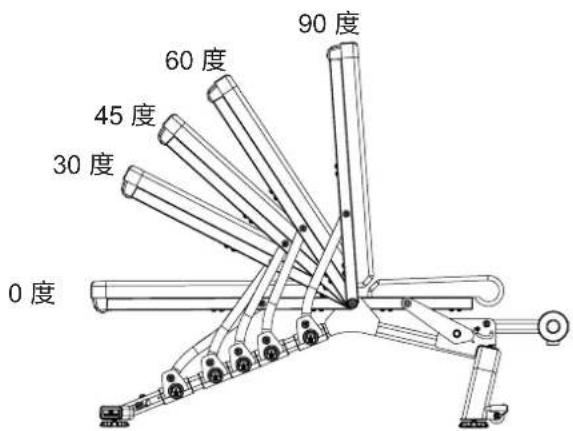
Loosen and pull the Pop Pin Knob on the Bench Rail. Adjust the Bench to the desired angle. Release the Pop Pin Knob to engage the locking pin. Be sure that the pin is fully engaged and fully tighten the Pop Pin Knob before using the bench.
Bench Positions
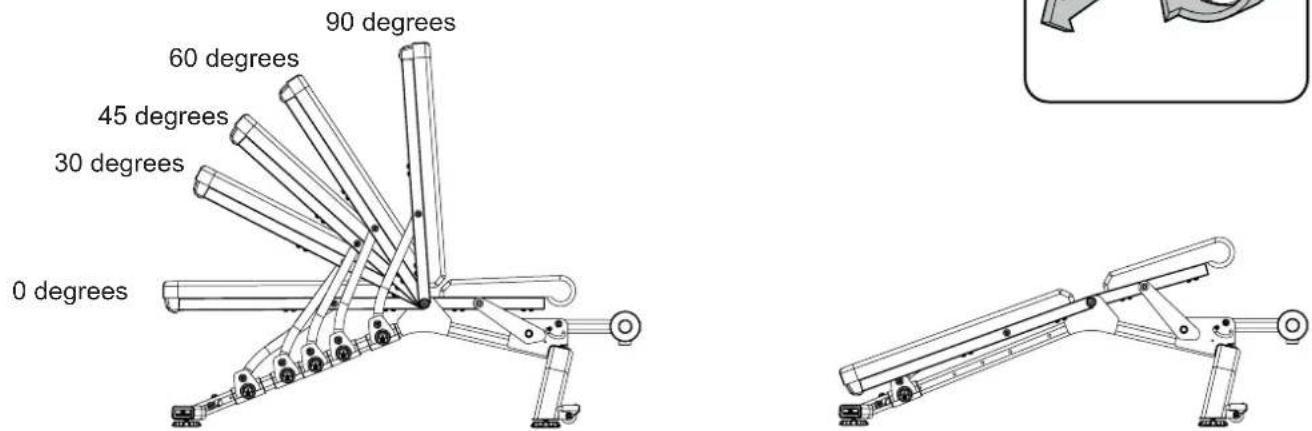
Positions of Seat Back 20 degree Decline with Raised Seat
Adjusting the Seat
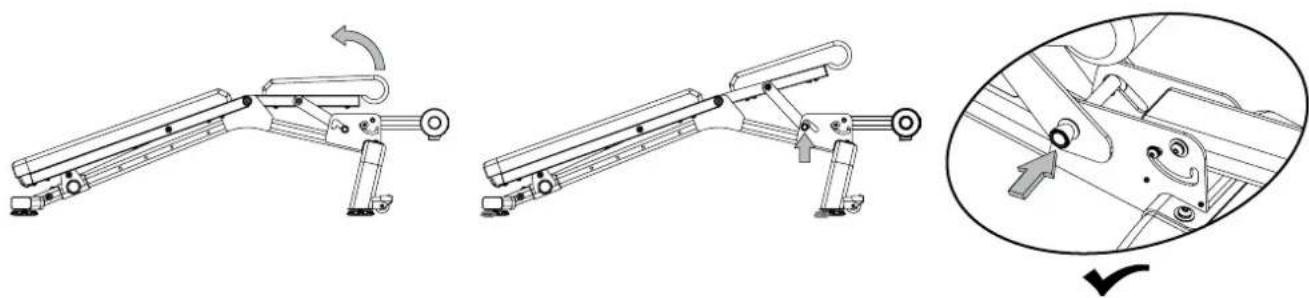
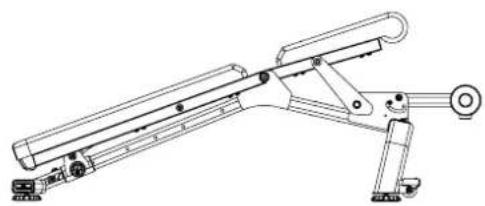
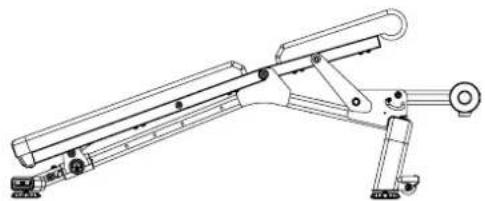
The Seat has two positions, flat or raised. To raise the Seat, lift up on it until the locking mechanism engages.
natural_image
Technical line drawing of a mechanical device with three sequential steps and a magnified detail view (no text or symbols)To lower the Seat, slightly lift the Seat and guide the locking mechanism to the lower setting. Safely lower the Seat into the flat position.
ASSEMBLY
Moving the Bench
The Front Stabilizer has two Transport Wheels to assist with moving the bench. With the Seat and Bench fully lowered, grasp the Handle and slightly lift until the weight of the Bench is on the Transport Wheels. Push the Bench into position, and safely lower into place.
natural_image
Silhouette of a person pushing a robotic arm (no text or symbols visible)Stowing the Bench
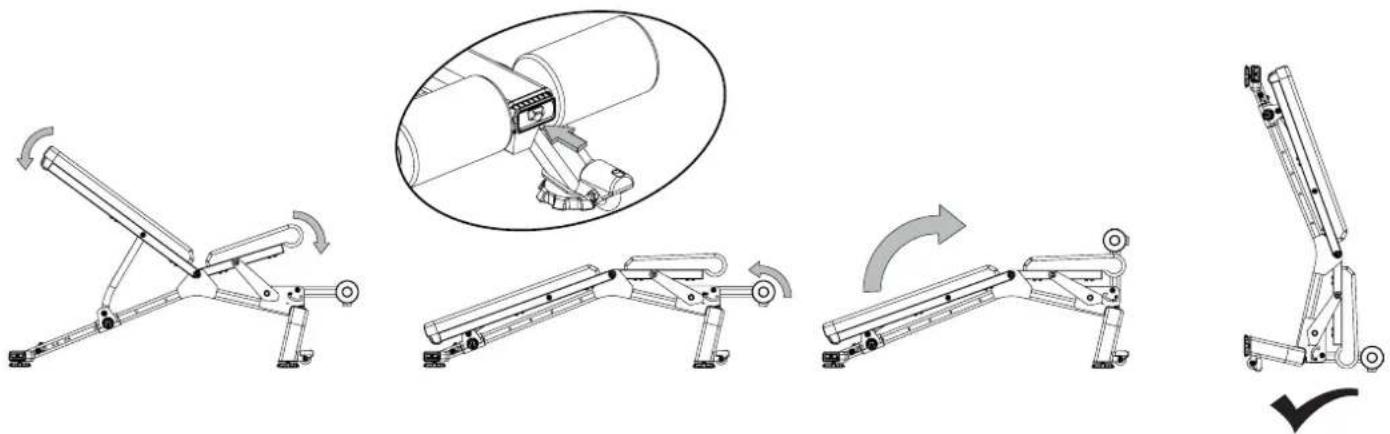
The Bench can be stowed to occupy less floor space and to be safely stored.
- Fully lower the Seat and Bench.
- Push the release button on the end of the Leg Extension and flip upward until it locks into place.
- Safely pivot the entire bench forward to rest on the Leg Extension and Front Stabilizer.
natural_image
Mechanical assembly diagram showing five sequential steps of a robotic arm with rotation arrows (no text or labels)TROUBLESHOOTING
| Problem Solution | |
| Bench makes a squeaking or chirping noise | Verify the following:1) The Bench is on a level surface.2) Loosen all leveling feet bolts attached during the assembly process, grease the threads, adjust and tighten again. |
MAINTENANCE
The safety and performance of this product can be maintained only if it is examined regularly for damage and wear. Examine the bench before each use for damage and wear. Replace broken components immediately or put the bench out of use until repaired.
| Daily/Before Each Use: | Examine bench. Make sure it looks in good condition and operates smoothly. If you find damage, DO NOT USE. Contact your TECH SUPPORT |
| Daily/After Each Use: | After each use, wipe bench free of sweat with a clean, dry cloth. Upholstery can be cleaned with a mild detergent or spray cleaner. |
| Weekly: | If used often, your bench should be thoroughly cleaned using a clean cloth and an ammonia based cleanser. Wipe bench down completely and be sure to touch up any scratches with touch up paint to prevent rusting. |
| Monthly: | Check the frame of the bench for any sign of cracking or permanent bending. Do not use the bench if you see this. Contact TECH Support |
natural_image
Technical line drawing of a mechanical assembly with no visible text or symbols
WARNUNG
natural_image
Silhouette of a person pushing a wheeled robotic arm (no text or symbols visible)Schritt 4.
Schritt 5. Endkontrolle
natural_image
Mechanical component diagram showing a knob and curved arrow mechanism (no text or symbols)Bankpositionen
natural_image
Technical line drawing of a mechanical assembly with articulated arms and mounting feet (no text or symbols)natural_image
Technical line drawing of a robotic arm with articulated joints and a curved handle (no text or symbols)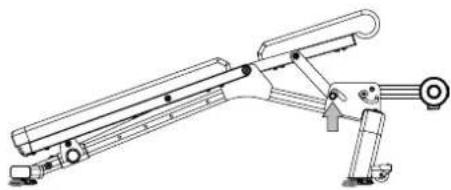
natural_image
Technical line drawing of a mechanical device with articulated arms and mounting base (no text or symbols)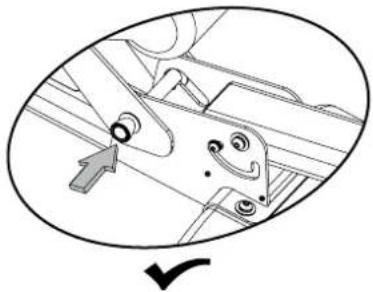
natural_image
Technical diagram of a mechanical assembly with no visible text or symbolsnatural_image
Silhouette of a person pushing a wheeled robotic arm (no text or symbols visible)Lagerung der Bank
natural_image
Sequence of mechanical arm diagrams showing progressive assembly from left to right, with no text or symbols present.FEHLERSUCHE
MODELNAAM: BowFlex SelectTech 5.1S Bench
natural_image
Technical line drawing of a mechanical assembly with no visible text or symbols
WAARSCHUWING
natural_image
Silhouette of a person pushing a wheeled robotic device (no text or symbols visible)TECHNISCHE SPECIFICATIES
Fabrikant: Johnson Industries (Shanghai) Co., Ltd. | Adres fabrikant: No.2217, Hechen Rd., JiaDing District, Shanghai, China
KENMERKEN
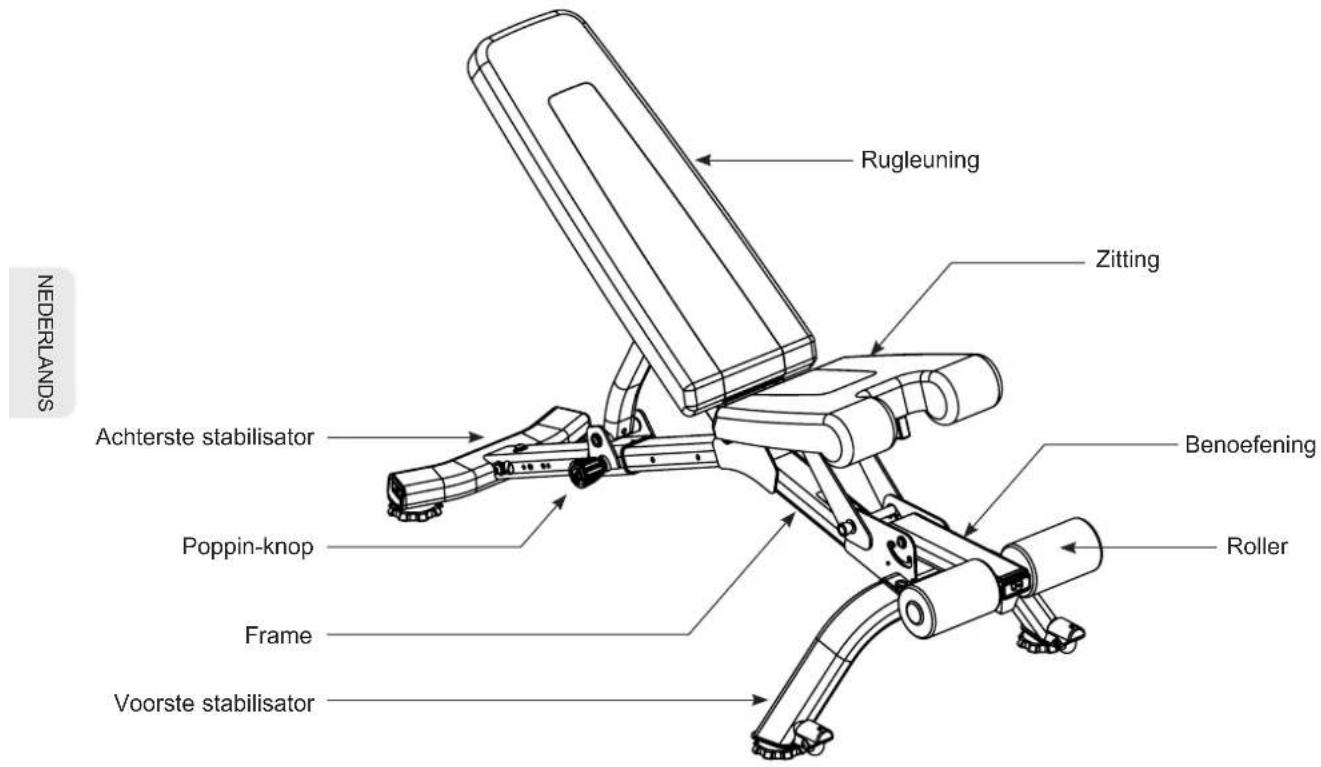
MEEGELEVERD BEVESTIGINGSMATERIAAL EN GEREEDSCHAP
(2) 4 ~mm 5 ~mm

natural_image
Technical line drawings of various mechanical components and parts (no text or symbols)Stap 4.
natural_image
Mechanical component diagram showing a knob and curved arrow mechanism (no text or symbols)De stoel verstellen
natural_image
Technical line drawing of a mechanical device with three sequential steps and a magnified detail view (no text or symbols)natural_image
Silhouette of a person pushing a robotic arm (no text or symbols visible)De bank opbergen
natural_image
Mechanical assembly diagram showing five sequential steps of a robotic arm mechanism, with no visible text or symbols.PROBLEEMOPLOSSING
natural_image
Technical line drawing of a mechanical assembly with no visible text or symbols
AVERTISSEMENT
SUPERFICIE LIBRE
EMPLACEMENT DU BANC
natural_image
Silhouette of a person pushing a wheeled robotic arm (no text or symbols visible)ASSEMBLAGE
Étape 3.
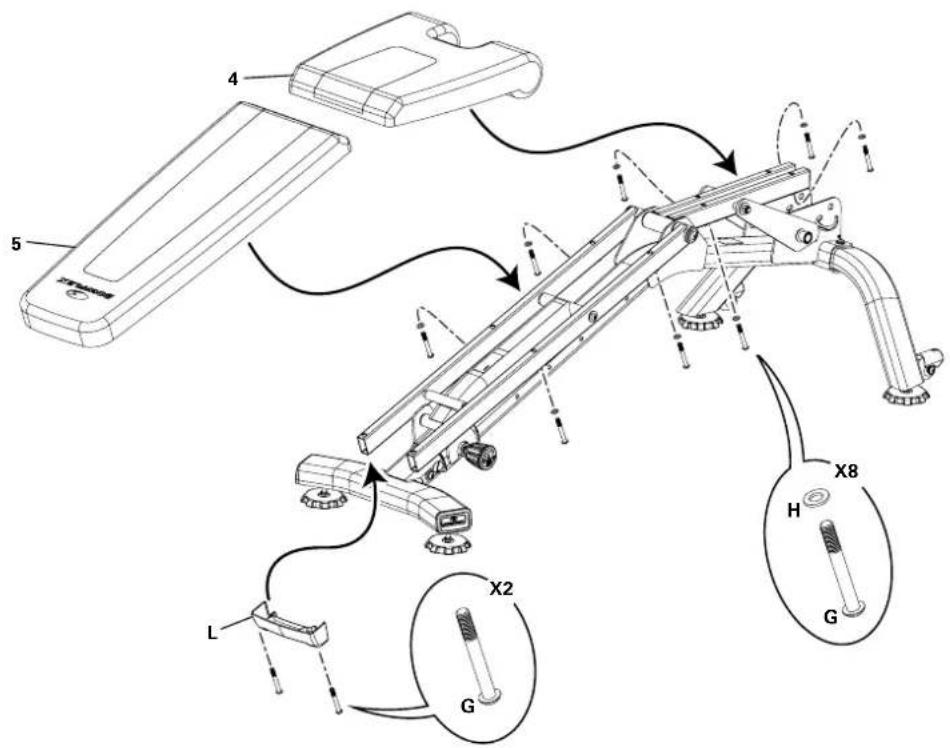
Étape 4.
Étape 5. Inspection finale
natural_image
Mechanical component diagram showing a rotating shaft and lever mechanism with directional arrows (no text or symbols)Positions du banc
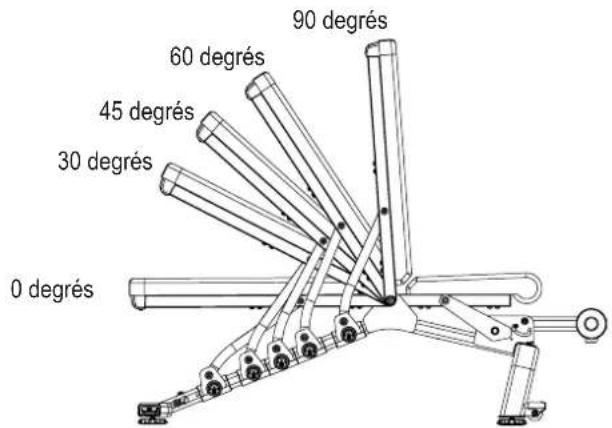
Positions dossier
natural_image
Technical line drawing of a mechanical assembly with articulated arms and levers (no text or symbols)natural_image
Technical line drawings of a mechanical device with three sequential steps and a close-up inset showing internal components (no text or symbols)natural_image
Silhouette of a person pushing a robotic arm (no text or symbols visible)Rangement du banc
natural_image
Mechanical assembly diagram showing five sequential steps of a robotic arm with rotation arrows (no text or labels)DÉPANNAGE
natural_image
Technical line drawing of a mechanical assembly with no visible text or symbols
ATTENZIONE
natural_image
Silhouette of a person pushing a wheeled robotic device (no text or symbols visible)SPECIFICHE TECNICHE
Manufacturer: Johnson Industries (Shanghai) Co., Ltd. | Manufacturer address: No.2217, Hechen Rd., JiaDing District, Shanghai, China
CARATTERISTICHE
Passo 4.
natural_image
Technical line drawing of a mechanical assembly with articulated arms and mounting feet (no text or symbols)natural_image
Mechanical component diagram showing a knob and curved arrow mechanism (no text or symbols)natural_image
Technical line drawing of a robotic arm with articulated joints and a curved handle (no text or symbols)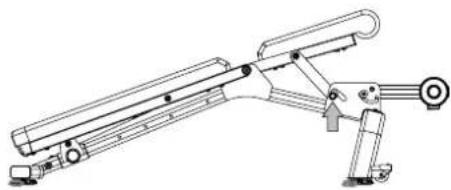
natural_image
Technical line drawing of a mechanical device with articulated arms and mounting base (no text or symbols)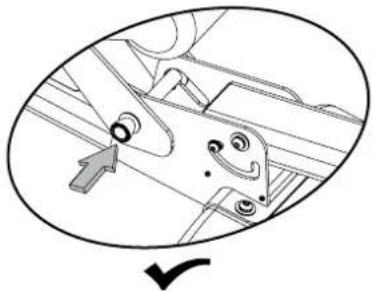
natural_image
Technical diagram of a mechanical assembly with no visible text or symbolsnatural_image
Silhouette of a person pushing a robotic arm (no text or symbols visible)natural_image
Technical line drawings of a robotic arm with motion arrows indicating movement, including a close-up inset showing the mechanical component (no text or symbols present)natural_image
Technical line drawing of a mechanical assembly with no visible text or symbols
ADVERTENCIA
natural_image
Silhouette of a person pushing a wheeled cart (no text or symbols visible)Paso 4.
natural_image
Mechanical component diagram showing a knob and curved arrow mechanism (no text or symbols)natural_image
Technical line drawing of a mechanical assembly with articulated arms and levers (no text or symbols)natural_image
Technical line drawing of a mechanical linkage assembly with motion arrows and a magnified detail view (no text or symbols)natural_image
Silhouette of a person pushing a wheeled robotic arm (no text or symbols visible)Plegado del banco
natural_image
Technical line drawing of a mechanical assembly with no visible text or symbols
注意
natural_image
Silhouette of a person pushing a wheeled robotic device (no text or symbols visible)技術規格
步驟 4
(*) 硬體已預安裝,並不在硬體卡上。
步驟 5 最後檢查
natural_image
Mechanical component diagram showing a knob and curved arrow mechanism (no text or symbols)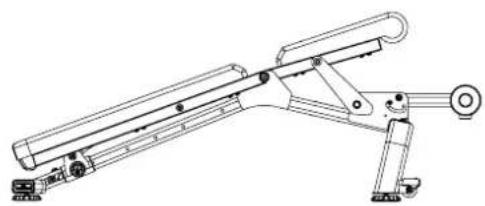
natural_image
Technical line drawing of a mechanical support system with articulated arms and mounting feet (no text or symbols)natural_image
Technical line drawing of a mechanical robotic arm with articulated joints and a curved arm (no text or symbols)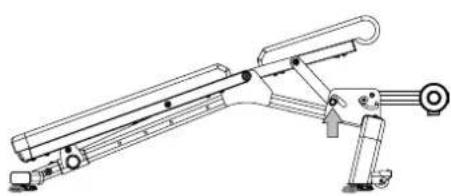
natural_image
Technical line drawing of a mechanical device with articulated arms and mounting base (no text or symbols)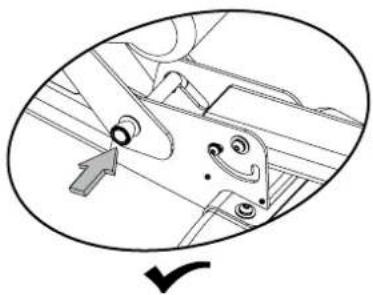
natural_image
Mechanical assembly diagram showing a bracket with mounting holes and a checkmark indicating a detail (no text or symbols present)natural_image
Silhouette of a person pushing a robotic arm (no text or symbols visible)收納健身椅
健身椅可摺收以節省空間,便於收納。
natural_image
Mechanical assembly diagram showing five sequential steps of a robotic arm with rotation indicators (no text or labels)故障排除
natural_image
Technical line drawing of a mechanical assembly with no visible text or symbols
警告
natural_image
Silhouette of a person pushing a wheeled robotic device (no text or symbols visible)技术规格
步骤4
步骤5最后检查
natural_image
Mechanical component diagram showing a knob and curved arrow mechanism (no text or symbols)椅背角度
natural_image
Technical line drawing of a mechanical support system with articulated arms and mounting feet (no text or symbols)调节座垫
natural_image
Technical line drawing of a mechanical robotic arm with articulated joints and a curved handle (no text or symbols)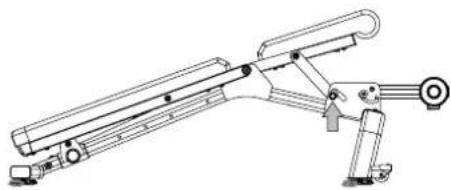
natural_image
Technical line drawing of a mechanical device with articulated arms and mounting base (no text or symbols)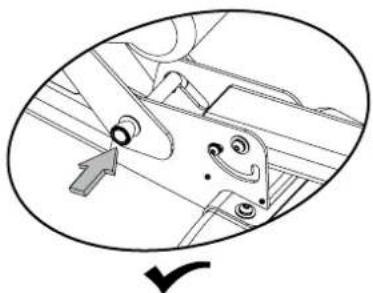
natural_image
Technical diagram of a mechanical assembly with no visible text or symbolsnatural_image
Silhouette of a person pushing a robotic arm (no text or symbols visible)折叠收纳
健身椅可折叠以节省占地并方便收纳。
natural_image
Mechanical assembly diagram showing five sequential steps of a robotic arm with rotation indicators (no text or labels)故障排除


- WARNING
- ADDITIONAL WARNING - ADJUSTABLE EQUIPMENT (FREE WEIGHT)
- LOCATION OF THE BENCH
- MOVING THE BENCH
- CAUTION!
- WARRANTY
- NEED HELP?
- FEATURES
- HARDWARE & TOOLS INCLUDED
- PARTS
- ASSEMBLY
- ! WARNING
- Step 3.
- Step 4.
- Step 5. Final Inspection
- BASIC OPERATION
- Adjusting the Bench
- Adjusting the Seat
- Stowing the Bench
- TROUBLESHOOTING
- MAINTENANCE
- WARNUNG
- Schritt 4.
- Schritt 5. Endkontrolle
- Bankpositionen
- Lagerung der Bank
- FEHLERSUCHE
- WAARSCHUWING
- Stap 4.
- De stoel verstellen
- De bank opbergen
- PROBLEEMOPLOSSING
- AVERTISSEMENT
- EMPLACEMENT DU BANC
- ASSEMBLAGE
- Étape 3.
- Étape 4.
- Étape 5. Inspection finale
- Rangement du banc
- DÉPANNAGE
- ATTENZIONE
- Passo 4.
- ADVERTENCIA
- Paso 4.
- Plegado del banco
- 注意
- 步驟 4
- 步驟 5 最後檢查
- 收納健身椅
- 故障排除
- 警告
- 步骤4
- 步骤5最后检查
- 椅背角度
- 调节座垫
- 折叠收纳
Brand : BOWFLEX
Model : SelectTech 5.1S
Category : Strength Equipment