WWHD500 - Waffle Maker Waring Commercial - Free user manual and instructions
Find the device manual for free WWHD500 Waring Commercial in PDF.

User questions about WWHD500 Waring Commercial
0 question about this device. Answer the ones you know or ask your own.
Ask a new question about this device
Download the instructions for your Waffle Maker in PDF format for free! Find your manual WWHD500 - Waring Commercial and take your electronic device back in hand. On this page are published all the documents necessary for the use of your device. WWHD500 by Waring Commercial.
USER MANUAL WWHD500 Waring Commercial
natural_image
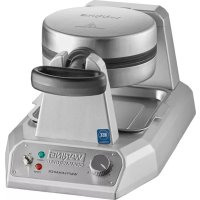
Industrial waill processing machine with digital display and warning panel (no readable text or symbols)WWHD500
For your safety and continued enjoyment of this product, always read the instruction book carefully before using.
When using electrical appliances, especially when children are present, basic safety precautions should always be taken, including the following:
- READ ALL INSTRUCTIONS.
- Unplug from outlet when not in use and before cleaning. Allow to cool before putting on or taking off parts, and before cleaning appliance.
- Do not touch hot surfaces. Use handles and knobs.
- To protect against fire, electric shock, and injury to persons, DO NOT IMMERSE CORD, PLUG, OR UNIT in water or other liquids.
- This appliance is not intended for use by persons (including children) with reduced physical, sensory, or mental capabilities, or lack of experience and knowledge. Children should be supervised to ensure that they do not play with the appliance.
- Do not operate any appliance with a damaged cord or plug, or after the appliance malfunctions or has been damaged in any manner. Return appliance to the nearest Waring Authorized Service Center for examination, repair, or adjustment.
- The use of accessory attachments not recommended by Waring® may result in fire, electric shock, or injury to persons.
- Do not use outdoors or for other than its intended use.
- Do not let power cord hang over edge of table or counter, or touch hot surfaces.
- Do not place on or near a hot gas or electric burner, or in a heated oven.
- Switch rocker switch to OFF position and unplug the unit when finished baking waffles.
- Extreme caution must be used when moving an appliance containing hot oil or other hot liquids.
-
Always begin by plugging appliance into wall outlet. To disconnect, switch rocker switch to OFF position and unplug the unit when finished baking waffles, then remove plug from wall outlet.
-
WARNING: TO REDUCE THE RISK OF FIRE OR ELECTRIC SHOCK, REPAIRS SHOULD BE MADE ONLY BY AUTHORIZED PERSONNEL. DO NOT REMOVE THE BASE PANEL. NO USER-SERVICEABLE PARTS ARE INSIDE.
-
To acquire another instruction manual, go to www.waring.com.
SAVE THESE INSTRUCTIONS APPROVED FOR COMMERCIAL USE
CONTENTS
Important Safeguards 2
Grounding Instructions.... 3
Special Cord Set Instructions 3
Special Features....4
Instructions for Use....5
Cleaning & Maintenance 6
Warranty 9
GROUNDING INSTRUCTIONS
For your protection, Waring ^® Waffle Makers are supplied with a molded, 3-prong, grounding-type plug and should be used in combination with a properly connected grounding-type outlet as shown in the figure.

text_image
CIRCUIT GROUND- ING CONDUCTOR CONNECTED PROPERLY GROUNDING PRONGSPECIAL CORD SET INSTRUCTIONS
A short power-supply cord is provided to reduce the risks resulting from becoming entangled in or tripping over a longer cord. Extension cords may be used if care is exercised in their use.
If an extension cord is used, the marked electrical rating of the extension cord should be at least as great as the electrical rating of the appliance, and the longer cord should be arranged so that it will not drape over the countertop or tabletop where it can be pulled on by children or animals, or tripped over.
SPECIAL FEATURES
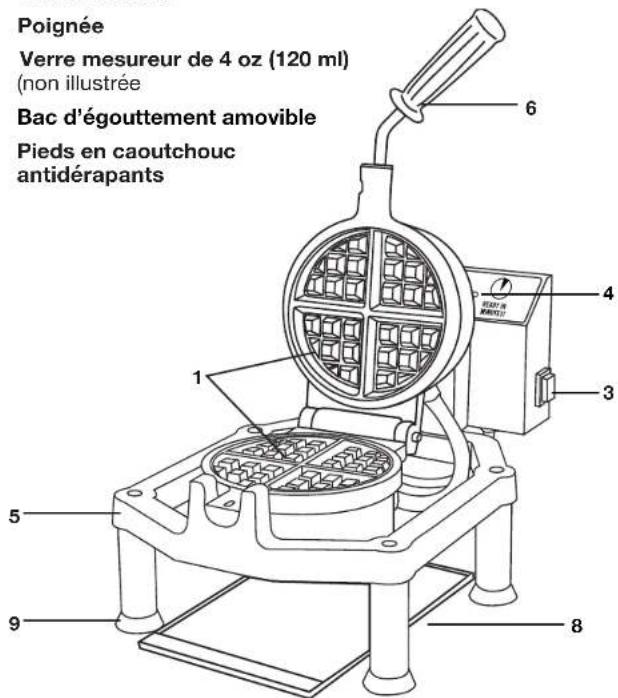
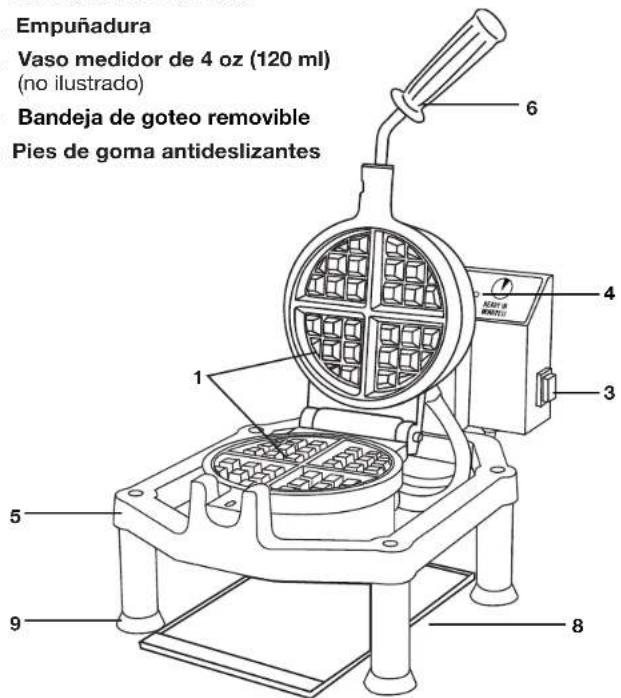
- Cast-Iron Belgian Waffle Grids
2.SettingsControl
Programmable temperature and time functionality on the rear of the control box.
3.PowerSwitch
ON/OFF power switch located on the back panel illuminates red when the unit is turned on.
- Ready Indicator Light
- Cast-Iron Base
- Handle
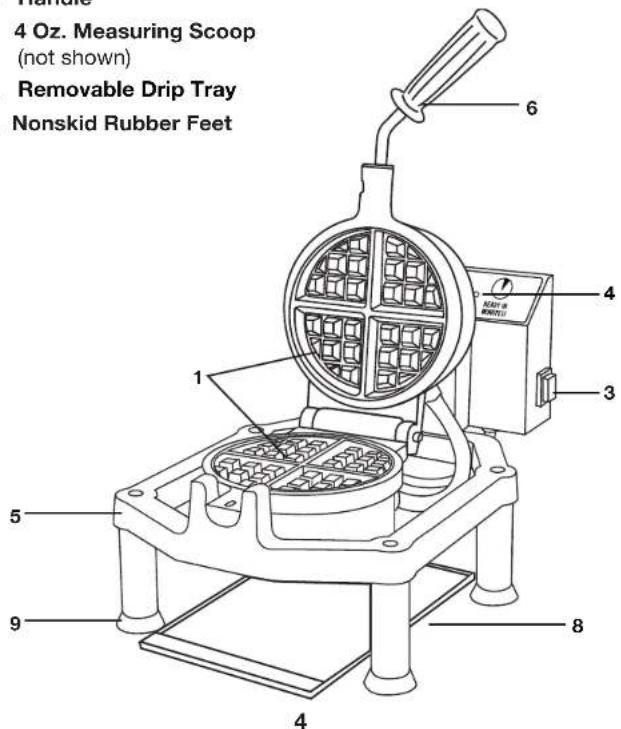
- 4 Oz. Measuring Scoop (not shown)
- Removable Drip Tray
- Nonskid Rubber Feet
text_image
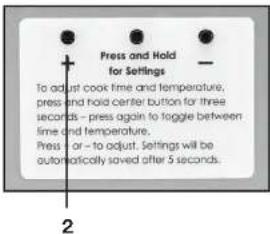
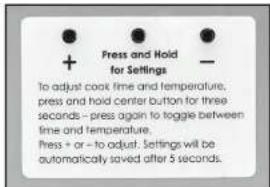
Press and Hold for Settings To adjust cook time and temperature, press and hold center button for three seconds – press again to toggle between time and temperature. Press or – to adjust. Settings will be automatically saved after 5 seconds.
text_image
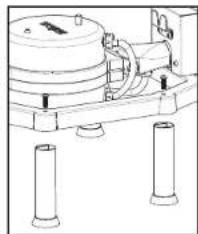
Handle 4 Oz. Measuring Scoop (not shown) Removable Drip Tray Nonskid Rubber Feet 1 2 3 4 6 4 5 9 8 4ASSEMBLING FEET TO CAST-IRON FRAME
The four feet come detached from the unit in the box.
- Unscrew the hardware from each foot.
- Locate assembly location for each foot on cast-iron frame and place each foot on bottom side of frame.
- Insert each screw on top side of frame and screw each screw with Phillips-head screwdriver, ensuring it is tight.
natural_image
Technical line drawing of a mechanical assembly with cylindrical components and mounting feet (no text or symbols)FACTORY SETTINGS
For Golden Brown Belgian Waffles
Temperature - 375°F
Timer - 2:15 minutes
Timer automatically begins counting down when rotated.
Changing Factory Settings
To adjust cook time and/or temperature, see the back of the machine.
- Press and hold center button for three seconds.
- Press again to toggle between time and temperature.
- Press + or - to adjust.
text_image
Press and Hold for Settings To adjust cook time and temperature, press and hold center button for three seconds - press again to toggle between time and temperature. Press + or - to adjust. Settings will be automatically saved after 5 seconds.Settings will be automatically exited after 5 seconds.
INSTRUCTIONS FOR USE
- Before using your Waring ^® Heavy-Duty Cast-Iron Belgian Waffle Maker for the first time, remove any dust from shipping by wiping the plates with a damp cloth. Remove all protective paper and wrapping.
- Screw on waffle plate handle (no tools needed).
-
Plug cord into wall outlet.
-
Turn the power rocker switch to the ON position (located on the right side of the unit). The LED screen will illuminate.
- Once on, the waffle maker will start preheating. Once the unit is heated to the programmed temperature, the ready light will turn on.
NOTE: This unit is preset to:
$$ \text { Temp } = 3 7 5 ^ {\circ} \mathrm{F} $$
Time = 2:15 minutes
Before first use, it is necessary to apply a non-aerosol spray that is canola or vegetable oil-based.
After the initial application, the non-stick coating will remain effective for an extensive period of time, depending on the frequency of use.
Prior to pouring batter, spray oil 6-8 inches from the plates.
NOTE: Be careful not to overspray as the plates might stick.
- Pour batter evenly into the center of the waffle grid. Use a heatproof spatula to spread the batter evenly over the grid. Close the lid and rotate the unit 180°. Once the lid is rotated, the timer will automatically start counting down.
- When the set time is reached, the unit will beep. Rotate the waffle maker 180^ , open the lid, and remove waffle by gently loosening the edges with a waffle fork or a heatproof plastic spatula.
CLEANING & MAINTENANCE
Clean daily and diligently; doing so will ensure that your waffle maker works properly and continues to work well over time.
How to Clean Waffle Plates
- Turn the power switch to OFF and remove plug from electrical outlet. Leave the waffle iron open to allow the plates to cool before cleaning.
- While plates are warm (not hot), - brush the plates and grooves with a bristle brush to remove any buildup or crumbs. Wipe with a dry lint-free cloth or towel.
- After plates have completely cooled down, clean and wipe cast-iron plates with a soft dry cloth. Be sure to absorb any excess oil.
Drip tray is removable for cleaning. Rinse and sanitize.
Do not submerge unit in water.
Never take your waffle maker apart for cleaning.
To clean exterior, wipe with a soft, dry cloth. Never use an abrasive cleanser or harsh pad. NEVER IMMERSE CORD, PLUG, OR UNIT IN WATER OR OTHER LIQUIDS.
The latch by the handle can be cleaned with a pipe cleaner or narrow bristle brush. To clean, lift up the unit from the bottom to create space around the latch and use brush to clean area.
The interconnect cord connecting the two waffle plates can develop buildup over time. It can be cleaned with a dry lint-free cloth, pipe cleaner, or narrow bristle brush.
CAST-IRON SEASONING
The cast-iron waffle plates are preseasoned and ready to bake, but it is necessary to apply an initial coating using non-aerosol sprays that are canola or vegetable oil-based to ensure optimal performance. After the initial coating your plates will remain seasoned for an extended period of time.
It is important to maintain the cleanliness of the plates to preserve the seasoning for as long as possible.
With extended use, plates may need to be reseasoned to maintain a nonstick surface. If so, always clean plates prior to seasoning.
Oil is a key ingredient to making your cast-iron plates nonstick. Recipes with minimal oil might require more frequent seasoning.
The Importance of Seasoning Your Waffle Maker
It is recommended to season your Waring waffle maker in order to maintain the nonstick surface. Seasoning is the process of coating the surface of cast-iron with a protective layer of oil that is then baked into the iron in order to produce a hard nonstick coating.
If using a cooking spray, it is recommended to use a canola or vegetable-oil based spray.
Advantages to Seasoning:
• Assists in creating a nonstick surface
- Prevents rusting
- Prolongs the life of your cast-iron plates
CAST-IRON SEASONING PROCESS
If you experience severe sticking or buildup after extended use, first clean waffle plates (see CLEANING & MAINTENENCE) and then season the plates prior to your next bake.
- Preheat unit to 415^ F.
- With a bristle brush, brush the cast-iron plates and guard rail with a very thin coat of vegetable or canola oil.
NOTE: Avoid pooling of oil in the grooves of the waffle plate as this can cause sticking. - Use a dry lint-free cloth or paper towel to remove excess oil and close the lid.
- Let the unit sit for about 45 minutes, then open the lid. NOTE: The unit will be smoking; this is normal.
- Test 1 waffle. If sticking occurs, apply another coat of oil and burn off at least 1 hour.
- You are now ready for operation!
Maintain daily cleaning and maintenance for optimal performance and life of the unit. If sticking begins to occur, you might need to clean and season your waffle plates.
TIPS AND TROUBLESHOOTING
-
To maintain nonstick surface of your waffle maker, proper maintenance and seasoning are recommended. Always clean plates before seasoning.
-
If waffles are sticking:
-
Make sure waffle plates are clean (see CLEANING & MAINTENANCE).
-
Season the waffle plates (see CAST-IRON SEASONING PROCESS).
-
Make sure to not apply too much oil – an excess of oil can cause sticking and buildup.
- Check your waffle recipe. Oil is a key ingredient to making your cast-iron waffle plates nonstick. Recipes with minimal oil might cause more sticking.
- Any add-ins or mix-ins can cause sticking – especially those with sugar.
- If after cleaning and seasoning sticking still continues, be sure to not apply too much oil prior to baking. An excess of oil can cause sticking and buildup.
- Plates should be seasoned more frequently if heavily used.
LIMITED ONE YEAR WARRANTY
(U.S. and Canada only)
Waring warrants every new Waring® Waffle Maker to be free from defects in material and workmanship for a period of one year from the date of purchase when used with foodstuffs, nonabrasive liquids (other than detergents), and nonabrasive semiliquids, providing it has not been subject to loads in excess of the indicated rating.
Under this warranty, Waring will repair or replace any part that, upon our examination, is defective in materials or workmanship, provided the product is delivered prepaid to any Factory Approved Service Center.
This warranty does not: a) apply to any product that has become worn, defective, damaged, or broken due to use or due to repairs or servicing by other than the Waring Service Center or a Factory Approved Service Center, or due to abuse, misuse, overloading, or tampering; or b) cover incidental or consequential damages of any kind.
Warning: This warranty is void if appliance is used on direct current (DC).
314 Ella T
Torrington

WARING
text_image
Press and Hold for Settings To adjust cook time and temperature, press and hold center button for three seconds – press again to toggle between time and temperature. Press + or - to adjust. Settings will be automatically saved after 5 seconds.
text_image
Empuñadura Vaso medidor de 4 oz (120 ml) (no ilustrado) Bandeja de goteo removable Pies de goma antideslizantes12 13
MONTAJE DE LAS PATAS
natural_image
Technical line drawing of a mechanical device with cylindrical components and mounting feet (no text or symbols)text_image
Press and Hold for Settings To adjust cook time and temperature, press and hold center button for three seconds - press again to toggle between time and temperature. Press + or - to adjust. Settings will be automatically saved after 5 seconds.text_image
Press and Hold for Settings To adjust cook time and temperature, press and hold center button for three seconds – press again to toggle between time and temperature. Press - or - to adjust. Settings will be automatically saved after 5 seconds. 2