WICSP180 - Waffle Maker Waring Commercial - Free user manual and instructions
Find the device manual for free WICSP180 Waring Commercial in PDF.
| Product type | Gelato panini press (waffle iron) |
| Brand | Waring Commercial |
| Model | WICSP180 |
| Usage | Commercial |
| Cooking surface | Non-stick plates |
| Temperature adjustment | Variable according to recipe and taste |
| Cooking time | 5 to 15 seconds |
| Power indicator (red) | Indicates the appliance is powered on and heating |
| Preheat indicator (green) | Indicates the appliance is ready; flashes during cooking |
| Audible signal | 6 beeps at the end of preheat, 3 beeps at the end of cycle |
| Control | STANDBY and START buttons |
| Power supply | 120 V ~ 60 Hz |
| Power | 1200 W (estimate) |
| Grounding | Three-prong plug, grounding required |
| Maintenance | Clean with a damp cloth after cooling; do not immerse |
| Safety | STANDBY button, hot surfaces, do not use with damaged cord |
| Warranty | 1 year limited (U.S. and Canada) |
| Accessories | No recommended accessories other than those from the manufacturer |
| Repairability | Repairs by authorized technician only |
Frequently Asked Questions - WICSP180 Waring Commercial
User questions about WICSP180 Waring Commercial
0 question about this device. Answer the ones you know or ask your own.
Ask a new question about this device
Download the instructions for your Waffle Maker in PDF format for free! Find your manual WICSP180 - Waring Commercial and take your electronic device back in hand. On this page are published all the documents necessary for the use of your device. WICSP180 by Waring Commercial.
USER MANUAL WICSP180 Waring Commercial
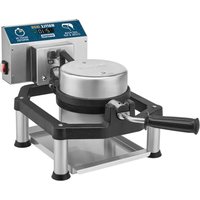
natural_image
Line drawing of a laboratory apparatus with a rotary top and base, no text or symbols present.WICSP180
For your safety and continued enjoyment of this product, always read the instruction book carefully before using.
When using electrical appliances, especially when children are present, basic safety precautions should always be taken, including the following:
- READ ALL INSTRUCTIONS.
- Unplug from outlet when not in use and before cleaning. Allow to cool before putting on or taking off parts, and before cleaning appliance.
- Do not touch hot surfaces. Use handles and knobs.
- To protect against fire, electric shock, and injury to persons, DO NOT IMMERSE CORD, PLUG, OR UNIT in water or other liquids.
- This appliance is not intended for use by persons (including children) with reduced physical, sensory or mental capabilities, or lack of experience and knowledge.
Children should be supervised to ensure that they do not play with the appliance.
-
Do not operate any appliance with a damaged cord or plug or after the appliance malfunctions or has been damaged in any manner. Return appliance to the nearest Waring Authorized Service Facility for examination, repair, or adjustment.
-
The use of accessory attachments not recommended by Waring may result in fire, electric shock, or injury to persons.
-
Do not use outdoors, or use for other than intended use.
-
D o not let power cord hang over edge of table or counter, or touch hot surfaces.
-
Do not place on or near a hot gas or electric burner, or in a heated oven.
-
When finished baking, press STANDBY and unplug the unit.
-
Extreme caution must be used when moving an appliance containing hot oil or other hot liquids.
-
Always begin by plugging appliance into wall outlet.
-
WARNING: TO REDUCE THE RISK OF FIRE OR ELECTRIC SHOCK, REPAIRS SHOULD BE MADE ONLY BY AUTHORIZED PERSONNEL. DO NOT REMOVE THE BASE PANEL. NO USER-SERVICEABLE PARTS ARE INSIDE.
SAVE THESE INSTRUCTIONS APPROVED FOR COMMERCIAL USE
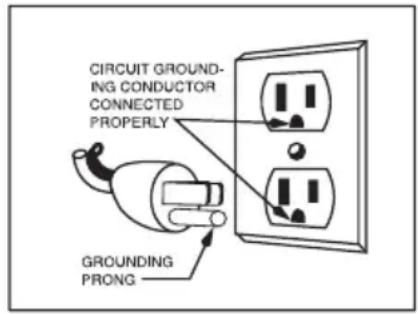
GROUNDING INSTRUCTIONS
For your protection, the Waring® Commercial Gelato Panini Press is supplied with a molded, 3-prong grounding-type plug and should be used in combination with a properly connected grounding-type outlet as shown in the figure.
text_image
CIRCUIT GROUND- ING CONDUCTOR CONNECTED PROPERLY GROUNDING PRONGSPECIAL CORD SET INSTRUCTIONS
A short power-supply cord is provided to reduce the risks resulting from becoming entangled in or tripping over a longer cord. Extension cords may be used if care is exercised in their use.
If an extension cord is used, the marked electrical rating of the extension cord should be at least as great as the electrical rating of the appliance, and the longer cord should be arranged so that it will not drape over the countertop or tabletop, where it can be pulled on by children or animals, or tripped over.
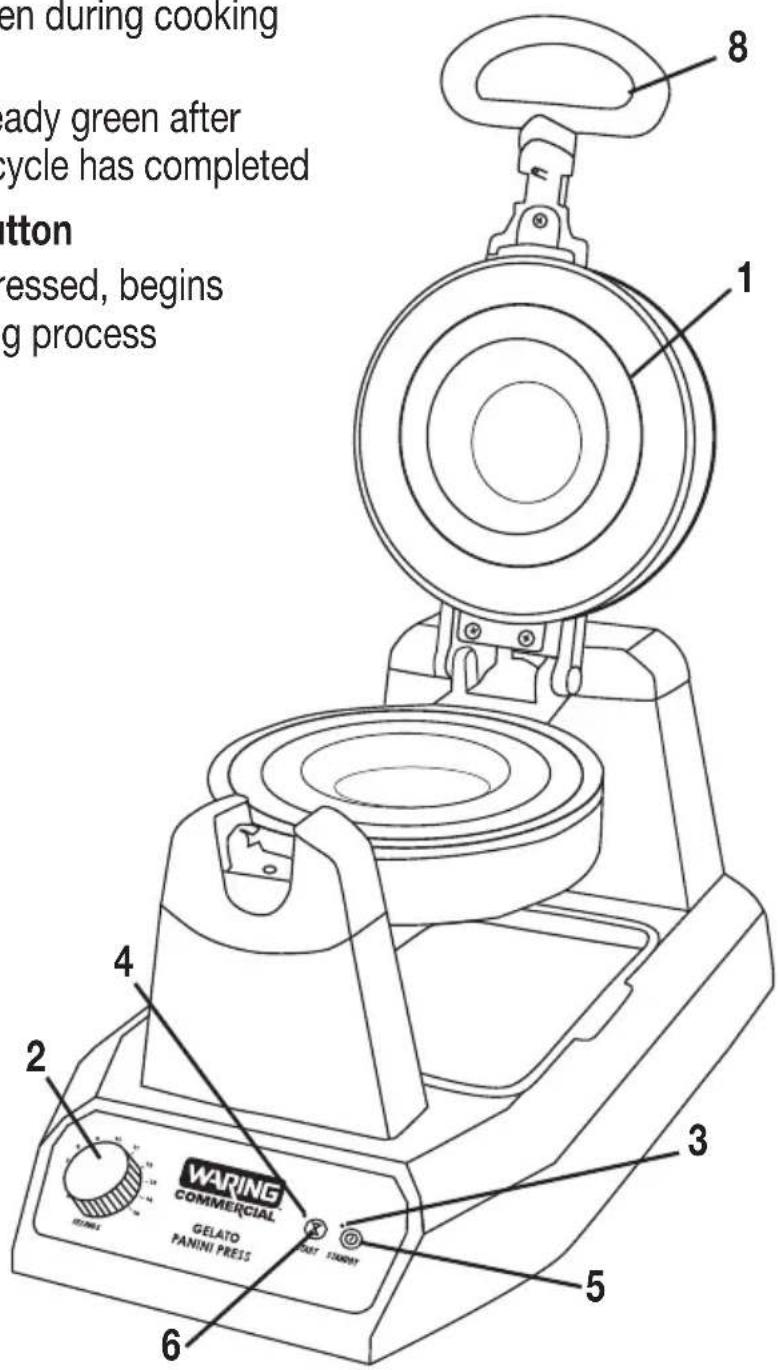
SPECIAL FEATURES
1.CookingSurface
2. Time Control Knob
- Adjustable for different recipes and personal preference
3. Power Indicator Light
- Lights red when unit is on and heating up
4. R eady Indicator Light
- Lights steady green when Gelato Panini Press is ready
- Blinks green during cooking cycle
- Lights steady green after cooking cycle has completed
5.STANDBYButton
- When pressed, begins preheating process
6.STARTButton
- Starts baking cycle when pressed
7. IndicatorBeeps (not shown)
- Will beep 6 times when unit is ready
- Will beep 3 times when cooking cycle is complete
8. Handle
text_image
en during cooking ady green after cycle has completed tton ressed, begins g process 1 2 3 4 5 6 WARING COMMERCIAL GELATO PANINI PRESSINTRODUCTION
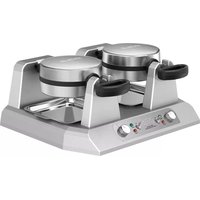
The Waring® Commercial Gelato Panini Press is uniquely designed to create a delicious new trend in frozen desserts called panini gelato. The concept sandwiches a scoop of gelato, frozen yogurt or ice cream and an optional topping in between a sweet bun. The machine lightly sears the two halves of sweet bun together to lock in the frozen dessert and toppings for a completely sealed pocket. The delicate nature of the searing process allows chefs to seal the bun together without melting the frozen dessert inside.
INSTRUCTIONS FOR USE
-
Before using your Waring® Commercial Gelato Panini Press for the first time, remove any dust from shipping by wiping the plates with a damp cloth. Remove all protective paper and wrapping.
-
Plug cord into wall outlet.
Press the STANDBY button. The Power Indicator light will illuminate (red) to signal that power is on. It will now begin the preheating process. This should take about 4 minutes. The machine will sound 6 beeps and the Ready Indicator light (green) will go on to signal the unit is ready for baking.
NOTE: The first time you use your Gelato Panini Press, it may have a slight odor and may smoke a bit. This is normal, and common to heating appliances.
-
S et the desired time setting on your Gelato Panini Press (from 5 to 15 seconds).
-
To prepare your gelato panini, cut a sweet bun, brioche roll or thick slice of bread in half horizontally. Add spreads, gelato and/or any other frozen dessert, and toppings to the bottom half. Place the top half over the bottom half. Be sure all toppings are completely covered by the bread.
-
Place the gelato panini into the cavity of the Gelato Panini Press. Be sure to center the panini in the cavity, so that when closed, all the edges of the bun, roll or bread will overlap the cavity's flat outer rim. This will ensure all edges get pressed and sealed.
-
Press the top heating plate over the gelato panini firmly and press the START button to start the baking cycle. The green LED light should blink during the baking cycle. Once the cycle is complete, the unit will beep 3 times. Open the press and remove your gelato panini using a nonmetal utensil.
-
Serve your gelato panini as desired.
CLEANING AND MAINTENANCE
Once you have finished baking, press STANDBY button and remove plug from electrical outlet. Leave top lid open and allow grids to cool before cleaning.
Never take your Gelato Panini Press apart for cleaning. Simply brush crumbs from grooves and absorb any excess cooking oil by wiping with a dry cloth or paper towel. You may clean the cleaning surface by wiping with a damp cloth to prevent staining and sticking from ingredients or oil buildup.
Be certain grids have cooled completely before cleaning.
If food adheres to plates, simply pour a little cooking oil onto the area and let stand approximately 5 minutes, allowing food to soften for easy removal.
To clean exterior, wipe with a soft, dry cloth. Never use an abrasive cleanser or harsh pad. NEVER IMMERSE CORD, PLUG OR UNIT IN WATER OR OTHER LIQUIDS.
Any other servicing should be performed by an authorized service center.
LIMITED ONE YEAR WARRANTY
(U.S. AND CANADA ONLY)
Waring warrants every new Waring ^® Commercial Gelato Panini Press to be free from defects in material and workmanship for a period of one year from the date of purchase when used with foodstuffs, nonabrasive liquids (other than detergents) and nonabrasive semi-liquids, providing it has not been subject to loads in excess of the indicated rating.
Under this warranty, Waring will repair or replace any part that, upon our examination, is defective in materials or workmanship, provided the product is delivered prepaid to the Waring Service Center at 314 Ella T. Grasso Ave., Torrington, CT 06790, or any Factory Approved Service Center.
This warranty does not: a) apply to any product that has become worn, defective, damaged or broken due to use or due to repairs or servicing by other than the Waring Service Center or a Factory Approved Service Center, or due to abuse, misuse, overloading or tampering; or b) cover incidental or consequential damages of any kind. This warranty is void if appliance is used on Direct Current (DC).

text_image
WARING COMMERCIALWARING COMMERCIAL
314 Ella T. Grasso Ave.
Torrington, CT 06790
text_image
WARING COMMERCIALWARING COMMERCIAL
314 Ella T. Grasso Ave.
Torrington, CT 06790
IMPORTANTES CONSIGNES DE SÉCURITÉ
text_image
WARING COMMERCIALWARING COMMERCIAL
314 Ella T. Grasso Ave.
Torrington, CT 06790
Trademarks or service marks of third parties used herein are the trademarks or service marks of their respective owners.
©2019 Waring Commercial
314 Ella T. Grasso Ave.
Torrington, CT 06790
www.waringcommercialproducts.com
Printed in China
Impreso en China
Imprimé en Chine
wicsp180 IB
18WC058896