
HCB 6170 SS - Oven TEKA - Free user manual and instructions
Find the device manual for free HCB 6170 SS TEKA in PDF.

| Product type | Built-in oven |
| Brand | Teka |
| Model | HCB 6170 SS |
| Volume | 70 L |
| Energy efficiency class | A |
| Energy consumption (conventional mode) | 0.99 kWh/cycle |
| Energy consumption (fan-forced convection) | 0.79 kWh/cycle |
| Power supply | 220-240 V ~, 50-60 Hz, 3.0 kW |
| Dimensions (W x H x D) | 595 x 590 x 560 mm (approximate) |
| Weight | Approximately 30 kg |
| Type of cooking | Convection, fan-forced, grill, defrost, eco, steam cleaning |
| Available functions | Light, defrost, double grill with fan, double grill, single grill, convection with fan, convection, bottom heat, ECO, cleaning |
| Maximum temperature | 250°C |
| Installation type | Built-in (kitchen cabinet) |
| Door | Glass window with handle |
| Accessories supplied | Cooking grid, small grid, tray, telescopic rails (depending on model) |
| Cleaning | Hydro Clean (steam) function and manual cleaning |
| Safety | Supervision required for children, avoid touching heating elements |
| Lamp replacement | Bulb resistant to 300°C, remove cover by turning |
| Repairability index | Not communicated, parts available via after-sales service |
Frequently Asked Questions - HCB 6170 SS TEKA
User questions about HCB 6170 SS TEKA
0 question about this device. Answer the ones you know or ask your own.
Ask a new question about this device
Download the instructions for your Oven in PDF format for free! Find your manual HCB 6170 SS - TEKA and take your electronic device back in hand. On this page are published all the documents necessary for the use of your device. HCB 6170 SS by TEKA.
USER MANUAL HCB 6170 SS TEKA
natural_image
Modern kitchen interior with dark wood-paneled cabinets and stainless steel appliances, featuring a 'TEKA' logo in the top-right corner (no other text or symbols)User Manual
HCB 6170 SS
ES PT EN FR GR RO
natural_image
Simple line drawing of a rectangular tray with internal geometric shapes (no text or symbols)Bandeja para asar
natural_image
Line drawing of a kitchen oven with a water dispenser inside (no text or symbols)Notas
natural_image
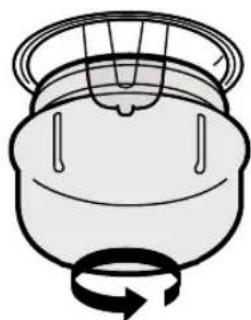
Simple line drawing of a container with a rotating arrow, no text or symbols presentAdvertencia
natural_image
Pure wire mesh diagram of a rectangular metal grate structure (no text or symbols)Grelha
natural_image
Simple line drawing of a rectangular tray with internal geometric shapes (no text or symbols)Tabuleiro de grelha
natural_image
Line drawing of a laboratory or storage unit with a grid-patterned chamber inside (no text or symbols)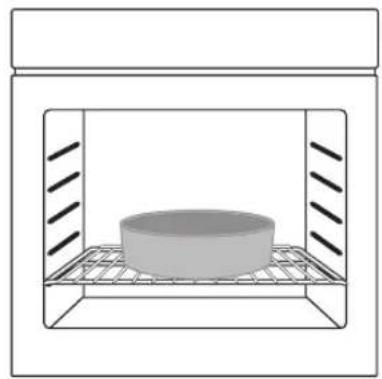
natural_image
Simple line drawing of a cylindrical object inside a rectangular chamber with grating (no text or symbols)
natural_image
Diagram of a laboratory setup with a tray holding multiple small vials, enclosed in a rectangular chamber (no text or labels)Painel de Controlo
flowchart
graph TD
    A[" "] --> B[" "]
    A --> C[" "]
    A --> D[" "]
    A --> E[" "]
    A --> F[" "]
    A --> G[" "]
    A --> H[" "]
    A --> I[" "]
    A --> J[" "]
    A --> K[" "]
    A --> L[" "]
    A --> M[" "]
    A --> N[" "]
    A --> O[" "]
    A --> P[" "]
    A --> Q[" "]
    A --> R[" "]
    A --> S[" "]
    A --> T[" "]
    A --> U[" "]
    A --> V[" "]
    A --> W[" "]
    A --> X[" "]
    A --> Y[" "]
    A --> Z[" "]
natural_image
Line drawing of a kitchen oven with a ladle pouring liquid into the opening (no text or symbols)Notas
natural_image
Simple line drawing of a container with a rotating arrow, no text or symbols presentAviso
IMPORTANT SAFETY INSTRUCTIONS
THESE WARNINGS ARE PROVIDED IN THE INTEREST OF SAFETY. PLEASE READ THEM CAREFULLY BEFORE INSTALLING OR USING THE APPLIANCE.
To maintain the EFFICIENCY and SAFETY of this appliance, we recommend:
-
Call only the Service Centers authorized by store where you buy the cooker
• Always use original Spare Parts -
When the oven is first switched on, it may give off an unpleasant smell. This is due to the bonding agent used for the insulating panels within the oven. Please run the new empty product with the conventional cooking function, 250°C, 90 minutes to clean oil impurities inside the cavity.
- During the first use, it is completely normal that there will be slight smoke and door. If it does occur, you should wait for the smell to be cleared before putting food into the oven.
- Please use the product under an open environment.
- The appliance and its accessible parts become hot during use. Care should be taken to avoid touching heating elements. Children less than 8 years of age shall be kept away unless continuously supervised.
- If the surface is cracked, switch off the appliance to avoid the possibility of electric shock.
-
This appliance can be used by children aged from 8 years and above and persons with reduced physical, sensory or mental capabilities or lack of experience and knowledge if they have been given supervision or instruction concerning use of the appliance in a safe way and understand the hazards involved. Children shall not play with the appliance. Cleaning and user maintenance shall not be made by children without supervision.
-
During use, the appliance becomes very hot. Care should be taken to avoid touching heating elements inside the oven.
- Do not allow children to go near the oven when it is operating, especially when the grill is on.
- Ensure that the appliance is switched off before replacing the oven lamp to avoid the possibility of electric shock.
- The means for disconnection must be incorporated in the fixed wiring in accordance with the wiring specifications.
- Children should be supervised to ensure that they do not play with the appliance.
- This appliance is not intended for use by persons (including children) with reduced physical, sensory or mental capabilities, or lack of experience and knowledge, unless they have been given supervision or instruction concerning use of the appliance by person responsible for their safety.
- Accessible parts may become hot during use. Young children should be kept away.
- An all-pole disconnection means must be incorporated in the fixed wiring in accordance with the wiring rules.
- If the supply cord is damaged, it must be replaced by the manufacturer, its service agent or similarly qualified persons in order to avoid a hazard.
- Do not use harsh abrasive cleaners or sharp metal scrapers to clean the oven door glass since they can scratch the surface, which may result in shattering of the glass.
- Only use the temperature probe recommended for this oven.
- A steam cleaner is not to be used.
- The appliance is not intended to be operated by means of an external timer or a separate remote control system.
-
The instructions for ovens that have shelves shall include details indicating the correct installations of the shelves.
-
Do not use the oven unless you are wearing something on your feet. Do not touch the oven with wet or damp hands or feet.
- For oven: Oven door should not be opened often during the cooking period.
- The appliance must be installed by an authorized technician and put into use. The producer is not responsible for any damage that might be caused by defective placement, and installation by unauthorized personnel.
- When the door or drawer of oven is open do not leave anything on it, or you may unbalance your appliance or break the door.
- Some parts of appliance may keep its heat for a long time; it is required to wait for it to cool down before touching onto the points that are exposed to the heat directly.
- If you will not use the appliance for a long time, it is advised to plug it off.
- The instructions for pyrolytic self-cleaning ovens shall state that excess spillage must be removed before cleaning and shall specify which utensils can be left in the oven during cleaning. If, for cleaning, the manufacturer instructs the user to set the controls to a position higher than for normal cooking purposes, the instructions shall state that under such conditions the surfaces may get hotter than usual and children should be kept away.
- Keep the appliance and its cord out of reach of children less than 8 years.
DECLARATION OF COMPLIANCE
When you have unpacked the oven, make sure that it has not been damaged in any way. If you have any doubts at all, do not use it: contact a professionally qualified person. Keep packing materials such as plastic bags, polystyrene, or nails out of the reach of children because these are dangerous to children.
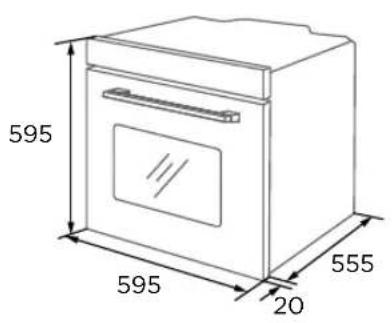
PRODUCT INSTALLATION
If there is any discrepancy between the illustration and the actual product, please refer to the actual product.
Cupboard Diagram (Standing Cupboard)
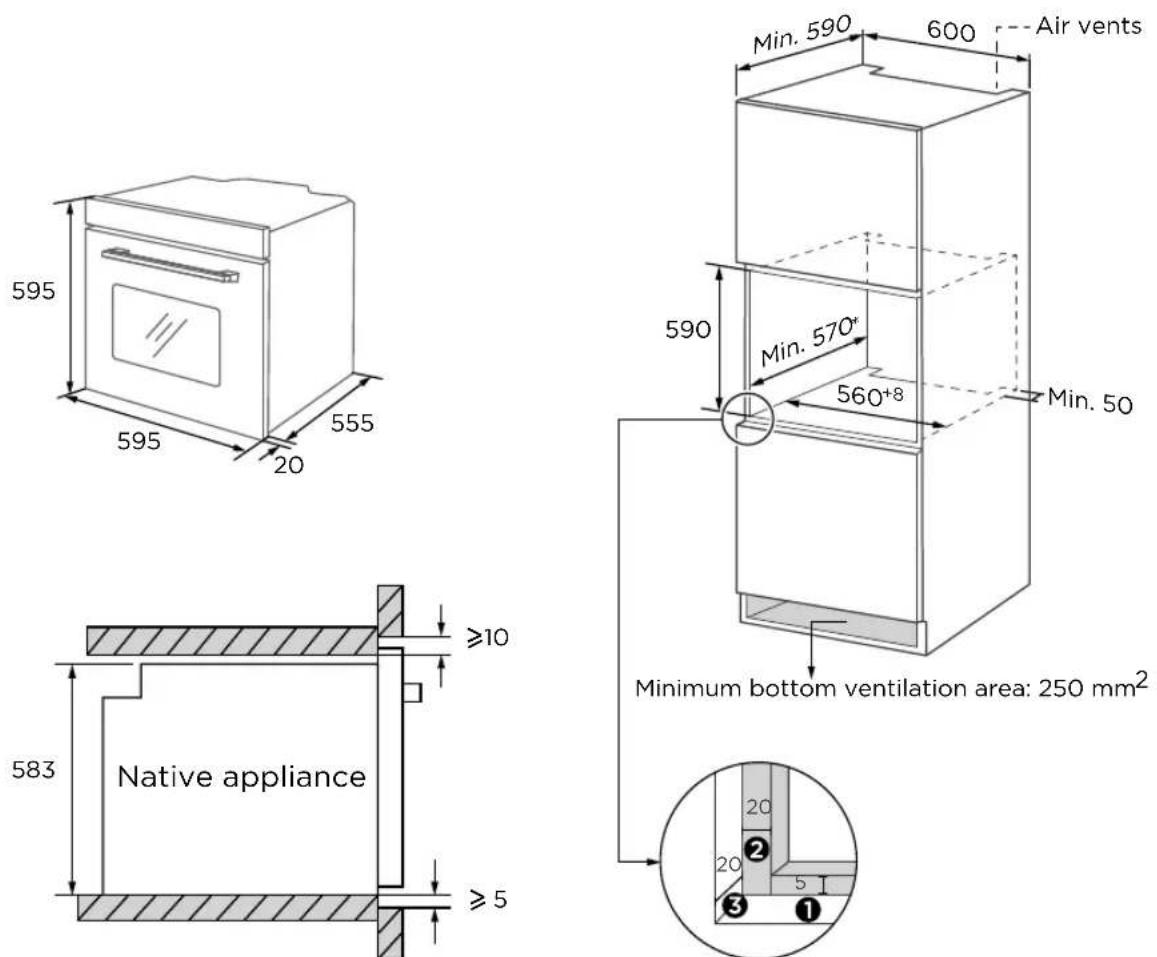
① Reserve 5 mm for the door panel at the top and bottom respectively.
② Reserve 20 mm for the door panel on the left and right respectively.
③ Reserve 20 mm for the door panel in thickness.
- The thickness of the cupboard board is 20 mm.
- If the power socket is installed on the back of the appliance, the depth of the cupboard opening shall be increased from a minimum of 590 mm to 620 mm.
- The dimensions in the figures are in mm.
Cupboard Diagram (Ground Cupboard)

Without hob
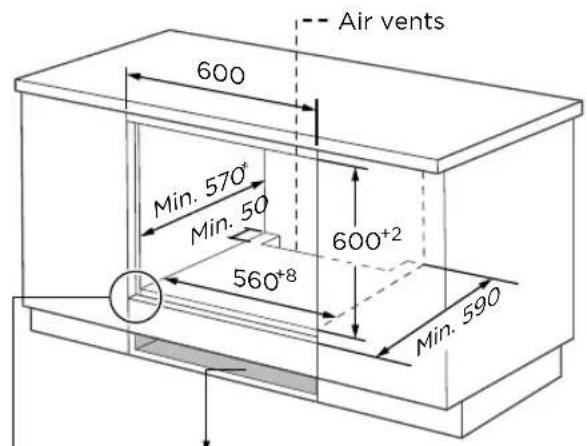
Minimum bottom ventilation area: 250 mm ^4

① Reserve 5 mm for the door panel at the top and bottom respectively.
② Reserve 20 mm for the door panel on the left and right respectively.
③ Reserve 20 mm for the door panel in thickness.
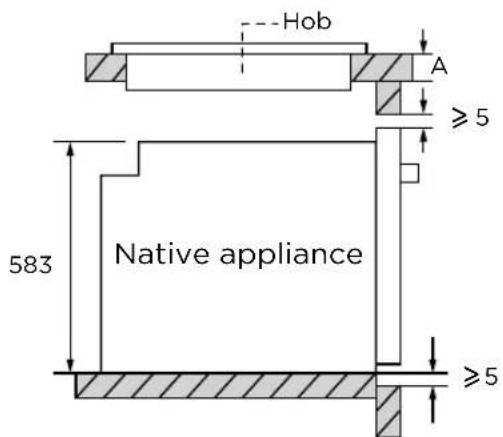
With hob
If the appliance is installed under the hob, the minimum thickness of worktop A is shown below:
| Hob type | worktop A |
| Induction hob 37 mm | |
| Full-surface induction hob 47 mm | |
| Gas hob | 30 mm |
| Electric hob | 27 mm |
- The thickness of the cupboard board is 20 mm.
- If the power socket is installed on the back of the appliance, the depth of the cupboard opening shall be increased from a minimum of 590 mm to 620 mm.
- The dimensions in the figures are in mm.
Installation Important Instructions
Content that means [mandatory]
- The safe operation of this appliance can only be guaranteed if it has been installed to a professional standard in accordance with these installation instructions. The installer shall be liable for any damage resulting from incorrect installation.
- The entire installation process requires two professional installers. Wear dry protective gloves during installation to avoid scratch or electric shock.
- Fitted units must be heat-resistant up to 90^ C, and adjacent unit fronts up to 70^ C.
- Please use a 16A socket.
Content that means [prohibit]
- Do not install the appliance behind a decorative door or the door of a kitchen unit, as this may cause the appliance to overheat.
- Check the appliance for damage after unpacking it. Do not connect the appliance if it has been damaged in transit.
- Do not block the vent of the appliance and the gap between the cupboard and the appliance.
- Use extreme caution when moving or installing the appliance. It is very heavy, do not lift the appliance by the door handle.
- If the power cord or power plug is damaged, stop using the appliance immediately, to avoid fire, electric shock or other injuries.
⚠️ Content that means [note]
- Be very careful when moving or installing the appliance to avoid damage to the appliance or damage to the cupboards.
- Before starting up the appliance, remove all packaging materials and accessories from the cavity.
- The power socket shall be accessible to users (such as next to the cupboard) for easy power-off.
- After installation is complete, make sure that the power plug is firmly inserted into the socket.
- Please refer to the "Cupboard Diagram" for the requirements of net depth of the cupboard. The clearance between the cupboard bottom board and the rear board (or wall) shall not be less than 50 mm.
Installation steps
- Please customize the cupboard according to the "Cupboard Diagram".
- Before installation, please check for normal power sockets and appropriate grounding, and check whether the cupboard dimension meets the installation requirements.
- Place the appliance in designated locations in the kitchen, install it in a vertical cupboard, and connect the power supply.
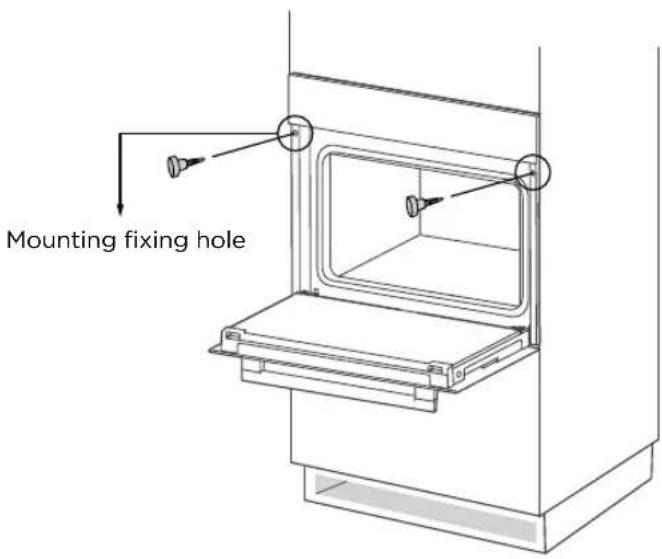
- To locate the mounting fixing holes, open the appliance door and look at the side frame of the appliance (position shown above).
- Fix the appliance on the Cupboard with two screws.
PRODUCT INTRODUCTION
Oven
When removing food, please wear heat insulating gloves to prevent burns!
At the moment of opening the door of the furnace, pay attention to the steam. Please open the door at a small Angle to avoid the steam on your face.
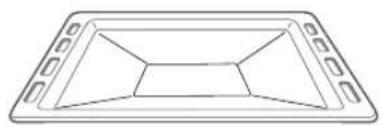
Accessories
natural_image
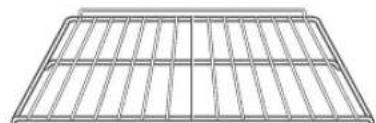
Pure wire mesh structure without any text, numbers, or symbolsGrill rack Grill tray
Grill food or place heat-resistant cooking containers
Small grill rack
Cook smaller portions of food Only for some models
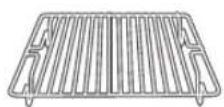
natural_image
Simple line drawing of a rectangular tray with internal geometric shapes (no text or symbols)Cook large portions of food or catch food scraps
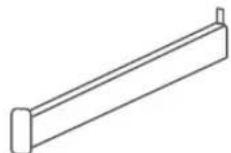
Slide rail
( Only for some models )
Accessories use(Only for some models)
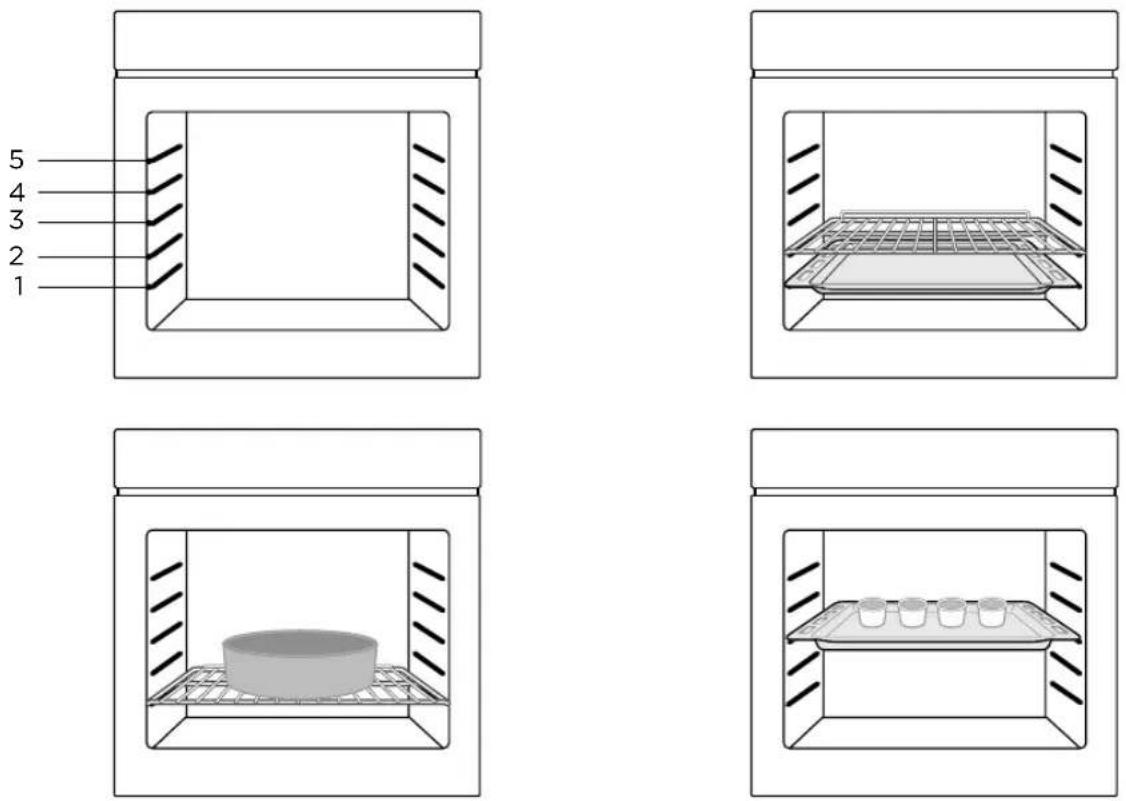
For the oven to work properly, the grill rack and Grill tray should only be placed between the first and fifth levels. When used together, place the Grill tray under the grill rack.
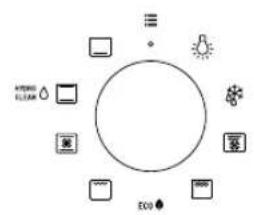
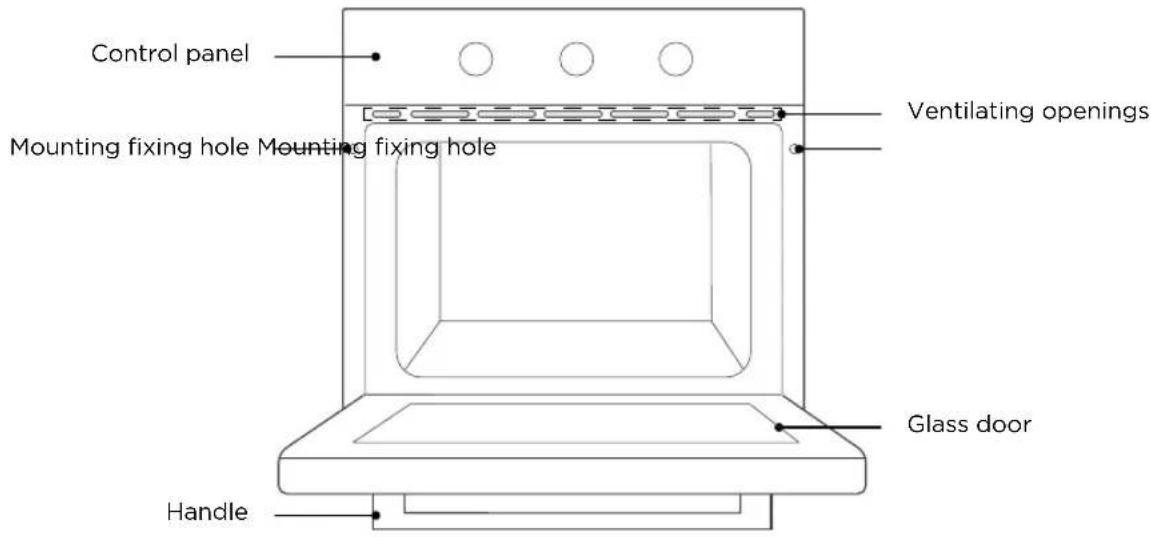
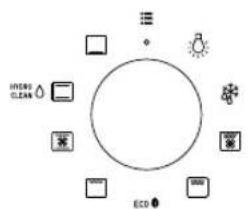
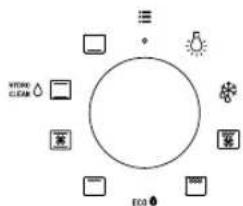
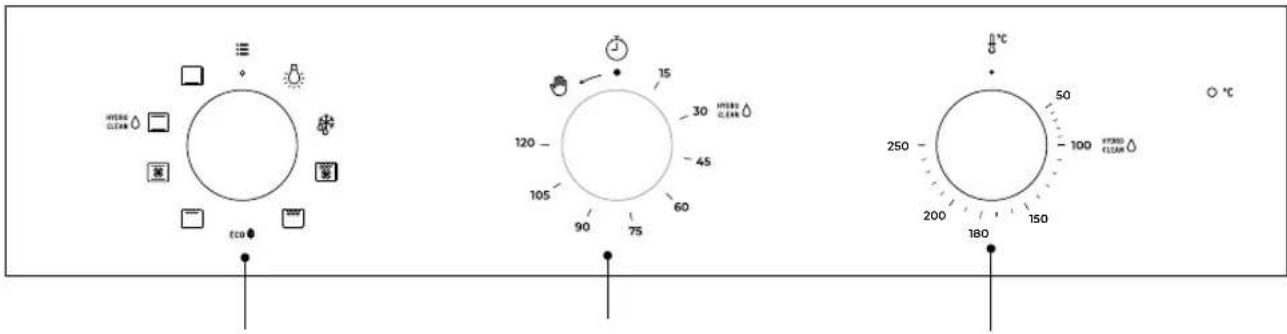
Control Panel
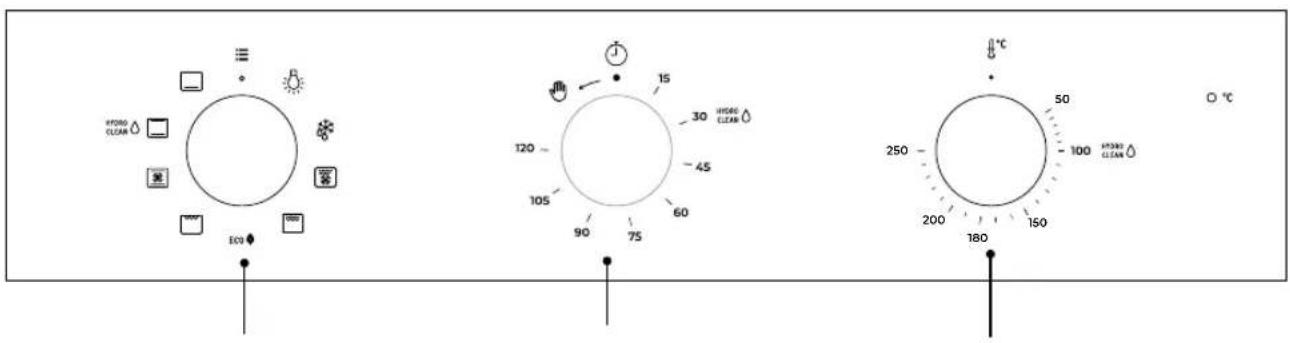
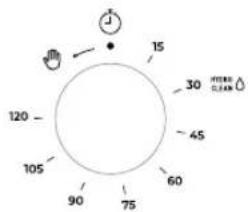
K1: For selecting oven functions.
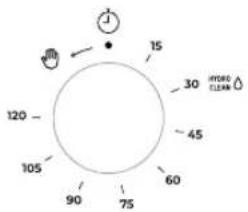
K2: For setting the time.
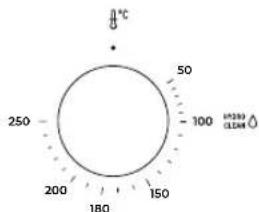
K3: For setting the temperature.
| Function Function introduction | |
 Lamp Lamp | The cooking process can be observed under illuminated conditions. Except ECO function. |
 Defrost Defrost | The circulation of air at room temperature enables quicker thawing of frozen food (without the use of any heat). |
 Double grill with fan Double grill with fan | The radiant heating element and top heating element are working with fan. |
 Double grill Double grill | The radiant heating element and top heating element are working. |
 Single grill Single grill | The inner grill element switches on and off to maintain temperature.Can be used to grill a small number of food. |
| [YBYA]Conventional+fan | The combination of fan and the top and bottom heating elements provides more even heat penetration and coloration, primarily for cooking meat. |
 Conventional Conventional | The top and bottom heating elements work together to provide convectional cooking. |
 Bottom heating Bottom heating | Heating is provided by heating pipes at the bottom of the oven.Mainly used for keeping warm and the coloring of the food. |
 ECO ECO | For energy-saving cooking. Cooking the selected ingredients in a gentle manner, and the heat comes from the top and the bottom. |
 Clean Clean | Steam softens food residue or grease in the cavity. |
Before using for the first time
- The oven must not be operated until it has been correctly installed.
- To avoid fire, remove all transport protection materials and ensure that the oven is free of residual packaging items and accessories (e.g. foam, cardboard, grill tray, grill rack, etc.).
- Clean the oven cavity and accessories with soapy water and a soft cloth.
- Open kitchen windows and cooker hoods to maintain high ventilation.
- Do not let children or pets into the kitchen and close the doors of adjacent rooms.
- After connecting the power, activate the oven mode, time, and temperature in the table below to remove odors in the cavity.
- After the first use, please open the oven door at a small angle and wait for the cooling to complete.
| Function Temperature Time | ||
| Conventional 250°C | 0.5-1 Hour | |
Regular operation
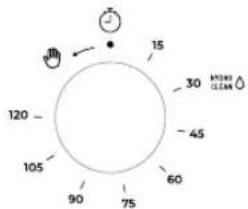
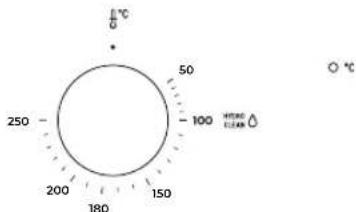
- Turn knob K1 to select the oven functions.
- Turn knob K2 to adjust the time.
- Turn knob K3 to adjust the temperature.
- When cooking is finished, turn all knobs to the "o" position.
Note
As a separate function, Oven light is used by consumers to actively choose to observe food or clean the cavity. After the user opens it, they need to actively close it before exiting and returning to standby mode.
CLEANING AND MAINTENANCE
Cleaning
Disconnect the power supply before cleaning and maintenance.
In order to ensure the life of the oven, clean it in time after cooking.
Cleaning steps are as follows:
- After cooking, wait for the oven to cool completely.
- Remove oven accessories, rinse with warm water and dry.
- Remove food residues and oil stains from the oevn cavity.
- Clean the oven surface with a soft cloth dampened with detergent and dry.
- Start the water clean function as follows:
1). Add about 250 ml of purified water and an appropriate amount of dish soap to the cavity and stir well.
2). With the oven door closed, turn Knob 1 to the "HYDRO CLEAN" position.
3). Turn knob K2 to the "30 minutes" position.
4). Turn knob K3 to the "100°C" position.
- After the water clean function is completed, wait for the oven to cool completely. Then dry the furnace oven cavity with clean absorbent sponge or soft cloth.

natural_image
Line drawing of a spray bottle pouring liquid into a container (no text or symbols)Notes
- Do not use sharp cleaning tools, hard brush and corrosive cleaning products, so as not to damage the oven and its accessories.
- Do not use rough scrubbing agent or sharp metal spatula to clean the door glass.
Lamp Replacement
- Switch off and disconnect the power from the oven. Ensure that the internal parts are cool before touching internal parts.
- Remove the lamp cover by turning it counter-clockwise (note, it may be stiff), replace the bulb with a new one of the same type.
- Insert the new bulb, which should be resistant to 300^ C. For replacement bulbs contact your local service centre.
- If in any doubt, consult a qualified electrician for help.
- The product contains a light source of energy efficiency class: G.
natural_image
Simple line drawing of a container with a rotating arrow, no text or symbols presentWarning
To avoid electric shocks-please ensure that the electricity supply to the appliance is switched off and the appliance is fully cold. before removing the lamp lens.
TROUBLESHOOTING
If the problem cannot be solved or other problems occur, please contact the after-sales service.
| Problem Possible reason Solution | ||
| Unable to start | Power is not connected connect power supply | |
| The main power switch is not turned on | Turn on the power switch | |
| Oven door not closed Close the oven door | ||
| lamp does not come on It's broken | Contact after-sales service | |
| Has a pungent odor or smoke | first use No processing required | |
| Food is not cooked | Temperature is too low | Use a higher temperature |
| Food portion is too large | Cook food in smaller pieces or extend the cooking time. | |
| Burnt or uneven food | The temperature is set too high or the heating time is too long | Adjust the cooking temperature or time |
| The food is too close to the heating tube | Adjust the placement layers of accessories | |
| The fan did not stop working after stopping the heating | Fan delays blowing for heat dissipation | No processing required |
SPECIFICATIONS
Product Information and Product Information Sheet according to EU and UK Ecodesign and Energy Labelling Regulations
Energy Efficiency Index 94.0
Energy efficiency class A
Energy consumption with a standard load, conventional mode 0.99kWh/cycle
Energy consumption with a standard load, fan-forced mode 0.79kWh/cycle
Number of cavities 1
Heat source Electricity
Volume 70L
Type of oven Built-in Oven
Power Supply 220-240V\~, 50Hz-60Hz
Electric Power 3.0kW
ENERGY CONSUMPTION
Product information for power consumption and maximum time to reach applicable low power mode.
Off mode 0.3W
PRODUCT RECYCLING
This symbol on the product or instruction manual indicates that your device should be disposed of separately from your household waste at the end of its useful life. There is a separate recycling system locally for recycling. For more information, please contact the local authority or retailer where you purchased the product.

When you have unpacked the oven, make sure that it has not been damaged in any way. If you have any doubts at all, do not use it: contact a professionally qualified person. Keep packing materials such as plastic bags, polys tyren, or nails out of the reach of children because these are dangerous to children.
INSTRUCTIONS DE SÉCURITÉ IMPORTANTES
CES AVERTISSEMENTS SONT FOURNIS DANS L'INTÉRÊT DE LA SÉCURITÉ. VEUILLEZ LES LIRE ATTENTIVEMENT AVANT D'INSTALLER OU D'UTILISER L'APPAREIL. Pour maintenir l'EFFICACITÉ
DÉCLARATION DE CONFORMITÉ
INSTALLATIONDUPRODUIT
INTRODUCTIONDUPRODUIT
Four
natural_image
Pure wire mesh diagram of a rectangular metal grate structure (no text or symbols)Grille de cuisson
natural_image
Simple line drawing of a rectangular tray with internal geometric shapes (no text or symbols)Plaque de cuisson
natural_image
Line drawing of a laboratory or storage unit with internal grid structure (no text or symbols)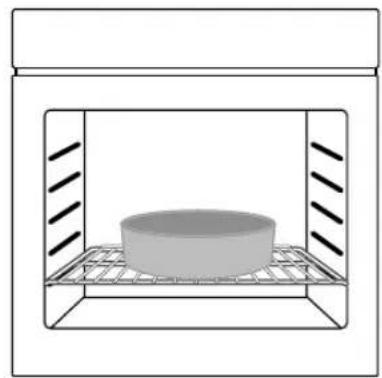
natural_image
Simple line drawing of a cylindrical object inside a rectangular chamber with grating (no text or symbols)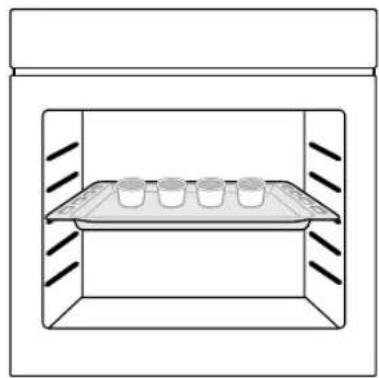
natural_image
Simple line drawing of a storage tray with six small cups inside, enclosed in an enclosure (no text or symbols)Panneau de contrôle
flowchart
graph TD
    A["Interior Clean"] --> B(( ))
    C["Outdoor Cleaning"] --> B
    D["Environmental Protection"] --> B
    E["Greenhouse"] --> B
    F["Eco®"] --> B
    B --> G["Sun icon"]
    B --> H["Light bulb icon"]
    B --> I["Light bulb icon"]
    B --> J["Light bulb icon"]
natural_image
Line drawing of a small object inside a transparent enclosure, possibly a shower or lamp, with no text or symbols present.Notes
natural_image
Simple line drawing of a container with a rotating arrow (no text or symbols)Avertissement
RECYCLAGE DU PRODUIT
natural_image
Simple line drawing of a rectangular tray with internal geometric shapes (no text or symbols)Ταψί ψησίματος
natural_image
Line drawing of a laboratory or storage unit with a grid-patterned tray inside, no text or symbols present.
natural_image
Simple line drawing of a cylindrical object inside a rectangular chamber with grating (no text or symbols)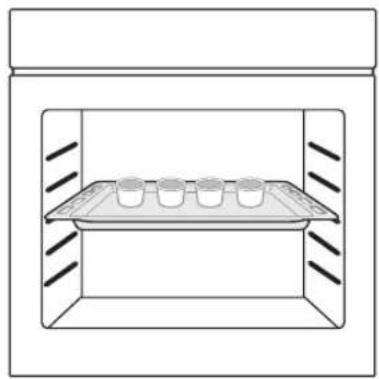
natural_image
Diagram of a laboratory setup with a tray holding multiple small vials, enclosed in a rectangular chamber (no text or labels)Πίνακας Ελέγχου
flowchart
graph TD
    A["ECO"] --> B["HEAT"]
    B --> C["CO2"]
    C --> D["CO2"]
    D --> E["CO2"]
    E --> F["CO2"]
    F --> G["CO2"]
    G --> H["CO2"]
    H --> I["CO2"]
    I --> J["CO2"]
    J --> K["CO2"]
    K --> L["CO2"]
    L --> M["CO2"]
    M --> N["CO2"]
    N --> O["CO2"]
    O --> P["CO2"]
    P --> Q["CO2"]
    Q --> R["CO2"]
    R --> S["CO2"]
    S --> T["CO2"]
    T --> U["CO2"]
    U --> V["CO2"]
    V --> W["CO2"]
    W --> X["CO2"]
    X --> Y["CO2"]
    Y --> Z["CO2"]

natural_image
Line drawing of a kitchen oven with a water dispenser inside (no text or symbols)Σημειώσεις
natural_image
Simple line drawing of a mechanical component with a rotating arrow (no text or symbols)Προειδοποίηση
natural_image
Pure wire mesh diagram of a rectangular metal grid structure (no text or symbols)Raft tip grătar
natural_image
Simple line drawing of a rectangular tray with internal geometric shapes (no text or symbols)Tavă
natural_image
Line drawing of a laboratory or storage unit with a grid-patterned tray and side panels (no text or symbols)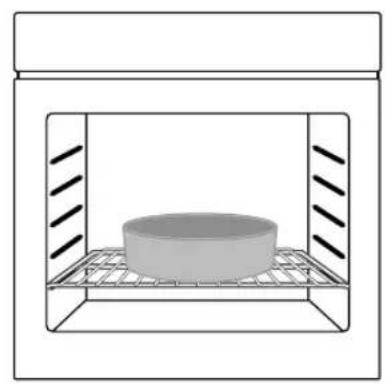
natural_image
Simple line drawing of a cylindrical object inside a rectangular chamber with grating (no text or symbols)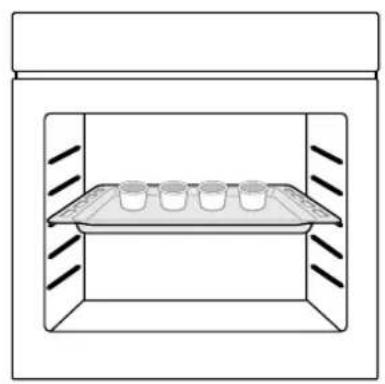
natural_image
Diagram of a laboratory setup with a tray holding multiple small vials, enclosed in a rectangular enclosure (no text or labels)Panoul de control
natural_image
Line drawing of a kitchen sink with a water dispenser inside (no text or symbols)Observații
natural_image
Simple line drawing of a container with a rotating arrow, no text or symbols presentAvertizare
Country Subsidiary Address City Phone
| AustriaKüppersbusch Austria | Eitnergasse, 13 | 1231 Wien | +43 18 668 022 |
| BelgiumKüppersbusch Belgium S.P.R.L. | Doomveld Industrie, Asse 3, No. 11 - Boite 7 | 1731 Zellik | +32 24 668 740 |
| BulgarlaTeka Bulgaria EOOD | Blvd. "Tsarigradsko Shosse" 135 | 1784 Sofia | +359 29 768 330 |
| ChileTeka Chile S.A. | Avd El Retiro Parque los Maitenes, 1237. Parque Enea | Pudahuel, Santiago de Chile | +56 24 386 000 |
| ChinaTeka International Trading (Shanghai) Co. Ltd. | No.1506, Shengyuan Henghua Bldg. No.200 Wending Rd. | Xuhui, Dist. 200030 Shanghai | +86 2 153 076 996 |
| Czech RepublicTeka CZ S.R.O. | V Holesovickách, 593 | 182 00 Praha 8 - Liben | +420 284 691 940 |
| EcuadorTeka Ecuador S.A. | Parque Ind. California 2, Via a Daule Km 12 | Guayaquil | +593 42 100 311 |
| GreeceTeka Hellas A.E. | Thesi Roupaki - Aspropyrgos | 193 00 Athens | +30 2 109 760 283 |
| HungaryTeka Magyarország Zrt. | Terv u. 92 | 9200 Mosonmagyaróvár | +36 96 574 500 |
| IndonesiaPT Teka Buana | Jalan Menteng Raya, Kantor Taman A9 Unit A3 | 12950 Jakarta | +62 215 762 272 |
| MalaysiaTeka Küchentechnik (Malaysia) Sdn Bhd | 10 Jalan Kartunis U1/47, Tmasya Park, Off Glenmarie | 40150 Shah Alam, Selangor Darul Ehsan | +60 376 201 600 |
| MexicoTeka Mexicana S.A. de C.V. | Blvd Manuel A. Camacho 126, Piso 3 Col. Chapultepec | 11000 Mexico D.F. | +52 5 551 330 493 |
| MoroccoTeka Maroc S.A. | 73, Bd. Slimane, Depôt 33, Route de Ain Sebaa | Casablanca | +212 22 674 462 |
| PeruTeka Küchentechnik Perú S.A. | Av. El Polo 670 local A 201, CC El polo, Surco | Lima | +51 14 363 078 |
| PolandTeka Polska Sp. ZO.O. | ul. 3-go Maja 8 / A2 | 05-800 Pruszkow | +48 227 383 270 |
| PortugalTeka Portugal S.A. | Estrada da Mota - Apdo 533 | 3834-909 Ilhavo, Aveiro | +35 1 234 329 500 |
| RomaniaS.C. Teka Küchentechnik Romania S.R.L. | Sevastopol str., no 24, 5th floor, of. 15 | 010992 Bucharest Sector 1 | +40 212 334 450 |
| Russia/PоссияTeka Rus LLC/000 "Teka Pyc" | Neverovskogo 9, Office 417, 121170, Moscow, Russia | 121087 Россия, Москва | +7 4 956 450 064 |
| SingaporeTeka Singapore PTE Ltd | Clemenceau Avenue, 83, 01-33/34 UE Square | 239920 Singapore | +65 67 342 415 |
| SpainTeka Industrial, S.A. | C/ Cajo,17 | 39011 Santander | +34 942 355 050 |
| ThailandTeka (Thailand) Co. Ltd. | 364/8 Sri-Ayuttaya Road, Phayathai, Ratchatavee | 10400 Bangkok | +66 -26 424 888 |
| TurkeyTeka Teknik Mutfak Aletleri Sanayi Ve | Büyükdere Cad. 24/13 | 80290 Mecidiyeköy, Istanbul | +90 2 122 883 134 |
| UkraineTeka Ukranie LLC | 86-e, Bozhenko Str .2nd floor,4th entrance | 03150 Kyiv | +380 444 960 680 |
| United Arab EmiratesTeka Middle East Fze | Building LOB 16, Office 417 | P.O. Box 18251 Dubai | +971 48 872 912 |
| United Arab EmiratesTeka Küchentechnik U.A.E LLC | Bin Khedia Centre | P.O. Box 35142 Dubai | +971 42 833 047 |
| VenezuelaTeka Andina S.A. | Ctra. Petare-Santa Lucia, km 3 (El Limoncito) | 1070 Caracas | +58 2 122 912 821 |
| VietnamTEKA Vietnam Co., Ltd. | 803, FI 8th, Daiminh Convention Center, 77, Hoang Van | Thai, Tan Phu Ward, District 7, Ho Chi Minh | +84 854 160 646 |
PN:16171100A46448

Teka Industrial S.A.
"for further information and updated contact adresses,
please refer to the corporate website"
teka.com


natural_image
World map silhouette showing continents and countries with no text or labelsteka.com
Asped mos eriatius sit atet hicil et velit