RM420AE - Lawn mower SCHEPPACH - Free user manual and instructions
Find the device manual for free RM420AE SCHEPPACH in PDF.


| Product type | Self-propelled petrol lawnmower |
| Brand | Scheppach |
| Model | RM420AE |
| Cutting width | 42 cm |
| Cutting height | 25–75 mm, adjustable to 7 positions |
| Grass catcher capacity | 45 L |
| Weight | 26.5 kg |
| Engine type | 4-stroke, air-cooled, 150 cm³ |
| Engine power | 2.7 kW (3.5 HP) at 2800 rpm |
| Fuel | Unleaded petrol (max 10% bioethanol) |
| Fuel tank capacity | 0.8 L |
| Engine oil | SAE 30 / 10W40 / 10W30, capacity 0.4 L |
| Battery | Lithium-ion 20 V, 2.0 Ah / 40 Wh |
| Charger | 100–240 V, charging current 2.4 A, charging time 50 min |
| Starting | Electric (battery) and manual recoil starter |
| Main functions | Classic mowing, mulching, grass collection into the bag |
| Sound pressure level | 82 dB(A) (uncertainty 3 dB) |
| Guaranteed sound power level | 92.8 dB(A) (uncertainty 1.86 dB) |
| Vibration (hand/arm) | 8.125 m/s² (K=1.5 m/s²) |
| Routine maintenance | Cleaning after use, annual oil change, air filter and spark plug maintenance |
| Wear parts (not covered by warranty) | Blade, spark plug, air filter, fuel filter, belt, battery |
| Safety | Engine brake, stop lever, protective cover, battery anti-start device |
Frequently Asked Questions - RM420AE SCHEPPACH
User questions about RM420AE SCHEPPACH
0 question about this device. Answer the ones you know or ask your own.
Ask a new question about this device
Download the instructions for your Lawn mower in PDF format for free! Find your manual RM420AE - SCHEPPACH and take your electronic device back in hand. On this page are published all the documents necessary for the use of your device. RM420AE by SCHEPPACH.
USER MANUAL RM420AE SCHEPPACH
natural_image
Black and white photo of a Schoppach lawn mower with visible branding and wheels (no text or symbols on the device itself)
text_image
https://www.scheppach.com/sde/service scheppachRM420AE
| DE | Hybrid-Start-Benzin RasenmäherOriginalbedienungsanleitung | 8 |
| GB | Hybrid starter petrol lawnmowerTranslation of original instruction manual | 29 |
| FR | Tondeuse thermique à démarrage hybrideTraduction des instructions d'origine | 47 |


CAUTION! Read the manual carefully before operating this machine!
natural_image
Close-up of a hand adjusting a bicycle wheel component (no visible text or symbols)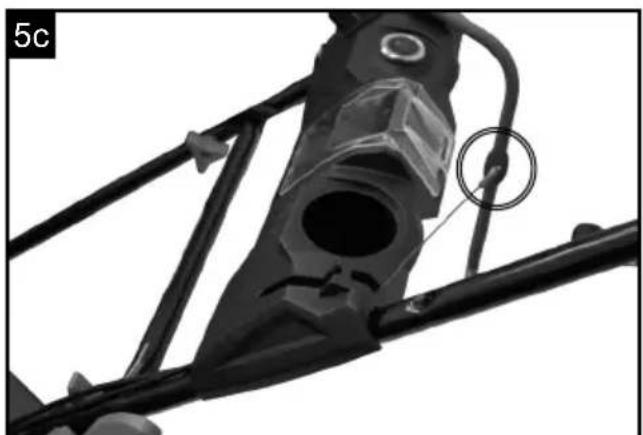
natural_image
Close-up of a mechanical component with a circular annotation and labeled part '5c' (no readable text or symbols beyond label)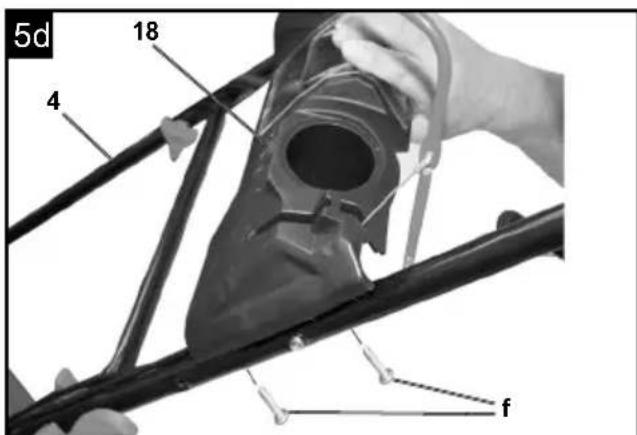
text_image
5d 18 4 f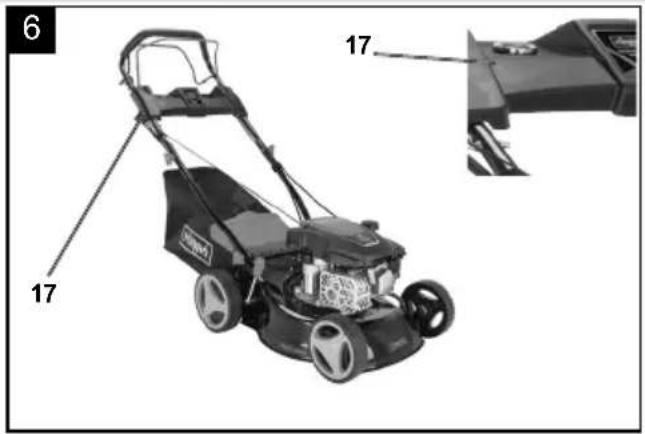
text_image
6 17 17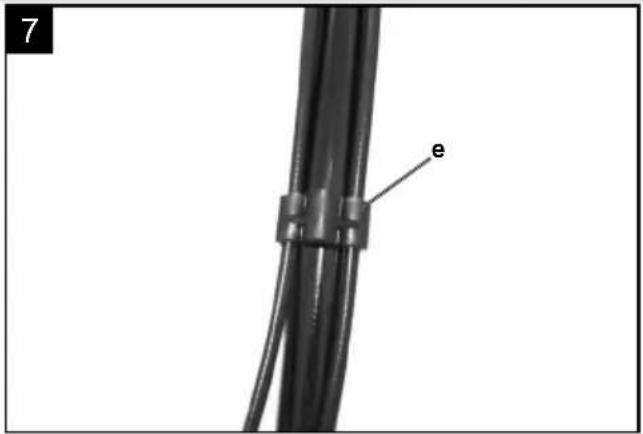
text_image
7 e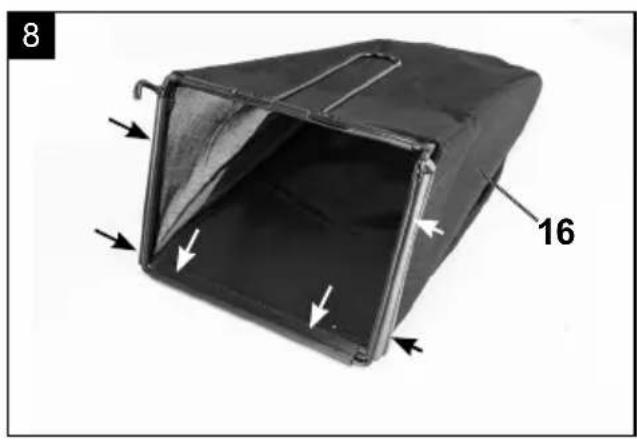
natural_image
Black metal container with white arrows indicating internal flow or movement, labeled '16' and number '8' (no text or symbols on the container itself)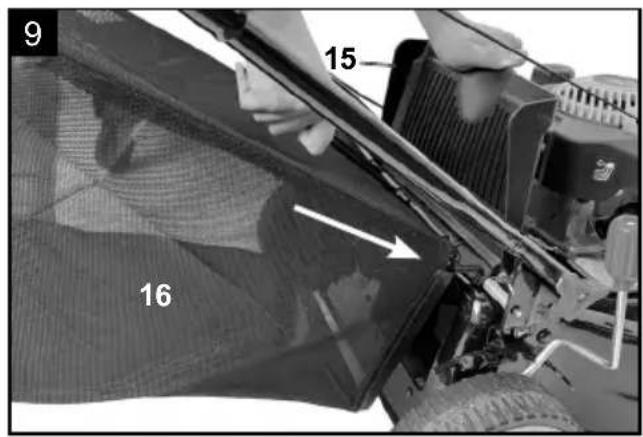
text_image
9 15 16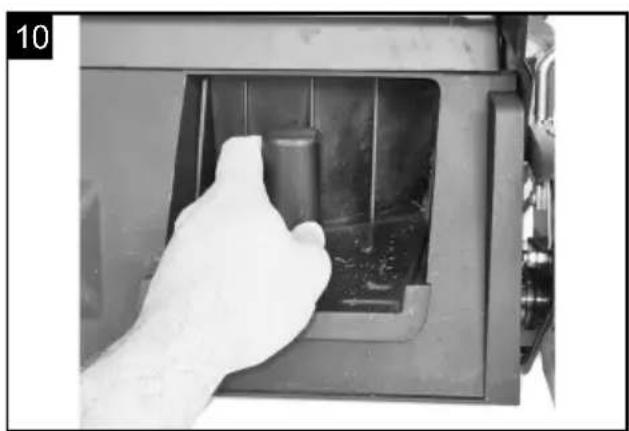
natural_image
Hand inserting a component into a device housing (no visible text or symbols)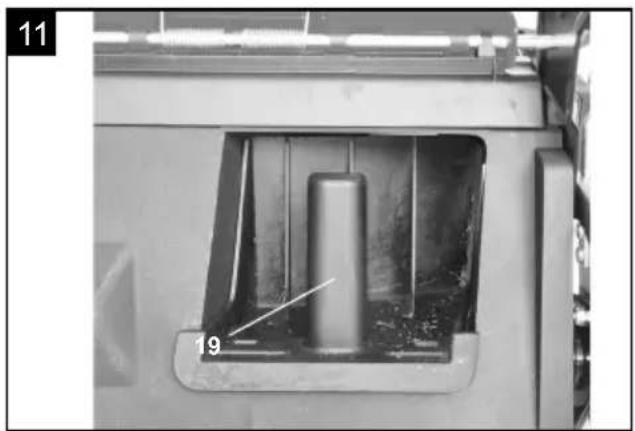
natural_image
Close-up of a mechanical component with a cylindrical part inserted into a housing, labeled with number 19 (no readable text or symbols beyond labels)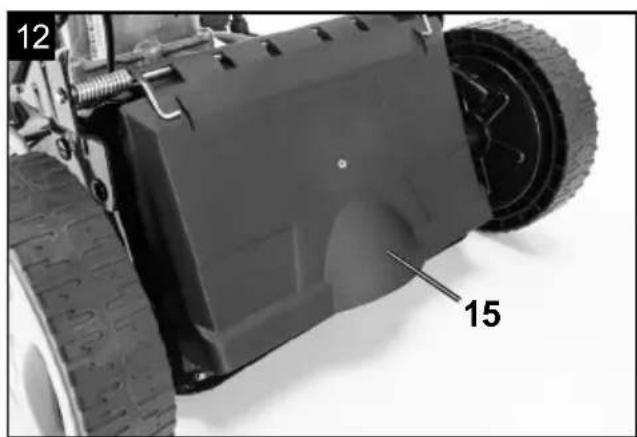
natural_image
Close-up of a mechanical vehicle showing a tire, wheels, and a labeled component (no text or symbols beyond numbers)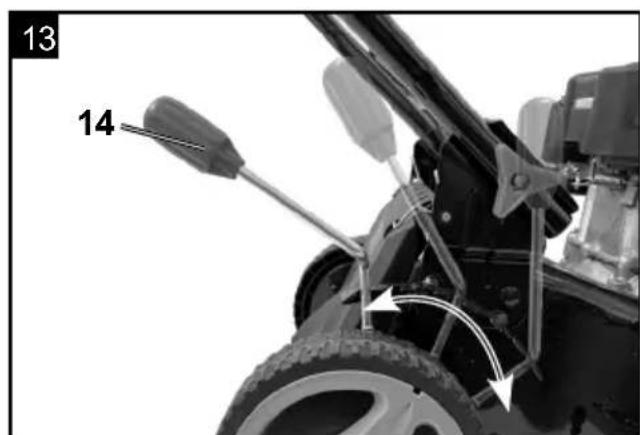
text_image
13 14
text_image
14 1 3 17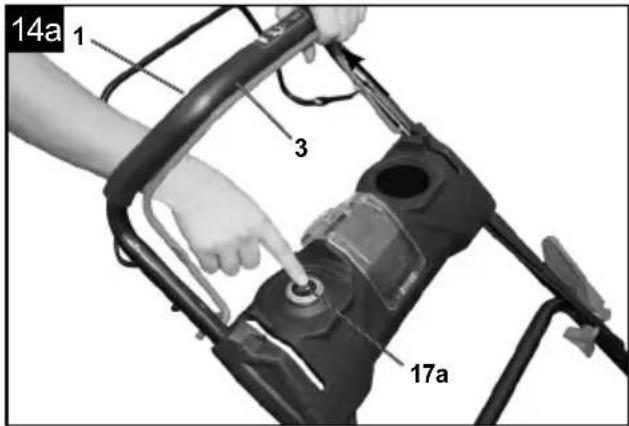
text_image
14a 1 3 17a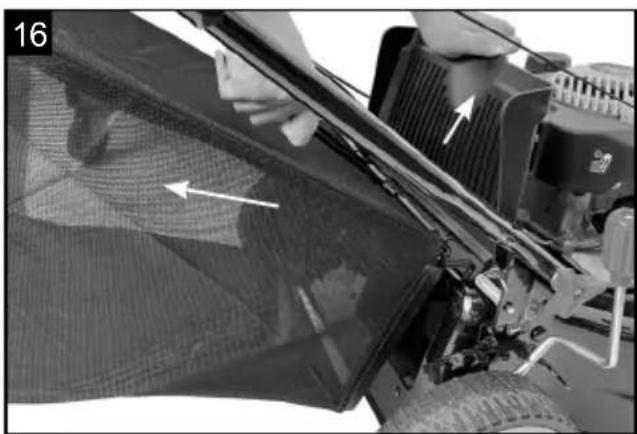
natural_image
Close-up of a mechanical device with a mesh cover and tool, showing no visible text or symbols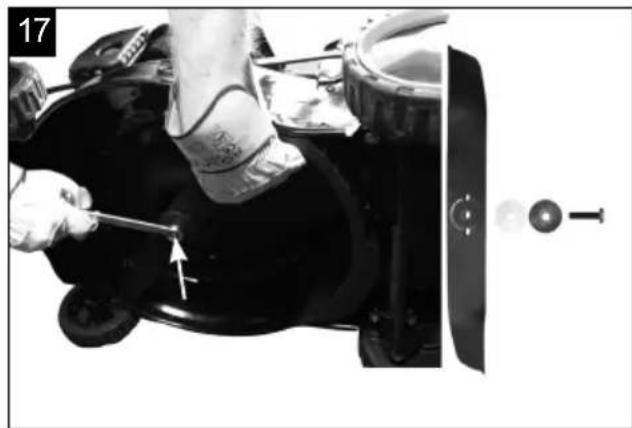
natural_image
Close-up of a person's leg being adjusted for a tool, with no visible text or symbols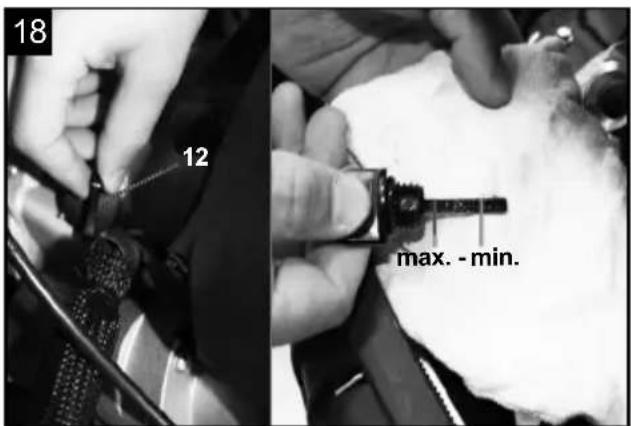
text_image
18 12 max. - min.
natural_image
Close-up of a mechanical component with arrows indicating features, no visible text or symbols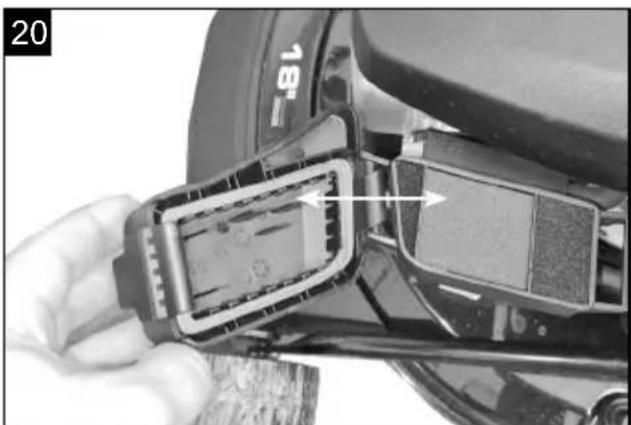
natural_image
Close-up of a hand inserting a component into a car's seatbelt (no visible text or symbols)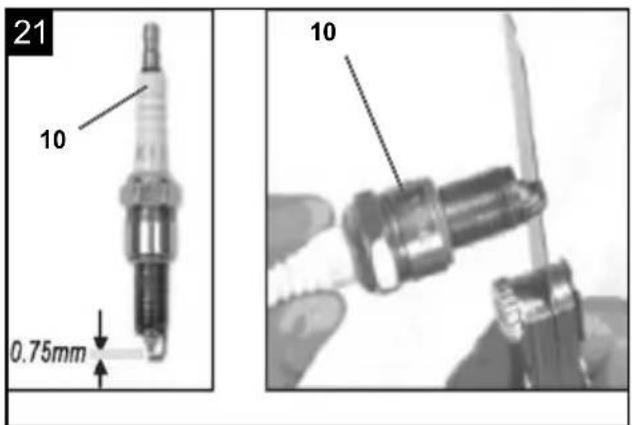
text_image
21 10 0.75mm 1022
natural_image
Black-and-white photo of a grass lawn mower with visible wheels and front-mounted engine (no text or symbols)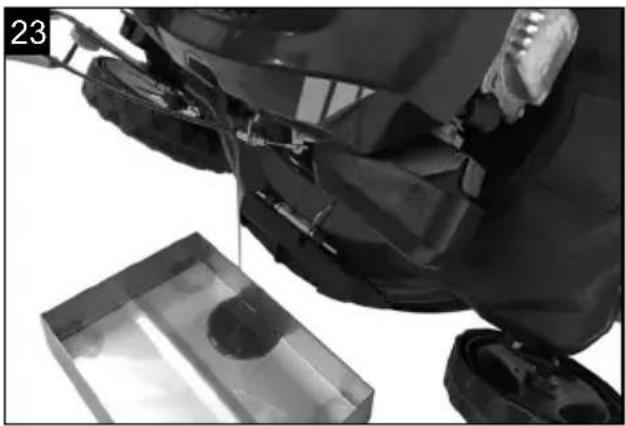
natural_image
Close-up of a robotic arm with a transparent box and mechanical components, no visible text or symbols24
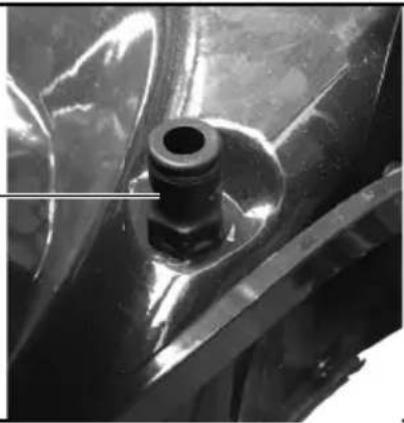
natural_image
Close-up of a mechanical component with a bolt and flange (no visible text or symbols)25
text_image
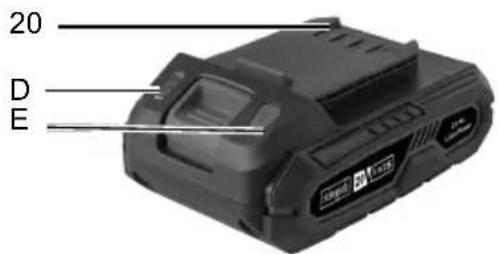
20 D E26
natural_image
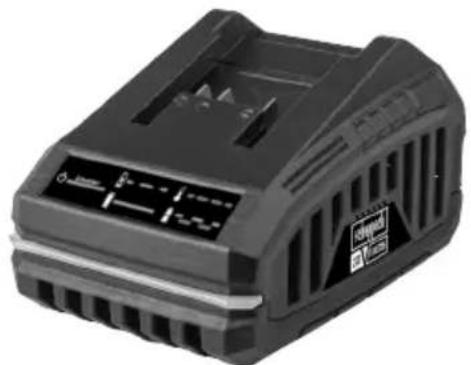
Black cylindrical power supply unit with cooling fins and a brand logo (no visible text or symbols on body)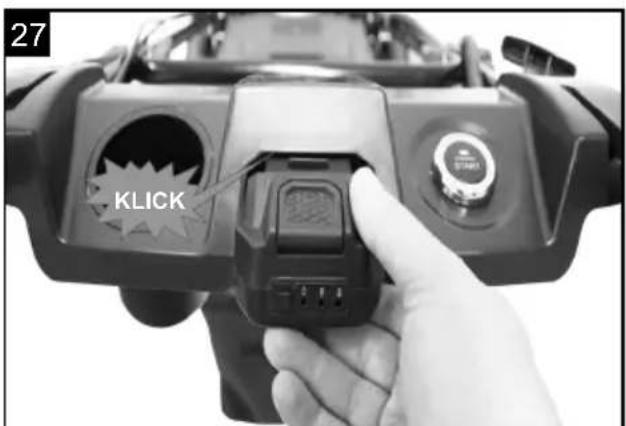
text_image
27 KlickGünzburger Straße 69
D-89335 Ichenhausen
Verehrter Kunde,
Homepage: https://www.scheppach.com/de/service
text_image
https://www.scheppach.com/de/service scheppachExplanation of the symbols on the equipment
Symbols are used in this manual to draw your attention to potential hazards. The safety symbols and the accompanying explanations must be fully understood. The warnings themselves will not rectify a hazard and cannot replace proper accident prevention measures.
 | Observe all safety instructions before use |
 | Caution - Read the operating instructions to reduce the risk of inquiry! |
 | On a slope, do not mow uphill or downhill. |
 | Before operating the lawn mower, remove lawn debris which may be ejected by the blade. |
 | There is a risk of debris being ejected when the engine is running. Make sure you keep a safe distance. |
 | Make sure other people also keep a safe distance. |
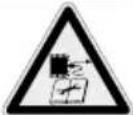 | Remove the ignition cable before all maintenance work, and read the instructions for use. |
 | Warning! Risk of injury! Do not let your hands or feet come in contact with the blades when the motor is running. |
 | Important. Exhaust gas is poisonous, do not operate in an unventilated area. |
 | Danger - Hot surface! |
 | Wear ear-muffs and safety goggles! |
 | Attention! Operating materials are flammable and explosive. Do not fill with fuel while the motor is hot or running. |
 | Fuel tank capacity |
 | Engine oil |
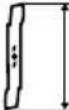 | Length knives. Max. Cutting width |
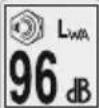 | Guaranteed sound power |
 | The product complies with the applicable European directives and an evaluation method of conformity for this directives was done. |
 | Check oil level |
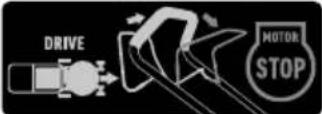 | DRIVE - Drive leverSTOP - Engine brake lever |
 | Use only in closed rooms! |
 | Protection class II (double insulated) |
 | Do not dispose of batteries with your domestic waste. |
 | The battery is used as a device key |
 | Protect the battery from water and moisture. |
 | Protect the battery from heat and fire. |
 | Protect the battery from temperatures above 45 °C. |
Table of contents: Page:
- Introduction....31
- Layout 31
- Scope of delivery 31
- Proper use 31
- Safety instructions 32
- Technical data.... 35
- Unpacking....36
- Before first use.... 36
- Operation 37
- Cleaning....40
- Transport....40
- Storage 40
- Maintenance 41
- Disposal and recycling.... 43
- Troubleshooting 44
1. Introduction
Manufacturer:
Scheppach GmbH
Günzburger Straße 69
D-89335 Ichenhausen
Dear customer,
We hope your new tool brings you much enjoyment and success.
Note:
According to the applicable product liability laws, the manufacturer of the device does not assume liability for damages to the product or damages caused by the product that occurs due to:
- Improper handling,
• Non-compliance of the operating instructions,
• Repairs by third parties, not by authorized service technicians,
• Installation and replacement of non-original spare parts,
• Application other than specified, - A breakdown of the electrical system that occurs due to the non-compliance of the electric regulations and VDE regulations 0100, DIN 57113 / VDE0113.
We recommend:
Read through the complete text in the operating instructions before installing and commissioning the device. The operating instructions are intended to help the user to become familiar with the machine and take advantage of its application possibilities in accordance with the recommendations. The operating instructions contain important information on how to operate the machine safely, professionally and economically, how to avoid danger, costly repairs, reduce downtimes and how to increase reliability and service life of the machine. In addition to the safety regulations in the operating instructions, you have to meet the applicable regulations that apply for the operation of the machine in your country. Keep the operating instructions package with the machine at all times and store it in a plastic cover to protect it from dirt and moisture. Read the instruction manual each time before operating the machine and carefully follow its information. The machine can only be operated by persons who were instructed concerning the operation of the machine and who are informed about the associated dangers. The minimum age requirement must be complied with. In addition to the safety notices contained in this operating manual and the particular instructions for your country, the generally recognised technical regulations for the operation of identical devices must be complied with. We accept no liability for accidents or damage that occur due to a failure to observe this manual and the safety information
2. Layout
Fig. 1 (1 - 21)
- Handle
- Drive lever
- Engine brake lever
- Upper push bar, 4a lower push bar
- plastic star grip nut
-
Petrol tank
-
Air filter
-
-
-
Wheel
-
Spark plug
-
Exhaust
-
Dip stick
-
Drive wheel
-
Wheel height adjustment
-
Discharge flap
-
Grass box
-
Pull starter, 17a. Electric starter
-
Electric starter unit
-
Mulch insert
-
Battery
-
Battery Charger
3. Scope of delivery
Fig. 1 (1 - 21 / a - h)
The machine meets the currently valid EU machine directive. Before starting any work, all protective and safety devices must be in place.
- The machine has been designed to be operated by one person.
- The operator is responsible for third parties in the area of operations.
- All safety and hazard notices on the machine must be observed.
- All safety and hazard notices on the machine must be kept in a completely legible condition.
- Use the machine in a technically flawless condition only, as well as for its intended purpose, in a safe manner and being aware of dangers, in compliance with the operating instructions!
- Disruptions which can affect safety in particular must be eliminated straight away!
- The manufacturer's safety, operation and maintenance instructions as well as the technical data given in the calibrations and dimensions must be adhered to.
- Relevant accident prevention regulations and other generally recognized safety and technical rules must also be adhered to.
- The machine may only be used, maintained or repaired by trained persons who are familiar with the machine and have been informed about the dangers. Unauthorized modifications of the machine exclude a liability of the manufacturer for damages resulting from the modifications.
- The machine is intended for use only with original spare parts and original tools from the producer.
- Any other use is considered to be not intended. The manufacturer excludes any liability for resulting damages, the risk is exclusively borne by the user.
- The device must not be used for commercial, technical or industrial applications.
- If you are not sure whether working conditions are safe or unsafe, do not work with the machine.
- The petrol lawn mower is intended for private use i.e. for use in home and gardening environments. Private use of the lawn mower refers an annual operating time generally not exceeding that of 50 hours, during which time the machine is primarily used to maintain small-scale, residential lawns and home/hobby gardens. Public facilities, sporting halls, and agricultural/forestry applications are excluded.
Important! Due to the high risk of bodily injury to the user, the lawn mower may not be used to trim bushes, hedges or shrubs, to cut scaling vegetation, planted roofs, or balcony-grown grass, to clean (suck up) dirt and debris off walkways, or to chop up tree or hedge clippings.
Moreover, the lawn mower may not be used as a power cultivator to level out high areas such as molehills. - For safety reasons, the lawn mower may not be used as a drive unit for other work tools or toolkits of any kind
⚠ WARNING
For your own safety, please thoroughly read this manual and the general safety instructions before turning the device on. If you give the device to third parties, always include these instructions.
5. Safety instructions
These operating instructions provide places concerning your safety which are marked with this indication: △
Furthermore this manual contains other important sections which are marked with the word „Attention!“.
⚠️ DANGER
Failure to follow these instructions may cause serious danger to life of danger or fatal injuries.
⚠ WARNING
Failure to follow these instructions may cause danger to life or danger of serious injuries.
CAUTION
Failure to follow these instructions may cause light to medium risk of injury.
NOTE
Failure to follow these instructions may cause danger of damage of the engine or other property values.
CAUTION
When using the equipment, a few safety precautions must be observed to avoid injuries and damage. Please read the complete operating instructions and safety regulations with due care. Keep this manual in a safe place, so that the information is available at all times. If you give the equipment to any other person, hand over these operating instructions and safety regulations as well. We cannot accept any liability for damage or accidents which arise due to a failure to follow these instructions and the safety instructions.
Improper use of the battery and charger can result in an electrical shock or fire.
When operating
- Keep battery charger dry. Avoid exposing battery pack to rain or wet conditions.
- To reduce the risk of electrical shock, do not allow water to flow into AC plug.
- Do not short circuit; never place any object into the battery contacts.
When charging battery pack
- Charge original battery pack only with original battery charger.
- Do not use battery charger to charge generic batteries.
- Keep battery charger dry. Avoid exposing battery pack to rain or wet conditions.
- To reduce risk of damage to electric plug and cord, pull by plug rather than cord when disconnecting charger.
- Do not operate charger with damaged plug or cord. The supply cord cannot be replaced. If the cord is damaged, the charger should be replaced immediately.
- Do not operate charger if it has received a sharp blow, been dropped, or otherwise damaged in any way. If charger is damaged it must be replaced. Charger is not serviceable.
- Do not disassemble charger; or attempt to service.
• To reduce risk of electric shock, unplug charger from outlet before cleaning.
- Do not short circuit; never place any object into the battery contacts.
- The charger is not intended for use by persons (including children) with reduced physical, sensory or mental capabilities, or lack of experience and knowledge, unless they have been given supervision or instruction concerning use of the appliance by a person responsible for their safety.
• Children should be supervised to ensure that they do not play with the charger.
Extension cord
An extension cord should not be used unless absolutely necessary. Use of improper extension cord could result in a risk of fire and electric shock. If an extension cord must be used, make sure that;
a) Pins on plug of extension cord are the same number, size, and shape as those of plug on charger,
b) Extension cord is properly wired and in good electrical condition, and
c) Wire size is a minimum of 16 AWG (American Wire Gauge) to allow for AC ampere rating of charger.
When storing battery pack
- Keep battery charger dry. Avoid exposing battery pack to rain or wet conditions.
Before performing adjustments or repairs
- Remove battery pack from engine battery tray.
WARNING
Battery chemicals are toxic and corrosive.
Fire or explosion can cause severe burns or death.
- Never burn or incinerate discarded or used battery packs as they may explode. Toxic fumes and materials are created when battery packs are burned.
- Do not use a battery that has been crushed, dropped, or damaged.
⚠ Warning! This electric tool generates an electromagnetic field during operation. This field can impair active or passive medical implants under certain conditions. In order to prevent the risk of serious or deadly injuries, we recommend that persons with medical implants consult with their physician and the manufacturer of the medical implant prior to operating the electric tool.
The following must not use the machine:
• Children and other people who do are not familiar with the operating manual (local stipulations may specify a minimum age for users).
• People under the influence of alcohol, drugs and medication, as well as those who are tired or ill.
Safety instructions for handoperated lawn mowers
Note
- Read the directions with due care. Familiarize yourself with the settings and proper operation of the machine.
- Never allow children or other persons who are not familiar with the operating instructions to use the mower. Contact your local governmental agency for information regarding minimum age requirements for operating the mower.
- Never mow in the direct vicinity of persons - especially children - or animals. Always keep in mind that the operator is responsible for accidents involving other persons and/or their property.
- If you give the equipment to any other person, give them these operating instructions as well.
• Always wear sturdy, non-slip footwear and long trousers when mowing. Never mow barefoot or in sandals.
- Check the grounds on which the machine will be used and remove all objects that could be caught up and violently flung out of the chute.(Like stones, toys, sticks and wires etc.)
⚠ WARNING
Petrol is highly flammable! Therefore:
- Only store petrol in containers designed to hold petroleum-based liquids.
- Only refuel out in the open and do not smoke during the refueling process.
- Always refuel the lawn mower before starting the engine. Always ensure that the fuel tank cap is closed when the engine is running and when the mower is hot; also do not refuel.
- If petrol has overflowed, do not under any circumstances attempt to start the engine. Instead, remove the machine from the affected area. Avoid starting the engine until the petrol fumes have completely evaporated.
- For safety reasons, the petrol tank and other tank closures must be replaced if they are damaged.
- Never store petrol near a source of sparks. Always use a tested canister. Keep petrol away from children.
- Replace defective mufflers.
- Before using the mower, visually inspect it to ensure that the blade, mounting bolts and the entire cutting apparatus are in good working order (i.e. not worn out or damaged). To prevent any imbalance, replace worn out or damaged blades and mounting bolts as a set only (if applicable).
- Please note that where a mower has more than one blade, the rotation of one of the blades can cause the others to rotate as well.
Handling
- Do not let the combustion engine run in enclosed areas, as dangerous carbon monoxide gas can build up.
- Only mow in broad daylight or in well-lit conditions. Avoid using the machine on wet grass as far as possible.
- Do not use the lawn mower in a thunderstorm - risk of lightning strike!
• Always maintain good footing on inclines. - Only operate the machine at a walking pace.
- For machines with wheels: Always mow across hills i.e. never straight up or straight down.
- Be particularly careful when you change direction on a slope.
- Do not mow on excessively steep slopes and nearby garbage dumps, ditches or dykes. Always be extra careful when turning the mower around and when pulling it towards you.
- Switch off the lawn mower and ensure that the blade has stopped rotating whenever the mower has to be tilted for transporting over areas other than lawns and whenever it has to be moved from or to the area you want to mow.
- Never use the lawn mower if the blade or safety grilles are damaged, or without the attached guards, e.g. deflectors and/or grass catching devices.
- Do not adjust or overclock the engine speed settings.
- Release the engine brake before you start the engine.
- Start the engine with care, in accordance with the manufacturer's instructions. Make sure that your feet are far enough away from the mower blade!
- Do not tilt the lawn mower when you start the engine unless the mower must raised off of the ground a little in order to start it. In the latter case, tilt the mower as little as absolutely necessary and only raise the side opposite to that of the user.
- Never start the engine while standing in front of the chute.
- Never move your hands or feet toward or under any rotating parts. Keep clear of the chute opening at all times.
- Never lift or carry a lawn mower with the engine running.
- Switch off the engine and pull the spark plug boot and make sure that all moving parts have come to a standstill:
- Before you dislodge any blockages or clogs in the chute.
- Before carrying out any checks, cleaning, maintenance or other work on the lawn mower
- If the lawn mower strikes a foreign body, examine it for signs of damage and carry out any necessary repairs before restarting and continuing to work with the mower. If the lawn mower begins to experience exceptionally strong vibrations, immediately switch it off and check it.
- Switch off the engine:
- When you leave the lawn mower.
- Before you refuel.
• Operation of the machine at higher than normal speed can lead to an increased risk of accidents.
- Take care when carrying out installation work on the machine, and avoid trapping fingers between the moving cutting tool and the fixed parts of the machine.
- Please be particularly careful when mowing on ground that may subside, on nearby landfills, trenches and embankments.
- The user must be adequately trained in the use, adjustment and operation of the machine (including prohibited operations).
- Check the machine regularly and ensure that all start locks and push buttons are working properly before each use.
- Please note that improper maintenance, the use of inappropriate spare parts, or the removal or modification of safety devices can result in damage to the machine and serious injury to the person working with it.
- Please note that the lawnmower's safety systems or devices must not be manipulated or deactivated.
- Please note that the user must not change or manipulate any sealed engine speed control settings.
- Only use cutting equipment and accessories recommended by the manufacturer. The use of other tools and accessories may result in injury to the operator.
• Always keep the lawnmower in good operating condition. - It is necessary to take enough breaks to reduce noise and vibration exposure.
- Attention! The lawnmower must not be operated without the use of either the full grass catcher or the self-closing guard for the discharge opening.
Residual risks and accident prevention standards
Neglect of ergonomic principles
Negligent handling of personal protective equipment (PPE)
Negligent handling or commission of the personal protective equipment may cause serious injuries.
- Wear prescribed personal protection equipment.
Human behaviour, misbehaviour
- For any work be fully concentrated.
⚠️ Residual - can never be ruled out.
Danger from noise
Hearing damage
Prelonged unprotected work with the device may cause hearing damage.
- Always wear ear-muffs.
In case of emergency
In case of a possibly occurring accident take the necessary first aid steps as appropriate and obtain qualified medical aid as quickly as possible.
6. Technical data
MS150-42E SE
| Type engine | Four stroke engine/air cooled |
| Cubic capacity 150 cm3 | |
| Rotation speed 2800 U/min | |
| Max. engine output kW 2,7 kW / 3,5 HP | |
| Fuel | Regular grade petrol/lead-free max. 10% bioethanol |
| Capacity tank 0,8 l | |
| Motor oil | SAE 30 / 10W40 / 10W30 |
| Capacity tank/oil 0,4 l | |
| Cutting height adjustment 25-75 mm / 7 -stages | |
| Collection bag capacity 45 l | |
| Cutting width 42 cm | |
| Weight 26,5 kg | |
Lithium-Ion-Battery
| Lithium-ion batteries | 20 V |
| Min. charging time | 50 min |
| Charging current | 2,4 A |
| AC-input of the charging device (variable) | 100 - 240 V |
| Battery capacity | 2000 mAh / 40 Wh |
Subject to technical changes!
Noise & vibration
⚠ Warning: Noise can have serious effects on your health. If the machine noise exceeds 85 dB (A), please wear suitable hearing protection.
Noise data
Sound pressure L_PA 82 dB (A)
Uncertainty K_PA 3 dB(A)
Sound power L_WA 92,8 dB (A)
Uncertainty K_WA 1,86 dB(A)
Vibration parameter
Vibration a_hv 8,125 m/s²
Uncertainty K_h 1,5 m/s ^2
Reduce noise generation and vibration to a minimum!
- Use only equipment that is in perfect condition.
- Maintain and clean the equipment regularly.
- Adopt your way of working to the equipment.
- Do not overload the equipment.
- Have the equipment checked if necessary.
- Switch off the equipment when not in use.
- Wear gloves.
When using the petrol lawn mower for extended periods, vibration-induced circulatory problems may occur (white finger disease).
We cannot give exact details about the duration of use in this case because it is different for each individual.
The following factors can influence the condition:
• Circulatory problems in the user's hands
- Low outside temperatures
• Extended periods of use
We therefore recommend you wear warm work gloves and take regular breaks.
7. Unpacking
Open the packaging and remove the device carefully.
Remove the packaging material as well as the packaging and transport bracing (if available)
Check that the delivery is complete.
Check the device and its spare parts for possible damage caused by transportation. In the event of complaints, you must contact the distributor without delay. Claims at a later stage will not be accepted.
If possible, store the packaging until the warranty period has expired
Before handling the device, make yourself familiar with it by reading the operating instructions.
For accessories, consumables and spare parts, only use original parts. Spare parts are available from your stockist. Include our item number, the device model and year of manufacture in your order.
⚠ Attention!
The device and packaging materials are not toys! Children must not be allowed to play with plastic bags, film and small parts! There is a risk of swallowing and suffocation!
8. Before first use
ATTENTION!
Always make sure the device is fully assembled before start-up!
Some parts of the mower come disassembled. For quick and easy assembly, read and follow the instructions below.
Important! You will need the following additional tools (not supplied) for assembly, and also for maintenance work:
• A 1 litre measuring jug (oil/petrol resistant)
- A petrol can (5 litres is sufficient for approx. 6 operating hours)
• A funnel (suitable for the tanks petrol filler neck)
- Household wipes (to wipe up oil/petrol residue; dispose of these at a filling station)
- A petrol suction pump (plastic, available from DIY stores)
• An oil can with hand pump (available from DIY stores)
• 0,4 litre of engine oil (SAE 30)
Assembly
- Take the mower and attachment parts out of the packaging and check that all parts are present.
- Attach the lower push bar (4a) to both sides of the mower with one screw (a), 1 washer (c), 1 plastic star grip nut (5) each. Make sure that the cables, which will be attached later, are not in the way (fig. 2-3).
- Attach the upper push bar (4) on the lower push bar (4a) with one screw (a), one washer (b), one plastic star grip nut (5) each on both sides (Fig. 4-5).
- Guide the gas throttle through the electric starter unit as shown in figure 5a.
- Insert the throttle cable into the engine brake lever (3) using a plier. (fig. 5b-5c)
- Secure the electric starter unit (18) using the screws (f) on the upper push bar (4). (fig. 5d)
- Insert the pull start handle (17) in the designated hook as shown in Fig. 6.
- Fix the cables to the push bar with the cable clips (18) provided (fig. 7).
-
Grass box (16) - open it up and click the plastic clips into position on the frame (fig. 8).
-
Mowing with grass box:
Lift the discharge flap (15) with one hand and hang the grass box (16) as shown in fig. 9.
- Mulching:
If the grass box (16) is attached, remove it and replace it with the mulch insert (19) as shown in fig. 10-12.
Setting the cutting height
CAUTION!
Adjust the cutting height only when the engine is switched off and the plug boot has been pulled.
- Before you begin to mow, check to ensure that the blade is not blunt and that none of the fasteners are damaged.
- To prevent any imbalance, replace blunt and/or damaged blades as a set only (if applicable). To carry out this check, first switch off the engine and pull the spark plug boot.
- The cutting height is centrally adjusted with the cutting height adjustor lever (fig. 13/ Item 14). 7 different cutting heights can be selected.
- Pull the adjustor lever out and select the desired cutting height. The lever snaps into the desired position. (fig. 13)
Preparing the area to be mowed
Before mowing, carefully examine the area. Remove stones, sticks, bones, wires, toys and other objects that may be ejected.
9. Operation
ATTENTION!
Always make sure the device is fully assembled before start-up!
CAUTION!
The engine does not come with oil in it. Therefore, ensure that you add 0,45 litres of oil before starting it up. Use normal, multigrade oil (SAE30). The oil level in the engine must be checked each time before mowing.
You will also need to fill in petrol, as this is also not supplied upon delivery.
- In order to avoid any unintentional start-ups of the lawn mower, it comes equipped with an engine brake (Fig. 1/ Item 3) which must be pulled back before the engine can be started. When the engine control lever is released it must return to its initial position, at which point the engine automatically switches off.
- Press the engine brake lever (3) together and give the starter cord (17) a vigorous pull. (Fig. 14)
Attention: When you pull the starting rope the cutting blade rotates even when dissolved motor brake lever. Make sure that there are no body parts in danger zone of cutting blade. - When the engine is running, press the drive lever (2) to the handle (1) in order to engage drive on the mower.
- Before you start mowing, you should run through this operation several times in order to ensure that the machine is working properly.
⚠ WARNING
Whenever you need to perform any kind of adjustment and/or repair work on your lawn mower, wait until the blade has come to a complete stop.
Always switch off the engine before carrying out any adjustments, maintenance or repairs.
Warning of the danger of moving blade assemblies!
Using the drive:
- Engine brake (3): Use the lever to stop the engine. When you release the lever the engine and the blade stop automatically.
- To mow, hold the drive lever (2) in the working position. Before you start to mow, check the start/stop lever several times to be sure that it is working properly. Ensure that the tension cable can be smoothly operated (i.e. is not catching or kinking in any way).
- Drive lever (2): If you press this the clutch for the drive will be closed and the lawnmower will start to move with the motor running. Release the drive lever in good time to stop the moving lawnmower. Practice starting and stopping before you use the mower for the first time until you are familiar with controlling the mower.
⚠ Caution: The blade begins to rotate as soon as the engine is started.
Important: Before you start the engine, move the motor brake several times to be sure that the stop cable is properly working.
Note: The engine is factory set to a speed that is optimal for cutting and blowing grass into the basket and is designed to provide many years of use.
- Check the oil level.
- Open the fuel tank cap and fill the petrol tank (6) up to the lower point of the tank inlet with about 0.8 litres of petrol. Use a funnel and a measuring container for filling. Do not overfill the tank. Use fresh, clean unleaded fuel.
Never mix oil with petrol. Buy fuel in amounts which can be used within 30 days in order to guarantee its freshness.
Note: Use only unleaded gasoline.
⚠ WARNING
Only use a safety petrol can. Do not smoke when fuel-ling. Remove any oil or petrol residues. Switch off the engine before refuelling and allow the engine to cool down for a few minutes.
Start engine (Fig. 14a)
- Check the engine oil. See the Check Oil Level section.
- Check the battery tray on top of the engine for debris and if dirty clean with a brushor cloth. Mount the battery pack in the engine battery tray on top of the engine. Make sure battery pack is securely installed. Battery pack may represent equipment key in some instances.
- Note: To wake up a new battery, a First Time quick charge of approximately ten (10) seconds is required. See the When To Charge Battery Pack section.
- Make sure equipment drive controls, if equipped, are disengaged.
- Models with electric start switch: Hold the engine stop lever (3) against the handle (1). Press the electrical starter. The engine starts.
Start engine (Fig. 14)
- Ensure that the ignition cable is connected to the spark plug.
- Stand behind the mower. One hand squeezes the engine brake lever (3) to the handle, the other pulls the pull start.
- Start the engine using the reversing starter (17). To do this pull the handle approx. 10 – 15 cm (until you feel a resistance) and then start the engine with a sharp pull. If the engine does not start, pull the handle again.
- Due to protective coating on the engine, a small amount of smoke may be present during the initial use of the product and should be considered normal.
When operating
- Keep battery charger dry. Avoid exposing battery pack to rain or wet conditions.
- To reduce the risk of electrical shock, do not allow water to flow into AC plug.
- Do not short circuit; never place any object into the battery contacts.
⚠️ CAUTION!
- Never allow the starter cord to snap back.
- Note: In cold weather, it may be necessary to repeat the starting process several times.
Turn off the engine:
- To turn off the engine, release the drive lever (2), then the engine brake lever (3) and wait for the blades to stop.
- Pull the spark plug boot from the spark plug (10) boot in order to prevent the engine from restarting.
- Before you start the engine again, check the cord for the engine brake. Check that the cord is correctly fitted. If the cord is kinked or damaged, it should be replaced.
- Remove the battery pack. The battery pack may represent equipment key in some instances.
Before mowing
Important information
• Make sure that you are properly dressed when mowing. Wear sturdy, non-slip footwear; do not wear sandals or tennis shoes.
- Inspect the blade. A blade that is bent or damaged in any other way must be immediately exchanged for a genuine replacement blade.
- Do not fill the fuel tank indoors, but rather out in the open. Use a filling funnel and a measuring jug. Wipe off any spilled petrol.
- Read and follow in the instructions in the operating manual as well as the information regarding the engine and accessory equipment. Store the manual in a place where it can be readily accessed by other users of the machine.
- Exhaust gas is dangerous. Only start the engine out in the open.
- Make sure that all the guards are fitted and that they are in good working order.
- The machine should only be operated by persons who are well informed with the way it works, and who are in reasonably good physical condition.
- It can be dangerous to mow the grass when it is wet. Try to ensure that you only mow the grass when it is dry.
- Advise children and others to keep well away from the lawn mower.
- Never mow the grass in poor visibility.
- Remove all loose objects from the lawn before you start mowing the grass.(Like stones, toys, sticks and wires etc.)
Tips for proper mowing
⚠ CAUTION! Never open the chute flap when the catch bag has been detached (to be emptied) and the engine is still running. The rotating blade can cause serious injuries!
Always carefully fasten the chute flap and grass basket. Switch off the engine before emptying the grass basket.
Always ensure that a safe distance (provided by the length of the long handles) is maintained between the user and the mower housing. Be especially careful when mowing and changing direction on slopes and inclines. Maintain a solid footing and wear sturdy, non-slip footwear and long trousers. Always mow along the incline (not up and down).
For safety reasons, the lawn mower may not be used to mow inclines whose gradient exceeds 15 degrees. Use special caution when backing up and pulling the lawn mower. Tripping hazard!
Mulching
In the mulching mode the cuttings are shredded in the enclosed mower housing and then spread back onto the lawn. It is not necessary to gather and dispose of the grass.
⚠️ Note! Mulching is only possible if the lawn is relatively short.
To use the mulching function, disconnect the debris bag (16), slide the mulching adaptor (Fig. 10-12 / pos. 19) into the ejector opening and close the ejector opening (15).
Mowing
Mowing can take place with the grass box (16) attached. Only use a sharp blade that is in good condition. This will prevent the grass blades from fraying and the lawn from turning yellow. Try to mow in straight lines for a nice, clean look. In doing so, the mowing swaths should always overlap each other by a few centimeters in order to avoid bare strips.
Keep the underside of the mower housing clean and remove grass build-up. Deposits not only make it more difficult to start the mower; they decrease the quality of the cut and make it harder for the machine to bag the grass. Always mow along inclines (not up and down). Slightly turning the front wheels up the hill while mowing will prevent the mower from sliding out of the straight line. Select the cutting height according to the length of the grass. If the lawn has grown quite a bit, mow over it several times so that no more than 4 cm of grass are cut at one time. Switch off the engine before doing any checks on the blade. Keep in mind that the blade continues to rotate for a few seconds after the engine has been switched off. Never attempt to manually stop the blade.
Regularly check to see if the blade is securely attached, is in good condition and is sharp. If the contrary is the case, sharpen the blade or replace it. In the event that the blade strikes an object, immediately switch off the lawn mower and wait for the blade to come to a complete stop. Then inspect the condition of the blade and the blade mount. Replace any parts that are damaged.
Tips for proper mowing:
- Pay attention to ensure that you do not run into or over anything that could damage the mower. The lawn mower could be damaged and/or the machine could inflict bodily injury.
- A hot engine, exhaust or drive unit can burn the skin if touched. Thus, do not touch these parts unless the mower has been switched off for a while and you know that they have cooled down!
- Use extra caution when mowing on inclines and steep grades.
- Insufficient daylight or even a sufficient level of artificial light is one reason not to mow.
- Check the mower, the blade and other parts if they have struck a foreign object or if the machine vibrates more than usual.
- Do not make any adjustments or repairs until the engine has been switched off. Pull the plug boot.
- Pay special attention if you are mowing directly next to a street or are close by one (traffic). Always keep the grass chute pointed away from the street.
- Avoid mowing in places where the wheels have trouble gripping or mowing is unsafe in any other way. Before you back up, ensure that nobody is standing behind you (especially little children, who are more difficult to see).
- When mowing over thick, high grass, select the highest cutting level and mow at a slower speed. Before you remove any grass or blockages of any kind, switch off the engine and pull the plug boot.
- Never remove any safety-related parts.
- Never fill the engine with petrol when it is hot or is running.
Emptying the grass basket
⚠ WARNING
Before taking off the grass basket, switch off the engine and wait until the blade has come to a stop.
To take off the grass basket (16), use one hand to lift up the chute flap (15) and the other to grab onto the basket handle (Fig. 16). Remove the basket. For safety reasons, the chute flap (15) automatically falls down after removing the grass basket and closes off the rear chute opening.
If any grass remains in the opening, it will be easier to restart the engine if you pull the mower back approx. 1 meter. Do not use your hands or feet to remove clippings in or on the mower housing, but instead use suitable tools such as a brush or a hand broom.
In order to ensure that the majority of grass clippings are picked up, the inside of both the grass basket (16) and especially the air grill must be cleaned after each use. Reattach the grass basket (16) only when the engine is switched off and the blade is stopped. Using one hand, lift up the chute flap (15), while grabbing onto the basket handle with the other. Hang in the basket from the top. Fig. 9
After mowing
- Allow the engine to cool before you put the lawn mower in an enclosed area. Remove grass, foliage, grease and oil before storing the mower. Do not place any objects on top of the mower.
- Check all the screws and nuts once more before you start to use the lawn mower again. Tighten any loose screws.
• Also be sure to empty the grass basket (16). - Pull the spark plug boot to prevent unauthorized use.
- Ensure that you do not park the mower next to any source of danger. Petrol fumes can lead to explosions.
- Only original parts or parts approved by the manufacturer may be used for repairs (see address on the warranty certificate).
- If the lawn mower is not going to be used for an extended period, empty the petrol tank using a petrol suction pump.
- Oil and maintain the machine.
10. Cleaning
⚠ Warning!
Always shut the engine down and remove the spark plug connector before carrying out any cleaning work.
The mower should be thoroughly cleaned after each use. In particular, the underside and the blade retainer.
Attention!
For safety reasons, disconnect the spark plug cable before cleaning.
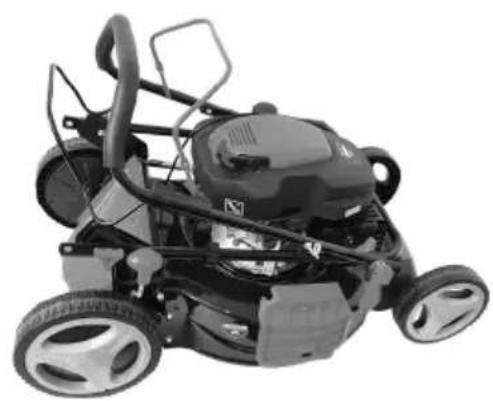
It is best to tilt the mower backwards. The spark plug should point upwards to prevent engine oil from entering the intake tract or leaking out.
Alternatively, you can tilt the device on its side, but you must make sure that the air filter is on the upper side.
Note: Before tilting the lawnmower, empty the fuel tank fully with a fuel scavenge pump.
Do not tilt the lawnmower beyond 90 degrees.
It is easiest to remove the dirt and grass immediately after mowing. Grass residues and dirt that have dried on can impair mowing. Check that the grass ejection channel is clear of grass residues and remove these if necessary. Never clean the mower with a water jet or high pressure cleaner. The motor should remain dry.
Do not use aggressive cleaning products such as cold cleaners or white spirit.
11. Transport
Preparing the mower for transportation (Fig. 22)
• Empty the petrol tank.
• Always let the engine run until it has used up the remainder of petrol in the tank.
• Empty the engine oil from the warm engine.
- Remove the spark plug boot from the spark plug.
- Clean the cooling fins of the cylinder and the housing.
- Remove the start tension cable (17) from the hook. Loosen the quick-release lever (5) and fold the upper push bar down. Make sure the cables are not bent during this process.
- Wedge a few layers of corrugated cardboard between the upper and lower push bars and the engine in order to prevent any chafing.
- In order to prevent damage and injury, secure the tool against tipping over and sliding when transporting it in vehicles.
12. Storage
Store the device and its accessories in a dark, dry and frost-free place that is inaccessible to children. The optimum storage temperature lies between 5 and 30 °C.
Store the device in its original packaging.
Cover the device to protect it from dust or moisture.
Store the operating manual with the device.
- Never store the machine with petrol in the tank inside a building in which fuel vapours may come into contact with naked flames or sparks
- Allow the engine to cool before before storing it.
- In order to reduce the risk of fire, keep the engine, exhaust, battery box and the area surrounding the fuel tank free of grass, straw, moss, leaves or escaping grease.
Preparing the mower for long-term storage
Caution: Do not empty the petrol tank in enclosed areas, near fire or when smoking. Petrol fumes can cause explosions and fire.
• Empty the petrol tank with a petrol suction pump.
- Start the engine and let it run until any remaining petrol has been used up.
- Change the oil at the end of every season. To do so, remove the used engine oil from a warm engine and refill with fresh oil.
- Remove the spark plug from the cylinder head.
- Fill the cylinder with approx. 20ml of oil from an oil can.
- Slowly pull back the starter handle, which will bathe in the cylinder wall with oil.
- Screw the spark plug back in.
- Clean the cooling fins of the cylinder and the housing.
- Be sure to clean the entire machine to protect the paint.
- Store the machine in a well-ventilated place.
Battery Pack and Charger
- When not in use, disconnect charger and store in a cool, dry area. Wet, damp areas can cause corrosion of terminals and electrical contacts. If stored for long periods in high temperatures (120° F / 49° C), permanent damage to the battery pack can result. Check electrical terminals and contacts on battery packs and charger. Wipe with clean cloth or blow clean with compressed air.
- After storage, a normal charge may be required. To check available charge, press the Battery Fuel Gauge button (E, Figure 24) and charge if required. See the Battery Fuel Gauge section.
13. Maintenance
- Regular, careful maintenance is required to guarantee the safety level and performance of the machine.
- Make sure that all nuts, bolts and screws are tightened securely and that the machine is in safe working condition.
- Routinely check the grass basket for signs of wear and impaired functionality.
Regularly clean the grass box with water and let it dry thoroughly. - For your own safety, replace worn or damaged parts without delay.
- If the fuel tank should require emptying this should only be done in the open air using a petrol suction pump (available from DIY shops).
⚠ WARNING
Never work on or touch conducting parts on the ignition unit with the engine running. Always pull the spark plug boot from the spark plug before starting any work of care or maintenance. Never perform any work on the machine while it is running. Any work not described in these Operating Instructions must be performed by an authorized service workshop only.
⚠ Attention!
Always shut the engine down and remove the spark plug connector before carrying out any cleaning work.
Wheel axles and wheel hubs
• These should be lightly greased once a season.
Blade
For safety reasons you should only ever have your blade sharpened, balanced and mounted by an authorized service workshop. For optimum results it is recommended that the blade should be inspected once a year.
Only ever use original spare parts when having the blade replaced. Wear gloves when replacing the blade in order to prevent injury.
Never have any other blade fitted.
• Empty the fuel tank before removing the blade
• To replace the blade, undo the screw.
- Reinstall as illustrated in Fig. 17. Tighten the screw properly. Tightening torque 45Nm . When replacing the blade, the blade screw should also be replaced.
Damaged blades
Should the blade, in spite of all precautions, come into contact with an obstruction, shut down the engine immediately and pull the spark plug boot. Tip the lawn mower onto its side and check the blade for damage. Damaged or bent blades must be replaced. Never attempt to bend a bent blade back to straight again. Never mow the lawn with a bent or heavily worn blade as this will cause vibrations and can lead to further damage to the lawn mower.
⚠️ CAUTION! There is a risk of injury if you work with a damaged blade.
Resharpening the blade
The blades can be resharpened with a metal file. In order to avoid imbalance, the blade should be resharpened by an authorized service workshop
Checking the oil level
⚠️ CAUTION! Never run the engine with no or too little oil. This could cause severe damage to the engine. Use only SAE30 engine oil.
Checking the oil level (Fig. 18):
- Stand the lawn mower on a flat level surface.
- Unscrew the oil dip stick (12) by turning anticlockwise, pull out and wipe. Insert the dip stick back in the filling mount as far as the stop, but do not screw back in.
- Pull out the dip stick (12) again and read off the oil level while holding horizontally. The oil level must be between the maximum and the minimum
Changing the oil (Fig. 23)
- Change the engine oil every year before the start of the season when the engine is warm.
• Use only engine oil (SAE30).
• Empty the fuel tank (with a petrol suction pump) - Place a flat oil drip tray in front of the mower (min. volume 1 litre).
- Remove the dipstick and tip over the mower until the whole oil is run out into the oil drip tray.
- Fill up with engine oil as far as the top mark on the dipstick (approx. 0.47 l).
- Important! Do not screw in the oil dipstick to check the oil level – only insert it as far as the thread.
Dispose of the used oil in accordance with applicable regulations.
The waste oil must be disposed of in accordance with the applicable regulations.
Cleaning the belts (Fig. 17, 19)
- Remove the knife and the gear housing by loosening the screws out.
- Clean the elements of the transmission and the belt once or twice a year with brush or compressed air.
- Screw the transmission housing and the knife on again.
Care and adjustment of the cables
Oil the cables at regular intervals and check that they move easily.
Maintenance of the air filter (Fig. 20)
A soiled air filter will reduce the performance of the engine because it will prevent enough air getting to the carburetor. It is therefore imperative that regular checks are made. The air filter should be checked every 25 hours and cleaned if required. If the air is very dusty the air filter should be checked more regularly. Unclip the air filter cover and remove the sponge filter element. To avoid objects falling into the air intake, replace the air filter cover. (Fig. 20).
Important: Never clean the air filter with petrol or inflammable cleaning agents. Clean the air filter with compressed air or simply by knocking out any soiling.
Maintenance of the spark plug (Fig. 21)
Check the spark plug for dirt and grime after 10 hours of operation and if necessary clean it with a copper wire brush. Thereafter service the spark plug after every 50 hours of operation.
Pull off the spark plug boot with a twist. Remove the spark plug (10) with a spark plug wrench.
Using a feeler gauge, set the gap to 0.75 mm( 0.030").
Refit the spark plug taking care not to overtighten.
Engine brake lever (Fig. 1)
The engine is equipped with a mechanical brake (3) which has to be checked regularly.
When releasing the brake lever, the blade must come to a halt within 7 seconds. If this is not the case, the machine must not be used. Contact an authorised specialist retailer.
Ensure that the machine is in a flawless condition for its entire service life. Improper maintenance may lead to life-threatening injuries.
Repairs
After any repair or maintenance work, check that all safety-related parts are in place and in proper working order. All parts which may cause injury must be kept where they are inaccessible to children or others.
Important: In accordance with product liability legislation we are not liable for any damages caused by improper repairs or the use of spare parts that are not original spare parts or parts approved by us.
In addition, we are also not liable for any damages arising from improper repairs. Such work should be performed by a customer services workshop or authorized specialist. The same applies to accessory parts.
Times of use
Please comply with statutory regulations, which may vary from location to location.
Please provide the following information in the event of any enquiries.
• Type of current for the motor
• Machine data - type plate
- Motor data - type plate
Important note in case of repair:
When returning the generator for repair, for safety reasons, ensure that it is free of oil and petrol when it is sent to the service centre.
Spare parts / accessories
Lawn mower blade - Article no.: 7911200617
Engine oil - Article no.: 7850000025
Battery - Article no.: 7909201708
Charging cable - Article no.: 7909201710
Service information
Please note that the following parts of this product are subject to normal wear and that the following parts are therefore also required for use as consumables.
Wear parts*: spark plug, air filter, petrol filter, knife, belt, battery
* not necessarily included in the scope of delivery!
14. Disposal and recycling
The device is supplied in packaging to avoid transport damages. This packaging is raw material and can thus be used again or can be reintegrated into the raw material cycle. The device and its accessories are made of different materials, such as metals and plastics. Take defective components to special waste disposal sites. Check with your specialist dealer or municipal administration!
Lithium-Ion Battery Pack Disposal
- Battery chemicals are toxic and corrosive.
- Fire or explosion can cause severe burns or death.
- Never burn or incinerate discarded or used battery packs as they may explode. Toxic fumes and materials are created when battery packs are burned.
- Do not use a battery that has been crushed, dropped, or damaged.
• Used and discarded battery packs will likely still carry a small electrical charge and should be handled with care.
• Always dispose of discarded or used battery acks according to federal, state and local regulations.
Old devices must not be disposed of with household waste!
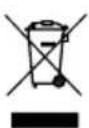
This symbol indicates that this product must not be disposed of together with domestic waste in compliance with the Directive (2012/19/EU) pertaining to waste electrical and electronic equipment (WEEE). This product must be disposed of at a designated collection point. This can occur, for example, by handing it in at an authorised collecting point for the recycling of waste electrical and electronic equipment. Improper handling of waste equipment may have negative consequences for the environment and human health due to potentially hazardous substances that are often contained in electrical and electronic equipment.
By properly disposing of this product, you are also contributing to the effective use of natural resources. You can obtain information on collection points for waste equipment from your municipal administration, public waste disposal authority, an authorised body for the disposal of waste electrical and electronic equipment or your waste disposal company.
Batteries and rechargeable batteries do not belong in the household waste!
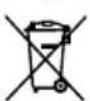
As the consumer you are required by law to bring all batteries and rechargeable batteries, regardless whether they contain harmful substances* or not, to a collection point run by the local authority or to a retailer, so that they can be disposed of in an environmentally friendly manner. Used batteries or accumulators can returned free of charge.
*labelled with: Cd = cadmium, Hg = mercury, Pb = lead Remove the batteries from the device before disposing of the machine and the batteries.
15. Troubleshooting
The following table shows fault symptoms and describes remedial measures in the event of your machine failing to work properly. If you cannot localise and rectify the problem with this, please contact your service workshop.
| Fault Possible cause Remedy | ||
| Loud while running, machine vibrates heavily | Screws are loose Check screws | |
| Blade fasteners are loose Check blade fasteners | ||
| Blade is unbalanced Replace blade | ||
| Engine does not start | Brake lever not pressed Press brake lever | |
| Spark plug is defective Replace spark plug | ||
| Fuel tank is empty Refill with fuel | ||
| Contaminated fuel Empty fuel tank and fill with clean fuel | ||
| Cold environment Push the primer button (if present) | ||
| Engine faulty Contact authorised customer service | ||
| Engine runs unsteadily | Air filter is soiled Clean the air filter | |
| Spark plug is soiled Clean the spark plug | ||
| Uneven mowing results | Blade is blunt Sharpen the blade | |
| Cutting height is too low | Set correct height | |
| Unsatisfactory bagging of the grass | Cutting height is too low | Set correct height |
| Blade is worn Replace the blade | ||
| Basket is clogged Empty the basket | ||
Günzburger Straße 69
D-89335 Ichenhausen
Cher client,
text_image
Exploded view diagram of a mechanical assembly with numbered parts and exploded views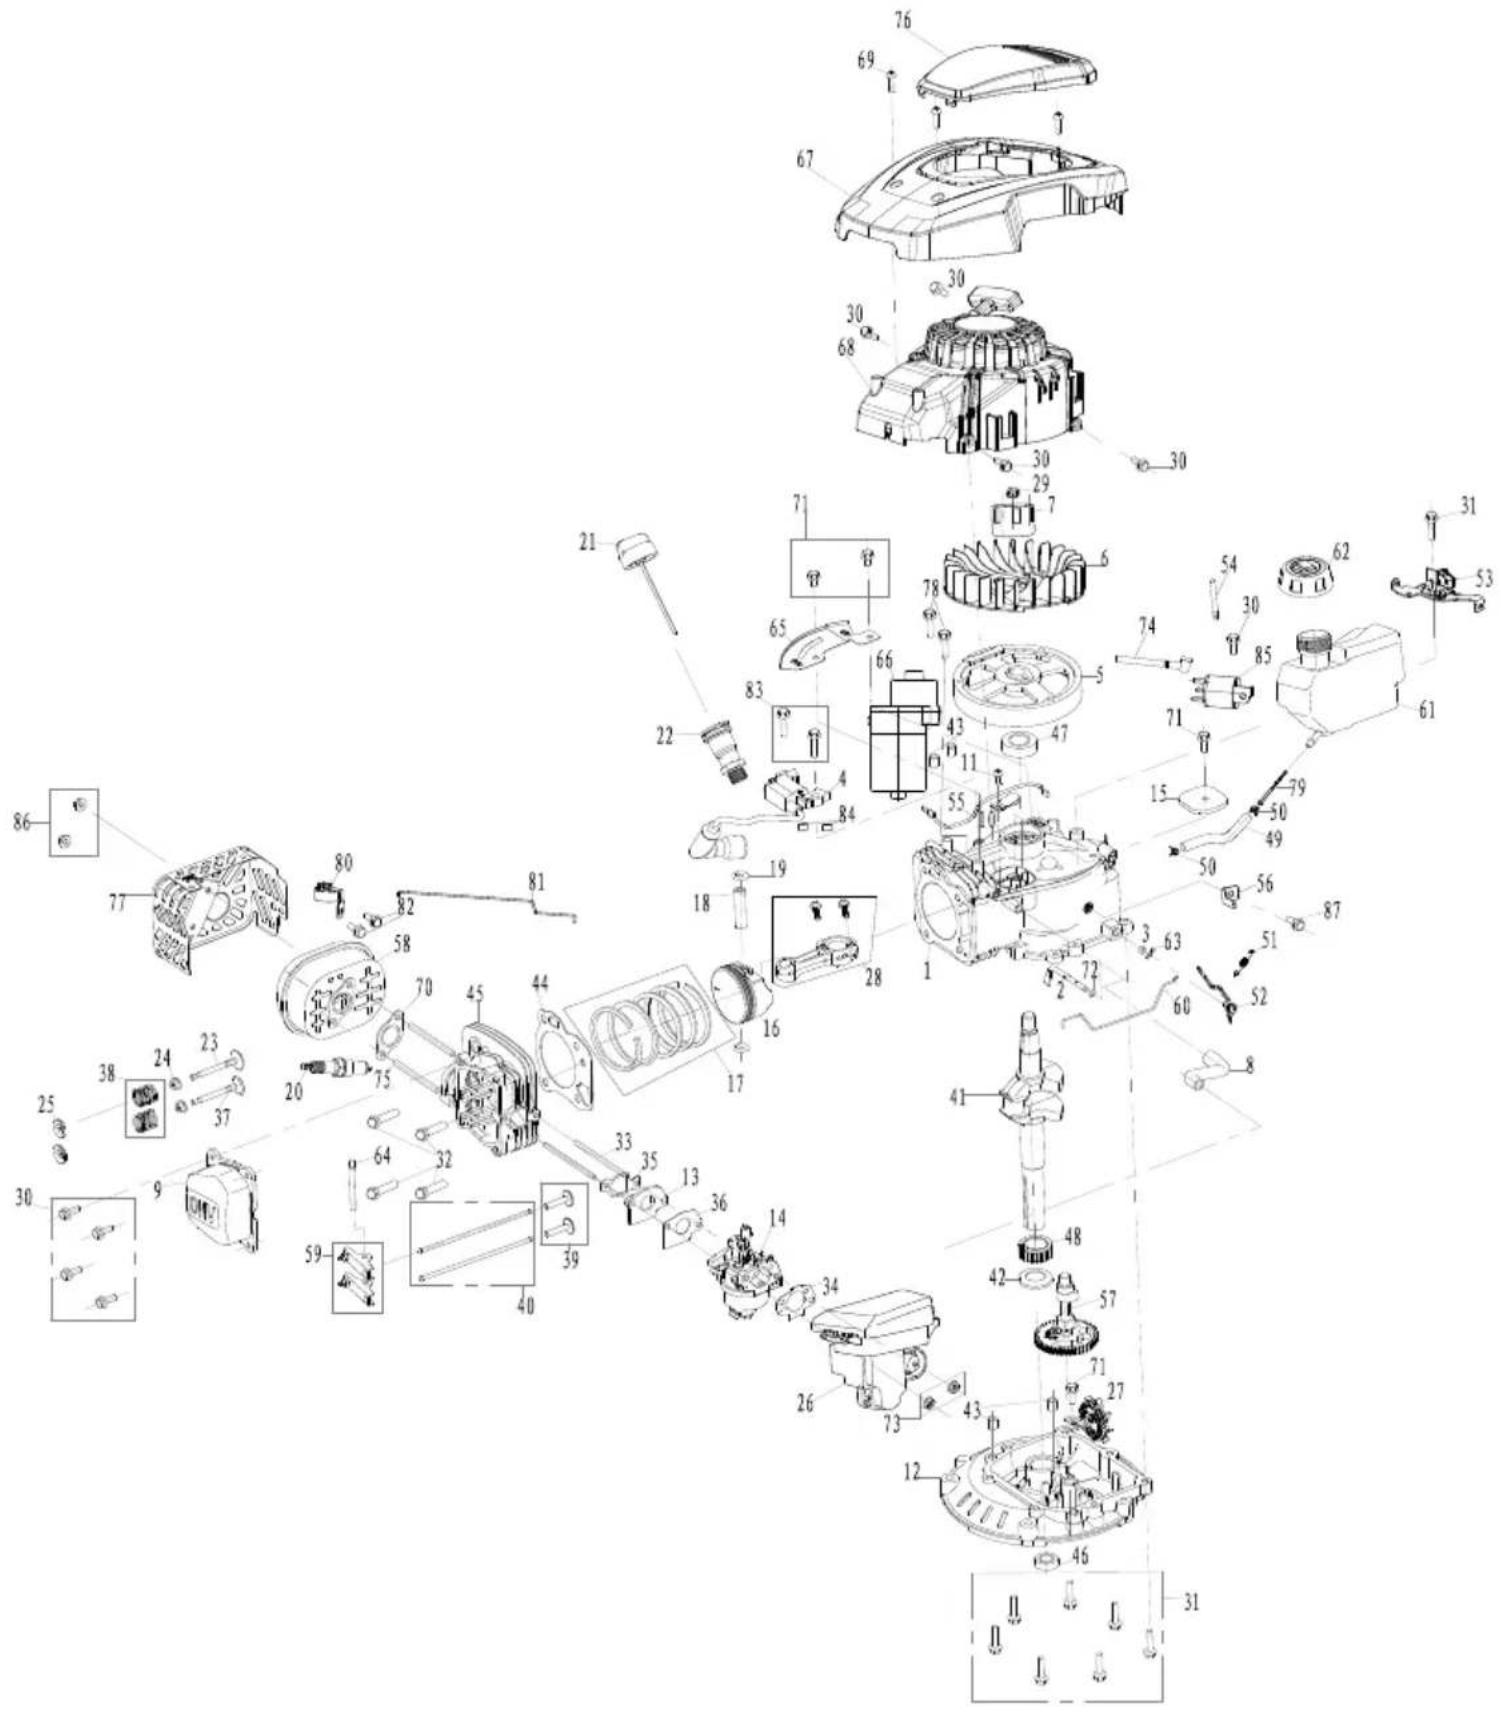
text_image
Exploded view diagram of a mechanical assembly with numbered components for identificationEC Declaration of Conformity
Standard references:
EN ISO 5395-1:2013/A1:2018; EN ISO 5395-2:2013/A2:2017; EN 14982:2009
This declaration of conformity is issued under the sole responsibility of the manufacturer.
The object of the declaration described above fulfils the regulations of the directive 2011/65/EU of the European Parliament and Council from 8th June 2011, on the restriction of the use of certain hazardous substances in electrical and electronic equipment.
Subject to change without notice
Documents registrar: David Rümpelein Günzburger Str. 69, D-89335 Ichenhausen
Garantie DE
Apparent defects must be notified within 8 days from the receipt of the goods. Otherwise, the buyer's rights of claim due to such defects are invalidated. We guarantee for our machines in case of proper treatment for the time of the statutory warranty period from delivery in such a way that we replace any machine part free of charge which provably becomes unusable due to faulty material or defects of fabrication within such period of time. With respect to parts not manufactured by us we only warrant insofar as we are entitled to warranty claims against the upstream suppliers. The costs for the installation of the new parts shall be borne by the buyer. The cancellation of sale or the reduction of purchase price as well as any other claims for damages shall be excluded.