USER MANUAL CMT-12V SCHEPPACH

CMT-12V
| DE | Akku-FeinbohrschleiferOriginalbetriebsanleitung | 4 |
| GB | Cordless rotary toolTranslation of original instruction manual | 23 |
| FR | Outil multifonction sans filTraduction des instructions d'origine | 39 |
Günzburger Straße 69
D-89335 Ichenhausen
Verehrter Kunde,
Homepage: https://www.scheppach.com/de/service
Explanation of the symbols on the product
Symbols are used in this manual to draw your attention to potential hazards. The safety symbols and the accompanying explanations must be fully understood. The warnings themselves will not rectify a hazard and cannot replace proper accident prevention measures.
 | Warning - Read the operating manual to reduce the risk of injury. |
 | Wear hearing protection. Excessive noise can result in a loss of hearing. |
 | Wear a dust protection mask. When machining wood and other materials, harmful dust may be generated. Do not machine material containing asbestos! |
 | Wear safety goggles. Sparks created during work or fragments, chippings and dust ejected by the product can case sight loss. |
 | The product complies with the applicable European directives. |
 | Protect batteries from heat and fire. |
 | Protect batteries from water and moisture. |
 | Protection class II (double insulation) |
 Li-ion Li-ion | Lithium-ion battery. |
| △ Attention! | We have marked points in these operating instructions that impact your safety with this symbol. |
Table of contents: Page:
- Introduction....25
- Product description (Fig. 1-2)....25
- Scope of delivery 25
- Proper use 26
- General safety instructions.... 26
- Residual risks 31
- Technical data.... 31
- Unpacking 32
- Operation 32
- Notes on material processing, insert tools and speed setting.... 34
- Working instructions 34
- Cleaning 35
- Storage 35
- Maintenance 36
- Transport....36
- Repair & ordering spare parts 36
- Disposal and recycling....36
- Troubleshooting 38
- Declaration of conformity 58
1. Introduction
Manufacturer:
Scheppach GmbH
Günzburger Straße 69
D-89335 Ichenhausen
Dear Customer,
We hope your new product brings you much enjoyment and success.
Note:
In accordance with the applicable product liability laws, the manufacturer of this product assumes no liability for damage to the product or caused by the product arising from:
- Improper handling
• Non-compliance with the operating manual
• Repairs carried out by third parties, unauthorised specialists
• Installing and replacing non-original spare parts
• Application other than specified
- Failure of the electrical system in the event of the electrical regulations and VDE provisions 0100, DIN 57113 / VDE0113 not being observed
Note:
Read through the complete text in the operating manual before installing and commissioning the device.
This operating manual should help you to familiarise yourself with your product and to use it for its intended purpose.
The operating manual includes important instructions for the safe, proper and economic operation of the product, for avoiding danger, for minimising repair costs and downtimes and for increasing the reliability and extending the service life of the product.
In addition to the safety instructions in this operating manual, you must also observe the regulations applicable to the operation of the product in your country.
Keep the operating manual package with the power tool at all times and store it in a plastic cover to protect it from dirt and moisture. They must be read and carefully observed by all operating personnel before starting the work.
The product may only be used by personnel who have been trained to use it and who have been instructed with respect to the associated hazards.
The required minimum age must be observed.
In addition to the safety instructions in this operating manual and the separate regulations of your country, the generally recognised technical rules relating to the operation of such products must also be observed.
We accept no liability for accidents or damage that occur due to a failure to observe this manual and the safety instructions.
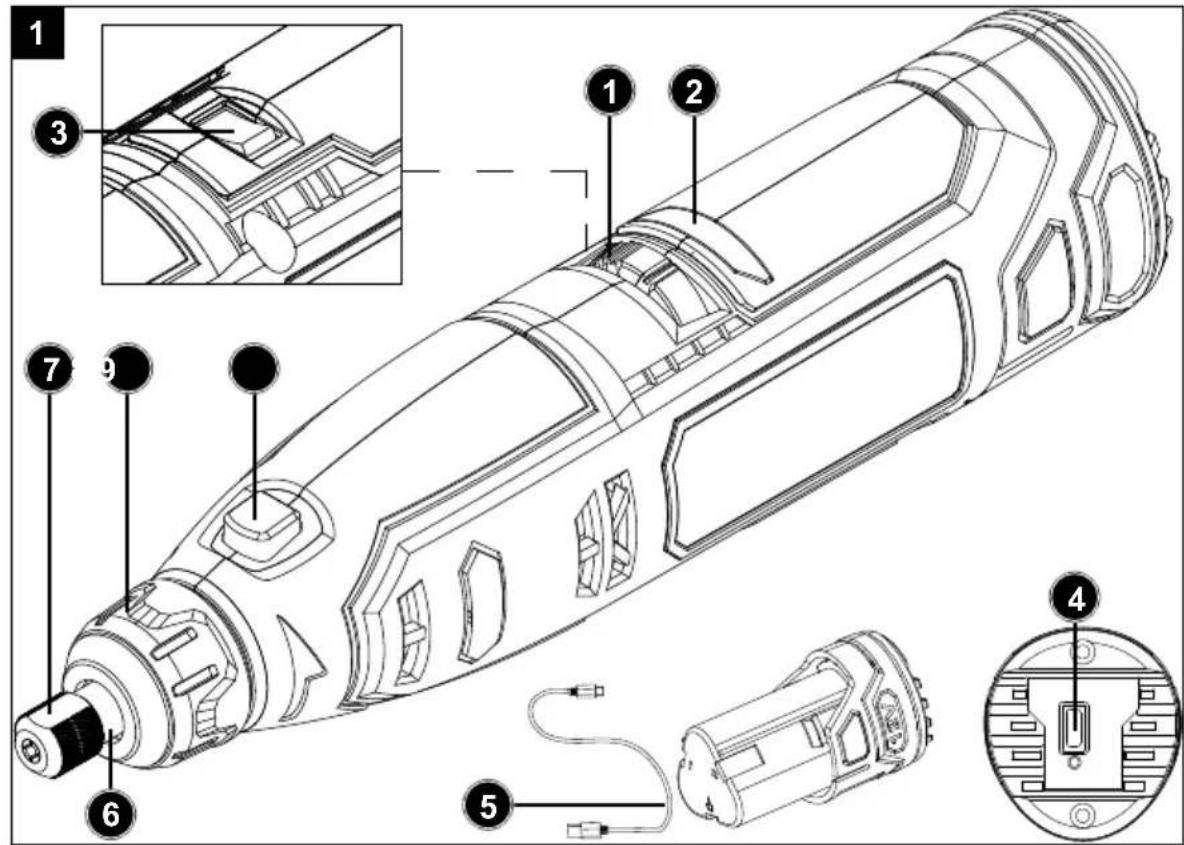
2. Product description (Fig. 1-2)
- Speed control
- Battery-operated LED
- ON/OFF switch
- Charge socket
- USB charging cable
- Thread insert
- Clamping nut
- Union nut
- Spindle locking
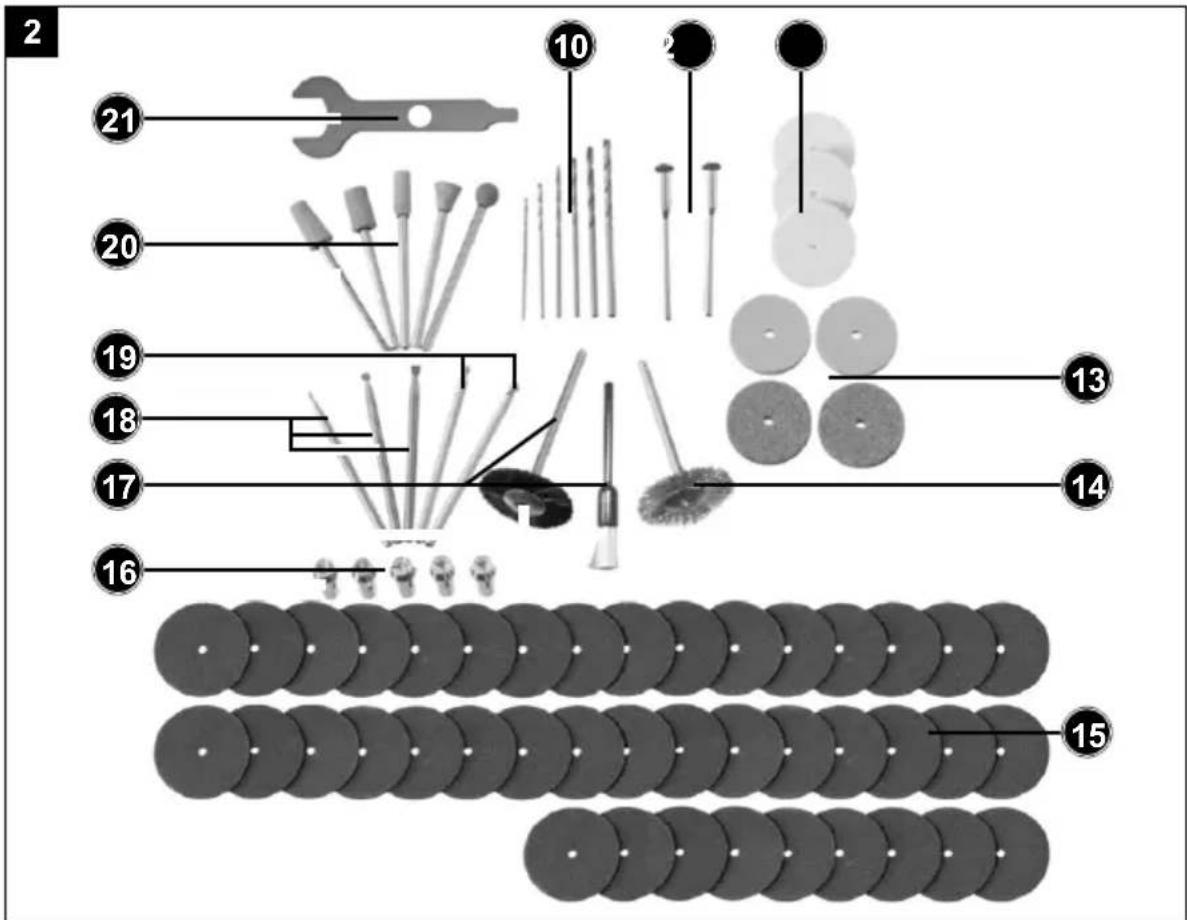
Accessories
- 6 x HSS drill
- 2 x clamping mandrels for tool receiver
- 3 x polishing wheels
- 4 x grinding discs
- 1 x wire brush
- 41 x cutting wheels
- 5 x collets
- 2 x plastic brushes
- 3 x milling cutter bits
- 2 x engraving bits
- 5 x grinding bits
- 1 x combination key
3. Scope of delivery
1 x rechargeable battery-operated multi-function tool
1 x USB charging cable
1 x accessory set (75 parts)
1 x carry case
1 x Operating manual
4. Proper use
The product may only be used in the intended manner. Any use beyond this is improper. The user/operator, not the manufacturer, is responsible for damages or injuries of any type resulting from this.
An element of the intended use is also the observance of the safety instructions, as well as the assembly instructions and operating information in the operating manual.
Persons who operate and maintain the product must be familiar with the manual and must be informed about potential dangers.
In addition, the applicable accident prevention regulations must be strictly observed.
Other general occupational health and safety-related rules and regulations must be observed.
The liability of the manufacturer and resulting damages are excluded in the event of modifications of the product.
The product may only be operated with original parts and original accessories from the manufacturer.
The safety, operating and maintenance specifications of the manufacturer, as well as the dimensions specified in the technical data, must be observed.
Please note that our products were not designed with the intention of use for commercial or industrial purposes. We assume no guarantee if the product is used in commercial or industrial applications, or for equivalent work.
The manufacturer is not liable for damage caused by an improper use or incorrect operation of this device.
- This battery-operated fine boring grinder (hereinafter referred to as "product" or "power tool") is suitable, with the appropriate accessories (as supplied), for:
- Drilling
- Cutting
- Engraving
- Polishing
- Clean
- Sanding
- Cutting materials such as wood, metal, plastic, ceramics or stone
- The product is not intended to be used for applications other than those described here. Examples of non-intended uses:
- Grinding with unsuitable grinding tools
5. General safety instructions
⚠ WARNING - Read all safety information, instructions, illustrations and technical data for this product.
Failure to follow all instructions listed below may result in electric shock, fire and/or serious injury.
Save all warnings and instructions for future reference. The term “power tool” used in the safety instructions refers to mains-powered electrical tools (with a mains cable) and battery-powered electrical tools (without a mains cable).
Electrical safety
1) Power tool plugs must match the outlet. Never modify the plug in any way. Do not use any adapter plugs with earthed (grounded) power tools. Unmodified plugs and matching outlets will reduce risk of electric shock.
2) Avoid body contact with earthed or grounded surfaces, such as pipes, radiators, ranges and refrigerators. There is an increased risk of electric shock if your body is earthed or grounded.
3) Do not expose power tools to rain or wet conditions. Water entering a power tool will increase the risk of electric shock.
4) Do not use the cable for another purpose, for example, carrying or hanging the power tool or pulling the plug out of the socket. Keep the cable away from heat, oil, sharp edges or moving device parts. Damaged or coiled cables increase the risk of an electric shock.
5) If you work with an electric tool outdoors, only use extension cables that are also permitted for outdoor use. Use of a cord suitable for outdoor use reduces the risk of electric shock.
6) If operating a power tool in a damp location is unavoidable, use a residual current device (RCD) protected supply. Use of an RCD reduces the risk of electric shock.
Personal safety
1) Always remain attentive, pay attention to what you are doing and be sensible when working with electric tools. Do not use a power tool while you are tired or under the influence of drugs, alcohol or medication. A moment of carelessness when using electrical tools can result in serious injuries.
2) Wear personal protective equipment and always safety goggles. Protective equipment such as a dust mask, non-skid safety shoes, hard hat or hearing protection used for appropriate conditions will reduce personal injuries.
3) Prevent unintentional starting. Ensure the switch is in the off-position before connecting to power source and/or rechargeable battery, picking up or carrying the tool. Keeping your finger on the switch when carrying the electric tool or having the device already switched on when connecting it to the power supply may result in accidents.
4) Remove any adjusting key or screwdriver before turning the power tool on. A tool or spanner that is located in a rotating device part may result in injuries.
5) Do not overreach. Keep proper footing and balance at all times. This enables better control of the power tool in unexpected situations.
6) Dress properly. Do not wear loose clothing or jewellery. Keep hair, clothing and gloves away from moving parts. Loose clothes, jewellery or long hair can be caught in moving parts.
7) If dust extraction and collection devices can be mounted, make sure that they are connected and used properly. Use of dust collection can reduce dust-related hazards.
8) Do not let familiarity gained from frequent use of tools allow you to become complacent and ignore tool safety principles. A careless action can cause severe injury within a fraction of a second.
1) Do not overload the device. Use the correct power tool for your application. The correct power tool will do the job better and safer at the rate for which it was designed.
2) Do not use the power tool if the switch does not turn it on and off. Any electric tool that cannot be controlled with the switch is dangerous and must be repaired.
3) Remove the plug from the socket and/or remove the battery before setting the device, changing accessories or putting the device away. Such preventive safety measures reduce the risk of starting the power tool accidentally.
4) Store idle power tools out of the reach of children and Do not let people use the electric tool who are not familiar with it or who have not read these instructions. Power tools are dangerous in the hands of untrained users.
5) Maintain power tools. Check whether moving parts function properly and do not get stuck and whether parts are broken or are damaged and thus adversely affect the electric tool function. Have damaged parts repaired before using the device. Many accidents are caused by poorly maintained power tools.
6) Keep cutting tools sharp and clean. Properly maintained cutting tools with sharp cutting edges are less likely to bind and are easier to control.
7) Use the power tool, accessories and tool bits etc. in accordance with these instructions, taking into account the working conditions and the work to be performed. Use of the power tool for operations different from those intended could result in a hazardous situation.
8) Keep handles and grasping surfaces dry, clean and free from oil and grease. Slippery handles and grasping surfaces do not allow for safe handling and control of the tool in unexpected situations.
1) Only charge the batteries in battery chargers recommended by the manufacturer. A battery charger that is suitable for a particular type of battery poses a fire hazard when used with other batteries.
2) Only use the batteries in power tools that are designed for them. The use of other batteries can lead to injuries and a risk of fire.
3) Keep the unused battery away from paper clips, coins, keys, nails, screws or other small metal objects that could cause a short-circuit between the contacts. A short-circuit between the contacts of the battery could result in burns or fires.
4) Liquid may leak from the battery if used incorrectly. Avoid contact with it. In case of accidental contact, rinse with water. If the liquid gets into your eyes, seek additional medical attention. Leaking battery fluid may cause skin irritation or burns.
5) Protect the battery from heat, e.g. also from continuous sunlight, fire, water and moisture. There is a risk of explosion.
Service
1) Have your power tool serviced by a qualified repair person using only identical replacement parts. This will ensure that the safety of the power tool is maintained.
Safety instructions for grinding machines ⚠ WARNING!
Dusts from materials such as paint containing lead, some types of wood and metal can be harmful to health.
⚠ WARNING!
Always wear safety goggles and respiratory protection!
Safety instructions for all applications
Common safety instructions for grinding, sandpaper grinding, working with wire brushes, polishing, milling or cut-off grinding.
1) This electric tool can be used as a grinder, sandpaper grinder, wire brush, polisher, for milling and as a cut-off grinder. Read all safety warnings, instructions, illustrations and specifications provided with this power tool. Failure to follow all instructions listed below may result in electric shock, fire and/or serious injury.
2) Do not use any accessories that have not been specifically provided or recommended by the manufacturer for this power tool. Just because you can attach the accessories to your power tool does not guarantee they are safe to use.
3) The maximum speed of the accessory tool used must be at least as high as the maximum speed specified for the power tool. Accessories which rotate faster than the maximum permissible rate can break and throw pieces into the air.
4) The external diameter and thickness of the accessory tool used must comply with the dimensions of the power tool. Incorrectly dimensioned accessory tools cannot be sufficiently shielded or controlled.
5) Grinding discs, grinding rollers or other accessories must fit exactly on the grinding spindle or collet of your electric tool. Tool attachments that do not fit exactly on your electrical tool's receptacle rotate unevenly, vibrate very strongly and can cause a loss of control.
6) Wheels/discs, grinding cylinders, cutting tools or other accessories mounted on a work arbor must be fully inserted into the collet or clamping chuck. The “protrusion” or the exposed part of the work arbor between the grinding body and the collet or clamping chuck must be minimal. If the work arbor is not sufficiently tensioned or the grinding body is too far forward, the tool attachment can come loose and be ejected at high speed.
7) Never use damaged accessory tools. Before each use, check insert tools such as grinding discs for chipping and cracks, grinding rollers for cracks, wear or heavy wear, wire brushes for loose or broken wires. If the power tool or the accessory tool in use is dropped, check to see if it is damaged or use an undamaged accessory tool. When you have checked and inserted the accessory tool, ensure that you and any other people in the vicinity remain outside of the level of the rotating accessory tool and allow the tool to rotate at maximum speed for one minute. Damaged tool attachments usually break during this test period.
8) Wear personal protective equipment. Depending on application, use face shield, safety goggles or safety glasses. Where appropriate, wear a dust mask, hearing protection, protective gloves or a special apron that will keep small grinding and material particles away from you. The eye protection must be capable of stopping flying debris generated by various operations. Dust or breathing masks must filter the dust generated during use. Prolonged exposure to high intensity noise may cause hearing loss.
9) Ensure that other people remain at a safe distance from your workspace. Anyone who enters the workspace must wear personal protective equipment. Fragments of workpiece or of a broken accessory may fly away and cause injury beyond immediate area of operation.
10) When performing work during which the insert tool can meet with concealed power lines or its own mains cable, only hold the electric tool by the insulated gripping surfaces. Contact with a live wire may make exposed metal parts of the power tool live and could give the operator an electric shock.
11) Always hold the electric tool firmly when starting it. When running up to full speed, the reaction torque of the motor can cause the electric tool to turn.
12) If possible, use clamps to hold the workpiece in place. Never hold a small workpiece in one hand and the electric tool in the other while using it. By clamping small workpieces, you have both hands free for better control of the electric tool. When cutting round workpieces such as wooden dowels, bar stock or pipes, they tend to roll away, causing the tool attachment to jam and be flung towards you.
13) Keep the USB charging cable away from rotating tool attachments. If you lose control of the device, the cable can be severed or caught and your hand or arm pulled into the rotating tool attachment.
14) Never put the power tool down until the accessory tool being used has come to a complete standstill. The rotating accessory tool can come into contact with the surface and cause you to lose control of the power tool.
15) After changing tool attachments or adjustments to the device, tighten the collet nut, clamping chuck or other fasteners securely. Loose fasteners can shift unexpectedly and cause loss of control; unattached rotating components will be thrown out violently.
16) Do not run the power tool while carrying it at your side. Accidental contact of your clothing with the rotating attachment part could lead to an injury.
17) Clean the ventilation slits of your power tool regularly. The engine fan draws dust into the housing and a strong accumulation of metal dust can cause electrical hazards.
18) Never use the power tool in the vicinity of inflammable materials. Sparks can ignite such materials.
Further safety instructions for all applications Kick-back and corresponding safety instructions Kick-back is the sudden reaction resulting from a caught or jammed rotating tool attachment, such as a grinding disc, grinding belt, wire brush, etc. Catching or jamming results in the rotating tool attachment stopping abruptly. As a result, an uncontrolled electric tool is accelerated against the direction of rotation of the tool attachment.
For example, if a grinding disc catches or jams in the workpiece, the edge of the grinding disc that plunges into the workpiece can get caught, causing the grinding disc to break away or kick back. The wheel may either jump toward or away from the operator, depending on direction of the wheel's movement at the point of pinching. Abrasive wheels may also break under these conditions. Kickback is the result of incorrect or deficient use of the electrical tool. It can be prevented by suitable precautionary measures, as described in the following.
1) Hold the power tool firmly in both hands and position your body and arms so they can absorb the force of a kickback. The operator can control the kick-back forces by taking appropriate precautionary measures.
2) Take special care when working near corners, sharp edges, etc. Avoid allowing the accessory tool to bounce back from the workpiece or jam. The rotating tool attachment tends to jam at corners, sharp edges or when it bounces back. This causes a loss of control or kick-back.
3) Do not use a serrated saw blade. Such accessories often cause a kickback or loss of control over the power tool.
4) Always guide the tool attachment into the material in the same direction in which the cutting edge leaves the material (corresponds to the same direction in which the chips are ejected). Guiding the electric tool in the wrong direction causes the cutting edge of the tool attachment to break out of the workpiece, pulling the electric tool in that feed direction.
5) Always clamp the workpiece firmly when using rotary files, cutting wheels, high-speed milling tools or carbide milling tools. Even with slight canting in the groove, these tool attachments get caught and can cause a kick-back. If a cutting wheel gets caught, it usually breaks. If rotary files, high-speed milling tools or carbide milling tools get caught, the tool insert may jump out of the groove and cause loss of control of the electric tool.
Additional safety instructions for grinding and cut-off grinding
Special safety instructions for grinding and cut-off grinding
1) Only use the grinding bodies approved for your electric tool and only for the recommended uses. Example: Never grind on the side surfaces of a cutting wheel. Cutting wheels are designed to remove material with the edge of the disc. Lateral forces on this grinding body can break it.
2) For tapered and straight threaded grinding pencils, use only undamaged work arbors of the correct size and length, without undercutting at the shoulder. Suitable work arbors prevent the possibility of breakage.
3) Avoid blocking the cutting wheel or applying too much pressure. Do not make excessively deep cuts. Overloading the cutting wheel increases its stress and susceptibility to tilting or blocking and therefore the possibility of kick-back or breaking of the grinding wheel.
4) Avoid the area in front of and behind the rotating cutting wheel with your hand. If you move the cutting wheel in the workpiece away from your hand, in the event of a kick-back the power tool with the spinning wheel can be thrown directly towards you.
5) If the cutting wheel jams or you interrupt your work, switch the device off and hold it still in the material until the disc has come to a standstill. Never try to pull the cutting wheel out of the cut while it is still running, otherwise kick-back may occur. Determine and remedy the cause of the jamming.
6) Do not switch the electric tool on again while it is in the workpiece. Allow the cutting wheel to reach its full speed first before carefully continuing the cut. Otherwise the disc can get stuck, jump out of the workpiece or cause kick-back.
7) Support plates or large workpieces to reduce the risk of kick-back caused by a jammed cutting wheel. Large workpieces tend to sag under their own weight. The workpiece must be supported on both sides of the disc, that is both close to the separating cut and at the edge.
8) Apply particular caution with "plunge cuts" in existing walls or other areas that are not visible. The plunging cutting wheel can cause kickback when cutting into gas or water pipes, electrical lines or other objects.
Additional safety instructions for working with wire brushes
Special safety instructions for working with wire brushes
1) Note that the wire brush loses pieces of wire even during normal use. Do not overtax the wires by applying too much contact pressure. Pieces of wire that fly off can easily penetrate thin clothing and/or the skin.
2) Run brushes at working speed for at least 1 minute before use. Make sure that no other person is in front of or in line with the brush during this time. During the running-in period, loose pieces of wire may fly away.
3) Point the rotating wire brush away from you. When working with these brushes, small particles and tiny pieces of wire can fly away at high speed and penetrate the skin.
Vibration and noise reduction
Limit the time of use, use low-vibration and low-noise operating modes and wear personal protective equipment to reduce vibration and noise effects.
The following measures help to reduce vibration and noise-related risks:
- Only use the product in accordance with its intended use and as described in these instructions.
- Ensure that the product is in perfect working order and well maintained.
- Use the correct tool attachments for this product and ensure that they are in perfect working order.
- Securely hold the product by the handles/gripping surfaces.
- Maintain the product according to the instructions and ensure sufficient lubrication (if applicable).
- Plan your workflow so that the use of high vibration products is spread over a longer time frame.
Behaviour in an emergency
Use this operating manual to familiarise yourself with the use of this product. Memorise the safety instructions and be sure to follow them. This helps to avoid risks and hazards.
• Always be alert when using this product so that you can detect hazards early and take action. Rapid intervention can prevent serious injuries and material damage.
- Switch off the product immediately in the event of malfunction. Have the product checked and, if necessary, repaired by a qualified specialist before putting it back into operation.
6. Residual risks
Residual risks
Even if you operate this product as instructed, there is still a potential risk of personal injury and material damage. The following hazards, among others, may occur in connection with the construction and design of this product:
- Damage to health resulting from vibration emissions if the product is used over an extended period of time or if it is not properly operated and maintained.
- Personal injury and material damage caused by defective cutting tools or sudden impact of a concealed object during use.
- Danger of injury and material damage caused by flying objects.
ATTENTION!
This product generates an electromagnetic field during operation! This field can impair active or passive medical implants under certain circumstances! In order to prevent the danger of serious or deadly injuries, we recommend that persons with medical implants consult with their physician and the manufacturer of the medical implant prior to operating the product!
Safety instructions for battery chargers (not supplied)
This device can be used by children from 8 years of age as well as by persons with reduced physical, sensory or mental capabilities or with a lack of experience or knowledge, if they are supervised or if they have been trained in the safe use of the device and understand the resultant hazards. Children may not play with the device.
Cleaning and user maintenance must not be carried out by children unsupervised.
- Only use the product with the battery charger provided.
- The battery charger (not supplied) is only suitable for indoor operation.
- If the connection cable for this battery charger (not supplied) is damaged then it must be replaced by the manufacturer or their customer services personnel or by a similarly qualified person, in order to avoid hazards.
- Protect electrical parts from moisture. Never immerse them in water or other liquids to avoid an electric shock. Never hold the device under running water. Follow the instructions for cleaning, maintenance and repair.
The product has been built according to state-of-the-art and the recognised technical safety rules. However, individual residual risks can arise during operation.
• Health hazard due to electrical power, with the use of improper electrical connection cables.
• Furthermore, despite all precautions having been met, some non-obvious residual risks may still remain.
- Residual risks can be minimised if the "Safety Instructions" and the "Intended Use" together with the operating manual as a whole are observed.
- Avoid accidental starting of the product: the operating button may not be pressed when inserting the plug in a socket. Use the tool attachment that is recommended in this operating manual. This is how to ensure that your product provides optimum performance.
- Keep your hands away from the working area when the product is in operation.
7. Technical data
Rated voltage: 12 V (direct current)
Rated speed: 5000 - 25000 rpm
Max. disc ∅ 25 mm
Chuck clamping range: max. ∅ 3.2 mm
Capacity: 1300 mAh
Battery (integrated): Lithium-ion
Cells: 3
Subject to technical changes!
Input voltage: 100 - 240 V\~
| Average operating efficiency: | 50 / 60Hz |
| Output voltage: 5.0 V (direct current) |
| Output current: | 1.5 A |
| Output power: | 8.5 W |
| Average operating efficiency: | 78.2 % |
| Power consumption at zero load: | 0.07 W |
| Input current: | 0.3 A |
| Protection class: | II (double insulation) |
| Connection type: | USB (C Type) |
* The voltage converter built into the battery converts the output voltage of the charger into the required rated voltage of the battery.
Noise and vibration
⚠ Warning: Noise can have serious effects on your health. If the machine noise exceeds 85 dB, please wear suitable hearing protection.
Noise data
| Sound power level L_WA | 71.4 dB |
| Sound pressure level L_pA | 60.4 dB |
| Uncertainty K_wa/pA | 3 dB |
Vibration parameters
Vibration value per EN 60745-2-23
| Vibration a_h | 1.289 m/s ^2 |
| Uncertainty K_h | 1.5 m/s ^2 |
NOTE!
The total vibration emission values specified and the device emissions values specified have been measured in accordance with a standardised test procedure and can be used for comparison of one power tool with another.
The total vibration emission values specified and the device emissions values specified can also be used for an initial estimation of the load.
⚠ WARNING!
The vibration and noise emission values can vary from the specified values during the actual use of the power tool, depending on the type and the manner in which the power tool is used, and in particular the type of workpiece being processed.
Try to keep the stress as low as possible. Some examples of means for reducing the vibration stress are wearing gloves while using the tool and limiting work time. In doing so, all parts of the operating cycle must be taken into account (such as times in which the power tool is switched off or times in which it is switched on, but is not running under a load).
8. Unpacking
- Open the packaging and carefully remove the product.
- Remove the packaging material, as well as the packaging and transport safety devices (if present).
- Check whether the scope of delivery is complete.
- Check the product and accessory parts for transport damage. In the event of complaints the carrier must be informed immediately. Later claims will not be recognised.
- If possible, keep the packaging until the expiry of the warranty period.
- Familiarise yourself with the product by means of the operating manual before using for the first time.
- With accessories as well as wearing parts and replacement parts use only original parts. Spare parts can be obtained from your specialist dealer.
- When ordering please provide our article number as well as type and year of manufacture for the product.
⚠ WARNING!
The product and the packaging material are not children's toys! Do not let children play with plastic bags, films or small parts! There is a danger of choking or suffocating!
9. Operation
Warning!
Always remove the battery before carrying out adjustments on the product.
NOTE!
A new battery or one that has not been used for a long time must be charged before it is used for the first time/ again.
- The integrated battery is partially charged on delivery. Li-ion rechargeable batteries can be charged at any time without affecting their service life. Interrupting the charging process will not damage the battery.
- This product has a built-in battery which cannot be replaced by the user. The rechargeable battery may only be removed or replaced by the manufacturer or its after-sales service or a similarly qualified person in order to avoid hazards. When disposing of this product, please note that it contains a battery.
Starting the charging process
- Connect the USB-C connector on the USB charging cable (5) to the charging socket (4).
- Connect the USB-A connector on the USB charging cable (5) to the battery charger.
- Connect the battery charger to a power socket.
- The battery LED (2) lights up red during charging.
- The battery is charged when the battery LED (2) is no longer illuminated.
Ending the charging process
- Disconnect the USB charging cable (5) from the product.
- Pull the battery charger out of the socket.
Read off the battery level
The battery LED (2) indicates the battery charge level when the product is switched on:
| Battery-operated LED (2) | Charge level |
| red / orange / green | Maximum charge level |
| red / orange Medium charge level | |
| red Low charge level | |
Inserting or alternating tool attachment and collet (Pos. 10-20).
⚠ WARNING!
Switch off the product and allow the product to cool down before cleaning the product or replacing accessories.
⚠️ CAUTION! RISK OF INJURY!
- Keep your hands away from the tool attachment when the product is in operation.
- After switching off the product, the tool attachment continues to move for some time. Do not touch or slow down the moving tool attachment.
- Only use manufacturer's recommended tool attachments. The use of other insertion tools and other accessories can entail a danger of injury.
- Only use tool attachments that bear information about the manufacturer, type of binding, dimensions and permitted number of revolutions.
- Only use tool attachments whose printed speed is at least as high as the speed specified on the product type plate.
- Do not use broken, cracked or otherwise damaged tool attachments.
-
Only use tools that are in perfect condition.
-
Make sure that the dimensions of the tool attachment fit the product.
- Do not re-drill a mounting hole on a tool attachment that is too small.
- Do not use separate reducing bushes or adapters to make large hole washers fit.
-
Support plates or workpieces to reduce the risk of kick-back caused by a jammed disc/wheel.
-
Press and hold the spindle lock (9).
- Turn the clamping nut (7) until the spindle lock (9) engages.
- Loosen the tension nut (7) from the thread with the combination spanner (21).
- If necessary, remove an inserted tool attachment or collet (16).
- Push the intended insert tool through the clamping nut (7).
- Insert the shaft of the tool attachment into the matching collet (16).
- Press and hold the spindle lock (9).
- Insert the collet (16) into the threaded insert (6). Tighten the tension nut (7) on the thread with the combination spanner (21).
Switching on and off/ setting the speed range ⚠️ CAUTION! RISK OF INJURY!
Always wear protective gloves when handling or working with the product.
- Keep your hands away from the tool attachment when the product is in operation.
- After switching off the product, the tool attachment continues to move for some time. Do not touch or slow down the moving tool attachment.
- Do not machine material containing asbestos. Asbestos is considered carcinogenic.
Switching on / setting the speed range
- Switch the on/off switch (3) to "I".
- Set the speed control (1) to a position between 1 and MAX.
Switching off
- Switch the on/off switch (3) to 0.
Usage Speed setting
- Plastics
• Materials with a low melting point 1 - 3 (low)
- Cleaning operations
- Polishing
• Buffing work 4 - 5 (middle)
- Rock
- Ceramics
- Softwood
- Hardwood 6 (high)
- Iron
- Steal Max
- Aluminium
- Copper
- Zinc
- Zinc alloys
Determine the suitable speed range by tests on test pieces
These details are non-binding recommendations. During practical work, also test for yourself which tool attachments and which settings are optimally suited for the material to be machined.
11. Working instructions
NOTE!
Observe the information on the correct protrusion (see "Selecting a suitable tool attachment").
The maximum diameter of compound grinding bodies, grinding cones and grinding pencils is 55 mm and must not be exceeded.
The maximum diameter for sandpaper grinding accessories is 80 mm and must not be exceeded.
The maximum permitted length of a mandrel is 33 mm.
Sanding
⚠ WARNING!
Never use a cutting wheel for grinding!
- Hold the product at an angle of 10 to 15^ for easy handling and a good grinding result.
- For maximum grinding efficiency: Hold the grinding disc with a light, even pressure on the work surface. It should never be necessary to operate the product with increased force. The weight of the product creates enough pressure.
- Too much pressure overloads the motor, slows down the grinding process, exerts dangerous pressure on the grinding disc and causes damage.
- Move the product back and forth evenly.
Wire brushes
⚠ Warning!
Do not use a brush that is damaged or imbalanced. Using a damaged brush can increase the likelihood of injury from contact with broken brush wires.
- Avoid applying too much pressure as this will overbend the wires and cause premature damage.
• Work at a moderate feed rate according to the material to be machined.
- Avoid bouncing and breaking the wire brush, especially when working on corners, sharp edges, etc. This can lead to loss of control and kick-back.
Cut-off grinding
⚠ WARNING!
Never use roughing wheels for cutting!
- Only tested, fibre-reinforced cutting or grinding discs may be used.
• Always work at a low feed rate. Only apply moderate pressure to the workpiece.
• Always work in counter-rotation so that the product is not pressed out of the cut in an uncontrolled manner.
Selecting a suitable tool attachment
| Function Accessories use | Protrusion (min-max) |
| Drilling HSS drill Machining wood | 18-25 mmUse of the smallest drill bit: 10 mm protrusion |
| Cutting Milling cutter bits | A variety of tasks, e.g.: Creating protrusions, hollows, shapes, grooves or slots | 18-25 mm |
Engraving Engraving bits Making markings Handicrafts 18-25 mm
| Rust removal | Wire brush Rust removal 9-15 mm |
| Polishing Polishing wheels | Machining various metals, especially precious metals such as gold or silver | 12-18 mm |
| Clean | Plastic brushes | Example:Cleaning plastic housings that are difficult to access | 9-15 mm |
| Sanding | Grinding disc Grinding bits | Grinding work on stone or wood Fine work on hard materials, such as ceramics or alloy steel | 12-18 mm10 mm |
| Cutting off | Cutting wheel | Machining metal, plastics and wood | 12-18 mm |
12. Cleaning
⚠ Warning!
Switch off the product and allow the product to cool down before carrying out inspection, maintenance or cleaning work!
Have the product repaired by the service centre or a qualified electrician and only with original spare parts. This ensures that safety of the product is maintained.
Make sure that no liquids can penetrate the interior of the product.
Always keep the product clean, dry and free from oil or grease. Remove dust after each use and before storage. Regular proper cleaning helps to ensure safe use and prolongs the service life of the product.
Clean the product with a dry cloth. Use a soft turnout brush for hard-to-reach areas.
In particular, remove dirt and dust from the vents with a cloth and a soft brush.
Ventilation openings must always be free.
Perform a complete recharge of the rechargeable battery at the beginning and at the end of a longer period of non-use.
If a lithium-ion battery is to be stored for a longer period of time, the charge level must be checked regularly. The optimal state of charge is between 50 and 80% . The optimal storage climate is cool and dry.
NOTE!
Do not use chemical, alkaline, abrasive or other aggressive cleaning agents or disinfectants to clean the product, as these may damage the surfaces.
Spare parts not listed (such as the battery charger) can be ordered via our call centres.
13. Storage
Store the product and its accessories in a dark, dry and frost-free place that is inaccessible to children.
The optimum storage temperature lies between 5 and 30 °C.
Store the product in its carry case. Store the operating manual with the product.
14. Maintenance
The product has no internal parts that require maintenance.
Before and after each use: Check the product and its accessories (e.g. tool attachments) for wear and damage. Replace the accessories if necessary. Observe the technical requirements (see "Technical data").
15. Transport
- This product contains a rechargeable Li-ion battery and is therefore subject to the legal regulations on hazardous substances. The product with integrated battery can be transported by road and sea without any special requirements.
- Packaging and marking are subject to special requirements in the case of transport by third-party providers (e.g. airline, courier, freight forwarder). A dangerous goods expert must be consulted when transporting through third parties.
- Transport the product in its carry case.
- Protect the product from shocks and strong vibrations that occur especially during transport in vehicles.
16. Repair & ordering spare parts
After repairs or maintenance, make sure that all safety-related parts are installed and are in perfect condition. All parts which may cause injury must be kept where they are inaccessible to children or others.
Attention: According to the German Product Liability Act, no liability is accepted for damage caused by improper repairs or by not using original spare parts.
Such work should be performed by a customer service centre or an authorised specialist. The same applies to accessory parts.
Spare parts and accessories can be obtained from our Service Centre. To do this, scan the QR code on the front page.
Connections and repairs
Connections and repair work on the electrical equipment may only be carried out by electricians.
Please provide the following information in the event of any queries:
• Type of current for the motor
• Machine data - type plate
• Engine data - type plate
16.1 Ordering spare parts
Please provide the following information when ordering spare parts:
- Model designation
- Item number
- Type plate data
With this product, it is necessary to note that the following parts are subject to natural or usage-related wear, or that the following parts are required as consumables.
Wearing parts*: HSS drills, mandrels for tool holding, polishing wheels, grinding wheels, wire brush, cut-off wheels, collets, plastic brushes, milling bits, engraving bits, grinding bits, combination spanners
* may not be included in the scope of delivery!
17. Disposal and recycling
Notes for packaging

The packaging materials are recyclable. Please dispose of packaging in an environmentally friendly manner.
Notes on the electrical and electronic equipment act [ElektroG]
Electrical and electronic appliances do not belong in household waste, but should be collected and disposed of separately.
• Used batteries or rechargeable batteries that are not installed permanently in the old appliance must be removed non-destructively before disposal. Their disposal is regulated by the battery act.
- Owners or users of electrical and electronic devices are legally obliged to return them after use.
- The end user is responsible for deleting their personal data from the old device being disposed of!
- The symbol of the crossed-out dustbin means that waste electrical and electronic equipment must not be disposed of with household waste.
- Waste electrical and electronic equipment can be handed in free of charge at the following places: - Public disposal or collection points (e.g. municipal works yards).
- Points of sale of electrical appliances (stationary and online), provided that dealers are obliged to take them back or offer to do so voluntarily.
- Up to three waste electrical devices per type of device, with an edge length of no more than 25 centimetres, can be returned free of charge to the manufacturer without prior purchase of a new device from the manufacturer or taken to another authorised collection point in your vicinity.
- For additional take-back conditions of the manufacturers and distributors, please contact the respective customer service.
- In the case of delivery of a new electrical device by the manufacturer to a private household, the latter may arrange for the free collection of the old electrical device upon request from the end-user. Get in contact with the manufacturer's customer service.
• These statements only apply to devices installed and sold in the countries of the European Union and which are subject to the European Directive 2012/19/EU. Different provisions may apply to the disposal of electrical and electronic appliances in countries outside the European Union.
![SCHEPPACH CMT-12V - Information on the battery act [BattG] - 1](/content/2026/04/738671/images/442e7fb4be63056945a74e9b6d1d9491e98c0099a01190393a8c2d470961b06a.jpg)
Used batteries and rechargeable batteries do not belong in household waste, but should be collected and disposed of separately.
- For safe removal of batteries or rechargeable batteries from the electrical device and for information on their type or chemical system, please refer to the additional information in the operating or assembly instructions.
- Owners or users of batteries and rechargeable batteries are legally obliged to return them after use. The return is limited to household quantities.
- Used batteries may contain pollutants or heavy metals that can harm the environment or human health. Recycling used batteries and using the resources they contain helps to protect these two important issues.
- The symbol of the crossed-out dustbin means that batteries and rechargeable batteries must not be disposed of with household waste.
- If the signs Hg, Cd or Pb are also located below the dustbin symbol, this stands for the following:
- Hg: Battery contains more than 0.0005% mercury
- Cd: Battery contains more than 0.002% cadmium
- Pb: Battery contains more than 0.004% lead
- Rechargeable batteries and batteries can be returned free of charge to the following places:
- Public disposal or collection points (e.g. municipal works yards)
- Sales points for batteries and rechargeable batteries
- Take-back points of the common take-back system for old device batteries
- Take-back point of the manufacturer (if not a member of the common take-back system)
• These statements are only valid for rechargeable batteries and batteries sold in the countries of the European Union and subject to the European Directive 2006/66/EC. Different provisions can apply to the disposal of rechargeable batteries and batteries in countries outside the European Union.
Removing the battery before disposing of the device
- The integrated battery must be removed and disposed of separately in an environmentally friendly manner before disposing of the device.
- Mask off the contacts and package the battery such that it cannot move in the packaging. Please also observe any further national regulations.
Contact your local refuse disposal authority for more details of how to dispose of your worn-out electrical devices.
18. Troubleshooting
The following table shows fault symptoms and describes remedial measures in the event of your product failing to work properly. If you cannot localise and rectify the problem with this, please contact your service workshop.
| Fault Possible cause Remedy |
| The product cannot be started. | The battery power is too weak. Charge the battery. | |
| The battery is not properly inserted. | Push the battery into the battery holder as far as it will go until you hear it click into place. |
| The product does not reach full speed. | The battery is not sufficiently charged. | Charge the battery. |
| The accessories wobble or remain stationary. | The clamping nut is loose. Tighten the clamping nuts more. | |
Günzburger Straße 69
D-89335 Ichenhausen
Cher client,
| X 2006/42/EG |
| Annex IV
Notified Body:
Notified Body No.:
Certificate No.: |
Standard references:
EN 60745-1:2009/A11:2010; EN 60745-2-23:2013;
EN IEC 55014-1:2021; EN IEC 55014-2:2021
This declaration of conformity is issued under the sole responsibility of the manufacturer.
The object of the declaration described above fulfils the regulations of the directive 2011/65/EU of the European Parliament and Council from 8th June 2011, on the restriction of the use of certain hazardous substances in electrical and electronic equipment.
Subject to change without notice
Documents registrar: Georg Kohler
Günzburger Str. 69, D-89335 Ichenhausen
Garantie DE
Apparent defects must be notified within 8 days from the receipt of the goods. Otherwise, the buyer's rights of claim due to such defects are invalidated. We guarantee for our machines in case of proper treatment for the time of the statutory warranty period from delivery in such a way that we replace any machine part free of charge which provably becomes unusable due to faulty material or defects of fabrication within such period of time. With respect to parts not manufactured by us we only warrant insofar as we are entitled to warranty claims against the upstream suppliers. The costs for the installation of the new parts shall be borne by the buyer. The cancellation of sale or the reduction of purchase price as well as any other claims for damages shall be excluded.
Garantie FR