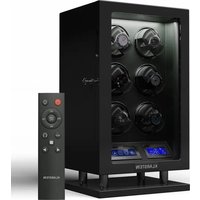
Verdon 4 - Watch accessory Klarstein - Free user manual and instructions
Find the device manual for free Verdon 4 Klarstein in PDF.

User questions about Verdon 4 Klarstein
0 question about this device. Answer the ones you know or ask your own.
Ask a new question about this device
Download the instructions for your Watch accessory in PDF format for free! Find your manual Verdon 4 - Klarstein and take your electronic device back in hand. On this page are published all the documents necessary for the use of your device. Verdon 4 by Klarstein.
USER MANUAL Verdon 4 Klarstein
text_image
QR code image containing encoded data, no visible human-readable textINHALTSVERZEICHNIS
natural_image
Symbol of a trash bin crossed with a diagonal line, no text or labels presentBerlin Brands Group UK Limited
PO Box 42
272 Kensington High Street
London, W8 6ND
United Kingdom
Dear customer,
Congratulations on your purchase. Please read the following instructions carefully and follow them to prevent potential damage. We accept no liability for damage caused by disregarding the instructions and improper use. Please scan the QR code to access the latest operating instructions and further information about the product.

text_image
QR code image containing encoded data, no visible human-readable textCONTENTS
Safety Instructions 16
Switches and connections 16
LED lighting 16
Fixing the watch in place 17
Display and control panel 18
Remote control 19
Programs 20
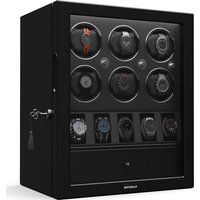
Fingerprint lock (10045663 & 10045665) 21
Disposal Considerations 23
Manufacturer & importer (UK) 23
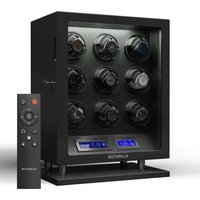
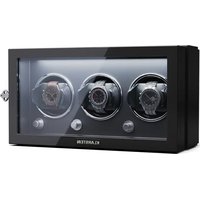
TECHNICAL DATA
| Article number | 10045663, 10045664, 10045665 | 10045661, 10045662 |
| Power supply (power adapter) | 100-240 V ~ 50/60 Hz5 V / 3 A | 100-240 V ~ 50/60 Hz5 V / 2 A |
| Maximum watch diameter | 66 mm | |
| Maximum circumference (strap) | 65 mm | |
SAFETY INSTRUCTIONS
- Children from the age of 8 years and mentally, sensory and physically impaired persons may only use the device if they have been informed in detail about the functions and safety precautions by a supervisor responsible for them beforehand and understand the associated risks.
- Only use the supplied power adapter.
- Do not rotate the watch winder manually as this could damage the watch winder.
- To avoid damaging the box, do not place the watch winder in direct sunlight and do not expose it to water, moisture or extreme temperatures.
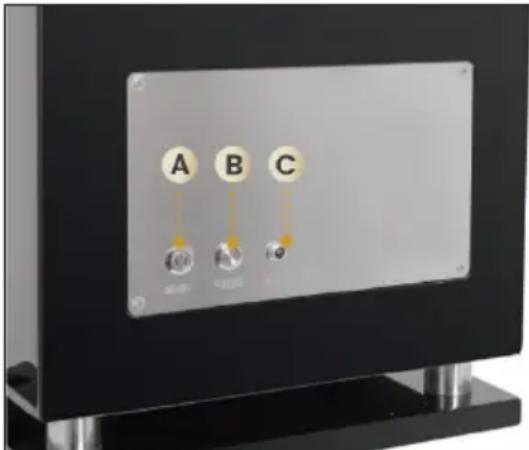
SWITCHES AND CONNECTIONS
text_image
A B C 请勿 请勿Switches and connections are located on the back of the device.
(A) On / off button
(B) Pause button
(C) Power supply
- When you press the pause button and open the front cover, all watch mounts will automatically align to 45 degrees after rotation.
- If you press the pause button again and open the front cover, all watch holders will continue to work.
LED LIGHTING
The watch winder is equipped with white LED lighting, which allows the owner to check the status of the watch better and more conveniently. The LED lighting can be switched on and off via the control panel or the remote control.
FIXING THE WATCH IN PLACE
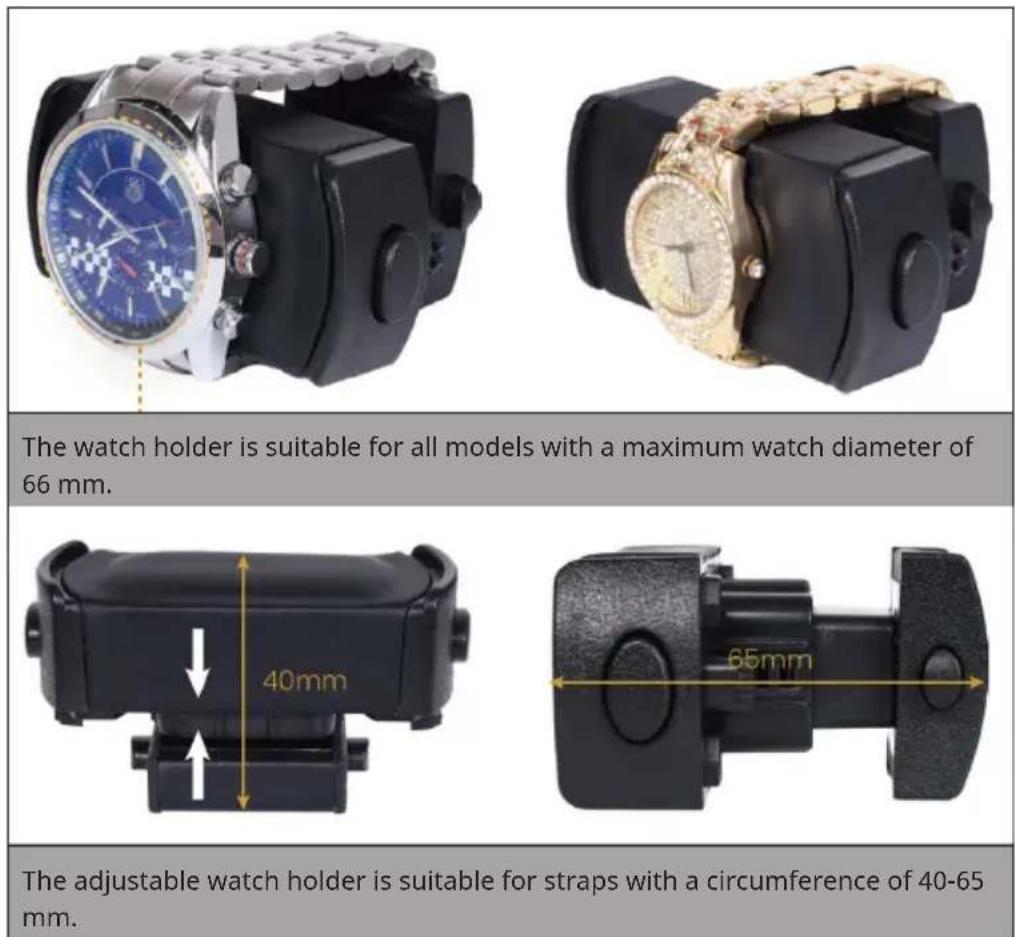
The watch holder is suitable for all models with a maximum watch diameter of 66 mm.
The adjustable watch holder is suitable for straps with a circumference of 40-65 mm.
How to fix the watch in place
| 1 Take the watch holder out of the device by pressing the two buttons on the side. |
| 2 Close the strap of your watch. |
| 3 Pinch the watch mount and slide your watch over the mount. |
| 4 Slide the watch holder into the device until you hear a click. |
DISPLAY AND CONTROL PANEL

text_image
Display 8 M 1950 TRD Control panel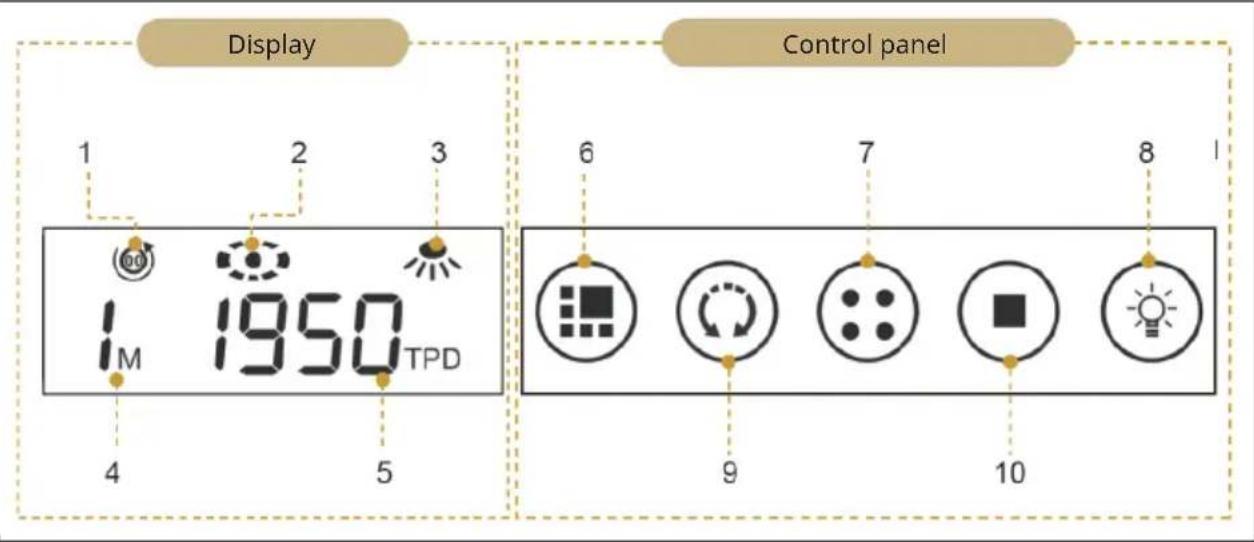
text_image
Display Control panel 1 2 3 1M 1950 TPD 4 5 6 7 8 9 10| 1 Direction of rotation 6 Program selection | ||
| 2 Rotate/stop 7 Watch selection | ||
| 3 LED light 8 LED light on/off | ||
| 4 Selected watch 9 Direction selection | ||
| 5 Revolutions per day 10 Rotate/stop |
Note: The blue backlight makes it easier for the user to read the display. It is activated when the device is switched on, the lid is opened or a program is changed. To save power, the backlight turns off automatically after 10 seconds.
REMOTE CONTROL
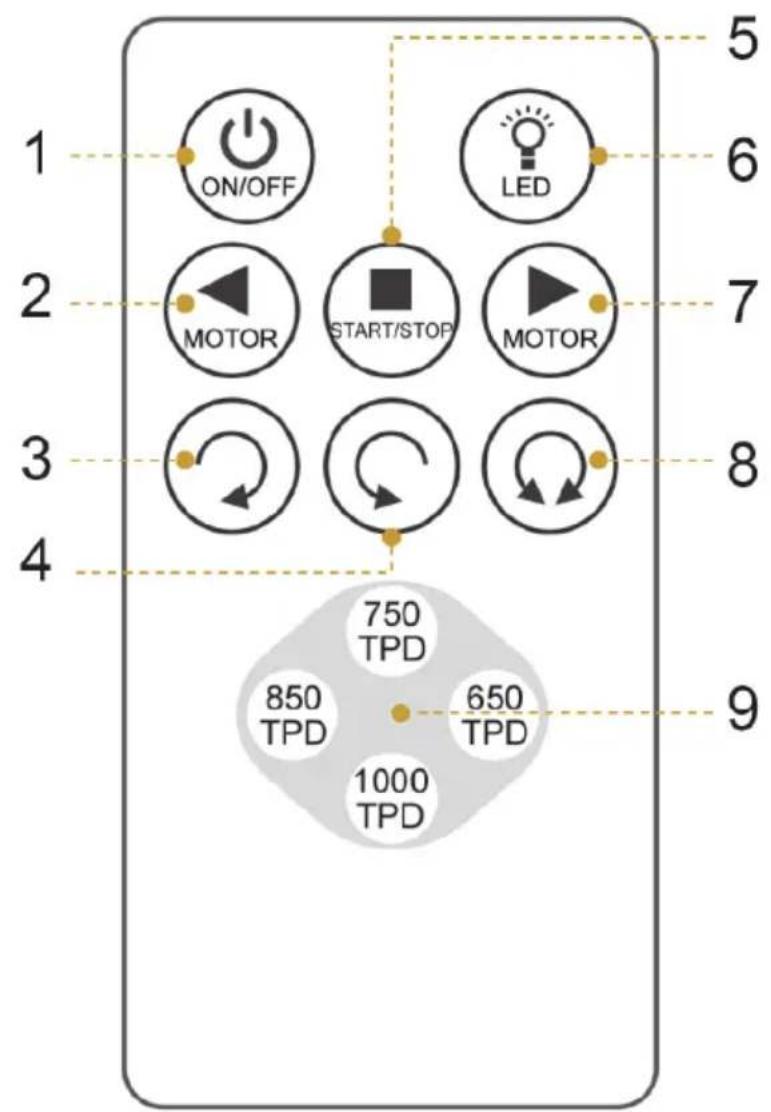
text_image
ON/OFF LED MOTOR START/STOP MOTOR 750 TPD 850 TPD 650 TPD 1000 TPD 9| 1 Device on/off 6 LED light on/off | ||
| 2 Watch selection (left) 7 Watch selection (right) | ||
| 3 Clockwise | 8 Clockwise and anti-clockwise | |
| 4 Anti-clockwise | ||
| 5 Rotate/stop 9 Revolutions per day | ||
PROGRAMS
| TPD Runs O | Operating time | (seconds) | Stop time (seconds) | Duration of a run (seconds) |
| 650 10 60 57 | 1 631 | |||
| 750 10 60 48 | 7 547 | |||
| 850 10 60 42 | 3 483 | |||
| 1000 10 60 35 | 0 410 | |||
| 1950 10 60 15 | 0 210 | |||
| Standard operating mode:24 hours, total 12 hoursOperation and a total of 12 hours break | ||||
There is no specific program with which your watch can be optimally wound. Factors such as number of watch functions, frequency of use of the chronograph function, frequency of wear, brand, time since last service, and many other variables affect what program your watch needs to stay wound.
The watch winder cannot wind a watch that has stopped completely. Therefore, you must first manually wind the watch to get it running. Then try different programs until you have found the right program for your watch.
Important notes on operation
- Do not remove or insert a watch during operation.
- Never move the turntables by hand.
- Switch off the device and pull the plug out of the socket if you will not be using the watch winder for a long period of time.
- The working temperature of the watch winder is between 0-40 °C.
- Place the watch winder far away from magnetic objects.
FINGERPRINT LOCK (10045663 & 10045665)
| A Admin key and activating port for fingerprint lock | |
| B Fingerprint sensor: Press your finger to identify yourself. | |
| C LED status light: Blue light, red light and pink light |
To create a fingerprint account for administrator 1:
Press your finger on the fingerprint sensor for 7 seconds. After the blue light flashes 3 times, you can release your finger. Then the pink light will flash once, signalling that the system is entering fingerprint enrolment status.
With your first fingerprint, you have defined yourself as an administrator. You now need to have your fingerprint scanned 6 times in a row. To do this, press the fingerprint sensor 6 times. The blue light flashes every time you press your finger on the sensor. When the system has captured your fingerprint 6 times, the blue light will illuminate for 2 seconds, indicating the first fingerprint entry was successful. The fingerprint entry is then terminated.
Note: If the red light flashes during fingerprint scanning, the fingerprint has not been scanned and you must continue scanning until 6 valid fingerprints are enrolled.
To create a fingerprint account for administrator 2:
Proceed as for creating the administrator 1 account.
To create a fingerprint account for users 3-20:
Proceed as for creating the administrator 1 account.
Important information on the fingerprinting process
- When using for the first time or when fingerprints are not set up, the device can be unlocked with any fingerprint.
- The first two fingerprint accounts created are for administrators (power users) by default.
- Up to 20 users can be set up with the fingerprint sensor (2 administrators and 18 user accounts).
- Do not create duplicate fingerprints.
- The setup of the 3rd to 20th fingerprints must be confirmed by the administrator.
Status messages
| Blue light stays on for 2 seconds • | The fingerprint was successfully scanned. |
| Red light flashes 3 times • Fingerprint scanning has failed. | |
| Pink light flashes once • System enters fingerprint enrolment status. | |
Delete all fingerprint accounts
Press any finger on the sensor and do not release the finger. The blue light flashes three times during the period. Continue holding your finger until the red light flashes three times prompting you to enter the administrator fingerprint twice. The pink light will flash with each valid press. After releasing the finger, the blue light will illuminate for 2 seconds, indicating that all fingerprints have been erased and factory mode has been restored.
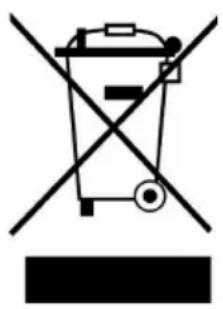
DISPOSAL CONSIDERATIONS
natural_image
Symbol of a trash bin crossed with a diagonal line, no text or labels presentIf there is a legal regulation in your country regarding the disposal of electrical and electronic equipment, this symbol on the product or on the packaging indicates that this product must not be disposed of with household waste. Instead, it must be taken to a collection point for the recycling of electrical and electronic equipment. By disposing of this product in accordance with the regulations, you protect the environment and the health of those around you from negative consequences. For information on recycling and disposal of this product, contact your local government or household waste disposal service.
This product contains batteries. If there is a legal regulation in your country regarding the disposal of batteries, the batteries must not be disposed of in household waste. Consult your local regulations for the disposal of batteries. By disposing of this product in accordance with the regulations, you protect the environment and the health of those around you from negative consequences.
MANUFACTURER & IMPORTER (UK)
Manufacturer:
Chal-Tec GmbH, Wallstrasse 16, 10179 Berlin, Germany.
Importer for Great Britain:
Berlin Brands Group UK Limited
PO Box 42
272 Kensington High Street
London, W8 6ND
United Kingdom
Estimado cliente:
text_image
QR code image containing encoded data, no visible human-readable textÍNDICE
natural_image
Symbol of a trash bin crossed with a diagonal line, no text or labels presentBerlin Brands Group UK Limited
PO Box 42
272 Kensington High Street
London, W8 6ND
Reino Unido
Cher client, chère cliente,
text_image
QR code image containing encoded data, no visible human-readable textSOMMAIRE
natural_image
Symbol of a trash bin crossed with a diagonal line, no text or labels presentBerlin Brands Group UK Ltd
PO Box 42
272 Kensington High Street
London, W8 6ND
United Kingdom
Gentile cliente,
text_image
QR code image containing encoded data, no visible human-readable textINDICE
natural_image
Symbol of a trash bin crossed with a diagonal line, no text or numbers presentPRODUTTORE E IMPORTATORE (UK)
Produttore:
Chal-Tec GmbH, Wallstraße 16, 10179 Berlino, Germania.
Berlin Brands Group UK Limited
PO Box 42
272 Kensington High Street
London, W8 6ND
United Kingdom