
ZPJ-25A-6 - Concrete level Vevor - Free user manual and instructions
Find the device manual for free ZPJ-25A-6 Vevor in PDF.
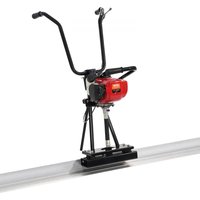


| Brand | Vevor |
| Model | ZPJ-25A-6 |
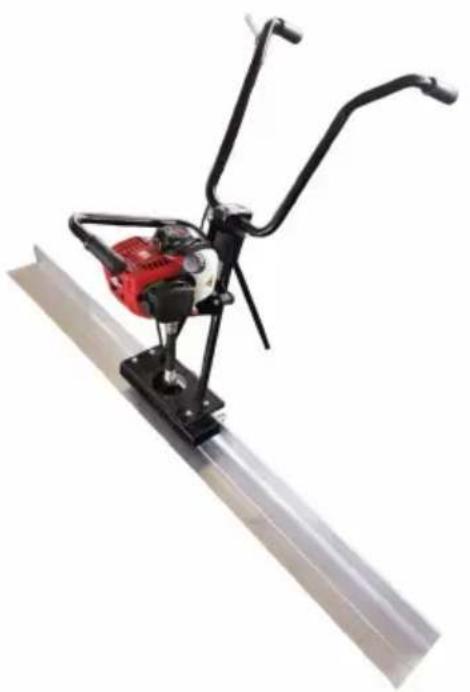
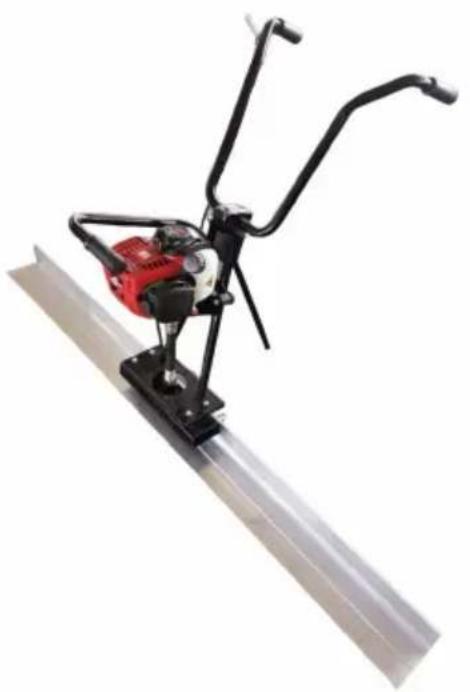
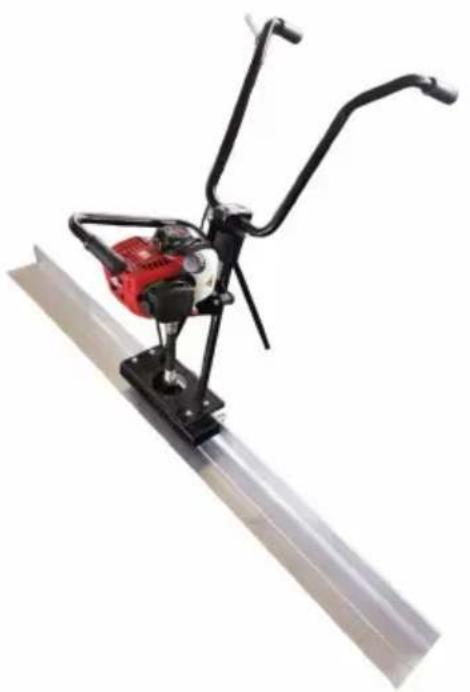
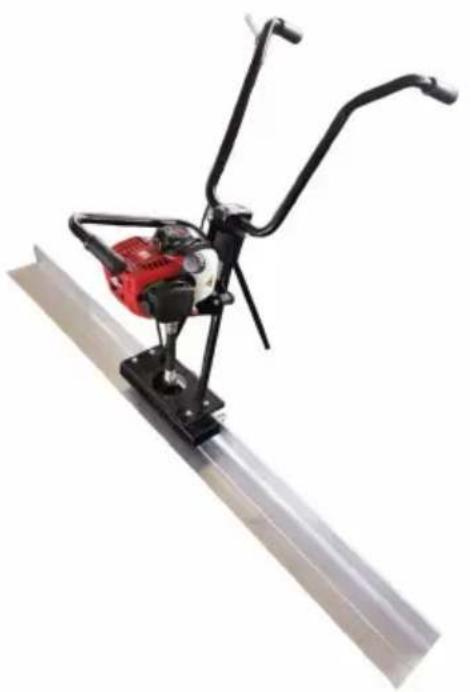
| Product Type | Concrete Screed (vibrating screed) |
| Dimensions (L x W x H) | 1830 x 670 x (730-1060) mm |
| Weight (head) | 18 kg |
| Engine | 140FA, 4-stroke, 37,7 cm³ |
| Fuel Type | Unleaded gasoline |
| Compatible Board Lengths | 6, 8, 10, 12, 14 ft (1.83 to 4.27 m) |
| Intended Use | Leveling and compacting concrete for slabs, roads, sidewalks, parking lots |
| Safety | Emergency stop on handle; use PPE (safety glasses, gloves, hearing protection) |
| Daily Maintenance | Check oil and fuel levels, tighten fasteners, clean cooling fins |
| Periodic Maintenance | Oil change every 20 h, air filter cleaning, spark plug replacement |
| Included Accessories | Hex keys (4, 6 mm), socket wrench, combination wrench (18 mm), bolts, manual, emissions declaration |
| Spare Parts Available | Replacement boards, filters, spark plugs, seals, etc. |
| Repairability | Technical support by email (www.vevor.com/support); repairable with original parts |
| Warranty | Electronic warranty certificate provided |
| Manufacturer | Shanghai Muxin Muye Co., Ltd., Baoshan, Shanghai, China |
| Importer (EU) | SHUNSHUN GmbH, Germany |
| Importer (UK) | Pooledas Group Ltd, Preston, United Kingdom |
Frequently Asked Questions - ZPJ-25A-6 Vevor
User questions about ZPJ-25A-6 Vevor
0 question about this device. Answer the ones you know or ask your own.
Ask a new question about this device
Download the instructions for your Concrete level in PDF format for free! Find your manual ZPJ-25A-6 - Vevor and take your electronic device back in hand. On this page are published all the documents necessary for the use of your device. ZPJ-25A-6 by Vevor.
USER MANUAL ZPJ-25A-6 Vevor
CONCRETE SCREED
MODEL: ZPJ-25A-6, ZPJ-25A-8, ZPJ-25A-11 ZPJ-25A-6/8/11
We continue to be committed to providing you with tools at competitive prices. "Save Half", "Half Price", or any other similar expressions used by us only represent an estimate of savings you might benefit from buying certain tools with us compared to top brands and does not necessarily mean to cover all categories of tools offered by us. We kindly remind you to verify carefully when placing an order with us if you are actually saving half in comparison with the top major brands.
MODEL: ZPJ-25A-6, ZPJ-25A-8, ZPJ-25A-11
ZPJ-25A-6/8/11
NEED HELP? CONTACT US!
Have product questions? Need technical support? Please feel free to contact us:
Technical Support and E-Warranty Certificate www.vevor.com/support
This is the original instruction. Please read all manual instructions carefully before operating. VEVOR reserves a clear interpretation of the user manual. The appearance of the product shall be subject to the product you received. Please forgive us that we won't inform you of any technology or software updates on our product.
IMPORTANT SAFEGUARDS

WARNING: Read and understand this entire manual before operating or servicing this product. Failure to follow these warnings and instructions can cause personal injury or damage to valuable property.
Intended Use
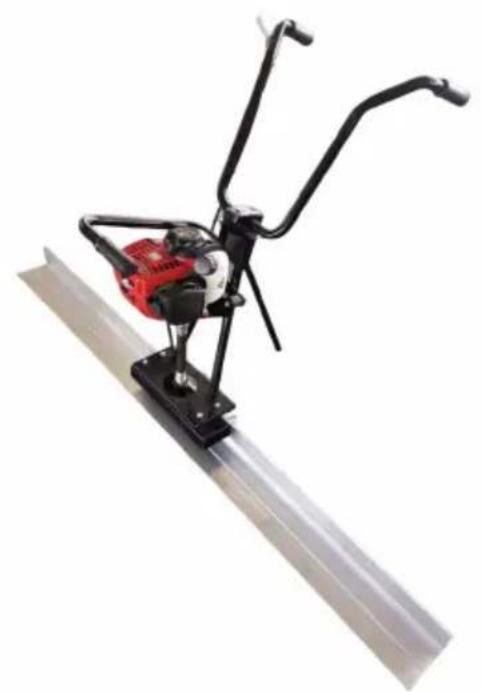
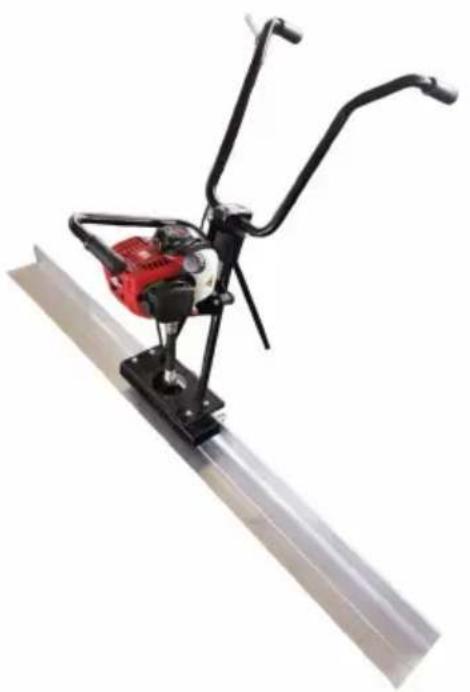
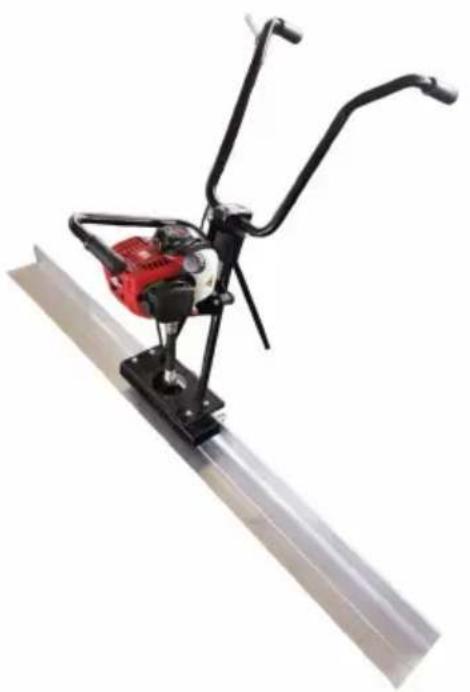
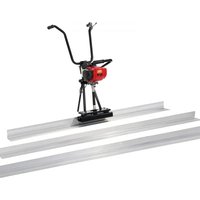
This screed uses vibration through a screed board to embed aggregate and reduce air voids in concrete, making the slabs stronger. It can be used with a variety of board lengths, including 6ft, 8ft, 10ft, 12ft, and 14ft, on floors, roads, pavement, or parking lots. Replacement boards and boards in other lengths are sold separately — see the technical specifications page for part numbers.
Power Source. The screed is powered by a gasoline engine.
Supplies Required. Normal operation will require you to supply:
- Gasoline
- Engine oil • Personal Protection Equipment
See “Specifications” section of this manual or the Engine Manual for more details.
Technical Specifications
Screed Head
| Model | ZPJ-25A |
| Engine | 140FA |
| Drive system | Flexible Shaft |
| Weight | 18kg |
| Type | 4-stroke,overheard camshaft,1 cylinder |
| Displacement | 37.7cc |
- The warnings, cautions, and instructions in this manual cannot cover all possible conditions or situations that could occur. Exercise common sense
and caution when using this tool. Always be aware of the environment and ensure that the tool is used in a safe and responsible manner.
- DO NOT allow persons to assemble or operate this product until they have read this manual and have developed a thorough understanding of how the product works.
- Use the right tool for the job. DO NOT attempt to force small equipment to do the work of larger industrial equipment. There are certain applications for which this equipment was designed. It will do the job better and more safely at the capacity for which it was intended. DO NOT use this equipment for a purpose for which it was not intended.
- Industrial or commercial applications must follow OSHA requirements.
WARNING
- Some dust created by power sanding, sawing, grinding, drilling, and other construction activities contains chemicals known to the State of California to cause cancer, birth defects, or other reproductive harm. Some examples of these chemicals are:
-lead from lead-based paints,
-crystalline silica from bricks and cement and other masonry products, and -arsenic and chromium from chemically treated lumber.
Your risk from these exposures varies, depending on how often you do this type of work. To reduce your exposure to these chemicals, work in a well-ventilated area and work with approved safety equipment, such as dust masks that are specially designed to filter out microscopic particles.
- Handling the power cord on corded products may expose you to lead, a chemical known to the State of California to cause cancer and birth defects or other reproductive harm. Wash hands after handling.
WARNING
WORK AREA SAFETY
- Inspect the work area before each use. Keep the work area clean, dry, free of clutter, and well-lit. Cluttered, wet, or dark work areas can result in injury.
- Do not use the Screed where there is a risk of causing a fire or an explosion; e.g., in the presence of flammable liquids, gases, or dust.
- Do not allow the tool to come into contact with an electrical source. The tool is not insulated, and contact will cause electrical shock.
- Keep children and bystanders away from the work area while operating the Screed. Do not allow children to handle the Screed.
- Be aware of all power lines, electrical circuits, water pipes, and mechanical hazards in your work area. Some of these hazards may be hidden from your view and may cause personal injury and/or property damage if contacted.
WARNING
PERSONAL SAFETY
- Stay alert, watch what you are doing, and use common sense when operating the Screed. Do not use the Screed while you are tired or under the influence of drugs, alcohol, or medication.
- Dress properly. Do not wear loose clothing, dangling objects, or jewelry. Keep your hair, clothing, and gloves away from moving parts. Loose clothing, jewelry, or long hair can be caught in moving parts.
- Use ANSI Z87.1-approved safety goggles or safety glasses with side shields, or when needed, a face shield. Use a dust mask in dusty work conditions. Also use non-skid safety shoes, hard hats, gloves, dust collection systems, and hearing protection when appropriate. This applies to all persons in the work area.
- Do not overreach. Keep proper footing and balance at all times.
- Remove adjusting keys or wrenches before starting the Screed. A wrench or key that is left attached to a rotating part of the Screed may cause personal injury.
- No smoking, matches, or open flames around machine. Fuel is flammable.
- Do not touch hot surfaces.
Engine exhaust contains carbon monoxide. This is a poison you cannot see or smell. NEVER use.
SCREED USE AND CARE
- Do not force the Screed to perform an operation other than its intended use. Screeds do a better and safer job when used in the manner for which they are designed. Plan your work, and use the correct Screed for the job.
- Check for damaged parts before each use. Carefully check that the Screed will operate properly and perform its intended function. Replace damaged or worn parts immediately. Never operate the Screed with a damaged part.
- Store the Screed when it is not in use. Store it in a dry, secure place out of the reach of children. Inspect the Screed for good working condition prior to storage and before re-use.
- Use only accessories that are recommended by the manufacturer for use with the Screed. Accessories that may be suitable for one Screed may create a risk of injury when used with another Screed.
- Keep guards in place and in working order.
- Keep the Screed board clean.
- Do not leave the Screed running unattended.
- Shut off the fuel valve when the engine is not in use.
- Only use the recommended fuel to avoid damaging the equipment.
- Oil does not come with the machine. Add oil to the engine before use.
- Check oil levels before operating the machine.
- DO NOT refuel the engine while it is still hot. Fuel is flammable.
- DO NOT service the engine while it is still hot.
Specific Operation Warnings
To avoid fatal accident
- Stop the engine before refueling and be careful not to spill fuel during refueling. Spilled fuel may ignite causing a fire.
- Do not refuel the engine near flammable objects to avoid fire.
- Do not run the engine in enclosed areas to prevent carbon monoxide poisoning.
To protect the operator
- When fatigue from operation, the operator must stop the machine and take a break.
- Hearing protection is required as this machine creates a noise emission while 1 m (3 feet) away from the equipment.
To avoid injury or damage
- The plate compactors are only operated by authorized persons who:
• are at least 18 years of age.
- are physically and mentally able to operate the screed.
- are properly trained in the operation and maintenance of the screed by the owner or its authorized representative.
- are assessed to be able to carry out their duties reliably.
- People who are drinking alcoholic beverages and/or taking drugs are not allowed to operate the plate compactor.
- People are not allowed to enter the danger zone of the screed.
- The operator has to monitor the danger zone at all times. It is not allowed to operate if there is a person in the danger zone.
- The operator has to give warning signs in case of an emergency situation.
- The screed can only be operated when adequate stability is granted.
- The operator has to control the running speed of the screed at all times during its operation so that the screed can be stopped at any time.
- The operator must turn off the screed completely as described in this manual before leaving the operating position. Also, the screed must be secured against unauthorized use.
- The engine has to be turned off and secured against re-starting by pulling out the spark plug socket during maintenance and servicing.
- The operator has to check the screed for functions and obvious defects before use.
• Discovered defects must be reported to supervising personnel and to the
operator. Do not leave the defects which may cause serious injury to the operator.
- Do not operate the screed when a defect endangers the safety of the operator until the defect is rectified.
- The screed has to be checked by an expert on a regular basis (at least once a year). And it must be checked by an expert before the initial use and after any essential modification.
- During operation, the operator must monitor other objects within a radius of 20 meters in case of lighting.
- The screed generates mechanical heat, so do not touch the engine body, muffler, or other parts during operation, as this may cause heat burns. Wait until it cools down before touching.
- The operator must be fully equipped with safety equipment including crash helmet, safety gloves, safety shoes, safety glasses, and mask before operating the screed.
- Do not transport the screed with fuel in its fuel tank by the motor.
- Do not lift the screed by a person when putting it on or off. Always use a proper lifting crane to move it. Lifting by a person may cause personal injury due to its heavy weight.
- Make sure to securely fasten the screed for transportation. Improper fastening, such as holding the handle of the screed during transportation, may cause injury.
- Note: Refer to the engine's instruction manual if there is a problem or question about it before or during its operation.
Assembly Instructions
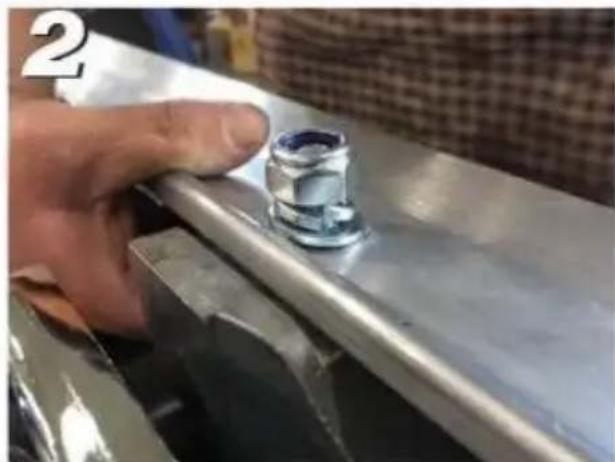
Screed Assembly
 | 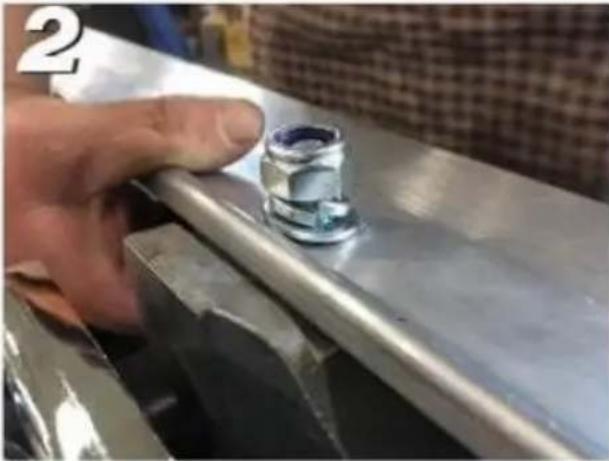 |
| Line up blade with assembly. | Attach washers, locking screws, and bolts. |
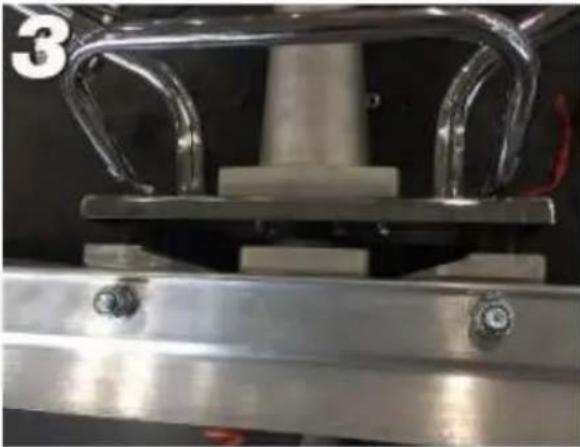 | 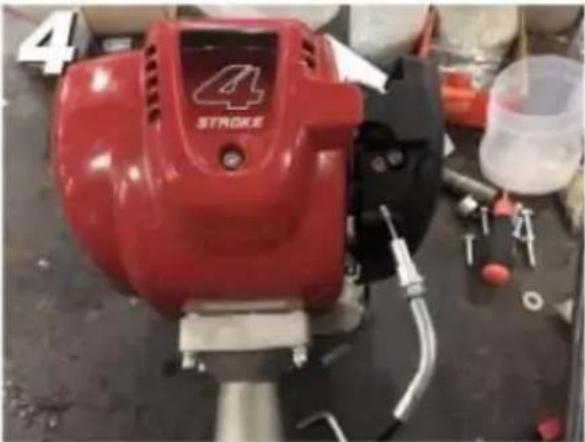 |
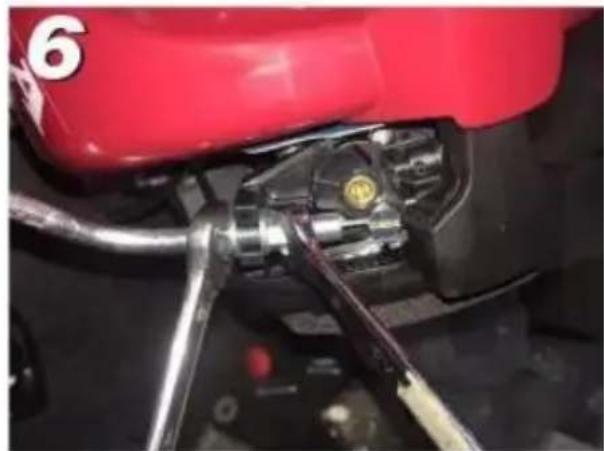
| Repeat Step 2 for the second ho | Connect accelerator cable to engine. |
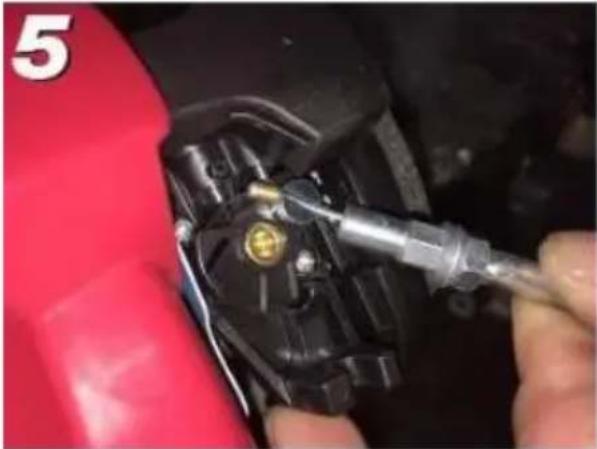 | 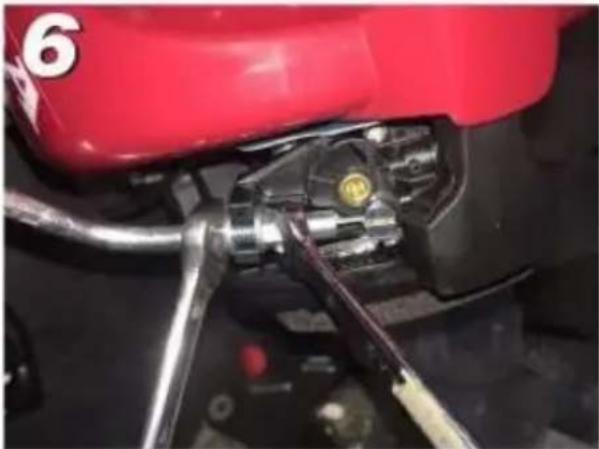 |
| Locate accelerator screw found o engine and place cable through t gap. | Tighten and make sure that whe you pull accelerator handle, the cable engages engine. |
Dimension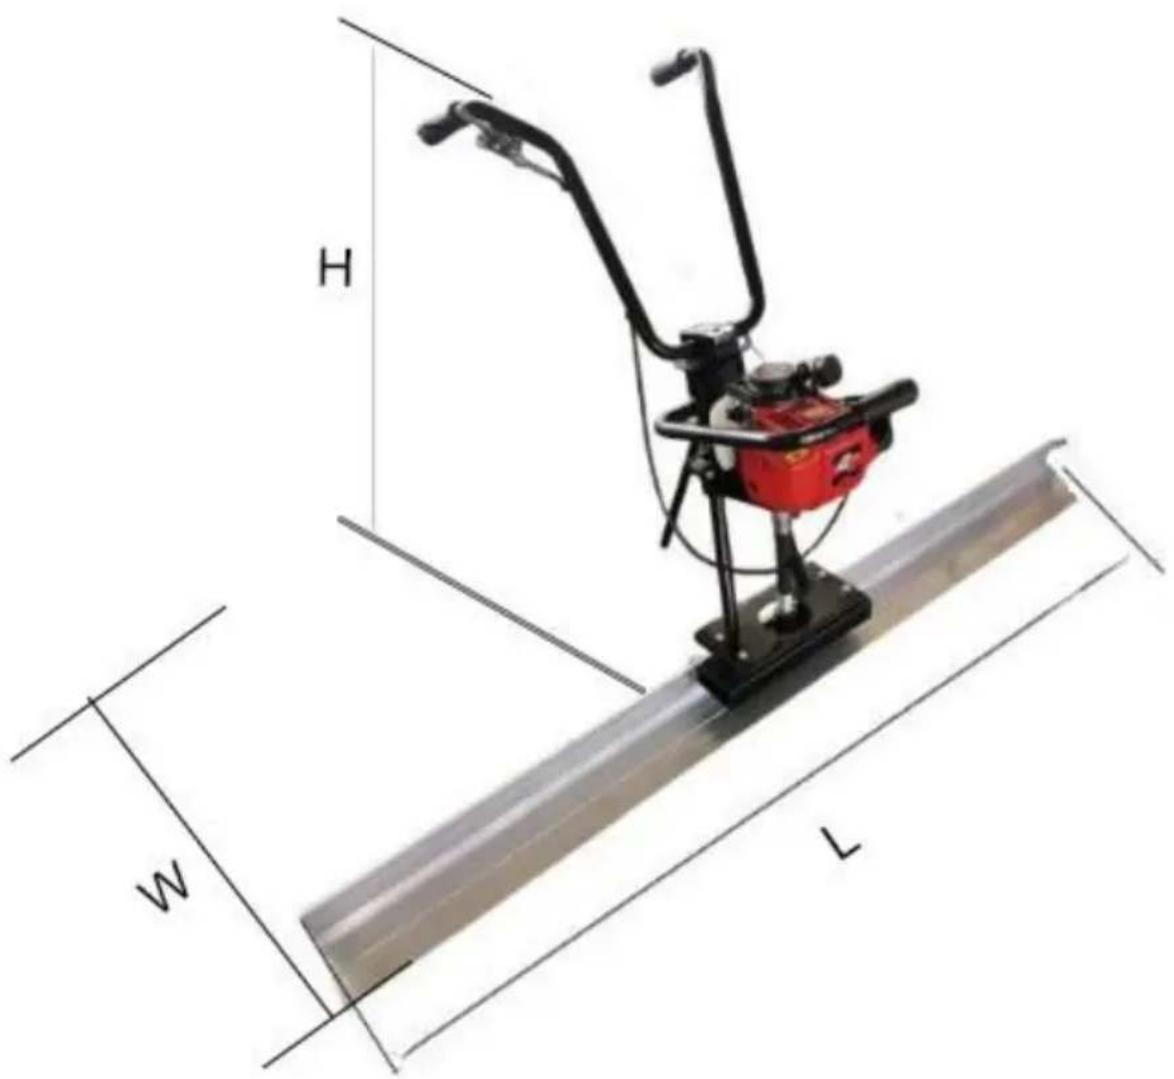
| Model | L(mm) | W(mm) | H(mm) |
| ZPJ-25A-6 | 1830 | 670 | 730-1060 |
| ZPJ-25A-8 | 2445 | 670 | 730-1060 |
| ZPJ-25A-11 | 3370 | 670 | 730-1060 |
| ZPJ-25A-6/8/11 | 3370 | 670 | 730-1060 |
Before Each Use
Preparation for Operation
1) Check all bolts, nuts, and bolts and tighten any that are loose.
2) Get the desired length of screed board.
Recommended Fuel
1) The screed engine requires regular unleaded gasoline. Use only fresh, clean fuel. Fuel containing water or dirt will damage the fuel system. Consult engine owner's manual for complete fuel specifications.
Before starting Engine
1) Read and understand the safety and operating instructions manual for the engine. 2) Check:
- Oil level in engine.
- Fuel level.
- Condition of air cleaner.
- Tightness of external fasteners.
- Condition of fuel lines.
- Wear of spark plug.
Operating Instructions
WARNING
Read and understand both the screed user's manual (this manual) and the engine manual before starting or operating the screed to avoid incorrect operation that may result in damage or injury.
Starting the Engine
- Perform all the Before Each Use steps.
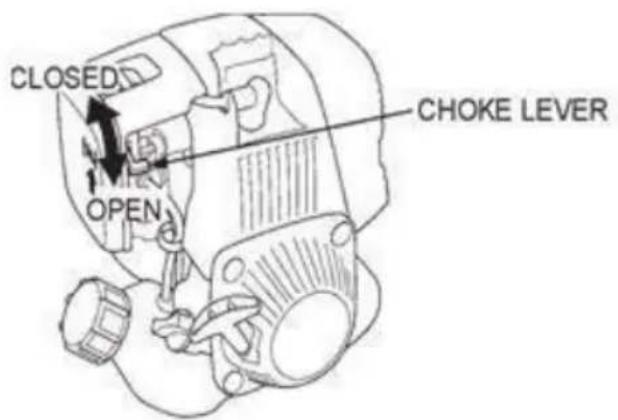
- To start a cold engine, move the choke lever to the CLOSED position. When restarting a warm engine, leave the choke lever in the OPEN position.
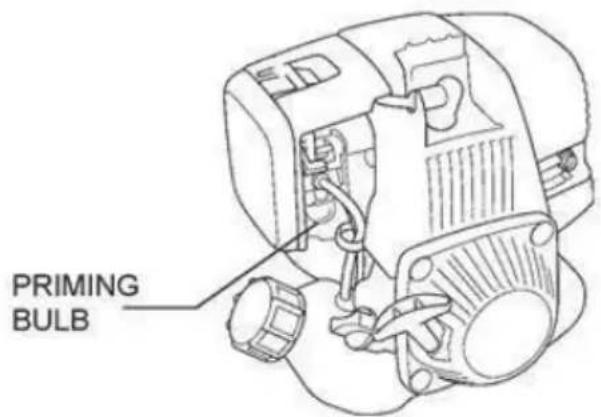
- Press the priming bulb repeatedly until fuel can be seen inside the clear plastic bulb.
- Move the throttle lever slightly in the direction of the arrow.
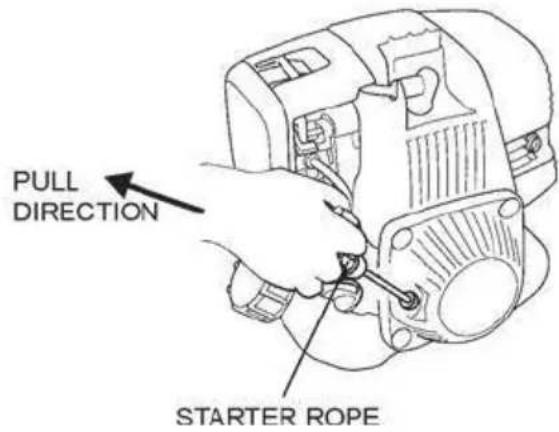
- Pull the starter rope (Figure 03) lightly until you feel resistance, then pull briskly in the direction of the arrow. Return the starter rope gently.
- Once the engine has started, open the choke and allow the engine to idle for 3 to 5 minutes to warm up.
Operation
Read and understand both the engine and compactor user's manual before starting or operating the compactor to avoid incorrect operation that may result in damage or injury.
Note: Whenever high speed operation is NOT required, slow the engine by moving the throttle lever to a low position to save fuel and extend the life of the equipment.
- Once the engine has started and warmed up, open the throttle fully in the direction of the arrow to operate the screed.
- Slowly move the screed backwards, watching for smooth concrete in front of the screed.
Stopping the Engine
In an emergency situation, turn off the engine switch immediately. In normal conditions, do not stop the engine when the screed is at high speed, or the engine temperature will rise suddenly, possibly causing engine parts to jam or the oil to deteriorate.
Note: To stop the engine in an emergency, simply press the Emergency Stop Switch on the handle.
To stop the engine normally:
- Reduce the engine speed by moving the throttle completely in the opposite direction of the arrow and let the engine idle for 2-3 minutes before turning it off.
- Press the emergency stop switch on the handle.
Please see the instruction manual of the engine for further detailed information.
After Each Use
Clean up
Clean the screed and screed board.
with water to remove all concrete, but take care that the engine does not get wet. The screed board can be thinly coated with diesel fuel to help prevent rust and make concrete removal easier.
Clean the engine cylinder cooling fins. A broom or old brush are good to remove concrete before it becomes solid.
Refer to the engine manual for more information about the engine.
In case of storing the screed and board for a long period of time (for more than 30 days):
In case of storing the screed and board for a long period of time (more than 30 days):
1) Clean the screed as described above. 2) Remove the board from the screed as described in this manual. 3) Drain the fuel tank and run the engine briefly until the fuel in the carburetor is completely consumed. 4) Change the engine oil and follow the procedures described in the engine manual for engine storage. 5) Clean or replace the engine air filter. 6) Store the screed and board separately in a clean, dry area. 7) Cover the screed and board completely with a dry cloth.
Maintenance
Check that the compactor engine is turned off and cooled before attempting any maintenance, cleaning, or inspection. Performing maintenance on an operating compactor can cause injury.
Maintain the Screed by adopting a program of conscientious repair and maintenance in accordance with the following recommended procedures: Also refer to the engine manufacturer's instruction manual for additional information about engine maintenance. The following chart is based on a normal operation schedule.
| Maintenance Interval | Maintenance Point |
| Daily before operating | Check the fuel level.Check the engine oil level.Inspect the fuel lines.Inspect the air filter and replace it if needed.Check and tighten the external hardware |
| After the first 20 operating hours or 3 months | Change the engine oil. |
| After the first 50 operating hours or every 6 months | Clean the air cleaner element.Change the engine oil.Check and clean the spark plug. |
| After the first 100 operating hours or every year | Clean the fuel strainer. |
| After the first 200 operating hours or every 2 years | Check and adjust the valve clearance.Clean the cylinder head.Replace the spark plug. |
| No. | Descriptions | Size or Dimension | Qty | |||
| Fit model | ||||||
| ZPJ-25A-6 | ZPJ-25A-8 | ZPJ-25A-11 | ZPJ-25A-6/8/11 | |||
| 1 | Concrete Screed Head | 1 | 1 | 1 | 1 | |
| 2 | Screed Board 6 ft | 6ft | 1 | / | / | 1 |
| Screed Board 8 ft | 8ft | / | 1 | / | 1 | |
| Screed Board 11 | 11ft | / | / | 1 | 1 | |
| 3 | Plain Washer | M12 | 2 | 2 | 2 | 2 |
| 4 | Bolt | M12x40 | 2 | 2 | 2 | 2 |
| 5 | Plain Washer | M12 | 2 | 2 | 2 | 2 |
| 6 | Spring Washer | M12 | 2 | 2 | 2 | 2 |
| 7 | Cap Nut | M12 | 2 | 2 | 2 | 2 |
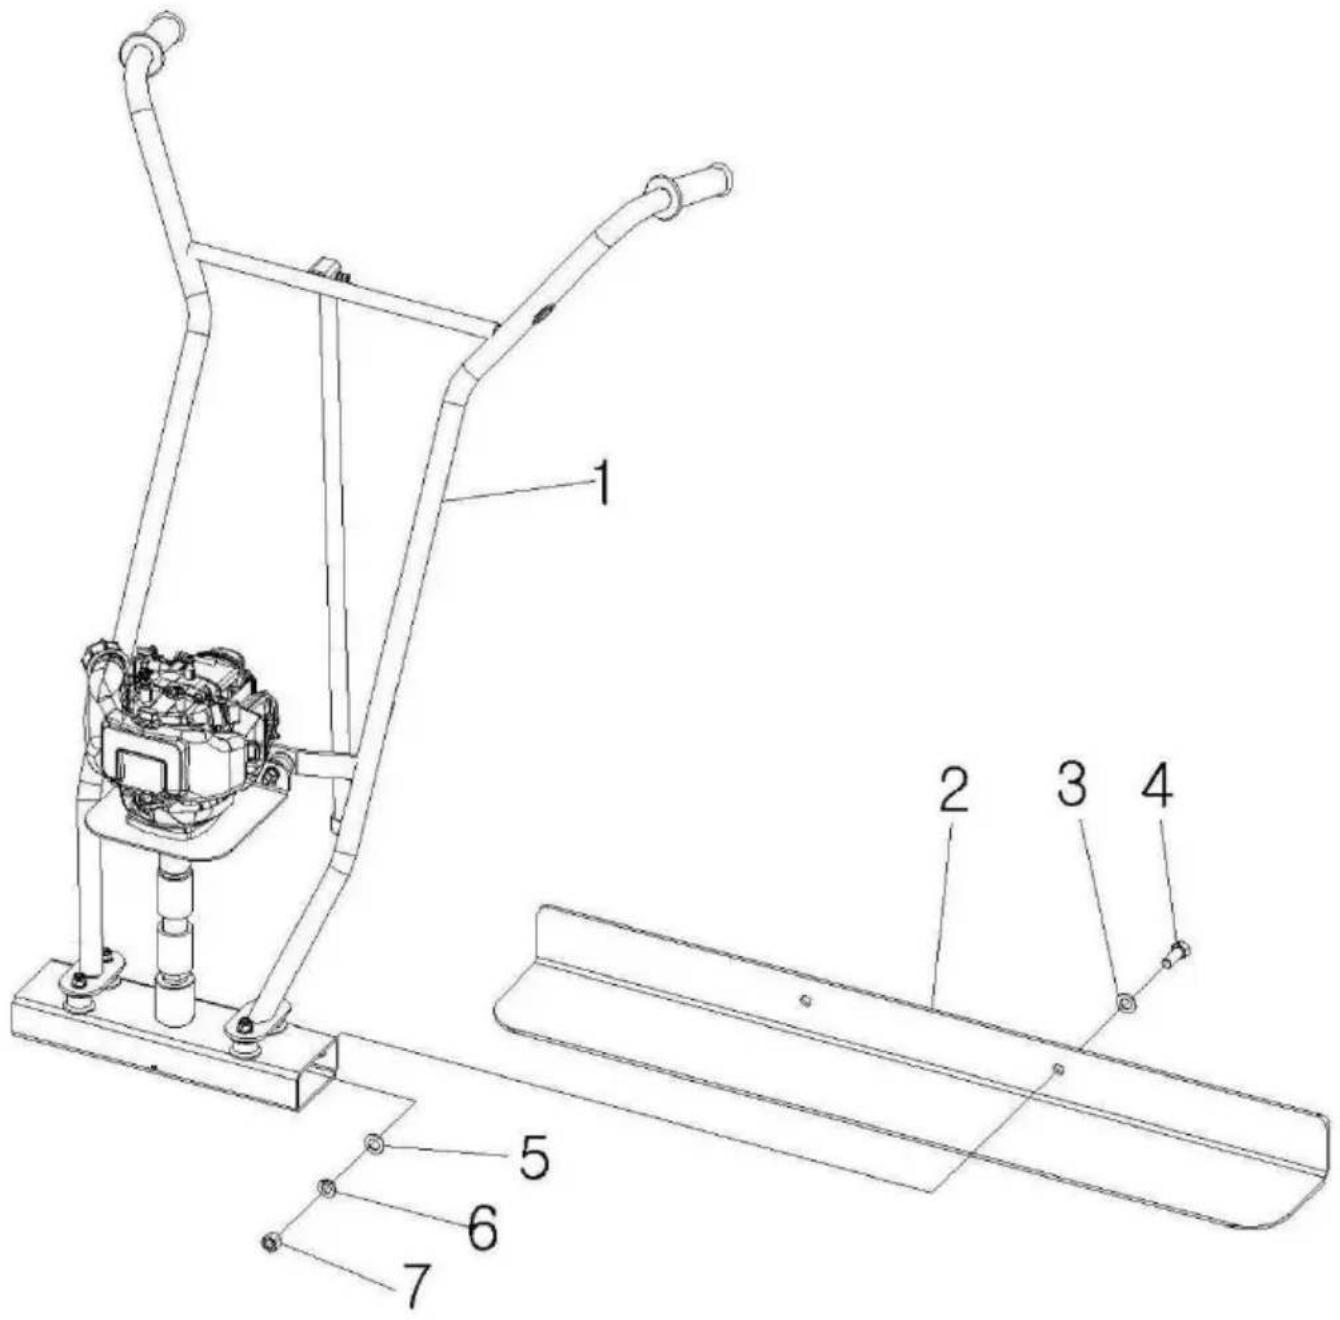
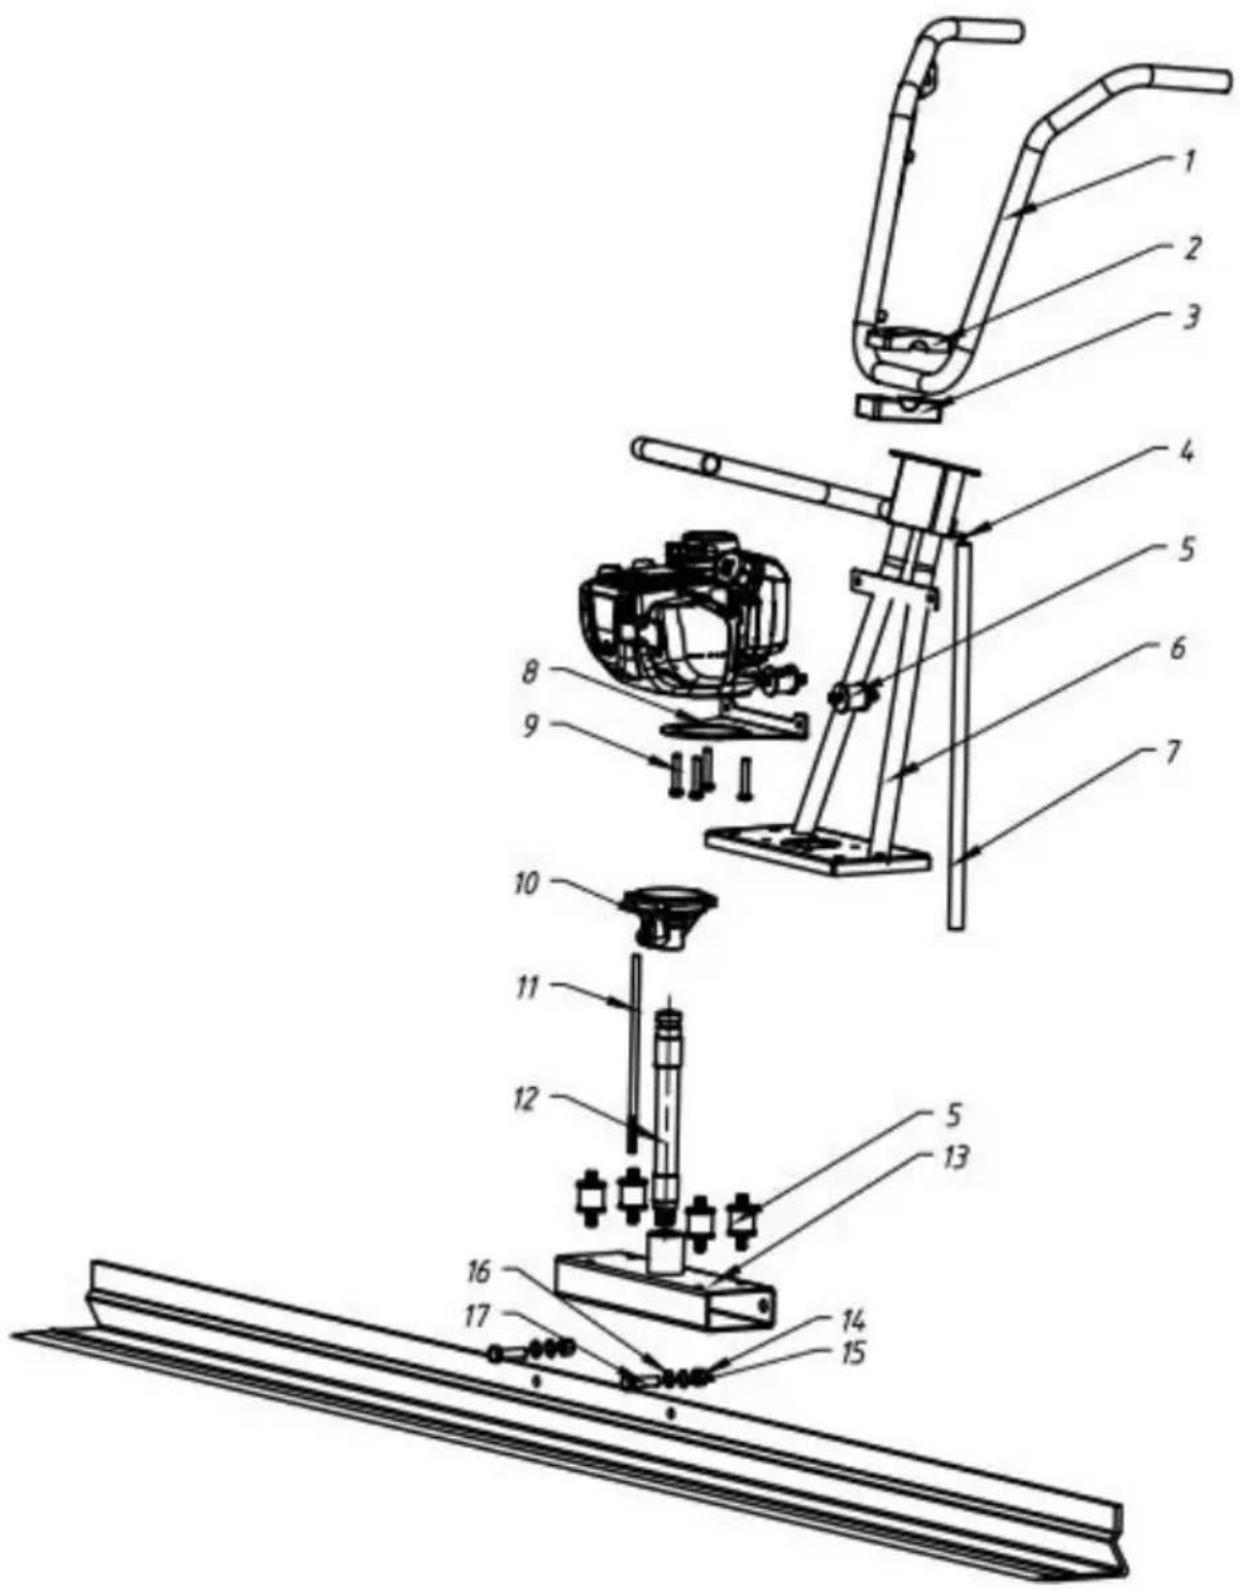
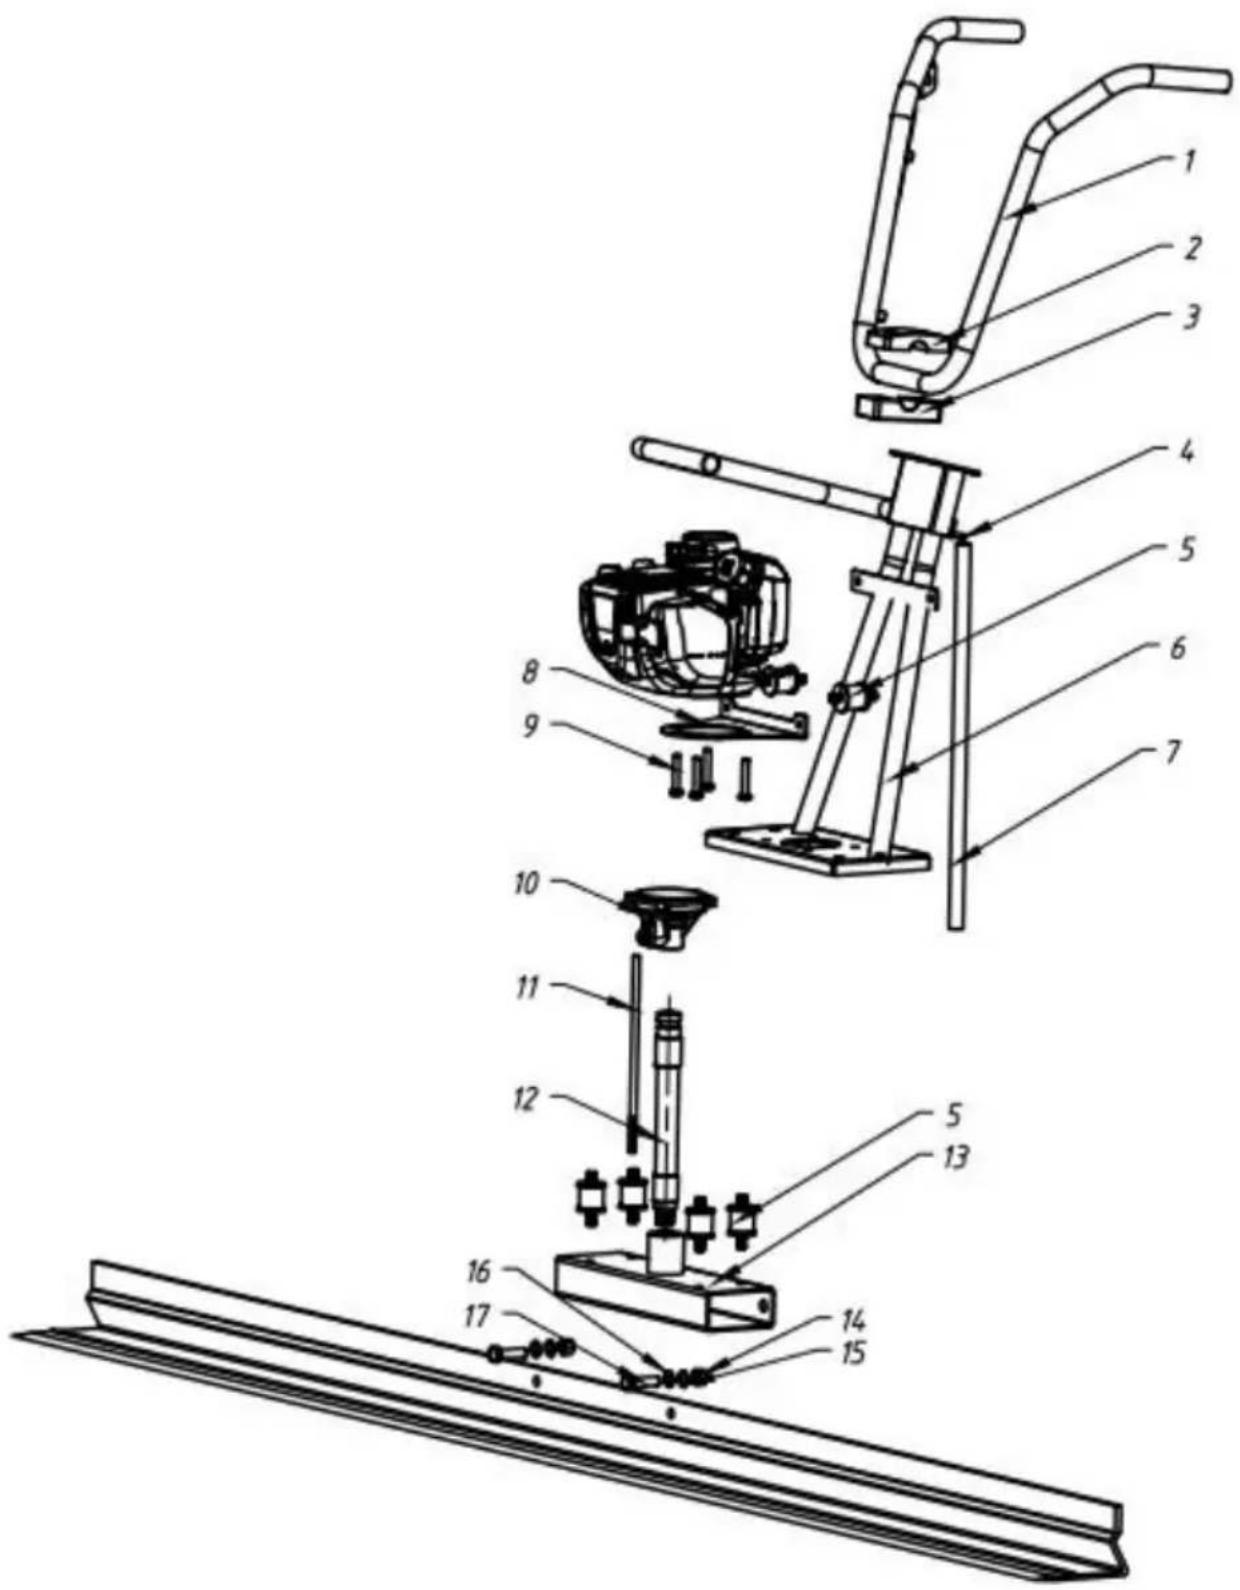
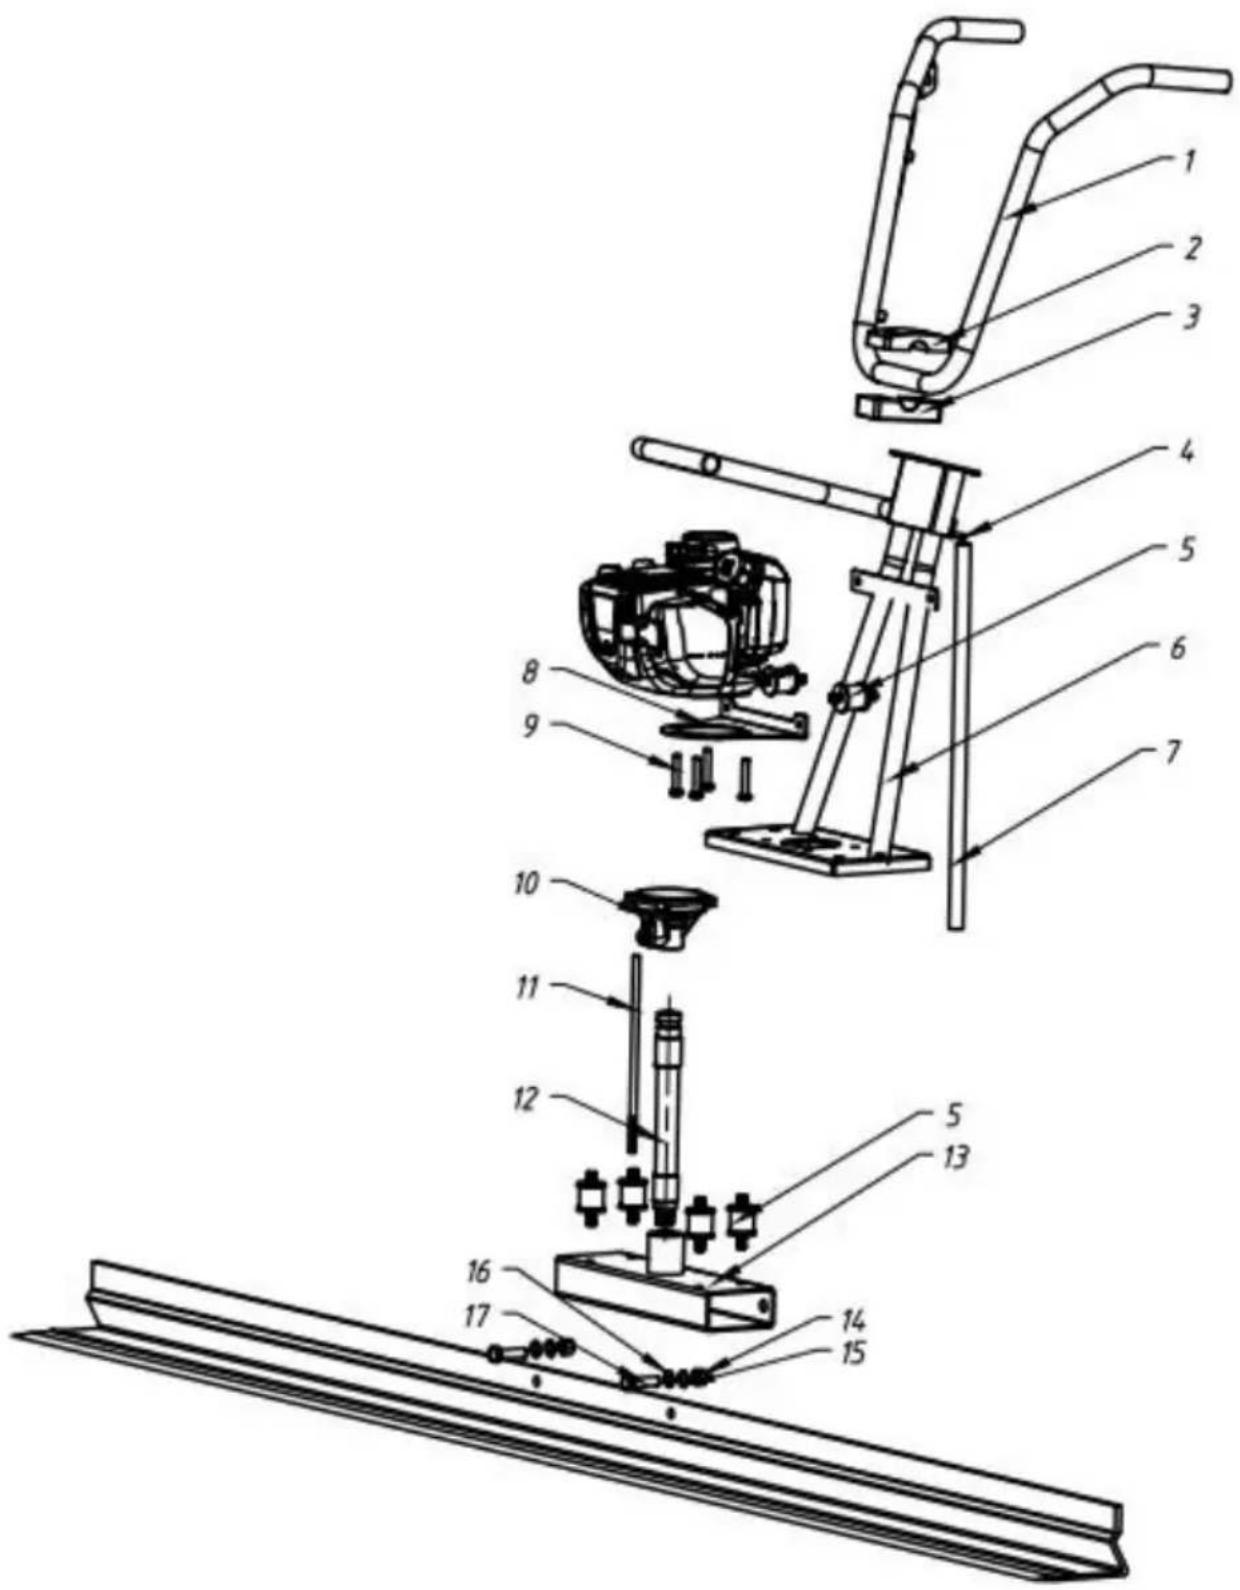
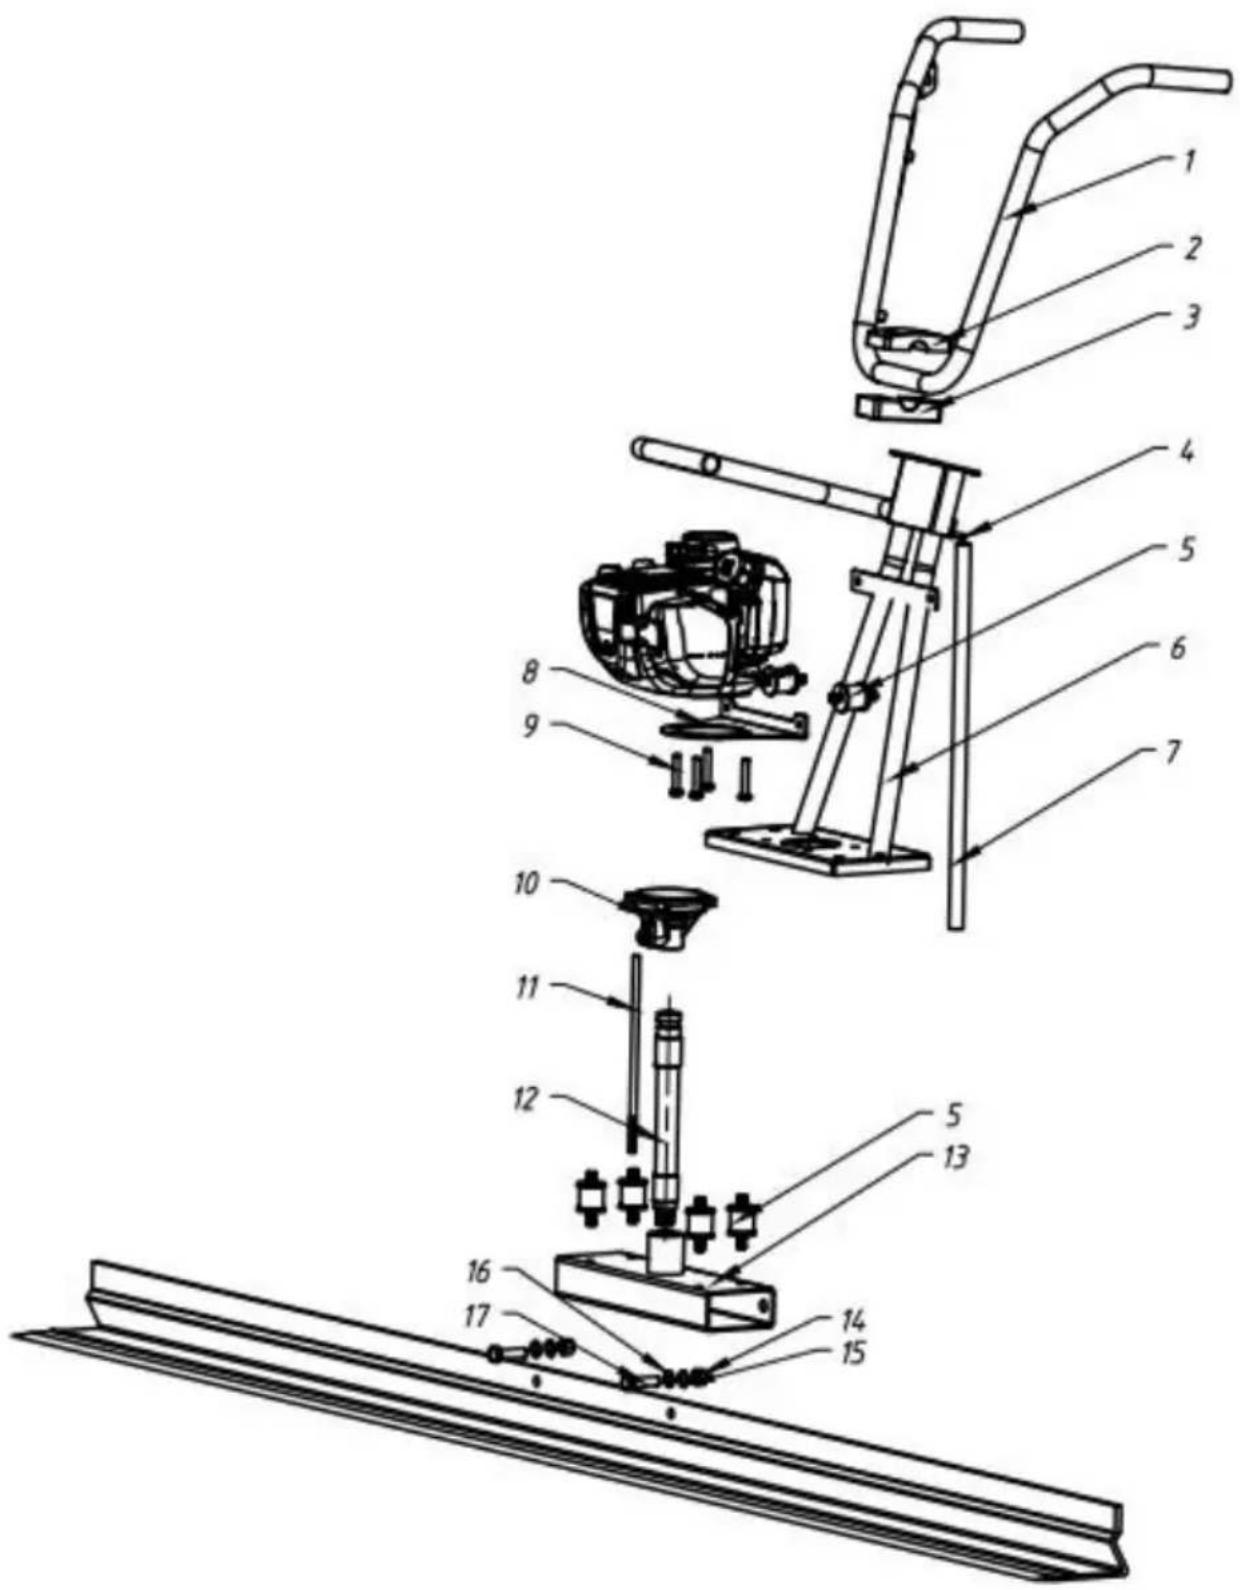
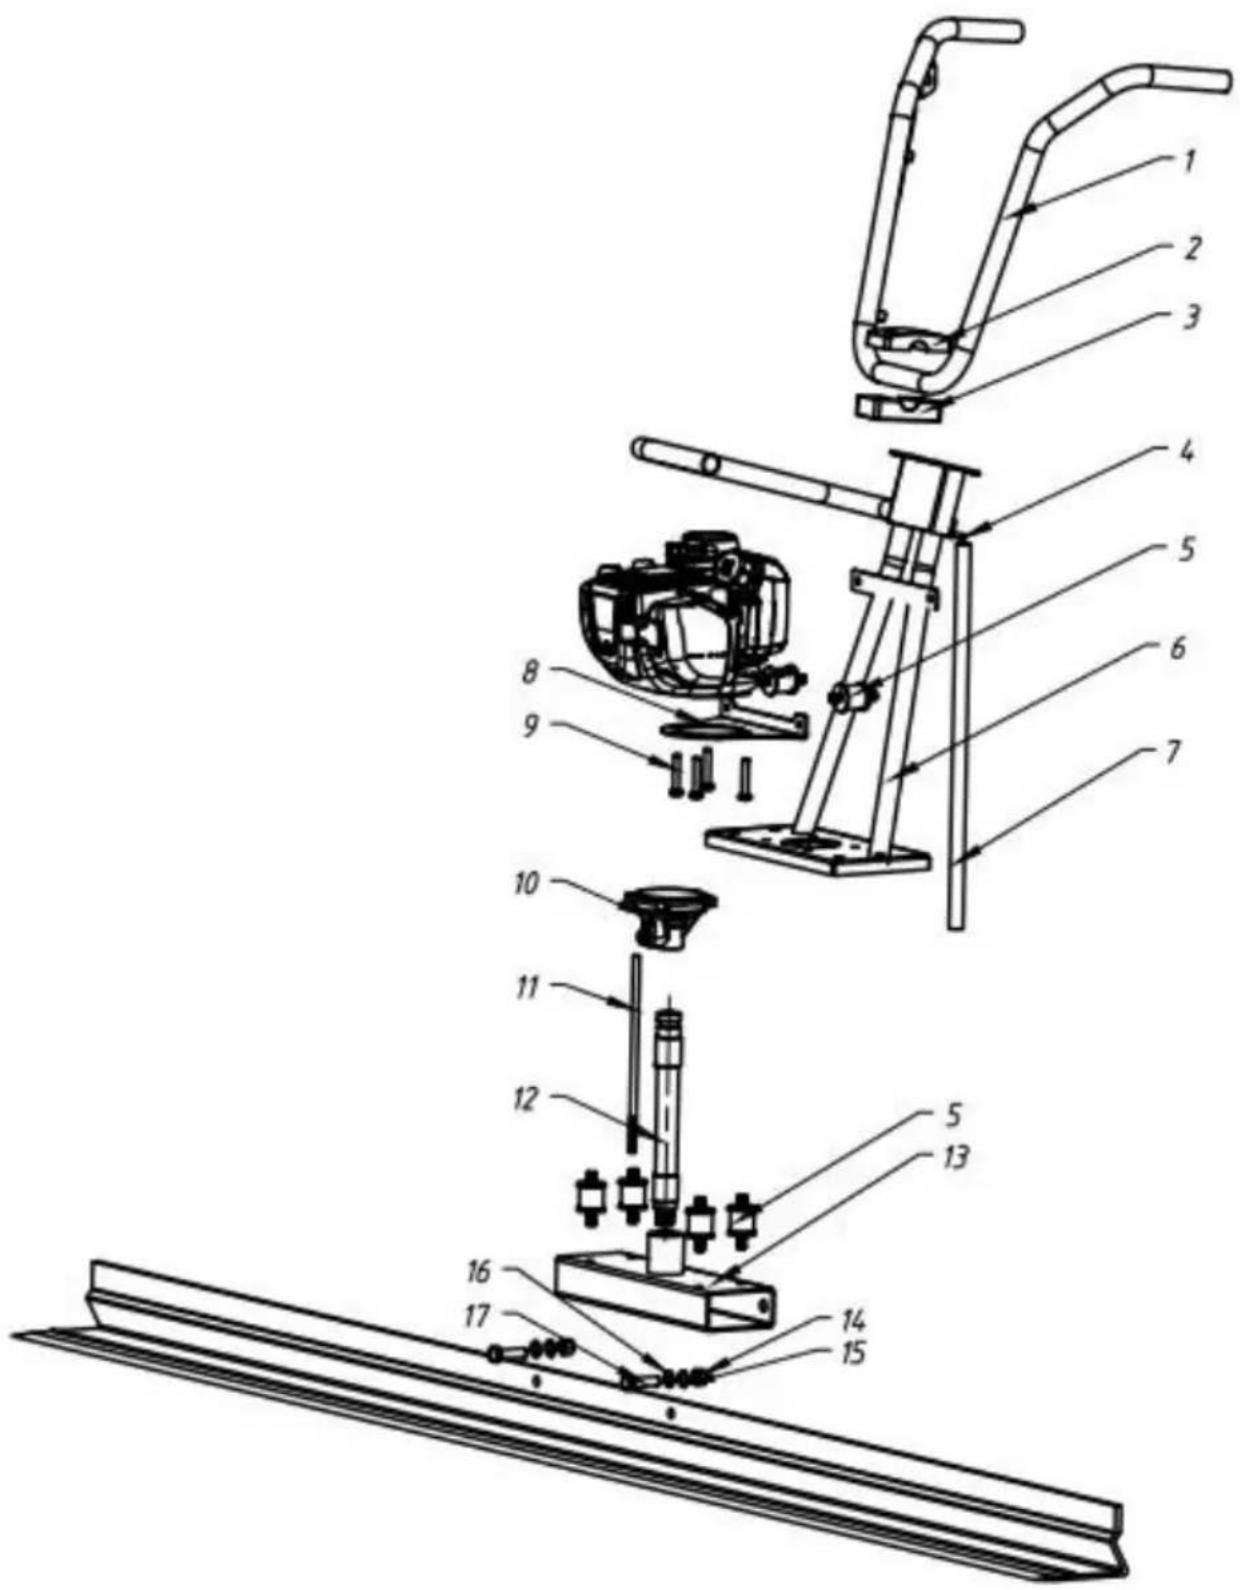
Explosion Diagram
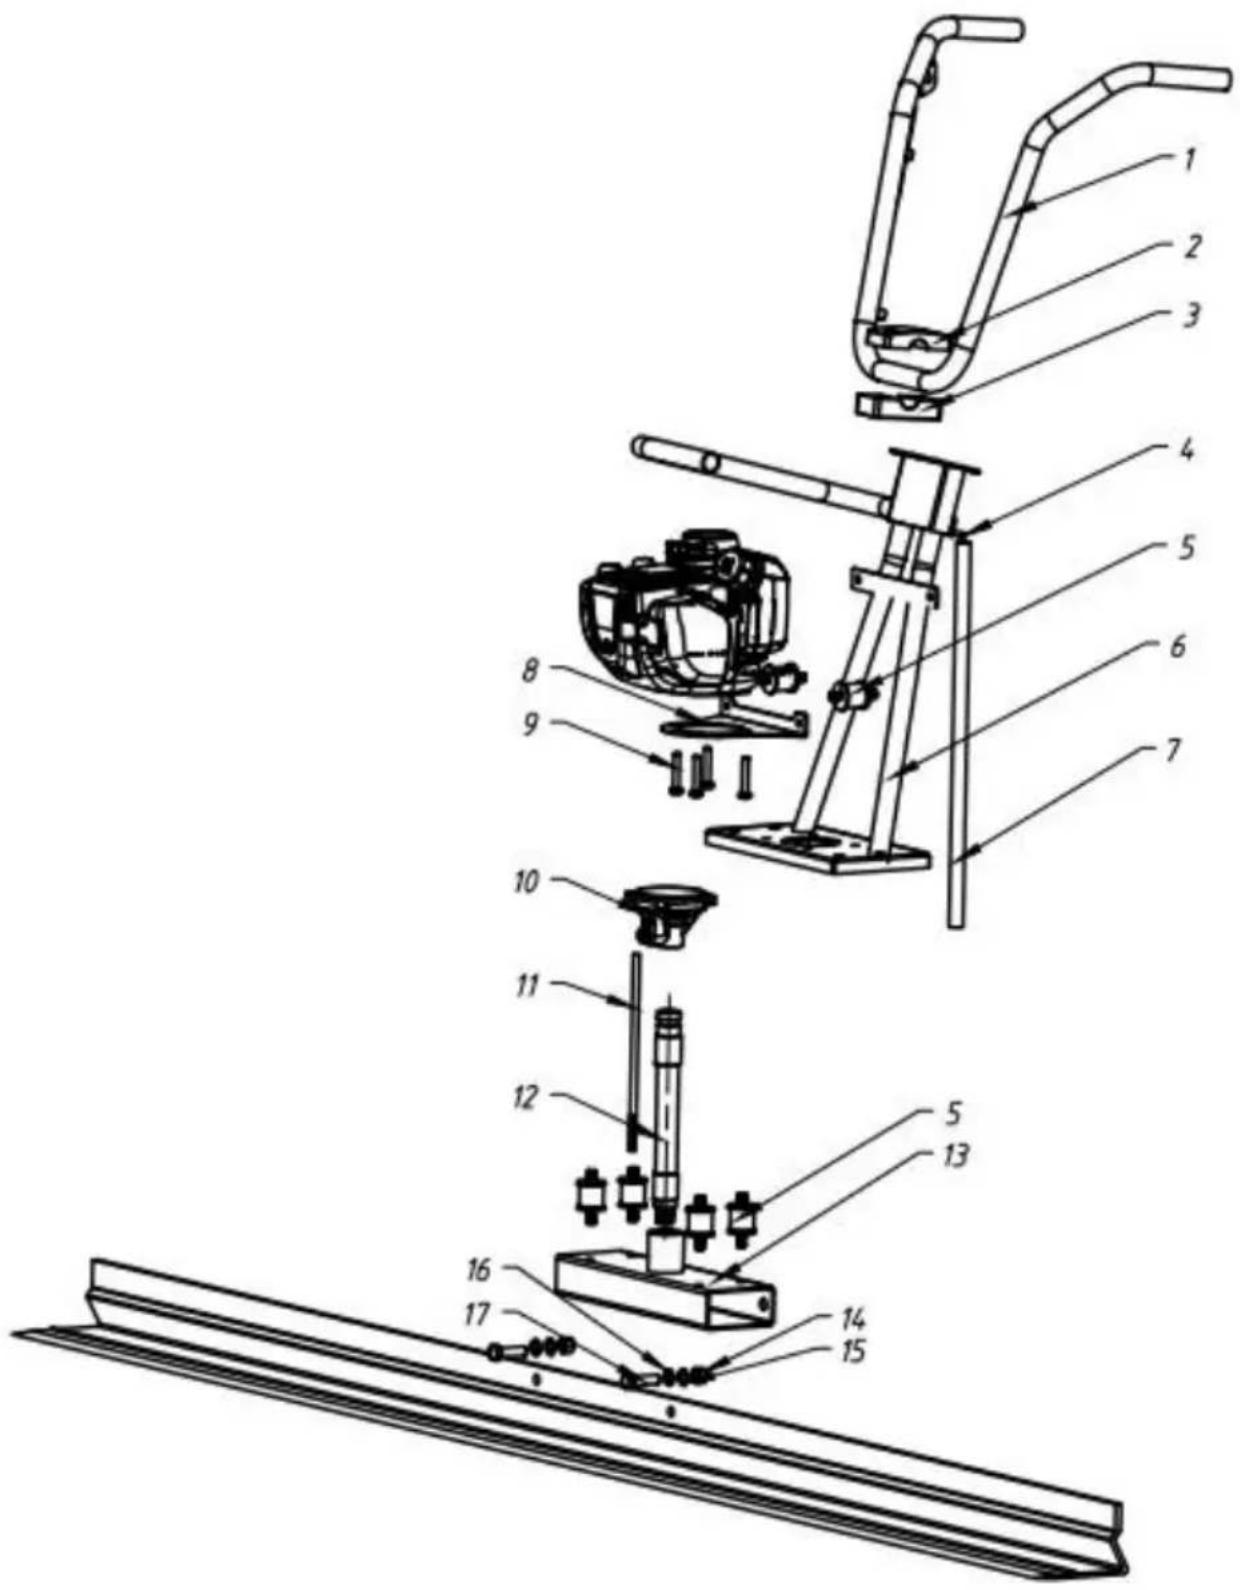
| No. | Descriptions | Qty | Size or Dimension |
| 1 | Handle Welding Assembly | 1 | ZPJ-25A.2 |
| 2 | Clamping block | 1 | ZPJ-25.9 |
| 3 | Clamping block | 1 | ZPJ-25.10 |
| 4 | Pin shaft | 1 | GB/T882-B6*35 |
| 5 | Handle Support Rubber | 6 | TVSA-T.18 |
| 6 | Handle Welding Assembly | 1 | ZPJ-25A.1 |
| 7 | Handle Support Pipe | 1 | ZPJ-25.12 |
| 8 | Engine Plate | 1 | ZPJ-25A.3 |
| 9 | Bolt | 4 | GB/T70.1-M6*30-10.9 |
| 10 | Clutch Housing Assembly | 1 | TVSA-T.15 |
| 11 | Wire | 1 | TVSA-T.16 |
| 12 | Rubber hose | 1 | TVSA-T.17 |
| 13 | Vibratory Housing Assembly | 1 | TVSA-T.14 |
| 14 | Nut | 2 | GB/T6170-M12 |
| 15 | Plain Washer | 2 | GB/T97.1-φ12 |
| 16 | Spring Washer | 2 | GB/T93-φ12 |
| 17 | Bolt | 2 | GB/T5783-M12*40 |
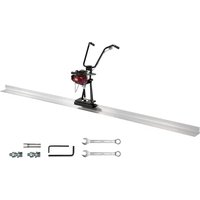
Parts list
| No. | Name | Picture | Qty |
| 1 | Hex key(S=4) | 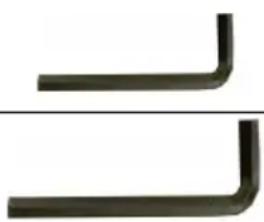 | 1 |
| 2 | Hex key(S=6) | 1 | |
| 3 | Socket wrench | 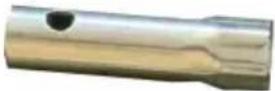 | |
| 4 | Dual-purpose wrench(S=18) |  | 2 |
| 5 | hex head screws kit (M12*40) | 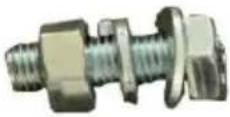 | 2 |
| 6 | Manual | 1 | |
| 7 | Emission declaration | 1 |
Troubleshooting
Please check the list below before addressing the problems to servicing personnel including local dealer. And if the problem continues after the troubleshooting as described below, call your local dealer for future assistance.
| Failure | Possible Cause | Remedial Measure |
| Vibrates insufficient and as a result the concrete floor can’t be leveled and smoothed in the proper way. | The centrifugal force is too low. | Increase engine speed. |
| There are excessive amounts of concrete along the leading edge of the board. | Remove the excessive concrete from the board. | |
| The chosen width of the board is too large | Work with a smaller board. | |
| Concrete looks “WAVY” as the screed board passes over it | Operator moving too slowly | Walk backwards at a faster pace. |
| Too much vibration for the type of concrete | Reduce engine speed and walk backwards at a faster pace. | |
| Leaving HIGH or LOW spots during wet screeding. | Concrete too high or low on one side? | Have workers shape the concrete close as possible to grade. Maintain about 1 inch of concrete across the front of the board at times. |
| Board digs into wet concrete. | Is board positioned correctly? | Each end of the board must ride on the same surface. Either each end of the board ride on forms or concrete (wet screed) not both |
Manufacturer: Shanghaimuxinmuyeyouxiangongsi
Address: Baoshanqu Shuangchenglu 803long 11hao 1602A-1609shi Shanghai
Imported to AUS: SIHAO PTY LTD.1 ROKEVA STREETEASTWOOD NSW 2122 Australia
Imported to USA: Sanven Technology Ltd. Suite 250, 9166 Anaheim Place, Rancho Cucamonga, CA 91730
EC REP SHUNSHUN GmbH.
Römeräcker 9 Z2021,76351 Linkenheim-Hochstetten, Germany
Tel: +49 1727041930 euvertreter@gmail.com
UK REP: Pooledas Group Ltd
Unit 5 Albert Edward House, The Pavilions Preston, United Kingdom
Tel: 01772418127 pooledas123@gmail.com
Made in China
VEVOR®
TOUGH TOOLS, HALF PRICE
Technical Support and E-Warranty Certificate
www.vevor.com/support
VEVOR®
TOUGH TOOLS, HALF PRICE
MODEL: ZPJ-25A-6, ZPJ-25A-8, ZPJ-25A-11 ZPJ-25A-6/8/11
We continue to be committed to provide you tools with competitive price.
"Save Half", "Half Price" or any other similar expressions used by us only represent an estimate of savings you might benefit from buying certain tools with us compared to top brands and does not necessarily mean to cover all categories of tools offered by us. We kindly remind you to verify carefully when you are placing an order with us if you are actually saving half in comparison with the top major brands.
MODEL: ZPJ-25A-6, ZPJ-25A-8, ZPJ-25A-11 ZPJ-25A-6/8/11
NEED HELP? CONTACT US!
Have product questions? Need technical support? Please feel free to contact us:
Technical Support and E-Warranty Certificate www.vevor.com/support
This is the original instruction. Please read all manual instructions carefully before operating. VEVOR reserves a clear interpretation of the user manual. The appearance of the product shall be subject to the product you received. Please forgive us that we won't inform you of any technology or software updates on our product.
IMPORTANT GUARANTEES

Exploded diagram
www.vevor.com/support
VEVOR®
TOUGH TOOLS, HALF PRICE
MODEL: ZPJ-25A-6, ZPJ-25A-8, ZPJ-25A-11 ZPJ-25A-6/8/11
We continue to be committed to providing you with tools at competitive prices. "Save Half", "Half Price" or any other similar expressions used by us only represent an estimate of savings you might benefit from buying certain tools with us compared to top brands and does not necessarily mean to cover all categories of tools offered by us. You are kindly reminded to verify carefully when placing an order with us if you are actually saving half in comparison with the top major brands.
MODEL: ZPJ-25A-6, ZPJ-25A-8, ZPJ-25A-11 ZPJ-25A-6/8/11
NEED HELP? CONTACT US!
Have product questions? Need technical support? Please feel free to contact us:
Technical Support and E-Warranty Certificate www.vevor.com/support
This is the original instruction. Please read all manual instructions carefully before operating. VEVOR reserves a clear interpretation of the user manual. The appearance of the product shall be subject to the product you received. Please forgive us that we won't inform you of any technology or software updates on our product.
Exploded diagram
UK REP: Pooledas Group Ltd
www.vevor.com/support
VEVOR®
TOUGH TOOLS, HALF PRICE
MODEL: ZPJ-25A-6, ZPJ-25A-8, ZPJ-25A-11 ZPJ-25A-6/8/11
We continue to be committed to provide you tools with competitive price. "Save Half", "Half Price" or any other similar expressions used by us only represent an estimate of savings you might benefit from buying certain tools with us compared to top brands and does not necessarily mean to cover all categories of tools offered. We kindly remind you to verify carefully when you are placing an order with us if you are actually saving half in comparison with the top major brands.
MODEL: ZPJ-25A-6, ZPJ-25A-8, ZPJ-25A-11 ZPJ-25A-6/8/11
NEED HELP? CONTACT US!
Have product questions? Need technical support? Please feel free to contact us:
Technical Support and E-Warranty Certificate www.vevor.com/support
This is the original instruction. Please read all manual instructions carefully before operating. VEVOR reserves a clear interpretation of the user manual. The appearance of the product shall be subject to the product you received. Please forgive us that we won't inform you of any technology or software updates on our product.
IMPORTANT SAFETY INSTRUCTIONS

Imported in AUS: SIHAO PTY LTD. 1 ROKEVA STREET EASTWOOD
NSW 2122 Australia
Anaheim Place, Rancho Cucamonga, CA 91730
EU REPRESENTATIVE: SHUNSHUN GmbH.
Römeräcker 9 Z2021, 76351 Linkenheim-Hochstetten, Germany
Tel: +49 1727041930 euvertreter@gmail.com
UK REPRESENTATIVE: Pooledas Group Ltd
www.vevor.com/support
VEVOR®
TOUGH TOOLS, HALF PRICE
MODEL: ZPJ-25A-6, ZPJ-25A-8, ZPJ-25A-11 ZPJ-25A-6/8/11
We continue to be committed to provide you tools with competitive price. "Save Half", "Half Price" or any other similar expressions used by us only represent an estimate of savings you might benefit from buying certain tools with us compared to top brands and does not necessarily mean to cover all categories of tools offered by us. You are kindly reminded to verify carefully when you are placing an order with us if you actually save half in comparison with the top major brands.
MODEL: ZPJ-25A-6, ZPJ-25A-8, ZPJ-25A-11 ZPJ-25A-6/8/11
NEED HELP? CONTACT US!
Have product questions? Need technical support? Please feel free to contact us:
Technical Support and E-Warranty Certificate www.vevor.com/support
This is the original instruction. Please read all manual instructions carefully before operating. VEVOR reserves a clear interpretation of the user manual. The appearance of the product shall be subject to the product you received. Please forgive us that we won't inform you of any technology or software updates on our product.
www.vevor.com/support
VEVOR®
TOUGH TOOLS, HALF PRICE
MODEL: ZPJ-25A-6, ZPJ-25A-8, ZPJ-25A-11 ZPJ-25A-6/8/11
We continue to be committed to provide you tools with competitive price. "Save Half", "Half Price" or any other similar expressions used by us only represent an estimate of savings you might benefit from buying certain tools with us compared to top brands and does not necessarily mean to cover all categories of tools offered by us. You are kindly reminded to verify carefully when you are placing an order with us if you are actually saving half in comparison with the top major brands.
MODEL: ZPJ-25A-6, ZPJ-25A-8, ZPJ-25A-11 ZPJ-25A-6/8/11
NEED HELP? CONTACT US!
Have product questions? Need technical support? Please feel free to contact us:
Technical Support and E-Warranty Certificate www.vevor.com/support
This is the original instruction. Please read all manual instructions carefully before operating. VEVOR reserves a clear interpretation of the user manual. The appearance of the product shall be subject to the product you received. Please forgive us that we won't inform you of any technology or software updates on our product.
IMPORTANT SAFETY INSTRUCTIONS

WORKPLACE SAFETY
Exploded Diagram
www.vevor.com/support
VEVOR®
TOUGH TOOLS, HALF PRICE
Technical Support and E-Warranty Certificate www.vevor.com/support
CONCRETE FLOOR
MODEL: ZPJ-25A-6, ZPJ-25A-8, ZPJ-25A-11 ZPJ-25A-6/8/11
We continue to be committed to provide you tools with competitive price. "Save Half", "Half Price" or any other similar expressions used by us only represent an estimate of savings you might benefit from buying certain tools with us compared to top brands and does not necessarily mean to cover all categories of tools offered by us. You are kindly reminded to verify carefully when you are placing an order with us if you actually save half in comparison with the top major brands.
MODEL: ZPJ-25A-6, ZPJ-25A-8, ZPJ-25A-11 ZPJ-25A-6/8/11
NEED HELP? CONTACT US!
Have product questions? Need technical support? Please feel free to contact us:
Technical Support and E-Warranty Certificate www.vevor.com/support
This is the original instruction. Please read all manual instructions carefully before operating. VEVOR reserves a clear interpretation of the user manual. The appearance of the product shall be subject to the product you received. Please forgive us that we won't inform you of any technology or software updates on our product.
IMPORTANT SAFETY MEASURES

Exploded diagram
| Nee. | Beschrijvingen | Aantal | Grootte of afmetin |
| 1 | Handvat lasmontage | 1 | ZPJ-25A.2 |
| 2 | Klemblok | 1 | ZPJ-25.9 |
| 3 | Klemblok | 1 | ZPJ-25.10 |
| 4 | Pin-as | 1 | GB/T882-B6*35 |
| 5 | Handvatsteunrubber | 6 | TVSA-T.18 |
| 6 | Handvat lasmontage | 1 | ZPJ-25A.1 |
| 7 | Handvatsteunpijp | 1 | ZPJ-25.12 |
| 8 | Motorplaat | 1 | ZPJ-25A.3 |
| 9 | Bout | 4 | GB/T70.1-M6*30-10.9 |
| 10 | Montage koppelingshuis | 1 | TVSA-T.15 |
| 11 | Draad | 1 | TVSA-T.16 |
| 12 | Tuinslang | 1 | TVSA-T.17 |
| 13 | Trilhuisconstructie | 1 | TVSA-T.14 |
| 14 | Noot | 2 | GB/T6170-M12 |
| 15 | Gewone wasmachine | 2 | GB/T97.1-φ12 |
| 16 | Veerring | 2 | GB/T93-φ12 |
| 17 | Bout | 2 | GB/T5783-M12*40 |
Parts list
Anaheim Place, Rancho Cucamonga, CA 91730
EG-REP: SHUNSHUN GmbH.
Römeräcker 9 Z2021, 76351 Linkenheim-Hochstetten, Germany
Tel: +49 1727041930 euvertreter@gmail.com
UK REP: Pooledas Group Ltd
www.vevor.com/support
VEVOR®
TOUGH TOOLS, HALF PRICE
MODEL: ZPJ-25A-6, ZPJ-25A-8, ZPJ-25A-11 ZPJ-25A-6/8/11
We continue to be committed to provide you tools with competitive price. "Save Half", "Half Price" or any other similar expressions used by us only represent an estimate of savings you might benefit from buying certain tools with us compared to top brands and does not necessarily mean to cover all categories of tools offered by us. We kindly remind you to verify carefully when you are placing an order with us if you actually saving half in comparison with the top major brands.
MODEL: ZPJ-25A-6, ZPJ-25A-8, ZPJ-25A-11 ZPJ-25A-6/8/11

NEED HELP? CONTACT US!
Have product questions? Need technical support? Please feel free to contact us:
Technical Support and E-Warranty Certificate www.vevor.com/support
This is the original instruction, please read all manual instructions carefully before operating. VEVOR reserves a clear interpretation of user manual. The appearance of the product shall be subject to the product you received. Please forgive us that we won't inform you there are any technology or software updates on our product.
IMPORTANT SAFETY MEASURES

Exploded diagram
| Nej. | Beskrivningar | Antal | Storlek eller dimension |
| 1 | Handtagssvetsenhet | 1 | ZPJ-25A.2 |
| 2 | Klämblock | 1 | ZPJ-25,9 |
| 3 | Klämblock | 1 | ZPJ-25.10 |
| 4 | Stiftaxel | 1 | GB/T882-B6*35 |
| 5 | Handtagsstödgummi | 6 | TVSA-T.18 |
| 6 | Handtagssvetsenhet | 1 | ZPJ-25A.1 |
| 7 | Handtagsstödrör | 1 | ZPJ-25.12 |
| 8 | Motorplatta | 1 | ZPJ-25A.3 |
| 9 | Bult | 4 | GB/T70.1-M6*30-10.9 |
| 10 | Kopplingshusenhet | 1 | TVSA-T.15 |
| 11 | Tråd | 1 | TVSA-T.16 |
| 12 | Gummislang | 1 | TVSA-T.17 |
| 13 | Vibrerande husmontage | 1 | TVSA-T.14 |
| 14 | Nöt | 2 | GB/T6170-M12 |
| 15 | Vanlig bricka | 2 | GB/T97.1-φ12 |
| 16 | Fjäderbricka | 2 | GB/T93-φ12 |
| 17 | Bult | 2 | GB/T5783-M12*40 |
Parts list
UK REP: Pooledas Group Ltd
Unit 5 Albert Edward House, The Pavilions Preston, UK
Tel: 01772418127 pooledas123@gmail.com
Made in China
VEVOR®
TOUGH TOOLS, HALF PRICE
www.vevor.com/support
- CONCRETE SCREED
- NEED HELP? CONTACT US
- IMPORTANT SAFEGUARDS
- INTENDED USE
- TECHNICAL SPECIFICATIONS
- WARNING
- WORK AREA SAFETY
- PERSONAL SAFETY
- SCREED USE AND CARE
- SPECIFIC OPERATION WARNINGS
- TO AVOID FATAL ACCIDENT
- TO PROTECT THE OPERATOR
- TO AVOID INJURY OR DAMAGE
- ASSEMBLY INSTRUCTIONS
- SCREED ASSEMBLY
- BEFORE EACH USE
- PREPARATION FOR OPERATION
- RECOMMENDED FUEL
- BEFORE STARTING ENGINE
- OPERATING INSTRUCTIONS
- STARTING THE ENGINE
- OPERATION
- STOPPING THE ENGINE
- TO STOP THE ENGINE NORMALLY
- AFTER EACH USE
- CLEAN UP
- IN CASE OF STORING THE SCREED AND BOARD FOR A LONG PERIOD OF TIME (FOR MORE THAN 30 DAYS)
- MAINTENANCE
- EXPLOSION DIAGRAM
- TROUBLESHOOTING
- VEVOR®
- TOUGH TOOLS, HALF PRICE
- IMPORTANT GUARANTEES
- IMPORTANT SAFETY INSTRUCTIONS
- WORKPLACE SAFETY
- CONCRETE FLOOR
- IMPORTANT SAFETY MEASURES
Brand : Vevor
Model : ZPJ-25A-6
Category : Concrete level