STD12A - Binding machine Vevor - Free user manual and instructions
Find the device manual for free STD12A Vevor in PDF.

| Brand | Vevor |
| Model | STD12A |
| Product Type | Binding Machine |
| Punching Capacity | 12 sheets (A4 80g) |
| Binding Capacity | 120 sheets (A4) |
| Paper Margin | 3 / 5 / 7 mm |
| Number of Square Holes | 34 |
| Square Hole Spacing | 8,46 mm |
| Square Hole Size | 4 x 4 mm |
| Knife Type | Single Knife |
| Compatible Paper Size | A4 or smaller sizes |
| Machine Dimensions | 385 x 246 x 367 mm |
| Net Weight | 4,9 kg |
| Gross Weight | 5,5 kg |
| Package Dimensions | 440 x 190 x 310 mm |
| Intended Use | Binding with plastic rings |
| Included Accessories | Single knife, paper shelf, blotting paper, instructions |
| Maintenance | Regularly clean the waste tray located at the back |
| Safety Instructions | Keep out of reach of children, avoid moisture, do not punch hard materials |
| First Use | Perform a punch with blotting paper to absorb excess lubricant |
Frequently Asked Questions - STD12A Vevor
User questions about STD12A Vevor
0 question about this device. Answer the ones you know or ask your own.
Ask a new question about this device
Download the instructions for your Binding machine in PDF format for free! Find your manual STD12A - Vevor and take your electronic device back in hand. On this page are published all the documents necessary for the use of your device. STD12A by Vevor.
USER MANUAL STD12A Vevor
Technical Support and E-Warranty Certificate www.vevor.com/support
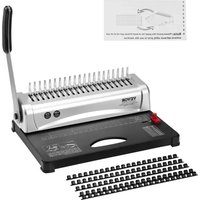
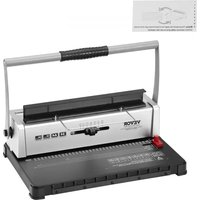
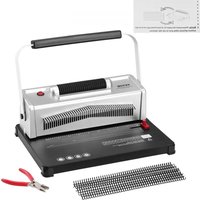
BINDING MACHINE
MODEL: STD12A
We continue to be committed to provide you tools with competitive price. "Save Half", "Half Price" or any other similar expressions used by us only represent the estimate of savings you might benefit from buying certain tools with us compared to top brands and does not necessarily mean to cover all categories of tools offered. Are kindly reminded to verify carefully when you are placing an order with us actually saving half in comparison with the top major brands.
MODEL: STD12A

NEED HELP? CONTACT US!
Have product questions? Need technical support? Please feel fr contact us:
Technical Support and E-Warranty Certificate www.vevor.com/support
This is the original instruction, please read all manual instruction carefully before operating. VEVOR reserves a clear interpretation user manual. The appearance of the product shall be subject to product you received. Please forgive us that we won't inform you there are any technology or software updates on our product.

Warning-To reduce the risk of injury, user must read instructions manual carefully.
WARMING & ATTENTIONS
Read this operation manual carefully before using.
Keep the machine separately from children.
Keep the machine away from fire and liquid.
Put the machine on a stable and safe place in order to prevent falling or causing any injury to people or the machine itself.
Test the machine with some scrap paper before formally punching binding, to make sure whether the position is correct to punch.
Please do not let the child operate separately.
Take out the surplus parts from the packing box. Put the machin balanced and safe place to avoid falling off or causing any injury people or the machine.
Operate the machine strictly as per the manuals especially pay attention to the max Punching and binding capacity.
Please test the machine before you punch the official documents.
When punching the plastic covers, we suggest that the cover sho be clipped between two pieces of paper.
Please don't use the machine to punch hard materials such as m to avoid damage to the machine.
When clamping the plastic ring, pls don't put your fingers inside the area, otherwise, you will get hurt.
The machine is only dedicated to using plastic ring.
Please don't put the machine in wet places to avoid any liquid d inside.
For the first use, make a punch with blotting paper to suck up a lube from the blade.
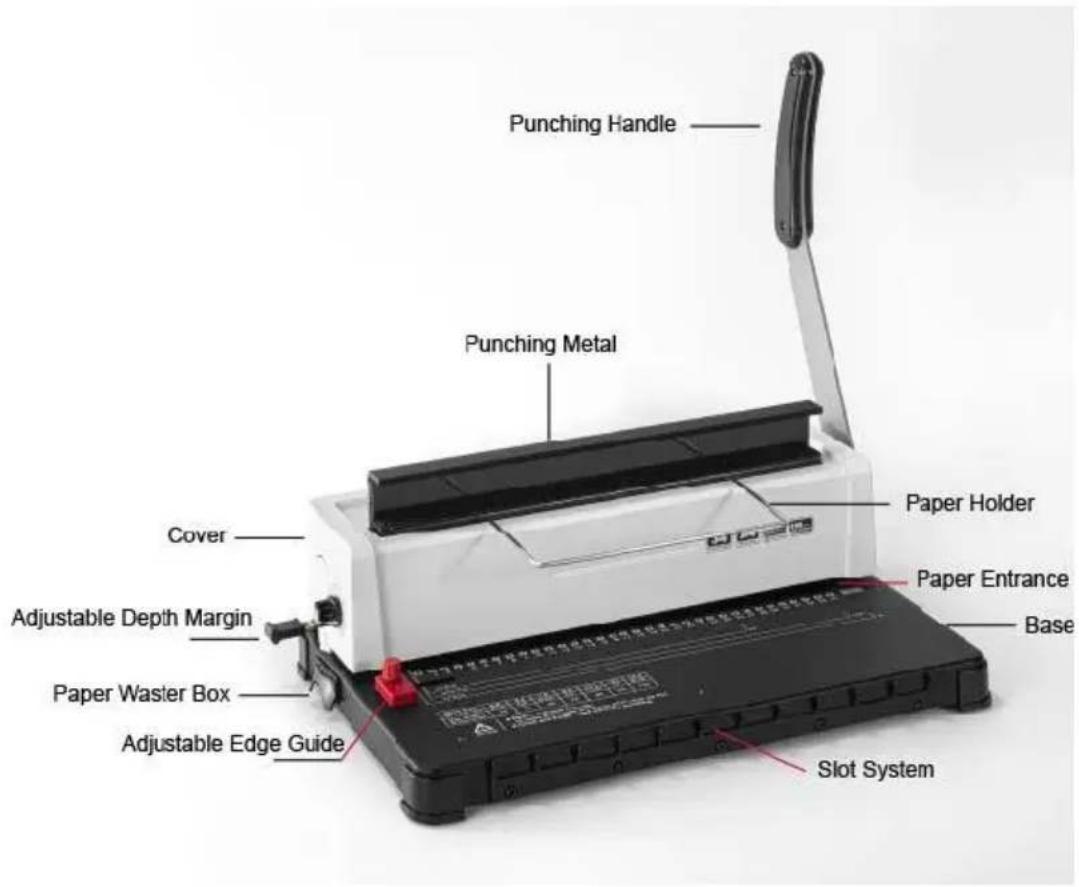
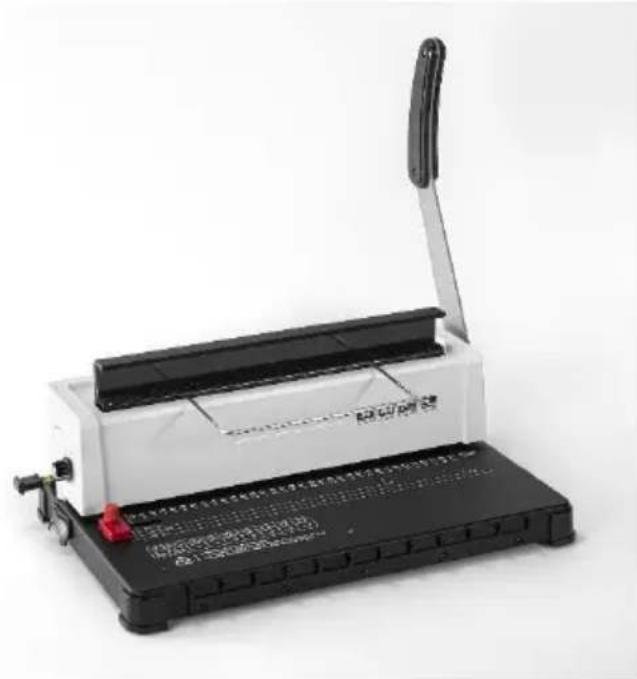
STRUCTURAL REPRESENTATION
TECHNICAL SPECIFICATIONS
| Punching Capacity: | 12 Sheets (A4 80g) |
| Binding Capacity: | 120 Sheets (A4) |
| Paper Margin: | 3/5/7 mm |
| Square Holes: | 34 holes |
| Square Hole Distance | 8.46mm |
| Square Hole Size | 4x4mm |
| Type of knife | single knife |
| Paper Format: | A4 paper or smaller sizes |
| Machine Dimension: | 385*246*367mm |
| N.W.: | 4.9kg |
| Packing Dimension: | 440*190*310mm |
| G.W.: | 5.5kg |
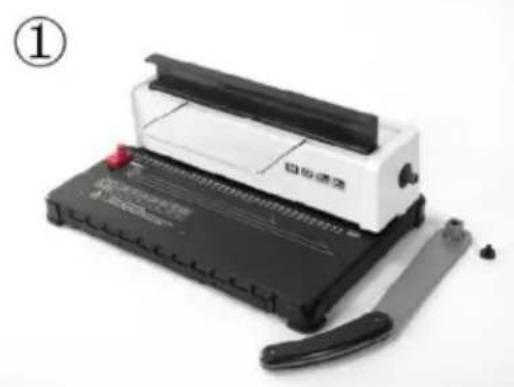
PARTS LIST
| Parts Name | Quantity |
| Single knife | 1 pc |
| Paper shelf | 1 pc |
| Blotting paper | 1 pc |
| Instructions | 1 pc |
OPERATING GUIDE

Place the machine on a steady and even place before using!
For the first use, make a punch with blotting paper to succeed excess lube from the blade.
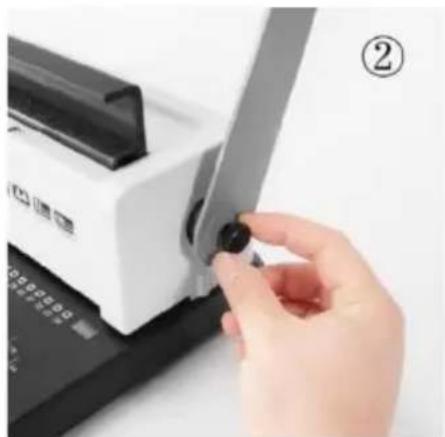
1. Installation Operations

After unpacking, locate and arrange the main unit and two parts on the diagram

Install the handle on the main unit and fix it with a nut
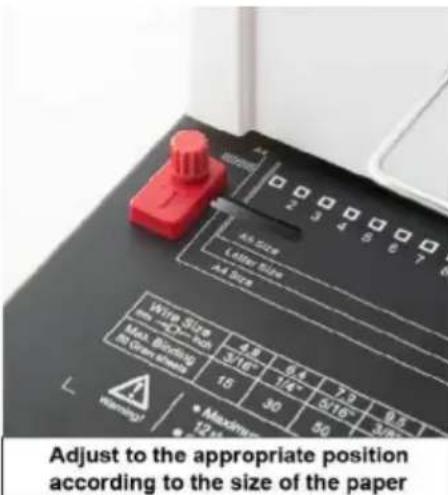
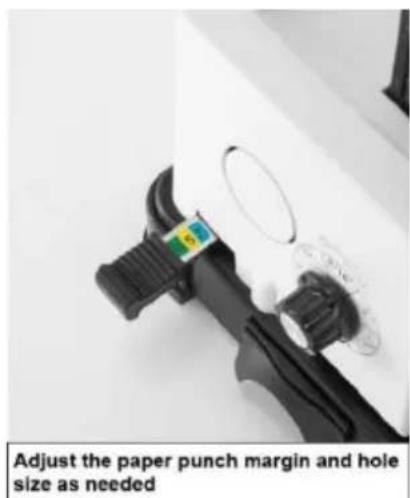
2. Adjustable Operation

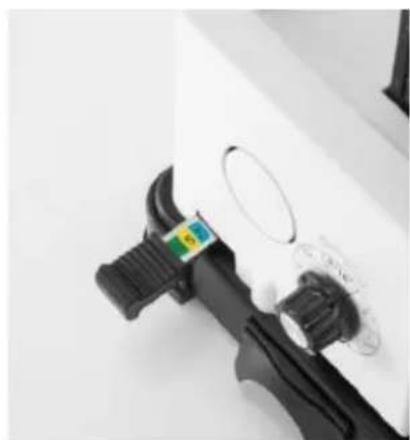
Adjust the paper punch margin and hole size as needed
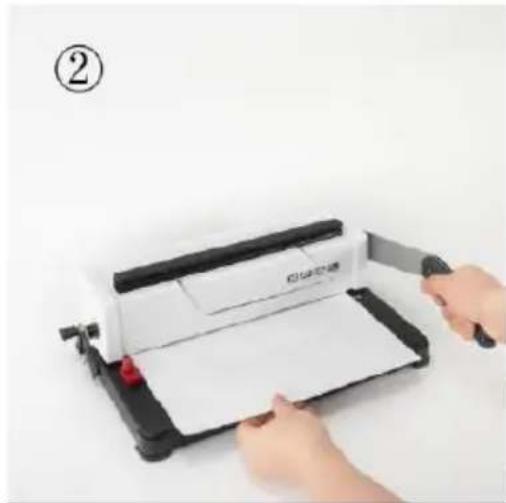
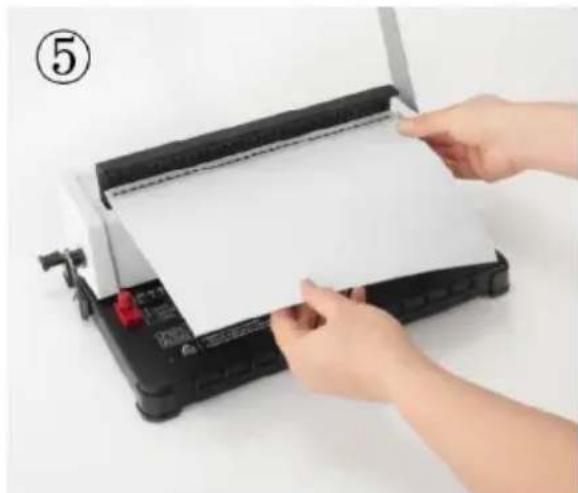
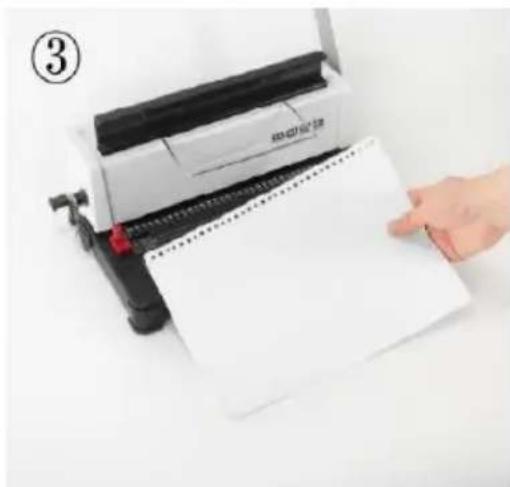
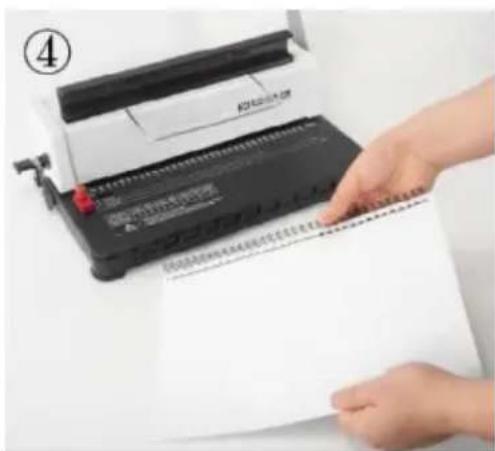
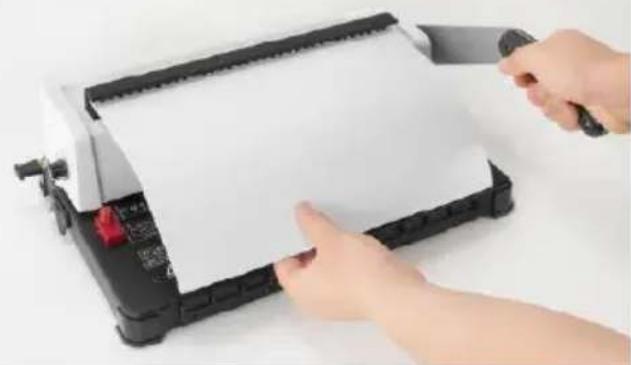
3. Punching Operation
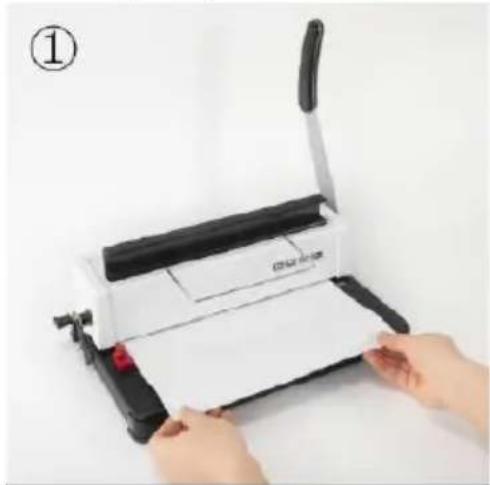
Depending on the size of the bindingfile, select the location of the binderand insert the file
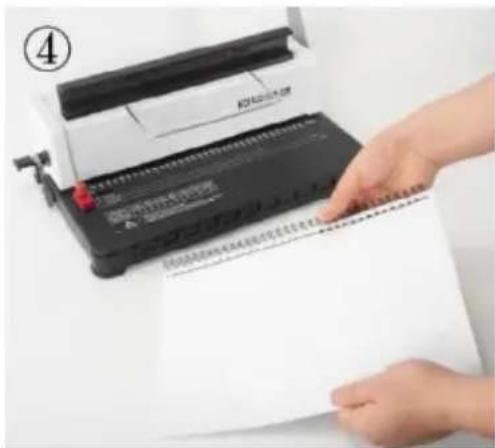
After Inserting the file, press the handle down and lift the handle

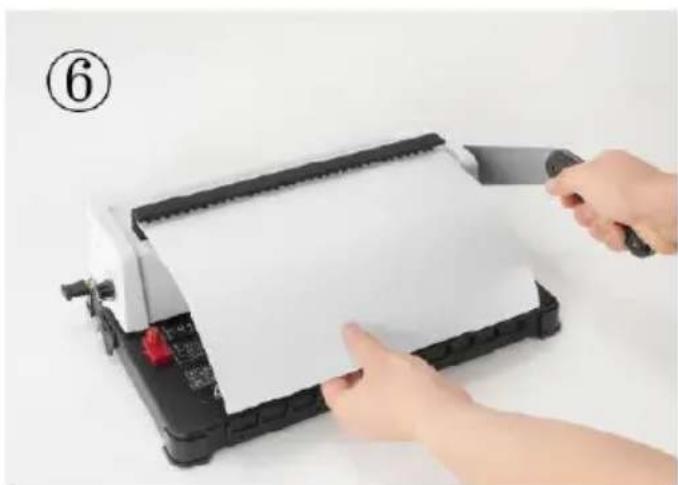
Release the handle, pull out the paper, and the hole is finished
4. Binding Operation
Select a correct size of 3:1 wirebinding ring you need, load it onthe slot system
Place the perforated paper and binding cover on the wire spine to keep them stacked
Get them to cling the punching metalmake sure the wire binding spine both ends reached Binding metal

6
Pull the handle downward to close the wire binding spine so as to complete binding
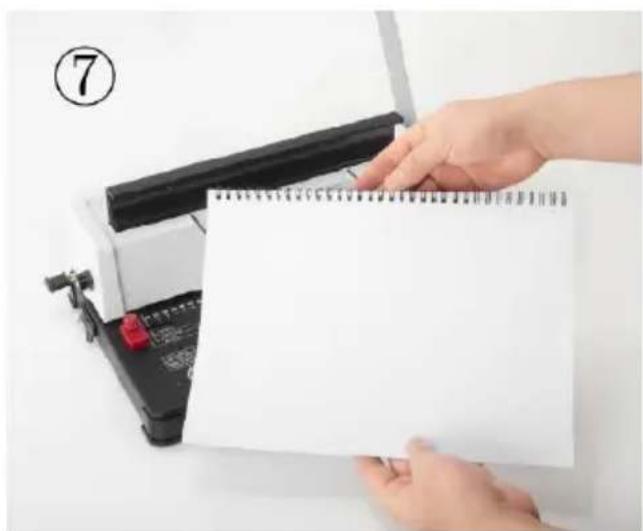
7
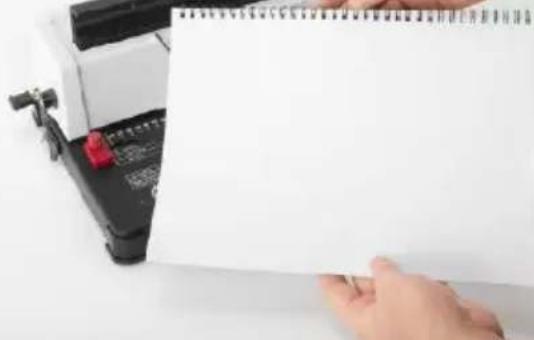
Release the handle, remove the paper, and the binding is complete
Choose the comb according to the thickness of the document. The following form is for your reference to choose the proper comb.
| Comb size Φ(mm) | Φ(inch) | Binding sheets | Comb size Φ(mm) | Φ(inch) | Binding sheets |
| 6 | 1/4" | 1-20 | 25 | 1 | 200-230 |
| 8 | 5/16" | 20-40 | 28 | 1-1/8 | 230-250 |
| 10 | 3/8" | 40-60 | 32 | 1-1/4 | 250-290 |
| 12 | 1/2" | 60-80 | 35 | 1-3/8 | 290-320 |
| 14 | 9/16" | 80-100 | 38 | 1-1/2 | 320-360 |
| 16 | 5/8" | 100-120 | 45 | 1-3/4 | 360-400 |
| 20 | 3/4" | 120-150 | 51 | 2 | 400-450 |
| 22 | 7/8" | 150-200 |
MAINTENANCE
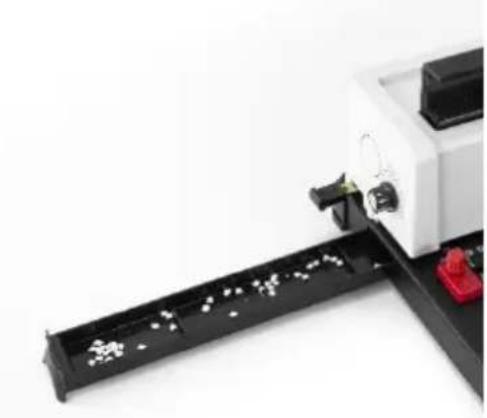
Clean up the waste bin
The waste bin, which is located at the back of the machine, is dedicated to the waste of punching. The frequency of cleaning up the waste bin depends on the frequency you use the machine.
1.Pull out the waste bin from the back of the machine
2.Pour the waste into the rubbish bin.
3. And insert the waste bin again.
Please clean up the waste bin frequently!
PROBLEMS & SOLUTIONS
| Problems | Reasons | Solutions |
| 1.The lever couldn't be pressed down when punching | Paper scraps or other hard materials stay inside the paper cutter | Clean up the rubbish with hardboard |
| Exceeding the punching capacity | Operate according to the manual | |
| 2.Slanting paper margin | The paper is lopsided when inserting | Take out the paper a put in again |
| Paper scraps or other hard materials stay inside the paper cutter | Clean up the rubbish with hardboard | |
| 3.Slanting plastic comb open | The binding mechanism distorted | Just the binding teeth on the rack |
| The comb opening hook distorted | Press opens the com opening mechanism and just the hook | |
| 4.Paper punching is not complete and it's hard to pull out the paper | Exceeding the max. Punching capacity | Lessen the punching thickness (follow the manual) |
| 5.Paper couldn't touch the rack where inserting | The paper is old with the side rolling up | Smooth the paper and insert again |
VEVOR
TOUGH TOOLS, HALF PRICE
Technical Support and E-Warranty Certificate www.vevor.com/support
VEVOR®
TOUGH TOOLS, HALF PRICE
We continue to be committed to provide you tools with competitive price. "Save Half", "Half Price" or any other similar expressions used by us only represent the estimate of savings you might benefit from buying certain tools with us compared to top brands and does not necessarily mean to cover all categories of tools offered. We are kindly reminded to verify carefully when you are placing an order with us actually saving half in comparison with the top major brands.
MODEL: STD12A

NEED HELP? CONTACT US!
Have product questions? Need technical support? Please feel fr contact us:
Technical Support and E-Warranty Certificate www.vevor.com/support
This is the original instruction, please read all manual instruction carefully before operating. VEVOR reserves a clear interpretation user manual. The appearance of the product shall be subject to product you received. Please forgive us that we won't inform you there are any technology or software updates on our product.

WARMING & ATTENTIONS
Select a correct size of 3:1 wirebinding ring you need, load it onthe slot system
Place the perforated paper and binding cover on the wire spine to keep them stacked

Get them to cling the punching metalmake sure the wire binding spine both ends reached Binding metal

Pull the handle downward to close the wire binding spine so as to complete binding

Release the handle, remove the paper, and the binding is complete
We continue to be committed to provide you tools with competitive price. "Save Half", "Half Price" or any other similar expressions used by us only represent the estimate of savings you might benefit from buying certain tools with us compared to top brands and does not necessarily mean to cover all categories of tools offered. We are kindly reminded to verify carefully when you are placing an order with us actually saving half in comparison with the top major brands.
MODELL: STD12A
NEED HELP? CONTACT US!
Have product questions? Need technical support? Please feel fr contact us:
Technical Support and E-Warranty Certificate www.vevor.com/support
This is the original instruction, please read all manual instruction carefully before operating. VEVOR reserves a clear interpretation user manual. The appearance of the product shall be subject to product you received. Please forgive us that we won't inform you there are any technology or software updates on our product.

WARMING & ATTENTIONS
Select a correct size of 3:1 wirebinding ring you need, load it onthe slot system
Place the perforated paper and binding cover on the wire spine to keep them stacked

Get them to cling the punching metalmake sure the wire binding spine both ends reached Binding metal

Pull the handle downward to close the wire binding spine so as to complete binding

Release the handle, remove the paper, and the binding is complete
We continue to be committed to provide you tools with competitive price. "Save Half", "Half Price" or any other similar expressions used by us only represent the estimate of savings you might benefit from buying certain tools with us compared to top brands and does not necessarily mean to cover all categories of tools offered. Are kindly reminded to verify carefully when you are placing an order with us actually saving half in comparison with the top major brands.
MODELE: STD12A

NEED HELP? CONTACT US!
Have product questions? Need technical support? Please feel fr contact us:
Technical Support and E-Warranty Certificate www.vevor.com/support
This is the original instruction, please read all manual instruction carefully before operating. VEVOR reserves a clear interpretation user manual. The appearance of the product shall be subject to product you received. Please forgive us that we won't inform you there are any technology or software updates on our product.

WARMING & ATTENTIONS
After unpacking, locate and arrange the main unit and two parts on the diagram
Install the handle on the main unit and fix it with a nut
Select a correct size of 3:1 wirebinding ring you need, load it onthe slot system
Place the perforated paper and binding cover on the wire spine to keep them stacked

Get them to cling the punching metalmake sure the wire binding spine both ends reached Binding metal

Pull the handle downward to close the wire binding spine so as to complete binding
Release the handle, remove the paper, and the binding is complete
We continue to be committed to provide you tools with competitive price. "Save Half", "Half Price" or any other similar expressions used by us only represent the estimate of savings you might benefit from buying certain tools with us compared to top brands and does not necessarily mean to cover all categories of tools offered. Are kindly reminded to verify carefully when you are placing an order with us actually saving half in comparison with the top major brands.
MODEL: STD12A

NEED HELP? CONTACT US!
Have product questions? Need technical support? Please feel fr contact us:
Technical Support and E-Warranty Certificate www.vevor.com/support
This is the original instruction, please read all manual instruction carefully before operating. VEVOR reserves a clear interpretation user manual. The appearance of the product shall be subject to product you received. Please forgive us that we won't inform you there are any technology or software updates on our product.

WARMING & ATTENTIONS
Select a correct size of 3:1 wirebinding ring you need, load it onthe slot system
Place the perforated paper and binding cover on the wire spine to keep them stacked

Get them to cling the punching metalmake sure the wire binding spine both ends reached Binding metal

Pull the handle downward to close the wire binding spine so as to complete binding

Release the handle, remove the paper, and the binding is complete
We continue to be committed to provide you tools with competitive price. "Save Half", "Half Price" or any other similar expressions used by us only represent the estimate of savings you might benefit from buying certain tools with us compared to top brands and does not necessarily mean to cover all categories of tools offered. Are kindly reminded to verify carefully when you are placing an order with us actually saving half in comparison with the top major brands.
MODELL: STD12A

NEED HELP? CONTACT US!
Have product questions? Need technical support? Please feel fr contact us:
Technical Support and E-Warranty Certificate www.vevor.com/support
This is the original instruction, please read all manual instruction carefully before operating. VEVOR reserves a clear interpretation user manual. The appearance of the product shall be subject to product you received. Please forgive us that we won't inform you there are any technology or software updates on our product.

WARMING & ATTENTIONS
1. Installationsoperationer
After unpacking, locate and arrange the main unit and two parts on the diagram

Install the handle on the main unit and fix it with a nut
2. Justerbar drift
3. Stansningsoperation

Depending on the size of the bindingfile, select the location of the binderand insert the file

After inserting the file, press the handle down and lift the handle
Release the handle, pull out the paper, and the hole is finished
4. Bindande operation
Select a correct size of 3:1 wirebinding ring you need, load it onthe slot system
Place the perforated paper and binding cover on the wire spine to keep them stacked

Get them to cling the punching metalmake sure the wire binding spine both ends reached Binding metal
6
Pull the handle downward to close the wire binding spine so as to complete binding
7

Release the handle, remove the paper, and the binding is complete
Valj kammen after dokumentets tjocklek. Följande formulär ar for di referens for att valja ratt kam.
| Comb size Φ(mm) | Φ(inch) | Binding sheets | Comb size Φ(mm) | Φ(inch) | Binding sheets |
| 6 | 1/4" | 1-20 | 25 | 1 | 200-230 |
| 8 | 5/16" | 20-40 | 28 | 1-1/8 | 230-250 |
| 10 | 3/8" | 40-60 | 32 | 1-1/4 | 250-290 |
| 12 | 1/2" | 60-80 | 35 | 1-3/8 | 290-320 |
| 14 | 9/16" | 80-100 | 38 | 1-1/2 | 320-360 |
| 16 | 5/8" | 100-120 | 45 | 1-3/4 | 360-400 |
| 20 | 3/4" | 120-150 | 51 | 2 | 400-450 |
| 22 | 7/8" | 150-200 |
MAINTENANCE
Städa upp soptunnan
We continue to be committed to provide you tools with competitive price. "Save Half", "Half Price" or any other similar expressions used by us only represent the estimate of savings you might benefit from buying certain tools with us compared to top brands and does not necessarily mean to cover all categories of tools offered. Are kindly reminded to verify carefully when you are placing an order with us actually saving half in comparison with the top major brands.
MODELO: STD12A

NEED HELP? CONTACT US!
Have product questions? Need technical support? Please feel fr contact us:
Technical Support and E-Warranty Certificate www.vevor.com/support
This is the original instruction, please read all manual instruction carefully before operating. VEVOR reserves a clear interpretation user manual. The appearance of the product shall be subject to product you received. Please forgive us that we won't inform you there are any technology or software updates on our product.

WARMING & ATTENTIONS
Select a correct size of 3:1 wirebinding ring you need, load it onthe slot system
Place the perforated paper and binding cover on the wire spine to keep them stacked

Get them to cling the punching metalmake sure the wire binding spine both ends reached Binding metal

Pull the handle downward to close the wire binding spine so as to complete binding

Release the handle, remove the paper, and the binding is complete
We continue to be committed to provide you tools with competitive price. "Save Half", "Half Price" or any other similar expressions used by us only represent the estimate of savings you might benefit from buying certain tools with us compared to top brands and does not necessarily mean to cover all categories of tools offered. Are kindly reminded to verify carefully when you are placing an order with us actually saving half in comparison with the top major brands.
MODELLO: STD12A

NEED HELP? CONTACT US!
Have product questions? Need technical support? Please feel fr contact us:
Technical Support and E-Warranty Certificate www.vevor.com/support
This is the original instruction, please read all manual instruction carefully before operating. VEVOR reserves a clear interpretation user manual. The appearance of the product shall be subject to product you received. Please forgive us that we won't inform you there are any technology or software updates on our product.

WARMING & ATTENTIONS
Select a correct size of 3:1 wirebinding ring you need, load it onthe slot system
Place the perforated paper and binding cover on the wire spine to keep them stacked

Get them to cling the punching metalmake sure the wire binding spine both ends reached Binding metal
Pull the handle downward to close the wire binding spine so as to complete binding

Release the handle, remove the paper, and the binding is complete