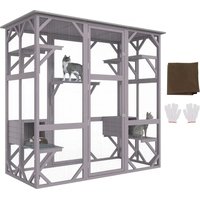
CH448 - Pets Vevor - Free user manual and instructions
Find the device manual for free CH448 Vevor in PDF.


User questions about CH448 Vevor
0 question about this device. Answer the ones you know or ask your own.
Ask a new question about this device
Download the instructions for your Pets in PDF format for free! Find your manual CH448 - Vevor and take your electronic device back in hand. On this page are published all the documents necessary for the use of your device. CH448 by Vevor.
USER MANUAL CH448 Vevor
Technical Support and E-Warranty Certificate www.vevor.com/support
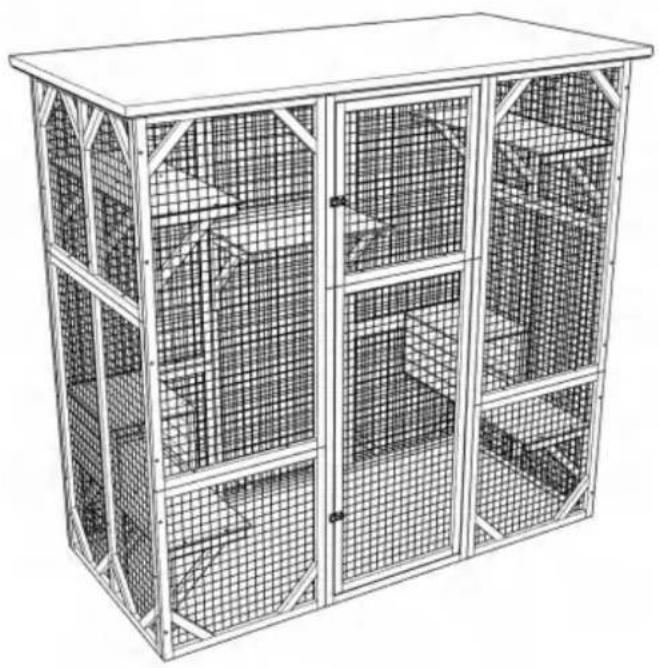
INSTRUCTION FOR CAT CAGE
MODEL:CH448
We continue to be committed to provide you tools with competitive price. "Save Half", "Half Price" or any other similar expressions used by us only represents an estimate of savings you might benefit from buying certain tools with us compared to the major top brands and does not necessarily mean to cover all categories of tools offered by us. You are kindly reminded to verify carefully when you are placing an order with us if you are actually saving half in comparison with the top major brands.
CH448
natural_image
Line drawing of a multi-level cage structure with grid panels and metal framing (no text or symbols)NEED HELP? CONTACT US!
Have product questions? Need technical support? Please feel free to contact us:
Technical Support and E-Warranty Certificate www.vevor.com/support
This is the original instruction, please read all manual instructions carefully before operating. VEVOR reserves a clear interpretation of our user manual. The appearance of the product shall be subject to the product you received. Please forgive us that we won't inform you again if there are any technology or software updates on our product.
WARNING:
Read this material before using this product. Failure to do so can result in serious injury.
Assembly precautions
- Assemble only according to these instructions. Improper assembly can create hazards.
- In order to ensure your own safety, please make sure to ANSI-approved safety goggles and heavy-duty work gloves when installing this product.
- Keep the assembly area clean and well lit.
- Keep bystanders out of the area during assembly.
- Do not assemble when tired or when under the influence of alcohol, drugs or medication.
- Product capabilities apply to properly and completely assembled product only.
- Assemble on a flat, level, hard and smooth surface capable of safely supporting a fully loaded cat cage.
Use precautions
TO PREVENT SERIOUS INJURY AND DEATH FROM TIPPING:
- DO NOT SIT OR STAND ON THIS ITEM.
- This product is not a toy. Do not allow children to play with or near this item.
Please keep small spare parts out of children's reach. - Use only on a flat, level, hard and smooth surface capable of safely supporting a fully loaded cat cage.
- Use as intended only.
- Inspect before every use; do not use if parts are loose or damaged.
SAVE THESE INSTRUCTIONS
SPECIFICATIONS
| Model | CH448 |
| Product Size | 1800*880*1690mm |
| Color | Gray |
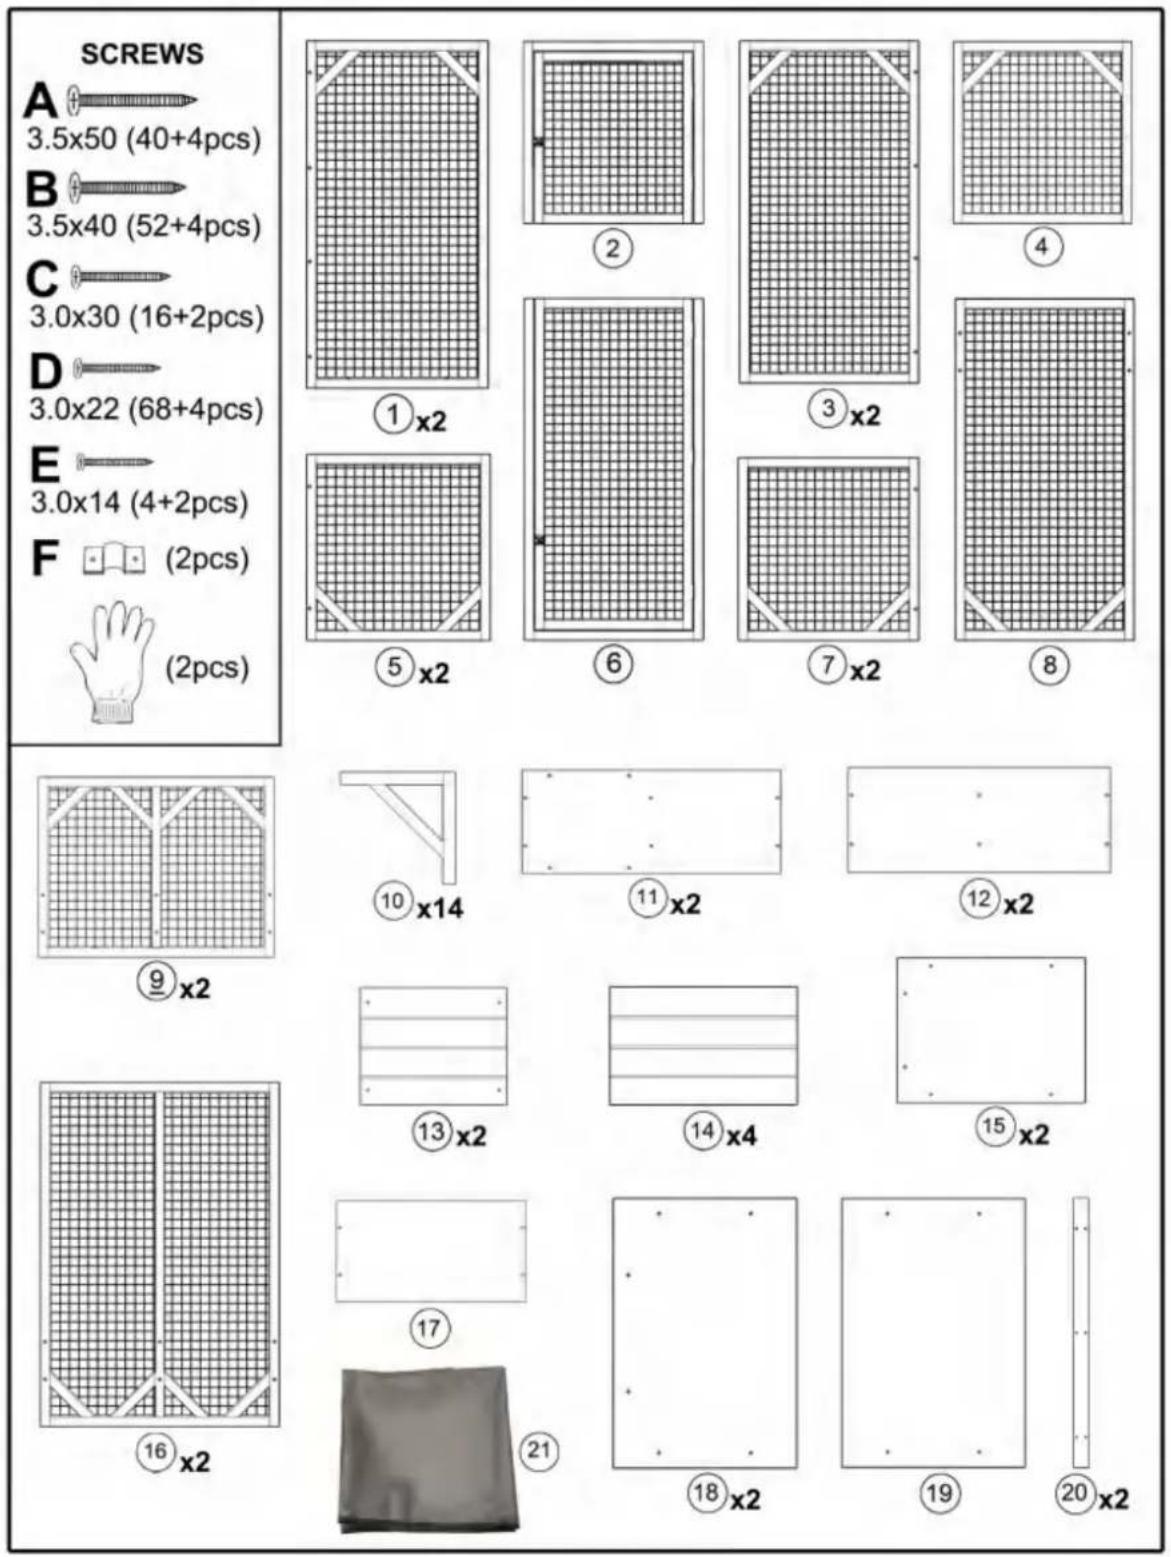
COMPONENTS
Notice:
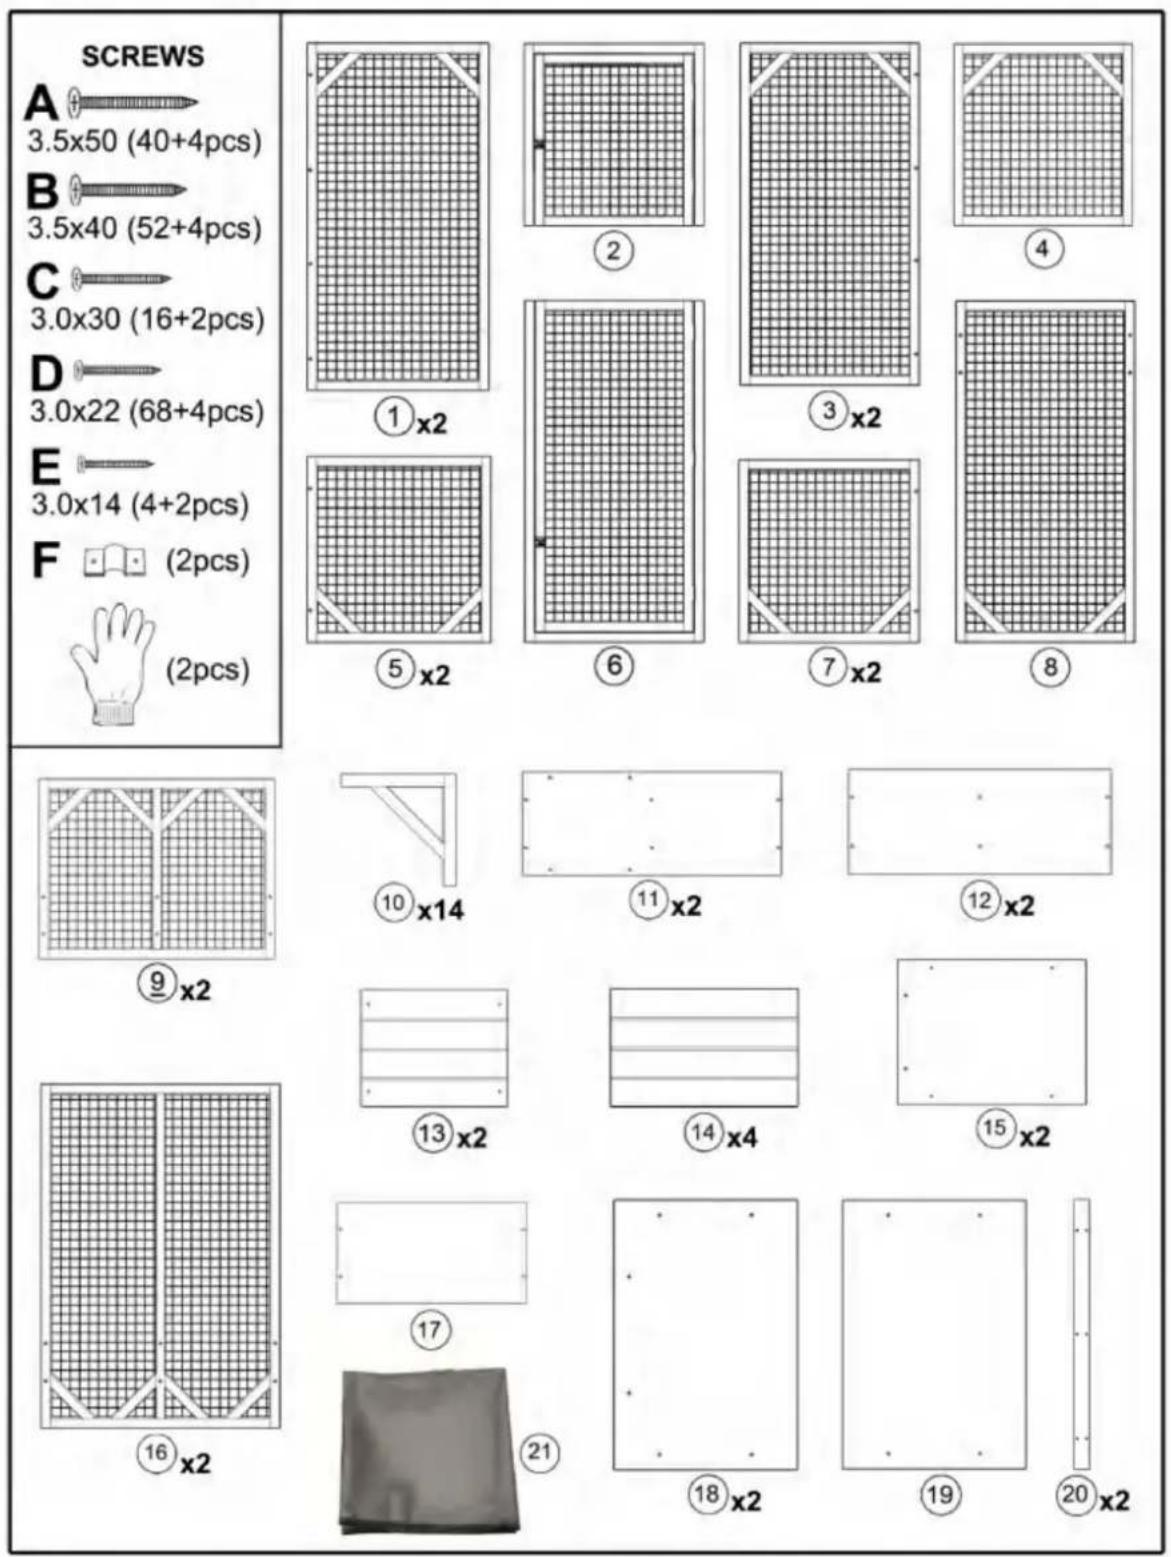
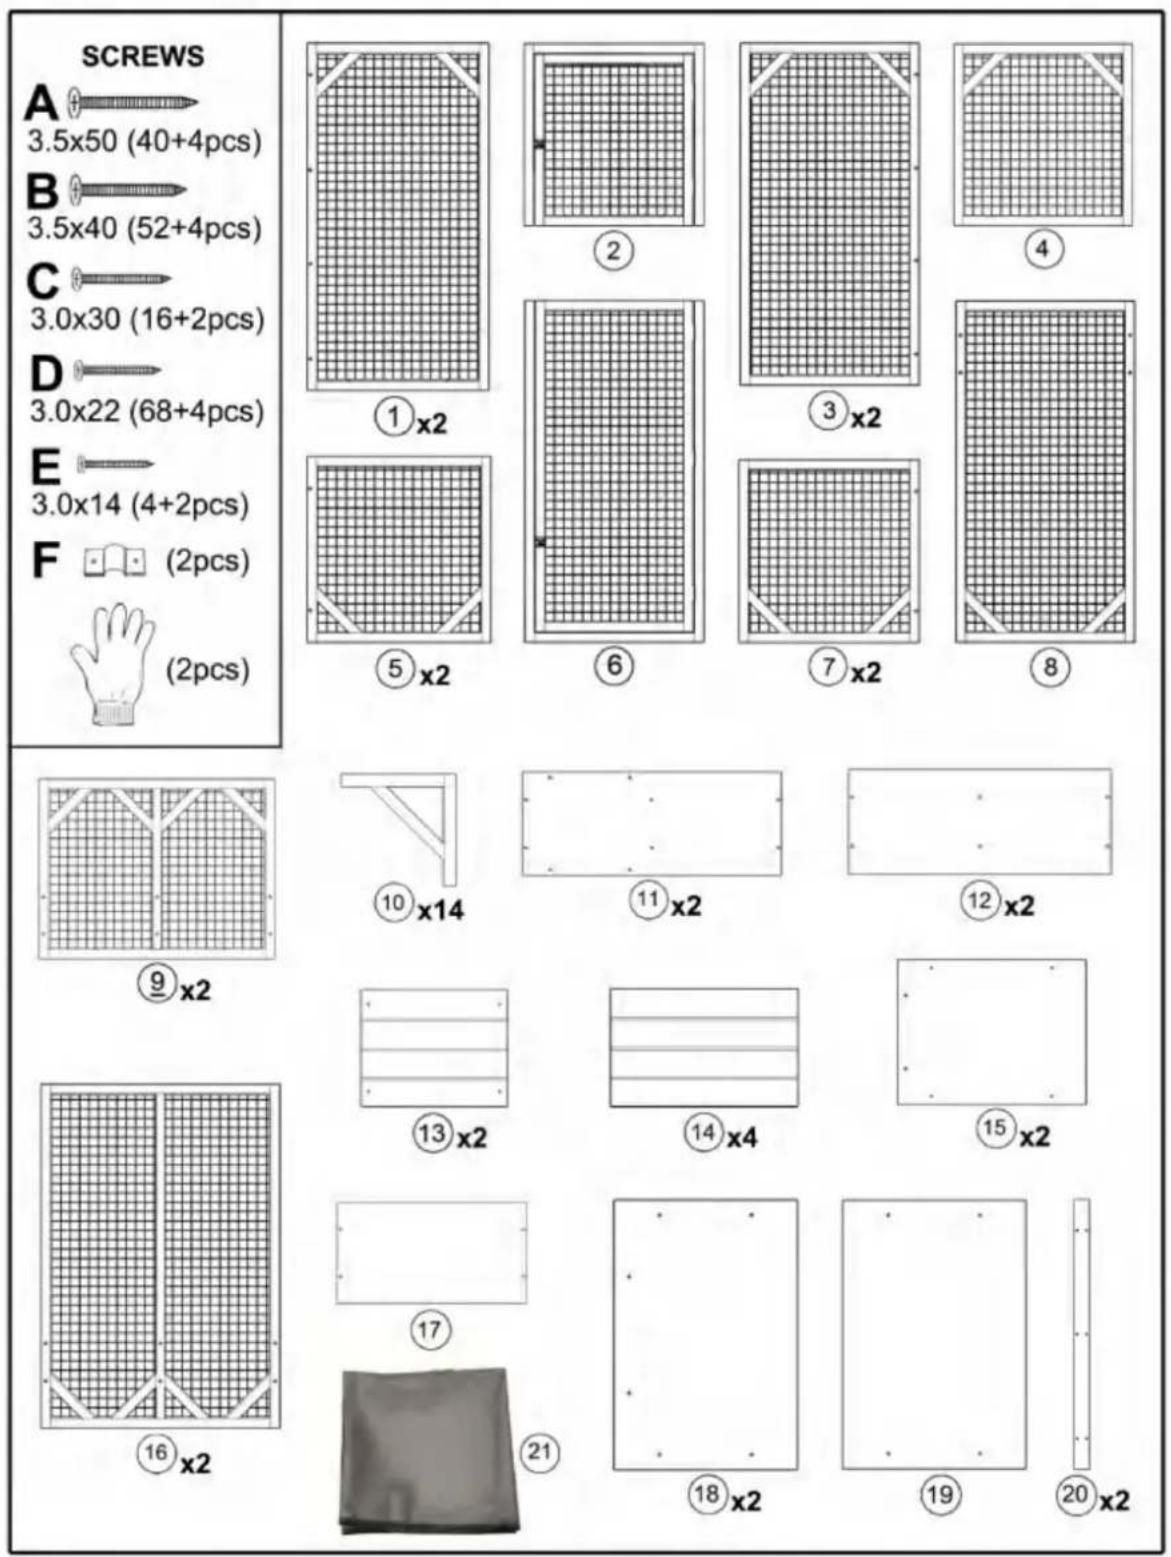
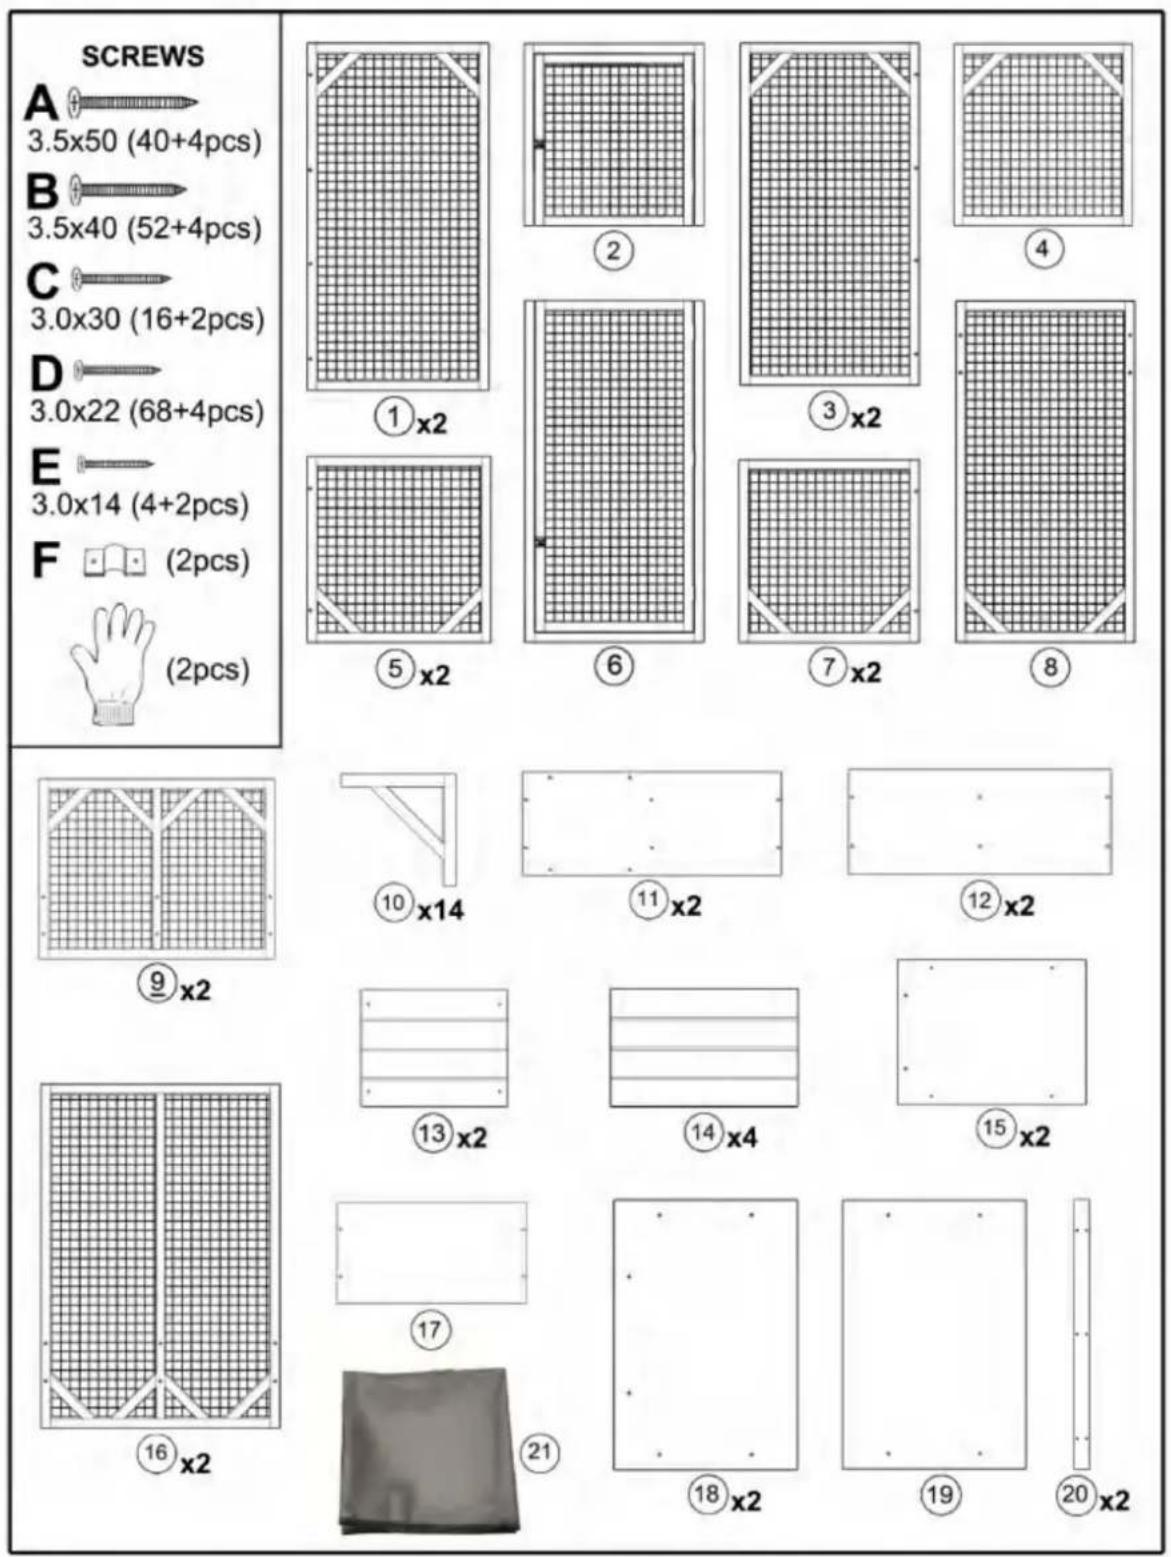
- Various specifications of screws are used in the installation of this product. Pay attention to the correct use of screw specifications according to the instruction manual.
- Please wear gloves when installing.
text_image
SCREWS A 3.5x50 (40+4pcs) B 3.5x40 (52+4pcs) C 3.0x30 (16+2pcs) D 3.0x22 (68+4pcs) E 3.0x14 (4+2pcs) F (2pcs) (2pcs) ①x2 ② ③x2 ④ ⑤x2 ⑥ ⑦x2 ⑧ ⑨x2 ⑩x14 ⑪x2 ⑫x2 ⑬x2 ⑭x2 ⑮x2 ⑯ ⑰x2 ⑱ ⑲x2 ⑳ ㉑ ㉒ ㉓ ㉔ ㉕ ㉖ ㉗ ㉘ ㉙ ㉚ ㉛ ㉜ ㉝ ㉞ ㉟ ㉳ ㉴ ㉵ ㉶ ㉷ ㉸ ㉹ ㉺ ㉚ ㉛ ㉜ ㉝ ㉞ ㉟ ㉟x2Assembly Instructions
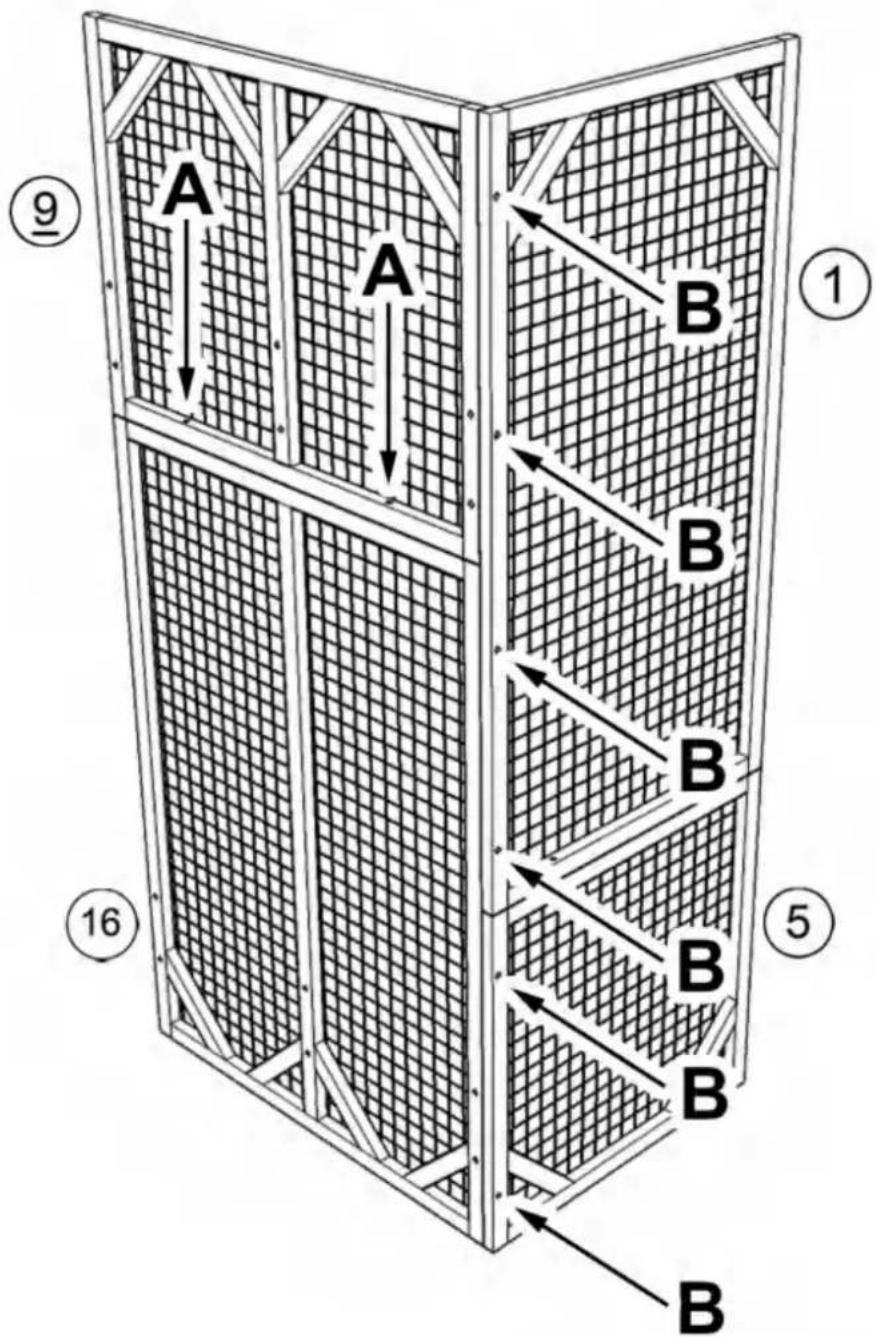
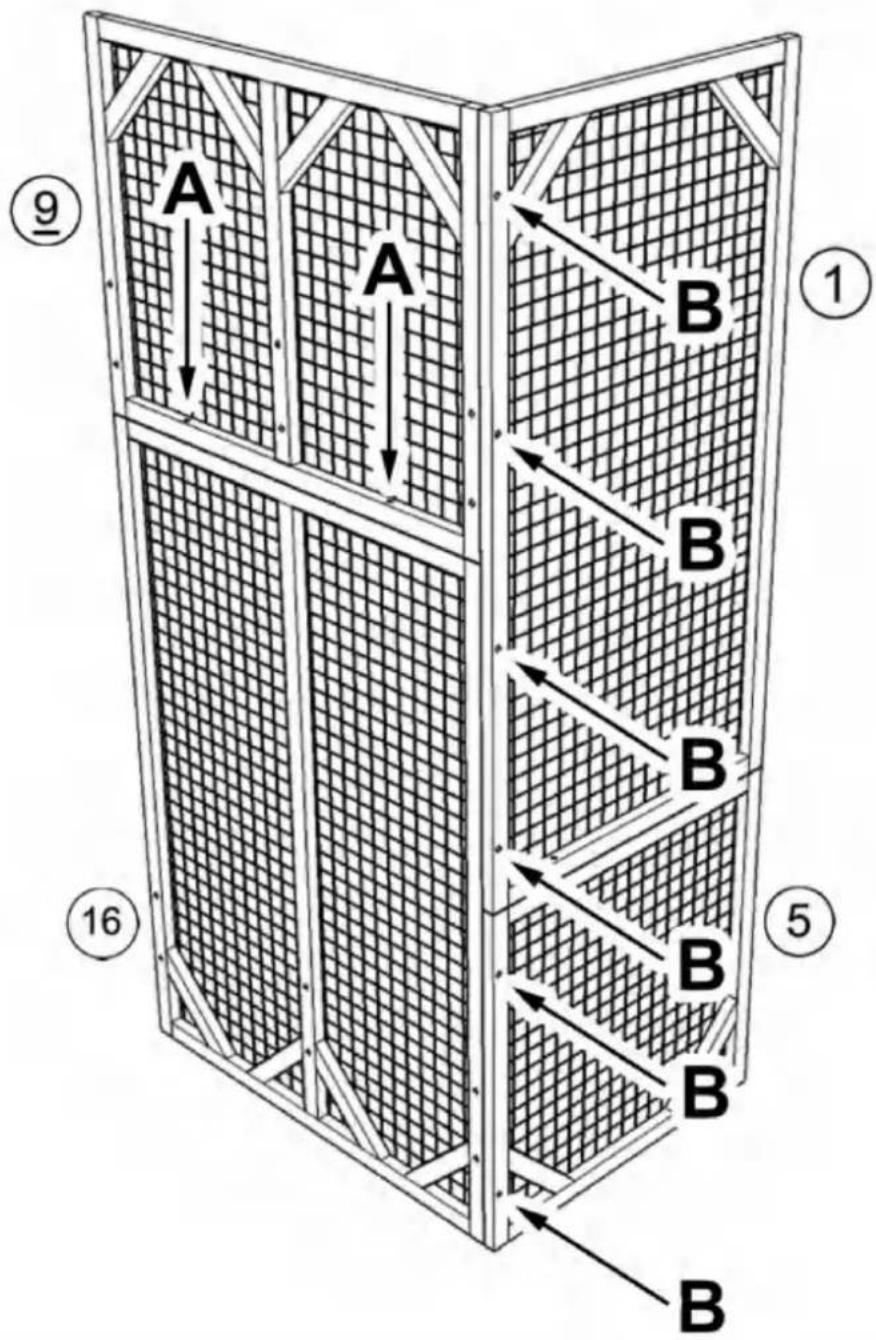
Please be noted that the side with wire nailed on is back side, should be inward when assembly
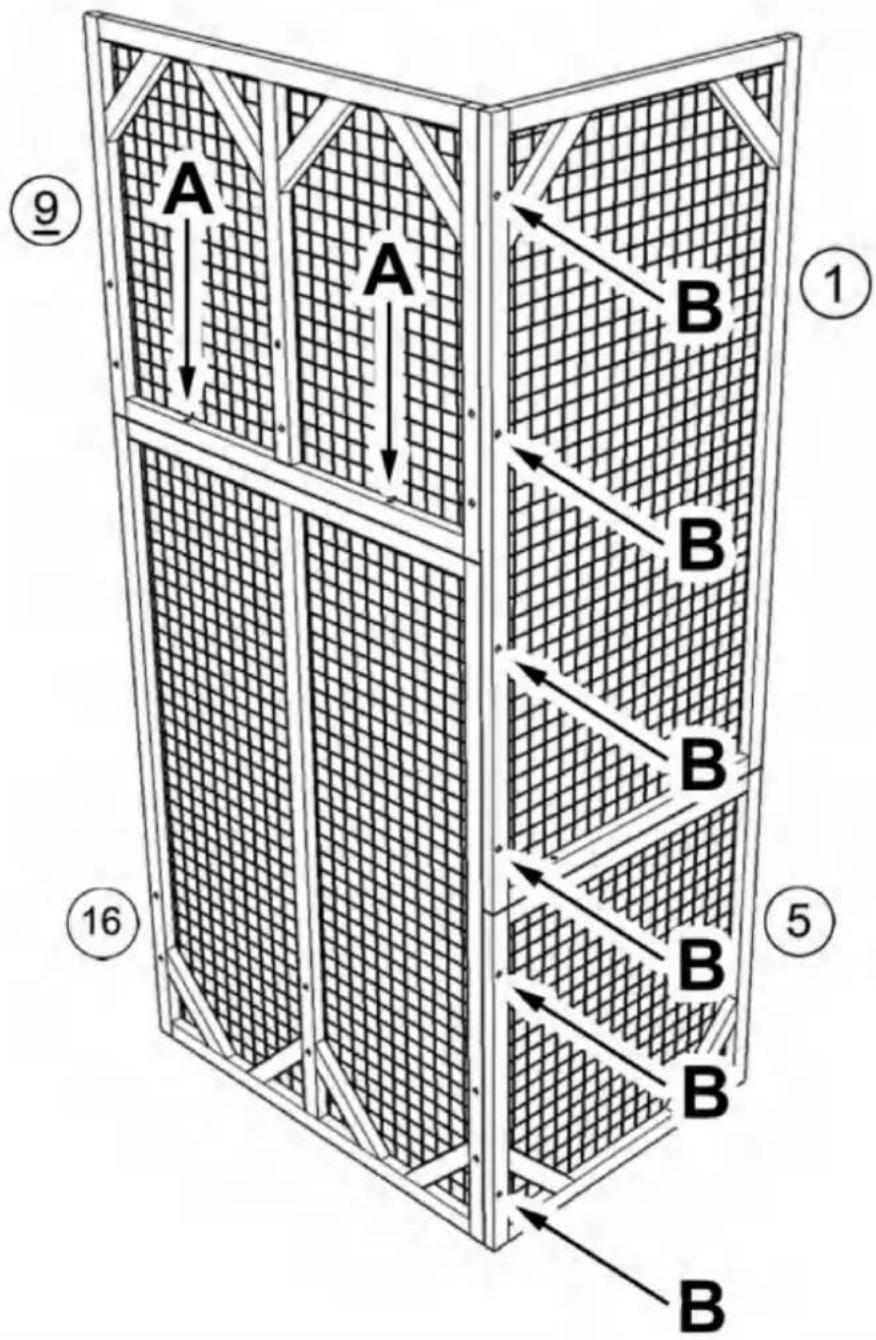
Pay attention to the up and bottom orientation of part #9 and part #1, the end with 2 pre-drilled holes is bottom as shown in the figure
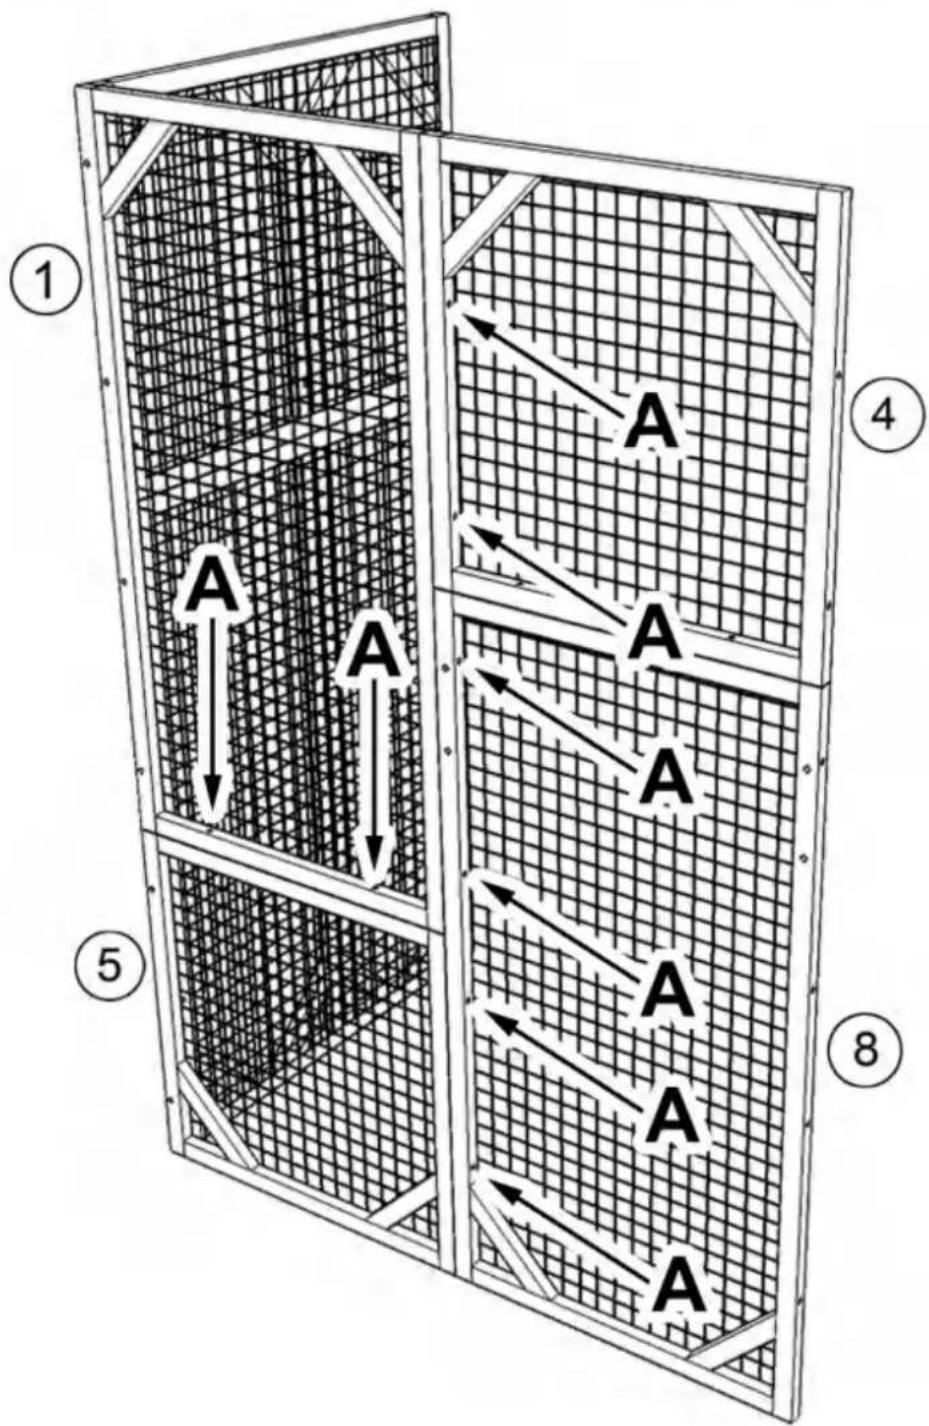
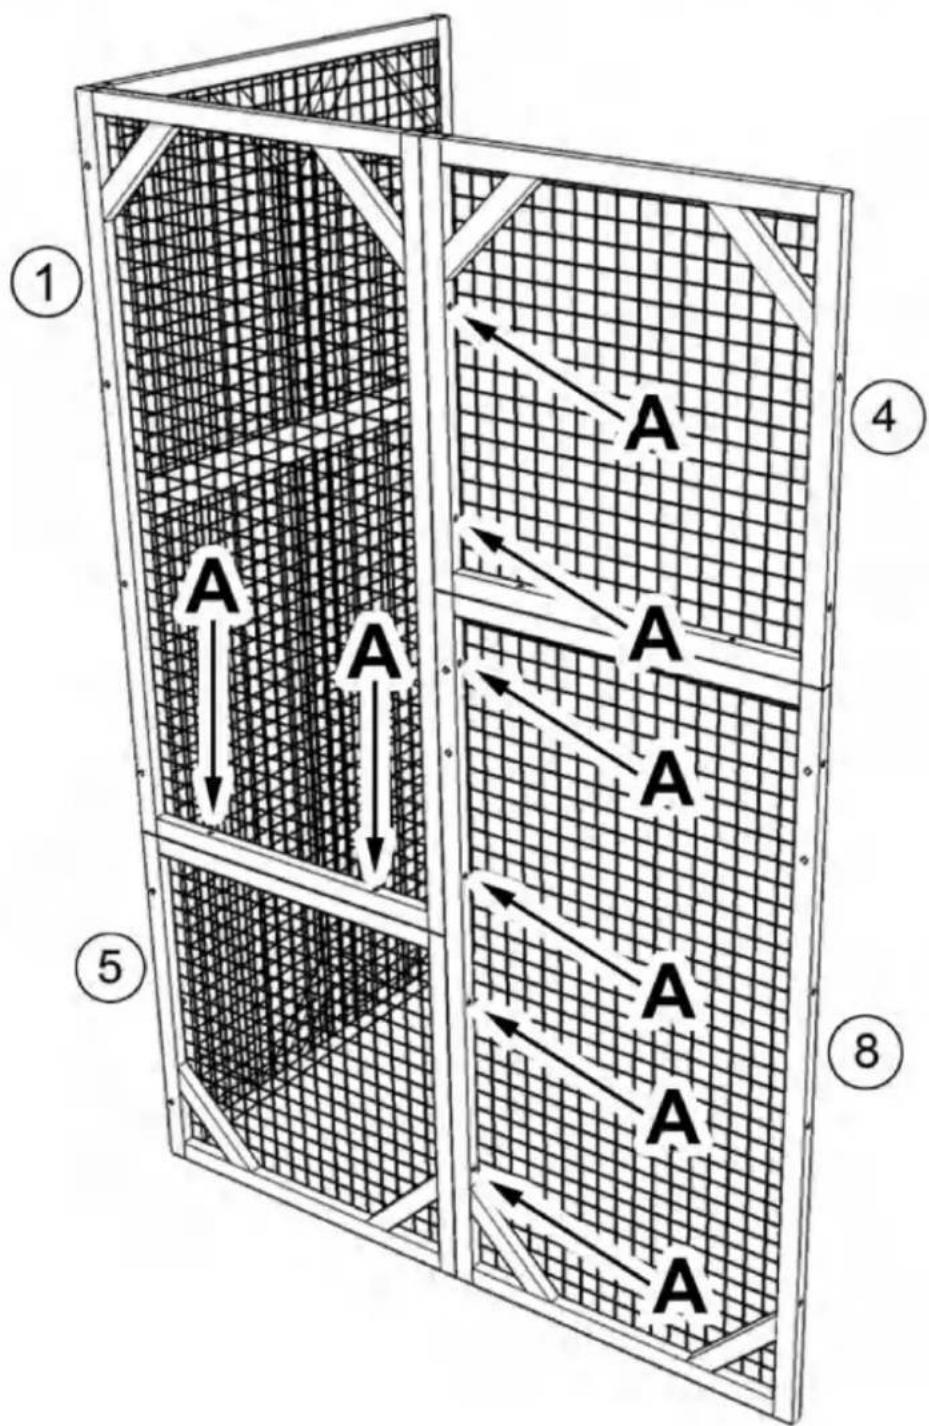
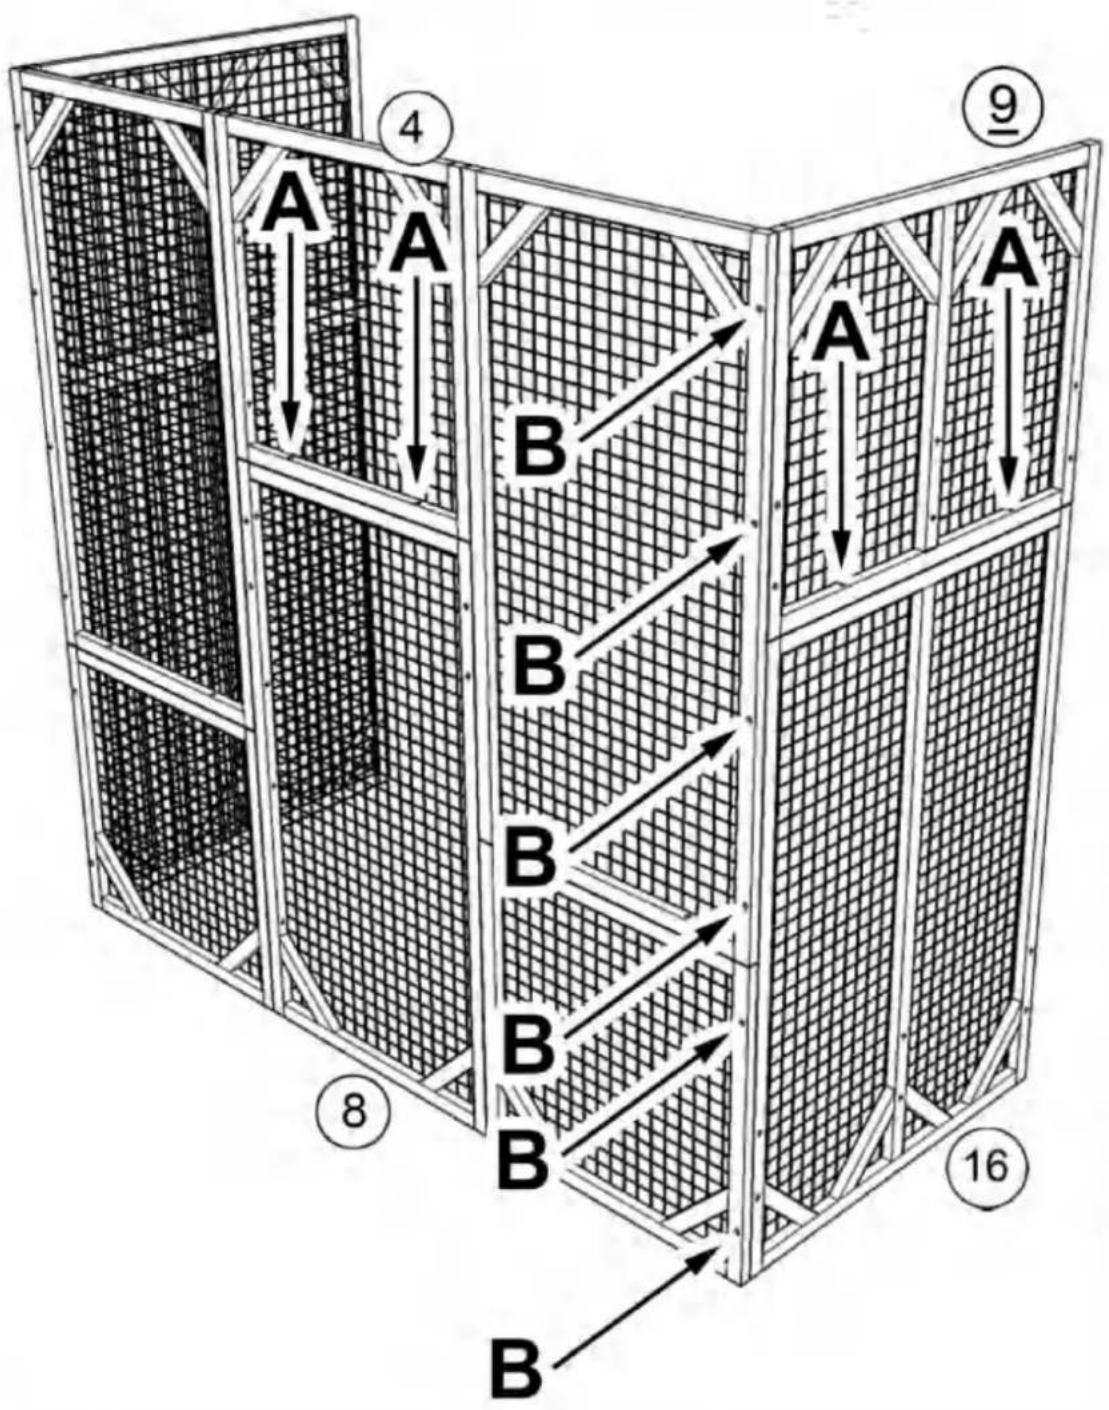
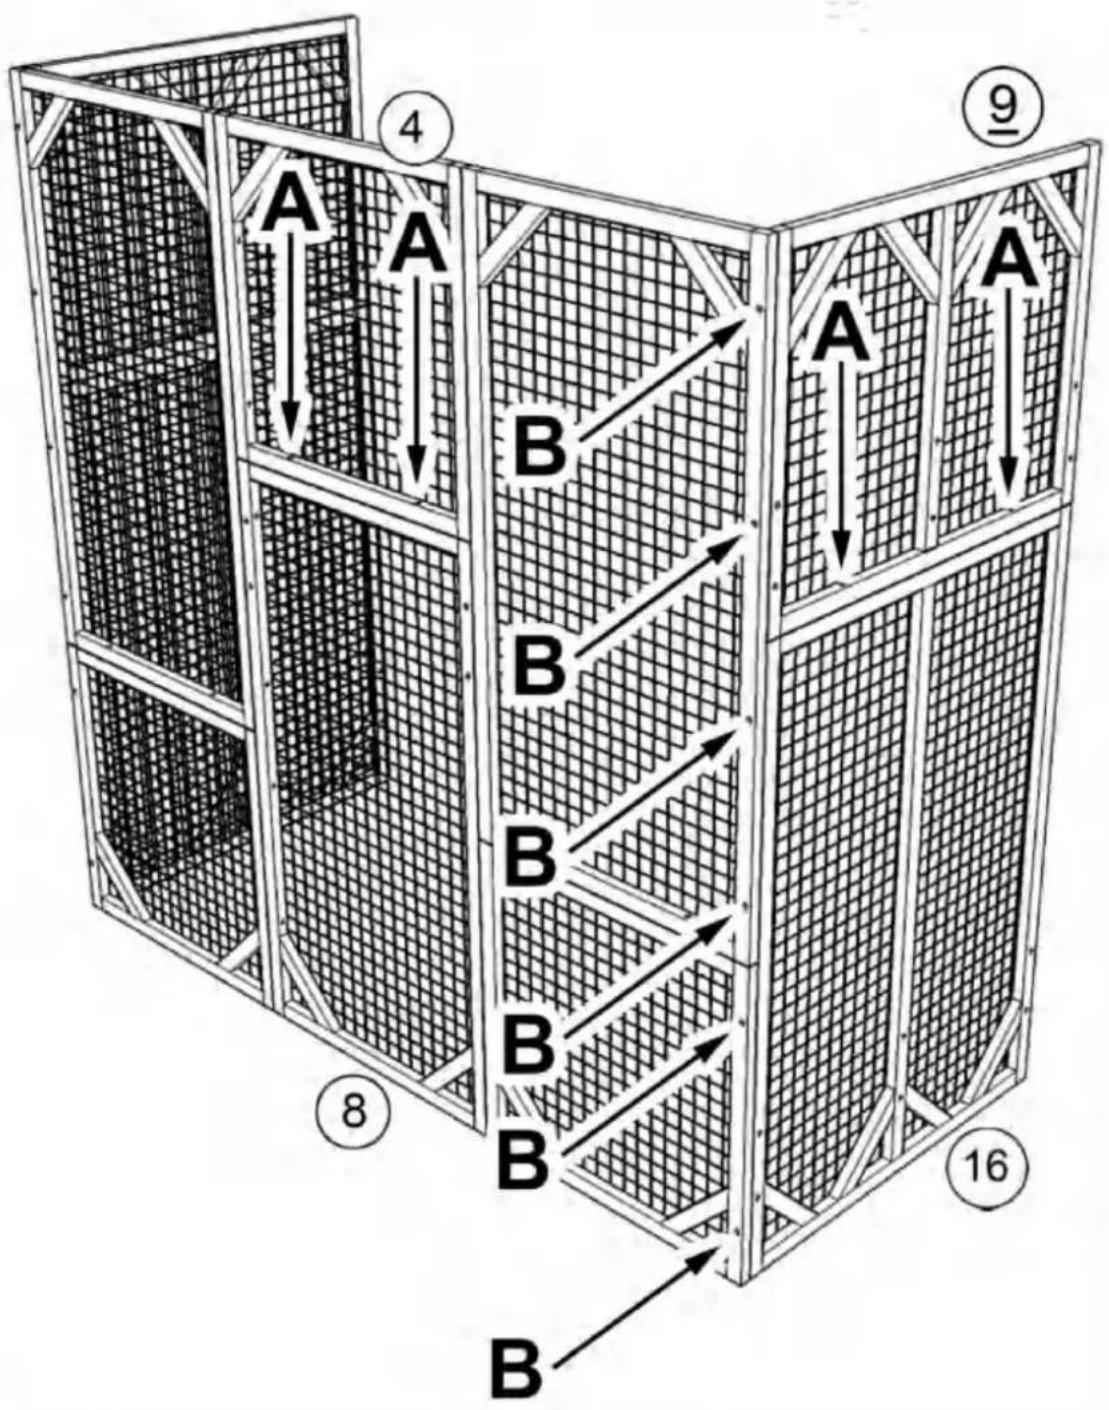
Assembling part #1, #5, #9, #16 with screw (B)x6 as shown, then secure part #9 to part #16 with screw (A)x2 downwards
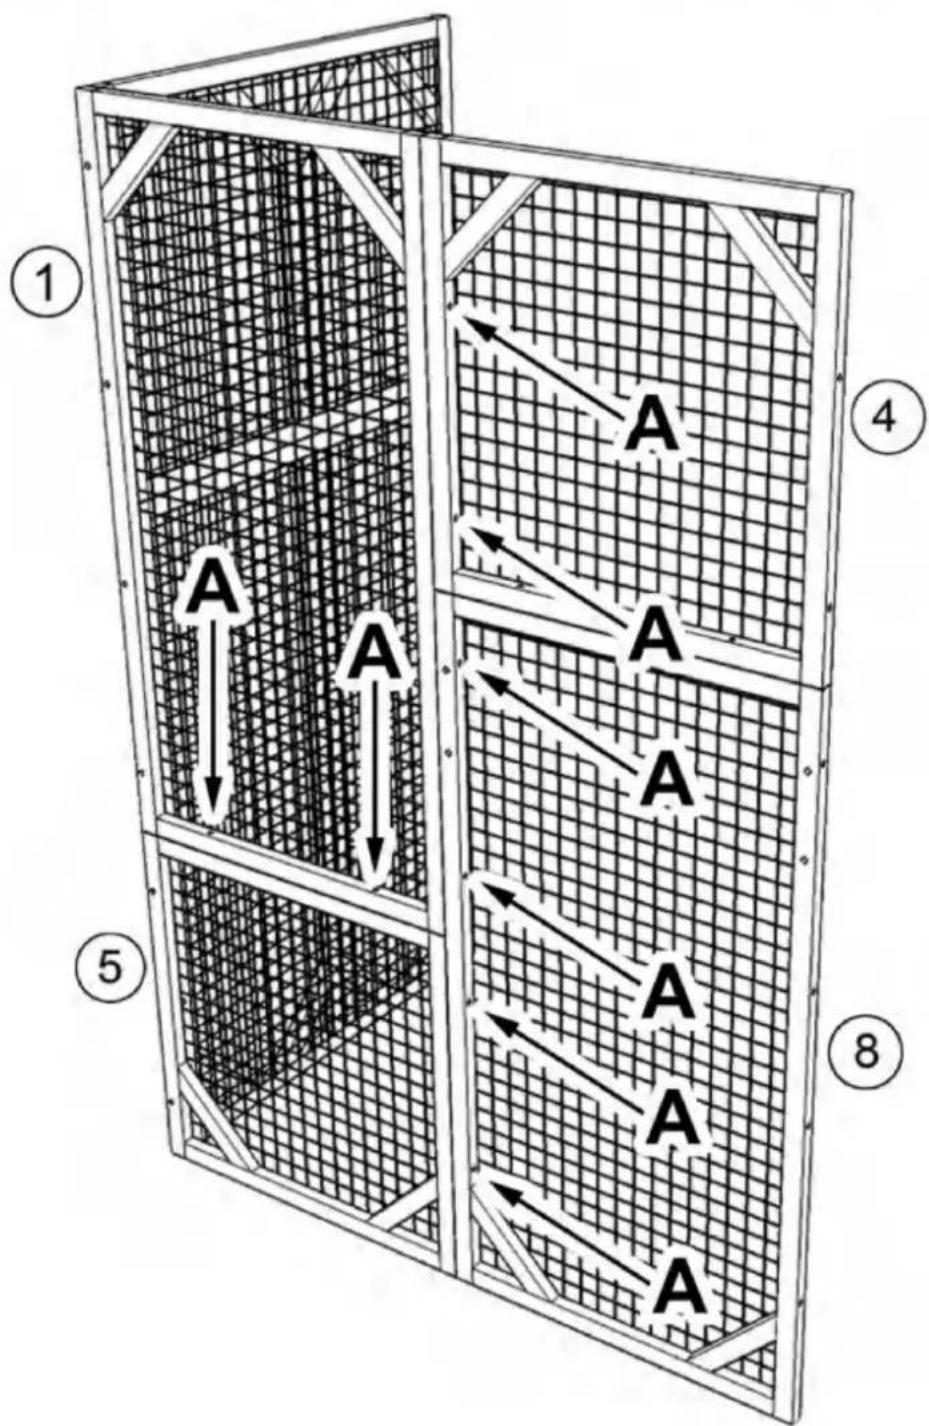
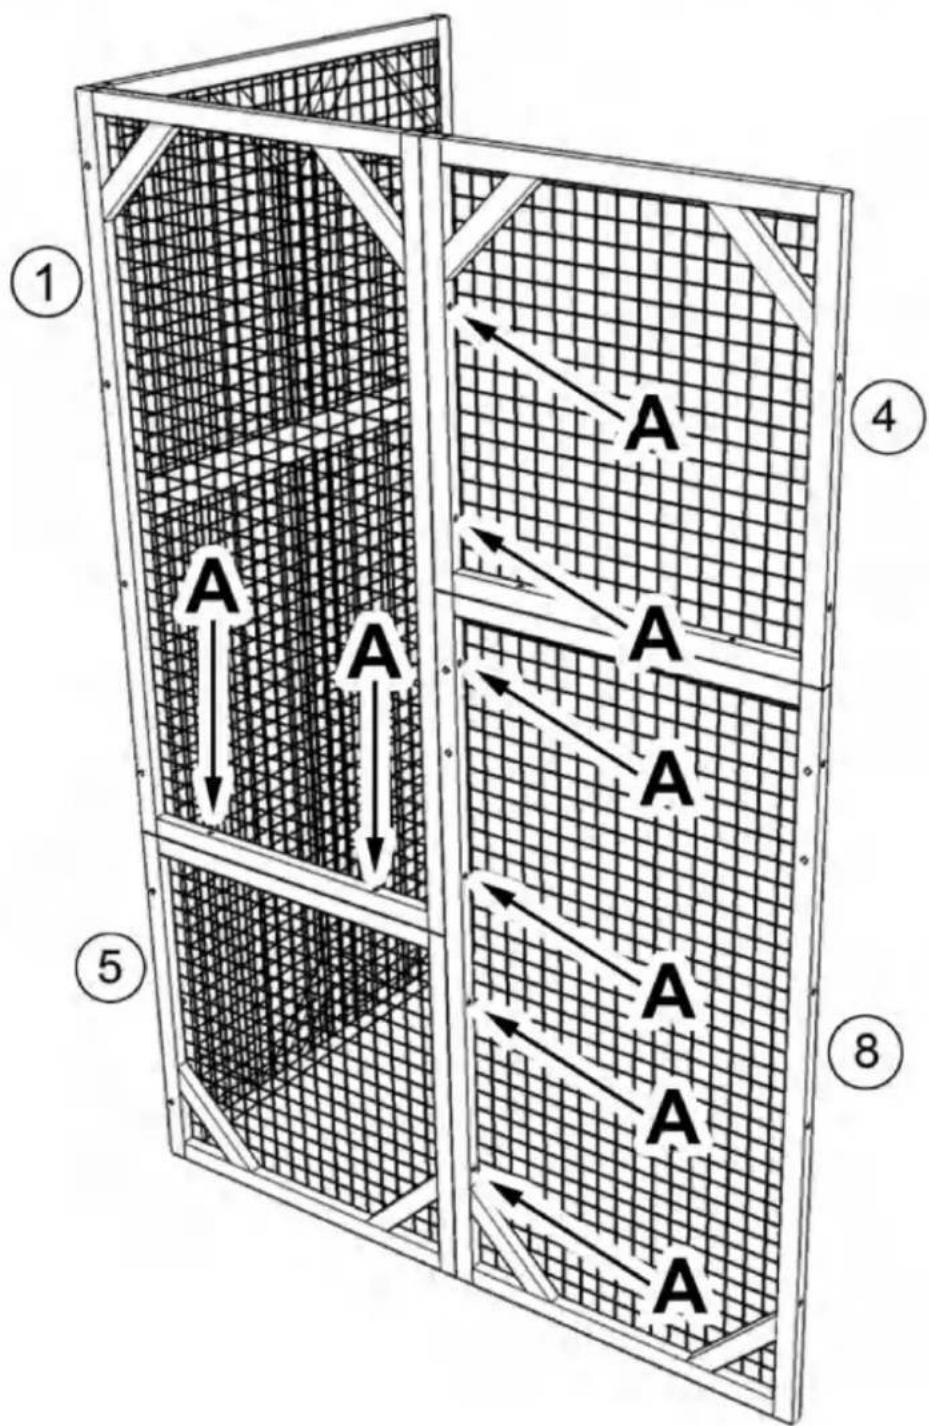
Secure part #1 to part #5 with screw (A)x2 downwards, then assemble part #4 and part #8 with screw (A) x6 as shown, please pay attention to the up and bottom orientation of part #4, the end with 2 pre-drilled holes is bottom as shown in the figure
text_image
1 2 3 4 5 6 7 8 A A A A A ASTEP:2
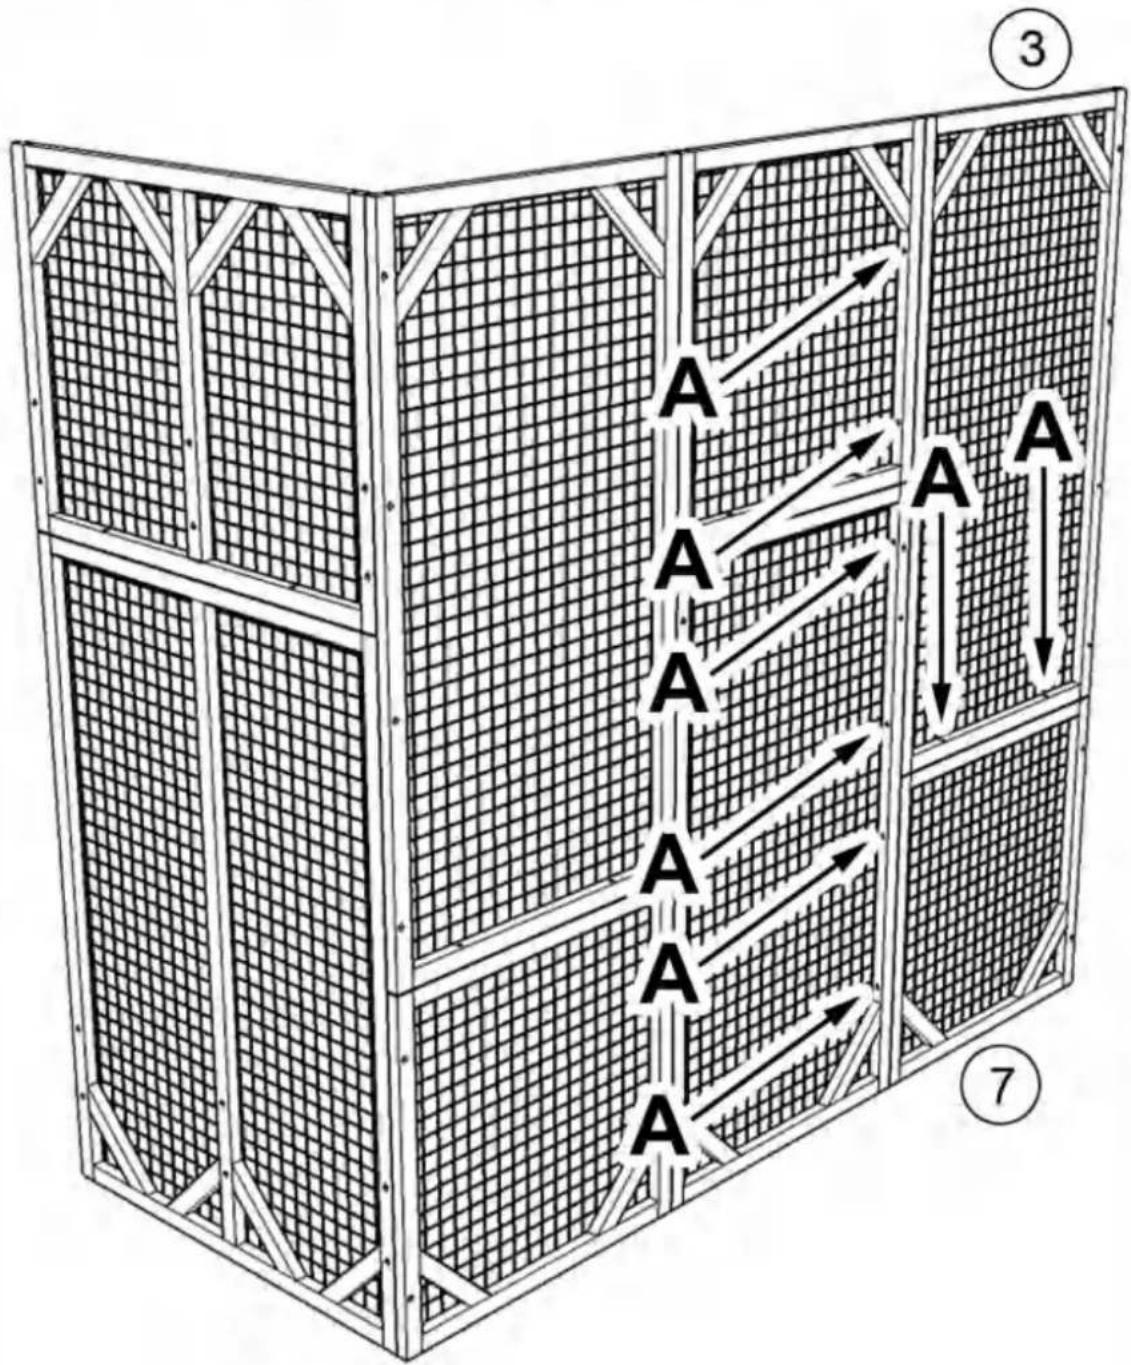
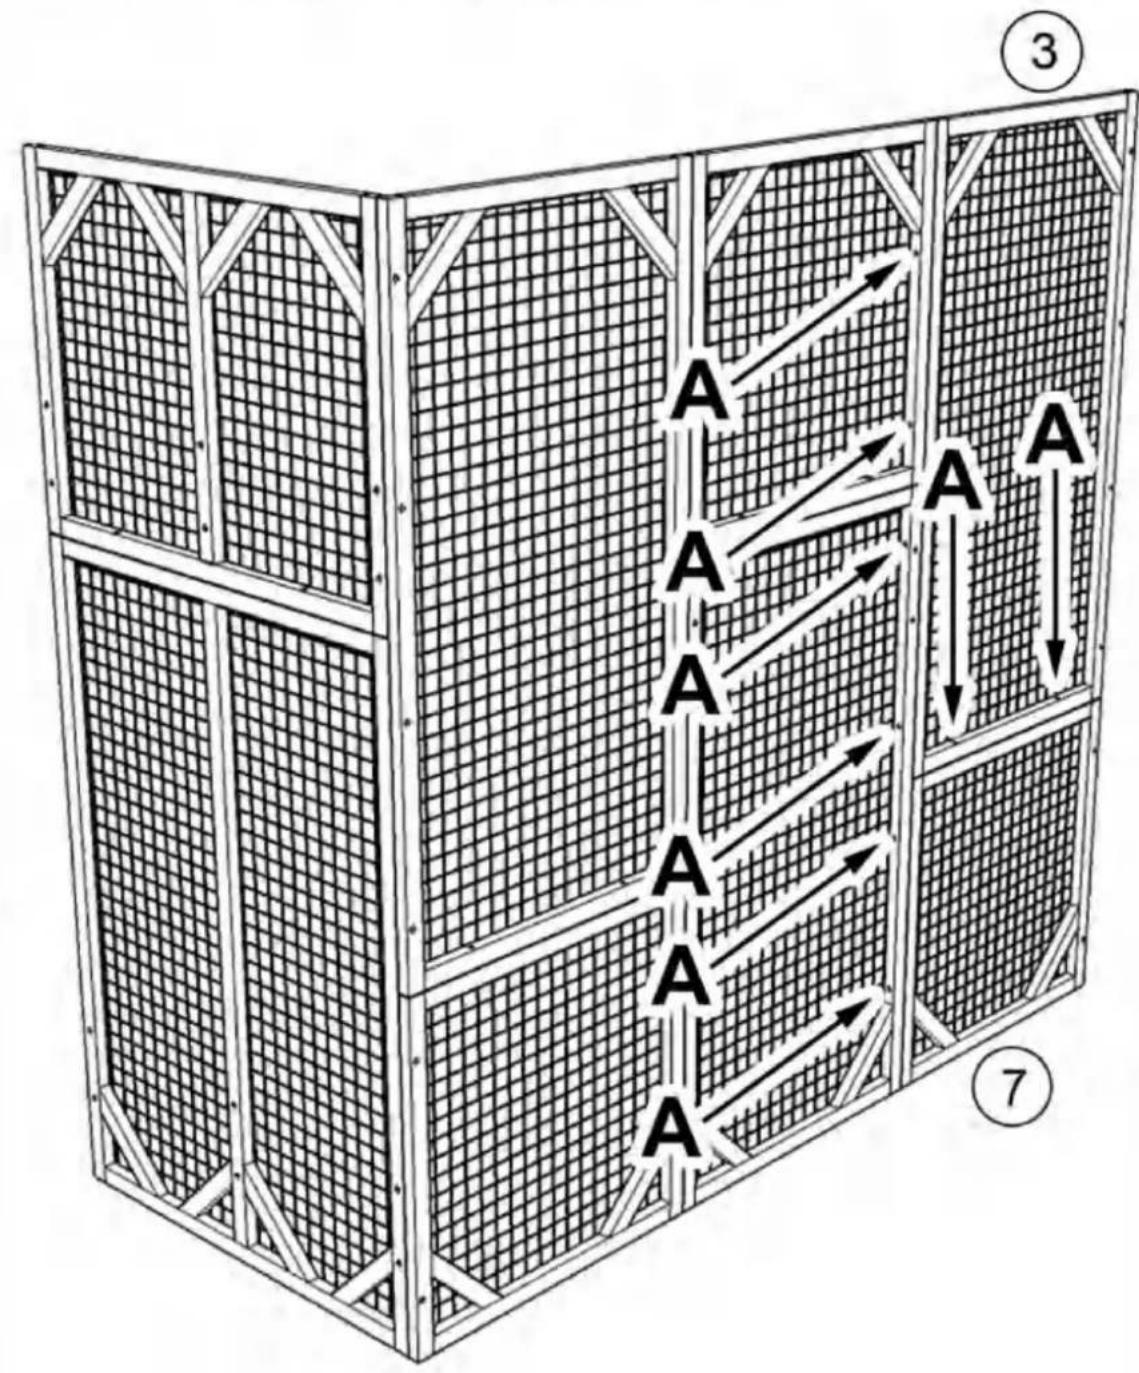
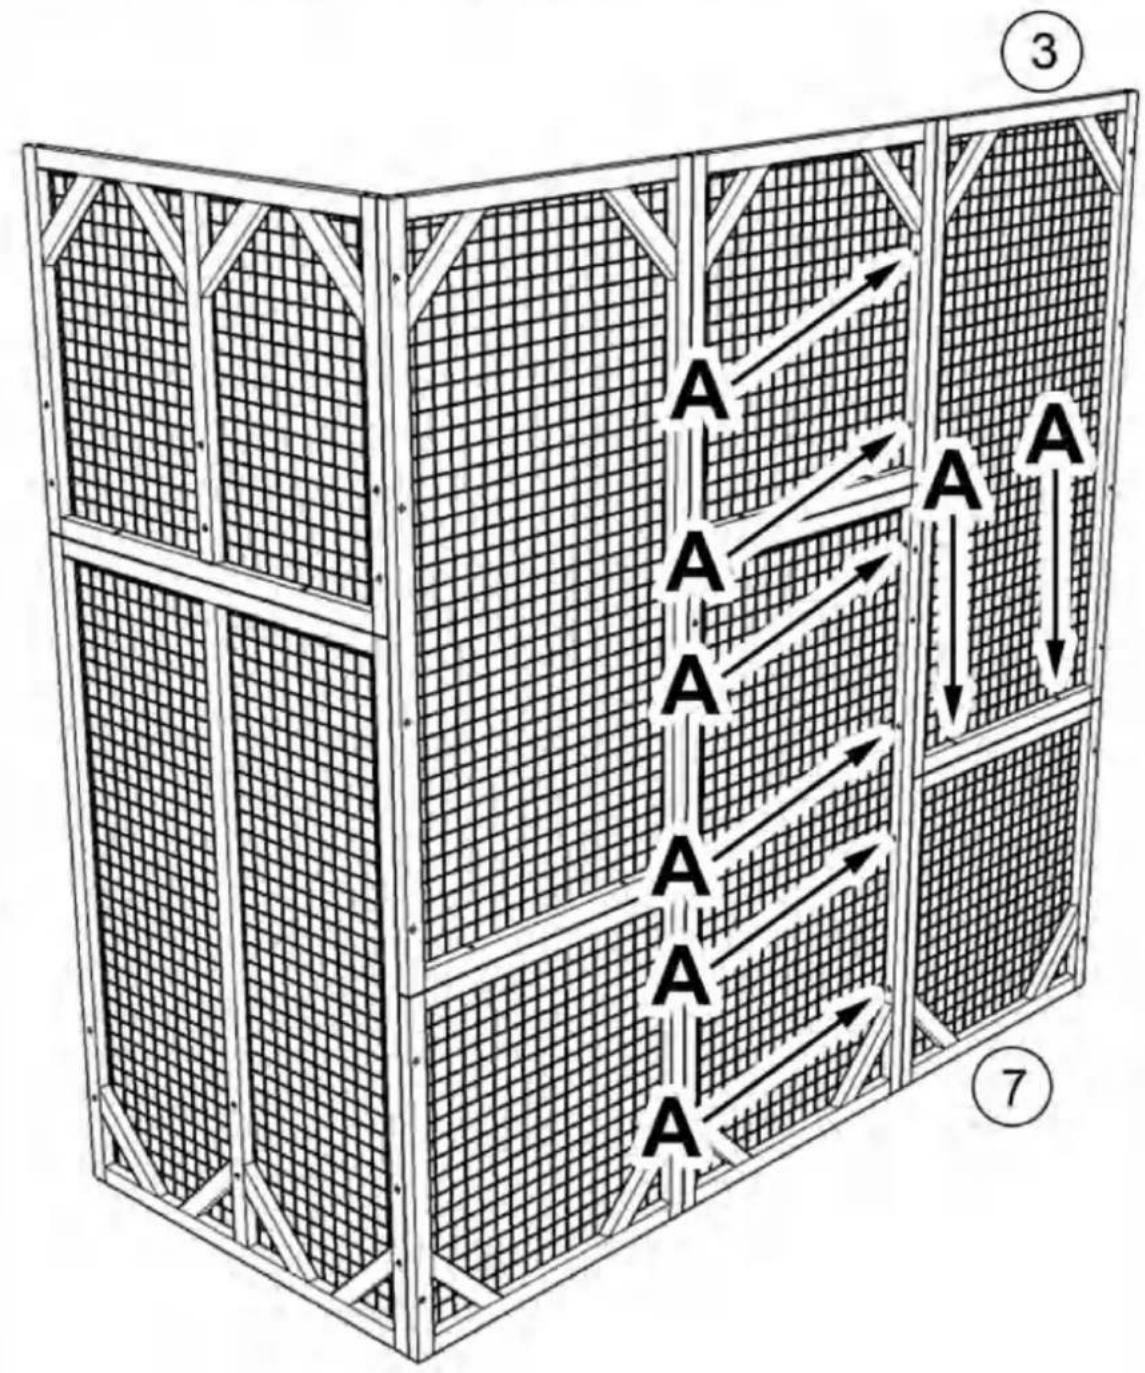
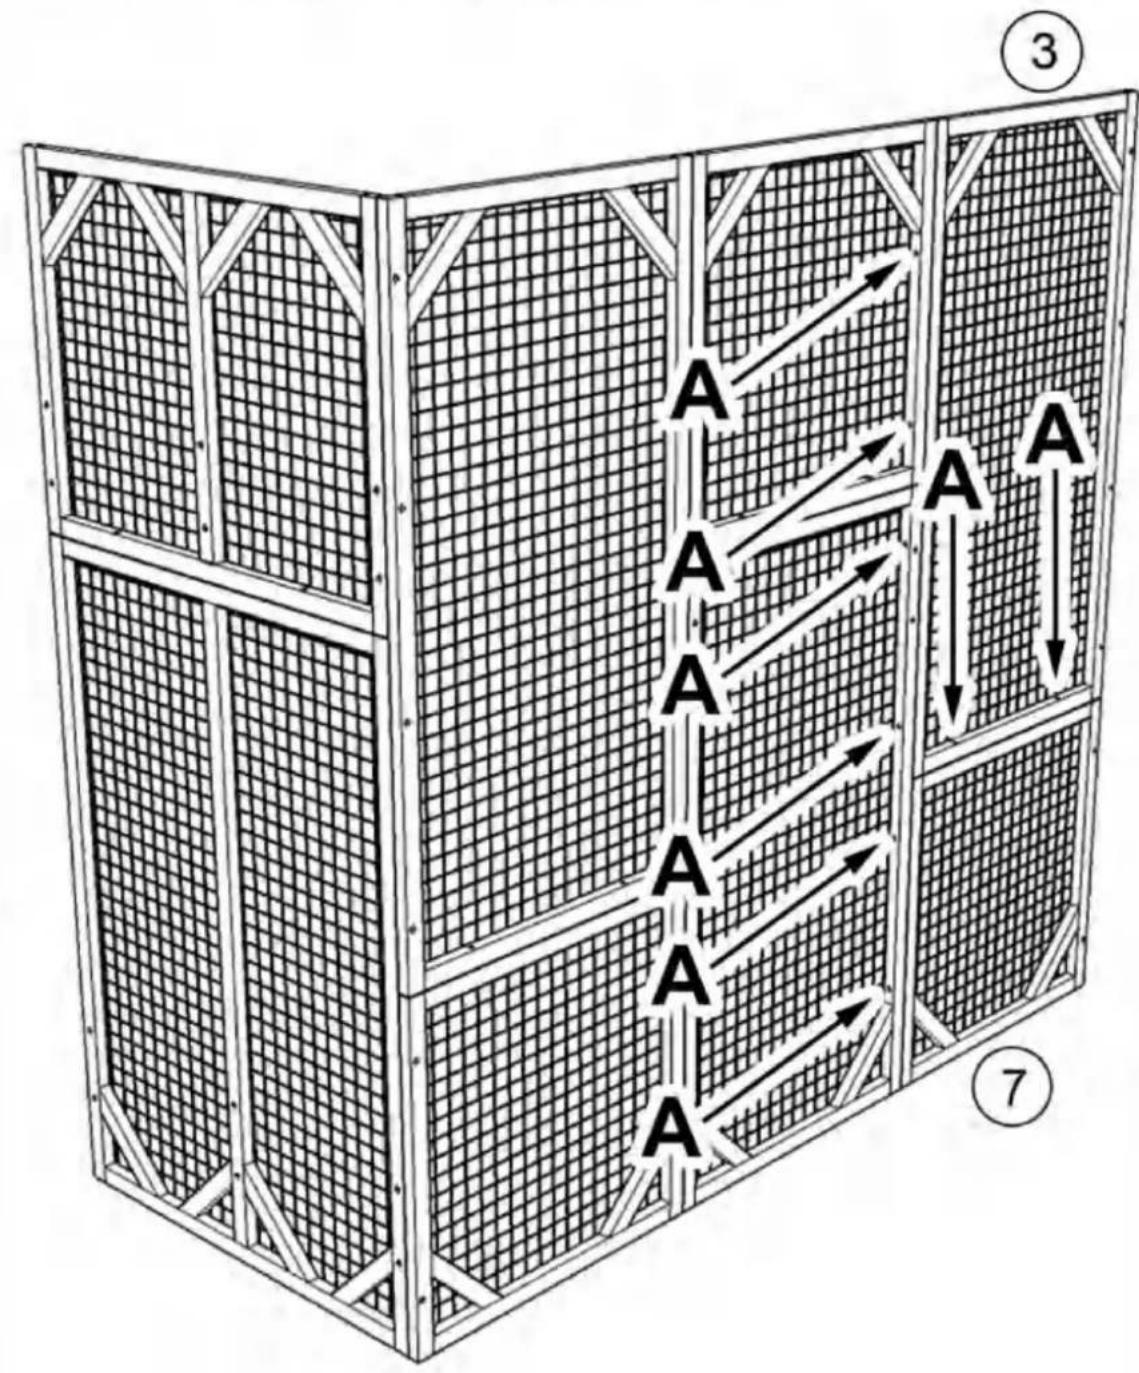
Assemble part #3 and part #7 with screw (A) x6 as shown, please pay attention to the up and bottom orientation of part #3, the end with 2 pre-drilled holes is bottom as shown in the figure, then secure part #3 to part #7 with screw (A)x2 downwards
flowchart
graph TD
    A1["A"] --> B1["A"]
    B1 --> C1["A"]
    C1 --> D1["A"]
    D1 --> E1["A"]
    E1 --> F1["A"]
    F1 --> G1["A"]
    G1 --> H1["A"]
    H1 --> I1["A"]
    I1 --> J1["A"]
    J1 --> K1["A"]
    K1 --> L1["A"]
    L1 --> M1["A"]
    M1 --> N1["A"]
    N1 --> O1["A"]
    O1 --> P1["A"]
    P1 --> Q1["A"]
    Q1 --> R1["A"]
    R1 --> S1["A"]
    S1 --> T1["A"]
    T1 --> U1["A"]
    U1 --> V1["A"]
    V1 --> W1["A"]
    W1 --> X1["A"]
    X1 --> Y1["A"]
    Y1 --> Z1["A"]
    Z1 --> AA1["A"]
    AA1 --> AB1["A"]
    AB1 --> AC1["A"]
    AC1 --> AD1["A"]
    AD1 --> AE1["A"]
    AE1 --> AF1["A"]
    AF1 --> AG1["A"]
    AG1 --> AH1["A"]
    AH1 --> AI1["A"]
    AI1 --> AJ1["A"]
    AJ1 --> AK1["A"]
    AK1 --> AL1["A"]
    AL1 --> AM1["A"]
    AM1 --> ANA["A"]
    ANA --> AO["③"]
    style A fill:#f9f,stroke:#333
    style B fill:#f9f,stroke:#333
    style C fill:#f9f,stroke:#333
    style D fill:#f9f,stroke:#333
    style E fill:#f9f,stroke:#333
    style F fill:#f9f,stroke:#333
    style G fill:#f9f,stroke:#333
    style H fill:#f9f,stroke:#333
    style I fill:#f9f,stroke:#333
    style J fill:#f9f,stroke:#333
    style K fill:#f9f,stroke:#333
    style L fill:#f9f,stroke:#333
    style M fill:#f9f,stroke:#333
    style N fill:#f9f,stroke:#333
    style O fill:#f9f,stroke:#333
    style P fill:#f9f,stroke:#333
    style Q fill:#f9f,stroke:#333
    style R fill:#f9f,stroke:#333
    style S fill:#f9f,stroke:#333
    style T fill:#f9f,stroke:#333
    style U fill:#f9f,stroke:#333
    style V fill:#f9f,stroke:#333
    style W fill:#f9f,stroke:#333
    style X fill:#f9f,stroke:#333
    style Y fill:#f9f,stroke:#333
    style Z fill:#f9f,stroke:#333
STEP:3
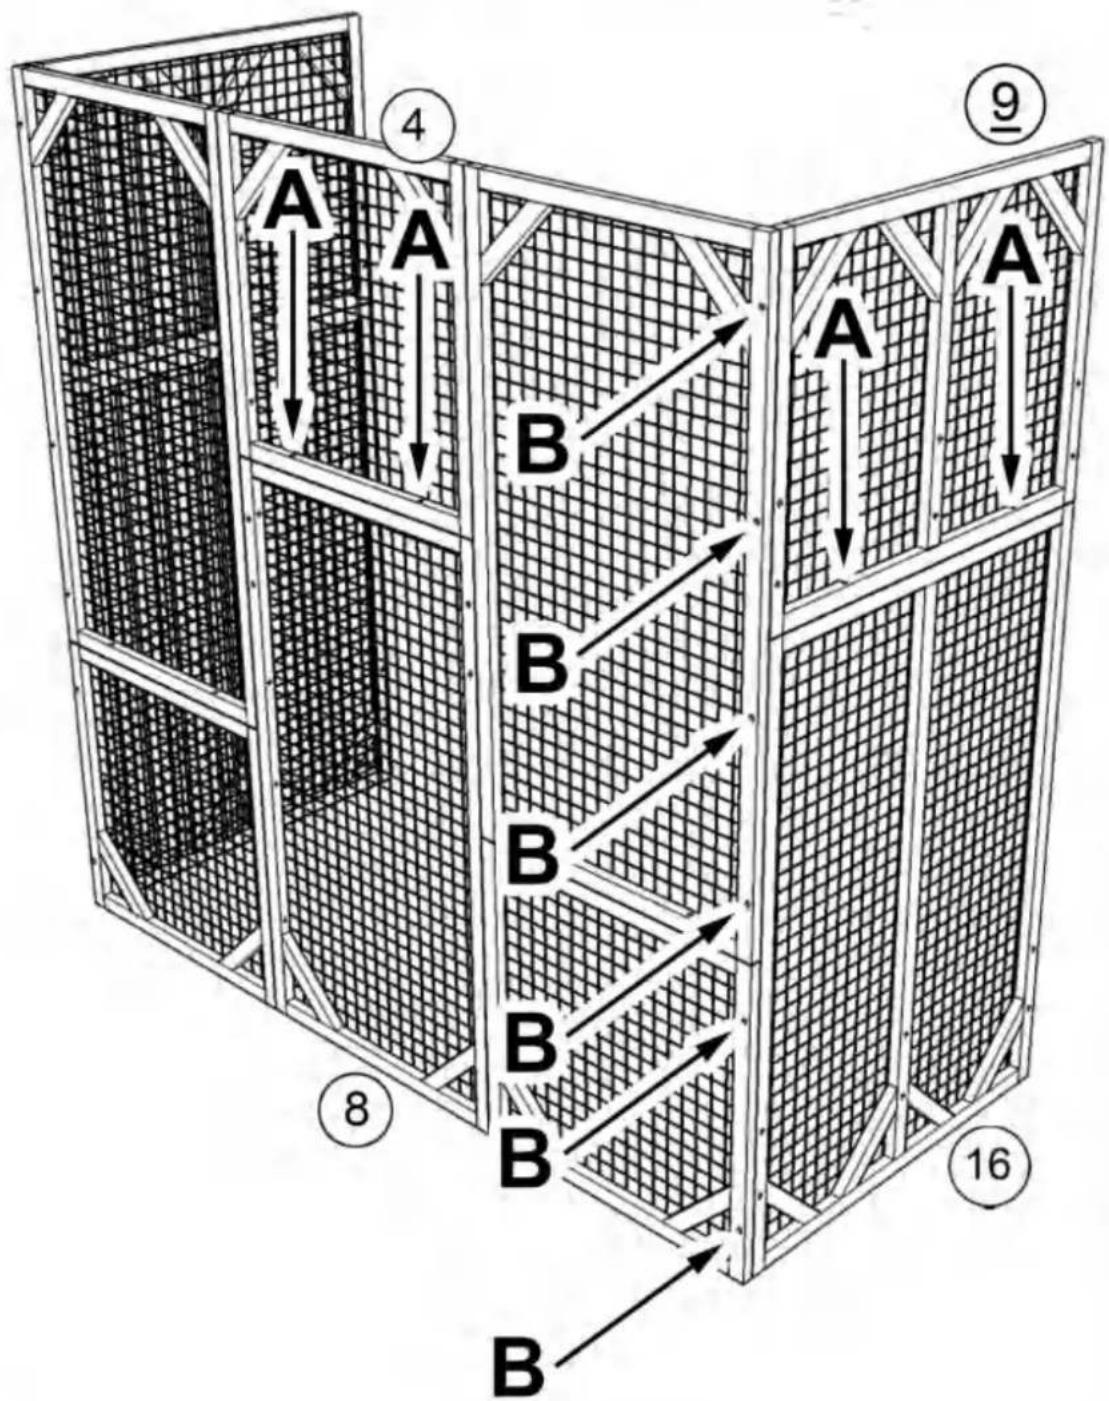
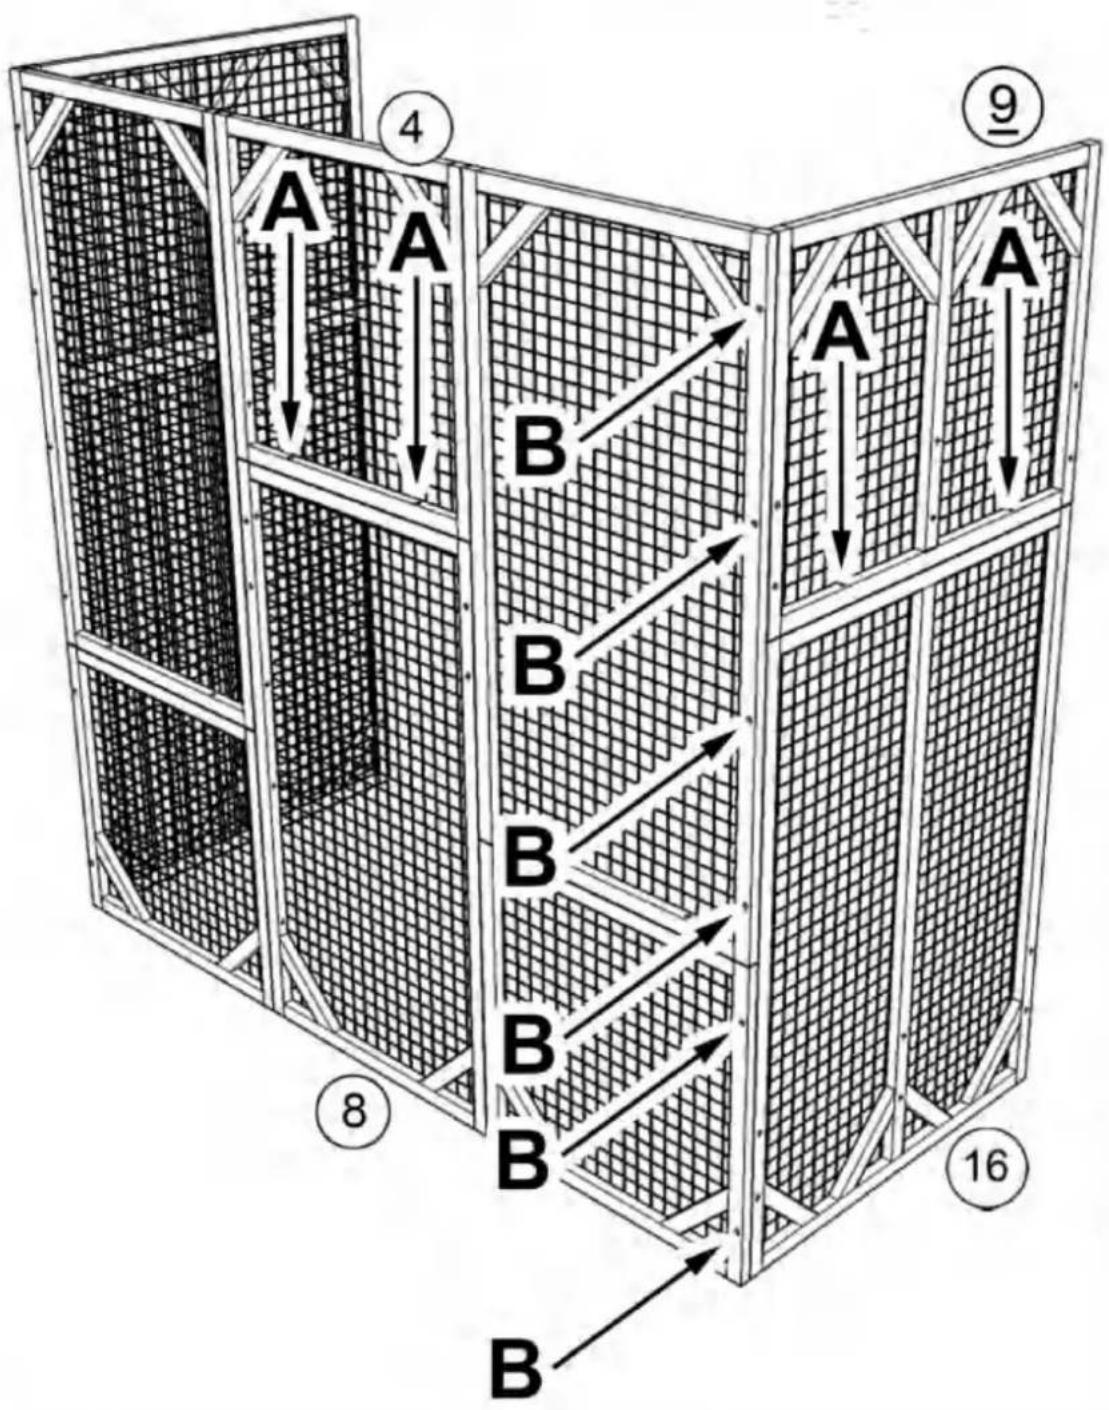
Secure part #4 to part #8 with screw (A)x2 downwards, then assemble part #9 and part #16 with screw (B) x6 as shown, please pay attention to the up and bottom orientation of part #9, the end with 2 pre-drilled holes is bottom as shown, then secure part #9 to part #16 with screw (A)x2 downwards
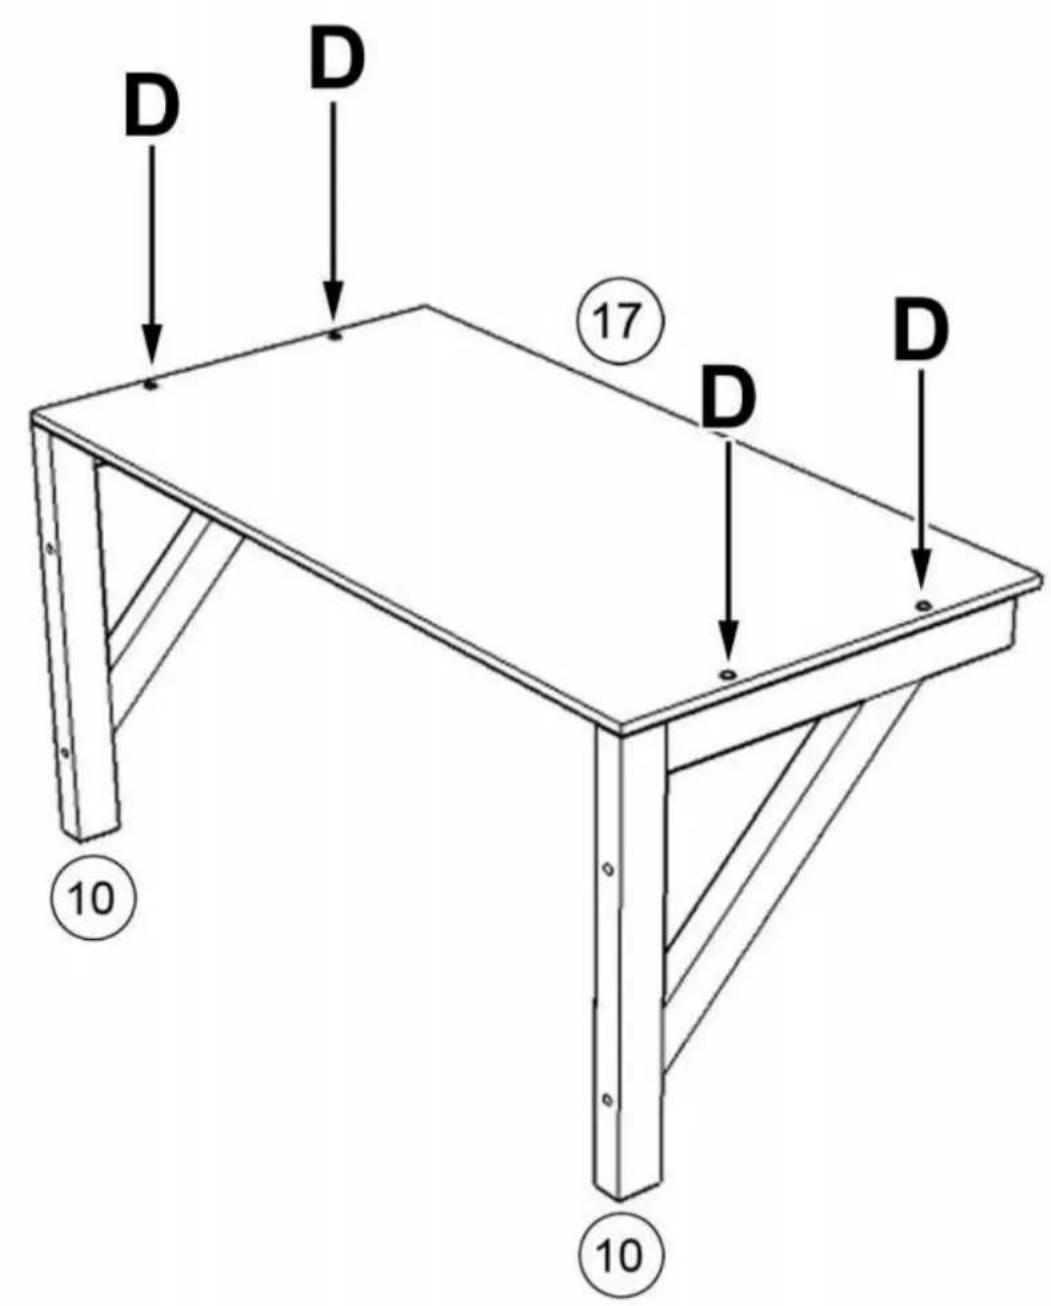
Assemble shelf with part #17 and part #10x2 with screw (D)x4 as shown
text_image
D D 17 D D 10 10STEP:5
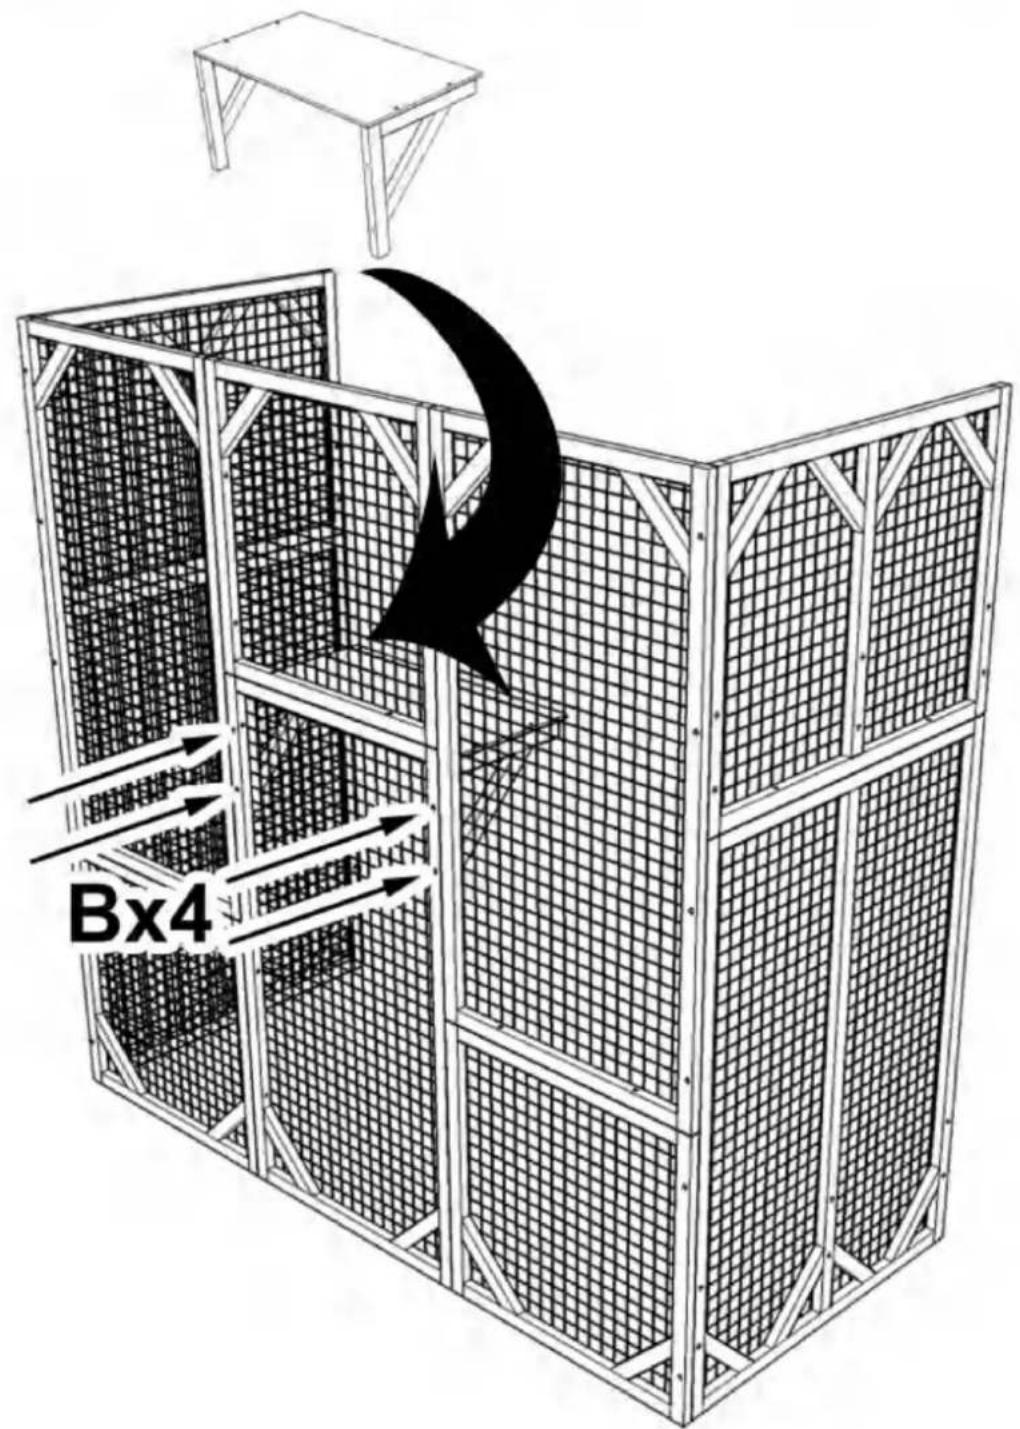
Requires two people to install the shelf at designated position, one person is inside the cage holding the shelf while the other person is outside locking the screws through the pre-drilled holes as shown.
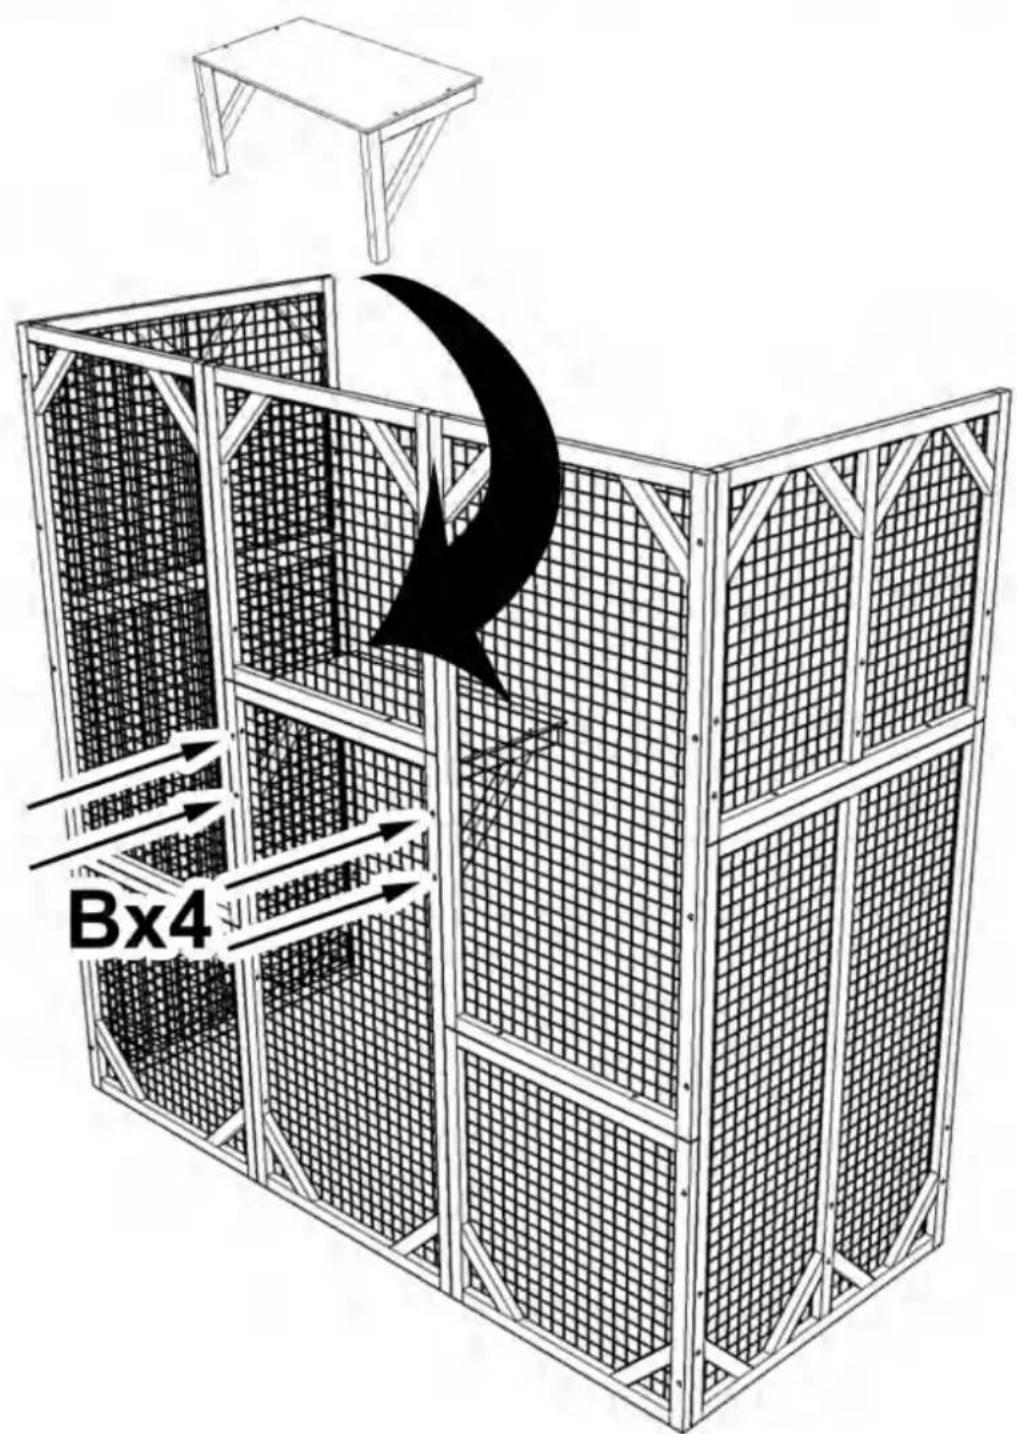
text_image
Bx4STEP:6
Assemble shelf with part #11 and part #10x3 with screw (D)x6 as shown
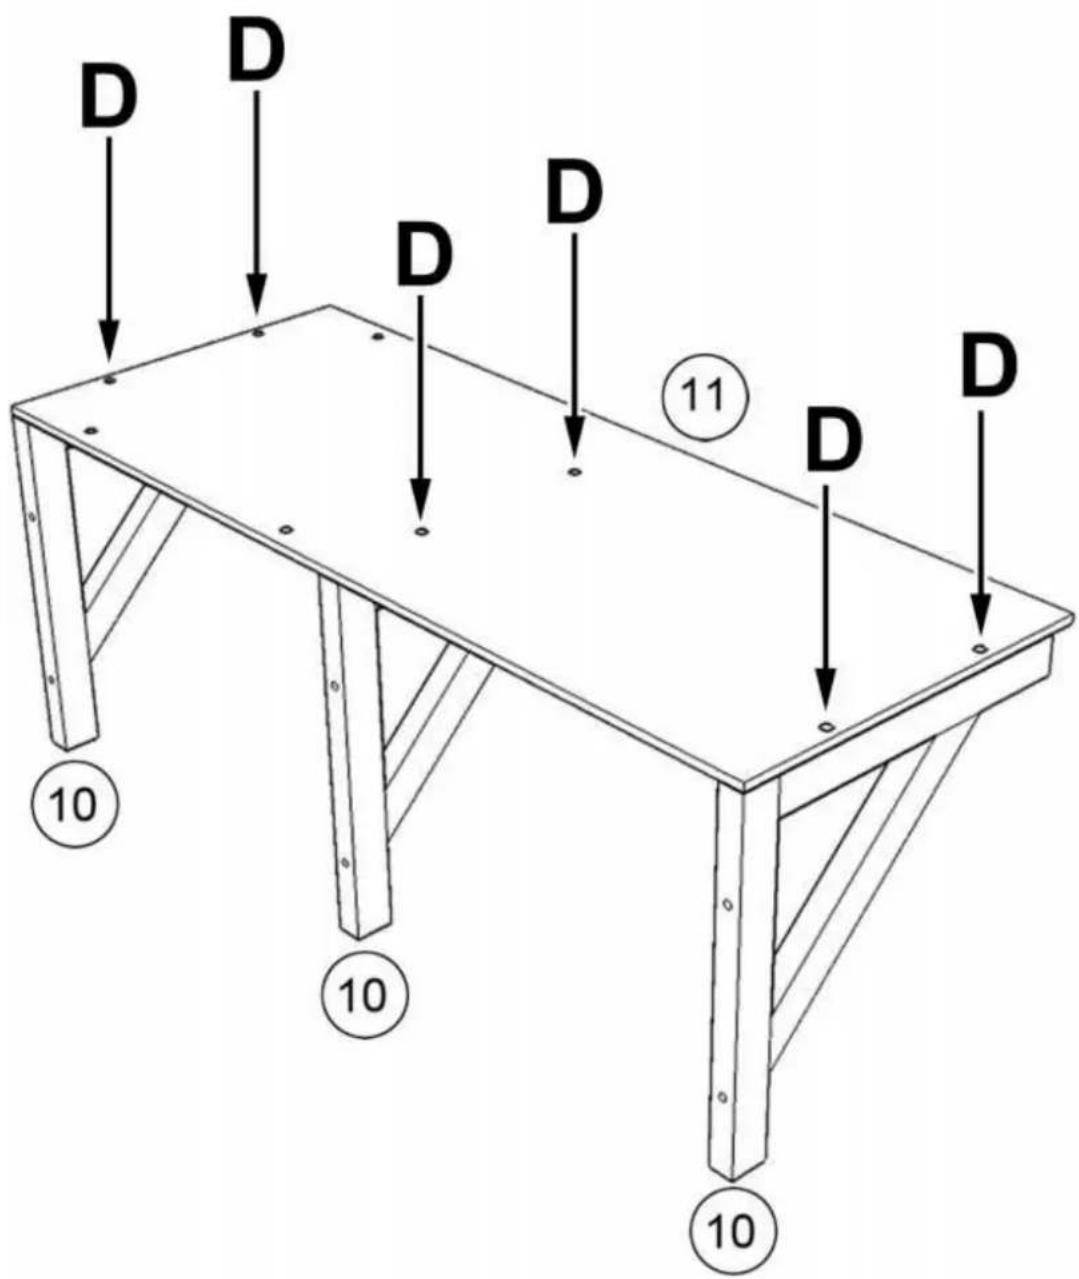
text_image
D D D D D 11 D D 10 10 10STEP:7
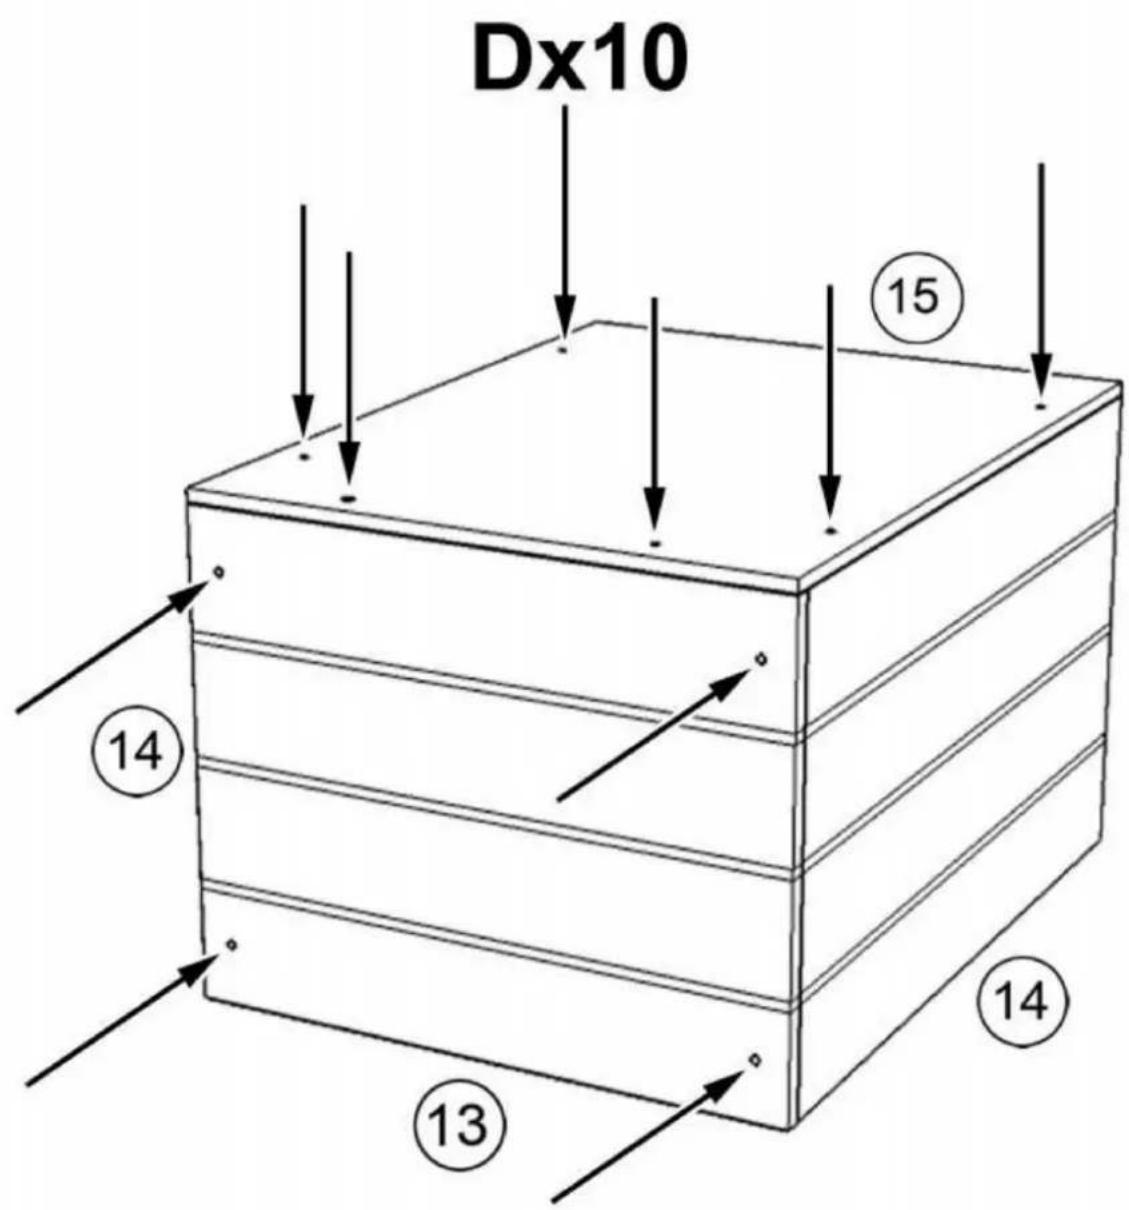
Assemble sleeping box with part #13, #14x2, #15 using screw (D)x10
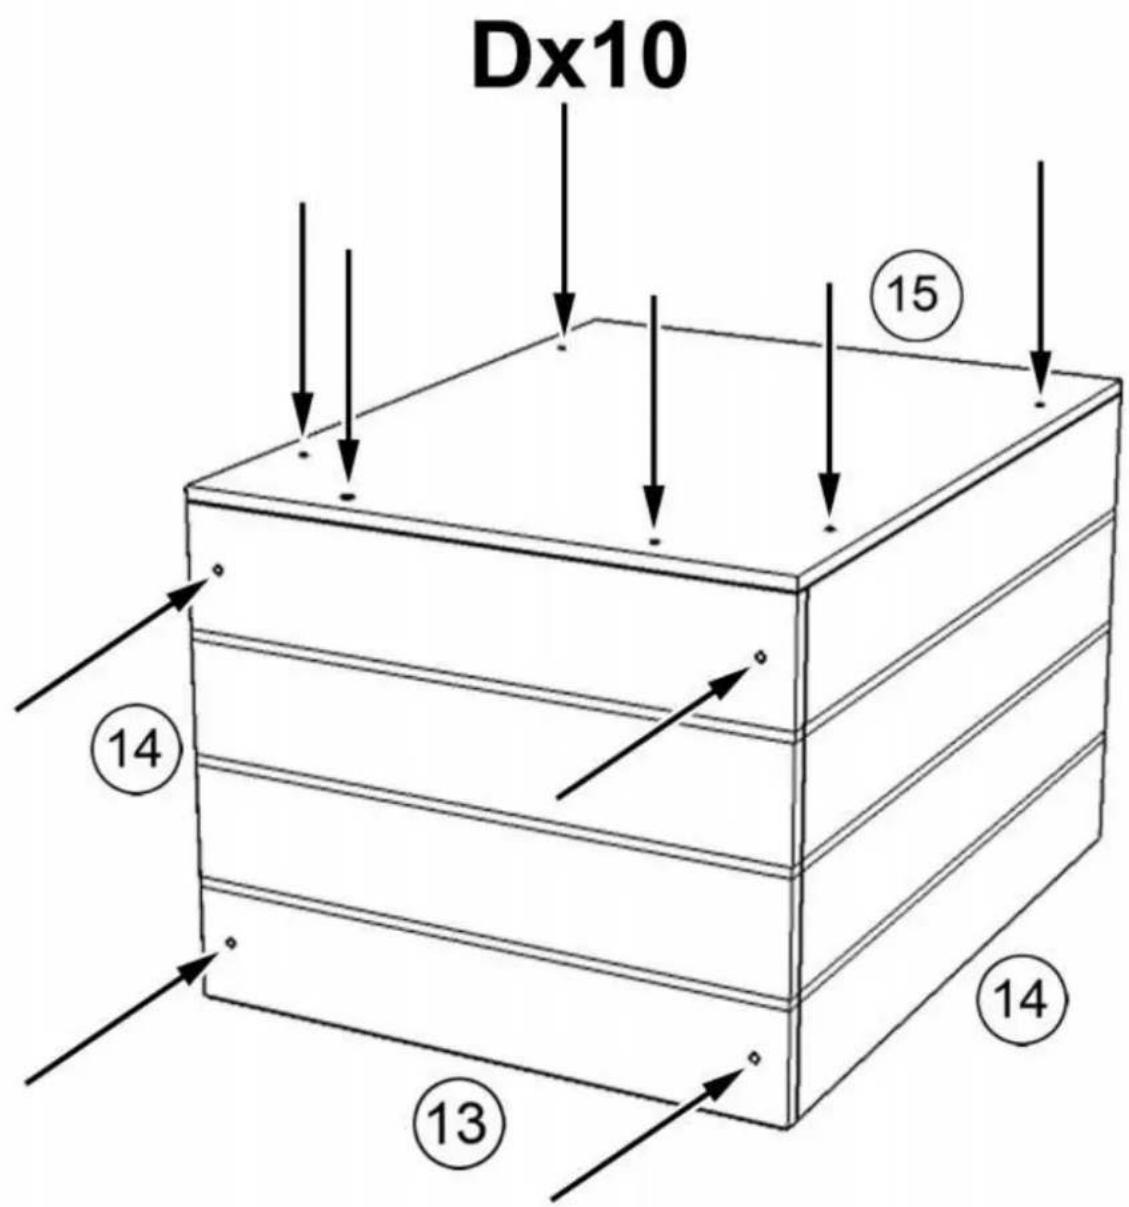
text_image
Dx10 15 14 13 14STEP:8
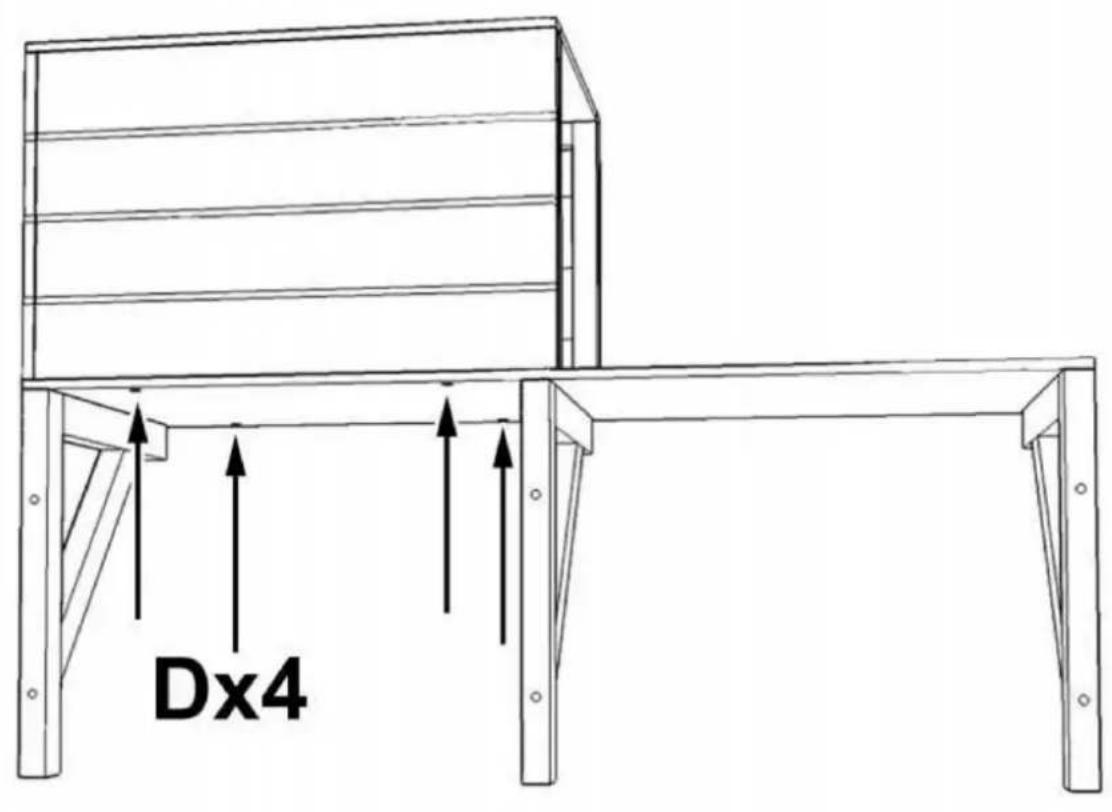
Install sleeping box on shelf as shown and secure the box with screw (D)x4 from the bottom
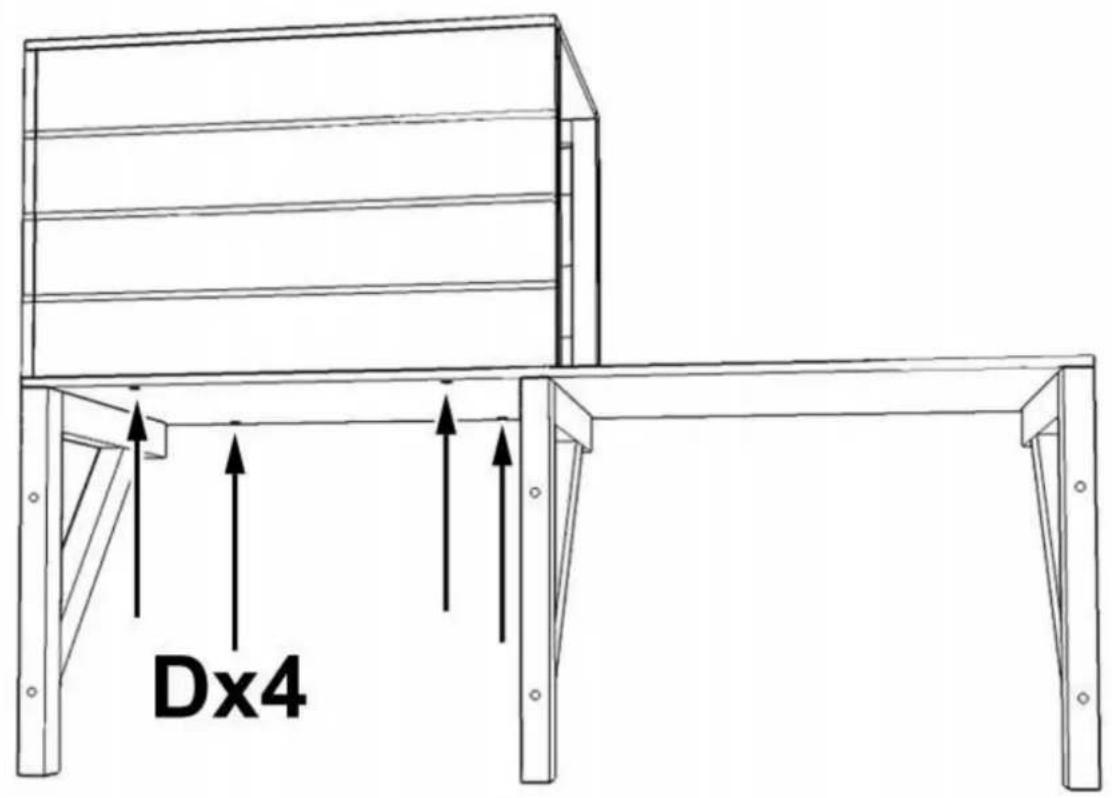
text_image
Dx4STEP:9
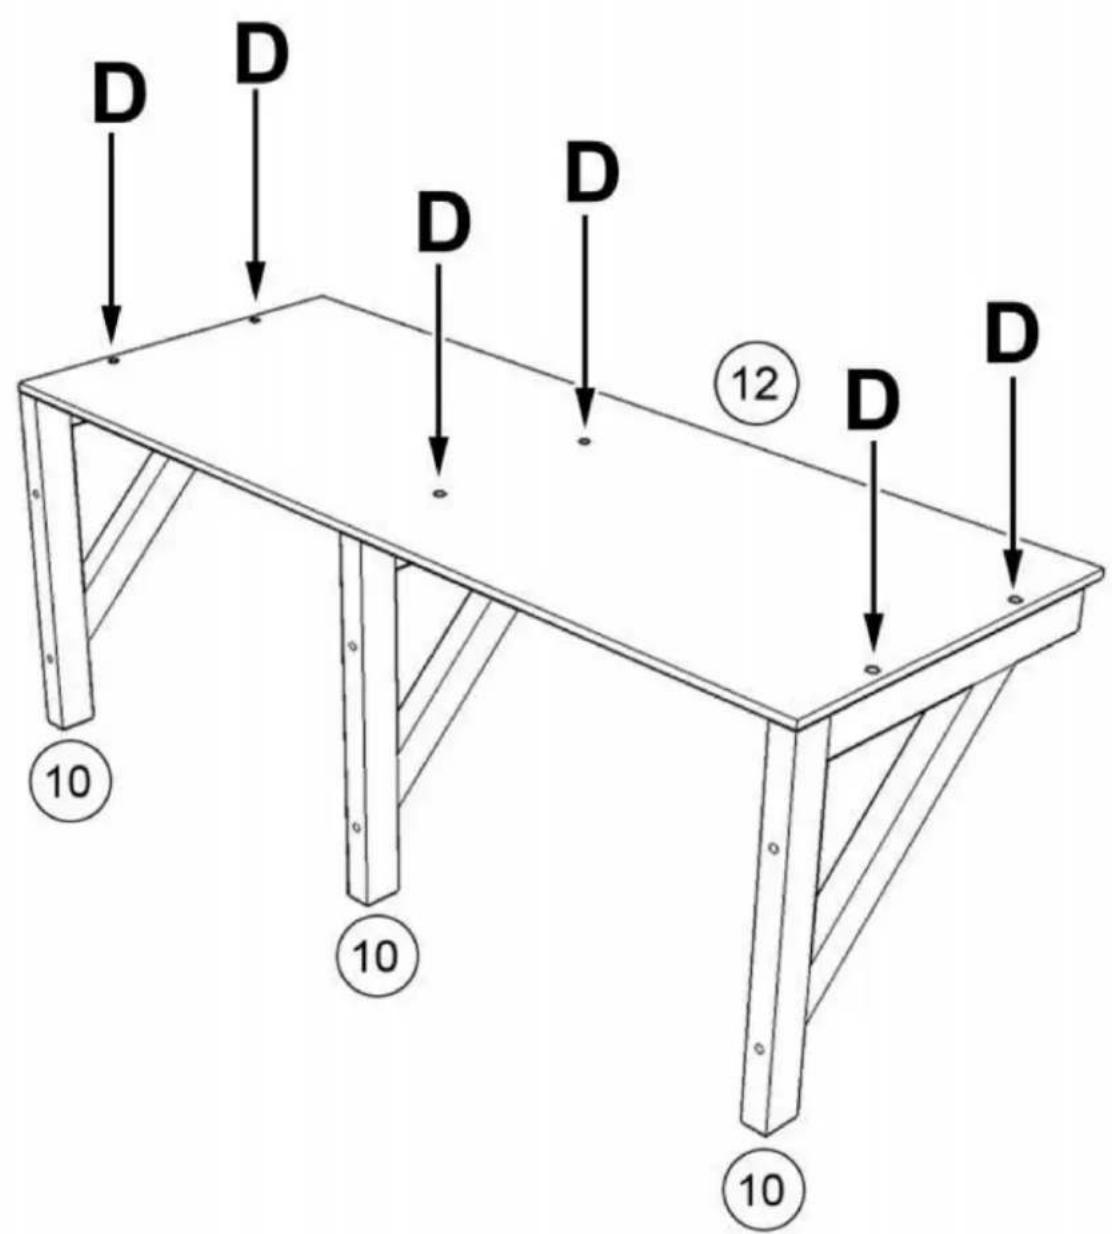
Assemble shelf with part #12 and part #10x3 with screw (D)x6 as shown
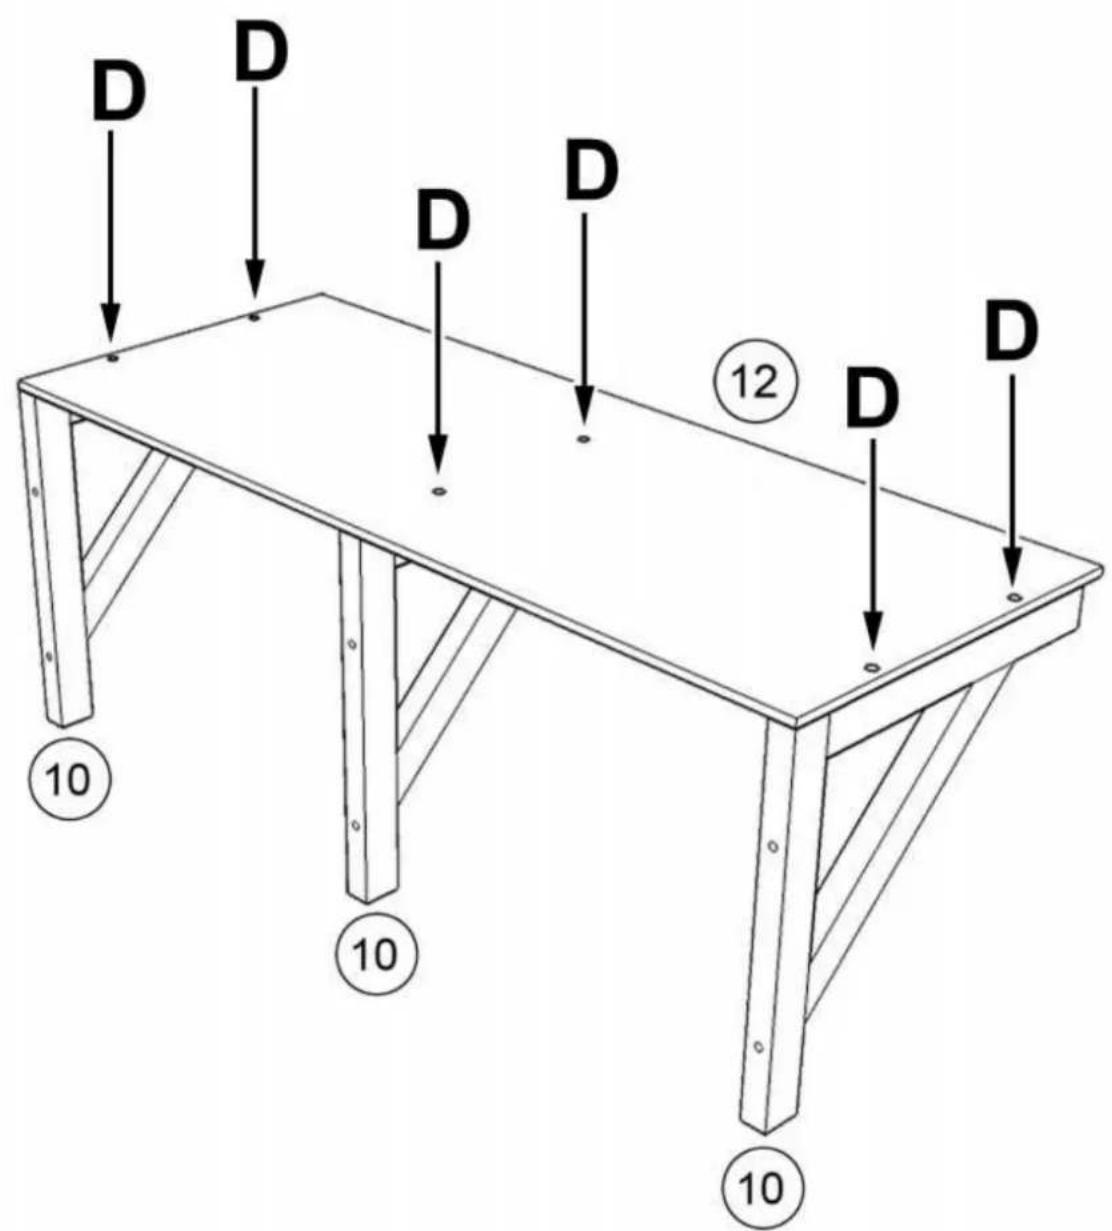
text_image
D D D D D ⑫ D D ⑩ ⑩ ⑩STEP:10
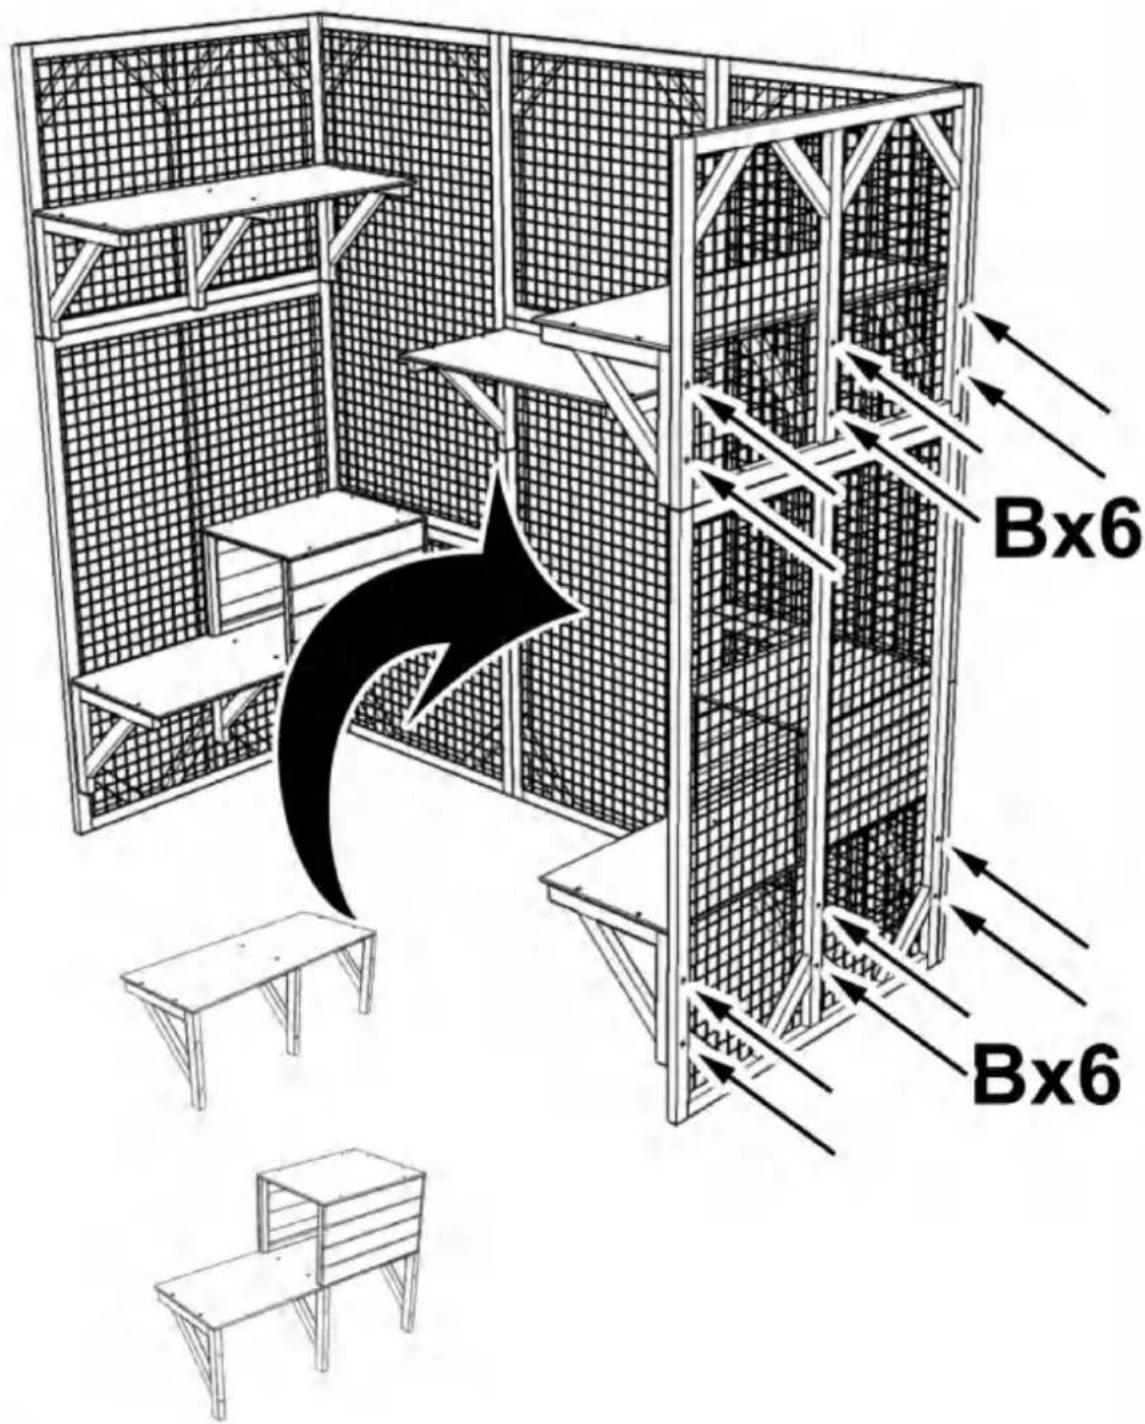
Requires two people to install the shelves at designated position, one person is inside the cage holding the shelf while the other person is outside locking the screws through the pre-drilled holes as shown
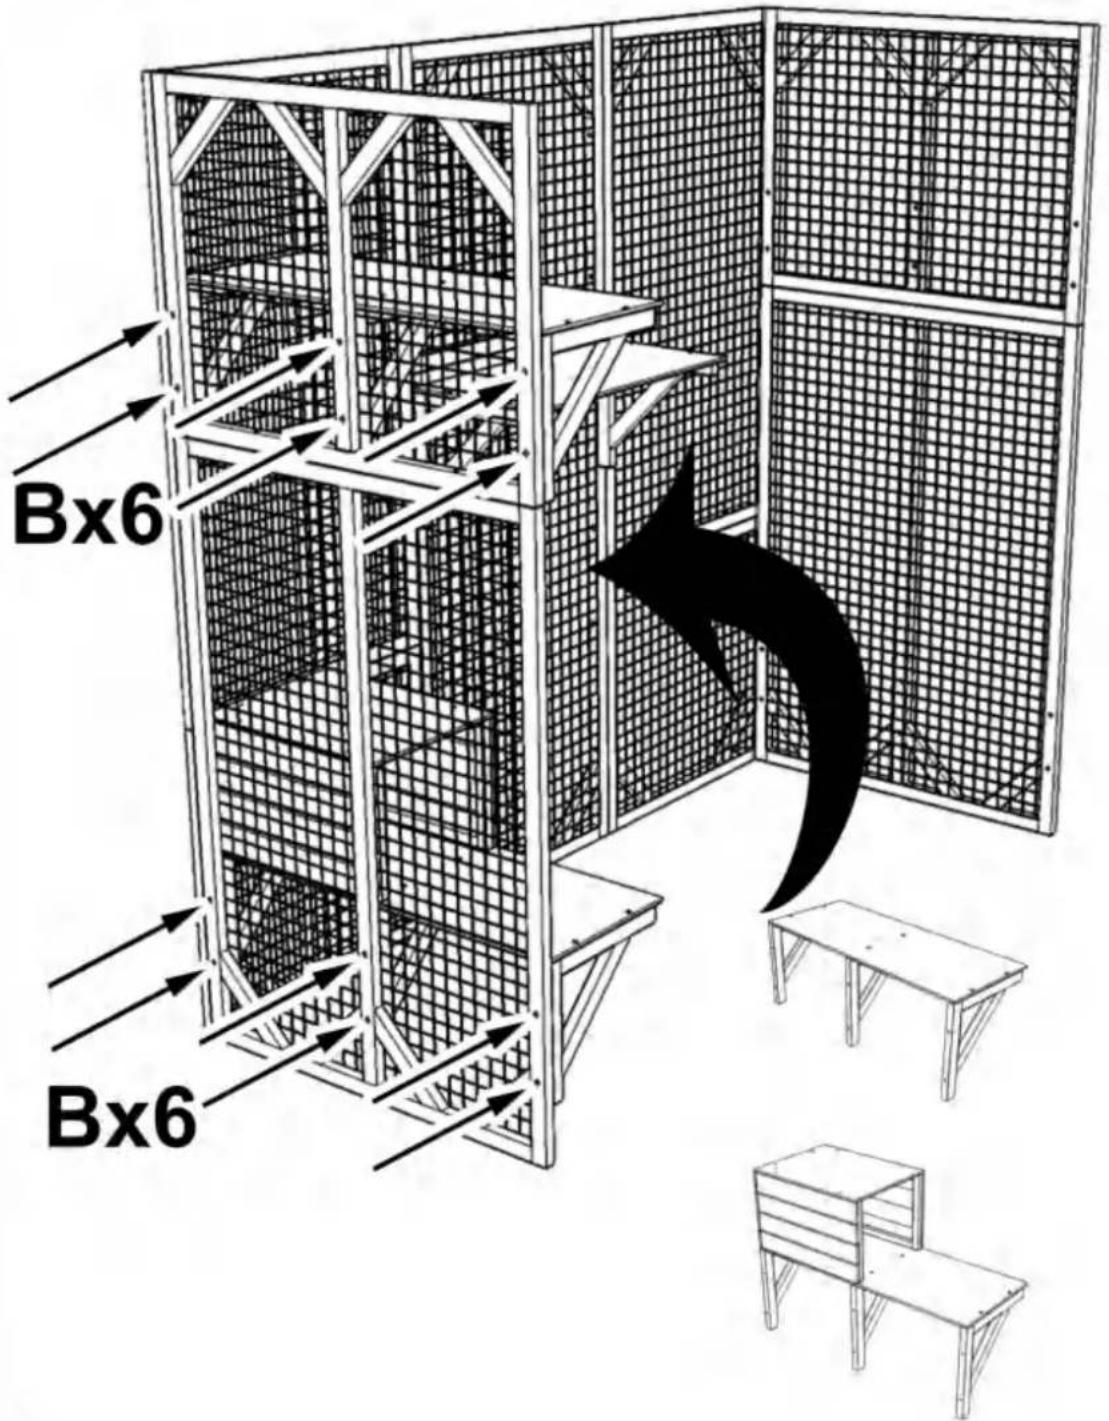
text_image
Bx6 Bx6STEP:11
Requires two people to install the shelves at designated position, one person is inside the cage holding the shelf while the other person is outside locking the screws through the pre-drilled holes as shown
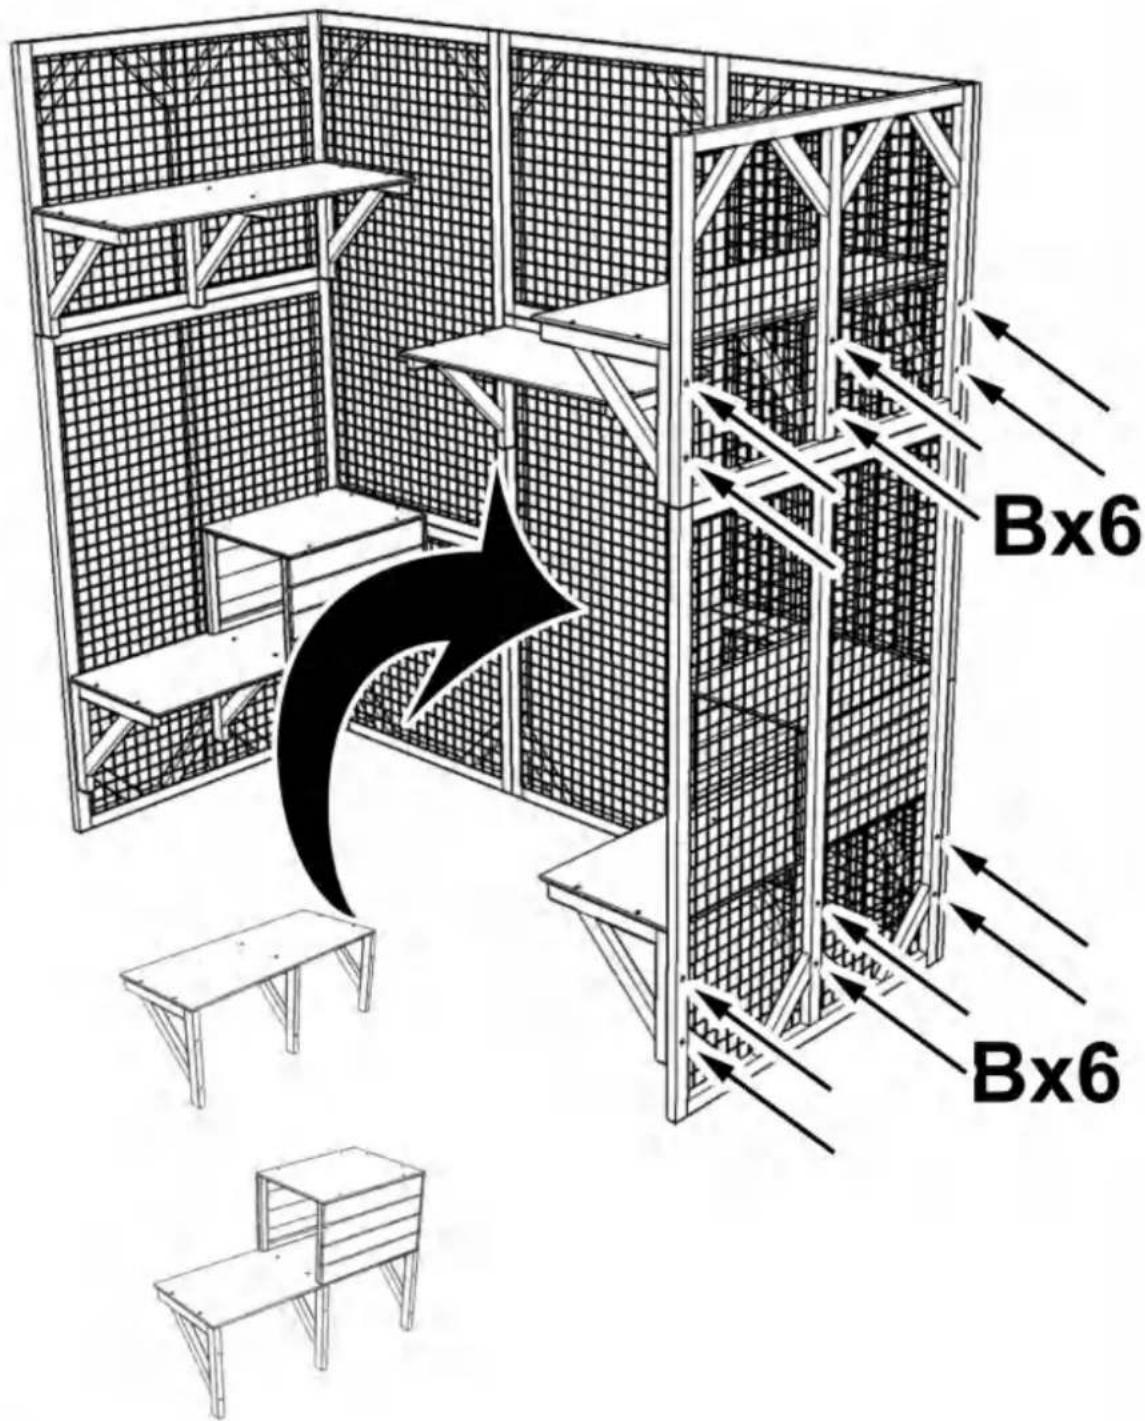
text_image
Bx6 Bx6STEP:12
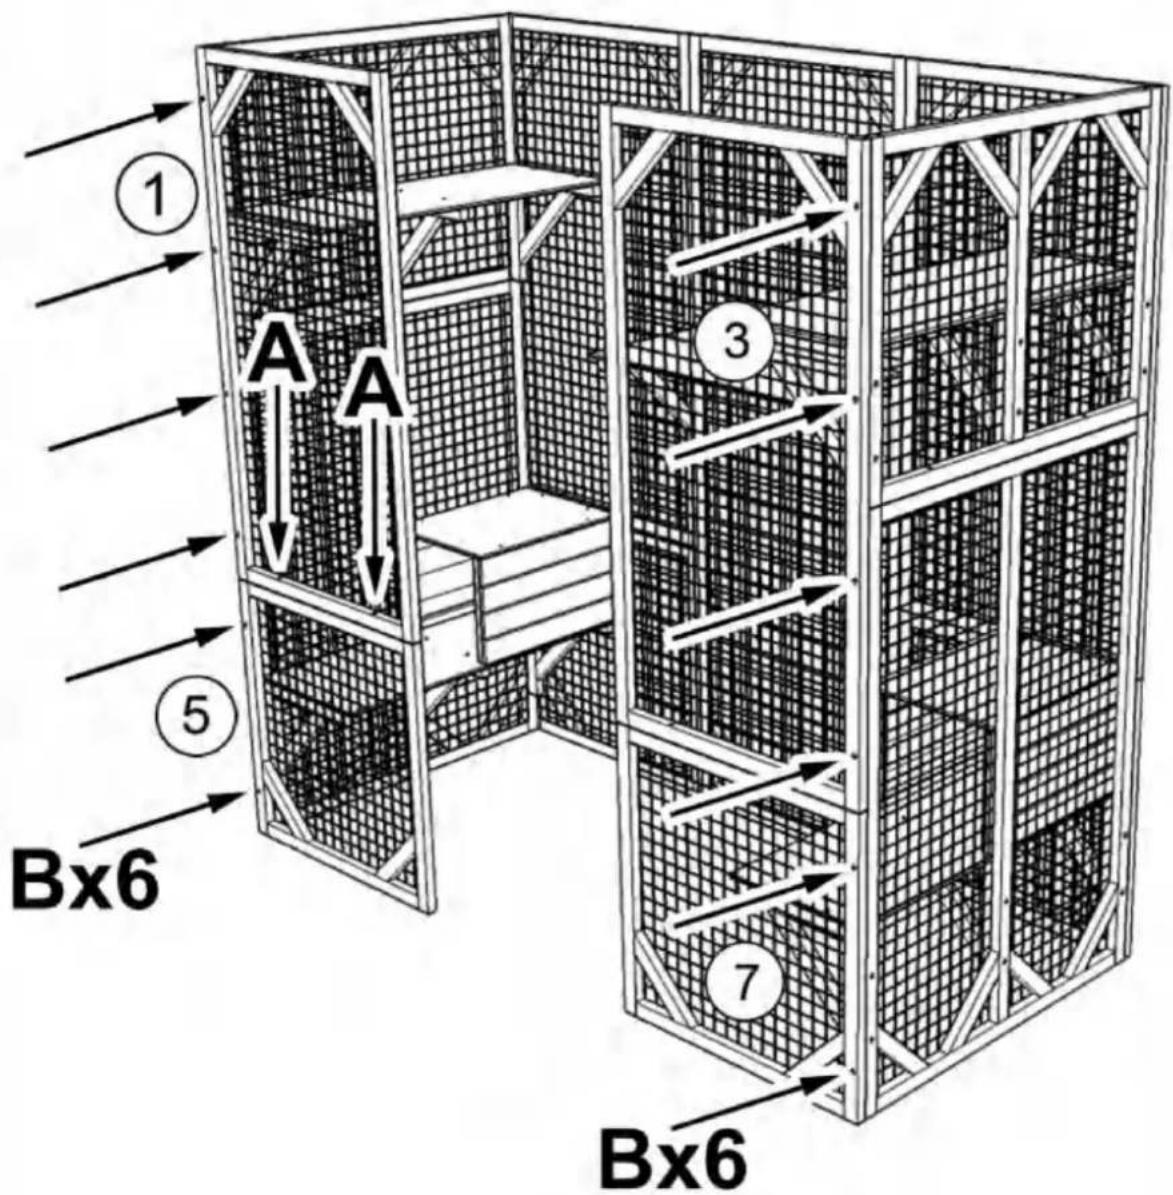
Assemble part #1 and #5, part #3 and #7 with screw (B) x12 as shown, please pay attention to the up and bottom orientation of part #1 and #3, the end with 2 pre-drilled holes is bottom as shown in the figure, then secure part #1 to part #5 with screw (A)x2 downwards
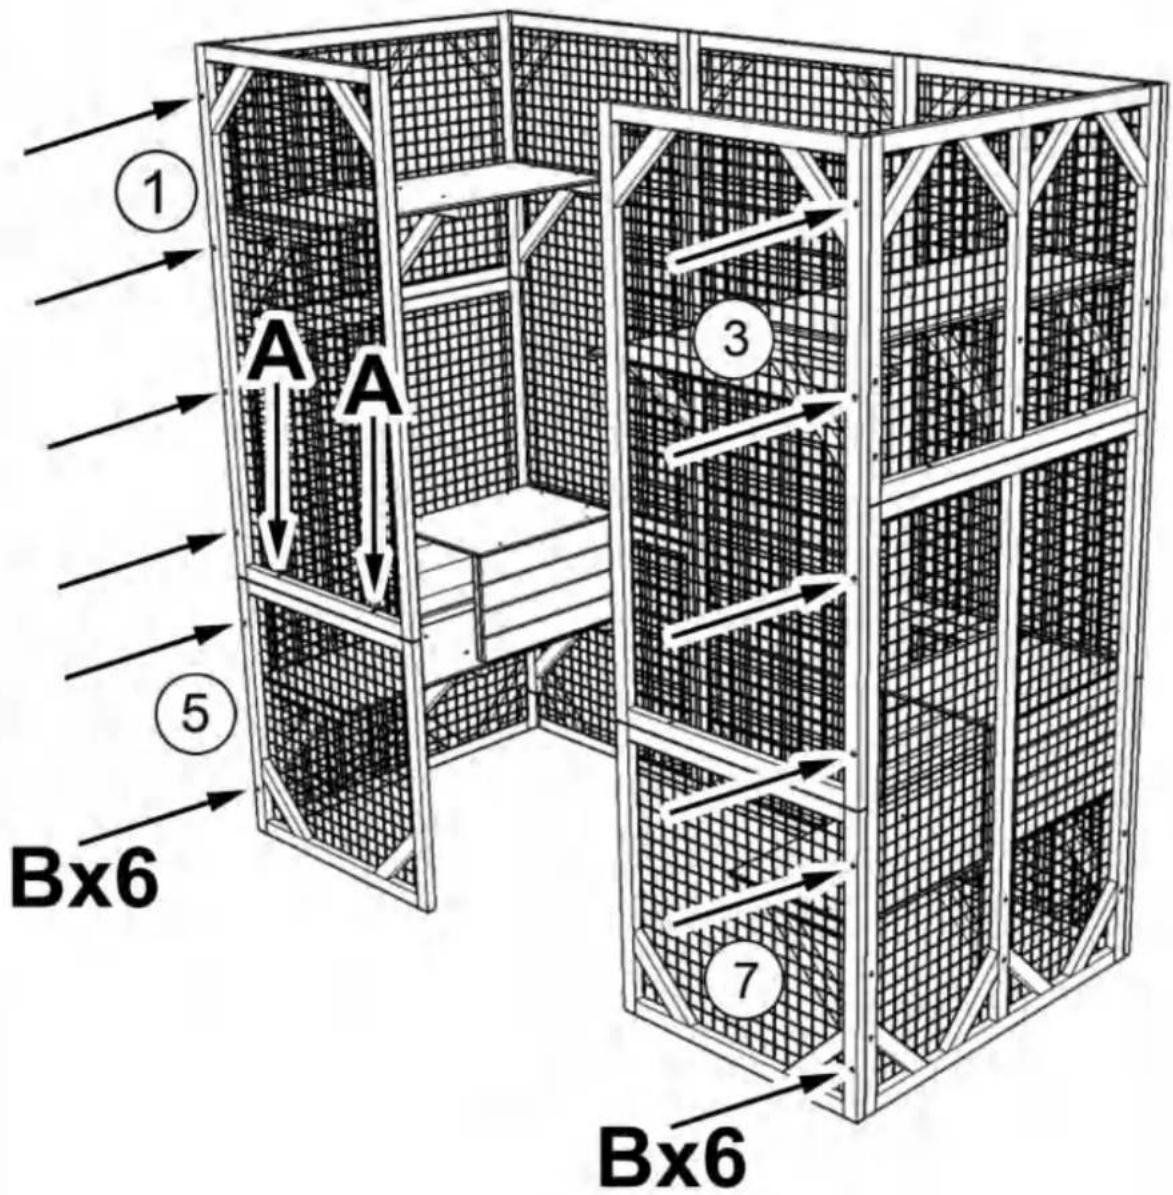
text_image
① A A ⑤ Bx6 ③ 7 Bx6STEP:13
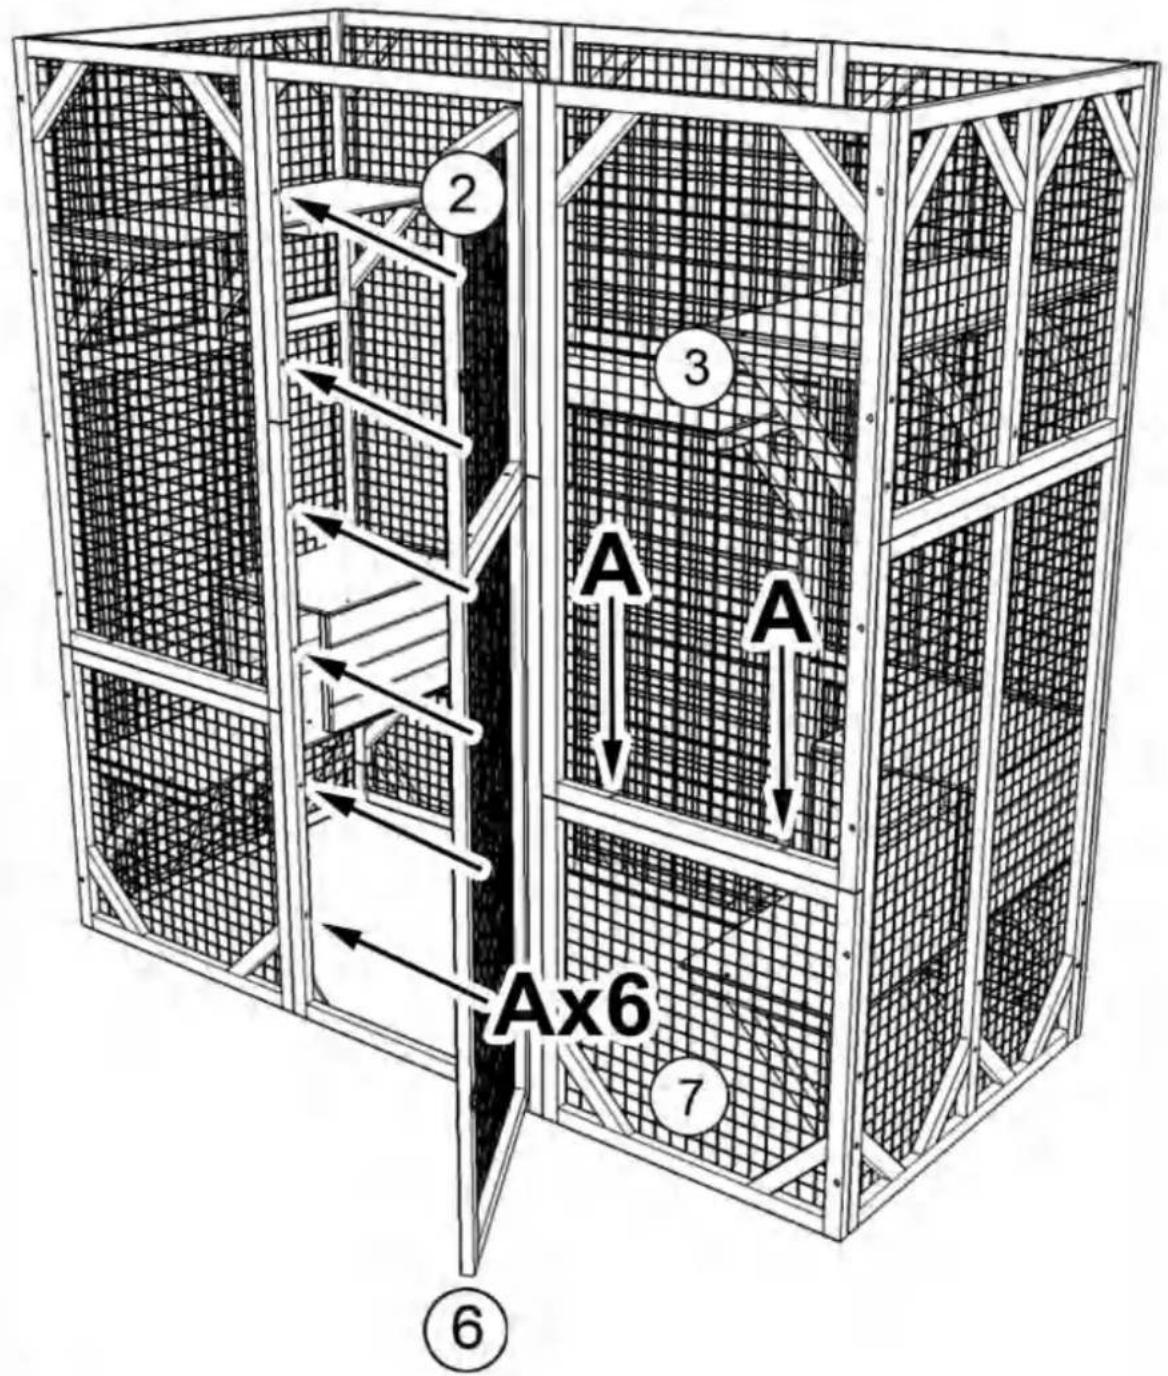
Secure part #3 to part #7 with screw (A)x2 downwards, then assemble part #2 and part #6 (open the doors) with screw (A) x6 as shown
text_image
2 3 A A Ax6 7 ⑥STEP:14
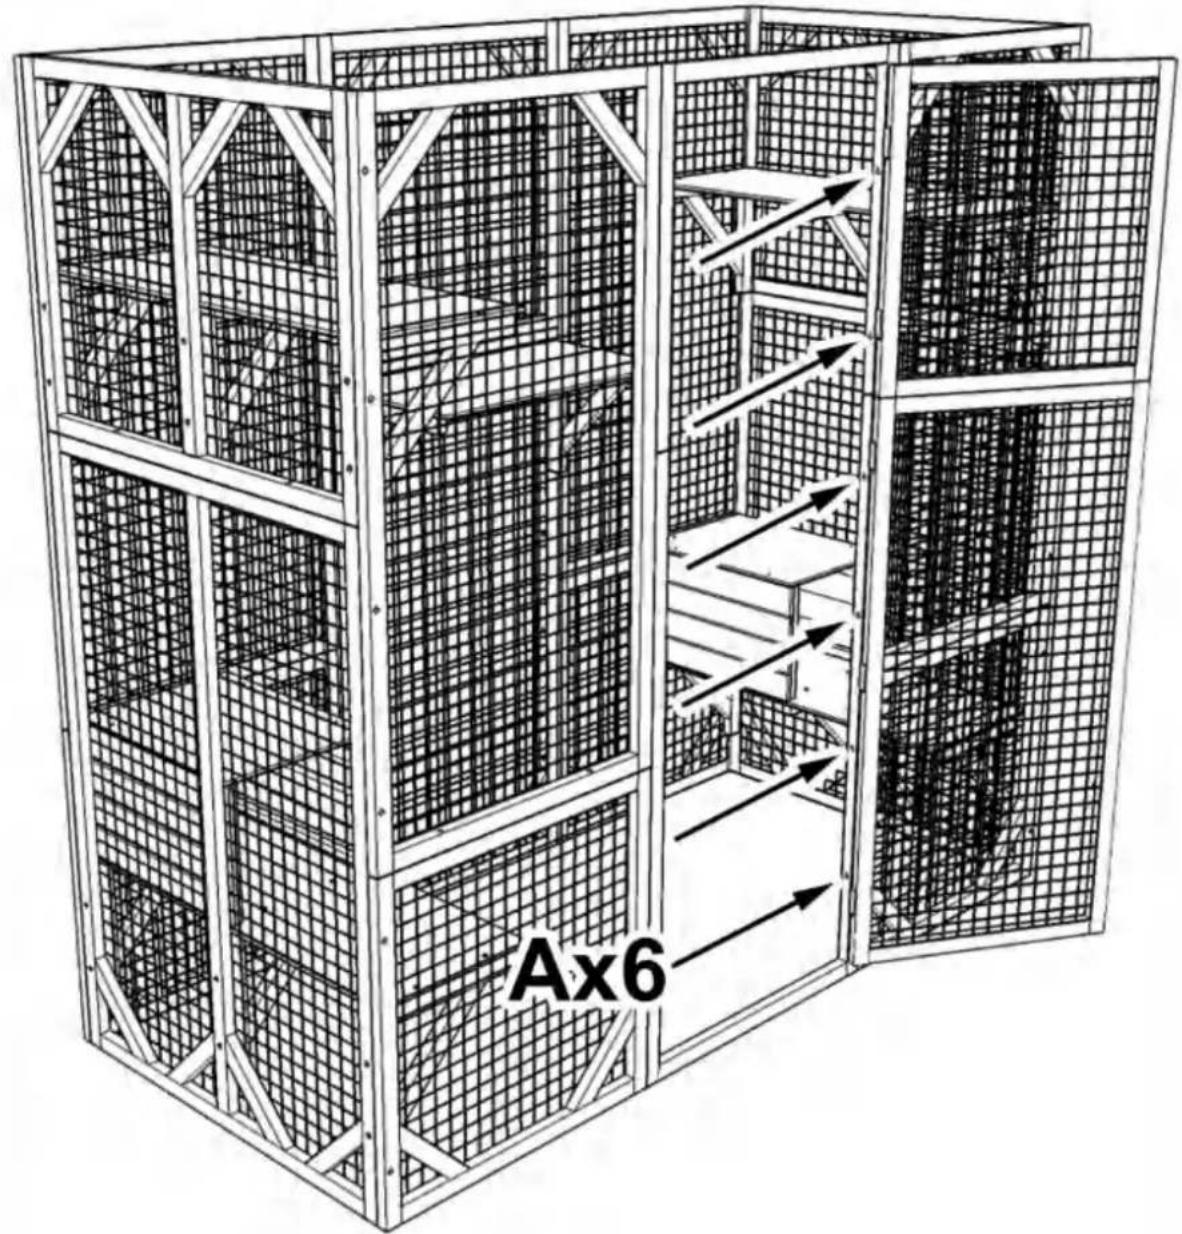
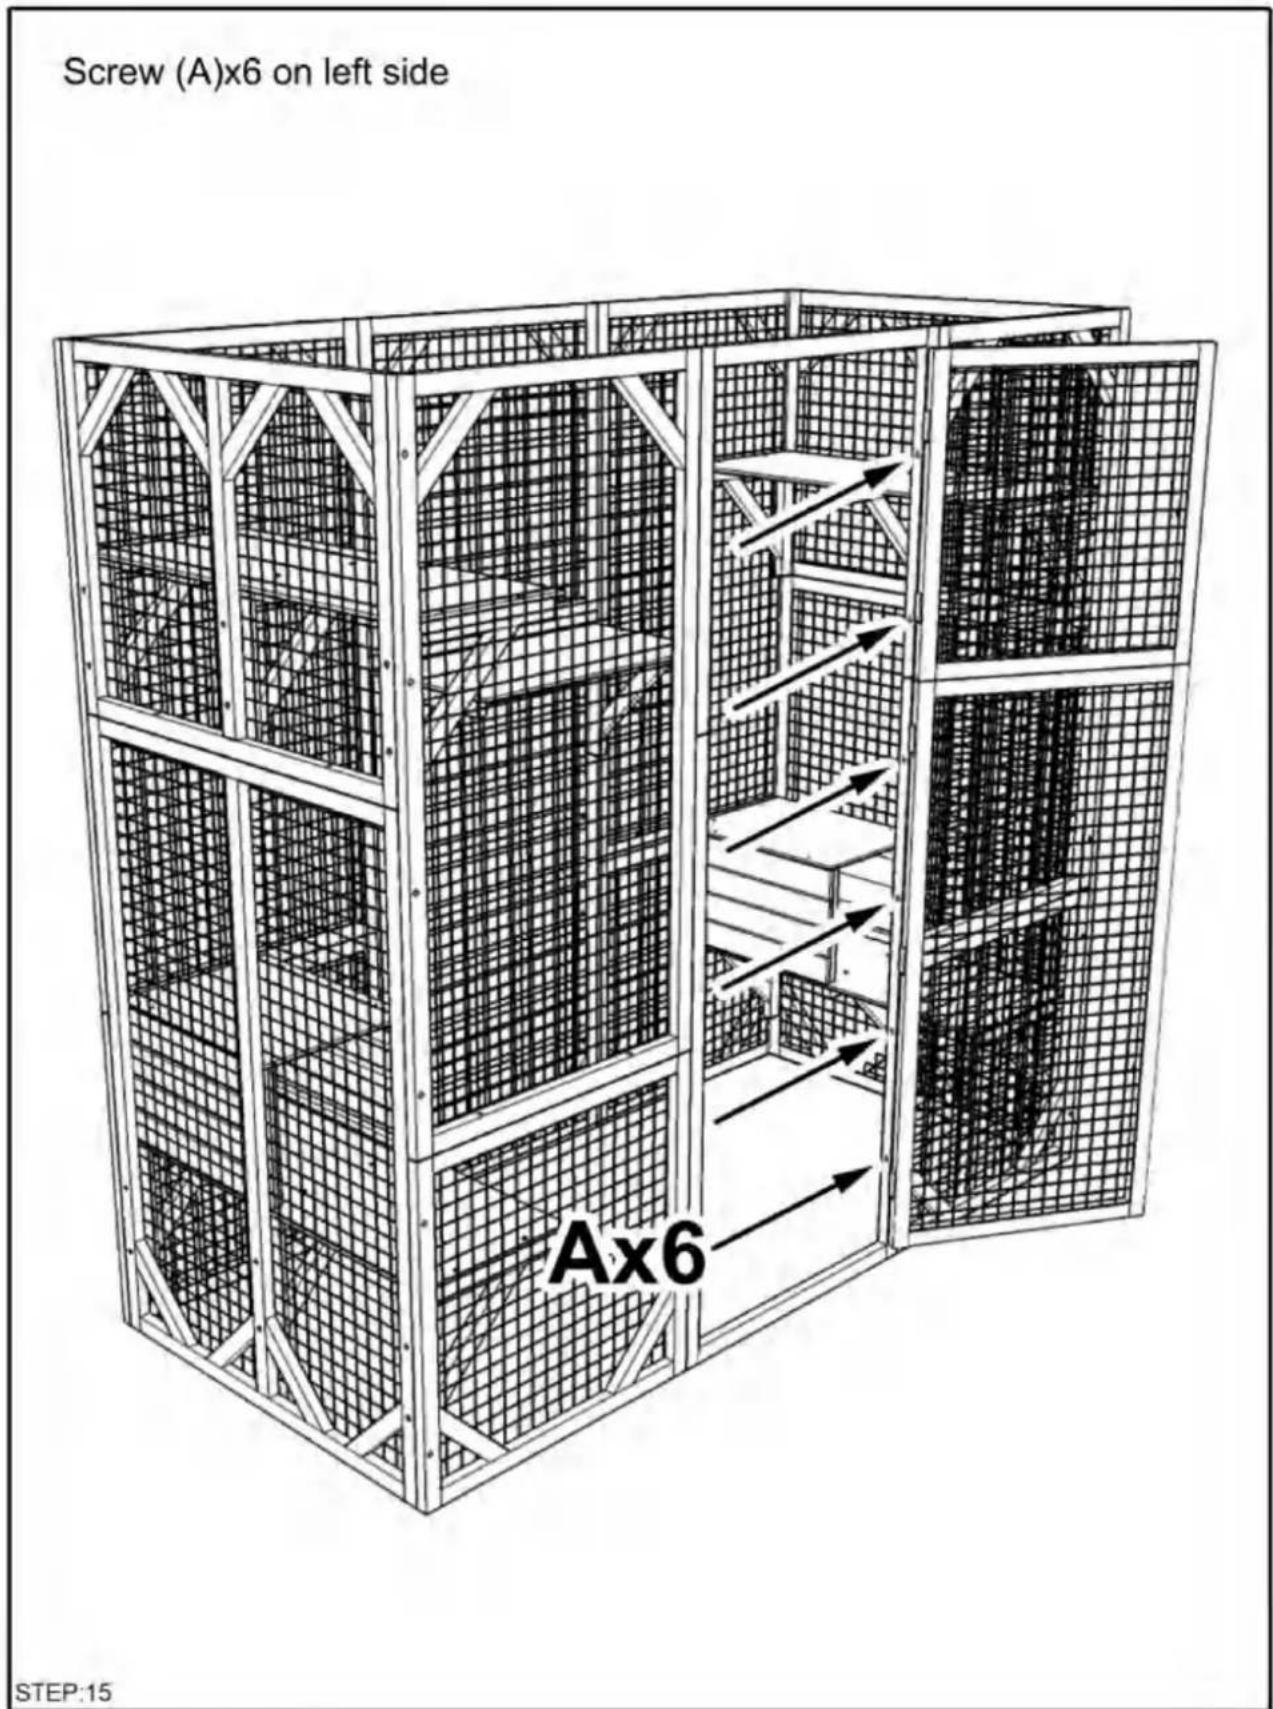
Screw (A)x6 on left side
text_image
Ax6STEP:15
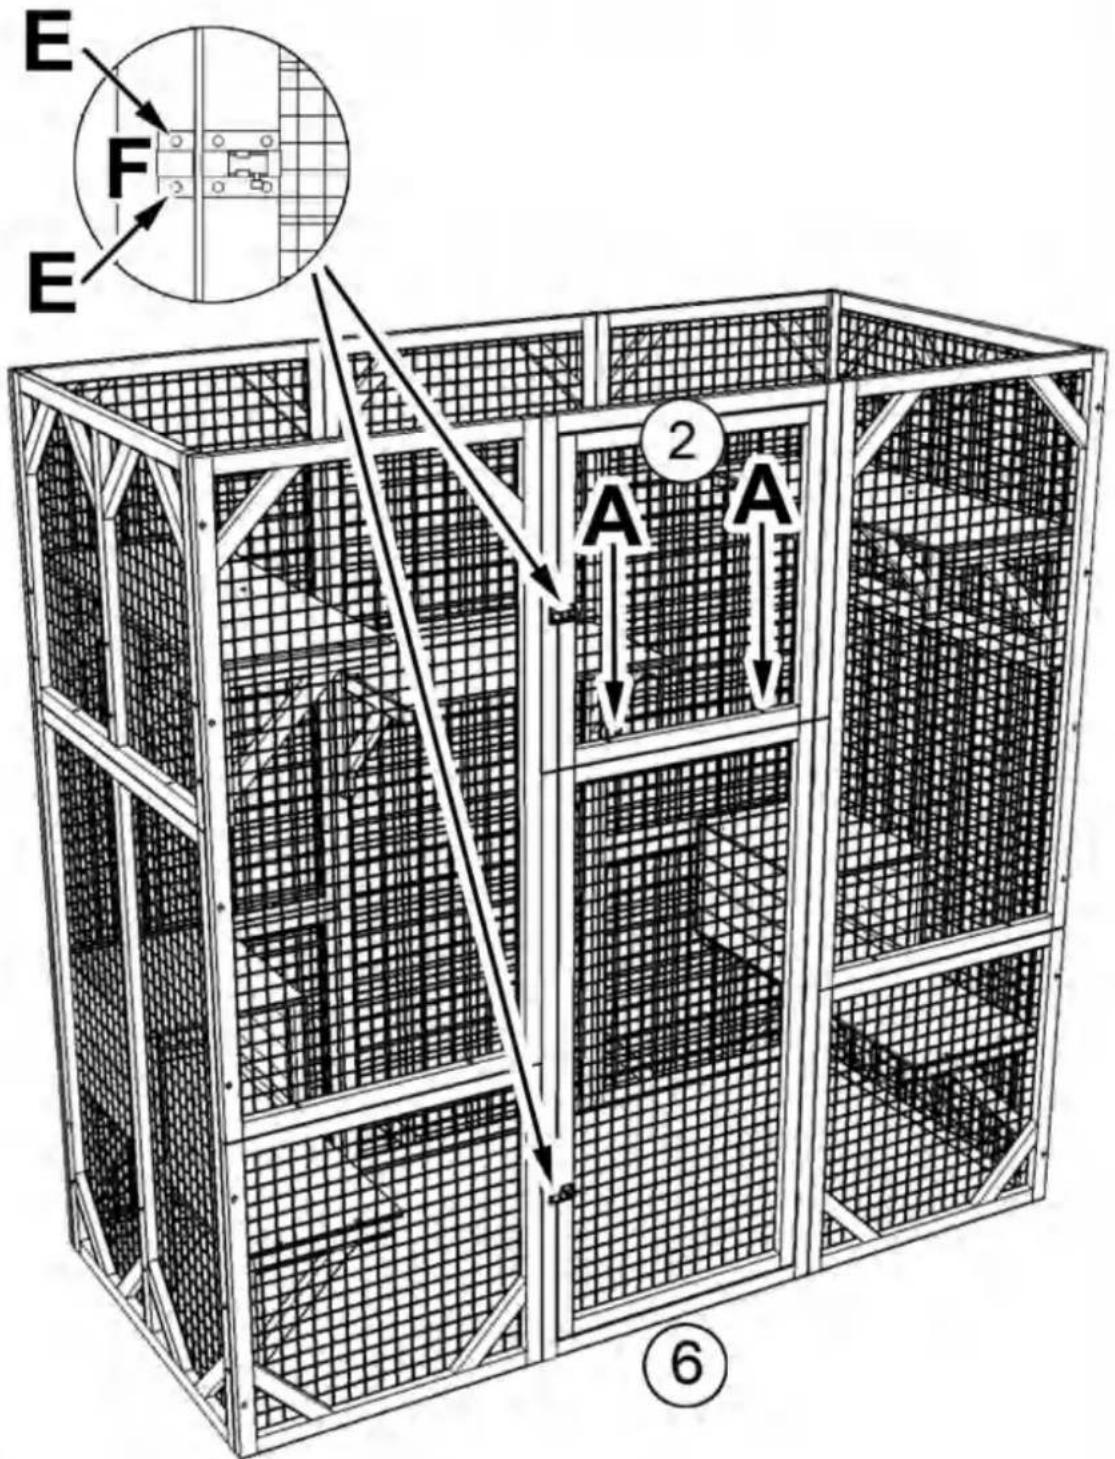
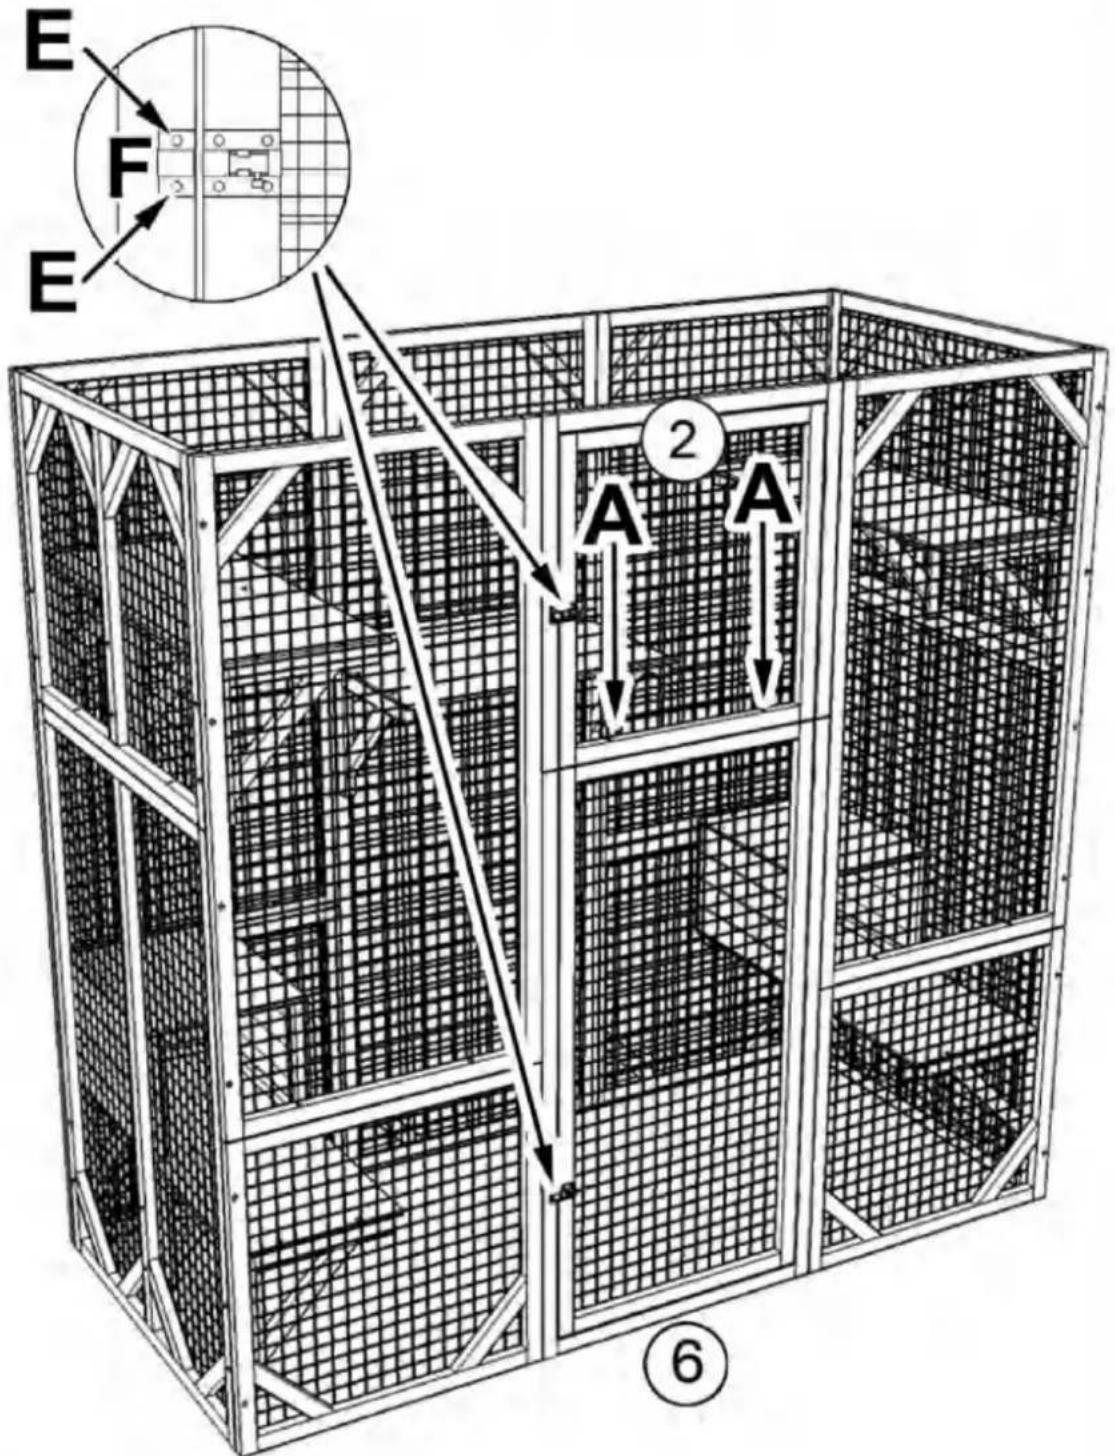
Align the short end of lock part #F with its other part already on door then secure it with screws (E)x2, secure part #2 to part #6 with screw (A)x2 downwards
text_image
E F E 2 A A ⑥STEP:16
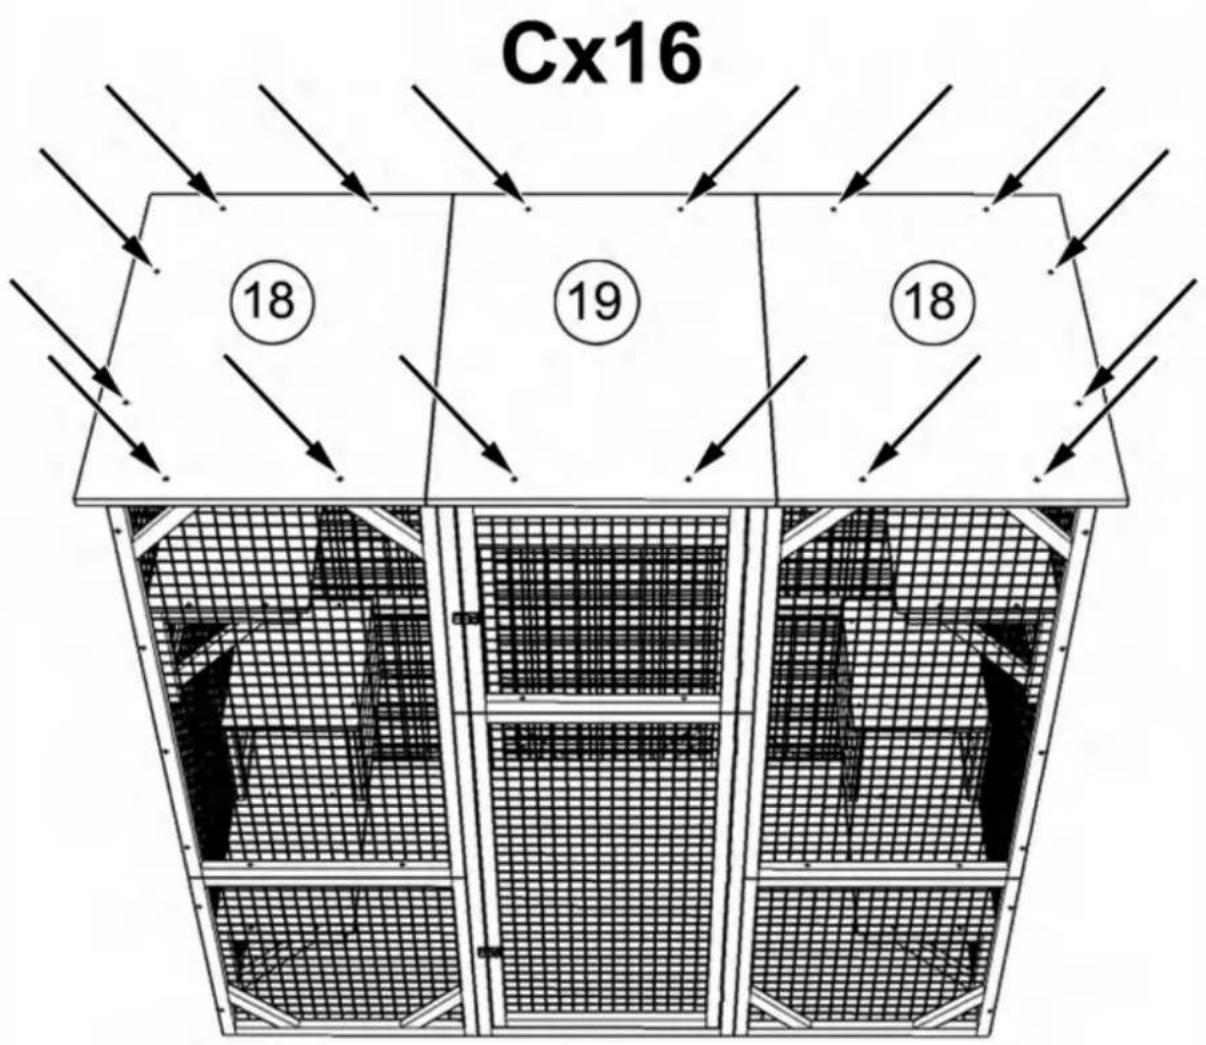
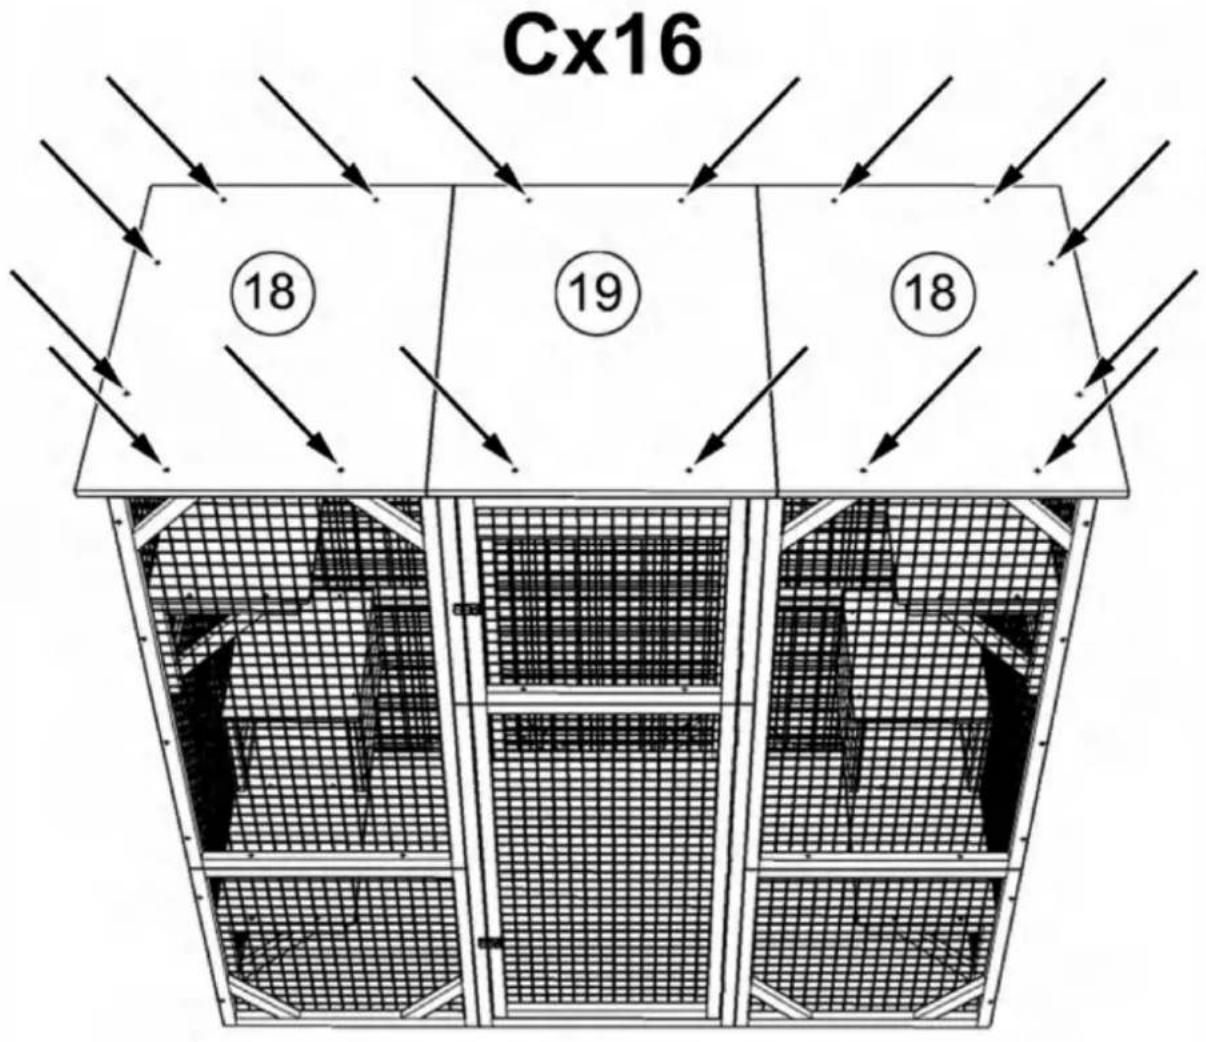
Install roofs with screw (C)x16 as shown, please be noted the edge of roof is 1.57 inch from the house underneath
text_image
Cx16 18 19 18STEP:17
©
Unfold the tarp and cover it
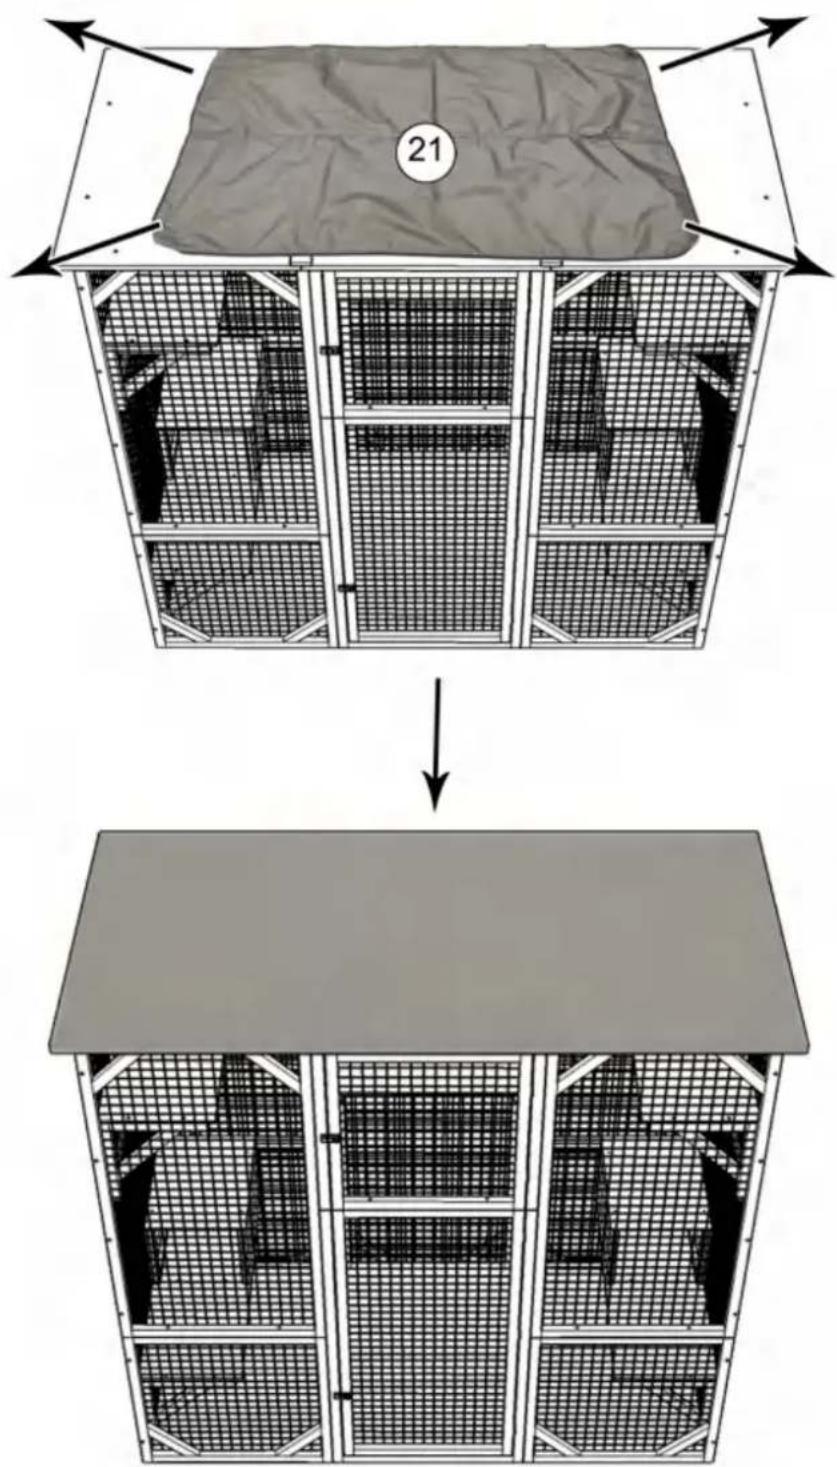
text_image
21STEP:19
Shuangchenglu 803nong11hao1602A-1609shi, baoshanqu, shanghai 200000 CN.
| EC | REP |
E-CrossStu GmbH. Mainzer Landstr.69, 60329 Frankfurt am Main.
| UK | REP |
YH CONSULTING LIMITED. C/O YH Consulting Limited Office 147, Centurion House, London Road, Staines-upon-Thames, Surrey, TW18 4AX
Imported to USA: Sanven Technology Ltd., Suite 250, 9166 Anaheim Place, Rancho Cucamonga, CA 91730
VEVOR®
TOUGH TOOLS, HALF PRICE
Technical Support and E-Warranty Certificate
www.vevor.com/support
VEVOR®
TOUGH TOOLS, HALF PRICE
Technical Support and E-Warranty Certificate www.vevor.com/support
INSTRUCTION FOR CAT CAGE
MODEL:CH448
natural_image
Line drawing of a multi-level cage structure with internal mesh compartments (no text or symbols)NEED HELP? CONTACT US!
Have product questions? Need technical support? Please feel free to contact us:
This is the original instruction, please read all manual instructions carefully before operating. VEVOR reserves a clear interpretation of our user manual. The appearance of the product shall be subject to the product you received. Please forgive us that we won't inform you again if there are any technology or software updates on our product.
WARNING:
Read this material before using this product. Failure to do so can result in serious injury.
Assembly precautions
- Assemble only according to these instructions. Improper assembly can create hazards.
- In order to ensure your own safety, please make sure to ANSI-approved safety goggles and heavy-duty work gloves when installing this product.
- Keep the assembly area clean and well lit.
- Keep bystanders out of the area during assembly.
- Do not assemble when tired or when under the influence of alcohol, drugs or medication.
- Product capabilities apply to properly and completely assembled product only.
- Assemble on a flat, level, hard and smooth surface capable of safely supporting a fully loaded cat cage.
Use precautions
TO PREVENT SERIOUS INJURY AND DEATH FROM TIPPING:
- DO NOT SIT OR STAND ON THIS ITEM.
- This product is not a toy. Do not allow children to play with or near this item.
Please keep small spare parts out of children's reach. - Use only on a flat, level, hard and smooth surface capable of safely supporting a fully loaded cat cage.
- Use as intended only.
- Inspect before every use; do not use if parts are loose or damaged.
SAVE THESE INSTRUCTIONS
SPECIFICATIONS
| Model | CH448 |
| Product Size | 1800*880*1690mm |
| Color | Gray |
COMPONENTS
Notice:
- Various specifications of screws are used in the installation of this product. Pay attention to the correct use of screw specifications according to the instruction manual.
- Please wear gloves when installing.
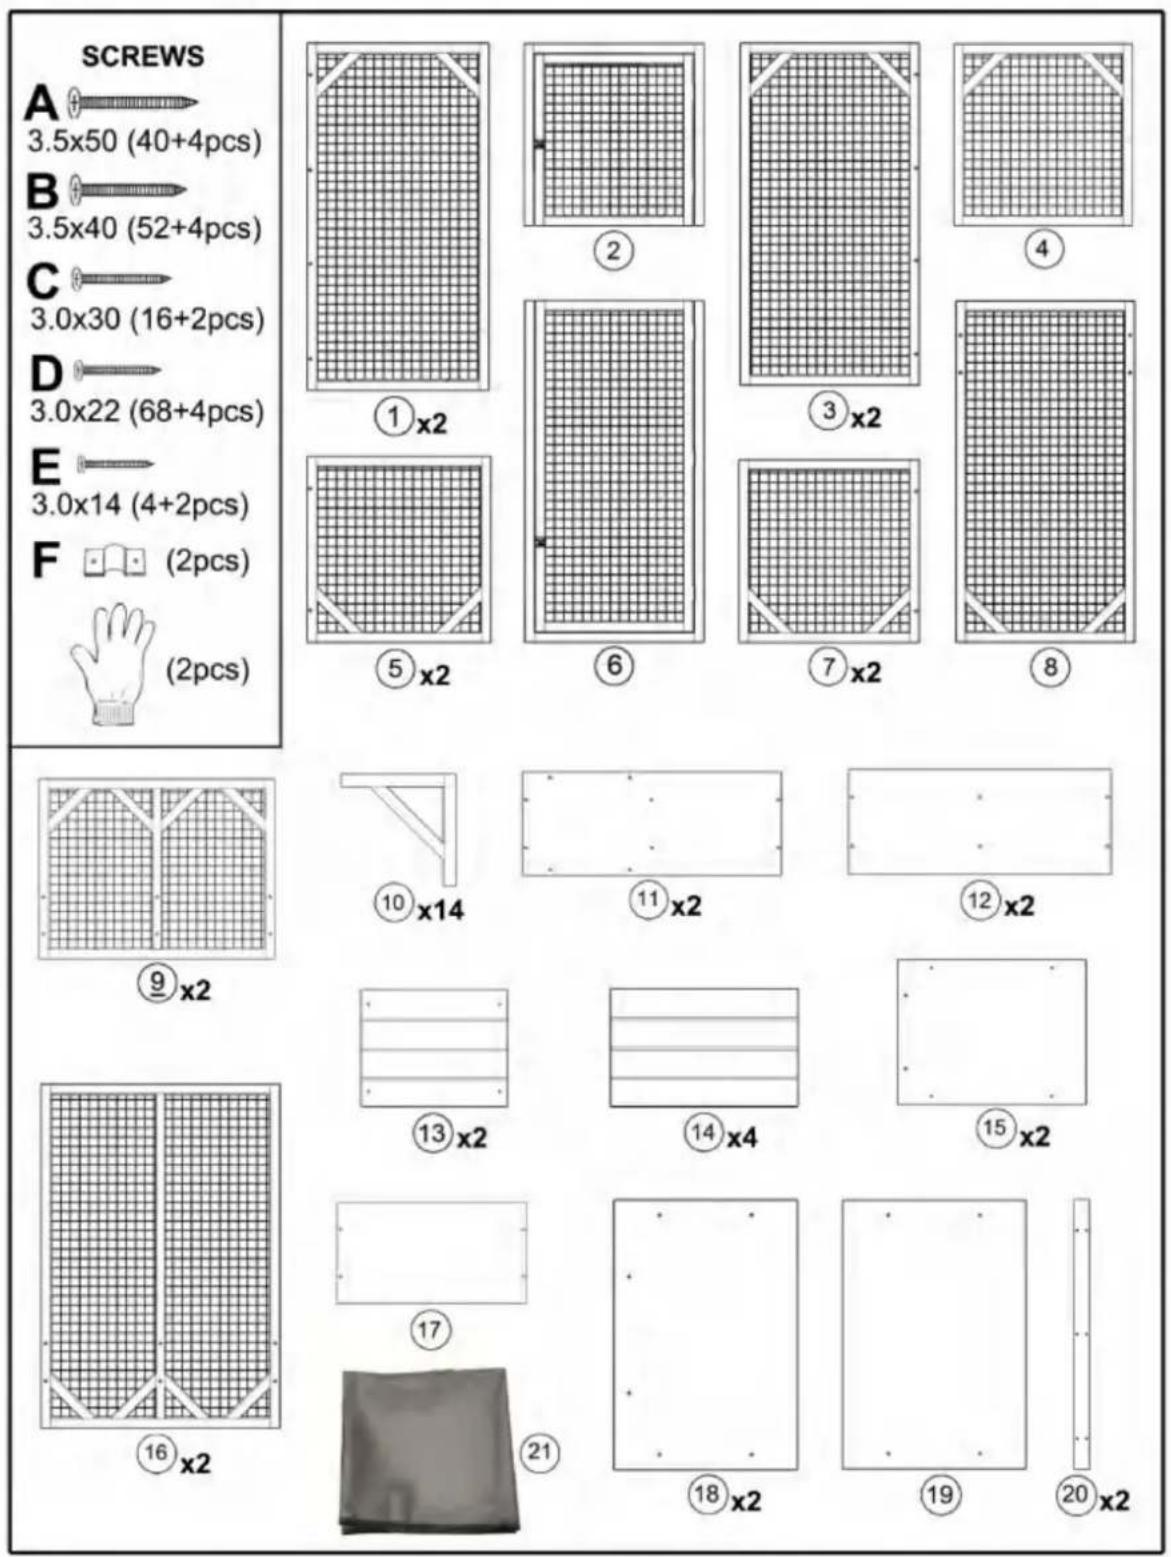
text_image
SCREWS A 3.5x50 (40+4pcs) B 3.5x40 (52+4pcs) C 3.0x30 (16+2pcs) D 3.0x22 (68+4pcs) E 3.0x14 (4+2pcs) F (2pcs) (2pcs) ①x2 ② ③x2 ④ ⑤x2 ⑥ ⑦x2 ⑧ ⑨x2 ⑩x14 ⑪x2 ⑫x2 ⑬x2 ⑭x2 ⑮x2 ⑯ ⑰x2 ⑱ ⑲x2 ⑳ ㉑ ㉒ ㉓ ㉔ ㉕ ㉖ ㉗ ㉘ ㉙ ㉚ ㉛ ㉜ ㉝ ㉞ ㉟ ㉳ ㉴ ㉵ ㉶ ㉷ ㉸ ㉹ ㉺ ㉻ ㉼ ㉽ ㉾ ㉿ ㉒ ㉓ ㉔ ㉕ ㉖ ㉗ ㉘ ㉙ ㉚ ㉛ ㉜ ㉝ ㉟ ㉟x2Assembly Instructions
Please be noted that the side with wire nailed on is back side, should be inward when assembly
Pay attention to the up and bottom orientation of part #9 and part #1, the end with 2 pre-drilled holes is bottom as shown in the figure Assembling part #1, #5, #9, #16 with screw (B)x6 as shown, then secure part #9 to part #16 with screw (A)x2 downwards
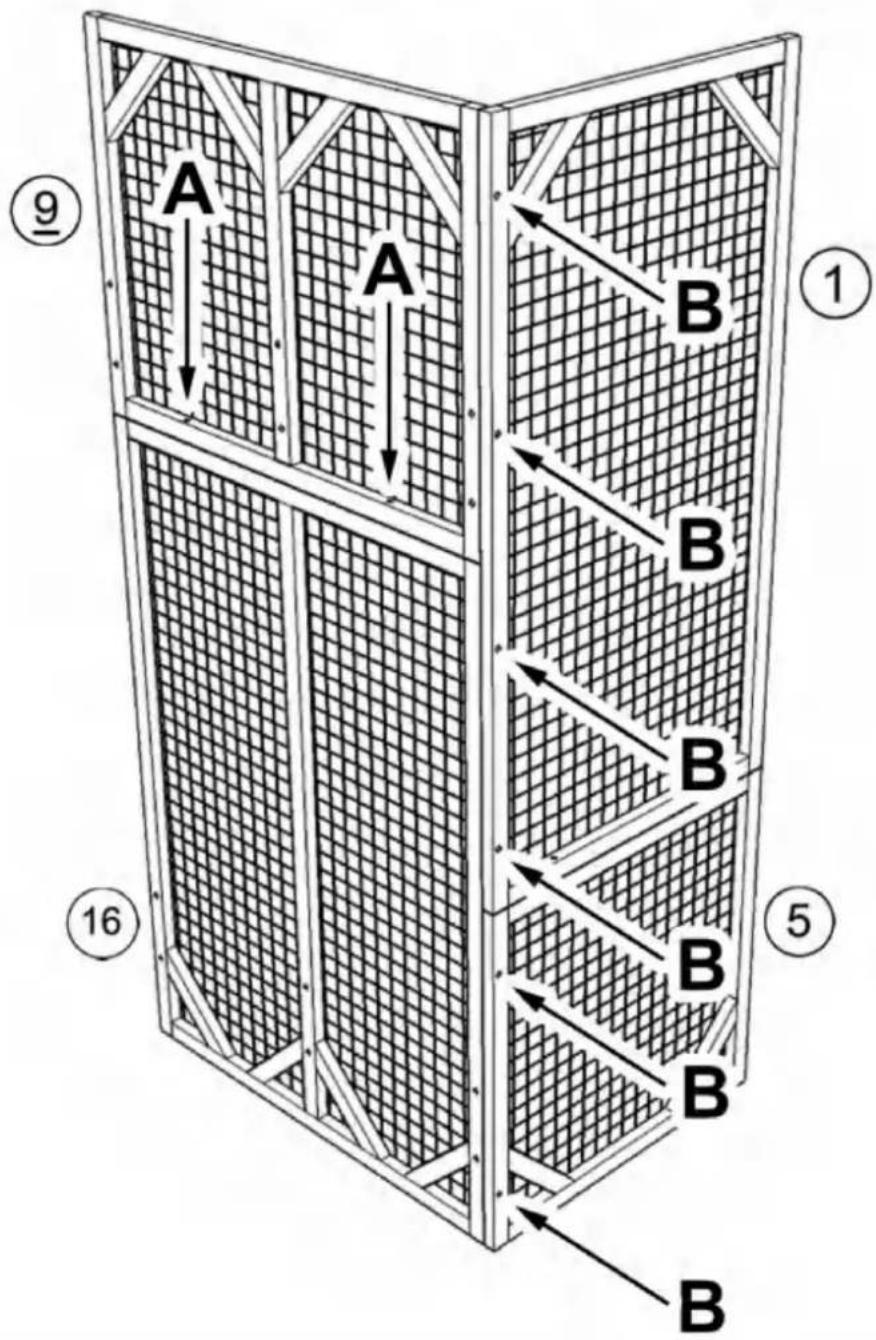
Secure part #1 to part #5 with screw (A)x2 downwards, then assemble part #4 and part #8 with screw (A) x6 as shown, please pay attention to the up and bottom orientation of part #4, the end with 2 pre-drilled holes is bottom as shown in the figure

text_image
A A A A A A A A A 1 4 5 8STEP:2
Assemble part #3 and part #7 with screw (A) x6 as shown, please pay attention to the up and bottom orientation of part #3, the end with 2 pre-drilled holes is bottom as shown in the figure, then secure part #3 to part #7 with screw (A)x2 downwards
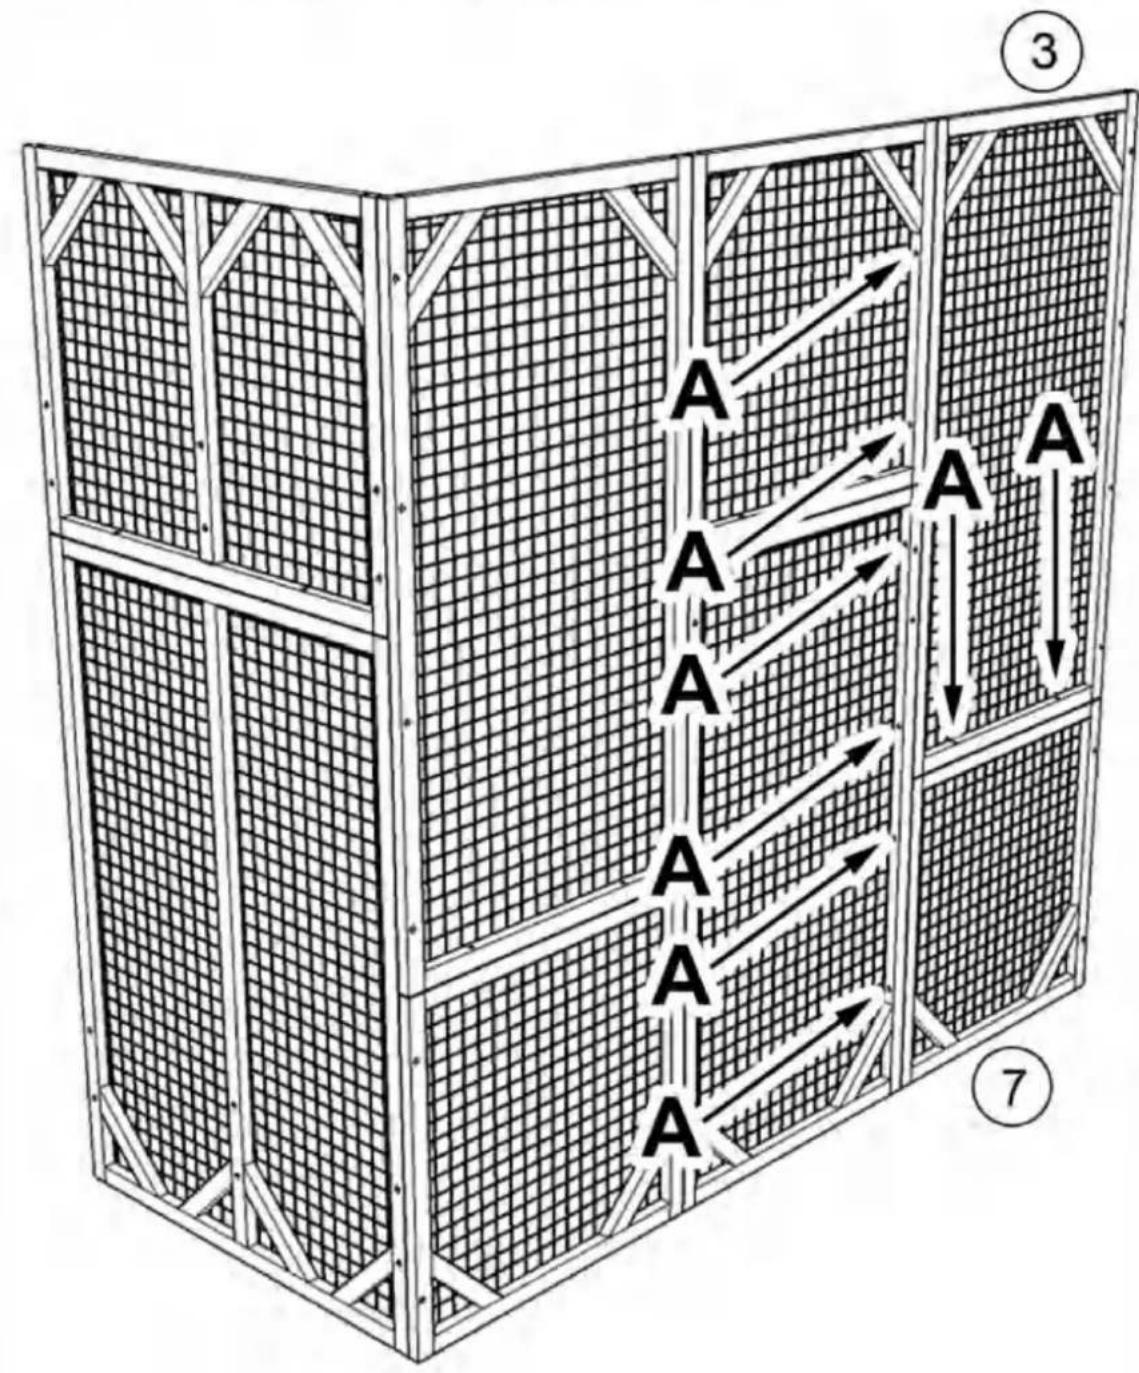
flowchart
graph TD
    A1["A"] --> B1["A"]
    A2["A"] --> B2["A"]
    A3["A"] --> B3["A"]
    A4["A"] --> B4["A"]
    B1 --> C1["A"]
    B2 --> C2["A"]
    B3 --> C3["A"]
    B4 --> C4["A"]
    style A1 fill:#f9f,stroke:#333
    style A2 fill:#f9f,stroke:#333
    style A3 fill:#f9f,stroke:#333
    style A4 fill:#f9f,stroke:#333
    style B1 fill:#ccf,stroke:#333
    style B2 fill:#ccf,stroke:#333
    style B3 fill:#ccf,stroke:#333
    style B4 fill:#ccf,stroke:#333
STEP:3
Secure part #4 to part #8 with screw (A)x2 downwards, then assemble part #9 and part #16 with screw (B) x6 as shown, please pay attention to the up and bottom orientation of part #9, the end with 2 pre-drilled holes is bottom as shown, then secure part #9 to part #16 with screw (A)x2 downwards
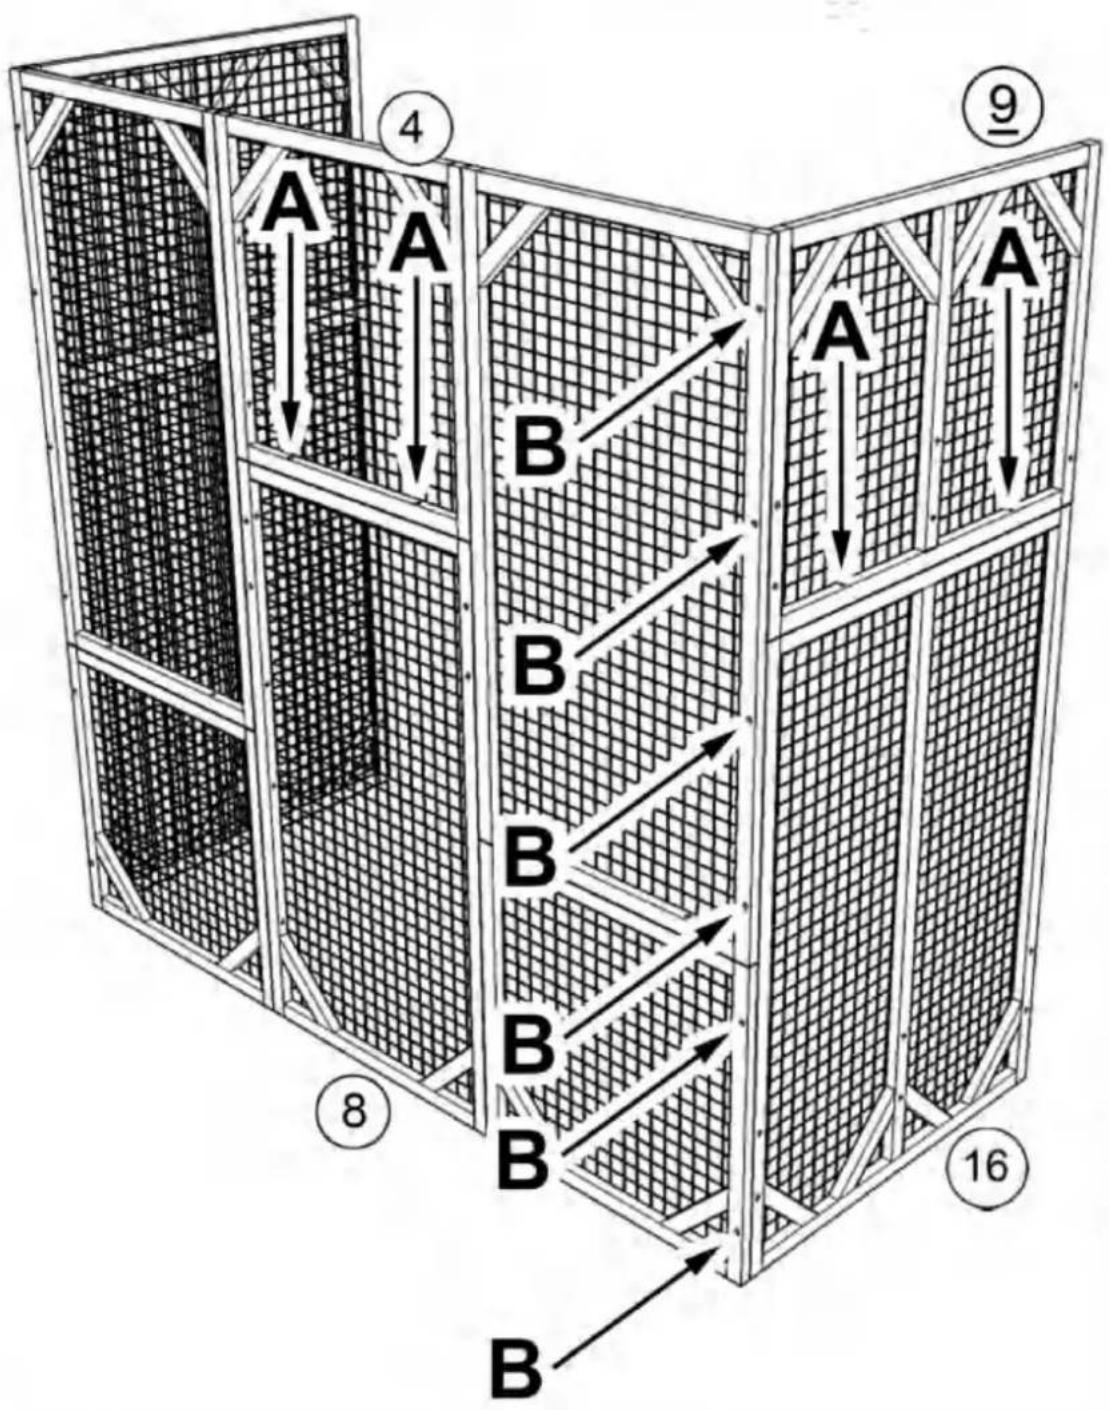
Assemble shelf with part #17 and part #10x2 with screw (D)x4 as shown
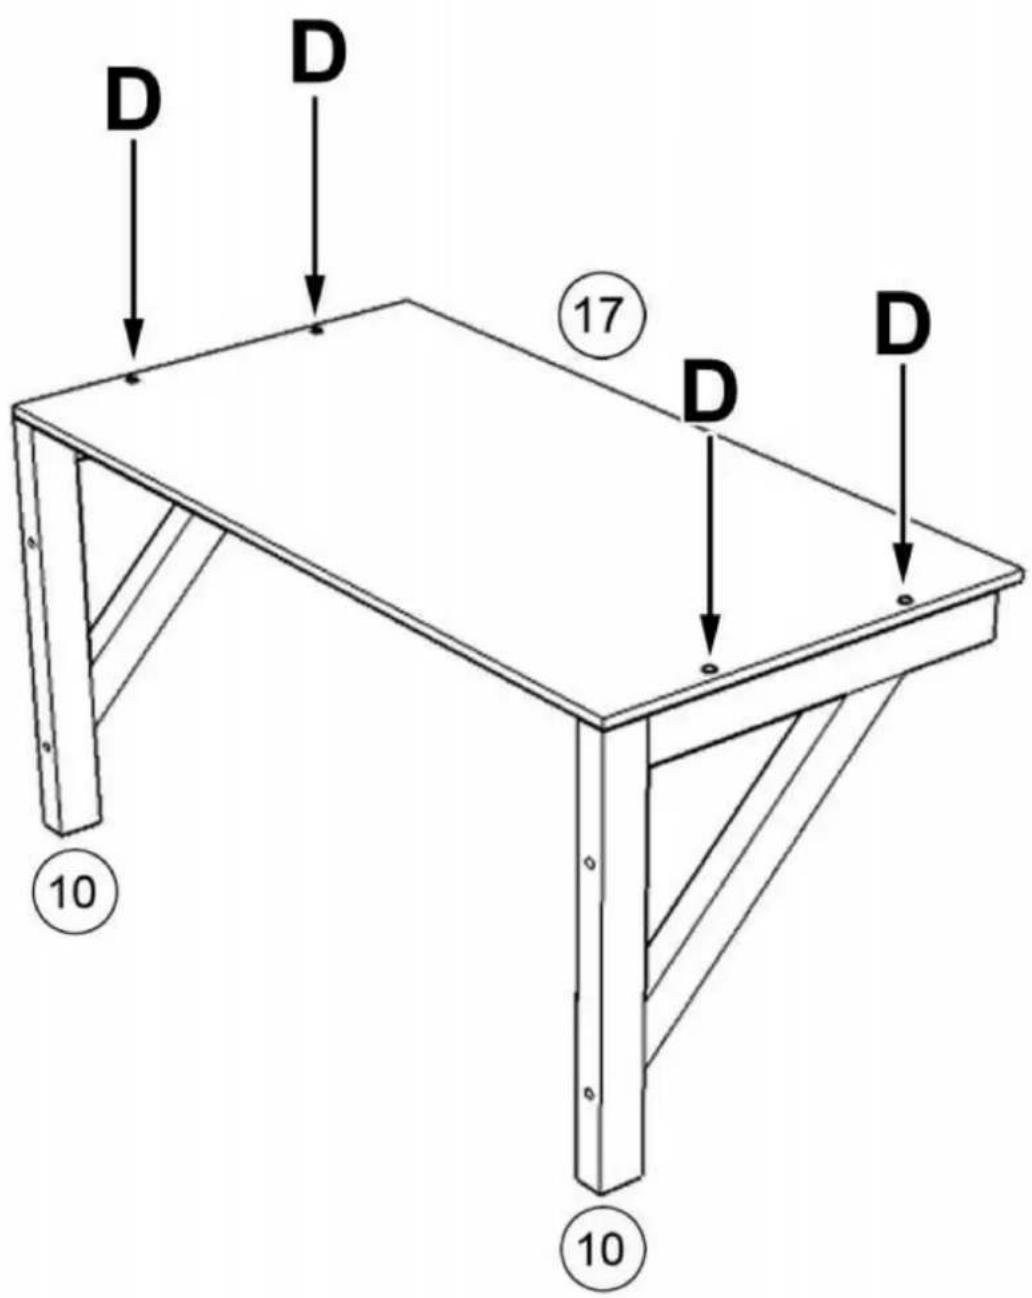
text_image
D D 17 D D 10 10STEP:5
Requires two people to install the shelf at designated position, one person is inside the cage holding the shelf while the other person is outside locking the screws through the pre-drilled holes as shown.
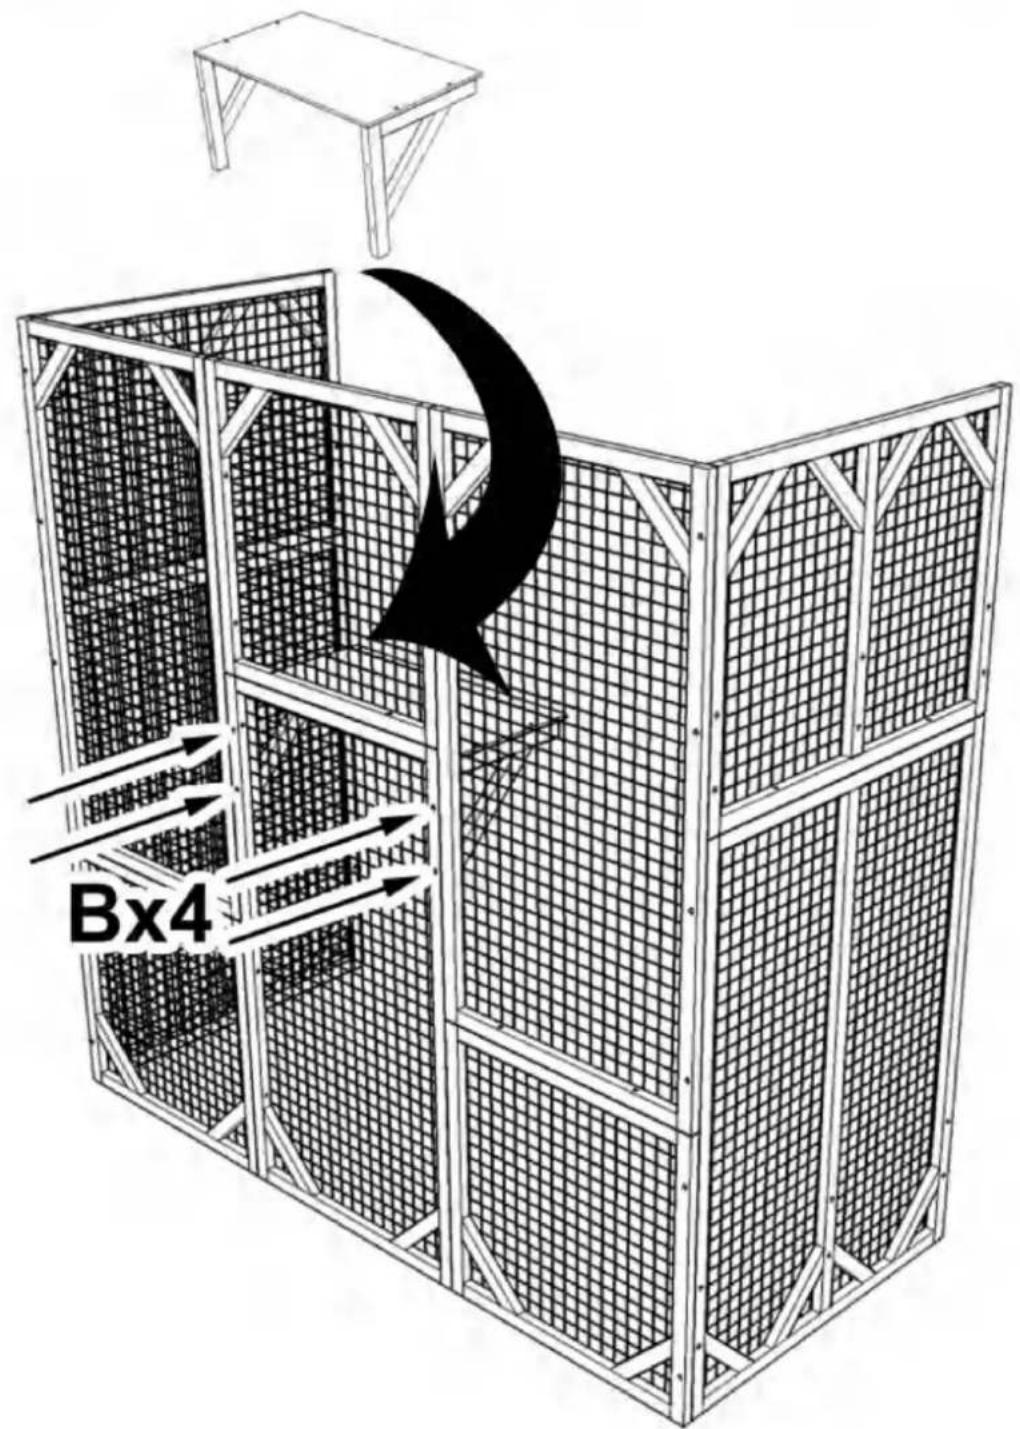
text_image
Bx4STEP:6
Assemble shelf with part #11 and part #10x3 with screw (D)x6 as shown
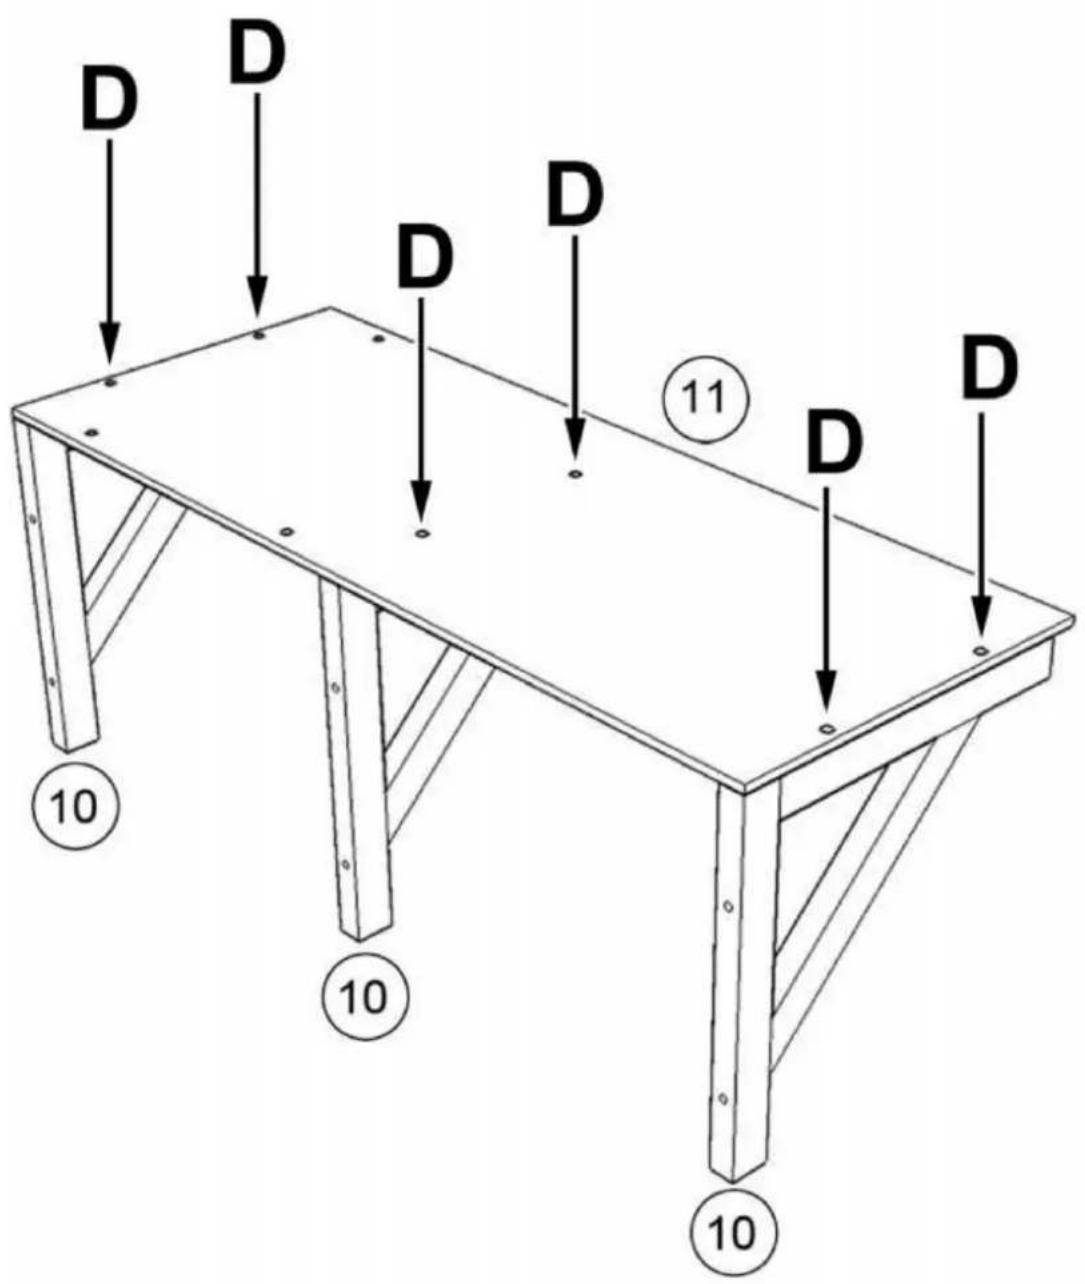
text_image
D D D D D 11 D D 10 10 10STEP:7
Assemble sleeping box with part #13, #14x2, #15 using screw (D)x10
text_image
Dx10 15 14 13 14STEP:8
Install sleeping box on shelf as shown and secure the box with screw (D)x4 from the bottom
text_image
Dx4STEP:9
Assemble shelf with part #12 and part #10x3 with screw (D)x6 as shown
text_image
D D D D D ⑫⑫ D D 10 10 10STEP:10
Requires two people to install the shelves at designated position, one person is inside the cage holding the shelf while the other person is outside locking the screws through the pre-drilled holes as shown
text_image
Bx6 Bx6STEP:12
Assemble part #1 and #5, part #3 and #7 with screw (B) x12 as shown, please pay attention to the up and bottom orientation of part #1 and #3, the end with 2 pre-drilled holes is bottom as shown in the figure, then secure part #1 to part #5 with screw (A)x2 downwards
text_image
① A A ⑤ Bx6 ③ 7 Bx6STEP:13
Secure part #3 to part #7 with screw (A)x2 downwards, then assemble part #2 and part #6 (open the doors) with screw (A) x6 as shown

text_image
2 3 A A Ax6 7 ⑥STEP:14
text_image
Screw (A)x6 on left side Ax6 STEP:15Align the short end of lock part #F with its other part already on door then secure it with screws (E)x2, secure part #2 to part #6 with screw (A)x2 downwards
text_image
E F E 2 A A ⑥STEP:16
Install roofs with screw (C)x16 as shown, please be noted the edge of roof is 1.57 inch from the house underneath
text_image
Cx16 18 19 18STEP:17
Install part #20x2 with screw (D)x12 as shown to cover the gap between roofs
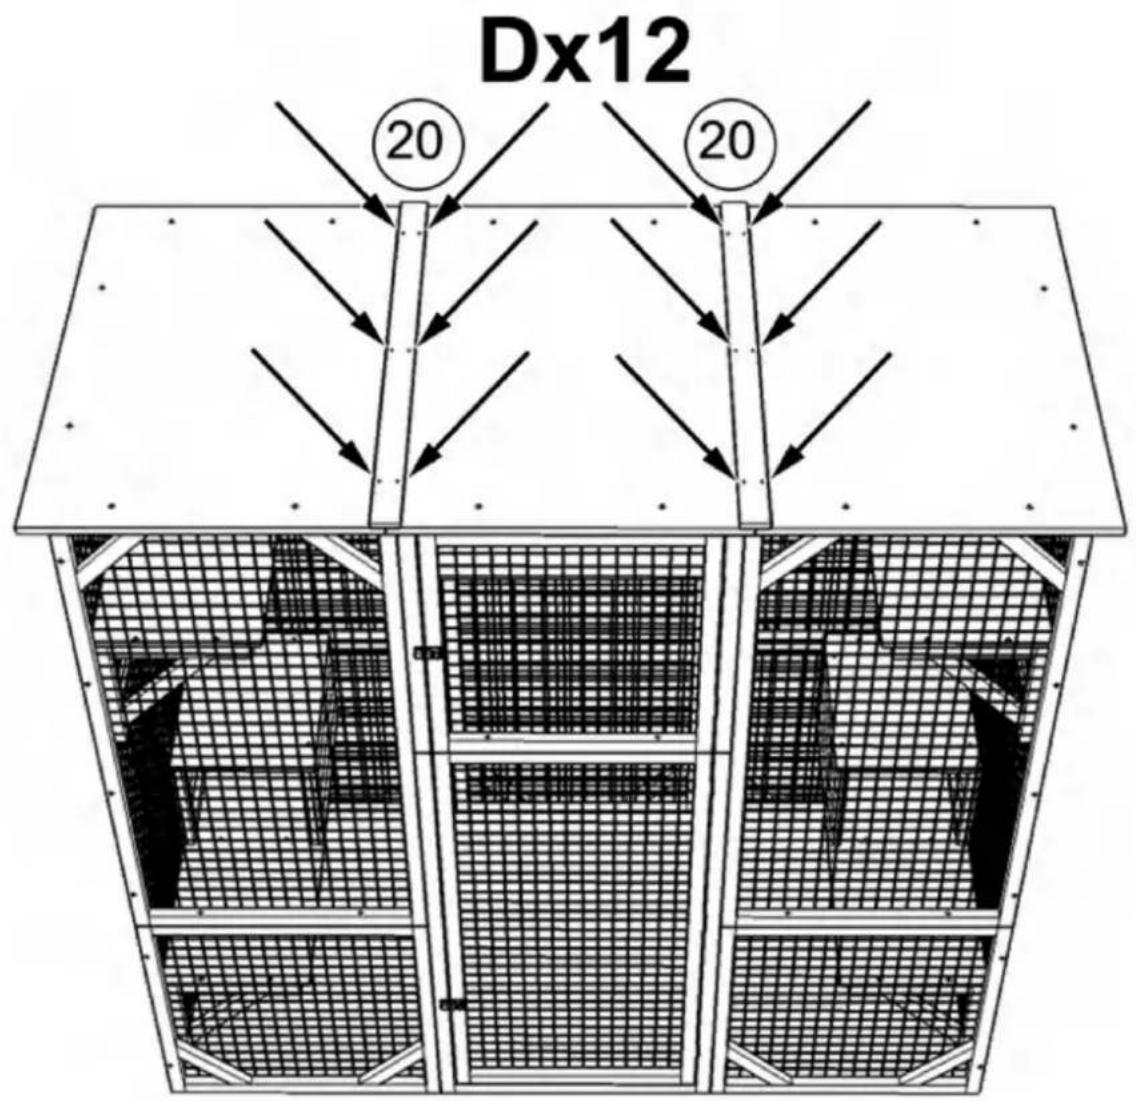
text_image
Dx12 20 20STEP:18
Unfold the tarp and cover it
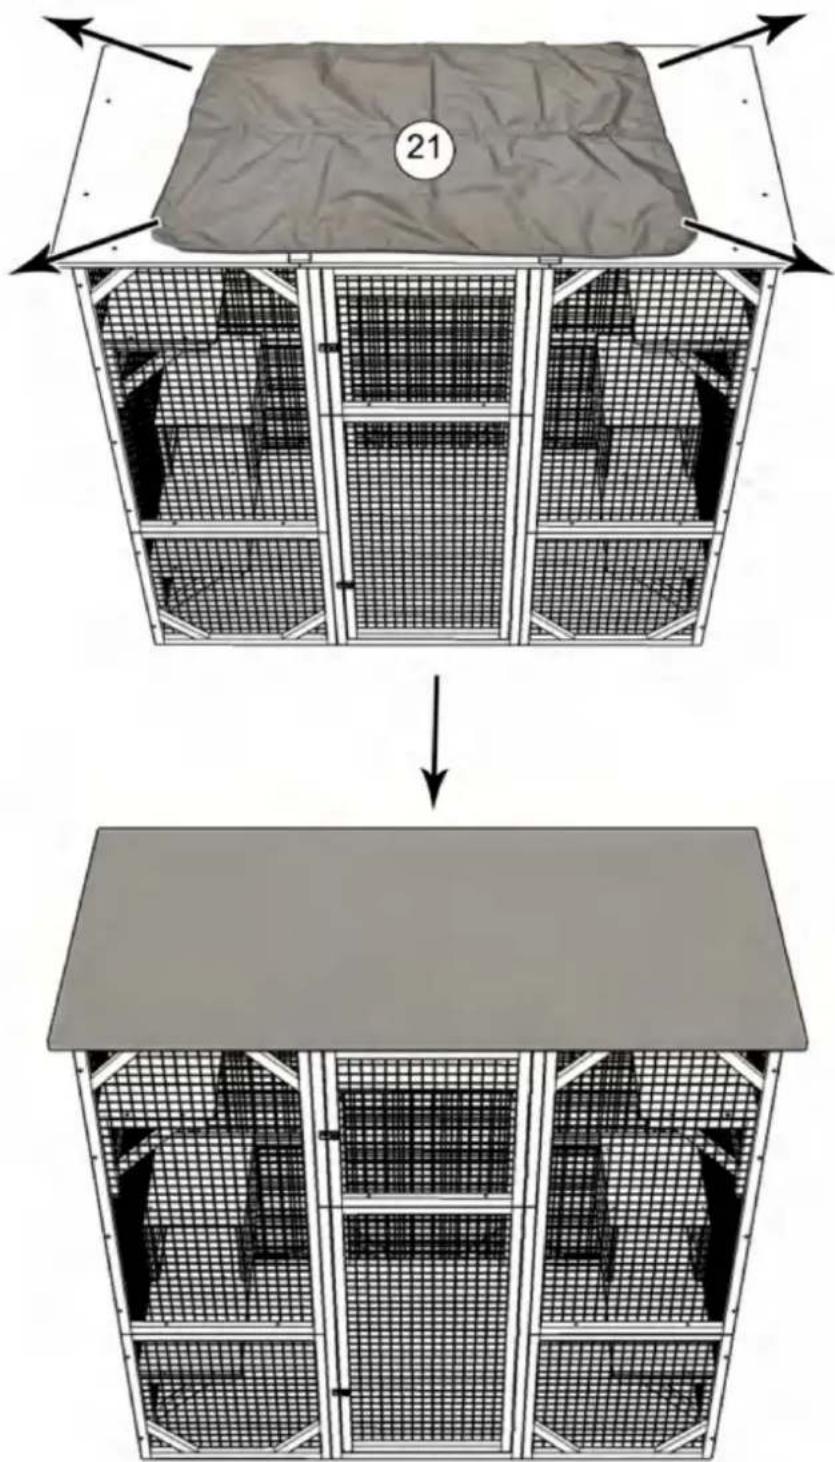
text_image
21STEP:19
Shuangchenglu 803nong11hao1602A-1609shi, baoshanqu, Shanghai 200000 CN.
| EC | REP |
E-CrossStu GmbH.
Mainzer Landstr.69, 60329
Frankfurt am Main.
| UK | REP |
YH CONSULTING LIMITED.
C/O YH Consulting Limited Office
147, Centurion House, London Road,
Staines-upon-Thames, Surrey, TW18 4AX
Importiert in die USA: Sanven Technology Ltd., Suite 250, 9166 Anaheim Place, Rancho Cucamonga, CA 91730
Machine Translated by Google
VEVOR®
TOUGH TOOLS, HALF PRICE
Technical Support and E-Warranty Certificate
www.vevor.com/support
VEVOR®
TOUGH TOOLS, HALF PRICE
Technical Support and E-Warranty Certificate www.vevor.com/support
INSTRUCTION FOR CAT CAGE
MODEL:CH448
natural_image
Line drawing of a multi-level cage structure with internal mesh compartments (no text or symbols)NEED HELP? CONTACT US!
Have product questions? Need technical support? Please feel free to contact us:
This is the original instruction, please read all manual instructions carefully before operating. VEVOR reserves a clear interpretation of our user manual. The appearance of the product shall be subject to the product you received. Please forgive us that we won't inform you again if there are any technology or software updates on our product.
WARNING:
Read this material before using this product. Failure to do so can result in serious injury.
Assembly precautions
- Assemble only according to these instructions. Improper assembly can create hazards.
- In order to ensure your own safety, please make sure to ANSI-approved safety goggles and heavy-duty work gloves when installing this product.
- Keep the assembly area clean and well lit.
- Keep bystanders out of the area during assembly.
- Do not assemble when tired or when under the influence of alcohol, drugs or medication.
- Product capabilities apply to properly and completely assembled product only.
- Assemble on a flat, level, hard and smooth surface capable of safely supporting a fully loaded cat cage.
Use precautions
TO PREVENT SERIOUS INJURY AND DEATH FROM TIPPING:
- DO NOT SIT OR STAND ON THIS ITEM.
- This product is not a toy. Do not allow children to play with or near this item.
Please keep small spare parts out of children's reach. - Use only on a flat, level, hard and smooth surface capable of safely supporting a fully loaded cat cage.
- Use as intended only.
- Inspect before every use; do not use if parts are loose or damaged.
SAVE THESE INSTRUCTIONS
SPECIFICATIONS
| Model | CH448 |
| Product Size | 1800*880*1690mm |
| Color | Gray |
COMPONENTS
Notice:
- Various specifications of screws are used in the installation of this product. Pay attention to the correct use of screw specifications according to the instruction manual.
- Please wear gloves when installing.
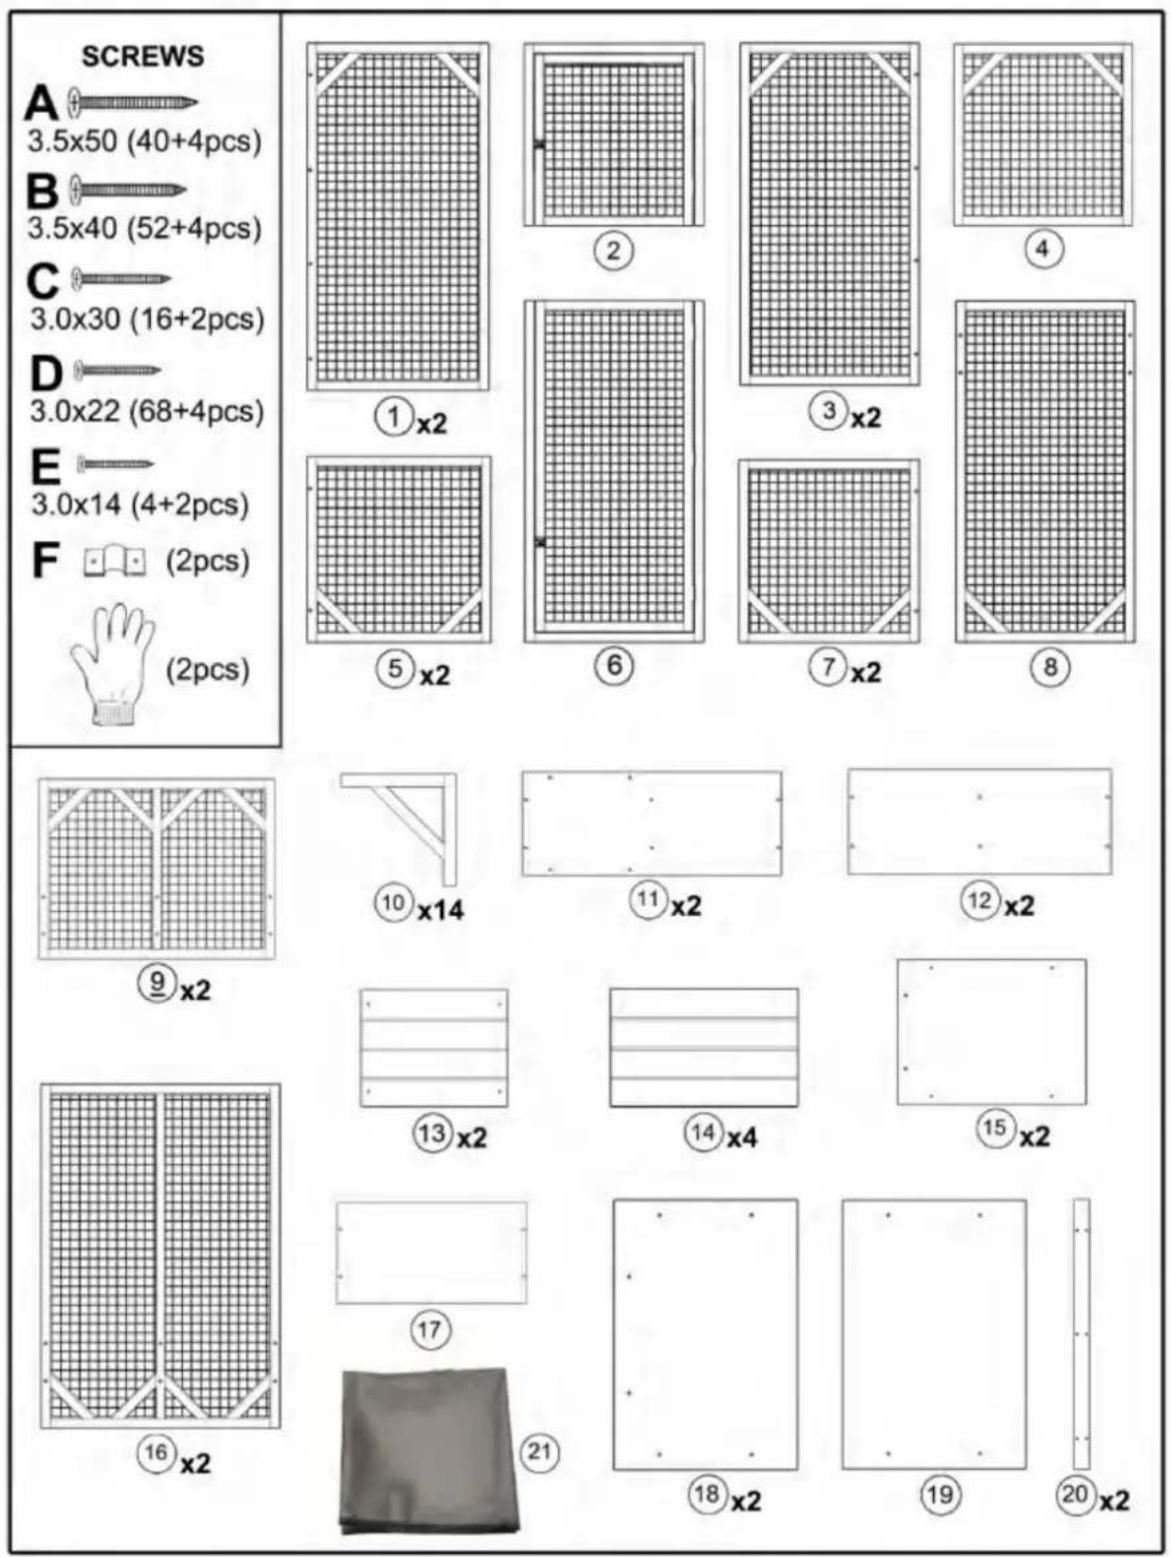
text_image
SCREWS A 3.5x50 (40+4pcs) B 3.5x40 (52+4pcs) C 3.0x30 (16+2pcs) D 3.0x22 (68+4pcs) E 3.0x14 (4+2pcs) F (2pcs) (2pcs) ①x2 ② ③x2 ④ ⑤x2 ⑥ ⑦x2 ⑧ ⑨x2 ⑩x14 ⑪x2 ⑫x2 ⑬x2 ⑭x2 ⑮x2 ⑯ ⑰x2 ⑱ ⑲x2 ⑳ ㉑ ㉒ ㉓ ㉔ ㉕ ㉖ ㉗ ㉘ ㉙ ㉚ ㉛ ㉜ ㉝ ㉞ ㉟ ㉳ ㉴ ㉵ ㉶ ㉷ ㉸ ㉹ ㉺ ㉚ ㉛ ㉜ ㉝ ㉞ ㉟ ㉟x2Assembly Instructions
Please be noted that the side with wire nailed on is back side, should be inward when assembly
Pay attention to the up and bottom orientation of part #9 and part #1, the end with 2 pre-drilled holes is bottom as shown in the figure Assembling part #1, #5, #9, #16 with screw (B)x6 as shown, then secure part #9 to part #16 with screw (A)x2 downwards
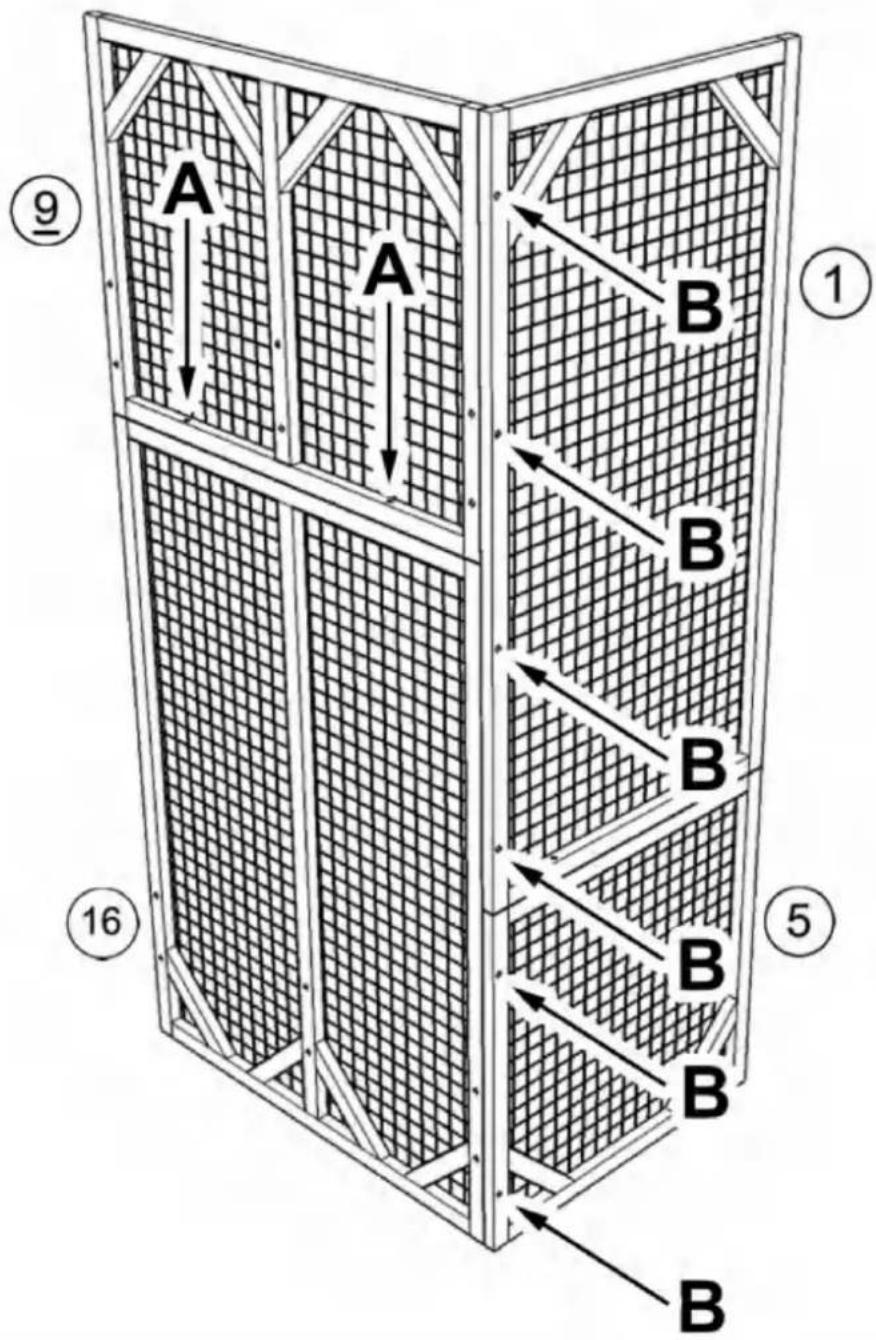
Secure part #1 to part #5 with screw (A)x2 downwards, then assemble part #4 and part #8 with screw (A) x6 as shown, please pay attention to the up and bottom orientation of part #4, the end with 2 pre-drilled holes is bottom as shown in the figure
text_image
A A A A A A A A A 1 4 5 8STEP:2
Assemble part #3 and part #7 with screw (A) x6 as shown, please pay attention to the up and bottom orientation of part #3, the end with 2 pre-drilled holes is bottom as shown in the figure, then secure part #3 to part #7 with screw (A)x2 downwards
flowchart
graph TD
    A1["A"] --> B1["A"]
    A2["A"] --> B2["A"]
    A3["A"] --> B3["A"]
    A4["A"] --> B4["A"]
    B1 --> C1["A"]
    B2 --> C2["A"]
    B3 --> C3["A"]
    B4 --> C4["A"]
    style A1 fill:#f9f,stroke:#333
    style A2 fill:#f9f,stroke:#333
    style A3 fill:#f9f,stroke:#333
    style A4 fill:#f9f,stroke:#333
    style B1 fill:#ccf,stroke:#333
    style B2 fill:#ccf,stroke:#333
    style B3 fill:#ccf,stroke:#333
    style B4 fill:#ccf,stroke:#333
STEP:3
Secure part #4 to part #8 with screw (A)x2 downwards, then assemble part #9 and part #16 with screw (B) x6 as shown, please pay attention to the up and bottom orientation of part #9, the end with 2 pre-drilled holes is bottom as shown, then secure part #9 to part #16 with screw (A)x2 downwards
Assemble shelf with part #17 and part #10x2 with screw (D)x4 as shown

text_image
D D 17 D D 10 10STEP:5
Requires two people to install the shelf at designated position, one person is inside the cage holding the shelf while the other person is outside locking the screws through the pre-drilled holes as shown.
text_image
Bx4STEP:6
Assemble shelf with part #11 and part #10x3 with screw (D)x6 as shown
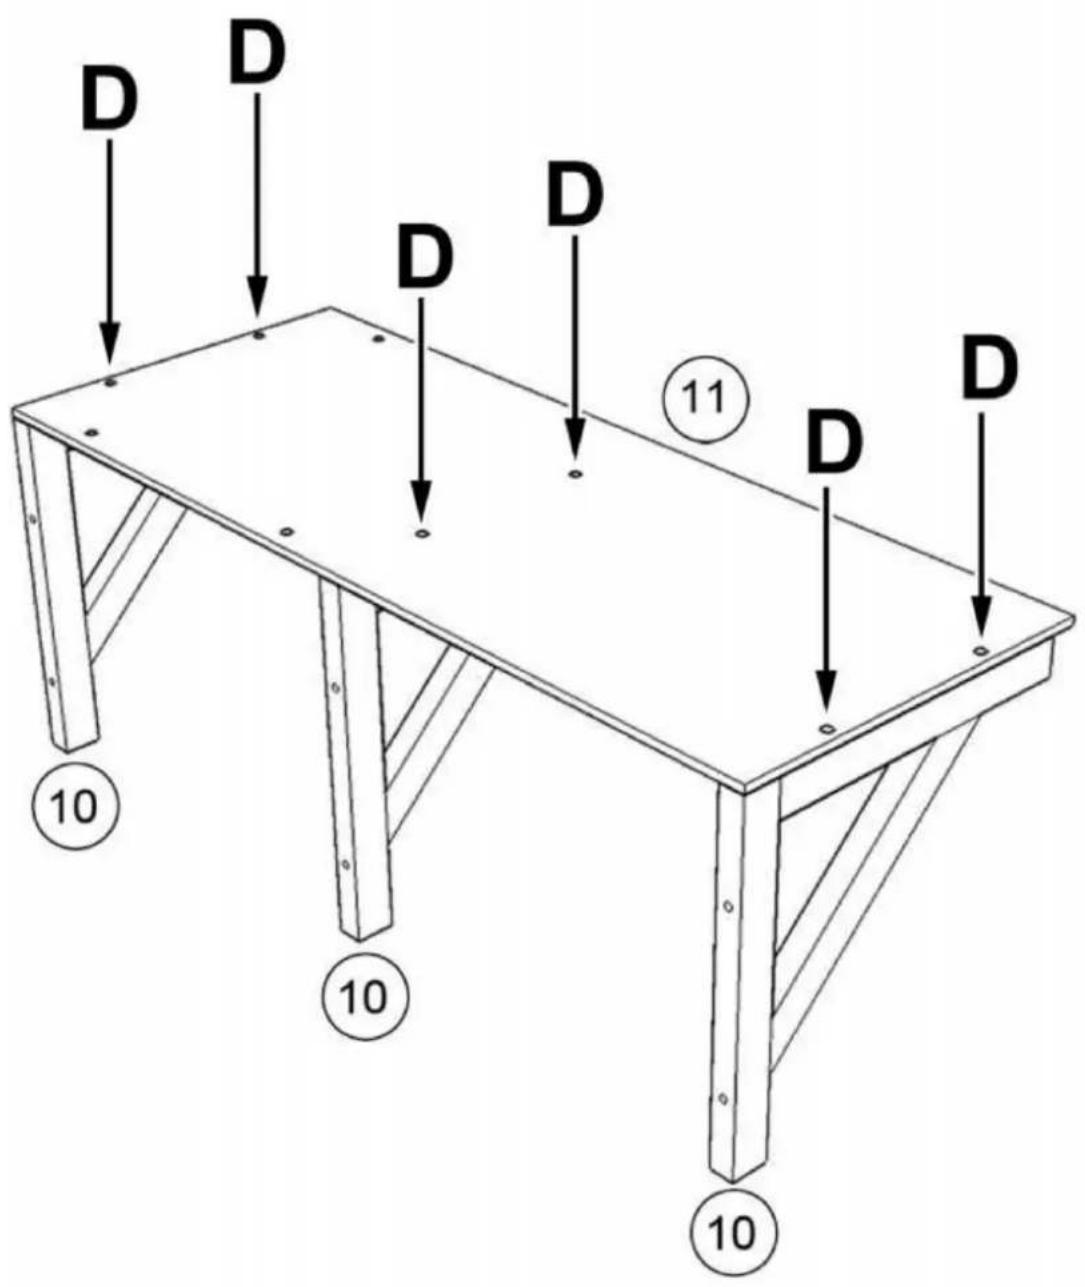
text_image
D D D D D 11 D D 10 10 10STEP:7
Assemble sleeping box with part #13, #14x2, #15 using screw (D)x10
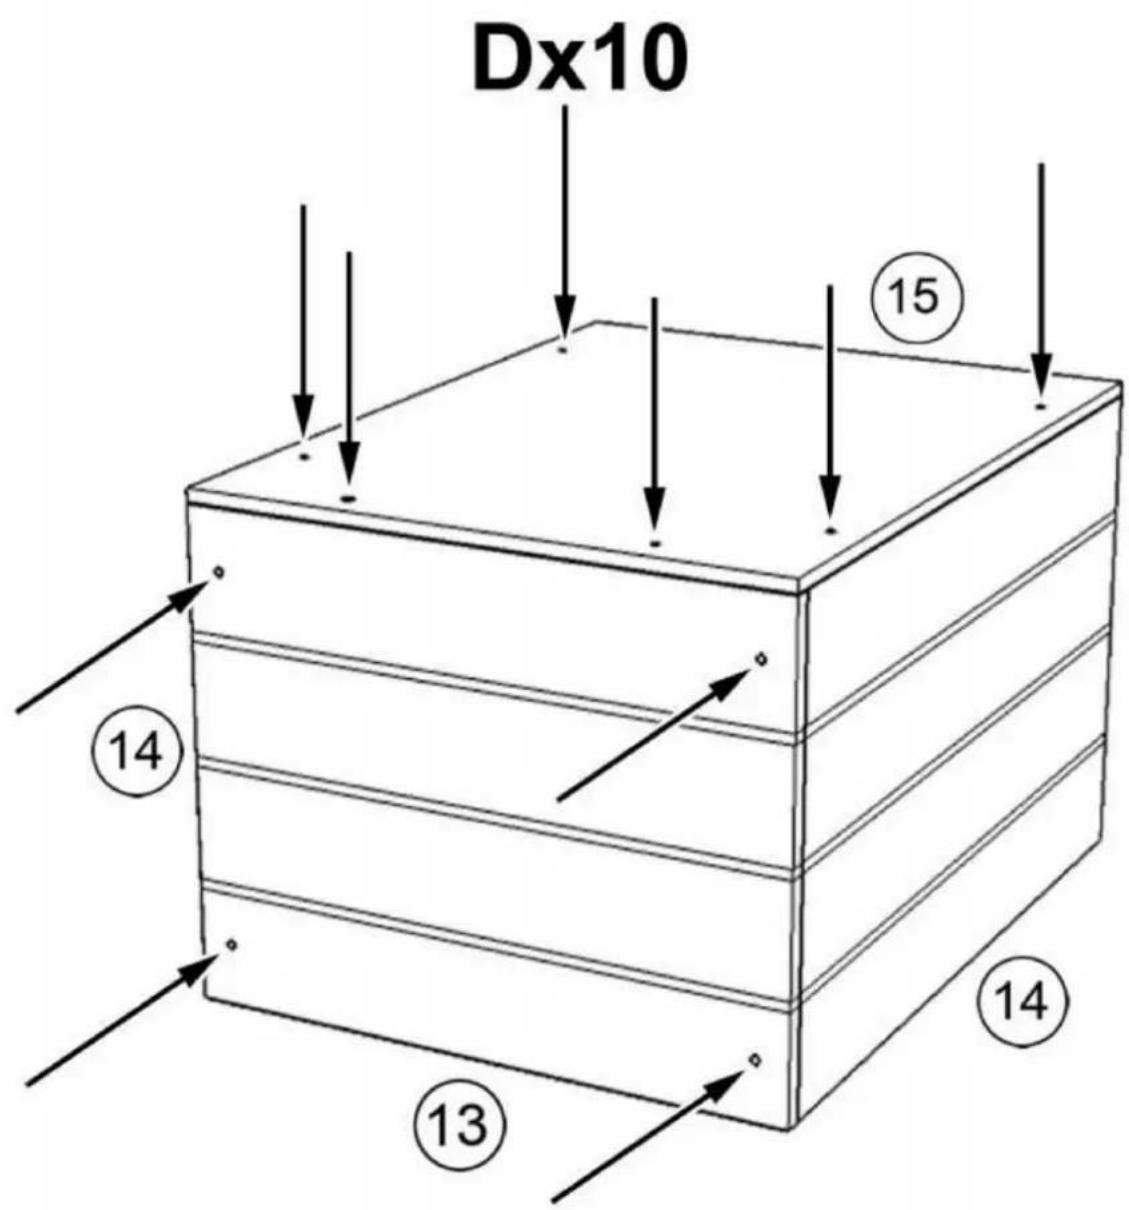
text_image
Dx10 15 14 13 14STEP:8
Install sleeping box on shelf as shown and secure the box with screw (D)x4 from the bottom
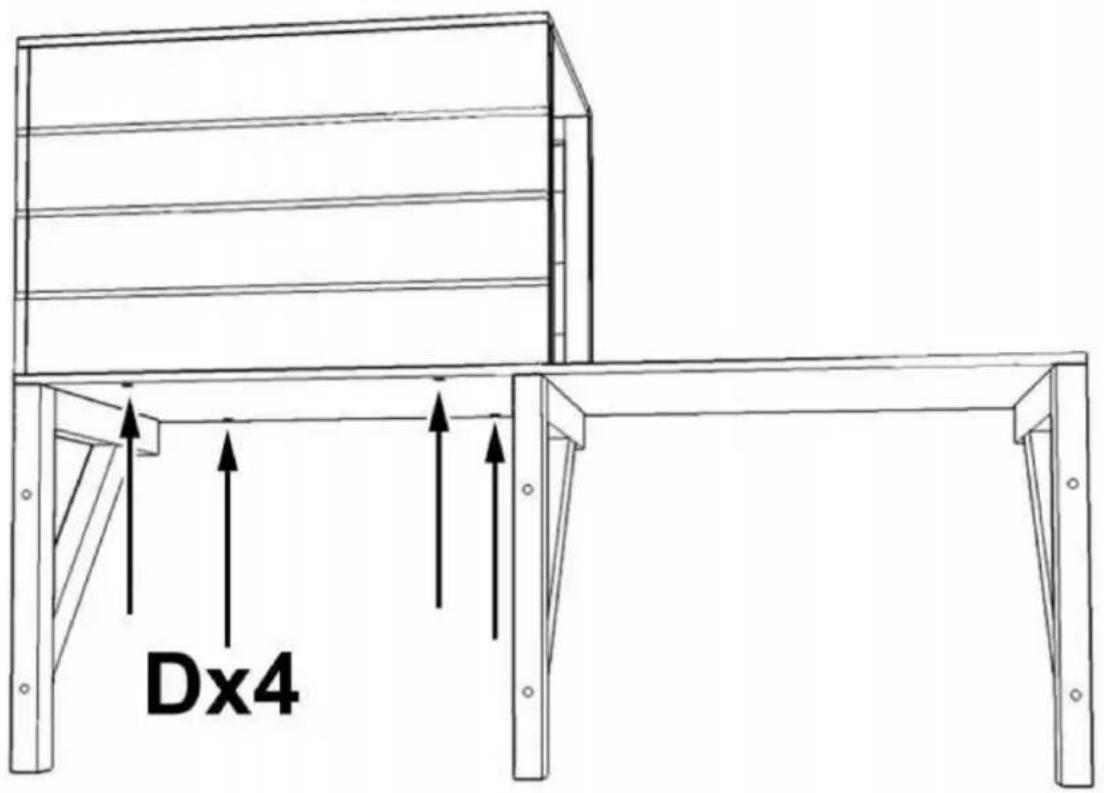
text_image
Dx4STEP:9
Assemble shelf with part #12 and part #10x3 with screw (D)x6 as shown
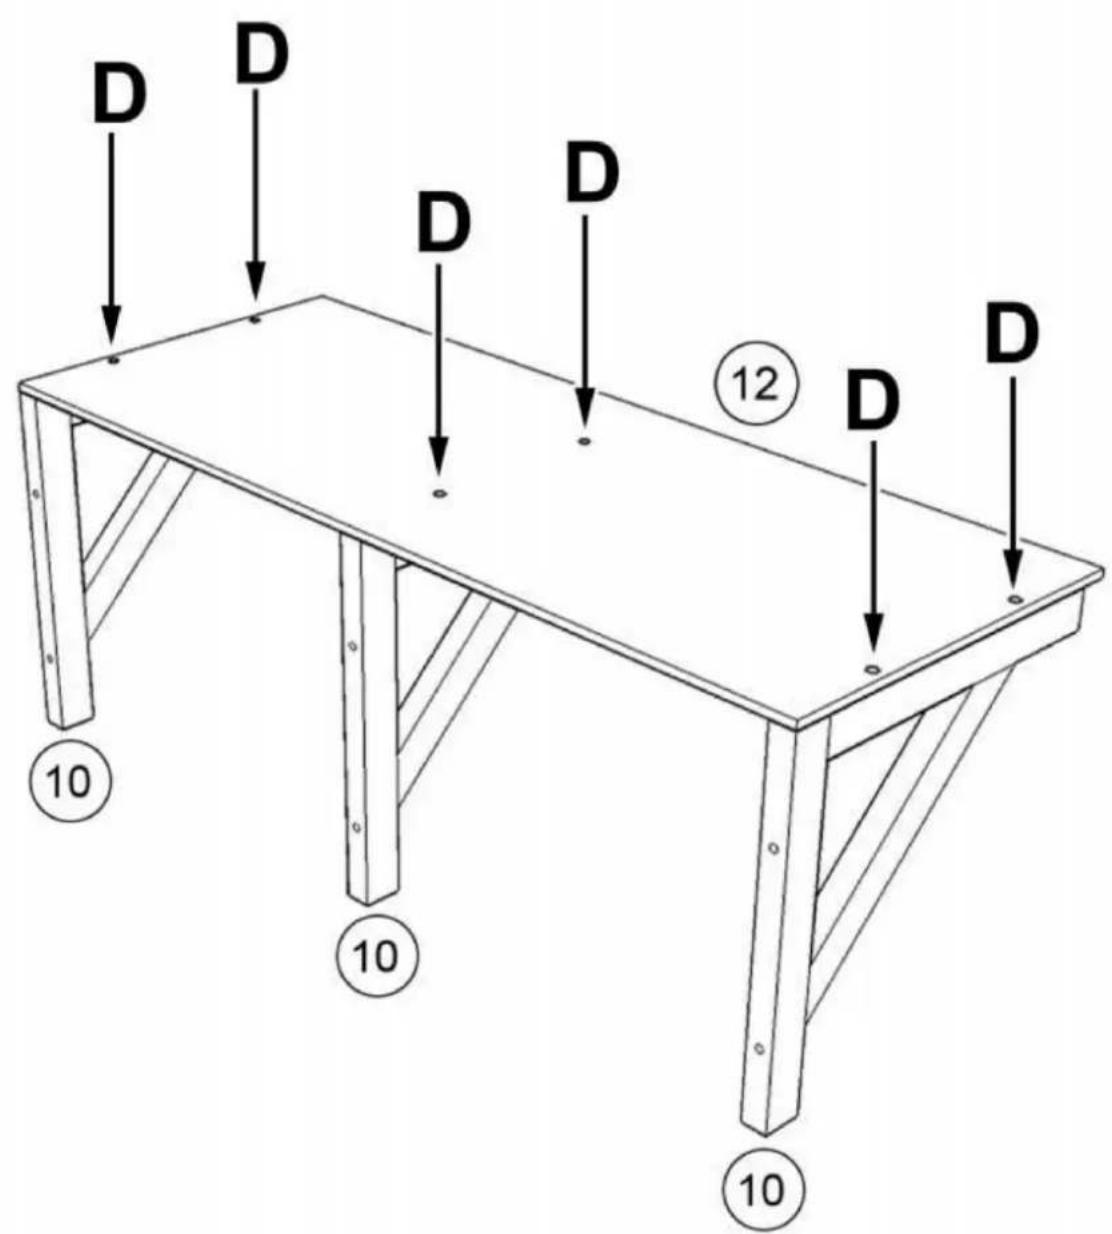
text_image
D D D D D ⑫⑫ D D 10 10 10STEP:10
Requires two people to install the shelves at designated position, one person is inside the cage holding the shelf while the other person is outside locking the screws through the pre-drilled holes as shown
text_image
Bx6 Bx6STEP:11
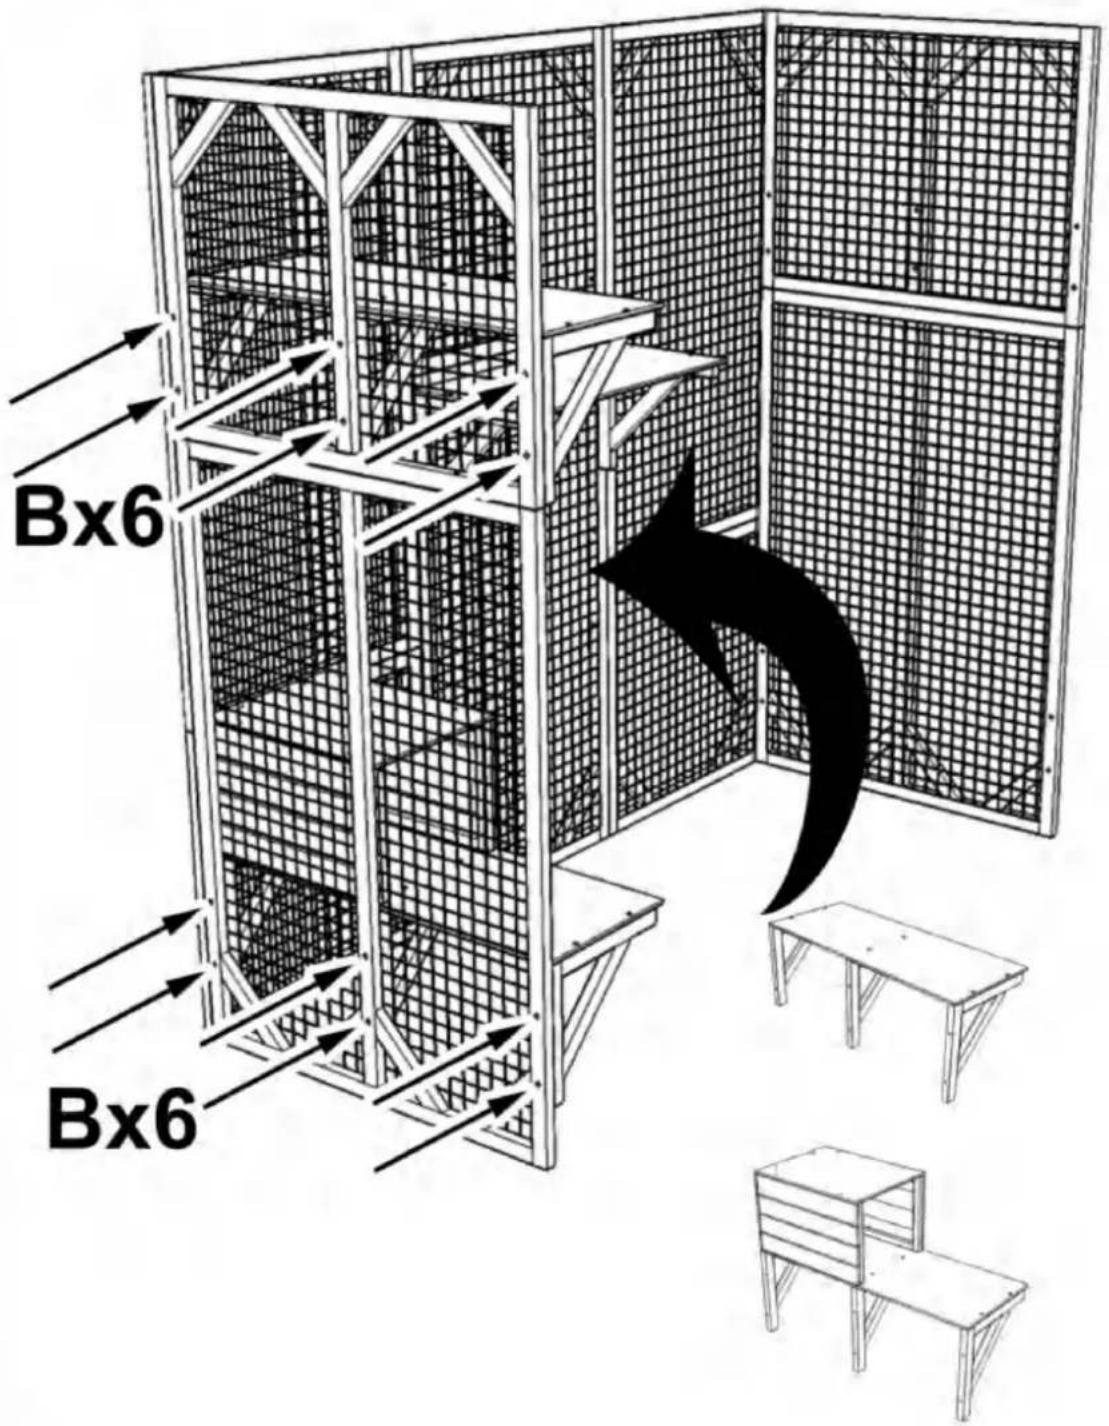
Requires two people to install the shelves at designated position, one person is inside the cage holding the shelf while the other person is outside locking the screws through the pre-drilled holes as shown

text_image
Bx6 Bx6STEP:12
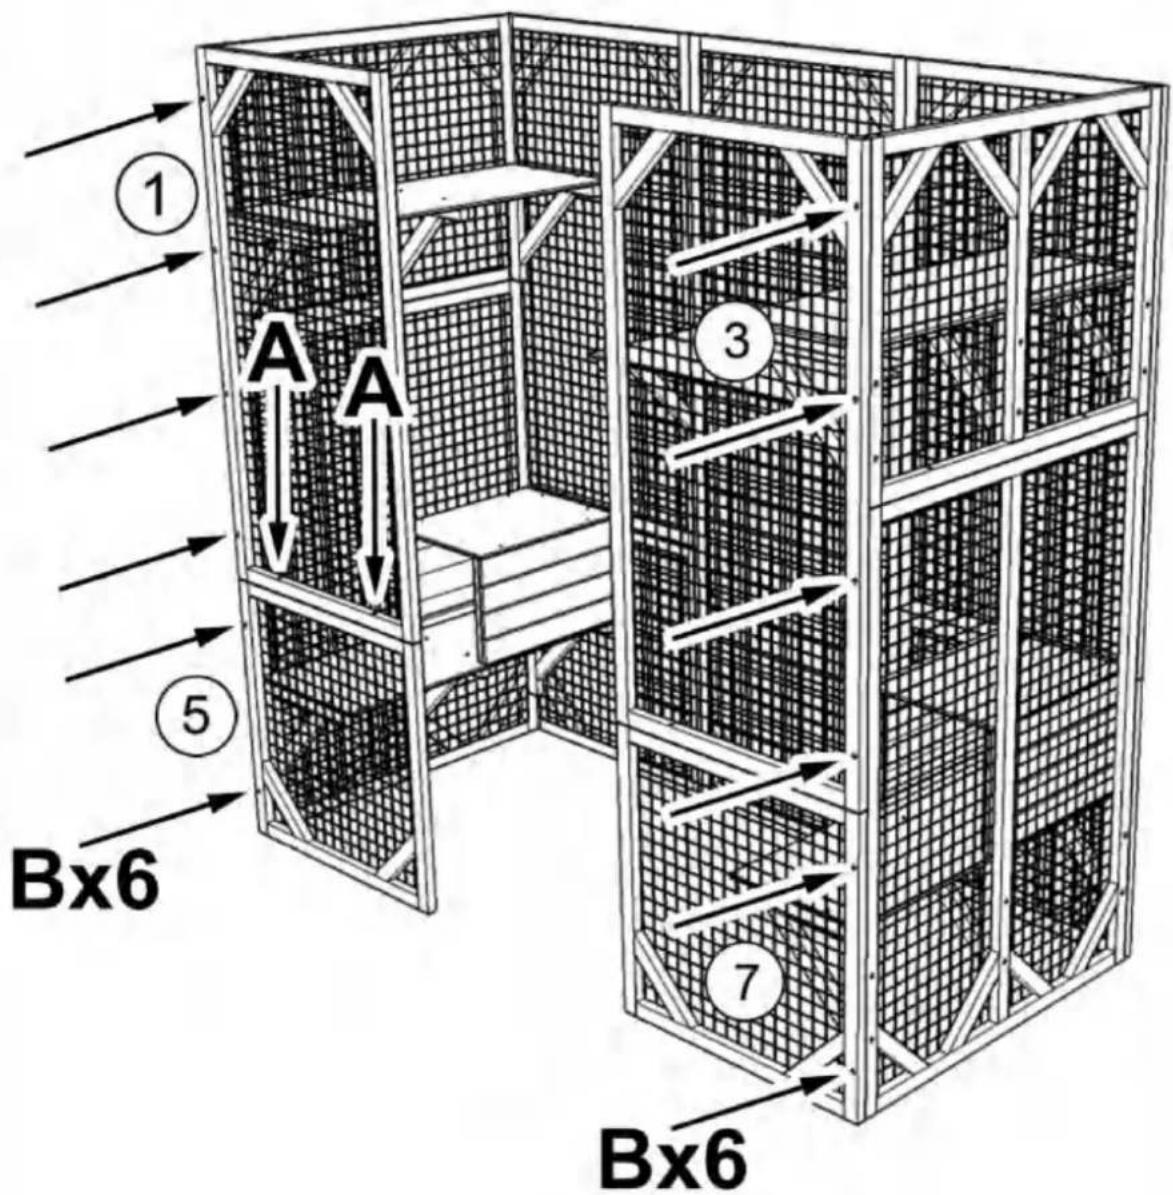
Assemble part #1 and #5, part #3 and #7 with screw (B) x12 as shown, please pay attention to the up and bottom orientation of part #1 and #3, the end with 2 pre-drilled holes is bottom as shown in the figure, then secure part #1 to part #5 with screw (A)x2 downwards
text_image
① A A ⑤ Bx6 ③ 7 Bx6STEP:13
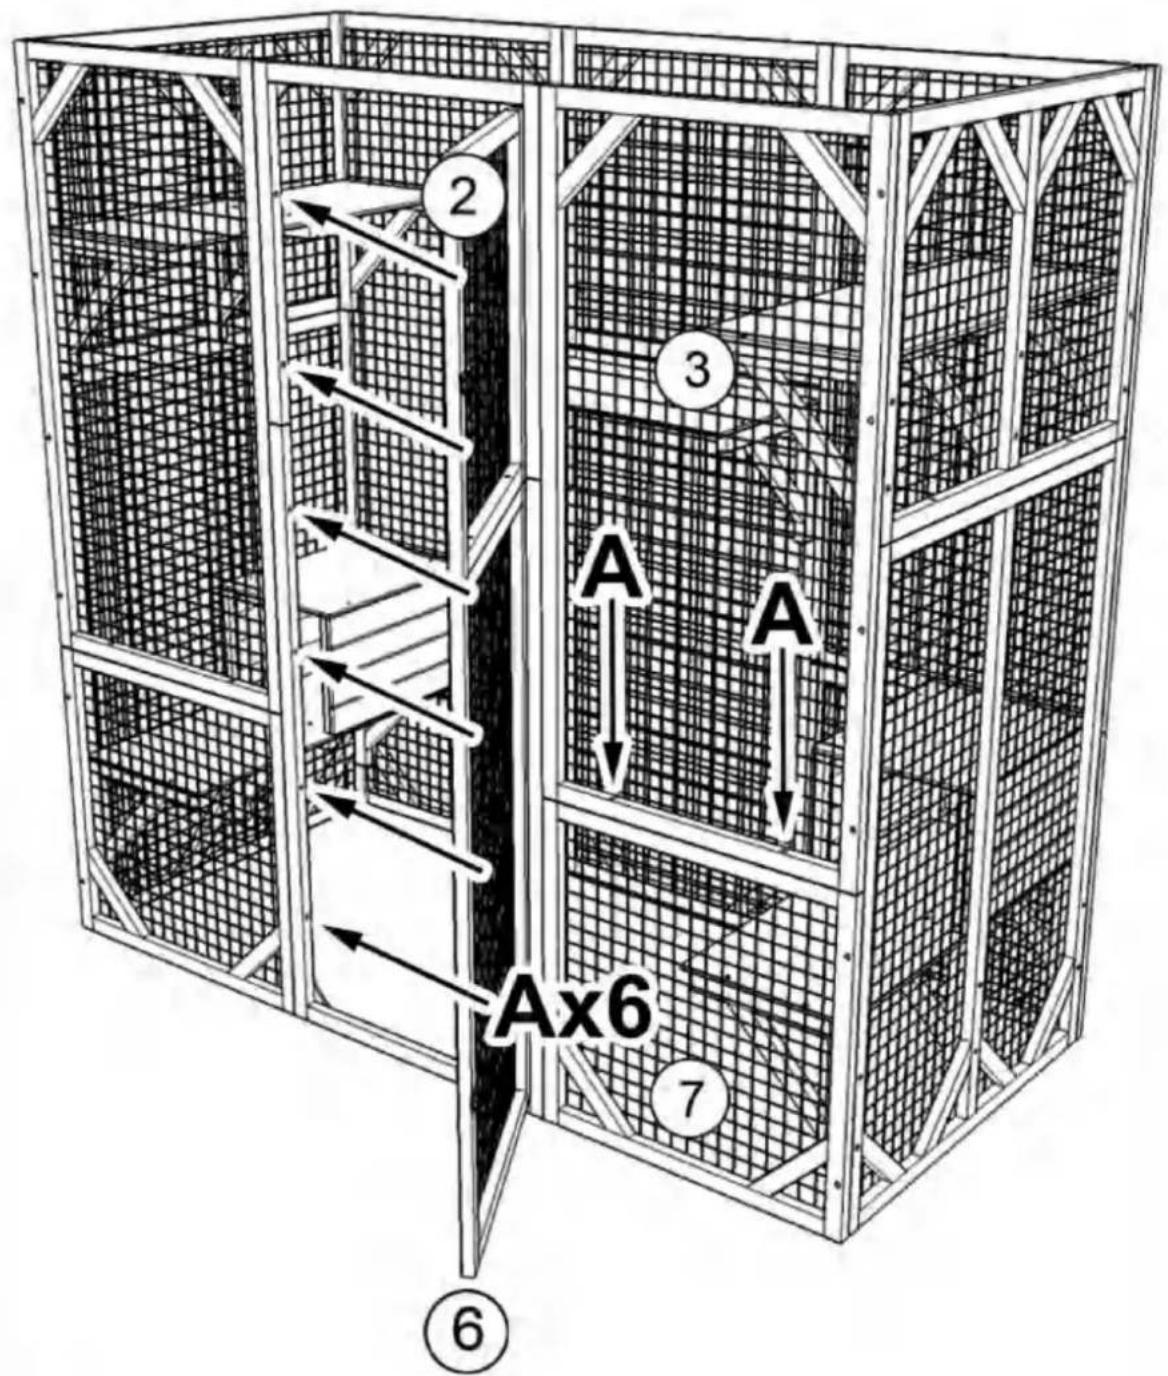
Secure part #3 to part #7 with screw (A)x2 downwards, then assemble part #2 and part #6 (open the doors) with screw (A) x6 as shown
text_image
2 3 A A Ax6 7 ⑥STEP:14
text_image
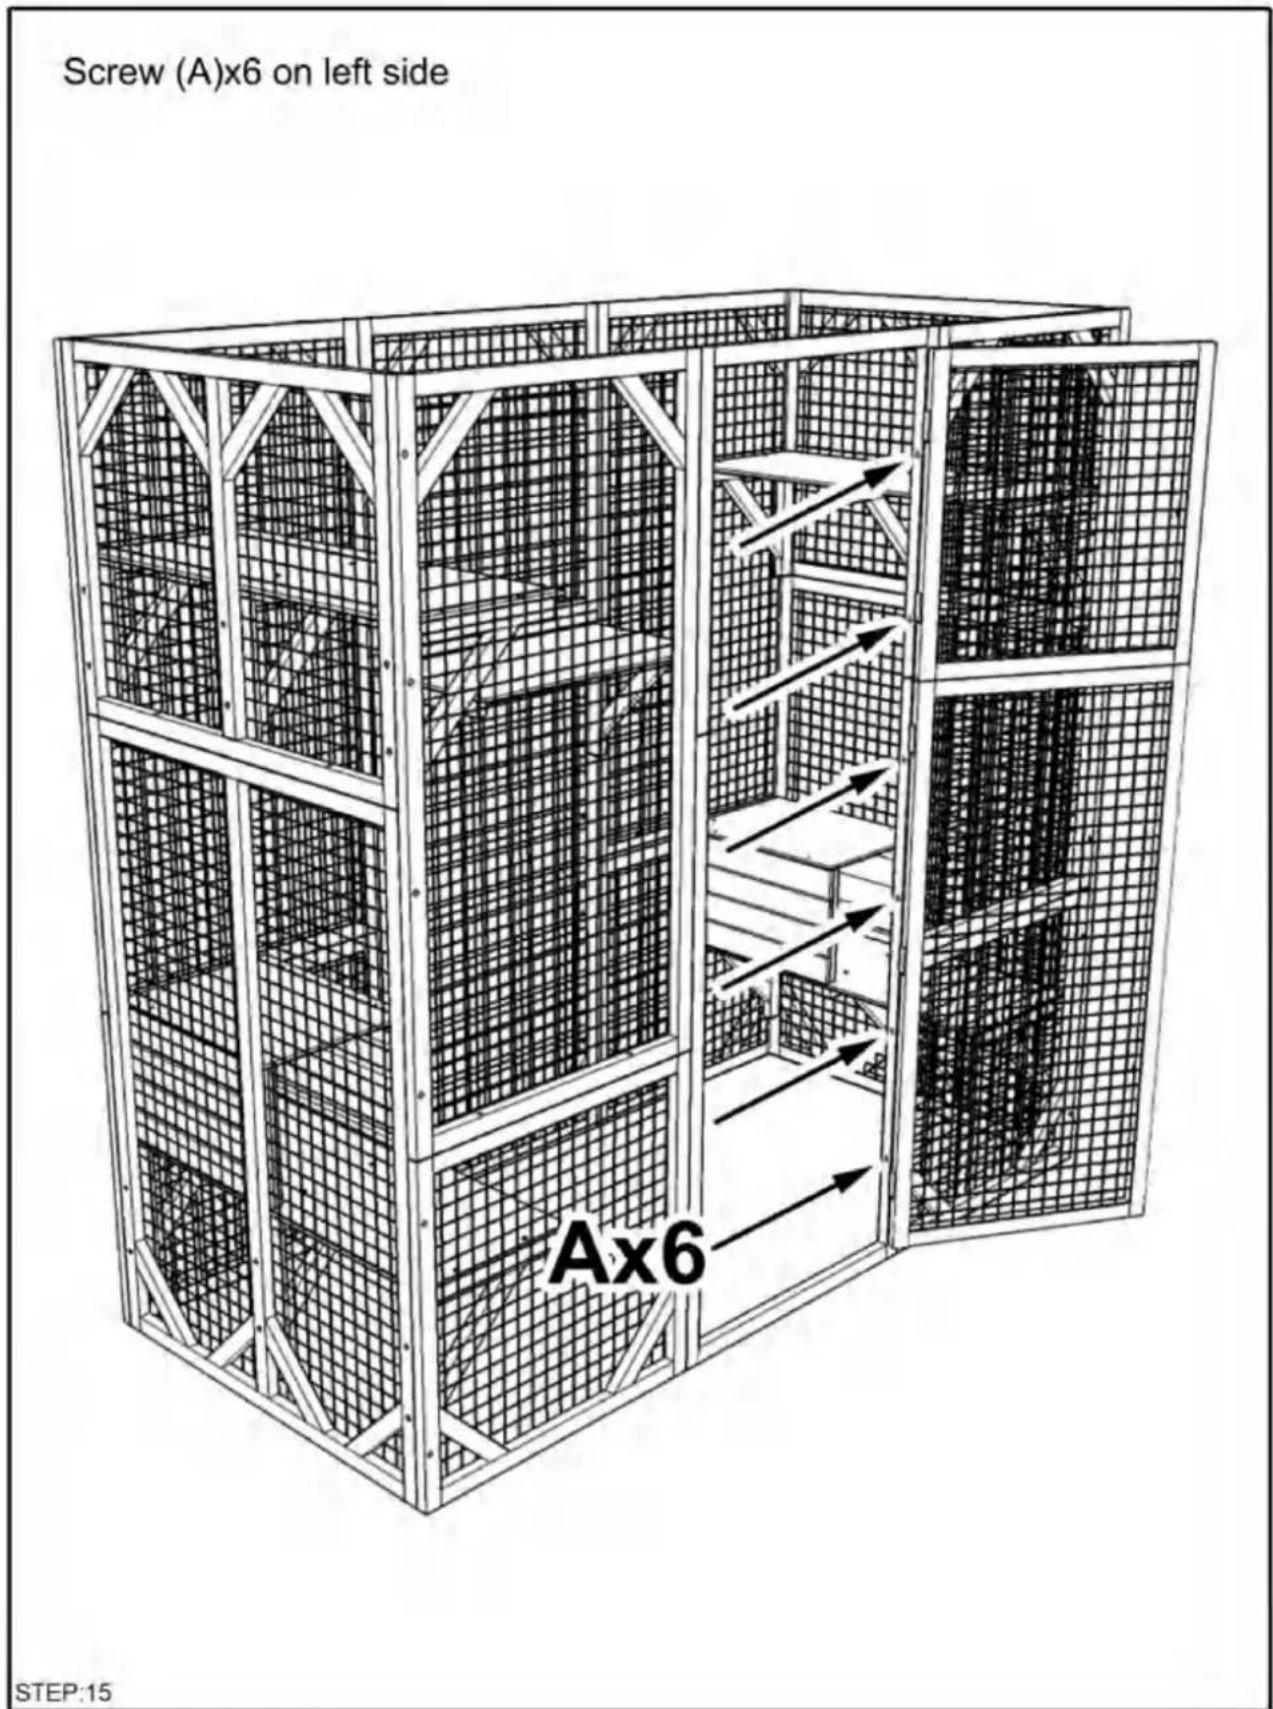
Screw (A)x6 on left side Ax6 STEP:15Align the short end of lock part #F with its other part already on door then secure it with screws (E)x2, secure part #2 to part #6 with screw (A)x2 downwards
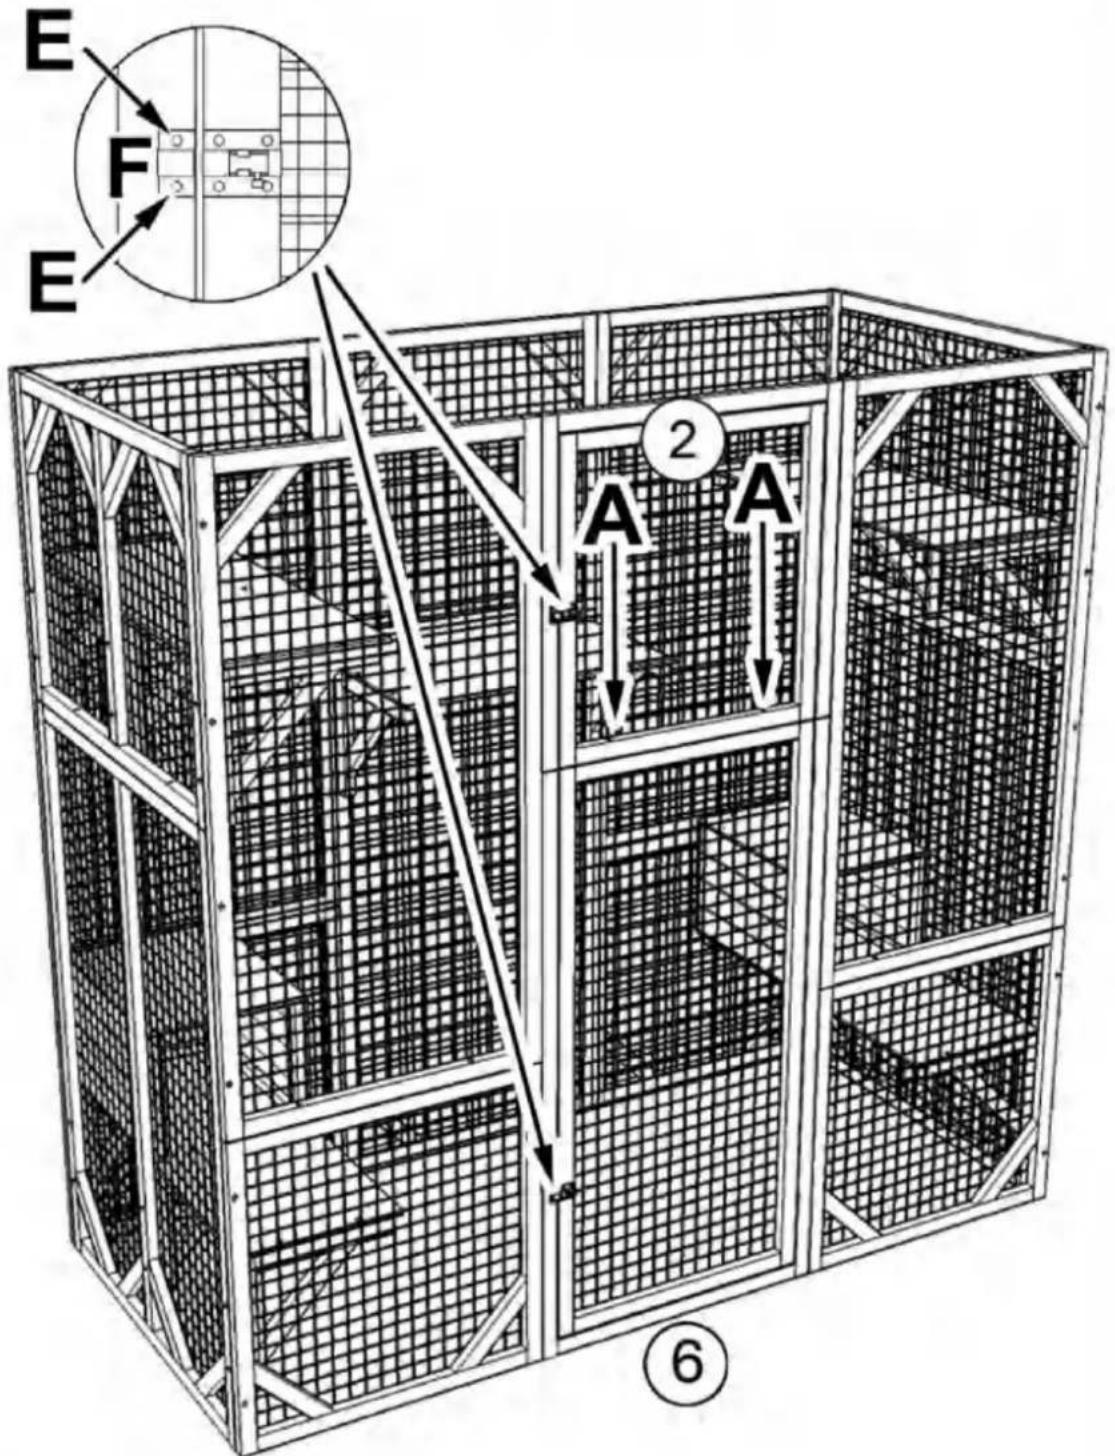
text_image
E F E 2 A A ⑥STEP:16
Install roofs with screw (C)x16 as shown, please be noted the edge of roof is 1.57 inch from the house underneath
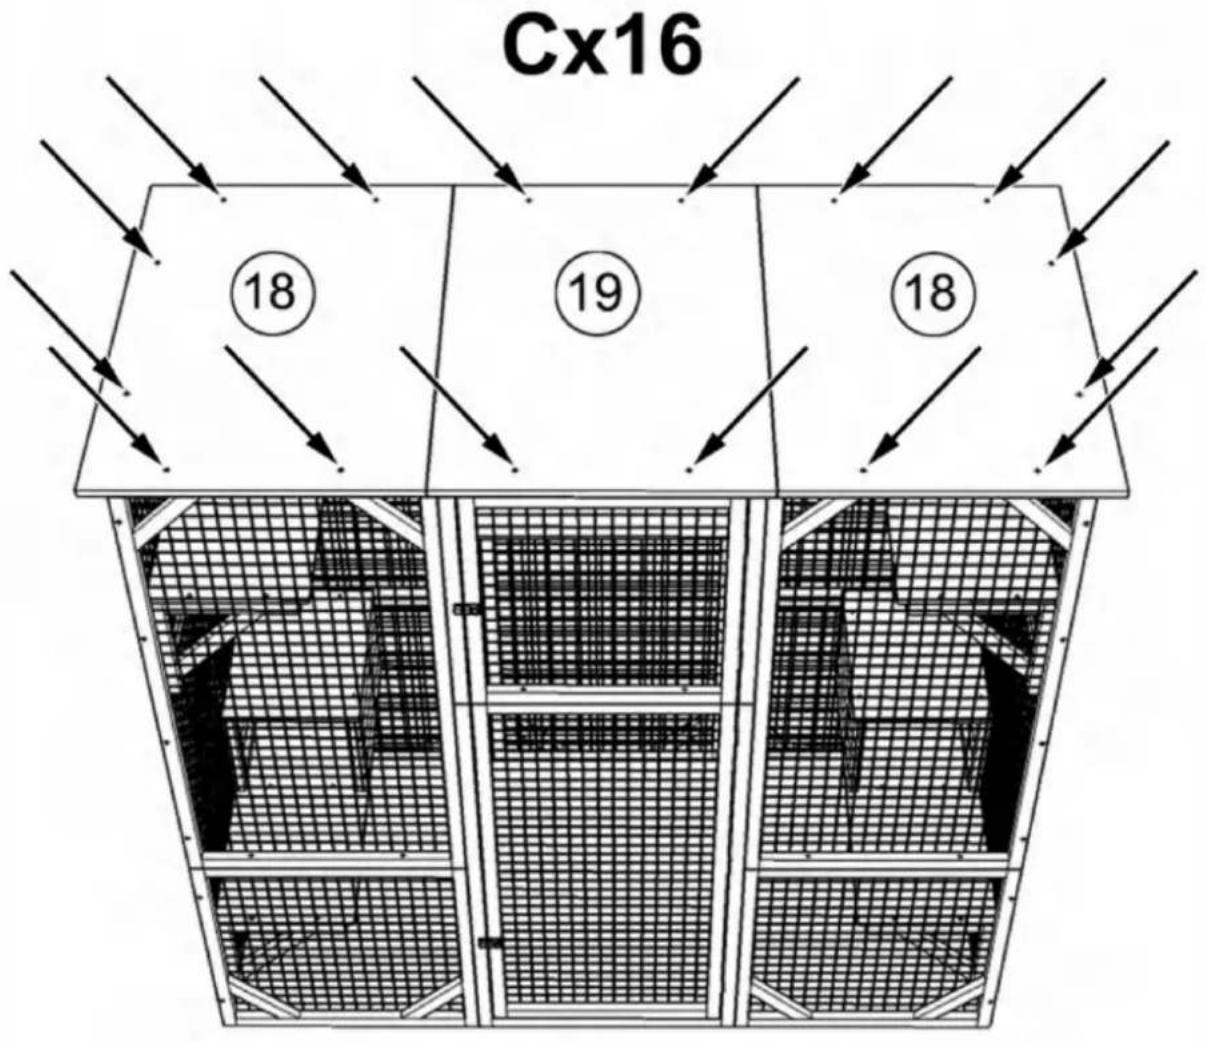
text_image
Cx16 18 19 18STEP:17
Install part #20x2 with screw (D)x12 as shown to cover the gap between roofs
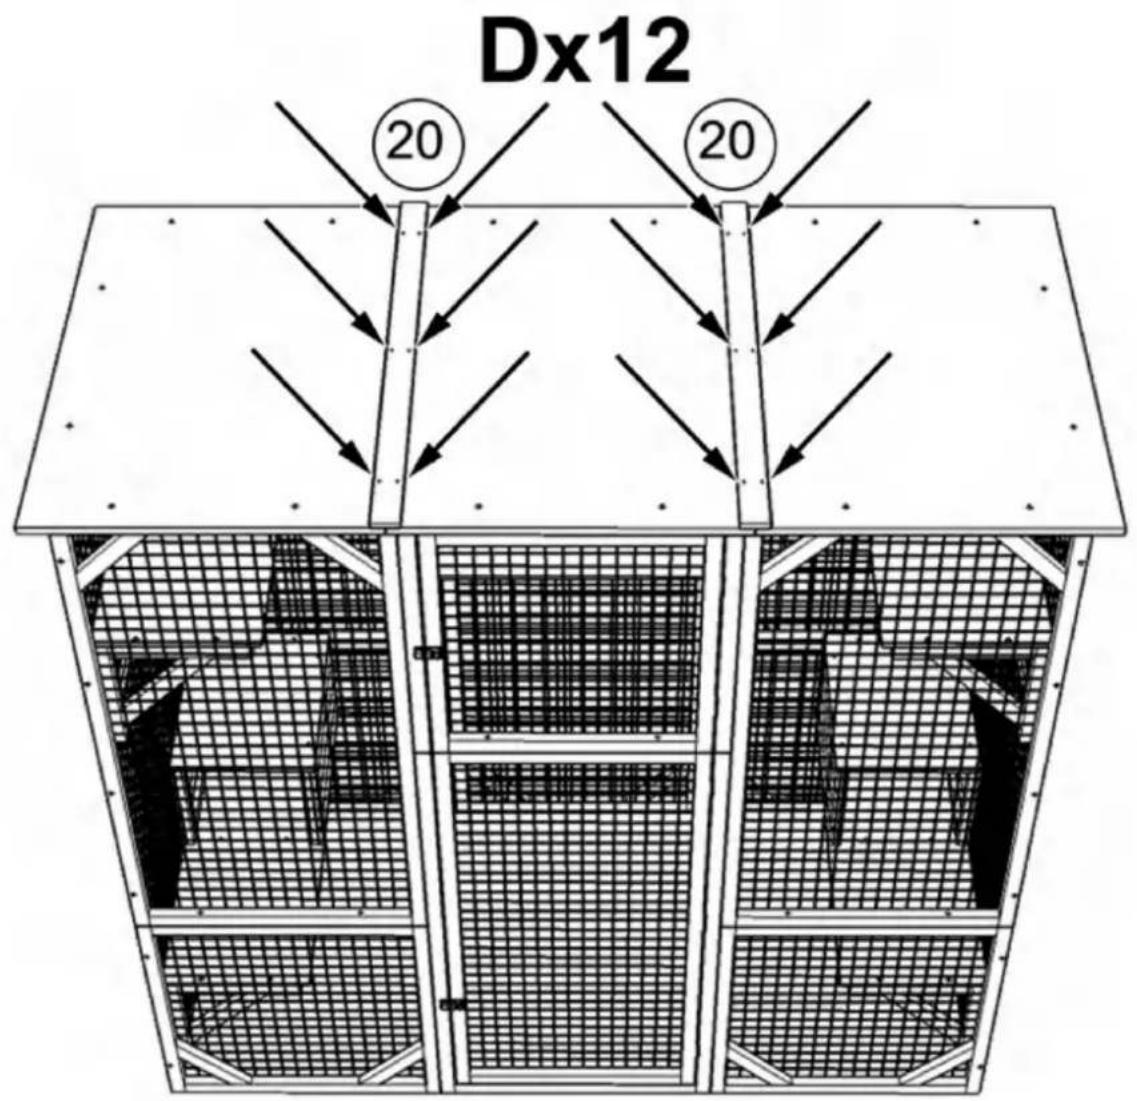
text_image
Dx12 20 20STEP:18
Unfold the tarp and cover it
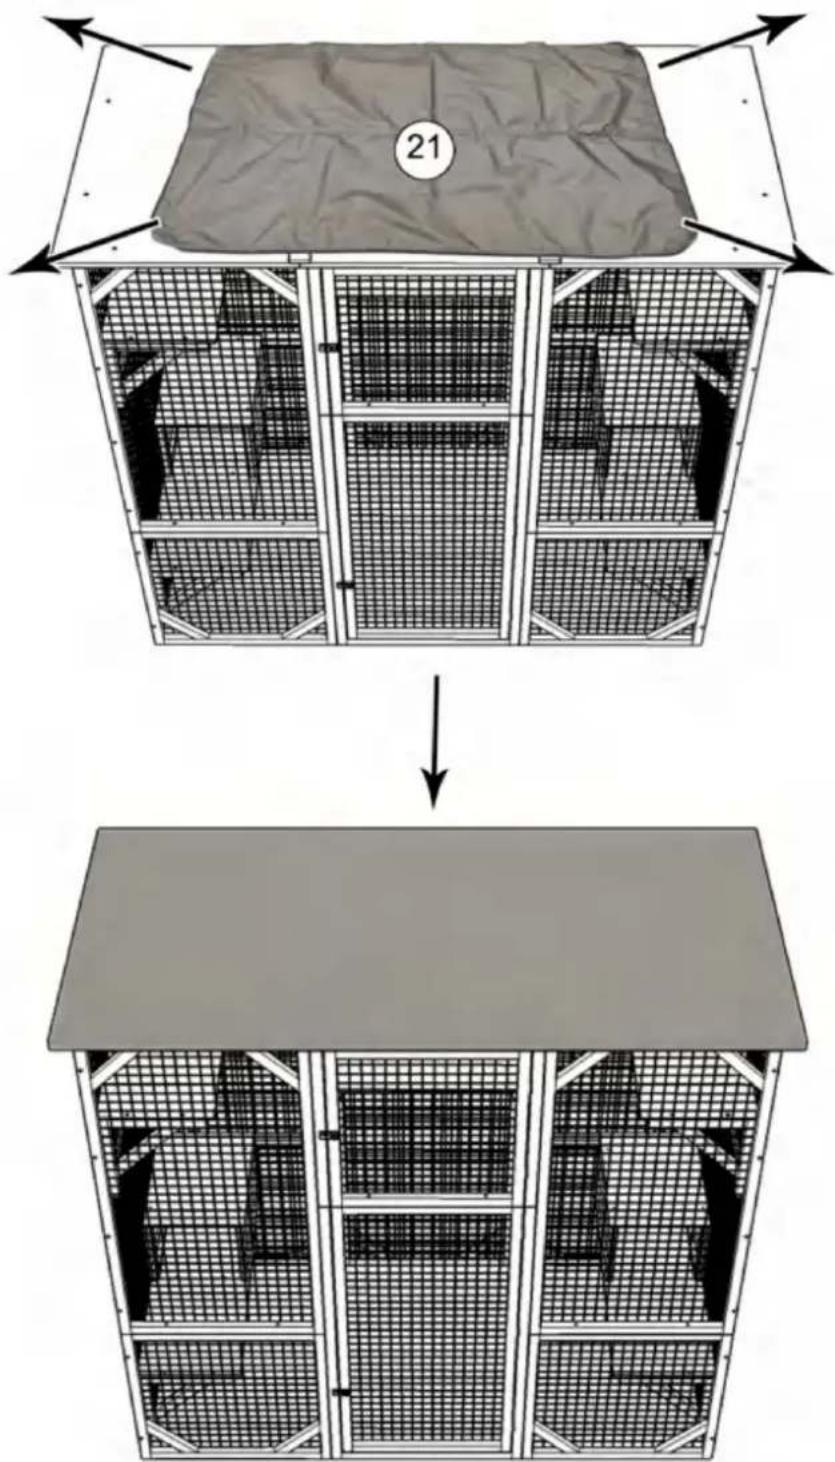
text_image
21STEP:19
Shuangchenglu 803nong11hao1602A-1609shi, baoshanqu, shanghai 200000 CN.
| EC | REP |
E-CrossStu GmbH.
Mainzer Landstr.69, 60329
A/S YH Consulting Limited Bureau
147, Centurion House, London Road,
Staines-upon-Thames, Surrey, TW18 4AX
Machine Translated by Google
VEVOR®
TOUGH TOOLS, HALF PRICE
Technical Support and E-Warranty Certificate
www.vevor.com/support
VEVOR®
TOUGH TOOLS, HALF PRICE
Technical Support and E-Warranty Certificate www.vevor.com/support
INSTRUCTION FOR CAT CAGE
MODEL:CH448
natural_image
Line drawing of a multi-level cage structure with internal mesh compartments (no text or symbols)NEED HELP? CONTACT US!
Have product questions? Need technical support? Please feel free to contact us:
Technische ondersteuning en e-garantiecertificaat www.vevor.com/support
This is the original instruction, please read all manual instructions carefully before operating. VEVOR reserves a clear interpretation of our user manual. The appearance of the product shall be subject to the product you received. Please forgive us that we won't inform you again if there are any technology or software updates on our product.
WARNING:
Read this material before using this product. Failure to do so can result in serious injury.
Assembly precautions
- Assemble only according to these instructions. Improper assembly can create hazards.
- In order to ensure your own safety, please make sure to ANSI-approved safety goggles and heavy-duty work gloves when installing this product.
- Keep the assembly area clean and well lit.
- Keep bystanders out of the area during assembly.
- Do not assemble when tired or when under the influence of alcohol, drugs or medication.
- Product capabilities apply to properly and completely assembled product only.
- Assemble on a flat, level, hard and smooth surface capable of safely supporting a fully loaded cat cage.
Use precautions
TO PREVENT SERIOUS INJURY AND DEATH FROM TIPPING:
- DO NOT SIT OR STAND ON THIS ITEM.
- This product is not a toy. Do not allow children to play with or near this item.
Please keep small spare parts out of children's reach. - Use only on a flat, level, hard and smooth surface capable of safely supporting a fully loaded cat cage.
- Use as intended only.
- Inspect before every use; do not use if parts are loose or damaged.
SAVE THESE INSTRUCTIONS
SPECIFICATIONS
| Model | CH448 |
| Product Size | 1800*880*1690mm |
| Color | Gray |
COMPONENTS
Notice:
- Various specifications of screws are used in the installation of this product. Pay attention to the correct use of screw specifications according to the instruction manual.
- Please wear gloves when installing.
text_image
SCREWS A 3.5x50 (40+4pcs) B 3.5x40 (52+4pcs) C 3.0x30 (16+2pcs) D 3.0x22 (68+4pcs) E 3.0x14 (4+2pcs) F (2pcs) (2pcs) ①x2 ② ③x2 ④ ⑤x2 ⑥ ⑦x2 ⑧ ⑨x2 ⑩x14 ⑪x2 ⑫x2 ⑬x2 ⑭x2 ⑮x2 ⑯ 13 x2 14 x4 15 x2 17 18 x2 19 20 x2Assembly Instructions
Please be noted that the side with wire nailed on is back side, should be inward when assembly
Pay attention to the up and bottom orientation of part #9 and part #1, the end with 2 pre-drilled holes is bottom as shown in the figure Assembling part #1, #5, #9, #16 with screw (B)x6 as shown, then secure part #9 to part #16 with screw (A)x2 downwards
Secure part #1 to part #5 with screw (A)x2 downwards, then assemble part #4 and part #8 with screw (A) x6 as shown, please pay attention to the up and bottom orientation of part #4, the end with 2 pre-drilled holes is bottom as shown in the figure
text_image
A A A A A A A A A 1 4 5 8STEP:2
Assemble part #3 and part #7 with screw (A) x6 as shown, please pay attention to the up and bottom orientation of part #3, the end with 2 pre-drilled holes is bottom as shown in the figure, then secure part #3 to part #7 with screw (A)x2 downwards
flowchart
graph TD
    A1["A"] --> B1["A"]
    A2["A"] --> B2["A"]
    A3["A"] --> B3["A"]
    A4["A"] --> B4["A"]
    B1 --> C1["A"]
    B2 --> C2["A"]
    B3 --> C3["A"]
    B4 --> C4["A"]
    style A1 fill:#f9f,stroke:#333
    style A2 fill:#f9f,stroke:#333
    style A3 fill:#f9f,stroke:#333
    style A4 fill:#f9f,stroke:#333
    style B1 fill:#ccf,stroke:#333
    style B2 fill:#ccf,stroke:#333
    style B3 fill:#ccf,stroke:#333
    style B4 fill:#ccf,stroke:#333
STEP:3
Secure part #4 to part #8 with screw (A)x2 downwards, then assemble part #9 and part #16 with screw (B) x6 as shown, please pay attention to the up and bottom orientation of part #9, the end with 2 pre-drilled holes is bottom as shown, then secure part #9 to part #16 with screw (A)x2 downwards
Assemble shelf with part #17 and part #10x2 with screw (D)x4 as shown
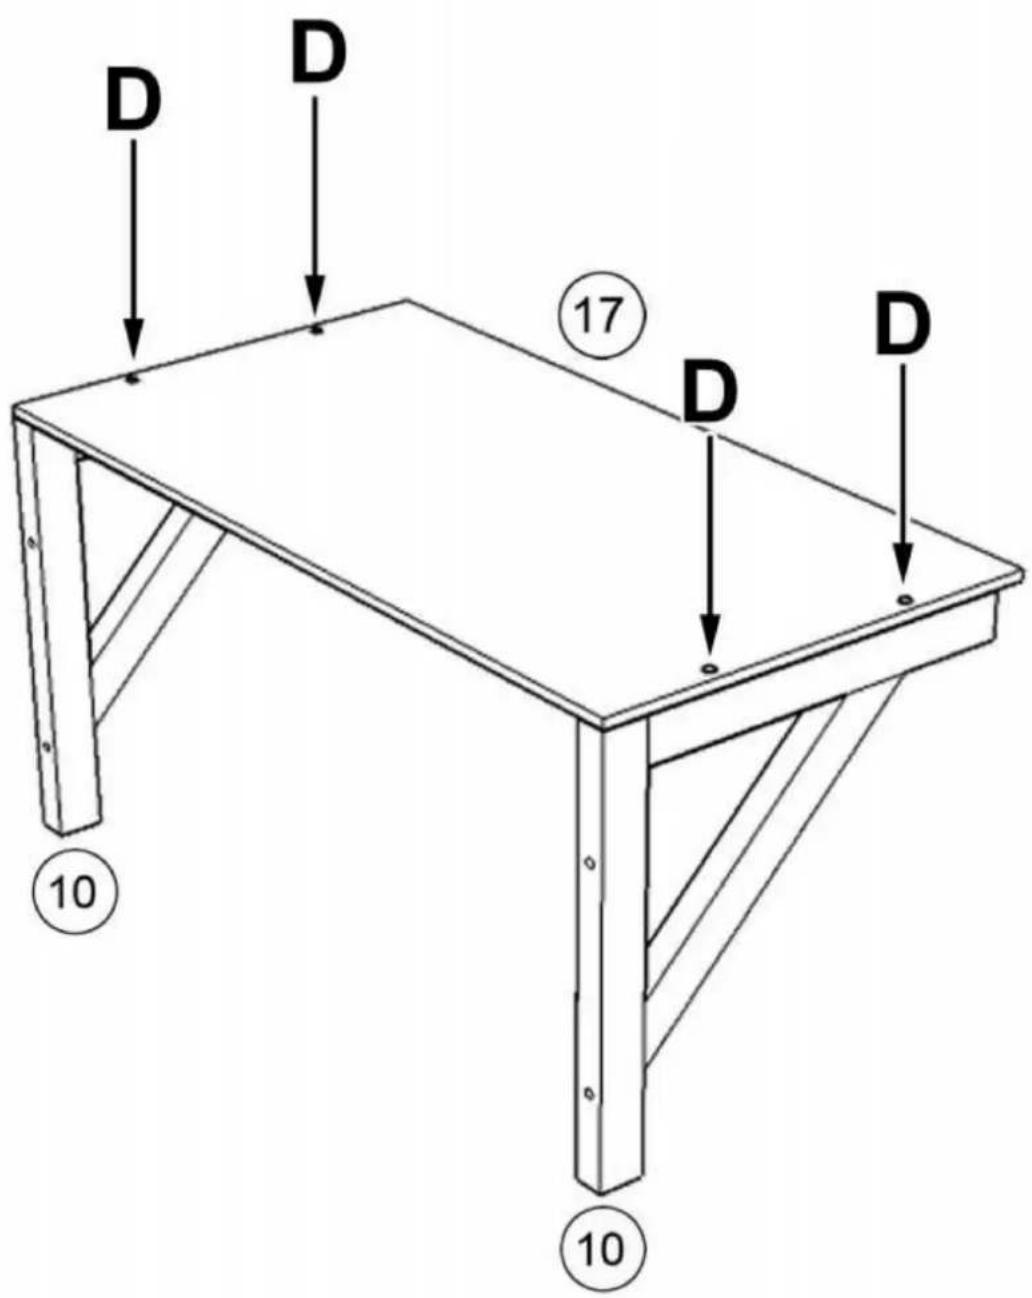
text_image
D D 17 D D 10 10STEP:5
Requires two people to install the shelf at designated position, one person is inside the cage holding the shelf while the other person is outside locking the screws through the pre-drilled holes as shown.
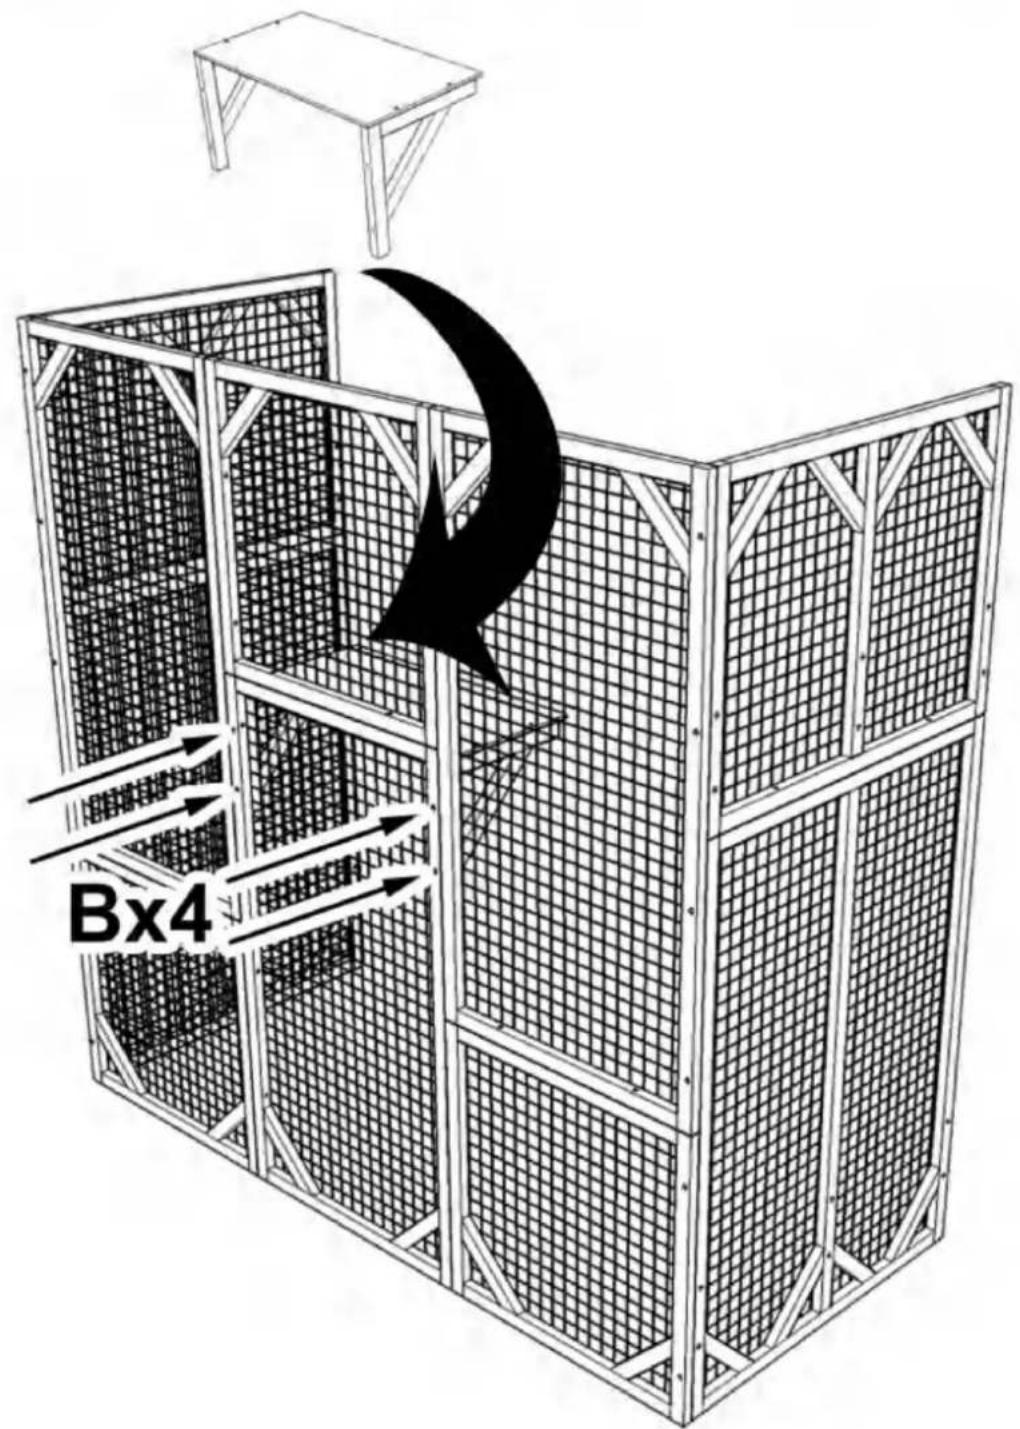
text_image
Bx4STEP:6
Assemble shelf with part #11 and part #10x3 with screw (D)x6 as shown
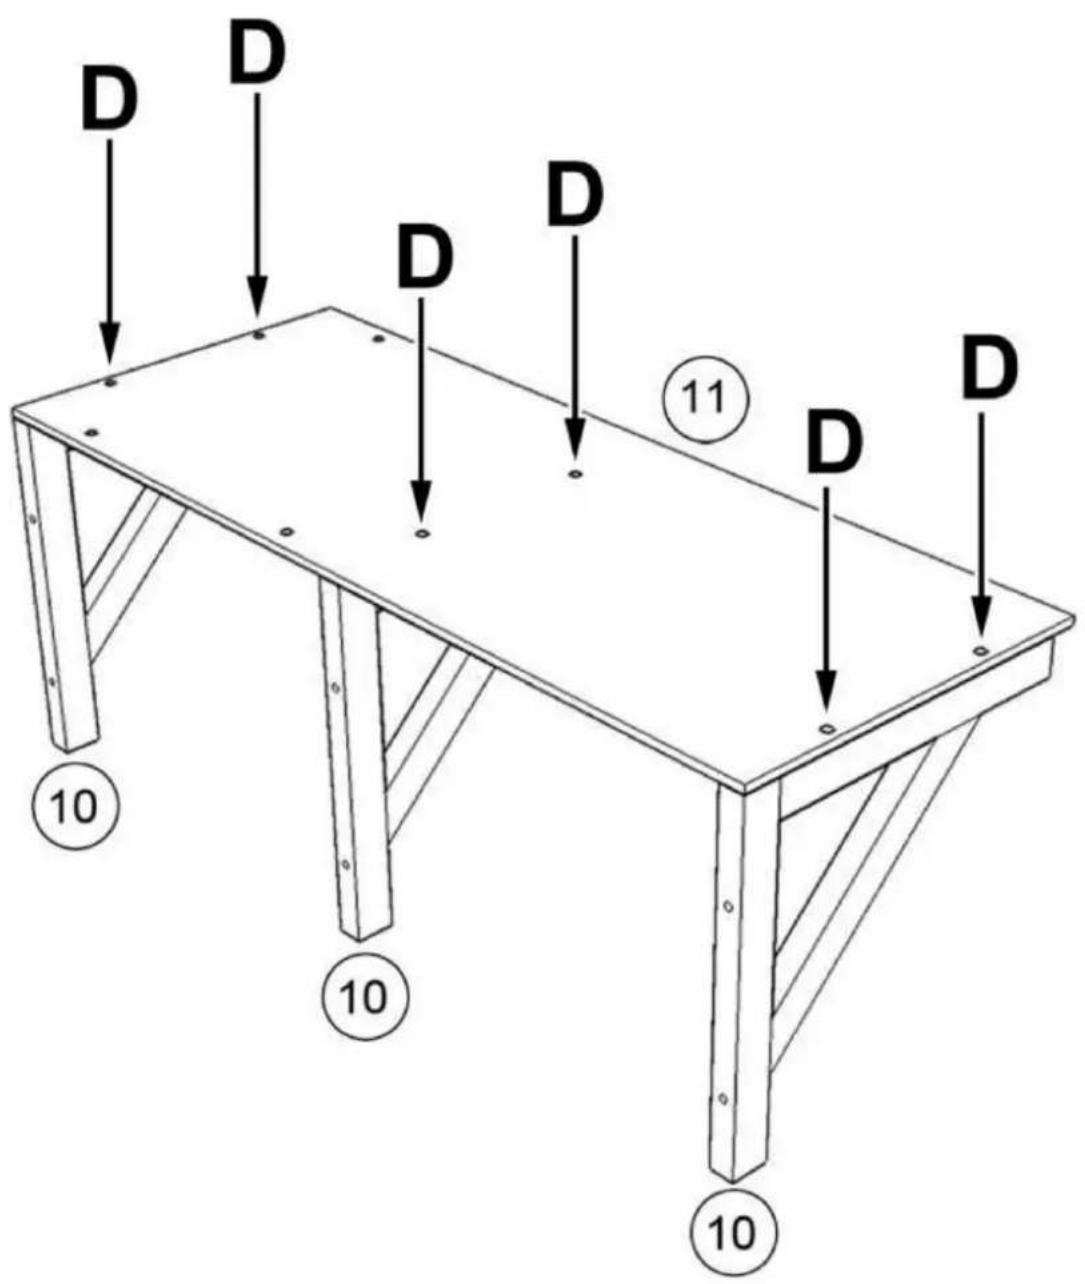
text_image
D D D D D 11 D D 10 10 10STEP:7
Assemble sleeping box with part #13, #14x2, #15 using screw (D)x10
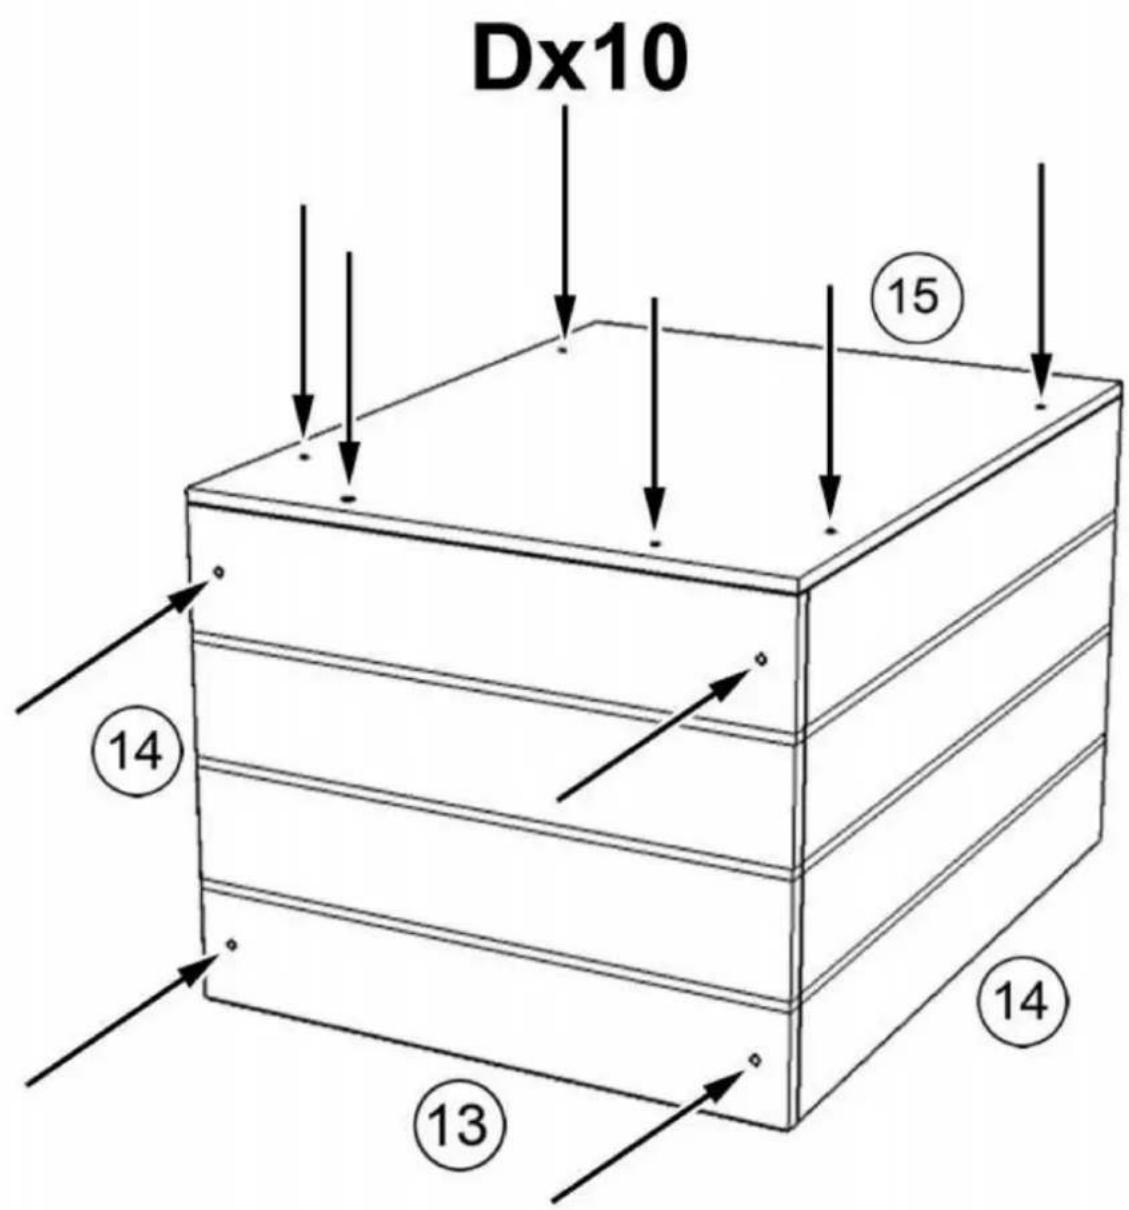
text_image
Dx10 15 14 13 14STEP:8
Install sleeping box on shelf as shown and secure the box with screw (D)x4 from the bottom
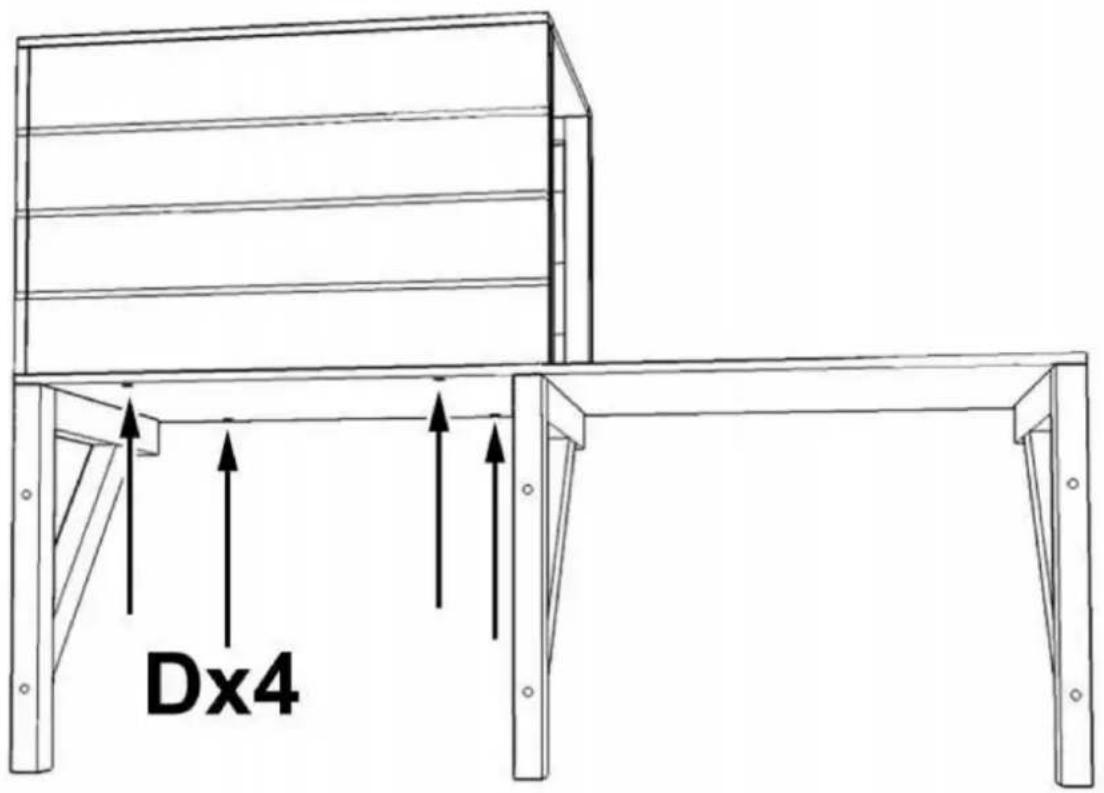
text_image
Dx4STEP:9
Assemble shelf with part #12 and part #10x3 with screw (D)x6 as shown
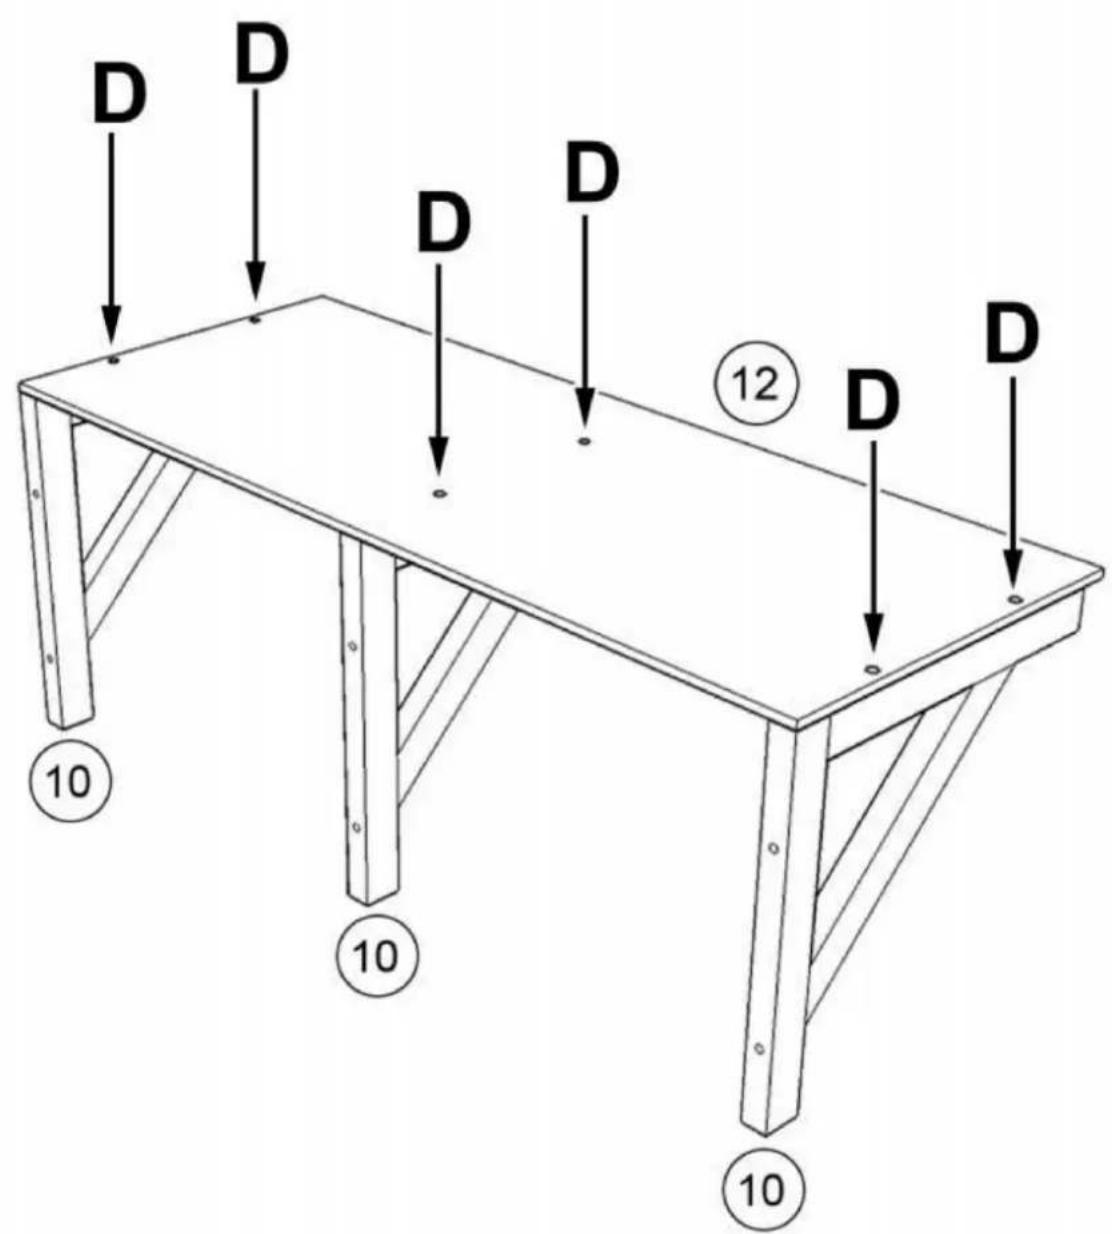
text_image
D D D D D ⑫⑫ D D 10 10 10STEP:10
Requires two people to install the shelves at designated position, one person is inside the cage holding the shelf while the other person is outside locking the screws through the pre-drilled holes as shown
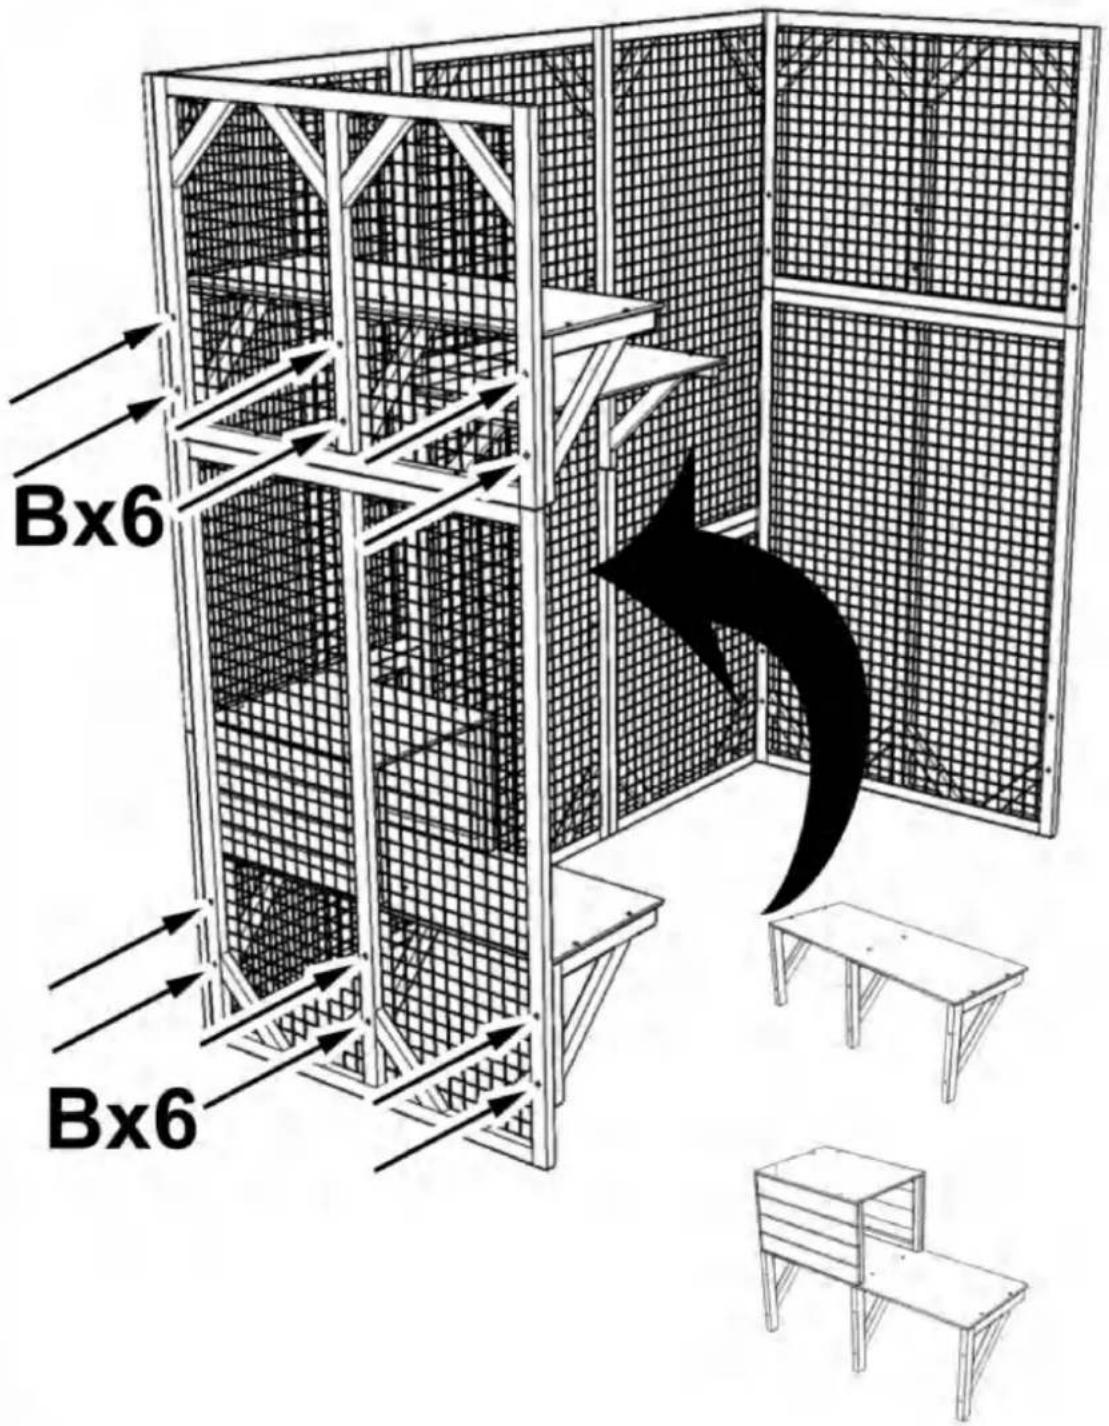
text_image
Bx6 Bx6STEP:11
Requires two people to install the shelves at designated position, one person is inside the cage holding the shelf while the other person is outside locking the screws through the pre-drilled holes as shown
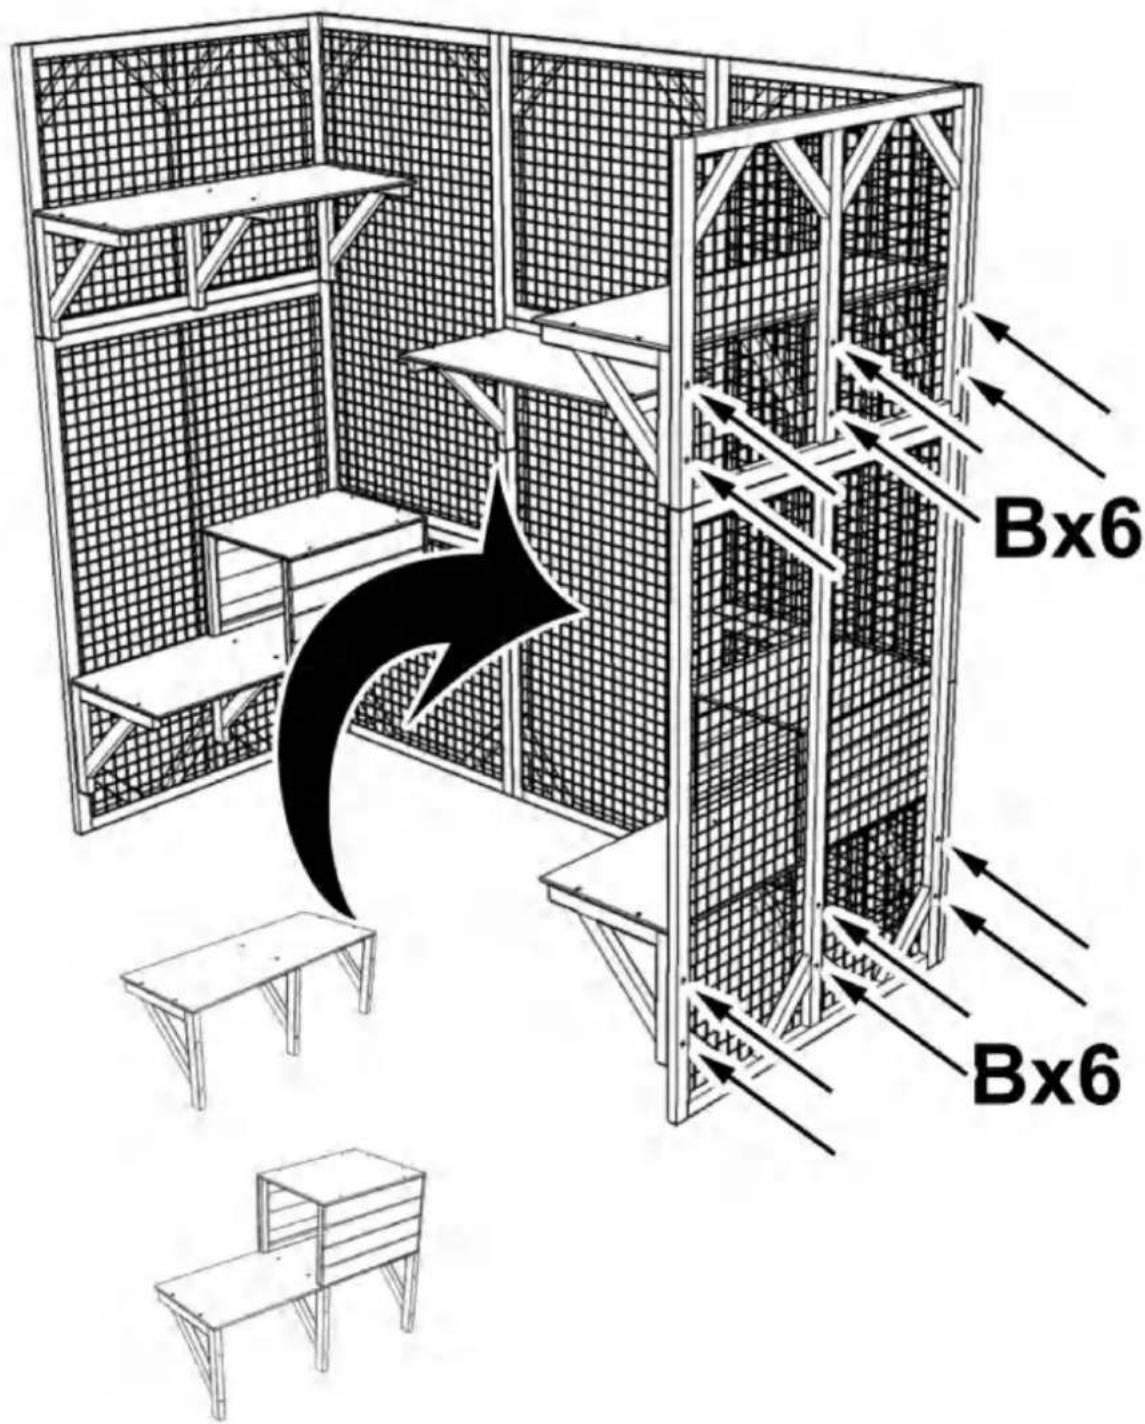
text_image
Bx6 Bx6STEP:12
Assemble part #1 and #5, part #3 and #7 with screw (B) x12 as shown, please pay attention to the up and bottom orientation of part #1 and #3, the end with 2 pre-drilled holes is bottom as shown in the figure, then secure part #1 to part #5 with screw (A)x2 downwards
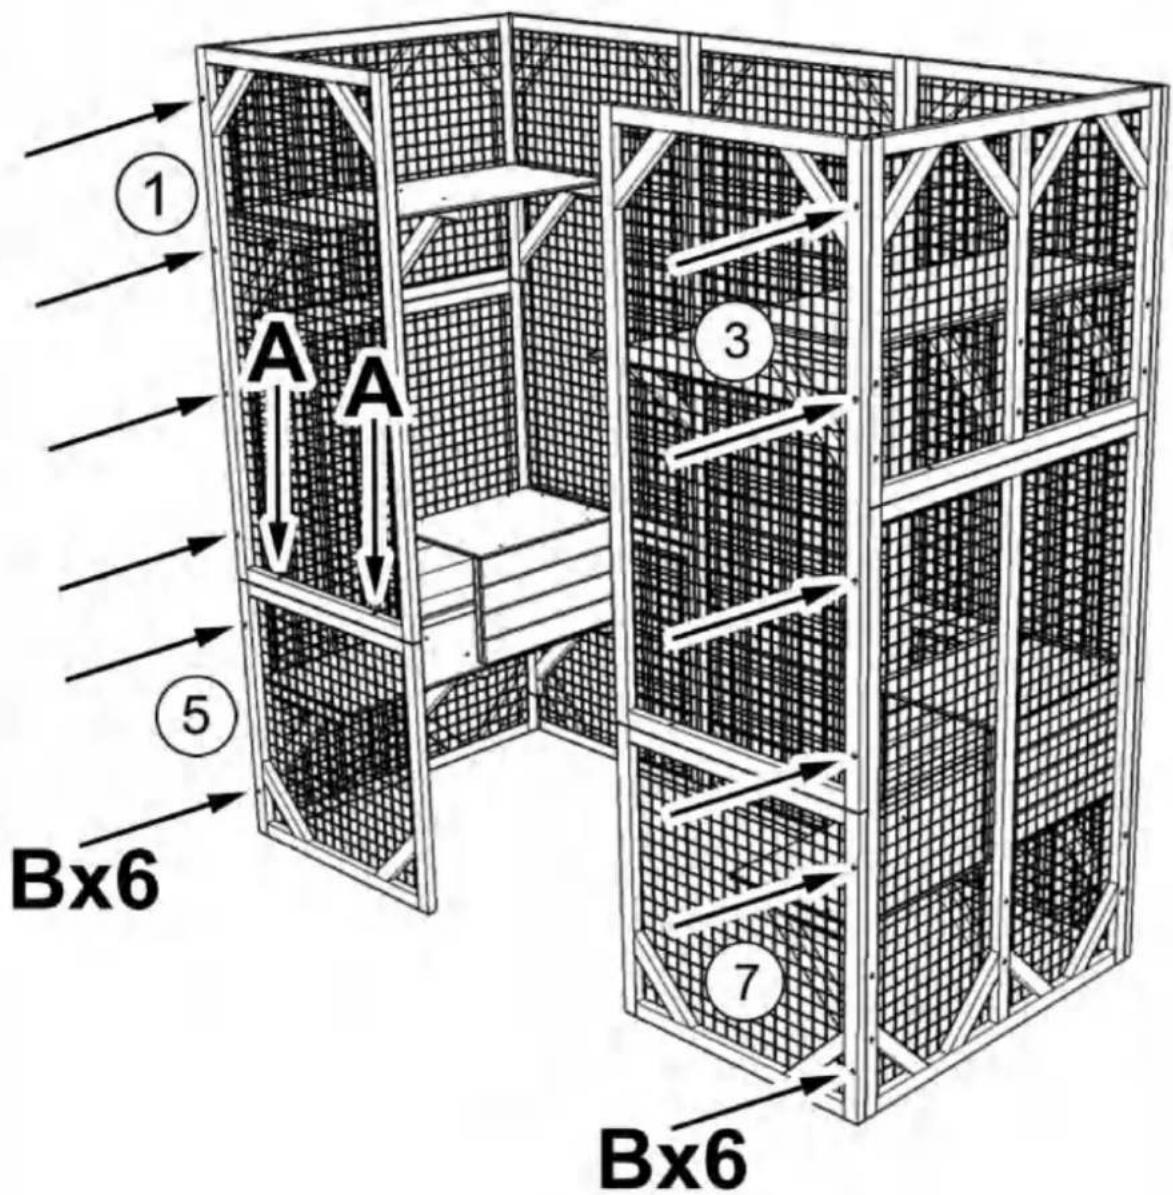
text_image
① A A ⑤ Bx6 ③ 7 Bx6STEP:13
Secure part #3 to part #7 with screw (A)x2 downwards, then assemble part #2 and part #6 (open the doors) with screw (A) x6 as shown
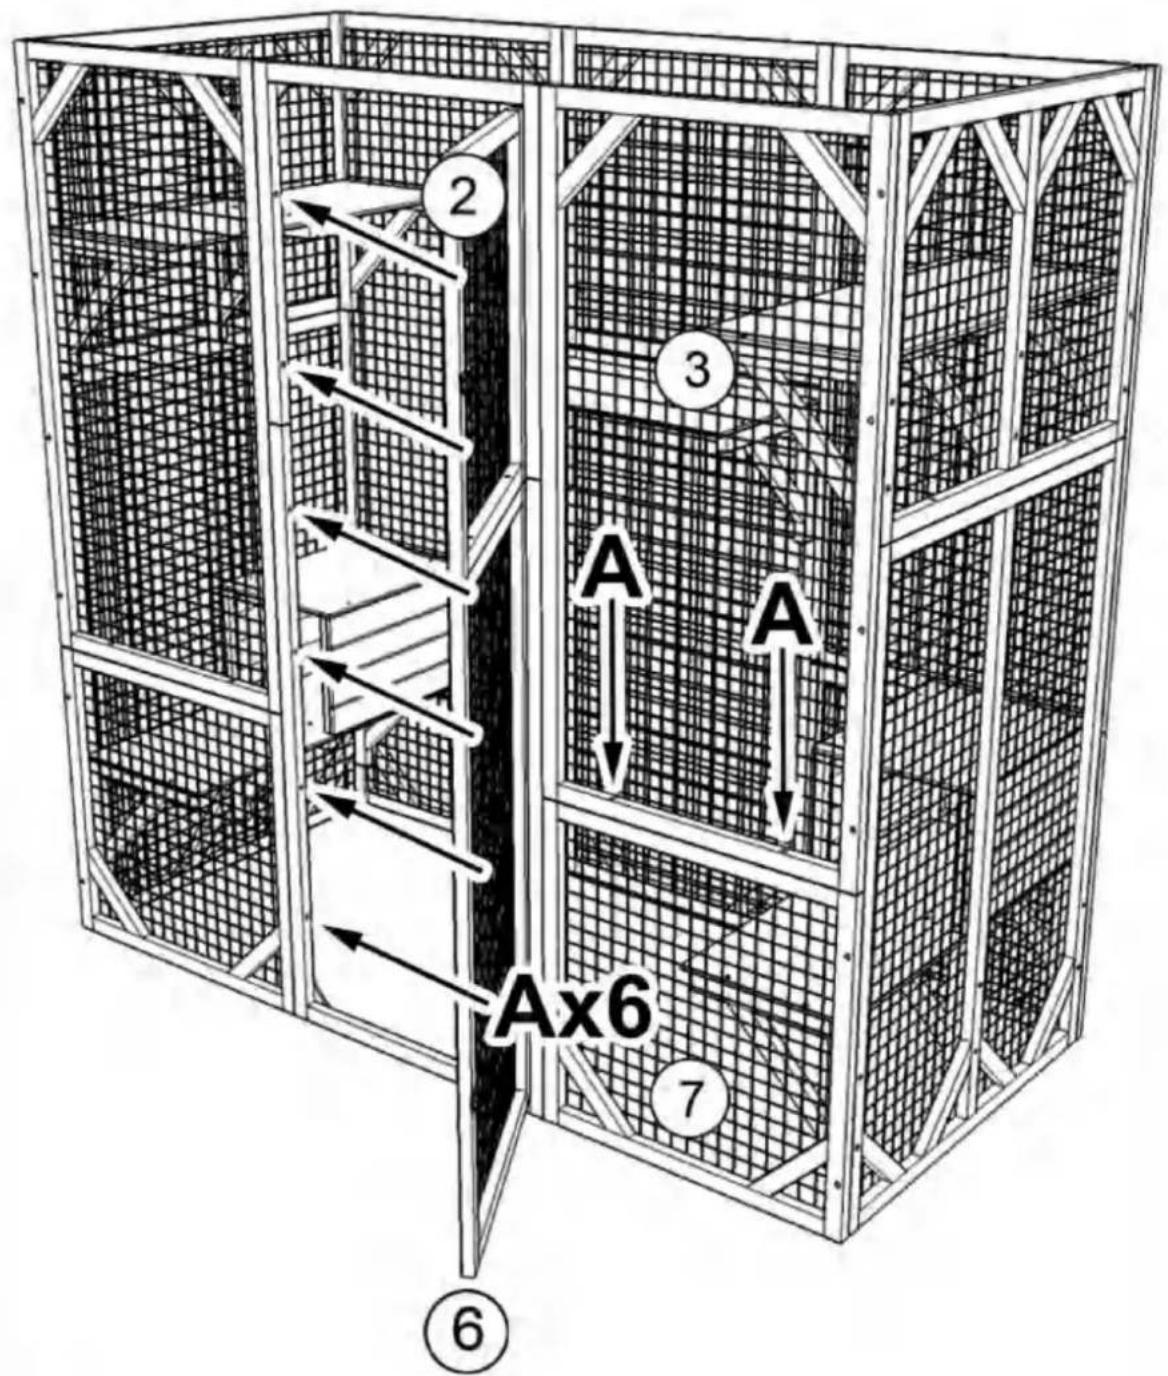
text_image
2 3 A A Ax6 7 ⑥STEP:14
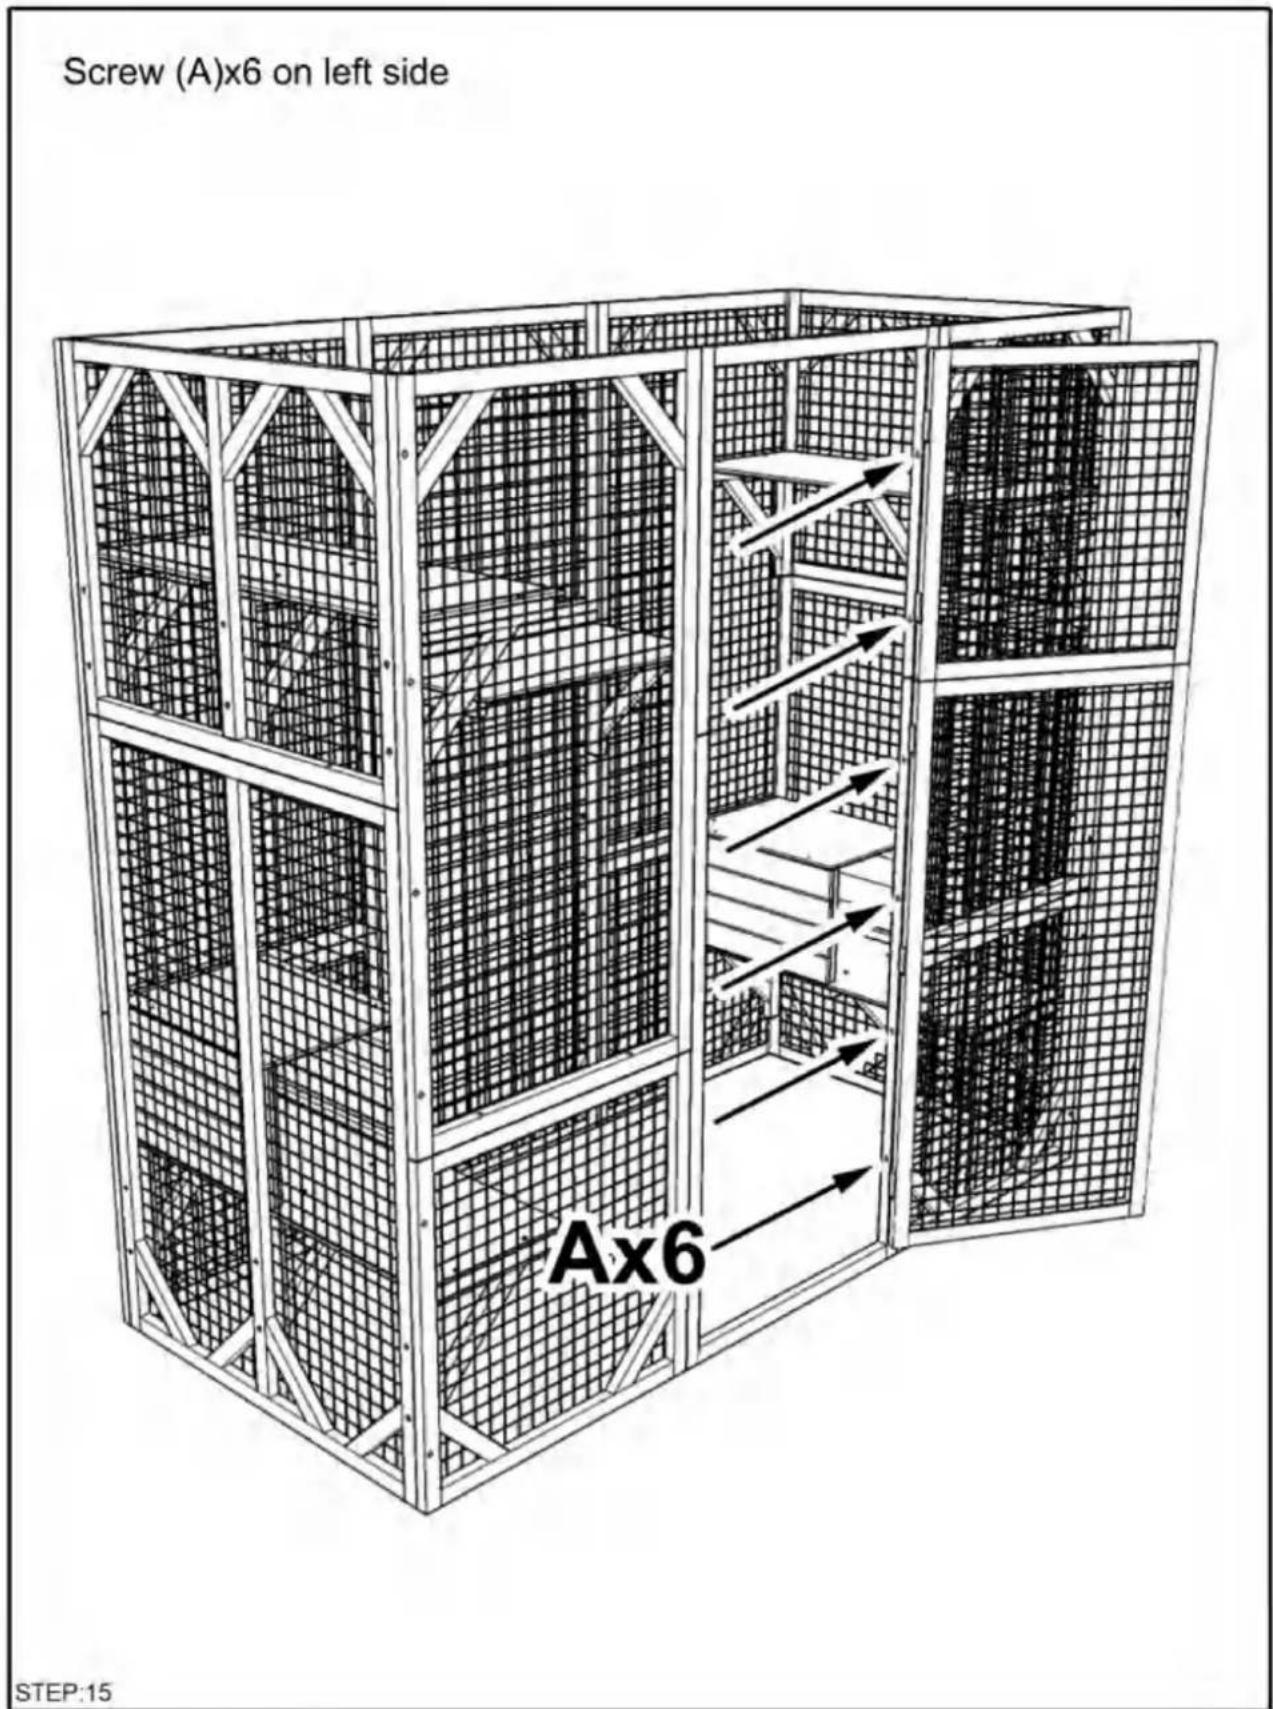
text_image
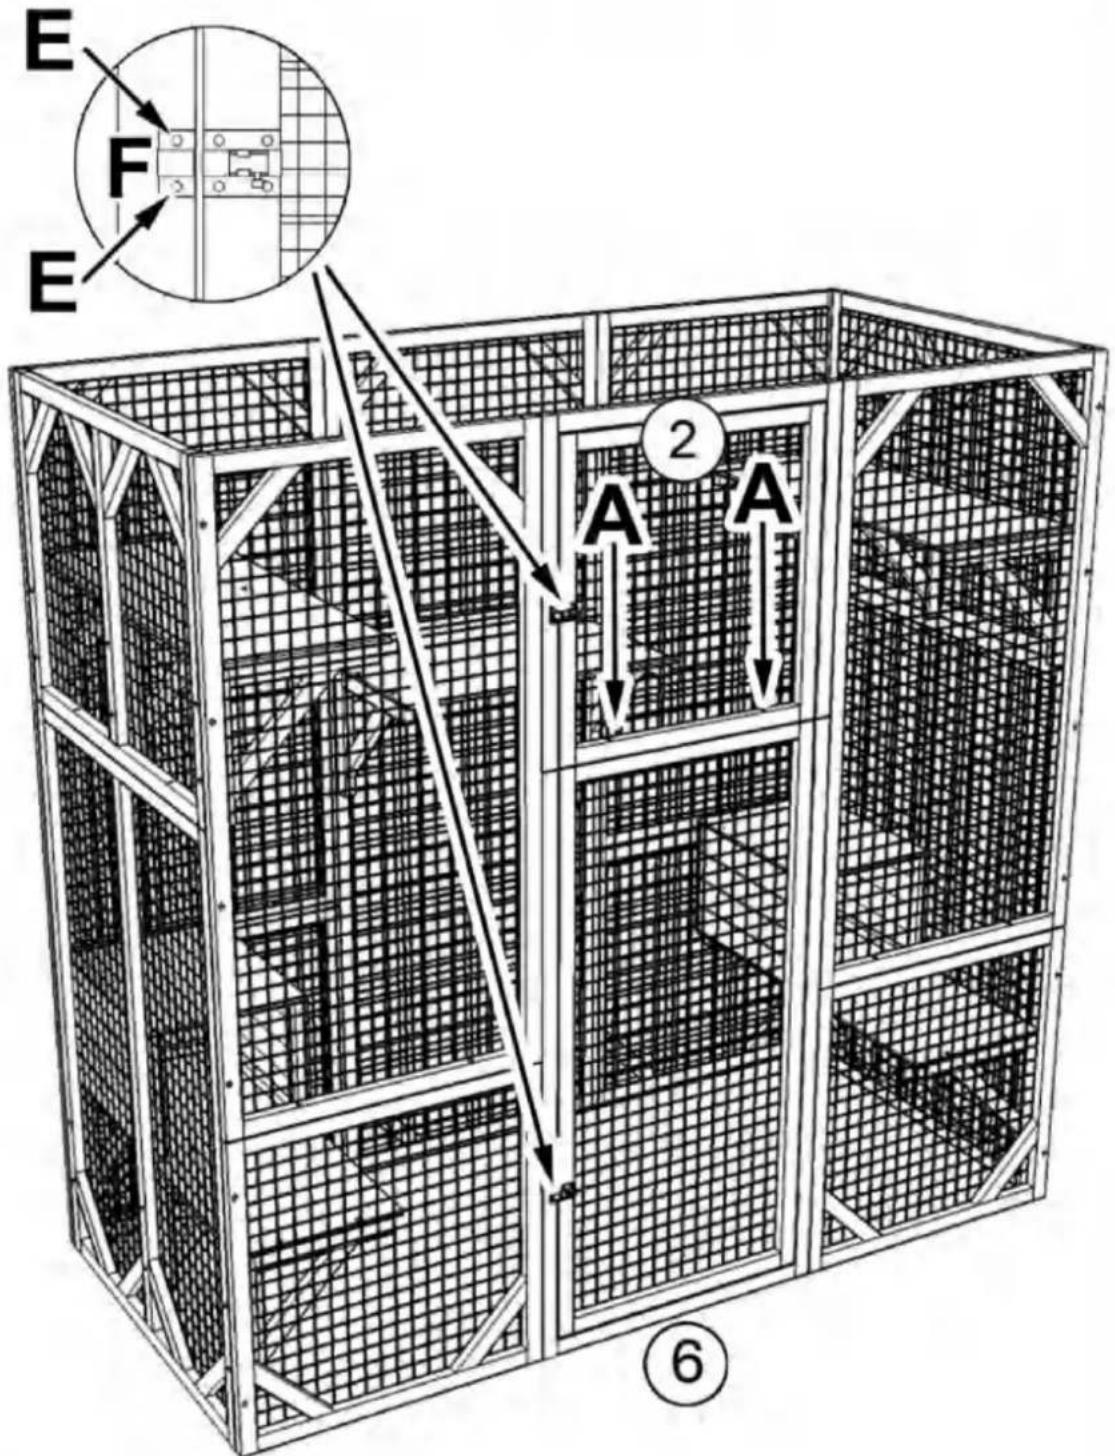
Screw (A)x6 on left side Ax6 STEP:15Align the short end of lock part #F with its other part already on door then secure it with screws (E)x2, secure part #2 to part #6 with screw (A)x2 downwards
text_image
E F E 2 A A ⑥STEP:16
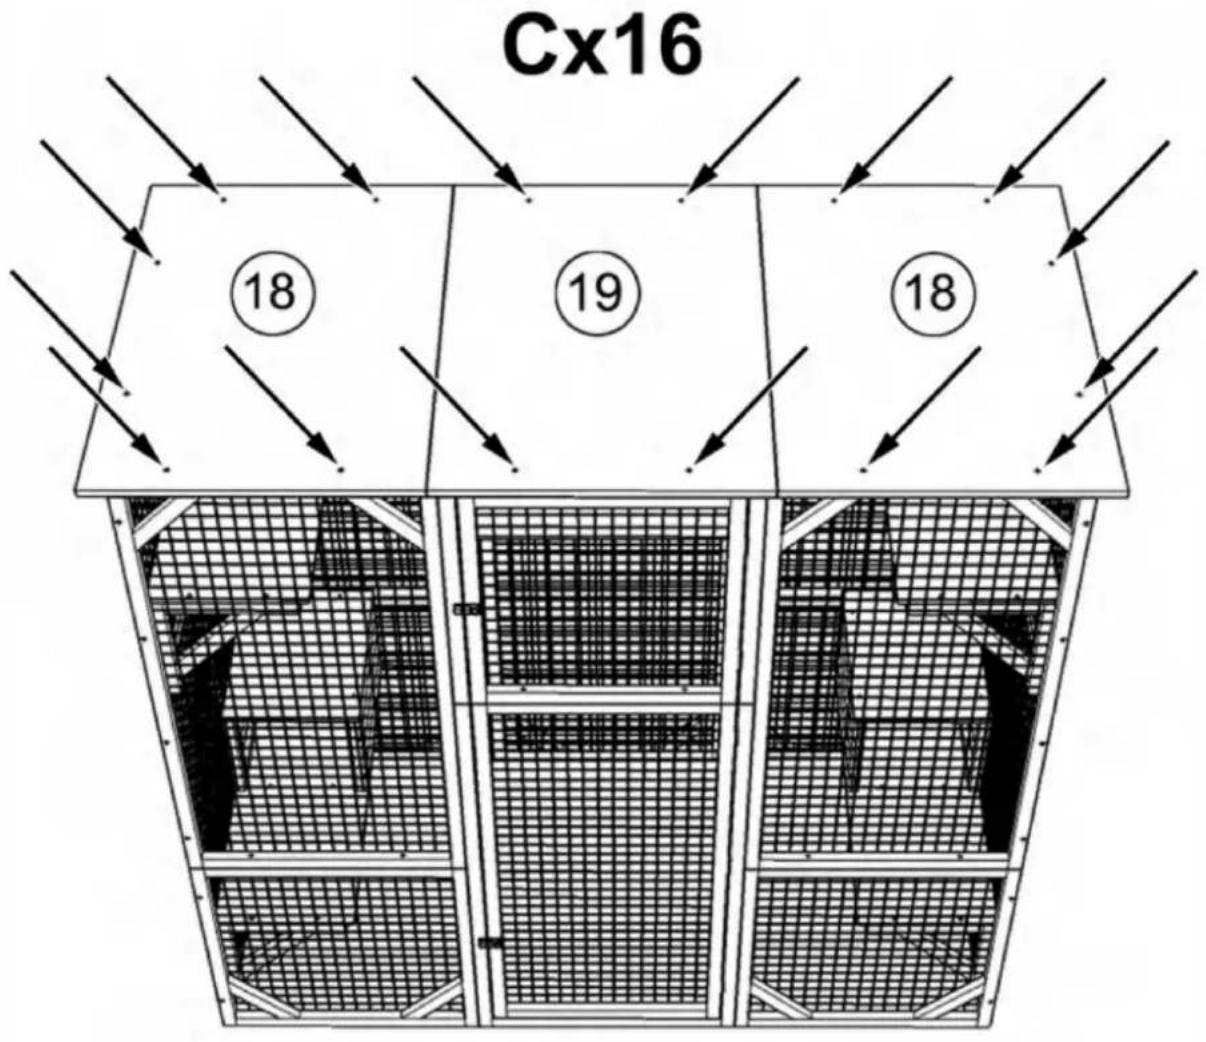
Install roofs with screw (C)x16 as shown, please be noted the edge of roof is 1.57 inch from the house underneath
text_image
Cx16 18 19 18STEP:17
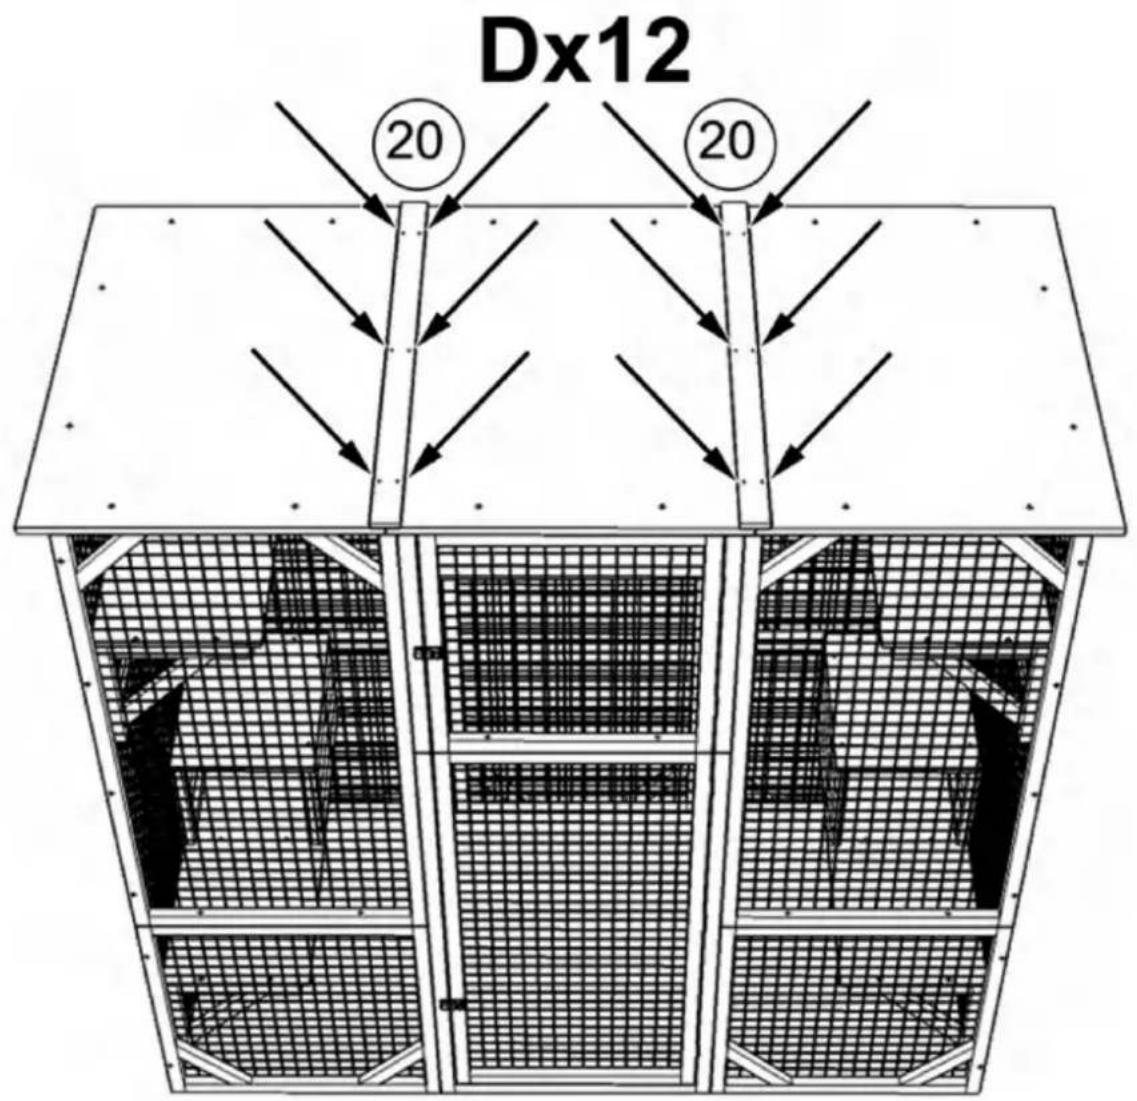
Install part #20x2 with screw (D)x12 as shown to cover the gap between roofs
text_image
Dx12 20 20STEP:18
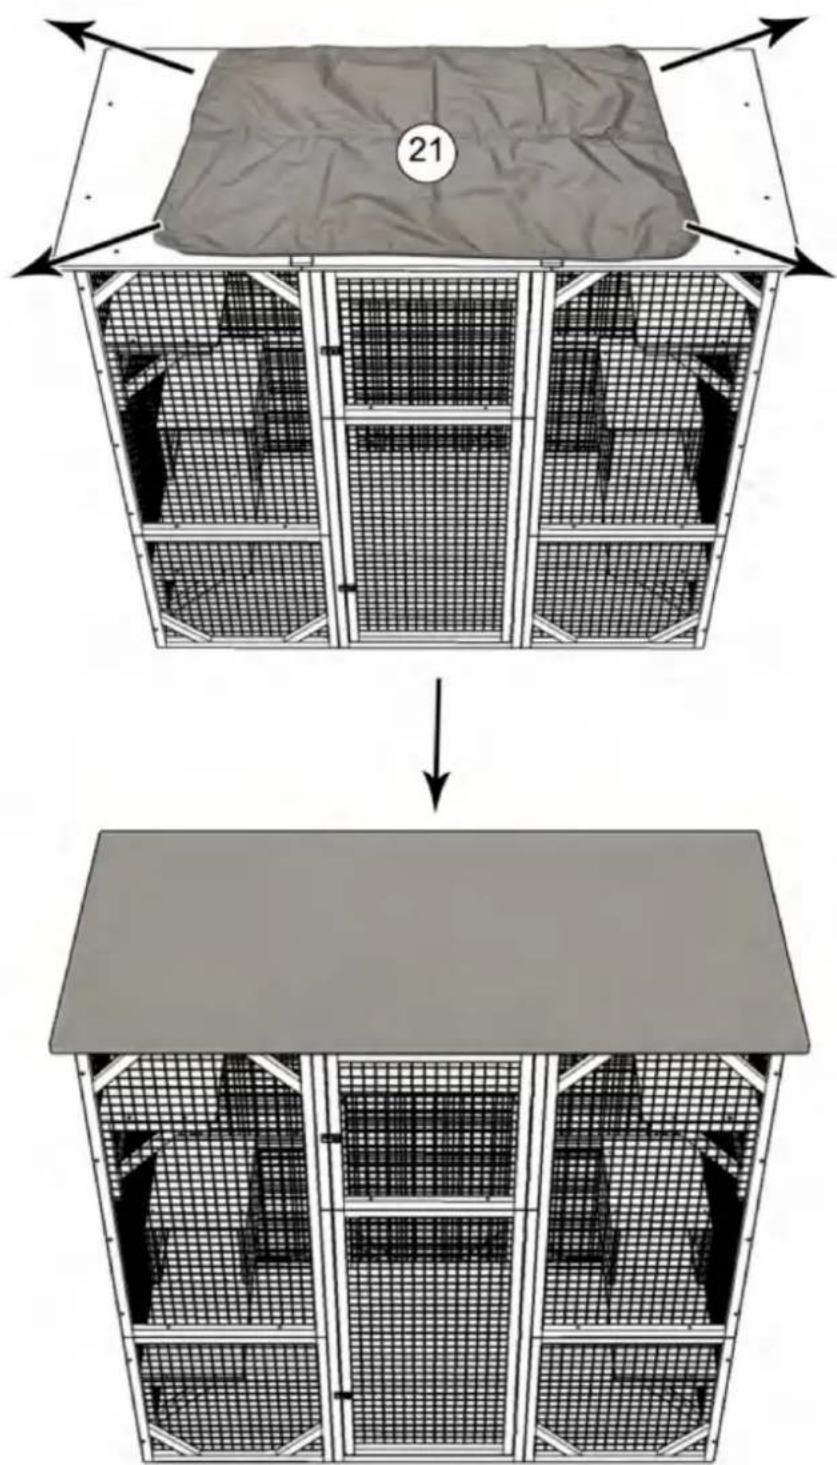
Unfold the tarp and cover it
text_image
21STEP:19
Shuangchenglu 803nong11hao1602A-1609shi, baoshanqu, shanghai 200000 CN.
| EC | REP |
E-CrossStu GmbH.
Mainzer Landstr.69, 60329
Frankfurt am Main.
| UK | REP |
YH CONSULTING LIMITED.
C/O YH Consulting Limited Kantoor
147, Centurion House, London Road,
Staines-upon-Thames, Surrey, TW18 4AX
Machine Translated by Google
VEVOR®
TOUGH TOOLS, HALF PRICE
Technical Support and E-Warranty Certificate
www.vevor.com/support
VEVOR®
TOUGH TOOLS, HALF PRICE
Technical Support and E-Warranty Certificate www.vevor.com/support
INSTRUCTION FOR CAT CAGE
MODEL:CH448
natural_image
Line drawing of a multi-level cage structure with internal mesh compartments (no text or symbols)NEED HELP? CONTACT US!
Have product questions? Need technical support? Please feel free to contact us:
This is the original instruction, please read all manual instructions carefully before operating. VEVOR reserves a clear interpretation of our user manual. The appearance of the product shall be subject to the product you received. Please forgive us that we won't inform you again if there are any technology or software updates on our product.
WARNING:
Read this material before using this product. Failure to do so can result in serious injury.
Assembly precautions
- Assemble only according to these instructions. Improper assembly can create hazards.
- In order to ensure your own safety, please make sure to ANSI-approved safety goggles and heavy-duty work gloves when installing this product.
- Keep the assembly area clean and well lit.
- Keep bystanders out of the area during assembly.
- Do not assemble when tired or when under the influence of alcohol, drugs or medication.
- Product capabilities apply to properly and completely assembled product only.
- Assemble on a flat, level, hard and smooth surface capable of safely supporting a fully loaded cat cage.
Use precautions
TO PREVENT SERIOUS INJURY AND DEATH FROM TIPPING:
- DO NOT SIT OR STAND ON THIS ITEM.
- This product is not a toy. Do not allow children to play with or near this item.
Please keep small spare parts out of children's reach. - Use only on a flat, level, hard and smooth surface capable of safely supporting a fully loaded cat cage.
- Use as intended only.
- Inspect before every use; do not use if parts are loose or damaged.
SAVE THESE INSTRUCTIONS
SPECIFICATIONS
| Model | CH448 |
| Product Size | 1800*880*1690mm |
| Color | Gray |
COMPONENTS
Notice:
- Various specifications of screws are used in the installation of this product. Pay attention to the correct use of screw specifications according to the instruction manual.
- Please wear gloves when installing.
text_image
SCREWS A 3.5x50 (40+4pcs) B 3.5x40 (52+4pcs) C 3.0x30 (16+2pcs) D 3.0x22 (68+4pcs) E 3.0x14 (4+2pcs) F (2pcs) (2pcs) ①x2 ② ③x2 ④ ⑤x2 ⑥ ⑦x2 ⑧ ⑨x2 ⑩x14 ⑪x2 ⑫x2 ⑬x2 ⑭x2 ⑮x2 ⑯ ⑰x2 ⑱ ⑲x2 ⑳ ㉑ ㉒ ㉓ ㉔ ㉕ ㉖ ㉗ ㉘ ㉙ ㉚ ㉛ ㉜ ㉝ ㉞ ㉟ ㉳ ㉴ ㉵ ㉶ ㉷ ㉸ ㉹ ㉺ ㉚ ㉛ ㉜ ㉝ ㉟ ㉟x2Assembly Instructions
Please be noted that the side with wire nailed on is back side, should be inward when assembly
Pay attention to the up and bottom orientation of part #9 and part #1, the end with 2 pre-drilled holes is bottom as shown in the figure Assembling part #1, #5, #9, #16 with screw (B)x6 as shown, then secure part #9 to part #16 with screw (A)x2 downwards
Secure part #1 to part #5 with screw (A)x2 downwards, then assemble part #4 and part #8 with screw (A) x6 as shown, please pay attention to the up and bottom orientation of part #4, the end with 2 pre-drilled holes is bottom as shown in the figure
text_image
A A A A A A A A A 1 4 5 8STEP:2
Assemble part #3 and part #7 with screw (A) x6 as shown, please pay attention to the up and bottom orientation of part #3, the end with 2 pre-drilled holes is bottom as shown in the figure, then secure part #3 to part #7 with screw (A)x2 downwards
flowchart
graph TD
    A1["A"] --> B1["A"]
    A2["A"] --> B2["A"]
    A3["A"] --> B3["A"]
    A4["A"] --> B4["A"]
    B1 --> C1["A"]
    B2 --> C2["A"]
    B3 --> C3["A"]
    B4 --> C4["A"]
    style A1 fill:#f9f,stroke:#333
    style A2 fill:#f9f,stroke:#333
    style A3 fill:#f9f,stroke:#333
    style A4 fill:#f9f,stroke:#333
    style B1 fill:#ccf,stroke:#333
    style B2 fill:#ccf,stroke:#333
    style B3 fill:#ccf,stroke:#333
    style B4 fill:#ccf,stroke:#333
STEP:3
Secure part #4 to part #8 with screw (A)x2 downwards, then assemble part #9 and part #16 with screw (B) x6 as shown, please pay attention to the up and bottom orientation of part #9, the end with 2 pre-drilled holes is bottom as shown, then secure part #9 to part #16 with screw (A)x2 downwards
Assemble shelf with part #17 and part #10x2 with screw (D)x4 as shown
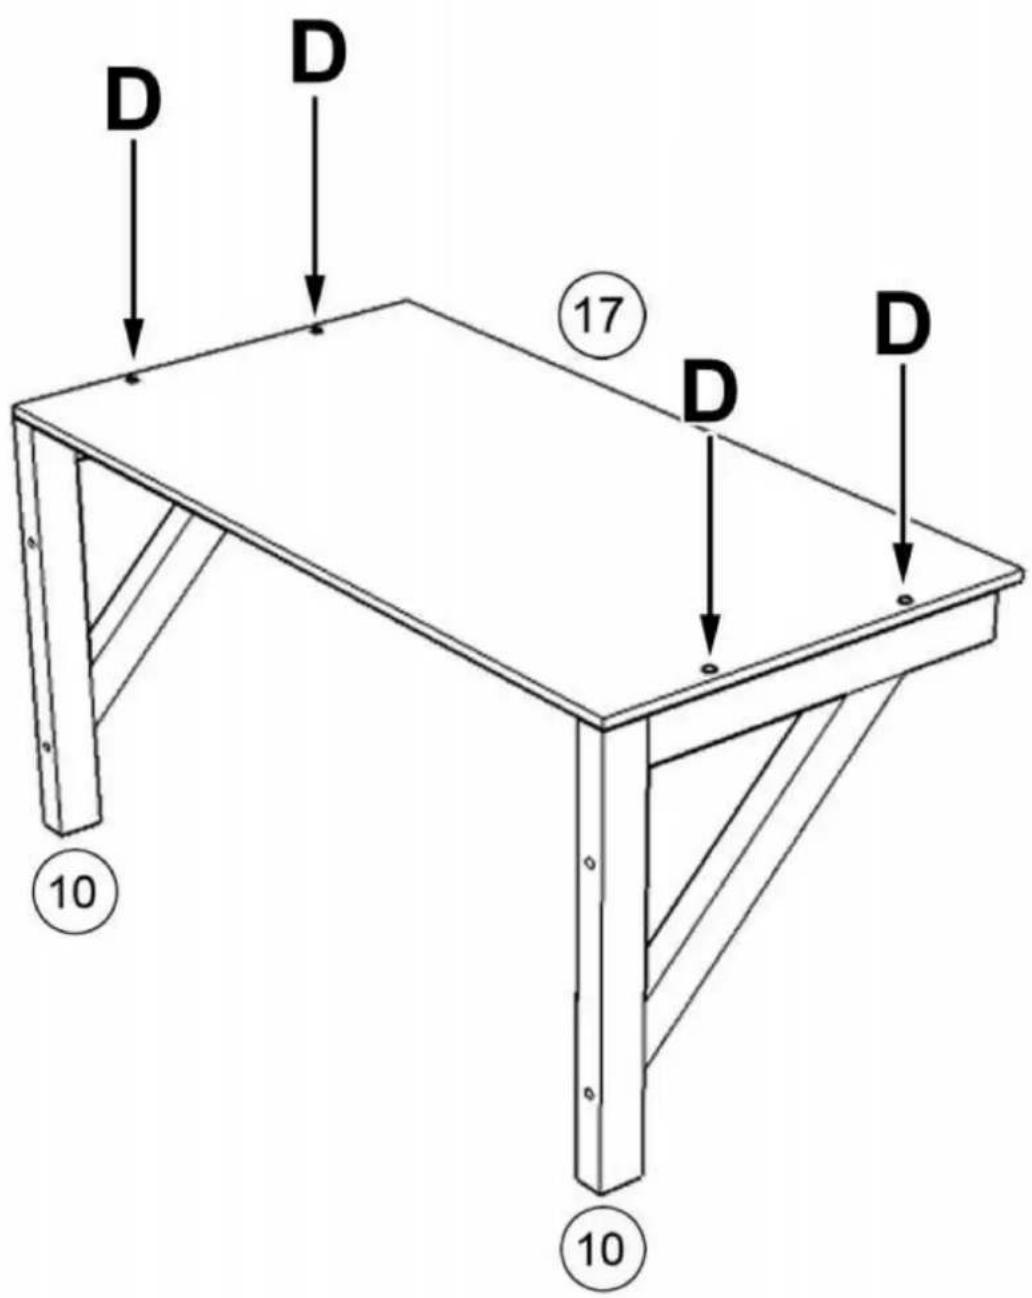
text_image
D D 17 D D 10 10STEP:5
Requires two people to install the shelf at designated position, one person is inside the cage holding the shelf while the other person is outside locking the screws through the pre-drilled holes as shown.
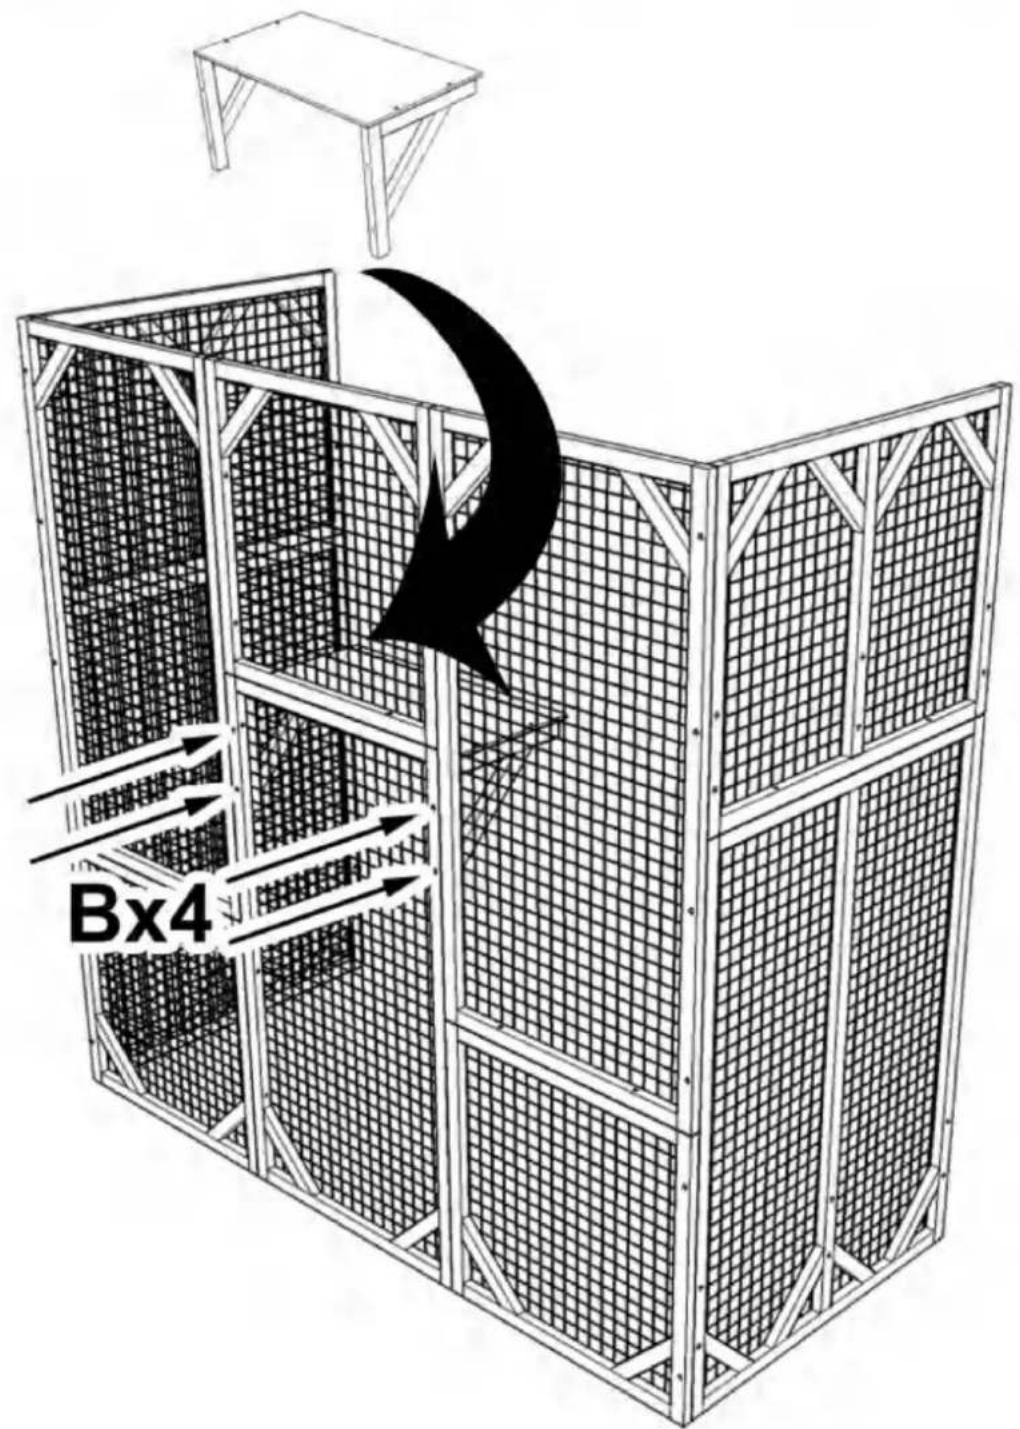
text_image
Bx4STEP:6
Assemble shelf with part #11 and part #10x3 with screw (D)x6 as shown
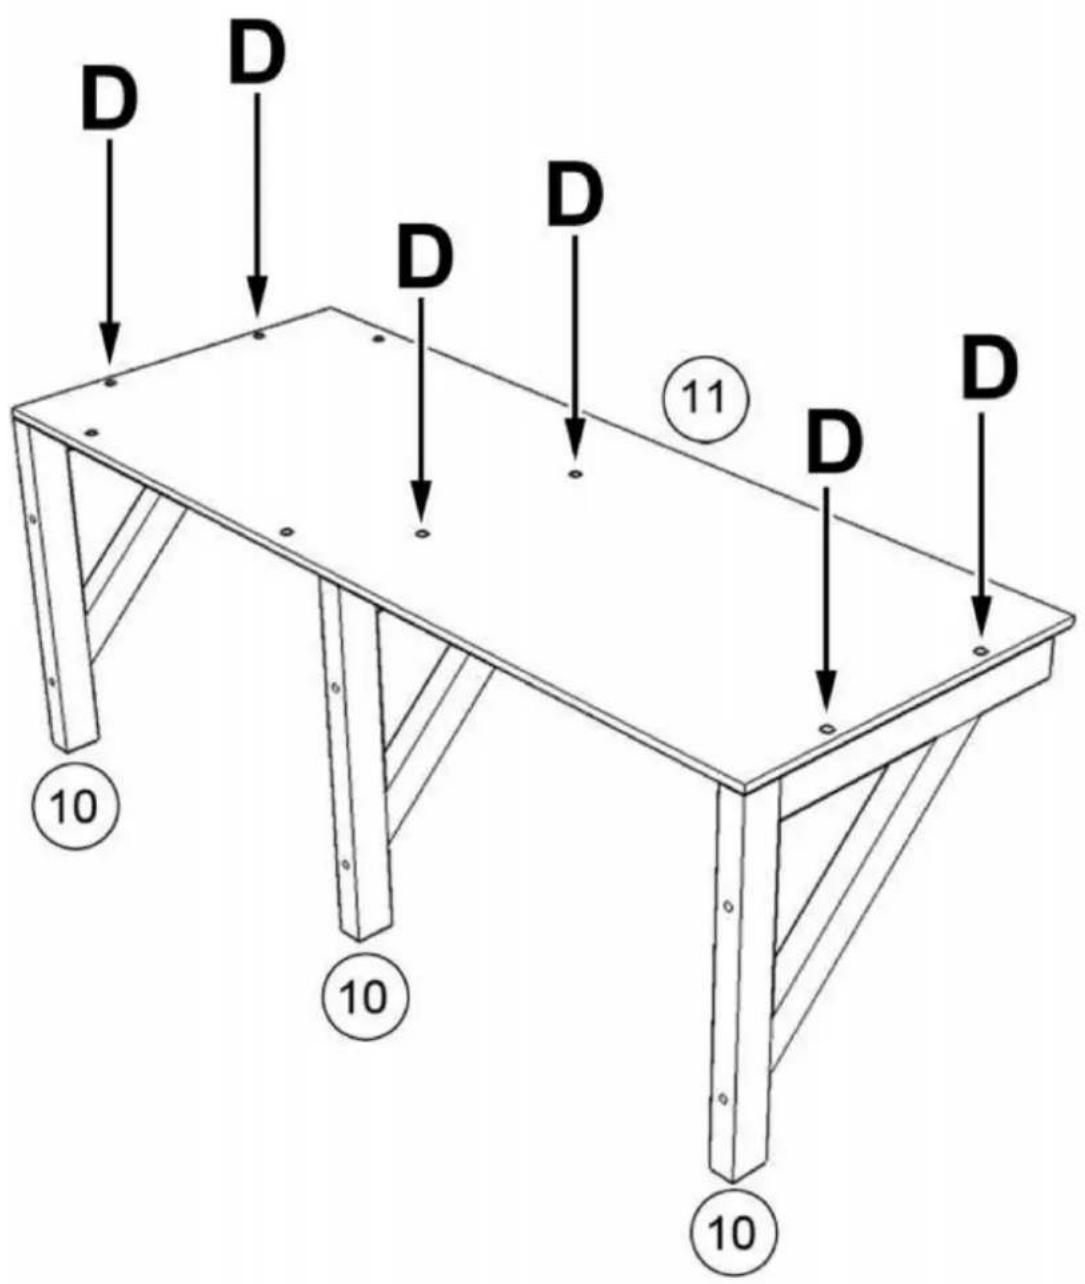
text_image
D D D D D 11 D D 10 10 10STEP:7
Assemble sleeping box with part #13, #14x2, #15 using screw (D)x10
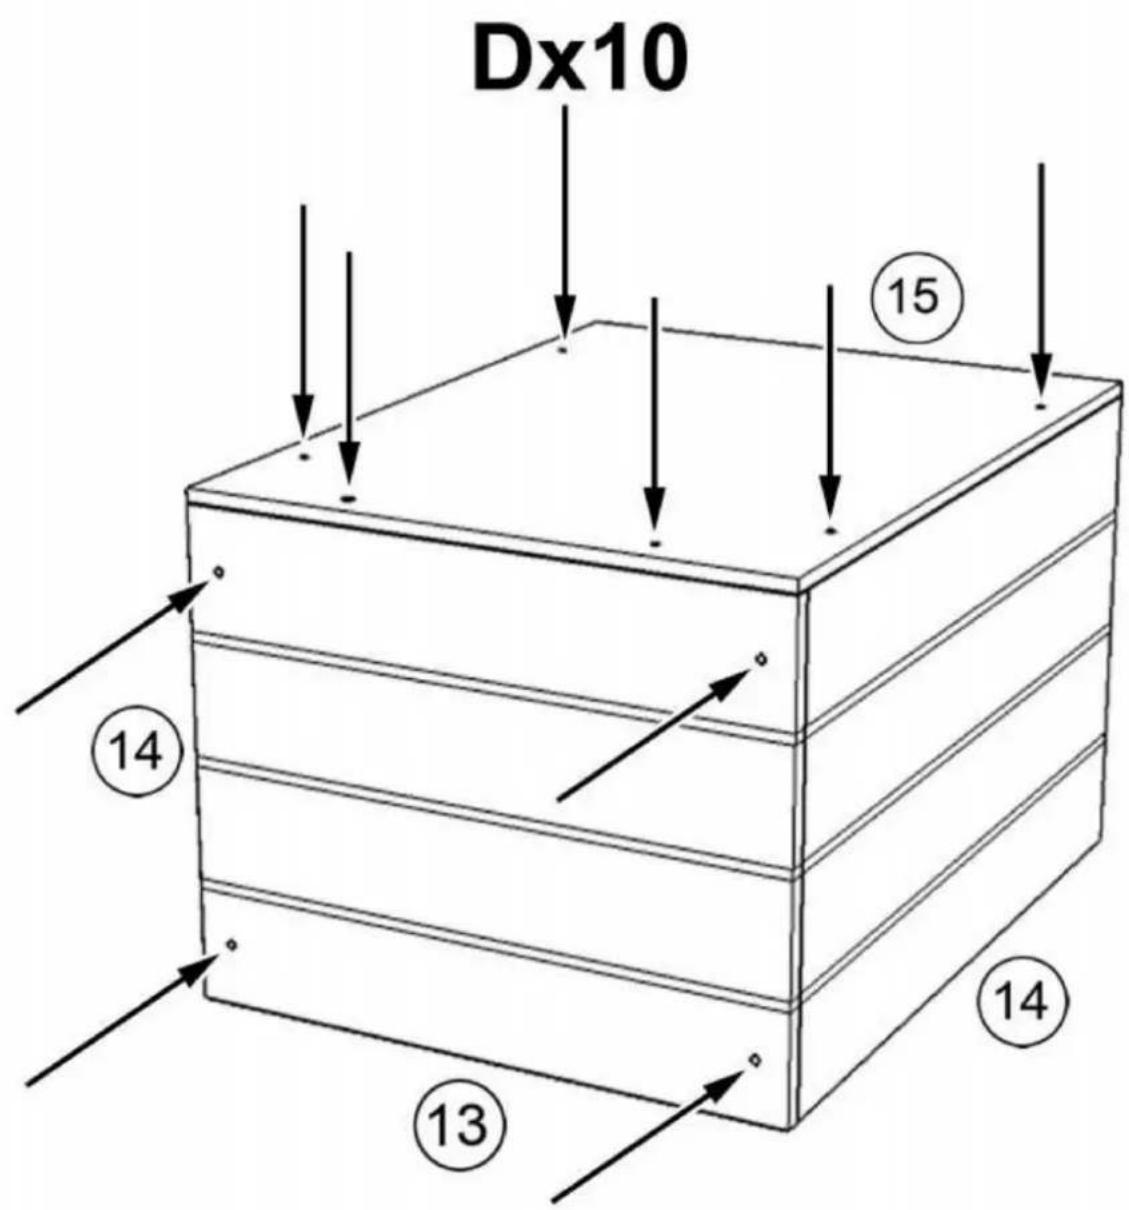
text_image
Dx10 15 14 13 14STEP:8
Install sleeping box on shelf as shown and secure the box with screw (D)x4 from the bottom
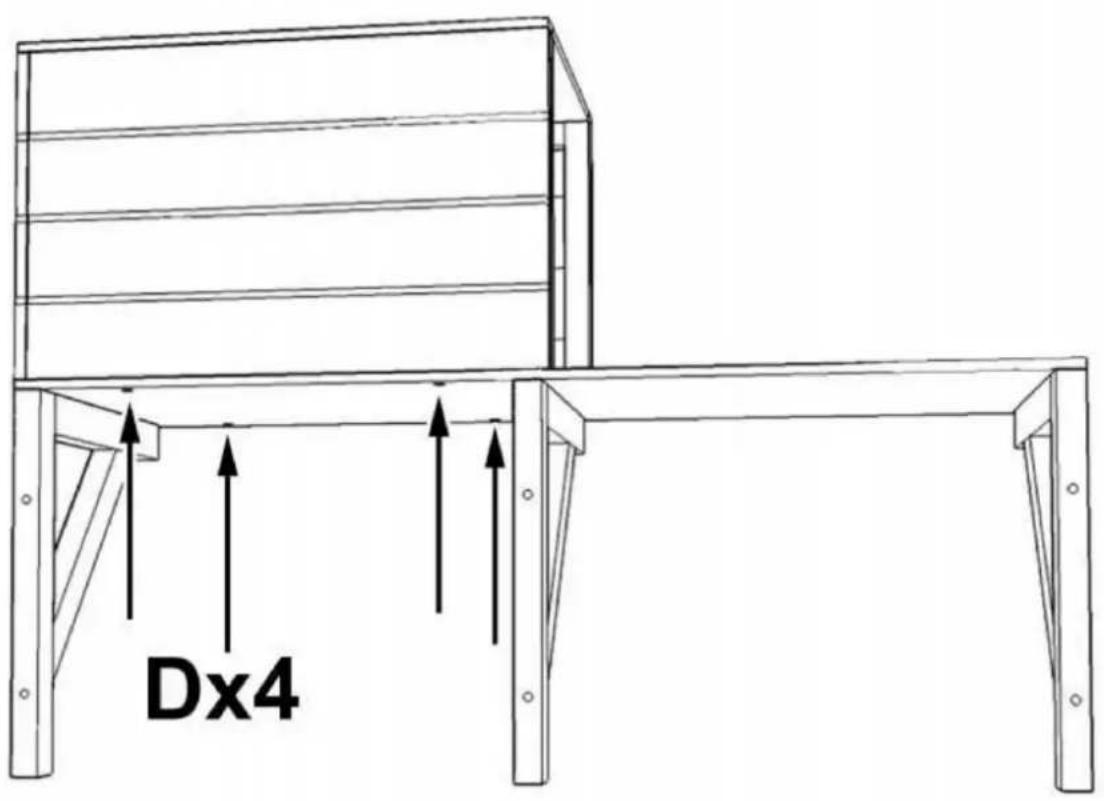
text_image
Dx4STEP:9
Assemble shelf with part #12 and part #10x3 with screw (D)x6 as shown
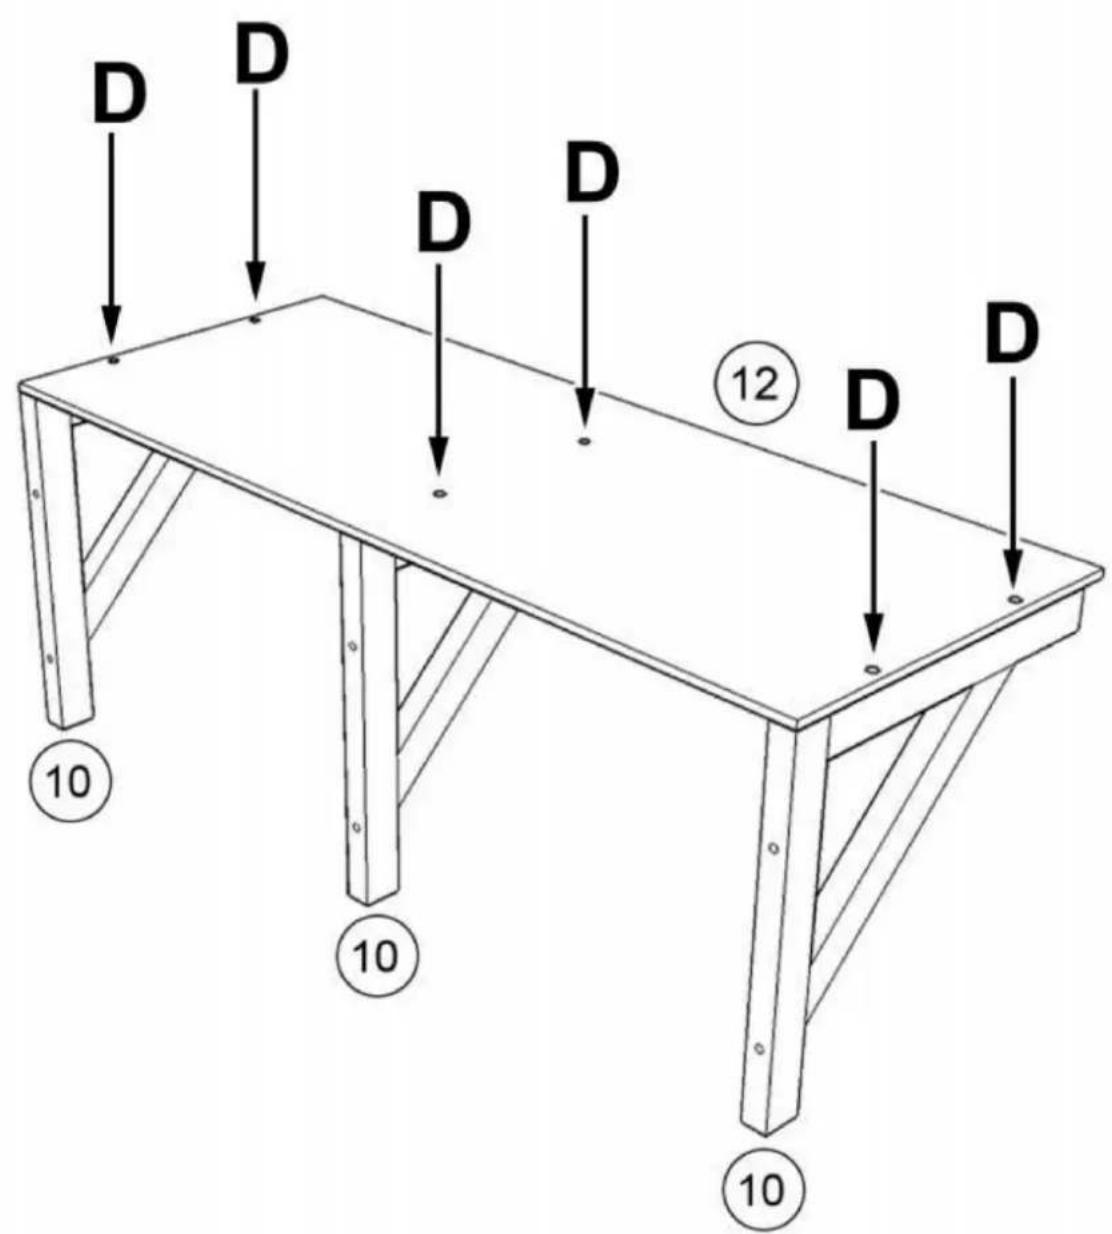
text_image
D D D D D ⑫⑫ D D 10 10 10STEP:10
Requires two people to install the shelves at designated position, one person is inside the cage holding the shelf while the other person is outside locking the screws through the pre-drilled holes as shown
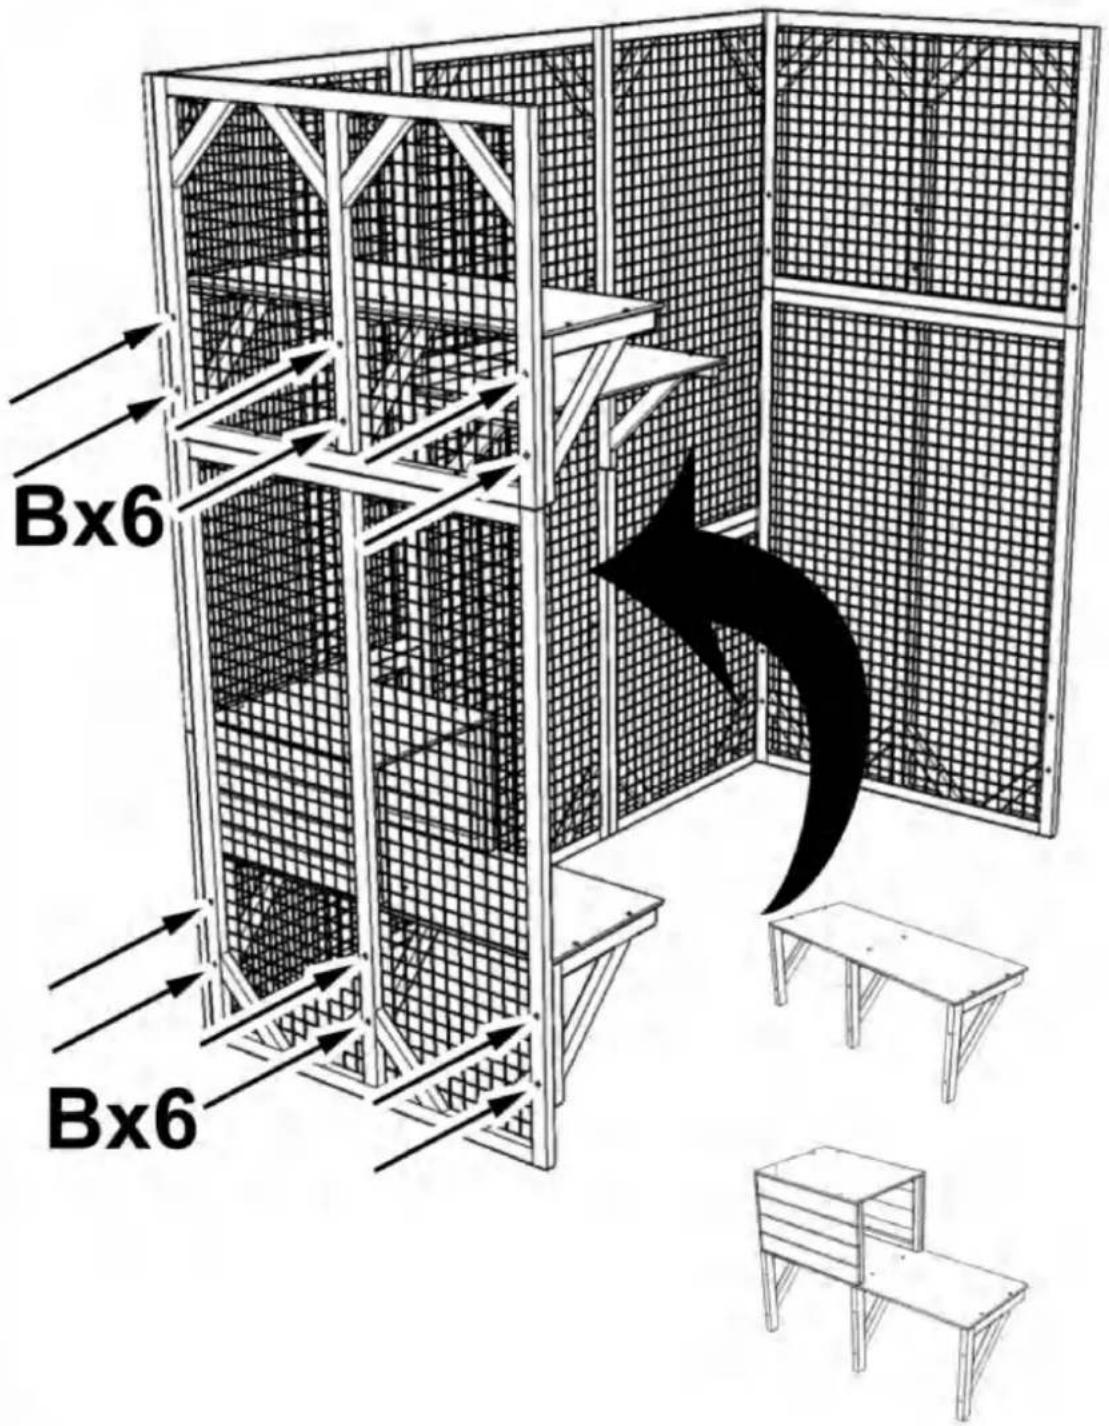
text_image
Bx6 Bx6STEP:11
Requires two people to install the shelves at designated position, one person is inside the cage holding the shelf while the other person is outside locking the screws through the pre-drilled holes as shown
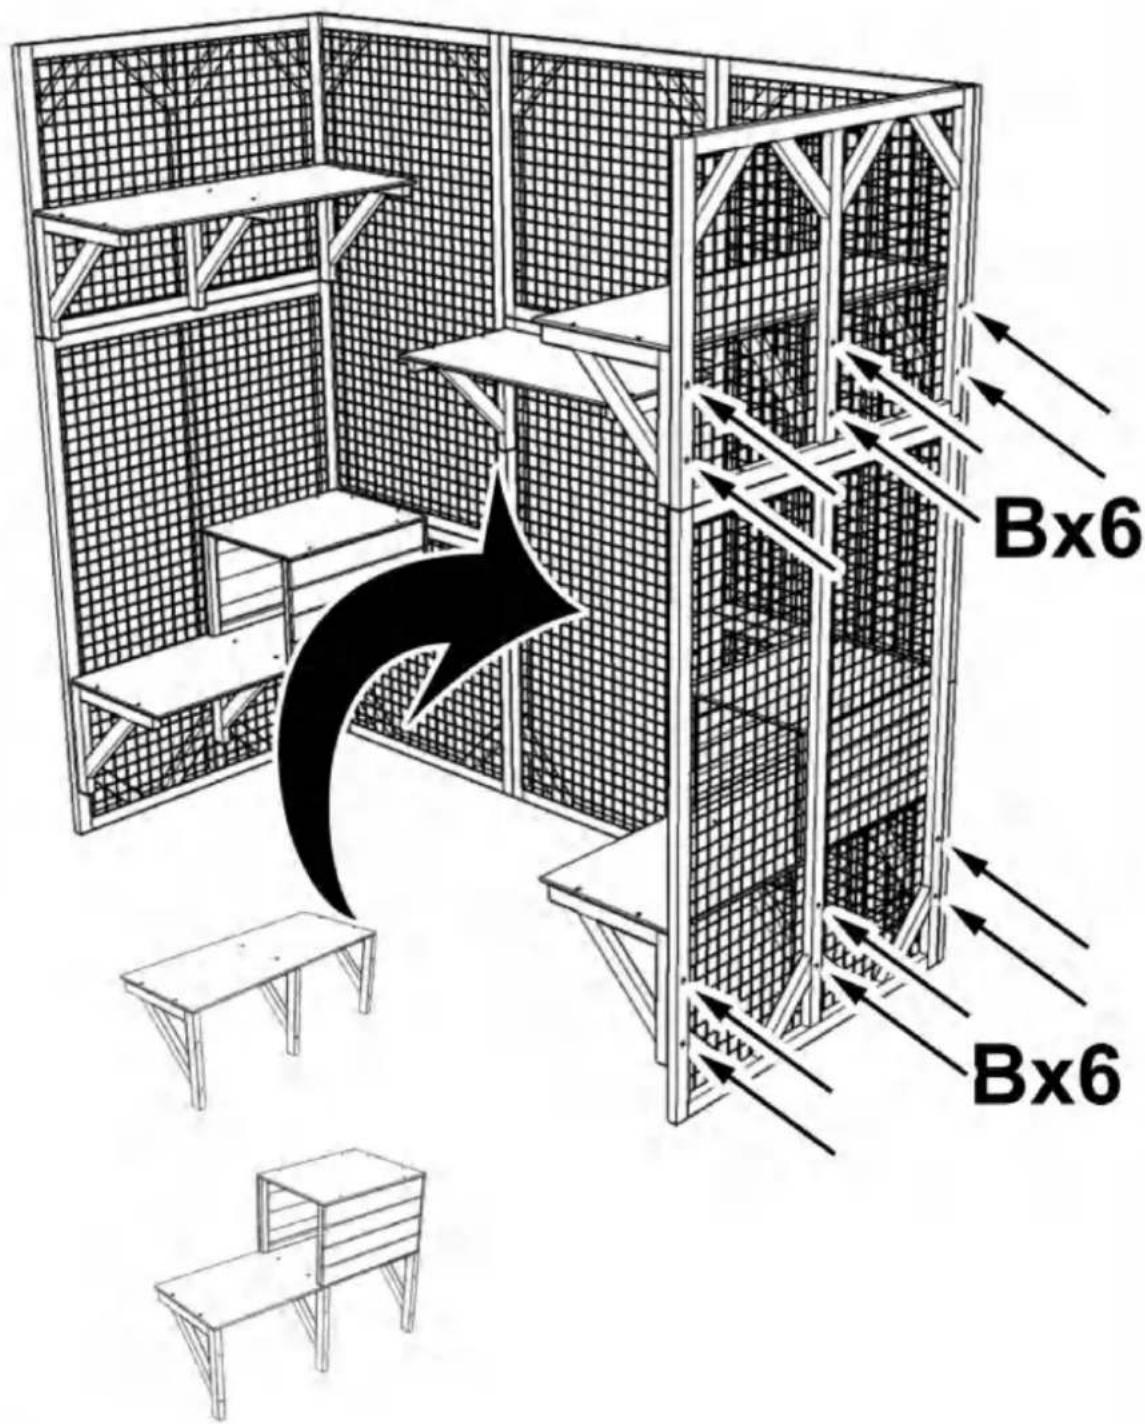
text_image
Bx6 Bx6STEP:12
Assemble part #1 and #5, part #3 and #7 with screw (B) x12 as shown, please pay attention to the up and bottom orientation of part #1 and #3, the end with 2 pre-drilled holes is bottom as shown in the figure, then secure part #1 to part #5 with screw (A)x2 downwards
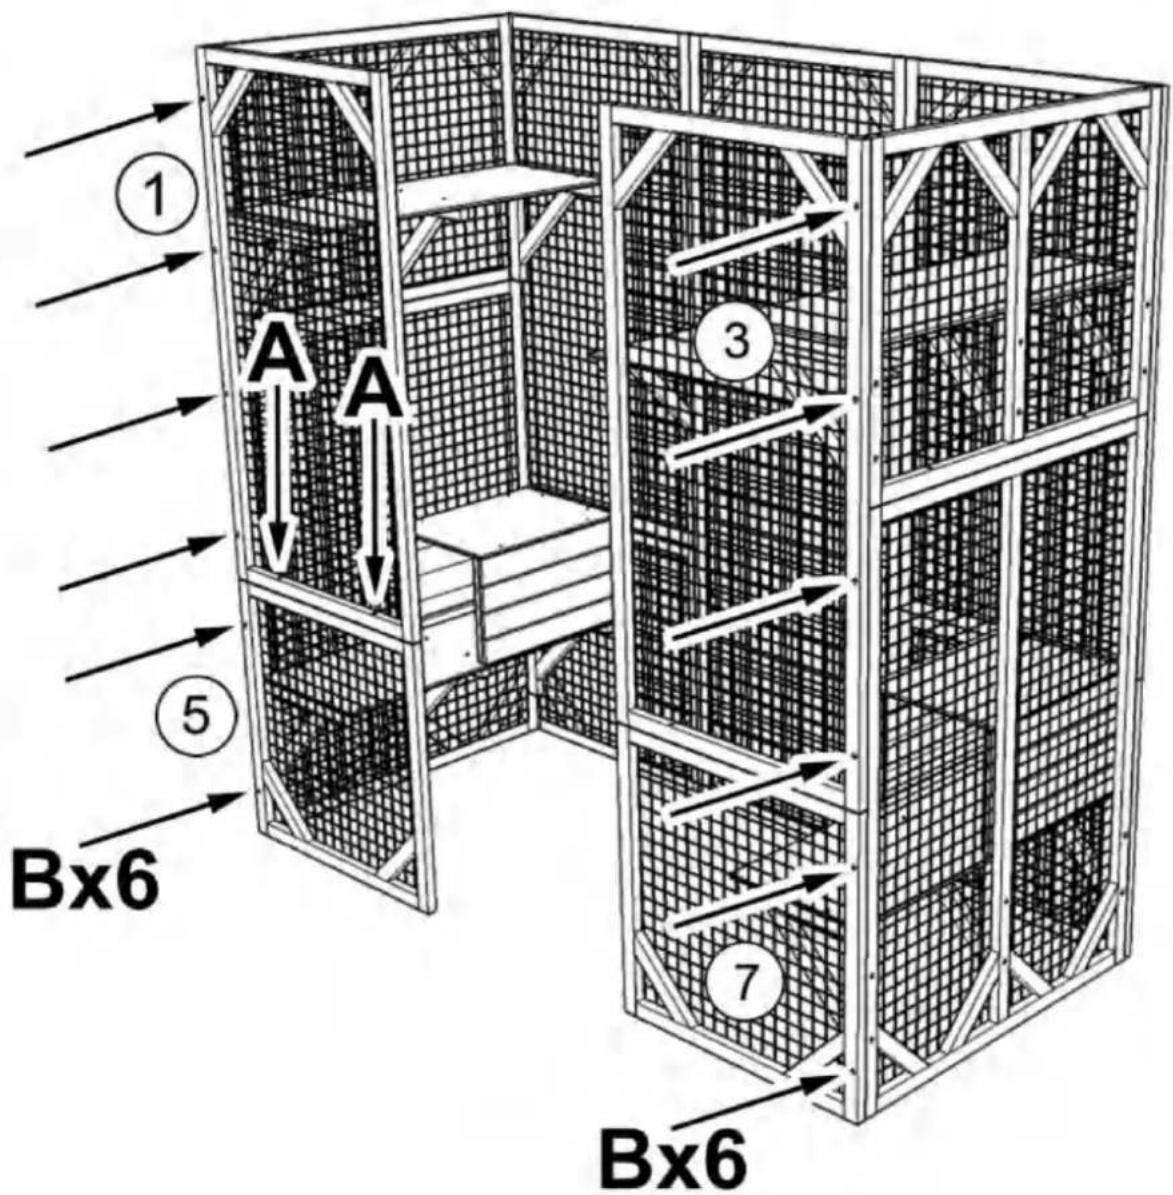
text_image
① A A ⑤ Bx6 ③ 7 Bx6STEP:13
Secure part #3 to part #7 with screw (A)x2 downwards, then assemble part #2 and part #6 (open the doors) with screw (A) x6 as shown
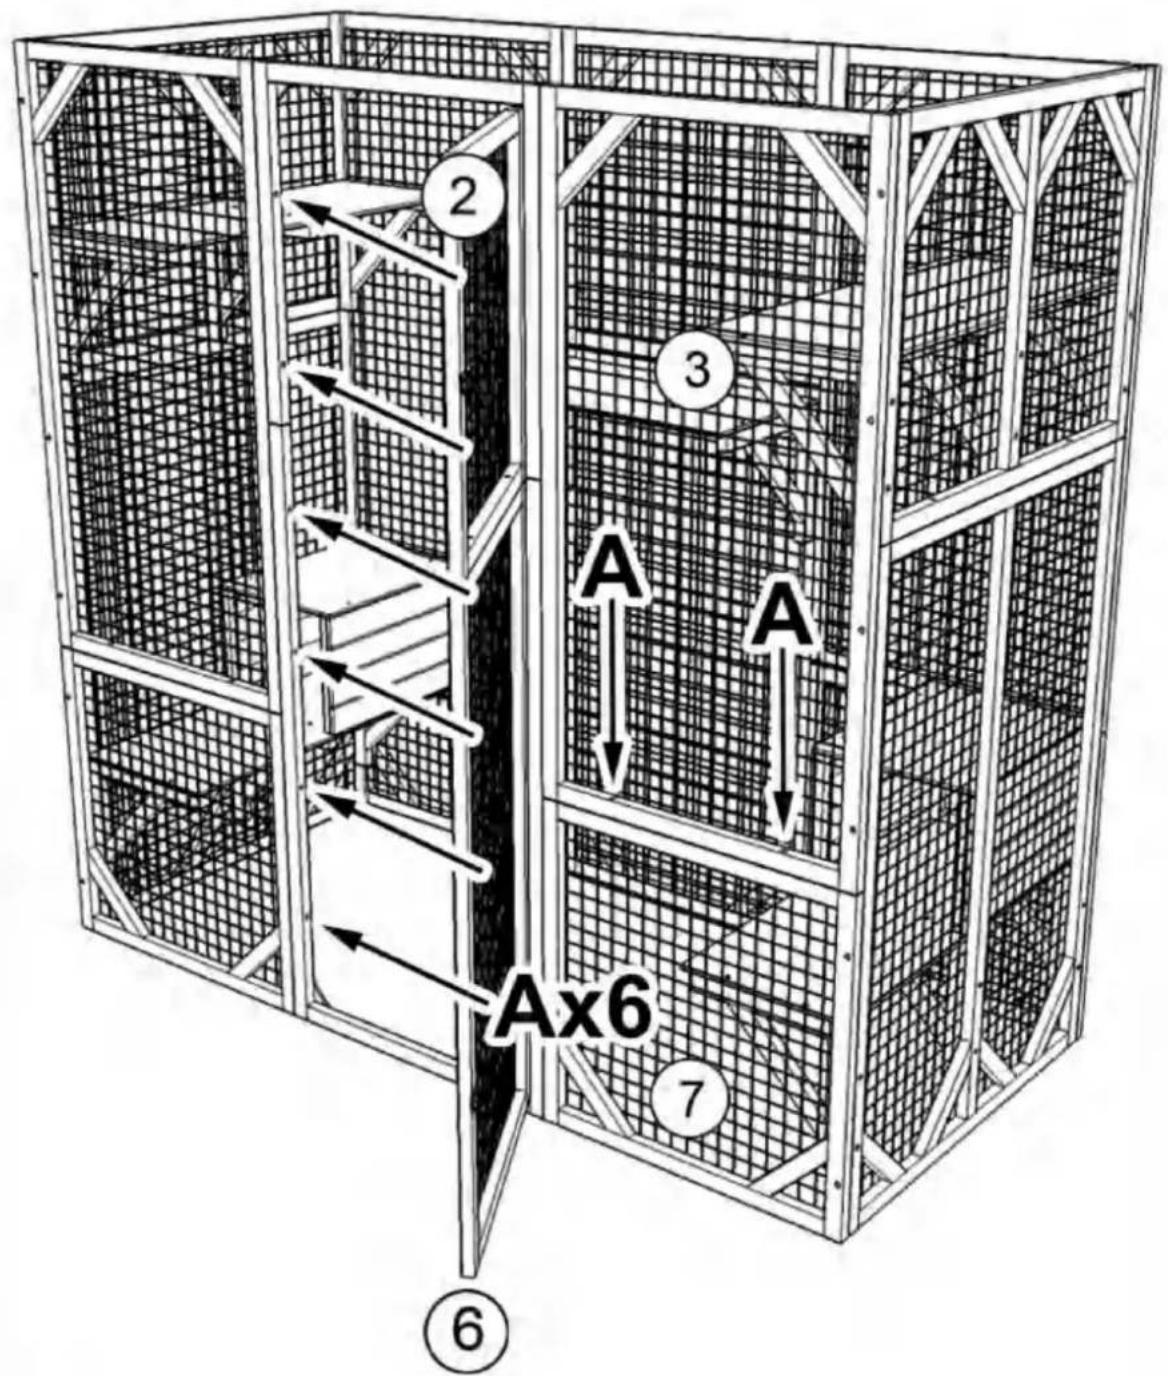
text_image
2 3 A A Ax6 7 ⑥STEP:14
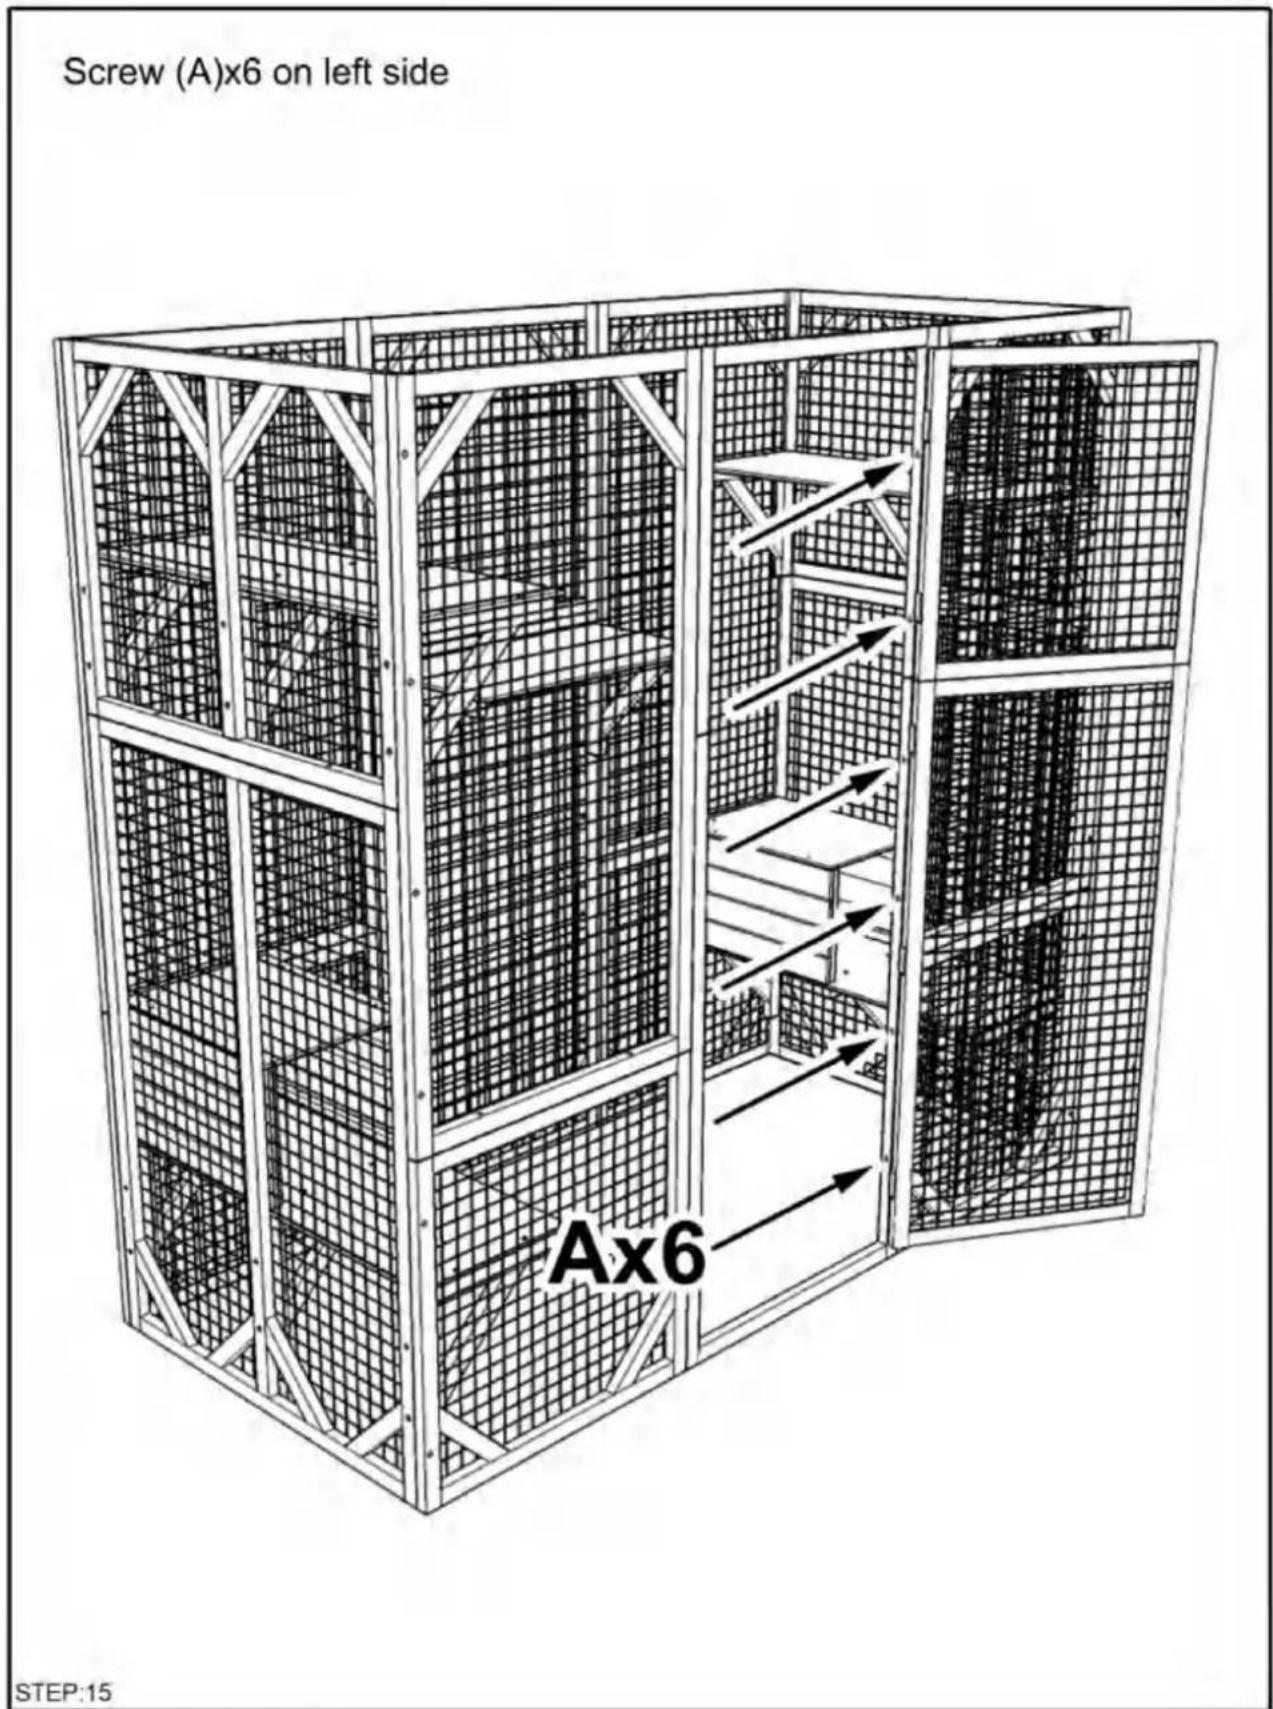
text_image
Screw (A)x6 on left side Ax6 STEP:15Align the short end of lock part #F with its other part already on door then secure it with screws (E)x2, secure part #2 to part #6 with screw (A)x2 downwards
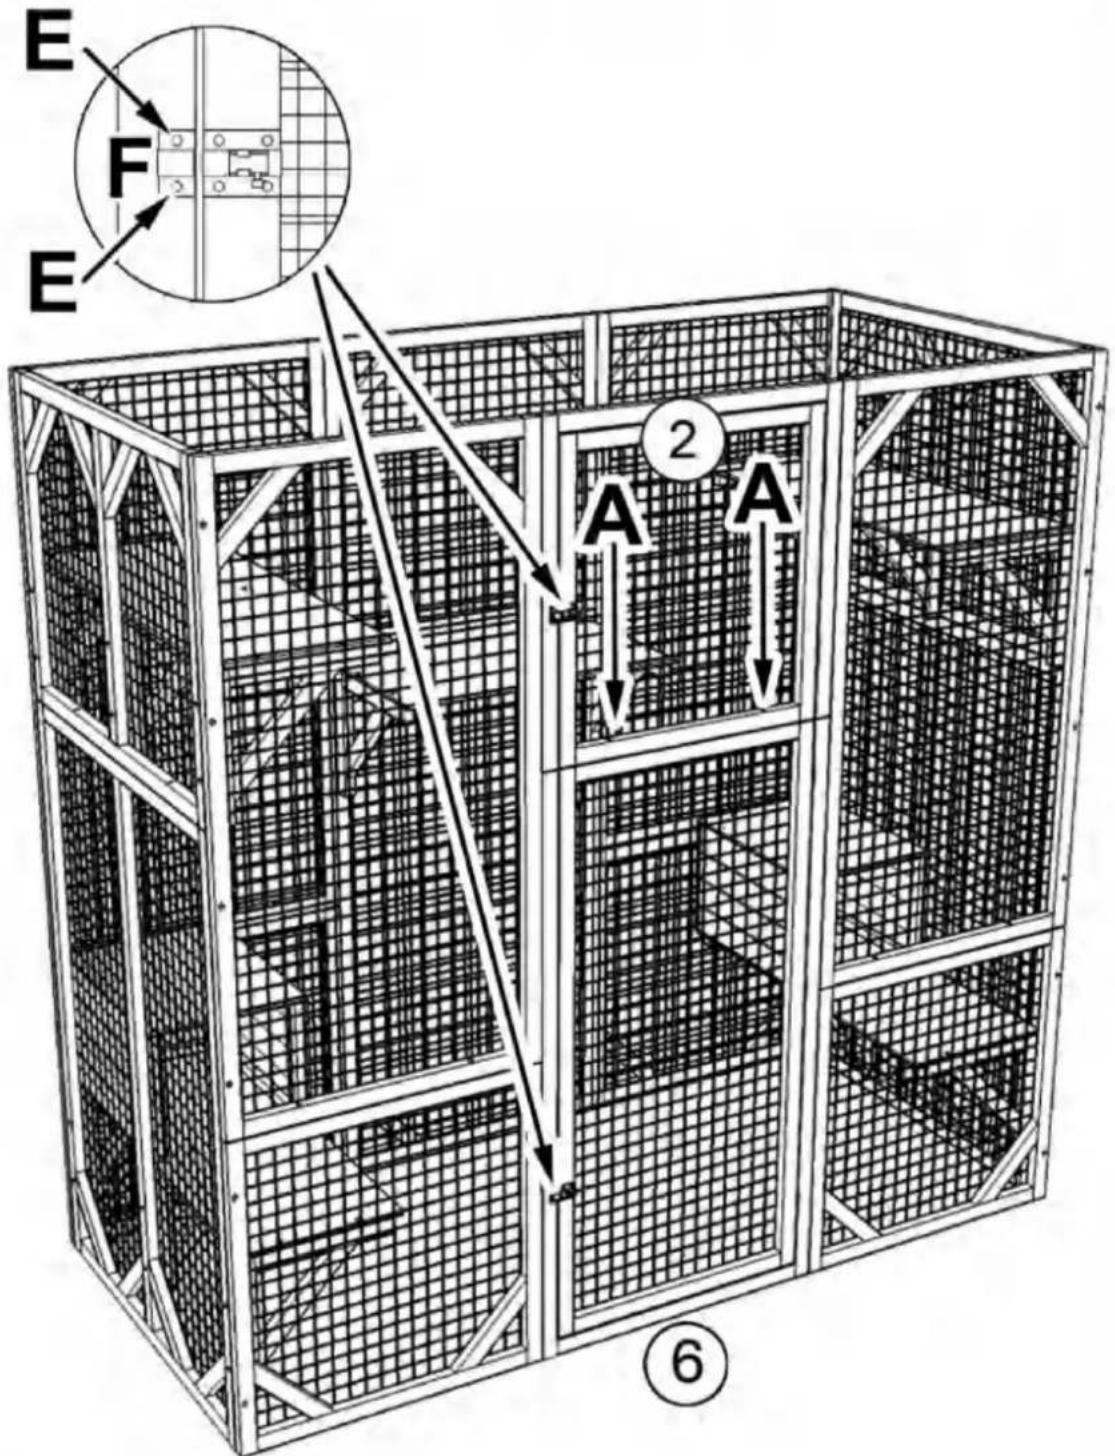
text_image
E F E 2 A A ⑥STEP:16
Install roofs with screw (C)x16 as shown, please be noted the edge of roof is 1.57 inch from the house underneath
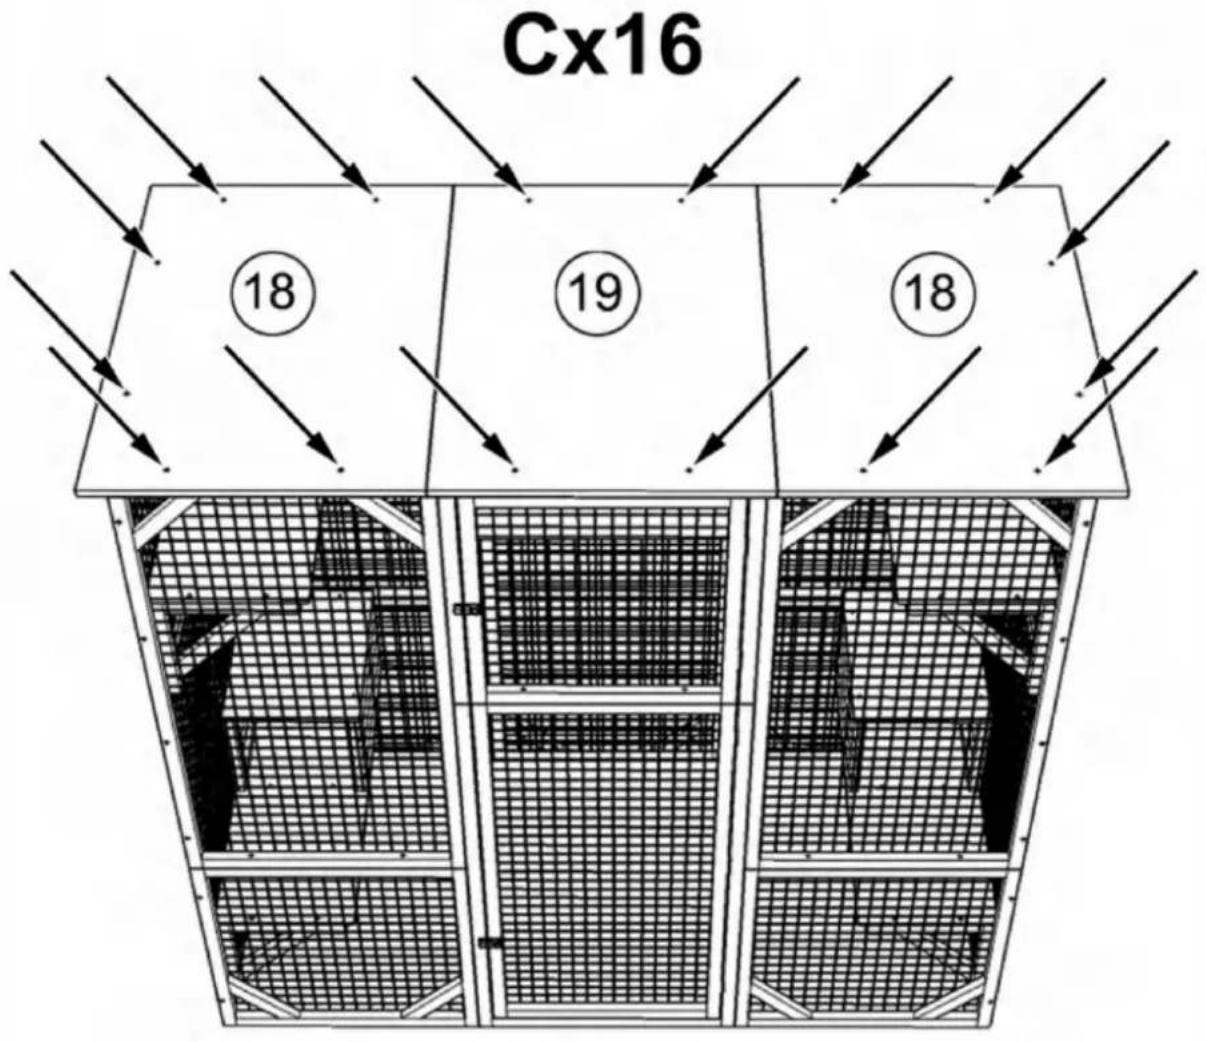
text_image
Cx16 18 19 18STEP:17
Install part #20x2 with screw (D)x12 as shown to cover the gap between roofs
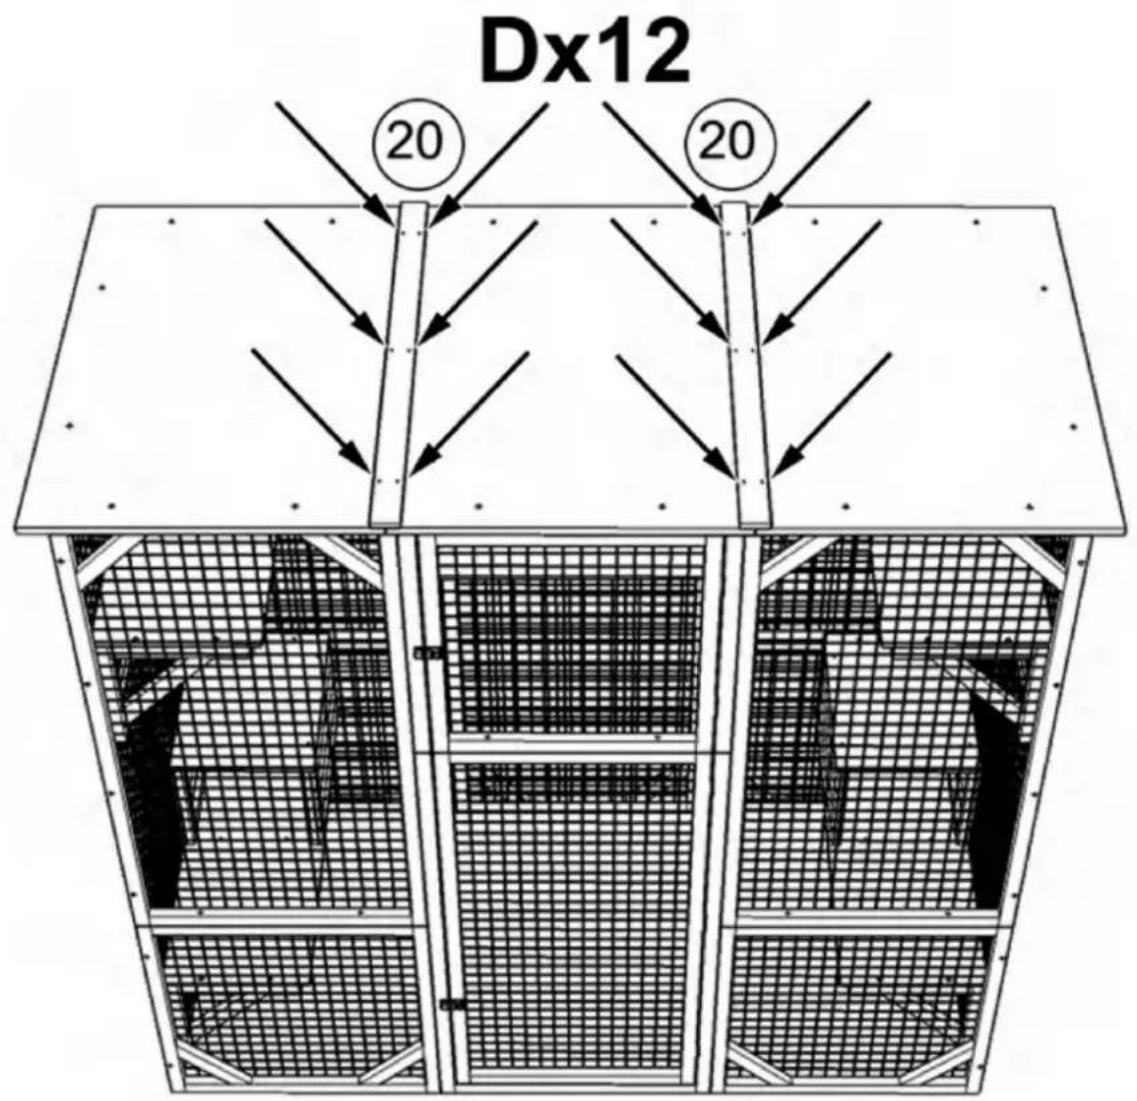
text_image
Dx12 20 20STEP:18
Unfold the tarp and cover it
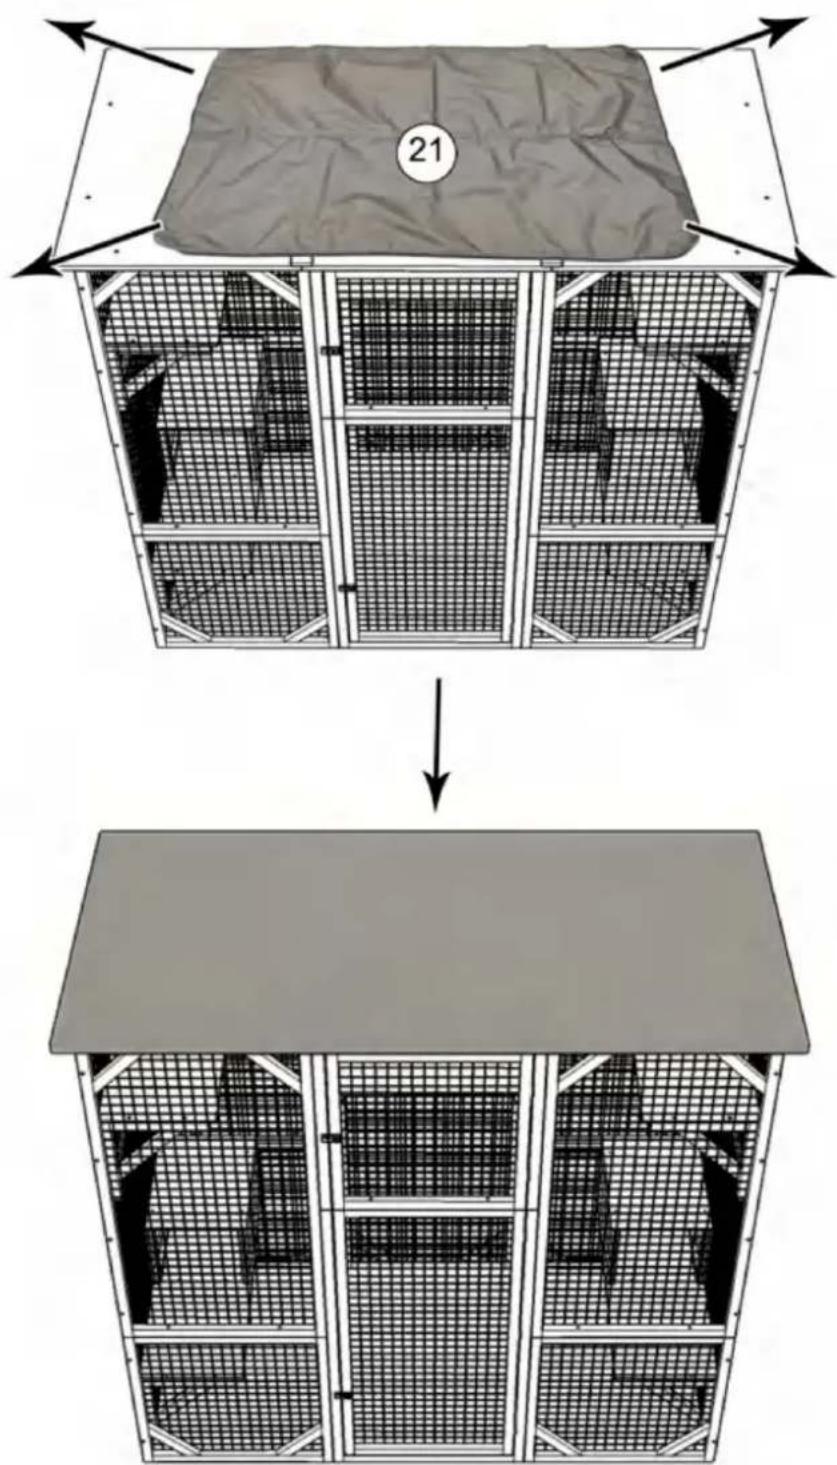
text_image
21STEP:19
Shuangchenglu 803nong11hao1602A-1609shi, baoshanqu, shanghai 200000 CN.
| EC | REP |
E-CrossStu GmbH.
Mainzer Landstr.69, 60329
Frankfurt am Main.
| UK | REP |
YH CONSULTING LIMITED.
C/O YH Consulting Limited Office
147, Centurion House, London Road,
Staines-upon-Thames, Surrey, TW18 4AX
Importerad till USA: Sanven Technology Ltd., Suite 250, 9166 Anaheim Place, Rancho Cucamonga, CA 91730
Machine Translated by Google
VEVOR®
TOUGH TOOLS, HALF PRICE
Technical Support and E-Warranty Certificate
www.vevor.com/support
VEVOR®
TOUGH TOOLS, HALF PRICE
Technical Support and E-Warranty Certificate www.vevor.com/support
INSTRUCTION FOR CAT CAGE
MODEL:CH448
natural_image
Line drawing of a multi-level cage structure with internal mesh compartments (no text or symbols)NEED HELP? CONTACT US!
Have product questions? Need technical support? Please feel free to contact us:
This is the original instruction, please read all manual instructions carefully before operating. VEVOR reserves a clear interpretation of our user manual. The appearance of the product shall be subject to the product you received. Please forgive us that we won't inform you again if there are any technology or software updates on our product.
WARNING:
Read this material before using this product. Failure to do so can result in serious injury.
Assembly precautions
- Assemble only according to these instructions. Improper assembly can create hazards.
- In order to ensure your own safety, please make sure to ANSI-approved safety goggles and heavy-duty work gloves when installing this product.
- Keep the assembly area clean and well lit.
- Keep bystanders out of the area during assembly.
- Do not assemble when tired or when under the influence of alcohol, drugs or medication.
- Product capabilities apply to properly and completely assembled product only.
- Assemble on a flat, level, hard and smooth surface capable of safely supporting a fully loaded cat cage.
Use precautions
TO PREVENT SERIOUS INJURY AND DEATH FROM TIPPING:
- DO NOT SIT OR STAND ON THIS ITEM.
- This product is not a toy. Do not allow children to play with or near this item.
Please keep small spare parts out of children's reach. - Use only on a flat, level, hard and smooth surface capable of safely supporting a fully loaded cat cage.
- Use as intended only.
- Inspect before every use; do not use if parts are loose or damaged.
SAVE THESE INSTRUCTIONS
SPECIFICATIONS
| Model | CH448 |
| Product Size | 1800*880*1690mm |
| Color | Gray |
COMPONENTS
Notice:
- Various specifications of screws are used in the installation of this product. Pay attention to the correct use of screw specifications according to the instruction manual.
- Please wear gloves when installing.
text_image
SCREWS A 3.5x50 (40+4pcs) B 3.5x40 (52+4pcs) C 3.0x30 (16+2pcs) D 3.0x22 (68+4pcs) E 3.0x14 (4+2pcs) F (2pcs) (2pcs) ①x2 ② ③x2 ④ ⑤x2 ⑥ ⑦x2 ⑧ ⑨x2 ⑩x14 ⑪x2 ⑫x2 ⑬x2 ⑭x2 ⑮x2 ⑯ ⑰x2 ⑱ ⑲x2 ⑳ ㉑ ㉒ ㉓ ㉔ ㉕ ㉖ ㉗ ㉘ ㉙ ㉚ ㉛ ㉜ ㉝ ㉞ ㉟ ㉳ ㉴ ㉵ ㉶ ㉷ ㉸ ㉹ ㉺ ㉚ ㉛ ㉜ ㉝ ㉞ ㉟ ㉟x2Assembly Instructions
Please be noted that the side with wire nailed on is back side, should be inward when assembly
Pay attention to the up and bottom orientation of part #9 and part #1, the end with 2 pre-drilled holes is bottom as shown in the figure Assembling part #1, #5, #9, #16 with screw (B)x6 as shown, then secure part #9 to part #16 with screw (A)x2 downwards
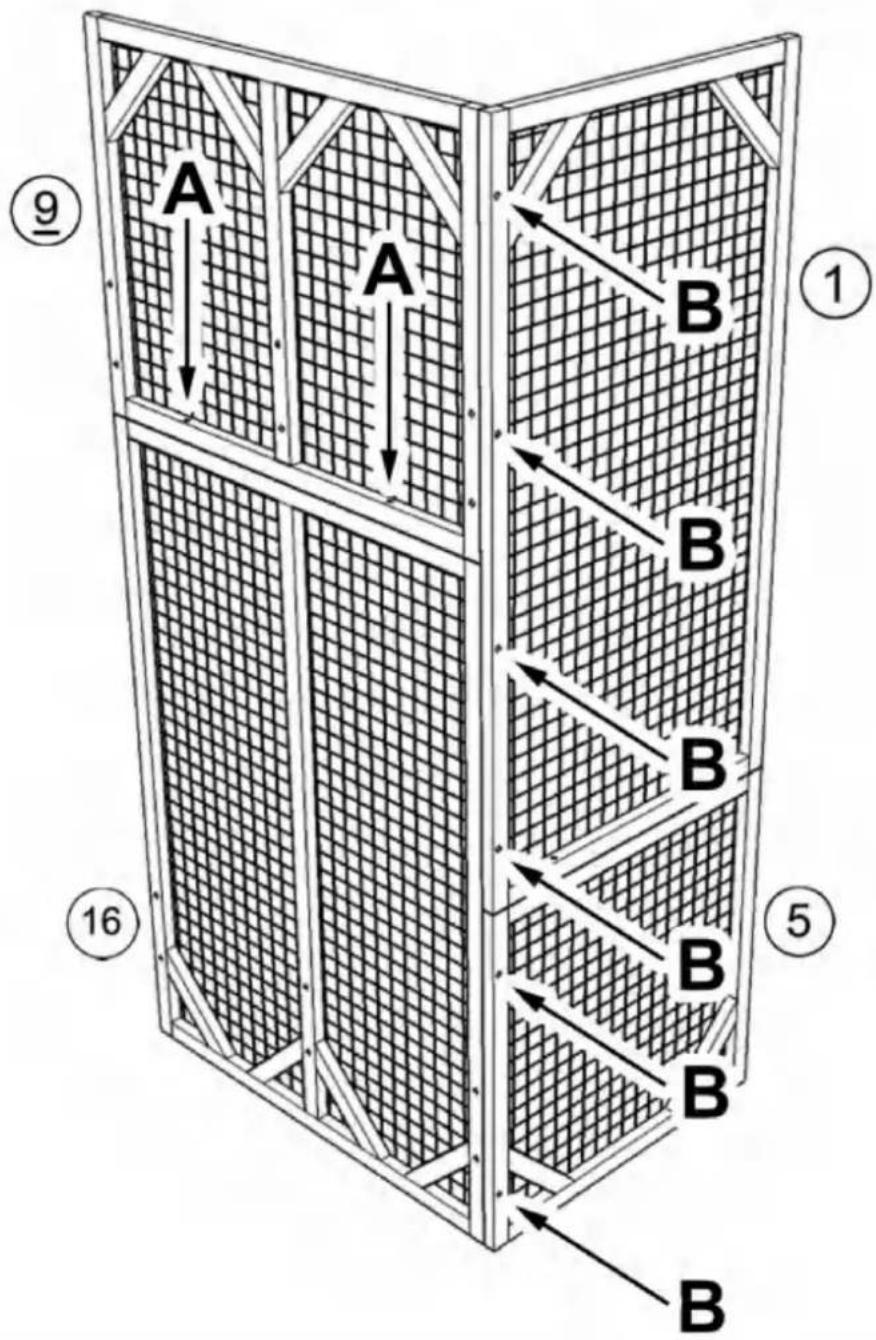
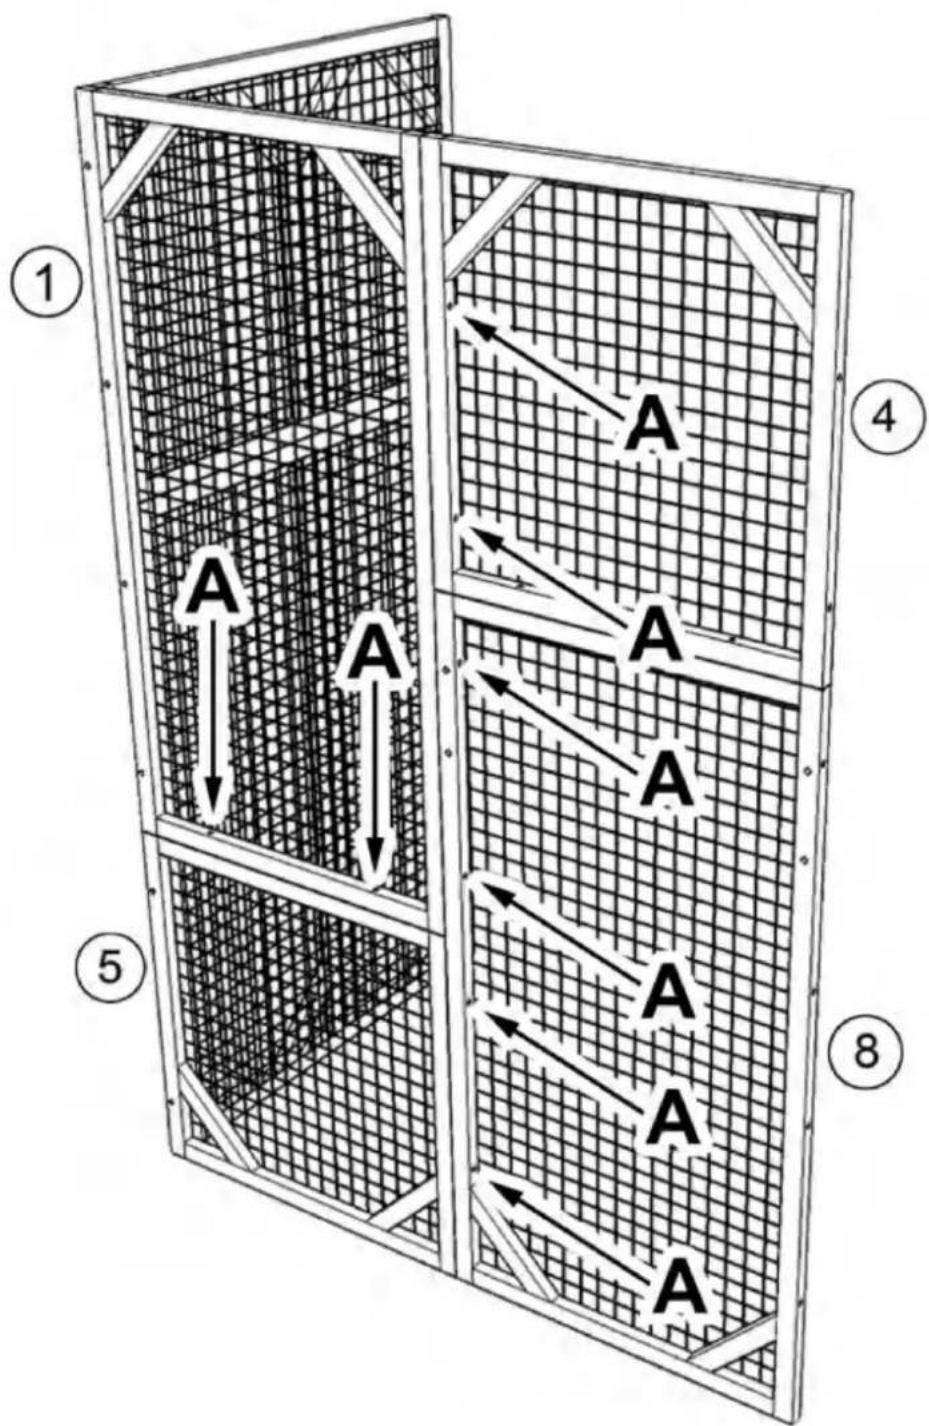
Secure part #1 to part #5 with screw (A)x2 downwards, then assemble part #4 and part #8 with screw (A) x6 as shown, please pay attention to the up and bottom orientation of part #4, the end with 2 pre-drilled holes is bottom as shown in the figure
text_image
A A A A A A A A A 1 4 5 8STEP:2
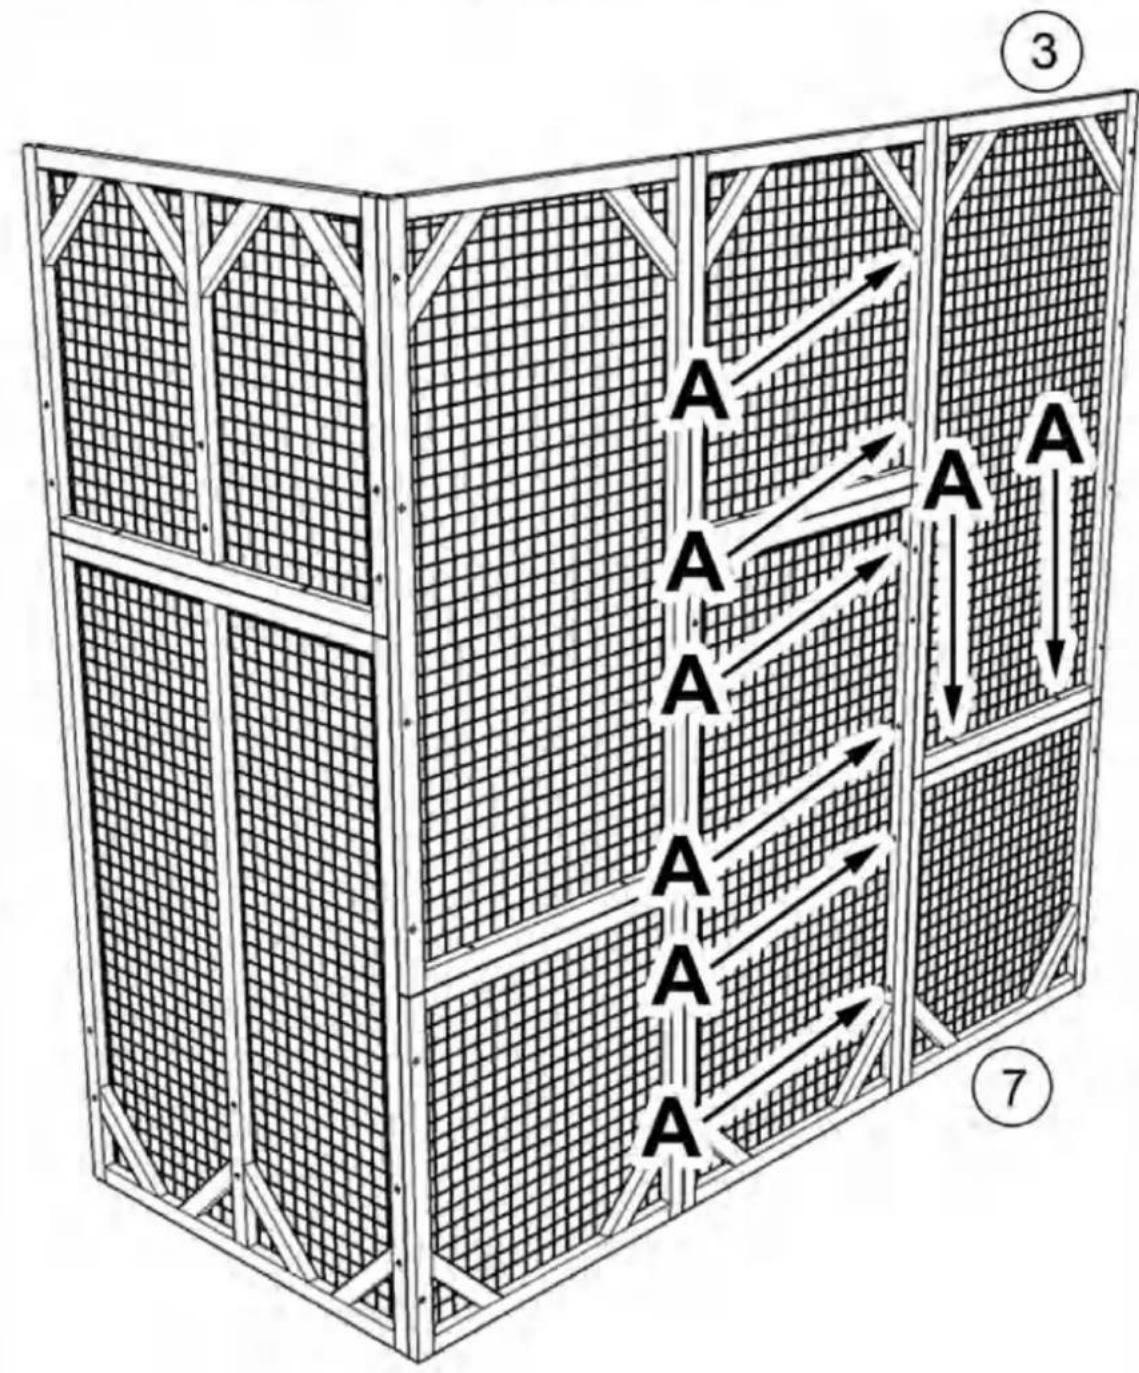
Assemble part #3 and part #7 with screw (A) x6 as shown, please pay attention to the up and bottom orientation of part #3, the end with 2 pre-drilled holes is bottom as shown in the figure, then secure part #3 to part #7 with screw (A)x2 downwards
flowchart
graph TD
    A1["A"] --> B1["A"]
    A2["A"] --> B2["A"]
    A3["A"] --> B3["A"]
    A4["A"] --> B4["A"]
    A5["A"] --> B5["A"]
    A6["A"] --> B6["A"]
    A7["A"] --> B7["A"]
    style A1 fill:#f9f,stroke:#333
    style A2 fill:#f9f,stroke:#333
    style A3 fill:#f9f,stroke:#333
    style A4 fill:#f9f,stroke:#333
    style A5 fill:#f9f,stroke:#333
    style A6 fill:#f9f,stroke:#333
    style A7 fill:#f9f,stroke:#333
STEP:3
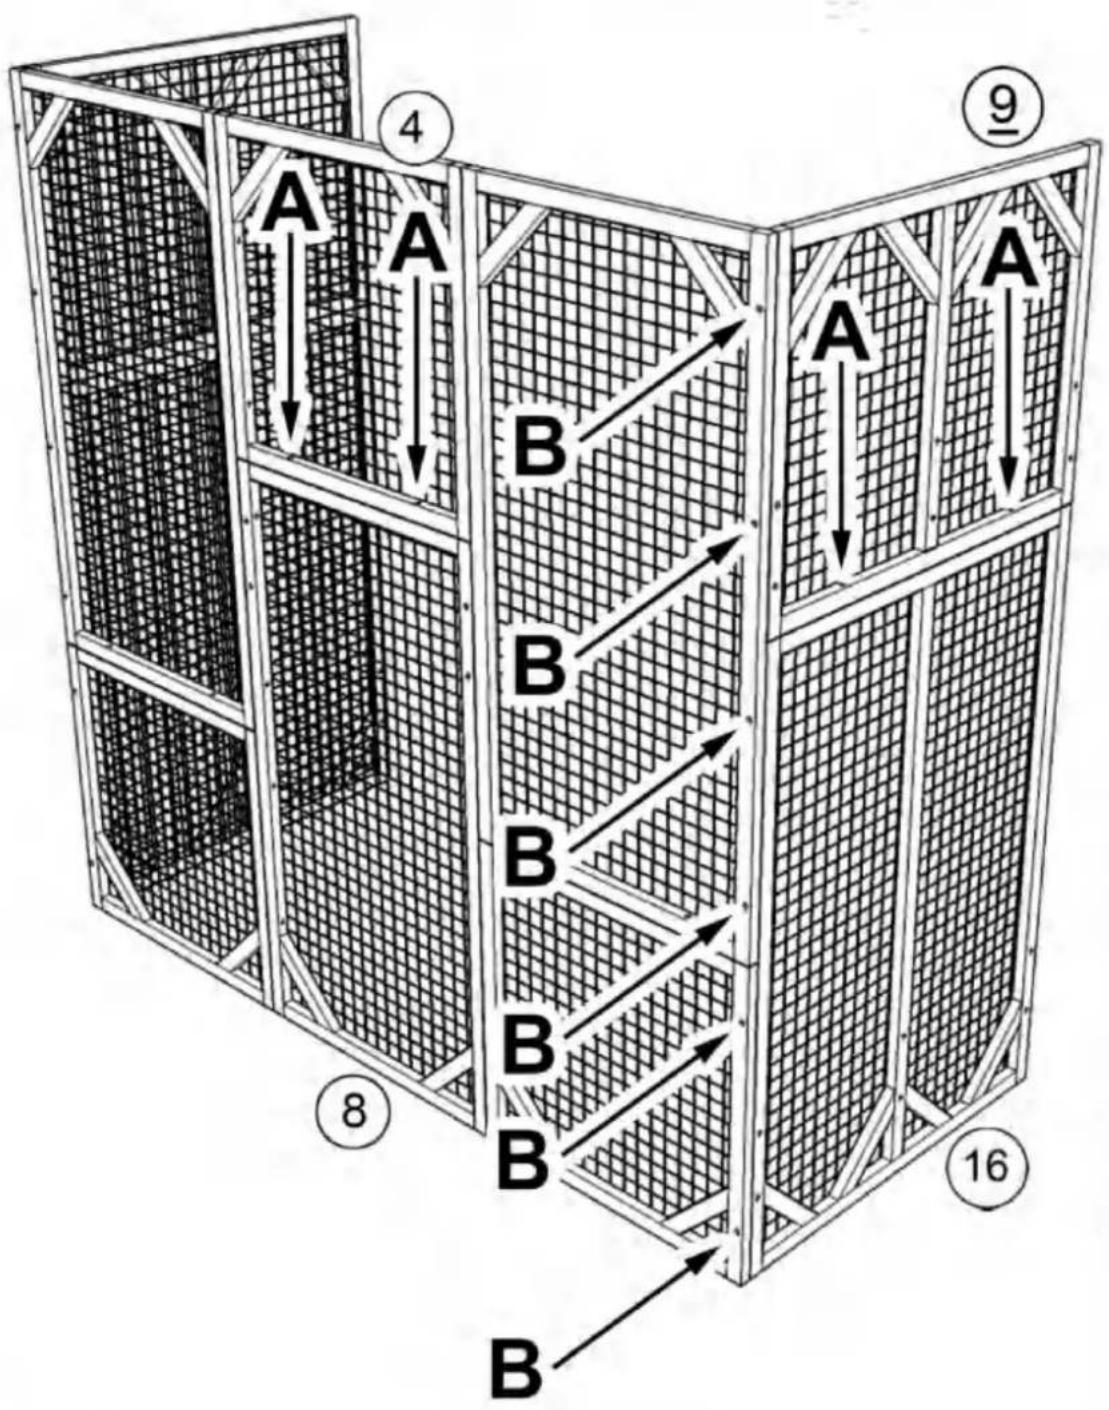
Secure part #4 to part #8 with screw (A)x2 downwards, then assemble part #9 and part #16 with screw (B) x6 as shown, please pay attention to the up and bottom orientation of part #9, the end with 2 pre-drilled holes is bottom as shown, then secure part #9 to part #16 with screw (A)x2 downwards
Assemble shelf with part #17 and part #10x2 with screw (D)x4 as shown
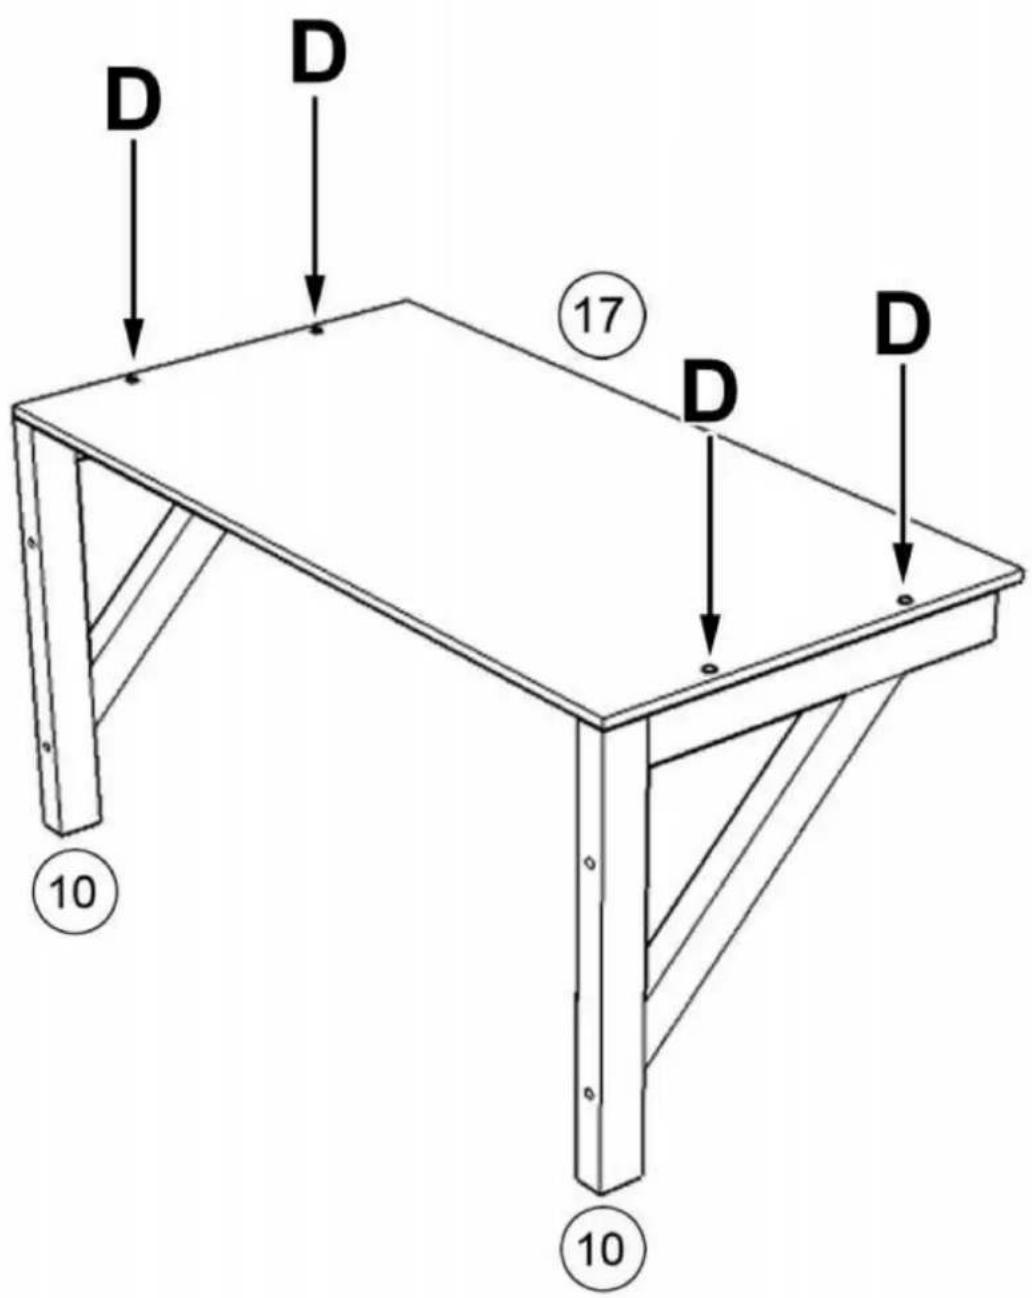
text_image
D D 17 D D 10 10STEP:5
Requires two people to install the shelf at designated position, one person is inside the cage holding the shelf while the other person is outside locking the screws through the pre-drilled holes as shown.
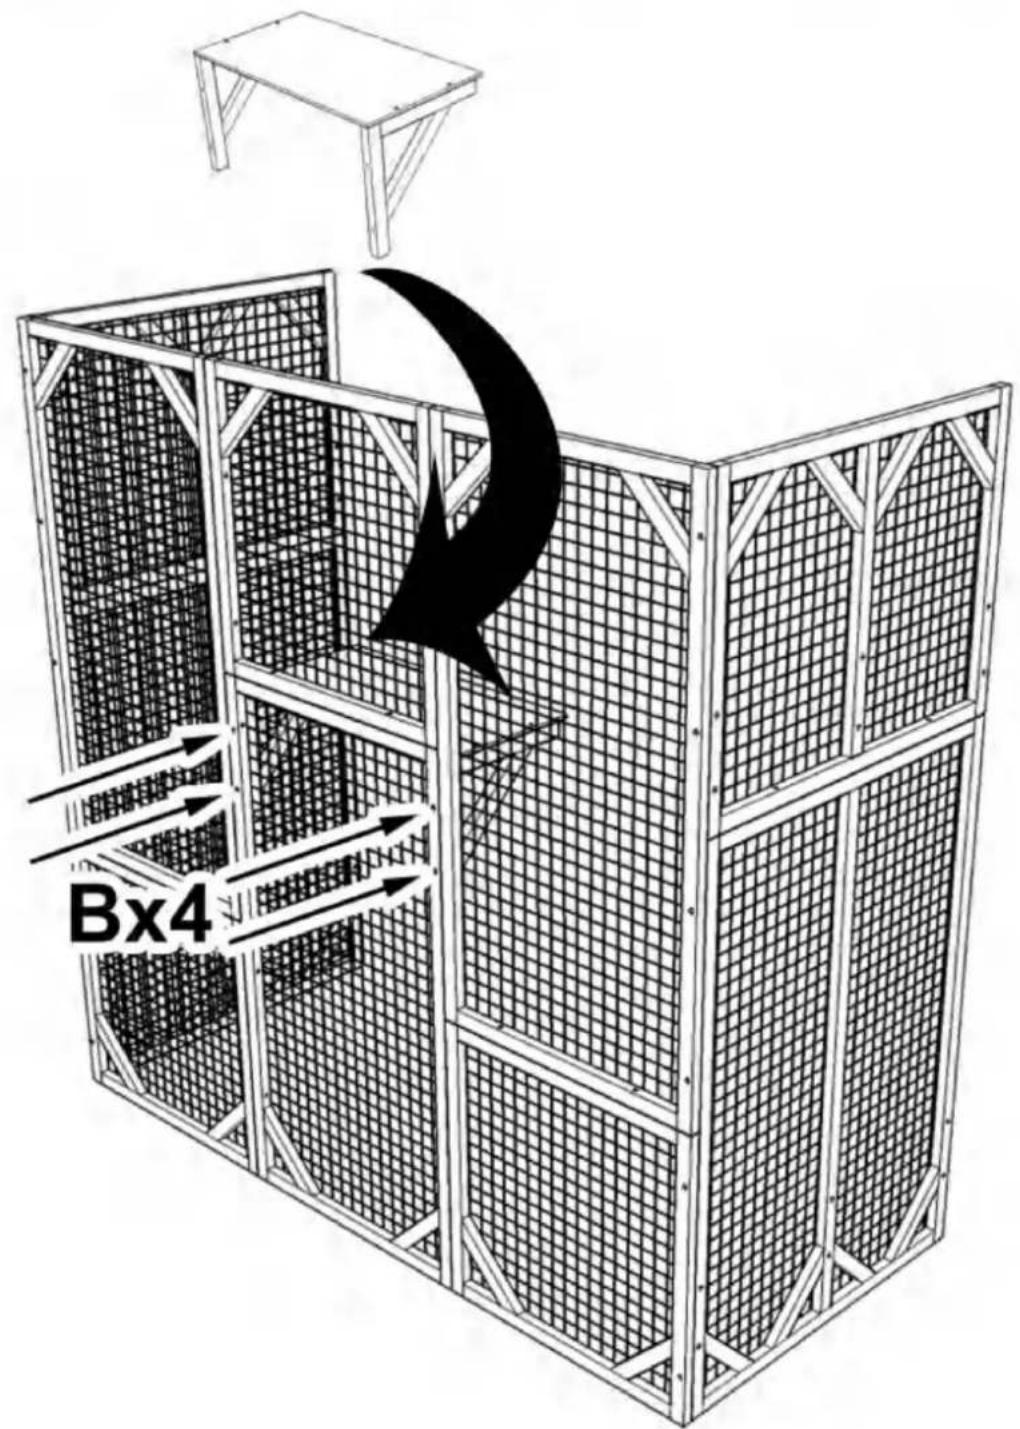
text_image
Bx4STEP:6
Assemble shelf with part #11 and part #10x3 with screw (D)x6 as shown
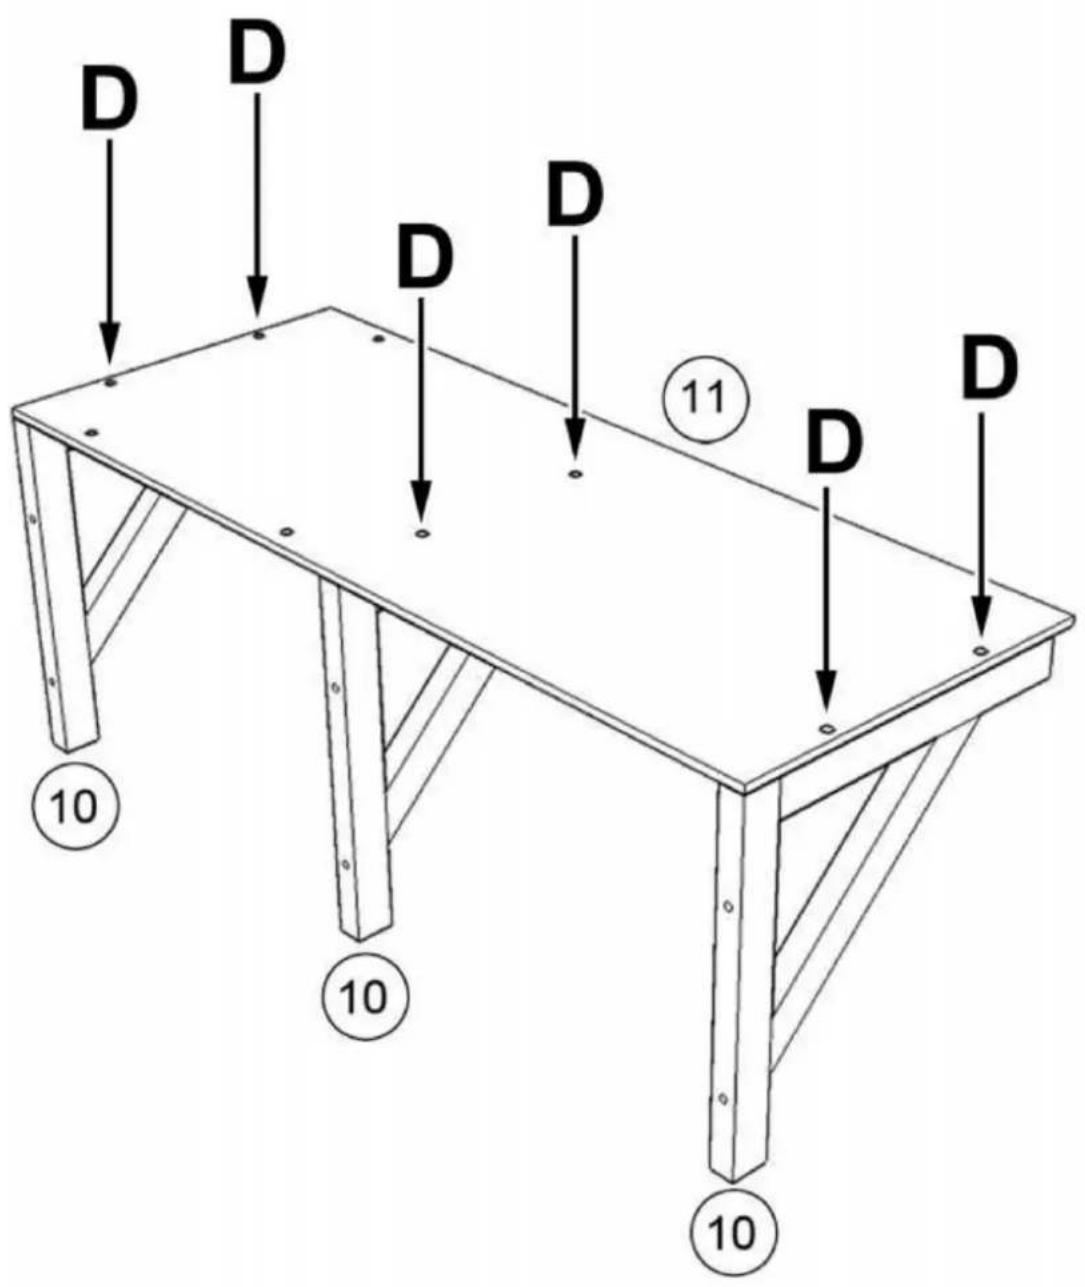
text_image
D D D D D 11 D D 10 10 10STEP:7
Assemble sleeping box with part #13, #14x2, #15 using screw (D)x10
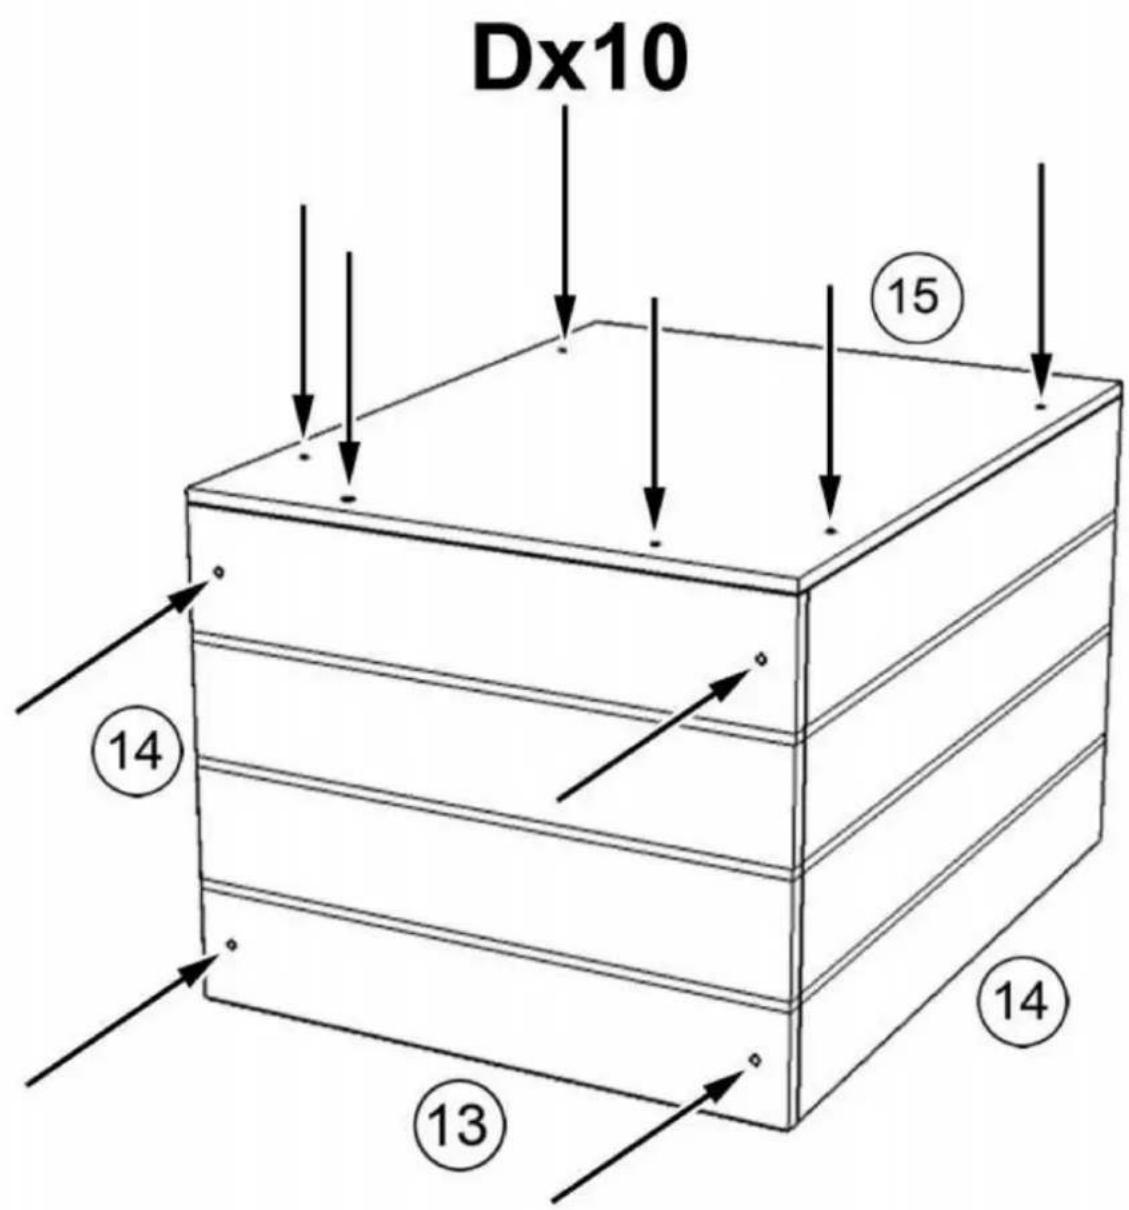
text_image
Dx10 15 14 13 14STEP:8
Install sleeping box on shelf as shown and secure the box with screw (D)x4 from the bottom
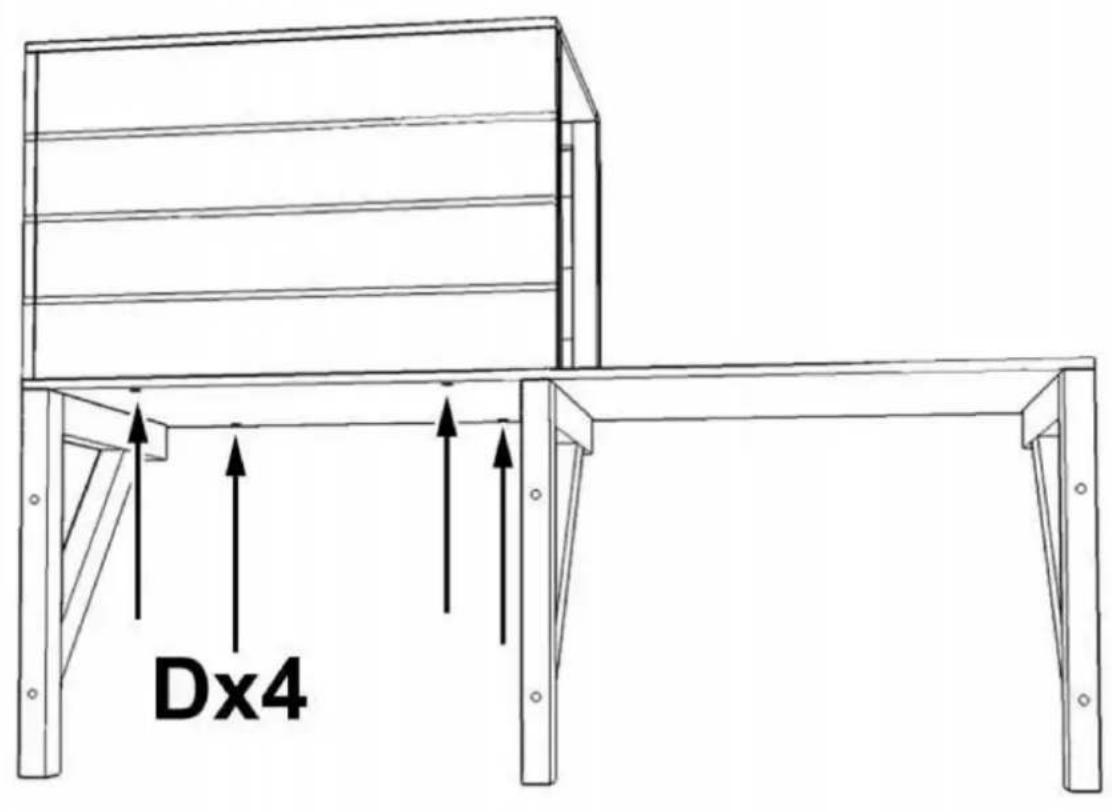
text_image
Dx4STEP:9
Assemble shelf with part #12 and part #10x3 with screw (D)x6 as shown
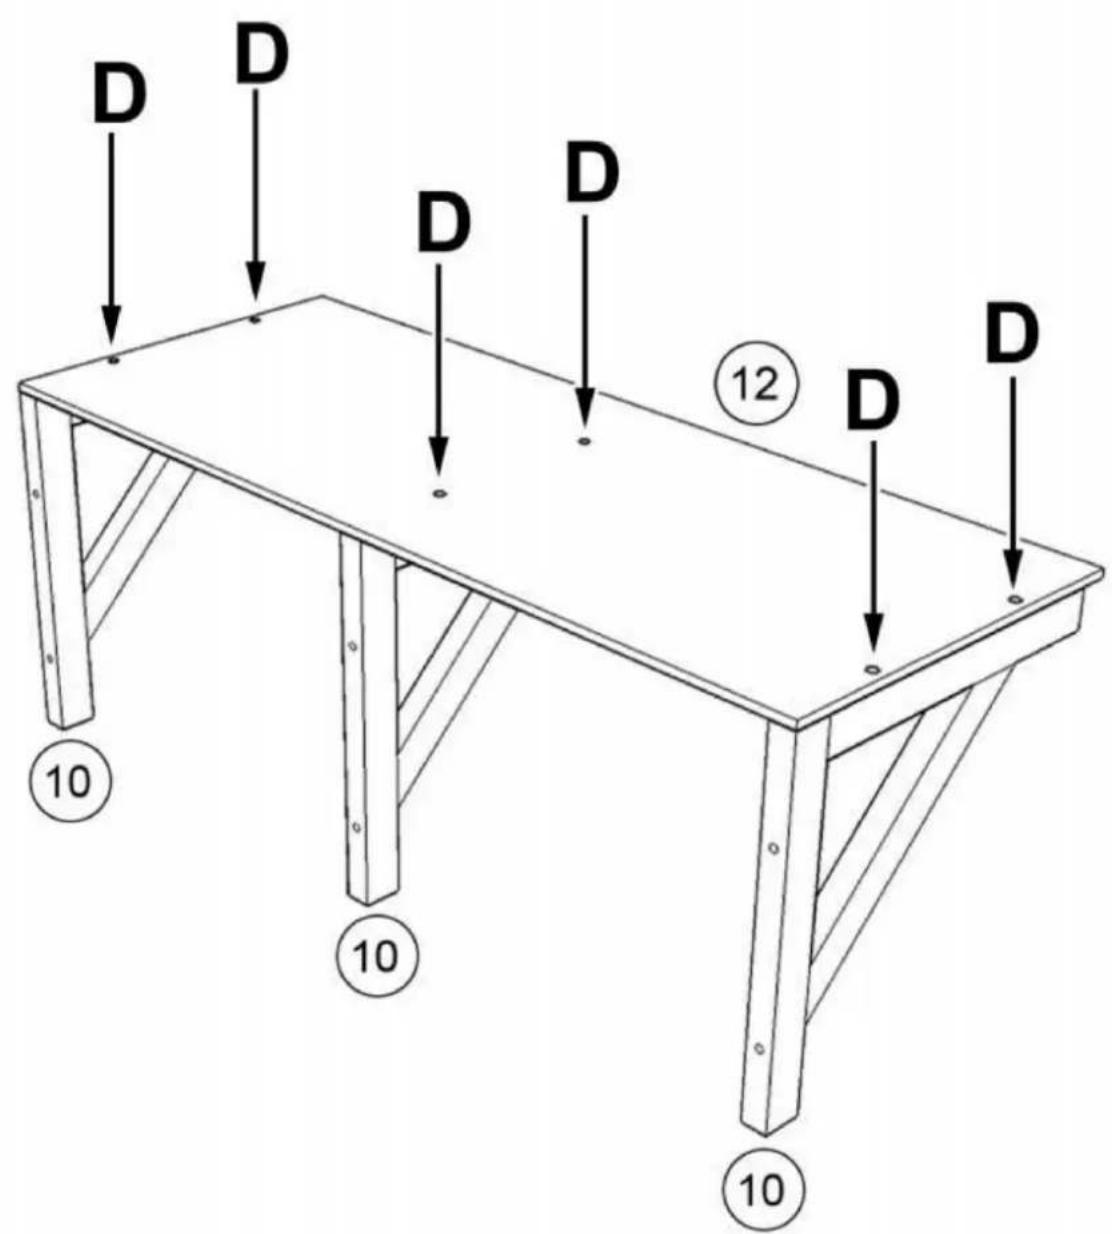
text_image
D D D D D ⑫⑫ D D ⑩ ⑩ ⑩STEP:10
Requires two people to install the shelves at designated position, one person is inside the cage holding the shelf while the other person is outside locking the screws through the pre-drilled holes as shown
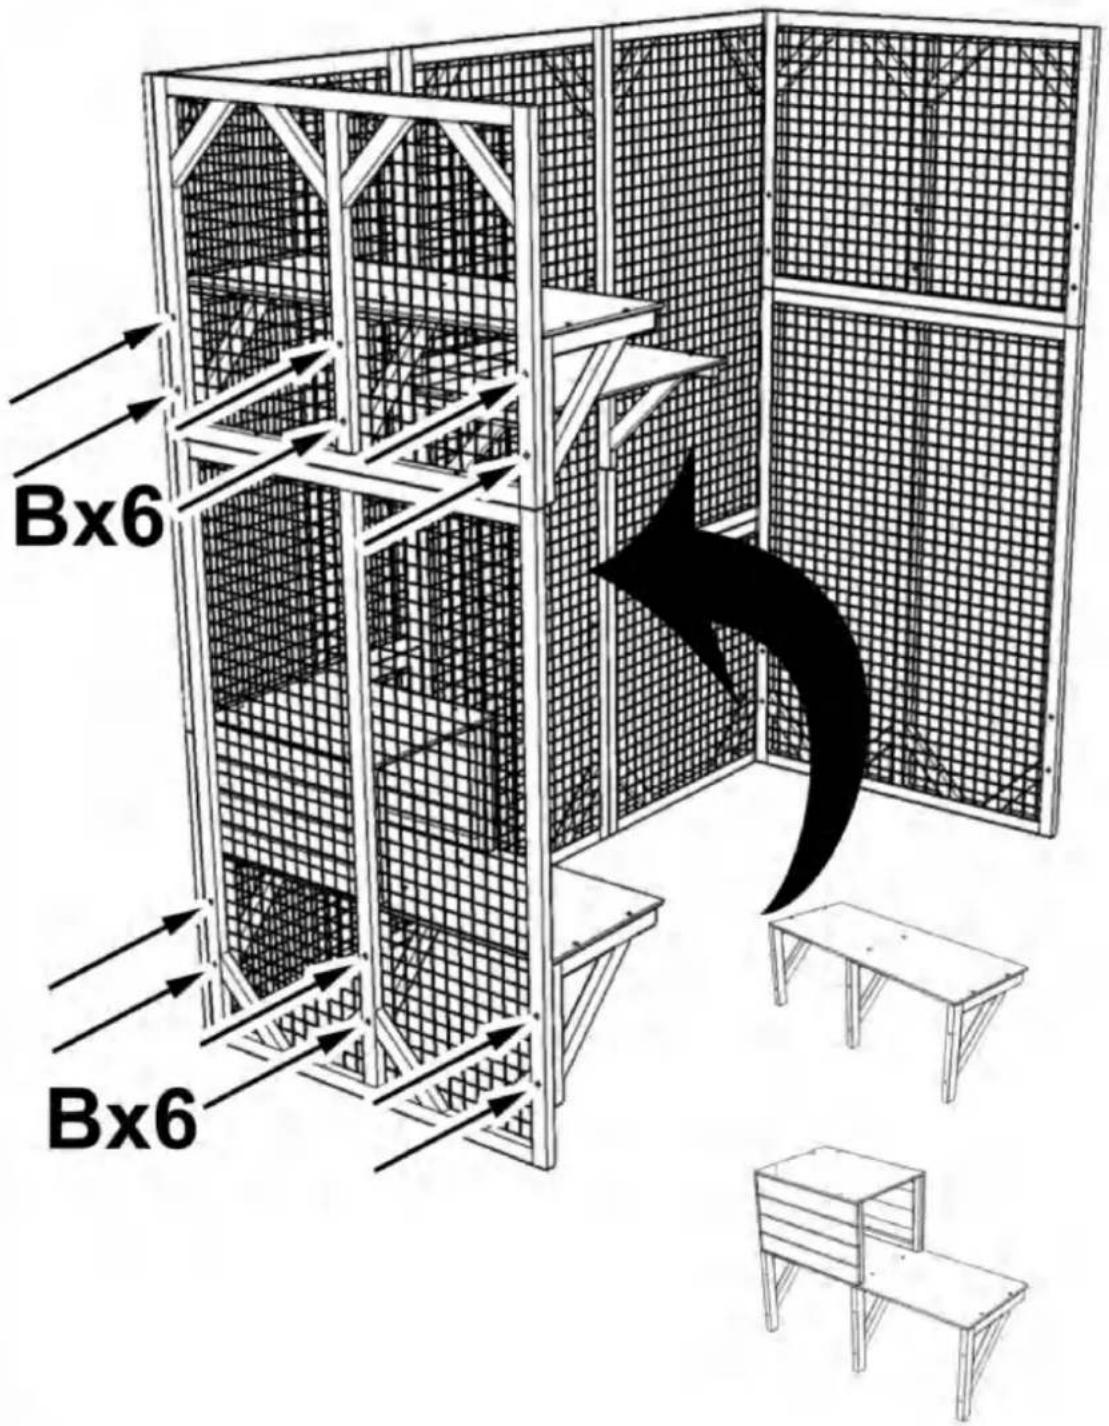
text_image
Bx6 Bx6STEP:11
Requires two people to install the shelves at designated position, one person is inside the cage holding the shelf while the other person is outside locking the screws through the pre-drilled holes as shown
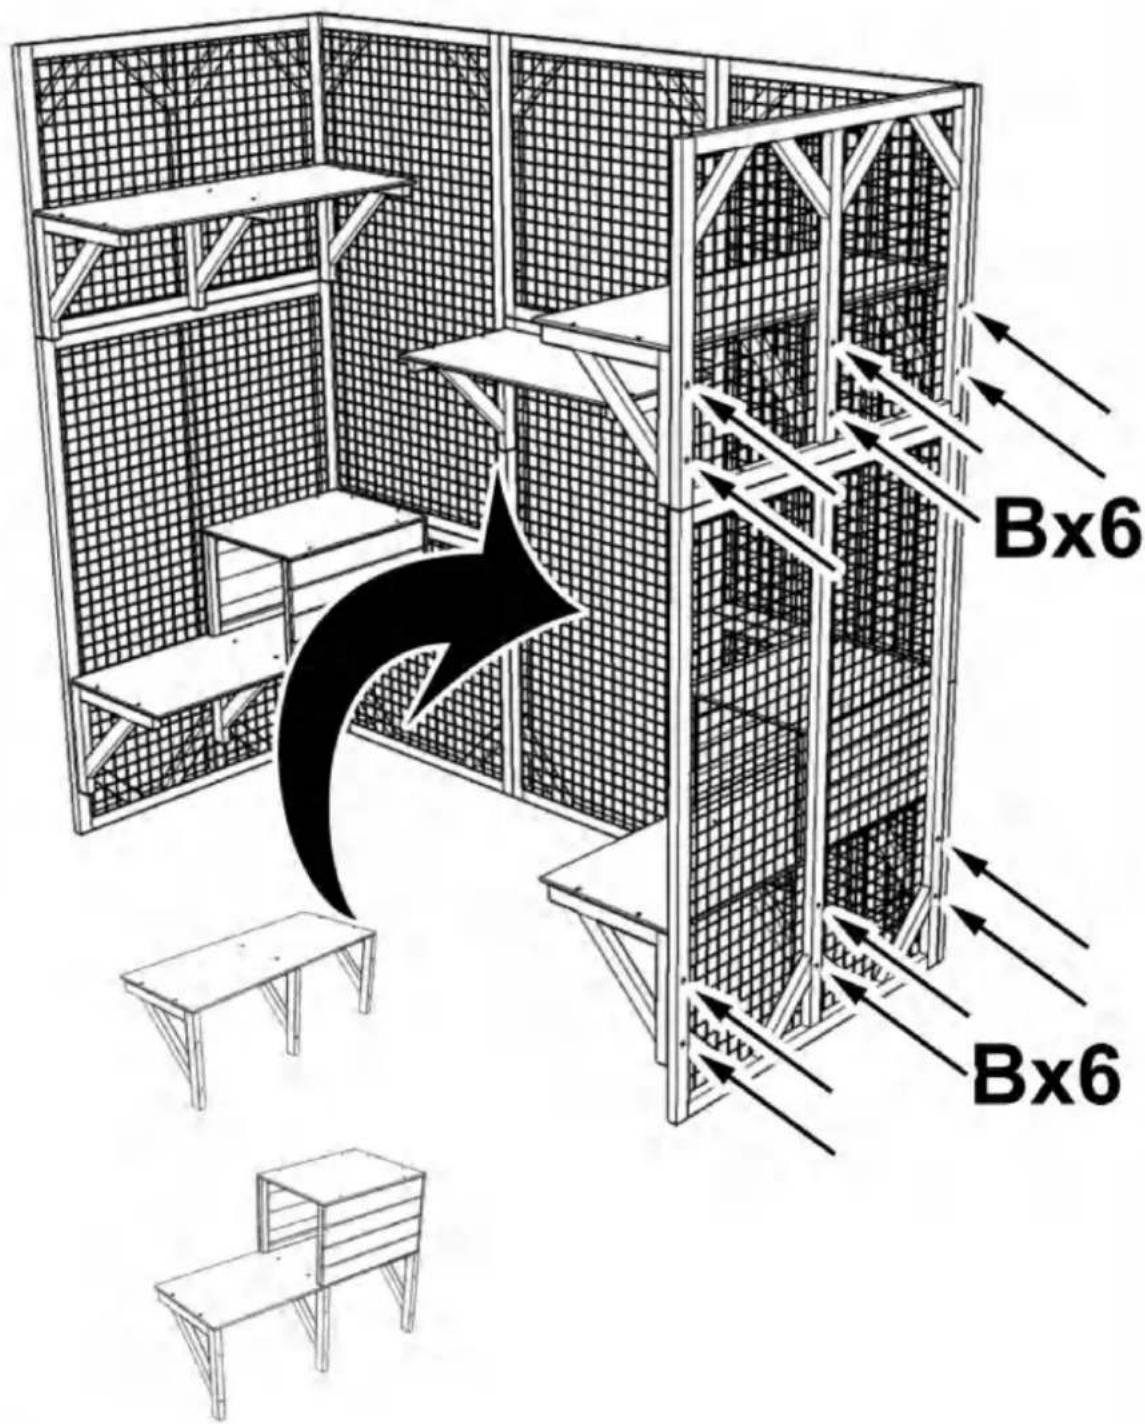
text_image
Bx6 Bx6STEP:12
Assemble part #1 and #5, part #3 and #7 with screw (B) x12 as shown, please pay attention to the up and bottom orientation of part #1 and #3, the end with 2 pre-drilled holes is bottom as shown in the figure, then secure part #1 to part #5 with screw (A)x2 downwards
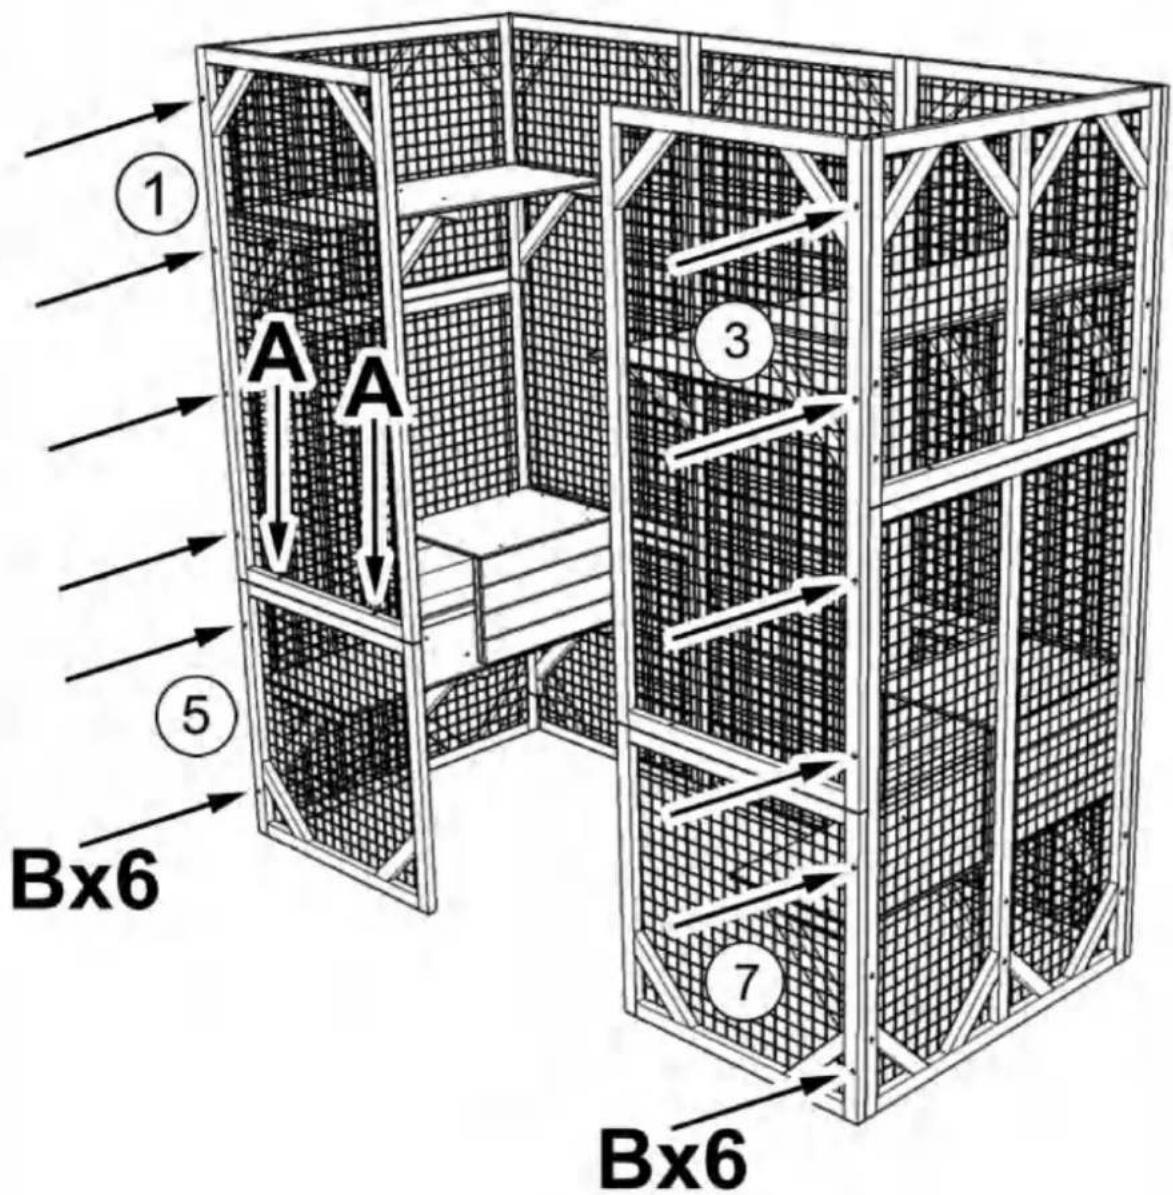
text_image
① A A ⑤ Bx6 ③ 7 Bx6STEP:13
Secure part #3 to part #7 with screw (A)x2 downwards, then assemble part #2 and part #6 (open the doors) with screw (A) x6 as shown
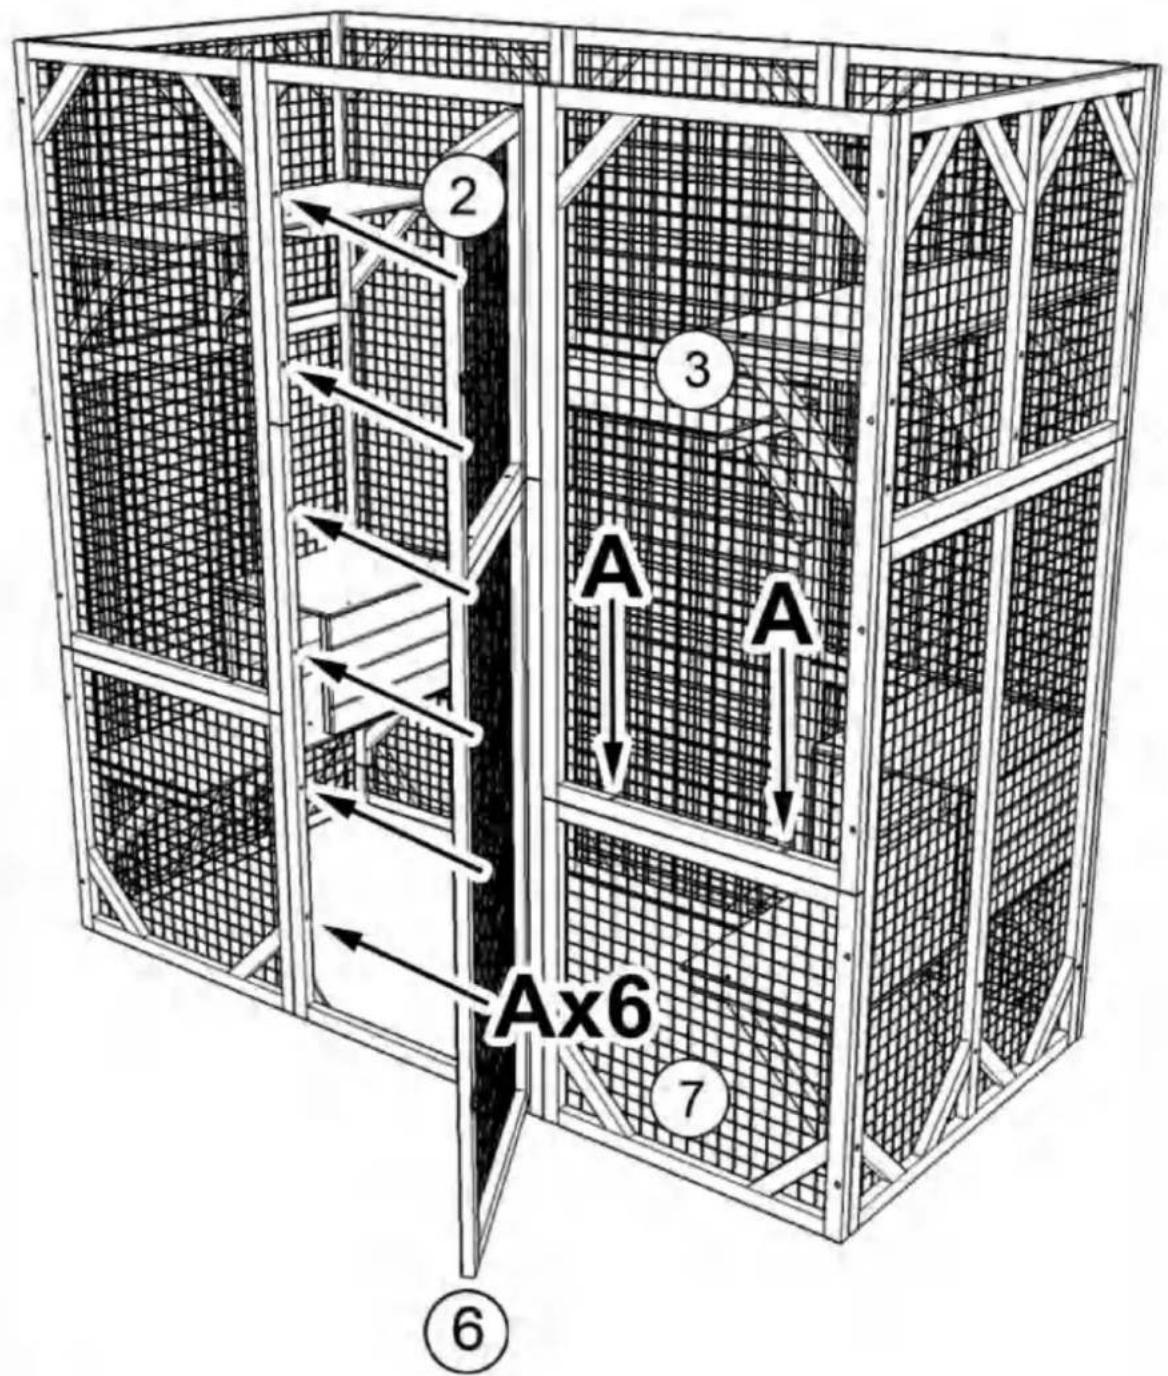
text_image
2 3 A A Ax6 7 ⑥STEP:14
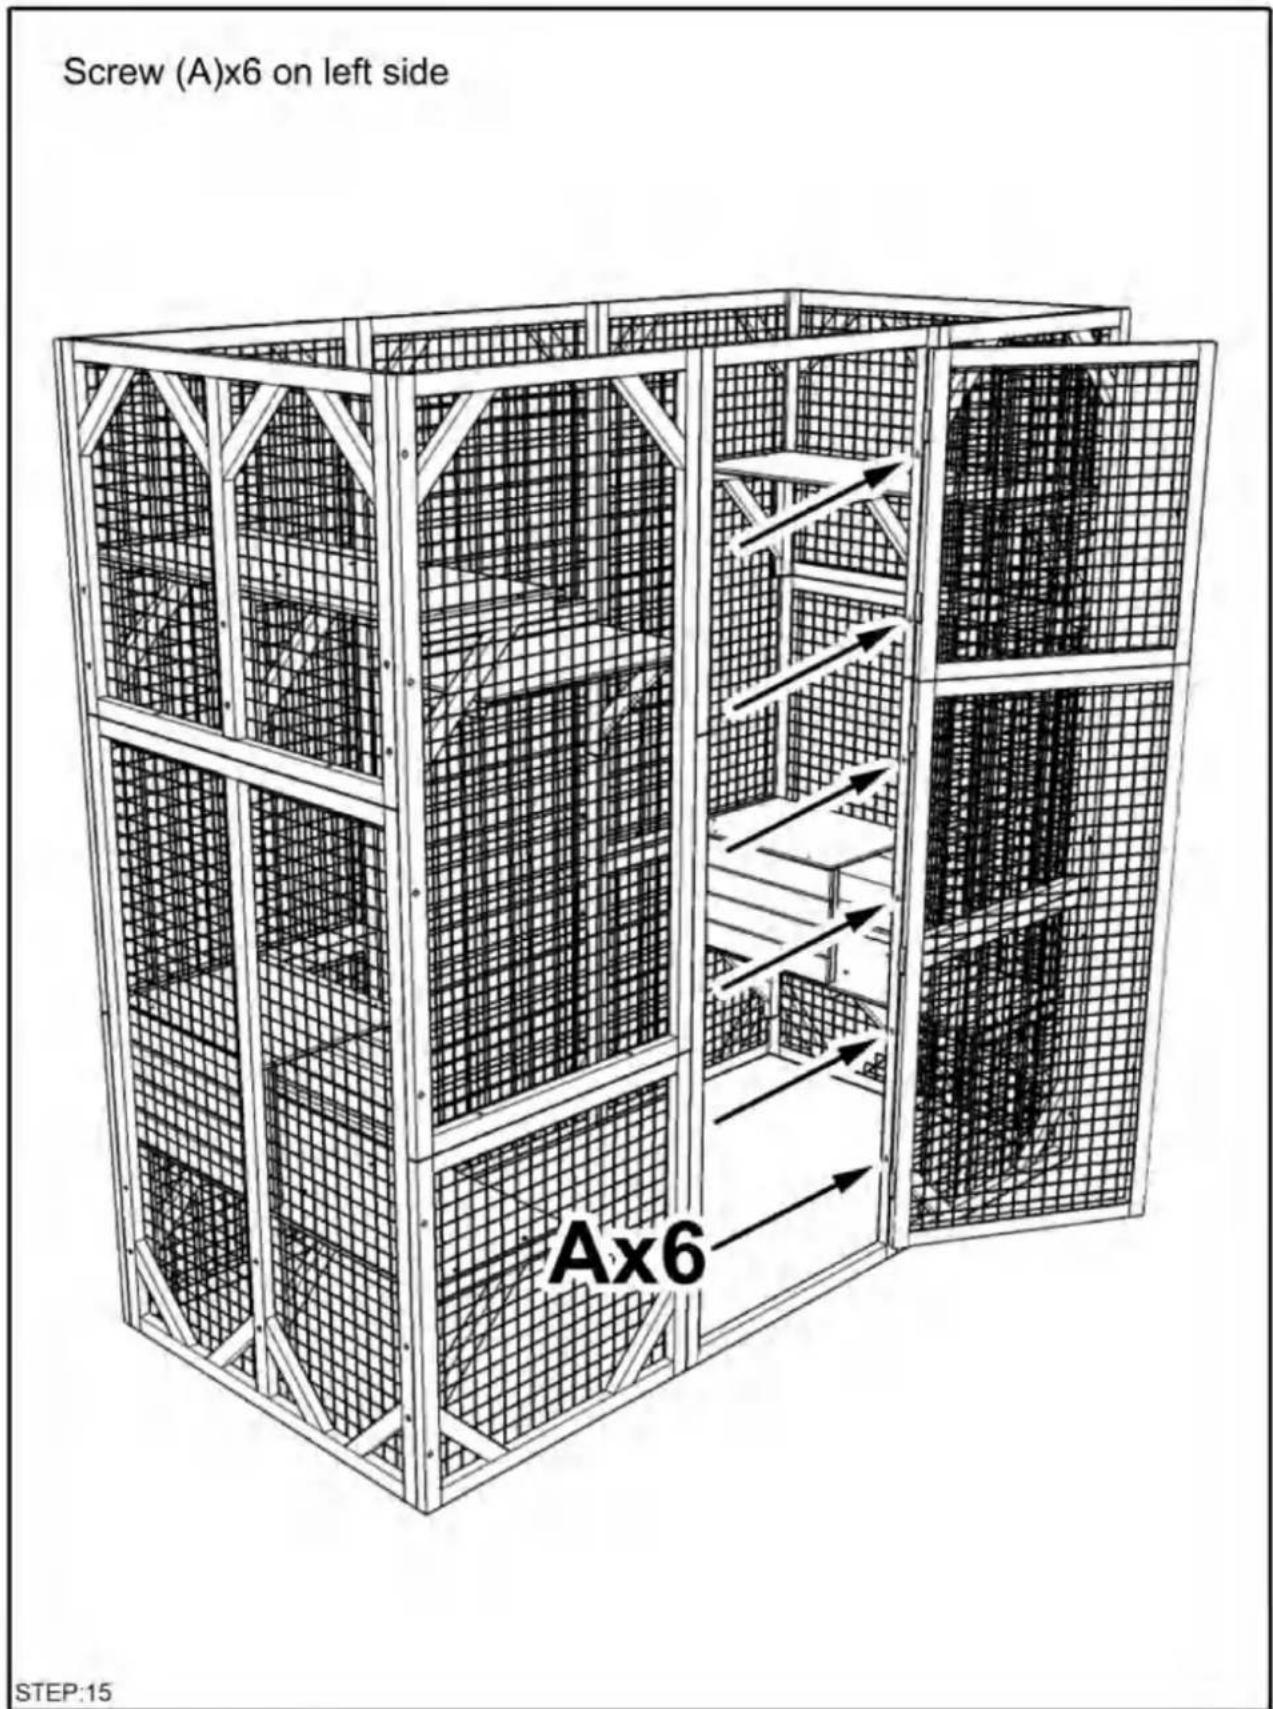
text_image
Screw (A)x6 on left side Ax6 STEP:15Align the short end of lock part #F with its other part already on door then secure it with screws (E)x2, secure part #2 to part #6 with screw (A)x2 downwards
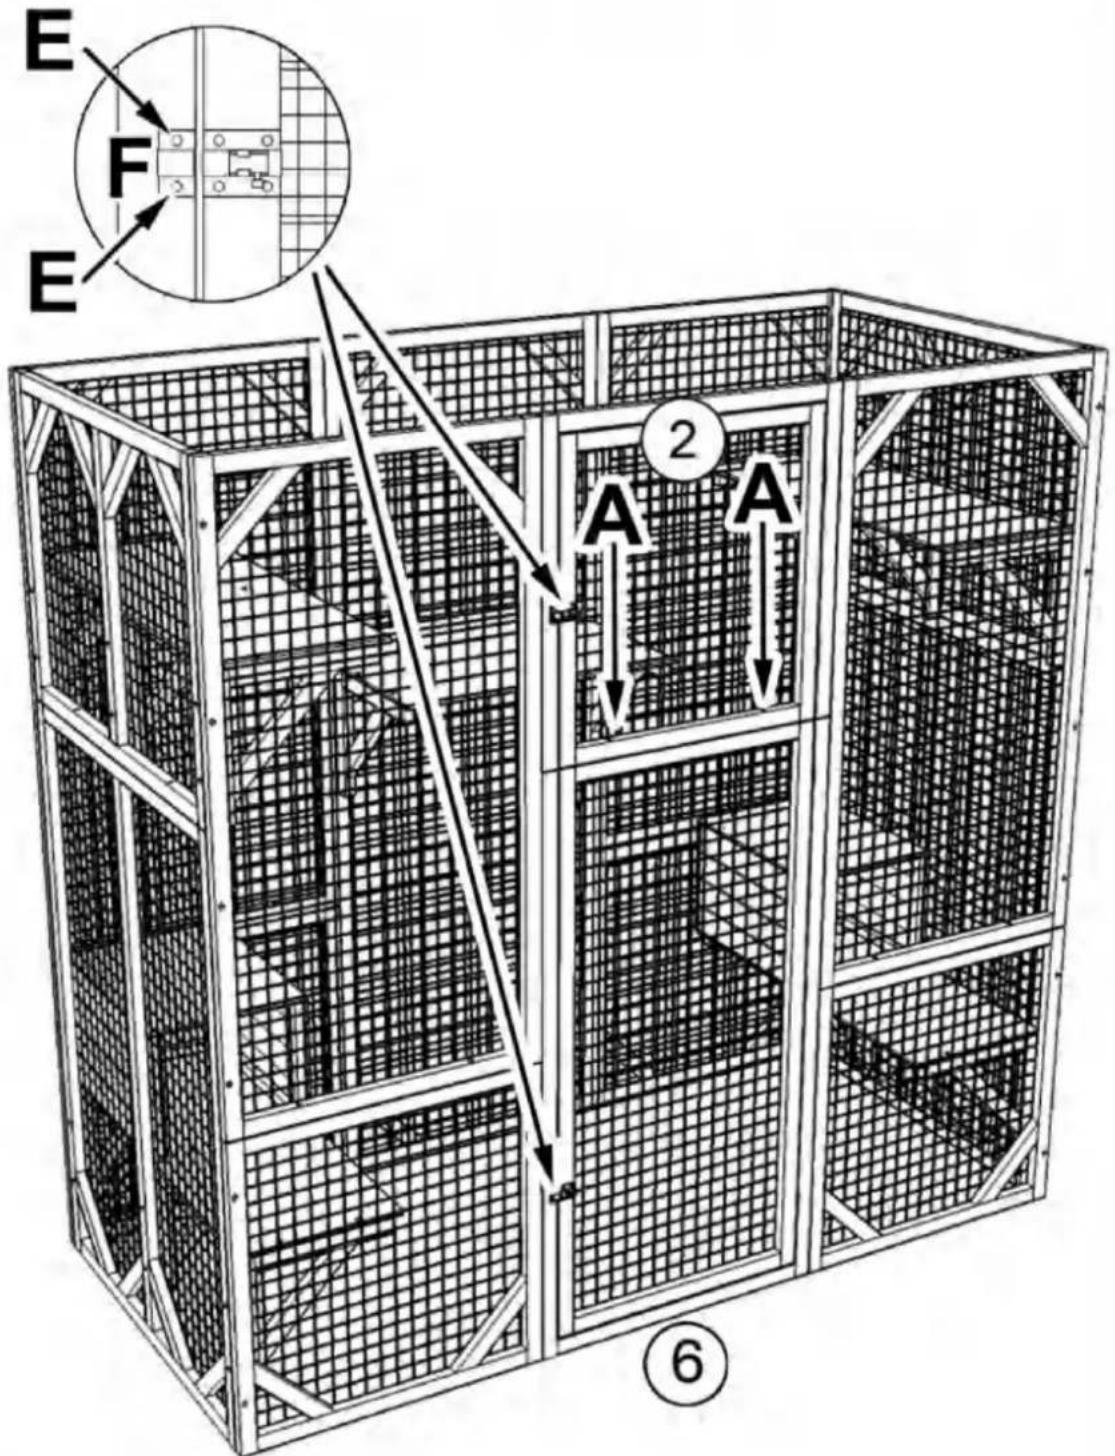
text_image
E F E 2 A A ⑥STEP:16
Install roofs with screw (C)x16 as shown, please be noted the edge of roof is 1.57 inch from the house underneath
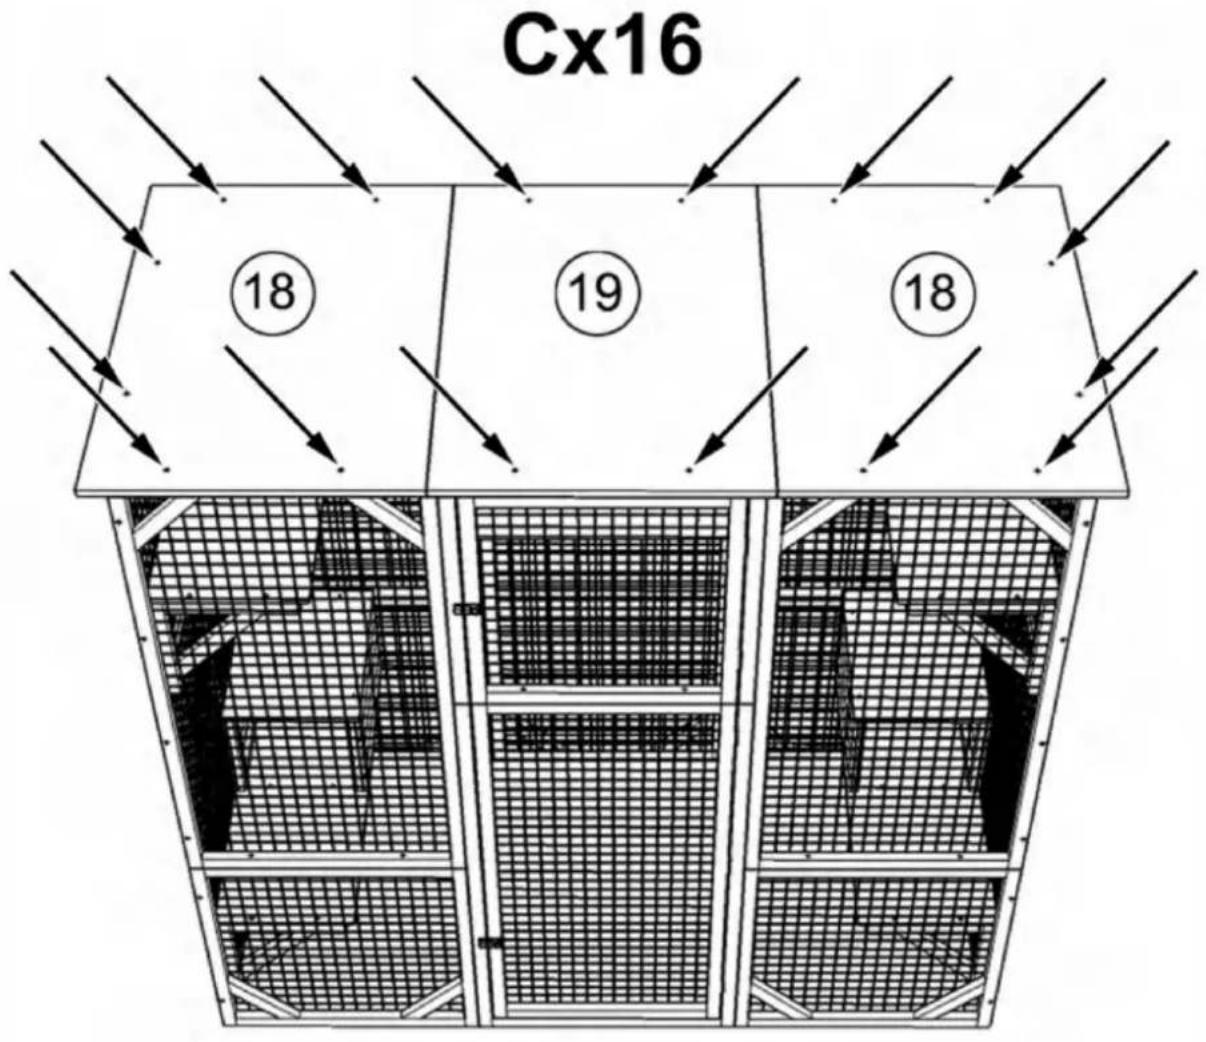
text_image
Cx16 18 19 18STEP:17
Install part #20x2 with screw (D)x12 as shown to cover the gap between roofs

text_image
Dx12 20 20STEP:18
Unfold the tarp and cover it
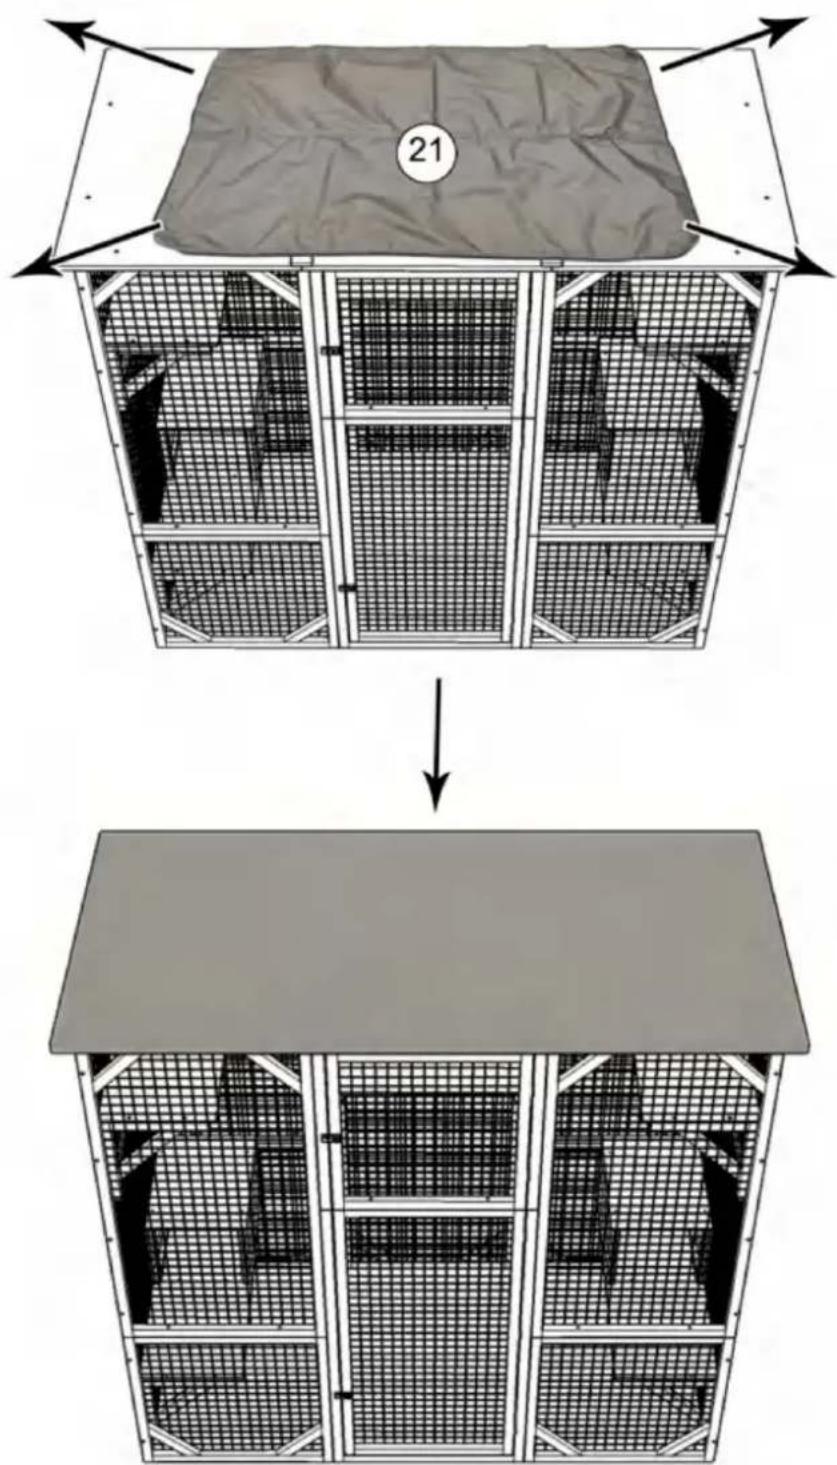
text_image
21STEP:19
Shuangchenglu 803nong11hao1602A-1609shi, baoshanqu, shanghai 200000 CN.
| EC | REP |
Empresa E-CrossStu GmbH.
Mainzer Landstr.69, 60329
Fráncfort del Meno.
| UK | REP |
YH CONSULTING LIMITADA.
C/O YH Consulting Limited Oficina 147,
Centurion House, London Road, Staines-upon-Thames, Surrey, TW18 4AX
Importado a EE. UU.: Sanven Technology Ltd., Suite 250, 9166 Anaheim Place, Rancho Cucamonga, CA 91730
Machine Translated by Google
VEVOR®
TOUGH TOOLS, HALF PRICE
Technical Support and E-Warranty Certificate
www.vevor.com/support
VEVOR®
TOUGH TOOLS, HALF PRICE
Technical Support and E-Warranty Certificate www.vevor.com/support
INSTRUCTION FOR CAT CAGE
MODEL:CH448
natural_image
Line drawing of a multi-level cage structure with internal mesh compartments (no text or symbols)NEED HELP? CONTACT US!
Have product questions? Need technical support? Please feel free to contact us:
This is the original instruction, please read all manual instructions carefully before operating. VEVOR reserves a clear interpretation of our user manual. The appearance of the product shall be subject to the product you received. Please forgive us that we won't inform you again if there are any technology or software updates on our product.
WARNING:
Read this material before using this product. Failure to do so can result in serious injury.
Assembly precautions
- Assemble only according to these instructions. Improper assembly can create hazards.
- In order to ensure your own safety, please make sure to ANSI-approved safety goggles and heavy-duty work gloves when installing this product.
- Keep the assembly area clean and well lit.
- Keep bystanders out of the area during assembly.
- Do not assemble when tired or when under the influence of alcohol, drugs or medication.
- Product capabilities apply to properly and completely assembled product only.
- Assemble on a flat, level, hard and smooth surface capable of safely supporting a fully loaded cat cage.
Use precautions
TO PREVENT SERIOUS INJURY AND DEATH FROM TIPPING:
- DO NOT SIT OR STAND ON THIS ITEM.
- This product is not a toy. Do not allow children to play with or near this item.
Please keep small spare parts out of children's reach. - Use only on a flat, level, hard and smooth surface capable of safely supporting a fully loaded cat cage.
- Use as intended only.
- Inspect before every use; do not use if parts are loose or damaged.
SAVE THESE INSTRUCTIONS
SPECIFICATIONS
| Model | CH448 |
| Product Size | 1800*880*1690mm |
| Color | Gray |
COMPONENTS
Notice:
- Various specifications of screws are used in the installation of this product. Pay attention to the correct use of screw specifications according to the instruction manual.
- Please wear gloves when installing.
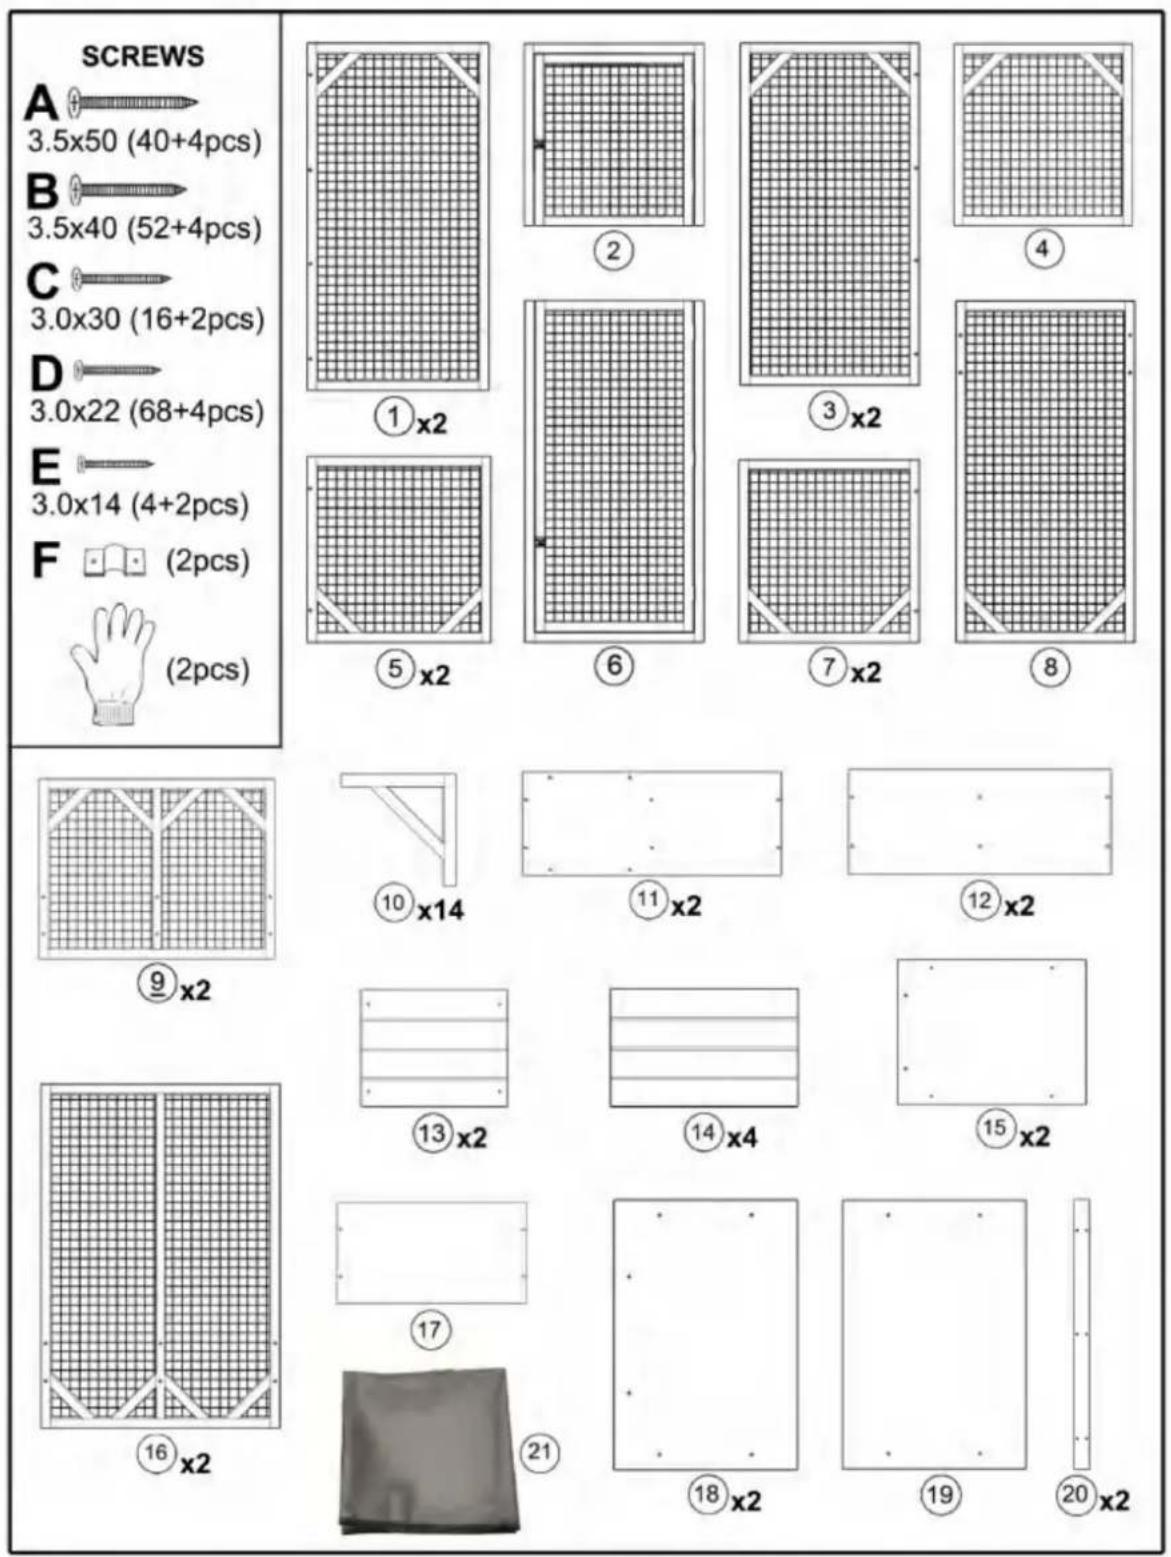
text_image
SCREWS A 3.5x50 (40+4pcs) B 3.5x40 (52+4pcs) C 3.0x30 (16+2pcs) D 3.0x22 (68+4pcs) E 3.0x14 (4+2pcs) F (2pcs) (2pcs) ①x2 ② ③x2 ④ ⑤x2 ⑥ ⑦x2 ⑧ ⑨x2 ⑩x14 ⑪x2 ⑫x2 ⑬x2 ⑭x2 ⑮x2 ⑯ ⑰x2 ⑱ ⑲x2 ⑳ ㉑ ㉒ ㉓ ㉔ ㉕ ㉖ ㉗ ㉘ ㉙ ㉚ ㉛ ㉜ ㉝ ㉞ ㉟ ㉳ ㉴ ㉵ ㉶ ㉷ ㉸ ㉹ ㉺ ㉻ ㉼ ㉽ ㉾ ㉿ ㉒ ㉓ ㉔ ㉕ ㉖ ㉗ ㉘ ㉙ ㉚ ㉛ ㉜ ㉝ ㉟ ㉟x2Assembly Instructions
Please be noted that the side with wire nailed on is back side, should be inward when assembly
Pay attention to the up and bottom orientation of part #9 and part #1, the end with 2 pre-drilled holes is bottom as shown in the figure Assembling part #1, #5, #9, #16 with screw (B)x6 as shown, then secure part #9 to part #16 with screw (A)x2 downwards
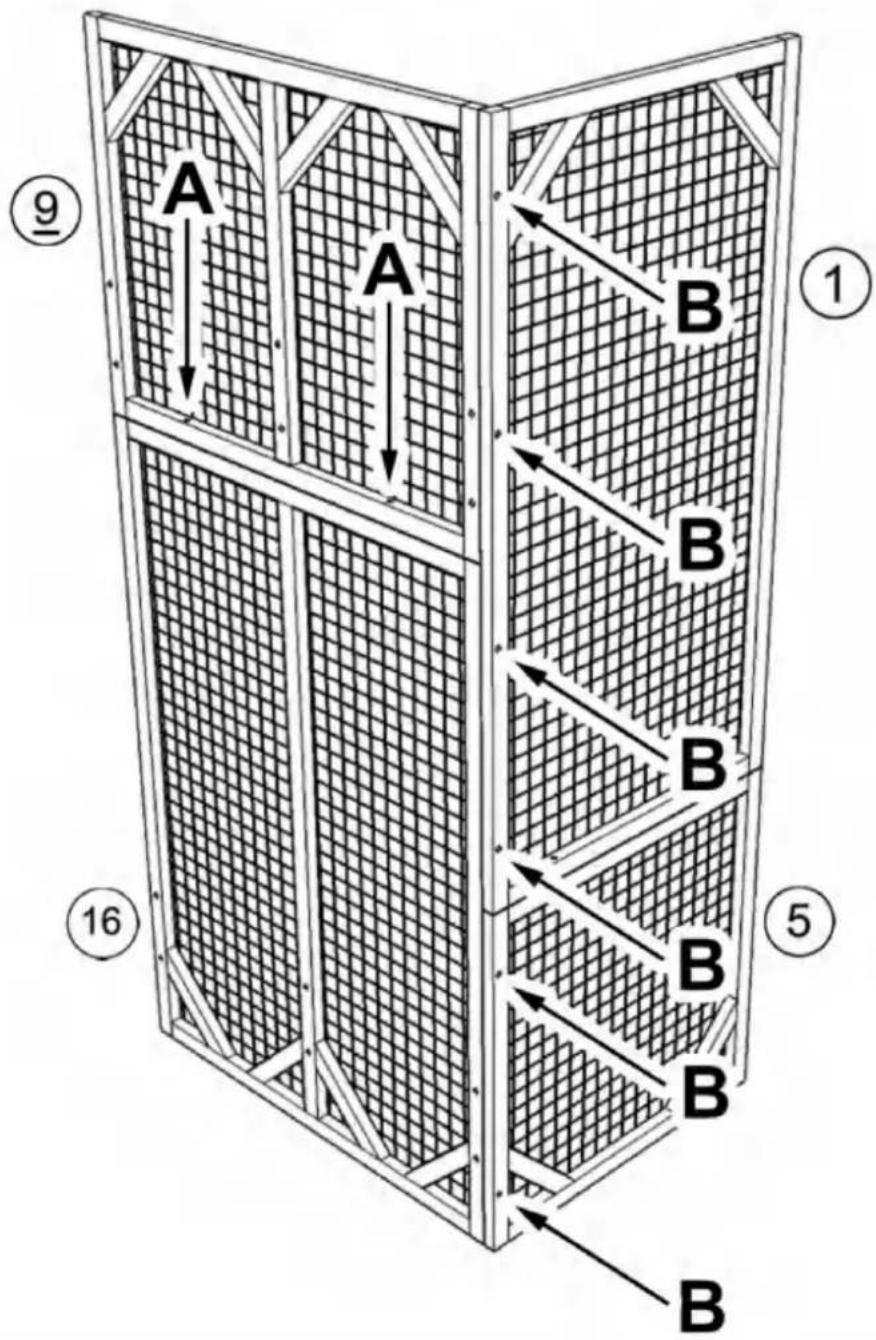
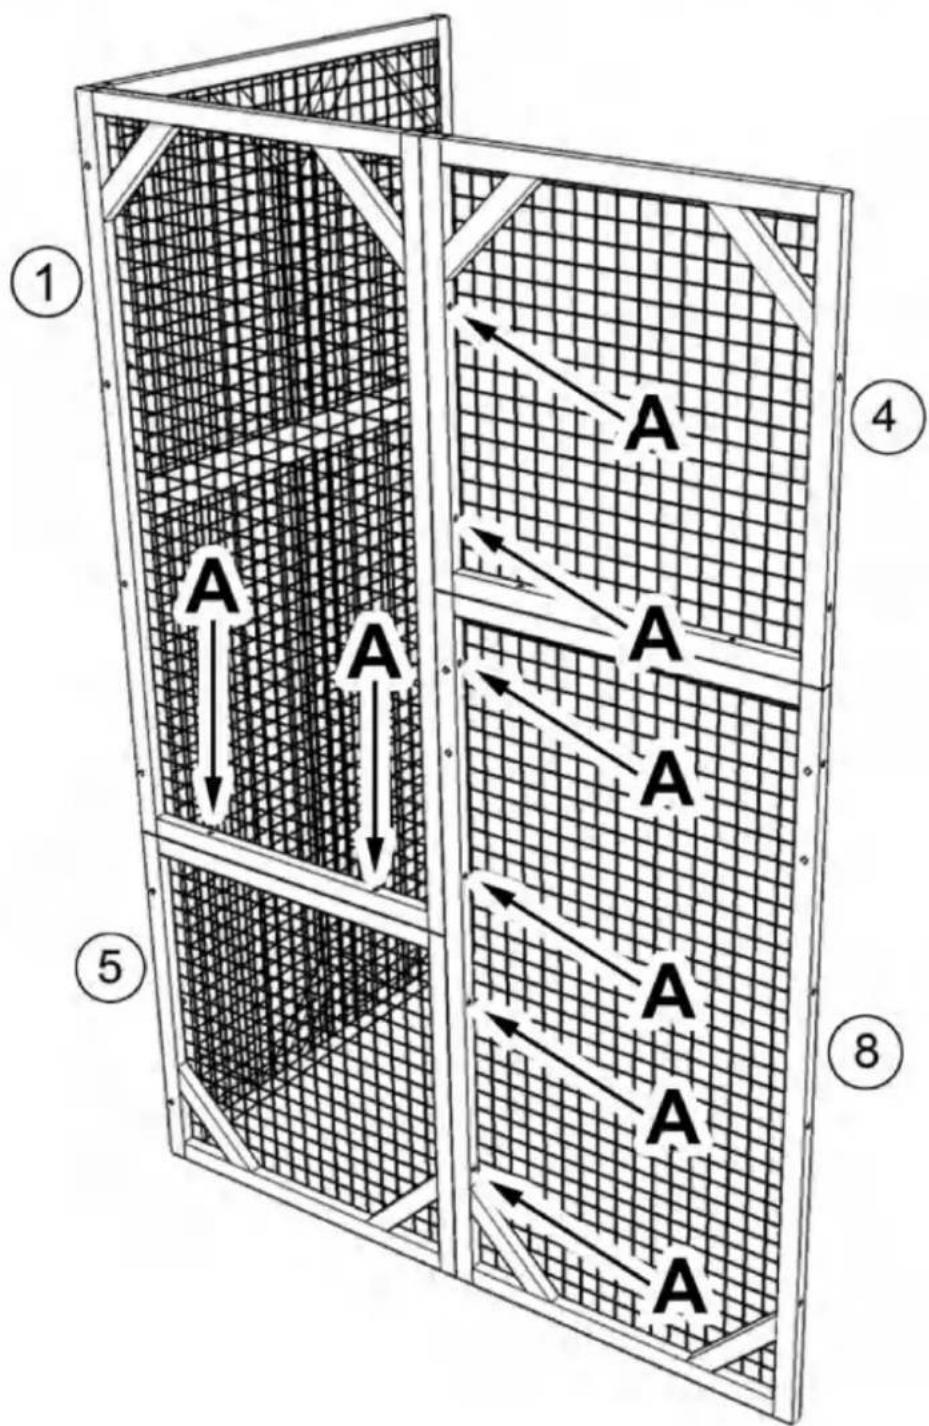
Secure part #1 to part #5 with screw (A)x2 downwards, then assemble part #4 and part #8 with screw (A) x6 as shown, please pay attention to the up and bottom orientation of part #4, the end with 2 pre-drilled holes is bottom as shown in the figure
text_image
A A A A A A A A A 1 4 5 8STEP:2
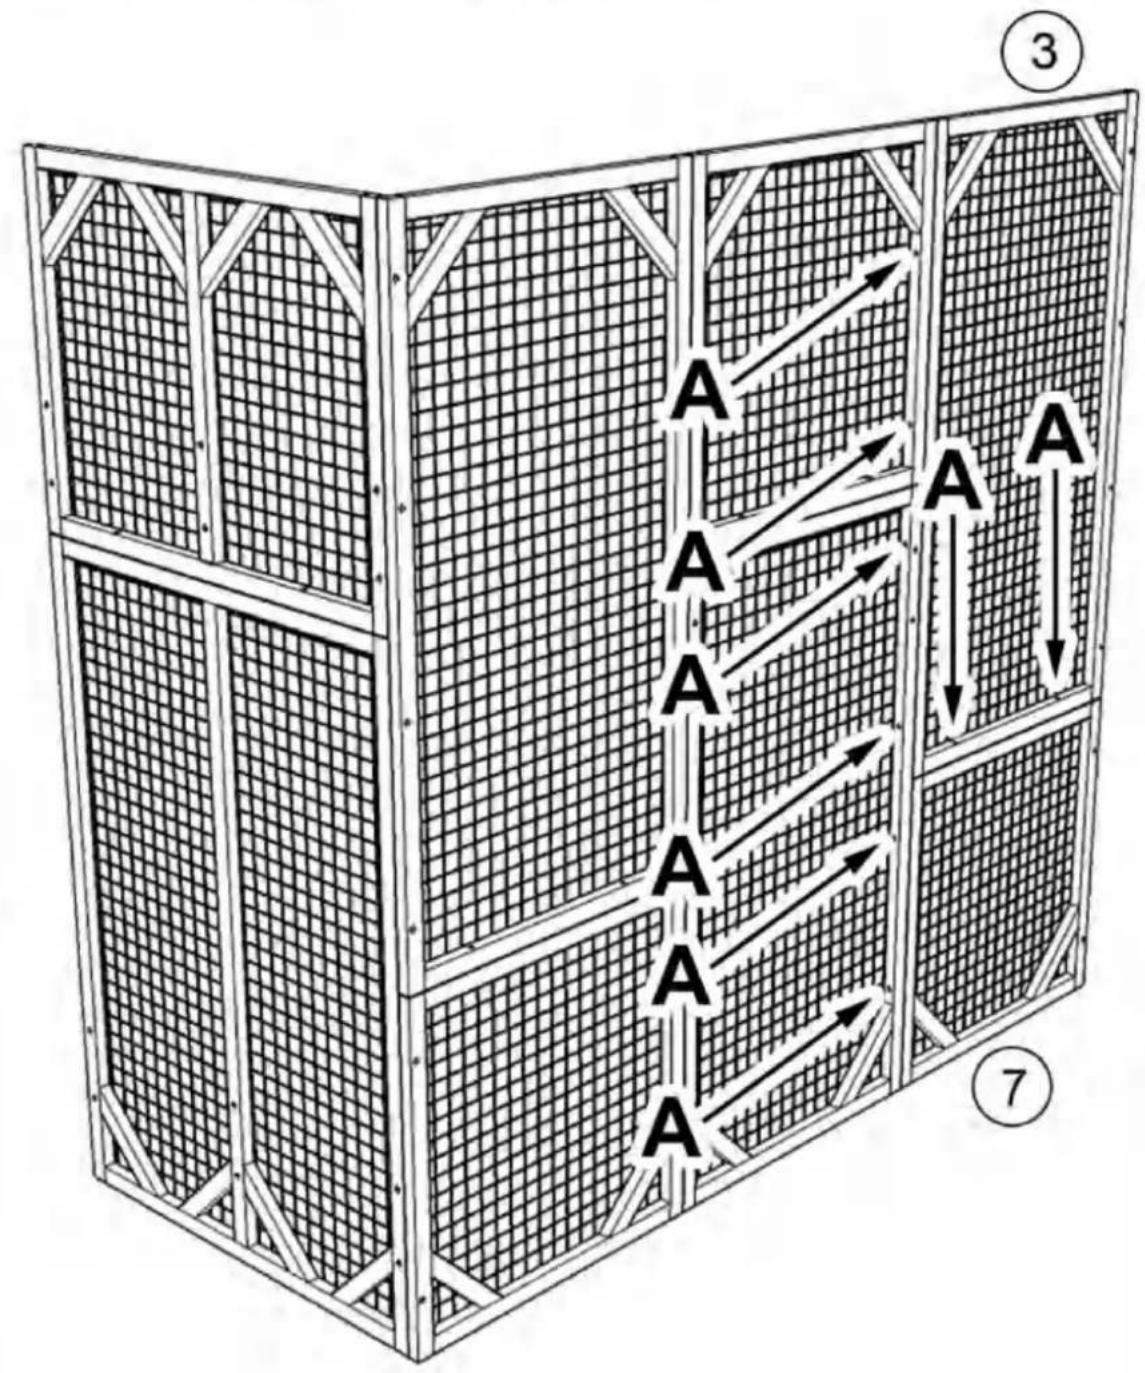
Assemble part #3 and part #7 with screw (A) x6 as shown, please pay attention to the up and bottom orientation of part #3, the end with 2 pre-drilled holes is bottom as shown in the figure, then secure part #3 to part #7 with screw (A)x2 downwards
flowchart
graph TD
    A1["A"] --> B1["A"]
    A2["A"] --> B2["A"]
    A3["A"] --> B3["A"]
    A4["A"] --> B4["A"]
    B1 --> C1["A"]
    B2 --> C2["A"]
    B3 --> C3["A"]
    B4 --> C4["A"]
    style A1 fill:#f9f,stroke:#333
    style A2 fill:#f9f,stroke:#333
    style A3 fill:#f9f,stroke:#333
    style A4 fill:#f9f,stroke:#333
    style B1 fill:#ccf,stroke:#333
    style B2 fill:#ccf,stroke:#333
    style B3 fill:#ccf,stroke:#333
    style B4 fill:#ccf,stroke:#333
STEP:3
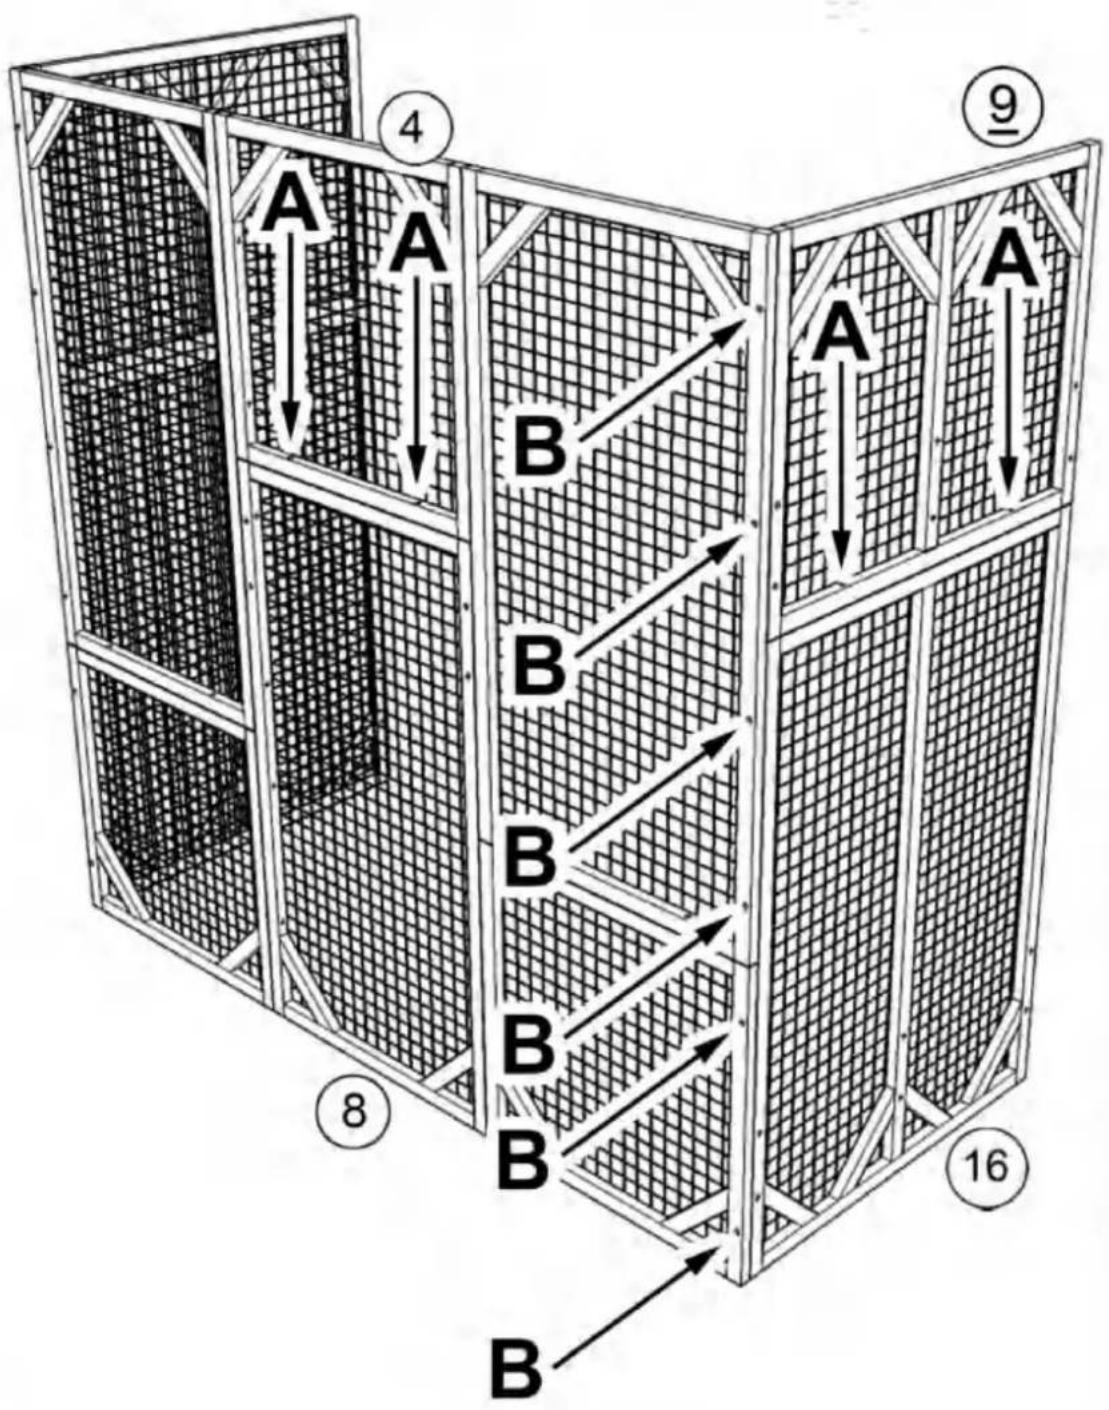
Secure part #4 to part #8 with screw (A)x2 downwards, then assemble part #9 and part #16 with screw (B) x6 as shown, please pay attention to the up and bottom orientation of part #9, the end with 2 pre-drilled holes is bottom as shown, then secure part #9 to part #16 with screw (A)x2 downwards
Assemble shelf with part #17 and part #10x2 with screw (D)x4 as shown
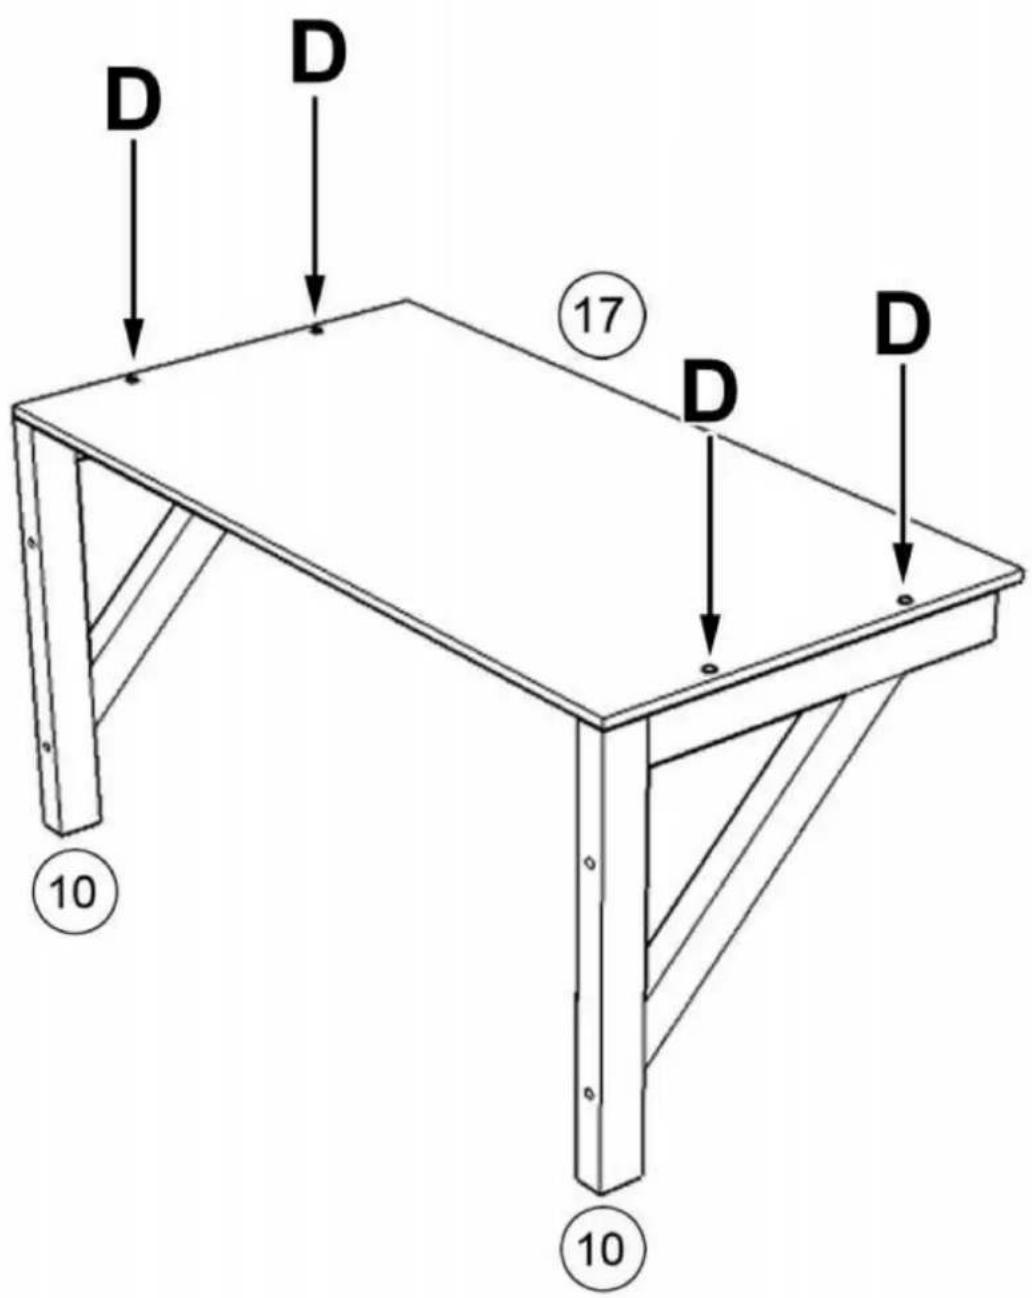
text_image
D D 17 D D 10 10STEP:5
Requires two people to install the shelf at designated position, one person is inside the cage holding the shelf while the other person is outside locking the screws through the pre-drilled holes as shown.
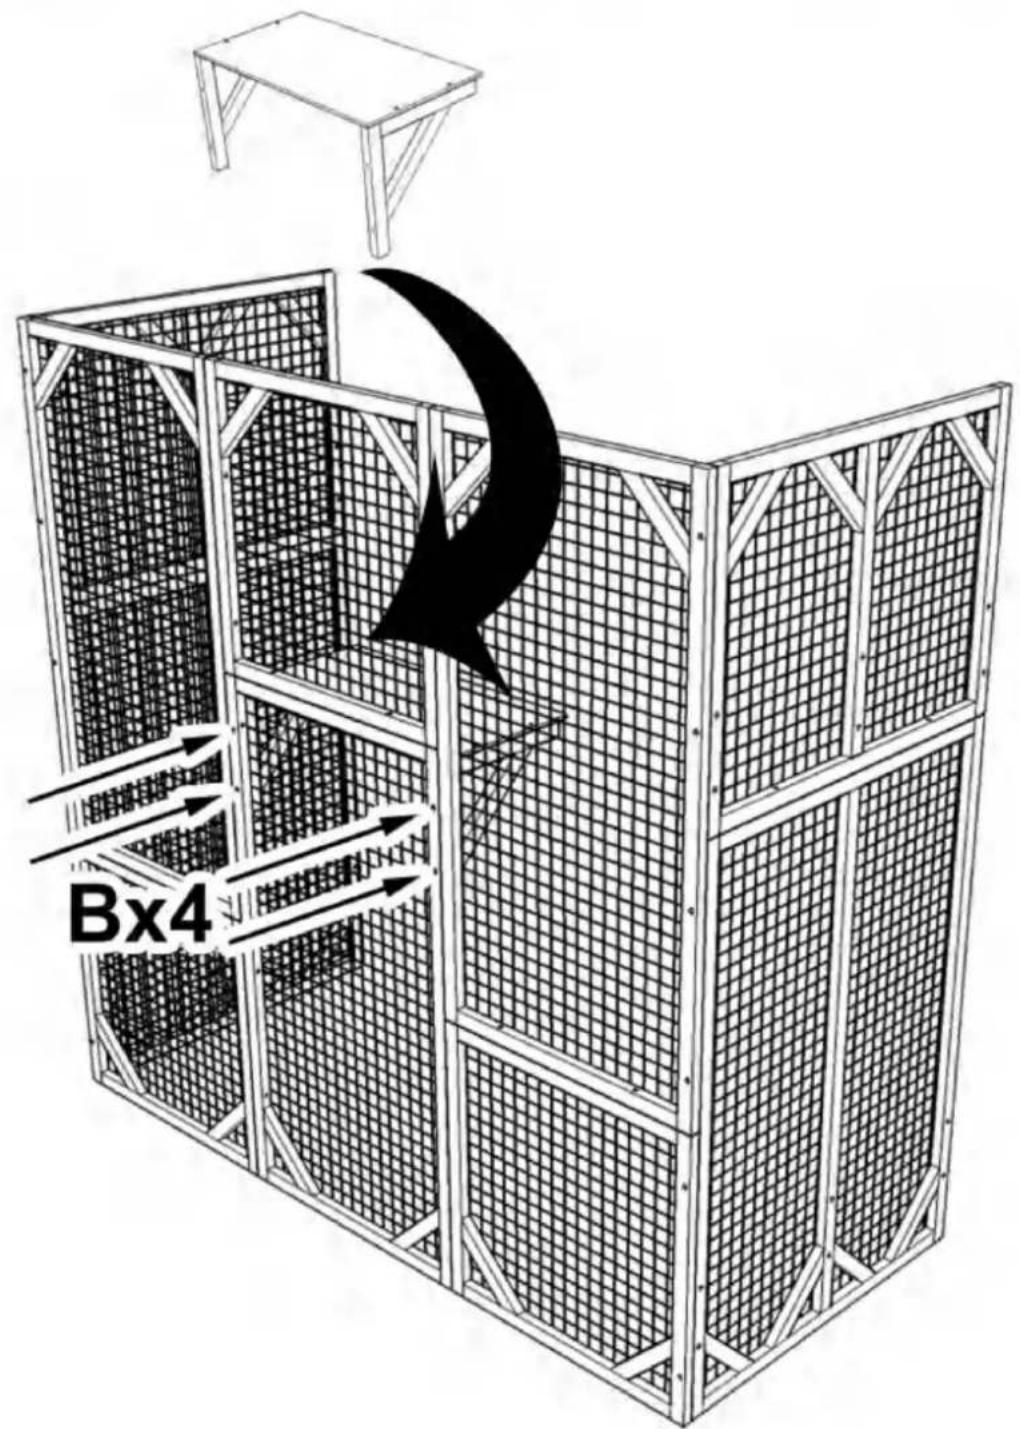
text_image
Bx4STEP:6
Assemble shelf with part #11 and part #10x3 with screw (D)x6 as shown
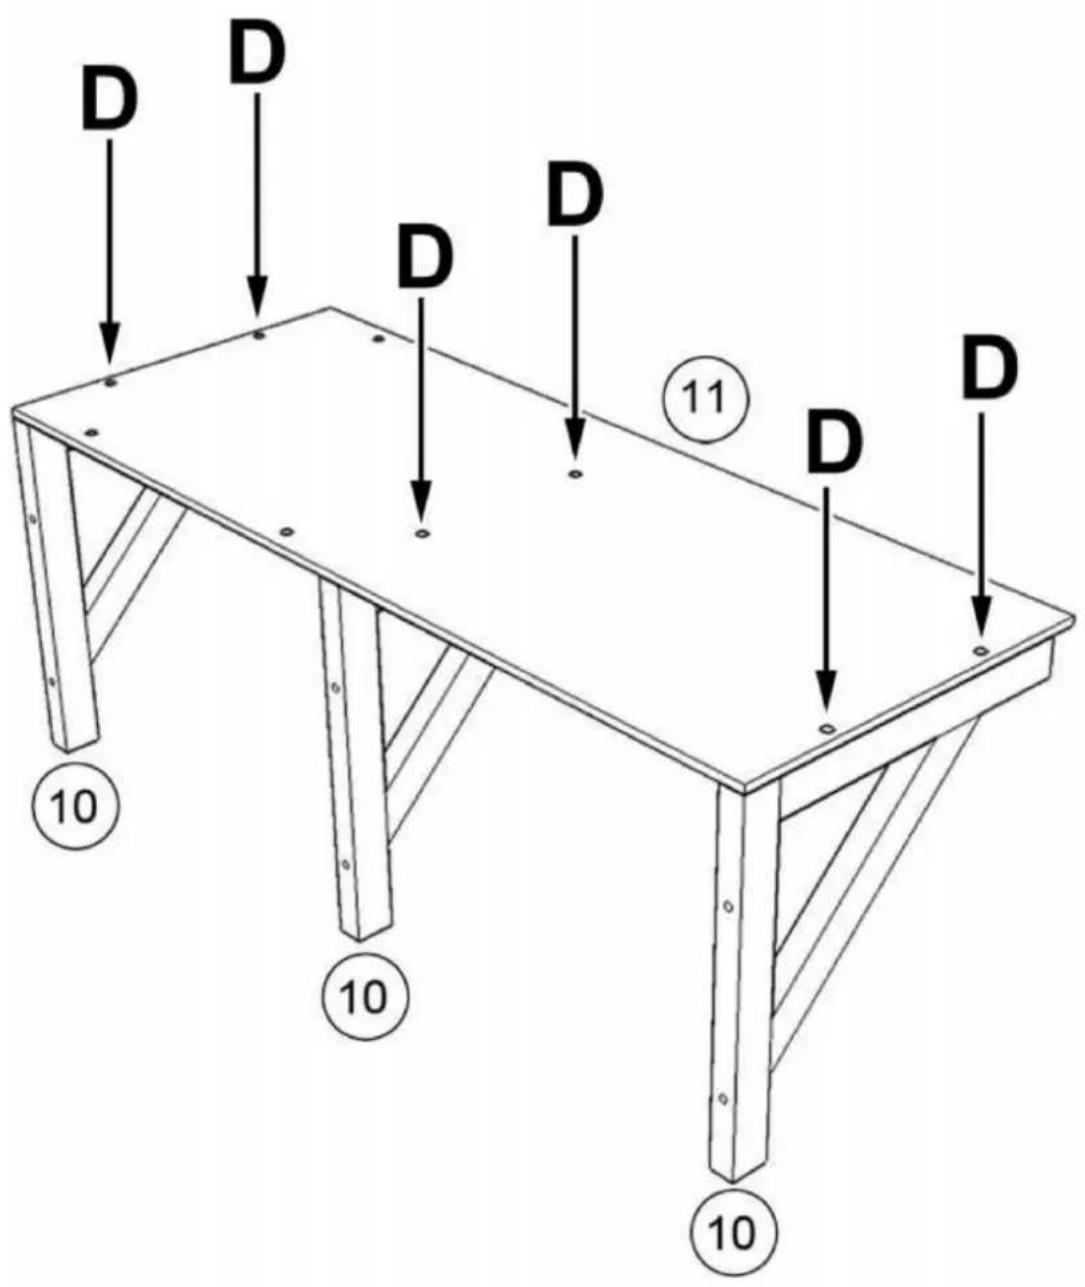
text_image
D D D D D 11 D D 10 10 10STEP:7
Assemble sleeping box with part #13, #14x2, #15 using screw (D)x10
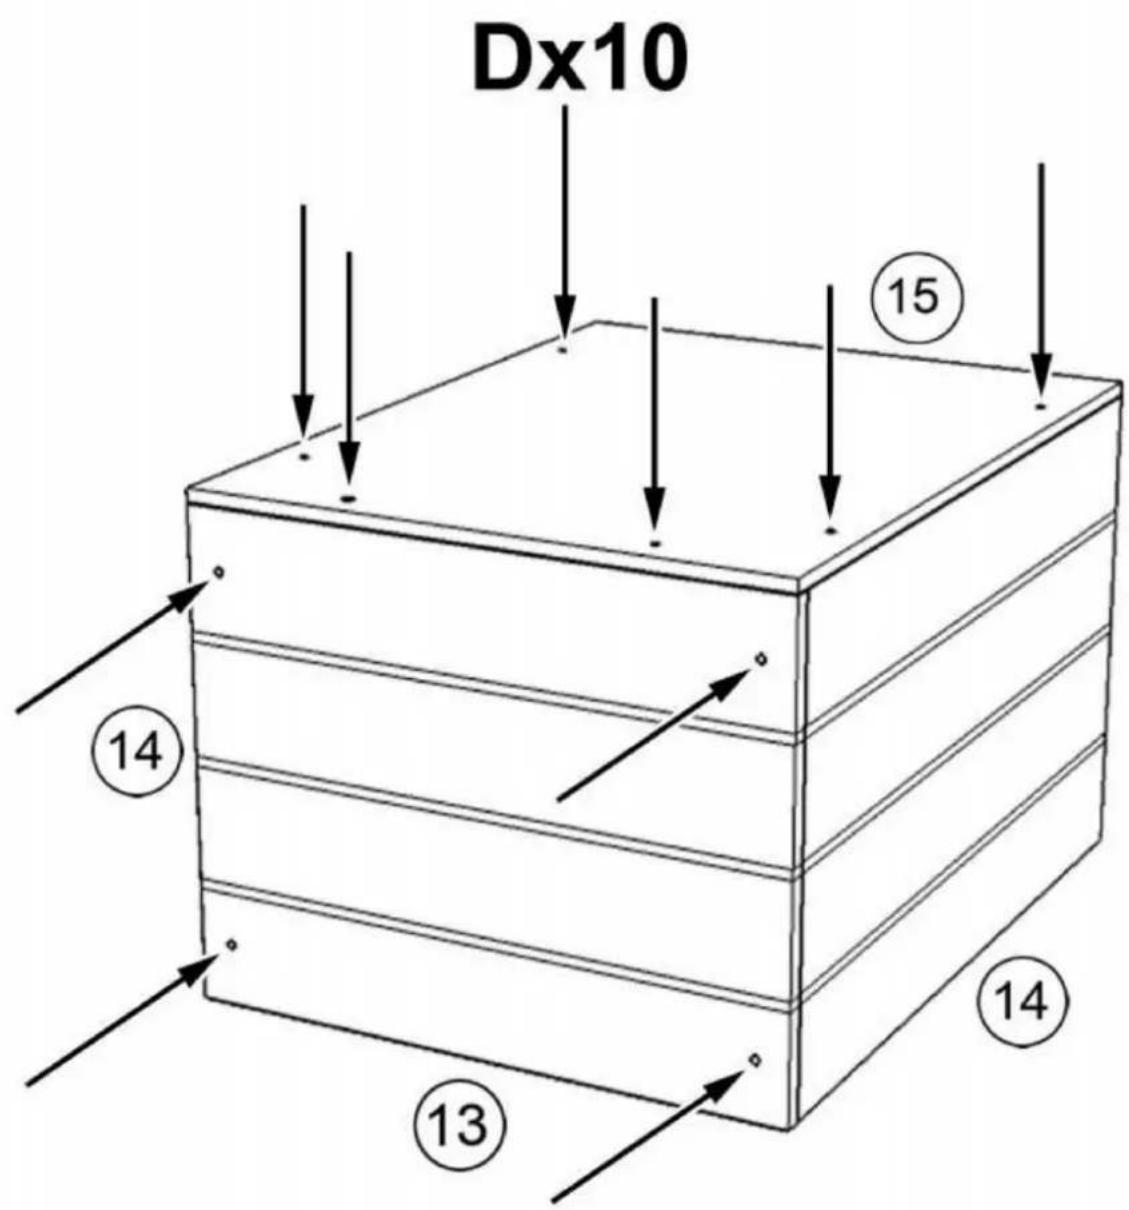
text_image
Dx10 15 14 13 14STEP:8
Install sleeping box on shelf as shown and secure the box with screw (D)x4 from the bottom
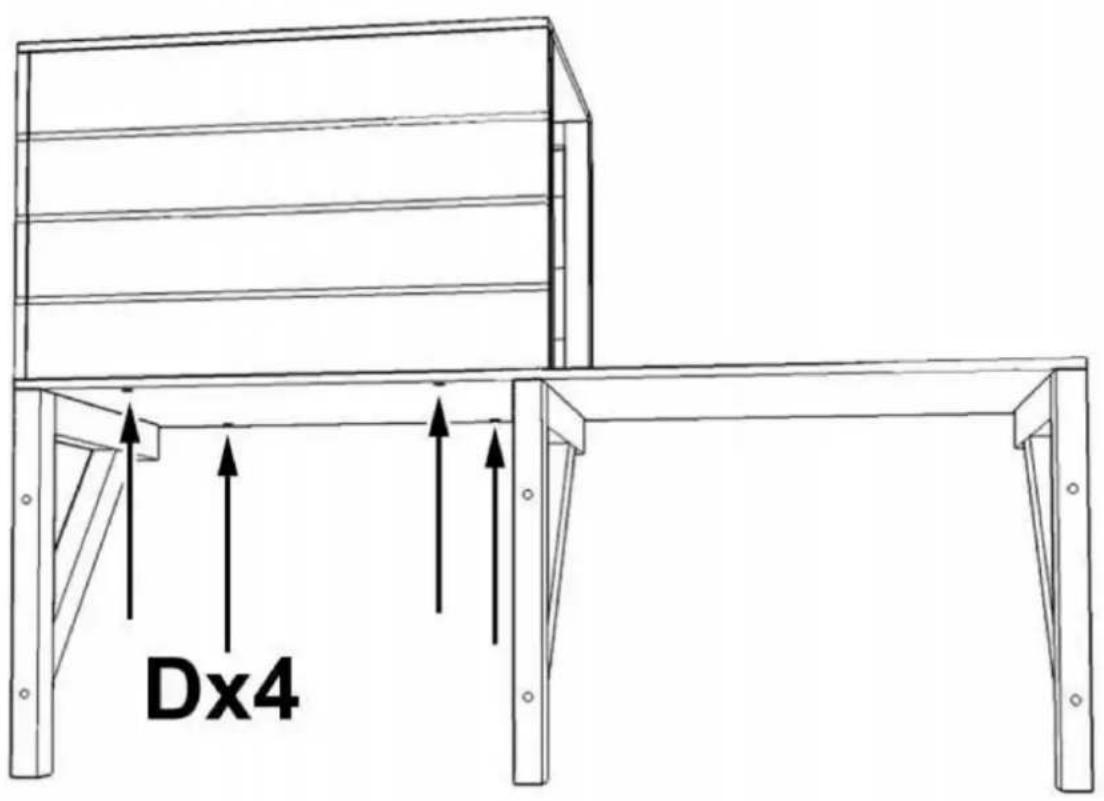
text_image
Dx4STEP:9
Assemble shelf with part #12 and part #10x3 with screw (D)x6 as shown
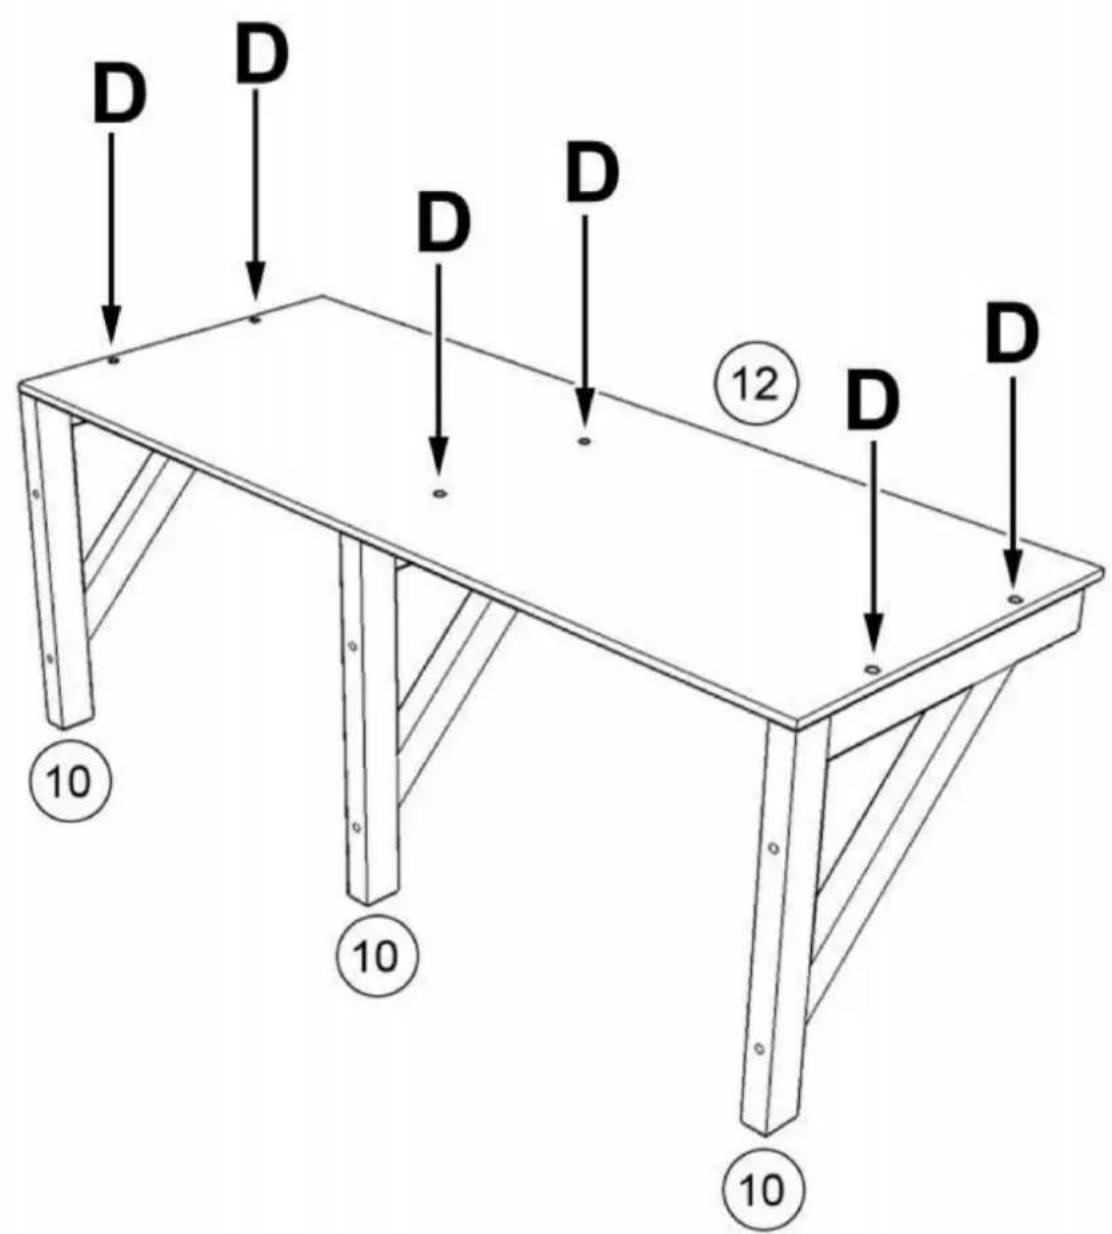
text_image
D D D D D ⑫⑫ D D ⑩ ⑩ ⑩STEP:10
Requires two people to install the shelves at designated position, one person is inside the cage holding the shelf while the other person is outside locking the screws through the pre-drilled holes as shown
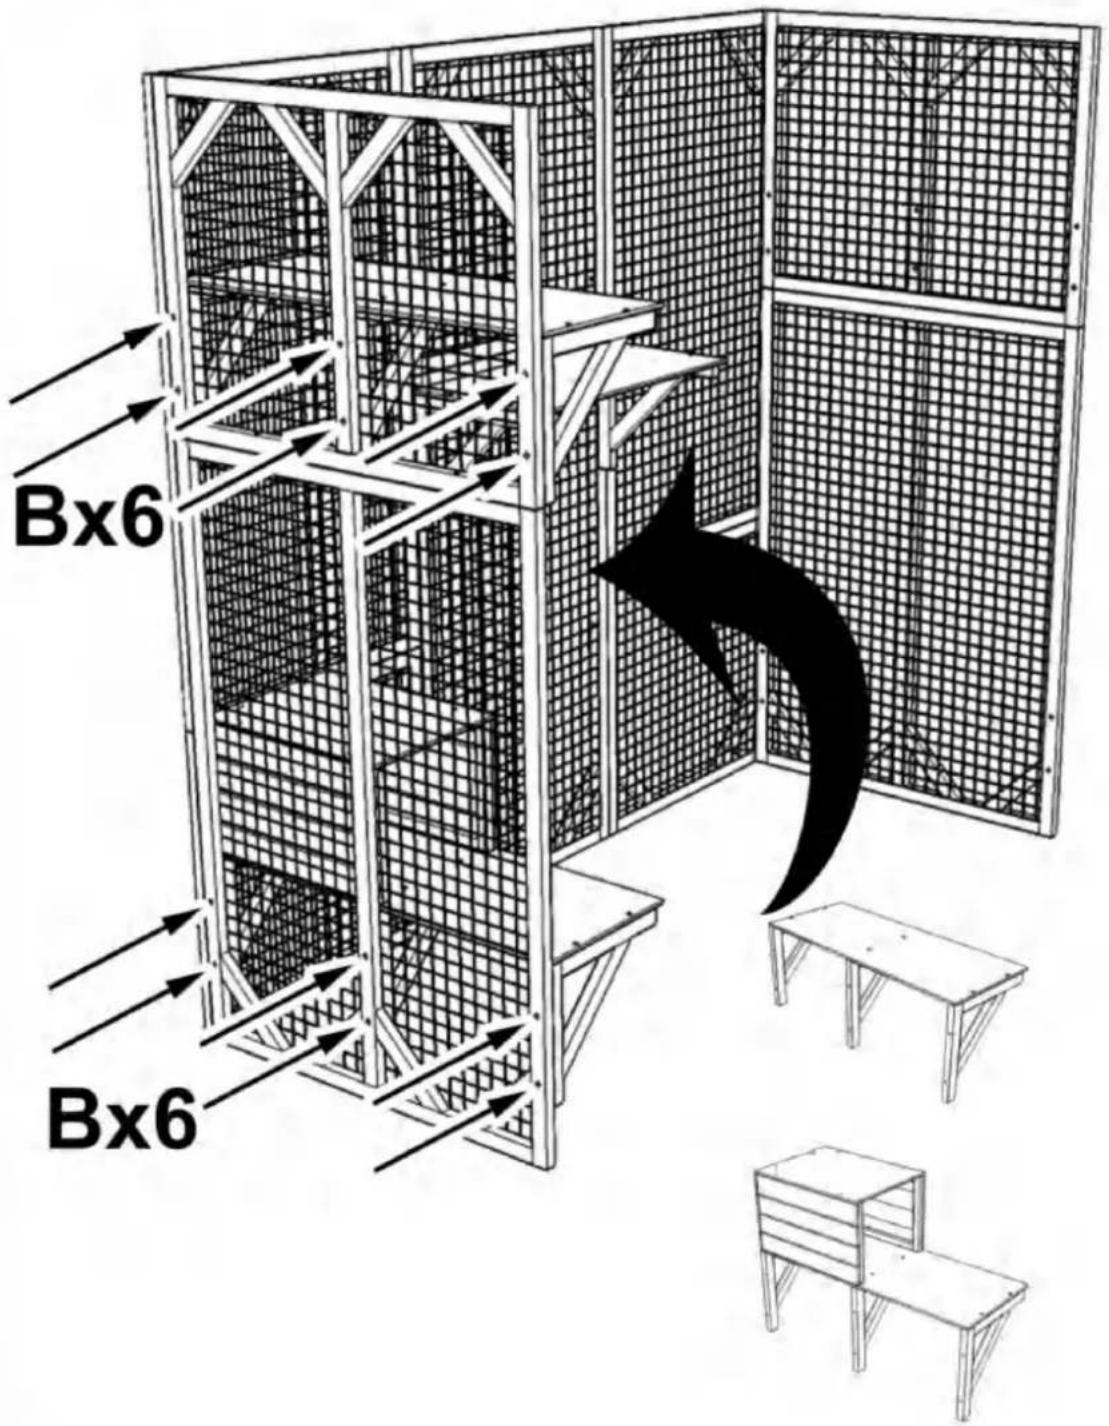
text_image
Bx6 Bx6STEP:11
Requires two people to install the shelves at designated position, one person is inside the cage holding the shelf while the other person is outside locking the screws through the pre-drilled holes as shown
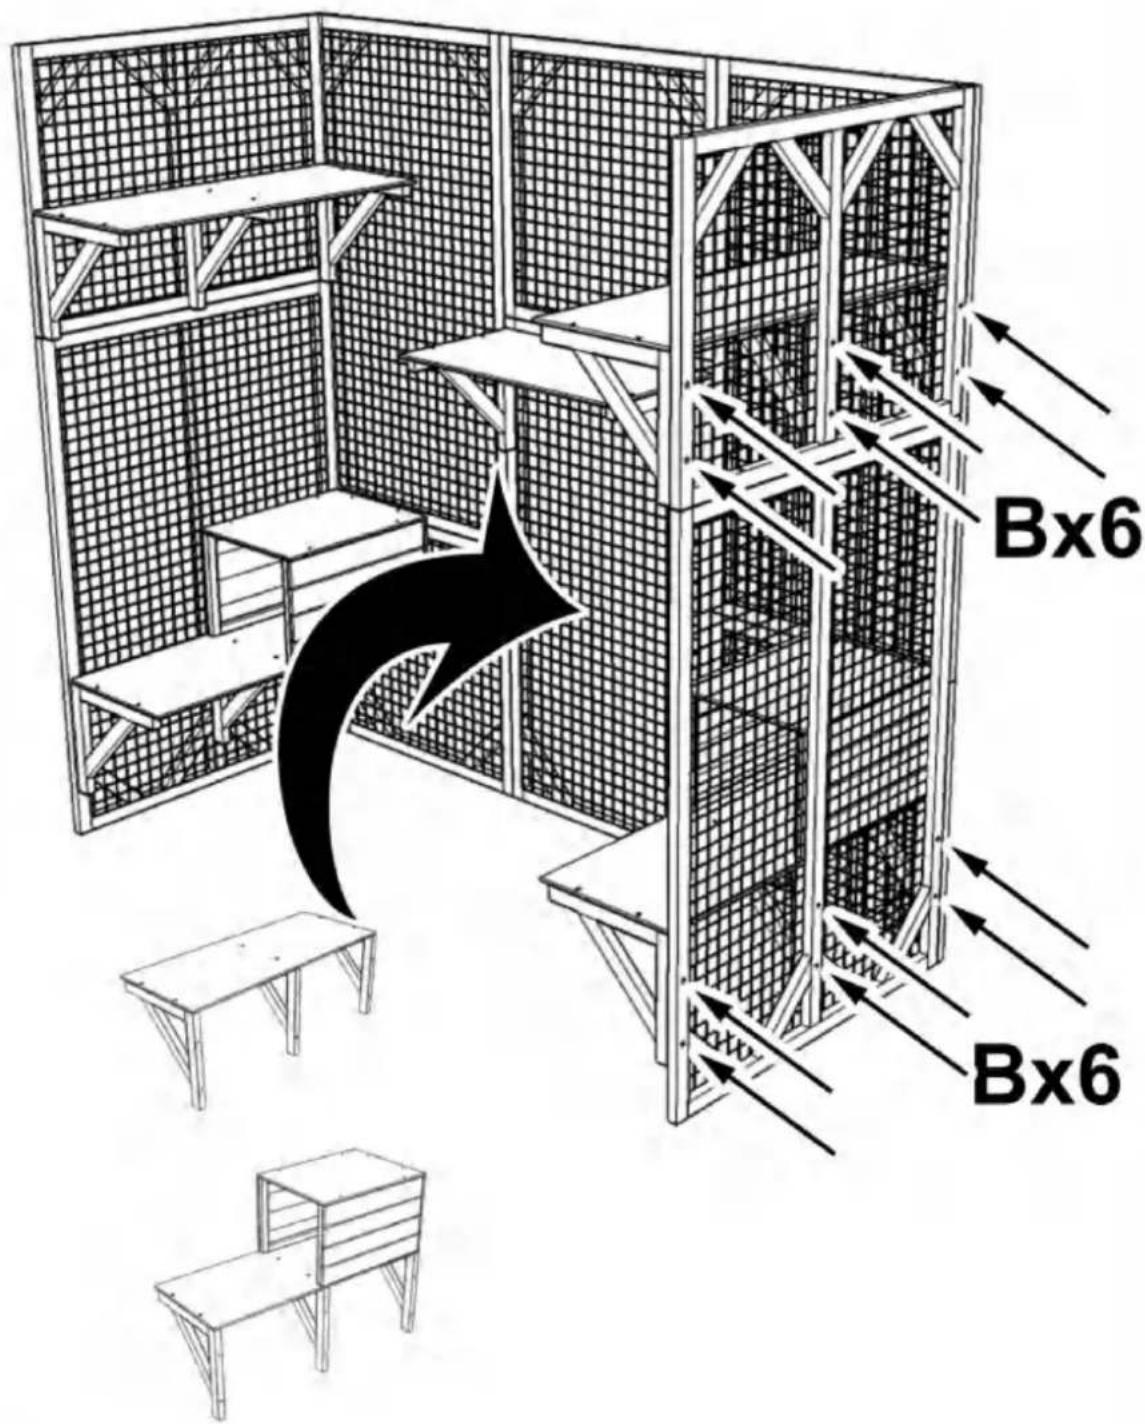
text_image
Bx6 Bx6STEP:12
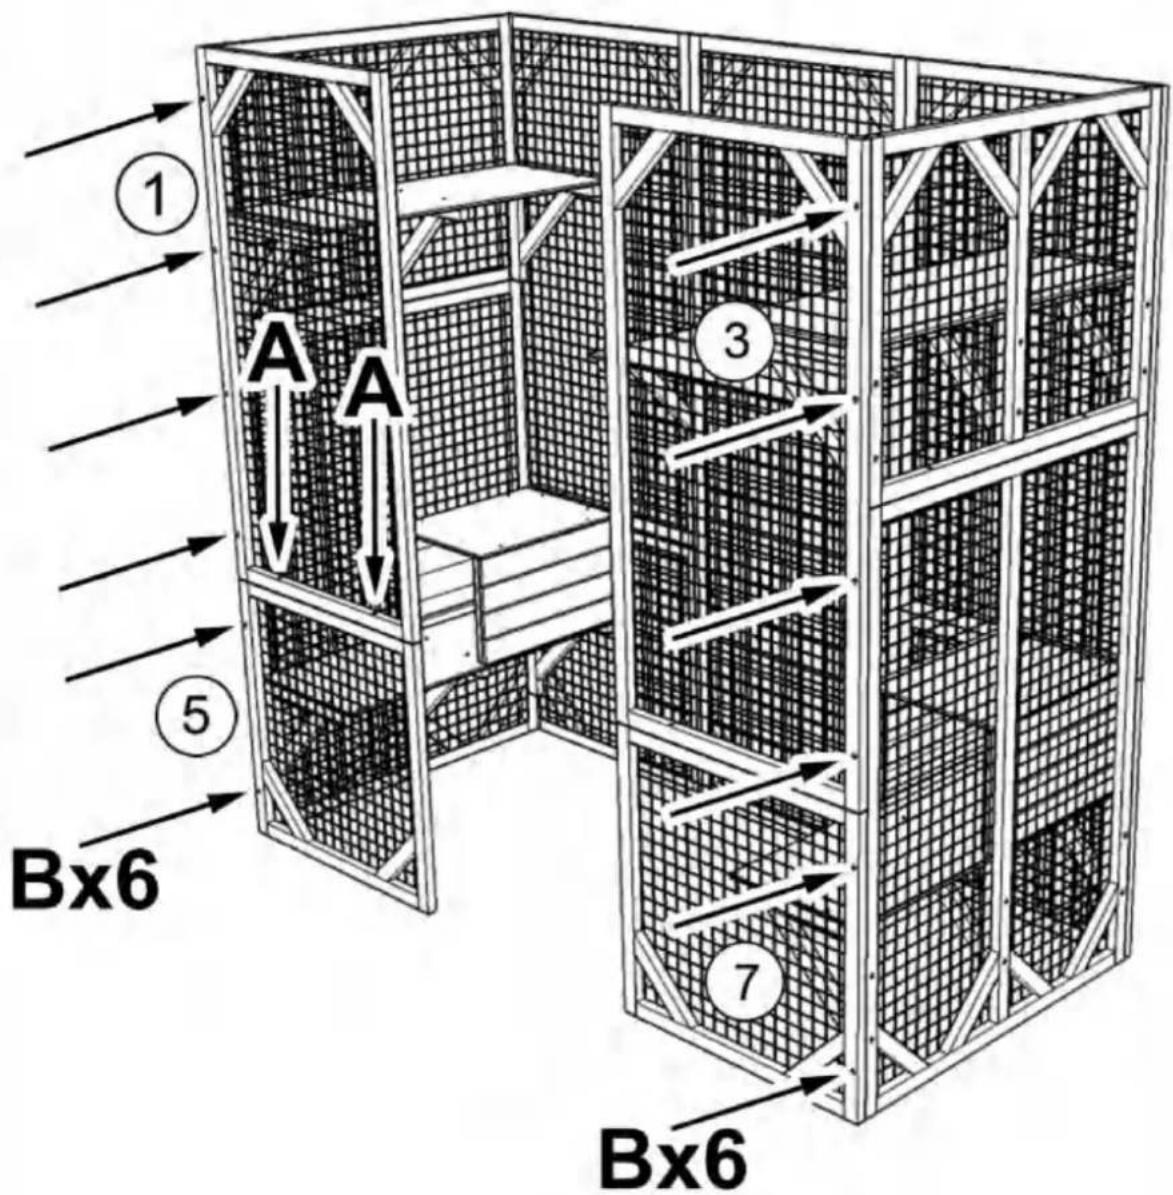
Assemble part #1 and #5, part #3 and #7 with screw (B) x12 as shown, please pay attention to the up and bottom orientation of part #1 and #3, the end with 2 pre-drilled holes is bottom as shown in the figure, then secure part #1 to part #5 with screw (A)x2 downwards
text_image
① A A ⑤ Bx6 ③ 7 Bx6STEP:13
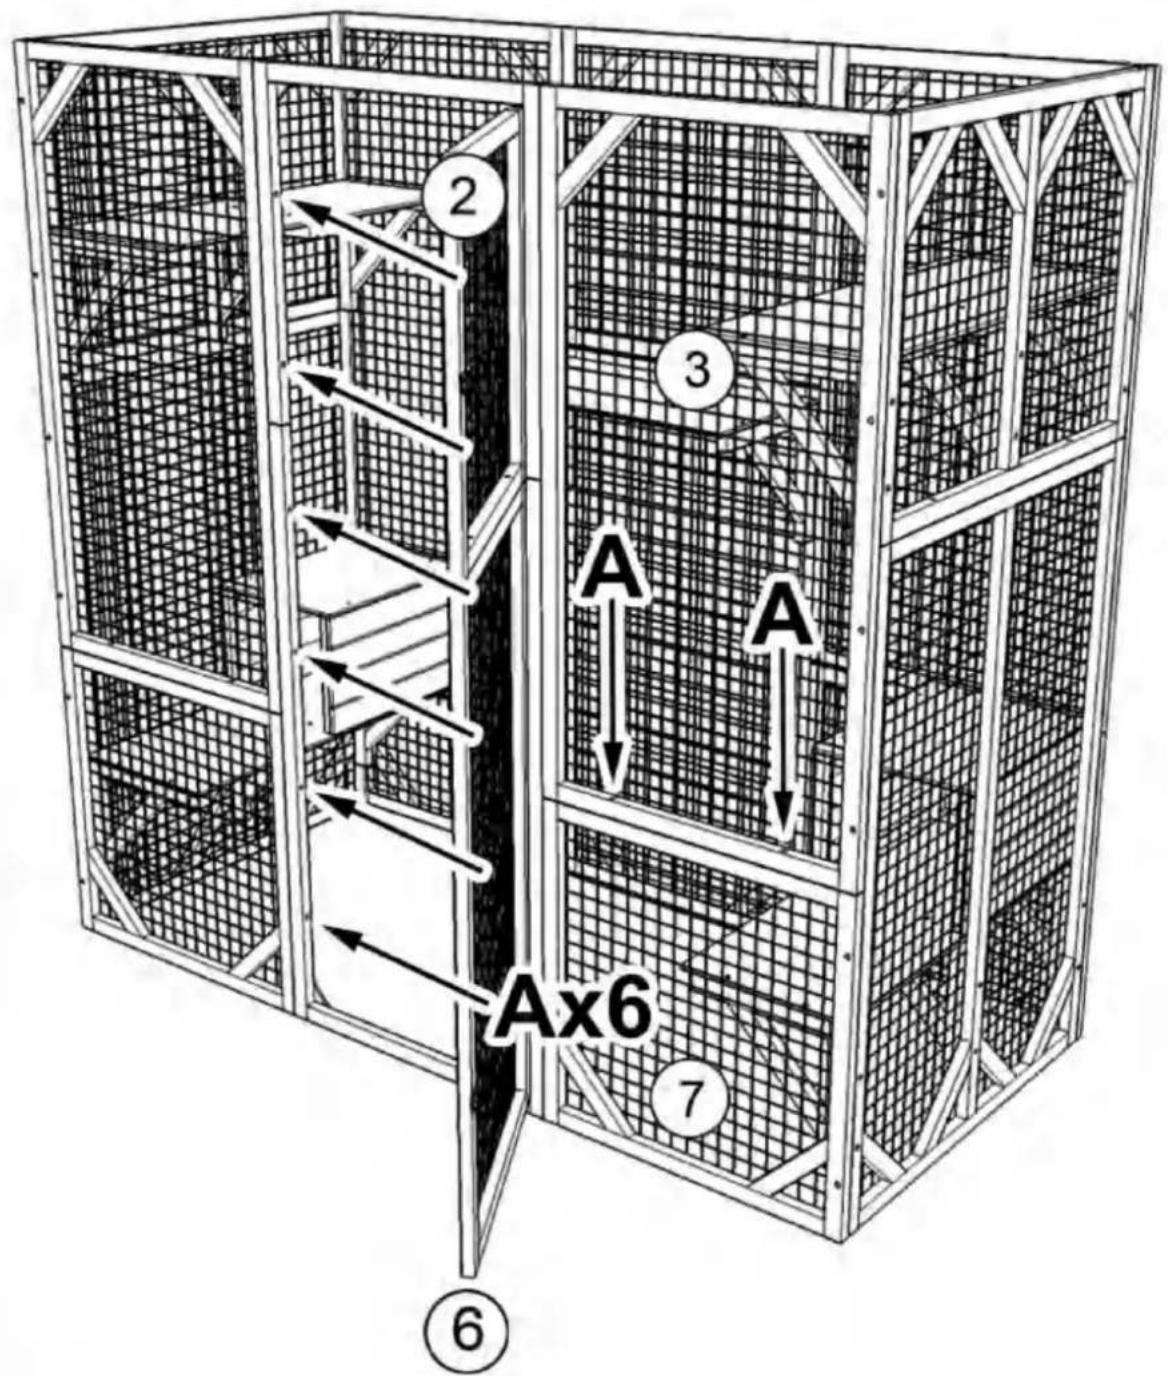
Secure part #3 to part #7 with screw (A)x2 downwards, then assemble part #2 and part #6 (open the doors) with screw (A) x6 as shown
text_image
2 3 A A Ax6 7 ⑥STEP:14
text_image
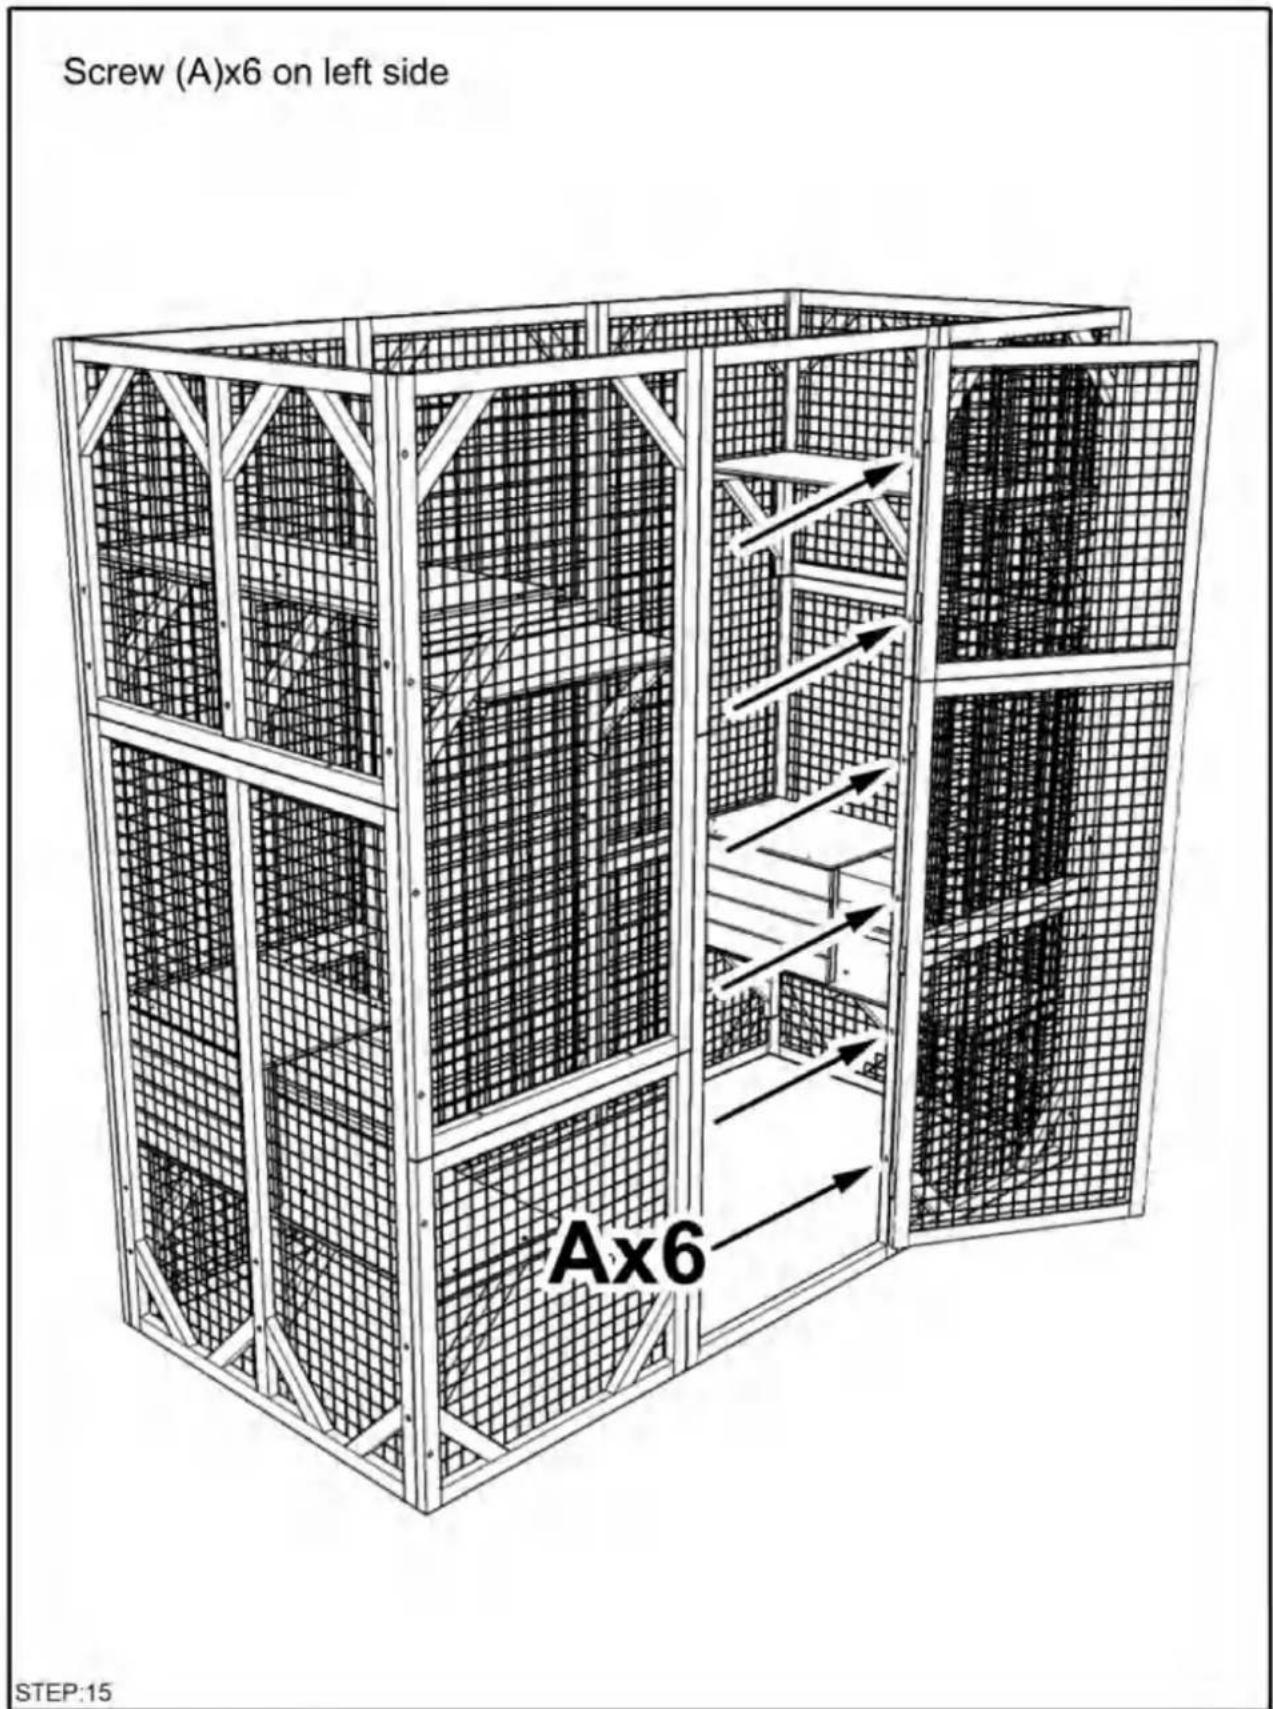
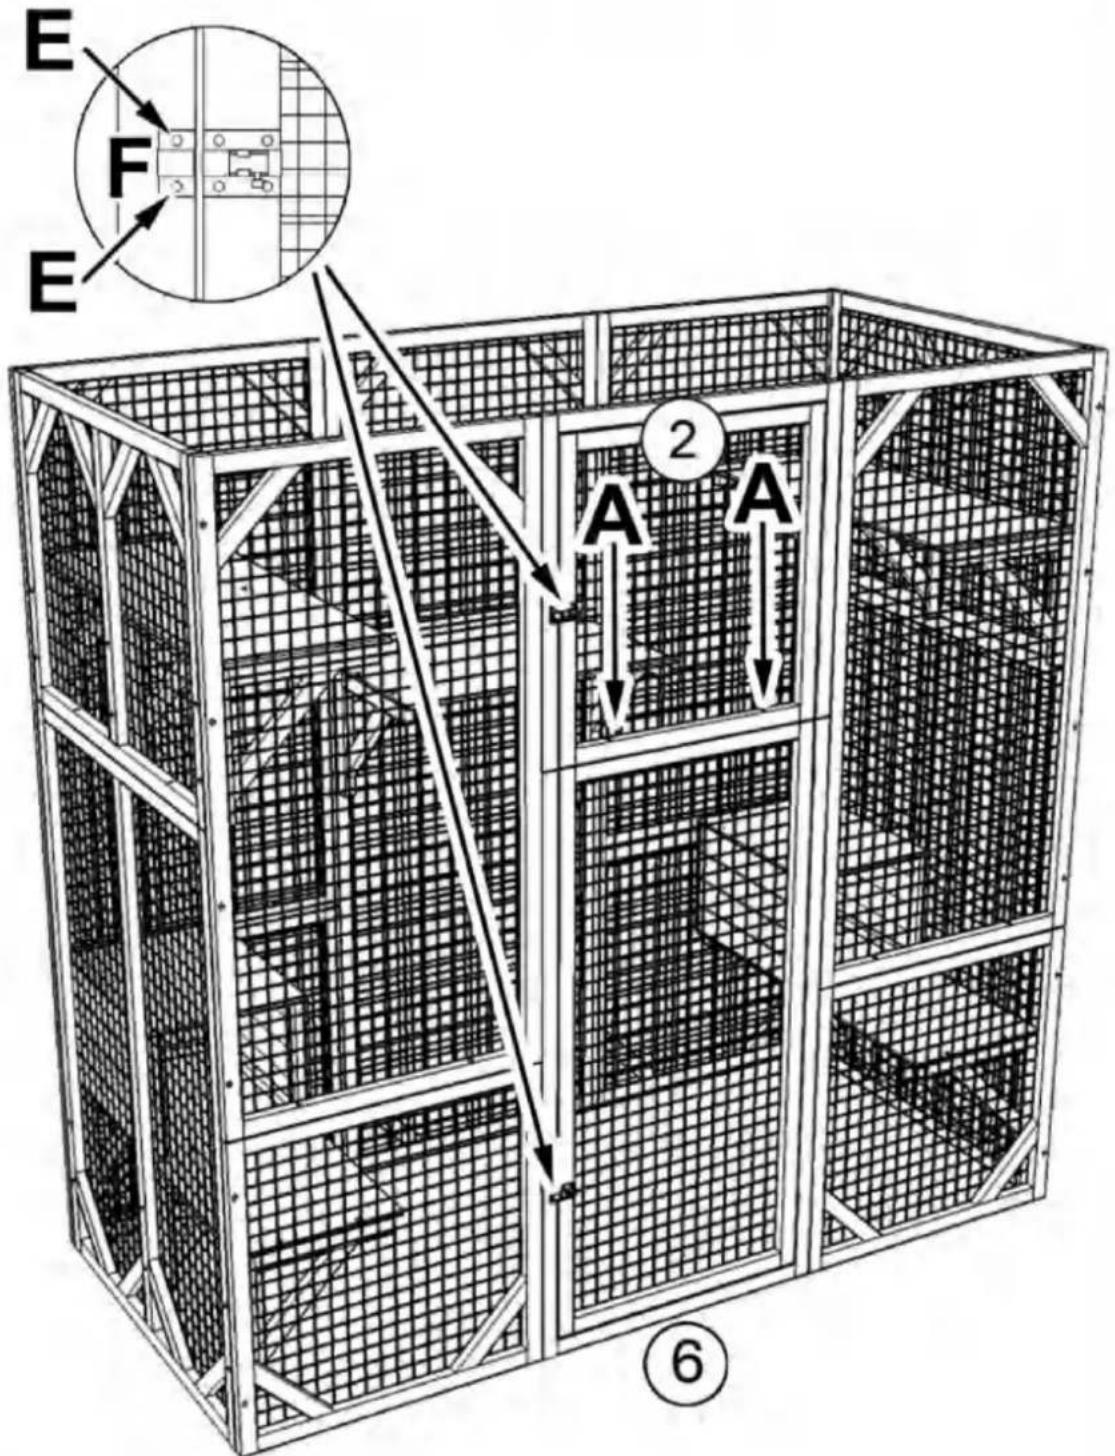
Screw (A)x6 on left side Ax6 STEP:15Align the short end of lock part #F with its other part already on door then secure it with screws (E)x2, secure part #2 to part #6 with screw (A)x2 downwards
text_image
E F E 2 A A ⑥STEP:16
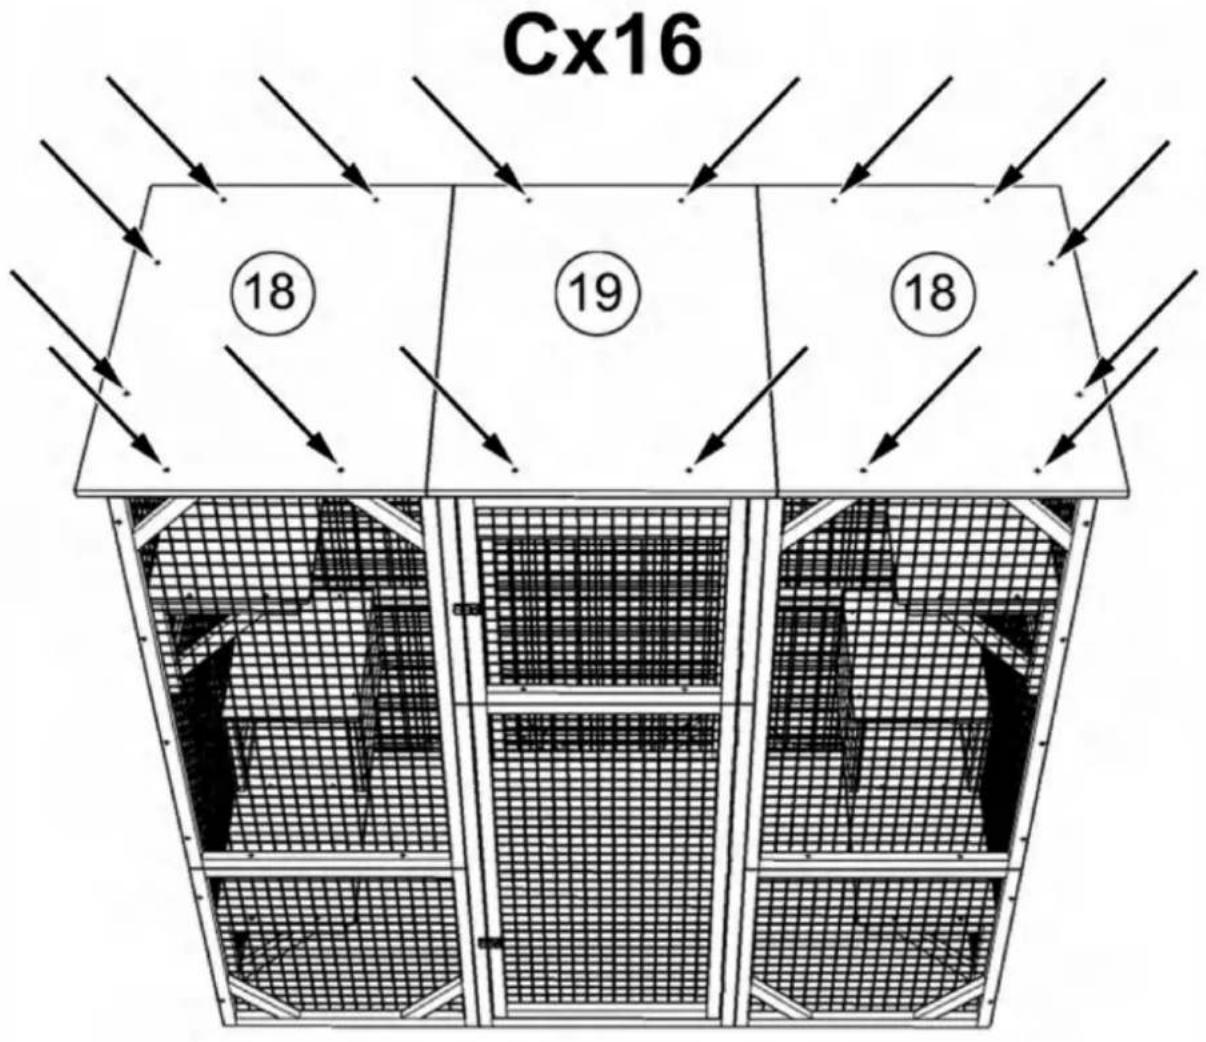
Install roofs with screw (C)x16 as shown, please be noted the edge of roof is 1.57 inch from the house underneath
text_image
Cx16 18 19 18STEP:17
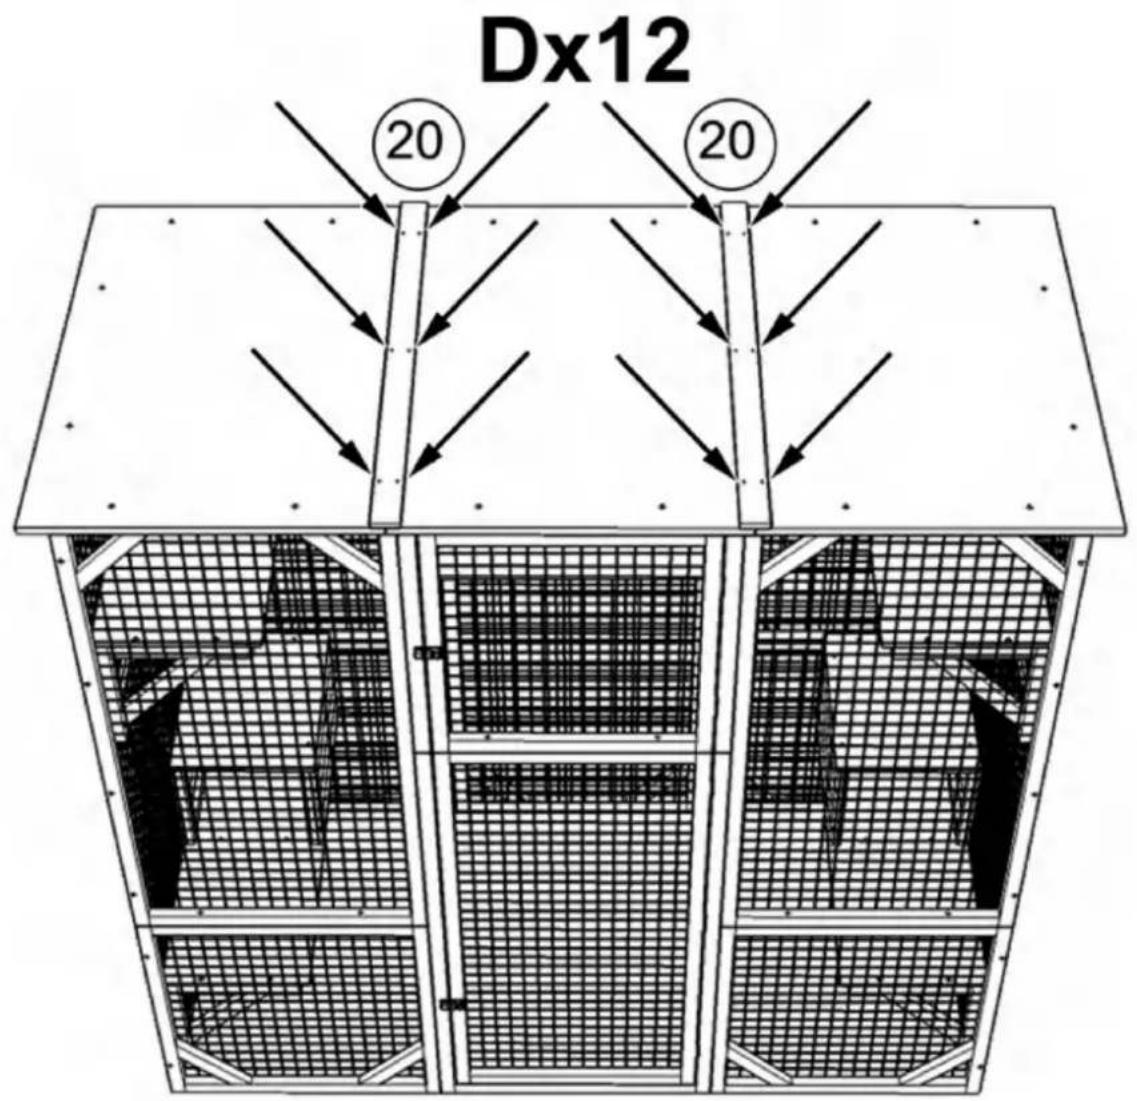
Install part #20x2 with screw (D)x12 as shown to cover the gap between roofs
text_image
Dx12 20 20STEP:18
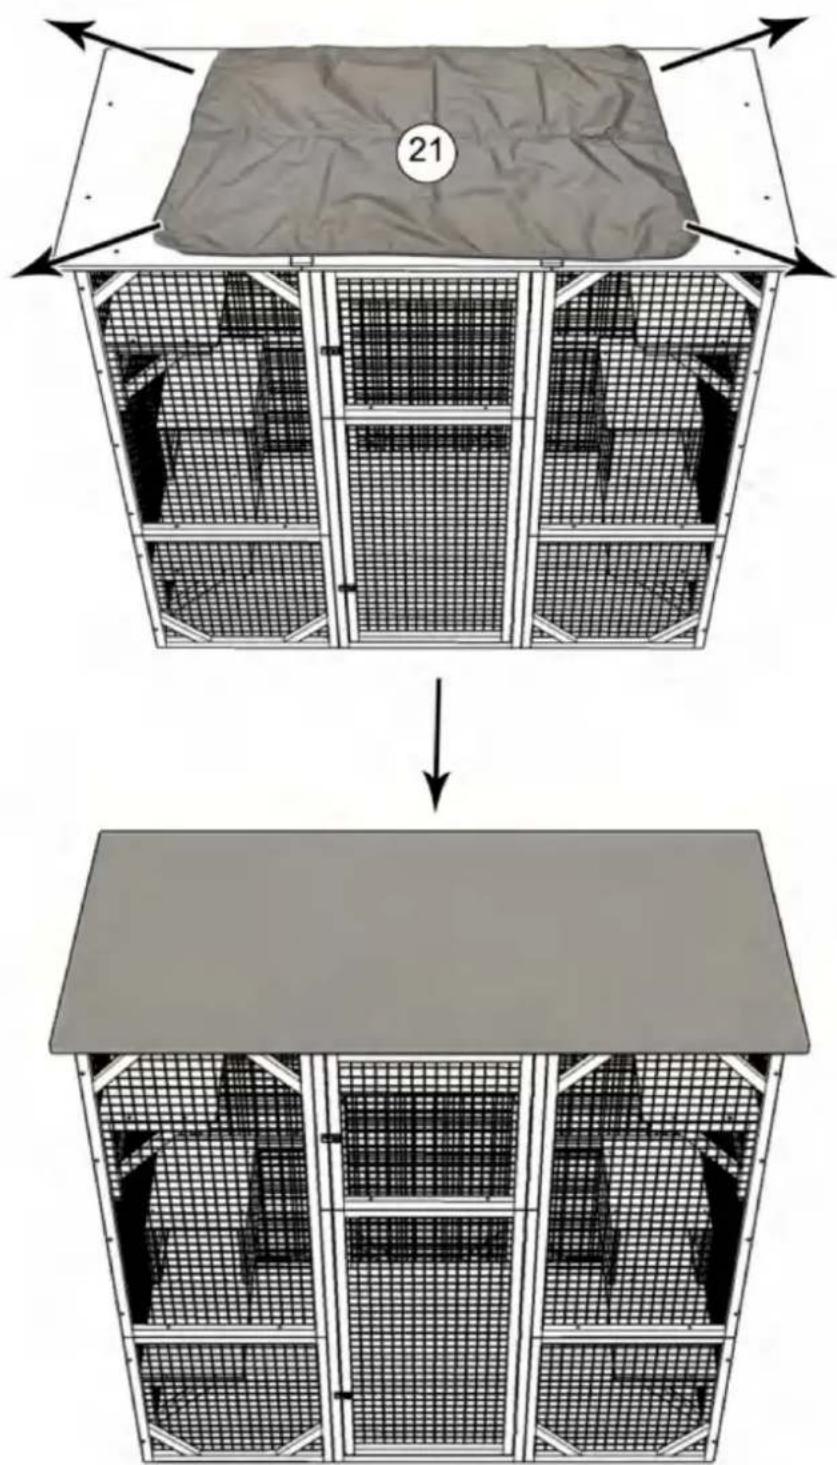
Unfold the tarp and cover it
text_image
21STEP:19
Shuangchenglu 803nong11hao1602A-1609shi, baoshanqu, shanghai 200000 CN.
| EC | REP |
Azienda: E-CrossStu GmbH.
Mainzer Landstr.69, 60329
C/O YH Consulting Limited Ufficio 147,
Centurion House, London Road, Staines-
upon-Thames, Surrey, TW18 4AX
Importato negli USA: Sanven Technology Ltd., Suite 250, 9166 Anaheim Place, Rancho Cucamonga, CA 91730
Machine Translated by Google
VEVOR®
TOUGH TOOLS, HALF PRICE
Technical Support and E-Warranty Certificate
www.vevor.com/support
VEVOR®
TOUGH TOOLS, HALF PRICE
Technical Support and E-Warranty Certificate www.vevor.com/support
INSTRUCTION FOR CAT CAGE
MODEL:CH448
natural_image
Line drawing of a multi-level cage structure with internal mesh compartments (no text or symbols)NEED HELP? CONTACT US!
Have product questions? Need technical support? Please feel free to contact us:
This is the original instruction, please read all manual instructions carefully before operating. VEVOR reserves a clear interpretation of our user manual. The appearance of the product shall be subject to the product you received. Please forgive us that we won't inform you again if there are any technology or software updates on our product.
WARNING:
Read this material before using this product. Failure to do so can result in serious injury.
Assembly precautions
- Assemble only according to these instructions. Improper assembly can create hazards.
- In order to ensure your own safety, please make sure to ANSI-approved safety goggles and heavy-duty work gloves when installing this product.
- Keep the assembly area clean and well lit.
- Keep bystanders out of the area during assembly.
- Do not assemble when tired or when under the influence of alcohol, drugs or medication.
- Product capabilities apply to properly and completely assembled product only.
- Assemble on a flat, level, hard and smooth surface capable of safely supporting a fully loaded cat cage.
Use precautions
TO PREVENT SERIOUS INJURY AND DEATH FROM TIPPING:
- DO NOT SIT OR STAND ON THIS ITEM.
- This product is not a toy. Do not allow children to play with or near this item.
Please keep small spare parts out of children's reach. - Use only on a flat, level, hard and smooth surface capable of safely supporting a fully loaded cat cage.
- Use as intended only.
- Inspect before every use; do not use if parts are loose or damaged.
SAVE THESE INSTRUCTIONS
SPECIFICATIONS
| Model | CH448 |
| Product Size | 1800*880*1690mm |
| Color | Gray |
COMPONENTS
Notice:
- Various specifications of screws are used in the installation of this product. Pay attention to the correct use of screw specifications according to the instruction manual.
- Please wear gloves when installing.
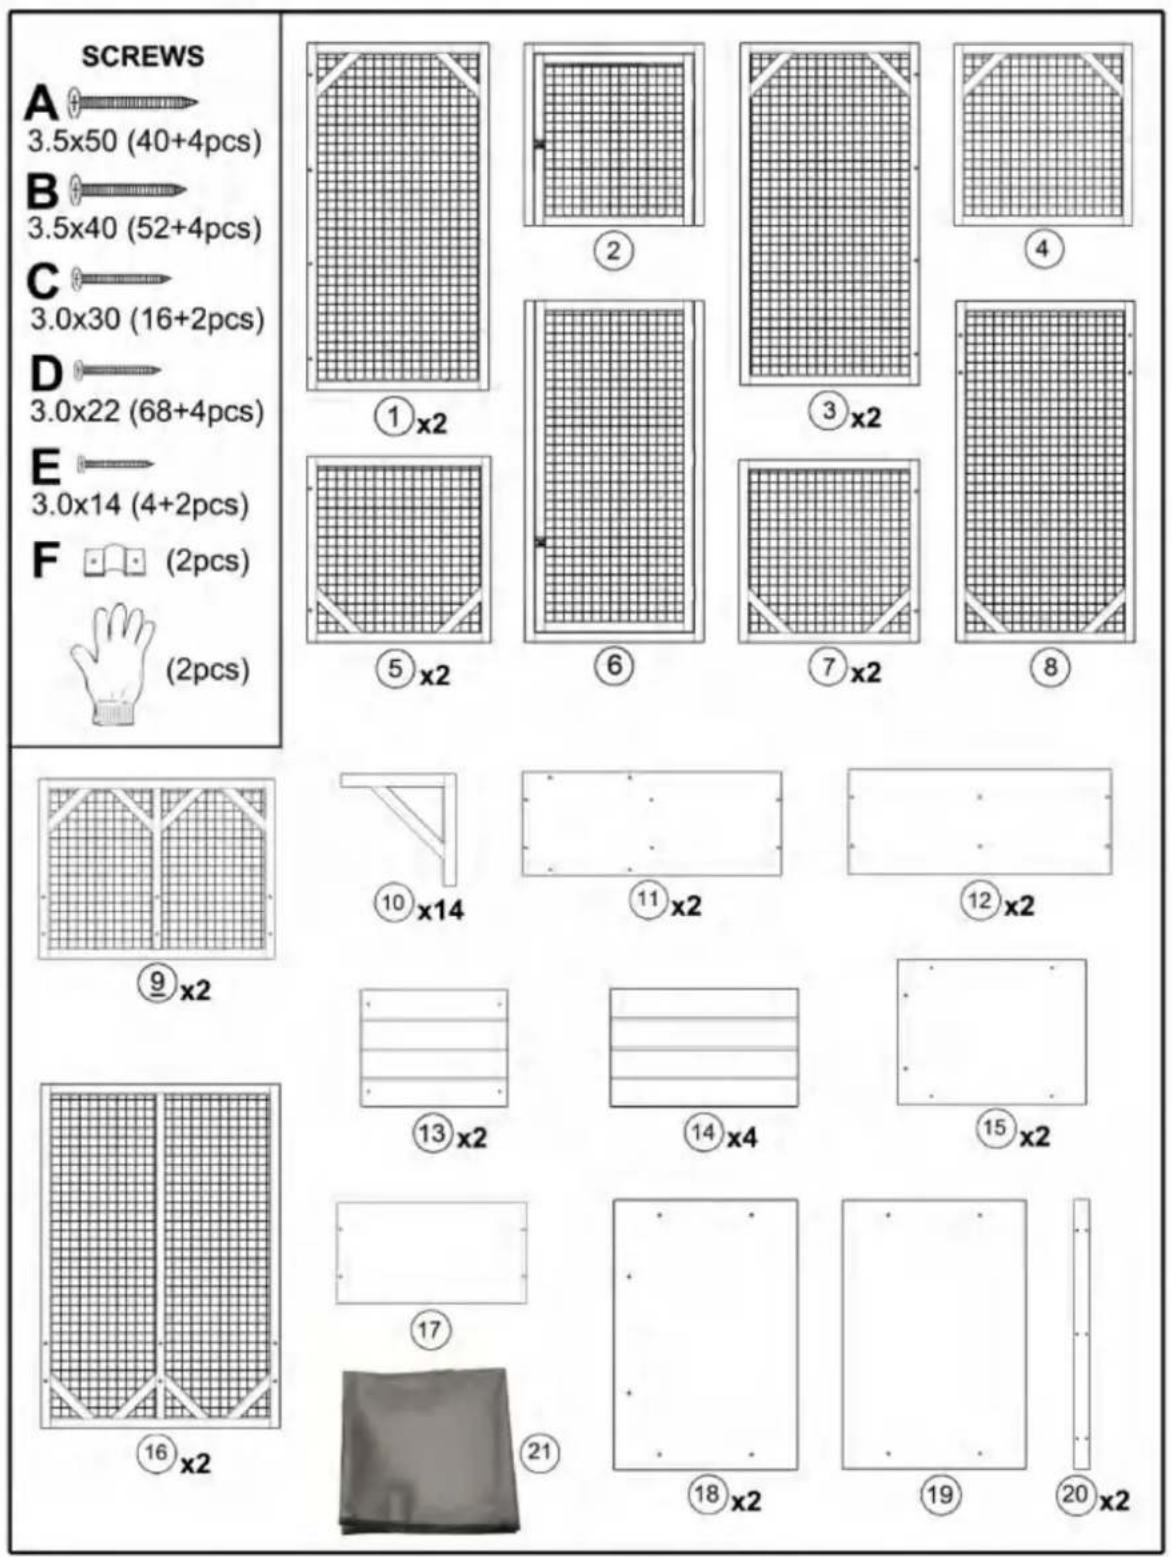
text_image
SCREWS A 3.5x50 (40+4pcs) B 3.5x40 (52+4pcs) C 3.0x30 (16+2pcs) D 3.0x22 (68+4pcs) E 3.0x14 (4+2pcs) F (2pcs) (2pcs) ①x2 ② ③x2 ④ ⑤x2 ⑥ ⑦x2 ⑧ ⑨x2 ⑩x14 ⑪x2 ⑫x2 ⑬x2 ⑭x2 ⑮x2 ⑯ 13 x2 14 x4 15 x2 17 18 x2 19 20 x2Assembly Instructions
Please be noted that the side with wire nailed on is back side, should be inward when assembly
Pay attention to the up and bottom orientation of part #9 and part #1, the end with 2 pre-drilled holes is bottom as shown in the figure Assembling part #1, #5, #9, #16 with screw (B)x6 as shown, then secure part #9 to part #16 with screw (A)x2 downwards
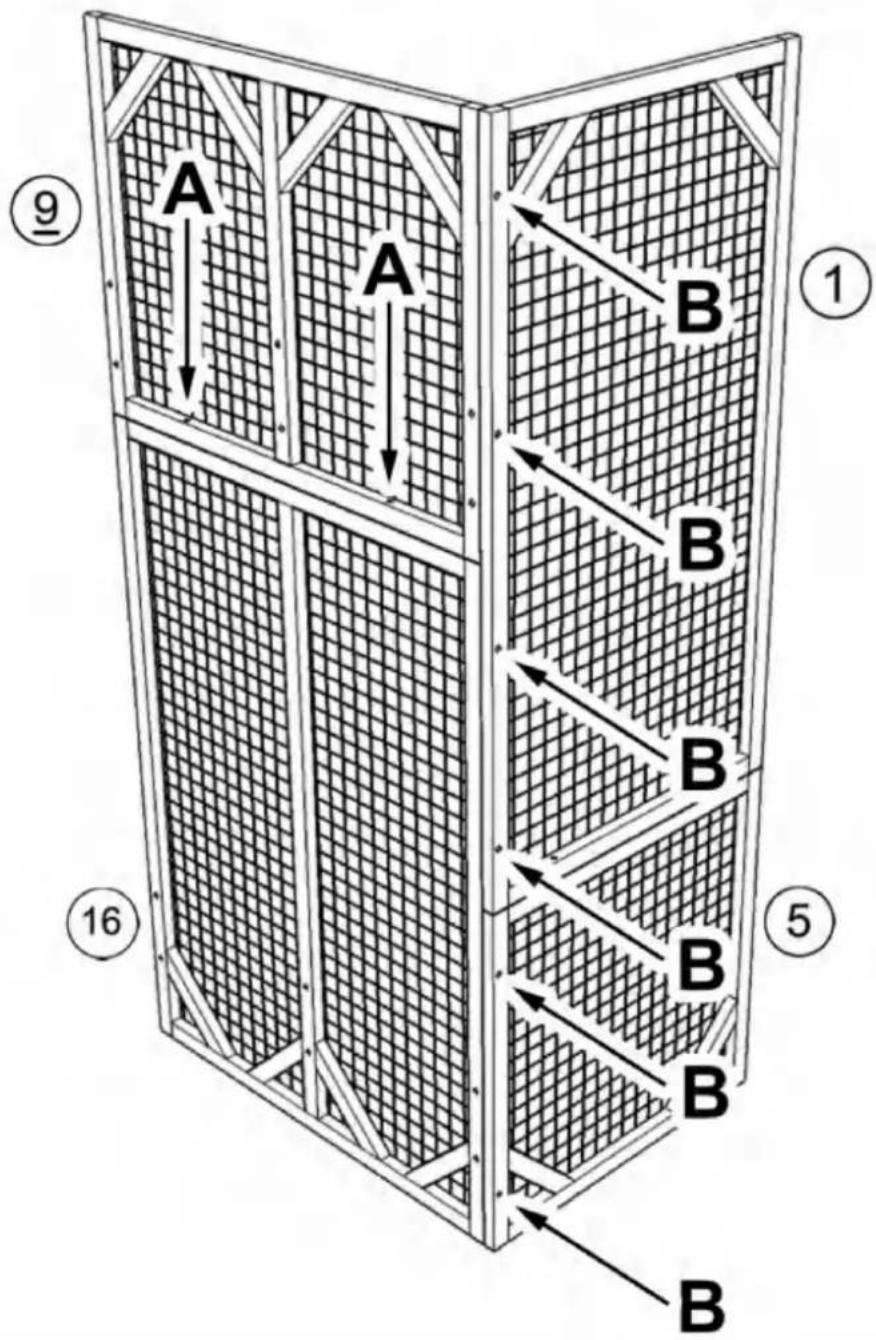
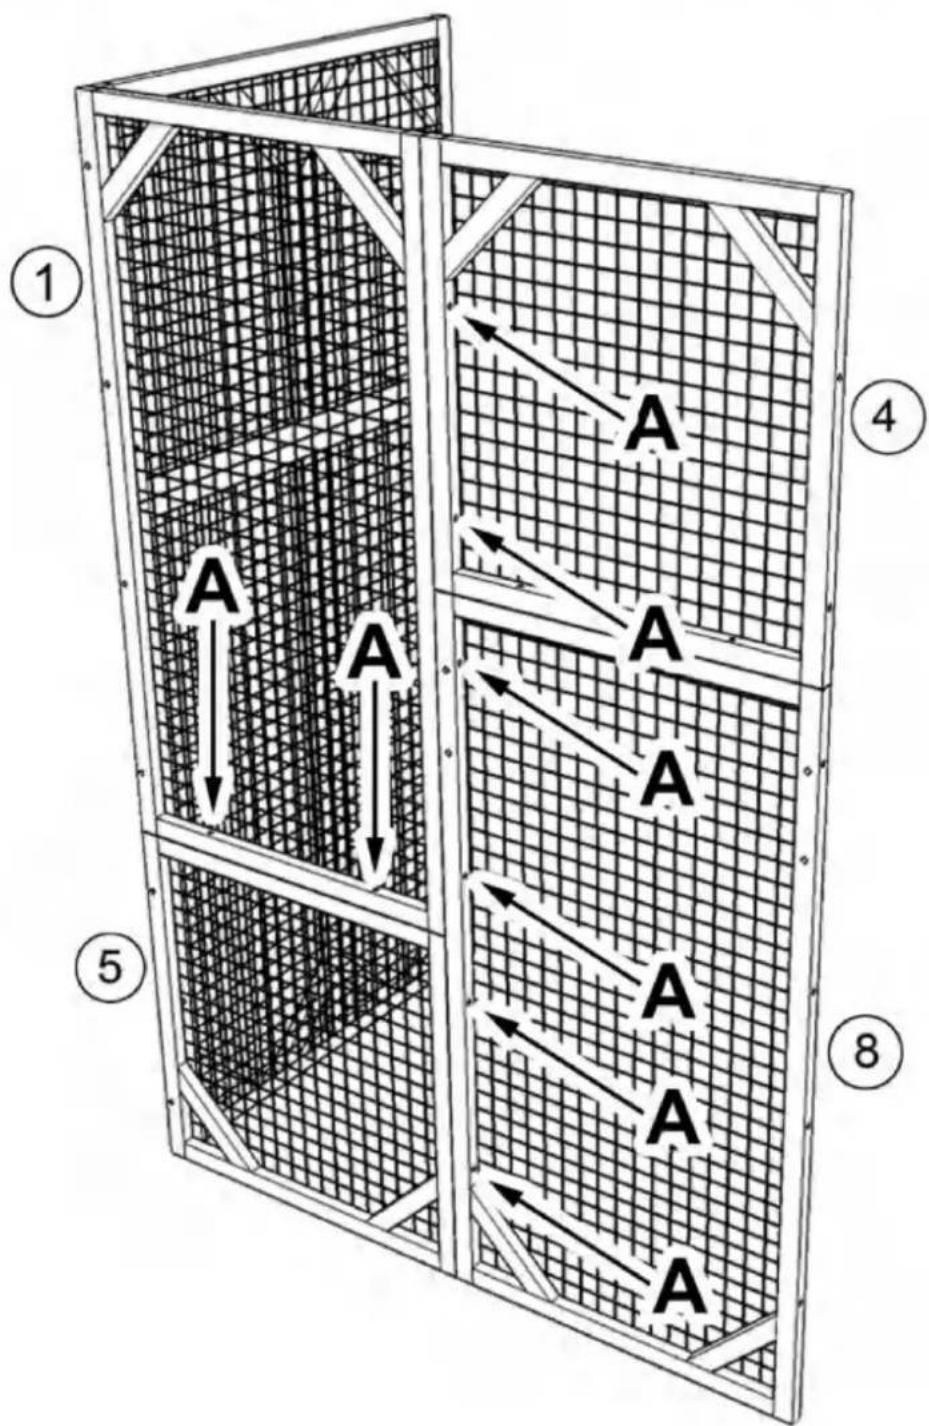
Secure part #1 to part #5 with screw (A)x2 downwards, then assemble part #4 and part #8 with screw (A) x6 as shown, please pay attention to the up and bottom orientation of part #4, the end with 2 pre-drilled holes is bottom as shown in the figure
text_image
A A A A A A A A A 1 4 5 8STEP:2
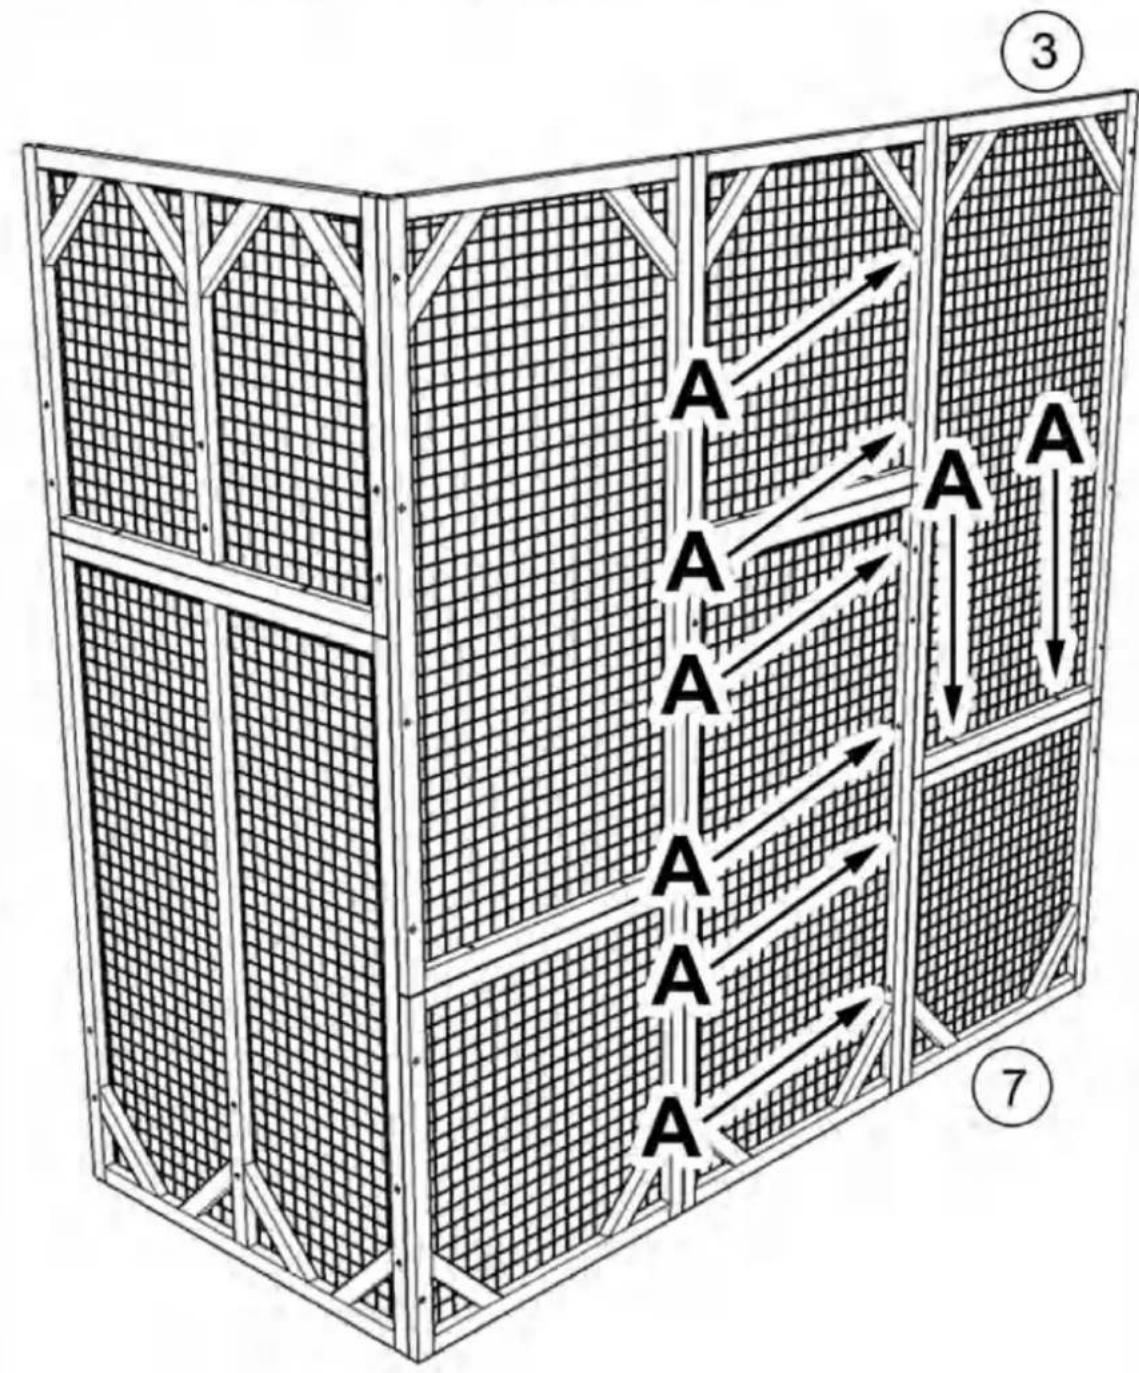
Assemble part #3 and part #7 with screw (A) x6 as shown, please pay attention to the up and bottom orientation of part #3, the end with 2 pre-drilled holes is bottom as shown in the figure, then secure part #3 to part #7 with screw (A)x2 downwards
flowchart
graph TD
    A1["A"] --> B1["A"]
    A2["A"] --> B2["A"]
    A3["A"] --> B3["A"]
    A4["A"] --> B4["A"]
    A5["A"] --> B5["A"]
    A6["A"] --> B6["A"]
    A7["A"] --> B7["A"]
    style A1 fill:#f9f,stroke:#333
    style A2 fill:#f9f,stroke:#333
    style A3 fill:#f9f,stroke:#333
    style A4 fill:#f9f,stroke:#333
    style A5 fill:#f9f,stroke:#333
    style A6 fill:#f9f,stroke:#333
    style A7 fill:#f9f,stroke:#333
STEP:3
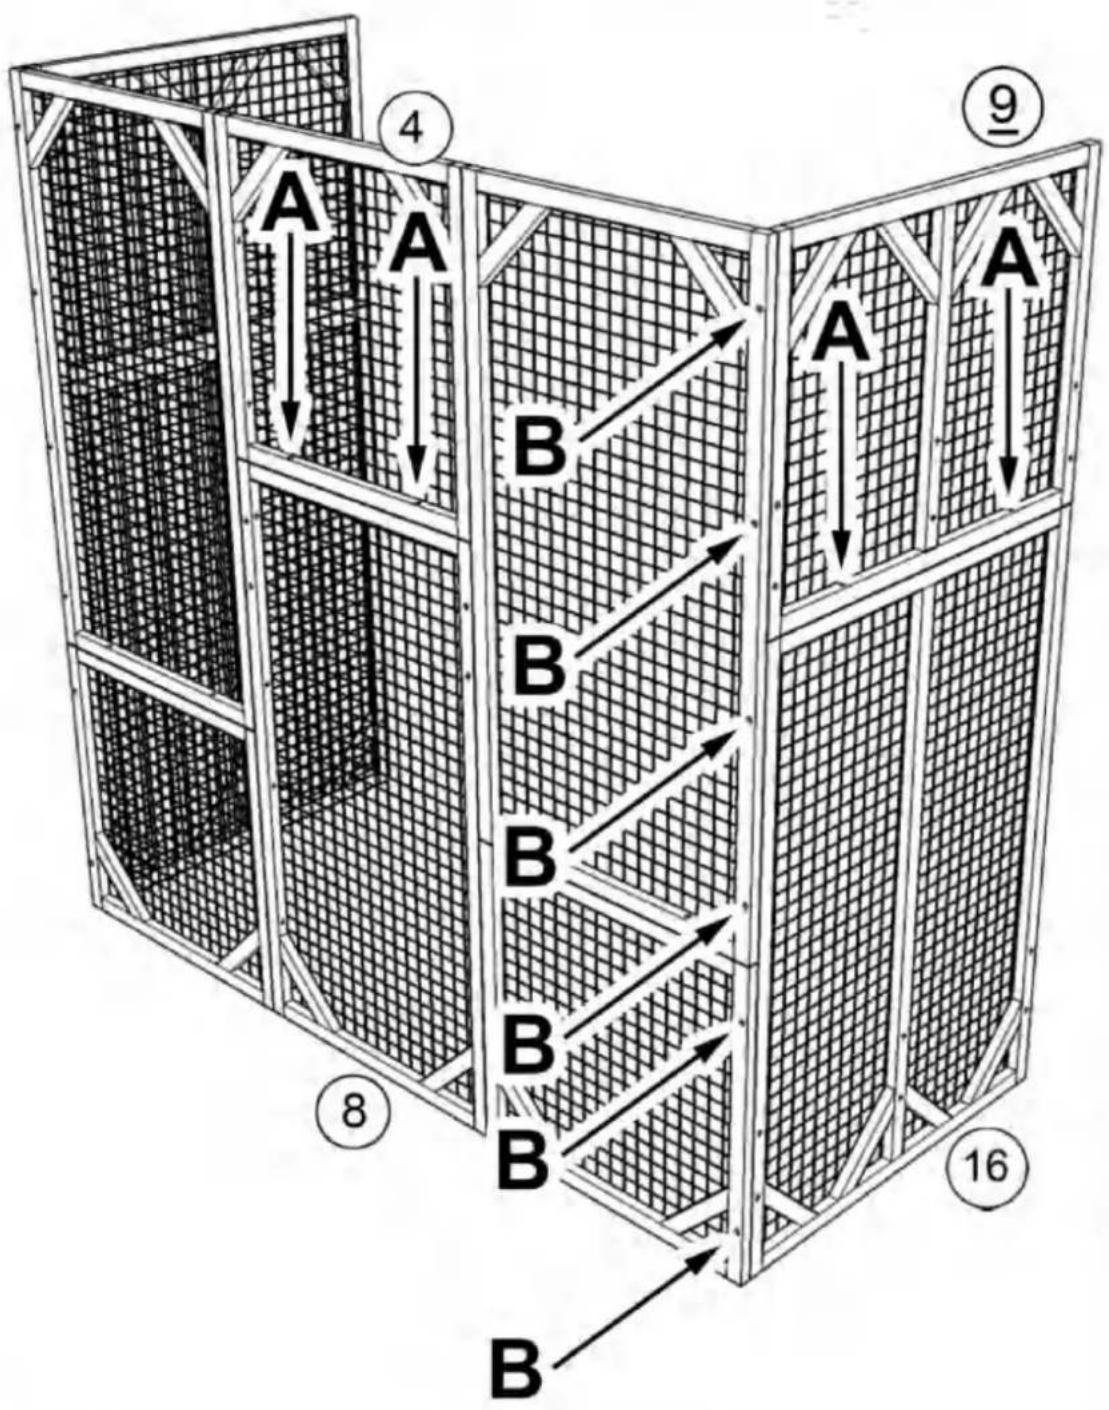
Secure part #4 to part #8 with screw (A)x2 downwards, then assemble part #9 and part #16 with screw (B) x6 as shown, please pay attention to the up and bottom orientation of part #9, the end with 2 pre-drilled holes is bottom as shown, then secure part #9 to part #16 with screw (A)x2 downwards
Assemble shelf with part #17 and part #10x2 with screw (D)x4 as shown
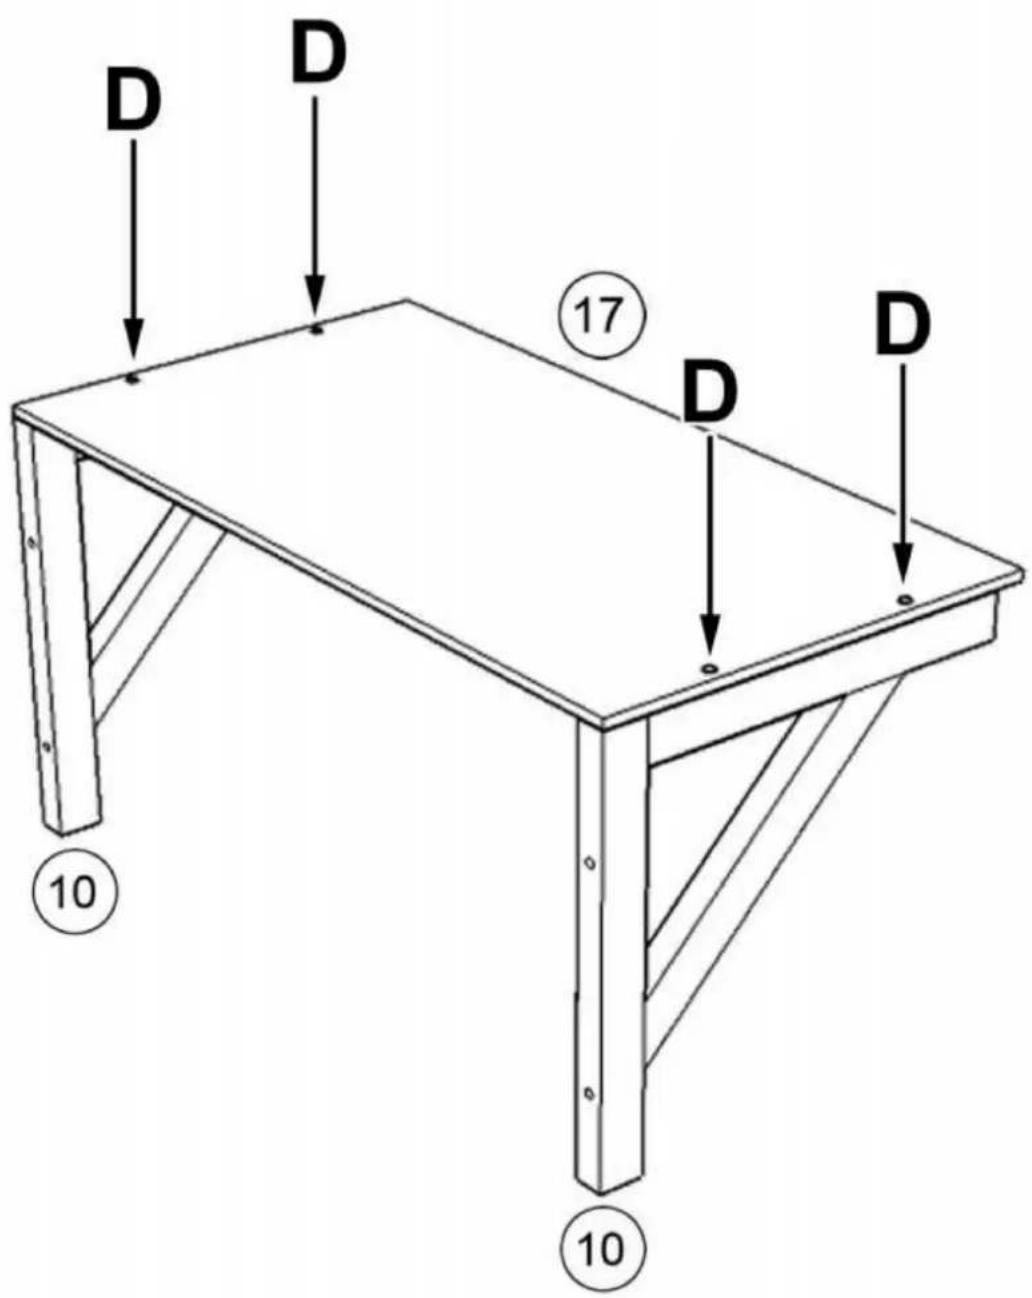
text_image
D D 17 D D 10 10STEP:5
Requires two people to install the shelf at designated position, one person is inside the cage holding the shelf while the other person is outside locking the screws through the pre-drilled holes as shown.
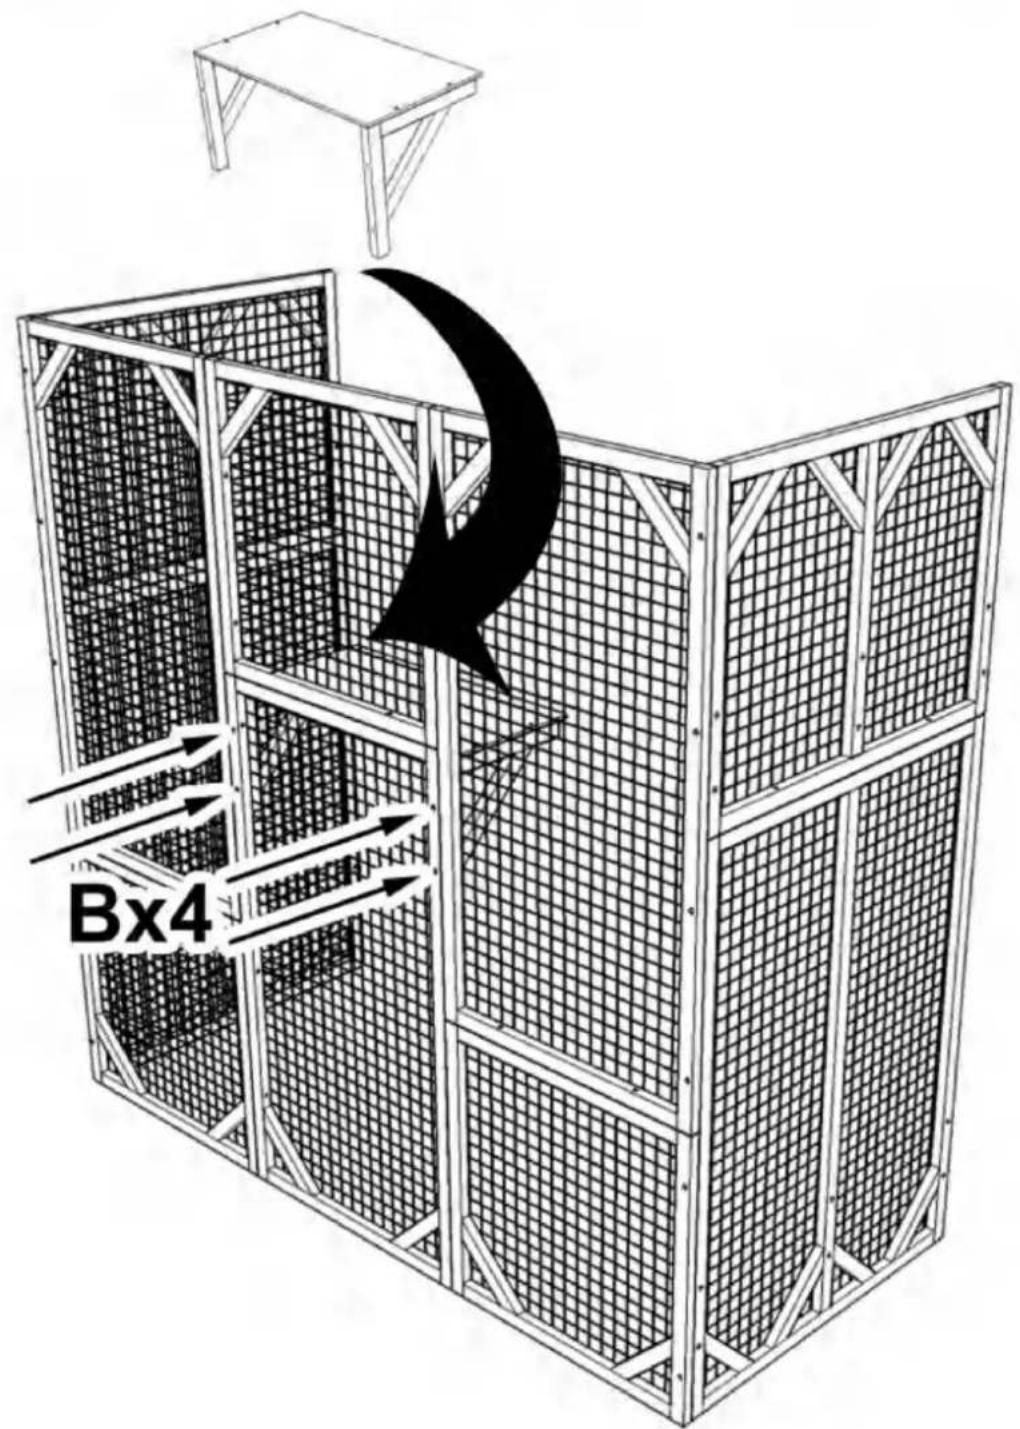
text_image
Bx4STEP:6
Assemble shelf with part #11 and part #10x3 with screw (D)x6 as shown
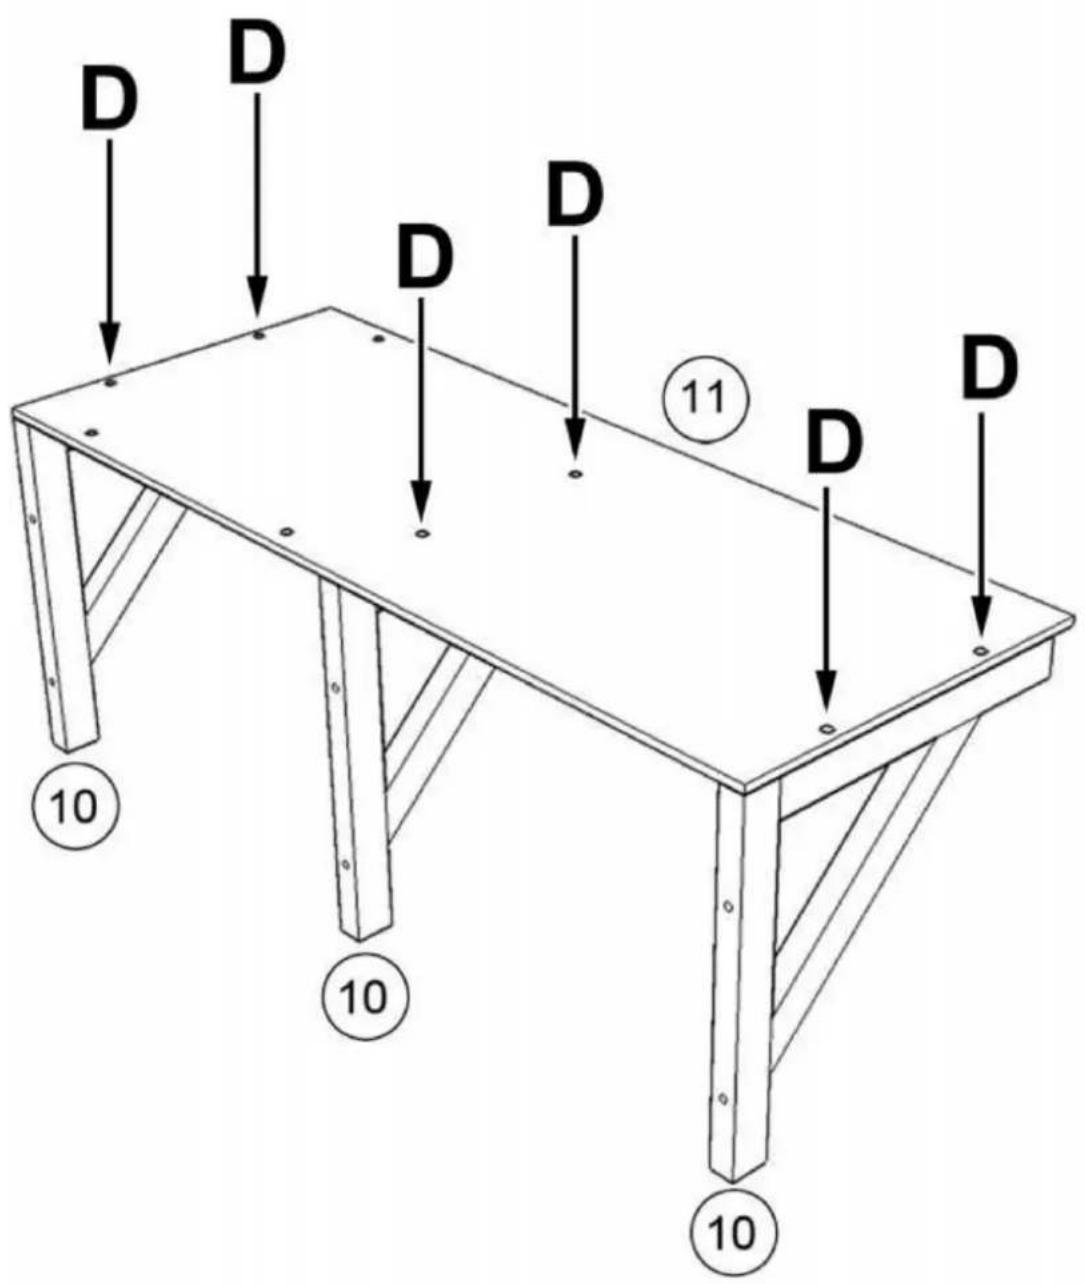
text_image
D D D D D 11 D D 10 10 10STEP:7
Assemble sleeping box with part #13, #14x2, #15 using screw (D)x10
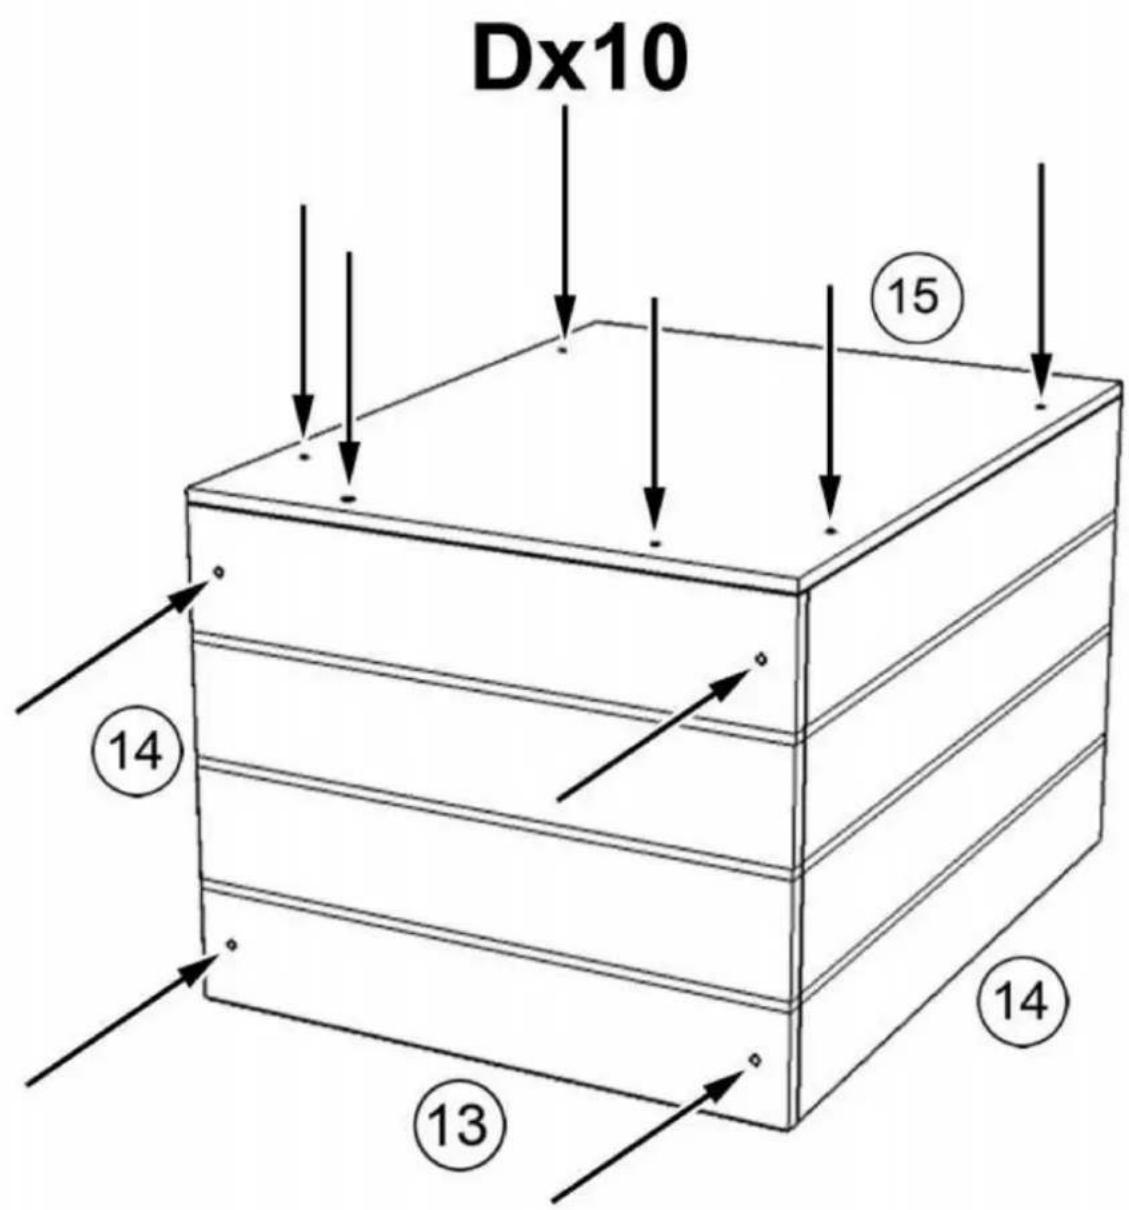
text_image
Dx10 15 14 13 14STEP:8
Install sleeping box on shelf as shown and secure the box with screw (D)x4 from the bottom
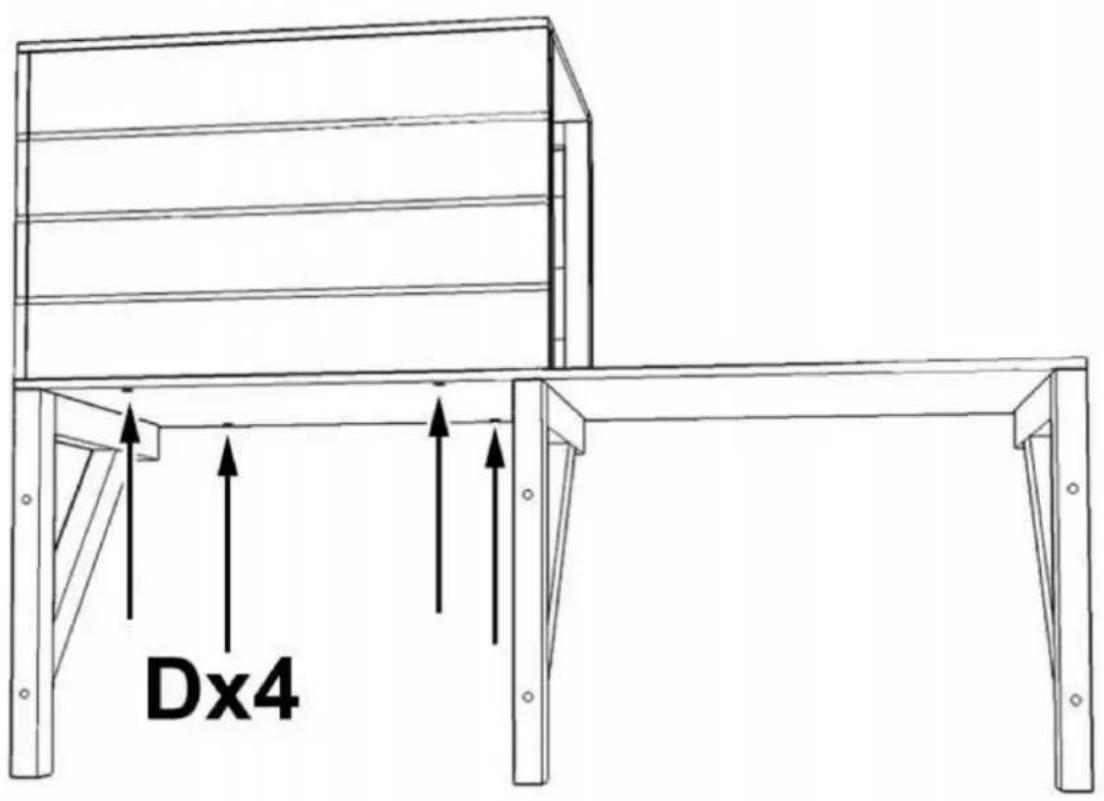
text_image
Dx4STEP:9

Requires two people to install the shelves at designated position, one person is inside the cage holding the shelf while the other person is outside locking the screws through the pre-drilled holes as shown
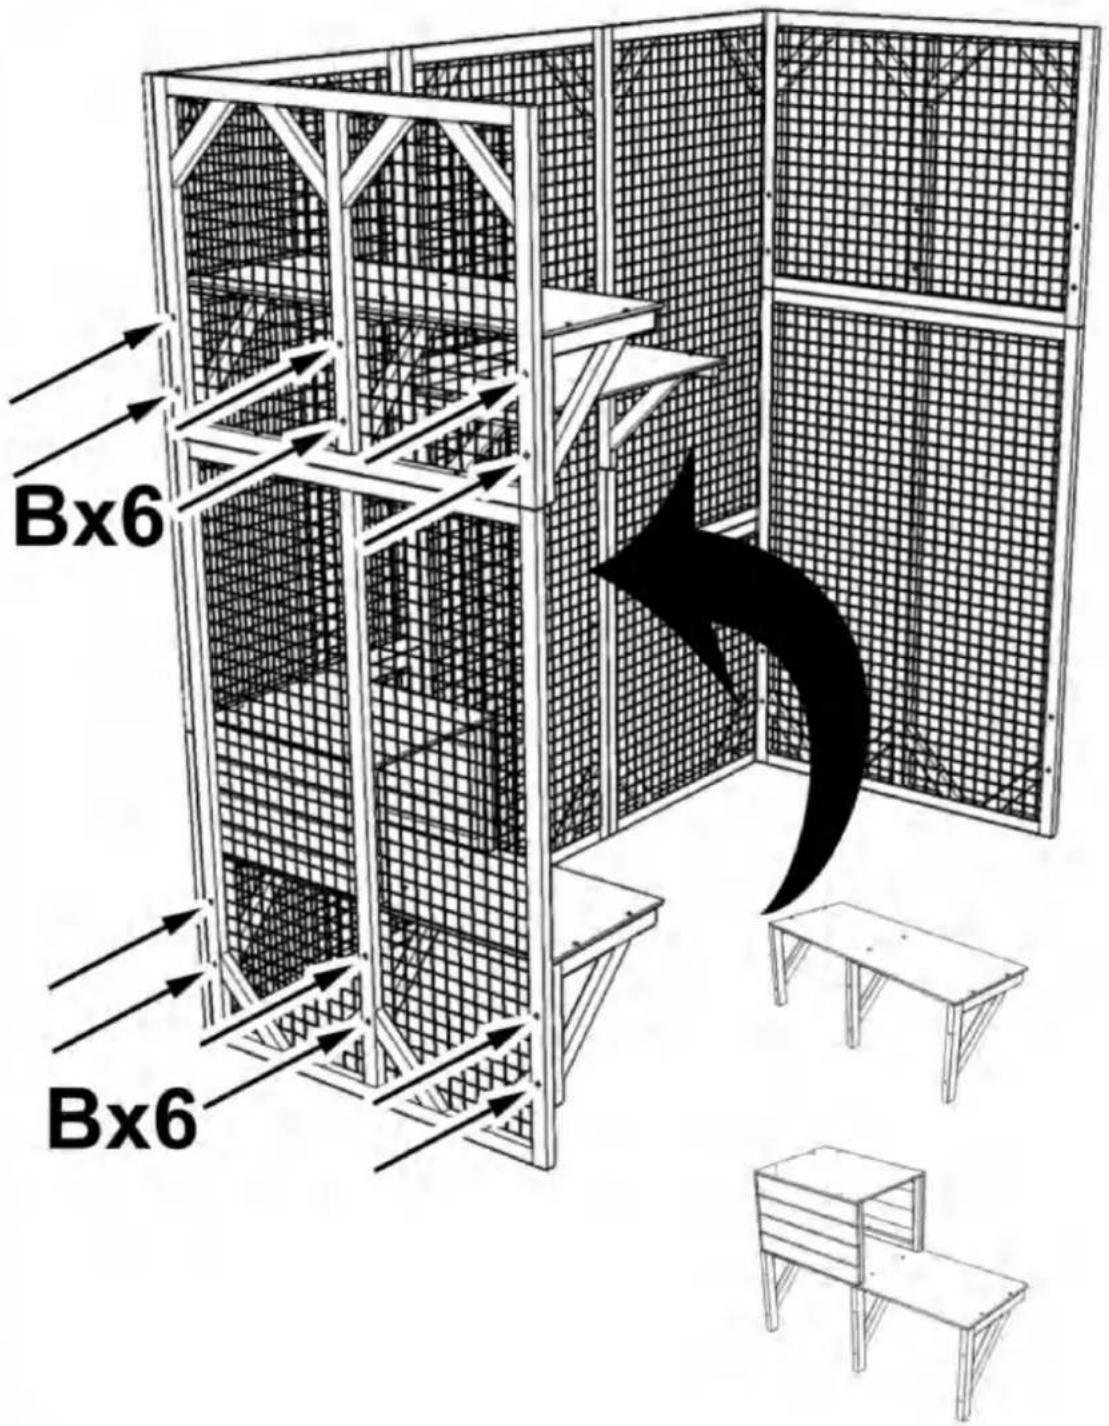
text_image
Bx6 Bx6STEP:11
Requires two people to install the shelves at designated position, one person is inside the cage holding the shelf while the other person is outside locking the screws through the pre-drilled holes as shown
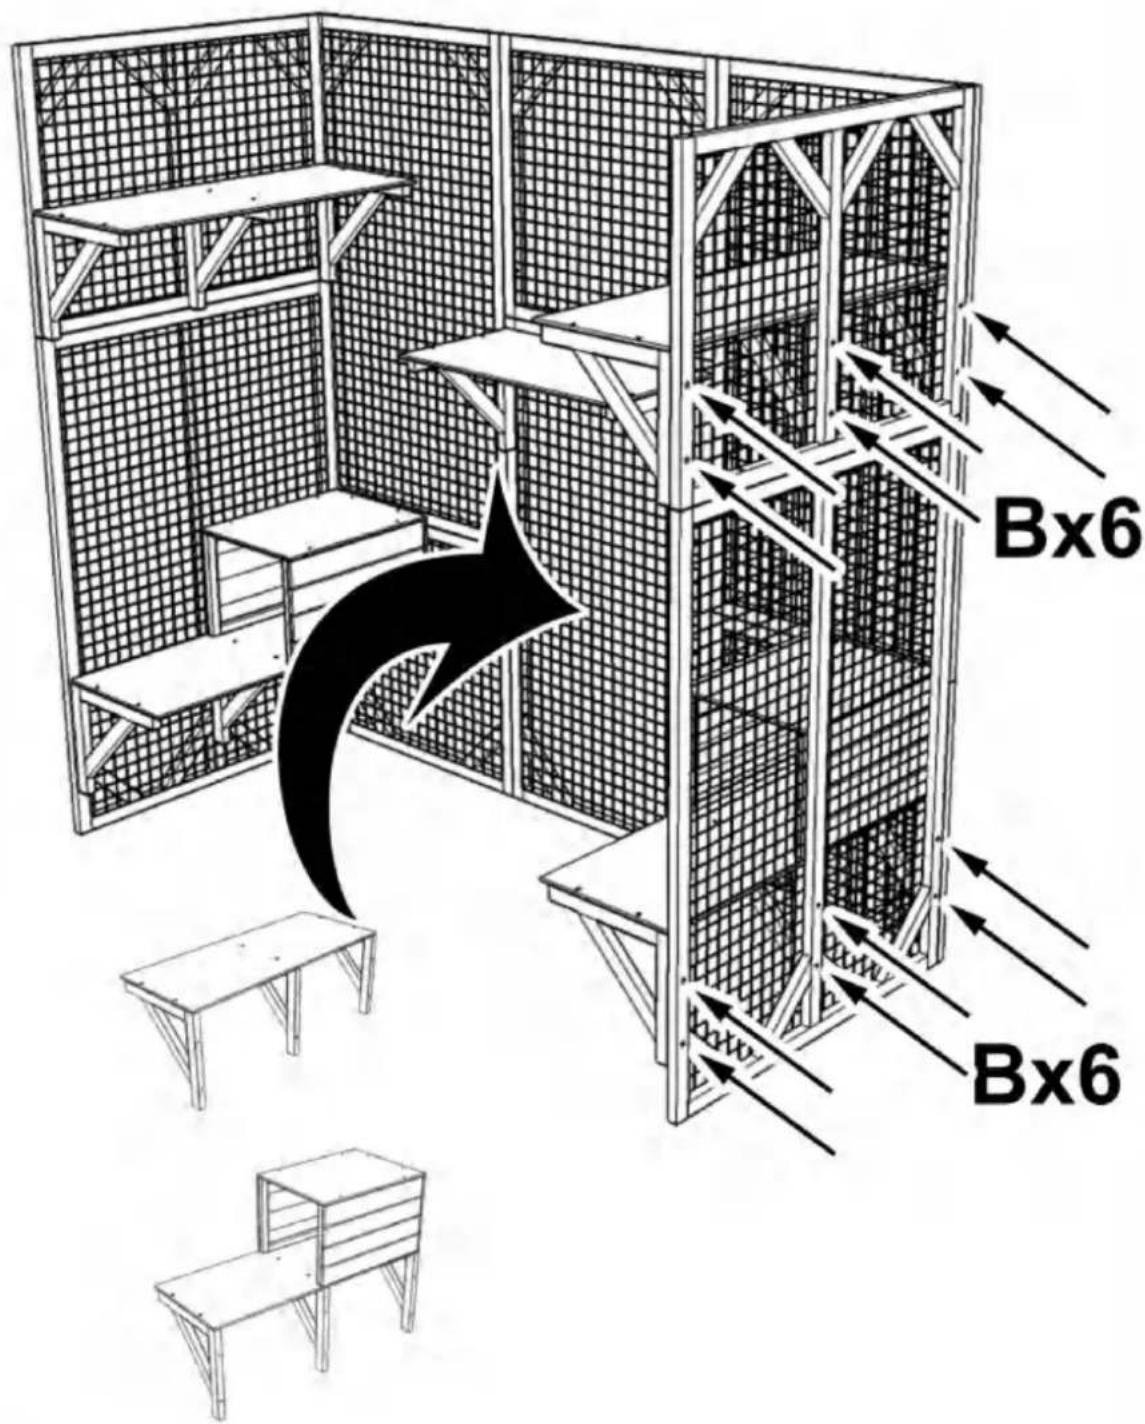
text_image
Bx6 Bx6STEP:12
Assemble part #1 and #5, part #3 and #7 with screw (B) x12 as shown, please pay attention to the up and bottom orientation of part #1 and #3, the end with 2 pre-drilled holes is bottom as shown in the figure, then secure part #1 to part #5 with screw (A)x2 downwards
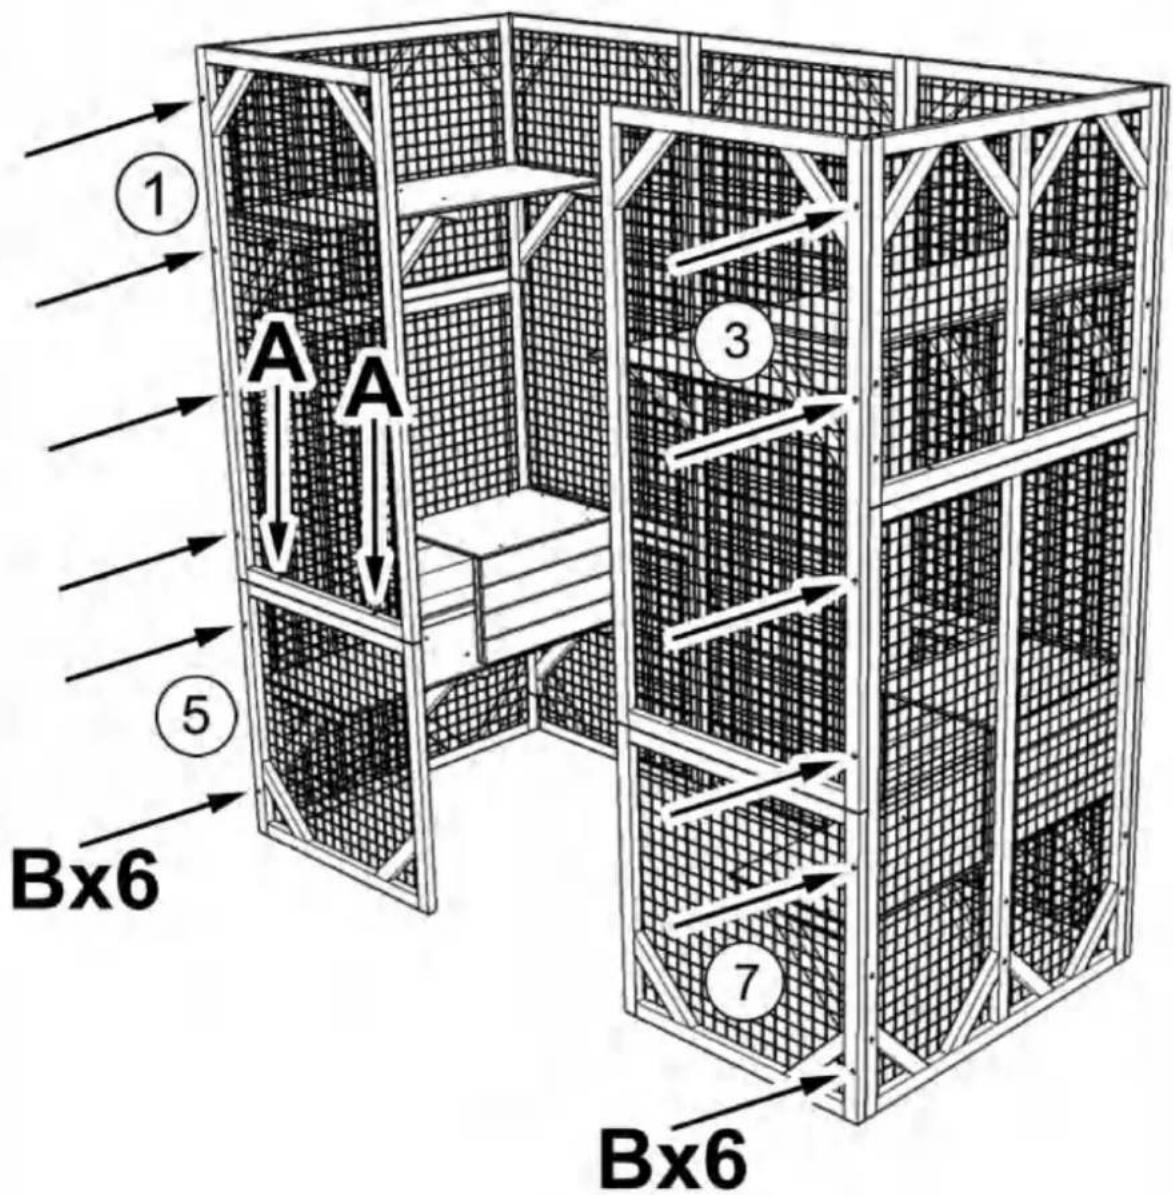
text_image
① A A ⑤ Bx6 ③ 7 Bx6STEP:13
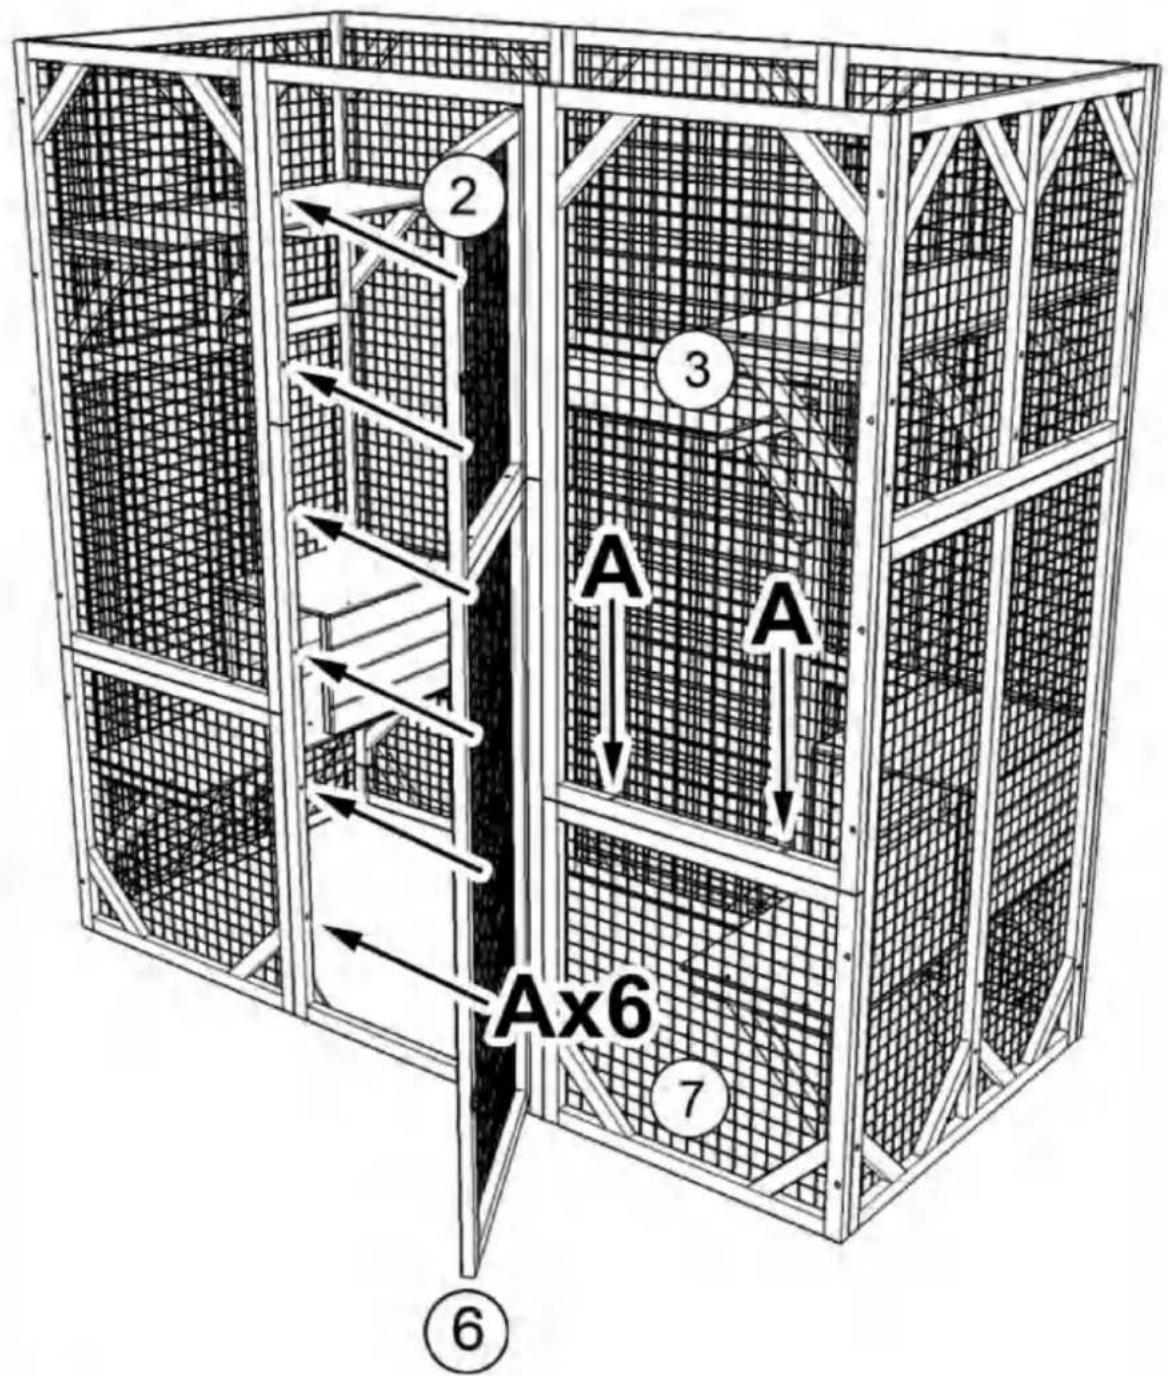
Secure part #3 to part #7 with screw (A)x2 downwards, then assemble part #2 and part #6 (open the doors) with screw (A) x6 as shown
text_image
2 3 A A Ax6 7 ⑥STEP:14
text_image
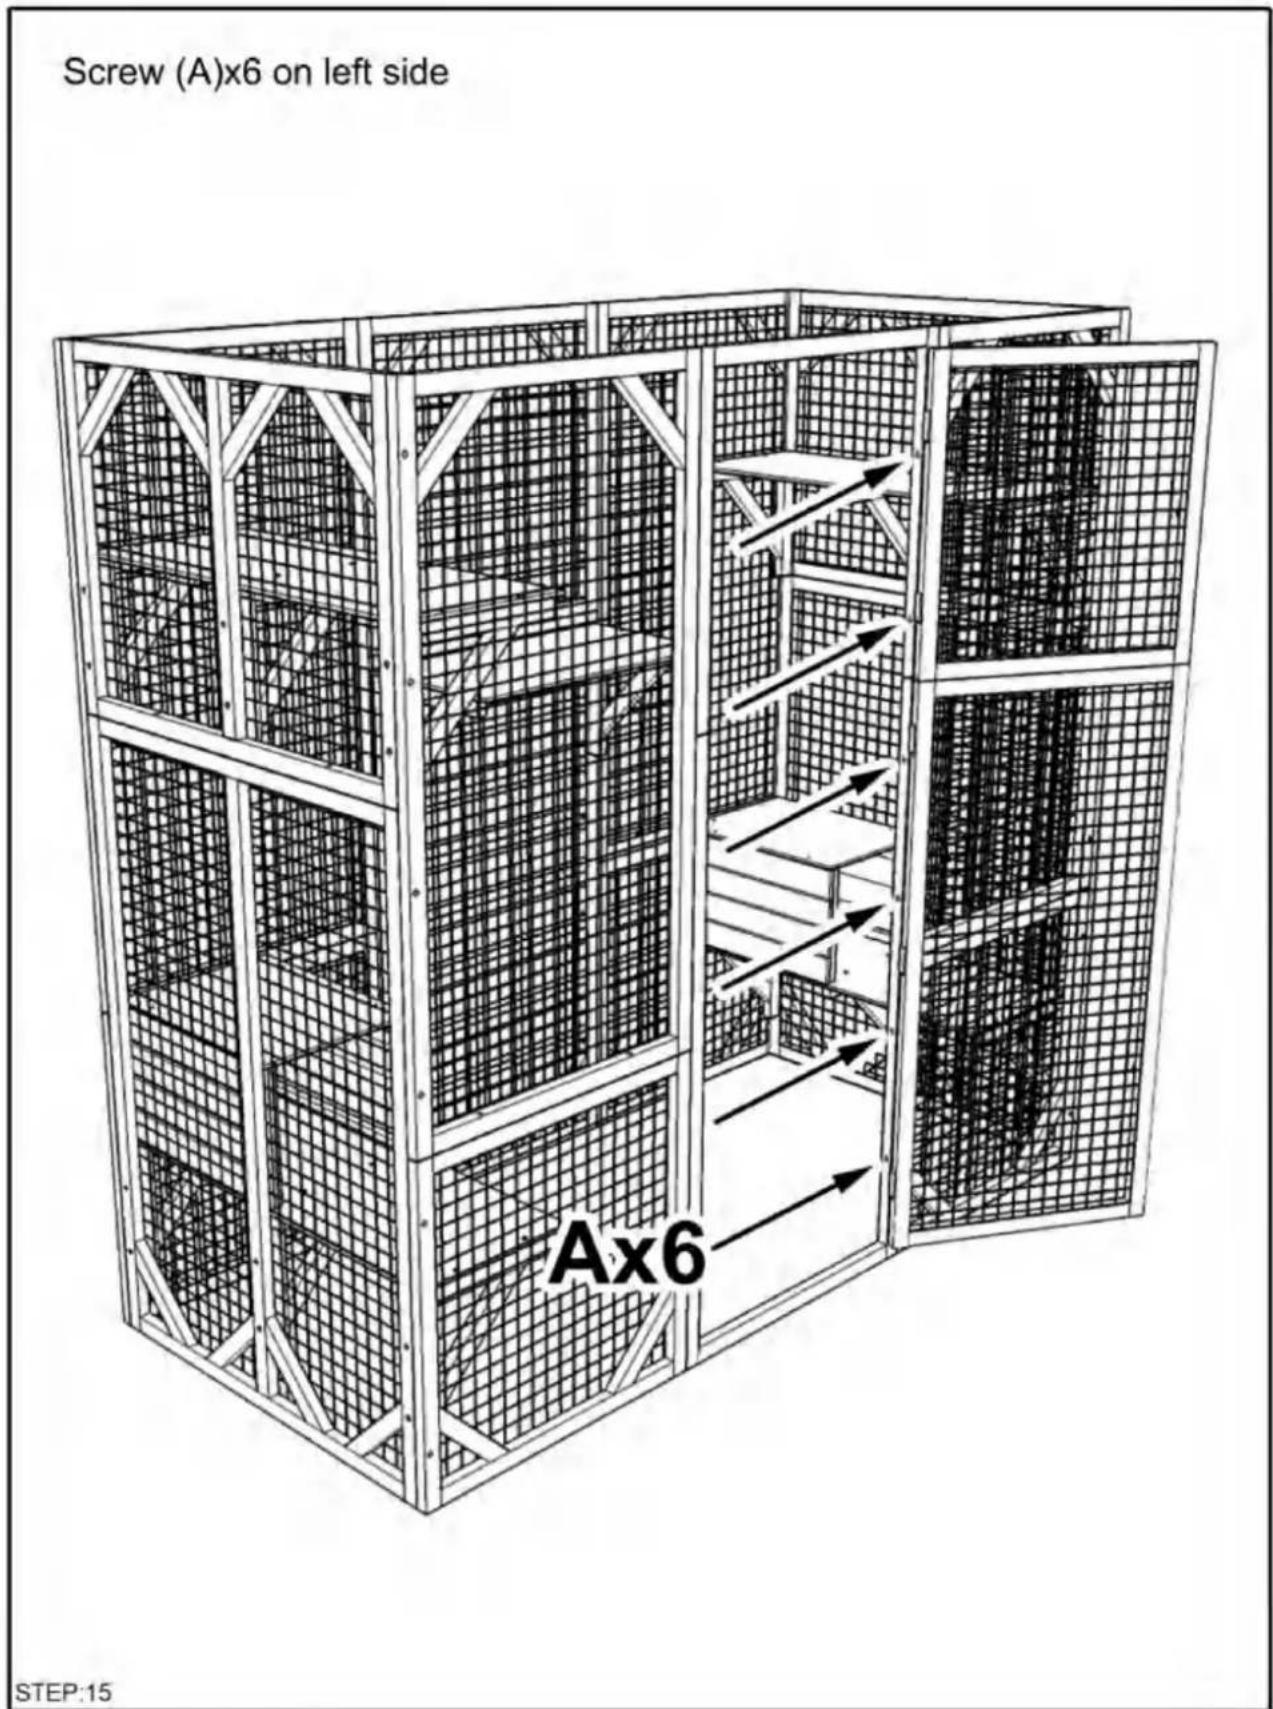
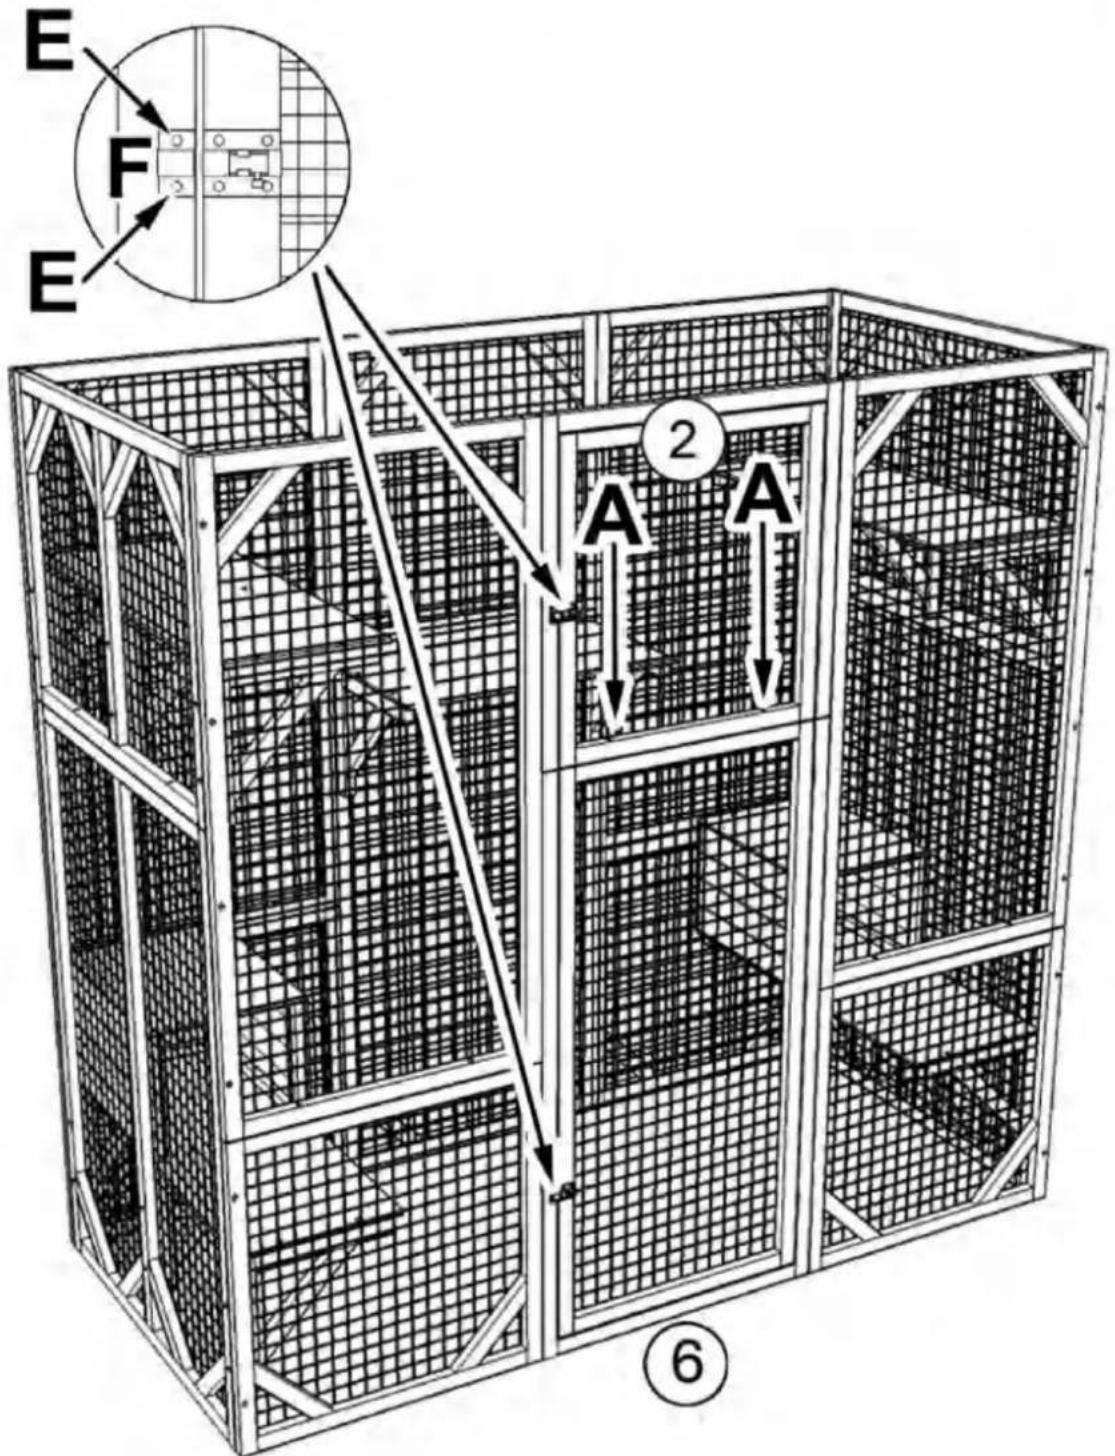
Screw (A)x6 on left side Ax6 STEP:15Align the short end of lock part #F with its other part already on door then secure it with screws (E)x2, secure part #2 to part #6 with screw (A)x2 downwards
text_image
E F E 2 A A ⑥STEP:16
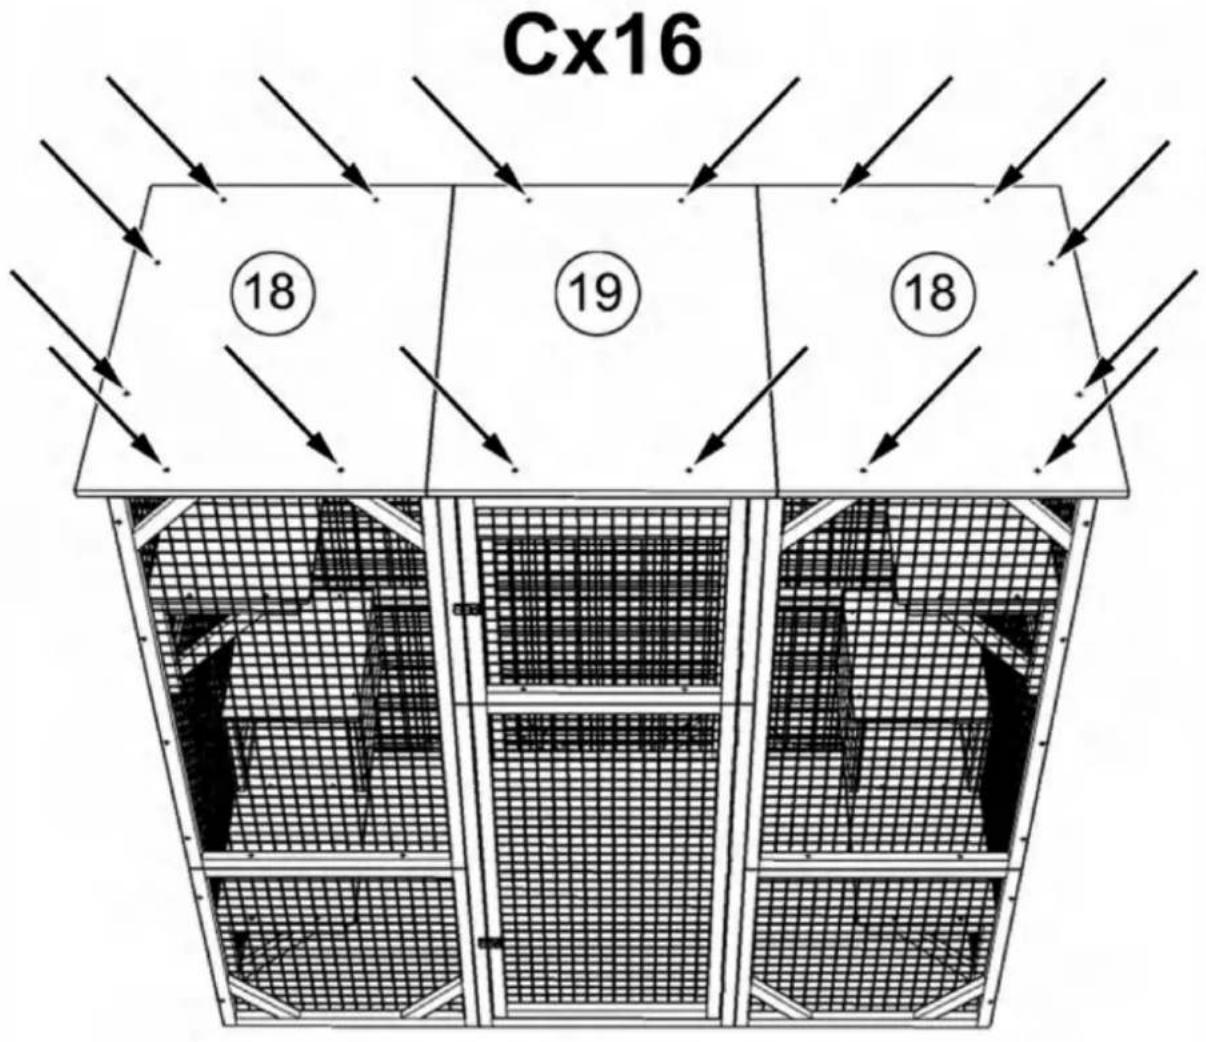
Install roofs with screw (C)x16 as shown, please be noted the edge of roof is 1.57 inch from the house underneath
text_image
Cx16 18 19 18STEP:17
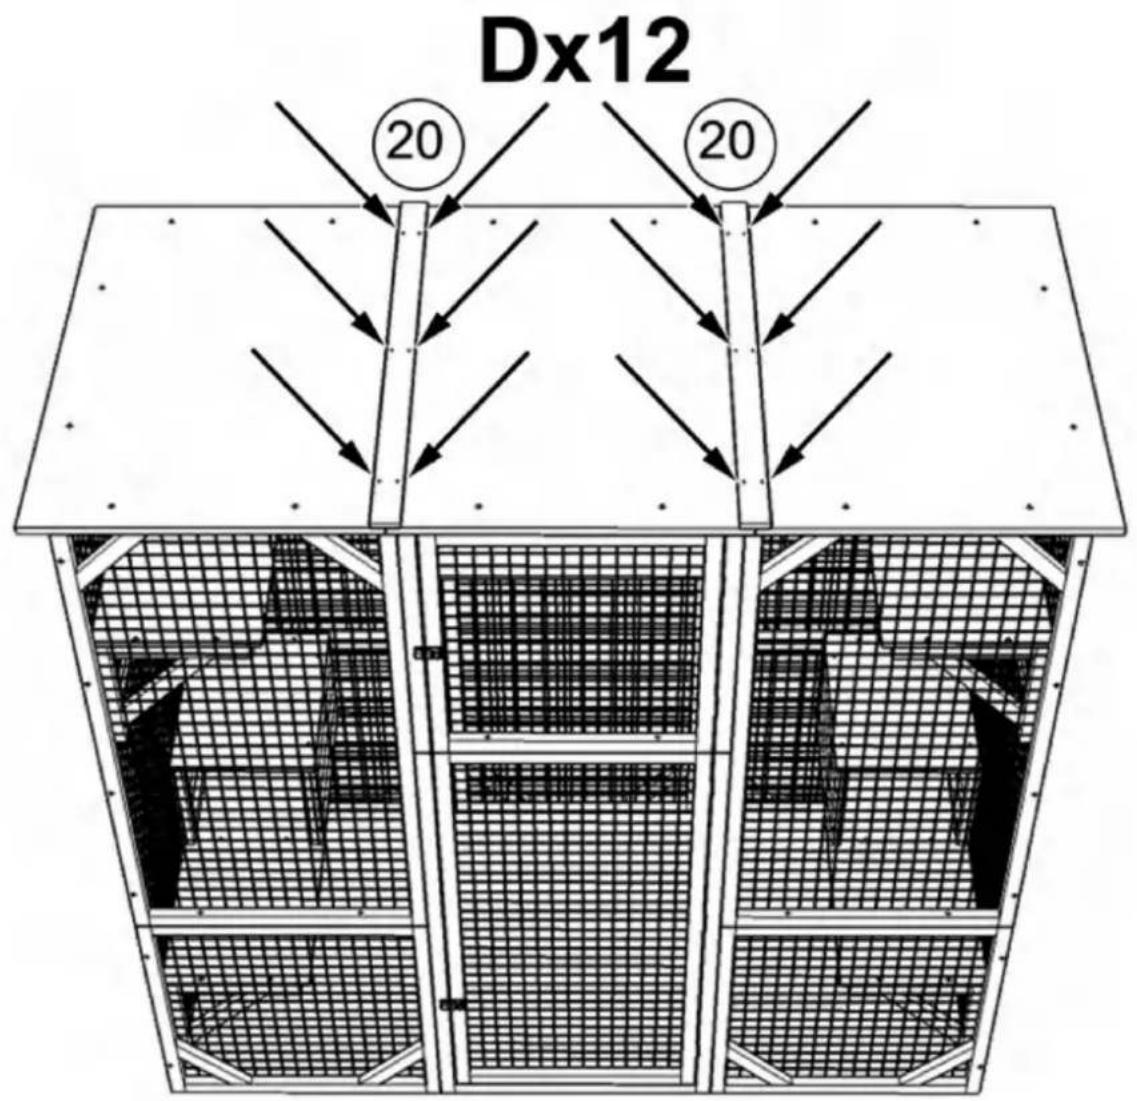
Install part #20x2 with screw (D)x12 as shown to cover the gap between roofs
text_image
Dx12 20 20STEP:18
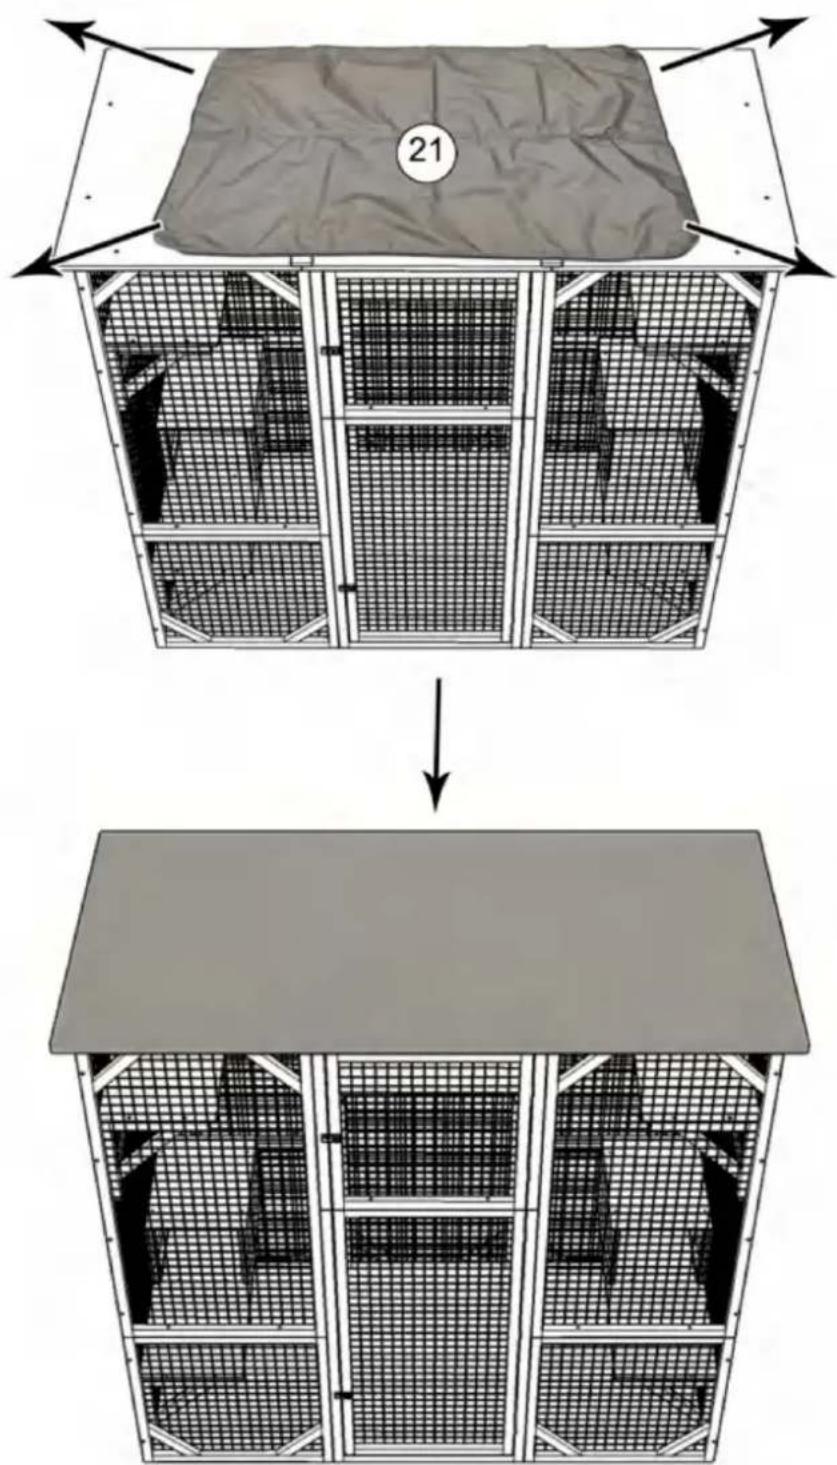
Unfold the tarp and cover it
text_image
21STEP:19
Shuangchenglu 803nong11hao1602A-1609shi, baoshanqu, szanghaj 200000 CN.
| EC | REP |
Firma E-CrossStu GmbH.
Mainzer Landstr.69, 60329 Frankfurt nad Menem.
| UK | REP |
YH CONSULTING LIMITED.
C/O YH Consulting Limited Biuro 147,
Centurion House, London Road, Staines-upon-Thames, Surrey, TW18 4AX
Importowane do USA: Sanven Technology Ltd., Suite 250, 9166 Anaheim Place, Rancho Cucamonga, Kalifornia 91730
Machine Translated by Google
VEVOR®
TOUGH TOOLS, HALF PRICE
Technical Support and E-Warranty Certificate
www.vevor.com/support