USER MANUAL Rapidwash NEW730BK EUREKA
natural_image
Line drawing of a vacuum cleaner (no text or symbols)
INSTRUCTION MANUAL
NEW730BK
FLOOR WASHER
Please read the manual before use.
CONTENTS
02
English 02
SAFETY INSTRUCTIONS 03
PRODUCT OVERVIEW 06
PRODUCT INSTALLATION 09
OPERATION INSTRUCTIONS 11
CLEANING AND MAINTENANCE 13
TROUBLESHOOTING 17
SPECIFICATIONS 19
French 20
German 38
Italian 56
Spanish 74
Polish 92
SAFETY INSTRUCTIONS
- This product is suitable for hard floors in the indoor environment, including waxed floors, stone floors, rubber floors, marble floors, granite floors, terrazzo floors, solid wood floors, composite floors, bamboo floors, as well as glazed tiles, ceramic facing tiles and other flat ground. It may not achieve the best results if the product is used on uneven ground surface.
- Do not use this product near or on the surface of flammable and explosive objects, which may cause fire and explosion.
- Do not use this product near a working fireplace or heater to prevent deformation of the machine casing.
- Do not use it to clean high-temperature substances (unextinguished cigarette butts, matches or hot ash, etc.), ultra-fine substances (such as lime, cement, wood chips, gypsum powder, ashes, charcoal, etc.), dangerous substances (such as solvents, descaling agents, etc.), chemical substances (such as acidic substances, detergents, etc.) and other substances with uncertain physical properties.
- Do not use this floor cleaner to absorb detergent, kerosene, gasoline, alcohol, paint or perfume, or else it may cause short-circuit, fire or explosion.
- Do not use this floor cleaner to absorb toner used in laser printers and copiers, or else it may cause fire or explosion.
- Do not use this floor cleaner to absorb sharp or large objects, such as glass shards, small toys, pins, paper clips, stones, plaster and large pieces of paper, or else it may block up and damage the machine.
- Do not use this floor cleaner to absorb any burning or smoking objects, such as soot from the unextinguished heat source, burning cigarette butts or matches.
- This product can't be used to clean stains of strong grease, strong viscosity, or strong dyeing properties such as shoe polish, paint, and pigments.
Do not touch the plug or any live part of the product with wet hands to avoid the risk of electric shock.
- Stop using it if the plug is damaged. Please call our service personnel for replacement in order to avoid hazards.
- Please keep the airflow channels and moving parts of this product away from long hair, loose clothing, fingers and other parts of the body. Do not point the suction tube, accessory tip or tool to the eyes or ears, or put them in the mouth.
- Please use the cleaning agent produced by our company and the manufacturer approved by us.
- Do not add other solutions to avoid generating toxic and harmful gases.
- If electric leakage, motor over-temperature, abnormal noise, peculiar smell or weak suction is found during use, stop using it immediately and call our service personnel.
SAFETY INSTRUCTIONS
- After using the machine, please clean the dirty water tank in time to avoid peculiar smell, and keep the ventilation path unobstructed, so as to avoid obstruction, or else it will cause the suction power to drop, the motor to heat up, and will affect the service life of the floor cleaner.
• After using the machine, please store it in a dry place. A humid place will affect the insulation and service life of the appliance.
- Do not soak or rinse the floor cleaner or floor brush in water.
- This appliance can be used by children aged from 8 years and above and persons with reduced physical, sensory or mental capabilities or lack of experience and knowledge if they have been given supervision or instruction concerning use of the appliance in a safe way and understand the hazards involved.
- Cleaning and user maintenance shall not be made by children without supervision.
• Children should not play with the appliance.
- Please check the suction pipe regularly. If there is a blockage, please clear it in time to avoid decrease in suction and affecting the performance of the machine.
- Turn off the power before replacing the brush.
• In the following situations, do not use the machine, contact to our customer service for help in time:
- Obvious damage or abnormal operation caused by drop;
- Power cord is damaged.
- Do not disassemble the enclosed machine without permission. There are no user serviceable parts. Do not try to change the performance of the machine, or else it will cause danger.
- Using a voltage that does not match the specifications will cause damage to the product and more likely to cause harm to the user. The correct rated voltage is marked on the nameplate.
- When cleaning the stairs, be extra cautious to prevent falling.
- Do not shake or impact the machine up and down to prevent dirty water from flowing into the motor.
- When the motor is working, do not lift or carry the appliance up and down, and do not put the machine on its side to prevent the dirty water from entering the motor. To prevent tip-over, place the machine against the wall after use.
- Do not use the floor cleaner before the clean water tank and dirty water tank are installed properly.
- Do not place any small objects in the outlet or block the outlet. Remove any small objects that may interfere with the flow of air through the outlet to prevent overheating of the machine.
SAFETY INSTRUCTIONS
- Do not wet the machine body, or it may cause damage and fire due to short circuit.
- This is only allow to use the charging base for charge the battery.
- The plug must be removed from the socket-outlet before cleaning or maintaining the appliance.
All the technologies and other data in this manual are obtained by our company or the designated third party testing company, and we reserve the right of final interpretation.
Use and Precautions of Washer Detergent
- Mix and clean according to instructions. It is recommended to use cleaning solution produced by our company or manufacturers approved by our company, which do not contain acid, alkali solutions or substances harmful to the environment.
- If a large amount of cleaning solution is added, more foam will be generated when used, which may infiltrate into the motor and cause danger.
- The cleaning solution should be kept out of reach of children. If the cleaning solution accidentally gets into eyes, rinse thoroughly with clean water; in case of accidental ingestion, seek medical treatment immediately. Follow local environmental protection regulations when handling dirty water and cleaning solution.
PRODUCT OVERVIEW
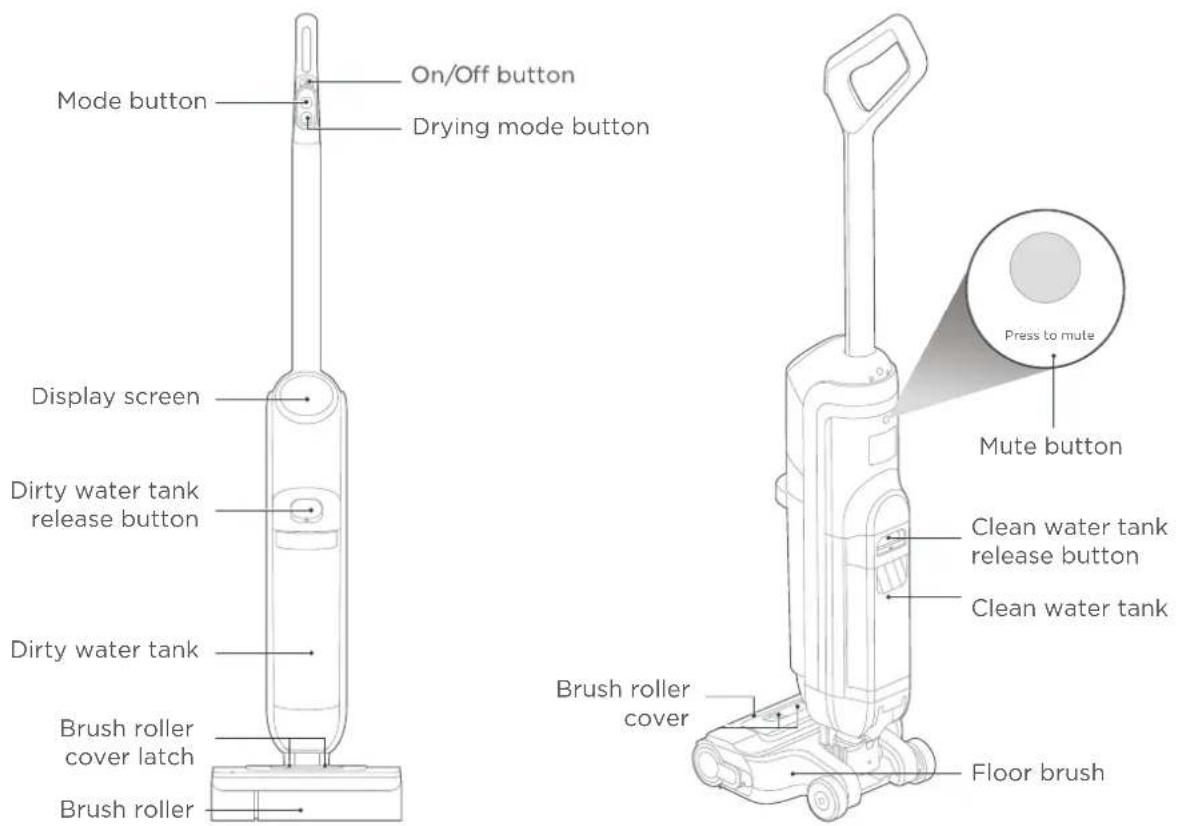
PRODUCT OVERVIEW
List of Accessories

Charging base Cleaning
solution
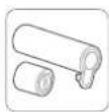
Brush roller
Filter Cleaning
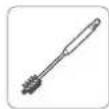
brush
User's manual
Parts
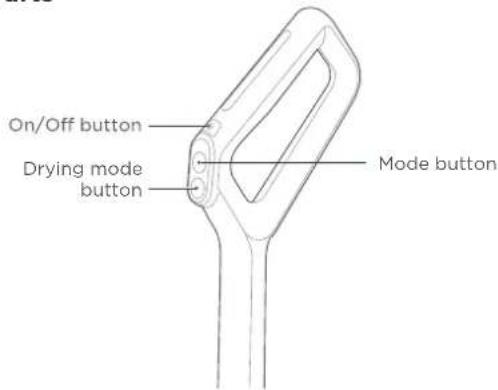
Auto mode (Default mode)
• The machine can identify the dirt on floor and adjust the suction automatically for the best clean performance.
Turbo mode
- The speed of the brush roller and the amount of water are increased to forcefully remove the heavy stains on the floor.


Dry suction mode
• The machine stops discharging water, and sucks dry garbage or residual water.

PRODUCT OVERVIEW
Charging base
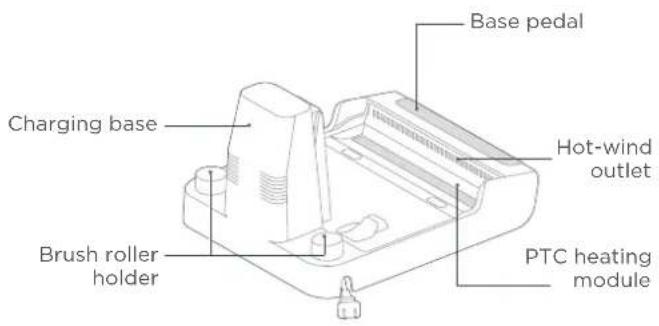
- There is a PTC heating module on the charging base. Do not touch it to prevent scald.
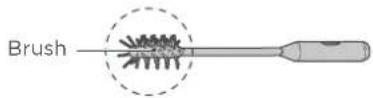
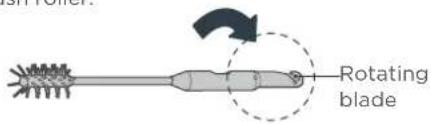
Cleaning brush
- One end is a brush to clean the stubborn dirt attached to the dirty water tank and the pipe under the ventilation pipe.
- The other end is a rotating blade to clean the hair wrapped on the brush roller.
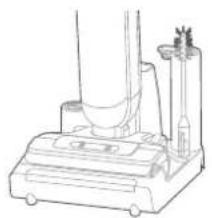
Accessory holder
- It is used to store brush roller and cleaning brush.
natural_image
Technical line drawing of a vacuum cleaner with a dome component and base mount (no text or symbols)
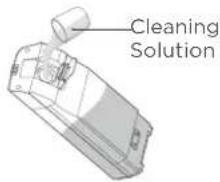
Cleaning solution
- Pay attention to the proportion of cleaning solution added.
- Use the cleaning solution that comes with the product.
PRODUCT INSTALLATION
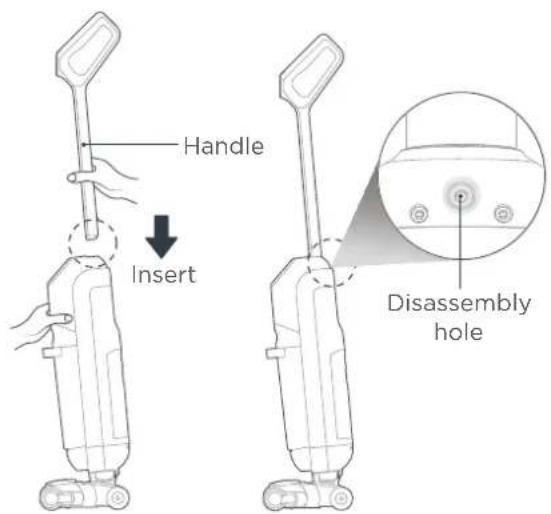
Handle Installation and Removal
Installation
Insert the end of the handle into the port of the main unit along the vertical direction until there is a click, which indicates the installation is successful.
Removal
Remove the rubber from the hole in the back, insert a screwdriver or other tools into the hole, and pull out the handle upward.
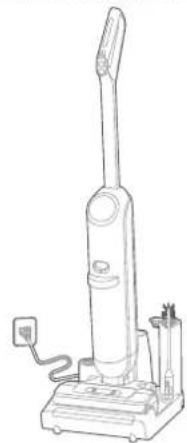
Charging Battery

ATTENTION
Charge the product before the first use.
- Connect the power plug to power supply.
- Put the machine upright into the charging base, and make sure that the bottom of the body completely falls into the charging base. At this moment, a voice will prompt "start charging", and the screen will display the charging quantity.
- It takes about 4 hours to fully charge the machine. When the battery is fully charged, the screen will go out and the machine will automatically power off.
natural_image
Line drawing of a vacuum cleaner with attached power outlet (no text or symbols)
PRODUCT INSTALLATION
Filling Clean Water Tank

ATTENTION
Fill water only to the clean water tank.
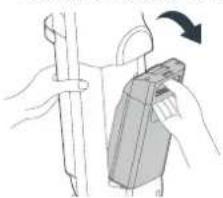
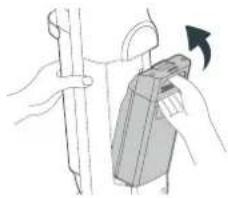
01 | Press the clean water tank button with the thumb and pull outward to remove the clean water tank.
natural_image
Illustration of a hand holding a vertical pole next to a device with a curved arrow indicating rotation (no text or symbols)
02 | Open the top cover of the clean water tank and fill tap water to the tank.
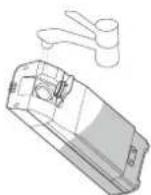
03 If deep cleaning is required, pour cleaning solution into the tank according to the instructions on the bottle.
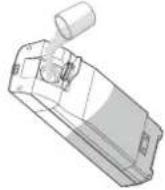
04 | Tighten the cover of the clean water tank.
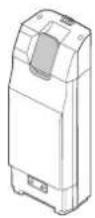
05 Install the clean water tank back to the body as it is, and the installation is successful when you hear a click.
natural_image
Illustration of hands using a tool to adjust a mechanical component (no text or symbols visible)
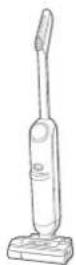
06 When the clean water tank is short of water, there will be voice prompt; in this case, no water is sprayed in auto mode, but the dry suction mode can be used normally.
Please add water to clean water tank
OPERATION INSTRUCTIONS
Turning On and Cleaning
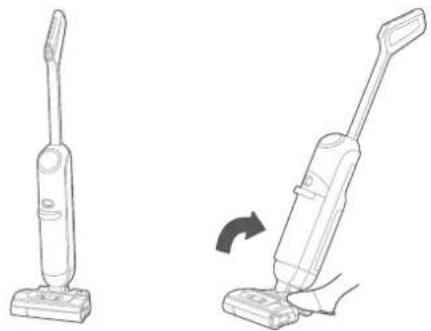
01 Step on thefloor brush and pull the handle, and the machine enters standby state.
natural_image
Line drawing of a vacuum cleaner with a hand operating the base (no text or symbols)
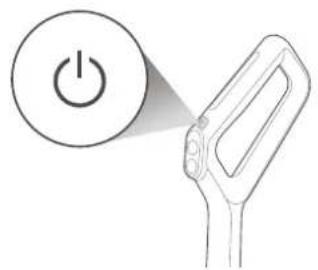
02 | Press the On/Off button to turn on the machine. It enters auto mode.
natural_image
Simple line drawing of a power switch with a circular icon and a lever handle (no text or symbols)
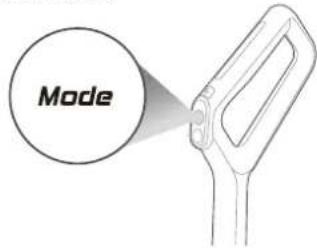
03 | Press the Mode button to switch between auto mode and turbo mode.

ATTENTION
After using the machine, it is recommended to place it vertically on the specially designed charging base.
OPERATION INSTRUCTIONS
Upright Pause Function
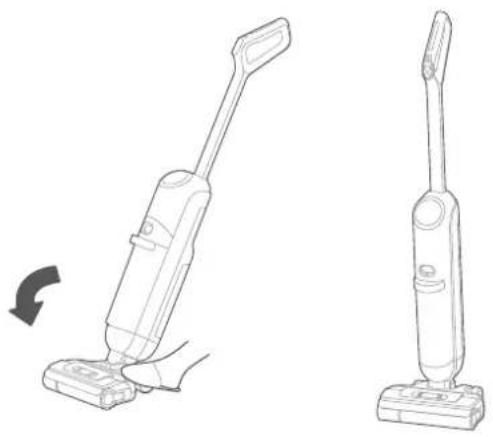
In working state, you can step on the floor brush to make the body upright, the machine will stop working and enter standby state; it will automatically turn off after 3 minutes of standby.
natural_image
Line drawing of a vacuum cleaner with a hand operating the base, shown in two different angles (no text or symbols)
Self-cleaning + Drying Function
How to start self-cleaning+drying fuction:
*Put the machine into the charging base, ensure that it is in the charging state and the battery stays above 25%.
*Step on the pedal with your foot to start self-cleaning and soft drying.
a.Click the drying mode button on the handle to switch to self-cleaning+rapid drying.
b.Double click the drying mode button to switch to self-cleaning only
*During the process, if you need to stop the self-cleaning/drying fuction, step on the pedal for 3 seconds or press the on/off button. Self-cleaning: the machine automatically cleans the brush roller and body pipe (about 5 minutes);
Drying: Keep blowing warm air on the charging base, and dry the brush roller properly
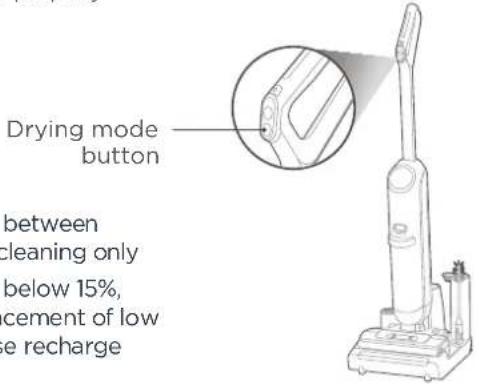
*Battery level between
15-25 %, self-cleaning only
*Battery level below 15%, voice announcement of low battery, please recharge
CLEANING AND MAINTENANCE

ATTENTION
- After cleaning, it is recommended to place the machine upright in the charging base; do not place the machine in places with direct sunlight or moisture.
- In order not to affect the performance of the machine, it is recommended that you regularly maintain its parts.
- Before cleaning, please disconnect the
- Scrub with water or neutral detergent, wring out the cleaning cloth before scrubbing to avoid water leaking into the electrical components.
01
Press the button of dirty water tank with your thumb and pull outward to remove the tank.
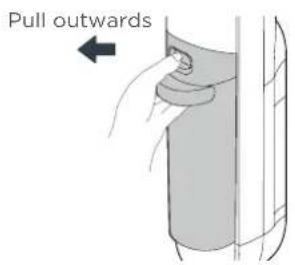
02
Hold the tank with one hand and pull out the top cover of the tank with the other hand.
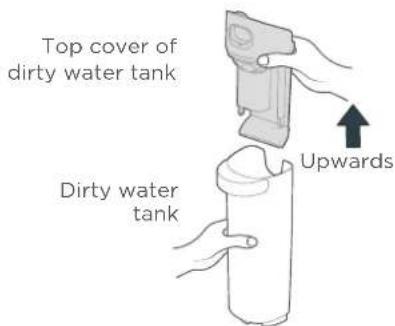
03
As shown in the figure, pour out the dirty water from the side of the tank. If there is stubborn dirt on the inner wall of the tank, please clean it directly with a cleaning brush.
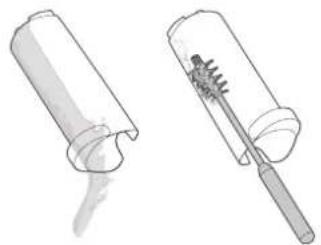
natural_image
Two technical illustrations of a mechanical component, one showing a cylindrical part with a curved opening and the other showing a brush-like tool inserted into a cylindrical housing (no text or symbols present)
CLEANING AND MAINTENANCE
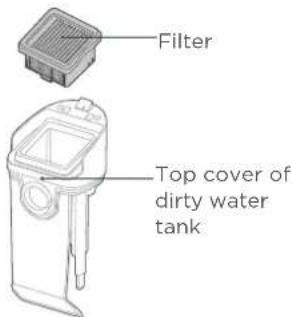
04| Take out the filter from the top cover of the dirty water tank and check whether there is any debris stuck on the cover.
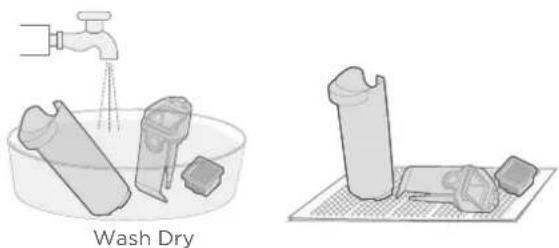
05 Wash with clean water after taking it out, dry it thoroughly and put it back as it was.
natural_image
Illustration of a wash dry water container and its corresponding plastic waste on a grid mat (no text or symbols)
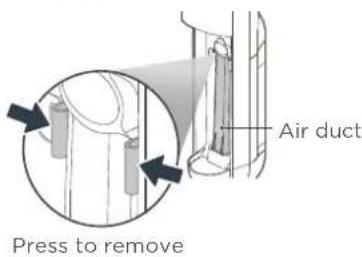
06 | Press the following elastic buckles on both sides to remove the air duct and rinse it with water; install as it was after rinsing.
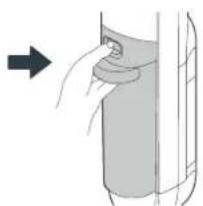
07 | Install the dirty water tank back to the machine until there is a click sound; (when installing dirty water tank is recommended to hold the body with another hand to avoid tipping over).
natural_image
Diagram showing a hand pressing down on a cylindrical object with an arrow indicating direction (no text or symbols)
CLEANING AND MAINTENANCE
Brush Roller and Cover Cleaning

ATTENTION
- It is recommended that after each use, the brush roller and cover should be cleaned and dried in time;
- If residual stains are found on the suction surface of the floor brush, wipe it with a wet cloth. Do not rinse it
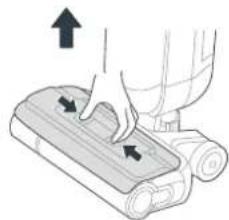
01 | Press the latch as shown, and remove the cover.
natural_image
Illustration of a hand pressing down on a wooden surface with arrows indicating motion (no text or symbols)
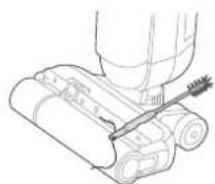
02 | Remove the cover, open the rotating blade of the cleaning brush, and remove the hair and other entanglements on the brush roller.
natural_image
Technical line drawing of a mechanical device with a tool inserted, showing no text or symbols
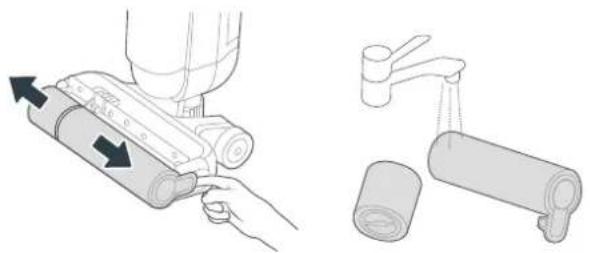
03 Remove the small brush roller and large brush roller in the direction shown in the figure and rinse the brush rollers and cover.
natural_image
Illustration of a hand holding a cylindrical device with arrows indicating motion, alongside a separate diagram showing a hand pouring liquid onto a rolled cylindrical container (no text or symbols present)
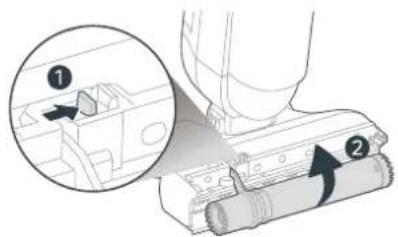
04 If residual stains are found in the suction port of the floor brush, toggle the slide knob to lift the motor module upwards as shown. (the motor module can be lifted or lowered only after the large and small brushes have been removed.)
CLEANING AND MAINTENANCE
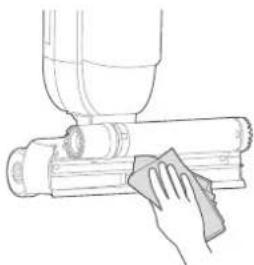
05 Remove stains from the suction port with a cloth, do not rinse with water.
natural_image
Line drawing of a hand cleaning a cylindrical object with a cloth (no text or symbols)
06 | Toggle the slide knob to lower the motor module as shown.
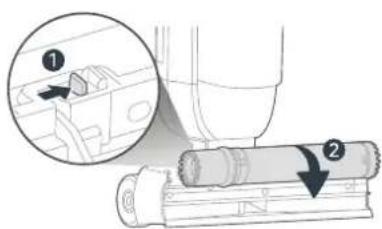
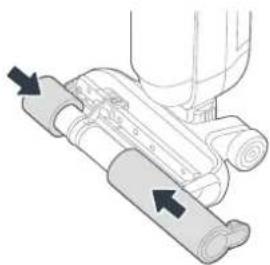
07 | After cleaning, install the small and large brush rollers in turn according to the direction shown in the figure. The installation is successful when you hear a click sound.
natural_image
Mechanical assembly diagram showing a cylindrical device with two ports and directional arrows indicating movement (no text or labels)
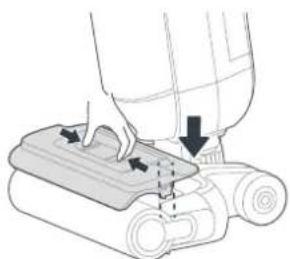
08 | Align the brush roller cover with the dotted line (as shown) and press down on the brush roller cover. The installation is successful when you hear a click sound.
natural_image
Diagram of a hand using a vacuum cleaner to press or install components (no text or symbols visible)
TROUBLESHOOTING
Please check the following table in case of any abnormal scenarios when using the product.
| Scenarios Possible cause Solution | | |
| The floor cleaner does not work | The brush roller is entangled by hair or stuck by foreign objects | Remove the brush roller to clean and reinstall |
| Dirty water tank is full Clean the dirty water tank | |
| No clean water Add water to clean water tank | |
| There is blockage in the pipe | Clean the pipes under the dirty water tank |
| Low battery Charge | |
| Suction power is weakened | Brush roller, brush roller cover, or dirty water tank is not installed in place | Remove all components and reinstall them |
| Brush roller is entangled Clean the brush roller | |
| There is hair tangled on the shaft | Remove the brush roller to clean the shaft |
| Floor brush suction or pipe blockage | Wipe the floor brush suction port and clean the pipe under the air duct |
| Dirty water tank filter is dirty | Clean the filter and dry thoroughly before installation |
| Dirty water tank filter isn't installed | Install filter |
| Abnormal noise when working | Debris in the suction port of the floor brush or in the pipe | Wipe the suction port and clean the pipe under the air duct |
| Dirty water tank is full Clean the dirty water tank | |
| Air duct isn't installed Install air duct | |
TROUBLESHOOTING
| Scenarios Possible cause Solution | | |
| Doesn't spray water | No water Add water to the clean water tank |
| Clean water tank is not installed properly | Reinstall the clean water tank |
| Air outlet leaks water | Too much water in the dirty water tank | Clean the dirty water tank |
| Dirty water tank filter isn't installed | Install filter |
| Dirty water tank filter is cleaned and not dried after use | Clean the filter and dry thoroughly before installation |
| Water leakage at the bottom of floor brush | Dirty water tank or filter isn't installed | Install dirty water tank and filter |
SPECIFICATIONS
| Product Model | NEW730BK |
| Charging rated input | 220-240V~ 50-60Hz |
| Charging output | 25V==1A |
| Power | 350W |
| Voltage | 22.2V--- |
| Product Size | 270x235x1160mm |
TABLE DES MATIÈRES
English 02
French 20
CONSIGNES DE SÉCURITÉ 21
PRÉSENTATION DU PRODUIT 24
INSTALLATION DU PRODUIT 27
INSTRUCTIONS D'UTILISATION 29
NETTOYAGE ET ENTRETIEN 31
DÉPANNAGE 35
CARACTÉRISTIQUES TECHNIQUES 37
German 38
Italian 56
Spanish 74
Polish 92
CONSIGNES DE SÉCURITÉ
Support d'accessoires
natural_image
Line drawing of a vacuum cleaner with a cylindrical component and base mount (no text or symbols)
INSTALLATION DU PRODUIT
natural_image
Line drawing of a vacuum cleaner on a base (no text or symbols)
INSTALLATION DU PRODUIT
natural_image
Illustration of hands using a tool to adjust a device (no text or symbols visible)
natural_image
Illustration of hands holding a tool with an arrow indicating rotation (no text or symbols)
06
natural_image
Line drawing of a hand using a vacuum cleaner with an arrow indicating rotation (no text or symbols)
02
natural_image
Simple line drawing of a power switch with a circular button and a lever handle (no text or symbols)
03
natural_image
Line drawing of a vacuum cleaner with a hand operating the base, shown in two different angles (no text or symbols present)
natural_image
Two technical illustrations of a mechanical component, one showing a curved pipe opening and the other a spring-like tool inserted into a cylindrical housing (no text or symbols)
NETTOYAGE ET ENTRETIEN
natural_image
Illustration of a laver secher with water tap and two plastic containers, no text or symbols present
natural_image
Diagram showing a hand pressing down on a cylindrical object with an arrow indicating direction (no text or symbols)
NETTOYAGE ET ENTRETIEN
natural_image
Illustration of a hand pressing down on a slide with arrows indicating motion (no text or symbols)
natural_image
Line drawing of a robotic arm gripping a cylindrical device (no text or symbols)
natural_image
Illustration of a hand holding a cylindrical device with arrows indicating motion, alongside a close-up of a rolled roller being handled by a tap (no text or symbols present)
natural_image
Technical illustration of a mechanical assembly with numbered components (no text or symbols)
NETTOYAGE ET ENTRETIEN
natural_image
Hand cleaning a cylindrical object with a cloth, no text or symbols visible
natural_image
Mechanical assembly diagram showing a cylindrical component with two directional arrows indicating movement or force (no text or symbols present)
natural_image
Diagram of a hand using a vacuum cleaner to press or install a component, with arrows indicating motion direction (no text or symbols present)
DÉPANNAGE
natural_image
Line drawing of a vacuum cleaner with a dome-shaped component and base mount (no text or symbols)
Reinigungslösung
natural_image
Line drawing of a vacuum cleaner on a base, showing no text or symbols
EINBAU DES PRODUKTS
natural_image
Illustration of hands holding a tool next to a mechanical component, with no visible text or symbols
natural_image
Illustration of hands holding a tool and a device with an arrow indicating rotation (no text or symbols)
06
natural_image
Line drawing of a vacuum cleaner with a hand operating the base (no text or symbols)
natural_image
Simple line drawing of a power button and a handheld device (no text or symbols)
natural_image
Line drawing of a vacuum cleaner with a hand operating the base, shown in two different angles (no text or symbols present)
cknungsfunktion
natural_image
Two technical illustrations of mechanical components, one showing a cylindrical part and the other a coiled spring-like tool (no text or symbols present)
natural_image
Illustration of a water tap and a mechanical device with a label 'Waschen Trocken' (no other text or symbols)
natural_image
Diagram showing a hand pressing down on a cylindrical object with an arrow indicating direction (no text or symbols)
natural_image
Illustration of a hand pressing down on a slide with arrows indicating motion (no text or symbols)
natural_image
Technical line drawing of a mechanical device with a tool inserted, no visible text or symbols
natural_image
Illustration of a hand holding a cylindrical device with arrows indicating motion, alongside a separate diagram showing a hand pouring liquid onto a rolled cylindrical container (no text or symbols present)
natural_image
Line drawing of a hand cleaning a cylindrical object with a cloth (no text or symbols)
natural_image
Diagram of a mechanical device with two arrows indicating directional movement (no text or symbols present)
natural_image
Diagram of a hand using a vacuum cleaner to press or install a component, with arrows indicating motion (no text or symbols present)
FEHLERBEHEBUNG
natural_image
Line drawing of a vacuum cleaner with a funnel and base (no text or symbols)
natural_image
Line drawing of a vacuum cleaner with attached circuit board (no text or symbols)
natural_image
Illustration of hands holding a tool next to a device with an arrow indicating rotation (no text or symbols)
natural_image
Illustration of hands holding a tool with an arrow indicating rotation (no text or symbols)
natural_image
Line drawing of a hand using a vacuum cleaner to lift a small object, with an arrow indicating rotation (no text or symbols present)
02
natural_image
Simple line drawing of a power switch with a circular button and a lever handle (no text or symbols)
03
natural_image
Line drawing of a vacuum cleaner with a hand operating the base, shown in two different angles (no text or symbols present)
cura
natural_image
Two technical illustrations of a mechanical component, one showing a cylindrical part with a curved opening and the other a brush-like tool inserted into a cylindrical housing (no text or symbols present)
natural_image
Illustration of two different items: a water tap and a mechanical component, both in a basin (no text or symbols)
natural_image
Diagram showing a hand pressing a button on a cylindrical object, with an arrow indicating direction (no text or symbols present)
natural_image
Illustration of a hand pressing down on a wooden surface with arrows indicating motion (no text or symbols)
natural_image
Technical line drawing of a mechanical device with a lever and base (no text or symbols)
natural_image
Illustration of a hand holding a cylindrical device with arrows indicating motion, alongside a separate diagram showing a hand pouring liquid onto a rolled cylindrical container (no text or symbols present)
natural_image
Hand cleaning a cylindrical object with a cloth, no text or symbols visible
natural_image
Mechanical assembly diagram showing a cylindrical component with two directional arrows indicating movement or force (no text or symbols present)
natural_image
Diagram of a vacuum cleaner's internal structure with arrows indicating motion direction (no text or symbols)
natural_image
Line drawing of a vacuum cleaner with a lid and base (no text or symbols)
natural_image
Illustration of hands holding a device with a lock, no text or symbols present
natural_image
Illustration of hands holding a tool with an arrow indicating motion (no text or symbols)
natural_image
Line drawing of a vacuum cleaner with a hand operating the base (no text or symbols)
natural_image
Simple line drawing of a power switch with a circular button and a lever handle (no text or symbols)
natural_image
Line drawing of a vacuum cleaner with a hand operating the base, shown in two different angles (no text or symbols present)
secado
natural_image
Two technical illustrations of a mechanical device, one showing a cylindrical component and the other a brush-like tool inserted into a cylindrical housing (no text or symbols present)
LIMPIEZA Y MANTENIMIENTO
natural_image
Illustration of two different methods: one using a faucet to clean lavar secar, the other with a tool placed on a mat (no text or symbols)
natural_image
Diagram showing a hand pressing a button on a cylindrical object, with an arrow indicating direction (no text or symbols present)
LIMPIEZA Y MANTENIMIENTO
natural_image
Illustration of a hand pressing down on a wooden surface with arrows indicating motion (no text or symbols)
natural_image
Technical line drawing of a mechanical device with a tool inserted (no text or symbols)
natural_image
Illustration of a hand holding a cylindrical device with arrows indicating motion, alongside a separate diagram showing a hand pouring liquid onto a rolled cylindrical container (no text or symbols present)
LIMPIEZA Y MANTENIMIENTO
natural_image
Hand cleaning a cylindrical object with a cloth (no text or symbols visible)
natural_image
Mechanical assembly diagram showing a cylindrical device with two directional arrows indicating movement or force (no text or symbols present)
natural_image
Diagram of a hand using a vacuum cleaner to press or install a component, with arrows indicating motion (no text or symbols present)
natural_image
Line drawing of a vacuum cleaner with a funnel and base (no text or symbols)
Środek czyszczący
natural_image
Line drawing of a vacuum cleaner with attached circuit board (no text or symbols)
MONTAŻ URZĄDZENIA
natural_image
Illustration of hands holding a tool next to a device with an arrow indicating rotation (no text or symbols)
natural_image
Illustration of hands holding a medical device with an arrow indicating rotation (no text or symbols)
natural_image
Line drawing of a vacuum cleaner with a hand operating the base (no text or symbols)
natural_image
Simple line drawing of a power switch with a circular button and a lever handle (no text or symbols)
natural_image
Line drawing of a vacuum cleaner with a hand operating the base, shown in two different angles (no text or symbols)
natural_image
Diagram of a hand pressing down on a cylindrical object with a knob, showing motion (no text or symbols)
natural_image
Two technical illustrations of a mechanical component, one showing a cylindrical part with a curved opening and the other a brush-like tool inserted (no text or symbols present)
CZYSZCZENIE I KONSERWACJA
natural_image
Diagram showing a hand pressing down on a cylindrical object with an arrow indicating direction (no text or symbols)
CZYSZCZENIE I KONSERWACJA
natural_image
Illustration of a hand pressing down on a wooden surface with arrows indicating motion (no text or symbols)
natural_image
Technical line drawing of a mechanical device with a tool inserted, no visible text or symbols
natural_image
Illustration of a hand holding a cylindrical device with arrows indicating motion, alongside a close-up of a rolled roller being handled by a tap (no text or symbols)
CZYSZCZENIE I KONSERWACJA
natural_image
Line drawing of a hand cleaning a cylindrical object with a cloth (no text or symbols)
natural_image
Mechanical assembly diagram showing a cylindrical device with two ports and directional arrows indicating movement (no text or labels)
natural_image
Diagram of a hand using a vacuum cleaner to press or install a component, with arrows indicating motion direction (no text or symbols present)
ROZWIĄZYWANIE PROBLEMÓW