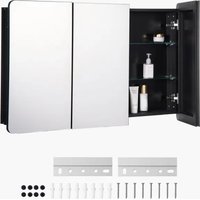
ML40×25.5-3 - Wardrobe Vevor - Free user manual and instructions
Find the device manual for free ML40×25.5-3 Vevor in PDF.


User questions about ML40×25.5-3 Vevor
0 question about this device. Answer the ones you know or ask your own.
Ask a new question about this device
Download the instructions for your Wardrobe in PDF format for free! Find your manual ML40×25.5-3 - Vevor and take your electronic device back in hand. On this page are published all the documents necessary for the use of your device. ML40×25.5-3 by Vevor.
USER MANUAL ML40×25.5-3 Vevor
Technical Support and E-Warranty Certificate www.vevor.com/support
MIRROR CABINET
MODEL: ML14X24-1 / ML16X24-1 / ML16.5X27.5-1 /
ML20X30-1 / ML24X30-1 / ML40X25.5-3 / ML26X30-2
We continue to be committed to provide you tools with competitive price. "Save Half", "Half Price" or any other similar expressions used by us only rep estimate of savings you might benefit from buying certain tools with us compared top brands and does not necessarily mean to cover all categories of tools offered are kindly reminded to verify carefully when you are placing an order with us actually saving half in comparison with the top major brands.
VEVOR®
MIRROR CABINET
| MODEL | MODEL | ||
| ML14X24-1 | 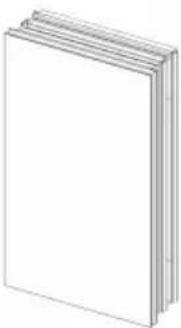 | ML40X25.5-3 | 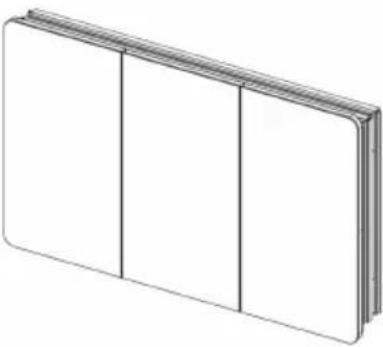 |
| ML16X24-1ML16.5X27.5-1ML20X30-1ML24X30-1 | 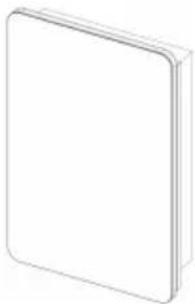 | ML26X30-2 | 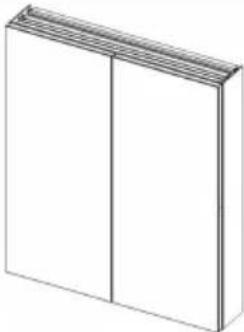 |
NEED HELP? CONTACT US!
Have product questions? Need technical support? Please feel fr contact us:
Technical Support and E-Warranty Certificate www.vevor.com/support
This is the original instruction, please read all manual instruction carefully before operating. VEVOR reserves a clear interpretation user manual. The appearance of the product shall be subject to product you received. Please forgive us that we won't inform you there are any technology or software updates on our product.
Warning-To reduce the risk of injury, user must read instructio manual carefully.
SECURITY & WARNINGS
WARNING
Risk of personal injury, the mirror must be properly grounded.
Total / Maximum shelf load 34lbs / 15.2kg.
Use this furnishing only for it's intended use as described in these instruction not use attachments not recommended by the manufacturer. Never drop or in any object into any opening. Do not use outdoors.
Suitable for Bathroom Zones and non bathroom/dry areas.
Avoid using hard or pointed items to strike the mirror glass.
When cleaning the mirror, please follow these steps:
- Use a soft, non-abrasive cloth to clean the mirror. Avoid using rough or materials that may damage the surface.
- Do not use any cleaning agents that may cause irritation or damage to t mirror's finish. Instead, use any of the recommended cleansers to remove dirt grime.
SAVE THESE INSTRUCTIONS
PARAMETER LIST
| Model | W×H | Door | Color | Mirror | Installation |
| ML14X24-1 | 14"X24" | 1PCS | Black | 2PCS | surface mounted or recessed mount |
| ML16X24-1 | 16"X24" | 1PCS | Black | 1PCS | |
| ML16.5X27.5-1 | 16.5"X27.5" | 1PCS | Black | 1PCS | |
| ML20X30-1 | 20"X30" | 1PCS | Black | 1PCS | |
| ML24X30-1 | 24"X30" | 1PCS | Black | 1PCS | |
| ML40X25.5-3 | 40"X25.5" | 3PCS | Black | 3PCS | |
| ML26X30-2 | 26"X30" | 2PCS | Black | 7PCS |
PART LIST
When unpacking this product, ensure the parts listed below are included and carefully inspect for any damage that may have occurred during transit. Do not attempt to assemble or use the product if any part is missing or damaged.
| Model | 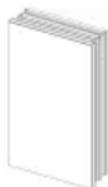 Cabinet Cabinet | 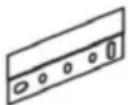 Mounting Brackets Mounting Brackets | 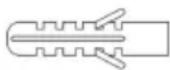 Expansion Tube Expansion Tube | 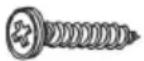 Self-Tapping Screw Self-Tapping Screw | 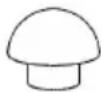 Plug Plug |
| ML14X24-1 | 1 | 2 | 8 | 8 | 8 |
| ML16X24-1 | 1 | 2 | 8 | 8 | 16 |
| ML16.5X27.5-1 | 1 | 2 | 8 | 8 | 12 |
| ML20X30-1 | 1 | 2 | 8 | 8 | 16 |
| ML24X30-1 | 1 | 2 | 8 | 8 | 24 |
| ML40X25.5-3 | 1 | 2 | 8 | 8 | 8 |
| ML26X30-2 | 1 | 2 | 8 | 8 | 8 |
INSTALLATION METHOD
BEFORE INSTALLATION
To ensure the best experience, please read carefully and follow the instruction provided below before assembling and installing the product.
1. Important Safety Instructions:
Assembly by two or more adults is highly recommended, so as to ensure pr installation.
Before installing, adding, or changing any components. Make sure that the fixin location can support the weight of the entire fixture(e.g. solid stone or brick). To prevent injury, the mirror must be installed as the instructions provided.
2. Pre-assembly :
Inspect the product immediately upon receipt for any transit damage or missir parts.
3. Before Installation
Please check and make sure that the mirror is functioning properly.
1. SURFACE-MOUNT INSTALLATION
Installation Tools (the following tools are not included in the package, you ne prepare them yourself)
Level Ruler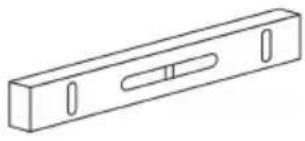 | Marker | Hammer | Tape Measure | ||
Electric Drill | Phillips Screwdriver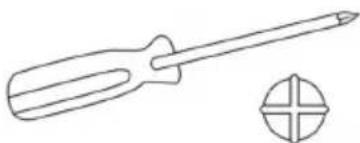 | Safety Goggles | |||
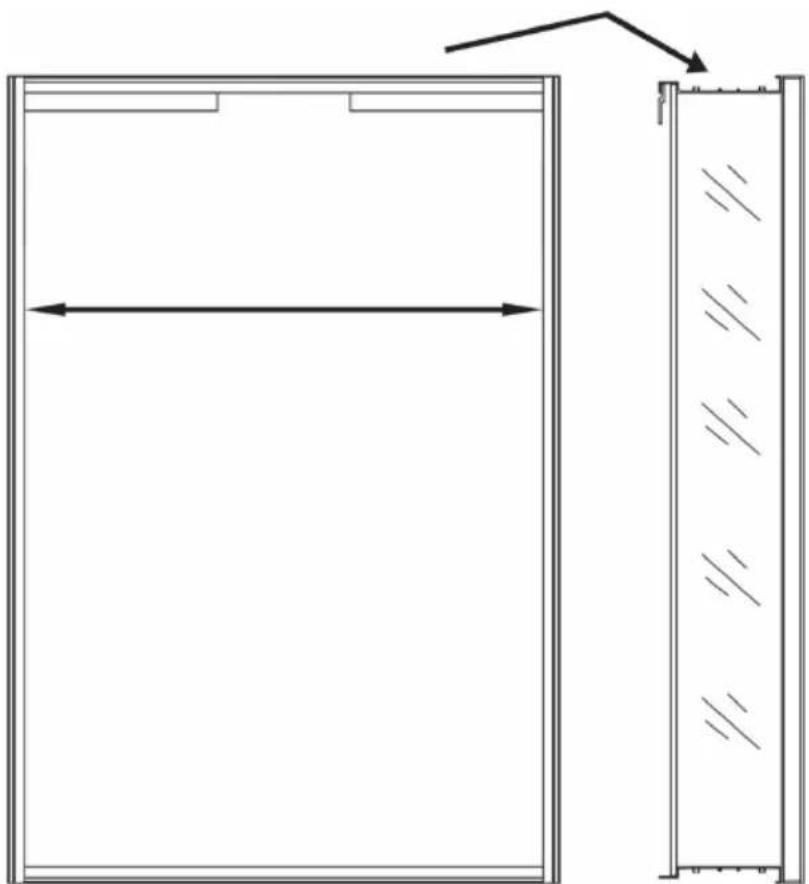
- Place the 1 pcs mounting bracket on the slot, measure the distance between the 2 side of t cabinet .
natural_image
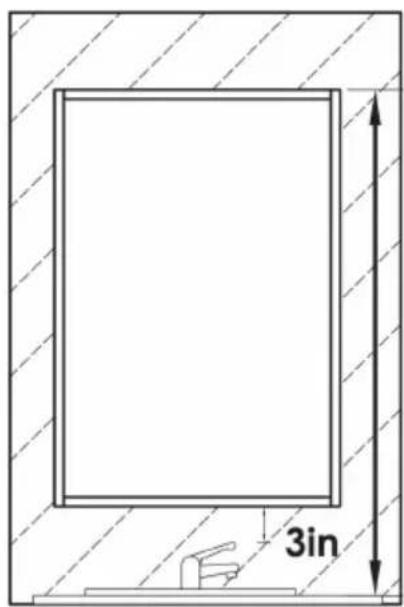
Diagram showing a rectangular frame with horizontal double-headed arrows and a vertical wall with diagonal lines (no text or symbols)- Place the Mirror Cabinet against the wall and mark the placement the cabinet. Draw a line of the wall with a level and marker to indicate where the cabinet upper is and mark spots (①②) for the lower brackets.
NOTE: Please hang the cabinet at least 3 inches above the faucet.
text_image
3in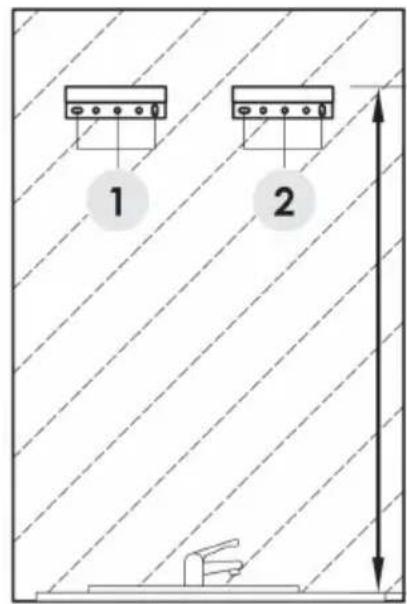
text_image
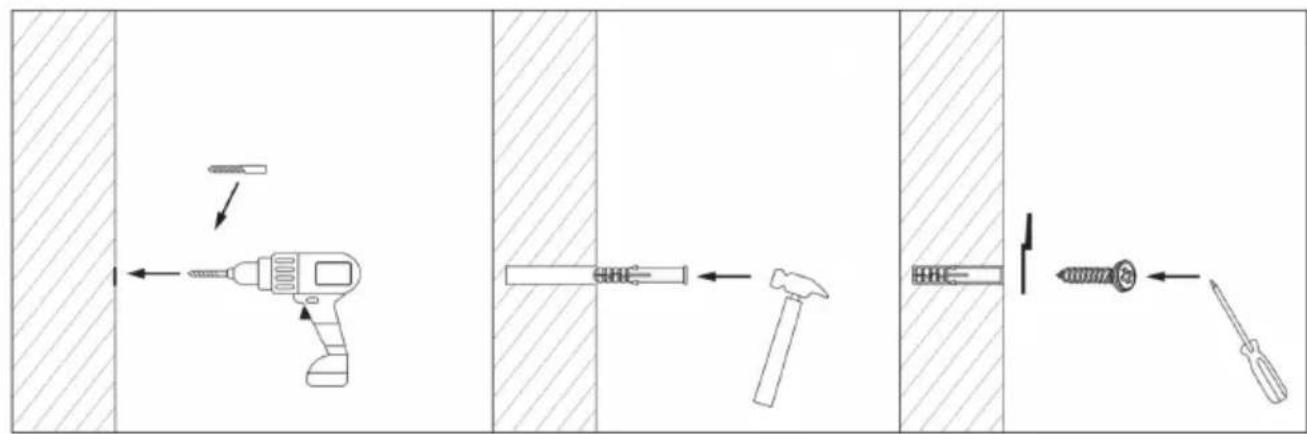
1 2- Use an electric drill to punch holes at the marked spots (①), then apply the 6 wall anchors with a hammer (②).
text_image
Diagram illustrating the working principle of a screwdriver tool, showing how to move from a drill to a hammer and then to a screwdriver.| Thickness Of Wall: | Recommended Drill Bite: |
| >5/8" (16mm) | 5/16"(8mm) drill bit,drilling depth in 131/32"(50mm) |
| 5/16" (8) - 5/8" (16mm) | 25/64"(10mm) drill bit |
| <5/16" (8mm) | Unapplicable |
NOTE: Please wear goggles and pay attention to your safety while dr
| 4. Wall mounted the mirror cabinet.NOTE: The cabinet can be hung upside down switch between left and right door openings. | 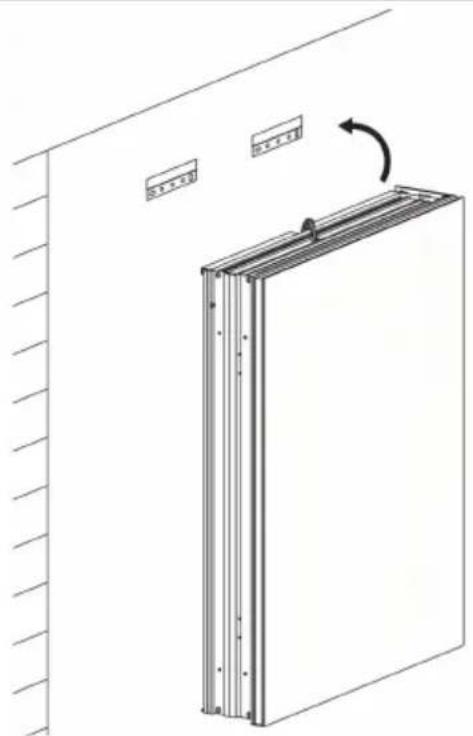 | 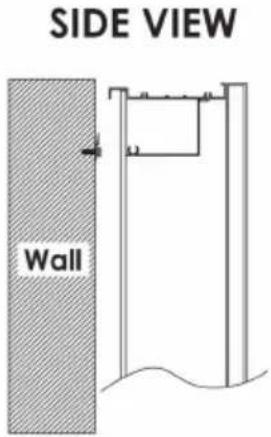 |
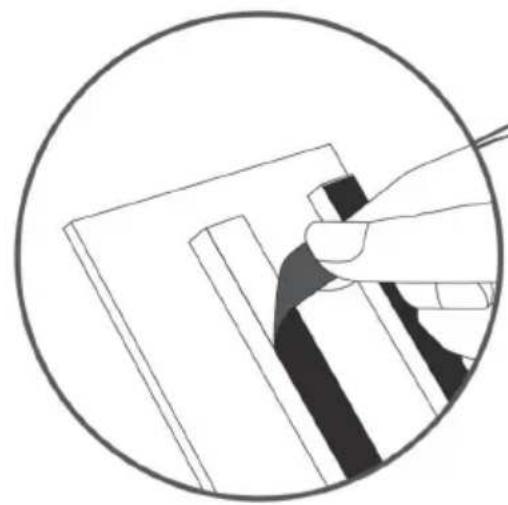 Tear off the adhesive at the 2 side of the mirror cabinet and stick it to the side of the aluminum surface.NOTE: The step just for model : ML40X25.5-3. Tear off the adhesive at the 2 side of the mirror cabinet and stick it to the side of the aluminum surface.NOTE: The step just for model : ML40X25.5-3. | ||
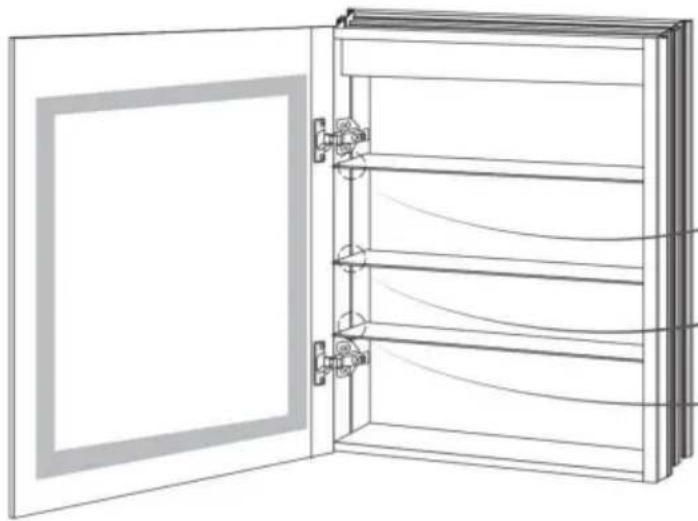
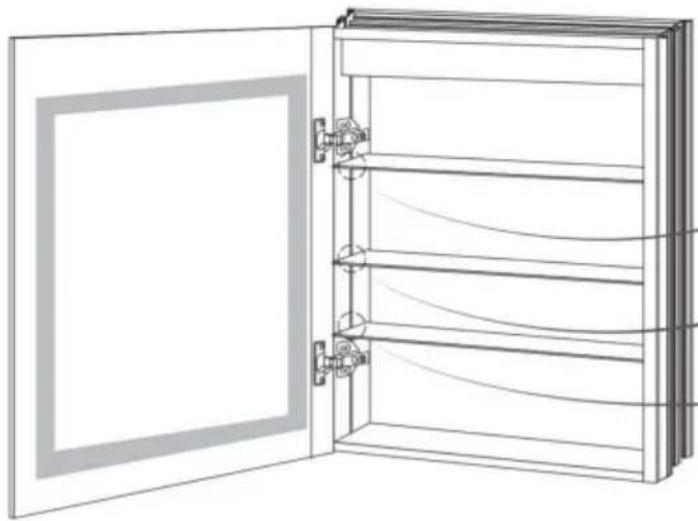
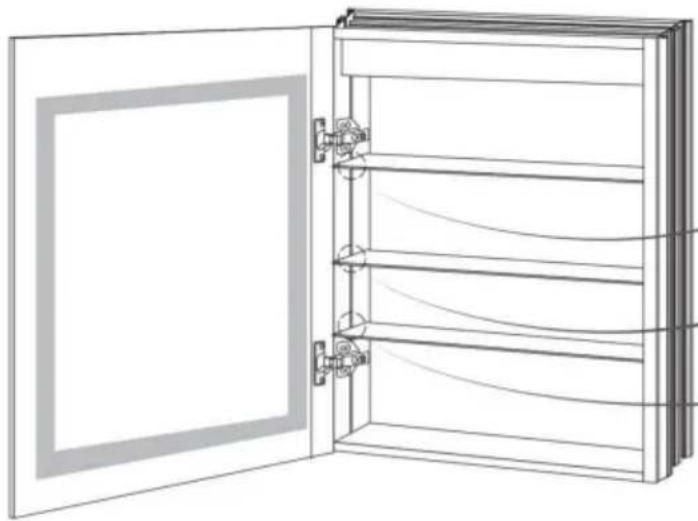
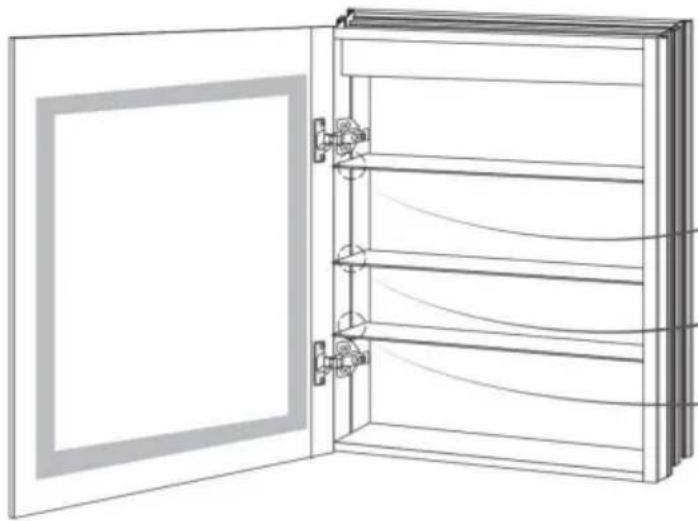
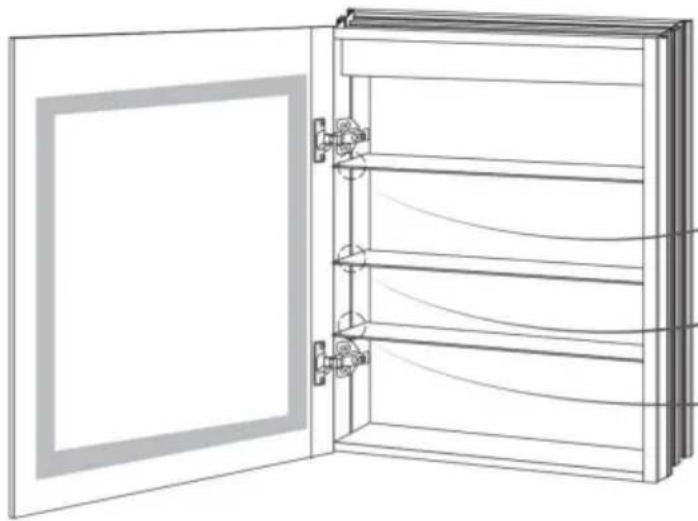
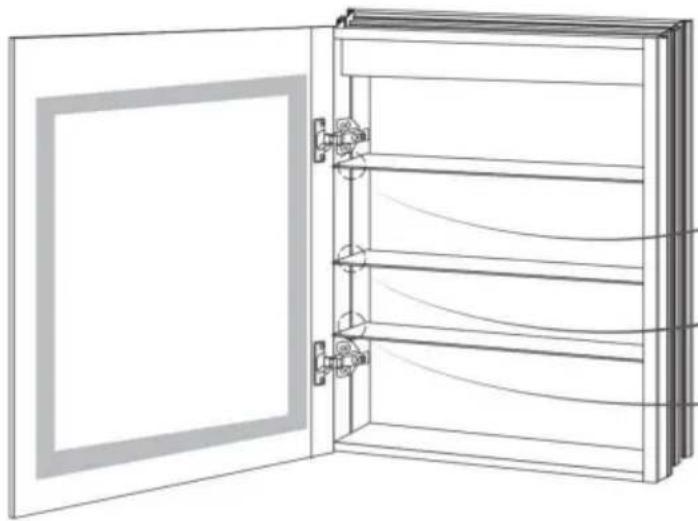
Using the +screwdriver to adjusting the tightness of the screws on the shelves.
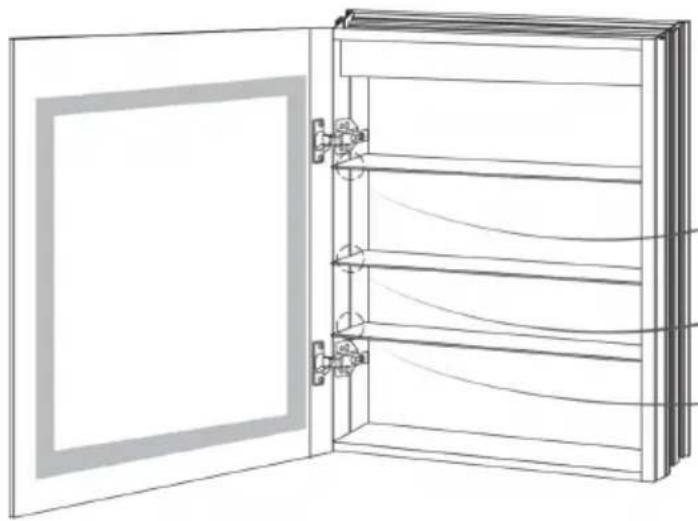
natural_image
Line drawing of a cabinet with open door and internal shelves (no text or symbols)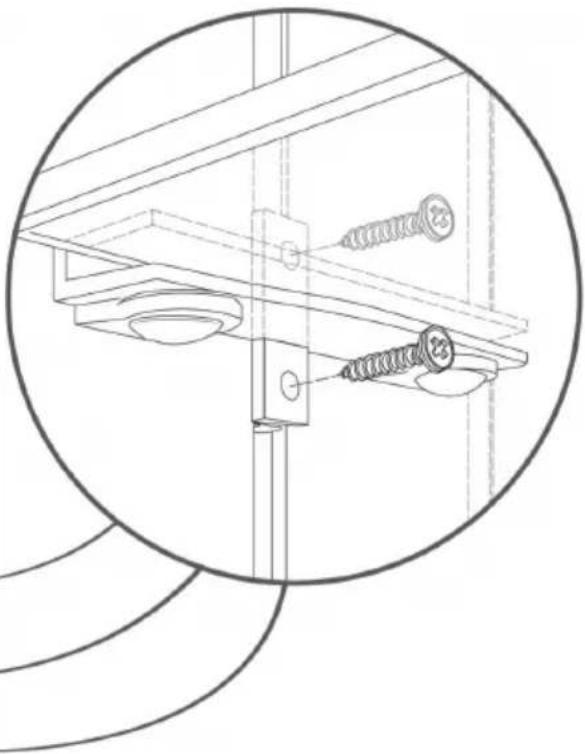
natural_image
Technical line drawing of a mechanical assembly with screws and bolts, enclosed in a circular detail (no text or symbols)NOTE: The step just for model : ML14X24-1 / ML40X25.5-3 / ML26X30-2.
2. RECESS-MOUNT INSTALLATION
- Make an outline for the cabinet (①), cut the marked perimeter through the drywall (②), and frame the cutout opening (③).
| A | B | C | |
| ML14X24-1 | 13.5"(342mm) | 23.6"(600mm) | 4.2"(106mm) |
| ML16X24-1 | 14.8"(376mm) | 20"(508mm) | 3.5"(88mm) |
| ML16.5X27.5-1 | 15.3"(388mm) | 23.9"(608mm) | 3.5"(88mm) |
| ML20X30-1 | 18.8"(477mm) | 26"(660mm) | 3.5"(88mm) |
| ML24X30-1 | 23.2"(590mm) | 26"(661mm) | 3.5"(88mm) |
| ML40X25.5-3 | 39.6"(1006mm) | 22.8"(578mm) | 4.2"(106mm) |
| ML26X30-2 | 25.5"(648mm) | 29.6"(752mm) | 4.2"(106mm) |
| NOTE: Suggest 5-10mm larger than A、B、C. | |||
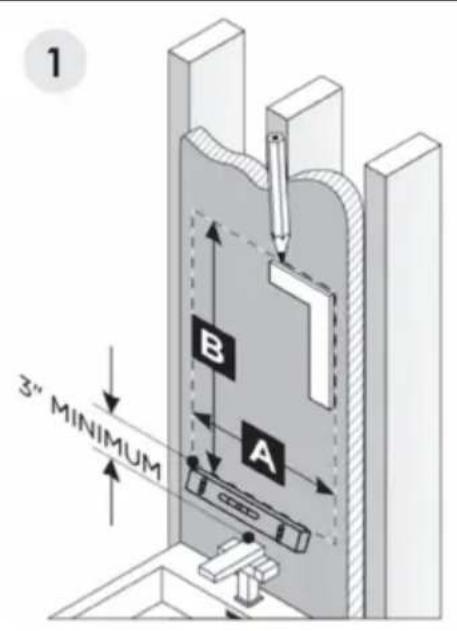
text_image
1 3" MINIMUM B A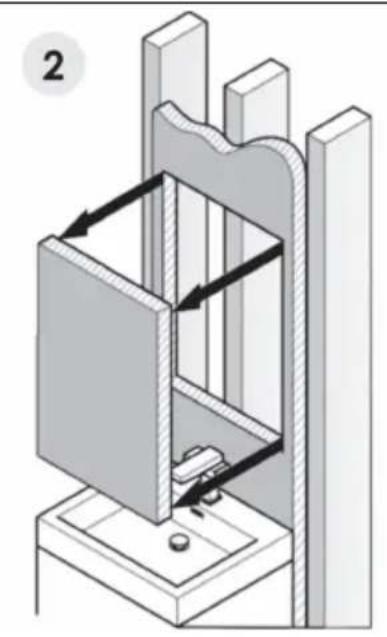
natural_image
Mechanical assembly diagram showing a clamping mechanism with arrows indicating motion (no text or symbols)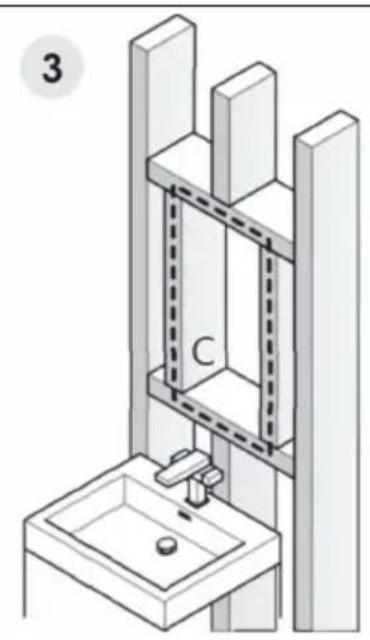
natural_image
Isometric diagram of a mechanical setup with a sink, frame structure, and labeled component 'C' (no text or symbols beyond label)a. Mark the center stud;
b. Saw it for cabinet to rest on;
c. Add additional 2 studs on the top and at the bottom of the open the cabinet;
d. Two more studs on both sides for the cabinet to be secured on.
4 STEPS TO FRAME THE CUTOUT OPENING
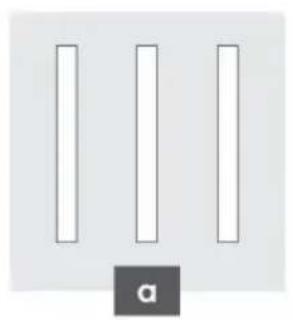
natural_image
Three vertical white bars arranged horizontally with a black square labeled 'a' at the bottom (no text or symbols on bars)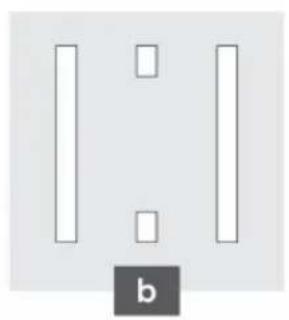
natural_image
Simple diagram with three vertical bars and two small squares, one labeled 'b' (no text or symbols on bars)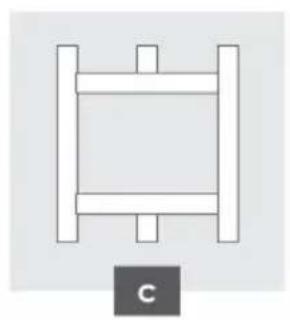
natural_image
Simple line drawing of a mechanical or structural component with vertical supports and a central rectangular block, labeled 'C' below (no text or symbols on the diagram itself)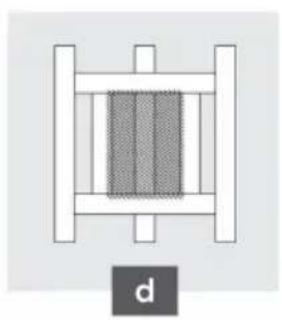
natural_image
Pure mechanical assembly diagram without any text, numbers, or symbols| 1. Position cabinet in cutout opening. | 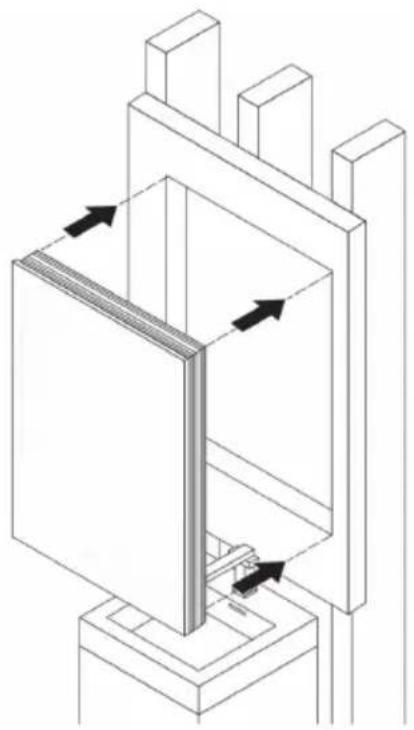 |
| 2. Use a pencil to set the po | 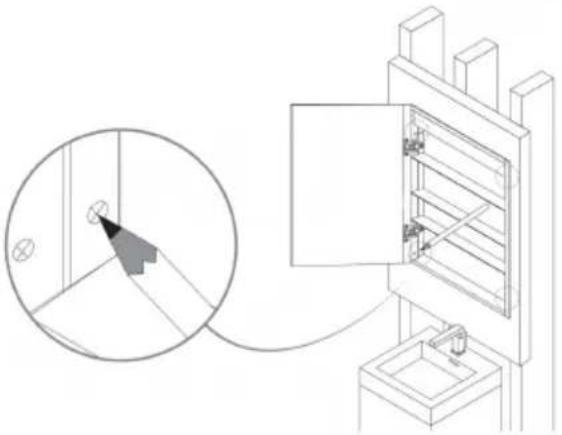 |
3. Punch holes at marked points and whack expansion tube into the 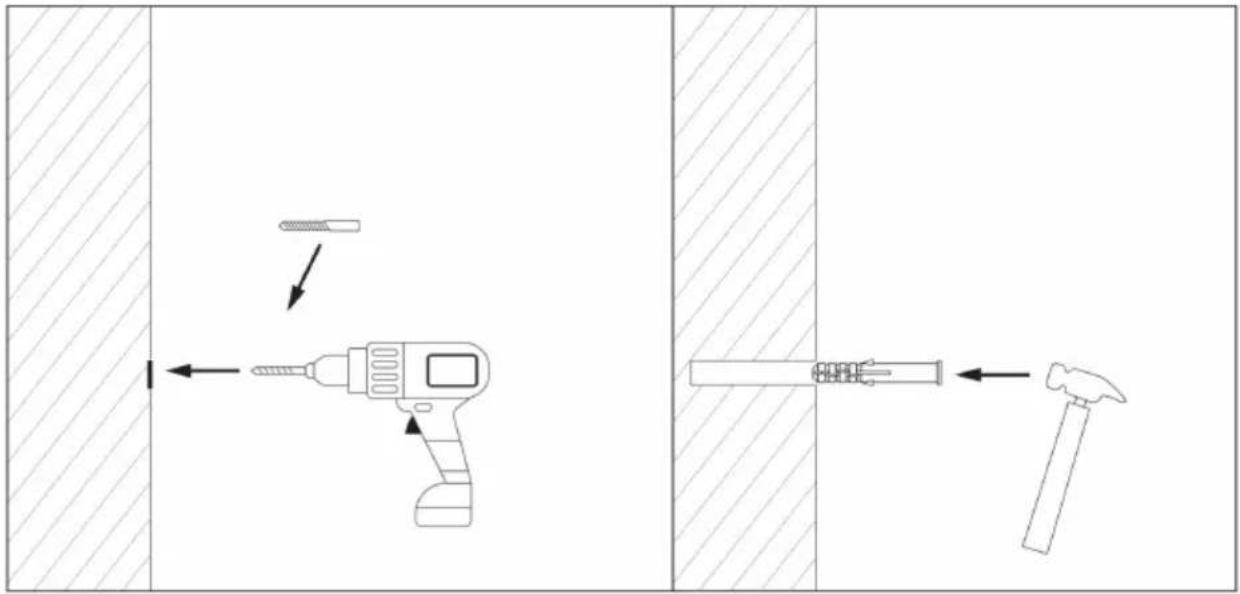 | |
- Secure it to the studs using screws.
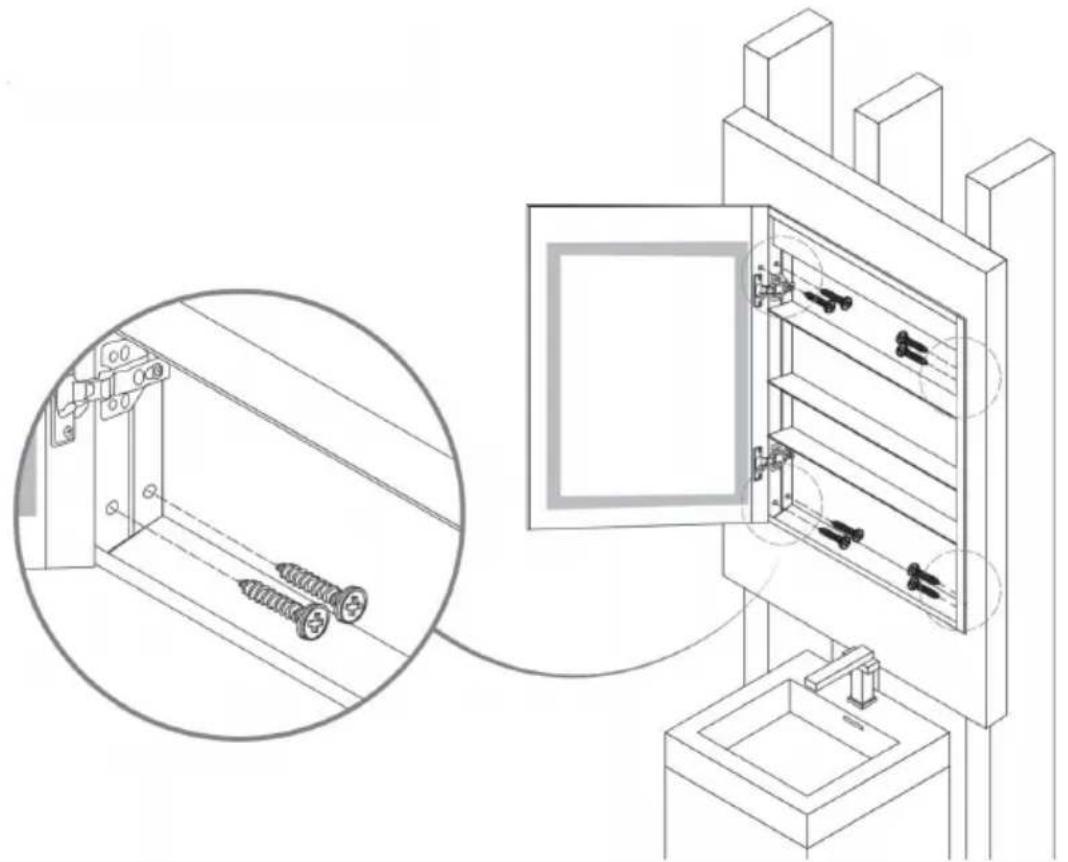
natural_image
Technical line drawing of a mechanical assembly with a close-up inset showing two screws mounted on a base (no text or symbols present)RECESS-MOUNT INSTALLATIONO
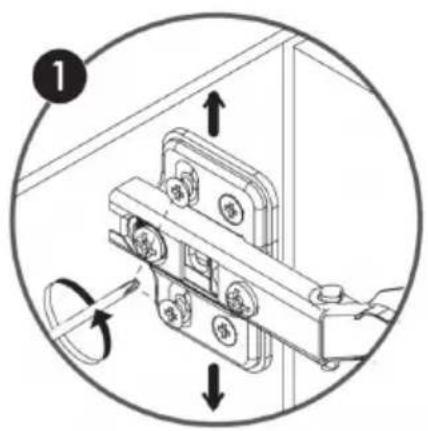
Open the "DTC" cover in the direction of the arrow.
Turn screw ① to adjust the depth of door overlay;
Turn front screw ② to adjust the gap between the door and cabinet; Turn the eccentric screw ③ to release the mounting plate from the cabinet, allowing the door to be moved up and down.
text_image
1
text_image
Diagram showing mechanical assembly with numbered component and directional arrows indicating motion or movement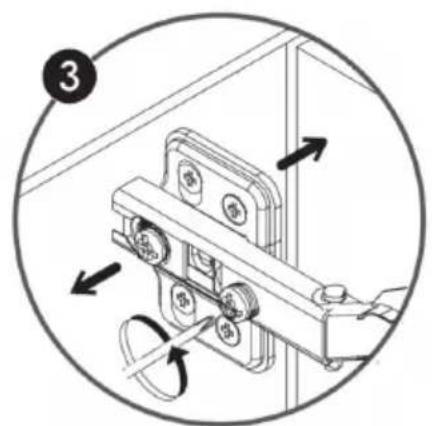
text_image
Diagram showing mechanical assembly with numbered component and directional arrows indicating motion or movementVEVOR®
TOUGH TOOLS, HALF PRICE
Technical Support and E-Warranty Certificate
www.vevor.com/support
VEVOR®
TOUGH TOOLS, HALF PRICE
natural_image
Pure architectural line drawing of a two-story building facade with vertical supports and horizontal beams, no text or symbols present.text_image
Diagram illustrating the working principle of a tool, showing how to move from a drill pen to a hammer and screw.| Thickness Of Wall: | Recommended Drill Bite: |
| >5/8" (16mm) | 5/16"(8mm) drill bit,drilling depth in 131/32"(50mm) |
| 5/16" (8) - 5/8" (16mm) | 25/64"(10mm) drill bit |
| <5/16" (8mm) | Unapplicable |
Using the +screwdriver to adjusting the tightness of the screws on the shelves.
natural_image
Line drawing of a cabinet with open door and shelves, no text or symbols present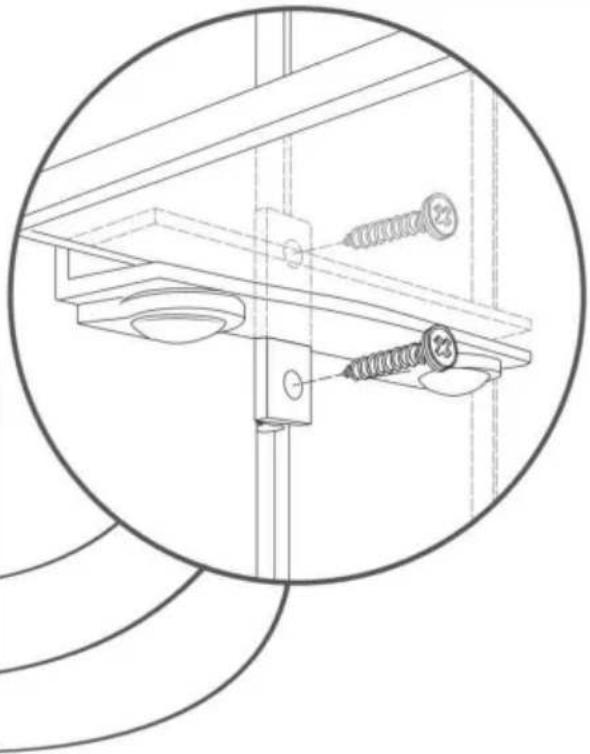
natural_image
Technical line drawing of a mechanical assembly with screws and bolts, enclosed in a circular detail (no text or symbols)natural_image
Isometric diagram of a mechanical assembly with directional arrows indicating motion or force (no text or symbols)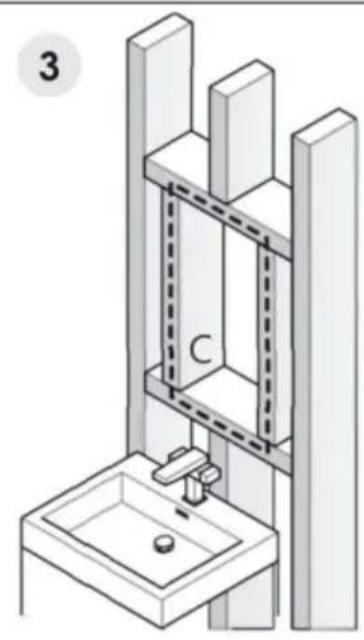
natural_image
Isometric diagram of a mechanical or architectural setup with a central column, water source, and support structure (no text or symbols)a. Marquez le montant
natural_image
Three vertical white bars on a gray background with a black square labeled 'a' at the bottom (no text or symbols on bars)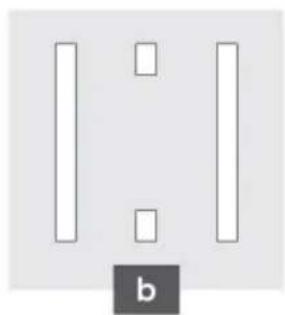
natural_image
Simple diagram with three vertical bars and two small rectangles, one labeled 'b' (no text or symbols on bars)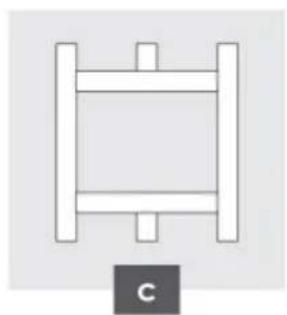
natural_image
Simple line drawing of a vertical ladder with horizontal bars, labeled 'C' below (no text or symbols on the diagram itself)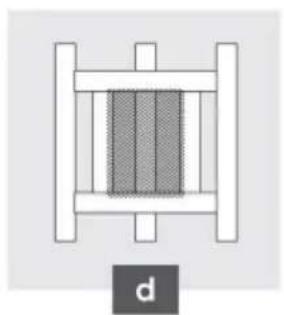
natural_image
Pure mechanical or structural diagram with no visible text, numbers, or symbolsnatural_image
Technical line drawing of a mechanical assembly with a close-up inset showing two screws inserted into a cabinet (no text or symbols present)INSTALLATION ENCASTRÉE
text_image
Diagram showing mechanical assembly with labeled components and directional arrows indicating motion or movement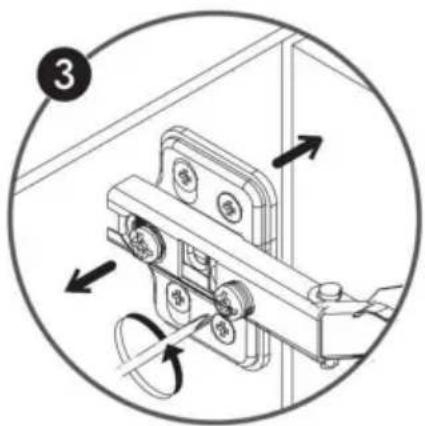
natural_image
Mechanical assembly diagram showing a bracket with rotating components and directional arrows (no text or symbols)VEVOR®
TOUGH TOOLS, HALF PRICE
INSTALLATIONSMETHODE
VOR DER INSTALLATION
natural_image
Diagram showing a rectangular frame with a horizontal double-headed arrow and a vertical wall with diagonal hatching (no text or symbols)| Thickness Of Wall: | Recommended Drill Bite: |
| >5/8" (16mm) | 5/16"(8mm) drill bit,drilling depth in 131/32"(50mm) |
| 5/16" (8) - 5/8" (16mm) | 25/64"(10mm) drill bit |
| <5/16" (8mm) | Unapplicable |
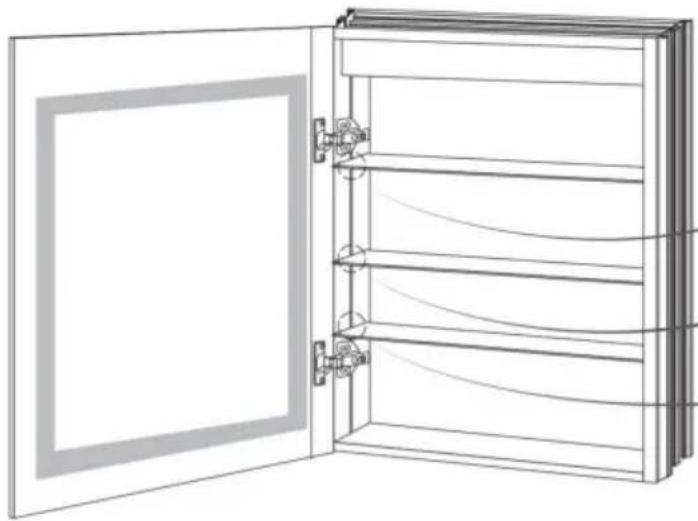
Using the +screwdriver to adjusting the tightness of the screws on the shelves.
natural_image
Line drawing of a cabinet with open door and shelves, no text or symbols present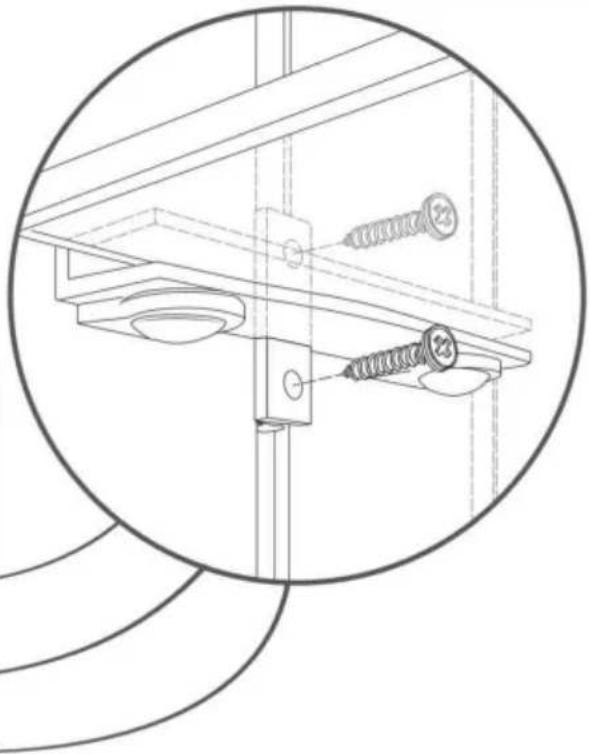
natural_image
Technical line drawing of a mechanical assembly with screws and bolts, enclosed in a circular detail (no text or symbols)natural_image
Isometric diagram of a mechanical assembly with directional arrows indicating motion or force (no text or symbols)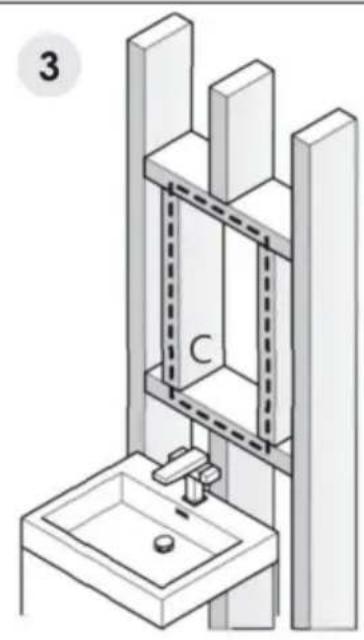
natural_image
Isometric diagram of a mechanical or architectural setup with a central column, water source, and support structure (no text or symbols)natural_image
Three vertical white bars arranged horizontally with a black square labeled 'a' at the bottom (no text or symbols on bars)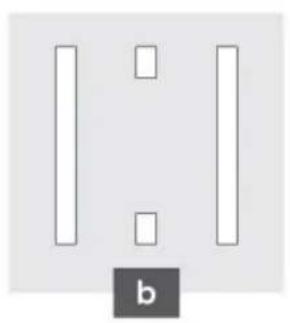
natural_image
Simple diagram with three vertical bars and two small rectangles, one labeled 'b' (no text or symbols on bars)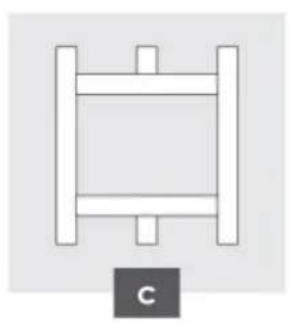
natural_image
Simple line drawing of a vertical ladder with two horizontal bars and a label 'C' below (no text or symbols on the ladder itself)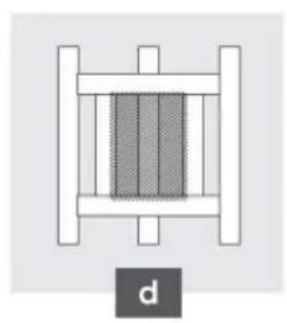
natural_image
Pure mechanical assembly diagram without any text, numbers, or symbolstext_image
Diagram illustrating the working principle of a tool, showing how to move from a screwdriver to a hammer via a drill, with directional arrows indicating movement.natural_image
Technical line drawing of a wall-mounted cabinet with screw fixtures and a close-up inset showing internal components (no text or symbols)EINBAUMONTAGE
text_image
Diagram showing mechanical assembly with numbered component and directional arrows indicating motion or movement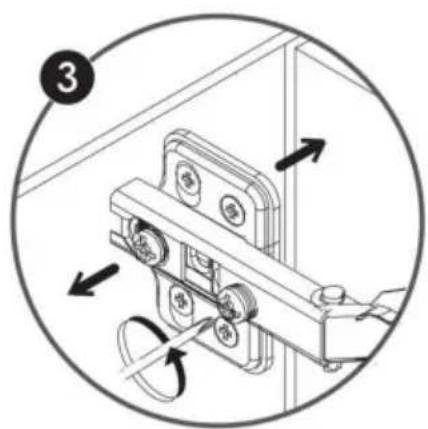
natural_image
Mechanical assembly diagram showing a bracket with rotating components and directional arrows (no text or symbols)VEVOR®
TOUGH TOOLS, HALF PRICE
www.vevor.com/support
VEVOR®
TOUGH TOOLS, HALF PRICE
natural_image
Diagram showing a rectangular frame with horizontal double-headed arrows indicating vertical alignment, no text or symbols present.text_image
Diagram illustrating the working principle of a screwdriver tool, showing how to move from a drill to a screw.| Thickness Of Wall: | Recommended Drill Bite: |
| >5/8" (16mm) | 5/16"(8mm) drill bit,drilling depth in 131/32"(50mm) |
| 5/16" (8) - 5/8" (16mm) | 25/64"(10mm) drill bit |
| <5/16" (8mm) | Unapplicable |
Using the +screwdriver to adjusting the tightness of the screws on the shelves.
natural_image
Line drawing of a cabinet with open door and shelves, no text or symbols present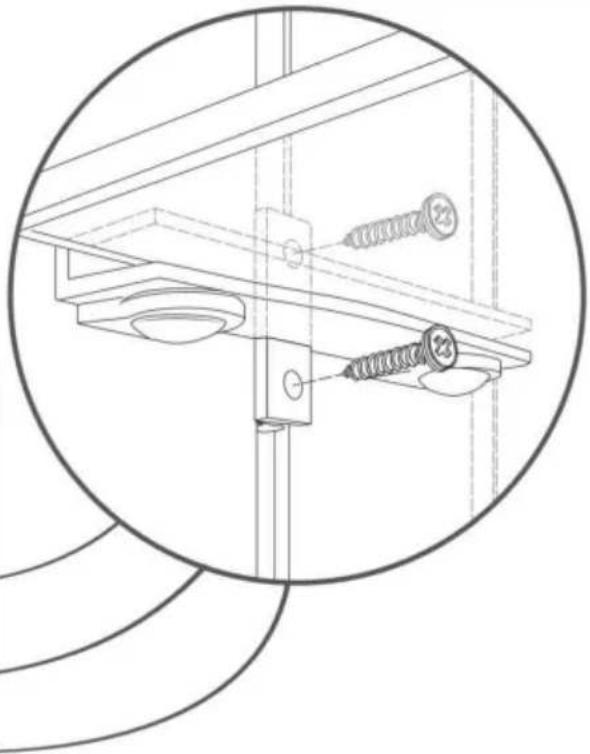
natural_image
Technical line drawing of a mechanical assembly with screws and bolts, enclosed in a circular detail (no text or symbols)natural_image
Isometric diagram of a mechanical assembly with directional arrows indicating motion or force (no text or symbols)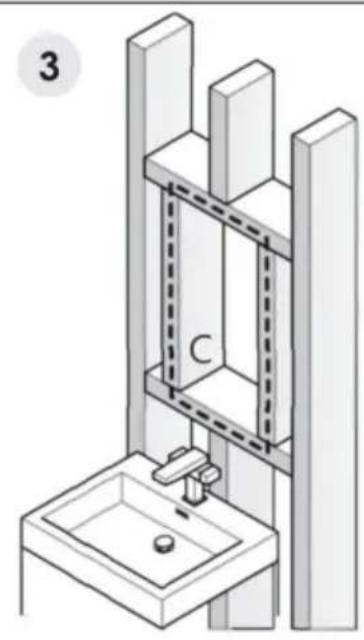
natural_image
Isometric diagram of a mechanical or architectural setup with a central column, water source, and support structure (no text or symbols)natural_image
Three vertical white bars arranged horizontally with a black square labeled 'a' at the bottom (no text or symbols on bars)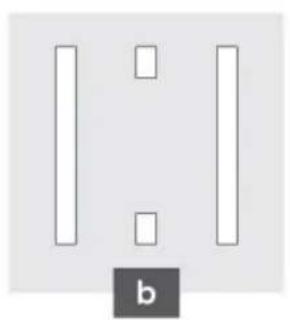
natural_image
Simple diagram with three vertical bars and two small rectangles, one labeled 'b' (no text or symbols on bars)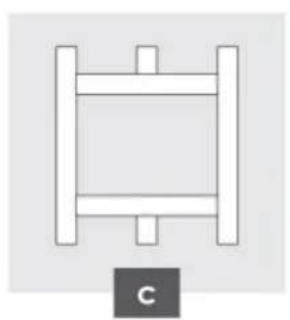
natural_image
Simple line drawing of a vertical ladder with two horizontal bars and a label 'C' below (no text or symbols on the ladder itself)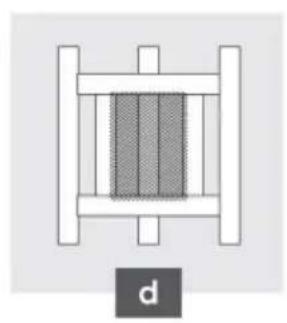
natural_image
Pure mechanical or structural diagram with no visible text, numbers, or symbolsnatural_image
Technical line drawing of a wall-mounted cabinet with screw fasteners and mounting base (no text or symbols)natural_image
Mechanical assembly diagram showing a bracket with mounting holes and directional arrows (no text or symbols)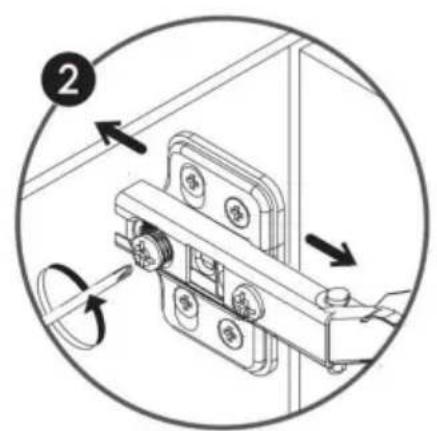
text_image
Diagram showing a mechanical assembly with labeled components and directional arrows indicating motion or movement.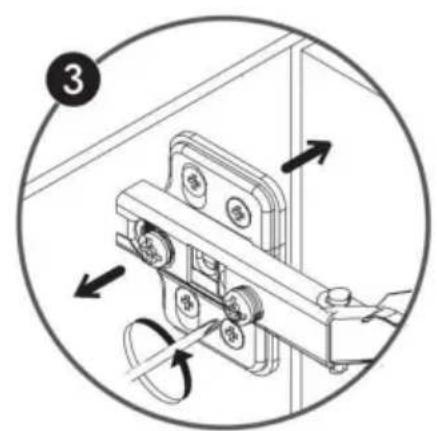
text_image
Diagram showing mechanical assembly with numbered annotation and directional arrows indicating motion or movementVEVOR®
TOUGH TOOLS, HALF PRICE
elettronica www.vevor.com/support
VEVOR®
TOUGH TOOLS, HALF PRICE
natural_image
Diagram showing a rectangular frame with horizontal double-headed arrows and a vertical wall with diagonal hatching (no text or symbols)2. Coloca el espejo
text_image
Diagram illustrating the working principle of a screwdriver tool, showing how to move from a drill to a hammer and then to a screw.| Thickness Of Wall: | Recommended Drill Bite: |
| >5/8" (16mm) | 5/16"(8mm) drill bit,drilling depth in 131/32"(50mm) |
| 5/16" (8) - 5/8" (16mm) | 25/64"(10mm) drill bit |
| <5/16" (8mm) | Unapplicable |
Using the +screwdriver to adjusting the tightness of the screws on the shelves.
natural_image
Line drawing of a cabinet with open door and shelves, no text or symbols present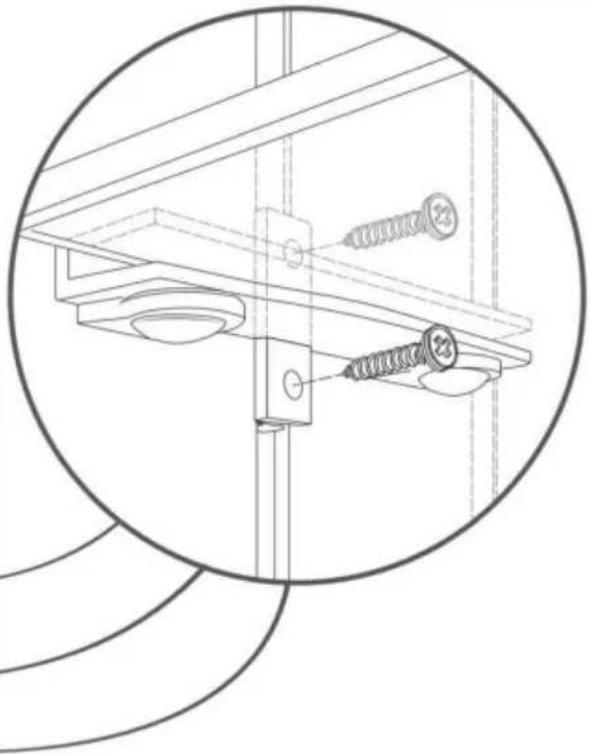
natural_image
Technical line drawing of a mechanical assembly with screws and bolts, enclosed in a circular detail (no text or symbols)natural_image
Isometric diagram of a mechanical assembly with directional arrows indicating motion or force (no text or symbols)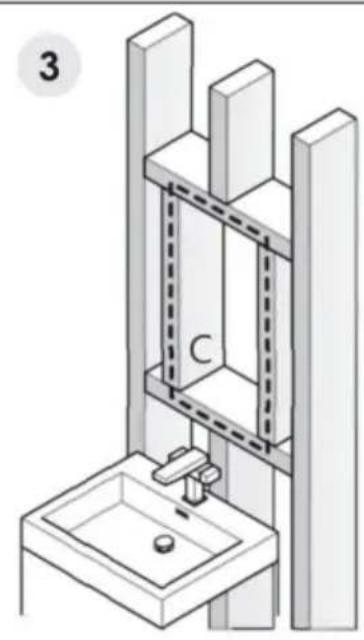
natural_image
Isometric diagram of a mechanical or architectural assembly with a central component labeled 'C', no text or symbols present.natural_image
Three vertical white bars arranged horizontally with a black square labeled 'a' at the bottom (no text or symbols on bars)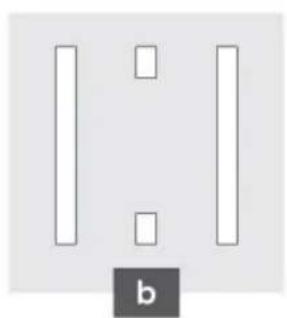
natural_image
Simple diagram with three vertical bars and two small squares, one labeled 'b' (no text or symbols on bars)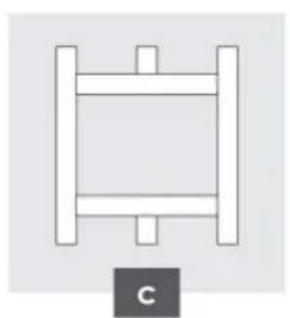
natural_image
Simple line drawing of a mechanical or structural component with two vertical bars and a central rectangular block, labeled 'C' below (no text or symbols on the diagram itself)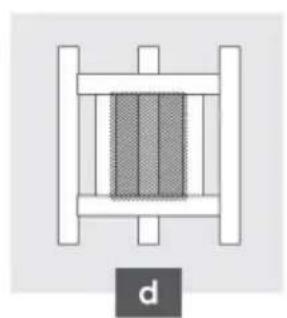
natural_image
Pure mechanical assembly diagram without any text, numbers, or symbolsnatural_image
Technical line drawing of a mechanical assembly with a close-up inset showing two screws inserted into a cabinet (no text or symbols present)text_image
Technical diagram showing mechanical assembly with labeled components and directional arrows indicating motion or movement.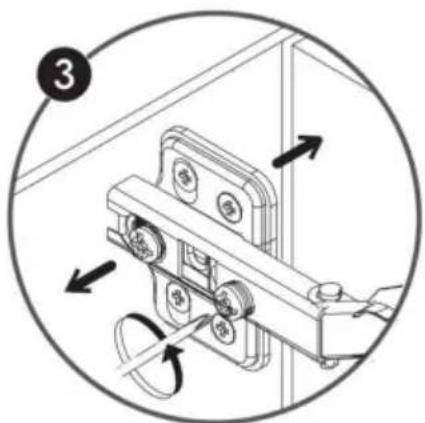
natural_image
Mechanical assembly diagram showing a rotating mechanism with arrows indicating motion (no text or symbols)VEVOR®
TOUGH TOOLS, HALF PRICE
natural_image
Pure architectural line drawing of a two-story building facade with vertical supports and horizontal beams, no text or symbols present.2. Umieść lustro
text_image
Diagram illustrating the working principle of a screwdriver tool, showing how to move from a drill to a screw.| Thickness Of Wall: | Recommended Drill Bite: |
| >5/8" (16mm) | 5/16"(8mm) drill bit,drilling depth in 131/32"(50mm) |
| 5/16" (8) - 5/8" (16mm) | 25/64"(10mm) drill bit |
| <5/16" (8mm) | Unapplicable |
Using the +screwdriver to adjusting the tightness of the screws on the shelves.
natural_image
Line drawing of a cabinet with open door and shelves, no text or symbols present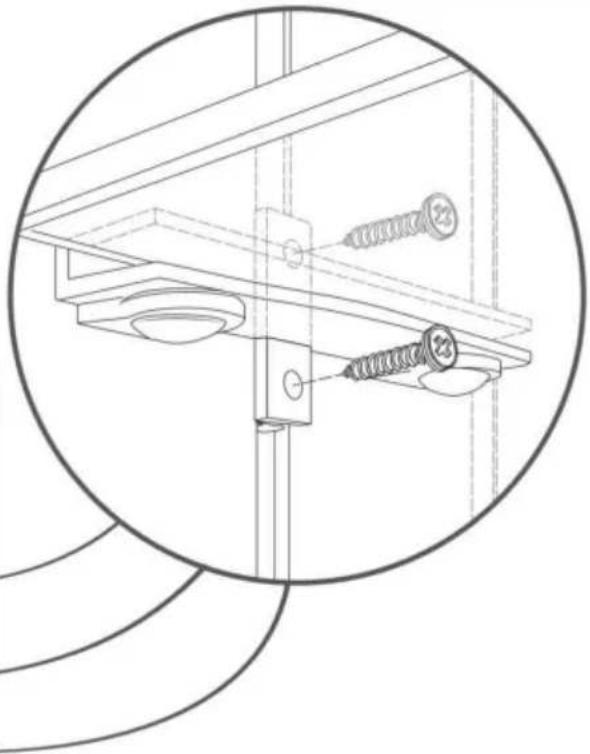
natural_image
Technical line drawing of a mechanical assembly with screws and bolts, enclosed in a circular detail (no text or symbols)natural_image
Isometric diagram of a mechanical assembly with directional arrows indicating motion or force (no text or symbols)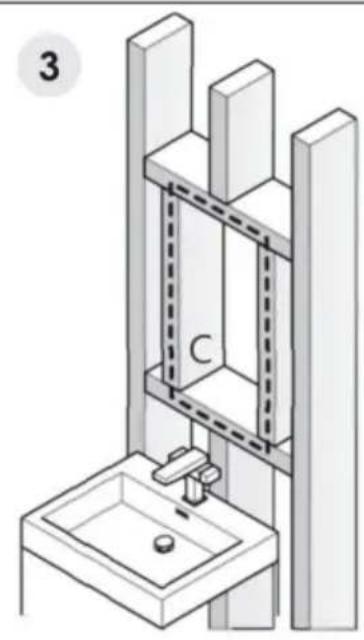
natural_image
Isometric diagram of a mechanical or architectural setup with a central column, water source, and support structure (no text or symbols)natural_image
Three vertical white bars arranged horizontally with a black square labeled 'a' at the bottom (no text or symbols on bars)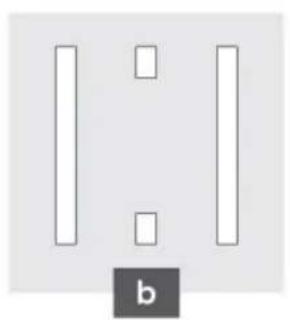
natural_image
Simple diagram with three vertical bars and two small rectangles, one labeled 'b' (no text or symbols on bars)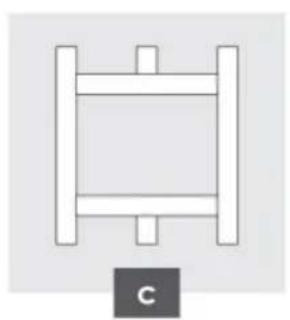
natural_image
Simple line drawing of a vertical ladder with two horizontal bars and a label 'C' below (no text or symbols on the ladder itself)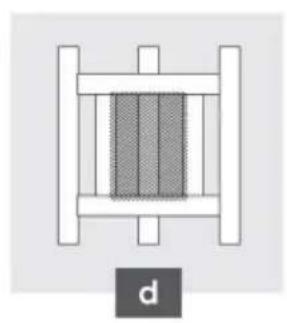
natural_image
Pure mechanical assembly diagram without any text, numbers, or symbolsnatural_image
Technical line drawing of a wall-mounted cabinet with screw fasteners and mounting base (no text or symbols)INSTALACJA WNEKOWA
natural_image
Mechanical assembly diagram showing a bracket with mounting holes and directional arrows (no text or symbols)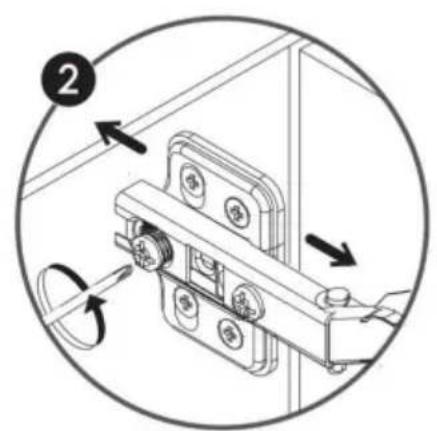
text_image
Diagram showing a mechanical assembly with labeled components and directional arrows indicating motion or movement.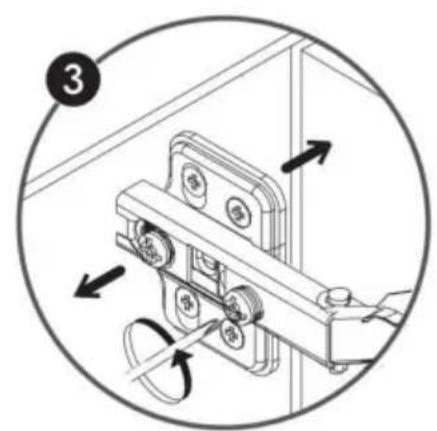
text_image
Diagram showing mechanical assembly with numbered annotation and directional arrows indicating motion or movementVEVOR®
TOUGH TOOLS, HALF PRICE
HULP NODIG? NEEM CONTACT MET ONS OP!
natural_image
Diagram showing a rectangular frame with horizontal double-headed arrows and a vertical wall with diagonal hatching (no text or symbols)text_image
Diagram illustrating the working principle of a screwdriver tool, showing how to move from a drill to a hammer and then to a screw.| Thickness Of Wall: | Recommended Drill Bite: |
| >5/8" (16mm) | 5/16"(8mm) drill bit,drilling depth in 131/32"(50mm) |
| 5/16" (8) - 5/8" (16mm) | 25/64"(10mm) drill bit |
| <5/16" (8mm) | Unapplicable |
Using the +screwdriver to adjusting the tightness of the screws on the shelves.
natural_image
Line drawing of a cabinet with open door and shelves, no text or symbols present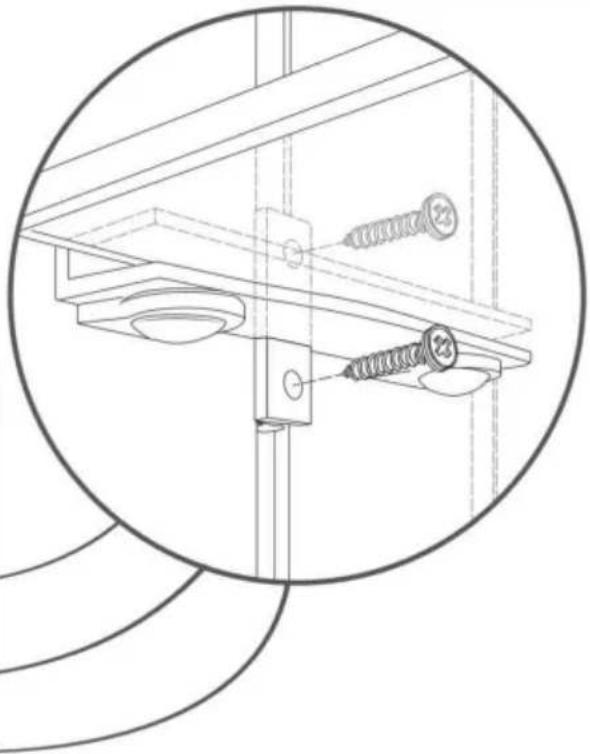
natural_image
Technical line drawing of a mechanical assembly with screws and bolts, enclosed in a circular detail (no text or symbols)2. INBOUWINSTALLATIE
natural_image
Isometric diagram of a mechanical assembly with directional arrows indicating motion or force (no text or symbols)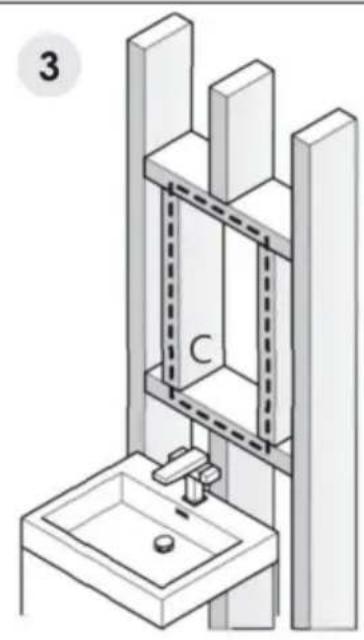
natural_image
Isometric diagram of a mechanical or architectural assembly with a central component labeled 'C', no text or symbols present.natural_image
Three vertical white bars arranged horizontally with a black square labeled 'a' at the bottom (no text or symbols on bars)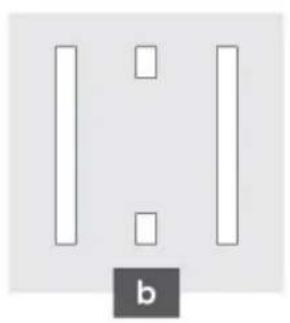
natural_image
Simple diagram with three vertical bars and two small rectangles, one labeled 'b' (no text or symbols on bars)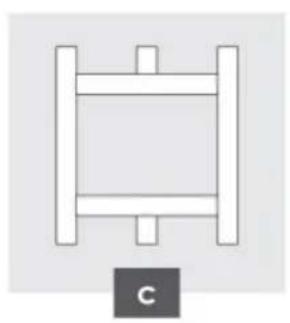
natural_image
Simple line drawing of a vertical ladder with two horizontal bars and a label 'C' below (no text or symbols on the ladder itself)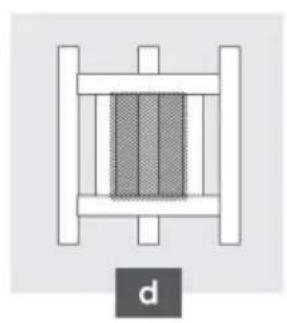
natural_image
Pure mechanical assembly diagram without any text, numbers, or symbolsnatural_image
Technical line drawing of a mechanical assembly with a close-up inset showing two screws inserted into a cabinet (no text or symbols present)INBOUWINSTALLATIEO
text_image
Diagram showing mechanical assembly with labeled components and directional arrows indicating motion or movement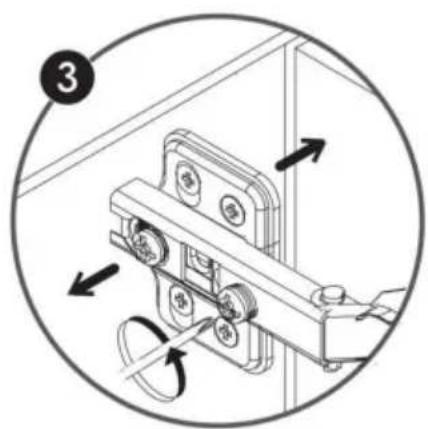
natural_image
Mechanical assembly diagram showing a bracket with rotating components and directional arrows (no text or symbols)VEVOR®
TOUGH TOOLS, HALF PRICE
garantiecertificaat www.vevor.com/support
VEVOR®
TOUGH TOOLS, HALF PRICE
natural_image
Diagram showing a rectangular frame with horizontal double-headed arrows and a vertical wall with diagonal hatching (no text or symbols)text_image
Diagram illustrating the working principle of a screwdriver tool, showing how to move from a drill to a screw.| Thickness Of Wall: | Recommended Drill Bite: |
| >5/8" (16mm) | 5/16"(8mm) drill bit,drilling depth in 131/32"(50mm) |
| 5/16" (8) - 5/8" (16mm) | 25/64"(10mm) drill bit |
| <5/16" (8mm) | Unapplicable |
Using the +screwdriver to adjusting the tightness of the screws on the shelves.
natural_image
Line drawing of a cabinet with open door and shelves, no text or symbols present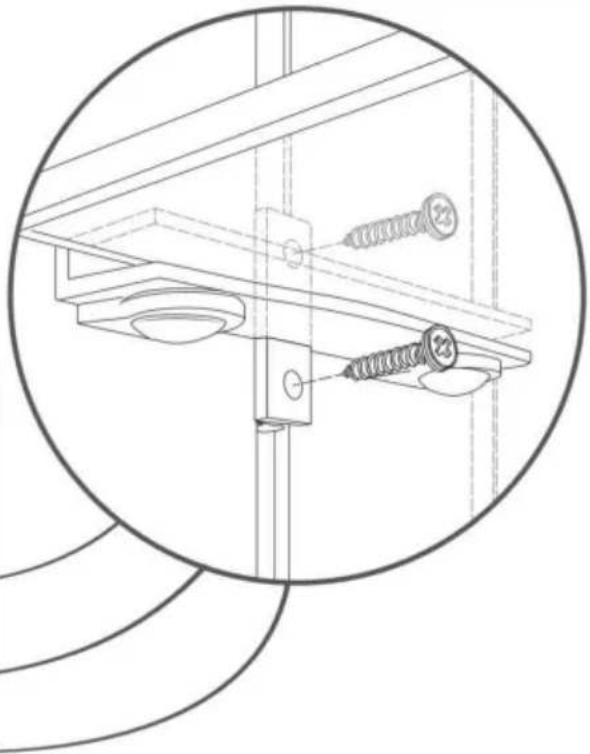
natural_image
Technical line drawing of a mechanical assembly with screws and bolts, enclosed in a circular detail (no text or symbols)OBS: Steget bara för modell: ML14X24-1 / ML40X25.5-3 / ML26X30-2.
2. INSTALLATION AV UPPBYGNING
natural_image
Isometric diagram of a mechanical assembly with directional arrows indicating motion or force (no text or symbols)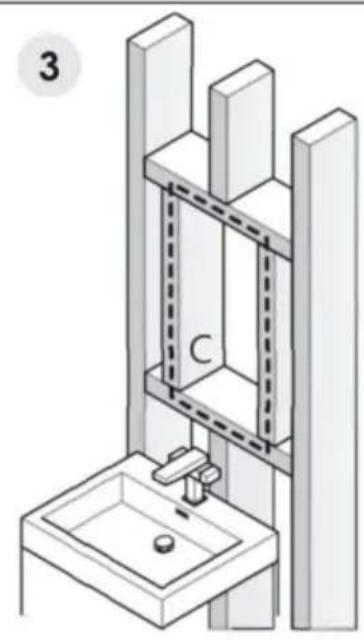
natural_image
Isometric diagram of a mechanical or architectural assembly with a central component labeled 'C', no text or symbols present.natural_image
Three vertical white bars arranged horizontally with a black square labeled 'a' at the bottom (no text or symbols on bars)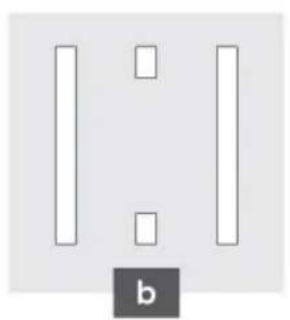
natural_image
Simple diagram with three vertical bars and two small rectangles, one labeled 'b' (no text or symbols on bars)
natural_image
Simple line drawing of a vertical ladder with two horizontal bars and a label 'C' below (no text or symbols on the ladder itself)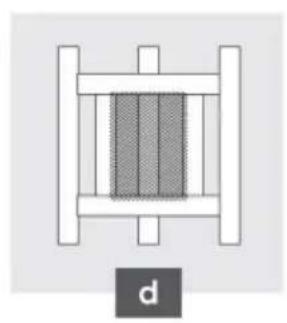
natural_image
Pure mechanical assembly diagram without any text, numbers, or symbolsnatural_image
Technical line drawing of a wall-mounted cabinet with screw fasteners and mounting base (no text or symbols)INSTALLATION AV UPPBYGNING
text_image
Diagram showing mechanical assembly with numbered component and directional arrows indicating motion or assembly steps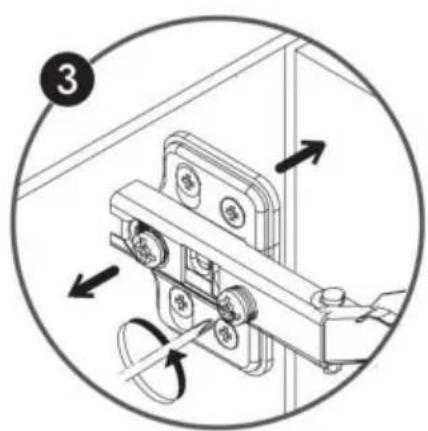
natural_image
Mechanical assembly diagram showing a sliding mechanism with directional arrows (no text or symbols)VEVOR®
TOUGH TOOLS, HALF PRICE
www.vevor.com/support