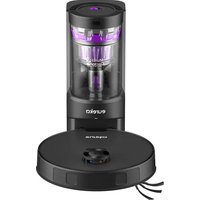
E20 Evo Plus - Robot vacuum EUREKA - Free user manual and instructions
Find the device manual for free E20 Evo Plus EUREKA in PDF.


| Product Type | Robot Vacuum |
| Brand | Eureka |
| Model | E20 Evo Plus |
| References | NERE20EVOPLUSBK, NERE20EVOPLUSWH |
| Battery | Lithium-ion, 14.4 V, 5200 mAh, 74.88 Wh |
| Charging Voltage | 16.7 V |
| Charging Station Power | 55 W |
| Auto-Empty Base Power | 850 W (input) |
| Auto-Empty Base Model | BS2301-2 |
| Navigation | LiDAR |
| Mopping Function | Yes (with water tank) |
| Auto-Empty | Yes |
| Connectivity | Wi-Fi 2.4 GHz, Eureka Robot App |
| App Compatibility | iOS 13+ / Android 8+ |
| Brushes | 1 side brush, 1 washable roller brush, cleaning brush |
| Filters | Sponge filter, cyclonic system |
| Dustbin Capacity | Not specified |
| Runtime | Not specified |
| Charging Time | Approximately 6 hours for first charge |
| Warranty | 2 years (vacuum) / 1 year (battery) |
| Box Contents | Robot, auto-empty base, side brush, cleaning brush, manual |
Frequently Asked Questions - E20 Evo Plus EUREKA
User questions about E20 Evo Plus EUREKA
0 question about this device. Answer the ones you know or ask your own.
Ask a new question about this device
Download the instructions for your Robot vacuum in PDF format for free! Find your manual E20 Evo Plus - EUREKA and take your electronic device back in hand. On this page are published all the documents necessary for the use of your device. E20 Evo Plus by EUREKA.
USER MANUAL E20 Evo Plus EUREKA
Please read the manual before use.
CONTENTS
English 02
Safety instructions 03
Technical data 08
What comes in the box 09
How to identify parts of your robot 10
Assembling and charging robot 11
How to use your robot 13
How to set up App, connect the device and use App 15
How to maintain your robot 17
How to maintain the self-emptying base 19
Troubleshooting 22
French 27
SAFETY INSTRUCTIONS
When using an electrical appliance, basic precautions should always be followed, including the following:
READ ALL INSTRUCTIONS BEFORE USING THIS VACUUM CLEANER
Failure to follow the warnings and instructions may result in electric shock, fire and/or serious injury. This vacuum should not be used by children under the age of eight or those with reduced physical, sensory or mental capabilities without supervision.
WARNING:
- Before using, clear area of power cables, pull cables for curtains or blinds, clothing and fragile items.
- Do not operate in a room where a child or infant is sleeping.
- Do not pour or spray any liquids on or in your robotic vacuum.
If you live in an area that is prone to electrical storms, we recommend using a surge protector. - Do not operate the robotic vacuum in a room that has lit candles or lit fireplace.
- Do not allow children to sit on vacuum.
- Do not use the self-emptying base if it is damaged.
- Do not operate in areas with exposed electrical outlets on the floor.
- Be aware that the robotic vacuum moves around on its own. Take care when walking in the area when it is in operation.
- Do not place the robotic vacuum on any unstable surfaces.
- Prevent unintentional starting. Ensure the power switch is in the off-position before picking up or carrying the appliance. Carrying the appliance with your finger on the switch or energizing appliance that has the switch on invites accidents.
- Danger. Do not touch it when the vacuum cleaner is on.
- Do not put any object into openings. Do not use with any openings blocked; keep free of dust, lint, hair and anything that may reduce air flow.
- Do not use outdoors or on wet surfaces.
- Do not use with damaged cord or plug.
- Do not operate the vacuum cleaner or self-emptying base if it has been damaged in any way. If vacuum cleaner is not working as it should, has been dropped, damaged, left outdoors, or dropped into water or other liquid, call the Eureka Customer Service HELP-LINE at 1-800-282-2886 (US) 1-833-947-4031 (CA).
- To avoid excessive heat and damage to the unit or battery, the vacuum cleaner will not operate while charging.
- Do not allow to be used as a toy. Close attention is necessary when used by or near children, pets or plants.
SAFETY INSTRUCTIONS
- Use only as described in this manual. Use only manufacturer's recommended attachments.
- Recharge only with the base specified by the manufacturer. A base that is suitable for one type of battery pack may create a risk of fire when used with another battery pack.
- Do not pull or carry the base by cable, use cable as a handle, close a door on cable, or pull cable around sharp edges or corners. Do not run appliance over cable. Keep cord away from heated surfaces.
- This base is not intended for use by travelers.
- Do not use extension cords or outlets with inadequate current-carrying capacity for the base.
- Do not unplug by pulling on cord. To unplug, grasp the plug, not the cord.
- Do not handle plug, base or vacuum cleaner with wet hands.
- Use appliances only with specifically designated battery packs. Use of any other battery packs may create a risk of injury and fire.
DO NOT MUTILATE OR INCINERATE BATTERIES. THEY BECOME DANGEROUS AT HIGH TEMPERATURES. - Liquid ejected from the battery may cause irritation or burns. If the liquid gets on the skin, (1) seek medical attention, (2) wash quickly with soap and water, and (3) neutralize with a mild acid such as lemon juice or vinegar. If the liquid gets into the eyes, flush them immediately with clean water for a minimum of 10 minutes.
- When battery pack is not in use, keep it away from other metal objects, like paper clips, coins, keys, nails, screws or other small metal objects, that can make a connection from one terminal to another. Shorting the battery terminals together may cause burns or a fire.
- This product is functioning at temperature range within 40^ - 104^ .
- Do not use a battery pack or appliance that is damaged or modified. Damaged or modified batteries may exhibit unpredictable behavior resulting in fire, explosion or risk of injury.
- Do not expose a battery pack or appliance to fire or excessive temperature. Exposure to fire or temperature above 266^ may cause explosion.
- Follow all charging instructions and do not charge the battery pack or appliance outside of the temperature range specified in the instructions. Charging improperly or at temperatures outside of the specified range may damage the battery and increase the risk of fire.
- Have servicing performed by a qualified repair person using only identical replacement parts. This will ensure that the safety of the product is maintained.
- Do not modify or attempt to repair the appliance or the battery pack except as indicated in the instructions for use and care.
- The terminals on both the vacuum cleaner and battery should be kept free and clear of objects. Do not insert metal objects inside the terminals.
SAFETY INSTRUCTIONS
- This vacuum cleaner creates suction. Keep hair, loose clothing, fingers, and all parts of body away from openings and moving parts.
- Do not pick up anything that is burning or smoking, such as cigarettes, matches, or hot ashes.
- Do not use without filters in place.
- Do not use the robotic vacuum to pick up flammable or combustible liquids, such as gasoline, or use in areas where they may be present.
- Store vacuum cleaner and self-emptying base indoors in a cool, dry area. To avoid electric shock and/or damage, do not expose to weather elements.
- Keep your work area well lit. Unplug electrical appliances before vacuuming them.
Overcharging, short circuiting, reverse charging, mutilating or incinerating the cells and the batteries must be avoided. - If a cell or a battery has leaked or vented, it should be replaced immediately using protective gloves.
- If and when necessary, these cellor batteries must be replaced with identical new ones from the same manufacturer. If a cell or a battery to be replaced is connected with other cells or batteries in series, it is recommended that the other cells or batteries be replaced with new ones at the same time.
- Reverse polarity installation of the cell or the battery in the end product must be avoided.
- Do not incinerate thisappliance even if it is severely damaged. Contact local waste facility before discarding in trash.
- Do not operate the vacuum in an area where there are lit candles or fragile objects on the floor to be cleaned.
- Do not operate the vacuum in a room that has lit candles on furniture that the vacuum may accidentally hit or bump into.
- The power cable must be unplugged from self-emptying base before cleaning or maintaining the self-emptying base.
- Remove the appliance from the self-emptying base and turn off the power of the appliance before removing the battery for disposal of the appliance.
- If the robotic vacuum will not be used for a long time, fully charge the robotic vacuum and power OFF for storage and unplug the base.
- Use only with Eureka BS2301-2 self-emptying base
- Self-emptying base is only for use with the Eureka NERE20EVOPLUSBK and NERE20EVOPLUSWH robotic vacuum.
- Warning: The battery charger (self-emptying base) is not intended to charge non-rechargeable batteries.
- Keep hair, loose clothing, fingers, and all parts of body away from openings and moving parts.
- Under abusive conditions, liquid may be ejected from the battery; avoid contact. If contact accidentally occurs, flush with water. If liquid contacts eyes, seek medical help immediately. Liquid ejected from the battery may cause irritation or burns.
- Do not use and store in extremely hot or cold environments (below 23^ or above 104^ ). Please charge the robotic vacuum in temperature above 39.2^ and below 104^ .
SAFETY INSTRUCTIONS
06
- Place the cables from other appliances out of the area to be cleaned.
- Turn off the power switch before cleaning or maintaining the appliance.
- WARNING: This product can expose you to chemicals including Di(2-ethylhexyl)phthalate (DEHP), which is known to the State of California to cause cancer and to cause birth defects or other reproductive harm. For more information go to www.P65Warnings.ca.gov.
- Do not use the vacuum on a wet surface.
- Unplug the self-emptying base from outlet when not in use and before servicing.
- Turn off all controls before unplugging.
CAUTION:
RISK OF INJURY. BRUSH MAY START UNEXPECTEDLY. REMOVE MAIN BRUSH BEFORE CLEANING OR SERVICING.
WARNING FOR BATTERY
The product must be powered off before removing the battery.
- Do not disassemble the battery by yourself.
- If you need to replace it, please contact the after-sales service center.
- Please dispose of used battery according to local laws and regulations.
- Do not dismantle, open or shred the battery.
- Do not expose batteries to heat or fire. Avoid storing or keeping robotic vacuum in direct sunlight.
- Do not short-circuit a battery.
- Do not store batteries haphazardly in a box or drawer where they may short-circuit each other or be short-circuited by other metal objects.
- Do not subject batteries to mechanical shock.
- In the event of a leaking, do not allow the liquid to come in contact with the skin or eyes. If contact has been made, wash the affected area with copious amounts of water and seek medical advice.
- Do not use any charger other than that specifically provided for use with the equipment.
- Do not use any battery which is not designed for use with the equipment.
- Do not mix different manufacture, capacity, size or type within a device. Keep batteries out of the reach of children.
- Seek medical advice immediately if the battery has been swallowed.
SAFETY INSTRUCTIONS
- Keep batteries clean and dry.
- Do not leave a battery on prolonged charge when not in use.
After extended periods of storage, it may be necessary to charge and discharge the batteries several times to obtain maximum performance. - The batteries give their best performance when they are operated at normal room temperature (59 °F - 77 °F).
- Retain the original product literature for future reference.
- The battery may be irreversibly damaged if the battery is in low power for a long time. It is recommended that the battery retain sufficient power before storage.
| [symbol IEC 60417-5957 (2004-12)] | for indoor use only | |
| [symbol ISO 7000-0790 (2004-01)] | read operator's manual | |
| [symbol IEC 60417-5031 (2002-10)] | direct current | |
| x | time-lag miniature fuse-link where X is the symbol for the time/current characteristic as given in IEC 60127 | |
| ~ | [symbol IEC 60417-5032 (2002-10)] | alternating current |
| [symbol IEC 60417-5172 (2003-02)] | class II equipment | |
| ON | ||
| ○ | OFF | |
TECHNICAL DATA
| Product Model | NERE20EVOPLUSBK NERE20EVOPLUSWH |
| Host Charging Voltage | 16.7V --- |
| Host Rated Voltage | 14.4V --- |
| Host Rated Power | 55W |
| Self-emptying Base Model | BS2301-2 |
| Self-emptying Base Input | 120V~, 50-60Hz, 850W |
| Self-emptying Base Output | 16.7V ---, 1A |
| Battery Model | BP14452H |
| Battery Rated Voltage | 14.4V --- |
| Battery Capacity | 5200mAh 74.88Wh |
| Charging Limit Voltage | 16.8V --- |
What comes in the box
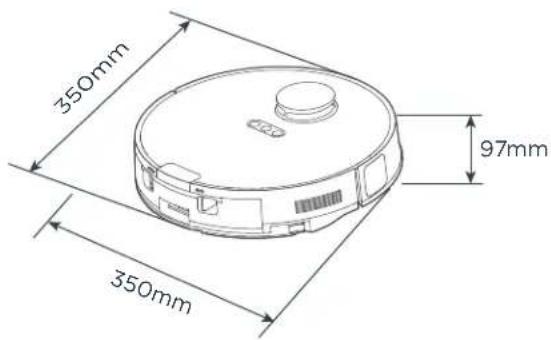
Robot Vacuum
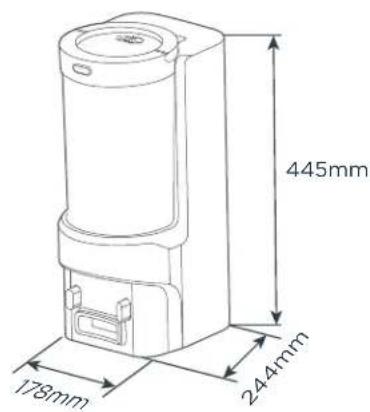
Self-Emptying Base
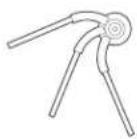
Side Brush
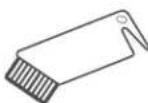
Cleaning Brush
Instruction Manual
How to identify parts of your robot
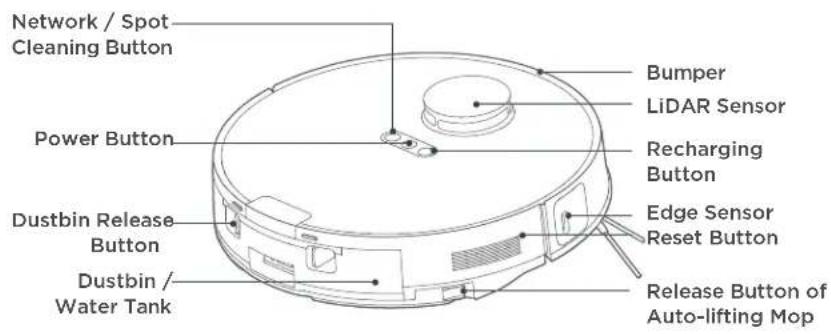
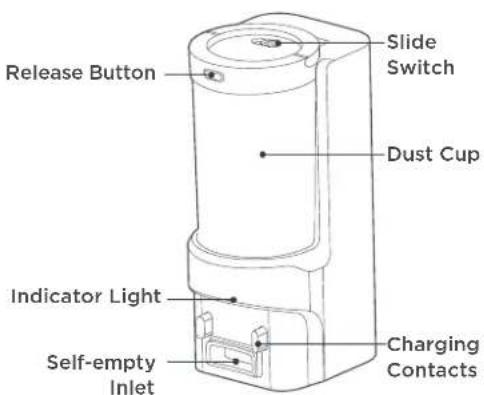
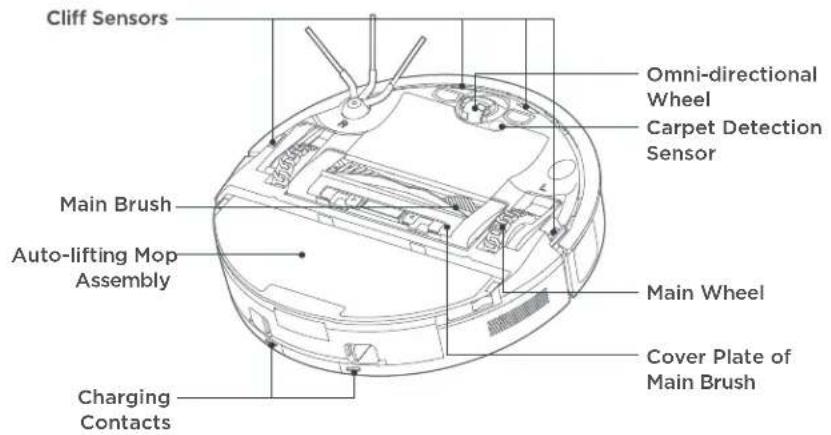
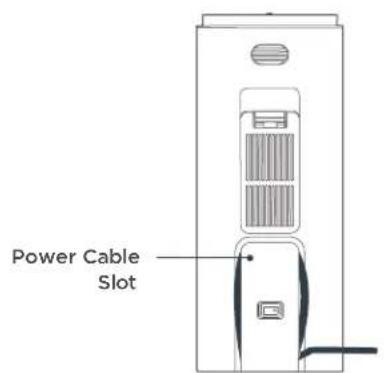
11
Assembling and charging robot

WARNING
Remove excess clutter and cables on the floor before cleaning.
Quick Assembly
01
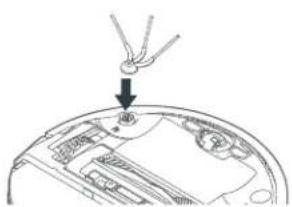
Installation of side brush
Turn the main unit over. Attach the side brush to its post and press down until it fits into place.
02
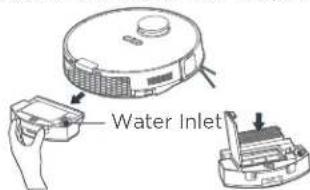
Filter installation
Robot comes with filter installed. Before use, remove dustbin from robot, pull up lid of dustbin and make sure filter is installed well. Ensure dustbin lid is securely closed and place back dustbin onto robot.
When using the mopping function, open the rubber tank lid, fill he water tank with cool tap water, and securely close the lid.

WARNING
Fill the tank with pure water, or add about 1mL of the manufacturer's solution (sold separately).
03
Setting up self-emptying base
- Place the self-emptying base flat against the wall on a level surface. If there is any charging base for other robot vacuum cleaners in the room, please put it away before use of our self-emptying base to avoid mismatching.
- Place the self-emptying base in an area covered with wireless network signal to ensure stable network connection of the robot and proper function of the App. Store the excess cables into the slot at the back of the base to avoid affecting the proper function of the robot vacuum.
- Plug the power plug into a power outlet.
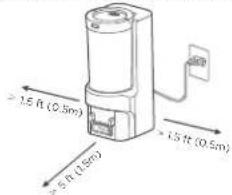
Assembling and charging robot
Charging
NOTES
- Avoid placing the robot and the base under direct sunlight.
- Be sure to keep the charging area dry.
Press and hold "O" for 3 seconds to power on the robot vacuum. After the power indicator turns on, press the recharging button or manually put the robot back into the self-emptying base for charging, as shown. We recommend you charge the robot for at least 6 hours before using it for the first time.
| Indicator Light | Status | ||
| off | stable light | off | Robot is in standby mode, or cleaning in progress, or robot is fully charged. |
| off | stable light | stable light | Battery level ≥ 20%, robot has finished its mission and is going to recharge |
| off | stable light | flash quickly | Battery level < 20%, robot is going to recharge |
| off | flash slowly | off | Robot is charging |
| off | flash quickly | off | Error. Please troubleshoot according to the actual performance of the robot, refer to 'Troubleshooting' |
| off | off | off | Robot is in sleep mode or turn off. |
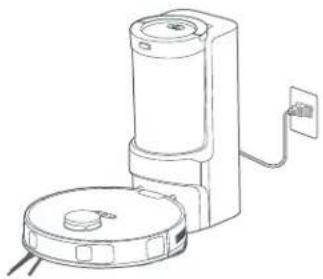
NOTES
- When the battery level is too low, the robot cannot be turned on. Please manually put the robot onto the self-emptying base.
- The robot will not be turned off when placed on the self-emptying base. To turn off the robot, remove the robot from the base, press and hold for 3s to shut it down. All indicators will be turned off.
- To ensure the optimal performance of the lithium-ion battery, please keep the robot charged.
- If you manually put the robot vacuum into the base, ensure that the charging contacts of both the robot and the base are connected.
- For long-term storage, remove the robot from the base turn it off and store it in a cool, dry place. If the robot is not used for more than 3 months, allow it to get charged for at least 12 hours before using. To preserve the battery lifespan, we suggest you fully charge the battery at least once every six months.
How to use your robot
| Operation | Button | ||
| ◎ | ◎ | ◎ | |
| Short Press | Start/pause/resume | Return to the base | Start spot cleaning |
| Press and hold for 3s | Shut down / | Enter the network pairing state | |
- Start / Pause / Resume
Briefly Press " 念 to start/pause/resume cleaning or use your app to control.
SPOT Cleaning
When the robot vacuum is in standby/pause mode, press "C" to start spot cleaning. The robot will begin to clean an area of one square meter centered on itself. After spot cleaning, the robot will automatically return to the base to recharge. Note that starting the spot cleaning mode will automatically stop the current cleaning cycle.
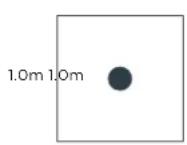
1.0m 1.0m

- Recharge
- When the robot vacuum is in standby mode, press " 念 " and the robot vacuum will start recharging.
- When the robot vacuum is in cleaning process, pressing " " can stop cleaning, and then press " " can start recharging.
Under special circumstances (such as power depletion, robot vacuum jamming, etc.), the robot vacuum may not be able to recharge automatically. Please manually place the robot vacuum back to the base.
NOTES
- The robot vacuum will enter sleep mode when it is in standby mode for more than 10 minutes. In sleep mode, press any key to wake up the robot vacuum.
- Do not immerse the robot in water. Doing so may damage the equipment, causing short-circuit or current leakage.
How to use your robot
Self-Emptying Function
- After cleaning, the robot will return to the base and automatically begin self-emptying.
- Press the recharging button (the recharge interval between two times should be longer than 5 minutes) to trigger self-emptying.
- Adjust dust collection frequency settings in the app to avoid manual self-emptying frequently.
Status Indicators of Self-Emptying Base
| Indicator Light Status | |
| Off | Self-emptying base is powered off. Self-emptying base is in sleep mode. |
| White light stays on | Self-emptying base is powered on. |
| White light flashes slowly | Self-emptying is in progress. |
| White light flashes quickly | The air duct of the dust cup may be clogged. Please check and empty the dust cup in time. |
How to set up App, connect the device and use App
Setting Up App and Connecting the Device
- Setting Up App
NOTES
- The app supports iOS versions 13.0 and above and Android versions 8.0 and above. The app is not available for use with tablets.
- This model does not support a WEP encrypted router.
- The home wireless network name and password must contain only letters, numbers and standard symbols.
- The network accessing configuration of the robot requires a wireless network of 2.4 GHz frequency range.
- The robot must be connected to wireless network to enable controlling the robot using the app. Once you have set up the app and connected the robot to wireless network, the app can be used to control the robot in wireless network /2G/3G/4G/5G network environment.
- If your home wireless network password is changed or the router is replaced, the robot will show as offline in the app; you will need to reconnect the robot to wireless network following the wireless network connection instructions.
- Download the App
Scan the following QR code or search for eureka robot to download the app. Follow the instructions in the app to create a new account or login.
Preparation
- Connect your phone to the network that you plan to use for operating the robot.
- Make sure the robot is placed within good wireless network coverage.
- After assembling and powering on the robotic vacuum, press and hold the " l button for 3 seconds until a beep is heard. The network indicator light should start flashing white.
-Add Device
Click "+" or "Add Device" in the app to add the device. Choose E20 Evo Plus.
Follow the instructions on the app and continue until the app prompts that the connection is successful.
How to set up App, connect the device and use App
Using Eureka Robot App
NOTE:
If the wireless network in your home is unstable, it may cause issues with the operation of the Eureka Robot App.
The content of the Eureka Robot App may change when the version is updated. Please refer to the Eureka Robotic
Vacuum interface for details. This interface will be upgraded later, this interface is for reference only.
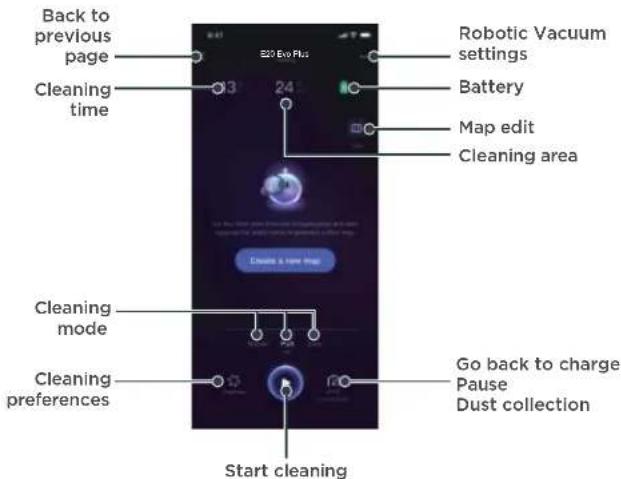
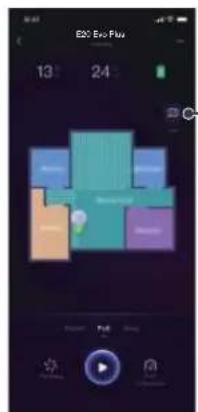
NOTE:
When you start clean, the machine automatically scans and creates a map.
How to maintain your robot

CAUTION
Never operate robot without all filters, and dustbin in proper position.
- Dustbin/Water tank maintenance (clean as needed)
01
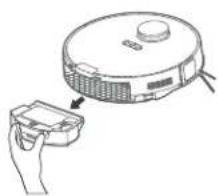
Take out the dustbin: Press the dustbin release button as shown and take out the dustbin.
02 Open the lid of the water tank and clean out the remaining water. Open the lid of the dustbin and take out the filter.
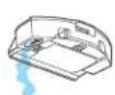
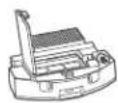
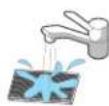
03 Remove debris by tapping the filter against your garbage bin. You can clean the dustbin, the filter and filter mesh with water, but remember to dry them THOROUGHLY before reinserting them into the robot (Do not clean the filter elements with detergents).

04 Reinsert the dustbin into the robot. It is recommended to clean the filter elements every week and replace them every 1-3 months.
- Cleaning the mop assembly
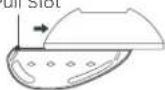
01 Release the mop assembly and clean it.
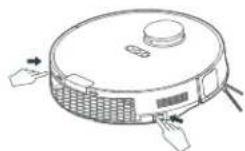
02 Remove the mopping cloth by sliding it out of the slot in the mop holder.
Push/Pull Slot
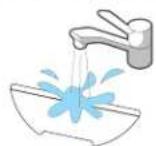
03 Wash the mopping cloth with water and dry it.
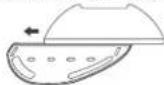
04 Insert the cleaned mopping cloth into the slot in the mop holder and reattach the mop assembly to the robot.
How to maintain your robot
Washable brushroll - clean frequently

CAUTION
Make sure robot is turned off and not plugged into a power source.
- Cleaning brush
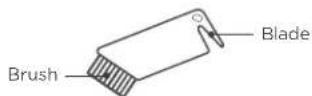
How to use the cleaning brush:
- Cut the hair entangled on the main brush with the blade.
- Brush off the hair.
- Main brush maintenance (weekly cleaning recommended)
01
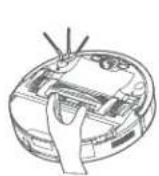
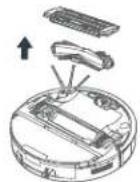
Turn the main unit over. Release the cover plate of the main brush and pull it out, and lift the right side of the main brush to take it out.
02
Clean the main brush and its cover plate with the cleaning brush or a soft cloth.

03
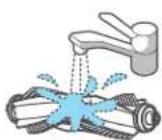
Rinse the main brush and dry it before putting it back.
04
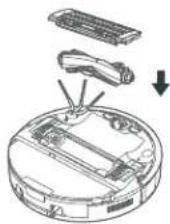
After cleaning, press the end cover back to the main brush body. Install the main brush body into the main unit according to the direction shown in the figure. It is recommended to clean the main brush every week and replace them every 6 months.
How to maintain the self-emptying base
Main wheels and side brushes cleaning
- Main wheels cleaning (weekly cleaning recommended)
Rotate the main wheels back and forth to remove debris or dust - remove and take out the hair or debris with the cleaning brush or a soft cloth.
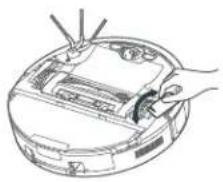
- Side brushes cleaning (weekly cleaning recommended)
01
Pull out the side brush. Remove dust on the side brush.
02
It is recommended to clean the side brush every week and replace them every 6 months.
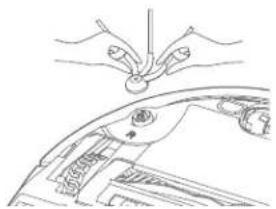
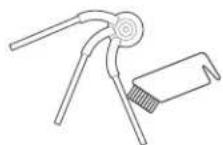
Maintenance of Self-Emptying Base
How to empty the dust cup
01
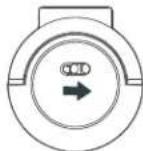
Flip the slide switch to the left so that the dust cup is detachable.
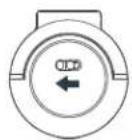
02
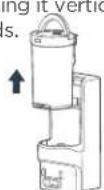
Empty as soon as dirt reaches the MAX mark. Remove the dust cup by moving it vertically upwards.
03
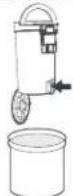
Hold the dust cup over a bin. Press the lower dust cup release button and empty the trash into the bin.
04
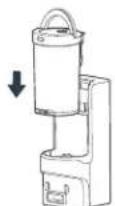
Close the cover, and place the dust cup straight down back into the self-emptying base.
05
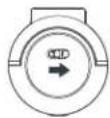
Flip the slide switch to the right to lock the dust cup.
How to maintain the self-emptying base
How to clean the cyclone
01
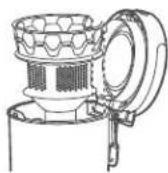
Press the upper release button to open the top of the dust cup.
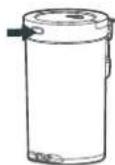
02
Take out the sponge filter and the cyclone (use the handle) as shown in figure.
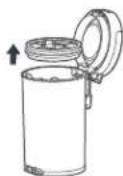
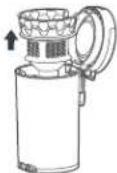
05
Place the dust cup back into the self-emptying base.
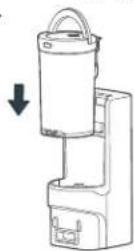
06
Slide the switch to the right to lock the dust cup.
03
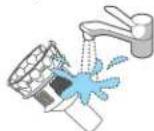
Rinse the cyclone with tap water and make sure it is completely dry before putting it back. Note: Do not use detergents, polishes or air fresheners to clean the dust cup and cyclone to avoid corrosion.
How to clean the filter
01
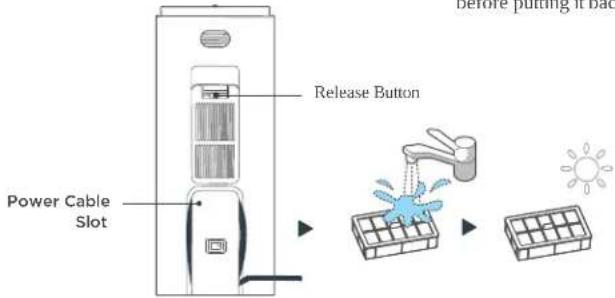
Press the release button of the cover of the filter on the back of the base to remove the cover.
02
Rinse the filter with clean water until it is clean. Make sure the filter is completely dry before putting it back.
04
Place the cyclone and sponge filter back down into their regular positions. Close the dust cup so it clicks into place.
Power Cable Slot
How to maintain the self-emptying base
How to clean the dust collection air duct
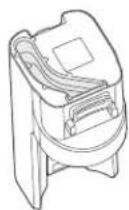
01
Turn the self-emptying base upside down and check whether the dust collection air duct has been clogged.
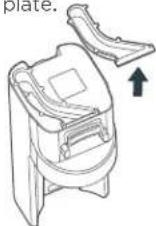
02
If the air duct has been clogged, use a screwdriver to unscrew the air duct cover plate and take off the air duct cover plate.
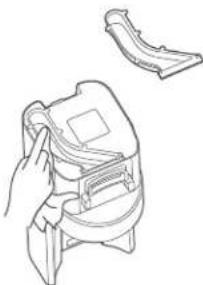
03
Clean and wipe the air duct and air duct cover plate with a dry cloth.
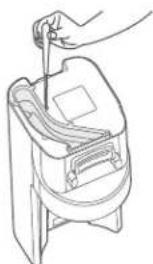
04
After cleaning, reinstall the air duct cover and tighten the air duct cover.
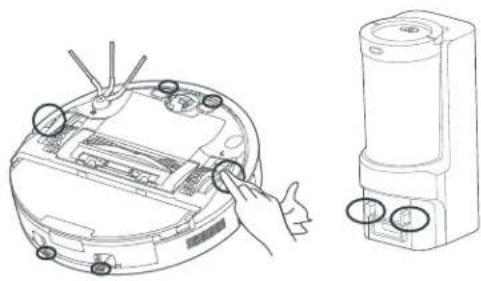
- Sensors and charging contacts cleaning
Wipe the sensors on the robot and charging contacts on both the robot and the base with a dry, soft cloth.
Troubleshooting
Make sure robot is off and charging plug is unplugged.
| Scenarios | Possible Causes | Solutions |
| The robot vacuum cannot be recharged | The robot vacuum is not in contact with the charging contacts. | Place the robot vacuum lm in front of the self-emptying base and press the recharging button. |
| The robot vacuum cannot return for charging | The self-emptying base is placed improperly. | Place the self-emptying base on a level surface that is free of obstacles. |
| The robot vacuum is trapped | The robot vacuum is entangled/stuck by objects (such as cords) on the floor. | Please put away the scattered cords and objects on the floor. |
| The side brush/main brush is stuck so that the robot vacuum cannot move normally. | Remove the objects that caused the main/side brush to be stuck and place the robot flat on the floor and restart. | |
| The robot vacuum is stuck by obstacles. | Remove the obstacles and proceed with cleaning, or set No-go zones in app. | |
| Cleaning process has not been completed, but the robot vacuum returns for charging | The battery level of the robot vacuum is running low. | Let the robot vacuum return for charging. |
| Fail to clean as scheduled | Scheduled Appointment has been cancelled. | Reset Scheduled Cleaning in the app. |
| The robot vacuum is in Do Not Disturb Mode. | Turn off “Do Not Disturb Mode” or adjust the “Do Not Disturb”. |
Troubleshooting
Make sure robot is off and charging plug is unplugged.
| Scenarios | Possible Causes | Solutions |
| The robot vacuum does not work | - Out of battery - The robot is stuck - Motor malfunction | Put the robot back to the base to charge. After fully charge, press the start button to clean. If the wheels are stuck, please clean the blockage or obstacles and restart the robot to clean again. |
| The robot vacuum moves backward | The LiDAR cover is stuck. | Gently tap the LiDAR cover to check if it's able to rebound. |
| There is obstacle ahead. | Remove the obstacle ahead. | |
| The bumper is stuck. | Gently tap the front bumper to check if it's able to rebound. | |
| There is dust on the cliff sensors. | Clean the surface of cliff sensors. | |
| The robot vacuum has no sound | The sound is muted. The robot vacuum is in Do Not Disturb Mode. | Turn up the volume. Turn off "Do Not Disturb Mode". |
| The app shows the connection is disconnected | The phone is not connected to the network normally. The router is not working properly. The robot vacuum is not turned on. The network is removed. Wireless network password or network has been changed. | Restart the router. Reconnect the phone with a 2.4 GHz network. Turn on the robot. Add new device in the app. Reset the network by pressing and holding the " \ \ button for 3 seconds Add the device again following the phone's instructions. |
Troubleshooting

Make sure robot is off and charging plug is unplugged.
| Scenarios | Possible Causes | Solutions |
| App operation response delays | Wireless network signal is weak. The network bandwidth is insufficient. | Restart the router to reduce the number of access users. Check the phone settings. Increase the network bandwidth. |
| After the robot vacuum returns to the self-emptying base, the self-emptying process fails to start automatically | The dust cup is full. | Empty the dust cup of the base. |
| The lid of dust cup is not closed. The dust cup is not installed correctly. | Close the lid. Reinstall the dust cup correctly. | |
| It's set to never collect dust. | Check the Settings-Dust Collection Frequency in the app and adjust to 1/3/5. |
THE EUREKA LIMITED WARRANTY
Midea America Corp. & Midea America (Canada) Corp. ("Eureka"), subject to the terms and conditions herein, warrants this vacuum cleaner and Battery Module to be free from defects in material and workmanship for a term of two years for the vacuum/one year for the Battery Module from the date of delivery when used in accordance with the Eureka operating and maintenance instructions and under normal household usage. This warranty is granted only to the original purchaser and members of immediate household, and is applicable only to original purchases from Eureka authorized resellers. The date of delivery establishes the warranty period, should service be required.
What Eureka will do:
Eureka will, at its option, repair or replace a defective vacuum/Battery Module or vacuum part that is covered by this warranty. Repairs may be performed using new or refurbished parts that meet or exceed Eureka specifications for new parts. If Eureka elects to replace it, the replacement may be a reconditioned unit. Depending on availability of products, Eureka reserves the right to provide you with a replacement product that is the same or similar, or substitute equivalent of the original product. As a matter of warranty policy, Eureka will not refund the consumer's purchase price.
This warranty does not cover:
- Normal wear and tear of the vacuum and vacuum parts that require replacement under normal use such as disposable dust bags, filters, drivebelts, light bulbs, brush-roll, bristles, impellers and cleaning.
- Damages or malfunctions resulting from improper or unreasonable use or maintenance, abuse, negligence, failure to follow instructions contained in any written materials that accompany the product, deterioration by reason of excess moisture, corrosive atmosphere, lightning, power surges, connections to improper voltage supply, unauthorized alteration, or other external causes such as extremes in temperature or humidity, modifications, scratches or discoloration, accidents, misuse, or acts of God. This warranty also does not cover damage resulting from repair or attempted repair by anyone other than Eureka or an authorized Eureka Warranty Station. This warranty is not applicable to any product that has been altered or on which the serial number has been defaced, modified or removed. Altering, erasing, or forging any proof-of-purchase documents voids any applicable product warranty.
Obtaining warranty service:
To obtain warranty service you must contact the Eureka Service Team, toll free, at 1-800-282-2886 (US) 1-833-947-4031 (CA) or email customerservice@eureka.com (US) CanadaSupport@eureka.com (CA), to discuss the warranty claim and procedures to be followed. All warranty claims must include submission of proof-of-purchase documentation. For additional information, you may also visit www.eureka.com (US) www.eureka.com/ca (CA).
THE EUREKA LIMITED WARRANTY
What Eureka will do:
You will be responsible for any initial shipping and insurance charges if the defective product(s) must be shipped for warranty service or warranty evaluation; however, Eureka or a Eureka Authorized Warranty Station will pay the return shipping charges if repairs are covered by the warranty. When returning parts for repair, you must include the model, type and serial number located on the rating plate. If any product submitted for warranty service is found to be ineligible, an estimate of repair cost will be furnished and the repair performed only if requested by the owner and upon receipt of payment or acceptable arrangements for payment.
Further limitations and exclusions:
Any warranty that may be implied in connection with your purchase or use of the vacuum, including any warranty of Merchantability or any warranty of Fitness For A Particular Purpose is limited to the duration of this limited warranty. Some states do not allow limitations on how long an implied warranty lasts, so the above limitations may not apply to you. Your relief for the breach of this warranty is limited to the relief expressly provided above. In no event shall the manufacturer be liable for any consequential or incidental damages you may incur in connection with your purchase or use of the vacuum. Some states do not allow the exclusion or limitation of incidental or consequential damages, so the above limitation or exclusion may not apply to you. This warranty gives you specific legal rights. You may also have other rights, which may vary by state.
DISCARDING THE VACUUM AND BATTERY PACK


Before you discard this vacuum, dispose of battery in an environmentally safe manner. Do not discard battery with your regular household trash.
Important battery disposal information.
To find a disposal location nearest you, call 1-800-822-8837.
To preserve natural resources, please recycle or dispose of expired battery pack properly. This product contains a lithium-ion battery. It must be disposed of properly. Local laws may prohibit disposal of lithium-ion batteries in ordinary trash. Consult your local waste authority for information regarding available recycling and/or disposal options.
CONTENTS
English 02
French 27
- Telecharger I'application
LA GARANTIE LIMITÉE D'UREKA
LA GARANTIE LIMITÉE D'UREKA
Ce qu'Eureka fera :

- CONTENTS
- English 02
- French 27
- SAFETY INSTRUCTIONS
- When using an electrical appliance, basic precautions should always be followed, including the following:
- READ ALL INSTRUCTIONS BEFORE USING THIS VACUUM CLEANER
- WARNING:
- CAUTION:
- RISK OF INJURY. BRUSH MAY START UNEXPECTEDLY. REMOVE MAIN BRUSH BEFORE CLEANING OR SERVICING.
- WARNING FOR BATTERY
- TECHNICAL DATA
- What comes in the box
- How to identify parts of your robot
- Assembling and charging robot
- WARNING
- Quick Assembly
- Charging
- NOTES
- How to use your robot
- - Start / Pause / Resume
- SPOT Cleaning
- - Recharge
- Self-Emptying Function
- How to set up App, connect the device and use App
- Setting Up App and Connecting the Device
- - Setting Up App
- - Download the App
- Preparation
- -Add Device
- Using Eureka Robot App
- NOTE:
- How to maintain your robot
- CAUTION
- Washable brushroll - clean frequently
- - Cleaning brush
- - Main brush maintenance (weekly cleaning recommended)
- 01
- 02
- 03
- 04
- How to maintain the self-emptying base
- Main wheels and side brushes cleaning
- Maintenance of Self-Emptying Base
- How to clean the cyclone
- 05
- 06
- How to clean the filter
- Troubleshooting
- THE EUREKA LIMITED WARRANTY
- What Eureka will do:
- This warranty does not cover:
- Obtaining warranty service:
- Further limitations and exclusions:
- DISCARDING THE VACUUM AND BATTERY PACK
- - Telecharger I'application
- LA GARANTIE LIMITÉE D'UREKA
- Ce qu'Eureka fera :
Brand : EUREKA
Model : E20 Evo Plus
Category : Robot vacuum