
NER650 - Robot vacuum EUREKA - Free user manual and instructions
Find the device manual for free NER650 EUREKA in PDF.


| Product Type | Robot Vacuum Cleaner |
| Model | NER650 |
| Brand | Eureka |
| Host Rated Voltage | 14.4 V DC |
| Host Rated Power | 55 W |
| Battery Model | BP14433A |
| Battery Rated Voltage | 14.4 V DC |
| Battery Capacity | 3350 mAh / 48.24 Wh |
| Charging Limit Voltage | 16.8 V DC |
| Host Charging Voltage | 16.7 V DC |
| Docking Station Model | DC2106 |
| Docking Station Input | 100-240 V~, 50-60 Hz, 24 W |
| Docking Station Output | 16.7 V DC, 1 A |
| Charging Time (First Use) | At least 4 hours |
| Navigation System | LIDAR |
| Connectivity | Wi-Fi 2.4 GHz; App for iOS 10+/Android 6+ |
| Voice Control | Amazon Alexa and Google Home compatible |
| Battery Warranty | 1 year limited |
| Product Warranty | 2 years limited |
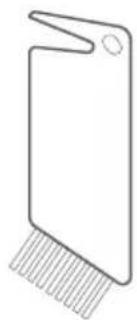
| Included Accessories | Charging dock, charger, 2 side brushes, filter, brush cleaning tool |
| Maintenance Frequency | Weekly cleaning of dustbin, brushroll, side brushes, sensors, and charging contacts |
| Safety Features | Auto-return to dock, cliff sensors, bump sensors, Class 1 laser |
Frequently Asked Questions - NER650 EUREKA
User questions about NER650 EUREKA
0 question about this device. Answer the ones you know or ask your own.
Ask a new question about this device
Download the instructions for your Robot vacuum in PDF format for free! Find your manual NER650 - EUREKA and take your electronic device back in hand. On this page are published all the documents necessary for the use of your device. NER650 by EUREKA.
USER MANUAL NER650 EUREKA
Thank you for purchasing your new Eureka vacuum!
Important instructions
For easy assembly, please take a few moments to read this owner's guide.
If you have questions about your new vacuum, please contact our customer service HELPLINE at 1-800-282-2886.
We're here to help!

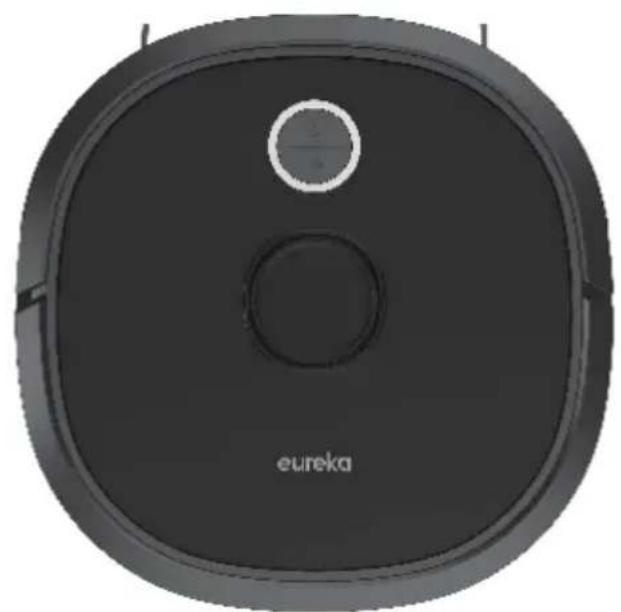
natural_image
Top-down view of a black eureka robotic device with circular head and central button (no text or symbols on body)www.eureka.com
eureka
Where to find important vacuum information
Keep this information
Write the model, type and serial number here:
Date of purchase (keep your receipt)
Model number and type
Serial number ____
Find these numbers on a label on the vacuum, battery, and charger. Refer to these numbers when ordering parts and accessories, or if service is needed.
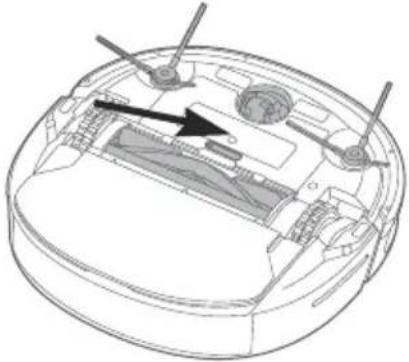
natural_image
Technical line drawing of a mechanical device interior with no visible text or symbolsThis Owner's Guide provides important instructions to use and maintain your Eureka vacuum cleaner
Registration: To register your product visit www.eureka.com and click on the 'Register Your Product' link in the top right corner.
Inspection: Carefully unpack and inspect your new Eureka vacuum cleaner for shipping damage. Each unit is tested and thoroughly inspected before shipping. For instructions regarding any shipping damage, call the Eureka Customer Service HELPLINE at 1-800-282-2886 immediately.
Contents
Important safeguards.... 2-6
FCC Compliance Statement 6
Technical data 7.
What comes in the box 8
How to identify parts of your robot 9.
Assembling and charging robot 10-11....
How to use your robot 12
How to set up app, connect Wi-Fi and use app 13
How to maintain your robot 14
How to maintain brushroll, other routine maintenance .....14-15
The Eureka limited warranty 16
Troubleshooting 17-20
Disposal of robot and battery pack 20
How to order replacement parts 21....
IMPORTANT SAFEGUARDS
When using an electrical appliance, basic precautions should
always be followed, including the following:
READ ALL INSTRUCTIONS BEFORE USING THIS VACUUM CLEANER
Failure to follow the warnings and instructions may result in
electric shock, fire and/or serious injury.
This vacuum should not be used by children under the age of eight or those with
reduced physical, sensory or mental capabilities without supervision.
WARNING
- Before using, clear area of power cords, pull cords for curtains or blinds, clothing and fragile items.
- Do not operate in a room where a child or infant is sleeping.
- Do not pour or spray any liquids on or in your robot.
- If you live in an area that is prone to electrical storms, we recommend using a surge protector.
- Do not operate the robot in a room that has lit candles or lit fireplace.
- Do not allow children to sit on vacuum.
- Do not use the docking station if it is damaged.
- Do not operate in areas with exposed electrical outlets on the floor.
- Be aware that the robot moves around on its own. Take care when walking in the area when it is in operation.
- Do not place the robot on any unstable surfaces.
- Prevent unintentional starting. Ensure the switch is in the off-position before picking up or carrying the appliance. Carrying the appliance with your finger on the switch or energizing appliance that has the switch on invites accidents.
- Danger. Do not touch nozzle when the vacuum cleaner is on.
- Do not put any object into openings. Do not use with any
openings blocked; keep free of dust, lint, hair and anything that may reduce air flow.
- Do not use outdoors or on wet surfaces.
- Do not operate the vacuum cleaner or charger if it has been damaged in any way. If vacuum cleaner is not working as it should, has been dropped, damaged, left outdoors, or dropped into water or other liquid, call the Eureka Customer Service HELPLINE at 1-800-282-2886.
• To avoid excessive heat and damage to the unit or battery, the vacuum cleaner will not operate while charging.
- Do not allow to be used as a toy. Close attention is necessary when used by or near children, pets or plants.
- Use only as described in this manual. Use only manufacturer's recommended attachments.
- Recharge only with the charger specified by the manufacturer. A charger that is suitable for one type of battery pack may create a risk of fire when used with another battery pack.”
- Do not pull or carry the charger by cord, use cord as a handle, close a door on cord, or pull cord around sharp edges or corners. Do not run appliance over cord. Keep cord away from heated surfaces.
- This charger is not intended for use by travelers.
IMPORTANT SAFEGUARDS
- Do not use extension cords or outlets with inadequate current-carrying capacity for the charger.
- Do not unplug by pulling on cord. To unplug, grasp the plug, not the cord.
- Do not handle charger or vacuum cleaner with wet hands.
- Use appliances only with specifically designated battery packs. Use of any other battery packs may create a risk of injury and fire.
• DO NOT MUTILATE OR INCINERATE BATTERIES. THEY BECOME DANGEROUS AT HIGH TEMPERATURES.
- Liquid ejected from the battery may cause irritation or burns. If the liquid gets on the skin, (1) seek medical attention, (2) wash quickly with soap and water, and (3) neutralize with a mild acid such as lemon juice or vinegar. If the liquid gets into the eyes, flush them immediately with clean water for a minimum of 10 minutes.
- When battery pack is not in use, keep it away from other metal objects, like paper clips, coins, keys, nails, screws or other small metal objects, that can make a connection from one terminal to another. Shorting the battery terminals together may cause burns or a fire.
- This product is functioning at temperature range within 40^ - 104^ .
- Do not use a battery pack or appliance that is damaged or modified. Damaged or modified batteries may exhibit unpredictable behavior resulting in fire, explosion or risk of injury.
- Do not expose a battery pack or appliance to fire or excessive temperature. Exposure to fire or temperature above 266^ may cause explosion.
- Follow all charging instructions and do not charge the battery pack or
appliance outside of the temperature range specified in the instructions.
Charging improperly or at temperatures outside of the specified range may damage the battery and increase the risk of fire.
- Have servicing performed by a qualified repair person using only identical replacement parts. This will ensure that the safety of the product is maintained.
- Do not modify or attempt to repair the appliance or the battery pack except as indicated in the instructions for use and care.
- The terminals on both the vacuum cleaner and battery should be kept free and clear of objects. Do not insert metal objects inside the terminals.
- This vacuum cleaner creates suction. Keep hair, loose clothing, fingers, and all parts of body away from openings and moving parts.
- Do not pick up anything that is burning or smoking, such as cigarettes, matches, or hot ashes.
- Do not use without filters in place.
- Do not use the robot to pick up flammable or combustible liquids, such as gasoline, or use in areas where they may be present.
- Store vacuum cleaner and charger indoors in a cool, dry area.
To avoid electric shock and/or damage, do not expose to weather elements.
- Keep your work area well lit. Unplug electrical appliances before vacuuming them.
• Overcharging, short circuiting, reverse charging, mutilating or incinerating the cells and the batteries must be avoided.
- If a cell or a battery has leaked or vented, it should be replaced immediately using protective gloves.
IMPORTANT SAFEGUARDS
- If and when necessary, these cells or batteries must be replaced with identical new ones from the same manufacturer. If a cell or a battery to be replaced is connected with other cells or batteries in series, it is recommended that the other cells or batteries be replaced with new ones at the same time.
- Reverse polarity installation of the cell or the battery in the end product must be avoided.
- Do not incinerate this appliance even if it is severely damaged.
Contact local waste facility before discarding in trash.
- Do not operate the vacuum in an area where there are lit candles or fragile objects on the floor to be cleaned.
- Do not operate the vacuum in a room that has lit candles on furniture that the vacuum may accidentally hit or bump into.
- The power cord must be unplugged from docking station before cleaning or maintaining the docking station.
- Remove the appliance from the docking station and turn off the power switch to the appliance before removing the battery for disposal of the appliance.
- If the robot will not be used for a long time, fully charge the robot and power OFF for storage and unplug the charger.
- Use only with eureka DC2106 docking station.
- Docking station is only for use with the Eureka NER650 robot.
-
Warning: The battery charger (Docking station) is not intended to charge non-rechargeable batteries.
-
Keep hair, loose clothing, fingers, and all parts of body away from openings and moving parts.
- Under abusive conditions, liquid may be ejected from the battery; avoid contact. If contact accidentally occurs, flush with water. If liquid contacts eyes, seek medical help immediately. Liquid ejected from the battery may cause irritation or burns.
- Do not use and store in extremely hot or cold environments (below 23^ or above 104^ ). Please charge the robot in temperature above 39.2^ and below 104^ .
- Place the cords from other appliances out of the area to be cleaned.
- Turn off the power switch before cleaning or maintaining the appliance.
- WARNING: This product can expose you to chemicals including Di(2-ethylhexyl)phthalate (DEHP), which is known to the State of California to cause cancer and to cause birth defects or other reproductive harm. For more information go to www.P65Warnings.ca.gov.
IMPORTANT SAFEGUARDS WARNING FOR BATTERY
- The product must be powered off before removing the battery.
- Do not disassemble the battery by yourself.
- If you need to replace it, please contact the after-sales service center.
- Please dispose of used battery according to local laws and regulations.
- Do not dismantle, open or shred the battery.
- Do not expose batteries to heat or fire. Avoid storing or keeping robot in direct sunlight.
- Do not short-circuit a battery.
- Do not store batteries haphazardly in a box or drawer where they may short-circuit each other or be short-circuited by other metal objects.
- Do not subject batteries to mechanical shock.
-
In the event of a leaking, do not allow the liquid to come in contact with the skin or eyes. If contact has been made, wash the affected area with copious amounts of water and seek medical advice.
-
Do not use any charger other than that specifically provided for use with the equipment.
- Do not use any battery which is not designed for use with the equipment.
- Do not mix different manufacture, capacity, size or type within a device. Keep batteries out of the reach of children.
- Seek medical advice immediately if the battery has been swallowed.
- Keep batteries clean and dry.
- Do not leave a battery on prolonged charge when not in use.
• After extended periods of storage, it may be necessary to charge and discharge the batteries several times to obtain maximum performance. - The batteries give their best performance when they are operated at normal room temperature (59 °F - 77 °F).
- Retain the original product literature for future reference.
- The battery may be irreversibly damaged if the battery is in low power for a long time. It is recommended that the battery retain sufficient power before storage.
| [symbol IEC 60417-5957 (2004-12)] | for indoor use only | |
| [symbol ISO 7000-0790 (2004-01)] | read operator's manual | |
| [symbol IEC 60417-5031 (2002-10)] | direct current | |
| time-lag miniature fuse-link where X is the symbol fo the time/current characteristic as given in IEC 60127 | ||
| [symbol IEC 60417-5032 (2002-10)] | alternating current | |
| [symbol IEC 60417-5172 (2003-02)] | class II equipment | |
SAVE THESE INSTRUCTIONS
Household use only
IMPORTANT SAFEGUARDS
CLASS 1 LASER PRODUCT
INVISIBLE LASER RADIATION
This device complies with DHHS Radiation Rules, 21CFR Chapter 1, Subchapter J.
-
Enter energy saving mode: Wait 2 minutes after powering on, press and hold the recharge button for 20s, the recharge light will turn on and then off, and the distribution network light will turn off, and then the machine enters energy saving mode.
-
Exit energy saving mode: In energy saving mode state, press the power button to power off the machine and exit energy saving mode.
FCC Compliance Statement CAUTION:
Please read the instruction sheet carefully before use
This device complies with Part 15 of the FCC Rules. Operation is subject to the following two conditions:
- This device may not cause harmful interference.
- This device must accept any interference received, including interference that may cause undesired operation.
- Changes or modifications not expressly approved by the party responsible for compliance could void the user's authority to operate the equipment. This equipment has been tested and found to comply with the limits for a Class B digital device, pursuant to part 15 of the FCC Rules. These limits are designed to provide reasonable protection against harmful interference in a residential installation.
This equipment can radiate radio frequency signals and, if not installed and used according to the instructions, may cause harmful interference to radio communications. However, there is no guarantee that interference will not occur in a particular installation. If this equipment does cause harmful interference to radio or television reception, which can be determined by turning the equipment off and on, the user is encouraged to try to correct the interference by one or more of the following measures:
- Reorient or relocate the receiving antenna.
- Increase the separation between the equipment and receiver.
- Connect the equipment into an outlet on a circuit different from that to which the receiver is connected.
- Consult the dealer or an experienced radio/TV technician for help.
To satisfy FCC RF exposure requirements, a separation distance of 20 cm or more should be maintained between the antenna of this device and persons during device operation.
TECHNICAL DATA
- Product Model: NER650
- Host Charging Voltage: 16.7 V ---
- Host Rated Voltage:14.4 V ---
- Host Rated Power:55 W
- Docking Station Model: DC2106
- Docking Station Input:100-240V\~,50-60Hz, 24W
- Docking Station Output:16.7V ---, 1A
- Battery Model: BP14433A
- Battery Rated Voltage:14.4V---
- Battery Capacity:3350mAh 48.24Wh
- Charging Limit Voltage:16.8V ---
Midea America Corp 300 Kimball Drive Parsippany NJ 07054, U.S.A
Parts and Components What comes in the box
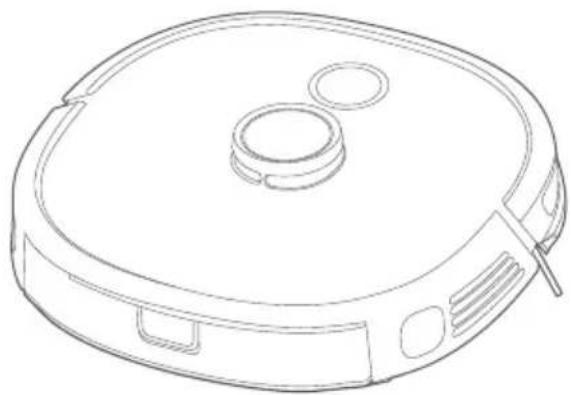
natural_image
Line drawing of a robotic vacuum cleaner with circular components and ventilation slots (no text or symbols)Robot (Vacuum)
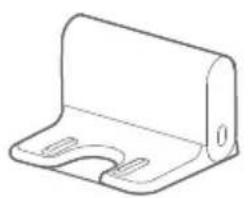
natural_image
Line drawing of a mechanical bracket or support structure (no text or symbols)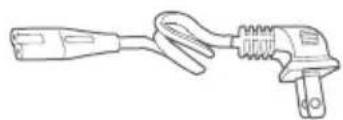
natural_image
Line drawing of a hairdryer tool with a coiled spring and handle (no text or symbols)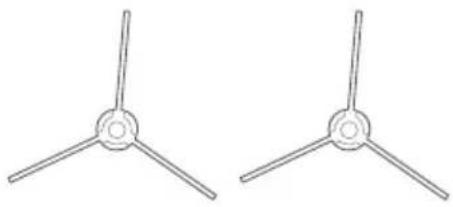
natural_image
Two identical line drawings of a three-bladed propeller or fan with no text or symbolsLeft Right
Charging dock Charger 2 Spinning side brushes
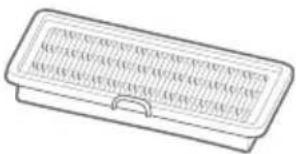
Filter
natural_image
Simple line drawing of a mechanical clip or clip with a handle and base, no text or symbols present.Brush cleaning tool (located on top of dustbin)
Owner's Manual
Owner's manual
How to identify parts of your robot
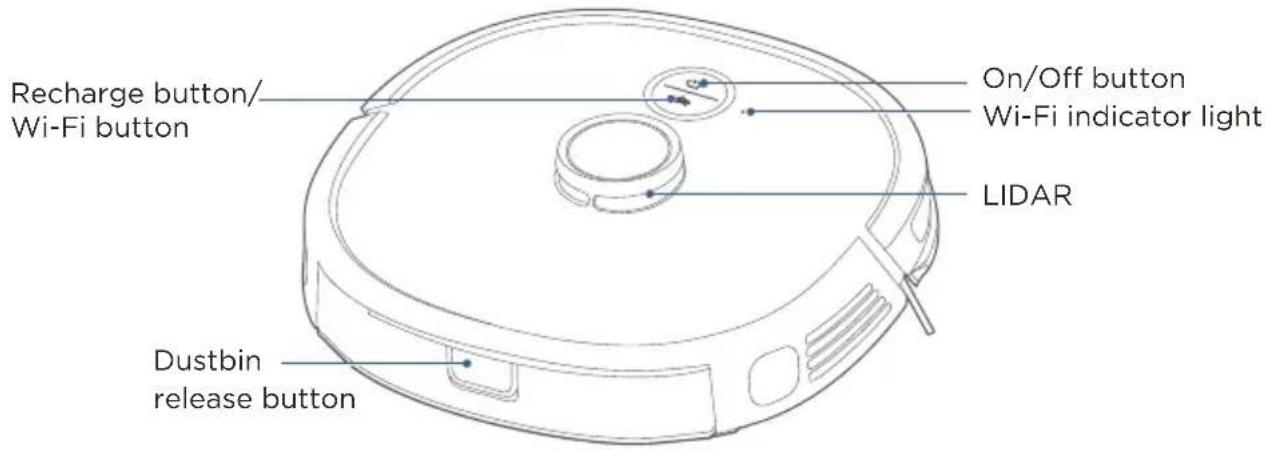
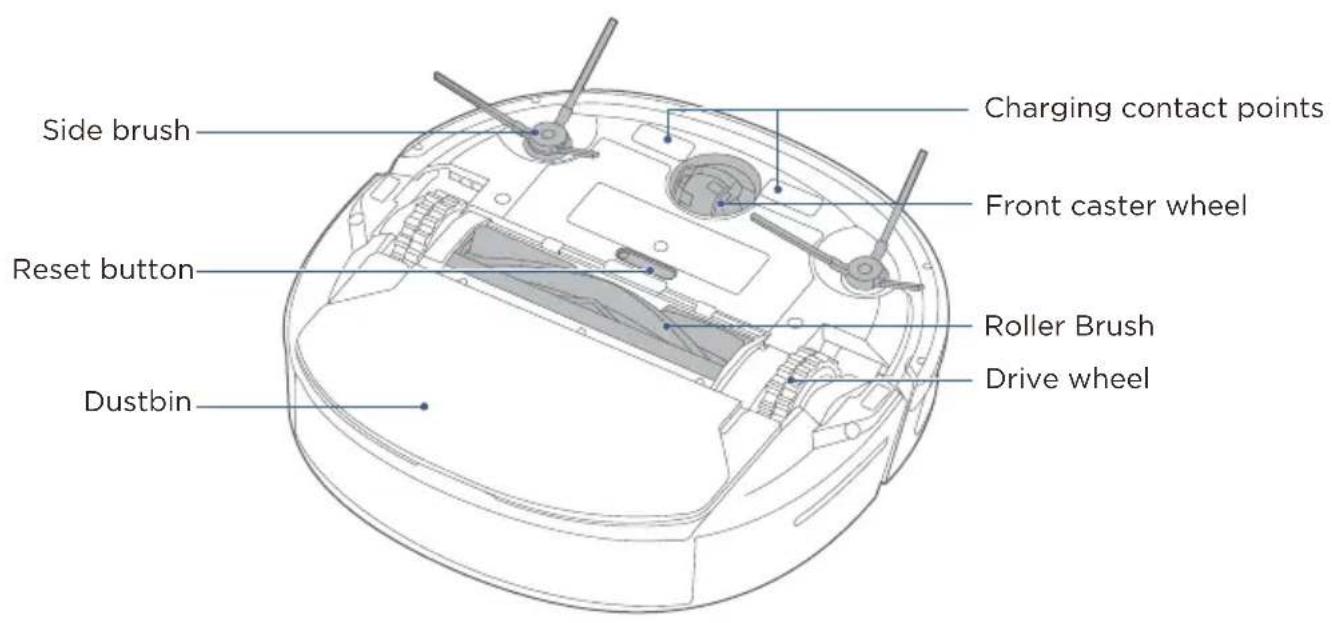
Buttons on Robot
Press power button for 1 second to turn robot on.
When robot is on, the power button will be lit up.
When the robot is on, to start the robot cleaning, press the power button.
When the robot is running press the power button to pause it.
To fully turn off the power, press and hold the power button for 3 seconds; the power indicator begins to flash. The cleaner makes a chord sound, and when the power indicator turns off, the robot shuts down successfully.
Before running the robot, clear area of power cords, pull cords for curtains or blinds, clothing and fragile items.
Quick Assembly
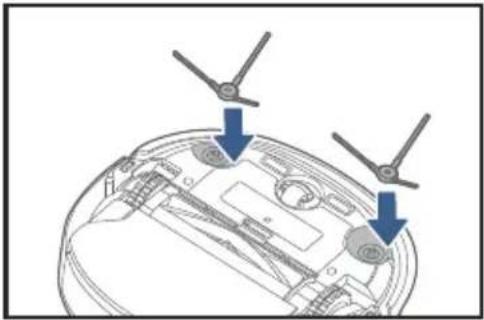
■ Installation of side brushes
-
Attach the correct color side brush to the matching post and push down until you hear it "click" into place.
-
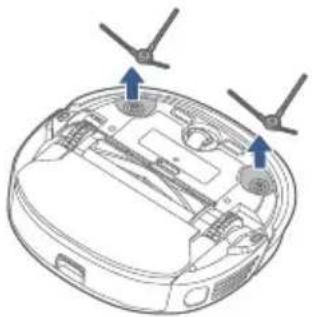
To remove the side brushes for maintenance, place the robot on a flat surface with the bottom facing up, use two hands to carefully pull up on the rubber legs of the side brush and remove any caught hair or debris.
natural_image
Technical diagram of a mechanical component with two directional arrows indicating assembly or movement (no text or symbols present)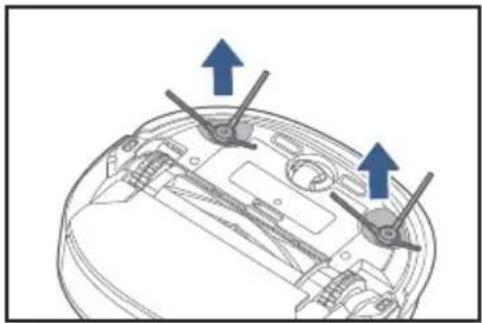
natural_image
Technical diagram of a mechanical component with two blue arrows indicating upward motion (no text or symbols present)■ Filter installation
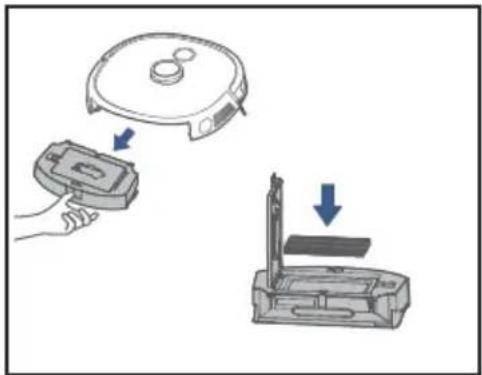
Robot comes with filter installed. Before use, ensure the filter is securely in place. If not, remove dustbin from robot, pull up lid of dustbin and make sure filter is snapped into place. Ensure dustbin lid and bottom latch are securely closed and place back dustbin onto robot.
■ Setting up charging dock
-
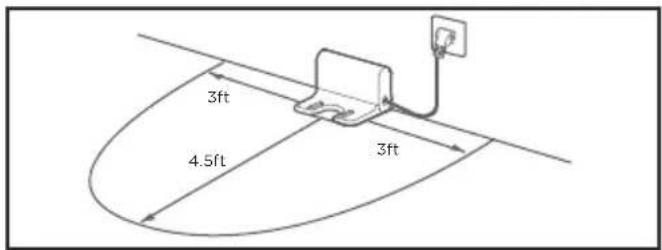
Place the back of the charging dock flush against a wall and ensure there are at least 3 feet of free space along the wall on either side and 4.5 feet of free space in front of the dock so the robot is not blocked.
-
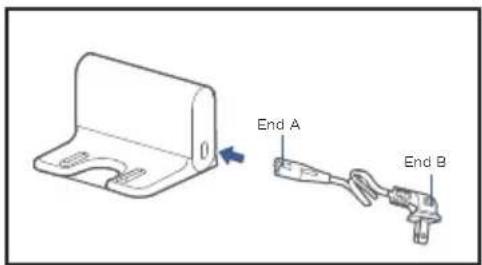
Connect the end of the charger into the port on the lower right side of the dock ensuring that it is securely attached. Then plug other end of the charger into a power outlet.
Charging
natural_image
Line drawing of a robotic vacuum cleaner with a power outlet connected to a device (no text or symbols)NOTES
- Ensure that the charging dock is located in an area covered by a Wi-Fi signal.
- Do not place the charging dock in direct sunlight.
- Charging dock should be placed on a hard floor, do not place on a carpeted area.
- Regularly dust off the charging dock to keep charging contacts and front panel clean so they operate properly.
- Secure excess power cord to prevent the robot from dragging the charging dock.
-
Keep charging area dry.
-
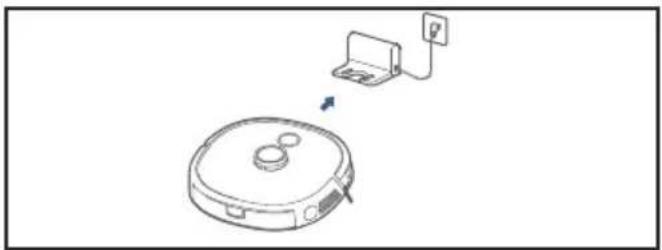
Place robot on charger and ensure that the metal charging contacts on the bottom of the robot and those on the charging dock are touching. When the charging contacts are correctly lined up the robot will make an audible beep and the power light will illuminate.
- The white light on the power button will blink while the robot is charging and will turn to a solid white light once the robot is fully charged.
- Before initial use fully charge the robot for at least 4 hours.
NOTES
When the battery power reaches less than 20% the robot will shut off the suction power and automatically return to the charging dock.
The robot may occasionally back up off the charger and then go forward back onto charger to realign itself if a better connection is needed with the metal charging contacts. Please note the robot will arrive with a partially charged battery. If you start using it before fully charging the battery, the cleaning cycle will be shorter than normal as it will return to the dock to recharge when it reaches 20% battery power.
To effectively extend the battery life, you should:
a. For the first use, please charge for at least 4 hours.
b. When the battery is low, please charge as soon as possible.
c. If you do not use the appliance for an extended period of time, fully charge the battery and store in a well ventilated and dry place.
d. If the appliance is not used for more than 3 months, charge the appliance for 12 hours.
Initial mapping of your home
- Before use, clear the cleaning area of power cords, pull cords for curtains or blinds, clothing, large debris and fragile items that robot may get caught in. Do not operate in a room with lit candles or lit fireplace. Clean up any liquids prior to use. Also be sure to turn on lights in all parts of the house you want the robot to map, if it is too dark the robot may not enter those zones to map.
- The first use of the robot is a mapping mission so that it can create a map that you can edit, use to create specific cleaning schedules and set up cleaning zones and no-go zones. Please note that while the robot is on its initial mapping mission it will not be cleaning, it will just be exploring. Also during the initial mapping the robot may bump into furniture, walls and objects as it learns your house, do not be alarmed. As the robot goes out on more cleaning runs it will continue to improve its mapping of your house.
- It is recommended to regularly monitor the robot during its initial mapping mission to assist if it gets stuck or runs into issues. If it gets stuck simply pick it up move it away from the obstacle, and remove obstacles if necessary, place it back on the ground and press start button on robot for it to resume mapping.
- Once the robot has completed its mapping mission you can create cleaning zones if you would like to set up cleaning in special areas such as high traffic spots, add no-go zones and set cleaning schedules that correspond to the specific areas in your house.
How to use your robot
■ Startup methods
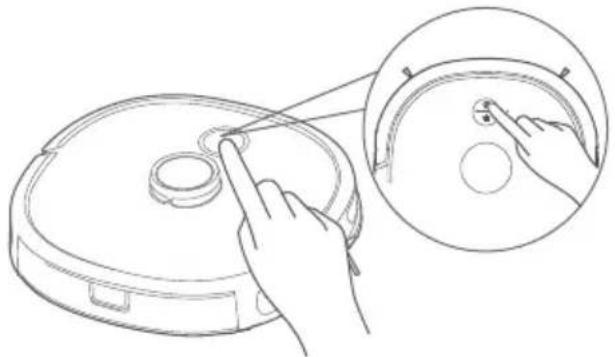
- In normal operation, it is recommended that cleaning is started using the app or the power button while the robot is on the charging dock.
- To power on the robot, press "☐" for 3 seconds. The power indicator light will flash and the robot will make a chord sound. The lit power indicator shows that the robot is in standby mode.
natural_image
Line drawing of a robotic vacuum cleaner with a hand interacting with the lid, showing a close-up view of the component (no text or symbols present)■ Start the cleaning
- When the robot is in standby mode, briefly press "⏻" for 1 second, and it will start to clean the whole room.
■ Pause the cleaning
- During the cleaning, briefly press "💡" for 1 second, and the robot will pause the cleaning and enter its standby status.
■ Return to charge
- After completion of the cleaning, the robot will enter its return-to-charge status.
- If return-to-charge is required during the cleaning, proceed as follows:
[NO TEXT]
(
[NO TEXT]
another 1 second, and the robot will start to return to charge.
- The robot may not be able to return to the charging dock in some situations, for example if the battery charge level is too low or the robot has become stuck. In these situations, place the robot on the charging dock manually.
■ Troubleshooting
- When the robot detects an error, the return-to-charge indicator turns red. Please fix the issue then briefly press " 🔍 " for 1 second to indicate to return the robot to standby mode.
- Place the robot on the floor then briefly press "⏻" for 1 second to restart cleaning.
- After completion of the cleaning, the robot will automatically return to charge. It is recommended that the robot should be kept in the charging dock.
Shutdown
- If the robot will not be used for a long time period and needs to be shut down, long press "⏻" for 3 seconds, and the power indicator begins to flash.
- The robot makes a sound, and when the power indicator turns off, the robot shuts down successfully.
- The robot can not fully shut down when it is on the charging dock. If you want to shutdown the robot you must remove it from the charging dock.
NOTES
- The robot will not start cleaning when the battery charge level is too low. Please charge the robot on the charging dock before starting to clean.
- During cleaning, the robot will automatically return to the charge dock when the battery charge level is too low. The robot will return to the same position to resume cleaning after the battery is fully charged.
- The robot will enter sleep mode after being in standby mode for more than 10 minutes. When in the sleep mode, press any key will wake up the robot.
- The power indicator flashes to signal that the battery is charging and is on continuously when the battery is fully charged.
NOTES
The app supports iOS versions 10.0 and above and Android versions 6.0 and above. The app is not available for use with tablets.
This model does not support a WEP encrypted router.
The home Wi-Fi name and password must contain only letters, numbers and standard symbols.
The network accessing configuration of the robot requires a Wi-Fi network of 2.4GHz frequency range.
The robot must be connected to Wi-Fi to enable
controlling the robot using the app. Once you have set up the app and connected the robot to Wi-Fi, the app can be used to control the robot in Wi-Fi/2G/3G/4G/5G network environment.
If your home Wi-Fi password is changed or the router is replaced, the robot will show as oine in the app; you will need to reconnect the robot to Wi-Fi following the Wi-Fi connection instructions.
- In the App Store or Google Play, search for Eureka Robot, download and install the app.
- Open the Eureka app and complete the registration process, which includes an email address confirmation, and once you have confirmed your email address you can log in and follow the setup instructions in the app.
- Connect your phone to your home Wi-Fi network.
- In the app select Add Devices and choose Robot NER650.
- Connect your robot to your Wi-Fi
After assembling and powering on the robot, press and hold down the "💡" button for 3 seconds until a beep is heard. The Wi-Fi indicator light should start to flicker. Follow instructions on app for next steps.
Using Eureka Robot App
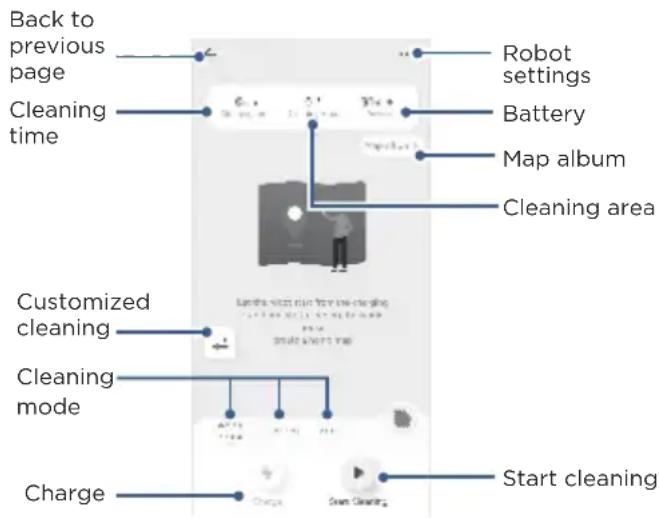
NOTES
If the Wi-Fi in your home is unstable, it may cause issues with the operation of the Eureka Robot App. The content of the Eureka Robot App may change when the version is updated.
Please refer to the Eureka Robot interface for details.
Note: This interface will be upgraded later, this interface is for reference only.
Using Amazon Alexa or Google Home
Amazon Alexa
-
Open Amazon Alexa App
-
Select 'Skills & Games' and search for
Eureka Robot and select
-
Enable the Eureka robot skill
-
Your Eureka robot app will then open and you will login using your Eureka robot app credentials
-
The Eureka robot skill and the app should now be successfully linked, and this will be indicated on the Amazon Alexa app.
-
You can now use the following commands to control the robot:
"Alexa, tell Eureka robot to start cleaning"
"Alexa, tell Eureka robot to stop cleaning"
"Alexa, tell Eureka robot to go home"
Google Home
-
Open Google Home App
-
Search for Eureka robot and select
-
Link Eureka robot skill
-
Your Eureka robot app will then open and you will login using your Eureka robot app credentials
-
The Eureka robot skill and the app should now be successfully linked
-
You can now use the following commands to control the robot:
"Ask Eureka robot to start cleaning"
"Ask Eureka robot to stop cleaning"
"Ask Eureka robot to go home"
How to maintain your robot

CAUTION
Never operate robot without all filters, filter screen and dustbin in proper position.
WARNING: Moving parts! Recharge robot vacuum cleaner after each use.
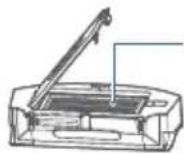
■ Dustbin maintenance (weekly cleaning recommended)
- Open the tops do not be a fast button to pull out the dustbin backwards;
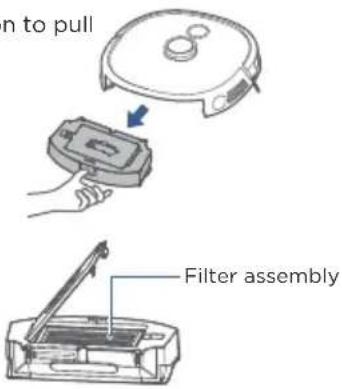
2.
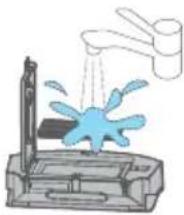
- Wipe clean the dustbin and tap clean the filter assembly then reinstall them in the robot. If the filter is excessively dirty, it may be washed under a tap then left to dry completely before reinstalled in the robot. Ensure that the filter and dustbin are installed correctly and robot's
natural_image
Illustration of a faucet spraying water onto a cleaning machine (no text or symbols)- Remove the filter assembly from the dustbin;
How to maintain brushroll
Washable brushroll - clean frequently

CAUTION
Make sure robot is turned off and not plugged into a power source.
WARNING: Do not attempt to remove belt. Call the Eureka Customer Service HELPLINE at 1-800-282-2886.
■ Cleaning tools
- Clearing dust has been located above the dustbin;
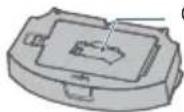
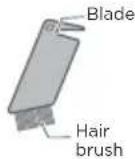
Cleaning brush
2.
following purposes:
from rolling brushes;
off the cut hair.
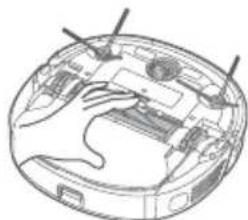
■ Rolling brush maintenance (weekly cleaning recommended)
- Turn over the robot, and by putting your hand at the upper dent of the rolling brush cover, press to remove the cover and pull it out, then take out the rolling brush from the red end cover of the brush;
natural_image
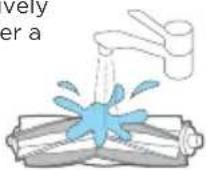
Technical line drawing of a mechanical device with internal components and two protruding pins (no text or symbols)- If the rolling brush is excessively dirty, it may be cleaned under a tap then dried completely;
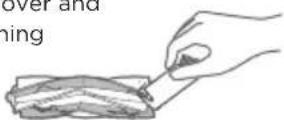
- Clean the rolling brush cover and rolling brush with a cleaning brush or soft cloth;
- Reinstall the rolling brush components and rolling
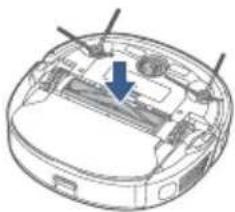
natural_image
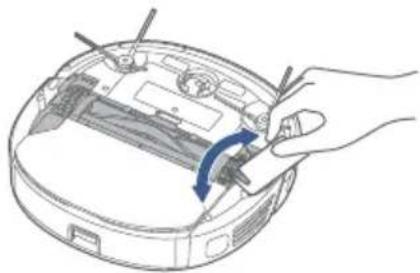
Diagram of a robotic device with a blue arrow pointing to the internal components (no text or symbols present)- If necessary, pull off the red end cover to remove tangled hair or debris;
■ Drive wheel cleaning (weekly cleaning recommended)
- Turn back and forth the wheel to remove debris. By using a cleaning tool or soft cloth, clean the wheel and remove hair or debris.
natural_image
Line drawing of a hand using a screwdriver to adjust or install a device on a circular base (no text or symbols)■ Side brushes cleaning (weekly cleaning recommended)
Remove the side brushes;1. Clean dust accumulating on
- the side brush.
natural_image
Technical diagram of a device interior with labeled components and directional arrows (no text or symbols)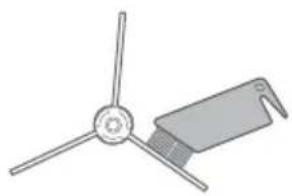
natural_image
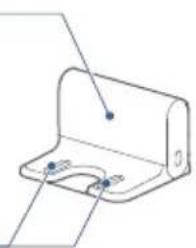
Illustration of a propeller and its internal structure (no text or symbols)■ Sensor and charging contact point cleaning (weekly cleaning recommended)
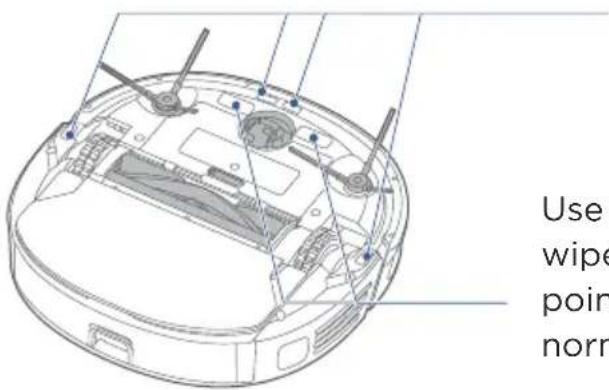
Use soft cloth to slightly wipe the sensors and remove dust from its surface
Use soft cloth to slightly wipe charger contact points to ensure normal charging
natural_image
Technical line drawing of a metal bracket with mounting holes and a pin (no text or symbols)The Eureka two year limited warranty
Midea America Corp. ("Eureka"), subject to the terms and conditions herein, warrants this vacuum cleaner to be free from defects in material and workmanship for a term of two years from the date of original purchase when used in accordance with the Eureka operating and maintenance instructions and under normal household usage. This warranty is granted only to the original purchaser and members of immediate household, and is applicable only to original purchases from Eureka authorized resellers.
What Eureka will do:
Eureka will, at its option, repair or replace a defective vacuum or vacuum part that is covered by this warranty. Repairs may be performed using new or refurbished parts that meet or exceed Eureka specifications for new parts. If Eureka elects to replace the vacuum, the replacement may be a reconditioned unit. Depending on availability of products, Eureka reserves the right to provide you with a replacement product that is the same or similar, or substitute equivalent of the original product. As a matter of warranty policy, Eureka will not refund the consumer's purchase price.
This warranty does not cover:
- Battery module and battery components. The battery module and its components are covered by a separate one-year limited battery warranty.
- Normal wear and tear of the vacuum and vacuum parts that require replacement under normal use such as disposable dust bags, filters, drive belts, light bulbs, brush-roll, bristles, impellers and cleaning.
- Damages or malfunctions resulting from: improper or unreasonable use or maintenance, abuse, negligence, failure to follow instructions contained in any written materials that accompany the product, deterioration by reason of excess moisture, corrosive atmosphere, lightning, power surges, connections to improper voltage supply, unauthorized alteration, or other external causes such as extremes in temperature or humidity, modifications, scratches or discoloration, accidents, misuse, or acts of God. This warranty also does not cover damage resulting from repair or attempted repair by anyone other than Eureka or an authorized Eureka Warranty Station. This warranty is not applicable to any product that has been altered or on which the serial number has been defaced, modified or removed. Altering, erasing, or forging any proof-of-purchase documents voids any applicable product warranty.
Obtaining warranty service:
To obtain warranty service you must contact the Eureka Service Team, toll free, at 1-800-282-2886 or email customerserviceusa@midea.com, to discuss the warranty claim and procedures to be followed. All warranty claims must include submission of proof-of-purchase documentation. For additional information, you may also visit www.eureka.com.
Shipping charges:
You will be responsible for any initial shipping and insurance charges if the defective product(s) must be shipped for warranty service or warranty evaluation; however, Eureka or a Eureka Authorized Warranty Station will pay the return shipping charges if repairs are covered by the warranty. When returning parts for repair, you must include the model, type and serial number located on the rating plate. If any product submitted for warranty service is found to be ineligible, an estimate of repair cost will be furnished and the repair performed only if requested by the owner and upon receipt of payment or acceptable arrangements for payment.
Further limitations and exclusions:
Any warranty that may be implied in connection with your purchase or use of the vacuum, including any warranty of Merchantability or any warranty of Fitness For A Particular Purpose is limited to the duration of this limited warranty. Some states do not allow limitations on how long an implied warranty lasts, so the above limitations may not apply to you.
Your relief for the breach of this warranty is limited to the relief expressly provided above. In no event shall the manufacturer be liable for any consequential or incidental damages you may incur in connection with your purchase or use of the vacuum. Some states do not allow the exclusion or limitation of incidental or consequential damages, so the above limitation or exclusion may not apply to you. This warranty gives you specific legal rights. You may also have other rights, which may vary by state.
The Eureka 12-month limited battery warranty
Midea America Corp. ("Eureka"), subject to the terms and conditions herein, warrants this Battery Module to be free from defects in material and workmanship for a term of one year from the date of original purchase when used in accordance with the Eureka operating and maintenance instructions and under normal household usage. This warranty is granted only to the original purchaser and members of immediate household, and is applicable only to original purchases from Eureka authorized resellers.
What Eureka will do:
Eureka will, at its option, repair or replace a defective Battery Module or battery part that is covered by this warranty. Repairs may be performed using new or refurbished parts that meet or exceed Eureka specifications for new parts. If Eureka elects to replace the Battery Module, the replacement may be a reconditioned unit. Depending on availability of products, Eureka reserves the right to provide you with a replacement product that is the same or similar, or substitute equivalent of the original product. As a matter of warranty policy, Eureka will not refund the consumer's purchase price.
This warranty does not cover:
- Normal wear and tear of the Battery Module and battery parts that require replacement under normal use.
- Damages or malfunctions resulting from: improper or unreasonable use or maintenance, abuse, negligence, failure to follow instructions contained in any written materials that accompany the product, deterioration by reason of excess moisture, corrosive atmosphere, lightning, power surges, connections to improper voltage supply, unauthorized alteration, or other external causes such as extremes in temperature or humidity, modifications, scratches or discoloration, accidents, misuse, or acts of God. This warranty also does not cover damage resulting from repair or attempted repair by anyone other than Eureka or an authorized Eureka Warranty Station. This warranty is not applicable to any product that has been altered or on which the serial number has been defaced, modified or removed. Altering, erasing, or forging any proof-of-purchase documents voids any applicable product warranty.
Obtaining warranty service:
To obtain warranty service you must contact the Eureka Service Team, toll free, at 1-800-282-2886 or email customerservice@eureka.com, to discuss the warranty claim and procedures to be followed. All warranty claims must include submission of proof-of-purchase documentation. For additional information, you may also visit www.eureka.com.
Shipping charges:
You will be responsible for any initial shipping and insurance charges if the defective product(s) must be shipped for warranty service or warranty evaluation; however, Eureka or a Eureka Authorized Warranty Station will pay the return shipping charges if repairs are covered by the warranty. When returning parts for repair, you must include the model, type and serial number located on the rating plate. If any product submitted for warranty service is found to be ineligible, an estimate of repair cost will be furnished and the repair performed only if requested by the owner and upon receipt of payment or acceptable arrangements for payment.
Further limitations and exclusions:
Any warranty that may be implied in connection with your purchase or use of the Battery Module, including any warranty of Merchantability or any warranty of Fitness For A Particular Purpose is limited to the duration of this limited warranty. Some states do not allow limitations on how long an implied warranty lasts, so the above limitations may not apply to you.
Your relief for the breach of this warranty is limited to the relief expressly provided above. In no event shall the manufacturer be liable for any consequential or incidental damages you may incur in connection with your purchase or use of the Battery Module. Some states do not allow the exclusion or limitation of incidental or consequential damages, so the above limitation or exclusion may not apply to you.
This warranty gives you specific legal rights. You may also have other rights, which may vary by state.
Troubleshooting
Make sure robot is off and charging plug is unplugged.
| Problem Scenarios | utions |
| Robot moves back from dock but doesn't begin cleaning | - Check if there is any debris or objects stuck in or around the wheels and in between the front bumper sensor plate.- Remove any obstacles in front of or around the robot.- Clean dust from the front sensors and bottom sensors on the robot. |
| Robot speaker not working | - Turn off the silence mode in the App.- Turn up the volume in the Eureka App. |
| App shows the robot is disconnected | - Reconnect the robot to Wi-Fi.- Restart the router.- Turn on the power switch of the robot cleaner.- If necessary try adding the robot again per the initial pairing instructions.- After system startup, long press the network pairing key on the robot for 3 seconds, and release it after you hear a beep, and then add a new device according to guidelines in the app. |
| App operations show delayed reactions | - Restart the router and reduce the number of users connected to the router.- Check the settings of your mobile itself to ensure it is connected to Wi-Fi and that the Wi-Fi is working properly. |
| Unable to charge | - Verify power is connected and all plugs are securely connected.- Make sure that the metal plates on the bottom of the robot and the contact points on the charging dock are contacting correctly.- The power indicator of the robot flashes to indicate the robot is charging, or check the power level display through App.- If robot hasn't been used in a long time it will need to fully recharge before use.- The battery cannot be charged below freezing. Robot must be charged and stored at room temperature. |
Troubleshooting

Make sure robot is off and charging plug is unplugged.
| Problem Scenarios | tions |
| Robot not returning to charging dock | - See the "Initial Use" section. |
| Robot is stuck | - The robot should activate its escape mode automatically, but if not then pick it up and move it away from the obstacle.- Clean any entangled debris or hair from side brush, and restart the robot to check for normal operation, or otherwise contact service department.- Remove obstacles from area robot is cleaning. |
| Robot returns to charge without completing the cleaning | - Charge the robot. |
| Robot is not cleaning when scheduled | - Reset the scheduled cleaning time in the app.- Make sure to disable the Do Not Disturb mode. |
| Robot is not moving | - Charge the robot.- Place the robot flat against the ground.- Contact the service department. |
| Robot does not clean at scheduled times | - Ensure the robot is turned on.- Ensure the remaining battery level is sufficient.- Check scheduled cleaning times in the App: check whether the status key is turned on, the scheduled cleaning time is correct, and the cleaning frequency is only one time (if you want the robot to have a reoccurring cleaning time, reset the timing schedule in the App).- Make sure the robot is sitting correctly on the charging dock and has fully recharged. Ensure there is no dust blocking the front sensors and the contact charging points on the bottom of robot.- In "Setup" menu items, click "Device Info Item", then click "Sync Now" under the time zone section to ensure robot is programmed to your correct time zone. |
Troubleshooting
Make sure robot is off and charging plug is unplugged.
| Problem Scenarios | tions |
| Robot will not turn off | - Move the robot off of the charging dock, and long press the power key for about 3s, then remove your finger after the power indicator begins to flash.- Turn over the robot, press the red key under the nameplate for 1s with a small cleaning tool or pointed object. |
| Wheels are not rotating or side brushes are not spinning | - Turn over the robot, and turn the wheel back and forth to check for hair and debris. Clear the debris.- Clean the side brush regularly. |
| Rolling brush does not rotate or gets stuck, triggering an alarm | - Turn over the robot, and turn the rolling brush to check for any tangles or debris that may be stuck. If necessary remove brushroll cover to access brush roll, pull brushroll out and use cleaning tool to remove any tangles or debris.Note: Be sure to clean the brushroll regularly. |
| Abnormal noise from the rolling brush | - Turn over robot, remove the rolling brush cover and then the rolling brush, using the cleaning tool remove anything that is entangled in the rolling brush. |
| Laser radar not working | - Press around the radar house to verify whether it will rebound, and whether there is a "click" sound from switch closure.- Check for any debris, and then manually turn the radar slightly to see whether it can rotate.- Wipe off dust regularly to ensure radar is clean for best performance. |
| Front bumper not working | - Tap the front bumper to see whether it will rebound smoothly, and check the bumper for debris around the front and bottom.- Clean dust from radar sensors. |
| Robot goes in circles | - Turn over the robot, check whether anything is stuck or entangled in the wheels and remove it. |
Troubleshooting

Make sure robot is off and charging plug is unplugged.
| Problem Scenarios | tions |
| Slow app reactions | - Ensure that your Wi-Fi is working properly and that the robot is properly paired in the app. |
| Delayed device reactions | - Dust off all the sensors to make sure they are not getting blocked. |
| Device ID not found | - Long press the return-to-charge key for 3 seconds to enter the network pairing mode (Check whether the Wi-Fi indicator begins to flash). |
| Software failed to update | - Place the robot on the charging dock and ensure it is fully charged.- Ensure your Wi-Fi connection is stable and device is properly paired when updating software. |
| Map cannot be deleted or is unavailable | - Make sure Wi-Fi connection is stable and device is properly paired with the app.- If map is still not available follow instructions to repeat the initial mapping process to create a new map. |
Disposal of robot and battery pack

Before you discard this vacuum, dispose of battery in an environmentally safe manner. Do not discard battery with your regular household trash.

Important battery disposal information. To find a disposal location nearest you, call 1-800-822-8837.
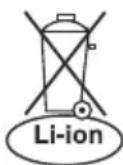
To preserve natural resources, please recycle or dispose of expired battery pack properly. This product contains a lithium-ion battery. It must be disposed of properly. Local laws may prohibit disposal of lithium-ion batteries in ordinary trash. Consult your local waste authority for information regarding available recycling and/or disposal options.
| Image | Part name | Part # (fits models) |
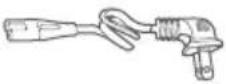 | Charger | R2016 |
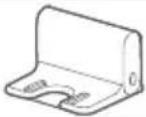 | Charging dock | R2017 |
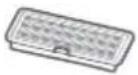 | Filter | R2018 |
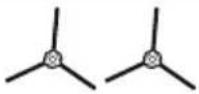 | Side brush set | R2019 |
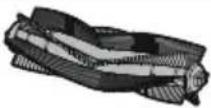 | Roller brush | R2020 |
Free 3 months extension of the original limited warranty period!
Just text proof of purchase to 844 224 1614
eureka
- Important instructions
- Where to find important vacuum information
- Keep this information
- This Owner's Guide provides important instructions to use and maintain your Eureka vacuum cleaner
- Contents
- IMPORTANT SAFEGUARDS
- WARNING
- IMPORTANT SAFEGUARDS WARNING FOR BATTERY
- SAVE THESE INSTRUCTIONS
- FCC Compliance Statement CAUTION:
- TECHNICAL DATA
- Parts and Components What comes in the box
- How to identify parts of your robot
- Buttons on Robot
- Quick Assembly
- ■ Installation of side brushes
- ■ Filter installation
- ■ Setting up charging dock
- Charging
- NOTES
- To effectively extend the battery life, you should:
- Initial mapping of your home
- How to use your robot
- ■ Startup methods
- ■ Start the cleaning
- ■ Pause the cleaning
- ■ Return to charge
- ■ Troubleshooting
- Shutdown
- Using Eureka Robot App
- Using Amazon Alexa or Google Home
- Amazon Alexa
- Google Home
- How to maintain your robot
- CAUTION
- ■ Dustbin maintenance (weekly cleaning recommended)
- How to maintain brushroll
- Washable brushroll - clean frequently
- ■ Cleaning tools
- ■ Rolling brush maintenance (weekly cleaning recommended)
- ■ Drive wheel cleaning (weekly cleaning recommended)
- ■ Side brushes cleaning (weekly cleaning recommended)
- ■ Sensor and charging contact point cleaning (weekly cleaning recommended)
- The Eureka two year limited warranty
- What Eureka will do:
- This warranty does not cover:
- Obtaining warranty service:
- Shipping charges:
- Further limitations and exclusions:
- The Eureka 12-month limited battery warranty
- Troubleshooting
- Make sure robot is off and charging plug is unplugged.
- Disposal of robot and battery pack
- eureka
Brand : EUREKA
Model : NER650
Category : Robot vacuum