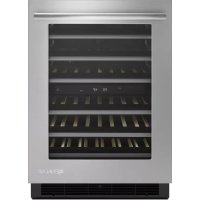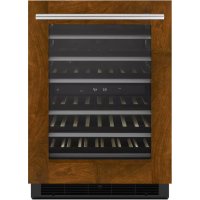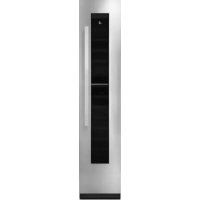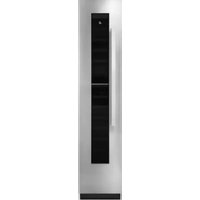
JBWFNR18RX - Wine cellar JENN-AIR - Free user manual and instructions
Find the device manual for free JBWFNR18RX JENN-AIR in PDF.


User questions about JBWFNR18RX JENN-AIR
0 question about this device. Answer the ones you know or ask your own.
Ask a new question about this device
Download the instructions for your Wine cellar in PDF format for free! Find your manual JBWFNR18RX - JENN-AIR and take your electronic device back in hand. On this page are published all the documents necessary for the use of your device. JBWFNR18RX by JENN-AIR.
USER MANUAL JBWFNR18RX JENN-AIR
WINE CELLAR COLUMN OWNER'S MANUAL
MANUEL D'UTILISATION DE LA CAVE À VIN
VERTICALE
MANUAL DEL PROPIETARIO COLUMNNA DE CAVA DE VINO
Table of Contents/Table des matières/Índice
WINE CELLAR SAFETY......2
Wine Cellar Safety 2
MAINTENANCE AND CARE ....3
Cleaning 3
Changing the LED Module ....4
Vacation and Moving Care ....4
Wine Cellar Drawers and Shelves .....4
INSTALLATION REQUIREMENTS .....4
Tools and Parts 4
Product Dimensions ....5
Door Swing Dimensions ....5
Location Requirements 6
Electrical Requirements ....7
INSTALLATION PREPARATION .....7
Unpack the Wine Cellar....7
Move Wine Cellar To Final Location
Connect to the Electrical Power
Supply......8
Leveling....8
Custom Wood Panel Preparation .....9
INSTALLATION INSTRUCTIONS ..... 10
Custom Wood Panel Installation ..... 10
Single Unit Installation 11
Multiple Unit Installation 12
WINE CELLAR FEATURES 15
Operating Your Wine Cellar...... 15
SÉCURITÉ DE LA CAVE À VIN......
Your safety and the safety of others are very important.
We have provided many important safety messages in this manual and on your appliance. Always read and obey all safety messages.

This is the safety alert symbol.
This symbol alerts you to potential hazards that can kill or hurt you and others.
All safety messages will follow the safety alert symbol and either the word "DANGER" or "WARNING." words mean:
safety
DANGER
WARNING
You can be killed or seriously injured if you don't immediately follow instructions.
You can be killed or seriously injured if you don't follow instructions.
All safety messages will tell you what the potential hazard is, tell you how to reduce the chance of injury, and tell you what can happen if the instructions are not followed.
IMPORTANT SAFETY INSTRUCTIONS
WARNING: To reduce the risk of fire, electric shock, or injury when using your wine cellar, follow these basic precautions:
■ Plug into a grounded 3 prong outlet.
■ Do not remove ground prong.
■ Do not use an adapter.
■ Do not use an extension cord.
■ Connect to potable water supply only.
■ Disconnect power before servicing.
■ Replace all parts and panels before operating.
■ Remove doors from your old wine cellar.
■ Use non flammable cleaner.
■ Do not store or use petrol, flammable liquids or gas in the vicinity of this or other electrical appliances. The fumes can cause fires or explosions.
■ Do not store explosive substances such as aerosol cans with a flammable propellant in this wine cellar.
■ Do not use or place electrical devices inside the wine cellar compartments if they are not of the type expressly authorized by the manufacture.
■ Use two or more people to move and install wine cellar.
■ When positioning the appliance, ensure the supply cord is not trapped or damaged.
■ Do not locate multiple portable socket-outlets or portable power supplies at the rear of the appliance.
This appliance is not intended for use by persons (including children) with reduced physical, sensory or mental capabilities, or lack of experience and knowledge, unless they have been given supervision or instruction concerning use of the appliance by a person responsible for their safety.
■ Children should be supervised to ensure that they do not play with the appliance.
■ To avoid the risk of children becoming trapped and suffocating, do not allow them to play or hide inside the wine cellar.
If the power supply cord is damaged, it must be replaced by the manufacturer or its service agent or a similarly qualified person.
- Keep ventilation openings, in the appliance enclosure or in the built-in structure, clear of obstruction.
■ Do not use mechanical devices or other means to accelerate the defrosting process, other than those recommended by the manufacturer.
■ Do not damage the refrigerant circuit.
■ To avoid a hazard due to instability of the appliance, it must be fixed in accordance with the instructions provided in the installation instructions.
SAVE THESE INSTRUCTIONS
Proper Disposal of Your Old Wine Cellar
WARNING
Suffocation Hazard
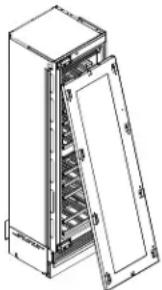
Remove doors or lid from your old appliance.
Failure to do so can result in death or brain damage.
IMPORTANT: Child entrapment and suffocation are not problems
of the past. Junked or abandoned wine cellars are still dangerous
- even if they will sit for "just a few days." If you are getting.
your old wine cellar, please follow these instructions to help prevent accidents.
Before You Throw Away Your Old Wine Cellar:
■ Take off the doors.
■ Leave the shelves in place so that children may not easily climb inside.
natural_image
Isometric line drawing of a cabinet with open lid and internal compartments (no text or symbols)Important information to know about disposal of refrigerants:
Dispose of wine cellar in accordance with federal and local regulations. Refrigerants must be evacuated by a licensed, EPA-certified refrigerant technician in accordance with established procedures.
MAINTENANCE AND CARE Cleaning
WARNING
Explosion Hazard
Risk of Fire or Explosion.
Flammable Refrigerant Used.
Do Not Use Mechanical Devices to Defrost Refrigerator.
Do Not Puncture Refrigerant Tubing.
Clean the wine cellar once a month to avoid odor buildup. Wipe up spills immediately.
IMPORTANT:
■ Because air circulates between both sections, any odors formed in one section will transfer to the other. You must thoroughly clean both sections to eliminate odors. To avoid odor transfer and drying out of food, wrap or cover foods tightly.
■ For stainless steel models, stainless steel is corrosion-resistant and not corrosion-proof. To help avoid corrosion of your stainless steel, keep your surfaces clean by using the following cleaning instructions.
Clean Your Wine Cellar:
-
rid Unplug wine cellar or disconnect power.
-
Remove all racks from inside the wine cellar.
- Hand-wash, rinse, and dry removable parts and interior surfaces thoroughly. Use a clean sponge or soft cloth and a mild detergent in warm water.
■ Always use the cloth and sponge in the direction of the steel's satin finish.
■ Do not bring cold glass parts into contact with hot water.
■ Do not wash any parts of the wine cellar in a dishwashing machine since this could damage or irreparably deform the parts.
■ Do not use abrasive or harsh cleaners such as window sprays, scouring cleansers, flammable fluids, muriatic acid, cleaning waxes, concentrated detergents, bleaches, or cleansers containing petroleum products on exterior surfaces (doors and cabinet), plastic parts, interior, and door liners or gaskets. Do not use paper towels, scouring pads, or other harsh cleaning tools. These can scratch or damage materials.
■ To help remove odors, you can wash interior walls with a mixture of warm water and baking soda (2 tbs to 1 qt [26 g to 0.95 L] of water).
Clean the exterior surfaces.
5. Replace the racks.
Painted metal: Wash painted metal exteriors with a clean, soft cloth or sponge and a mild detergent in warm water. Rinse surfaces with clean, warm water and dry immediately to avoid water spots.
Stainless steel: Wash stainless steel surfaces with a clean, soft cloth or sponge and a mild detergent in warm water. Rinse surfaces with clean, warm water and dry immediately to avoid water spots.
NOTE: When cleaning stainless steel, always wipe with the grain to avoid cross-grain scratching.
Cleaning Of The Ventilation Grille, Filter, And Condenser
WARNING
Explosion Hazard
Risk of Fire or Explosion due to Puncture of Refr Tubing;
Follow Handling Instructions Carefully.
Flammable Refrigerant Used.
In order for the unit to operate correctly, the ventilation gr filter and condenser must be cleaned periodically.
■ Clean the wine cellar once in six months. A reminder for periodic cleaning is provided through sound alerts and a notification shown on the display.
■ The condenser is located behind the lower or upper front ventilation grille, depending on the model.
■ To clean it use a vacuum cleaner with a soft brush attack at maximum power, sweeping it along the vent slits.
In the event of significant dust build up, the ventilation gr can be removed to allow a more thorough cleaning of the
■ After cleaning the condenser, touch the RESET icon in or reactivate the warning signal in 6 months.
To clean the condenser in the models Classic, Integrated Brilliance follow the instructions:
- Unplug wine cellar or disconnect power.
- Wait for 30 minutes until the condenser cools down to ambient temperature.
- Remove the removable grille under the door.
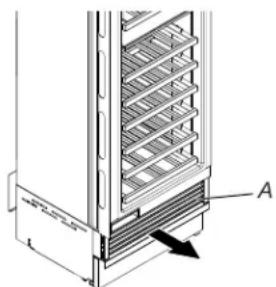
natural_image
Technical line drawing of a refrigerator with ventilation grilles and labeled component A (no text or symbols beyond label)A. Grille
- Use a vacuum cleaner with a soft brush to clean the grille, the open areas behind the grille, and the front surface area of the condenser.
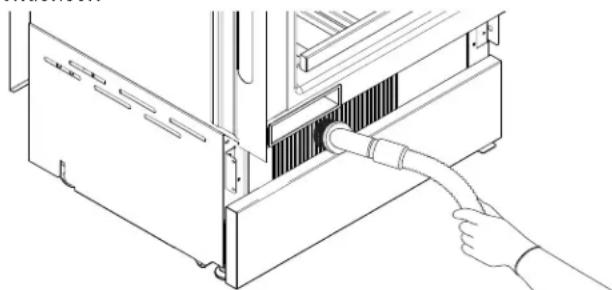
natural_image
Line drawing of a computer tower internal structure with a hand connecting a cable to a rack (no text or symbols)-
Replace the grille when finished.
-
Plug in wine cellar or reconnect power.
NOTE: If you are unable to clean the condenser, please call for service.
Changing the LED Module
IMPORTANT: The lights in wine cellar compartment use LED technology.
If an LED module(s) do not illuminate when the wine cellar door opened, call for assistance or service. See "Quick Start Guide" for contact information.
Vacation and Moving Care
Vacations Care
If You Choose to turn the wine cellar off before you leave, follow these steps:
- Remove all wine bottles from the wine cellar.
- Unplug the wine cellar.
- Clean the wine cellar.
- Tape a rubber or wood block to the top of the door to prop i his open far enough for air to get in. This stops odor and mold from building up.
Moving Care
When you are moving your wine cellar to a new home, follow these steps to prepare it for the move.
- Remove all wine bottles from the wine cellar.
e2. Unplug the wine cellar.
jlteClean, wipe, and dry it thoroughly.
e4. to Take out all removable parts, wrap them well, and tape them together so they don't shift and rattle during the move.
15.orTape the door shut and tape the power cord to the wine cella When you get to your new home, put everything back and refer t "Installation Instructions".
Wine Cellar Drawers and Shelves
Wine Cellar Shelf
To remove a shelf:
- Remove wine bottles from the shelf.
- Open the shelf to its full extension.
- Tilt it upward until the wheels are free of their seat and extracit.
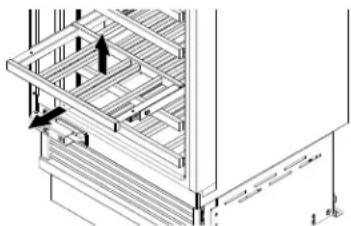
natural_image
Technical line drawing of a mechanical assembly with no visible text or symbolsINSTALLATION REQUIREMENTS
Tools and Parts
IMPORTANT:
■ Installer: Leave Installation Instructions with the homeowner.
■ Homeowner: Keep Installation Instructions for future reference. Save these Installation Instructions for the local electrical inspector's use.
Tools Needed:
Gather the required tools and parts before starting installation.
Read and follow the instructions provided with any tools listed here.
■ Phillips screwdriver
■ Wood drill
■ 1/8" (2.5 mm) bit for Wood
■ 5/16" (8 mm) bit for Walls
■ 3/8" (10 mm) bit for Walls
■ 11/16" (17 mm) Wrench
■ 3/4" (19 mm) Wrench
■ 1/2" (13 mm) socket for adjusting the rear leveling legs
■ 2.5 mm Allen Wrench for installing handles
Parts Supplied:
■ Cleaning Kit
■ Anti-tipping kit
■ Overlay panel mounting kit
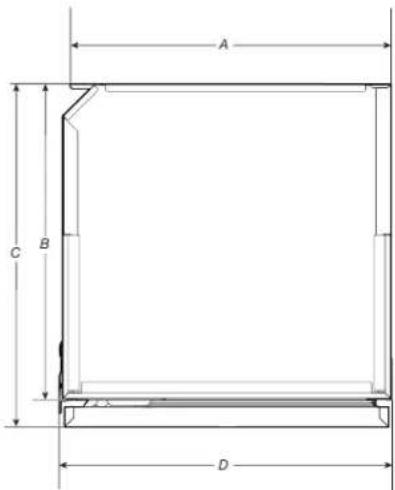
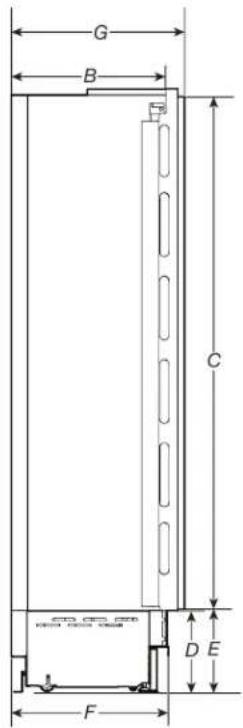
Product Dimensions
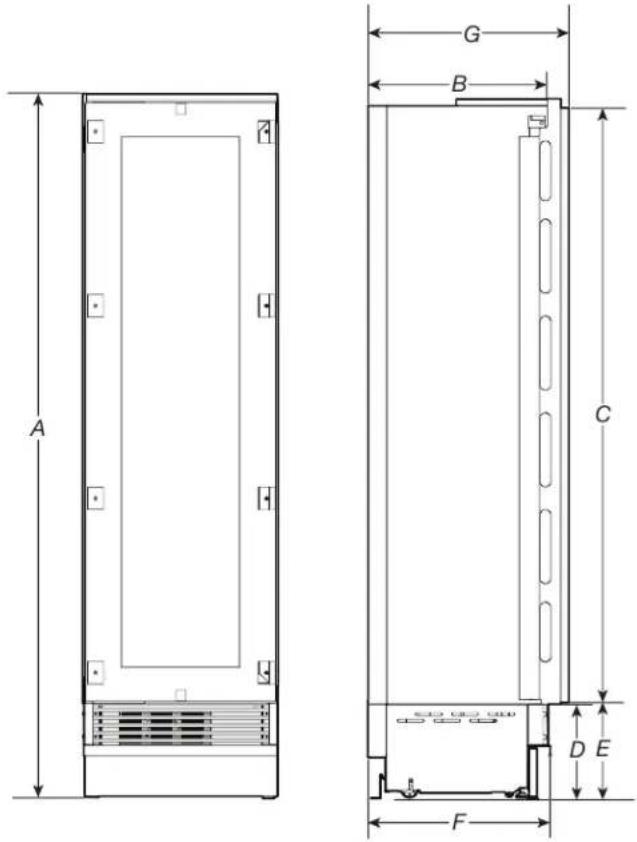
A. 83 1/2" (2120 mm) + 1"
(25 mm)
B. 22" (560 mm)
C. 71 14 " (1808 mm)
D. 9118 " (231 mm) + 1" (25 mm)
E. 9 ^1/4 " (233 mm) + 1" (25 mm)
F. 19 34 " (500 mm)
G. 24" (610 mm)

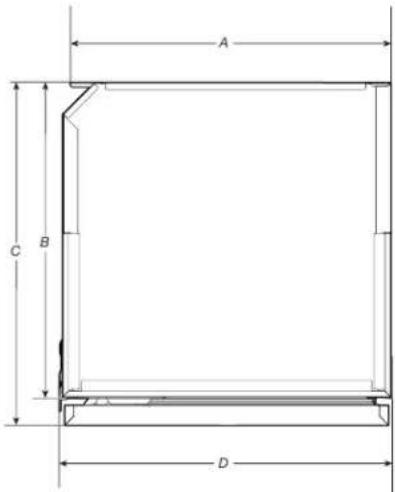
text_image
A B C DA. Width of appliance body 18" model: "7" (435 mm) and 24" model: 23" (585 mm)
B. 22" (560 mm)
C. 24" (610 mm)
D. Width of appliance with mounting brackets installed (effective width) 18" model: 17/8" (455 mm) and 24" model: 7/23 (608 mm)
Door Swing Dimensions
The location must permit door to open to a minimum of 90°. Allow 1/4" (15 mm) minimum space between the side of the wine cellar and a corner wall.
NOTE: More clearance may be required if you are using wood overlay panels, custom handles, or extended handles.
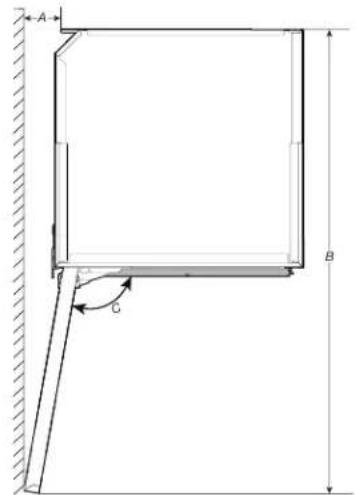
text_image
A B CA. Minimum distance from the wall (hinge side) 18" model: 382 mm and 24" model: 14" (108 mm)
B. Door-Swing Clearance 18" model: 404" (1036 mm) and 24" model: 404" (1187 mm)
C. 105^
Location Requirements
WARNING
Explosion Hazard
Keep flammable materials and vapors, such as gasoline, away from appliance.
Use nonflammable cleaner.
Failure to do so can result in death, explosion, or fire.
IMPORTANT: This wine cellar is designed for indoor, household use only.
This wine cellar is intended to be used in a household and similar applications such as:
■ Staff kitchen areas in shops, offices and other working environments.
■ Farm houses and by clients in hotels, motels and other residential type environments.
■ Bed and breakfast type environments.
■ Catering and similar non-retail applications.
NOTES:
For the wine cellar to be flush with the front of the base cabinets, remove any baseboards or moldings from the rea the opening. See "Product Dimensions" and later in this section, "Opening Dimensions."
■ It is recommended that you do not install the wine cellar in an oven, radiator, or other heat source.
■ Do not install in a location where the temperature will fall below 55°F (13°C). For best performance, do not install the wine cellar behind a cabinet door or block the base grille.
■ Catering and similar non-retail applications.
Single Unit - Opening Dimensions
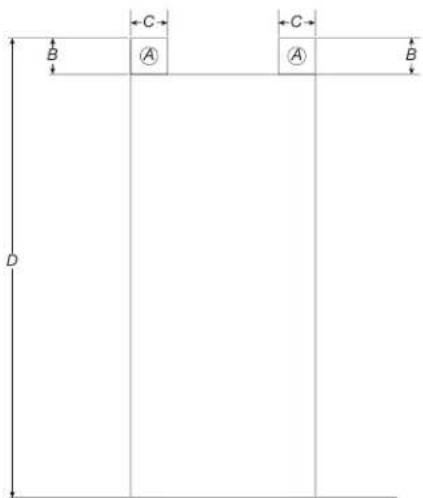
text_image
B C A C A B DA. Area to be left clear to install Anti-tip brackets
B. 3^1/2 " (82 mm)
C. Area to be left clear for the anti-tipping brackets 5" (127 mm)
D. Cutout height 84" (2134 mm)
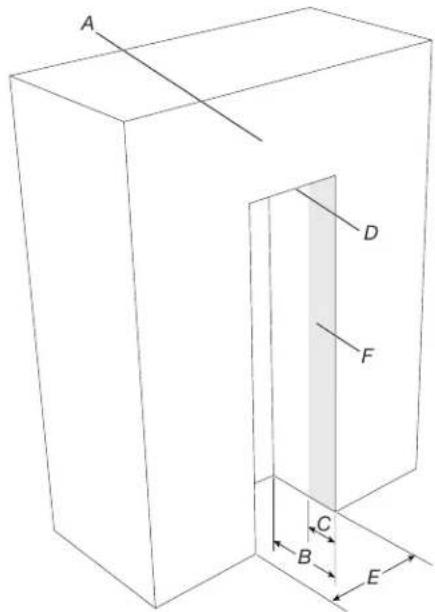
text_image
A D F C B EA. Soffit
B. 25" (635 mm)
C. 8" (203 mm)
D. 14" (356 mm) Upper furniture return
E. Wine Cellar Width 18" (457 mm) or 24" (610 mm)
F. Furniture return
Area above wine cellar must be clear to attach the anti-tip brackets and identify the stud location within this area A. The of minimum gap between the panels and cavity should be 1/16" (1 mm).
Multiple Unit - Opening Dimensions
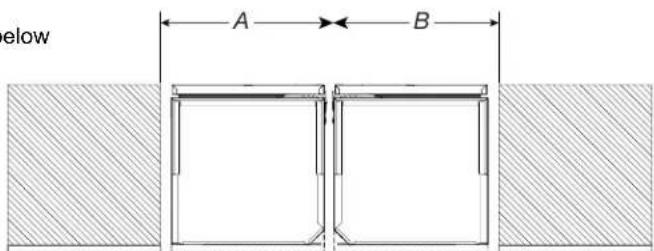
text_image
elow A BCORRECT SPACING BETWEEN APPLIANCES SHOWN LATER IN THIS MANUAL.
| A | |||
| B | 18" 24" | ||
| 18" | 36" (914 mm) | 42" (1067 mm) | |
| 24" | 42" (1067 mm) | 48" (1220 mm) | |
If wine cellar A is 18" (457 mm) and wine cellar B is 24" (610 r the required opening width will be 18"+24" = 42"
Electrical Requirements
WARNING

Electrical Shock Hazard
Plug into a grounded 3 prong outlet.
Do not remove ground prong.
Do not use an adapter.
Do not use an extension cord.
Failure to follow these instructions can result in fire, or electrical shock.
INSTALLATION PREPARATION
Unpack the Wine Cellar
WARNING
Excessive Weight Hazard
Use two or more people to move and install or uninstall appliance.
Failure to do so can result in back or other injury.
Remove the Packaging
Dispose of/recycle all packaging materials. Do not use sharp instruments, rubbing alcohol, flammable fluids, or abrasive cleaners to remove tape or glue. These products can damage the surface of your wine cellar. For more information, see "Wine Cellar Safety."
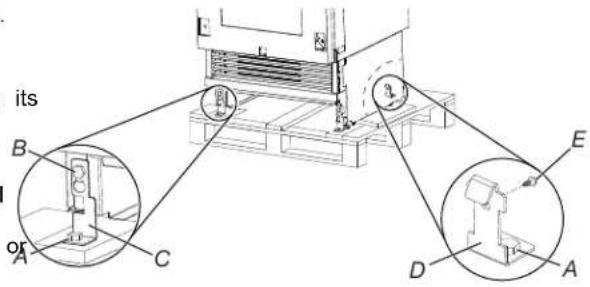
Wine cellar is attached to the packaging base with four bolts. Follow the below steps to release the wine cellar from base.
Before you move your wine cellar into its final location, it is important to make sure you have the proper electrical connection.
If the supply cord is damaged, it must be replaced by the manufacturer or its service agent or a similarly qualified person. Do not use a cord that shows cracks or abrasion damage along its length or at either the plug or connector end.
Recommended Grounding Method
A 110 V-120 V, 60 Hz AC only, 15 A fused, grounded electrical supply is required. Use a dedicated 15 A circuit breaker that is easy to reach, so it can be turned off quickly before installation during maintenance. Electrical connections located directly behind the wine cellar must be recessed.
text_image
its B or A C D E ANOTE: Before performing any type of installation, cleaning, or A. Bolts removing a light bulb, turn the wine cellar to OFF. Depending on Adjusting bolt your model, turn the wine cellar control to the word OFF, or press Front fixing brackets the wine cellar down arrow touch pad until a dash (−) appears in wine cellar displays as shown. Disconnect the wine cellar from the electrical source. When you are finished, reconnect the wine cellar to the electrical source and reset the temperature controls to the desired setting. See "Quick Start Guide."
D. Back fixing brackets E. Screw
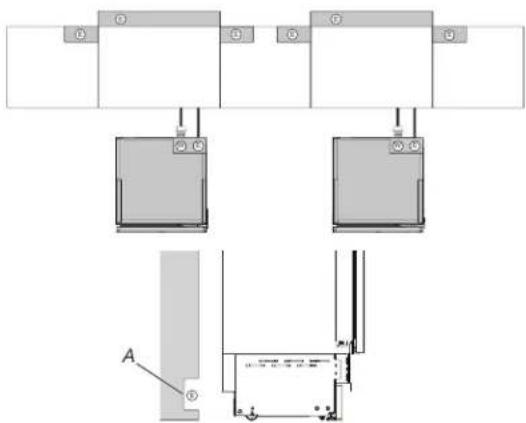
natural_image
Pure electrical circuit lines without any symbolsA. Electrical connection
Unscrew the four bolts (A) by using 3/4" (19 mm) wrench. To release the front fixing bracket (C), loosen the rear wheel adjusting bolt (B) using a 13 mm (1/2") wrench. Avoid straining this bolt one way or the other at its stop points so as to avoid damaging the rear leveling system. Ensure that the front leveling legs are retracted, so that all four wheels are able to contact the floor for easiest maneuvering.
- Remove the screws (E) to release the fixing bracket (D).
- Remove the fixing brackets (C) and (D).
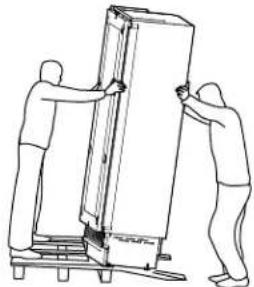
- Remove the wine cellar and place it on the floor using a suitable, heavy-duty hand truck from the back of the unit.
- Adjust the rear rollers down [clockwise on the leveling rod (B)] until they make contact with the floor, and raise the rear of the wine cellar enough so that it will roll freely.
- Unscrew the rear wheel adjusting bolt (B) to release the fixing bracket (C) by using 3/4" (19 mm) wrench.
When Moving Your Wine Cellar:
natural_image
Line drawing of two people assembling a large refrigerator (no text or symbols)■ The appliance must always be transported upright. If this is no2. Move the wine cellar to the installation structure. possible it should be laid flat, resting on its back.
IMPORTANT:
- If transported on its back, the unit must be placed upright for a minimum of 24 hours prior to plugging it in and twice it on to allow lubricating oils to return to the compressor/
Your wine cellar is heavy. When moving the wine cellar cleaning or service, be sure to cover the floor with cardboard or hardboard to avoid floor damage. Always pull the wine cellar straight out when moving it. Do not wiggle or "walk" the wine cellar when trying to move it, as floor damage could occur. - All four leveling legs must contact the floor to support and stabilize the full weight of the wine cellar.
Clean Before Using
After you remove all of the package materials, clean the inside your wine cellar before using it. See the "Cleaning" section in manual.
Move Wine Cellar To Final Locatio
WARNING

Tip Over Hazard
Wine cellar is top heavy and tips easily when not completely installed.
Keep doors taped closed until wine cellar is completely installed.
Use two or more people to move and install wine cellar. Failure to do so can result in death or serious injury.
When Moving Your Wine Cellar:
- Your wine cellar is heavy. When moving the wine cellar for 2. Make sure the wine cellar is in Stand-by mode and that all cleaning or service, be sure to cover the floor with cardboard lights are off; if required, press the power button to turn off th or hardboard to avoid floor damage. Always pull the wine cellawine cellar.
straight out when moving it. Do not wiggle or "walk" the wine cellar when trying to move it, as floor damage could occur.
IMPORTANT: All four leveling legs must contact the floor to support and stabilize the full weight of the wine cellar.
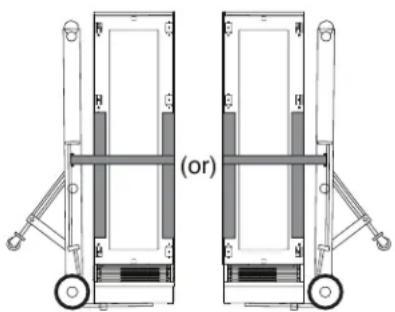
- Place an appliance dolly under the ether side of the win cellar as shown. Place the corner posts from the packing materials over the trims as appropriate. Slowly tighten the strap.
natural_image
Technical line drawing of two mechanical lifting devices with wheels and structural supports (no text or symbols)Connect to the Electrical Power Supply
WARNING

Electrical Shock Hazard
of Plug into a grounded 3 prong outlet. This Do not remove ground prong.
Do not use an adapter.
Do not use an extension cord.
Failure to follow these instructions can result in death, fire, or electrical shock.
natural_image
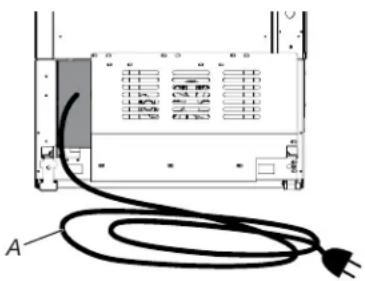
Diagram of an electronic device with a black cable and labeled point A, showing internal components without any readable text or symbols.A. Power Cord
-
Unwind the electric cable, and connect it directly to the wall socket.
-
Make sure the wine cellar is in Stand-by mode and that all hard lights are off; if required, press the power button to turn off the cellawine cellar.
.Leveling
WARNING
Excessive Weight Hazard
Use two or more people to move and install or uninstall appliance.
Failure to do so can result in back or other injury.
IMPORTANT: All four leveling legs must contact the floor to support and stabilize the full weight of wine cellar. Rollers are for moving the wine cellar, not for permanent support.
After moving the wine cellar to its final location:
- Remove the bottom grille.
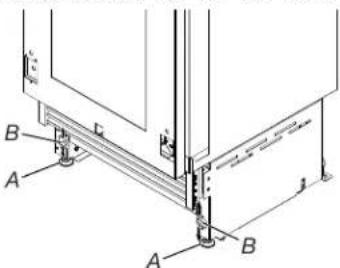
- Use a 11/16" (17 mm) socket driver to turn the leveling bolts clockwise or counterclockwise to adjust the legs to the floor as shown. The rollers should be off the floor.
text_image
Technical diagram showing labeled components A and B with dimension lines and annotationsA. Leveling legs
B. Adjusting bolts
- Adjust the leveling legs to level and align the wine cellar from left to right and front to back so that the wine cellar is level and aligned with the cabinets.
- Continue adjusting the leveling legs until the top of the wine cellar is making contact with the bottom of the solid soffit, or the bottom of the anti-tip boards, if anti-tip boards were used.
- Re-install the bottom grille.
IMPORTANT: Adjust in small increments to keep from damaging the cabinet trim and causing problems with the door alignment or top grille fit. A. 17 ^3/4 " (451 mm) for 18" model and 423 (604 mm) for 24" model B. 6 ^13/16 " (173 mm) for 18" model and 3/16" (326 mm) for 24" model C. 62" (1575 mm) D. 51/16 (100 mm)
Custom Wood Panel Preparation
Dimensions
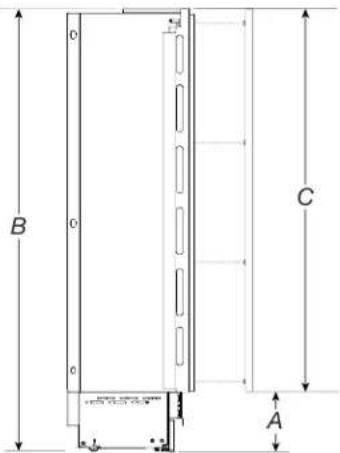
text_image
B C AA. 4" (100 mm) minimum
B. 83 1/2" (2120 mm) + 1" (25 mm)
C. 75 ^7/8 " (1929 mm) minimum and ^3/4 9 (2027 mm) maximum
text_image
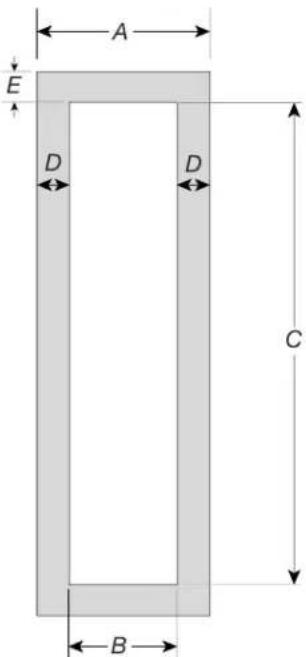
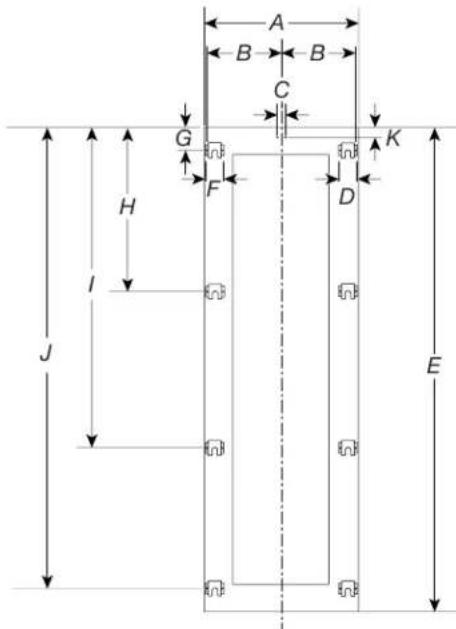
A E D D C BMounting Brackets Hole positions:
text_image
A B B C G H I J F D K EA. 17 3/4'' (451 mm) for 18" model and 29/4'' (604 mm) for 24" model
B. 77/8" (200 mm) for 18" model and 108" (275 mm) for 24" model
C. 1/4" (6.4 mm) from center on both the sides (1/2" [12.7 mm] total)
D. 1^3/_8 " (34 mm)
E. 75 7/8" (1929 mm) minimum and 793/4" (2027 mm) maximum
F. 1 ^3 / 8 " (34 mm)
G. 6 ^1/2 " (165 mm)
H. 27 1/4" (690.5 mm)
1. 50" (1271.5 mm)
J. 70 ^3/4 " (1797 mm)
K. 4^3/8 " (112 mm)
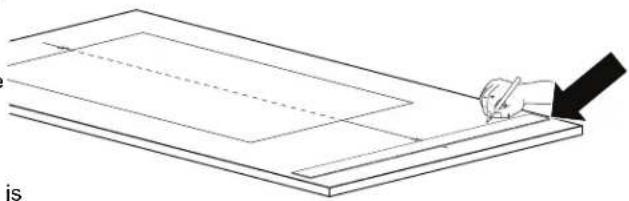
Panels can have thickness ranging between 3/4" (19 mm) and ■ Mark the external and then the internal hole. 1½"(28 mm).
IMPORTANT: Custom wood panels must have a minimum of 3/4" (19 mm) material at all the hardware locations.
Maximum allowable door panel weight is 34 kg (75 lbs).
Exceeding these weights could void your warranty for any service issues which can be attributed to overweight panels.
The hinging mechanism on wine cellar is considered to be 'Zero-clearance'. The door width specified below assume the minimum niche width is being used and a 1/8" (3.5 mm) reveal is desired around the panels. Adjust your panel dimensions accordingly to your own design criteria considering your niche width and your reveal. Minimum distance should not be less than 1/16" (1.5 mm).
natural_image
Simple line drawing of a hand using a pen to cut or mark a rectangular object on a flat surface (no text or symbols)Position the brackets on each set of marks to make sure they are aligned, if you choose to drill small pilot holes for the screws pay special attention to not pass through the panel entirely.
INSTALLATION INSTRUCTIONS
Custom Wood Panel Installation
Pinch Hazard
CAUTION: Installation of door panels with less than a 3/8" (905 mm) gap between the door panel and the adjacent cabinet increases the risk of potential pinching.
The dimensions of the panels are indicated in the table and drawings on below pages.
According to the requirements for aligning with other kitchen structures, the door panel can be higher than the upper edge and lower edge of the wine cellar door.
The panels must be mounted using special brackets which attach to adjustable devices provided on the door with brackets that anchor and adjust the panel's vertical direction.
Brackets and fixing screws are provided with the wine cellar and must be applied to the panel as indicated.
Follow the instructions:
To prepare the panels to be mounted on the wine cellar, follow these steps, working on the back of the panel.
Door Panel
Use the dimensions shown in the 'Holes positions' section on page TBD for the following steps.
■ Draw a vertical center line on the panel from top to bottom.
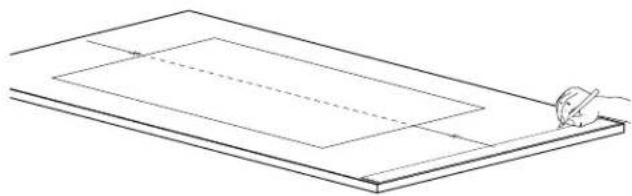
natural_image
Line drawing of a rectangular panel with a hand holding a circular object, no text or symbols present■ Starting from the bottom edge of the panel, mark the position of the brackets.
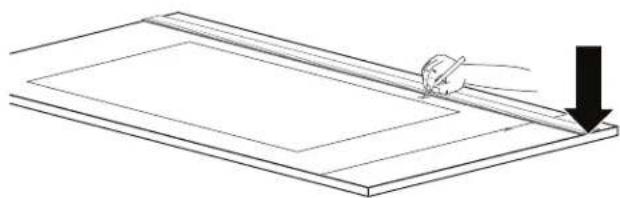
natural_image
Line drawing of a drafting or drafting process with a pencil and arrow indicating direction (no text or symbols)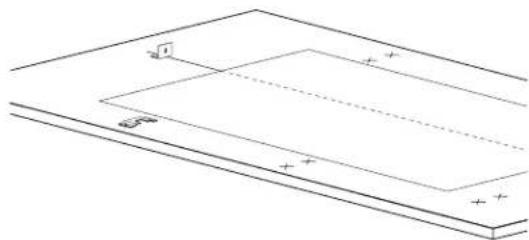
natural_image
Pure electrical circuit lines without any symbols■ Screw the brackets in place.
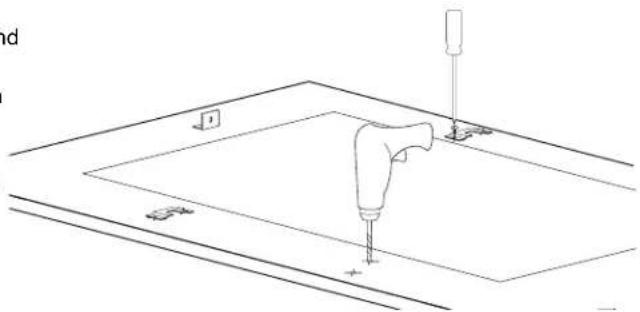
natural_image
Technical line drawing of a mechanical component with mounting holes and a base plate (no text or symbols)Prepare The Wine Cellar Door For Panel Installation
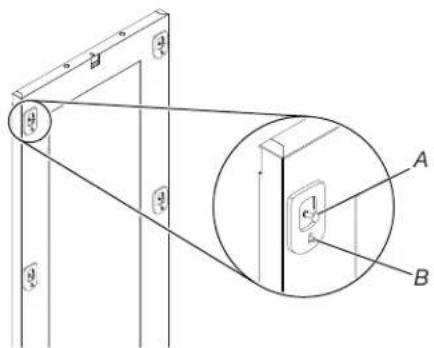
■ Prepare the Wine cellar door for panel mounting by threading the shoulder bolts into the recessed receivers and the set screws into the other hole. Ensure the end with the hex key socket is threaded into the door and not on the visible end. Thread this in far enough that it is flush with refrigerator door face so as not to interference with hanging the panel. You will adjust these later from the inside of the door.
text_image
Technical diagram showing a pulley system with labeled components A and B, including a magnified inset view.A. Shoulder bolt for hanging brackets
B. Set screw to adjust the depth of panel
Mount The Custom Wood Panel On The Door
- Attach the panel to the fixing devices starting from the top aligning brackets.
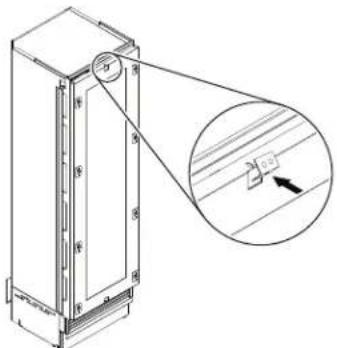
text_image
Technical diagram of a cabinet with an inset showing a close-up of the internal structure and a label pointing to a component.- At this point, alignment between the panel and adjacent cabinets can be adjusted using the alignment brackets and small brackets.
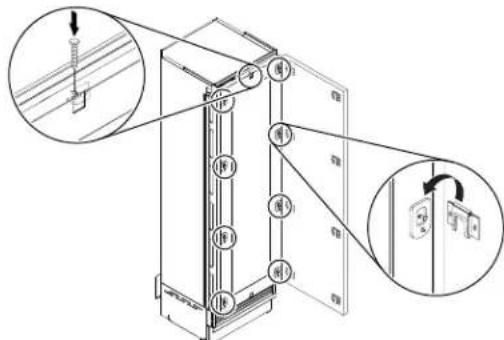
text_image
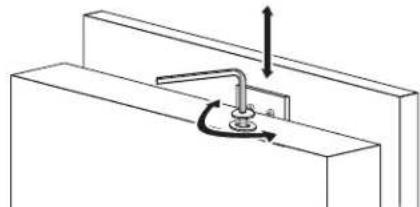
Technical diagram showing a door panel assembly with labeled components and two inset views of the door panel.- Vertical alignment: Tighten or loosen the wine cellar top adjustment screw to raise or lower the panel.
natural_image
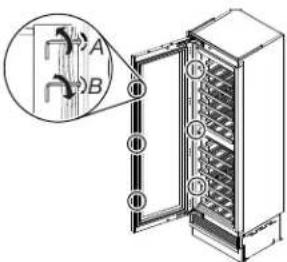
Pure mechanical diagram showing a lever and pivot mechanism without any text or symbols- Depth alignment: Working from the inside of the door, after lifting up the magnetic seal on the handle side and rotating the plastic covers on the hinge side, adjust the panel position in the Z-direction by adjusting the shoulder bolts and setscrews with the 4 mm hex key in conjunction with each other finally locking each mounting position in place.
text_image
Technical diagram of an open refrigerator with labeled parts and a magnified inset showing internal structure details.A. Shoulder Screw adjustment
B. Locking Screw adjustment
NOTE: Once the front panel has been adjusted, check that the gasket has been repositioned correctly to assure the door. is closing correctly and avoid operational errors of the unit. This
- To ensure proper ventilation for your wine cellar, allow for 5 mm of space behind the wine cellar to avoid overheating. - To avoid floor damage, make sure levelers are raised (not touching floor) and wine cellar is on rollers before moving.
Single Unit Installation
- Push the wine cellar into the opening.
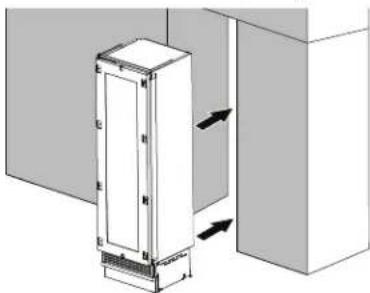
natural_image
Diagram of a cabinet with directional arrows indicating movement or force, no text or symbols present- Always install front panel on door before pushing the wine cellar into its final position inside the cutout or structure.
- Check the leveling of the wine cellar, and correct it by adjusting its feet and wheels.
- Open the door and secure the appliance to the adjacent cabinets using the (x10) spacer brackets.
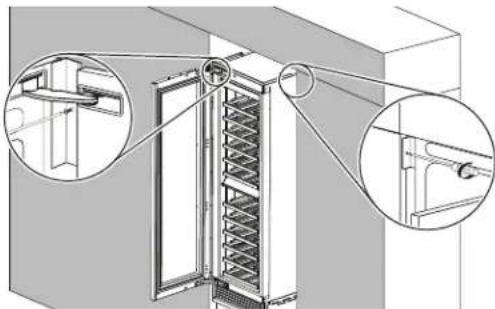
natural_image
Technical illustration of a refrigerator with doors open and close-ups showing internal components (no text or symbols)Maximum cabinet depth over "Integrated" wine cellar with single door panel
It is possible to design a panel which will be the same for the structure where wine cellar is going to be place and the cabinet of the top of the same structure.
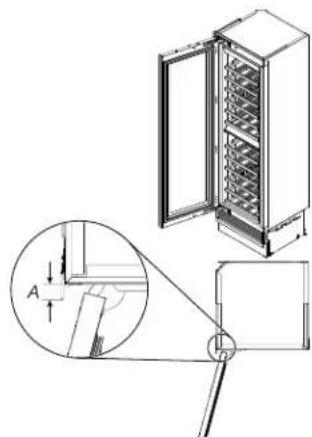
In this case, the total depth of the cabinet without the door (above the wine cellar) must not exceed the total depth of the wine cella
natural_image
Technical diagram of a refrigerator with an open door and a close-up inset showing a mechanical component (no text or symbols)A. 1^7/_8 " (47 mm) + front panel thickness
allow the panel attached to the wine cellar door to open without interference during its rotation up to 105°.
Multiple Unit Installation
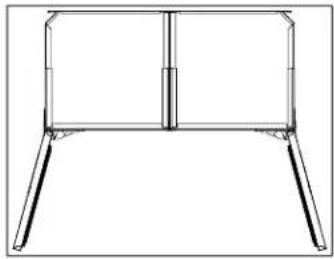
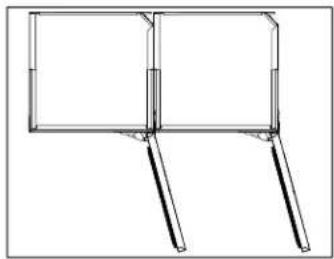
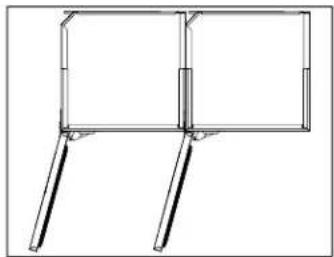
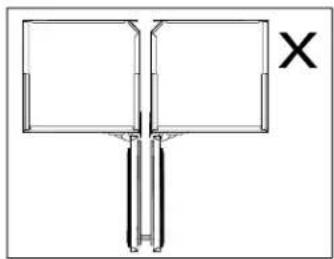
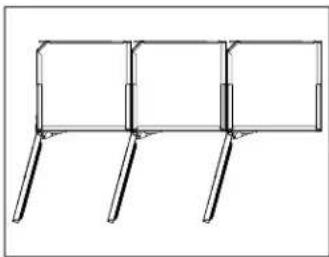
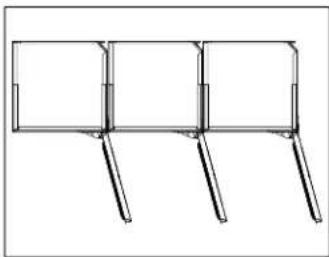
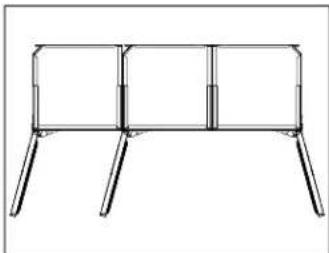
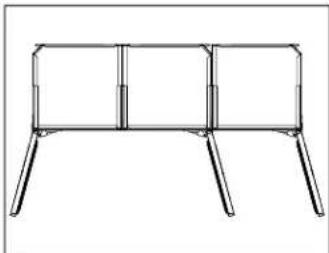
These JennAir® wine cellar columns can be installed along with JennAir® refrigerator or freezer columns in a row (upto 3 appliances).
24" Wine Column
JBWFNL24RX - left swing
JBWFNR24RX - right swing
18" Wine Column
JBWFNL18RX - left swing
JBWFNR18RX - right swing
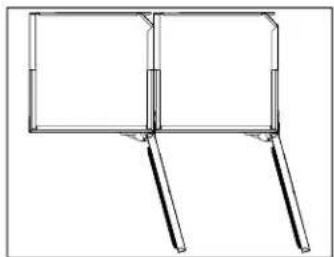
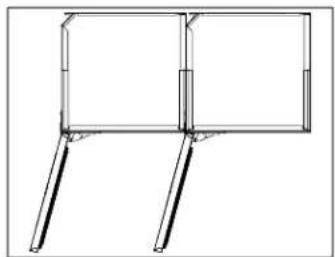
Permissible 2-unit configurations:
Handle-to-handle join kit (JAJ13HSS) + Wine Cellar Kit
natural_image
Simple line drawing of a two-legged table or stand (no text or symbols)Hinge-to-handle join kit (JAJ12HSS) + Wine Cellar Kit
natural_image
Pure technical line drawing of a two-panel mechanical structure without any text, numbers, or symbolsHandle-to-hinge join kit (JAJ11HSS) + Wine Cellar Kit
natural_image
Pure architectural line drawing of a two-story building frame with vertical supports (no text or symbols)Non-permissible 2-unit configurations:
natural_image
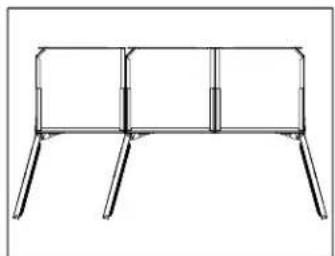
Pure mechanical cross-section diagram without any text, numbers, or symbolsPermissible 3-unit configurations:
with Handle-to-hinge and handle-to-hinge join kits: JAJ11HSS (x2) + Wine Cellar Kit
natural_image
Pure technical line drawing of a three-panel table frame without any text, numbers, or symbolsHinge-to-handle and hinge-to-handle join kits: JAJ12HSS (x2) + Wine Cellar Kit
natural_image
Pure technical line drawing of a three-panel table frame without any text, numbers, or symbolsHandle-to-hinge and handle-to-handle join kits: JAJ11HSS and JAJ13HSS + Wine Cellar Kit
natural_image
Line drawing of a simple wooden table with three legs and two panes (no text or symbols)Handle-to-handle and hinge-to-handle join kits: JAJ13HSS and JAJ12HSS + Wine Cellar Kit
natural_image
Line drawing of a simple wooden table with three legs and two panes (no text or symbols)Non-permissible 3-unit configurations:
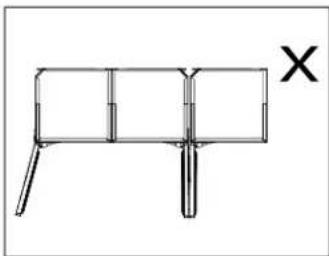
natural_image
Simple line drawing of a rectangular structure with a vertical support and a cross mark (no text or symbols)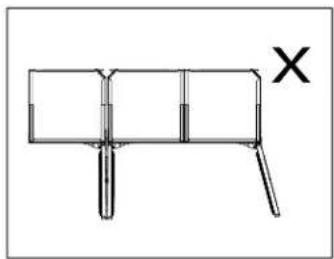
natural_image
Simple line drawing of a three-legged table with a cross mark and a handle, no text or symbols present.Joining Two Wine Cellar Columns
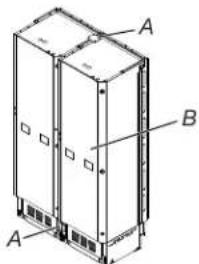
- Secure side trims.
NOTE: When installing a pair of wine cellar columns, the heater is not needed.
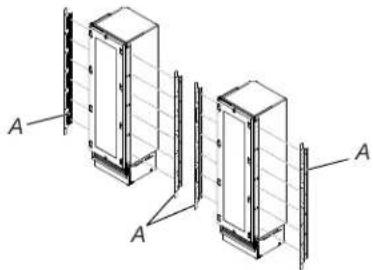
natural_image
Technical line drawing of two rectangular electronic components with labeled terminals A, showing internal structure and mounting points (no text or symbols beyond labels)A. Side trims
- Remove bottom grilles and toe-kicks. Then, attach lower front plates with bolts.
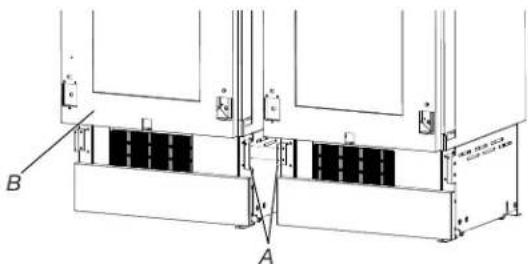
text_image
Technical diagram of a mechanical assembly with labeled components A and B, showing structural elements and connections.A. Bolts
B. Front of the unit
- Install the top joining bracket, and bracket on the back-side.
text_image
A B AA. Joining bracket
B. Back of the unit
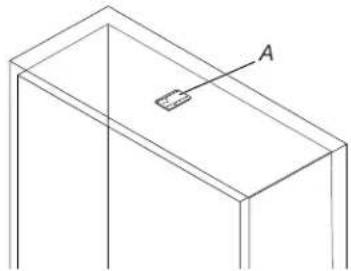
- Install the top anti-tip bracket.
natural_image
Isometric line drawing of a rectangular frame with a small labeled object inside (no text or symbols)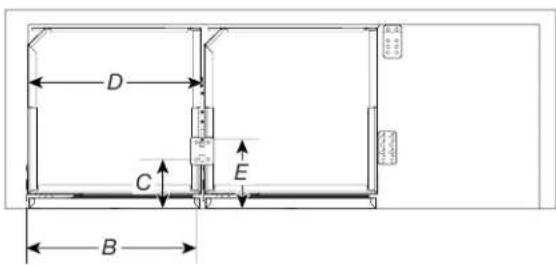
text_image
D C E BA. Top anti-tip bracket
B. 16 ^15/16 " (430 mm) for 18" model and ^5/27 (583 mm) for 24" model
C. 47/8" (124.3 mm)
D. 17 7/8" (454 mm) for 18" model and/23(607 mm) for 24" model
E. 8^1/2 " (215.6 mm)
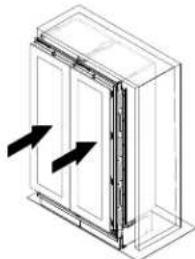
- Push the wine cellars into the opening.
natural_image
Isometric line drawing of a door with double pan and two arrows indicating direction (no text or symbols)- Push the wine cellars until the joining brackets (front) and the anti-tip bracket (rear) are in contact with the stopper pin.
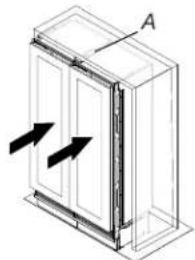
natural_image
Isometric diagram of a window frame with directional arrows indicating movement (no text or symbols)A. Joining bracket
- Raise the wine cellars so that the pin on the anti-tip bracket inserted into the hole of the front union bracket.
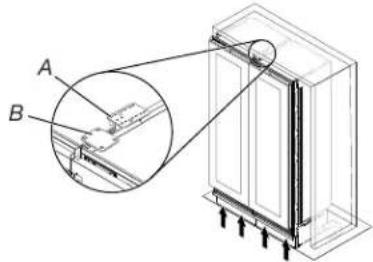
text_image
Technical diagram showing a mechanical assembly with labeled components A and B, including a magnified inset view.A. Anti-tip bracket
B. Joining bracket
Joining Wine Cellar Columns To Refrigeration/Freezer Column
NOTE: When installing refrigerator/freezer column with wine cellar columns, please install the heater according to the instructions provided with refrigerator/freezer columns.
- Secure the bracket to the wine cellar unit, ensuring proper alignment with designated mounting points.
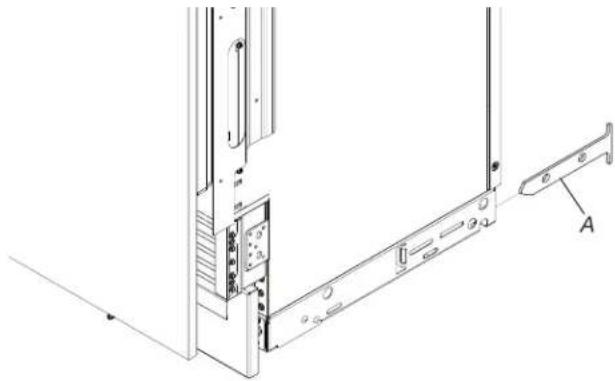
natural_image
Technical line drawing of a server rack with mounting bracket and labeled component A (no text or symbols beyond label)A. Bracket
- Install the bottom anti-tip bracket in between the wine cellar column and refrigerator/freezer column.
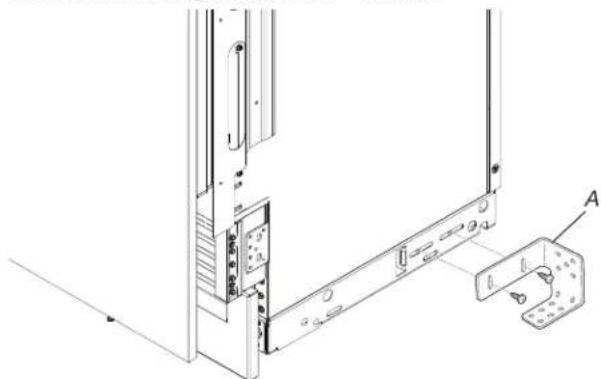
natural_image
Technical line drawing of a server rack with mounting bracket and mounting bracket (no text or symbols)A. Bottom anti-tip bracket
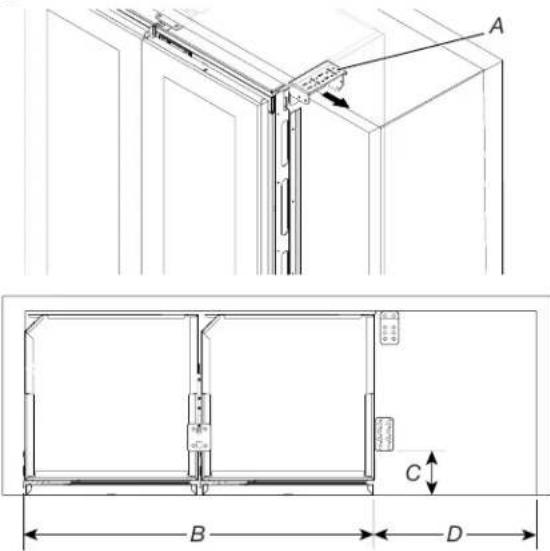
Install the top anti-tip bracket (Refrigerator/Freezer Column to Wine Cellar Column) between the wine cellar column and refrigerator/freezer column.
text_image
Technical diagram showing a structural assembly with labeled components A, B, C, D and directional arrows indicating movement or force.A. Top anti-tip bracket
B. 35 1/2" (902.5 mm) for 18" model and 8/47 (1208.5 mm) for 24" model
C. 45/8" (116.8 mm)
D. 18 1/2" (469.5 mm)
-
Install the wine cellar column(s) as per "Single Unit Installation" section.
-
Push the refrigerator/freezer column into the opening.
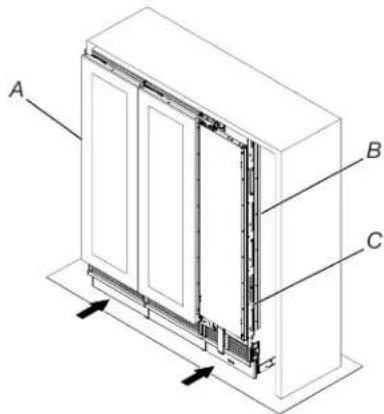
text_image
A B CA. Wine cellar
B. Refrigerator/Freezer column
C. Side trim
- Secure the wine cellar columns to the top anti-tip bracket.
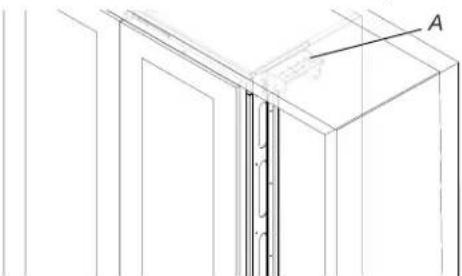
natural_image
Architectural line drawing of a window frame with vertical guide rails and a diagonal line labeled A (no text or symbols beyond label)A. Top anti-tip bracket
-
Adjust the refrigerator/ freezer column height.
-
Secure the refrigerator/ freezer column with the wine cellar column.
- Secure the side trims with the opening.
WINE CELLAR FEATURES
Operating Your Wine Cellar
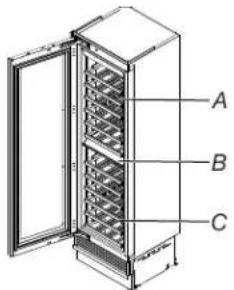
text_image
A B CA. Upper storage area
B. User interface
C. Lower storage area
User Interface
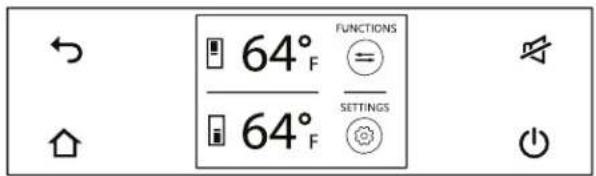
text_image
64°F FUNCTIONS 64°F SETTINGS
BACK
Touch the BACK icon to go back to the preview screen.

HOME
Touch the HOME icon to go back to the home screen

ALARM
Touch the ALARM icon to view the alarm tone functions and to deactivate them.

ON/OFF
Touch the icon to turn the unit ON or OFF
Turning ON
- Touch the ON/OFF button.

- During the start up, Wait for 3 minutes. The initial tests will run during this time.
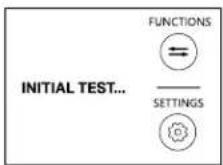
- After the startup, the display will show the main screen with the ambient temperature measured from the inside the compartments. The unit will automatically start to cool down until reaching the preset temperatures.
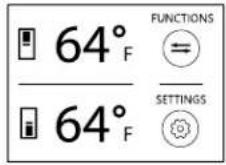
- When the appliance is first switched on, it is recommended to wait at least 12 hours before placing any wines inside the unit. During this time, remove any error messages by touching the ALARM button.
Turning OFF
- Touch the ON/OFF button.

- Touch YES to confirm the action.
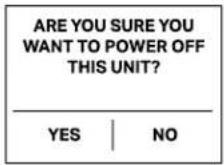
- Touch YES to confirm again.
Adjust Compartment Temperatures
The wine cellar columns come with factory-preset optimum temperatures for each compartment.
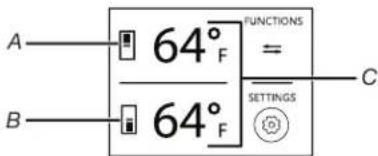
- Touch desired compartment icon.
text_image
A 64° F FUNCTIONS = C B 64° F SETTINGSA. Upper storage area
B. Lower storage area
C. Present temperatures
- To adjust the upper compartment temperature, touch the desired compartment icon and scroll through the temperature values up or down to select desired temperature.
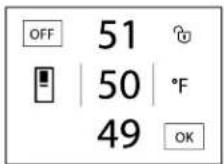
- To adjust the lower compartment temperature, touch the desired compartment icon and scroll through the temperature values up or down to select desired temperature.
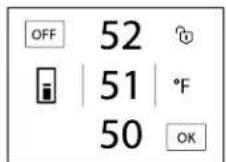
- Touch OK to confirm the selected temperature.
NOTE: The displayed temperature may vary slightly with respect to the set temperature if the doors are continuously opened or if large quantities of wines at ambient temperature are placed inside the wine cellar. It takes 6 to 12 hours to reach the selected temperature.
Recommended Temperatures
Time of conservation
Improvement of wine over time and its duration usually depends on the character of the variety and its type. The following chart shows the best period of conservation and aging for various types in ideal conservation conditions offered by your appliance.
In any case, follow the suggestions offered by the bottle producer, in particular for the finest wines.
| TYPE OF WINE | CONSERVATION TEMPERATURE | TIME OF CONSERVATION |
| New wines (Vin Nouveau) | from 12°C (54°F) to 14°C (57°F) | 6 months |
| Sweet sparkling wines | from 8°C (46°F) to 10°C (50°F) | 1 year |
| Rosé | from 10°C (50°F) to 14°C (57°F) | 1 year |
| Semi-sparkling wines | from 10°C (50°F) to 12°C (54°F) | 1-2 years |
| Normal white wines | from 10°C (50°F) to 14°C (57°F) | 1-2 years |
| Light red wines | from 12°C (54°F) to 14°C (57°F) | 2 years |
| Dry sparkling wines | from 8°C (46°F) to 10°C (50°F) | 2 years |
| Classic sparkling wines | from 8°C (46°F) to 10°C (50°F) | 3-4 years |
| Barrique and Vigorous white wines | from 8°C (46°F) to 12°C (54°F) | 3-5 years |
| Normal red wines | from 14°C (57°F) to 16°C (61°F) | 3-5 years |
| Barrique and Vigorous red wines | from 14°C (57°F) to 18°C (64°F) | 7-10 years |
| Straw wines or Liquorous wines | from 16°C (61°F) to 18°C (64°F) | 10-15 years |
SETTINGS
Touch the SETTINGS icon on the home screen. You will find the following menu options under the settings.
| DATE | DATE |
| TIME | TIME |
| °C/°F | °C/°F |
| ctifside | LANGUAGE | LANGUAGE |
| DEMO MODE | DEMO MODE | |
| artypes | RESET | RESET |
| INFO SYSTEM | INFO SYSTEM | |
| SERVICE | SERVICE |
DATE
- Touch the SETTINGS icon.
SETTINGS

- Touch the DATE icon.
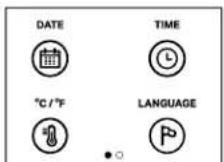
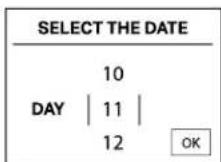
- Scroll up and down to select the desired day and touch OK.
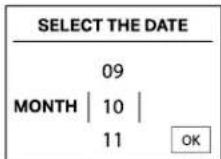
- Scroll up or down to select the desired month, then touch OK.
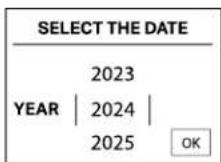
- Scroll up or down to select the desired year, then touch OK.
TIME
- Touch the SETTINGS icon.
SETTINGS

- Touch the TIME icon.
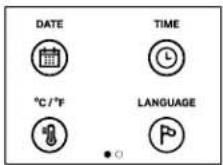
- Touch 12 hour or 24 hour clock type as per requirement.

- Scroll up or down to select the hours and then touch OK.
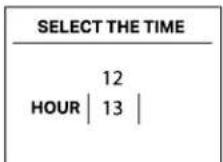
- Scroll up or down and select the minutes and then touch OK.
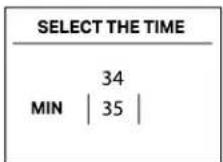
°C/°F (CELSIUS AND FAHRENHEIT)
- Touch the SETTINGS icon.
SETTINGS

- Touch the °C/°F icon.
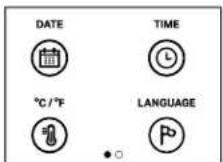
- Scroll up or down to select the degrees in Centigrade or Fahrenheit and press OK.
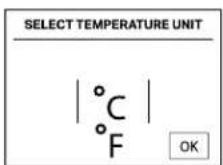
LANGUAGE
- Touch the SETTINGS icon.
SETTINGS

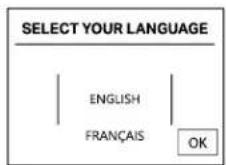
- Touch the LANGUAGE icon.
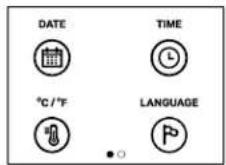
- Scroll up or down to select the desired language and press OK.
DEMO MODE
- Touch the SETTINGS icon.
SETTINGS

- Scroll right and select the DEMO icon.
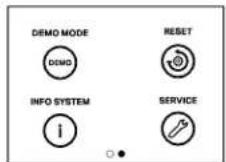
- Enter the PASSWORD necessary to activate, that must be requested from the Manufacturer. Default password: 1-1-3-4
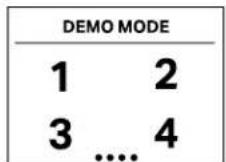
- Touch the ON or the OFF icon.
RESET
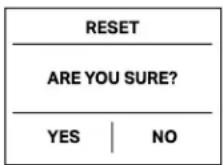
This offers the possibility to reset default factory settings and cancel any previous changes.
- Touch the SETTINGS icon.
SETTINGS

- Scroll right and select the RESET icon.
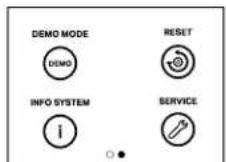
- Touch the YES button to reset.
INFO SYSTEM
- Touch the SETTINGS icon.
SETTINGS

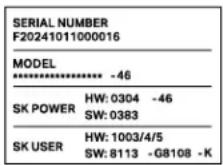
- Scroll right and select the INFO SYSTEM icon.
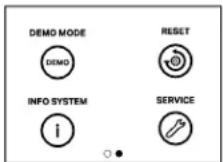
- Information about the appliance is displayed.
SERVICE
The Service function is reserved for the Manufacturer's Customer Service.
FUNCTIONS
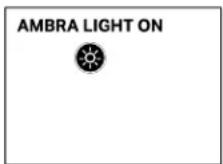
AMBRA LIGHT ON/OFF
When this function is turned on, the lights inside the wine cellar column stay on even when the door is closed. When the door is open, the lights are white to maximize visibility; when the door is closed, the wine cellar will illuminate with amber colored light. The long wave length of amber colored light helps filter out the shorter wave length of UV light, aiding in wine preservation.
To turn ON/OFF Ambra Lighting:
- Touch the functions menu on UI.
FUNCTIONS

- Touch AMBRA LIGHT ON option to turn ON/OFF the ambra lighting.
Stocking The Wine Cellar Columns
To Stock the Wine Cellar Column
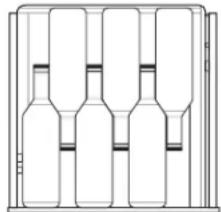
NOTE: The wine rack can be stocked with the bottles facing either direction, however, to optimize storage adjacent bottles should be facing in opposite.
- Starting on the left-hand side, place the first bottle on the bottom of the rack with the neck of the bottle facing the front the wine cellar.
- Place the next bottle on its side with the neck of the bottle facing the back of the wine cellar. Alternate the direction of the bottles, in this manner, until the rack is full.
natural_image
Diagram of five identical bottles arranged in a row inside a rack (no text or labels)SÉCURITÉ DE LA CAVE À VIN
natural_image
Technical line drawing of an open industrial cabinet or enclosure with internal shelves (no text or symbols)natural_image
Technical line drawing of a refrigerator with ventilation grilles and labeled component A (no text or symbols beyond label)A. Grille
natural_image
Line drawing of a computer tower with a hand connecting a cable to the internal panel (no text or symbols)natural_image
Technical line drawing of a mechanical assembly with no visible text or symbolsEXIGENCES D'INSTALLATION
Outils et pièces
IMPORTANT:
text_image
A H G B C D E FA. 83 12 po (2 120 mm) + 1 poE. 9 14 po (233 mm) + 1 po (25 mm)
B. 22 po (560 mm) F. 19 3/4po (500 mm)
C. 71 1/4 po (1 808 mm) G. 24 po (610 mm)
D. 9 18 po (231 mm) + 1 po (25 mm)
text_image
A B C Dnatural_image
Pure electrical circuit lines without any symbolstext_image
Technical diagram of a mechanical assembly with labeled components A, B, C, D, E and circular insets showing cross-sections.A. Boulons
natural_image
Line drawing of two people handling a large rectangular object on a platform (no text or symbols)natural_image
Technical line drawing of two mechanical lifting devices with wheels and a labeled section (or), no text or symbols present.text_image
Diagram of an electronic device with labeled ports and a black cable, showing connections to a power outlet.text_image
Technical diagram showing labeled components A and B with alignment indicators and dimension linestext_image
A B B C G H I J F D K Enatural_image
Line drawing of a hand using a pen to cut or mark a rectangular object on a flat surface (no text or symbols)natural_image
Pure electrical circuit lines without any symbolsnatural_image
Technical line drawing of a mechanical component with mounting bracket and base plate (no text or symbols)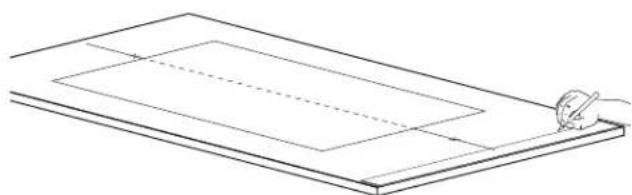
natural_image
Line drawing of a rectangular board with horizontal and dashed lines, no text or symbols presentnatural_image
Simple line drawing of a drafting or drafting setup with a ruler and arrow, no text or symbols present.text_image
Technical diagram showing a pulley system with labeled components A and B, including a magnified inset view.text_image
Technical diagram of a cabinet with labeled components and an inset showing a magnified view of a component.text_image
Technical diagram of a door frame assembly with labeled parts and zoomed-in detail viewstext_image
Technical diagram of a cabinet with labeled parts A and B, showing internal structure and connection points.natural_image
Diagram of a refrigerator with directional arrows indicating movement or force (no text or symbols present)natural_image
Technical illustration of a multi-level refrigerator with close-ups of internal components (no text or symbols)natural_image
Technical line drawing of a refrigerator with an open door and internal structure, showing a close-up view of the door's side view (no text or symbols present)natural_image
Line drawing of a simple metal frame structure with vertical supports (no text or symbols)natural_image
Pure technical line drawing of a mechanical bracket or frame structure without any text, numbers, or symbolsnatural_image
Pure architectural line drawing of a two-story building frame with vertical supports (no text or symbols)natural_image
Pure architectural line drawing of a symmetrical structure with no text or symbolsnatural_image
Pure technical line drawing of a three-panel table frame without any text, numbers, or symbolsnatural_image
Simple line drawing of a three-legged table or bench with no text, numbers, or symbolsnatural_image
Line drawing of a simple wooden table with three legs and two panes (no text or symbols)natural_image
Line drawing of a three-legged table with legs and a side panel (no text or symbols)natural_image
Simple line drawing of a rectangular structure with a vertical rod and a cross mark, no text or symbols present.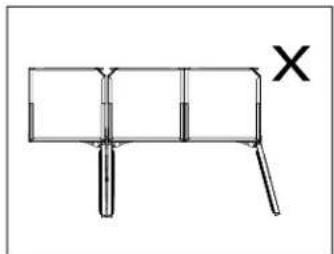
natural_image
Simple line drawing of a three-legged table with a cross mark and a letter X on the right side (no text or symbols)natural_image
Technical line drawing of two rectangular electronic components with labeled terminals A, showing internal structure and mounting brackets (no text or symbols beyond labels)text_image
Technical diagram of a mechanical or electrical device with labeled components A and B, showing internal structure and mounting points.A. Boulons
natural_image
Diagram of a door frame with two arrows indicating direction (no text or symbols)natural_image
Isometric diagram of a double door with labeled section A and directional arrows indicating flow or movement (no text or symbols present)text_image
Technical diagram showing a structural assembly with labeled components A and B, including an inset magnified view of detail.natural_image
Technical line drawing of a server rack with mounting bracket and labeled component A (no text or symbols beyond label)A. Support
natural_image
Technical line drawing of a server rack with mounting bracket and mounting bracket (no text or symbols)text_image
Technical diagram showing structural components with labeled dimensions A, B, C, D and a directional arrow indicating assembly or movement.natural_image
Architectural line drawing of a corner wall with vertical and horizontal lines, no text or symbols presentON/OFF (MARCHE/ARRÊT)
text_image
A 64° F FUNCTIONS = C B 64° F SETTINGSFUNCTIONS (FONCTIONS)
natural_image
Line drawing of a multi-volume wine bottle rack (no text or labels)natural_image
Technical line drawing of an open industrial cabinet with internal shelves (no text or symbols)natural_image
Technical line drawing of a refrigerated refrigerator with ventilation grilles and a labeled component 'A' (no text or symbols beyond label)A. Rejilla
natural_image
Line drawing of a hand connecting a cable to a computer tower (no text or symbols)natural_image
Technical line drawing of a mechanical assembly with no visible text or symbolsnatural_image
Pure technical diagram of a rectangular frame with dimension labels A and Q, no text or symbols present.A. 83 12 " (2120 mm) + 1" (25 mm)
B. 22" (560 mm)
C. 71 1/4" (1808 mm)
D. 9^1/8 " (231 mm) + 1" (25 mm)
text_image
G B C D E FE. 91/4" (233 mm) + 1" (25 mm)
F. 19 ^3/4 " (500 mm)
G. 24" (610 mm)
text_image
A B C Dtext_image
Technical diagram of a machine with labeled components A, B, C, D, E and internal views showing mechanical assembly or assembly.A. Pernos
natural_image
Two workers assembling a large cylindrical object on a platform (no text or symbols visible)natural_image
Technical line drawing of two mechanical lifting devices with wheels and a central frame, no text or symbols presentnatural_image
Diagram of an electronic device with a cable and power plug, no visible text or symbolsA. Cable eléctrico
text_image
A B B C G H I J F D K Enatural_image
Line drawing of a rectangular sheet with dashed lines indicating hidden edges, and a hand holding a pen (no text or symbols)natural_image
Line drawing of a hand using a pen to cut a sheet of paper or paper (no text or symbols present)natural_image
Line drawing of a hand holding a pen over a blank sheet with horizontal lines and a downward arrow (no text or symbols)natural_image
Pure technical line drawing of a rectangular frame with internal dashed lines and plus signs, no text or symbols present.text_image
Technical diagram showing a pulley system with labeled components A and B, including numbered parts and an inset view of the cylinder.A. Perno de tope para soportes colgados
text_image
Technical diagram of a cabinet with an inset showing a close-up view of the internal structure and a labeled component.text_image
Technical diagram showing a door panel assembly with labeled components and two inset views of the door panel.natural_image
Pure mechanical diagram showing a lever and rotating component without any text or symbolstext_image
Technical diagram of a cabinet with labeled parts and a magnified inset showing internal structure details.natural_image
Diagram of a refrigerator with directional arrows indicating movement or force (no text or symbols present)natural_image
Technical illustration of a refrigerator with doors open and close-up views showing internal components (no text or symbols)natural_image
Technical line drawing of a refrigerator with an open door and internal structure, showing a close-up view of the door's side view (no text or symbols present)A. 17/8" (47 mm) + grosor del panel frontal
natural_image
Simple line drawing of a two-legged table or bench (no text or symbols)Kit de unión de bisagra a manija (JAJ12HSS) + Kit de cava vino
natural_image
Technical line drawing of a two-panel cabinet or enclosure with legs and side supports (no text or symbols)Kit de unión de manija a bisagra (JAJ11HSS) + Kit de cava de vino
natural_image
Pure technical line drawing of a mechanical bracket or frame structure without any text, numbers, or symbolsnatural_image
Pure architectural line drawing of a symmetrical structure with no text or symbolsnatural_image
Pure technical line drawing of a three-panel table frame without any text, numbers, or symbolsnatural_image
Simple line drawing of a three-legged table or bench with no text, numbers, or symbolsJuegos de juntas manija a bisagra y manija a manija: JAJ11HSS dAJ13HSS + Kit de cava de vino
natural_image
Line drawing of a simple wooden table with three legs and two panes (no text or symbols)natural_image
Line drawing of a three-legged table with legs and feet (no text or symbols)natural_image
Simple line drawing of a rectangular structure with a vertical rod and a cross mark, no text or symbols present.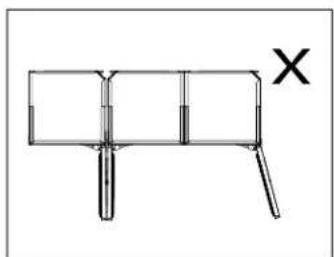
natural_image
Simple line drawing of a mechanical or architectural component with no text, numbers, or symbolsnatural_image
Technical line drawing of two rectangular electronic components with vertical supports, labeled A (no text or symbols present)A. Marcos laterales
text_image
Technical diagram showing labeled components A and B with internal structure and alignment markersA. Pernos
natural_image
Isometric line drawing of a door with double pan and two arrows indicating direction (no text or symbols)natural_image
Isometric diagram of a double door with labeled section A and directional arrows indicating flow or movement (no text or symbols present)A. Soporte de unión
text_image
Technical diagram showing a structural assembly with labeled components A and B, including an inset magnified view of detail.natural_image
Technical line drawing of a server rack with labeled component A (no text or symbols beyond label)A. Soporte
natural_image
Technical line drawing of a mechanical assembly with mounting bracket and mounting bracket (no text or symbols)text_image
Technical diagram showing a structural assembly with labeled components A, B, C, D and directional arrows indicating flow or movement.natural_image
Architectural line drawing of a corner wall with vertical and horizontal lines, no text or symbols presenttext_image
A 64° FUNCTIONS = B 64° SETTINGS CDEMO MODE (MODO DEMO)
natural_image
Line drawing of a multi-volume wine bottle arranged in a grid (no text or symbols)NOTES